Supplier Management
The Supplier Management tab comprises the following options that are crucial to setting up and using the Procurement Module:
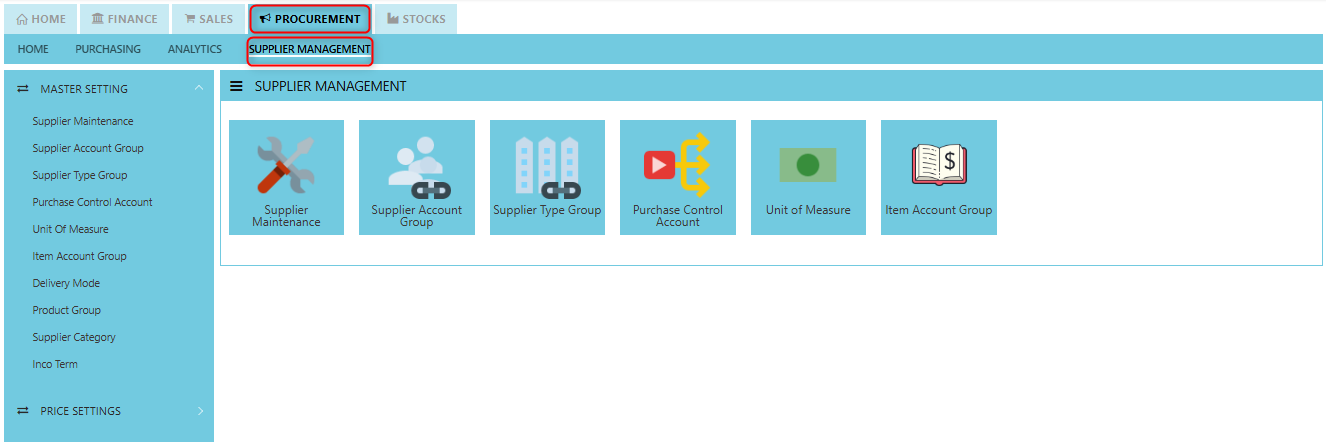
- Supplier Maintenance
- Supplier Account Group
- Supplier Type Group
- Purchases Control Account
- Unit of Measure
- Item Account Group
- Delivery Mode
- Product Group
- Supplier Category
- Inco Terms
Supplier Maintenance
The Supplier Maintenance stores all the supplier information such as the supplier code, name, and addresses. The supplier code created in the Supplier Maintenance is used to present all the transactions entered for that supplier.
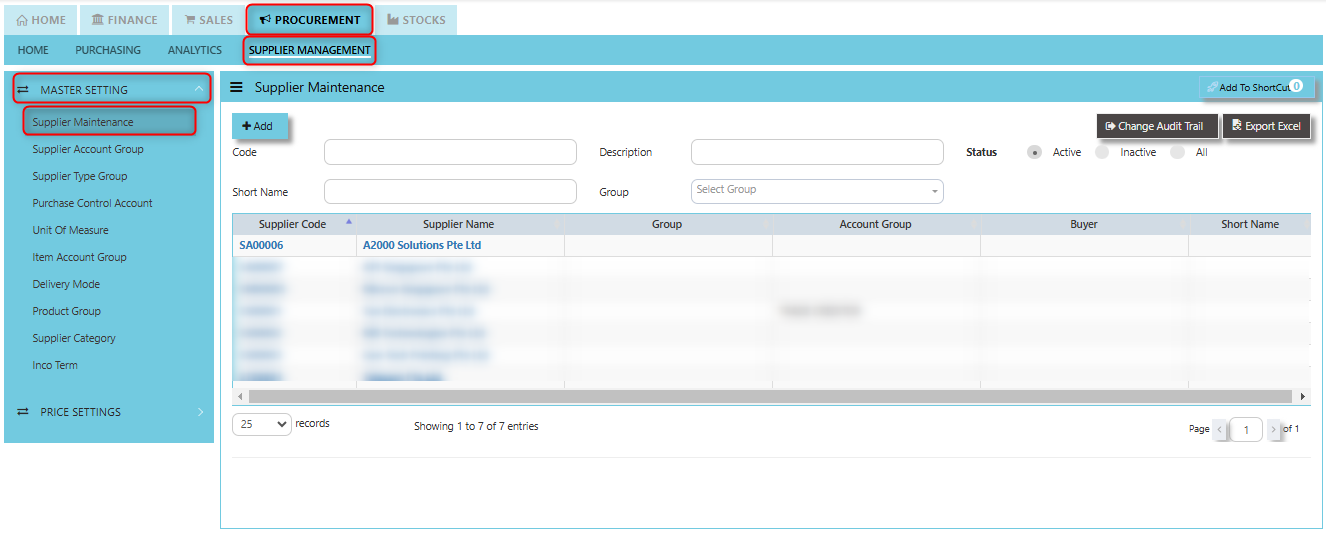
How to create Supplier Maintenance?
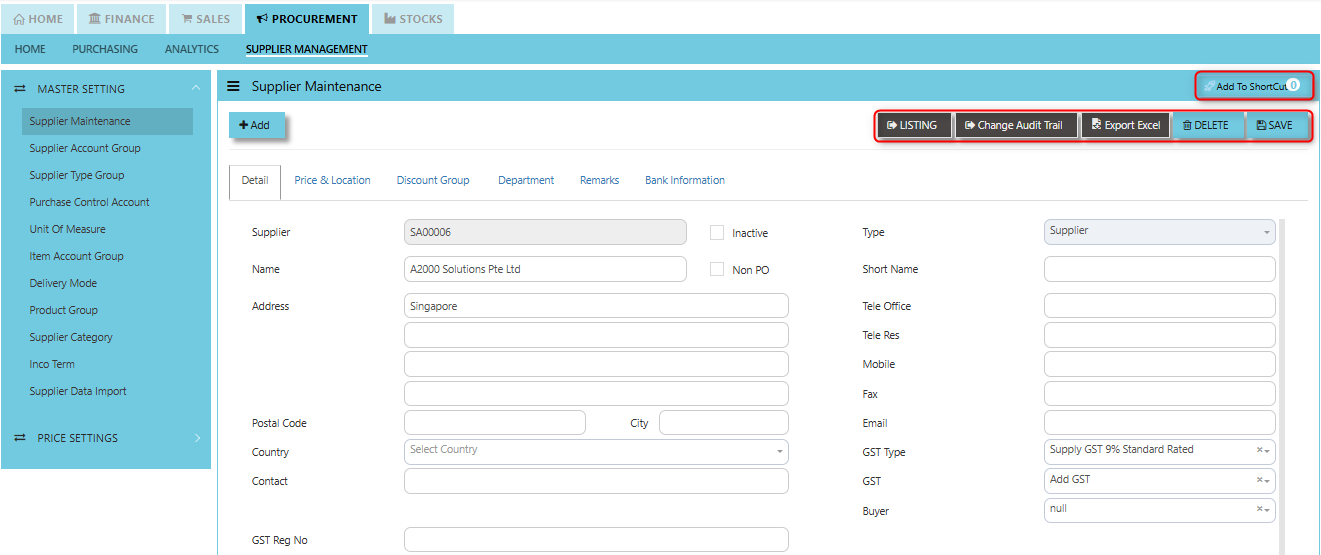
- Click on PROCUREMENT – SUPPLIER MANAGEMENT – MASTER SETTING - SUPPLIER MAINTENANCE - DETAIL TAB for the following screen:
- This is where you add new suppliers or edit existing ones. Some of the fields are mandatory, such as the following:
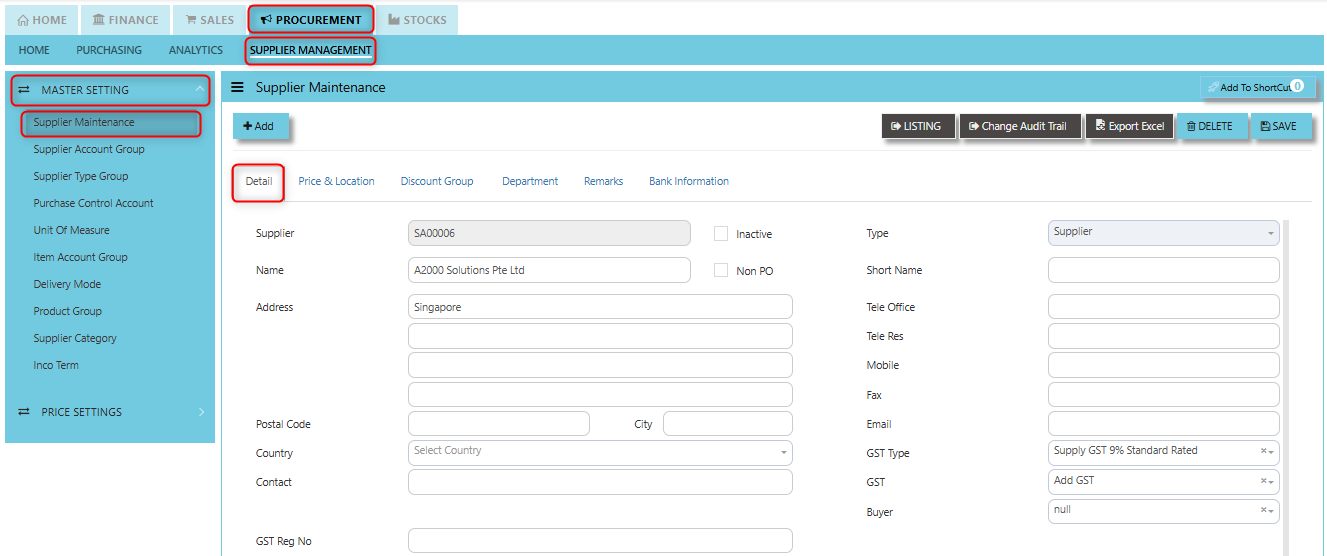
Mandatory Information:
Supplier - Enter the code for the new supplier. The maximum is 10 alphanumeric characters.
Name - Enter the name of supplier. The maximum is 50 alphanumeric characters. Key in the necessary information, such as addresses, telephone, fax and e-mail.
Type - Select S for supplier or B for both supplier and customer.
GST Type - classification of the Goods and Services Tax (GST) applicable to the transactions with a specific supplier.
GST - Select Add GST: means that the GST is not included in the supplier's listed price, and it will be added separately to the transaction amount or GST Included: when this option is selected, it means that the GST is already included in the price provided by the supplier.
Account Group - If the account posting is set based on supplier, then select the relevant Account Group here which has been defined under Procurement – Supplier Management – Account Group.
Group – This is to select the Group defined under Procurement – Supplier Management – Supplier Type Group. This grouping is for the reports under Purchases\Purchases Analysis Reports\Supplier Group wise Purchases Analysis.
Delivery Term – This is to select the Delivery Term defined under Procurement – Supplier Management – Delivery Term
Example: FOB - Free on Board
CIF - Carriage, Insurance & Freight
Delivery Mode - Click to select the Delivery Mode defined under Procurement – Supplier Management – Delivery Mode
Example: Truck, Flight, Self-Collection
Payment Term - Click to select the Payment Term defined under Procurement – Supplier Management – Payment Terms
Example: 30 Days, 60Days, COD (Cash on delivery)
Payment Mode - Click to select the Payment Mode defined under Procurement – Supplier Management – Payment mode
Example: Cash Payment, Cheque Payment and TT
Default Currency - Select the currency that this supplier normally transacts in.
Discount - Enter the discount in percentage this supplier is enjoying. For example, if a wholesale supplier gets 30% off List Price, enter “30” in this field for that supplier. With this feature, you need not remember each and every of your supplier’s discount rate.
Credit Period - Enter the number of days, weeks, or months that this supplier enjoys as credit period.
Credit Limit - Enter the Credit Limit of supplier. The system will block the purchase transaction once the figure reaches the limit.
Credit Used - This is a non-editable field. It is updated automatically by the system every time the credit is used up.
SP/Buyer - Click to select the Purchaser defined under System Manager – System Utilities – Employee
Price Type - You may decide on pricing method for each and every supplier. Below are the different price type:
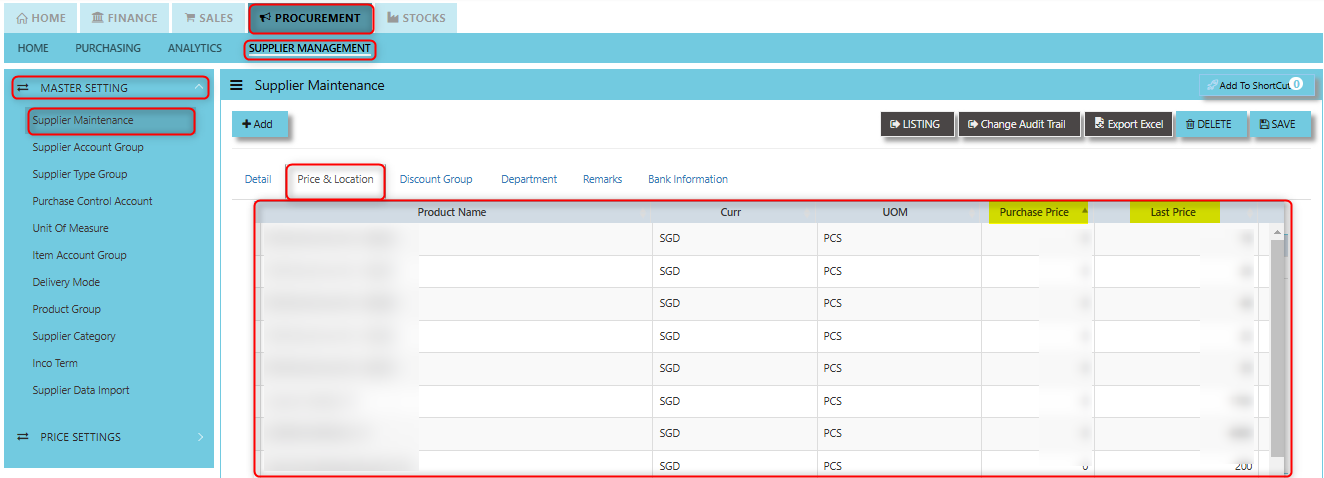
- A: Price Table (Last) and T: Price Table (Purchases) - Every time an invoice is created for this supplier, the system will call out the selling price from the Supplier Maintenance Price Table.
User may look and maintain the price under "Price & Location" tab. Click on PROCUREMENT - SUPPLIER MANAGEMENT - MASTER SETTING - SUPPLIER MAINTENANCE - PRICE & LOCATION TAB for the screen below.
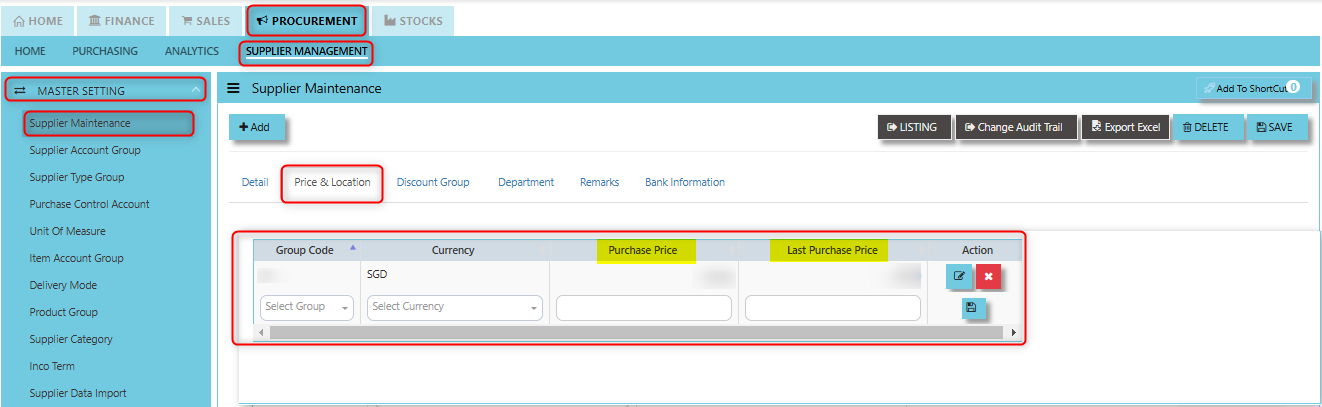
- B: Group Table (Last) and G (Purchases) - Every time an invoice is created for this supplier, the system will call out the selling price from the Supplier Maintenance Group Table. This group assumes that all items in the group carry the same purchase price.
User may look and maintain the price under "Price & Location" tab . Click on PROCUREMENT - SUPPLIER MANAGEMENT - MASTER SETTING - SUPPLIER MAINTENANCE - PRICE & LOCATION TAB for the screen below.
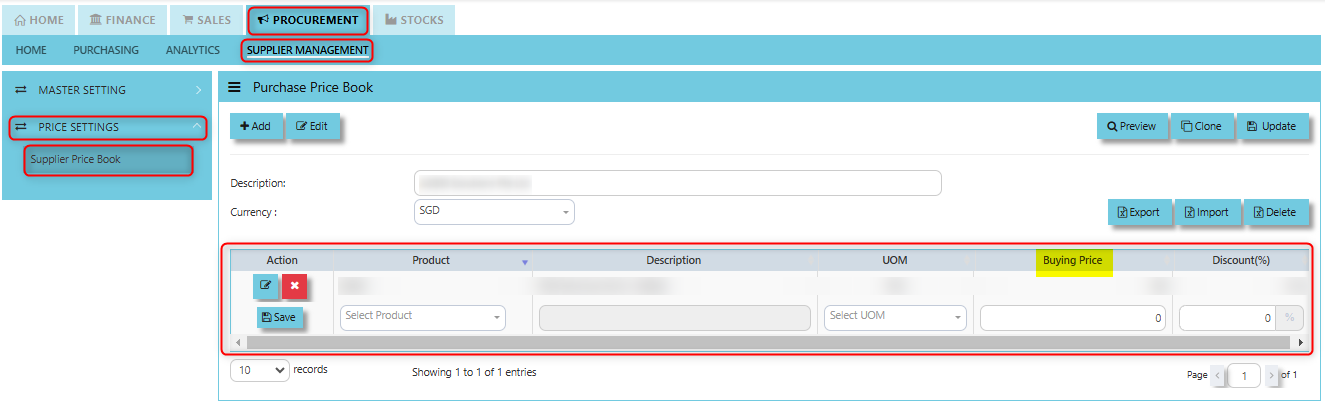
- F: Price Book - collection of pricing information that defines the cost of products or services provided by a supplier.
User may look and maintain the price under "Supplier Price Book". Click on PROCUREMENT – SUPPLIER MANAGEMENT – PRICE SETTINGS - SUPPLIER PRICE BOOK for the screen below.
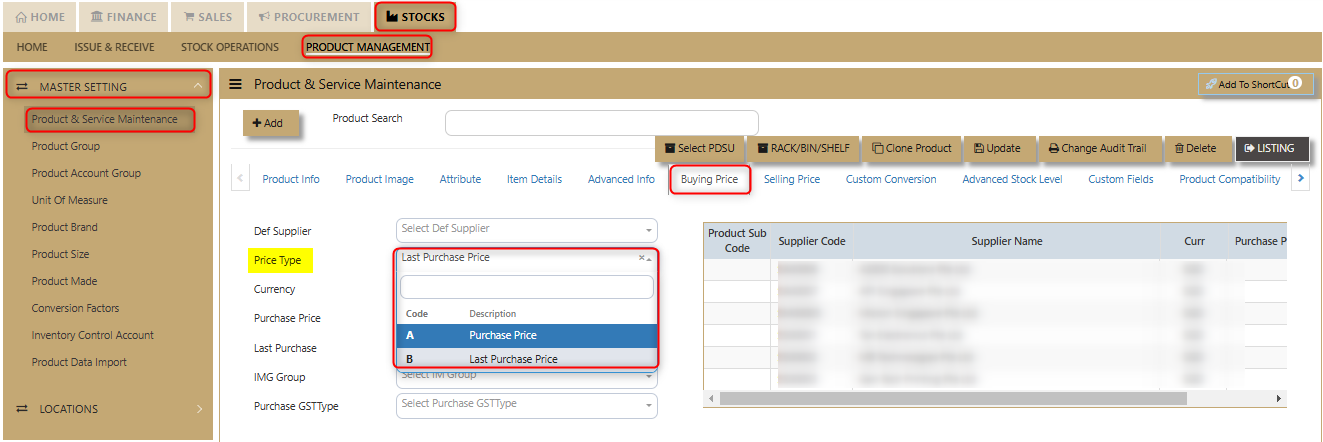
- L: Last Price – If Last Price is selected, the price billed for a particular product will be saved in the Last Price column of the Price table. The next time the same product is entered in an invoice for that supplier, the Last Price will be automatically picked up.
User may look and maintain the price in "Last Purchase" field under "Buying Price" Tab of Product & Service Maintenance. Click on STOCKS – PRODUCT MANAGEMENT – MASTER SETTING - PRODUCT & SERVICE MAINTENANCE - BUYING PRICE TAB for the screen below.

- M: Bracket Price - a pricing structure where the price of goods or services is determined based on predefined "brackets" or ranges.
- N: Period Price - the price of goods or services changes over a defined period. This can be used to define prices for specific time frames such as monthly, quarterly, or yearly pricing.
- O: Product Setting - Every time an invoice is created for this supplier, the system will show the selling price from the Product & Service Maintenance (Depends on the Price Type selected).
User may look and maintain the price depends on the "Price Type" selected under "Buying Price" Tab of Product & Service Maintenance. Below are the types selection:
-
-
- A Purchase Price - Once user selected this, the price will be automatically picked up under this field in Buying Price Tab.
- B Last Purchase Price - Once user selected this, the price will be automatically picked up under this field in Buying Price Tab.
-
Click on STOCKS – PRODUCT MANAGEMENT – MASTER SETTING - PRODUCT & SERVICE MAINTENANCE - BUYING PRICE TAB for the screen below.
- P: Purchases - Every time an invoice is created for this supplier, the system will call out the Purchase Price from the Product & Service Maintenance. The user will have to manually set and update the Purchase Price field there.
User may look and maintain the price in "Last Purchase" field under "Buying Price" Tab of Product & Service Maintenance. Click on STOCKS – PRODUCT MANAGEMENT – MASTER SETTING - PRODUCT & SERVICE MAINTENANCE - BUYING PRICE TAB for the screen below.

- S: Discount Group - a way to apply discount percentages or fixed discounts based on predefined criteria or classifications of customers, regions, product types, or purchasing conditions.
Location - Create different delivery locations for this supplier.
Price - Records the history of selling price for this supplier if Price Table is selected for the Price Type.
The Price and Location Tab serves as a key area for managing the pricing information and logistical details related to suppliers.
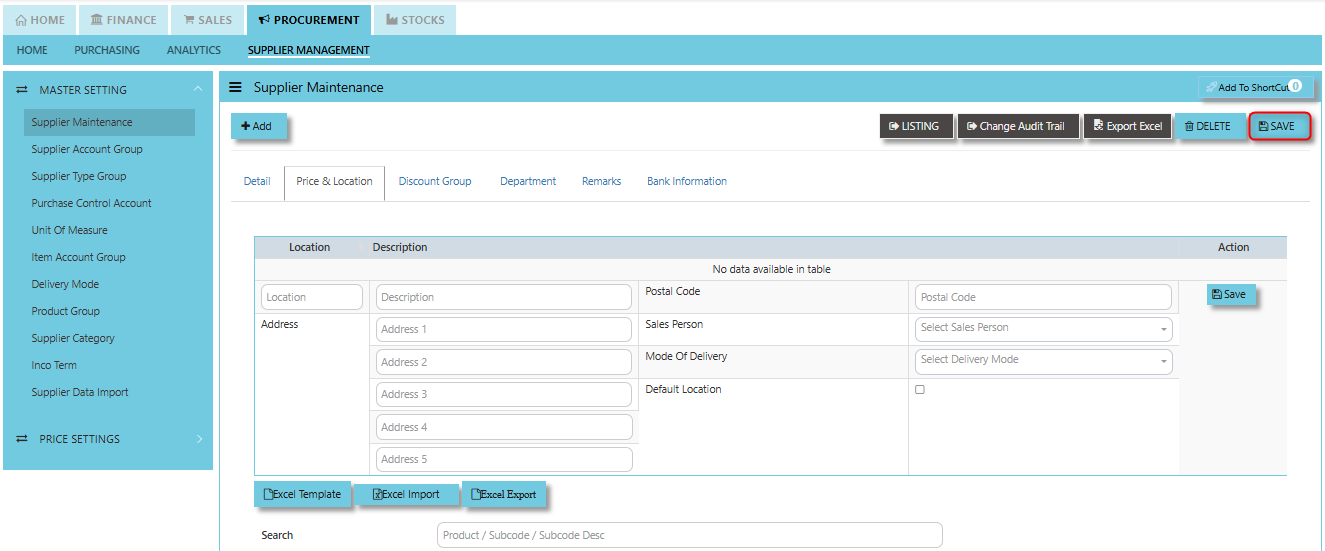
How to set Price and Location?
- Click on PROCUREMENT - SUPPLIER MANAGEMENT - MASTER SETTING - SUPPLIER MAINTENANCE - PRICE & LOCATION TAB for the screen below.
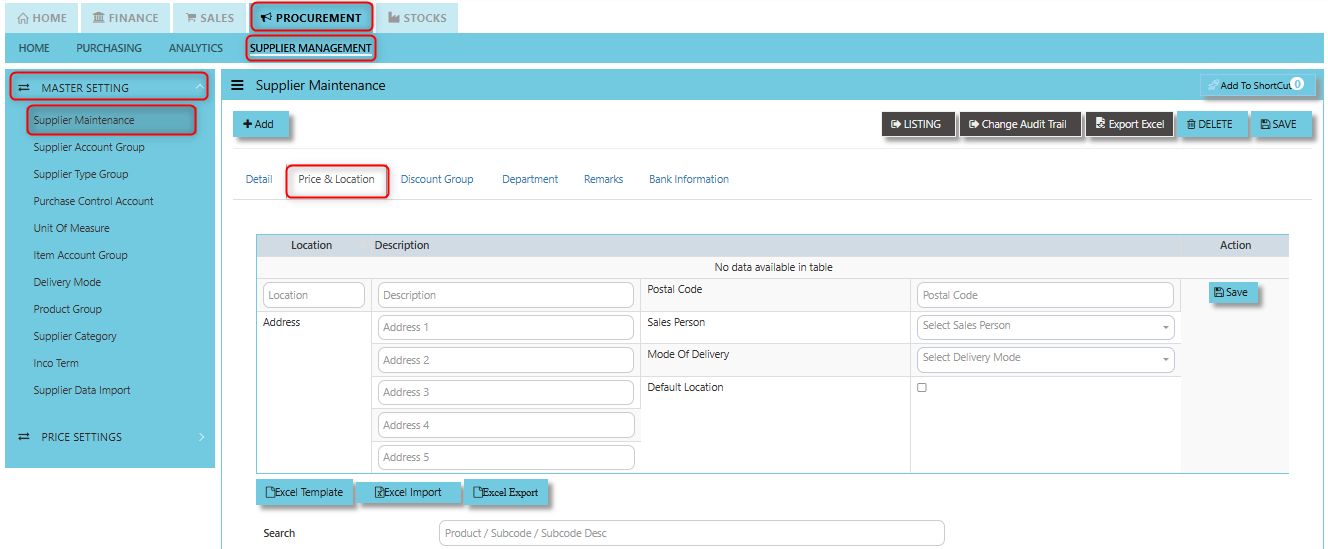
1. Input the necessary details such as Address, Postal Code, Sales Person and Mode of Delivery. When the "Default Location" checkbox is ticked for a supplier, the system automatically associates that location with the supplier's transactions.
2. Key in the details of the below fields for Pricing the click SAVE button of each line:
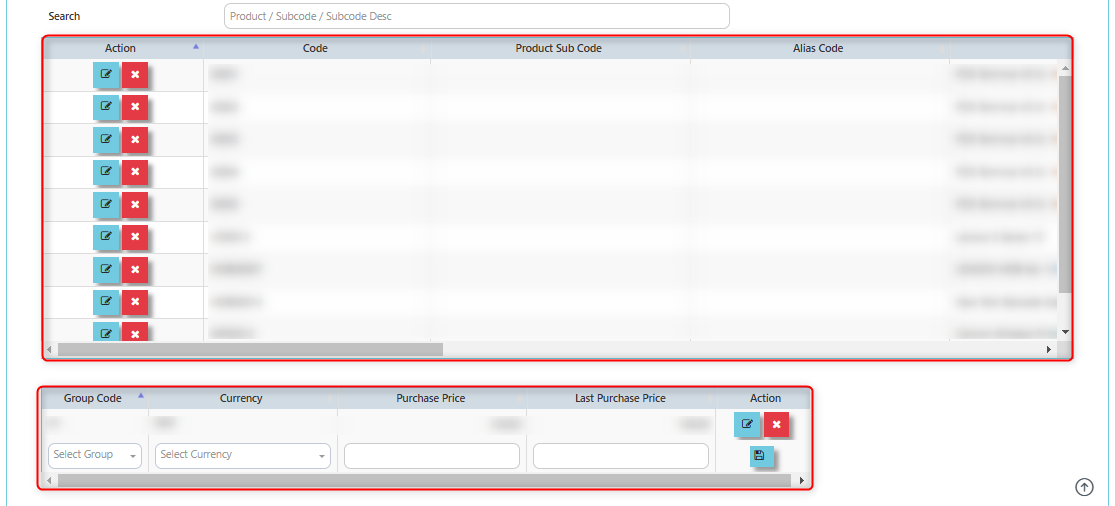
A: Price Table (Last) and T: Price Table (Purchases)
- Filter the "Code"
- Product Sub Code
- Alias Code
- Product Name
- Currency
- UOM
- Purchase Price
- Last Price
- Dealer Price
- Retail Price
- List Price
- Promotion Price
B: Group Table (Last) and G (Purchases)
- Group Code
- Currency
- Purchase Price
- Last Purchase Price
3. After keyed in the above details, click SAVE button.
User may have an option to use the below buttons:

- The Excel Template button is usually provided to allow users to download a preformatted Excel template that is structured according to the system's data import requirements.
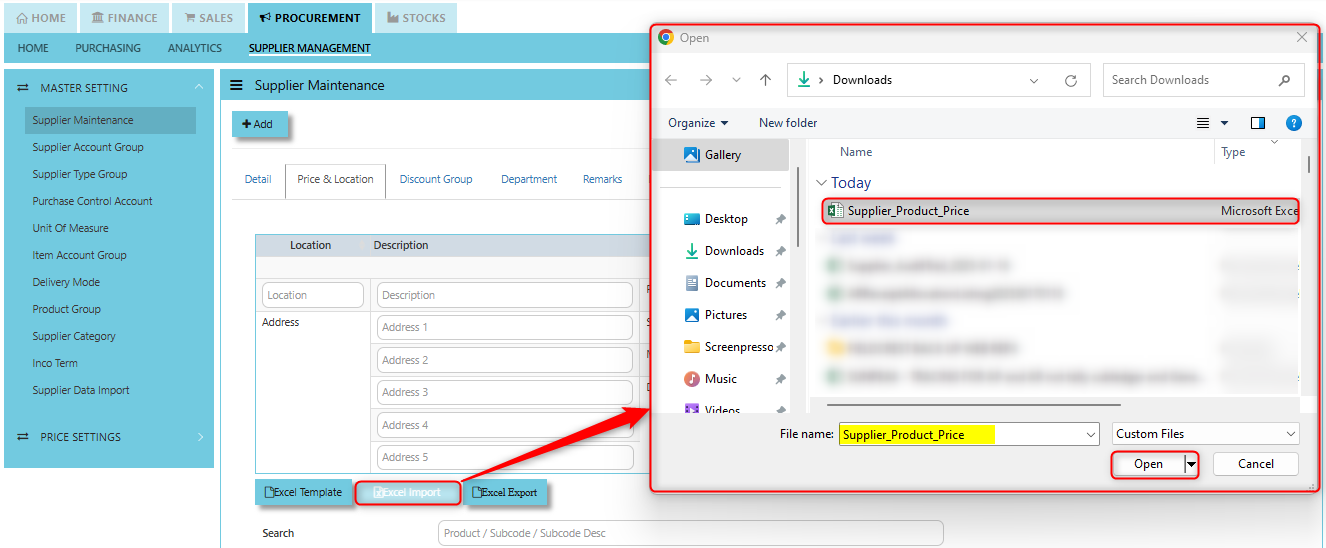
- The Excel Import button is used to upload data from an Excel file into the ERP system.
- The Excel Export button allows users to export data from the system to an Excel file.
How to use Excel Import?
1. Download the Excel Template and fill out with supplier information.
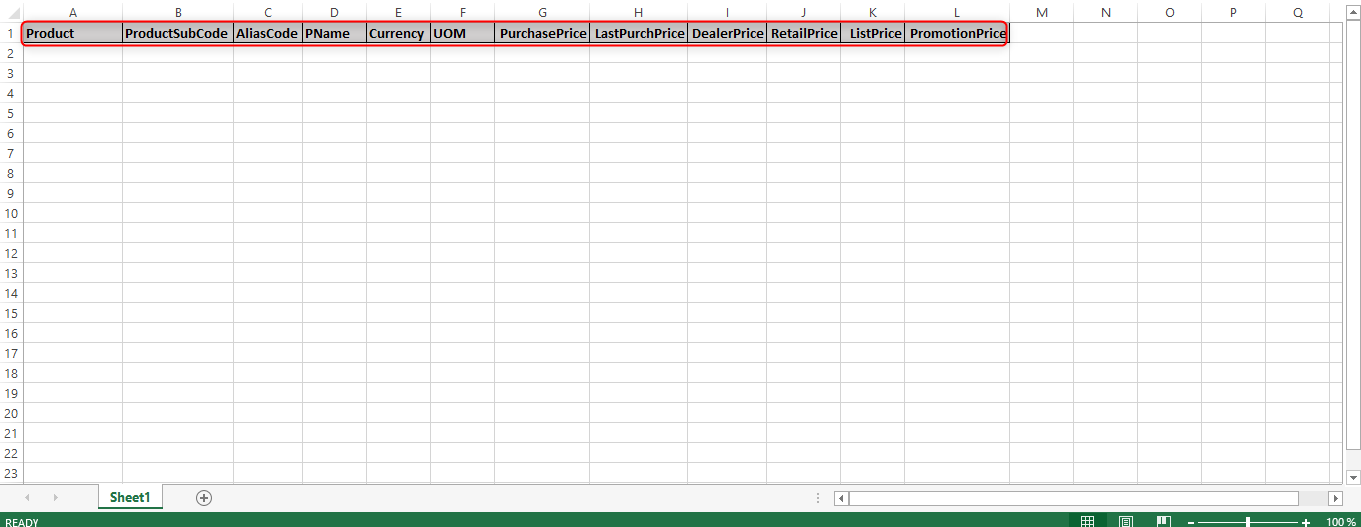
2. Click "Excel Import" then choose the file to upload.
3. Once the data imported, click SAVE.
How to set Discount Group?
- Click on PROCUREMENT - SUPPLIER MANAGEMENT - MASTER SETTING - SUPPLIER MAINTENANCE - DISCOUNT GROUP TAB for the screen below.
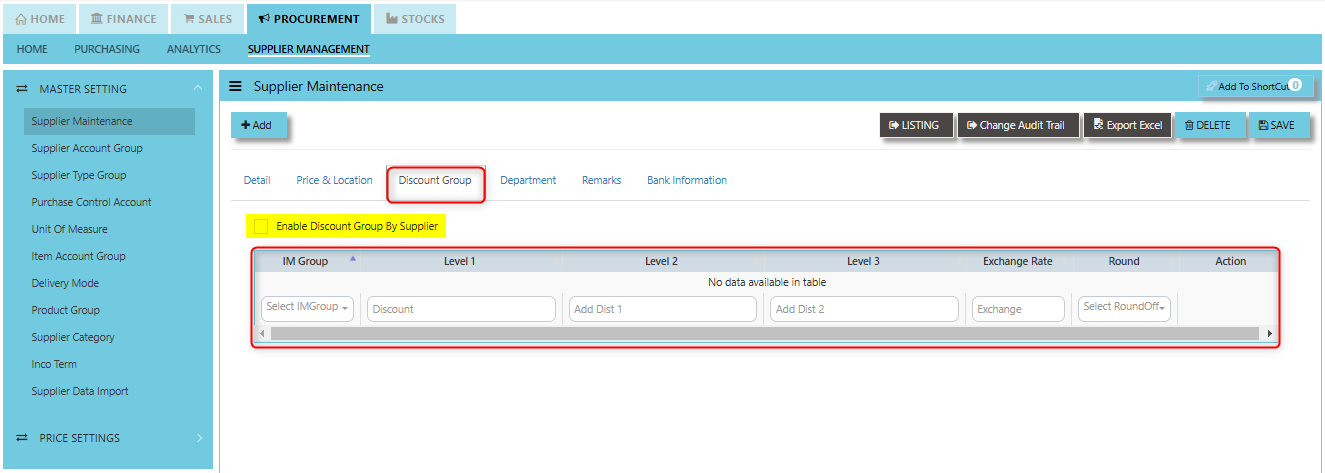
- Enter IM Group, Level 1 to 3 Discounts, Exchange Rate and Round off then click SAVE to maintain line detail.
- Once the "Enable Discount Group by Supplier" is ticked, it activates the ability to organize and manage discounts based on different groups or categories within the context of a specific supplier.
- Click SAVE in upper right corner of the screen.
How to set Department?
- Click on PROCUREMENT - SUPPLIER MANAGEMENT - MASTER SETTING - SUPPLIER MAINTENANCE - DEPARTMENT TAB for the screen below.
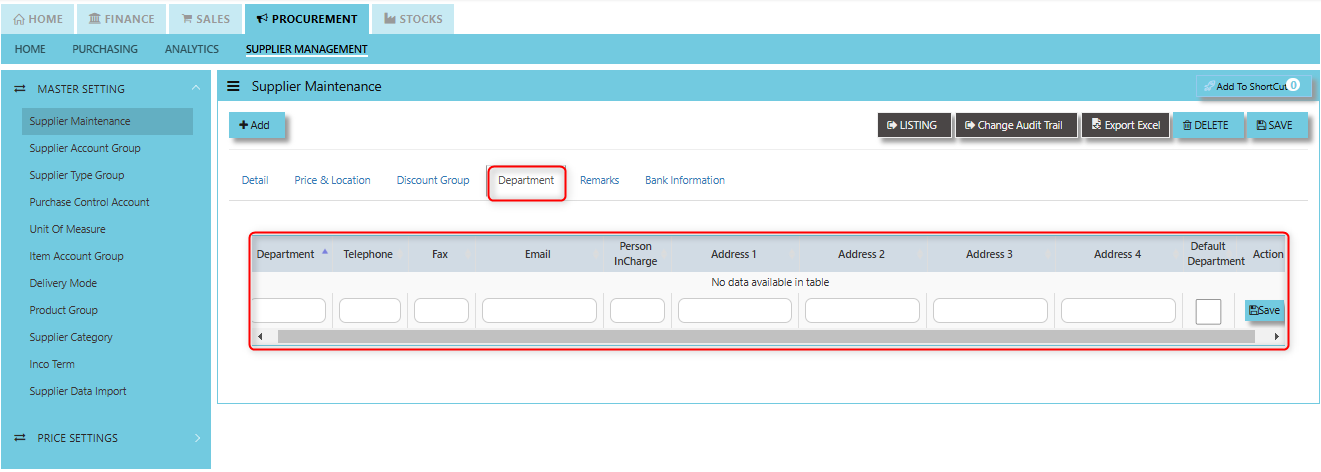
- Enter the details for the below fields:
- Department
- Telephone
- Fax
- Person InCharge
- Address 1, 2, 3 & 4
- Default Department - Serves to automatically assign a specific department within the organization to a supplier during procurement activities once enabled.
- After keyed in the above necessary details, click SAVE to maintain the line detail.
- Click SAVE in upper right corner of the screen.
How to set Remarks?
- Click on PROCUREMENT - SUPPLIER MANAGEMENT - MASTER SETTING - SUPPLIER MAINTENANCE - REMARKS TAB for the screen below.
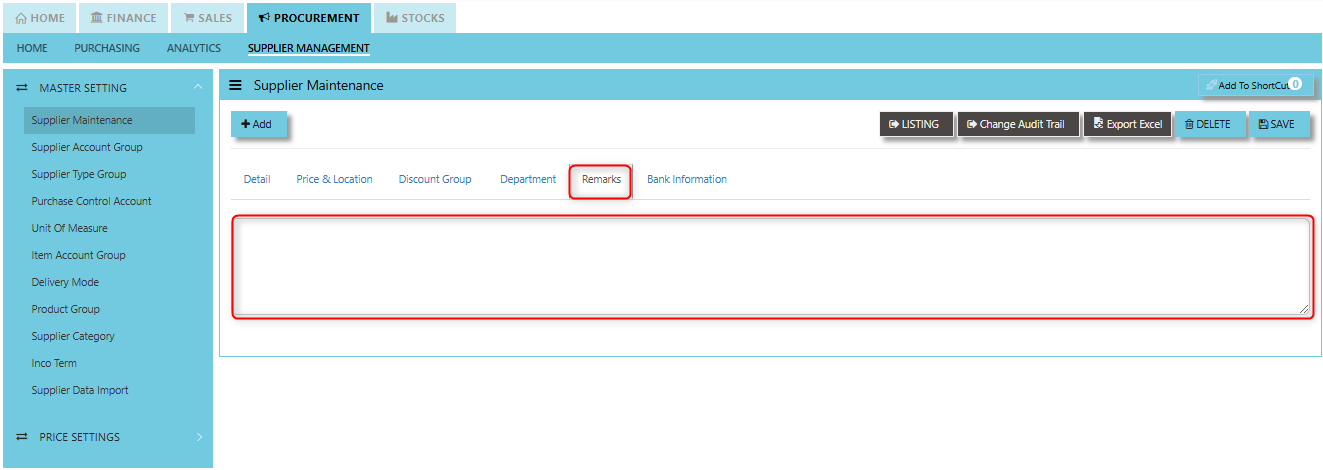
Provides a space for users to enter additional notes or comments related to a particular supplier. This section serves as a repository for any relevant information that doesn’t necessarily fit into the other structured fields of supplier data, but is important for context or communication purposes.
How to set Bank Information?
- Click on PROCUREMENT - SUPPLIER MANAGEMENT - MASTER SETTING - SUPPLIER MAINTENANCE - BANK INFORMATION TAB for the screen below.
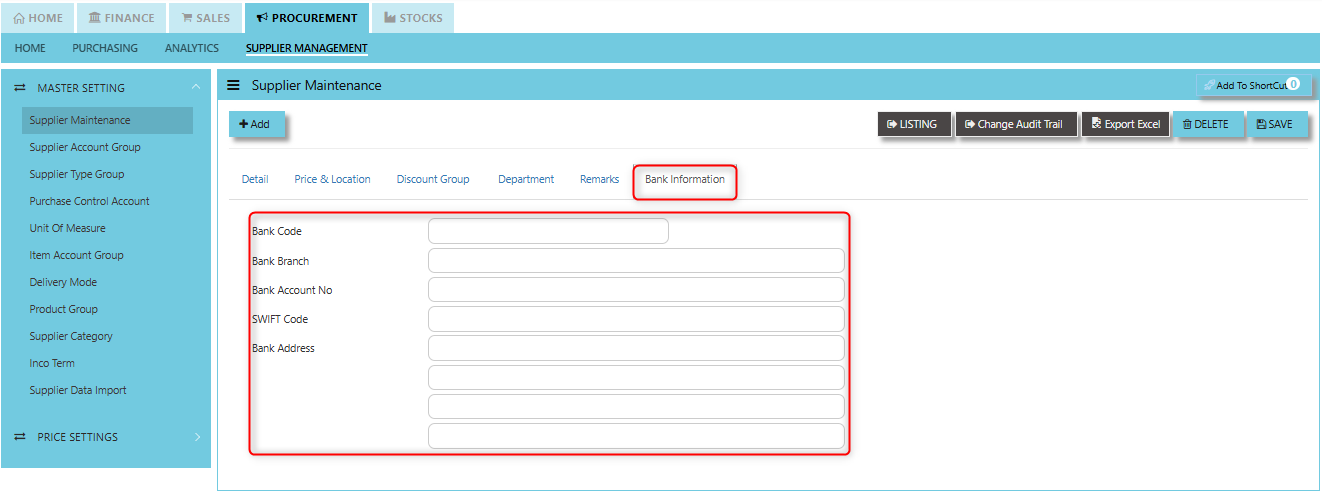
- Enter the details of the below fields:
- Bank Code
- Bank Branch
- SWIFT Code
- Bank Address
- Once keyed in the above information, Click SAVE.
Below are the other buttons that user can utilize under Supplier Maintenance:
Add to ShortCut - Clicking this button allows users to add a specific supplier's profile or page to a shortcut list. Once added, this shortcut enables the user to quickly navigate to the supplier’s details directly from a dashboard or main menu, without having to search for the supplier each time.
How to use Add to ShortCut?
1. Click "Add to ShortCut" and system will open below windows:
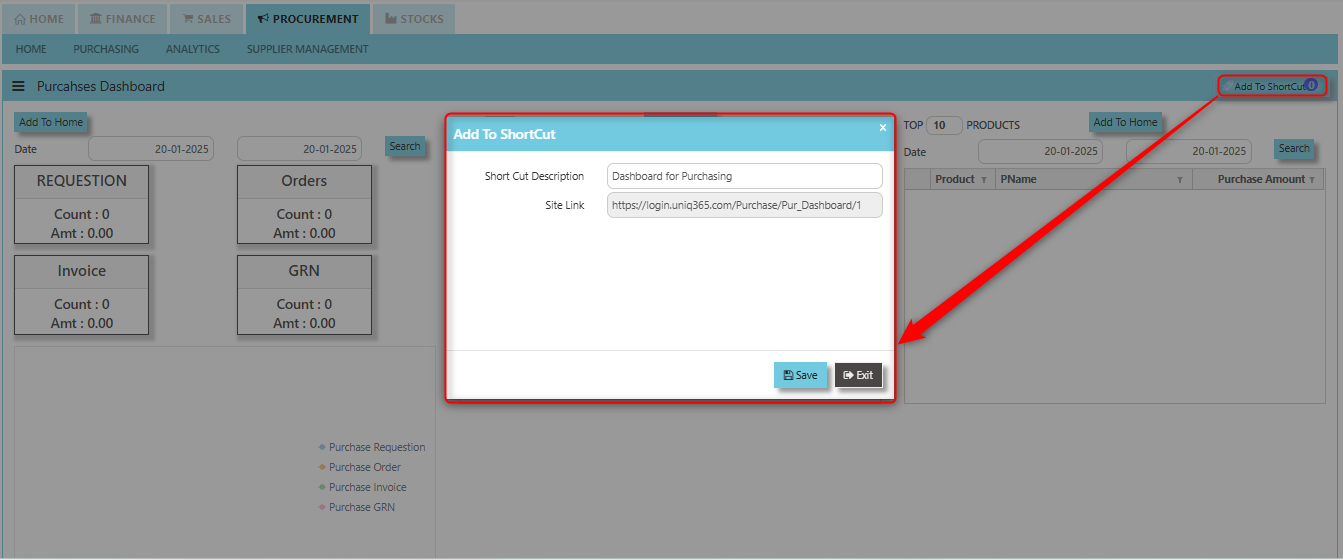
2. Enter Short Cut Description
3. Click SAVE then click OK.
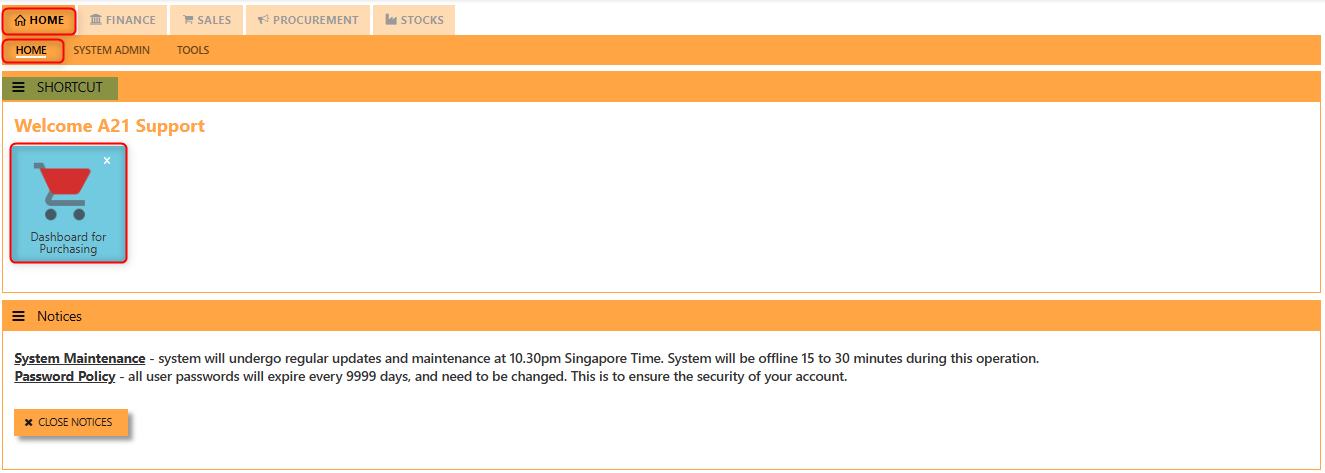
4. User may look to the Homepage for the added function or page. Click on HOME - HOME - SHORTCUT for the screen below.
Listing Button - Once clicked this will navigate the user back to the previous screen or the main supplier listing page.
Change Audit Trail Button - A feature that tracks and displays historical changes or modifications made to the supplier information within the system. This button helps users view and audit any updates, deletions, or additions made to supplier records, providing a detailed audit trail of supplier data changes over time. Once clicked, system will auto download an excel file for user reference.
Excel Export Button - Used to export supplier data from the system into an Excel spreadsheet format. This feature provides users with a convenient way to extract supplier information from the system and work with it externally, either for analysis, reporting, or further processing.
Delete Button - Used to remove a supplier from the system entirely. When clicked, it will permanently delete the supplier’s profile and all associated data, such as contact details, pricing, order history, and any other information linked to that supplier.
Save Button - Used to save any changes or updates made to a supplier’s record or profile. When you edit or add details related to a supplier (such as contact information, payment terms, pricing, or other data), clicking the "Save" button ensures that these modifications are stored and updated in the system.
Supplier Account Group
The feature is used for auto accounts posting when saving Purchase Transactions. Unlike other systems that are hard-coded, Uniq365 allows the user to set their own Supplier Accounts postings. The Supplier Account Group needs to be set if the account posting is by Supplier.
How to Setup Supplier Account Group?
- Click on PROCUREMENT – SUPPLIER MANEGEMENT – MASTER SETTING - SUPPLIER ACCOUNT GROUP icon for the following screen.
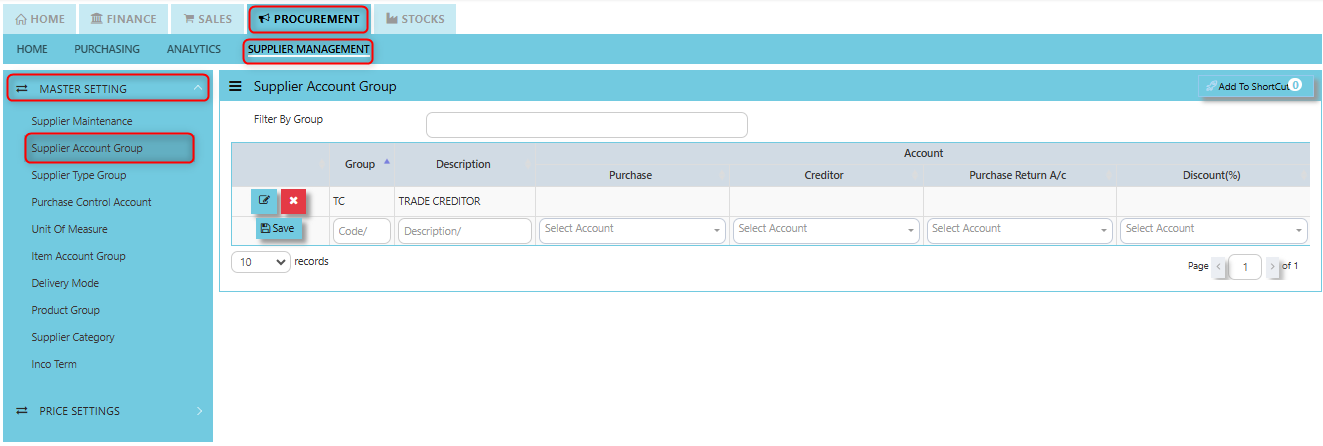
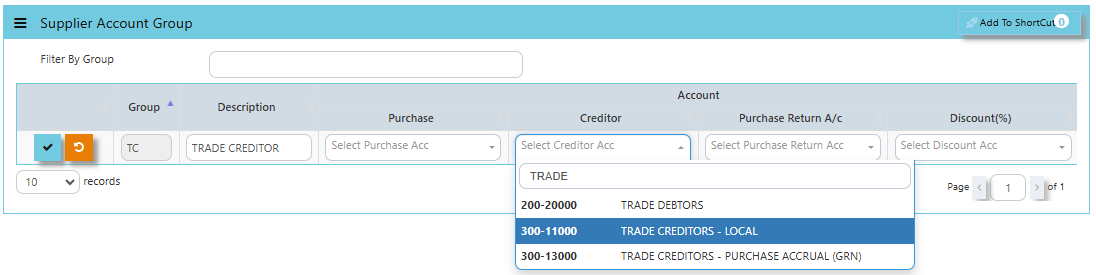
- Enter the Code and Description to create the Supplier Account Group. After this is done, set the GL Chart of Account code for “Creditor A/C”, “Purchases A/C” , "Purchase Return A/C" & “Discount A/C”.
Creditor Account: Tracks the amounts owed to suppliers (liabilities), reflecting unpaid invoices.
Purchases Account: Records the cost of goods or services purchased from suppliers (expenses or inventory increase).
Purchase Return Account: Records the value of goods returned to suppliers (reduces purchase costs).
Discount Account: Tracks discounts received from suppliers (reduces the overall purchase amount).
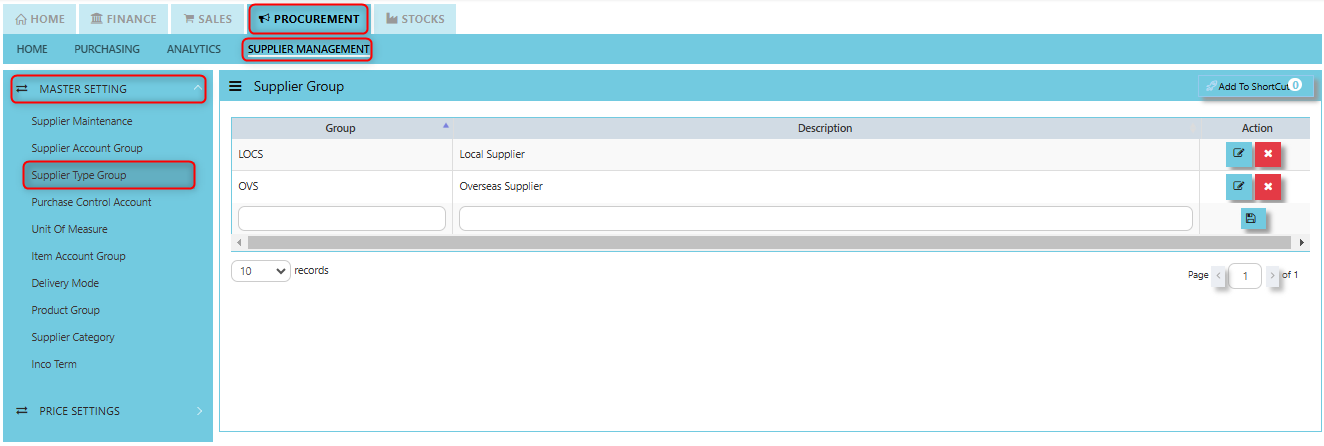
Supplier Type Group
In Uniq365, this is where you create the Supplier Group which will be used to sort or filter reports (Optional).
How to Setup Supplier Type Group?
- Click on PROCUREMENT – SUPPLIER MANAGEMENT - MASTER SETTING - SUPPLIER TYPE GROUP for the screen below.
- Enter the Group and Description to create the Supplier Type Group. After this is done, click the save button.
Purchase Control Account
In Uniq365, this is where you can set the Purchase Control Accounts for the GL Auto Account Posting.
How to set Purchase Control Account?
- Click on PROCUREMENT – SUPPLIER MANAGEMENT – MASTER SETTING - PURCHASE CONTROL ACCOUNT for the screen below.
- Enter the Account Name, Posting Type and if choose "Fixed", user have to set the GL Chart of Account code for Fixed Account to create the Purchase Control Account. After this is done, click save button.
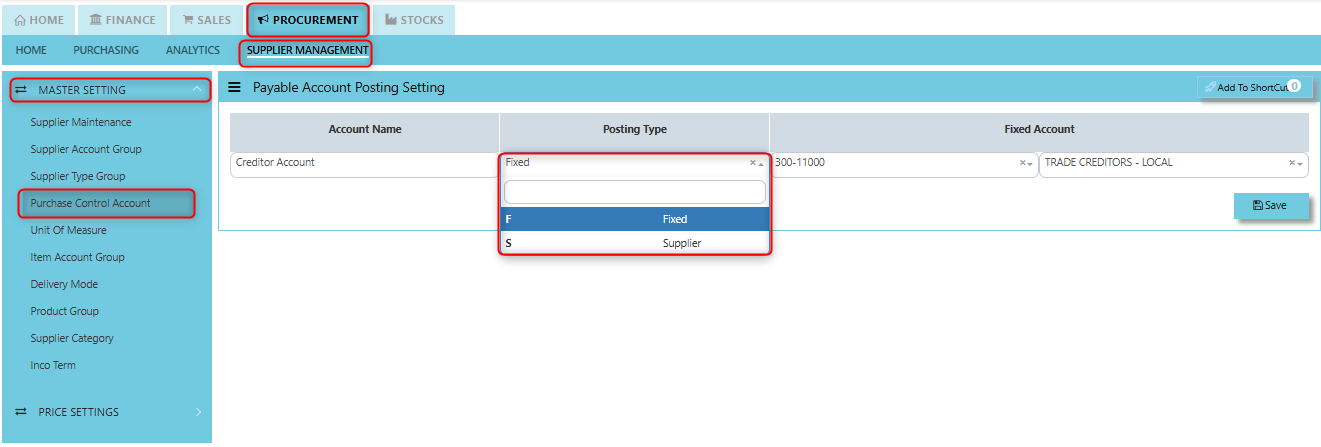
Posting Type determines the specific nature of the accounting entry that will be created when a purchase transaction occurs. It helps define how the system will treat and record the accounting entries related to supplier purchases in the General Ledger.
- If you select Fixed, you have to choose the specific fixed account. This relates to standardized or predefined accounting entries, often used for fixed or standard costs.
- If you select Supplier, relates to transactions that are specific to a supplier, allowing for accurate tracking of accounts payable or receivable linked to a supplier’s account.
Fixed Account this is a predefined ledger account for specific, consistent purchases ensuring uniformity in how those transactions are posted in the general ledger.
Unit of Measure
In Uniq365, this is where you indicate the Unit of Measure for the product in Procurement Module.
How to create Unit of Measure?
- Click on PROCUREMENT – SUPPLIER MANAGEMENT – MASTER SETTING - UNIT OF MEASURE for the screen below.
- Enter the Code, Description, Remarks to create the Unit of Measure. After this is done, click the save button.
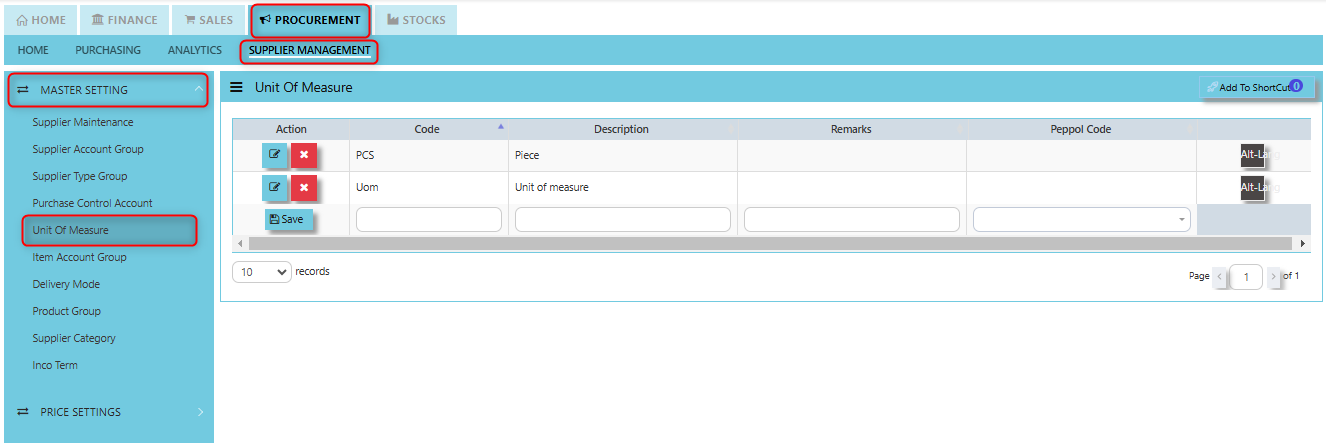
ALT-LANG button prompt windows for user to maintain other Language description. This feature that allows users to manage product information in multiple languages.
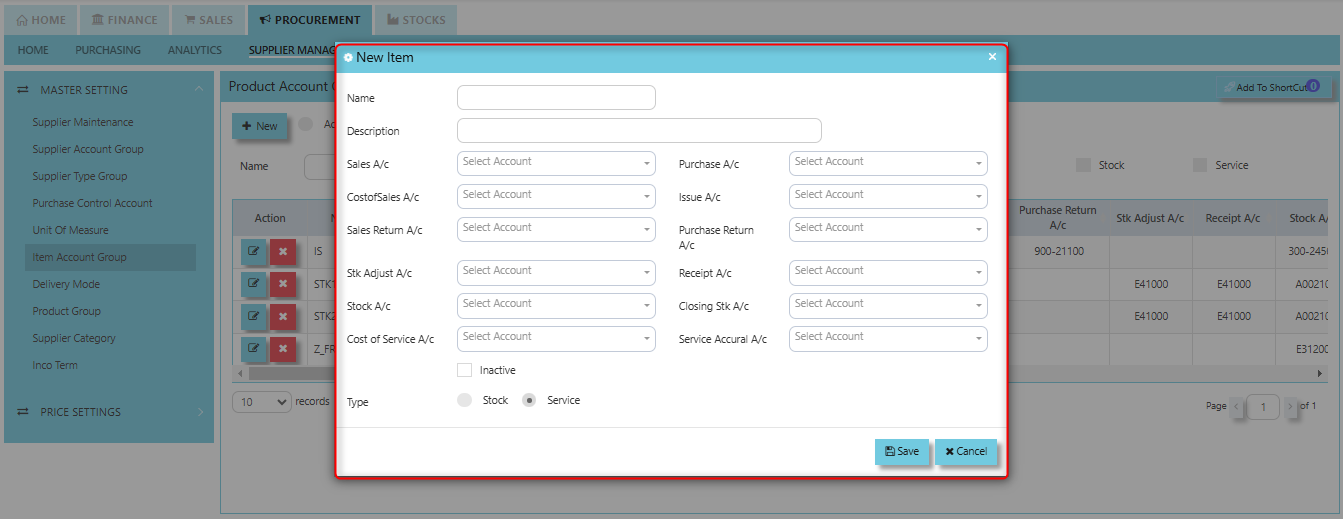
Item Account Group
The Product Account Group is used to categorize products into different accounting groups to manage the financial posting and treatment of transactions related to those products.
How to create Product Account Group?
- Click on PROCUREMENT – SUPPLIER MANAGEMENT – MASTER SETTING - ITEM ACCOUNT GROUP for the screen below.
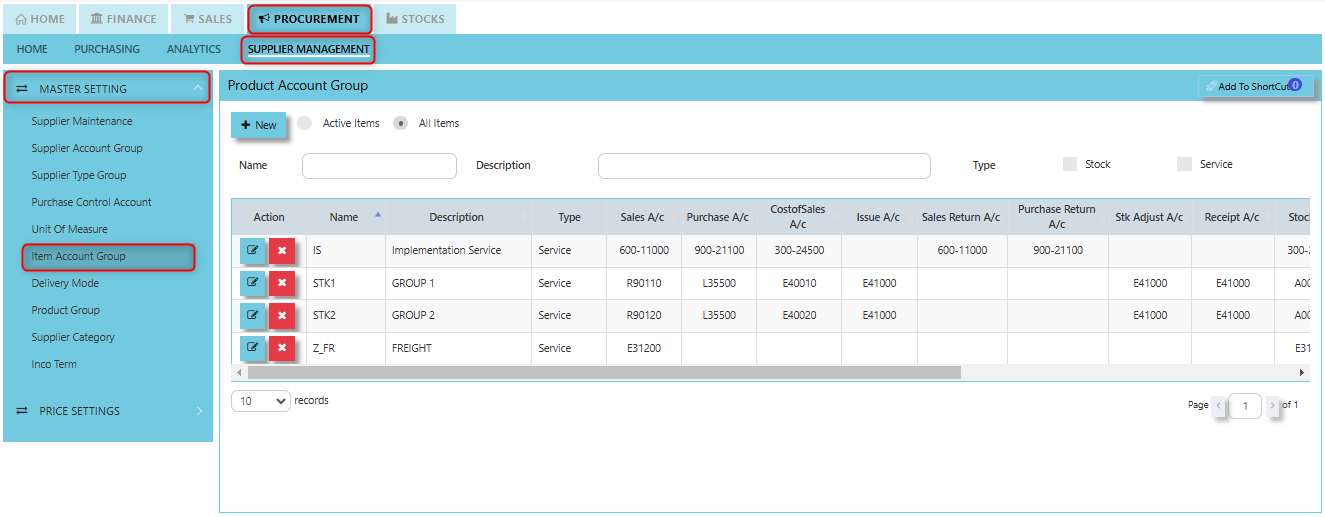
1. Enter the Name, Description and set the GL Chart of Account code for the below accounts:
- Sales A/C
- Purchase A/C
- Cost of Sales A/C
- Issue A/C
- Sales Return A/C
- Purchase Return A/C
- Stock Adjust A/C
- Receipt A/C
- Stock A/C
- Closing Stock A/C
- Cost of Service A/C
- Service Accrual A/C
After set up those accounts, choose the type if "Stock" or "Service" to create the Purchase Control Account. After this is done, click save button.
Sales Account This account tracks the revenue from goods or services sold to customers. It is used in sales transactions and is generally credited when a sale occurs.
Purchase Account This account tracks the cost of goods or services purchased from suppliers. It is debited when a purchase is made.
Cost of Sales A/C This account tracks the cost of goods sold (COGS) or services rendered. It reflects the direct costs associated with producing or acquiring goods that are sold during a period.
Issue A/C This account is used to track inventory issues or the movement of goods from inventory.
Sales Return A/C This account tracks the return of goods from customers. It is a contra-revenue account that reduces sales revenue when goods are returned.
Purchase Return A/C This account tracks the return of goods to suppliers. It is a contra-expense account, reducing the overall cost of purchases.
Stock Adjust A/C This account tracks adjustments made to stock levels, such as inventory discrepancies due to loss, damage, or errors.
Receipt A/C This account tracks the receipt of payments from customers or payments related to purchases from suppliers.
Stock A/C This account tracks the value of inventory held by the company. It is debited when goods are purchased and added to inventory and credited when goods are issued or sold.
Closing Stock A/C This account tracks the closing balance of inventory at the end of the financial period. It is used for adjusting the stock value at the end of the period.
Cost of Service A/C This account tracks the costs associated with services provided by suppliers or incurred by the company.
Service Accrual A/C This account is used to record accrued expenses for services that have been received but not yet invoiced or paid.
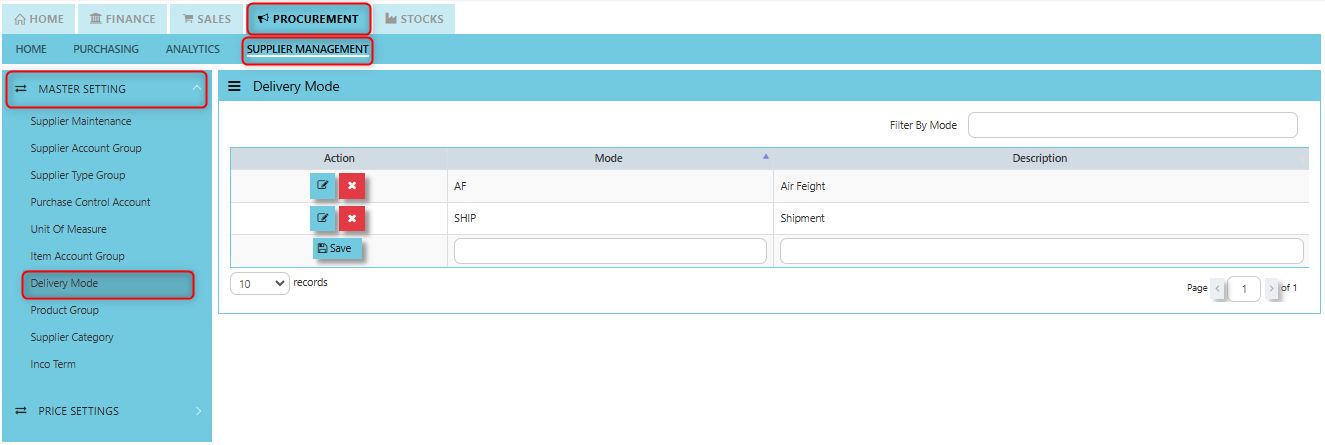
Delivery Mode
In Uniq365, you can indicate the Supplier Delivery Mode in the Supplier Maintenance or Transactions. You can also sort or filter reports by Delivery Mode.
How to create Delivery Mode?
- Click on PROCUREMENT – SUPPLIER MANAGEMENT – MASTER SETTING - DELIVERY MODE for the screen below.
- Enter the Mode and Description to create the Delivery Mode. After this is done, click save button.
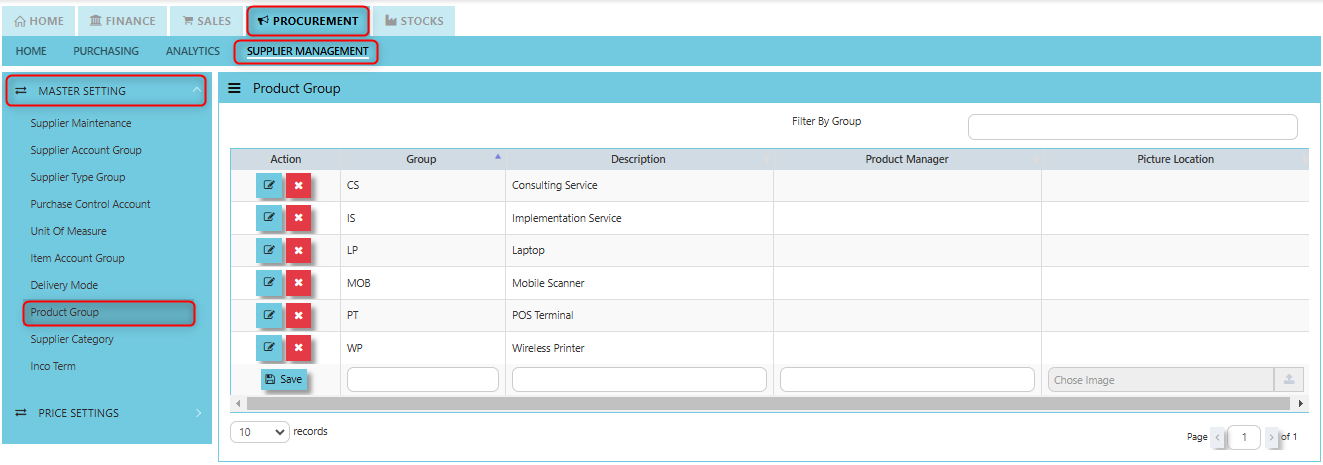
Product Group
In Uniq365, this is where you can set the Product Group for the classification or categorization of products based on shared characteristics and usage.
How to set Product Group?
- Click on PROCUREMENT – SUPPLIER MANAGEMENT – MASTER SETTING - PRODUCT GROUP for the screen below.
- Enter the Group and Description to create the Product Group. User may leave blank for Product Manager and Picture Location. After this is done, click save button.
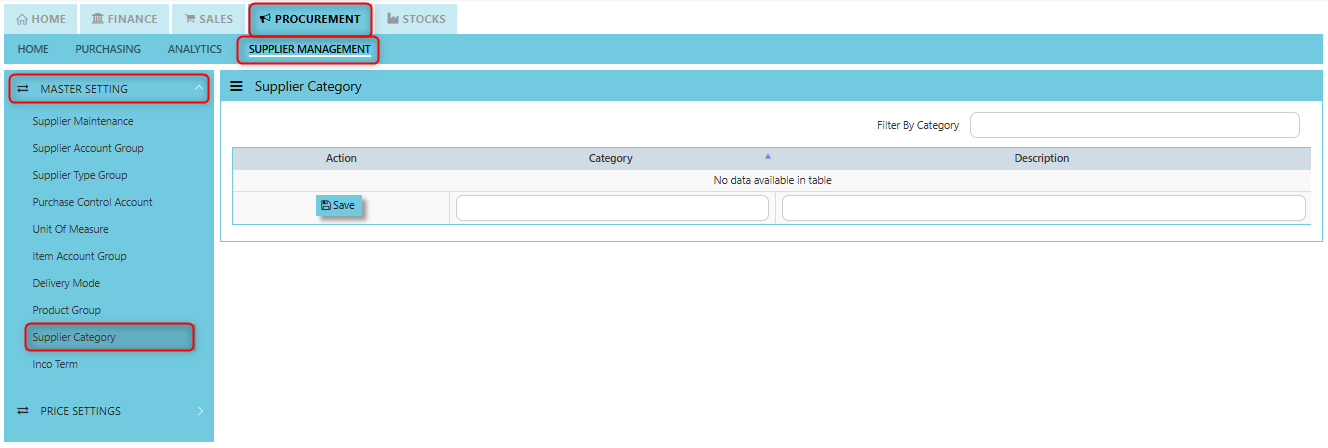
Supplier Category
In Uniq365, this is where you can set the Supplier Category for the classification used to group suppliers based on specific characteristics, such as the types of products or services they provide.
How to set Supplier Category?
- Click on PROCUREMENT – SUPPLIER MANAGEMENT – MASTER SETTING - SUPPLIER CATEGORY for the screen below.
- Enter the Category and Description to create the Supplier Category. After this is done, click save button.
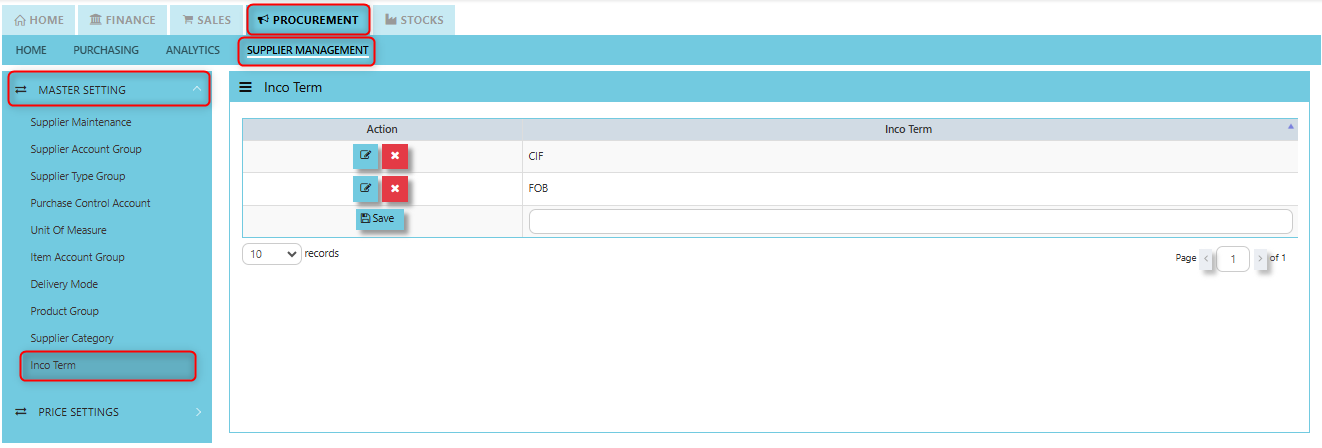
Inco Term
In Uniq365, you can specify the Inco Terms in Supplier Quotation and Purchase Order Transactions. The Inco Terms will first need to be created in the Maintenance first before it can be used at the transaction level.
How to create Inco Term?
- Click on PROCUREMENT – SUPPLIER MANAGEMENT – MASTER SETTING - INCO TERM for the screen below.
- Enter the Inco Term Code to create the Inco Term. After this is done, click save button.
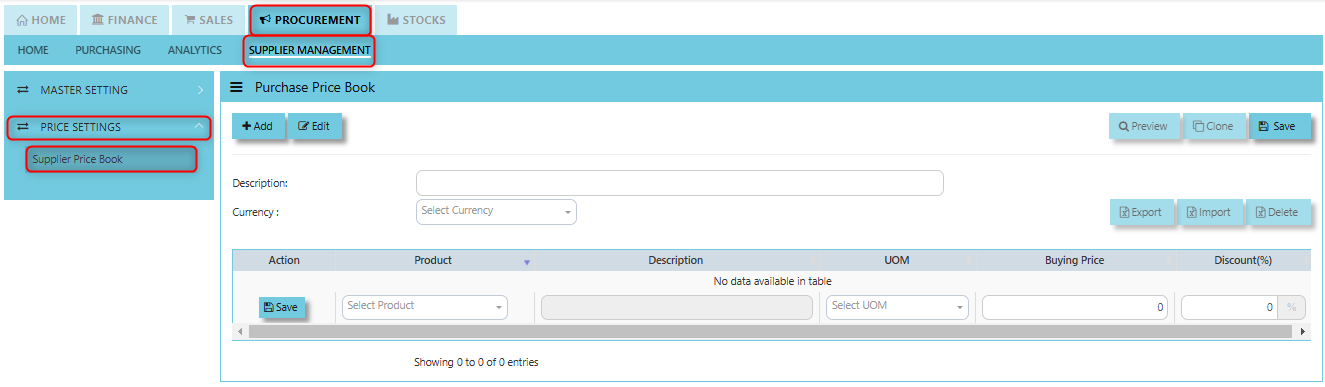
Supplier Price Book
In Uniq365, you may maintain a Supplier Price Book which is a record or catalog that contains the agreed-upon prices for products or services provided by a specific supplier. The price book typically includes a list of items or services, their associated prices, and any other terms or conditions related to the purchase, such as buying price, UOM and discounts.
How to create Supplier Price Book?
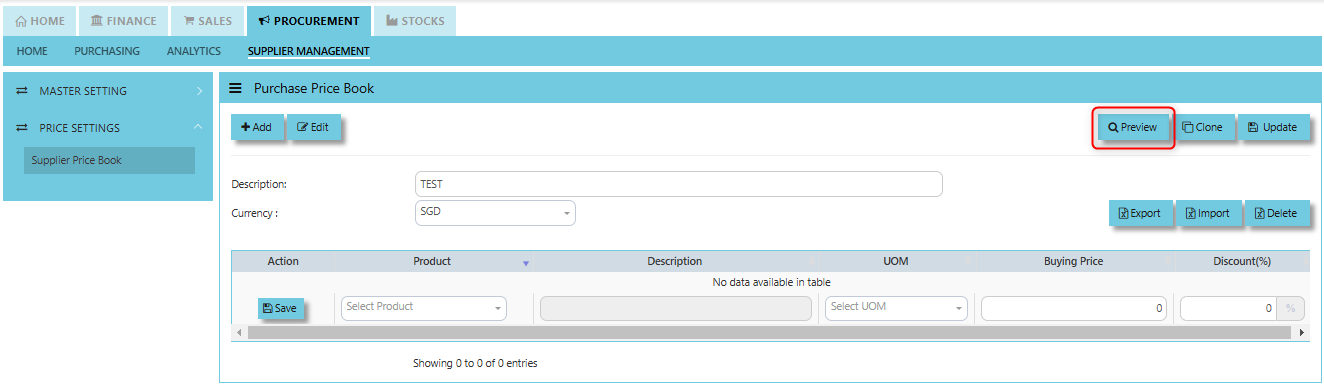
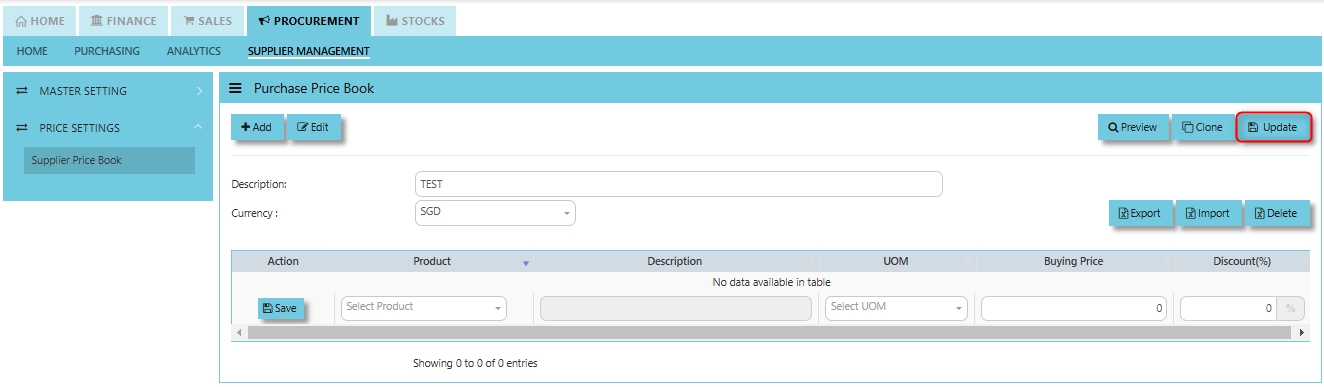
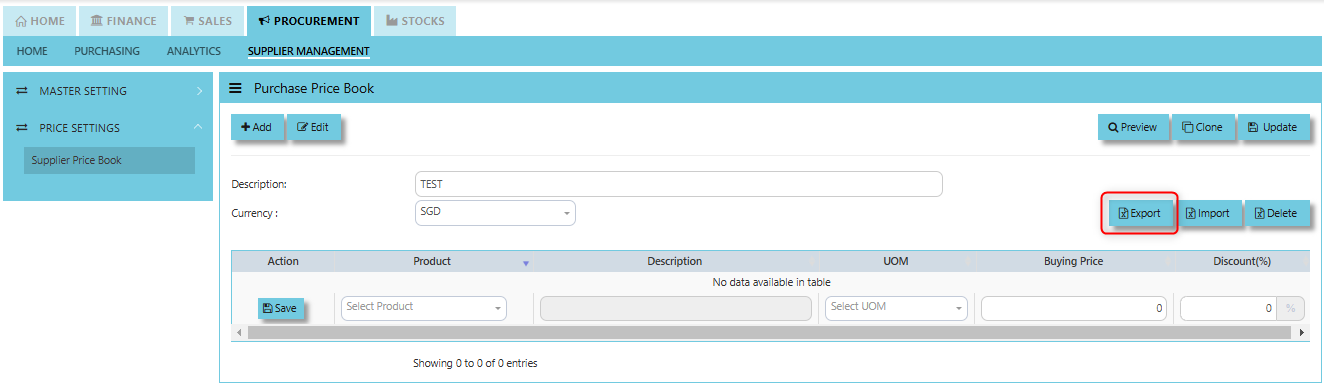
- Click on PROCUREMENT – SUPPLIER MANAGEMENT – PRICE SETTINGS - SUPPLIER PRICE BOOK for the screen below.
- Enter the Description and Currency to create the Supplier Price Book then click save. After this is done, add line item by key in the Product, Description, UOM, Buying Price and Discount then click save button.
Preview Button allows users to view the Supplier Price Book data without making any permanent changes, providing a chance to review the information first.
Clone Button creates a duplicate of an existing Supplier Price Book entry, which can then be modified, saving time when similar pricing structures need to be applied.

Update Button saves any changes or updates made to the Supplier Price Book, making the adjustments permanent in the system.
Delete Button removes an entry from the Supplier Price Book, typically used for deleting obsolete or incorrect pricing data.

Export Button allows users to export Supplier Price Book data to a file format (e.g., CSV or Excel) for external use, backup, or reporting purposes.
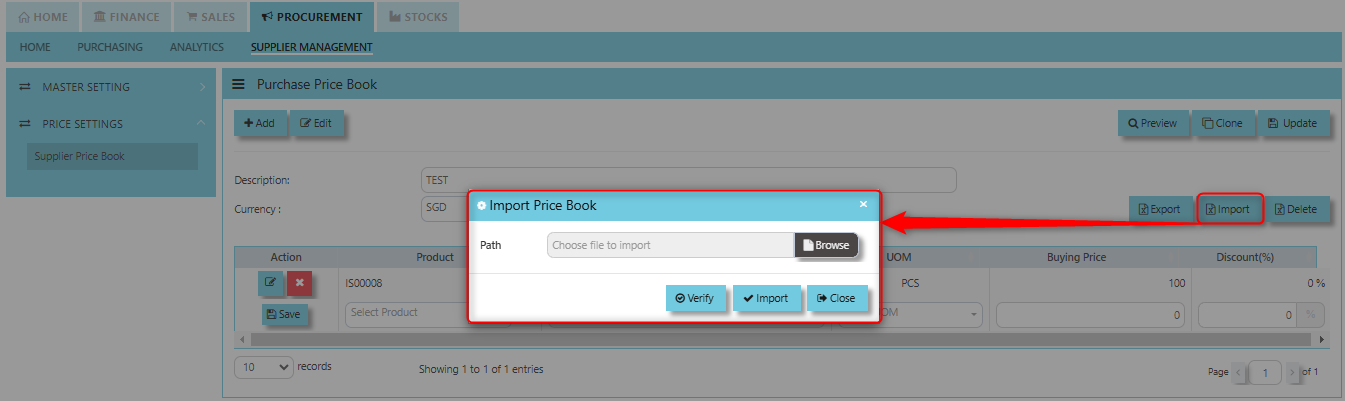
Import Button enables the uploading of external pricing data into the Supplier Price Book, automating the process of data entry from a file format.

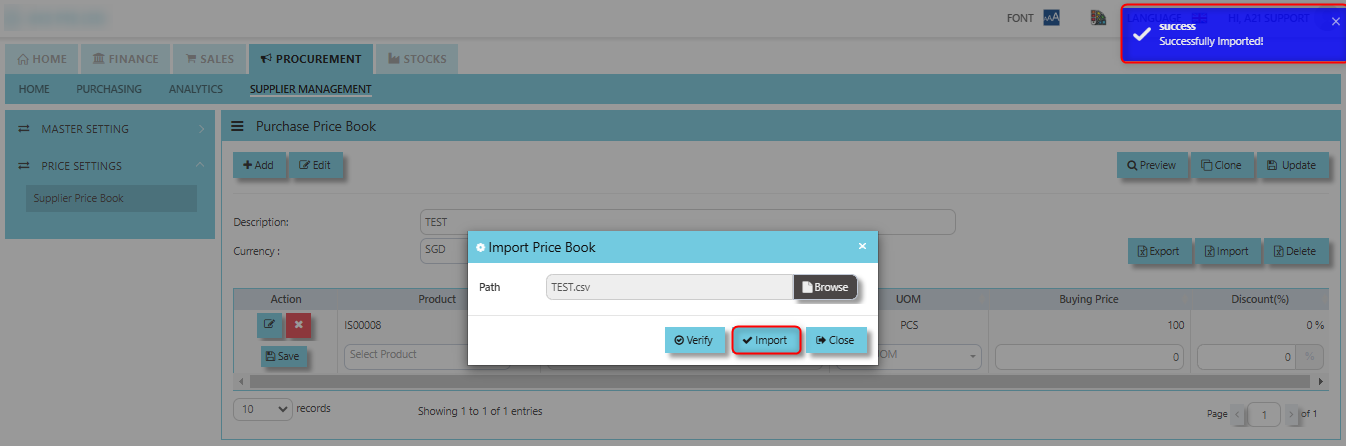
How to use "Import" function?
1. Generate the Excel format needed in uploading data. User may export the excel file format by utilizing "Export" button.

2. Open the exported excel format (see below screenshot) and fill all the necessary information and save.
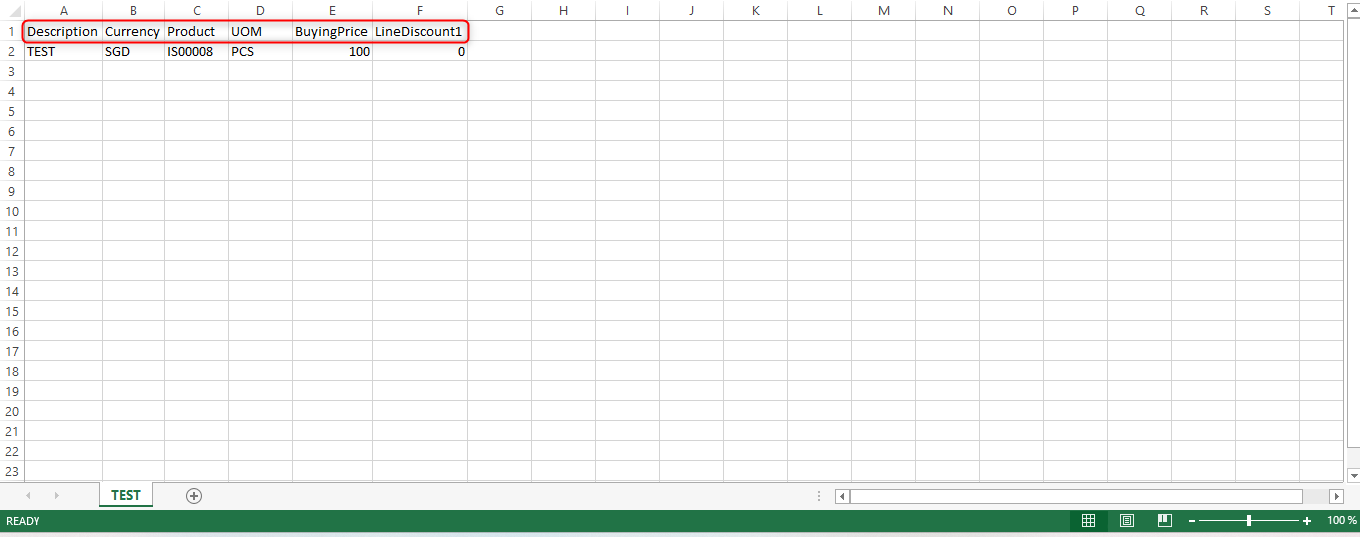
3. Upload the filled up excel format. Click the "Browse" and choose the excel file to import, click "Verify" then "Import".
4. Once the file uploaded, click "Verify" then system will prompt you a message of "Validation Success".
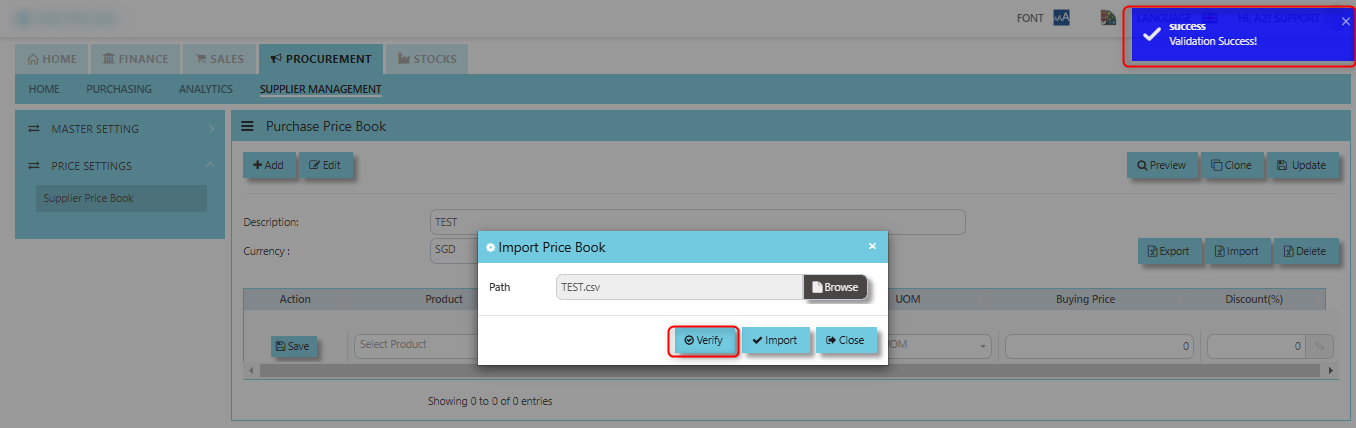
5. Click "Import" to add the line details. Once clicked the import button, system will prompt you a message that "Successfully Imported".