
Sales Operations
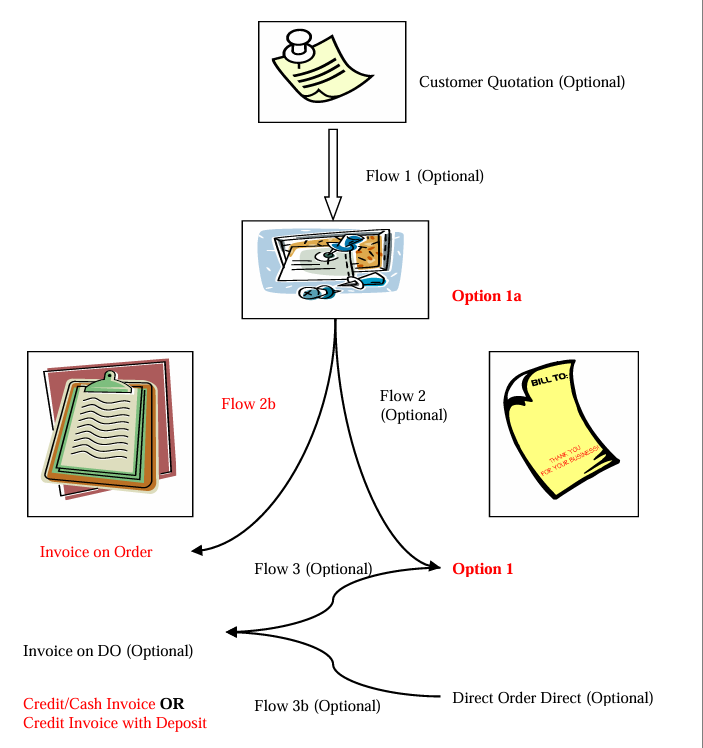
The Sales Operation involves several steps, which may vary depending on the organization's requirements. The following flows outline the typical sales process:
Flow 1: Sales Quotation to Sales Order (Optional)
1. Create a Sales Quotation for a customer.
2. Confirm the quotation.
3. Create a Sales Order.
Flow 2: Sales Order to Delivery Order (Optional)
1. Confirm the Sales Order.
2. Create a Delivery Order (DO) for the customer.
Flow 2b: Sales Order to Invoice (Optional)
1. Confirm the Sales Order.
2. Create an Invoice for the customer.
Flow 3: Verbal Order to Invoice (Optional)
1. Receive a verbal order from the customer.
2. Deliver the goods to the customer.
3. Create an Invoice for the customer.
Flow 3b: Direct Sales to Invoice
1. Receive an order from the customer.
2. Deliver the goods to the customer.
3. Create a Credit/Cash Invoice for the customer.
Deposit-Based Sales (Optional)
1. Receive a deposit from the customer.
2. Deliver the goods to the customer.
3. Create an Invoice for the customer.
Note: These flows are optional and may vary depending on the organization's specific requirements and sales processes.
________________________________________________________________________________________________________________________________________________
How to locate Sales Operations?
- Click on SALES – SALES - SALES OPERATION for the screen below.

Sales Order
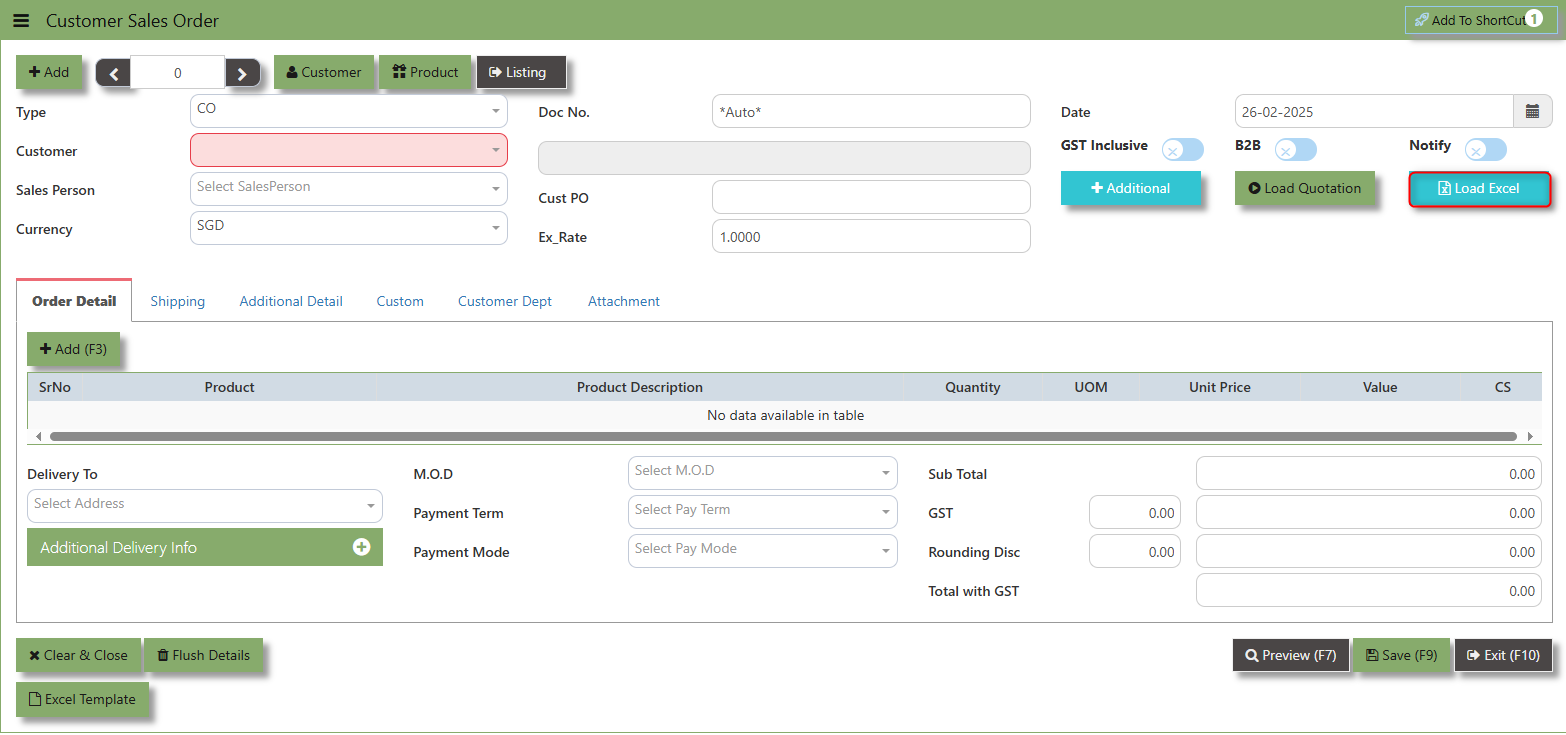
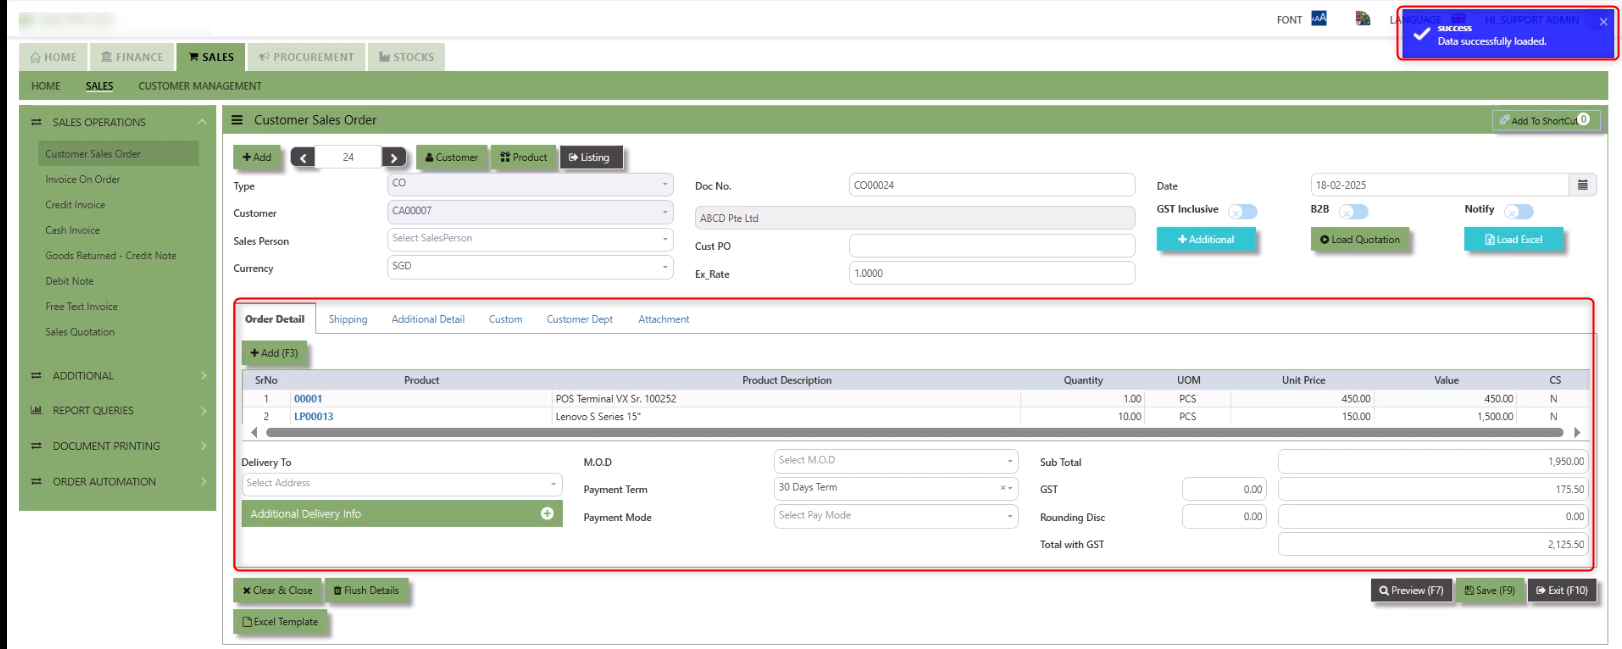
The Sales Order at the Sales Operation Module screen will open the Sales Order screen as seen below. The Sales Order main function is to prepare a document to update the system that goods are on placement. No ledger postings will be made at this moment. Sales Order is denoted by transaction type “CO”.
How to set Customer Sales Order?
1.Click on SALES – SALES OPERATIONS – CUSTOMER SALES ORDER for the screen below.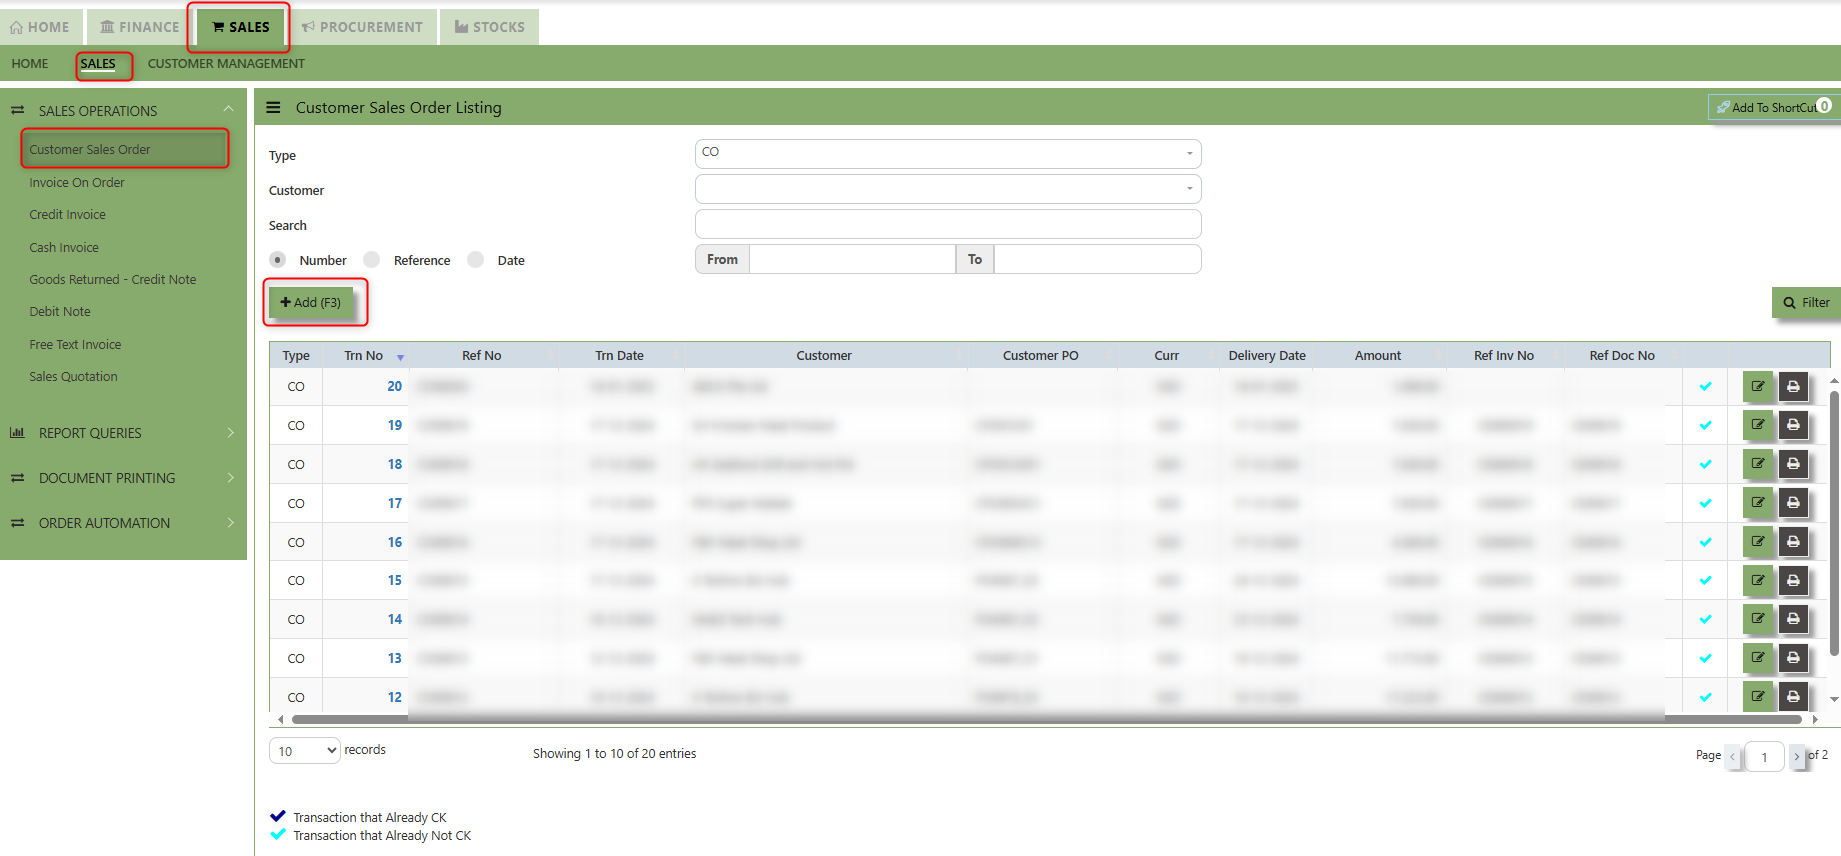
2. Click on Add button or press F3 to create a new transaction.
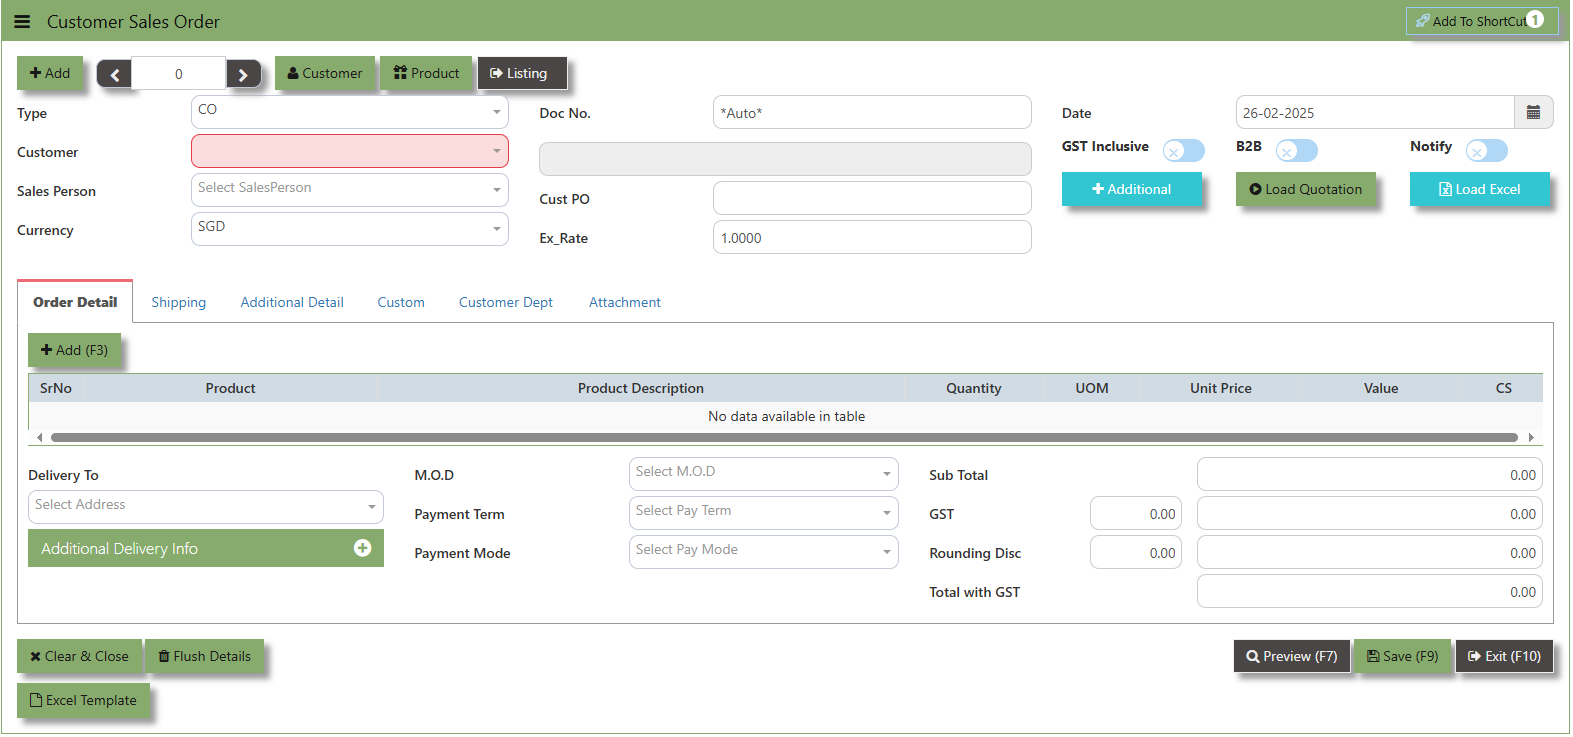
3. Click the Type - drop-down to select transaction type – CO (Sales Order).
4. After the transaction type selection, you can use the tab button to go to the Ref No. column & Date fields.
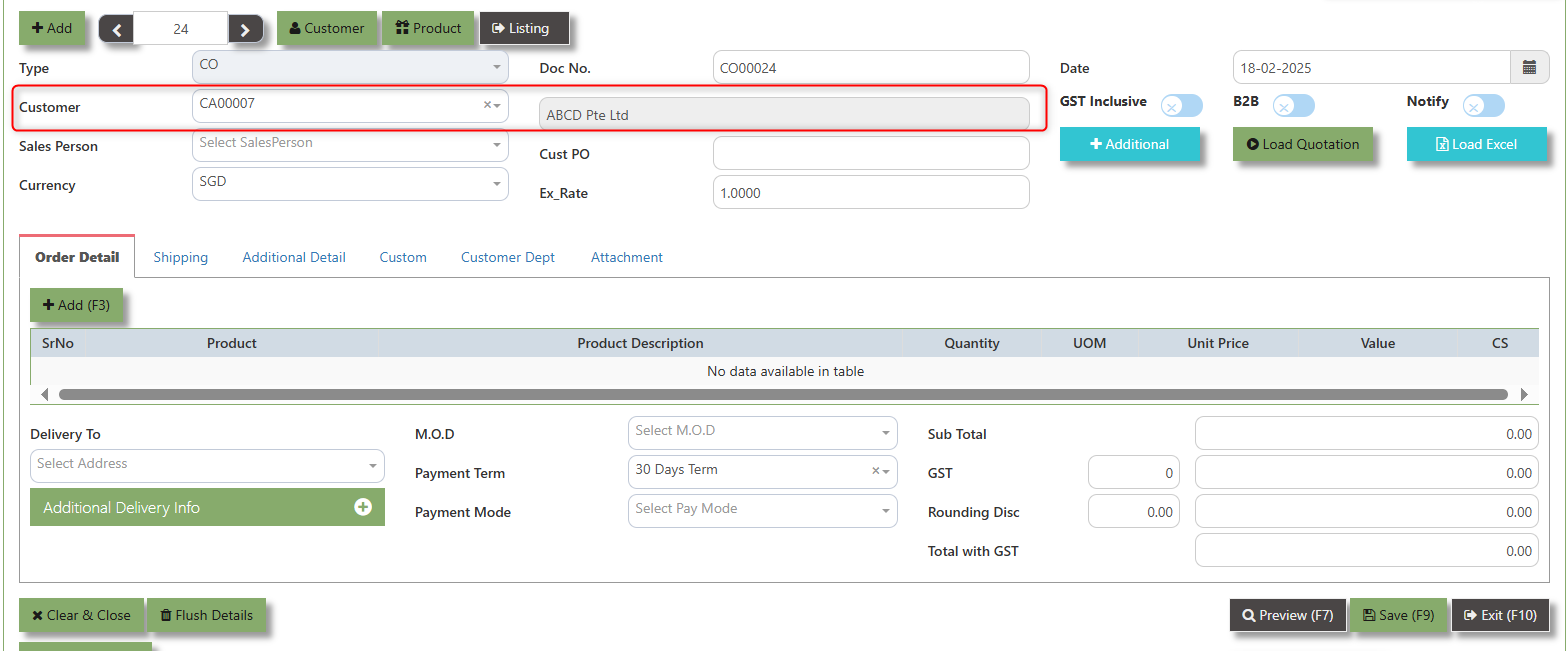
5.Click Customer - drop-down to select Customer Name, followed by the Sales Person, PDS, Currency, Rate, Customer PO, Quotation, Delivery Date & Lead Time if applicable.
6.After all the header information has been entered, the user can go to the Order Detail section and select the product items for that transaction. Save the Sales Order transaction after it is completed.
___________________________________________________________________________________________________________________________________________
Add to Shortcut - Used to create a shortcut for quick access to a specific Sales Transaction . By clicking this button, users can add the current Sales Order to a list of shortcuts, allowing them to access the invoice or related functionality quickly and efficiently, without needing to search for it each time.
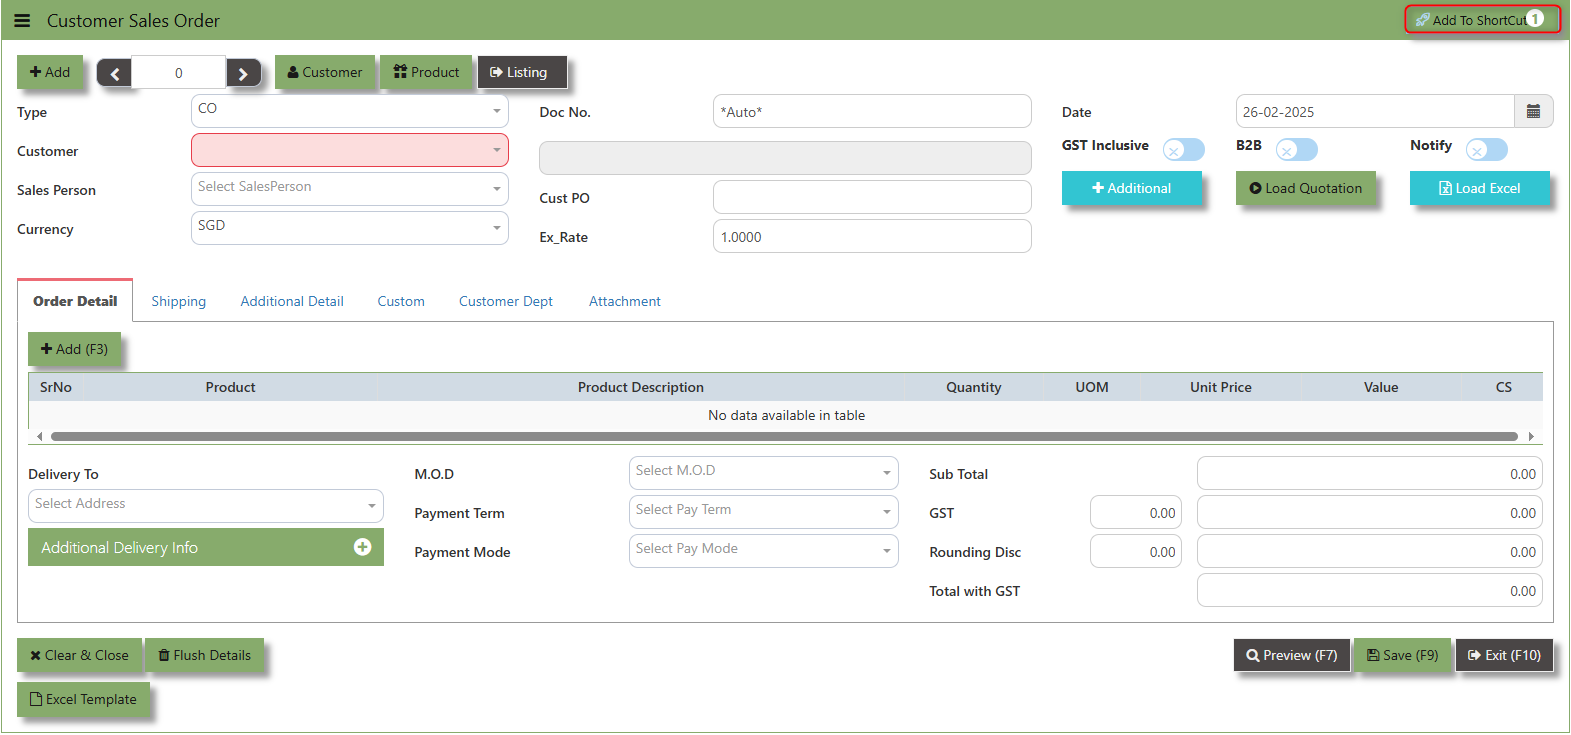
How to use Add to ShortCut?
1. Click "Add to ShortCut" and system will open below windows:
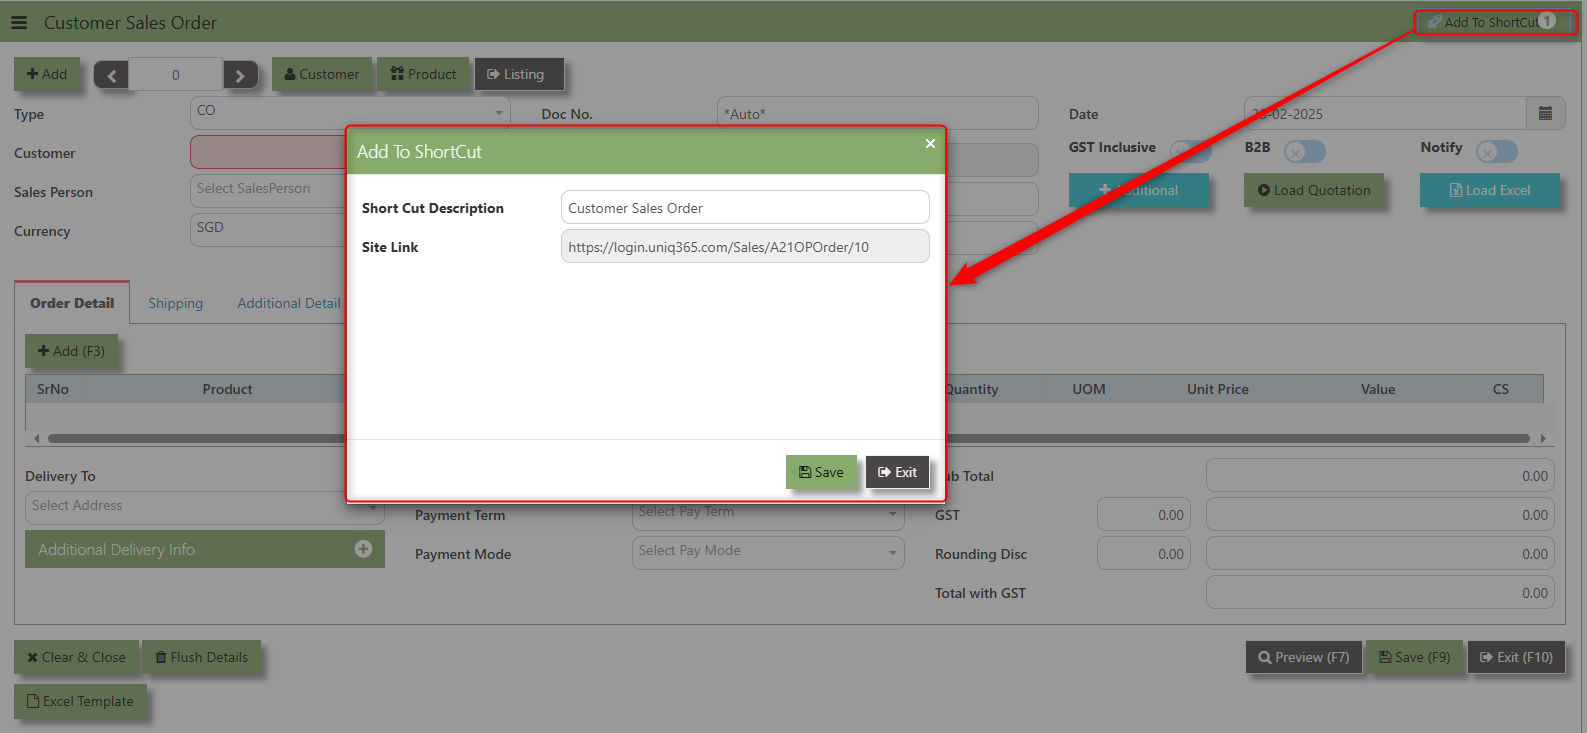
2. Enter Short Cut Description
3. Click SAVE then click OK.
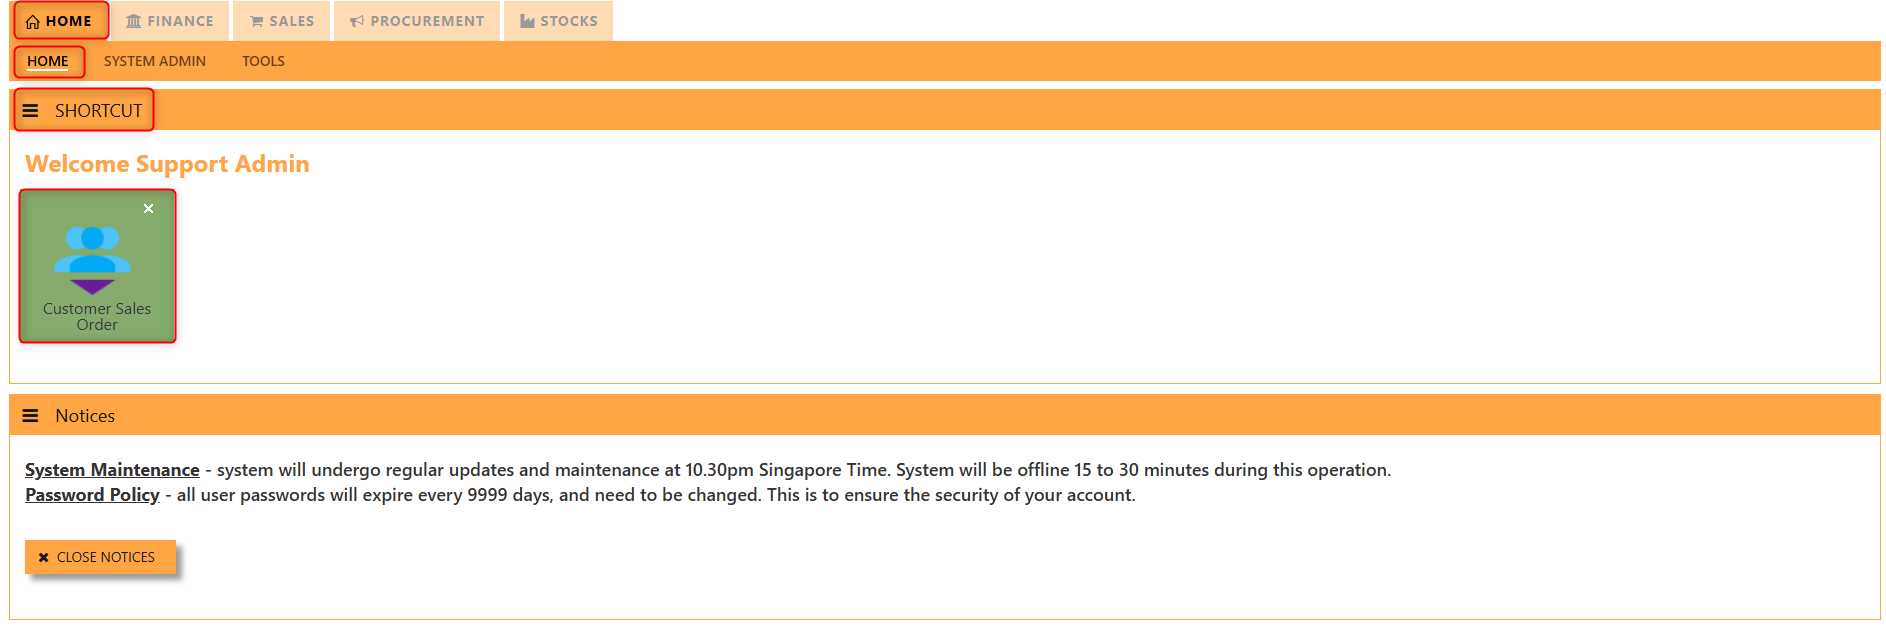
4. User may look to the Homepage for the added function or page. Click on HOME - HOME - SHORTCUT for the screen below.
___________________________________________________________________________________________________________________________________________
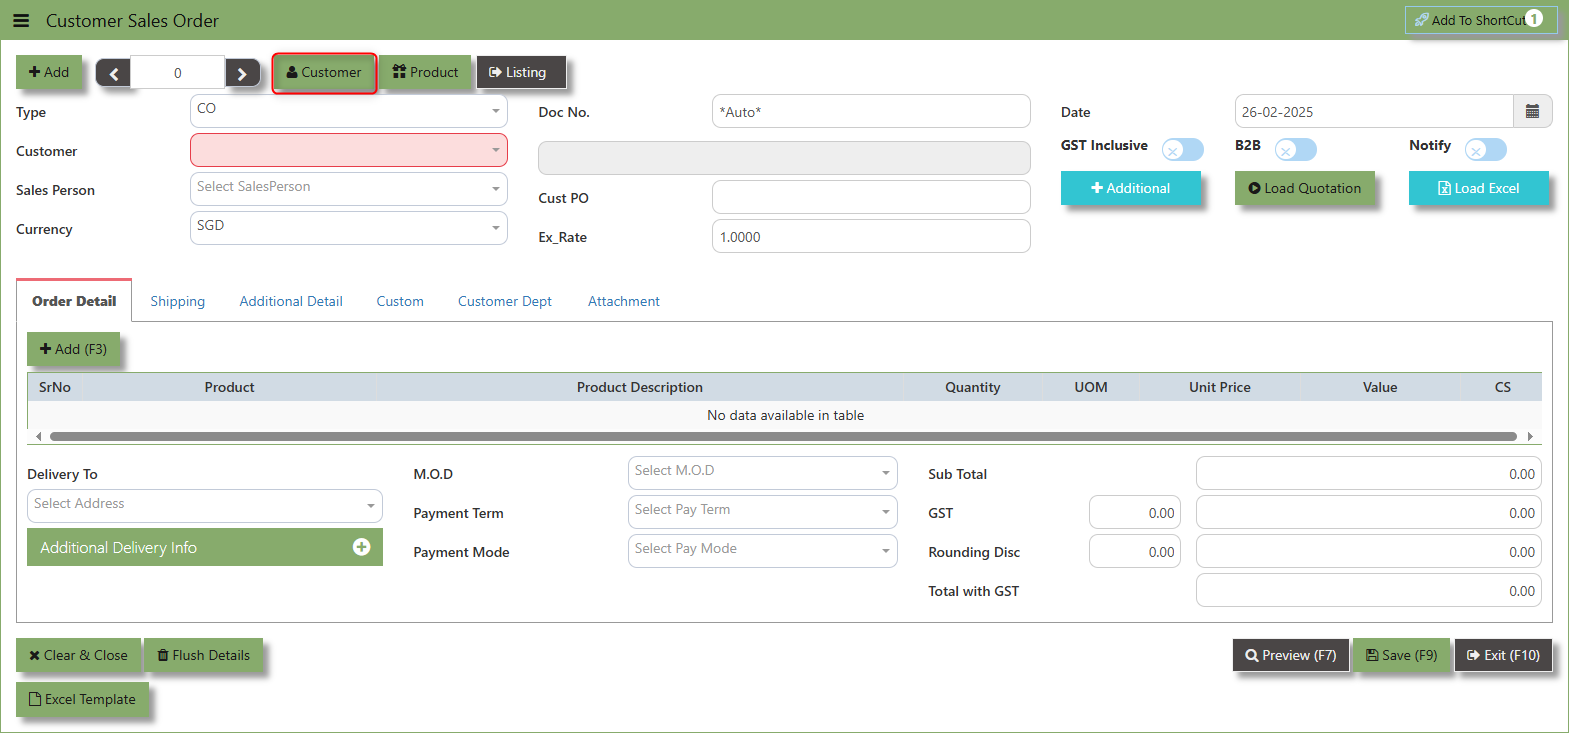
The Customer button provides quick access to detailed supplier profiles under Customer maintenance.
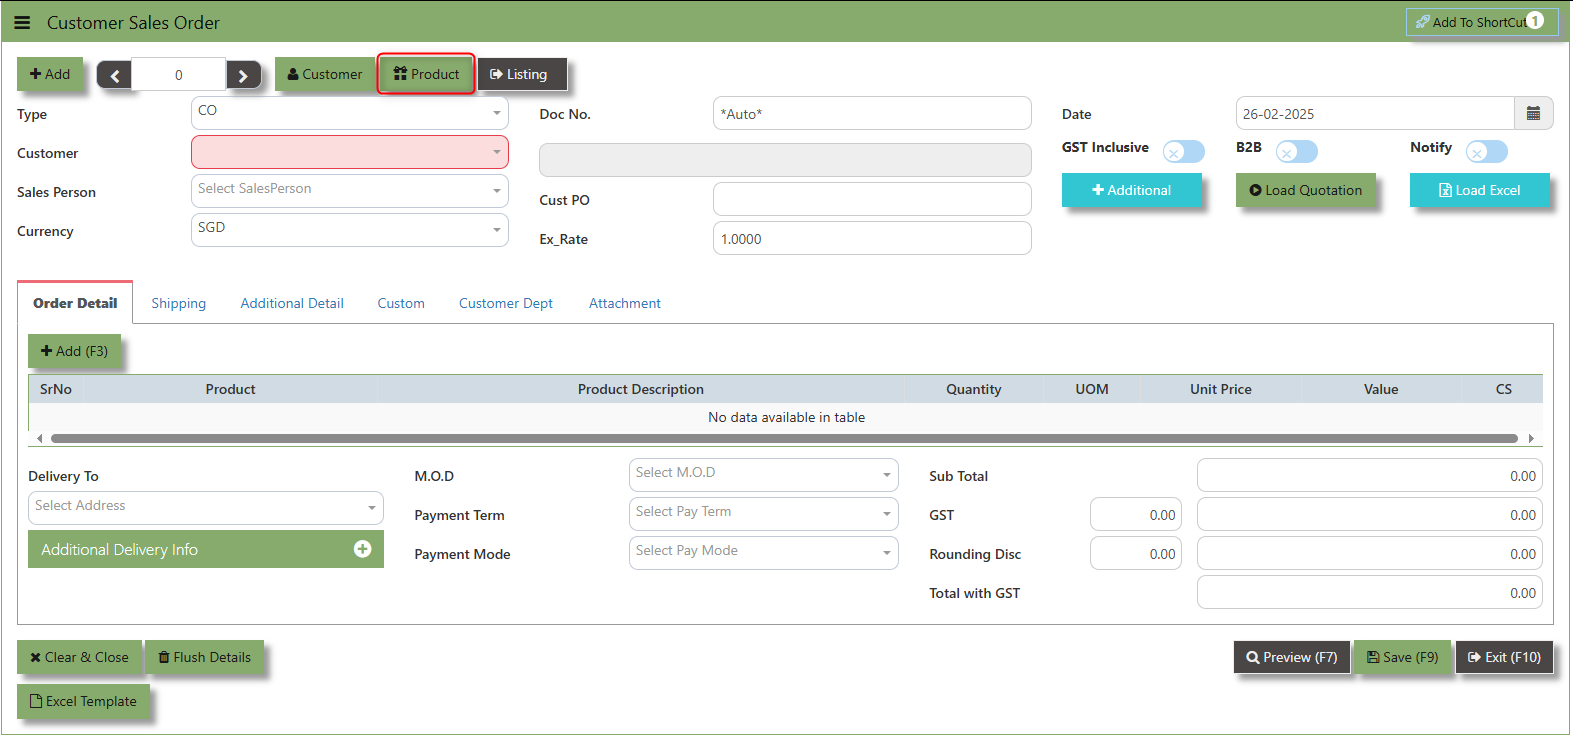
The Product button provides quick access to product and service maintenance.
The GST Inclusive checkbox indicates whether the unit price in the CO include Goods and Services Tax (GST) or not.
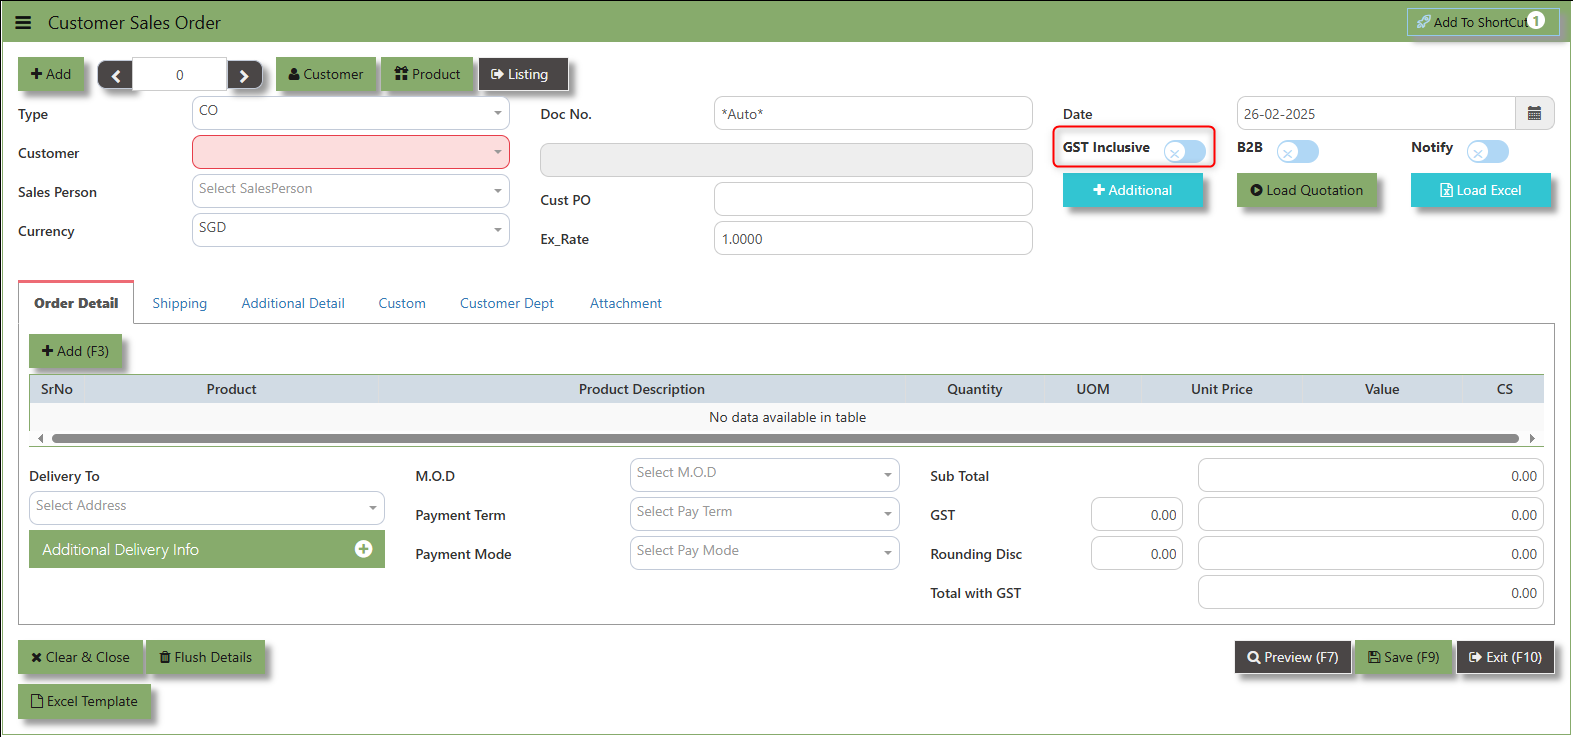
- When ticked (GST Inclusive): provided in the Sales Order already includes the applicable GST amount. The GST amount will not be calculated or displayed separately, as it's already accounted for in the quoted price.
- When not ticked (GST Exclusive): The unit price is considered exclusive of GST. The system will calculate and add the GST based on the applicable tax rate, and the final total will be the sum of the base price plus the GST amount.
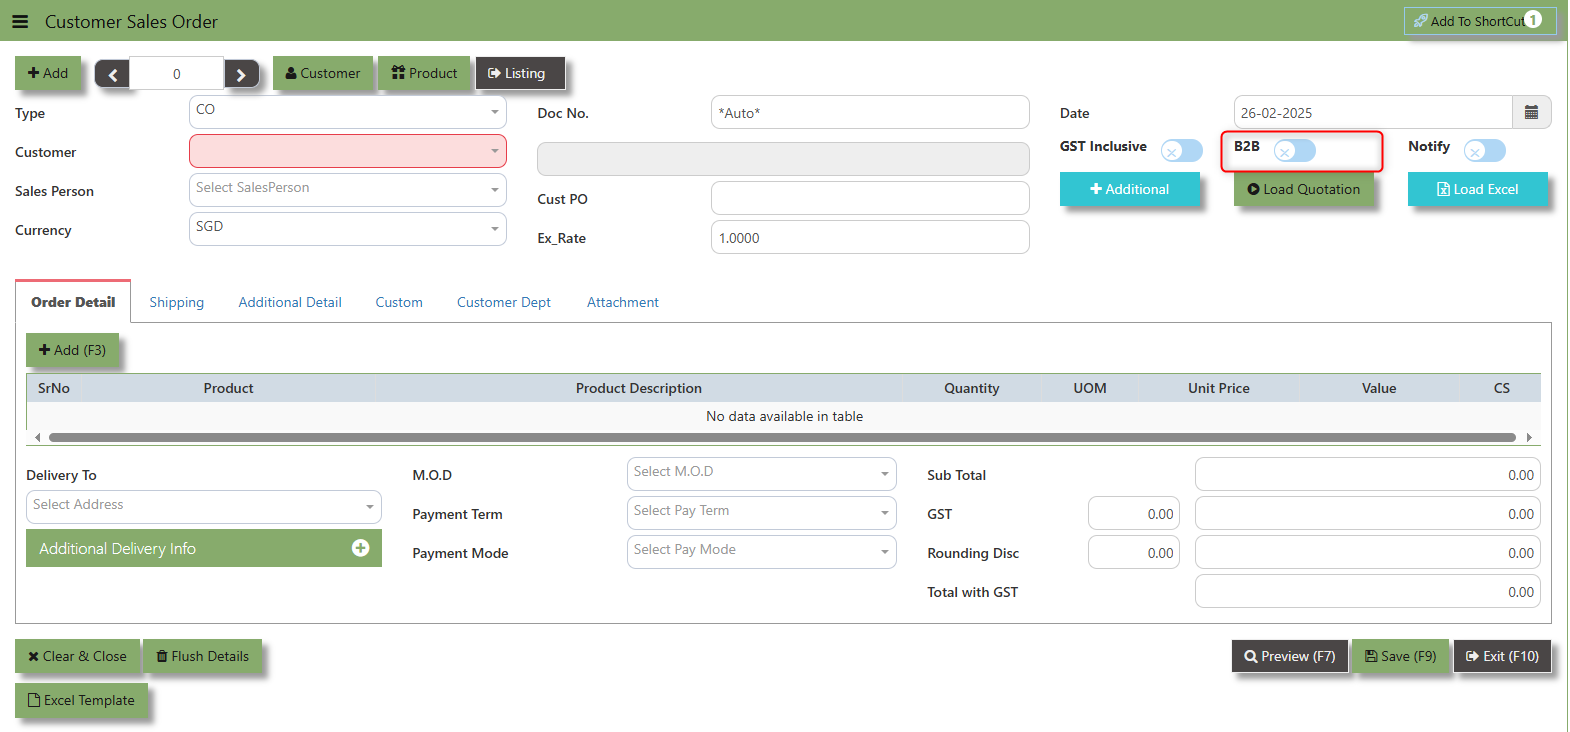
The "B2B order" is which specific sales order demand triggers supply creation and a link is established between the sales order and the supply.
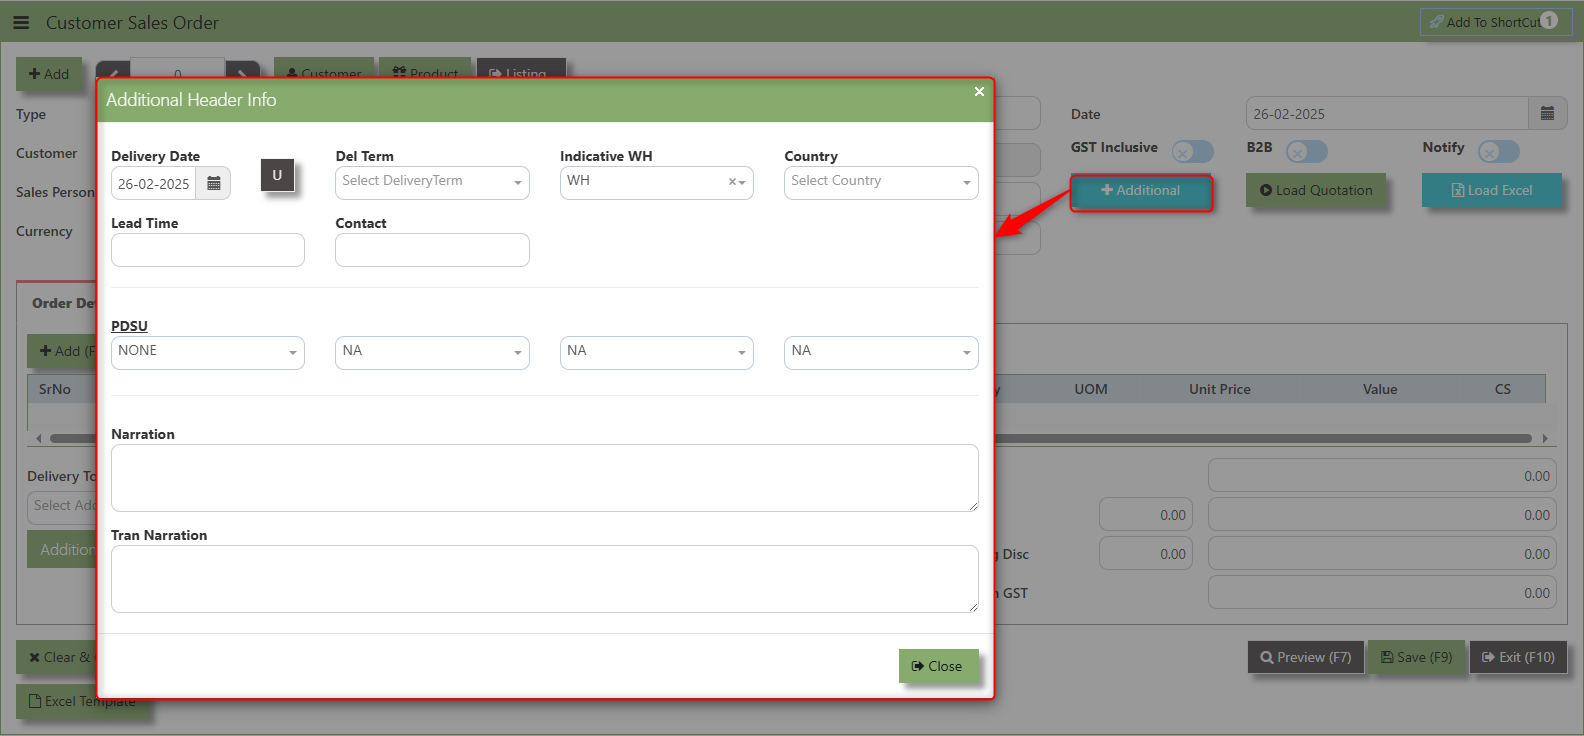
Additional Header Info button is typically used to capture and manage additional information related to the sales order at the header level (i.e., Delivery date, Del Term , Indicative WH , Country, Lead Time, Contact, PDSU, Narration and Transaction Narration). This feature allows users to add extra data or notes that are relevant to the entire sales order.
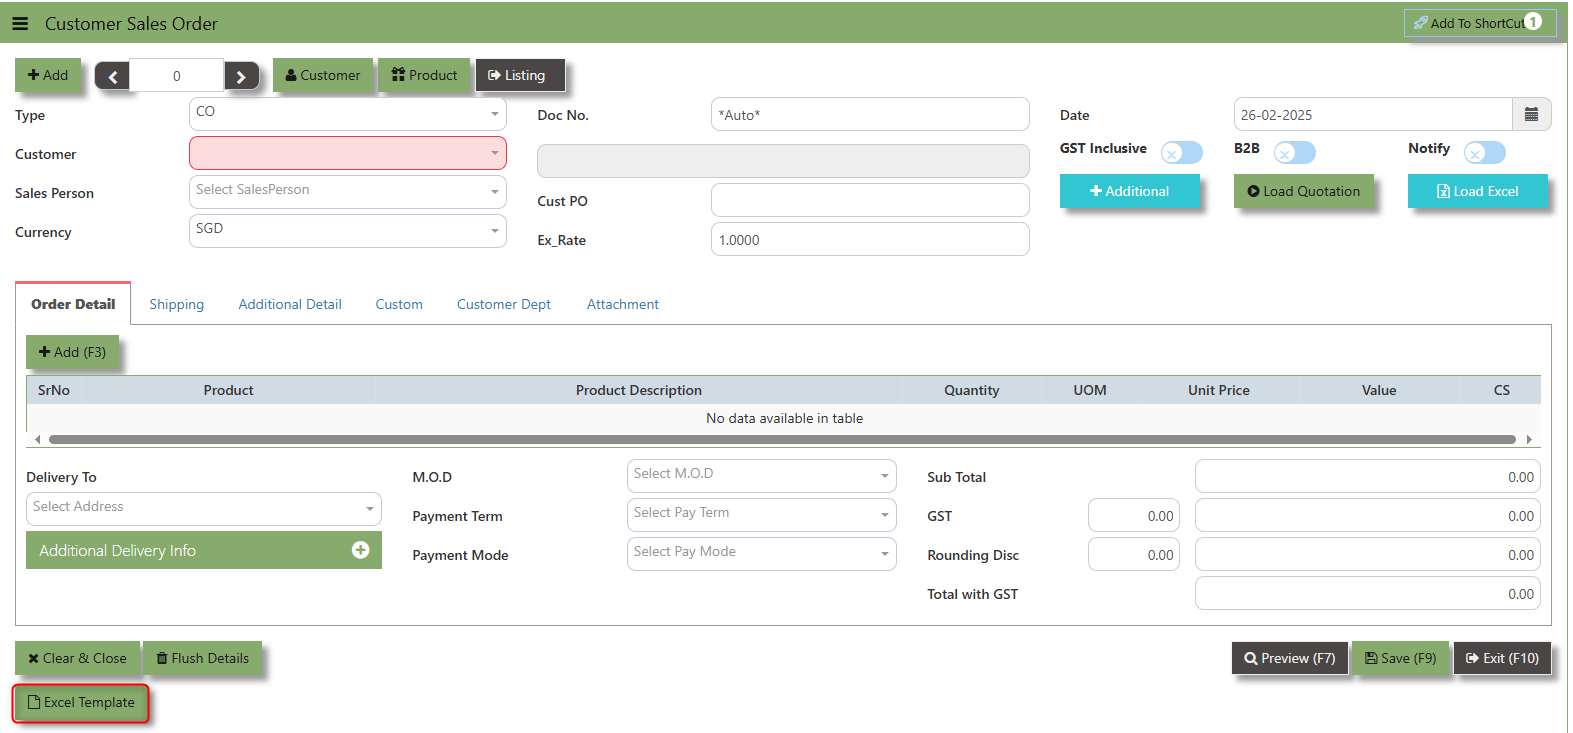
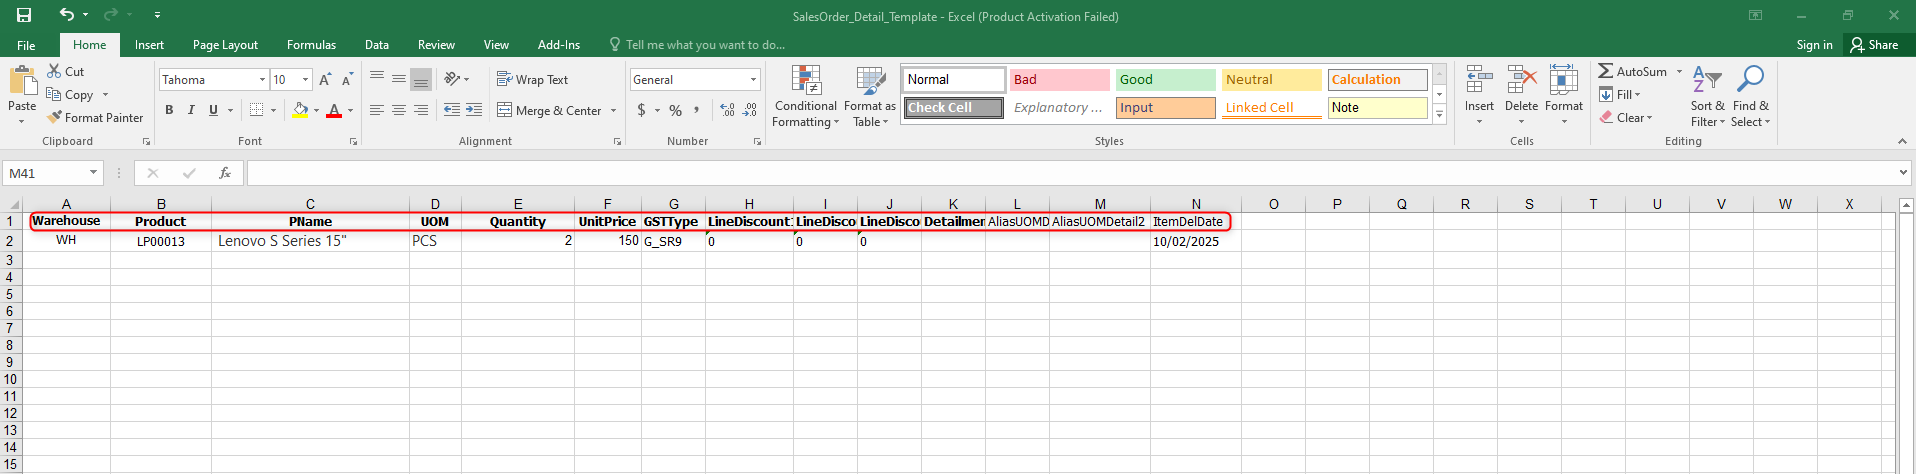
Excel Template - The button allows users to download a pre-configured Excel template for entering or importing data related to the sales order. The template is usually formatted to match the system's required structure for Sales orders, ensuring consistency and data accuracy.
Load Excel - When users have an Excel file from Excel Template with Sales order information (ie Warehouse, Product, Pname, UOM, Quantity, Unit Price, GST type, Line Discount, Detail Memo) the "Load Excel" button allows them to upload and import this data directly into the system. This eliminates the need for manual entry of the data into the system's Sales order fields.
How to use Load Excel?
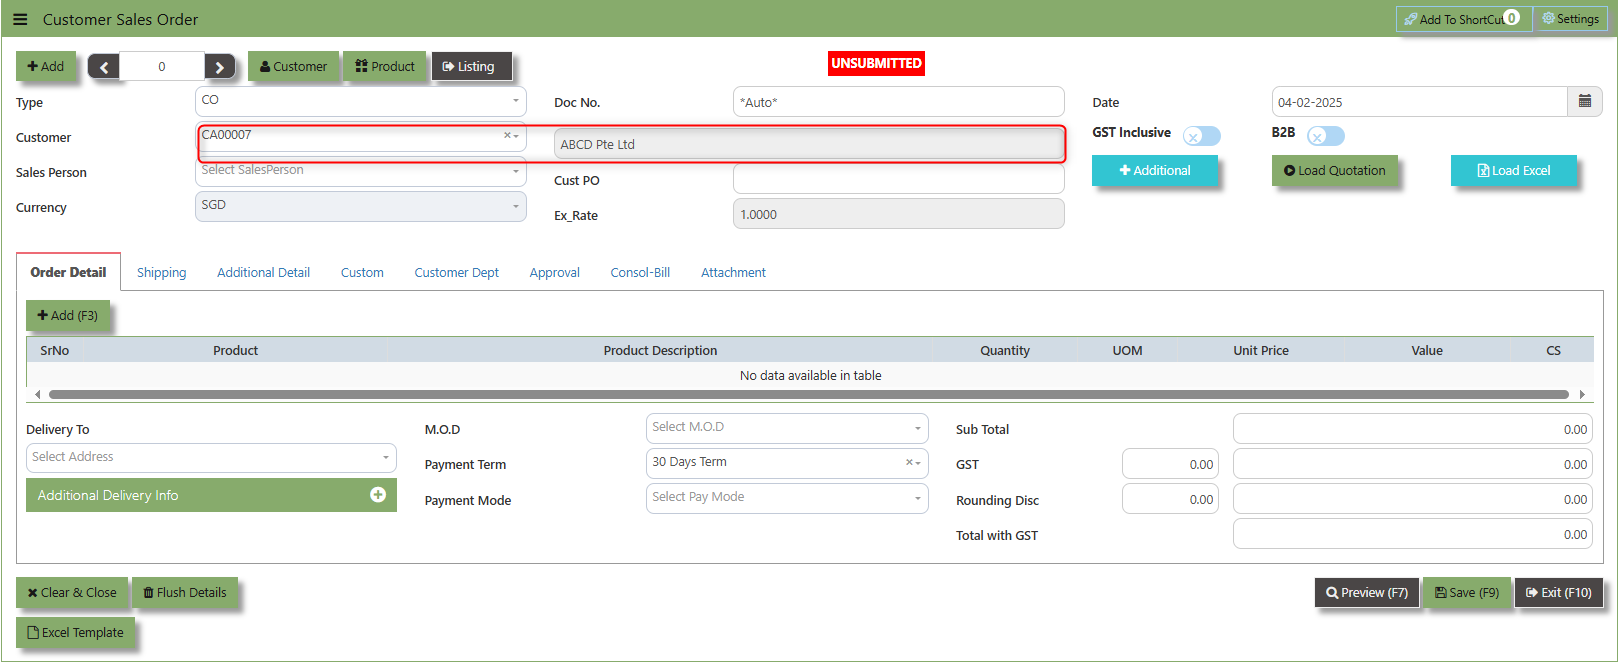
1. Click the Customer - drop-down list to select Customer Name
2. Download the Excel Template and ensure the Excel file you plan to upload is formatted correctly. It should contain all the necessary fields required for sales order, such as:
- Warehouse
- Product Code
- Product Name
- UOM
- Quantity
- Unit Price
- GST Type
- Line Discount 1, 2 & 3
- Detail Memo
- Item Delivery Date
- Alias UOM Detail 1 & 2
- Item Delivery Date
3. Click the Load Excel button to open the file upload interface. This may open a file browser or prompt you to select the Excel file you want to upload.
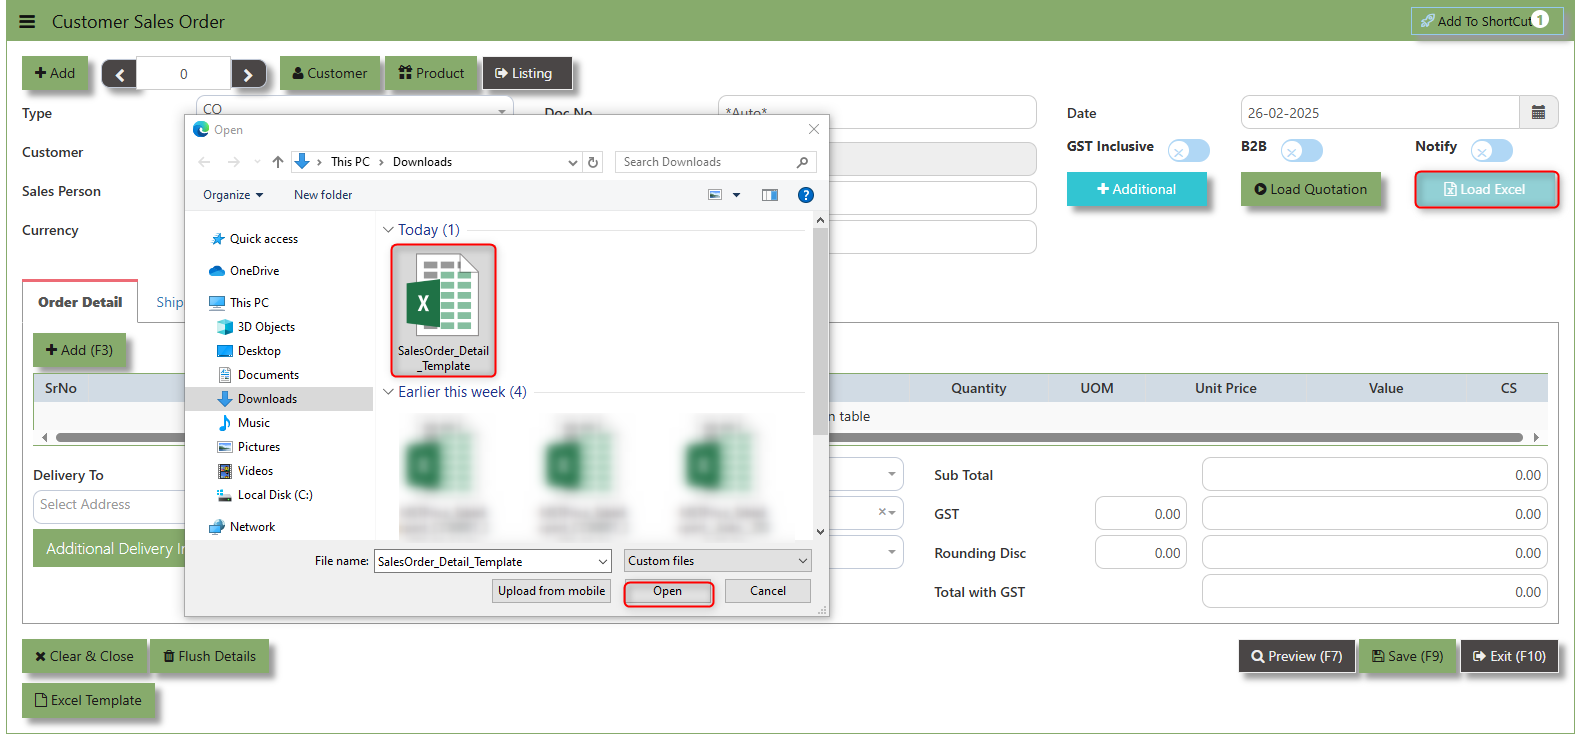
4. Once the filed uploaded, system will prompt a message that record has been imported successfully
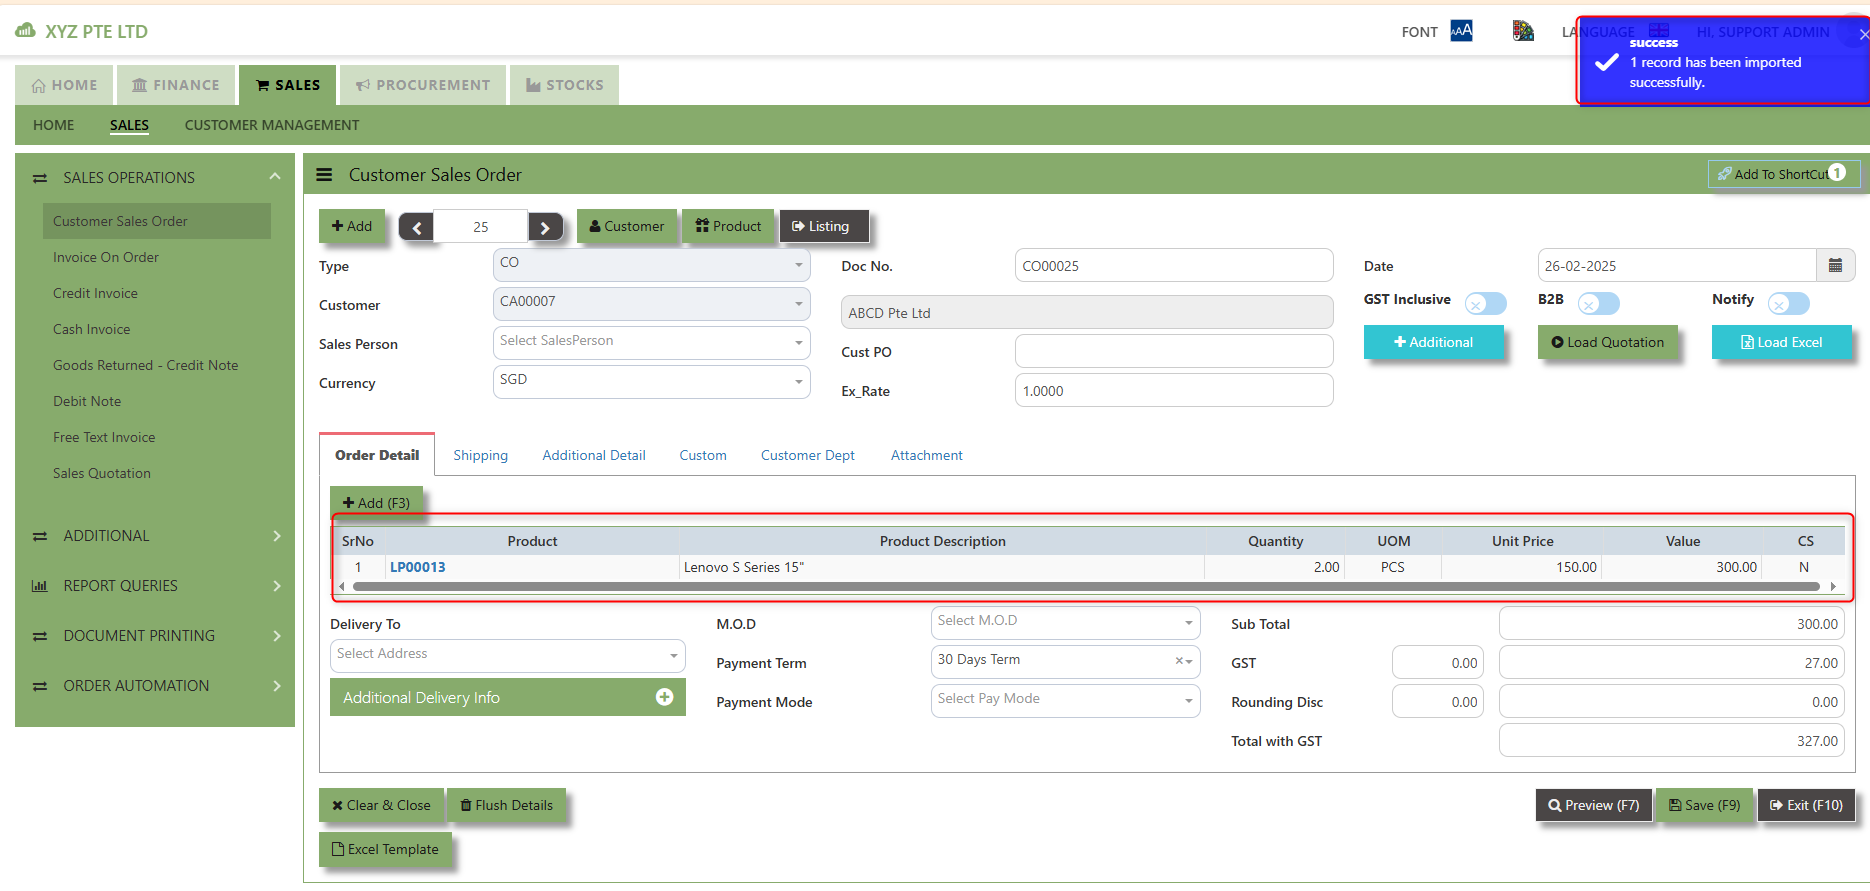
5. After the import is complete, review the imported sales order in the system to ensure everything has been transferred correctly. This might include checking that the order details, such as item descriptions, quantities, prices, and suppliers, are accurate.
6. Once the data is imported successfully and checking is done, you can proceed to save the sales order as required by your workflow. This may involve further approvals or other processes depending on the organization's procedures.
___________________________________________________________________________________________________________________________________________
Load Quotation - When users already done Sales Quotation the "Load Quotation" button allows them to load the sales quotation directly into the Sales order. This eliminates the need for manual entry of the data into the system's Sales order fields.
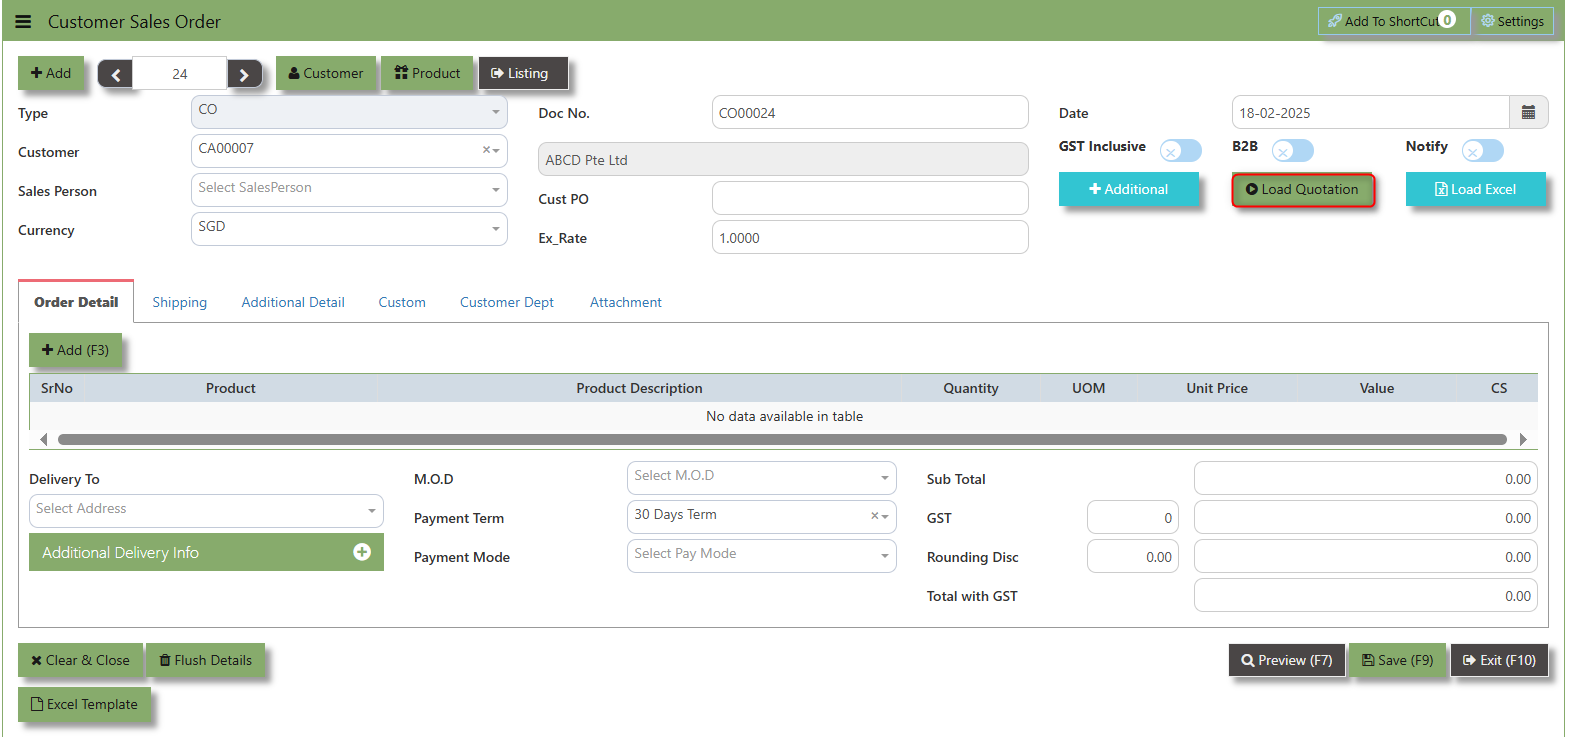
How to use Load Quotation?
1.Click the Supplier - drop-down list to select Customer Name
2. Click the Load Quotation Button, select the Type and the Trn No of the sales quotation and click the diskette icon.
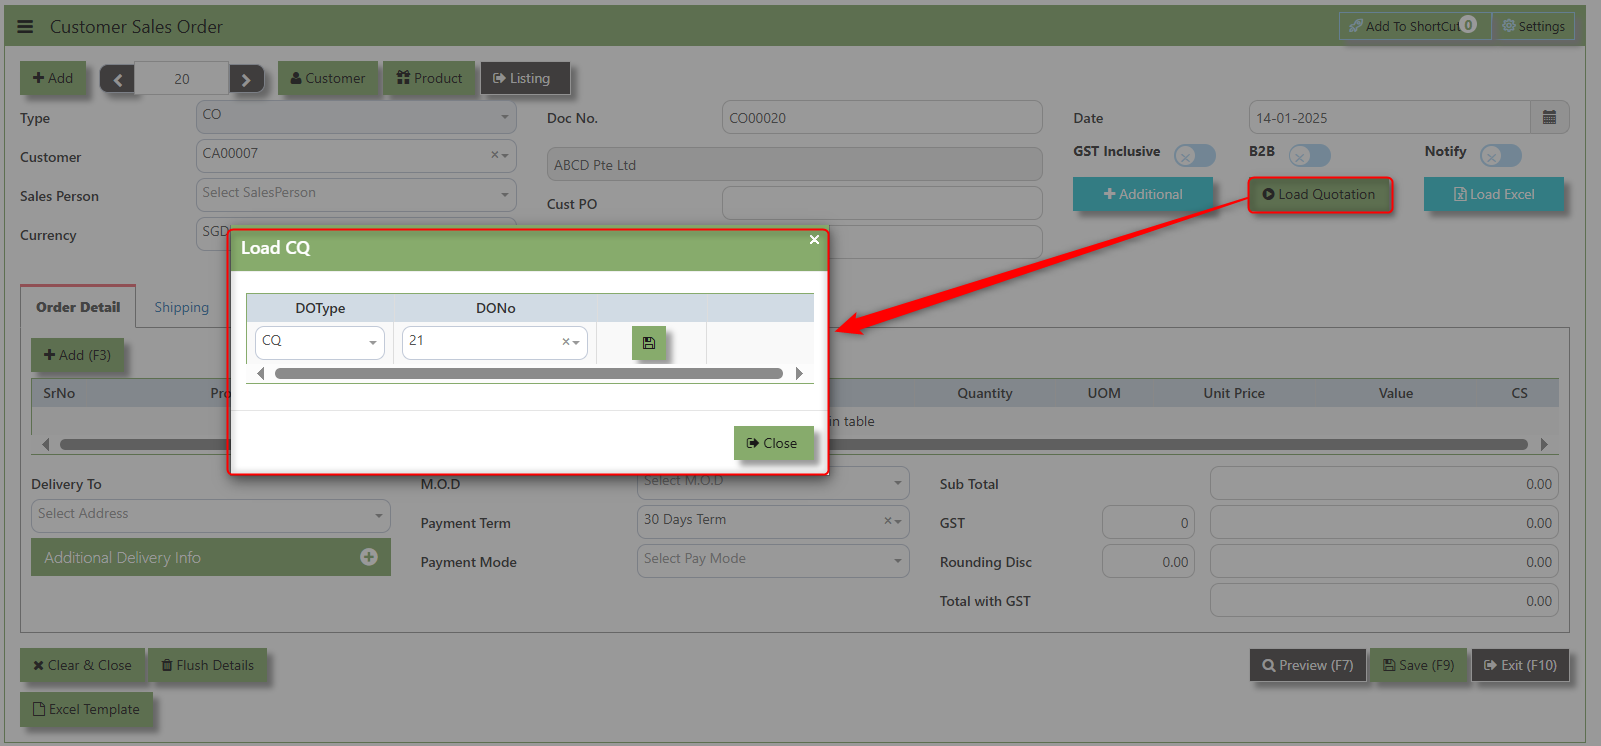
2. Click the L Icon button to load the Transactions details of the Sales Quotation

3.Once the Sales Quotation is loaded, system will prompt a message that the Data successfully loaded.
___________________________________________________________________________________________________________________________________________
Shipping Tab a section where specific shipping-related information is entered and managed for the sold goods or services. This tab ensures that all relevant details regarding the shipment, delivery location, and delivery expectations are captured in the system to facilitate smooth and accurate order fulfillment.
How to set Shipping Info?
1. Click on SALES – SALES OPERATIONS – CUSTOMER SALES ORDER - SHIPPING TAB for the screen below.
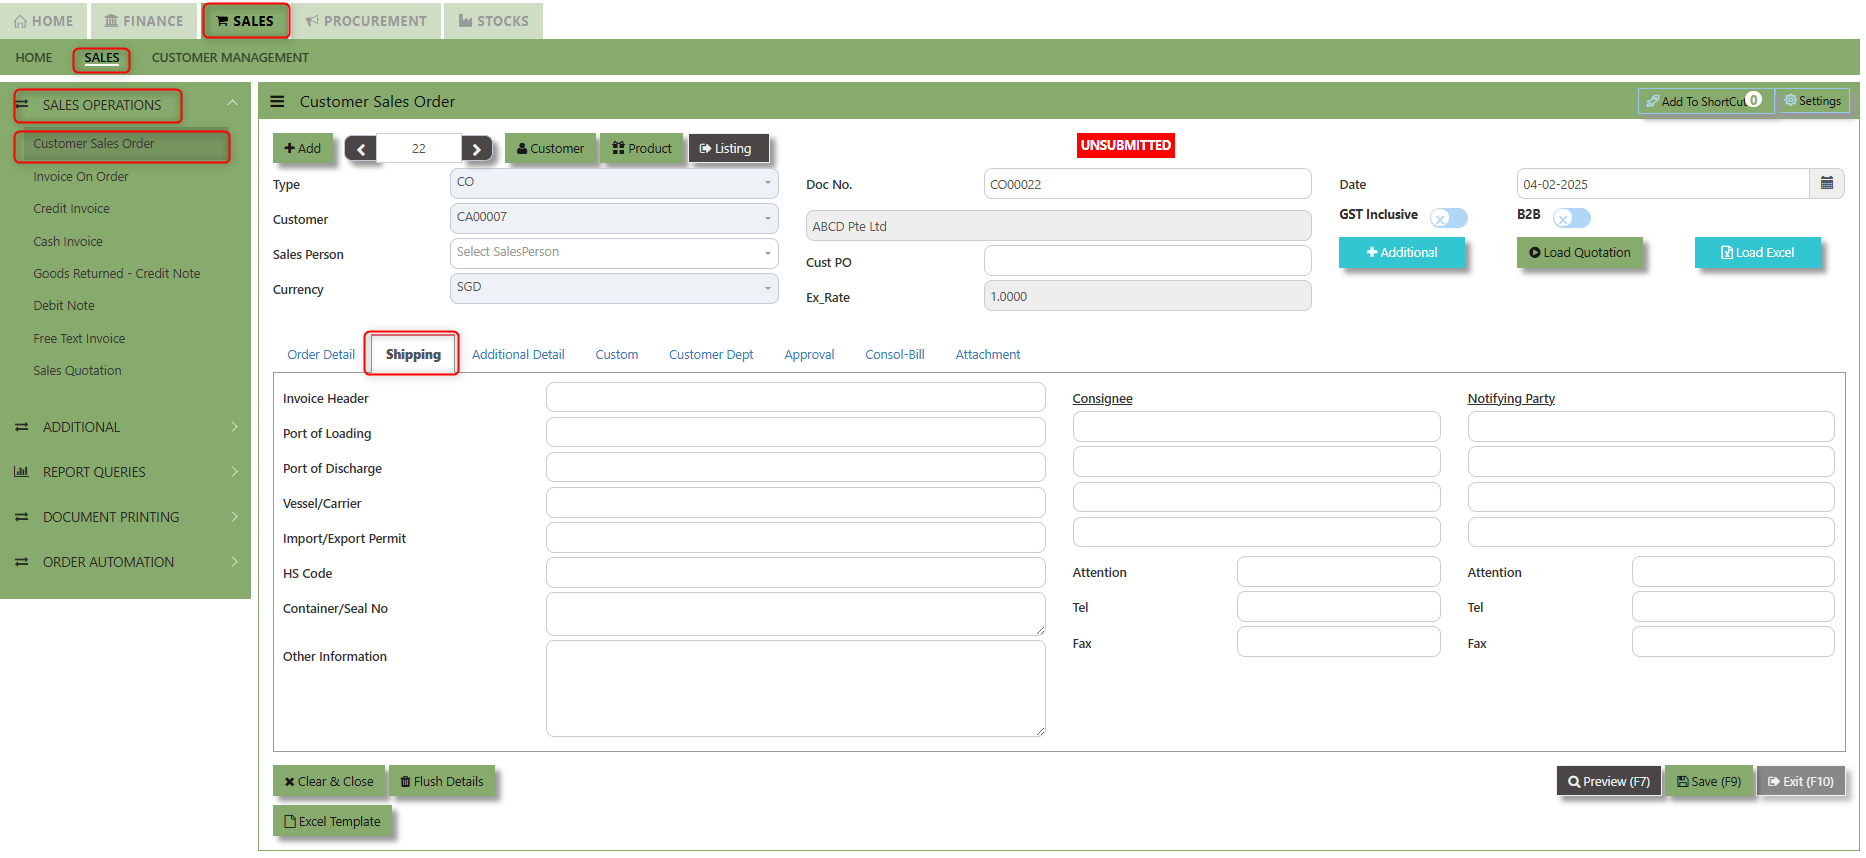
2. Input the below details for the below fields:
-
- Invoice Header
- Port of Loading
- Port of Discharge
- Vessel/Carrier
- Import/Export Permit
- HS Code
- Container/Seal No
- Other Information
- Consignee
- Attention
- Tel
- Fax
- Notifying Party
- Attention
- Tel
- Fax
3. Once keyed in the necessary details, click the next tab and will automatically save all the information then system will prompt you a message.
___________________________________________________________________________________________________________________________________________
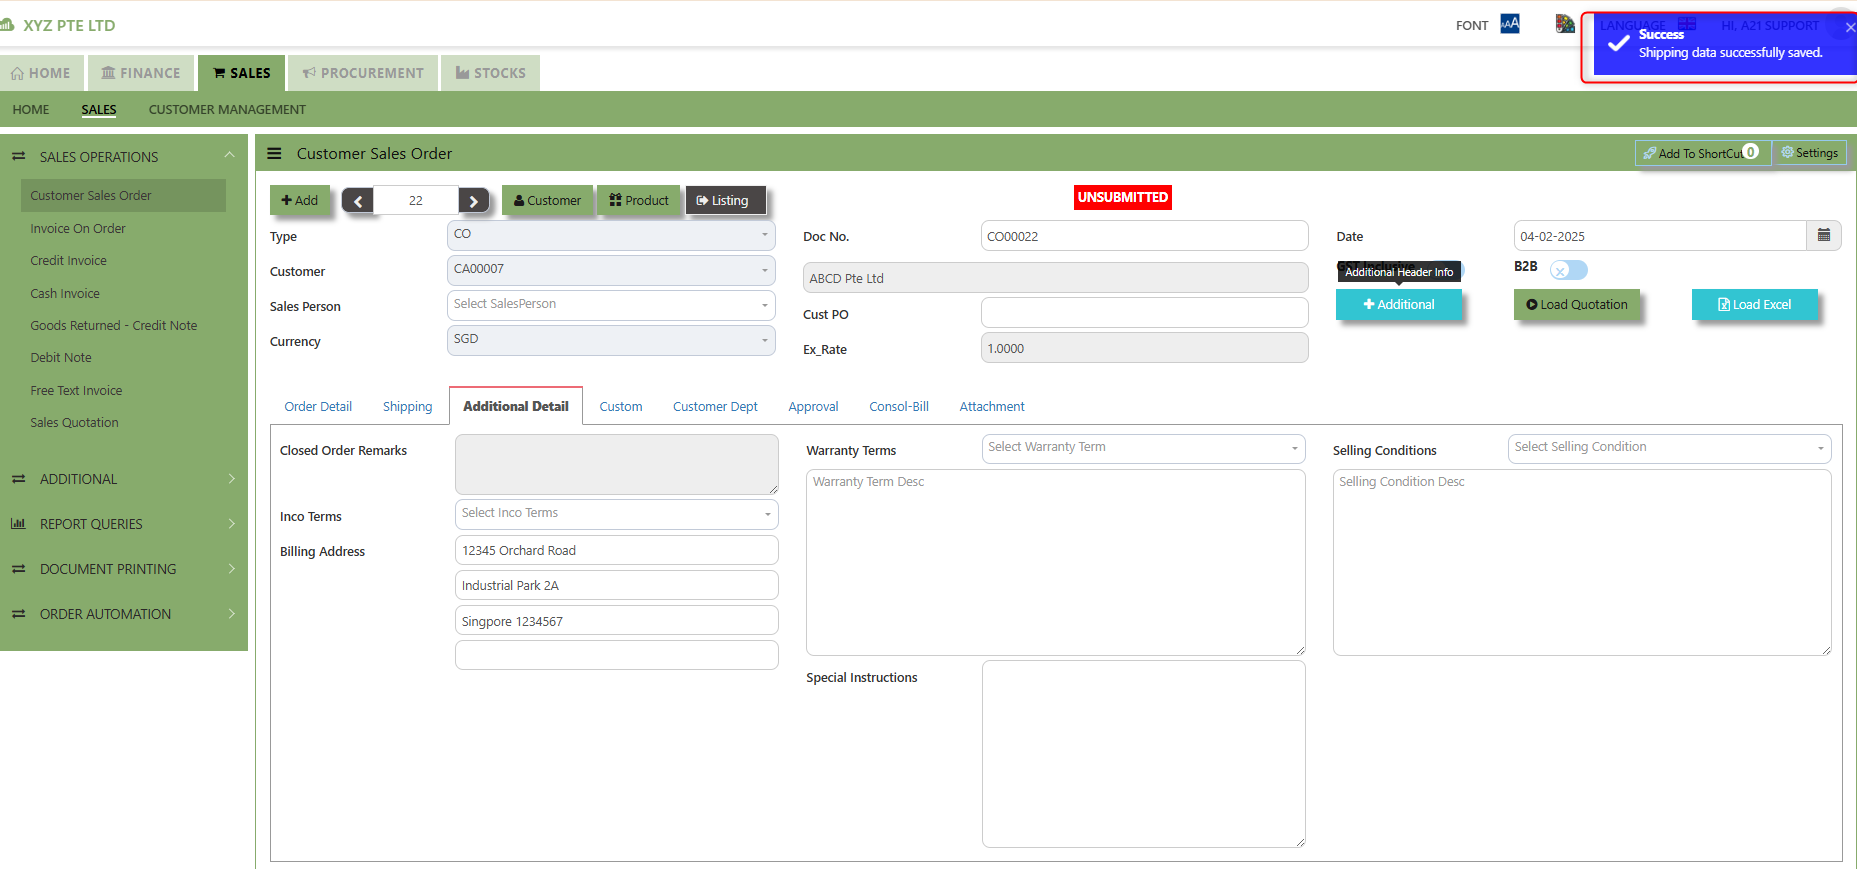
Additional Detail Tab a section where the additional information is entered and managed for the sold goods or services. This tab ensures that all relevant details regarding the Closed order remarks, Inco Terms , billing address warranty terms Selling conditions , and special instruction are captured in the system to facilitate smooth and accurate order fulfillment.
How to set Additional Detail?
1. Click on SALES – SALES OPERATIONS – CUSTOMER SALES ORDER - ADDITIONAL DETAIL TAB for the screen below.
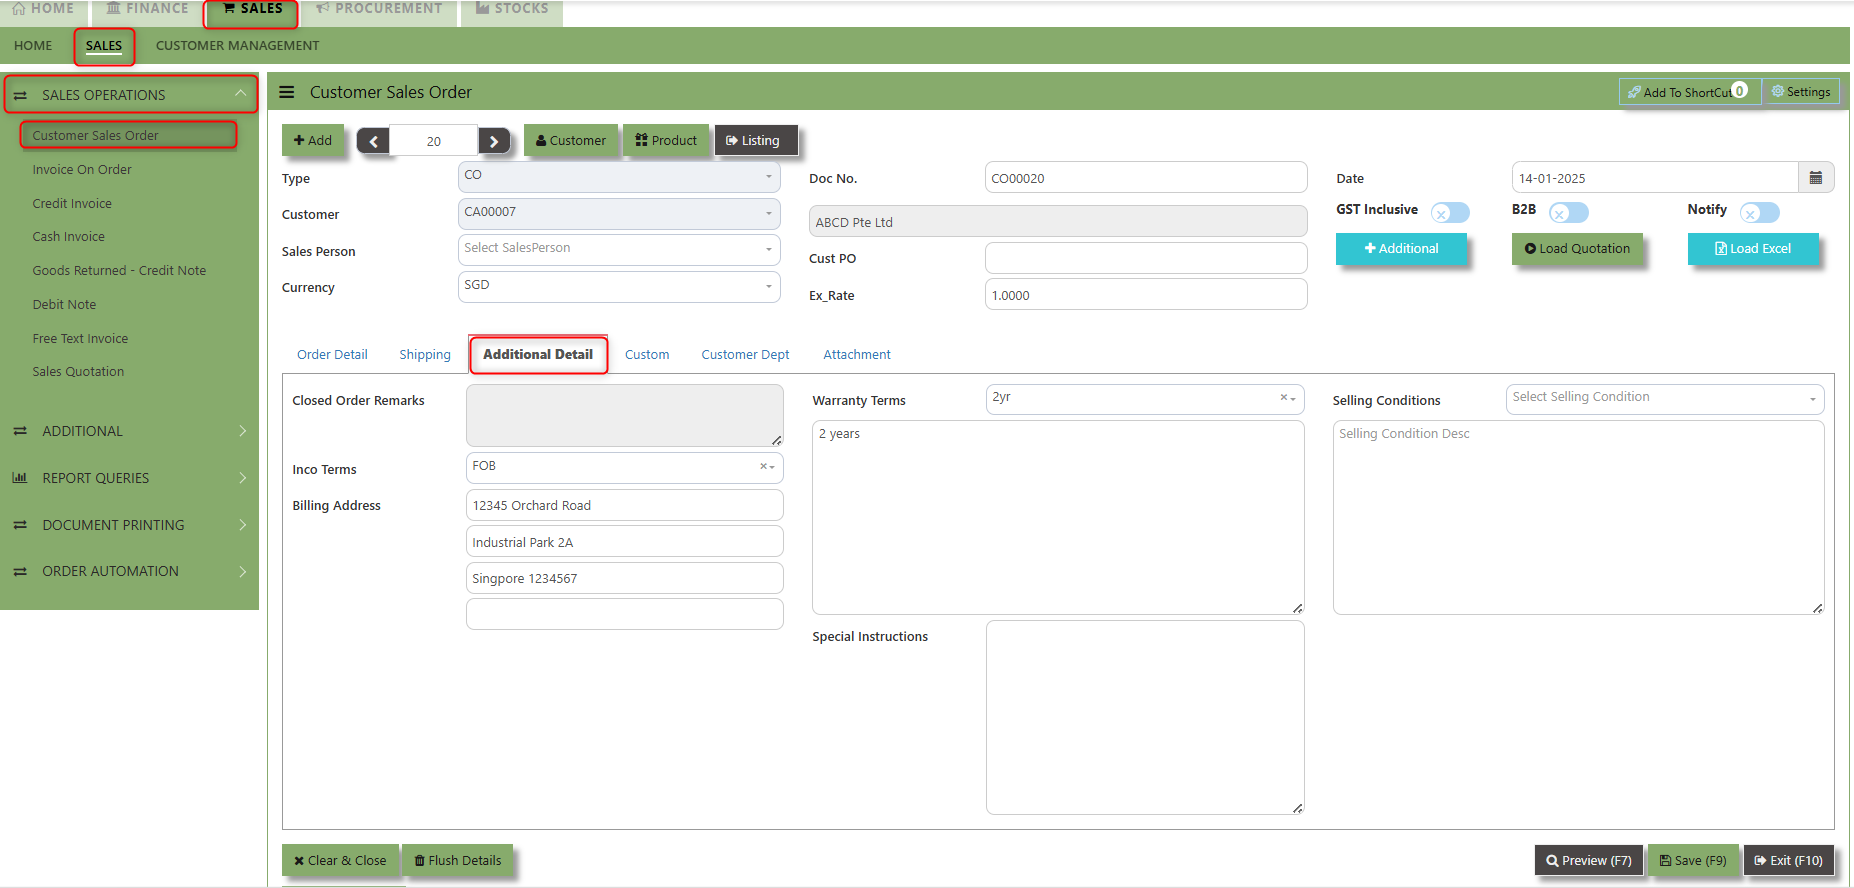
2. Input the below details for the below fields:
-
- Inco terms
- Billing Address
- Warranty Terms
- Selling conditions
- Special instruction
3. Once keyed in the necessary details, click the next tab and will automatically save all the information
___________________________________________________________________________________________________________________________________________
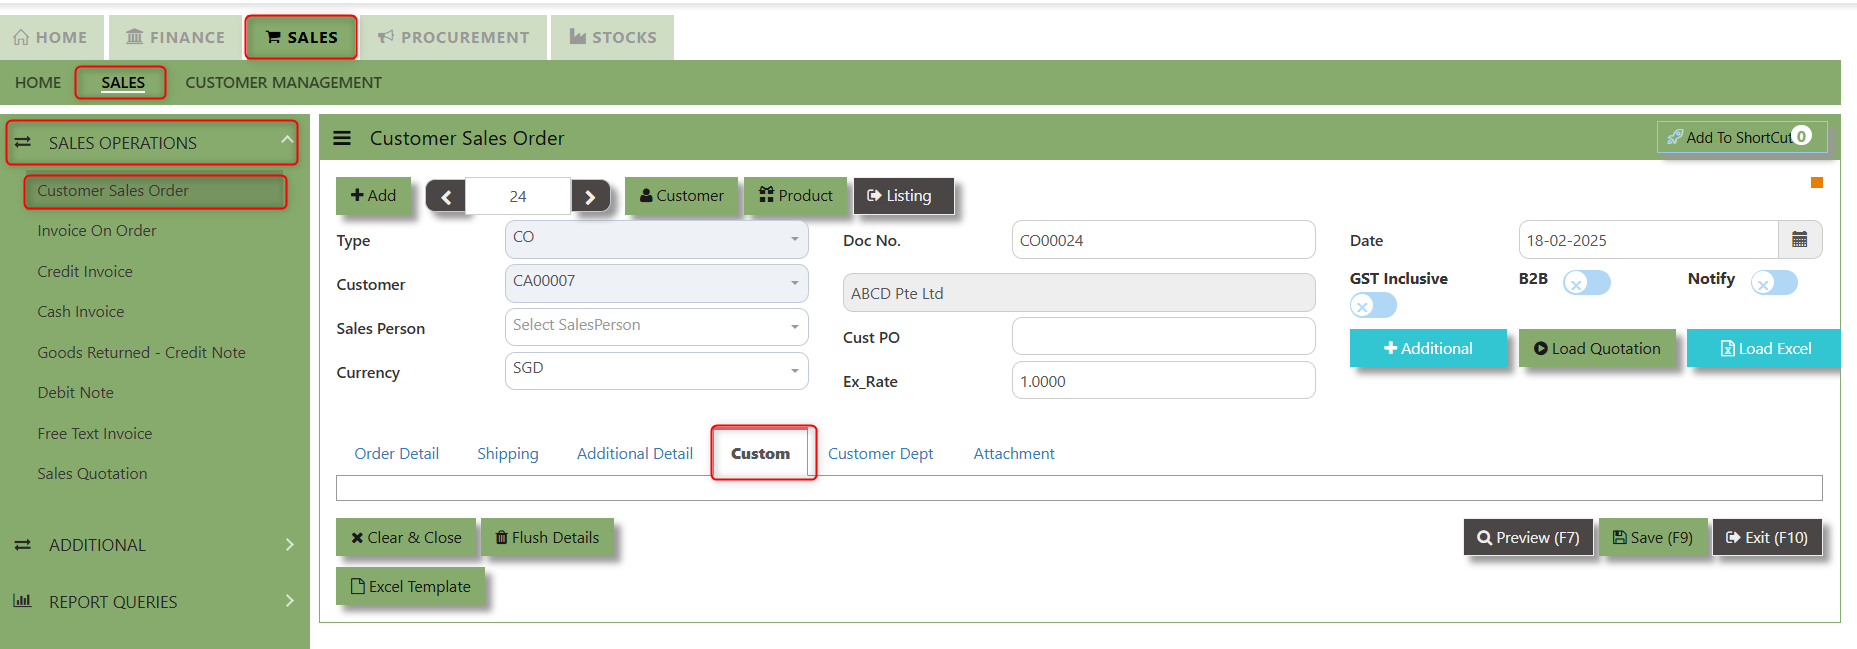
"Custom Tab" provides a space for users to input customized data or additional fields that are specific to their business processes and requirements.
- Click on SALES – SALES OPERATIONS – CUSTOMER SALES ORDER - CUSTOM TAB for the screen below.
___________________________________________________________________________________________________________________________________________
"Customer Dept Tab" section where the Customer Department information is entered. This tab ensures that all relevant details regarding Customer Department details which is linked to the Customer Maintenance under Department Tab
- Click on SALES – SALES OPERATIONS – CUSTOMER SALES ORDER - CUSTOMER DEPT TAB for the screen below.
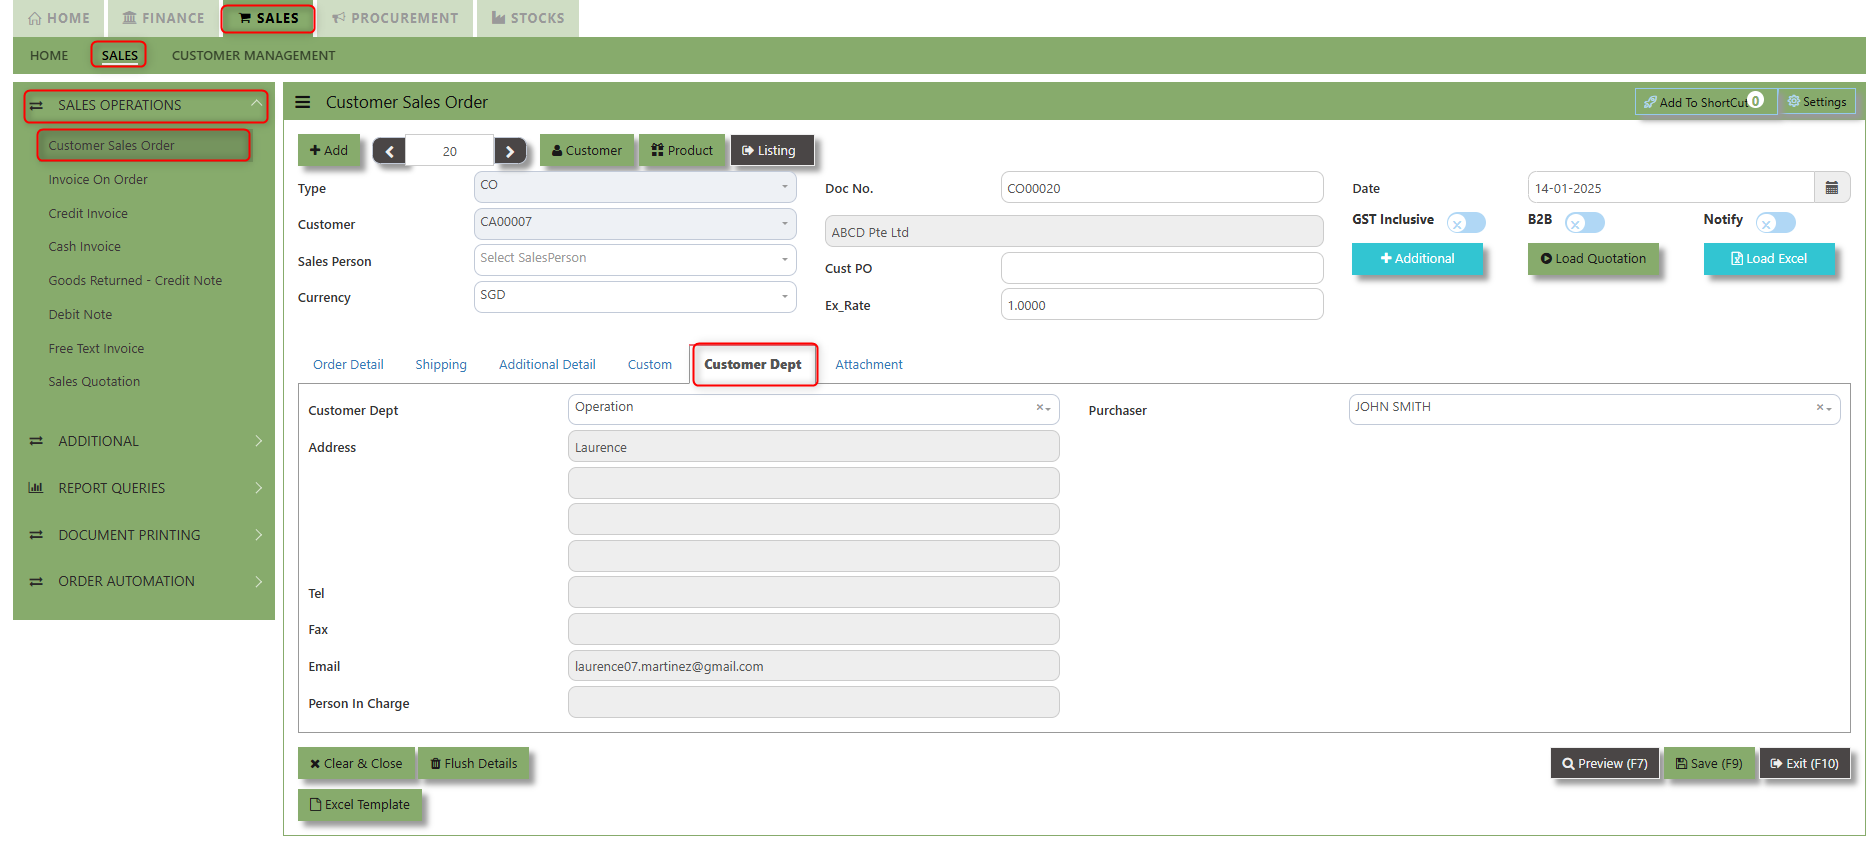
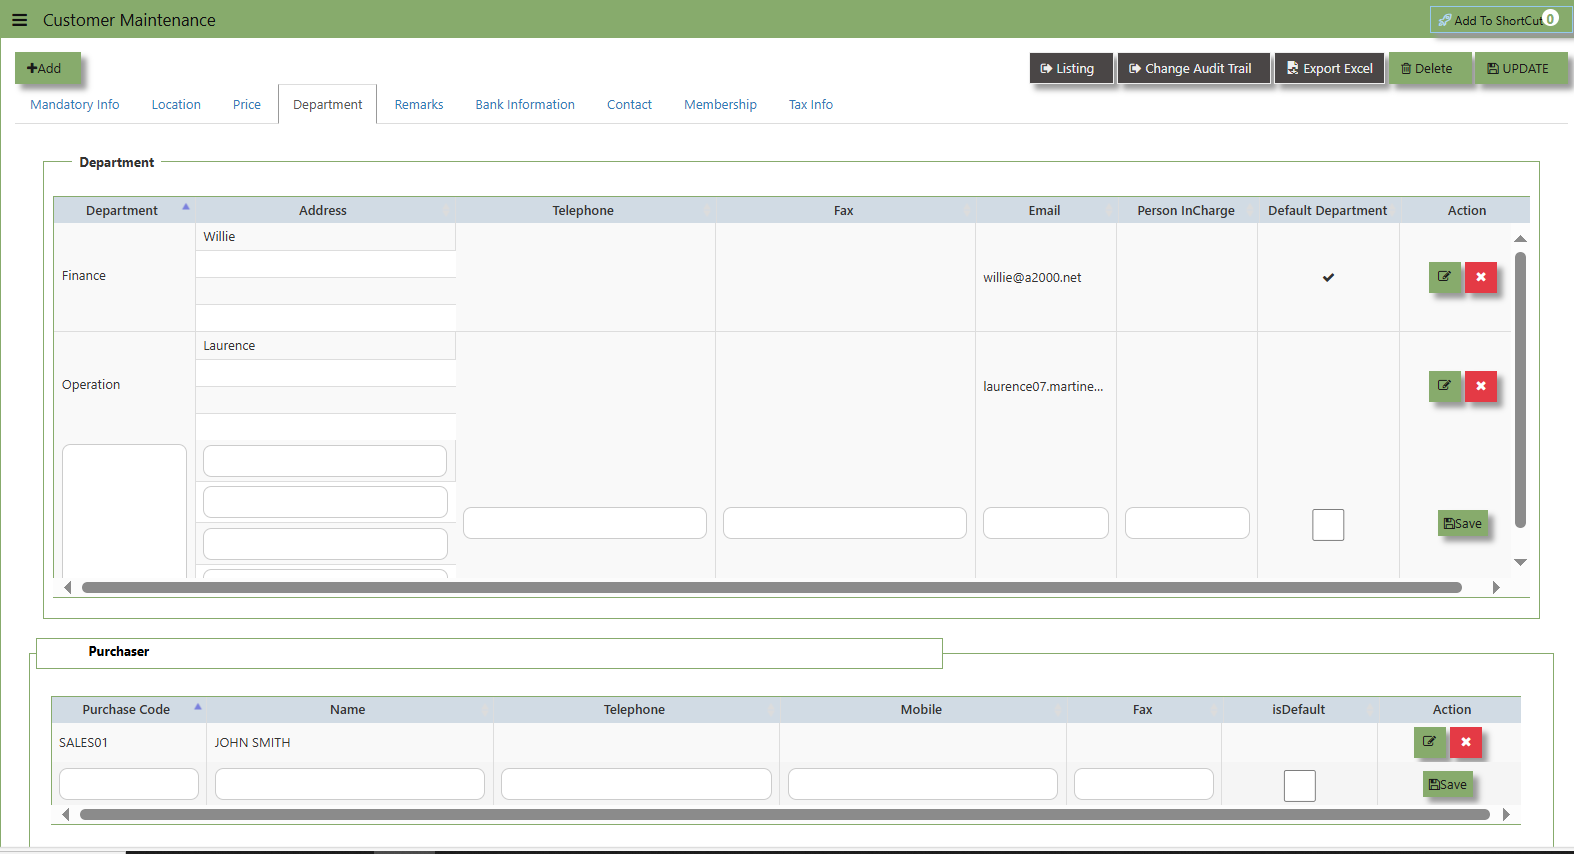
The drop down selection for Customer Dept and Purchaser is maintained in Customer Maintenance under Department Tab
__________________________________________________________________________________________________________________________________________
"Attachment Tab" allows users to attach various files and documents related to the sales order. By attaching relevant files, users ensure that all purchase-related information is kept in one place, making the sales process smoother, more transparent, and easier to track.
How to use Attachment Tab?
1. Click on SALES – SALES OPERATIONS – CUSTOMER SALES ORDER – ATTACHEMENT TAB for the screen below.
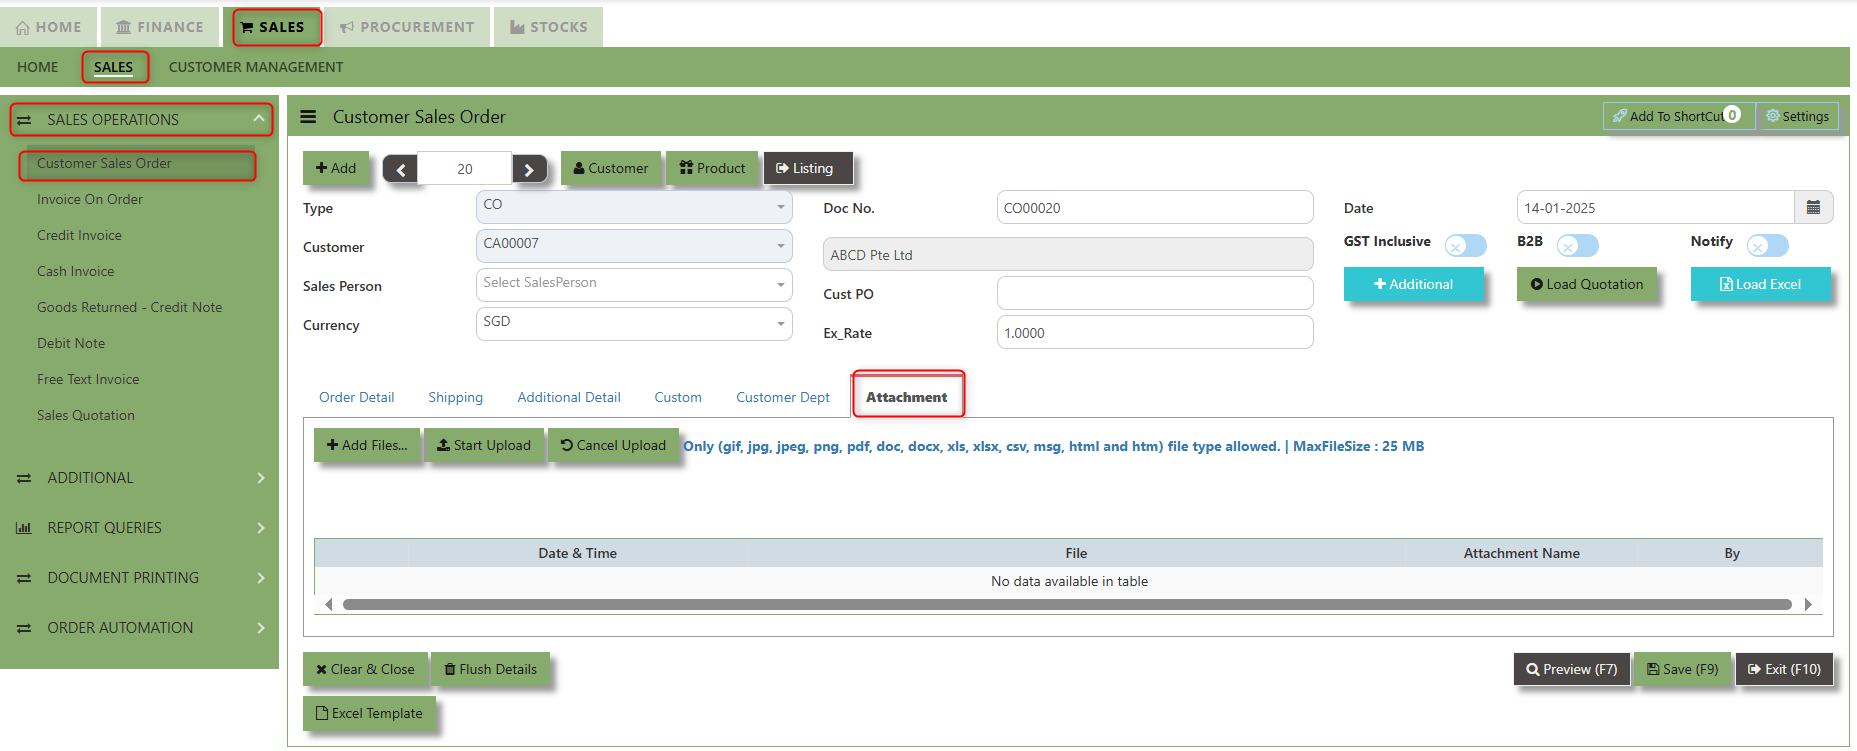
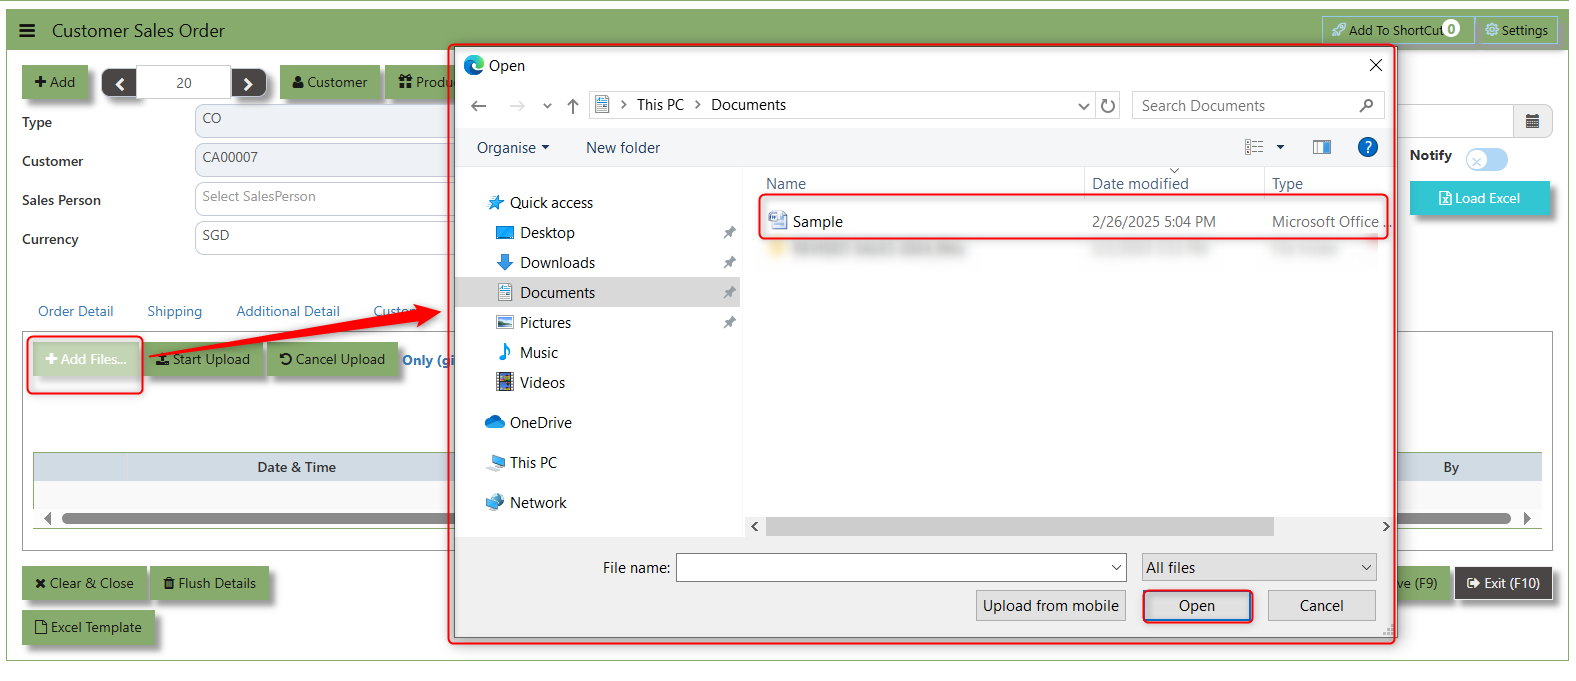
2. Click +Add files and windows will prompt then choose the file you want to upload by clicking open. Kindly take note the file types and maximum size requirements in uploading: Only (gif, jpg, jpeg, png, pdf, doc, docx, xls, xlsx, csv, msg, html and htm) file type allowed. | MaxFileSize : 25 MB
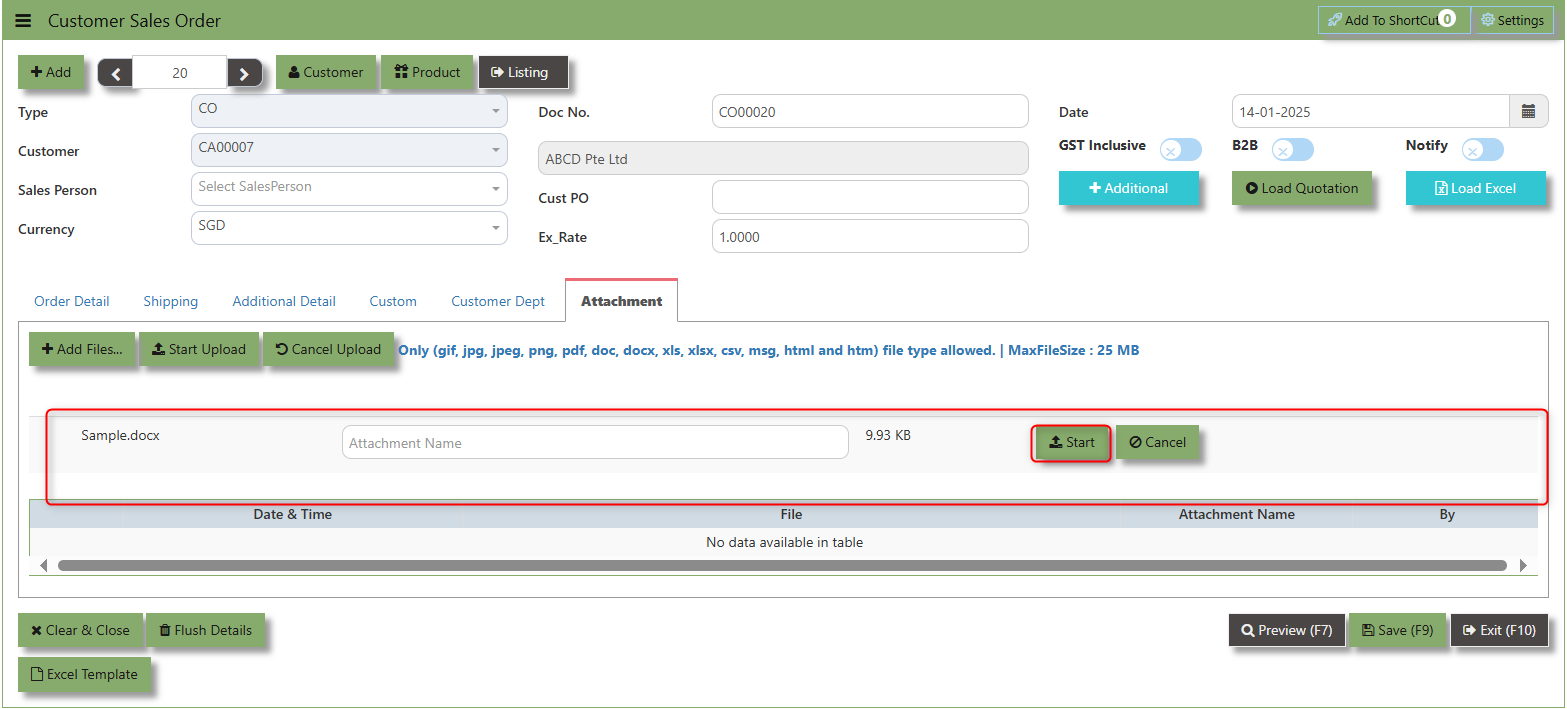
3. Key in the Attachment Name then click start to upload.
4.Once the file attached, click "SAVE" button
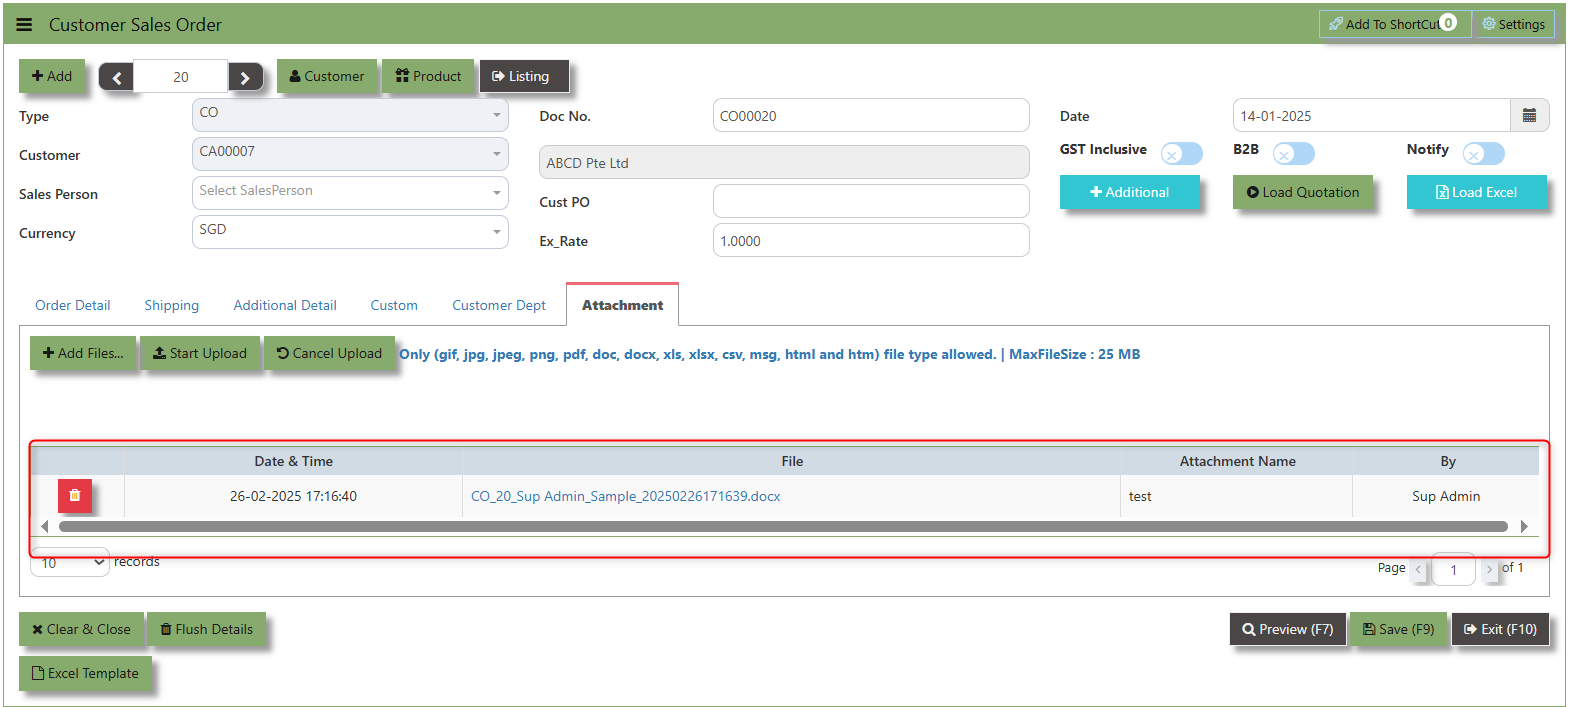
User may opt to cancel the uploading by clicking the "Cancel Upload" button and delete the file uploaded by clicking the "Bin icon" at the line detail.
___________________________________________________________________________________________________________________________________________
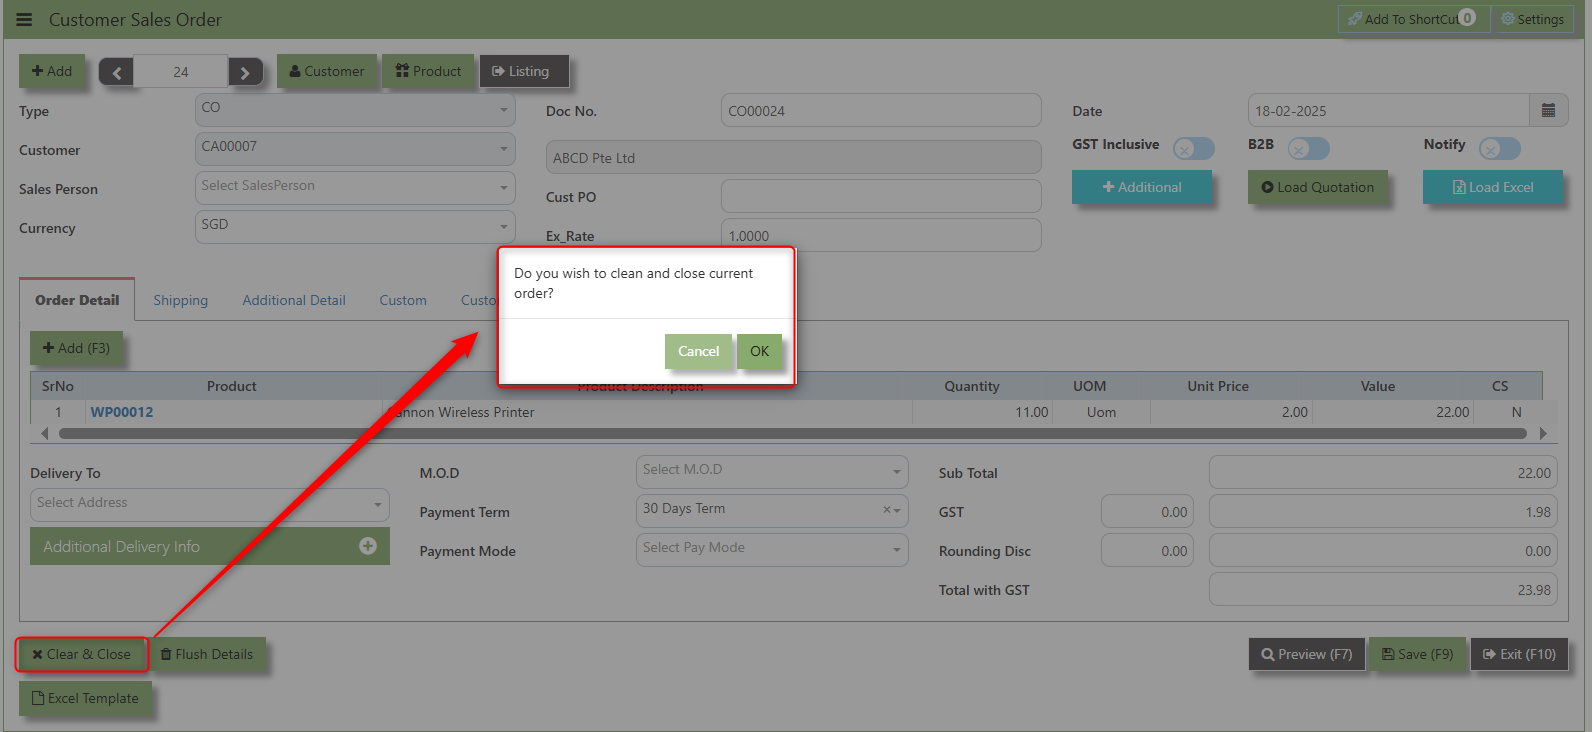
Clear and Close Button - this button can be use to clear the all details and close the current order in one press.
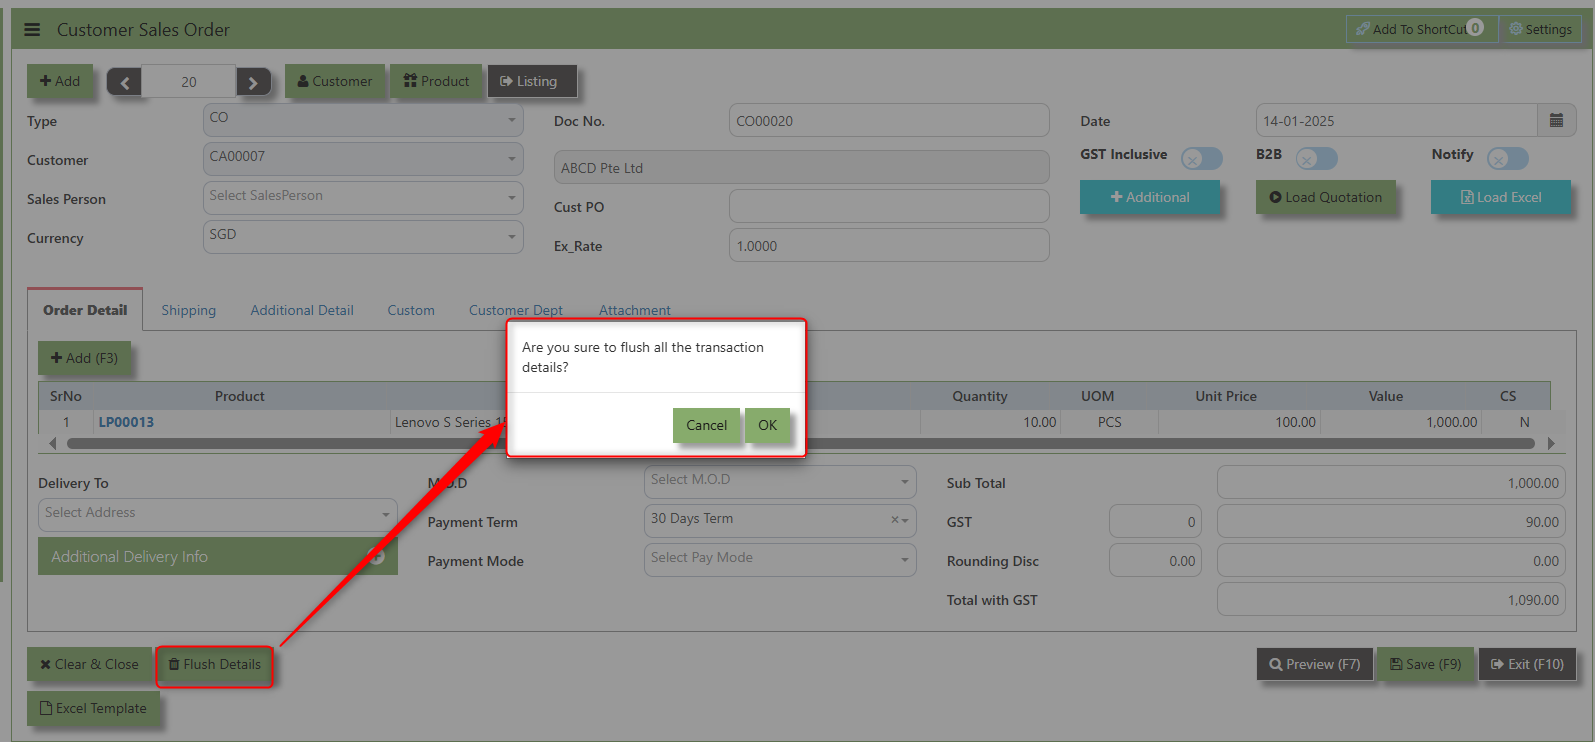
Flush Details Button - this button allows the user to flush all of the details of the sales order except the Header.
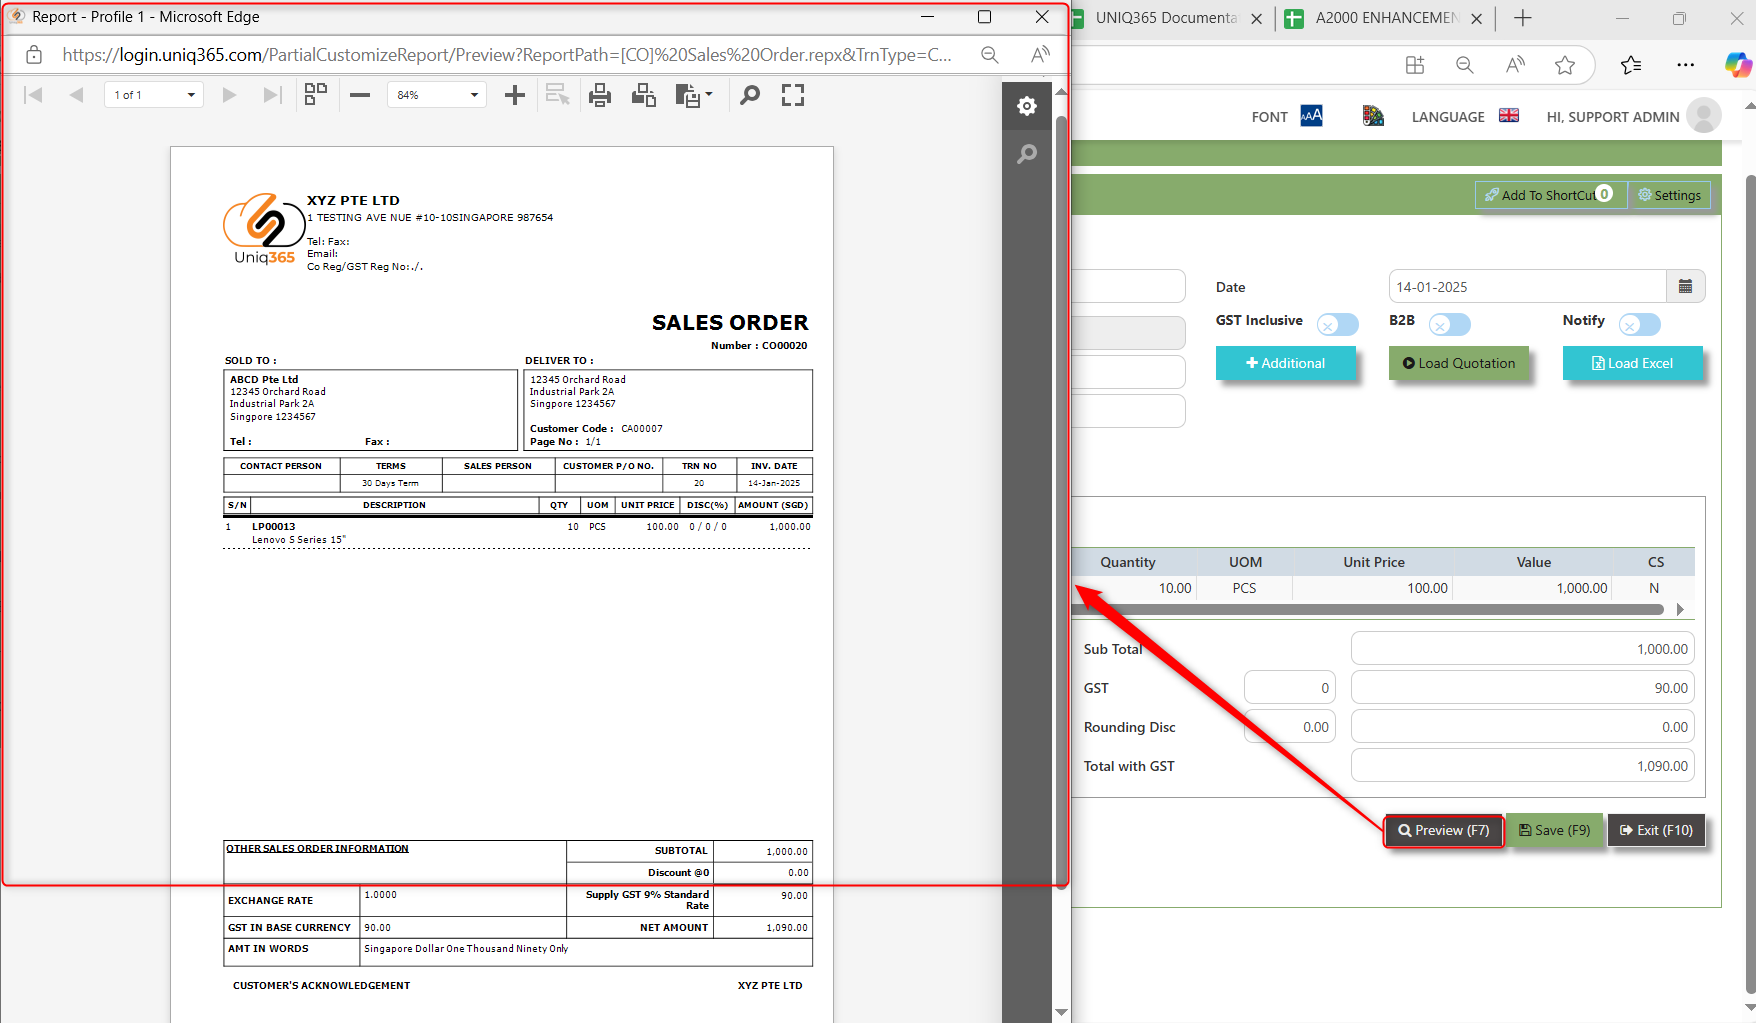
Preview - this Button is use to preview the Sales order invoice. It will pop up a document preview.
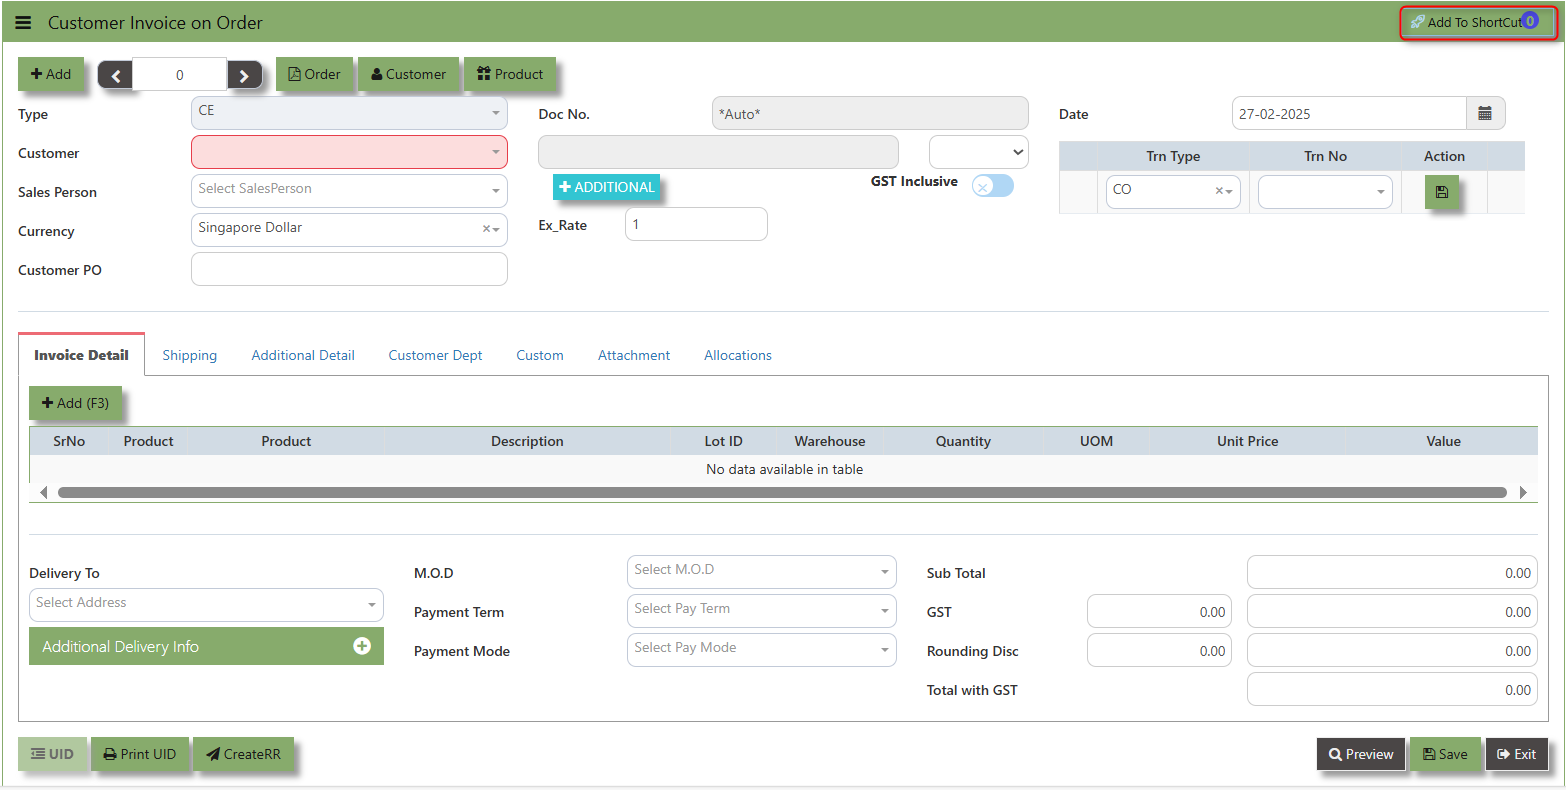
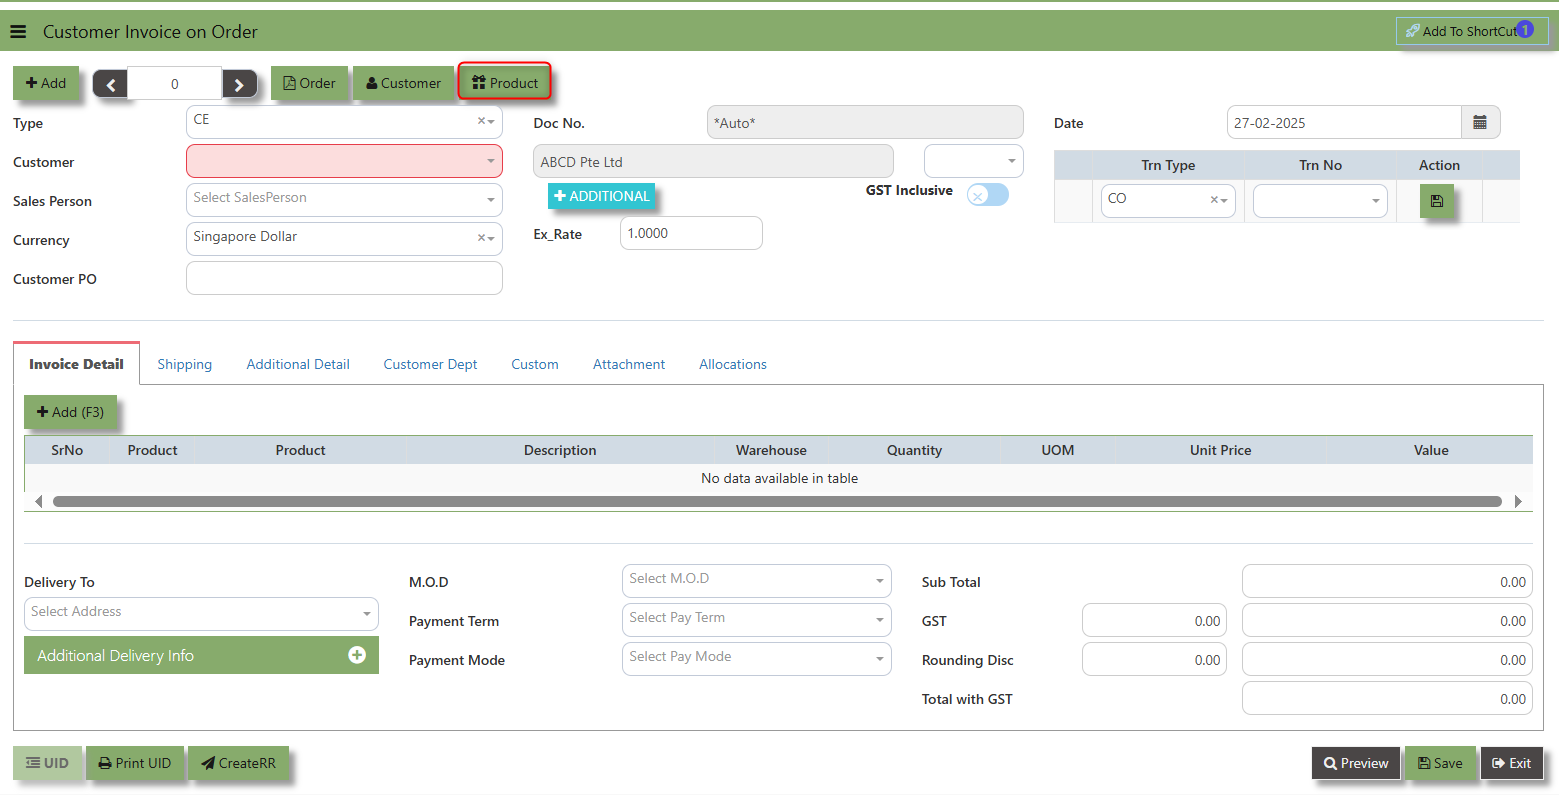
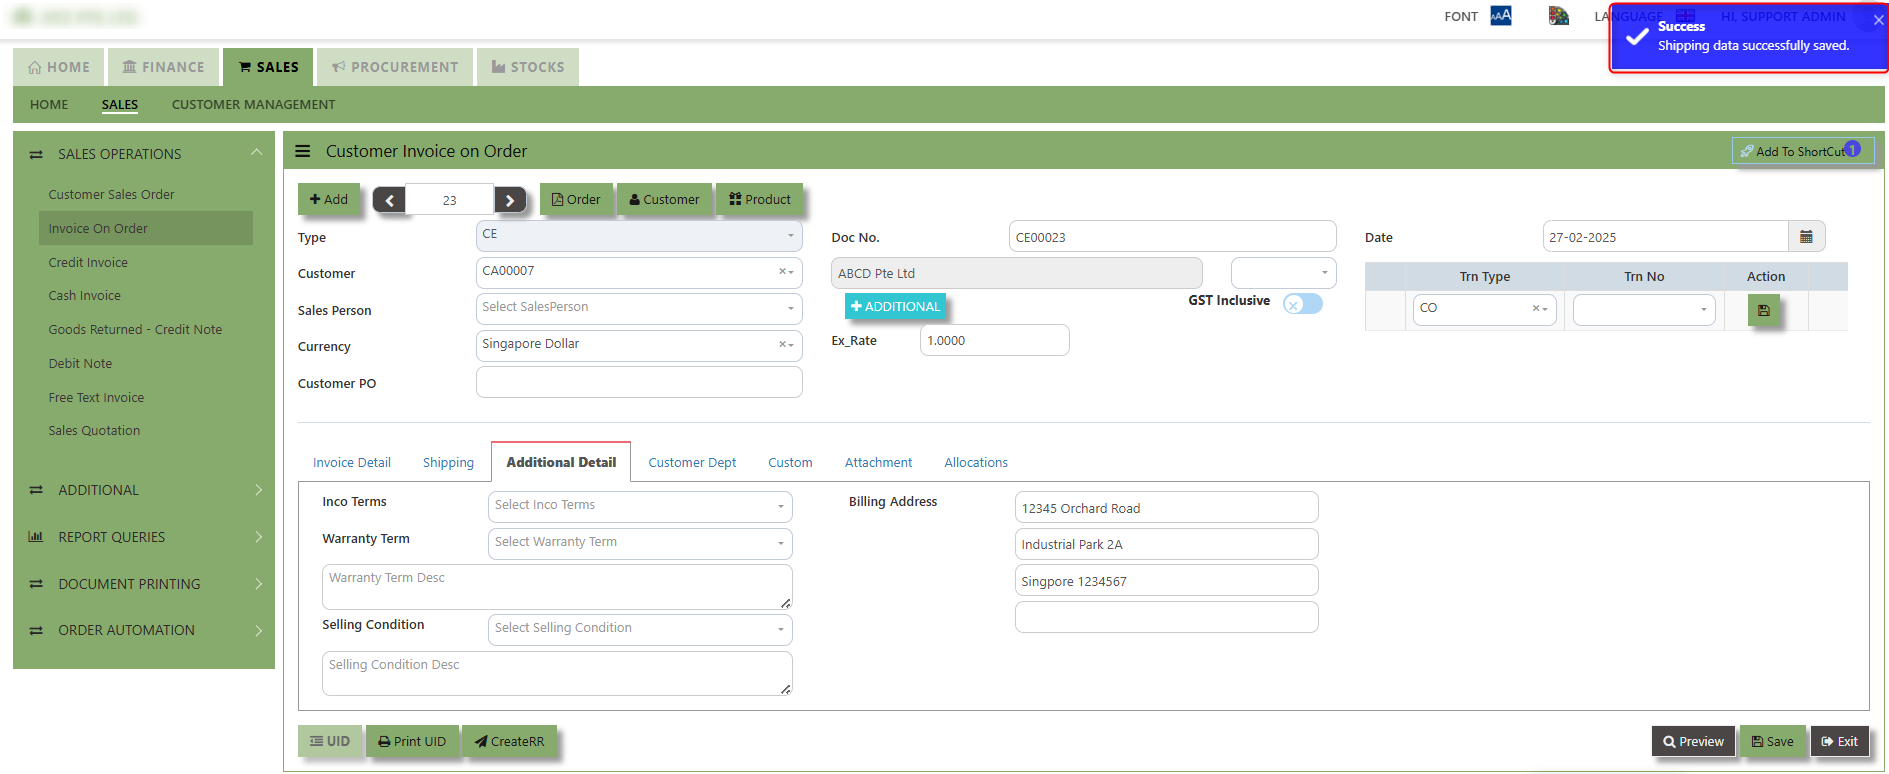
Invoice on Order
After the Sales Order (Flow 2b), you will create Customer Invoice on Order. Enter the required fields such as the transaction type and customer for that invoice, before specifying the CO number at the top right hand corner of the screen. The line items from the sales order have to be verified and added in accordingly at the line detail level into the CE. After verifying all the details, click on the Save button to save the transaction. Postings are automatically carried out and the GL and Inventory status will be updated.
How to Create Invoice on Order?
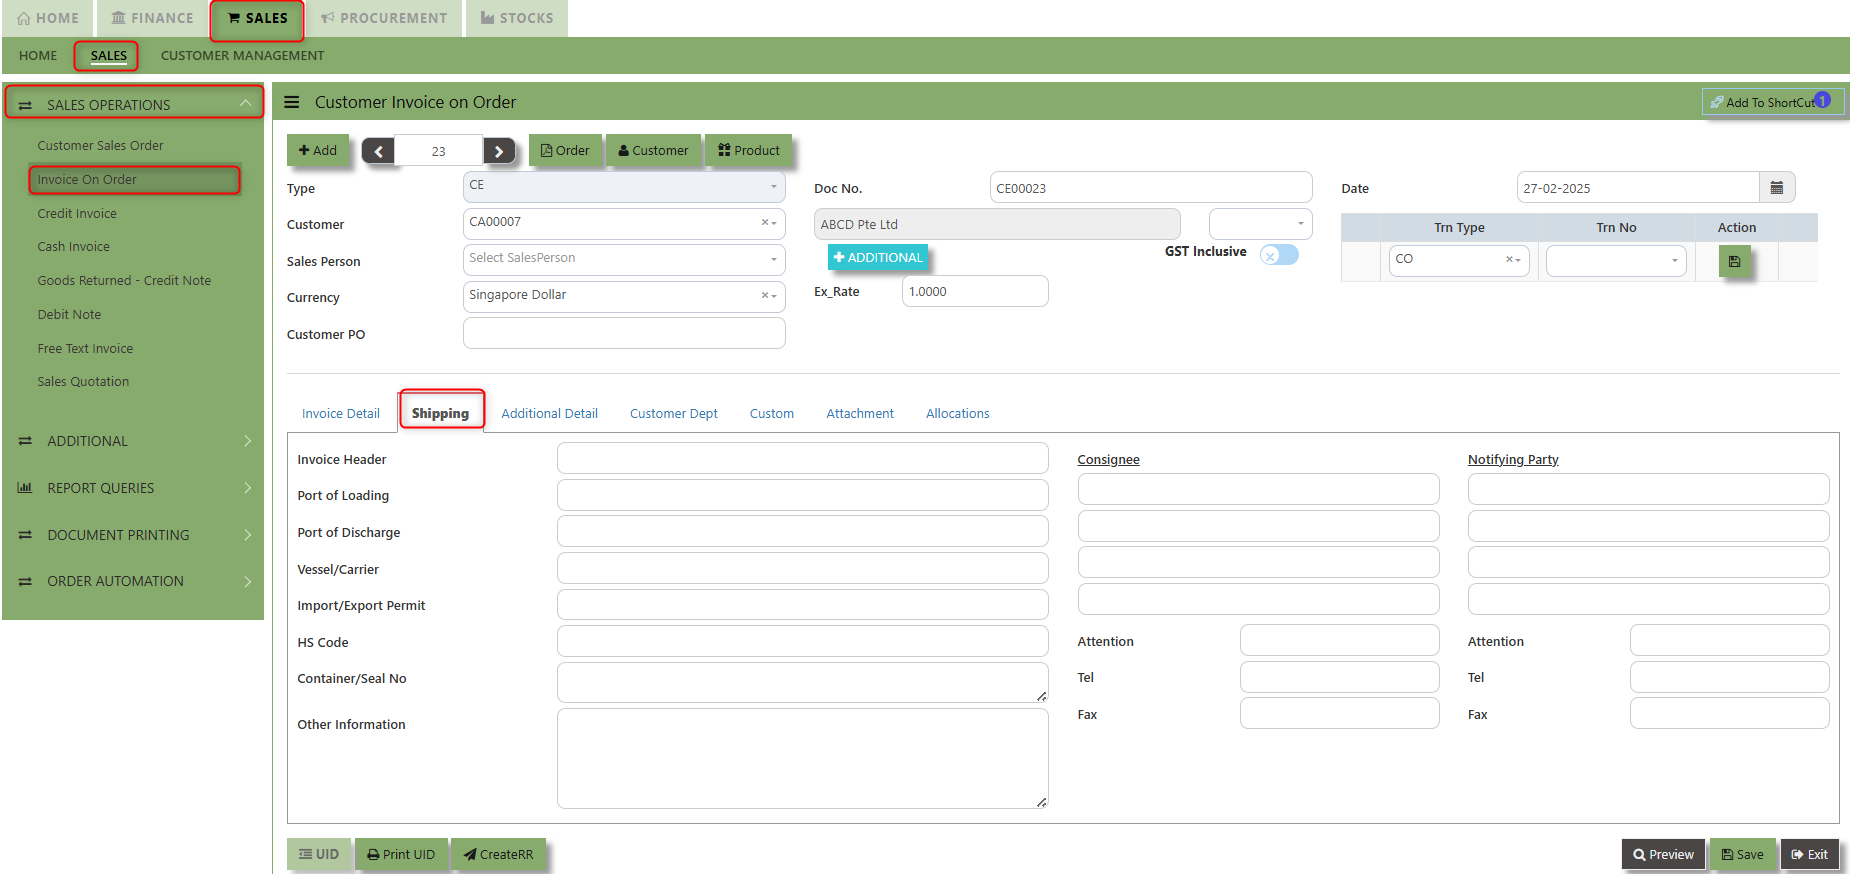
1.Click on SALES – SALES – SALES OPERATIONS – INVOICE ON ORDER for the screen below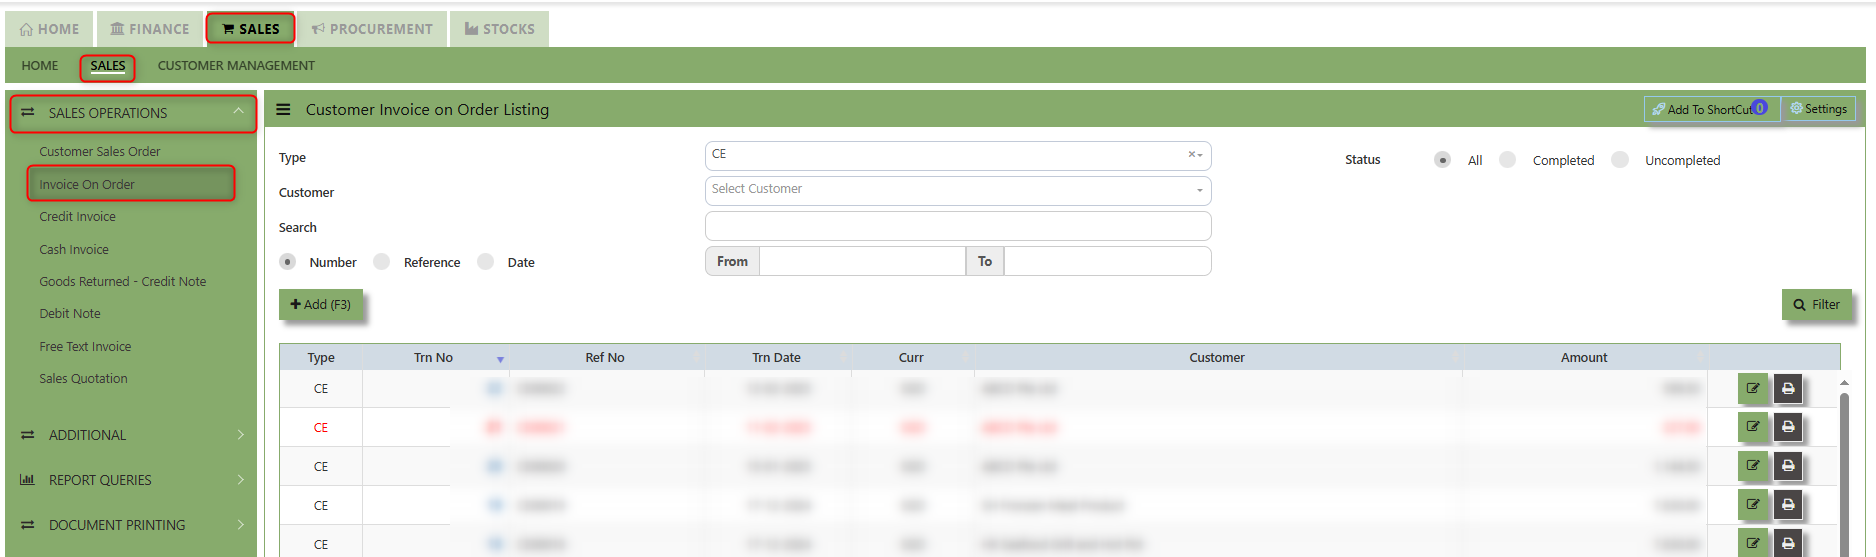
2. Click on Add button or press F3 to create a new transaction.
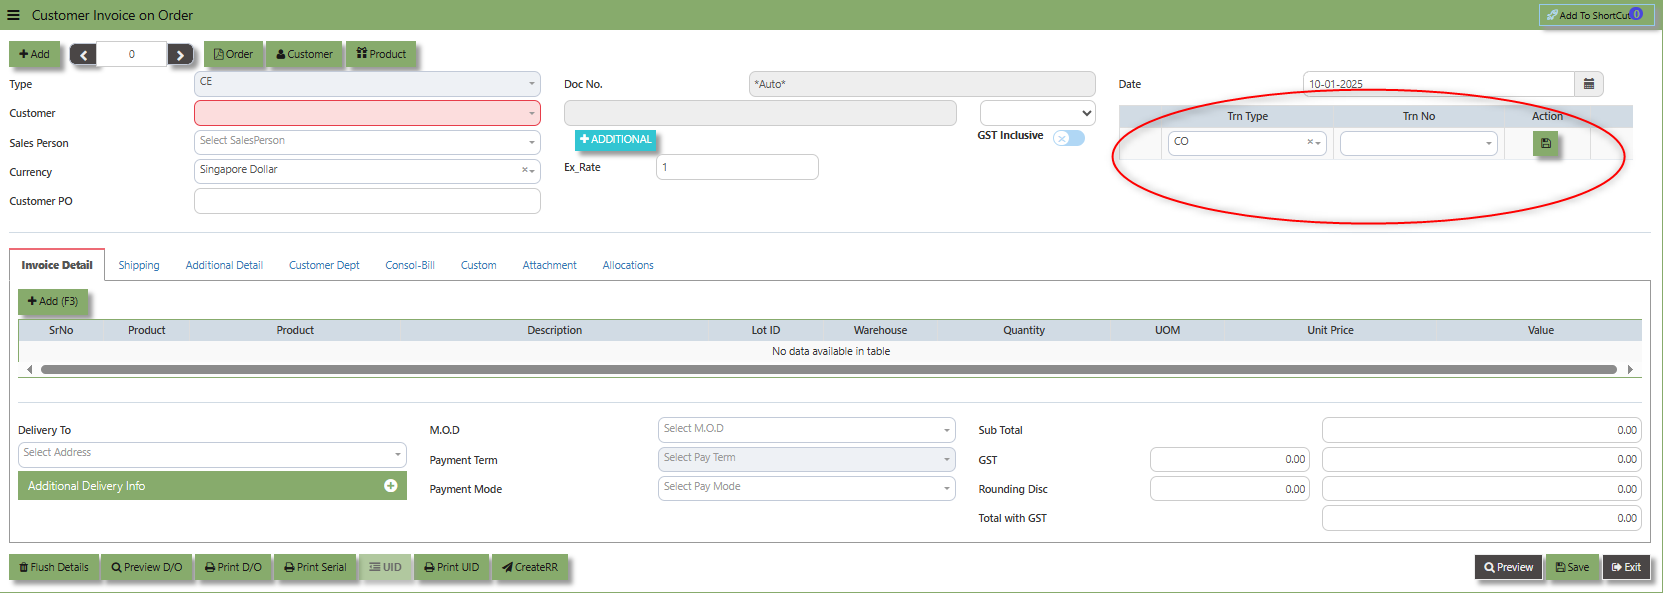
3. After the transaction type selection, you can use the tab button to go to the Ref No. and Date fields to fill up the information.
4. Click the Customer - drop-down to select Customer Name, followed by the Sales Person, PDS, Currency, Rate, Our DO and Order Ref No. if applicable.
5. After completing the above steps, click the Order No. drop down list to select the Sales Order to be invoiced (refer to the highlighted screen).
6. After selecting the Sales Order transaction from the Order No. column, user can use the “L” button to load all the product items. Alternatively, you can use the Ref column in the detail section to call out the product items one by one. Save the CE transaction after this is done.
___________________________________________________________________________________________________________________________________________
Add to ShortCut - Used to create a shortcut for quick access to a specific sales invoice or sales-related functionality. By clicking this button, users can add the current sales invoice on order to a list of shortcuts, allowing them to access the invoice or related functionality quickly and efficiently, without needing to search for it each time.
How to use Add to ShortCut?
1. Click "Add to ShortCut" and system will open below windows:
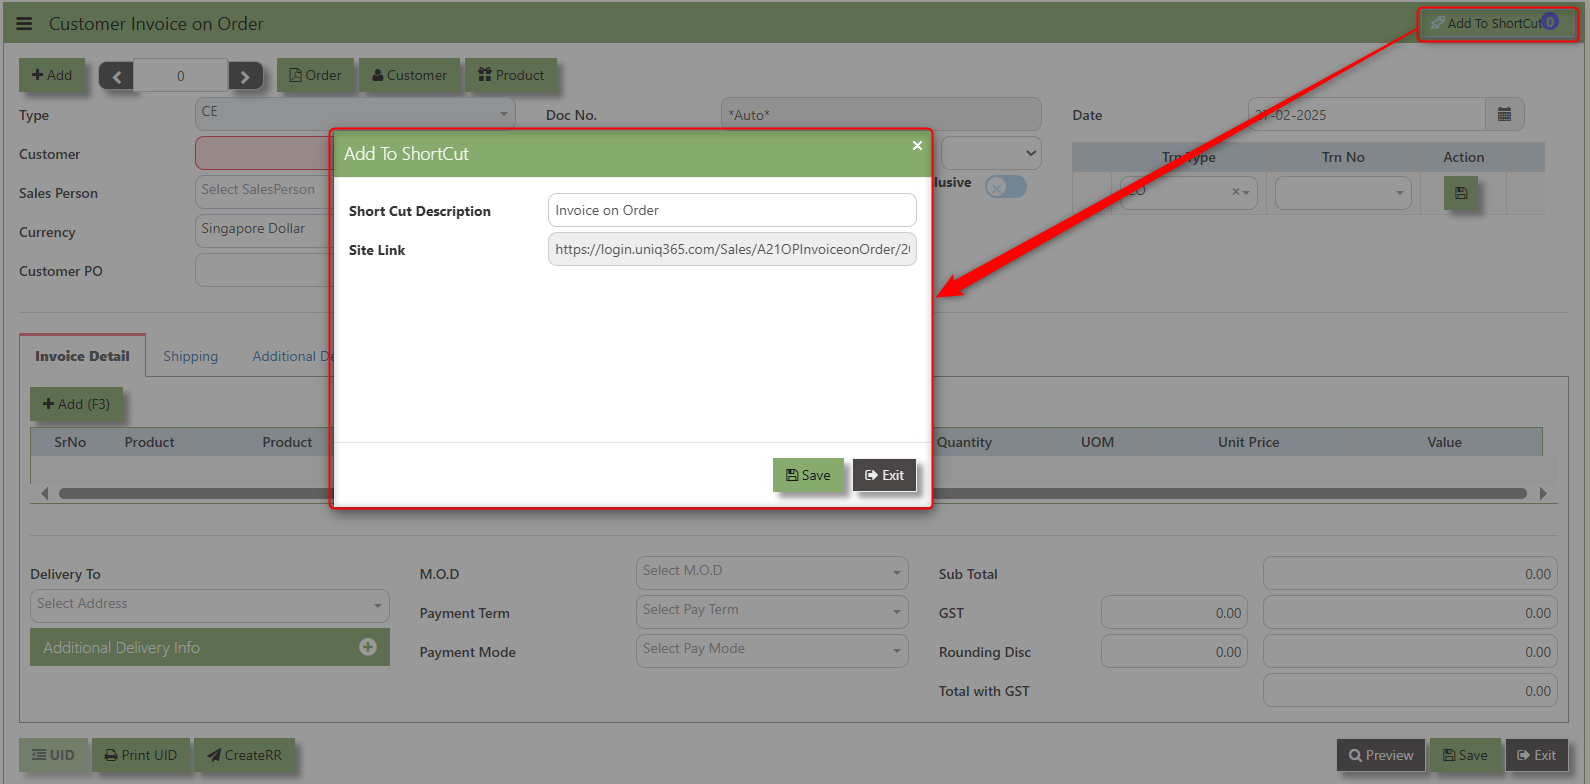
2. Enter Short Cut Description
3. Click SAVE then click OK.
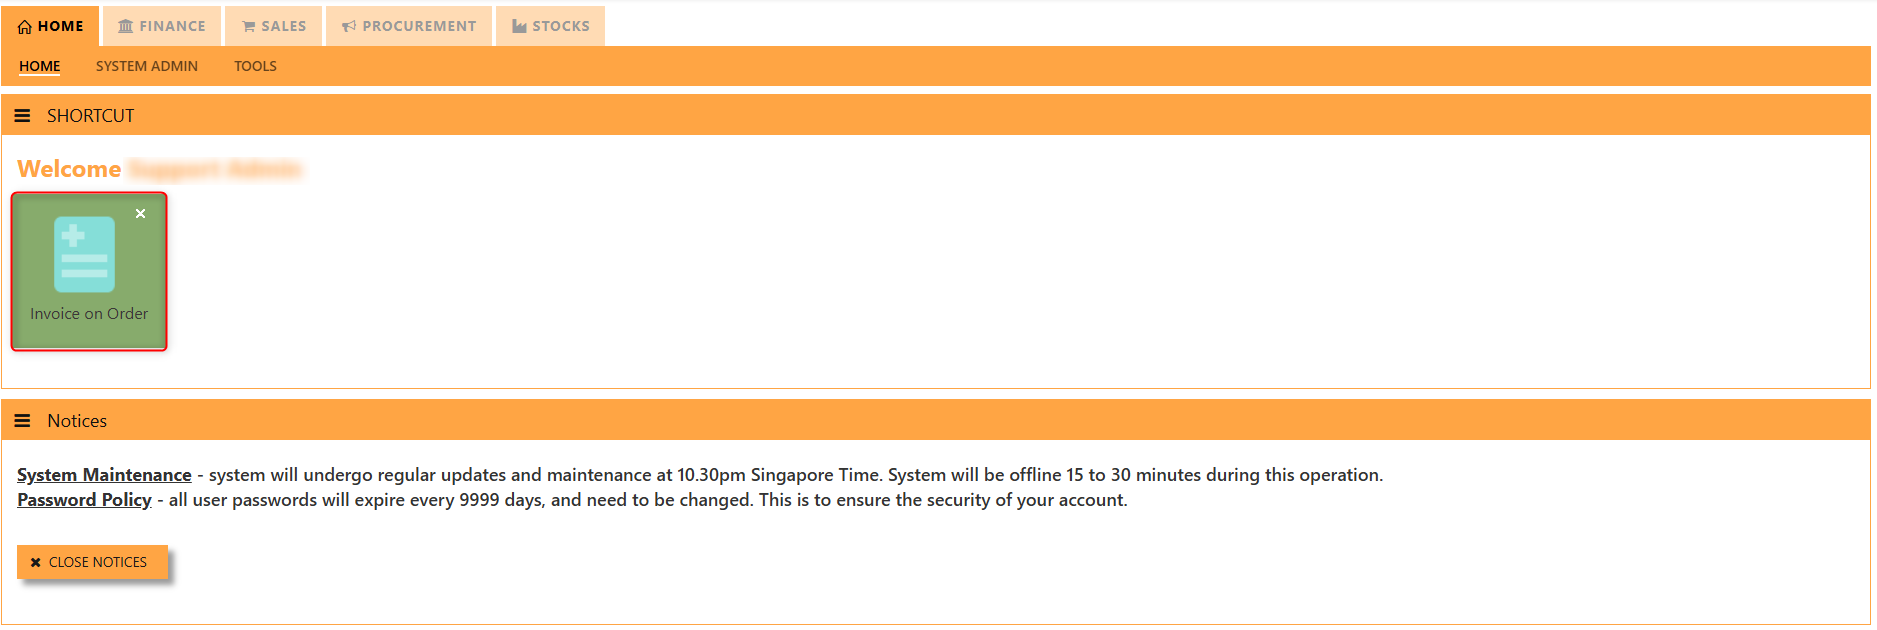
4. User may look to the Homepage for the added function or page. Click on HOME - HOME - SHORTCUT for the screen below.
___________________________________________________________________________________________________________________________________________
The Customer button provides quick access to detailed supplier profiles under Customer maintenance.
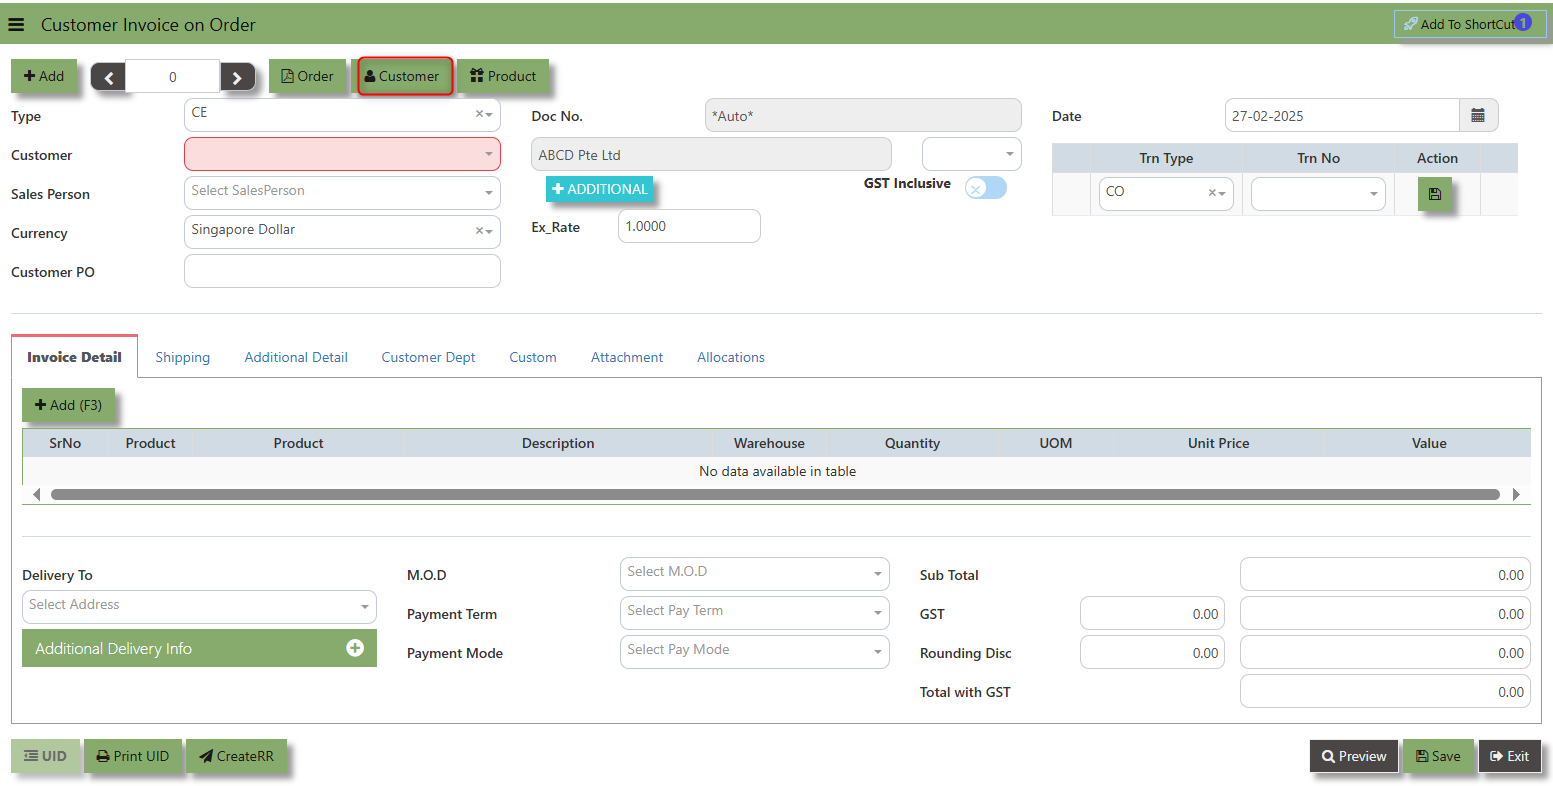
The Product button provides quick access to product and service maintenance.
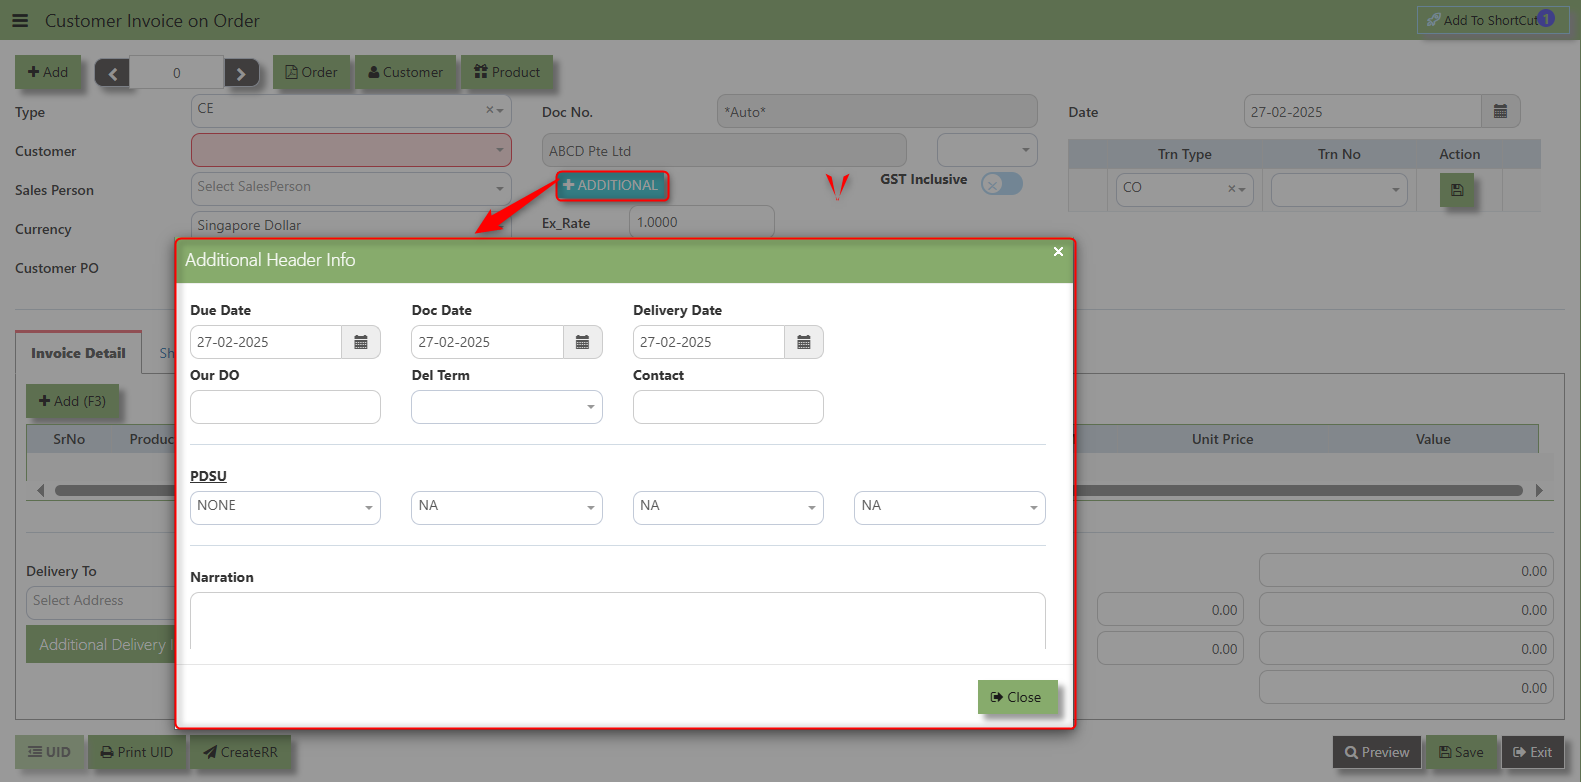
Additional Header Info button is typically used to capture and manage additional information related to the sales Invoice on order at the header level (i.e., Delivery date, Del Term , Indicative WH , Country, Lead Time, Contact, PDSU, Narration and Transaction Narration). This feature allows users to add extra data or notes that are relevant to the entire sales invoice on order.
The GST Inclusive checkbox indicates whether the unit price in the CR include Goods and Services Tax (GST) or not.
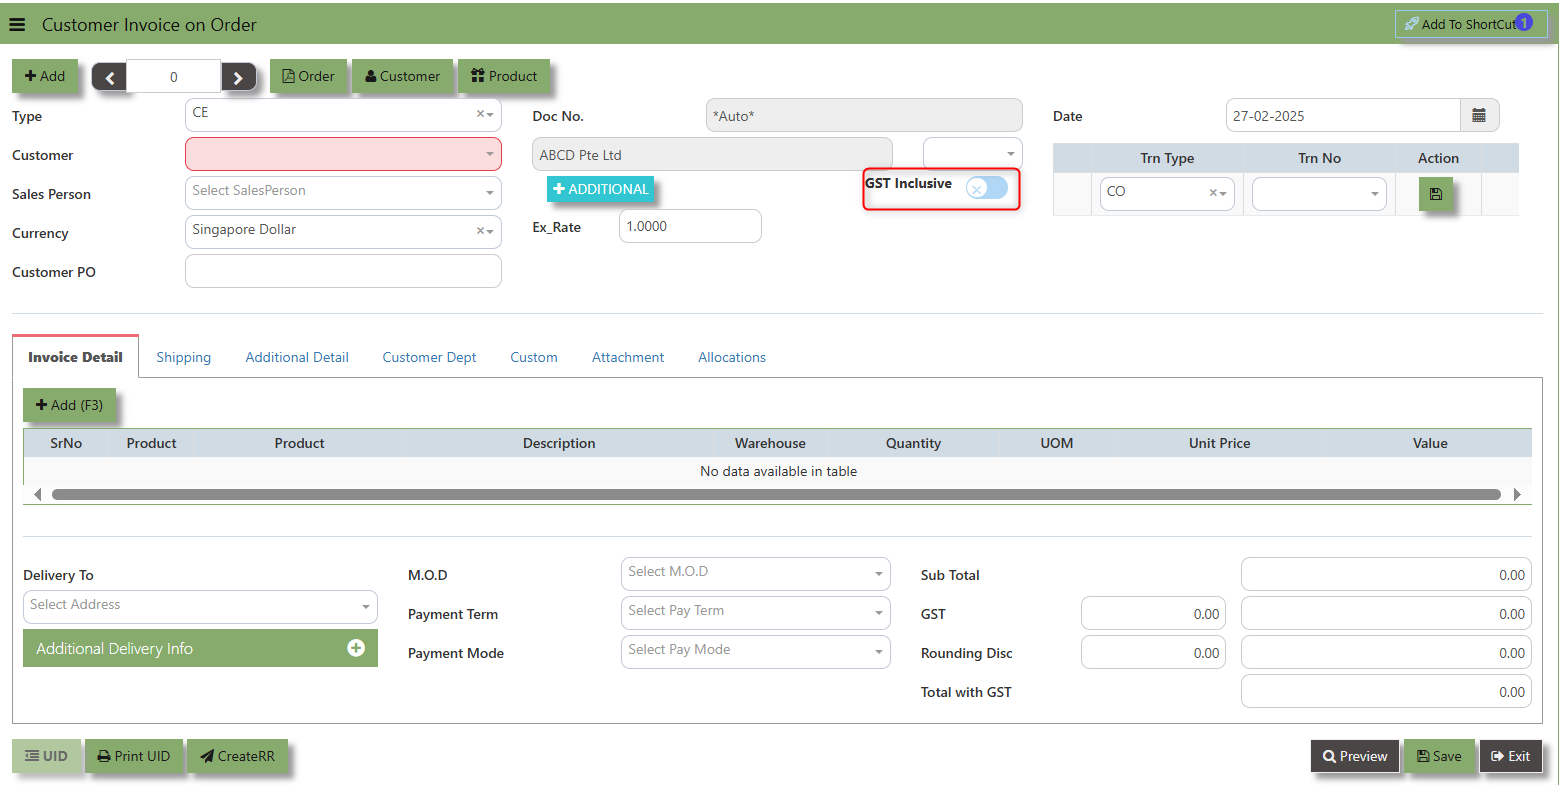
- When ticked (GST Inclusive): provided in the Sales Order already includes the applicable GST amount. The GST amount will not be calculated or displayed separately, as it's already accounted for in the quoted price.
- When not ticked (GST Exclusive): The unit price is considered exclusive of GST. The system will calculate and add the GST based on the applicable tax rate, and the final total will be the sum of the base price plus the GST amount
___________________________________________________________________________________________________________________________________________
Shipping Tab a section where specific shipping-related information is entered and managed for the sold goods or services. This tab ensures that all relevant details regarding the shipment, delivery location, and delivery expectations are captured in the system to facilitate smooth and accurate order fulfillment.
How to set Shipping Info?
1. Click on SALES – SALES OPERATIONS – SALES INVOICE ON ORDER - SHIPPING TAB for the screen below.
2. Input the below details for the below fields:
-
- Invoice Header
- Port of Loading
- Port of Discharge
- Vessel/Carrier
- Import/Export Permit
- HS Code
- Container/Seal No
- Other Information
- Consignee
- Attention
- Tel
- Fax
- Notifying Party
- Attention
- Tel
- Fax
3. Once keyed in the necessary details, click the next tab and will automatically save all the information then system will prompt you a message.
___________________________________________________________________________________________________________________________________________
Additional Detail Tab a section where the additional information is entered and managed for the sold goods or services. This tab ensures that all relevant details regarding the Closed order remarks, Inco Terms , billing address warranty terms Selling conditions , and special instruction are captured in the system to facilitate smooth and accurate order fulfillment.
How to set Additional Detail?
1. Click on SALES – SALES OPERATIONS – SALES INVOICE ON ORDER- ADDITIONAL DETAIL TAB for the screen below.
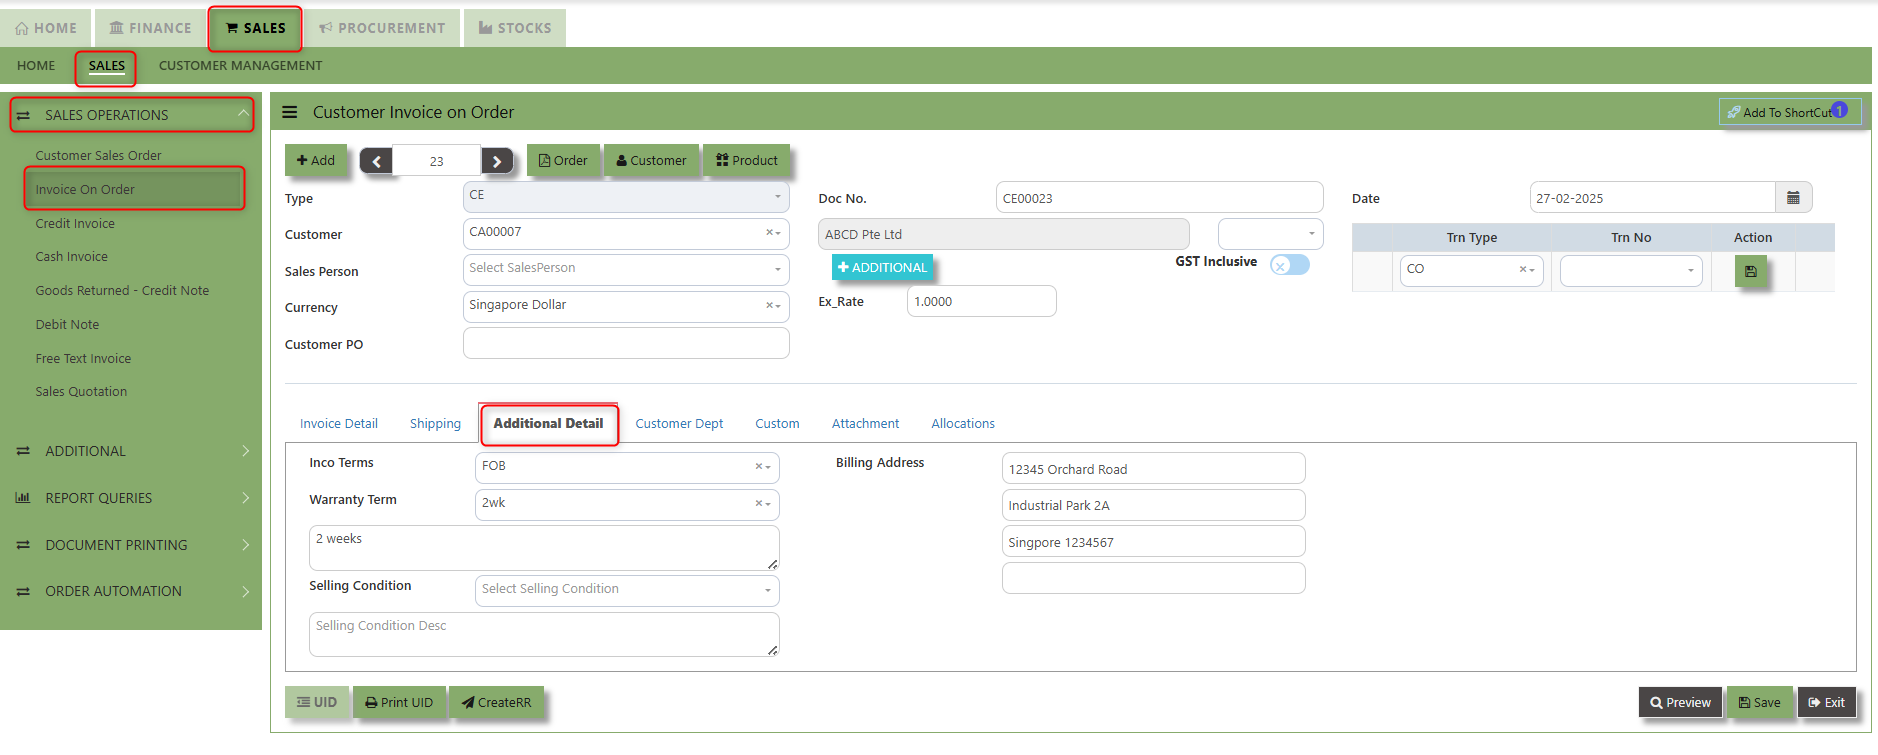
2. Input the below details for the below fields:
-
- Inco terms
- Billing Address
- Warranty Terms
- Selling conditions
- Special instruction
3. Once keyed in the necessary details, click the next tab and will automatically save all the information
___________________________________________________________________________________________________________________________________________
"Customer Dept Tab" section where the Customer Department information is entered. This tab ensures that all relevant details regarding Customer Department details which is linked to the Customer Maintenance under Department Tab
- Click on SALES – SALES OPERATIONS – SALES INVOICE ON ORDER - CUSTOMER DEBT TAB for the screen below.
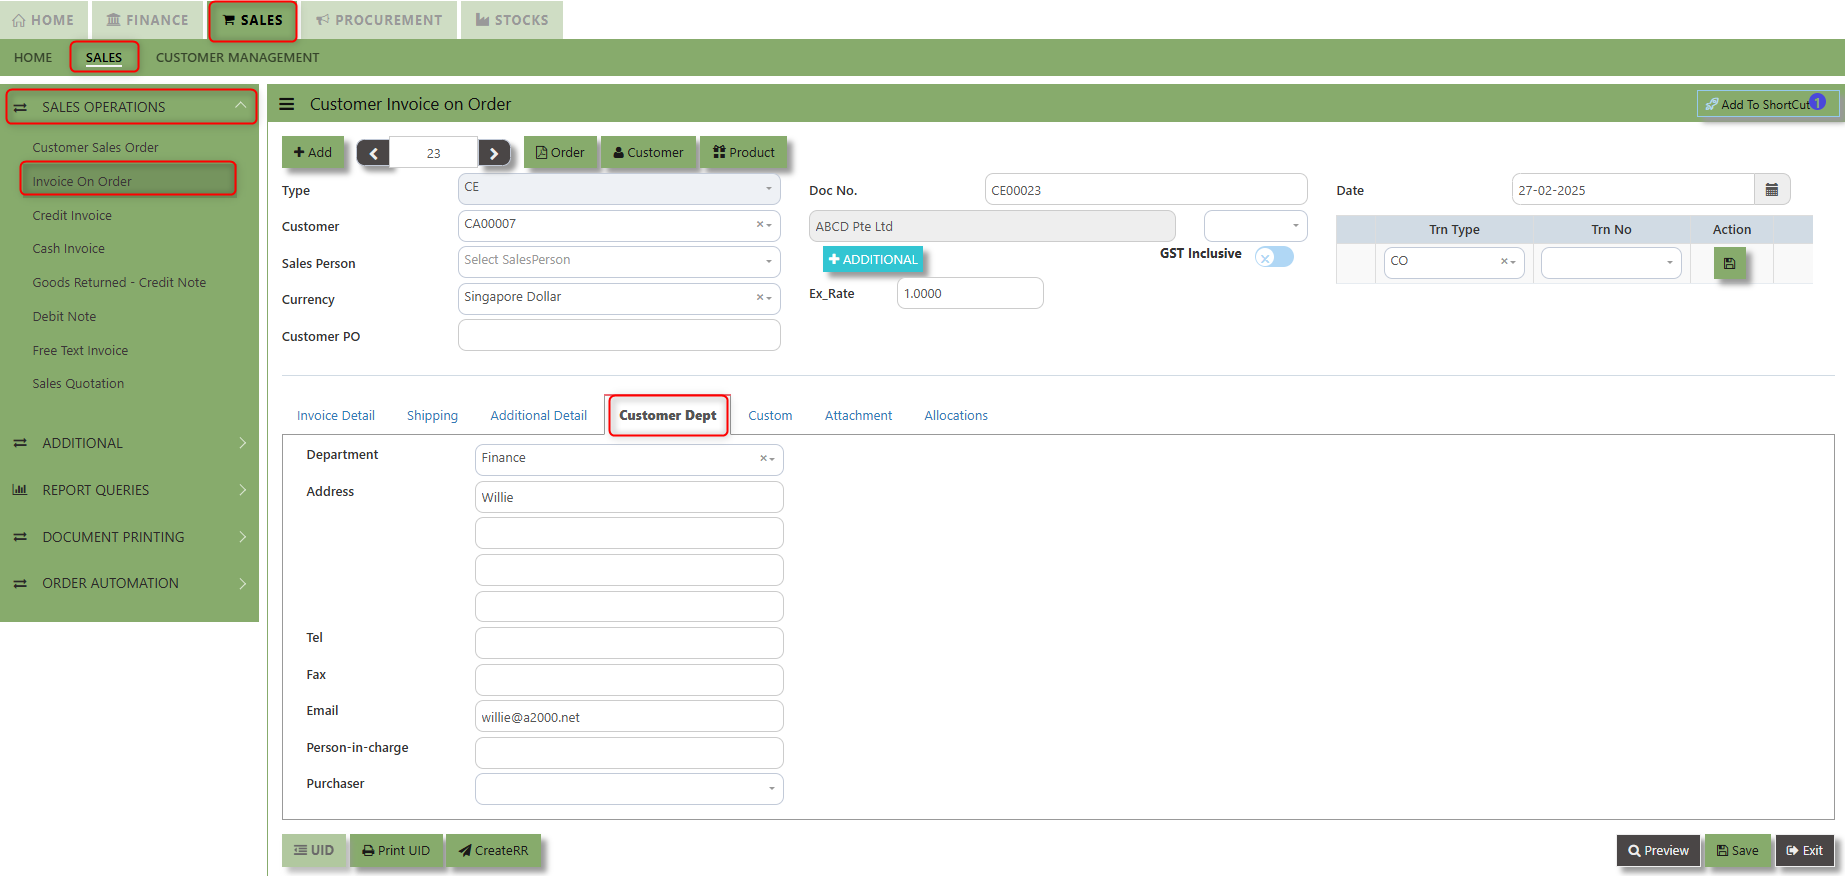
The drop down selection for Customer Dept and Purchaser is maintained in Customer Maintenance under Department Tab

___________________________________________________________________________________________________________________________________________
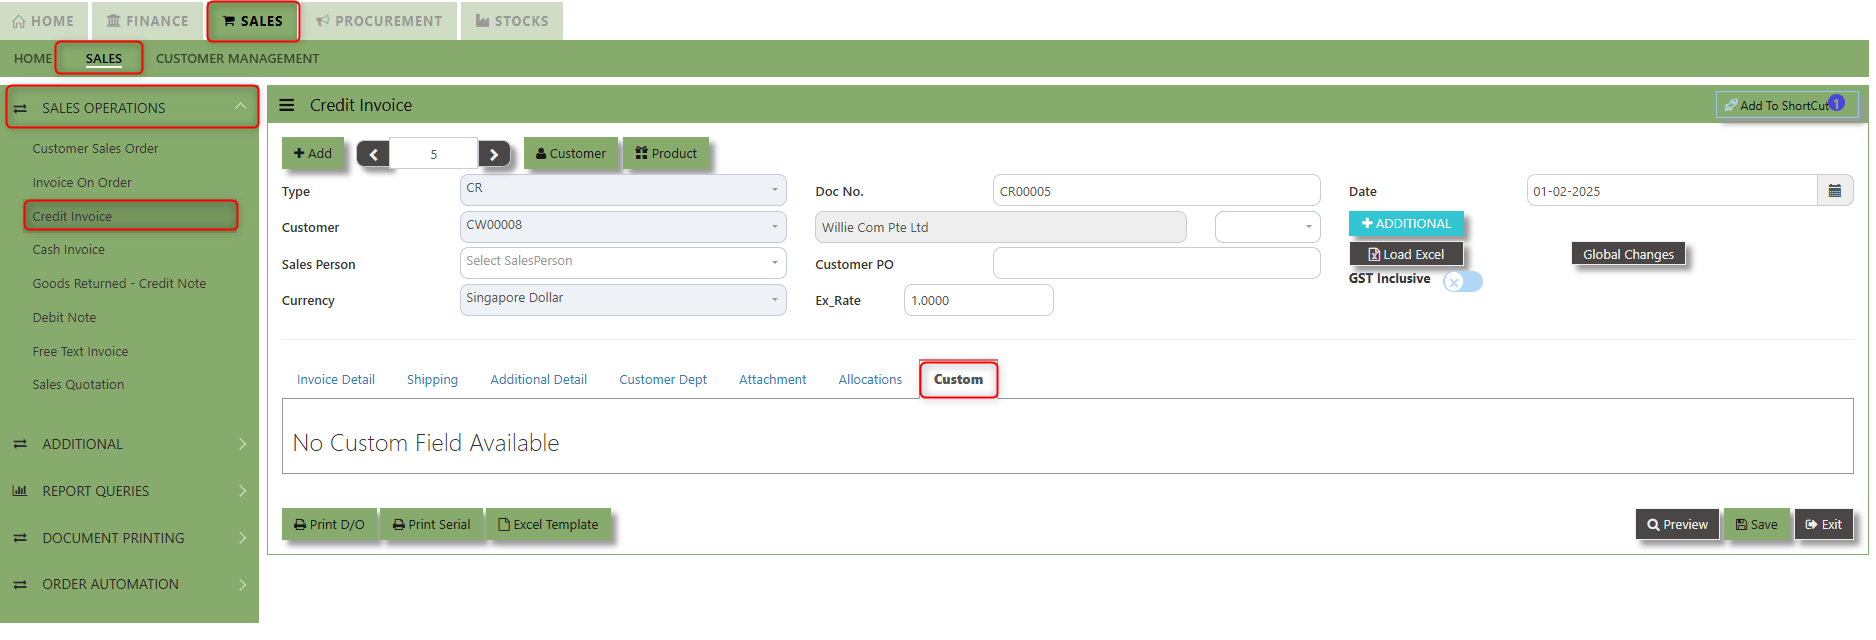
"Custom Tab" provides a space for users to input customized data or additional fields that are specific to their business processes and requirements.
- Click on SALES – SALES OPERATIONS – SALES INVOICE ON ORDER - CUSTOM TAB for the screen below.

___________________________________________________________________________________________________________________________________________
"Attachment Tab" allows users to attach various files and documents related to the sales order. By attaching relevant files, users ensure that all purchase-related information is kept in one place, making the sales process smoother, more transparent, and easier to track.
How to use Attachment Tab?
1. Click on SALES – SALES OPERATIONS – SALES INVOICE ON ORDER – ATTACHEMENT TAB for the screen below.
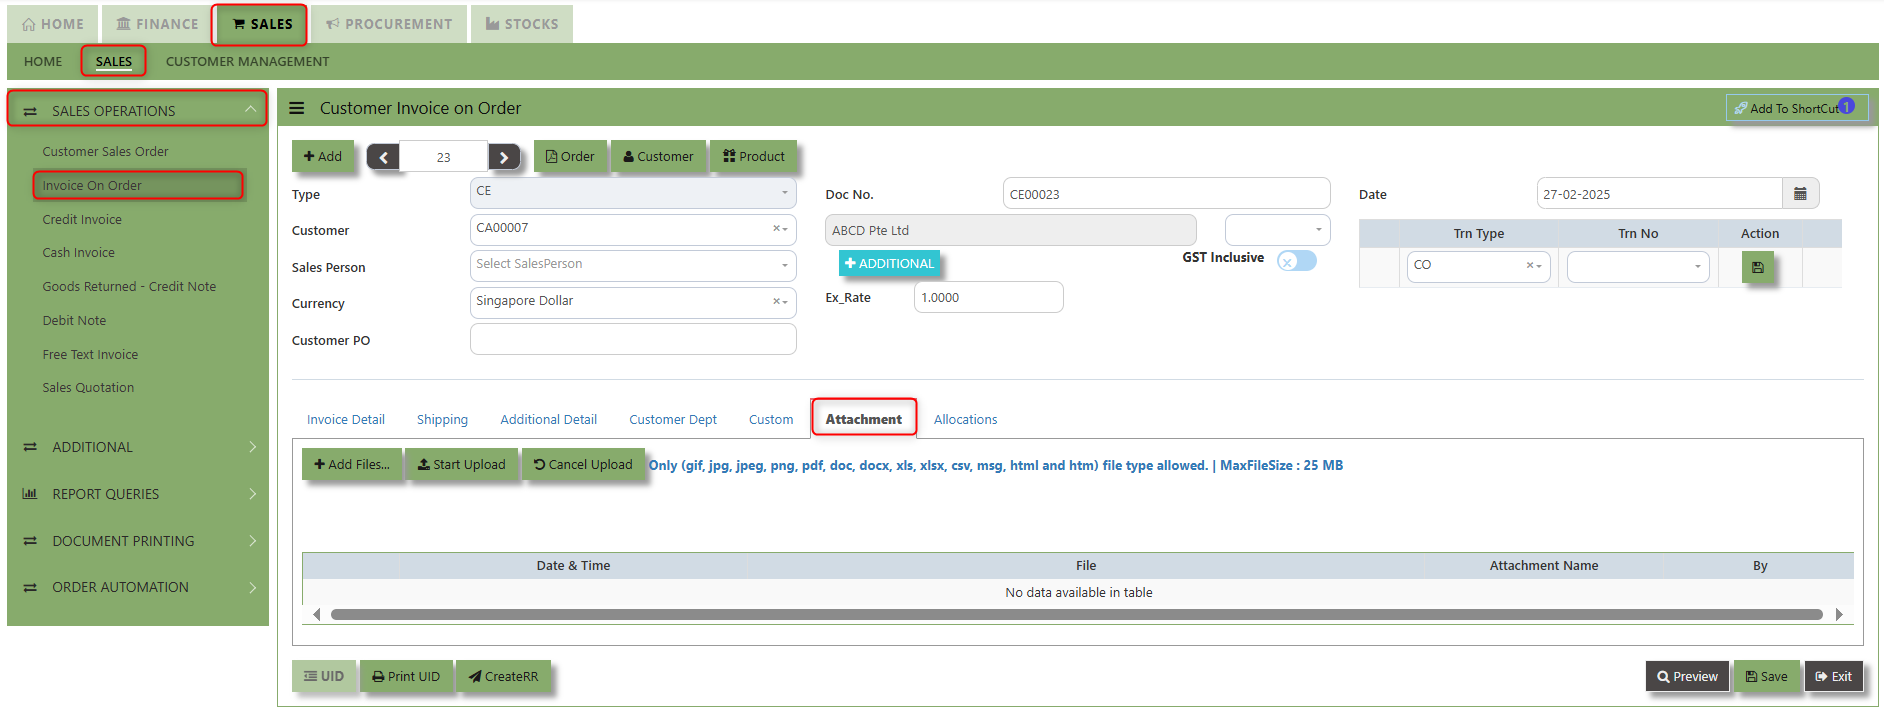
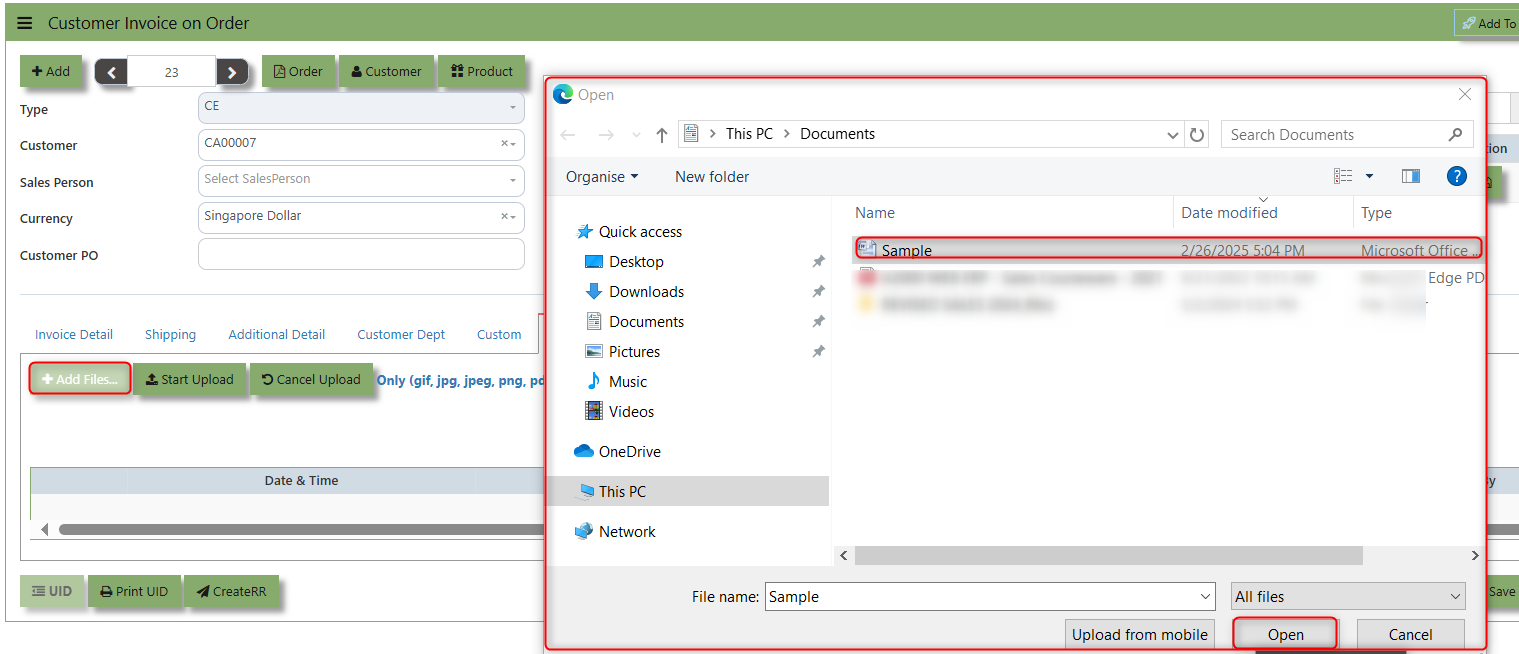
2. Click +Add files and windows will prompt then choose the file you want to upload by clicking open. Kindly take note the file types and maximum size requirements in uploading: Only (gif, jpg, jpeg, png, pdf, doc, docx, xls, xlsx, csv, msg, html and htm) file type allowed. | MaxFileSize : 25 MB
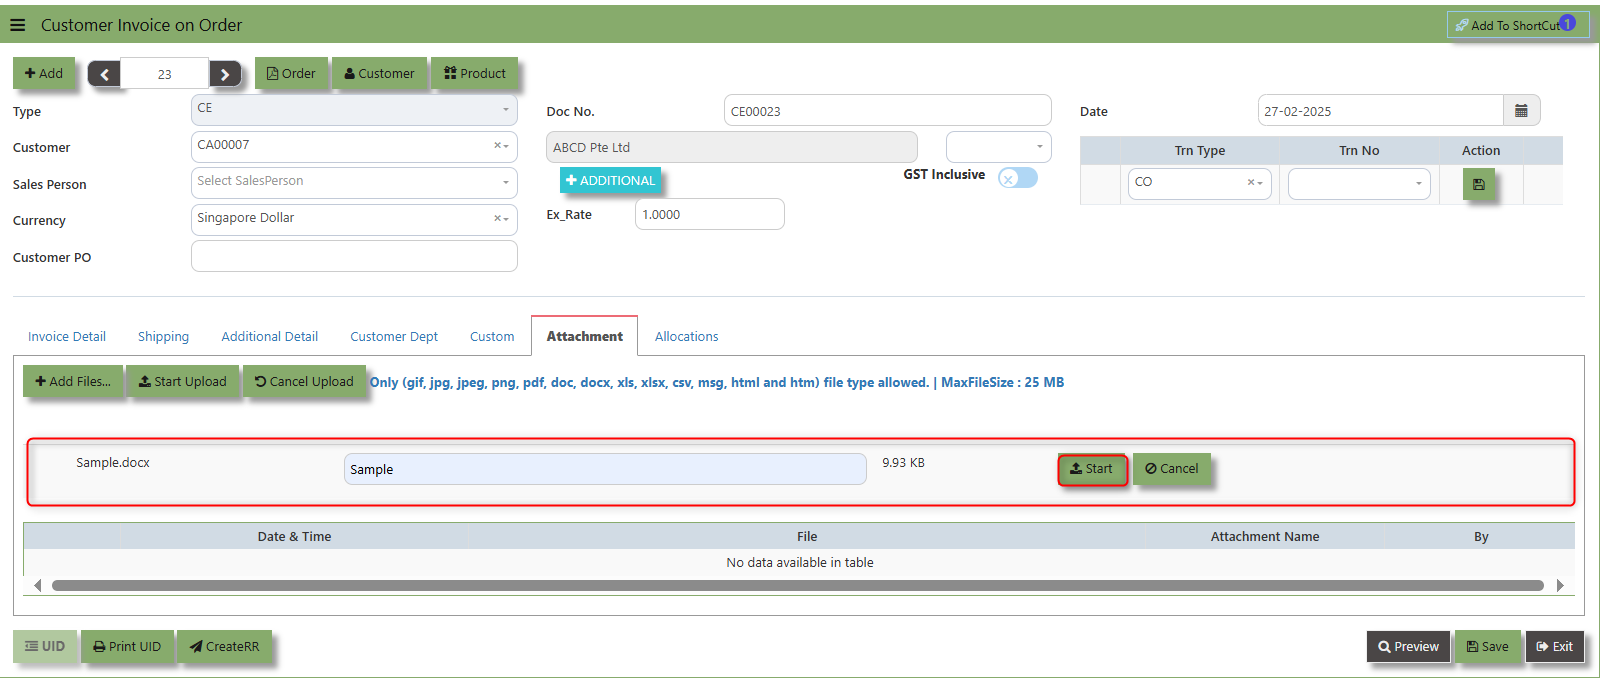
3. Key in the Attachment Name then click start to upload.
4. Once the file attached, click "SAVE" button
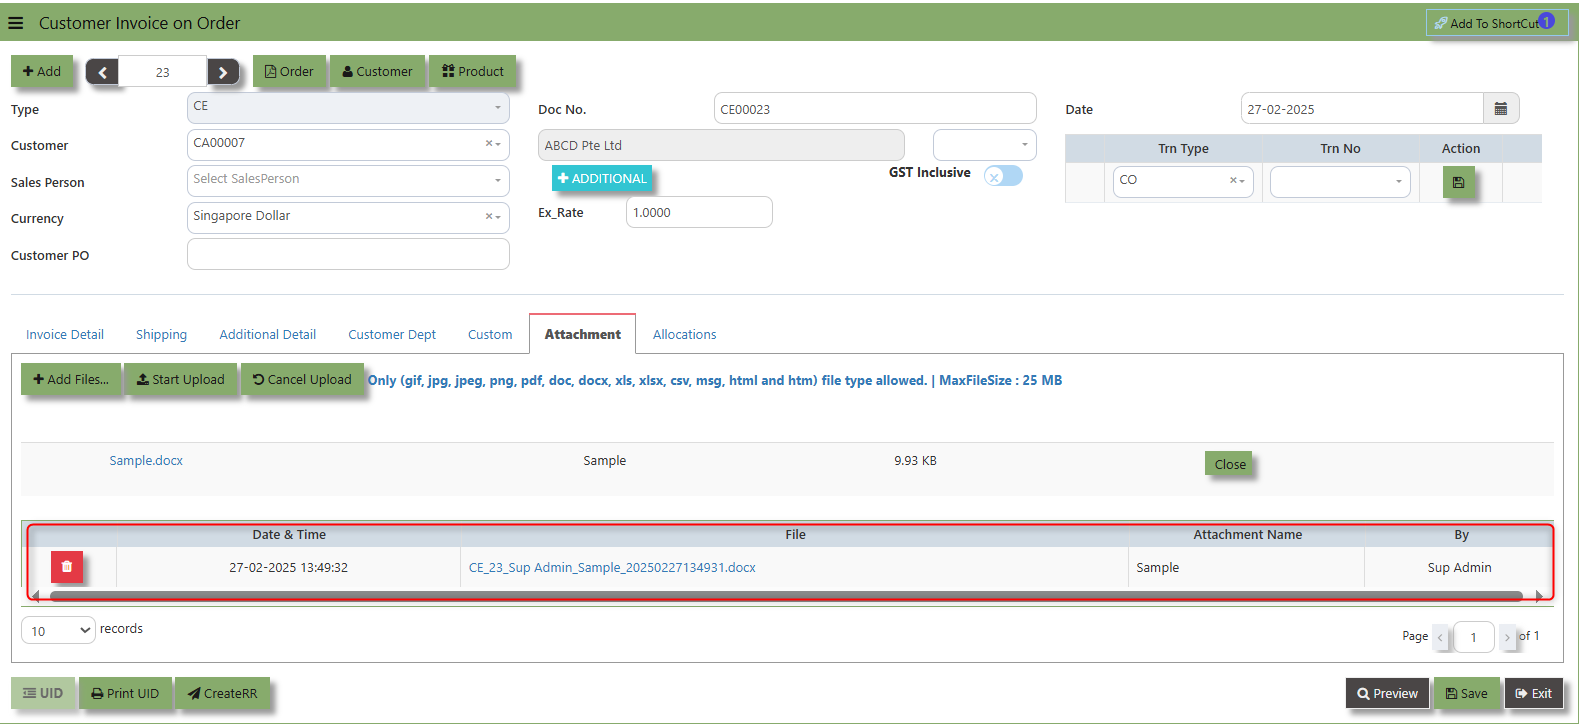
User may opt to cancel the uploading by clicking the "Cancel Upload" button and delete the file uploaded by clicking the "Bin icon" at the line detail.
___________________________________________________________________________________________________________________________________________
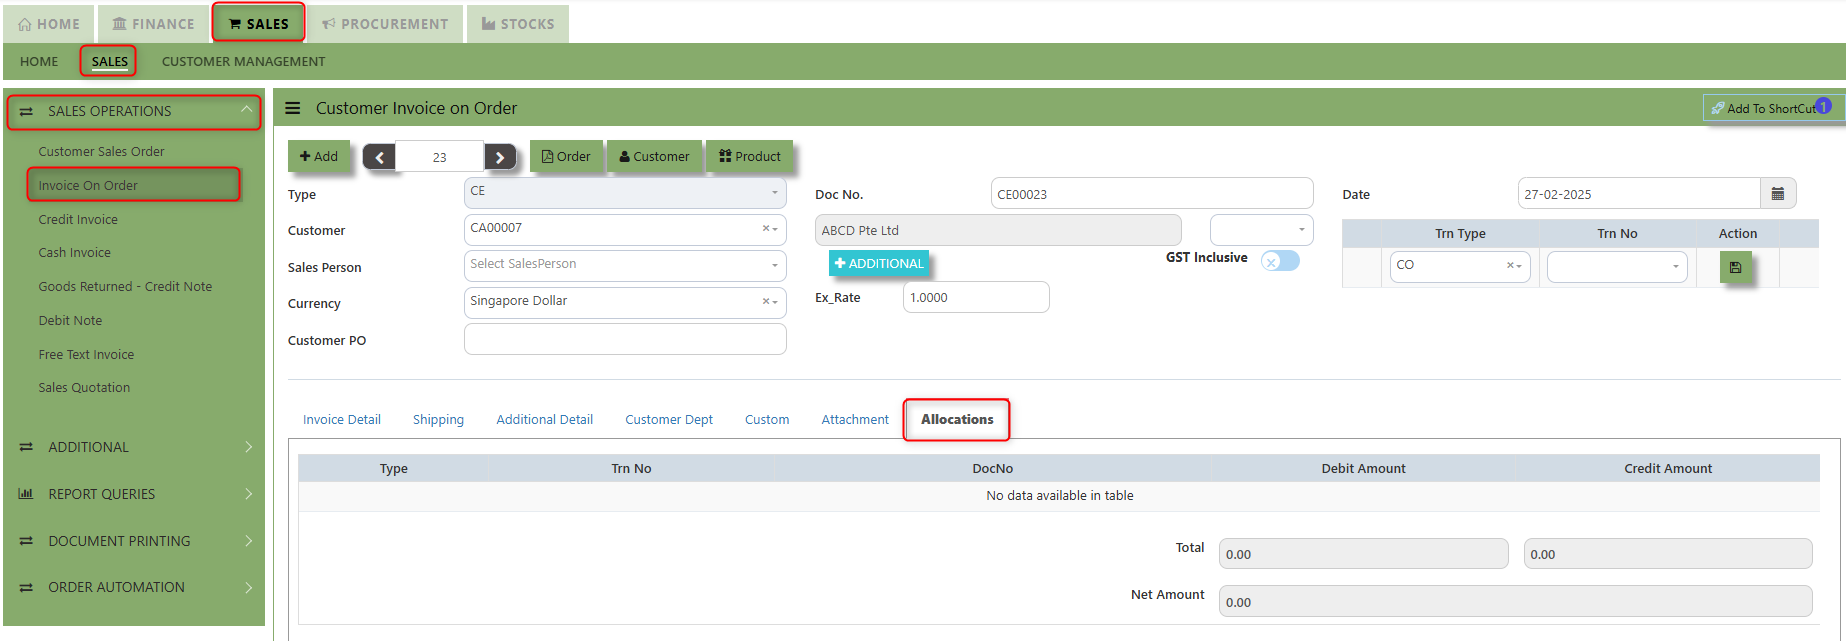
The Allocations Tab is used to manage and allocate the amounts or costs associated with the Customer Invoice on order. Click on SALES – SALES OPERATIONS – SALES INVOICE ON ORDER - ATTACHMENT TAB for the screen below.
Credit Invoice
A Customer Credit Invoice directly updates the inventory status and represents a direct transaction for invoicing. It will also update the Accounts Receivables at the same time.
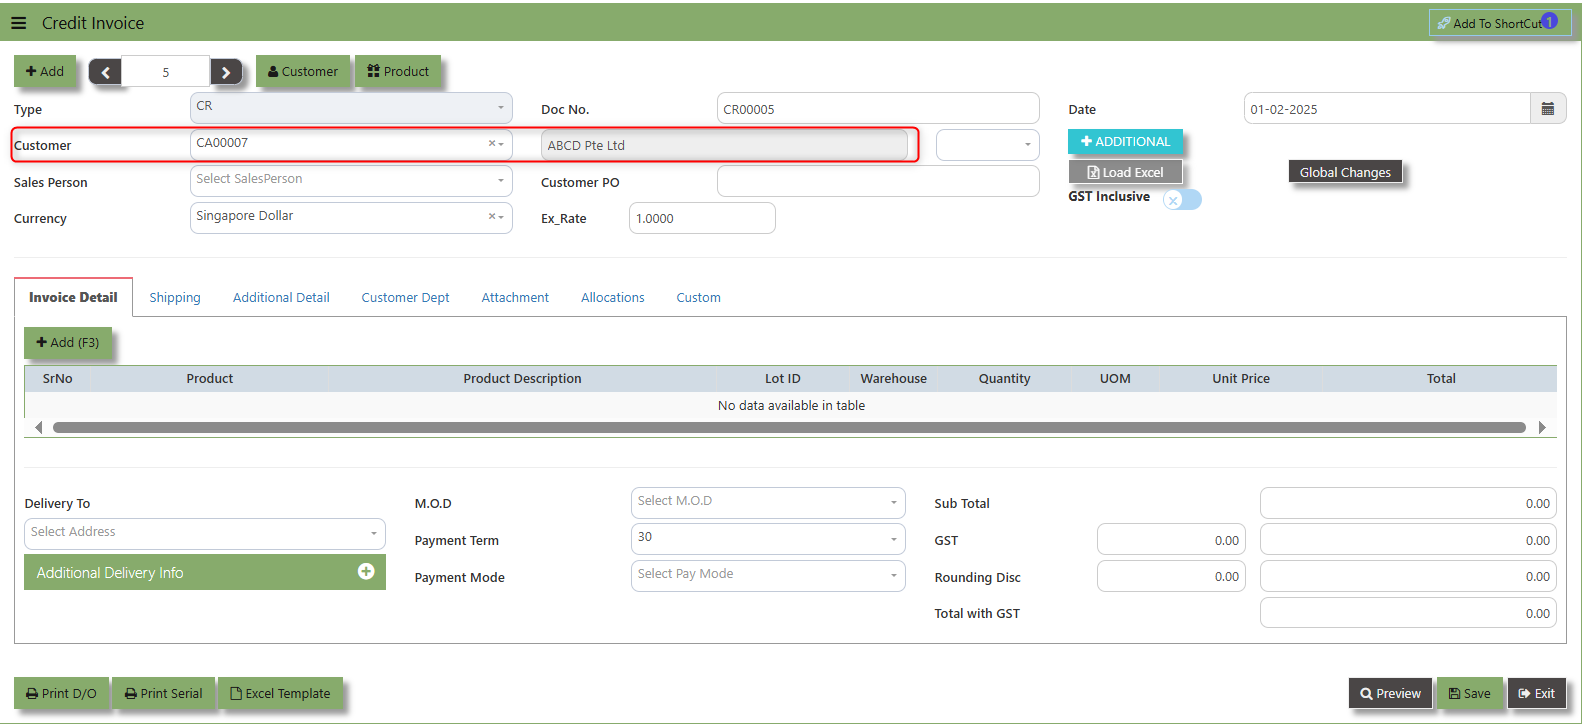
How to Create Credit Invoice?
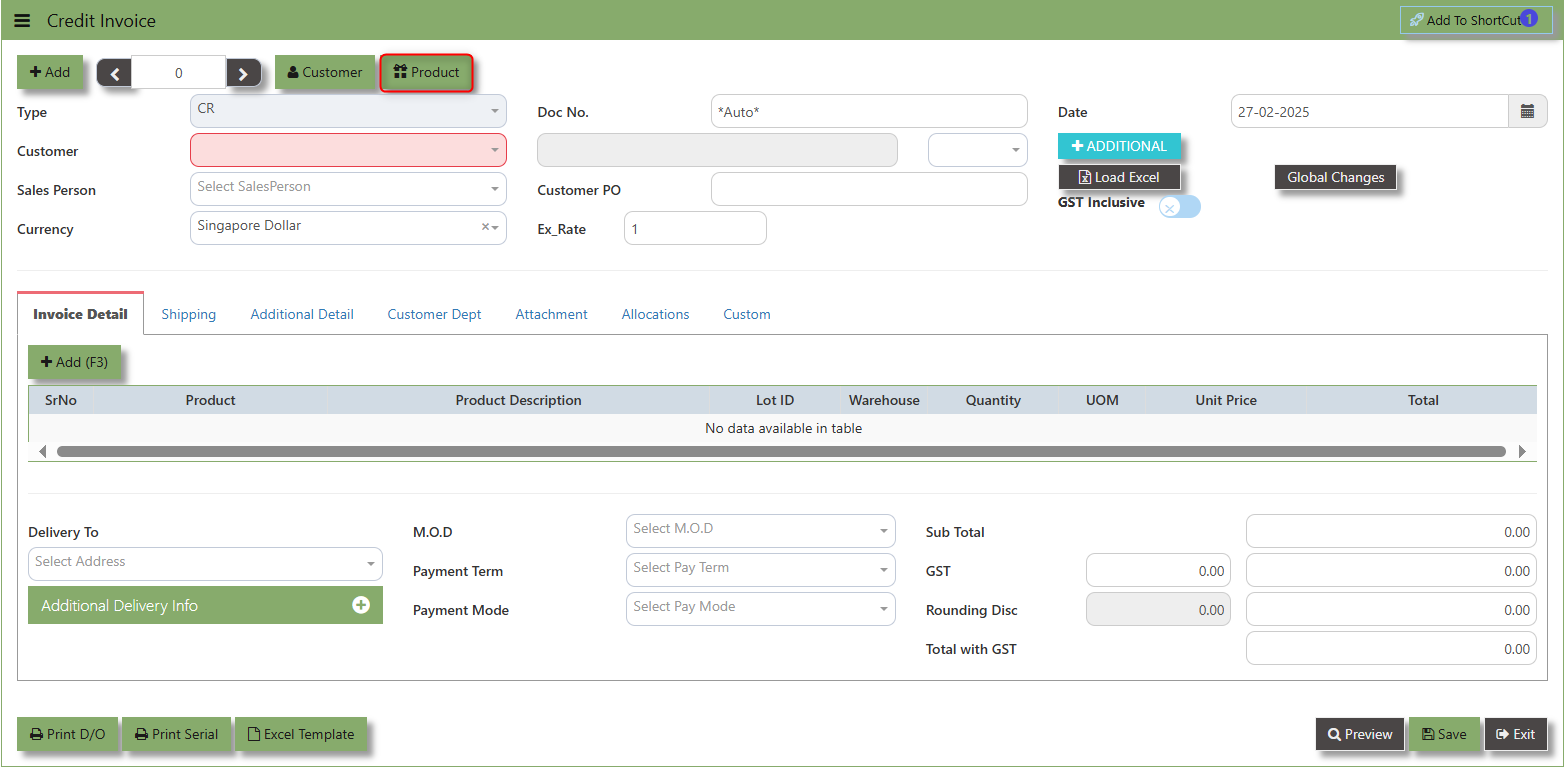
1. Click on SALES – SALES – SALES OPERATIONS – CREDIT INVOICE for the screen below.
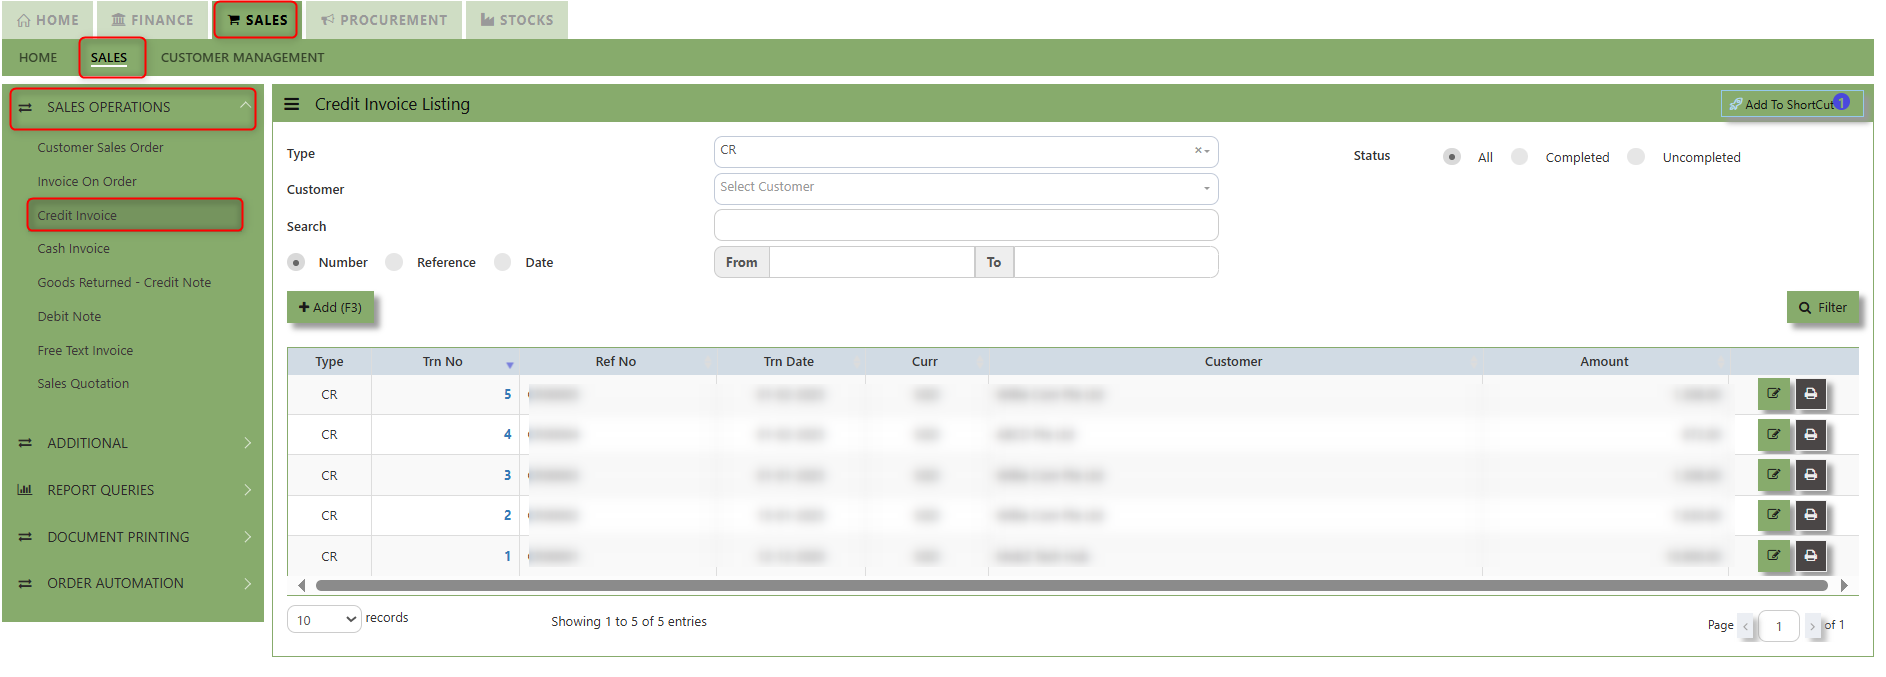
2. Click on Add button or press F3 to create a new transaction.
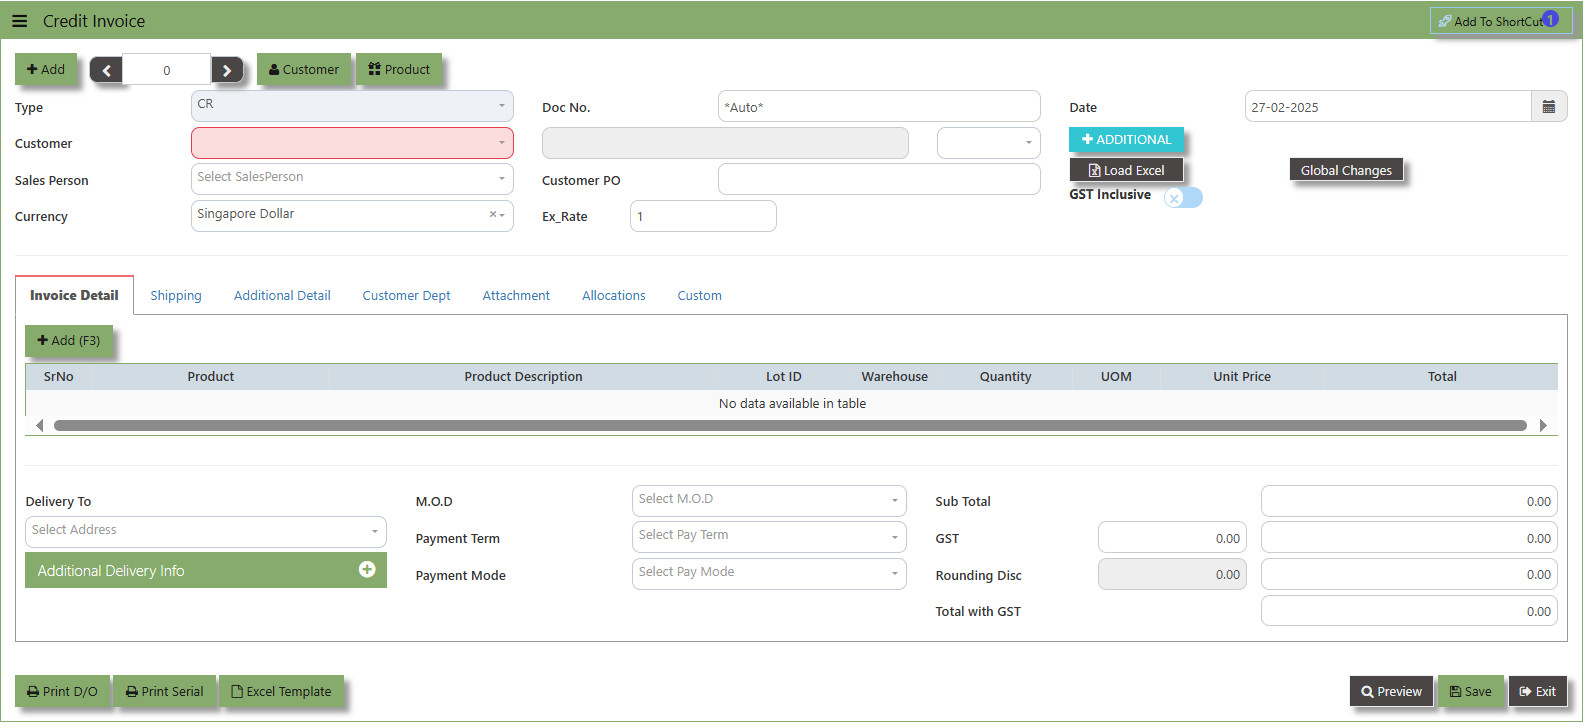
3. Click the Type - drop-down to select transaction type – CR (Credit Invoice).
4. After selecting the transaction type, you can use the tab button go to the Ref No. and Date fields to fill up the information.
5. Click the Customer - drop-down list to select the Customer for this invoice, followed by the Salesperson, PDS, Currency, Rate, Our D/O, Order Ref No. and Order Ref. Date if applicable.
6. After completing the above steps, you can go to the Details section to select the product items from the product drop
down list, as well as to specify the quantity and unit price. Save the transaction after this is done.
___________________________________________________________________________________________________________________________________________
Add to ShortCut - Used to create a shortcut for quick access to a specific sales transaction. By clicking this button, users can add the current sales invoice on order to a list of shortcuts, allowing them to access the invoice or related functionality quickly and efficiently, without needing to search for it each time.
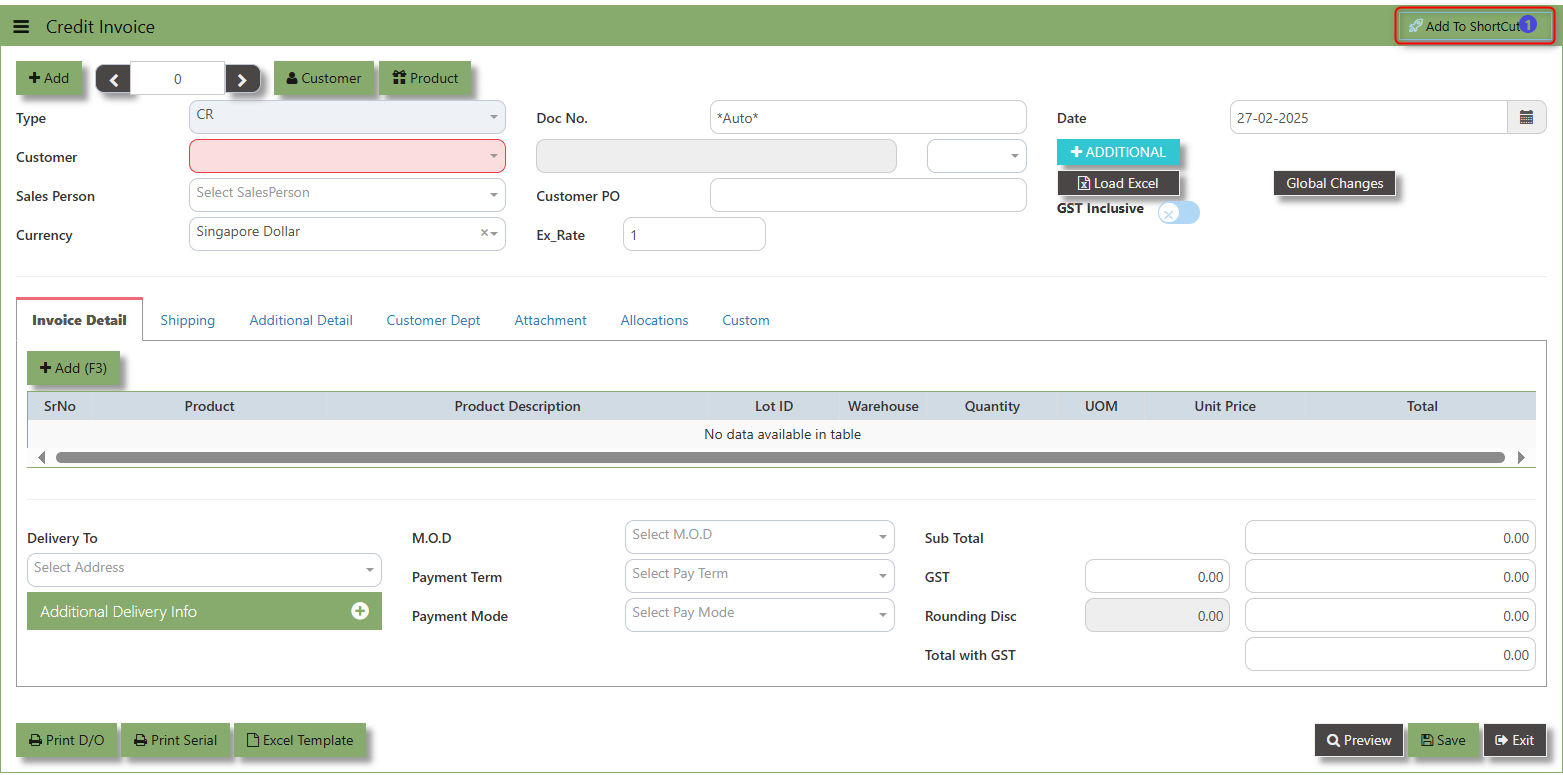
How to use Add to ShortCut?
1. Click "Add to ShortCut" and system will open below windows:

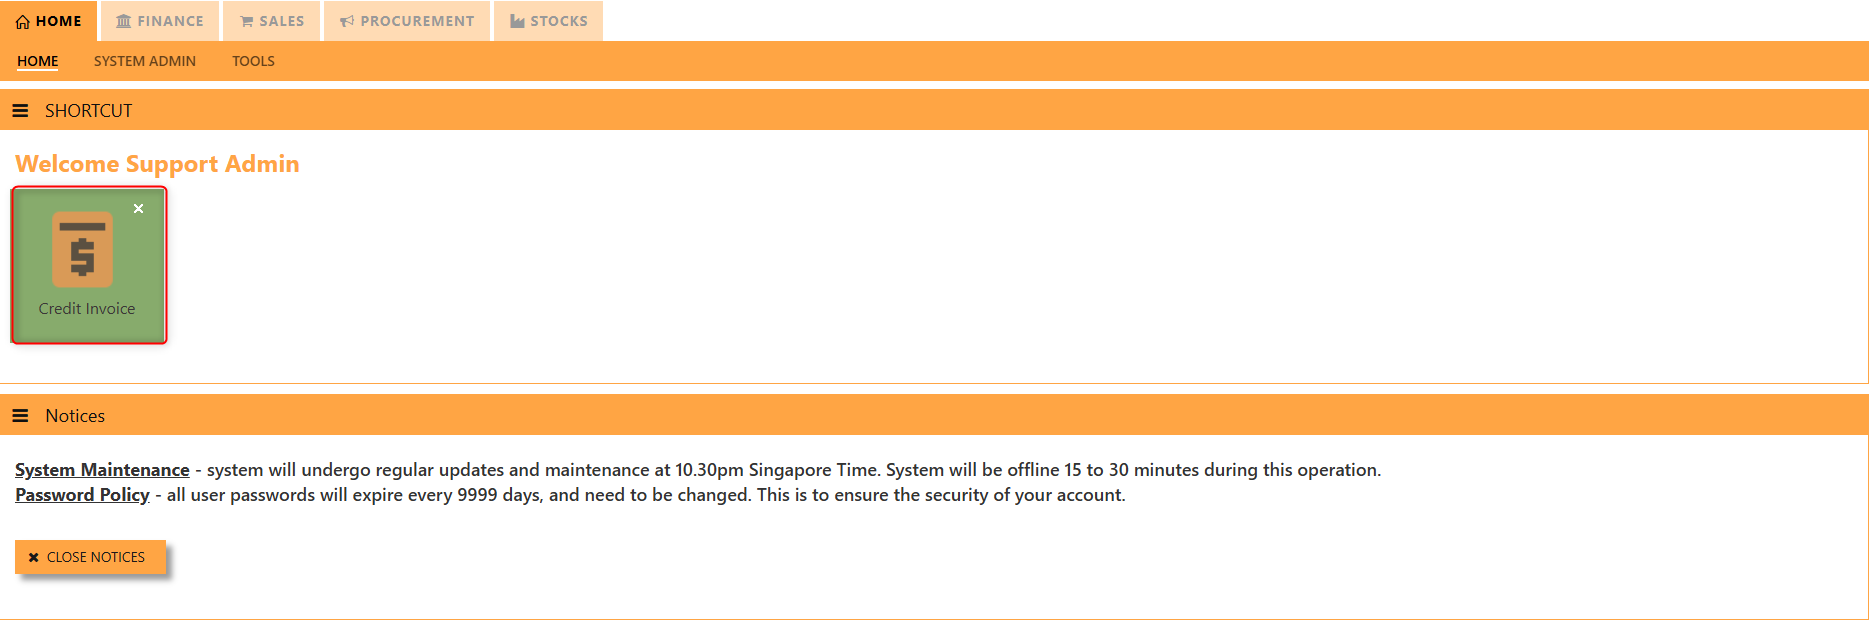
2. Enter Short Cut Description
3. Click SAVE then click OK.
4. User may look to the Homepage for the added function or page. Click on HOME - HOME - SHORTCUT for the screen below.
___________________________________________________________________________________________________________________________________________
The Customer button provides quick access to detailed supplier profiles under Customer maintenance.

The Product button provides quick access to product and service maintenance
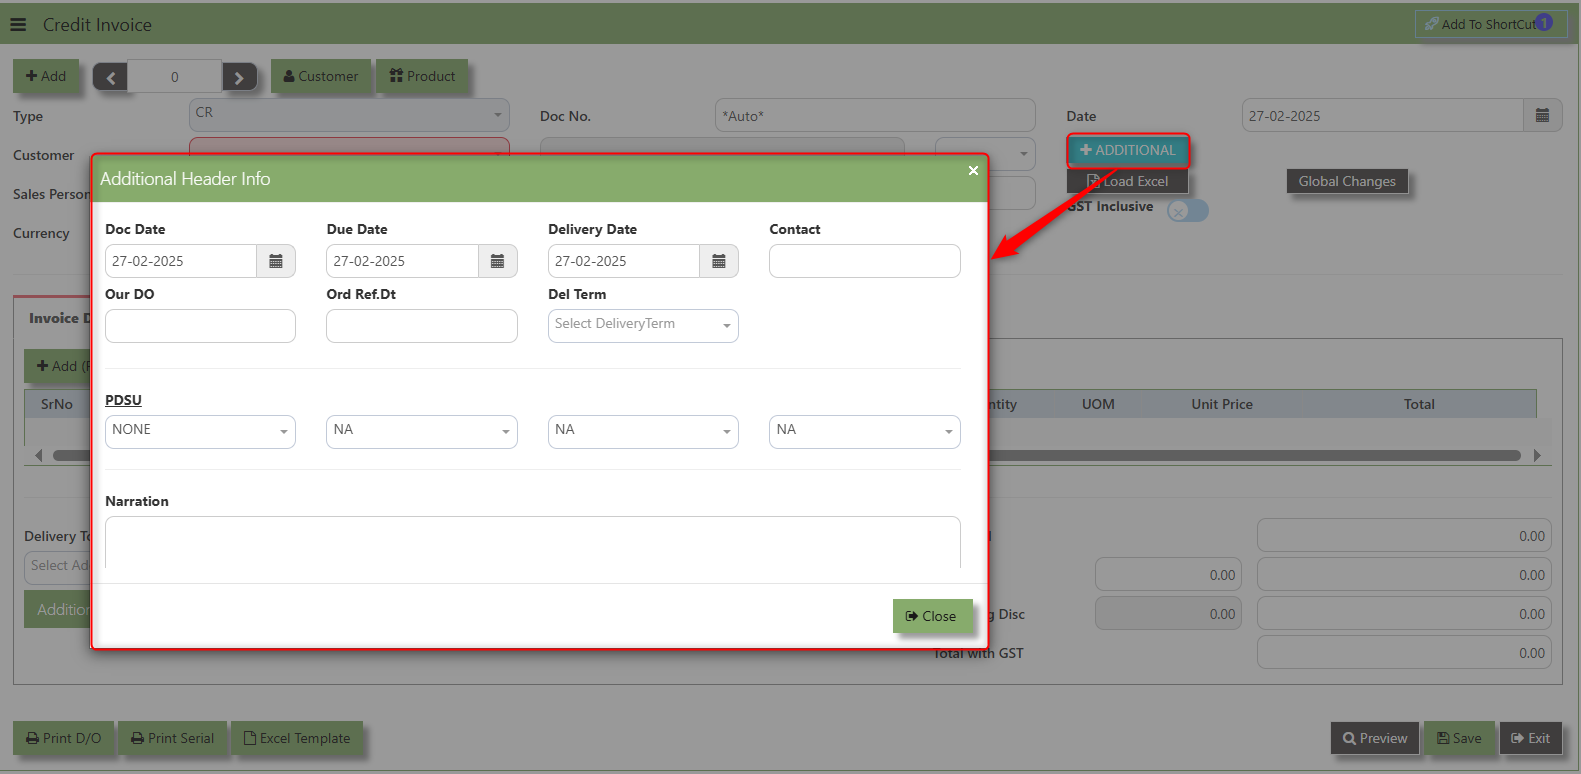
Additional Header Info button is typically used to capture and manage additional information related to the Sales Credit Invoice at the header level (i.e., Delivery date, Del Term , Indicative WH , Country, Lead Time, Contact, PDSU, Narration and Transaction Narration). This feature allows users to add extra data or notes that are relevant to the entire sales invoice on order.
The GST Inclusive checkbox indicates whether the unit price in the CE include Goods and Services Tax (GST) or not.
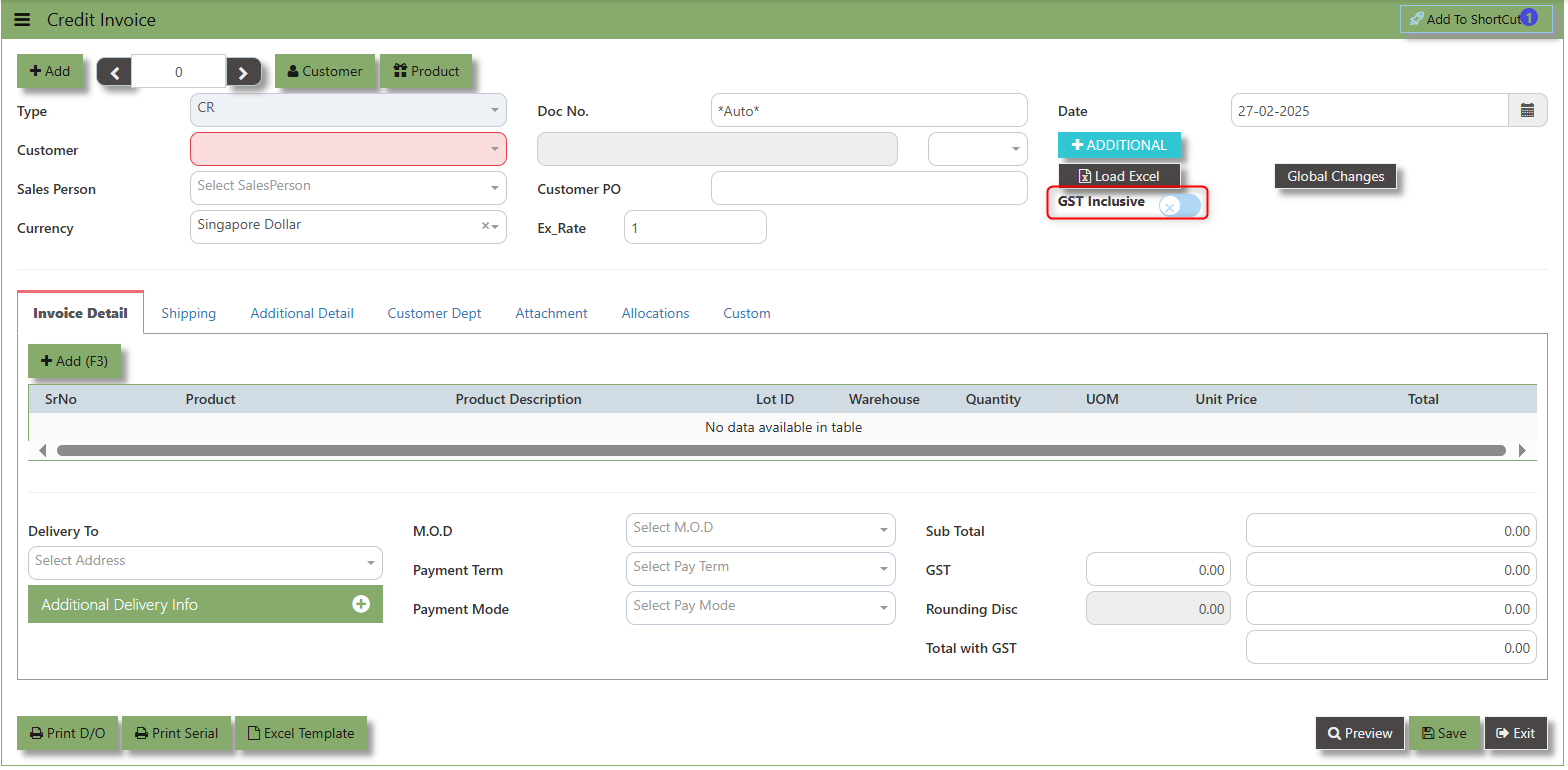
- When ticked (GST Inclusive): provided in the Sales Credit Invoice already includes the applicable GST amount. The GST amount will not be calculated or displayed separately, as it's already accounted for in the quoted price.
- When not ticked (GST Exclusive): The unit price is considered exclusive of GST. The system will calculate and add the GST based on the applicable tax rate, and the final total will be the sum of the base price plus the GST amount
How to use Global Changes?
1.Click "Global Changes" and system will open below windows:
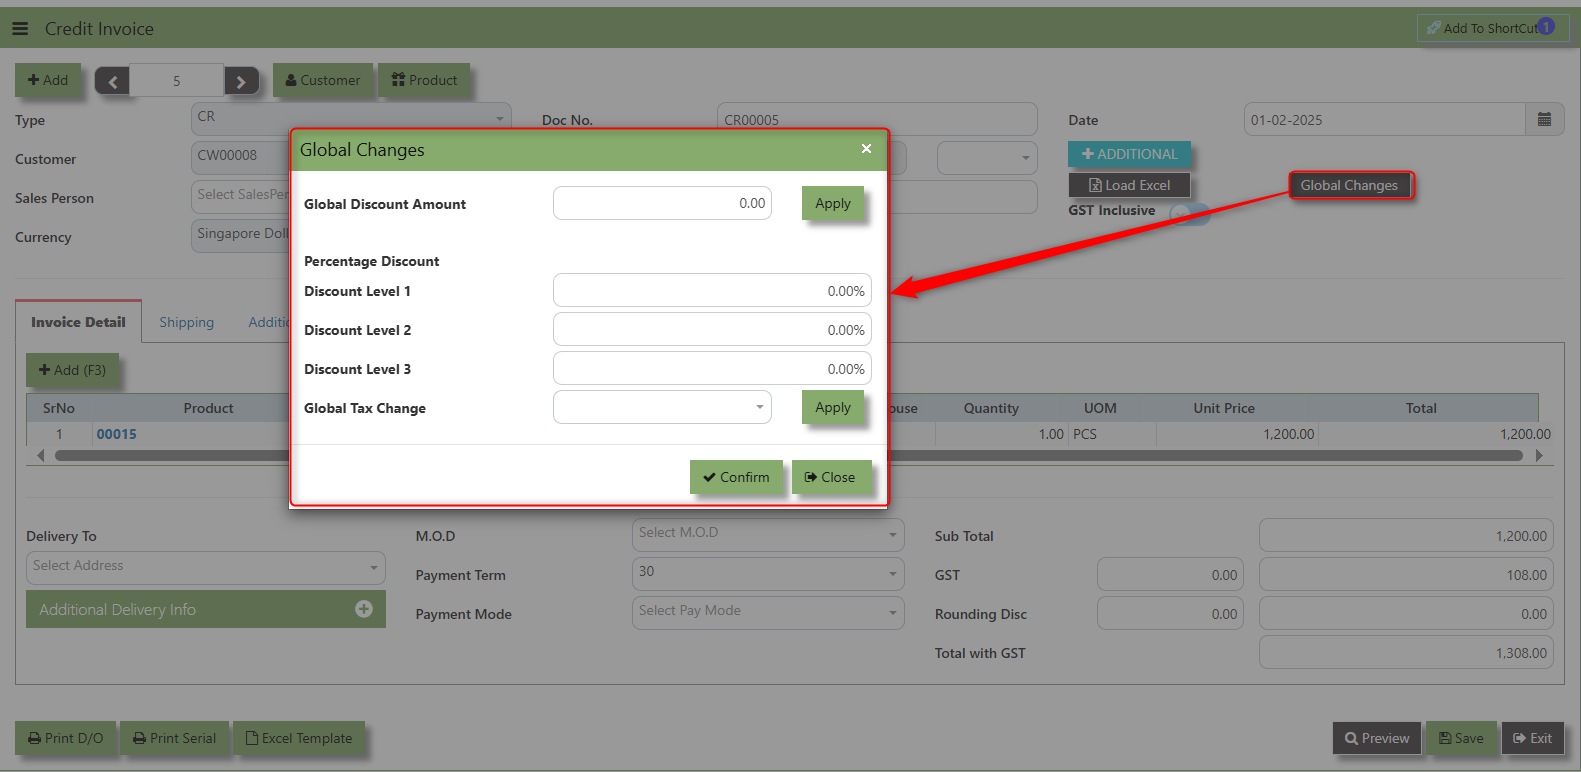
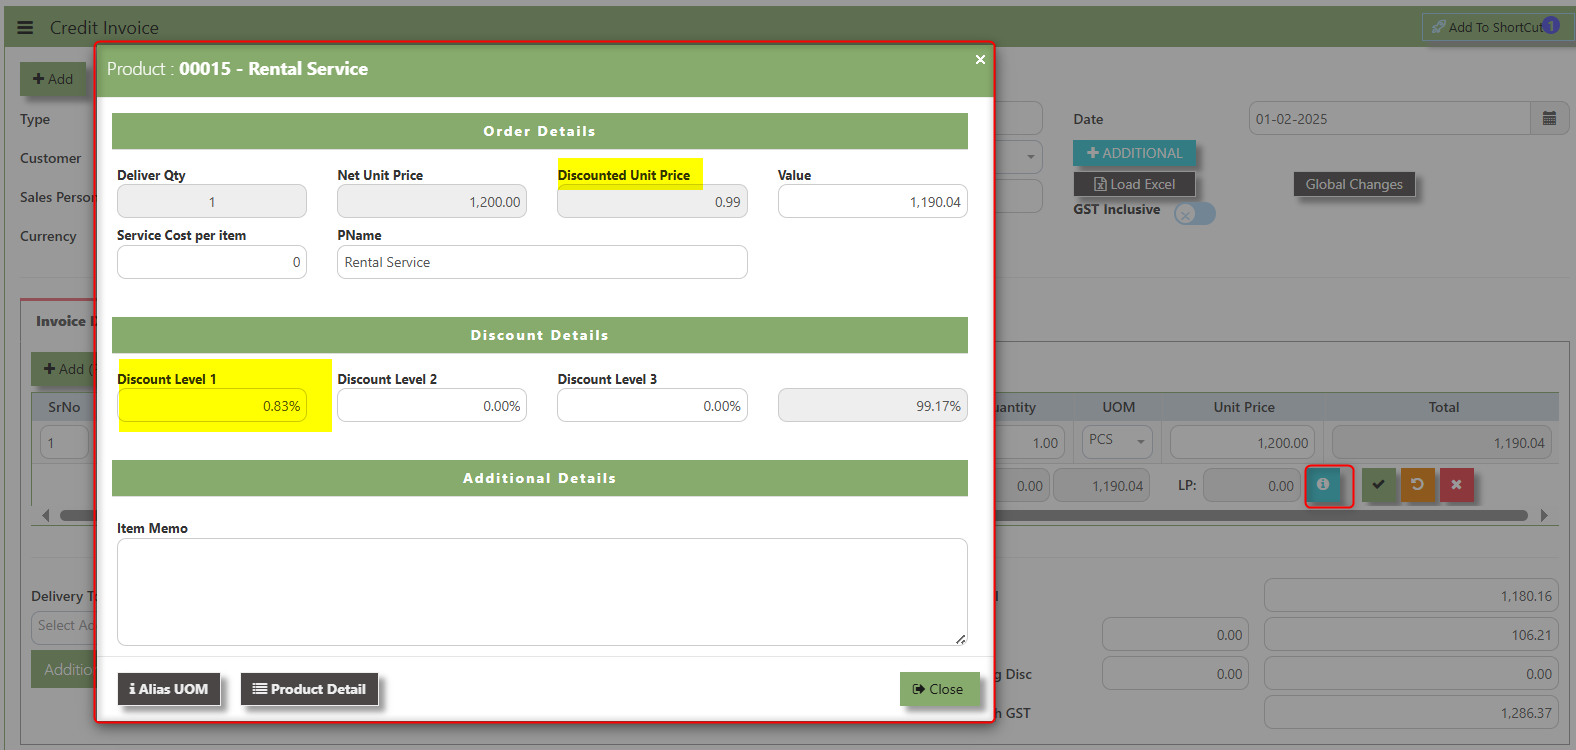
2. Add a Discount to the transaction if its Global Discount Amount or Percentage Discount.
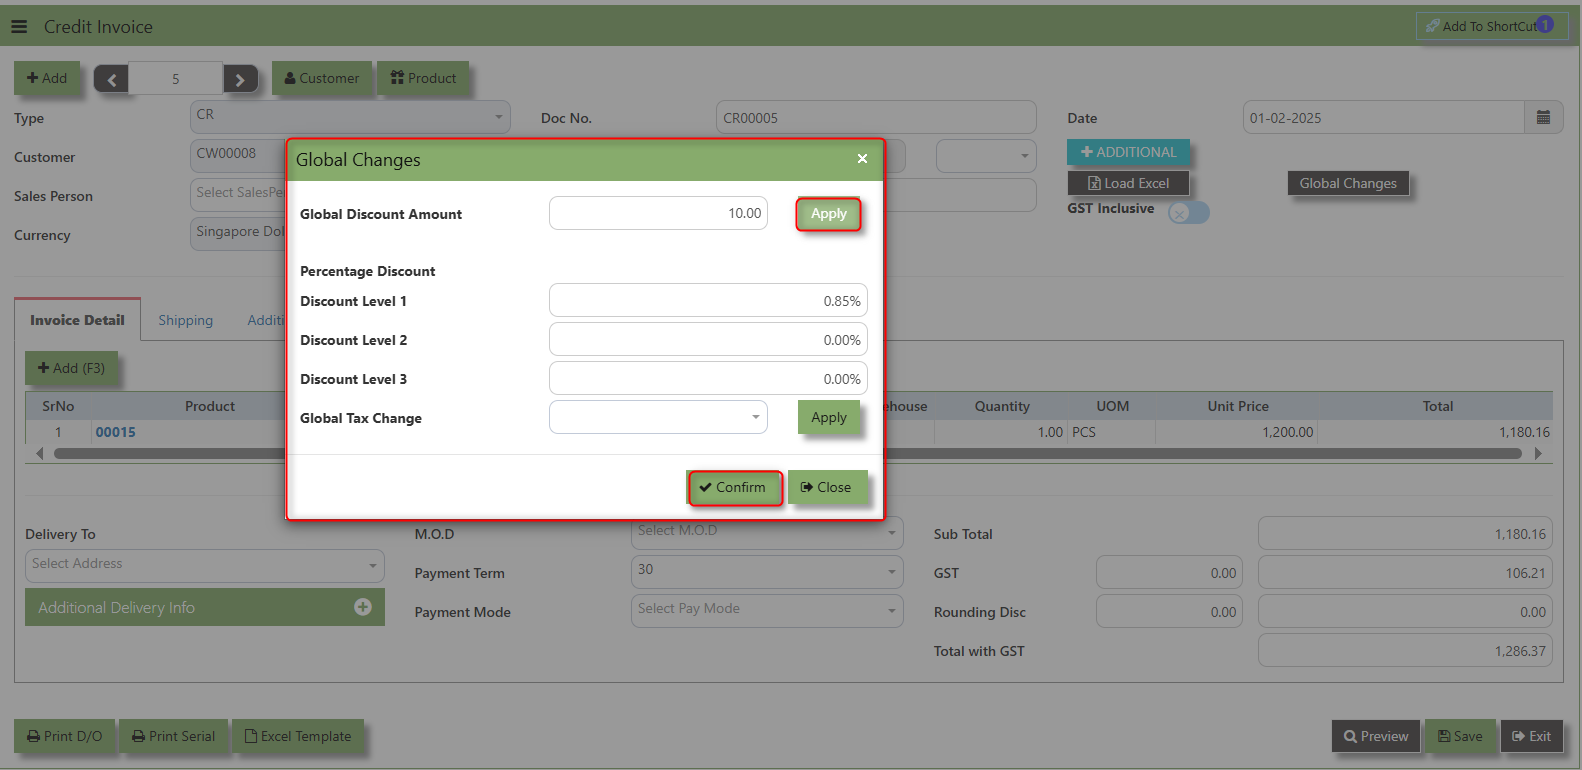
3. Click Apply and Confirm button, the discount will be automatically captured in the line item and in the transaction.
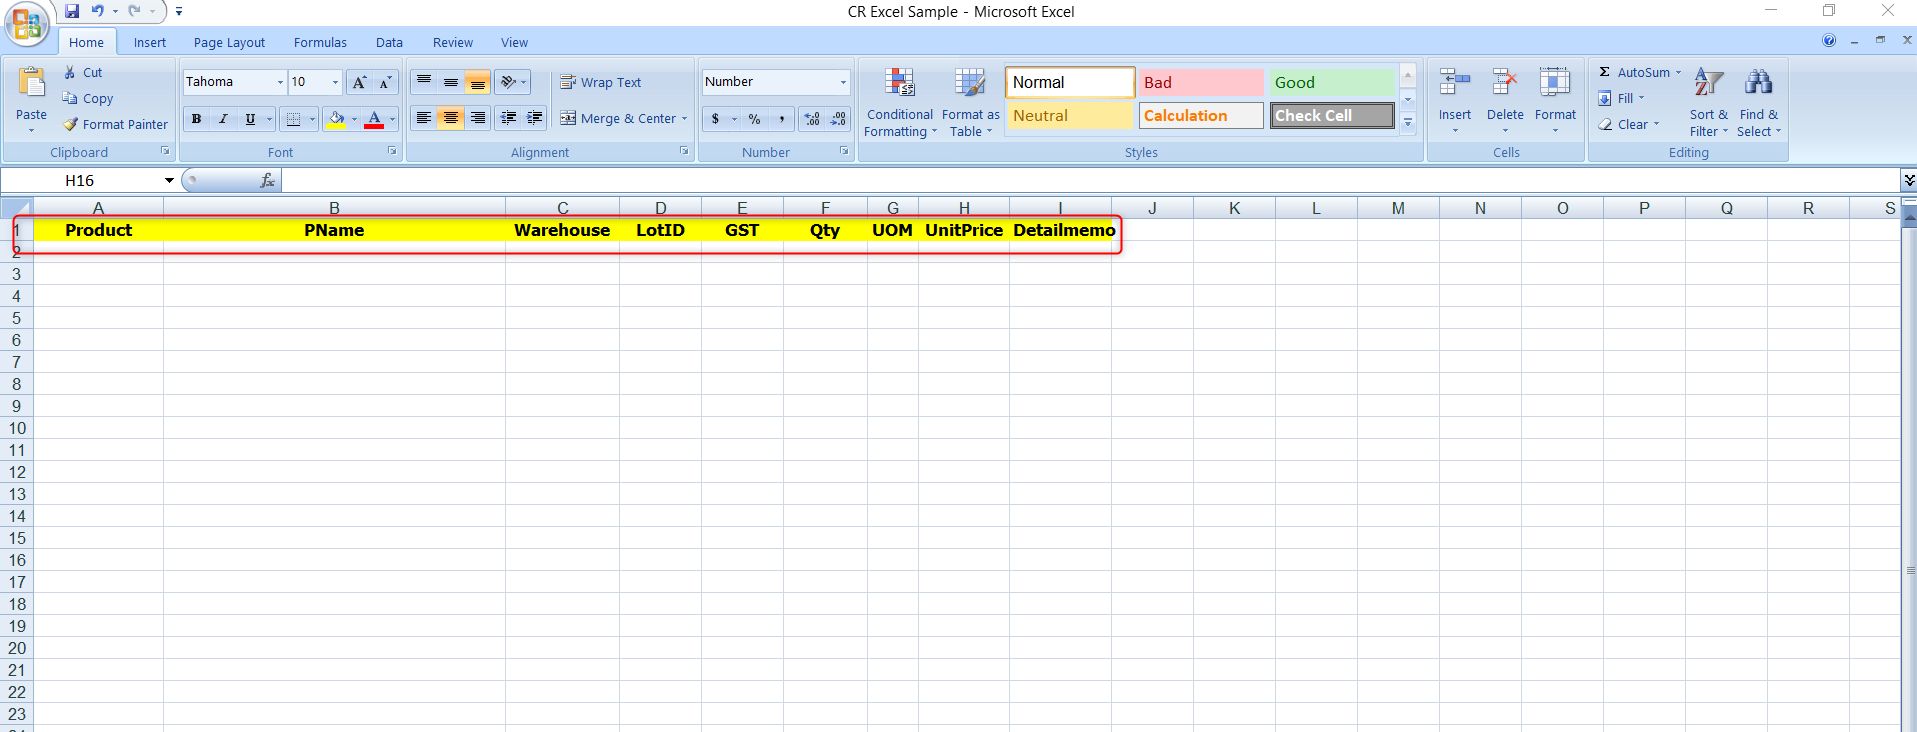
Load Excel - When users have an Excel file from Excel Template with Credit Invoice information (ie Warehouse, Product, Pname, UOM, Quantity, Unit Price, GST type, Line Discount, Detail Memo) the "Load Excel" button allows them to upload and import this data directly into the system. This eliminates the need for manual entry of the data into the system's Credit Invoice fields.
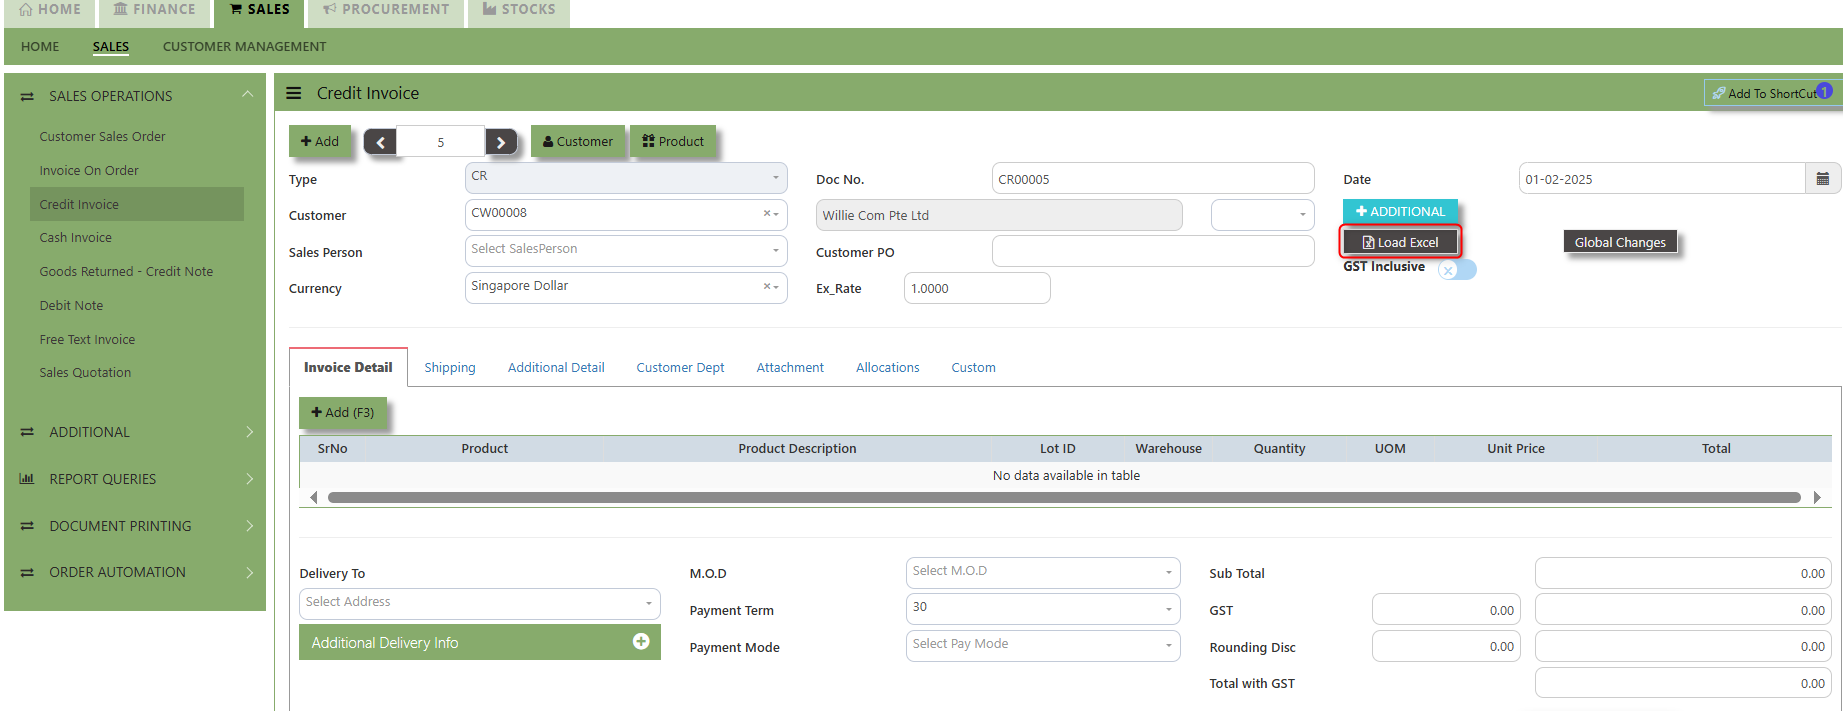
How to use Load Excel?
1. Click the Customer - drop-down list to select Customer Name
2. Download the Excel Template and ensure the Excel file you plan to upload is formatted correctly. It should contain all the necessary fields required for credit invoice, such as:
- Warehouse
- Product Code
- Product Name
- LotID
- GST Type
- Quantity
- UOM
- Unit Price
- Detail Memo
3. Click the Load Excel button to open the file upload interface. This may open a file browser or prompt you to select the Excel file you want to upload.

4. Once the filed uploaded, system will prompt a message that record has been imported successfully.
5. After the import is complete, review the imported credit invoice in the system to ensure everything has been transferred correctly. This might include checking that the order details, such as item descriptions, quantities, prices, and customers, are accurate.
6. Once the data is imported successfully and checking is done, you can proceed to save the sales order as required by your workflow. This may involve further approvals or other processes depending on the organization's procedures.
___________________________________________________________________________________________________________________________________________
Shipping Tab a section where specific shipping-related information is entered and managed for the sold goods or services. This tab ensures that all relevant details regarding the shipment, delivery location, and delivery expectations are captured in the system to facilitate smooth and accurate order fulfillment.
How to set Shipping Info?
1. Click on SALES – SALES OPERATIONS – CREDIT INVOICE - SHIPPING TAB for the screen below.
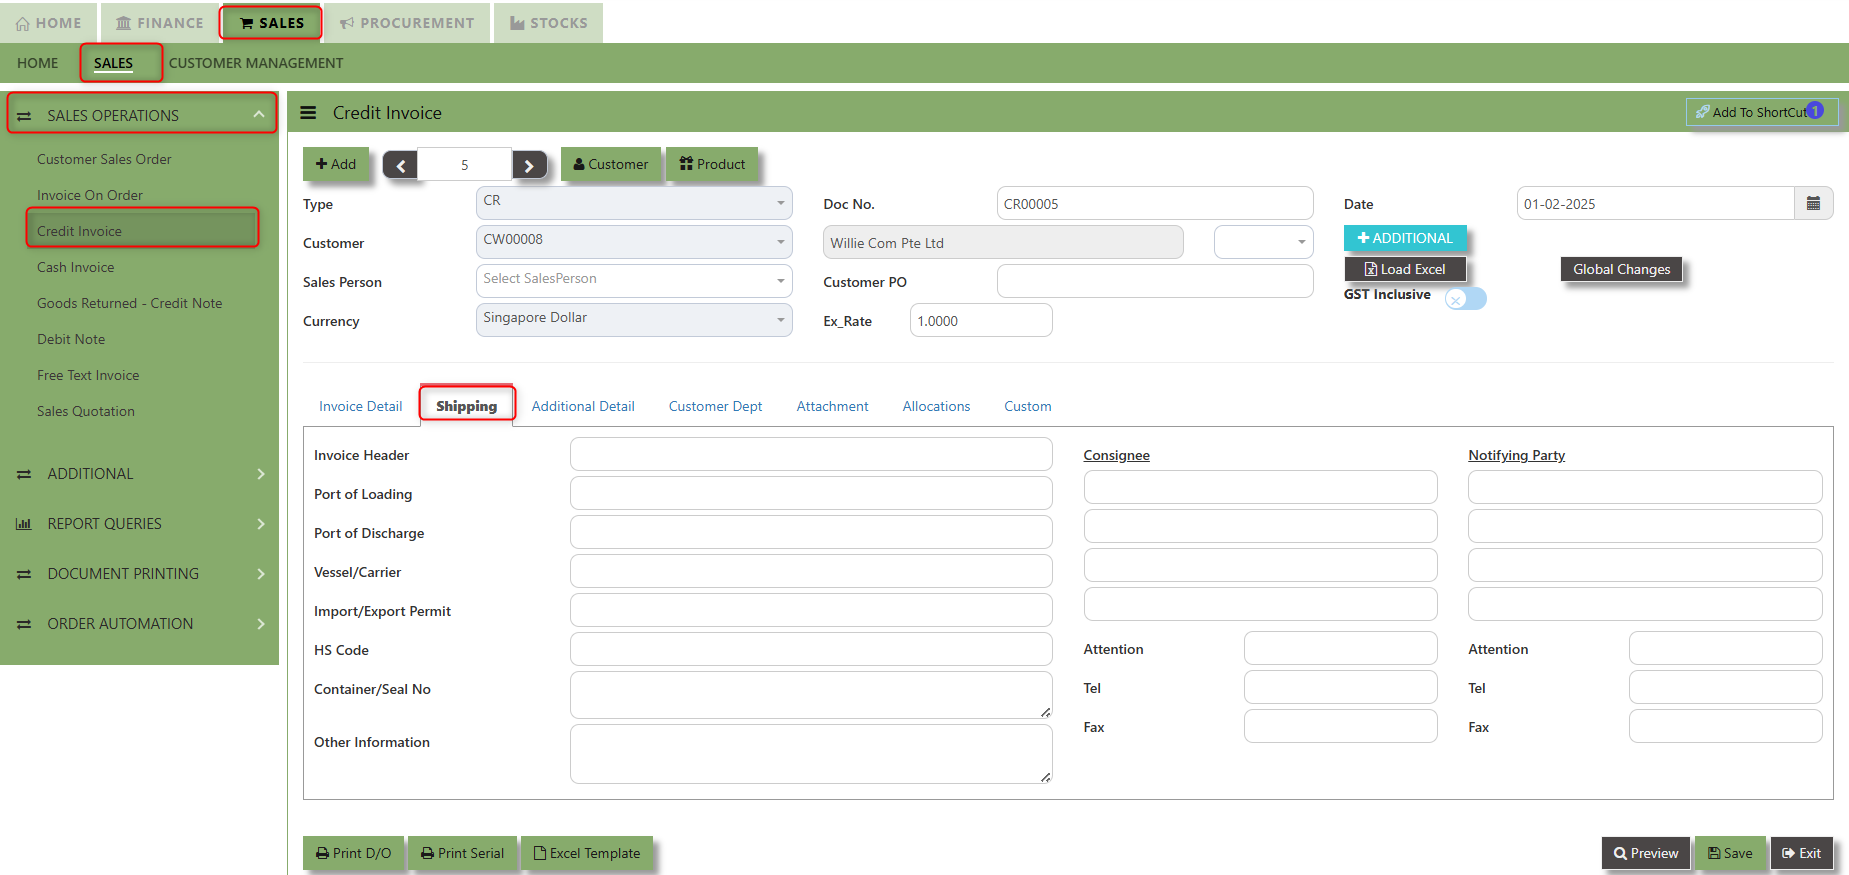
2. Input the below details for the below fields:
-
- Invoice Header
- Port of Loading
- Port of Discharge
- Vessel/Carrier
- Import/Export Permit
- HS Code
- Container/Seal No
- Other Information
- Consignee
- Attention
- Tel
- Fax
- Notifying Party
- Attention
- Tel
- Fax
3. Once keyed in the necessary details, click the next tab and will automatically save all the information then system will prompt you a message.

___________________________________________________________________________________________________________________________________________
Additional Detail Tab a section where the additional information is entered . This tab ensures that all relevant details regarding the Narration, Inco Terms , billing address warranty terms Selling conditions , and special instruction are captured in the system to facilitate smooth and accurate sales quotation.
How to set Additional Detail?
1. Click on SALES – SALES OPERATIONS –CREDIT INVOICE - ADDITIONAL DETAILS TAB for the screen below.
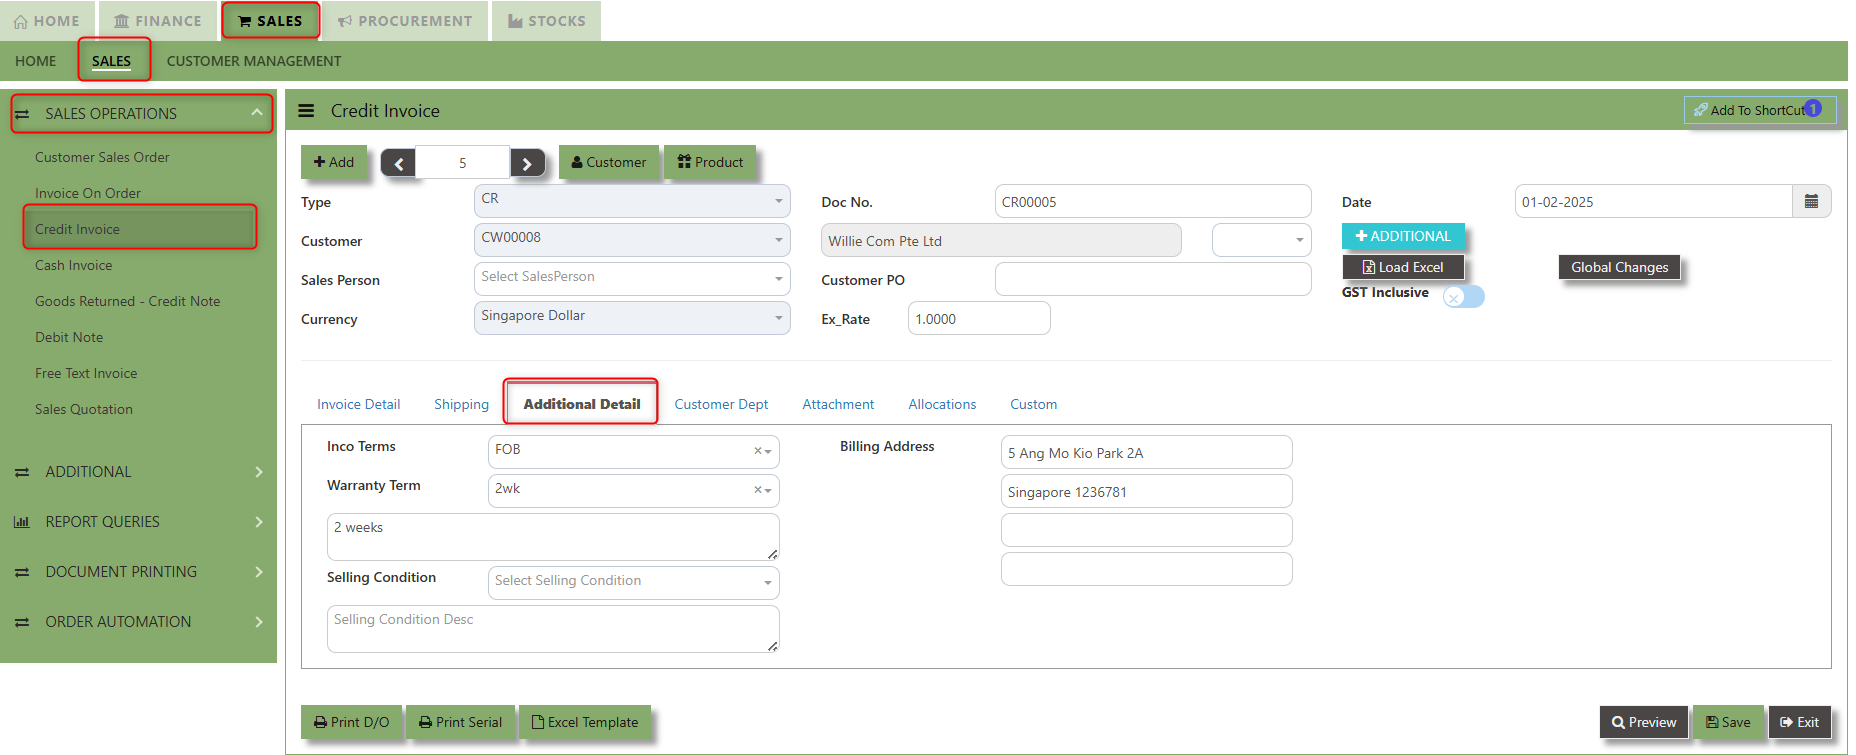
2. Input the below details for the below fields:
-
- Narration
- Billing Address
- Inco Terms
- Warranty Terms
- Selling Condition
- Inquiry Received Date
- Quotation Sent Date
3. Once keyed in the necessary details, click the next tab and will automatically save all the information.
___________________________________________________________________________________________________________________________________________
"Customer Dept Tab" section where the Customer Department information is entered. This tab ensures that all relevant details regarding Customer Department details which is linked to the Customer Maintenance under Department Tab
- Click on SALES – SALES OPERATIONS – CREDIT INVOICE - CUSTOMER DEPT TAB for the screen below.
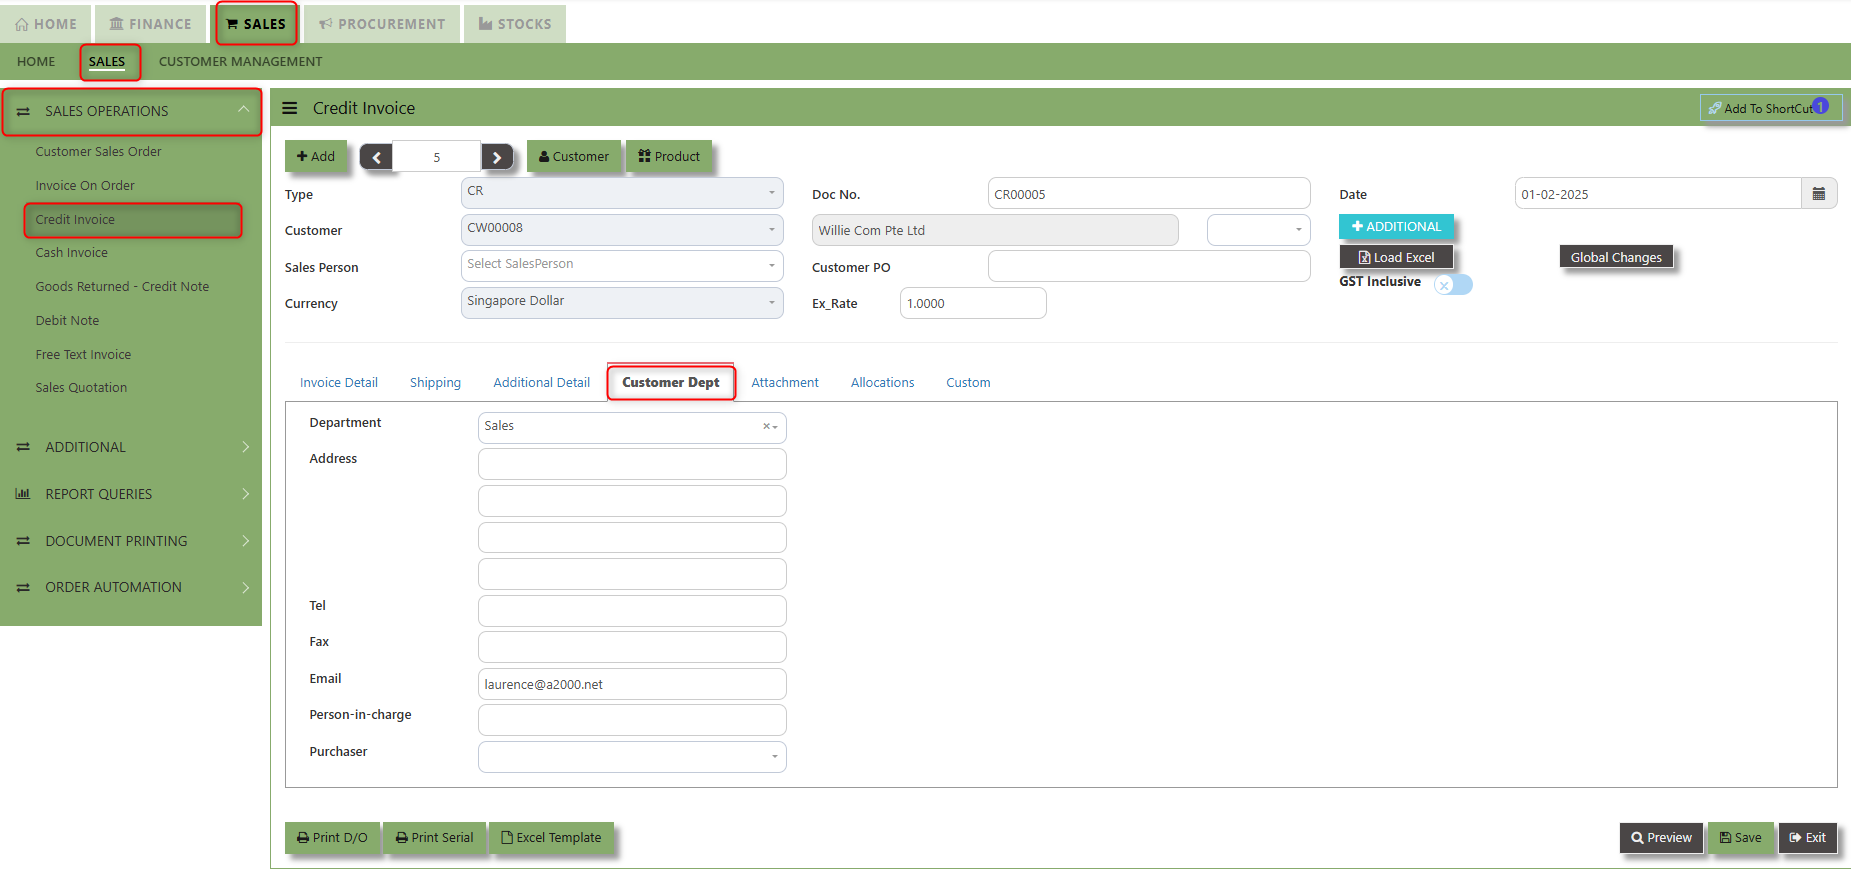
The drop down selection for Customer Dept and Purchaser is maintained in Customer Maintenance under Department Tab

__________________________________________________________________________________________________________________________________________
"Attachment Tab" allows users to attach various files and documents related to the sales order. By attaching relevant files, users ensure that all purchase-related information is kept in one place, making the sales process smoother, more transparent, and easier to track.
How to use Attachment Tab?
1. Click on SALES – SALES OPERATIONS – CREDIT INVOICE – ATTACHEMENT TAB for the screen below.
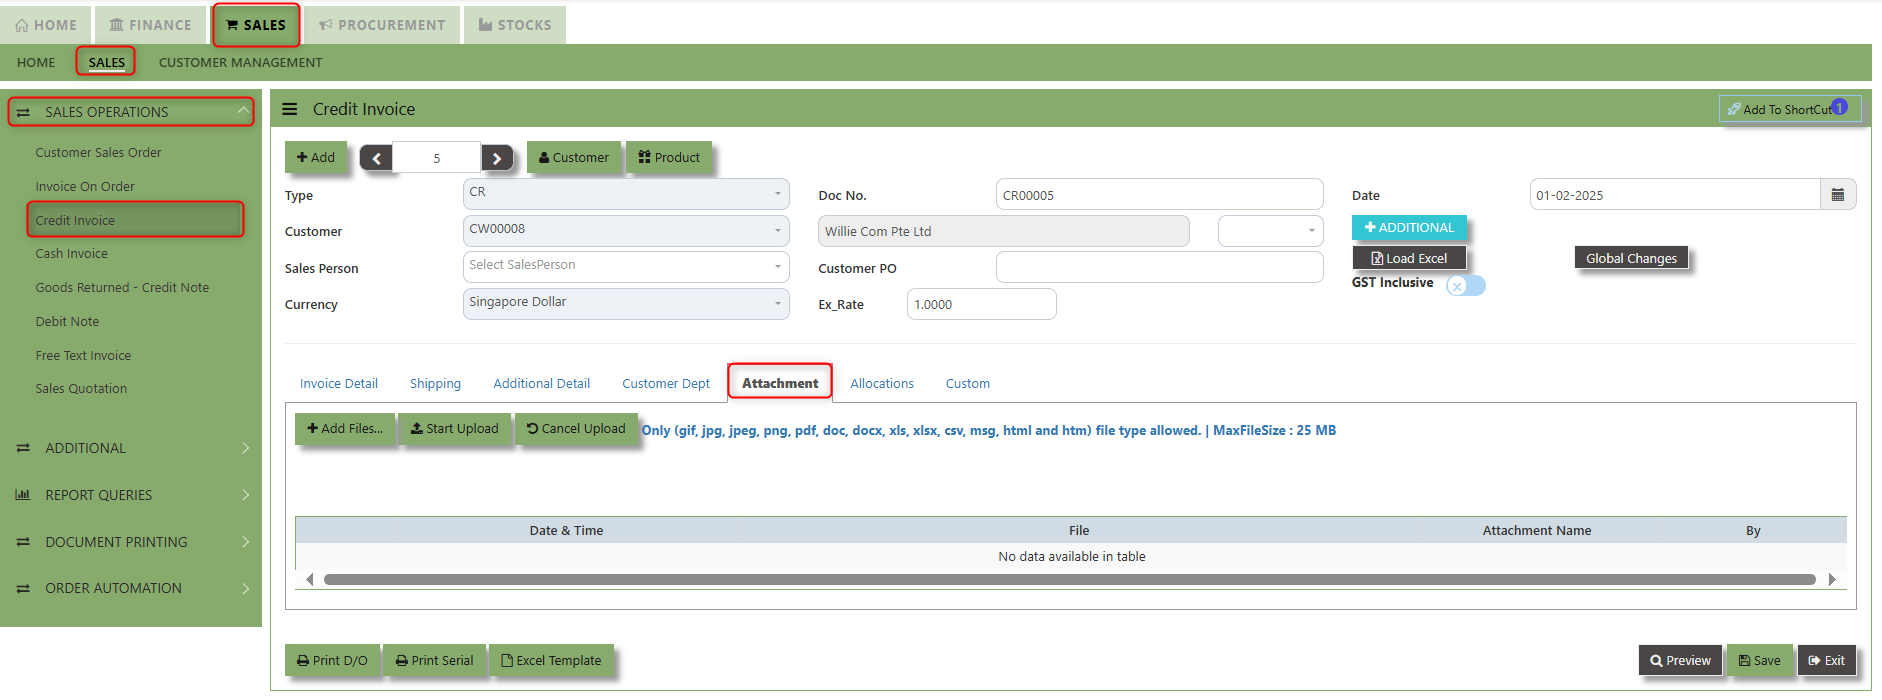
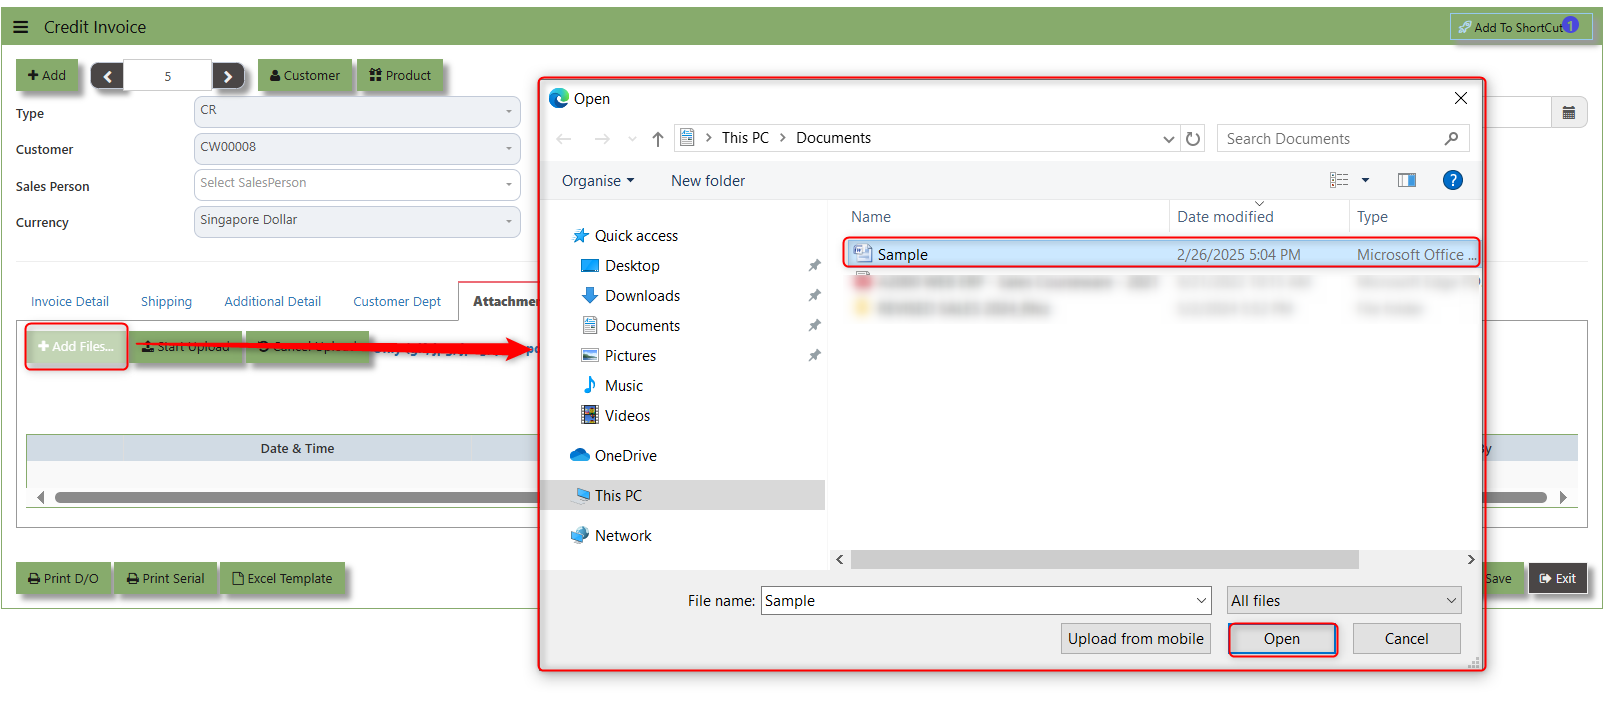
2. Click +Add files and windows will prompt then choose the file you want to upload by clicking open. Kindly take note the file types and maximum size requirements in uploading: Only (gif, jpg, jpeg, png, pdf, doc, docx, xls, xlsx, csv, msg, html and htm) file type allowed. | MaxFileSize : 25 MB
3. Key in the Attachment Name then click start to upload.
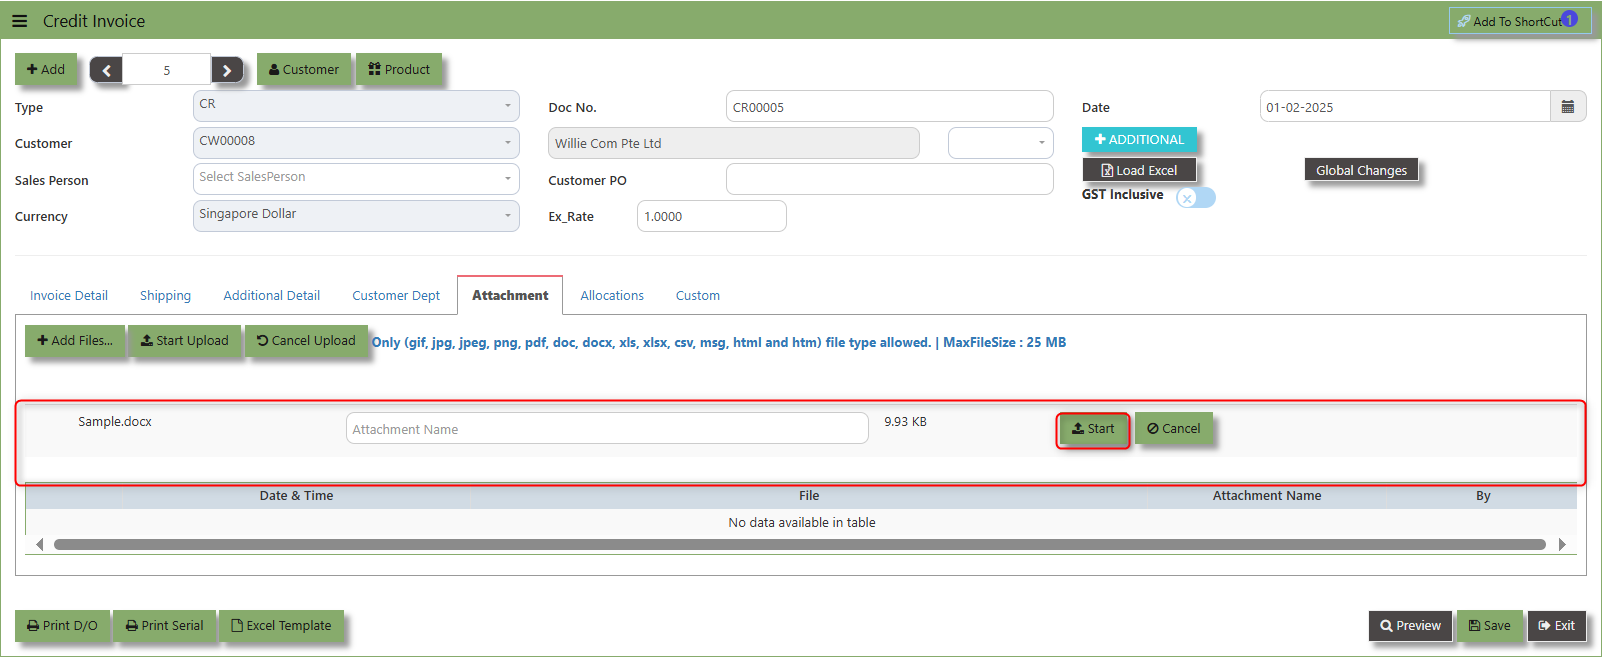
4.Once the file attached, click "SAVE" button
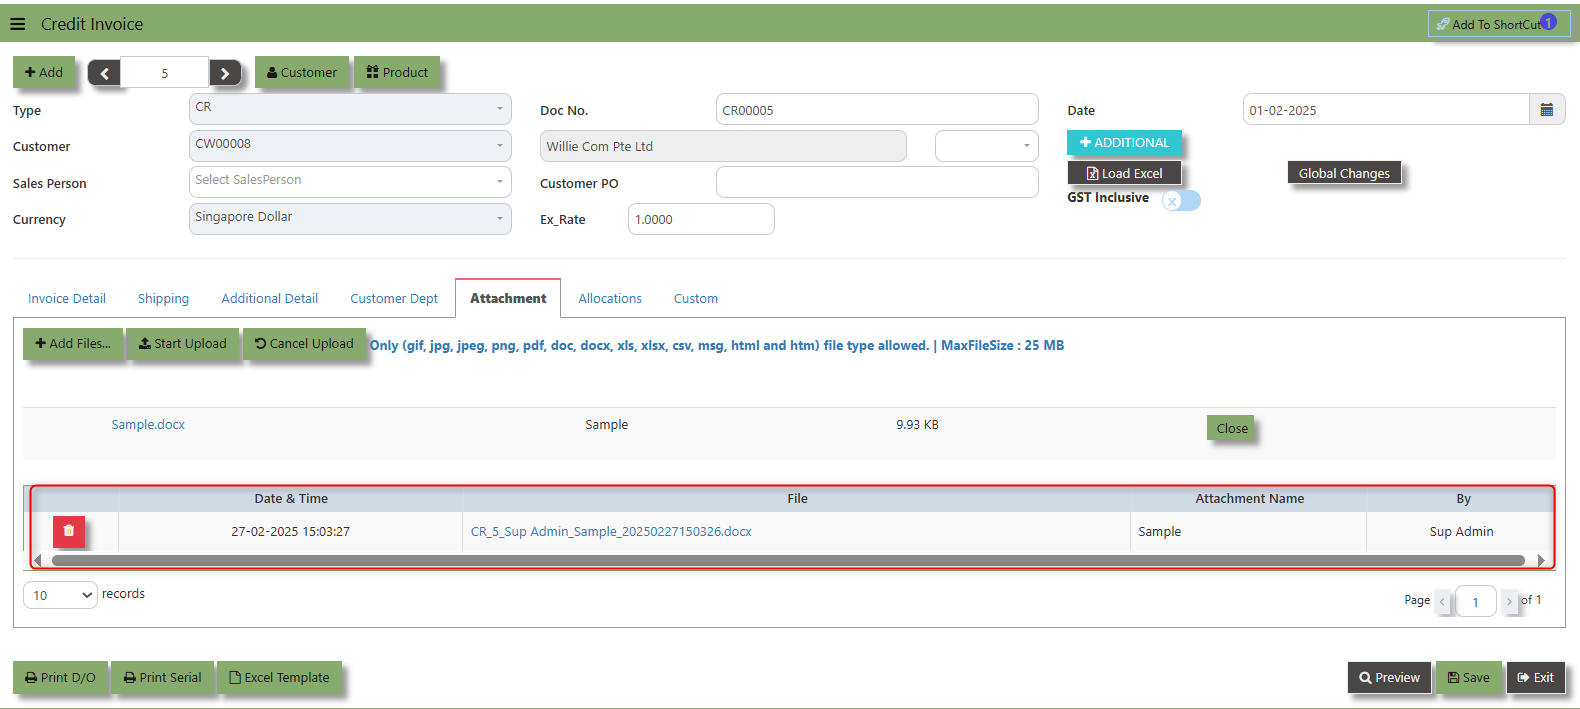
User may opt to cancel the uploading by clicking the "Cancel Upload" button and delete the file uploaded by clicking the "Bin icon" at the line detail.
___________________________________________________________________________________________________________________________________________
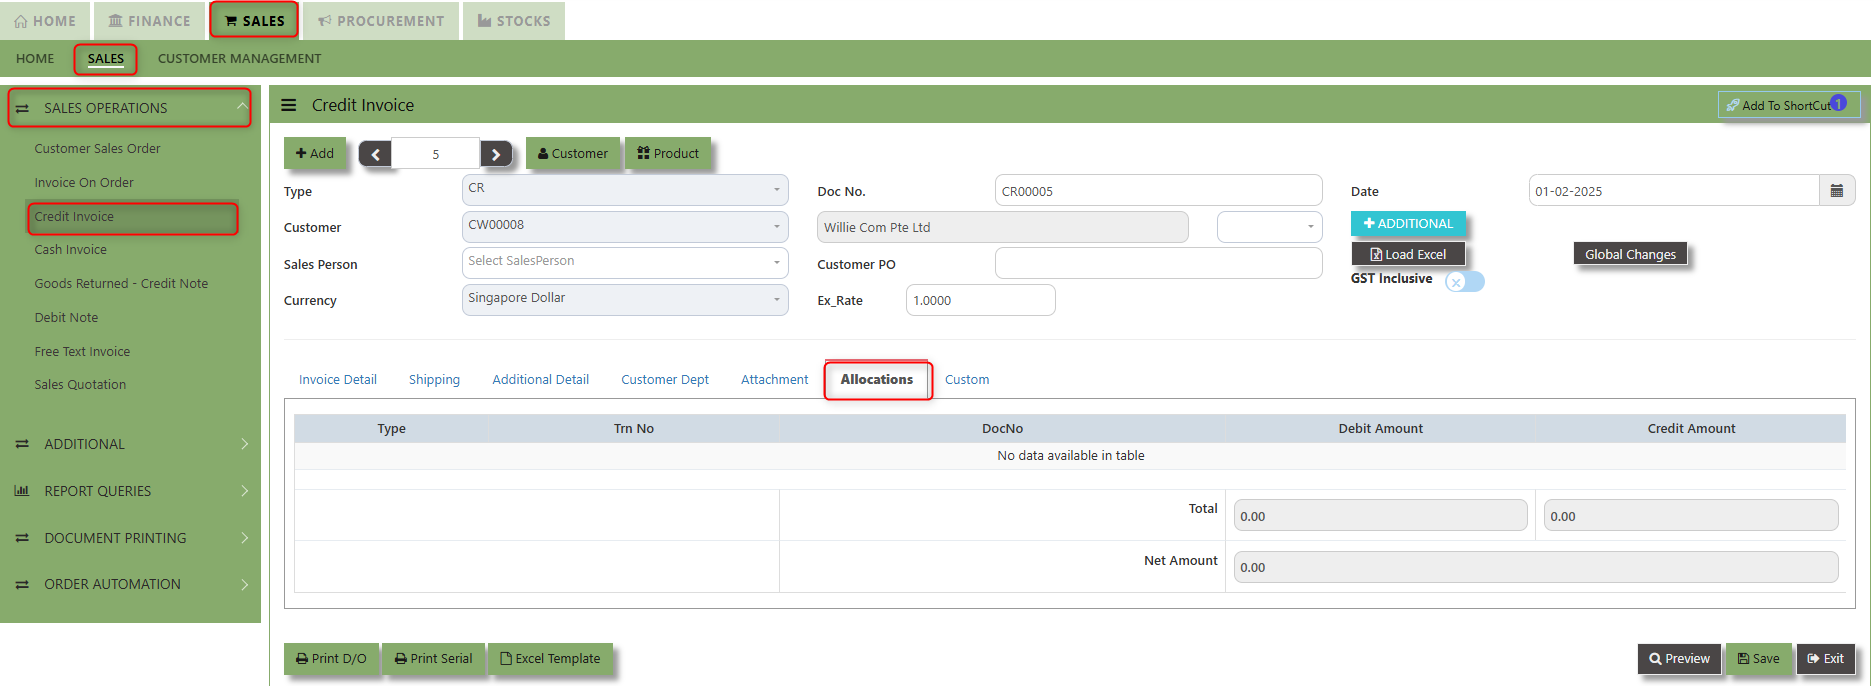
The Allocations Tab is used to manage and allocate the amounts or costs associated with the purchase invoice. Click on SALES – SALES OPERATIONS – CREDIT INVOICE - ATTACHMENT TAB for the screen below.
___________________________________________________________________________________________________________________________________________
The Allocations Tab is used to manage and allocate the amounts or costs associated with the purchase invoice. Click on SALES – SALES OPERATIONS – CREDIT INVOICE - ATTACHMENT TAB for the screen below.
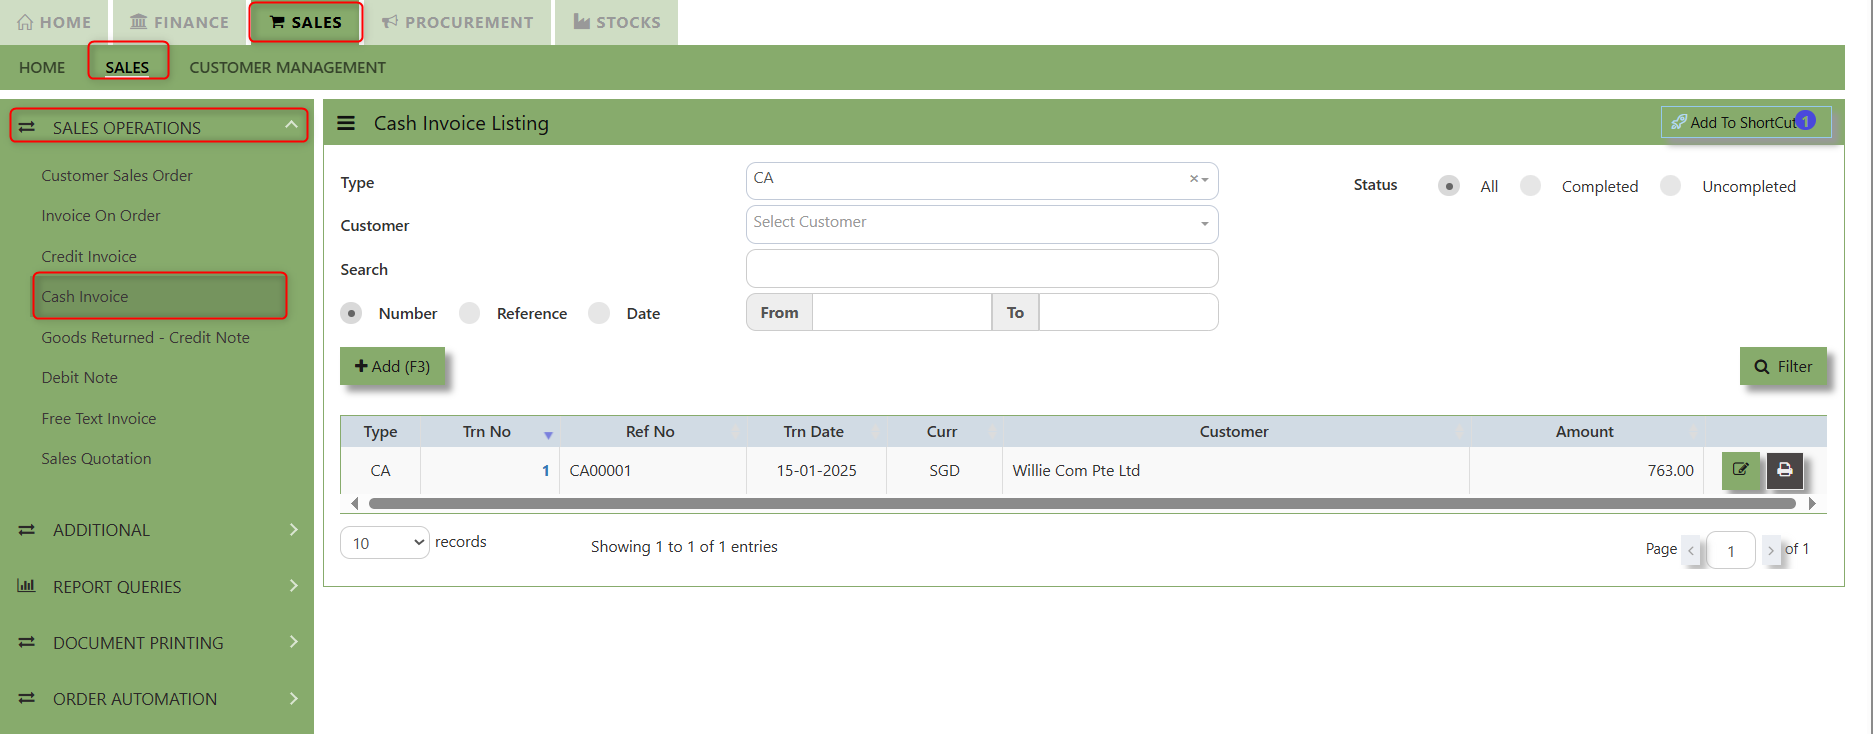
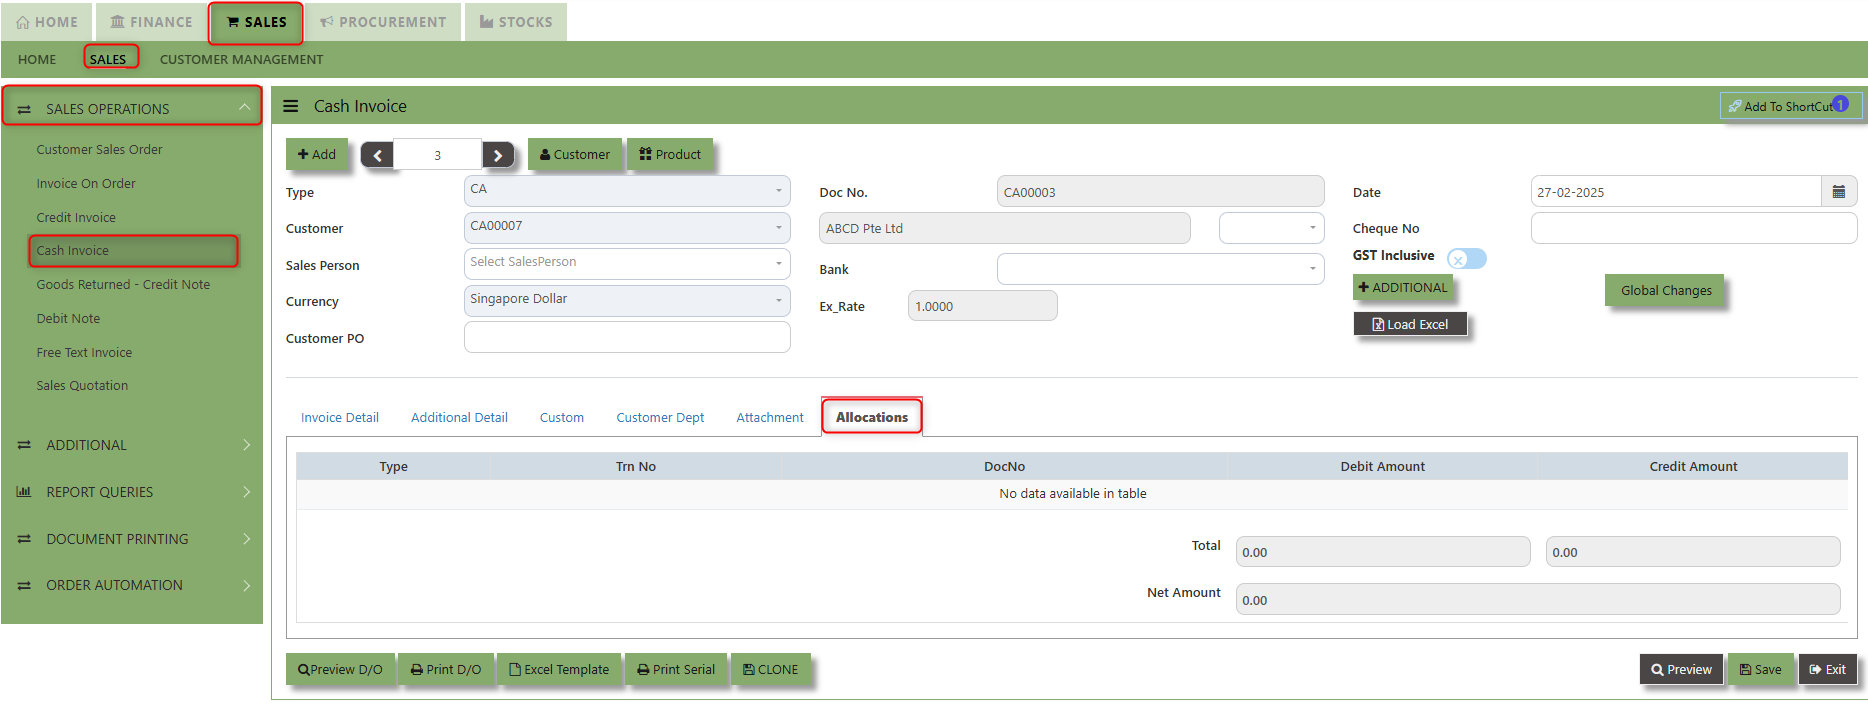
Cash Invoice
Unlike the Credit Sales Invoice, the Customer Invoice – Cash directly debits the bank as it is a direct cash transaction. This transaction updates the inventory as well as the GL. The Bank code has to be selected when saving the transaction.
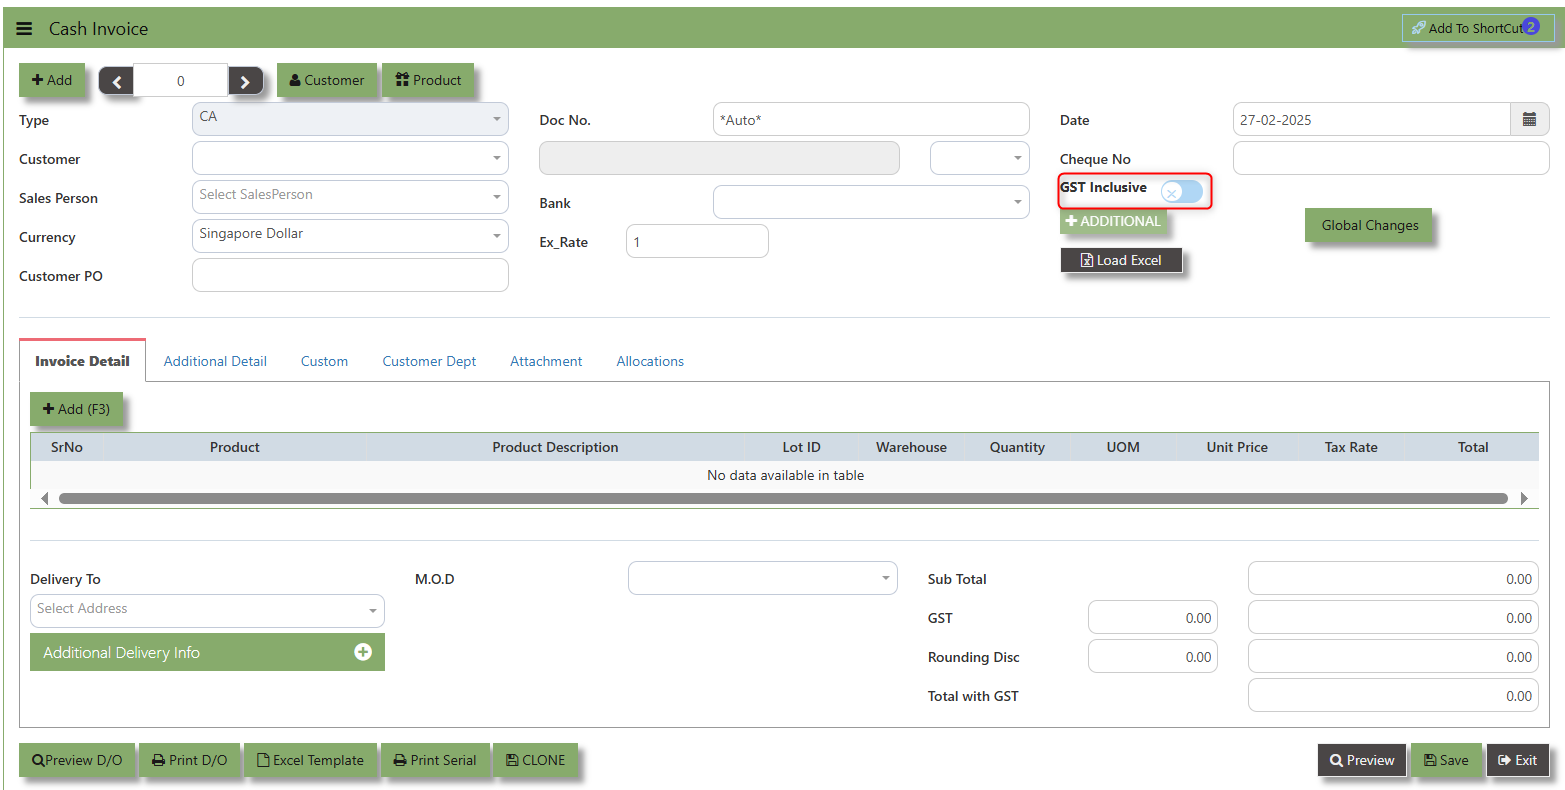
How to Create Cash Invoice?
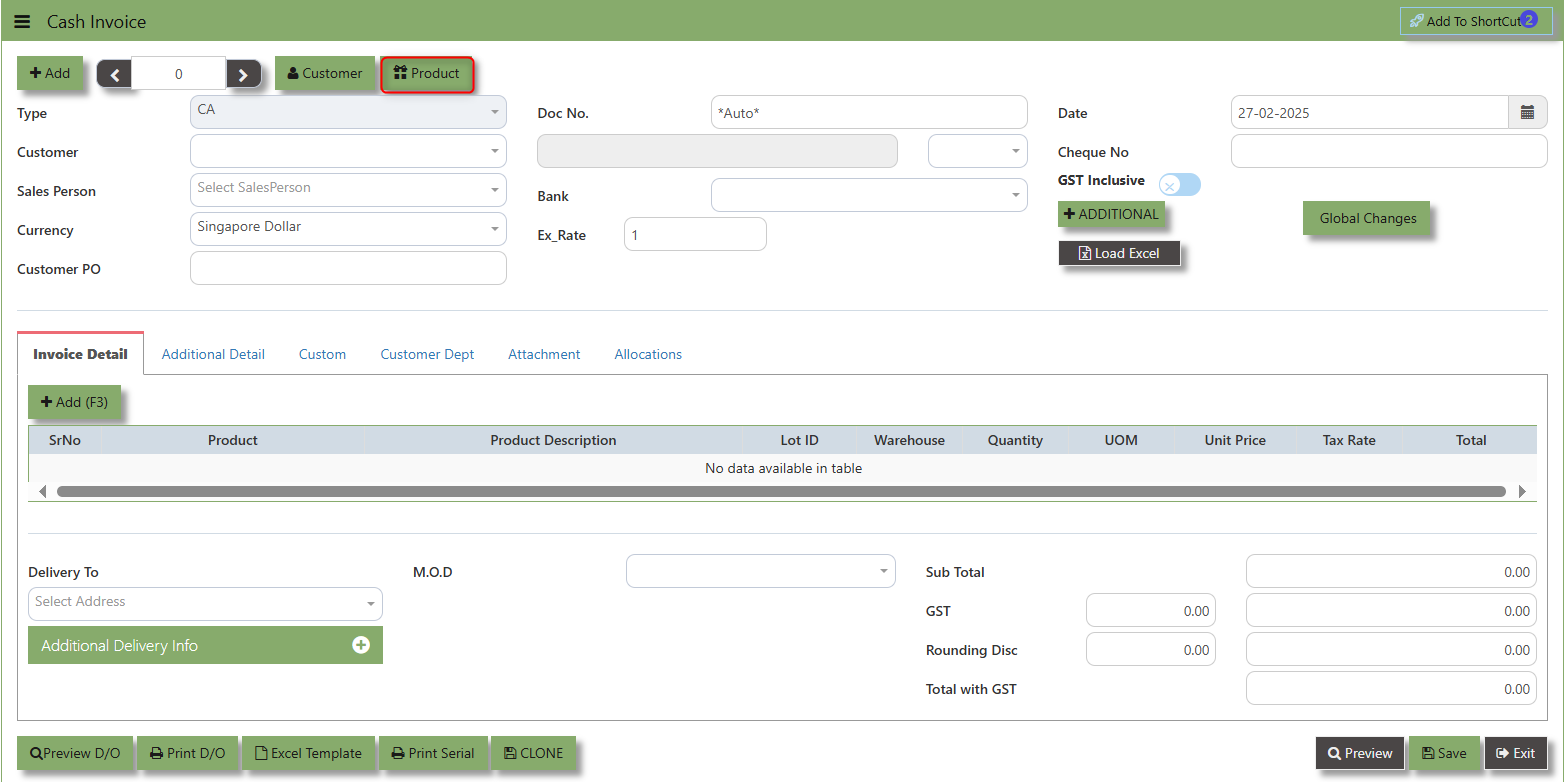
1. Click on SALES – SALES – SALES OPERATIONS – CASH INVOICE for the screen below.
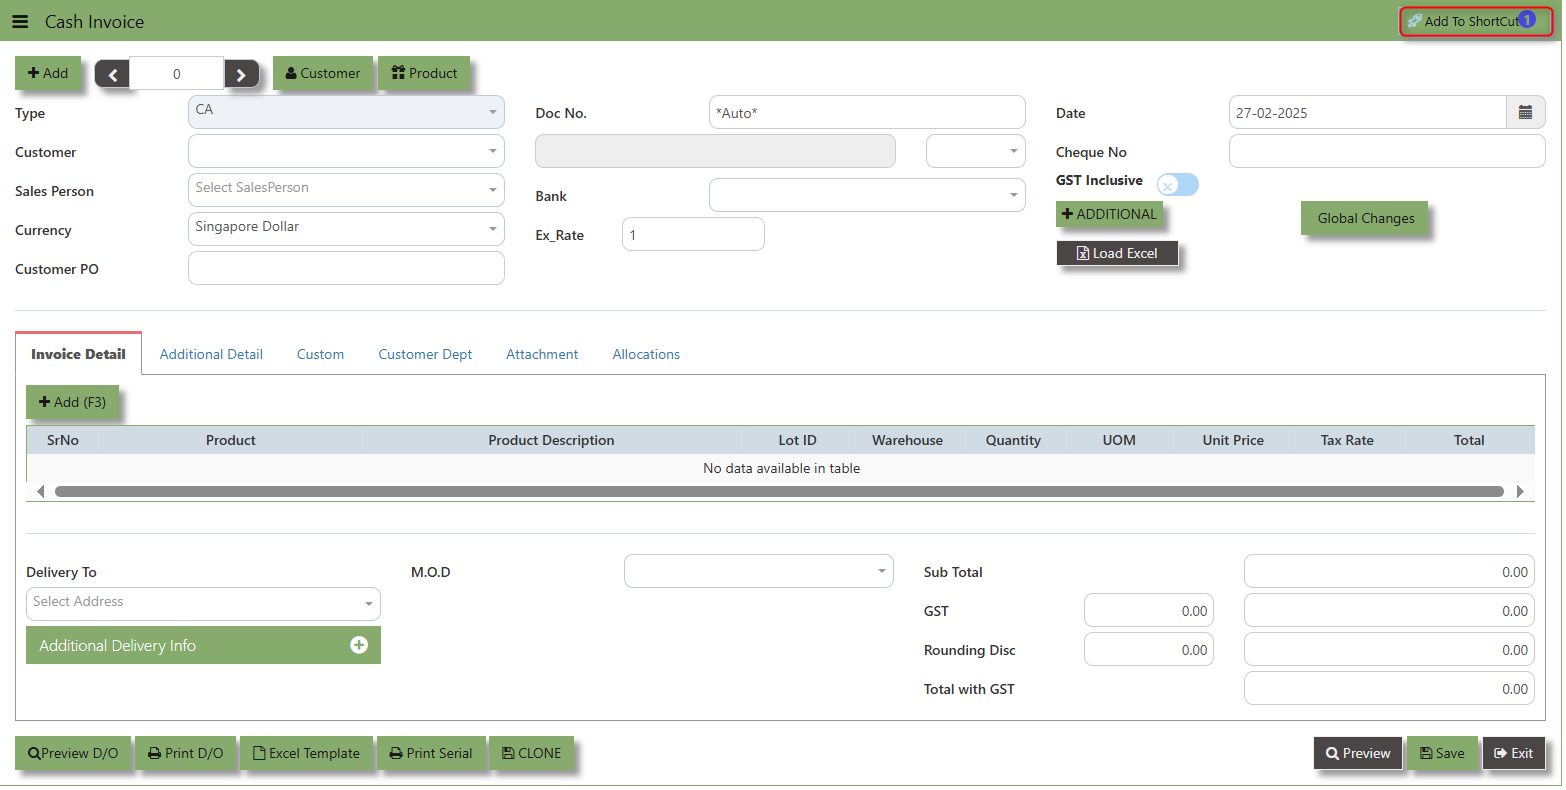
2. Click on Add button or press F3 to create a new transaction

3. Click the Type - drop-down to select transaction type – CA(Cash Invoice).
4. After selecting the transaction type, you can use the tab button to go to the Ref No. and Date fields to enter the information.
5. Click the Customer - drop-down list to select the Customer, followed by the Sales Person, PDS, Currency and Rate.
6. The “Cheque Number” is an important field which must be specified (refer to the highlighted screen)
7. After the Bank code is selected, user can enter the information for Our D/O, Order Ref. No and Order Ref Date if applicable.
8. Once all the header information has been entered, the user can proceed to the Details section to select the product items from the product drop down list, before specifying the warehouse, quantity and unit price. Save the transaction after this is done.
___________________________________________________________________________________________________________________________________________
Add to ShortCut - Used to create a shortcut for quick access to a specific sales transaction. By clicking this button, users can add the current sales invoice on order to a list of shortcuts, allowing them to access the invoice or related functionality quickly and efficiently, without needing to search for it each time.
How to use Add to ShortCut?
1. Click "Add to ShortCut" and system will open below windows:
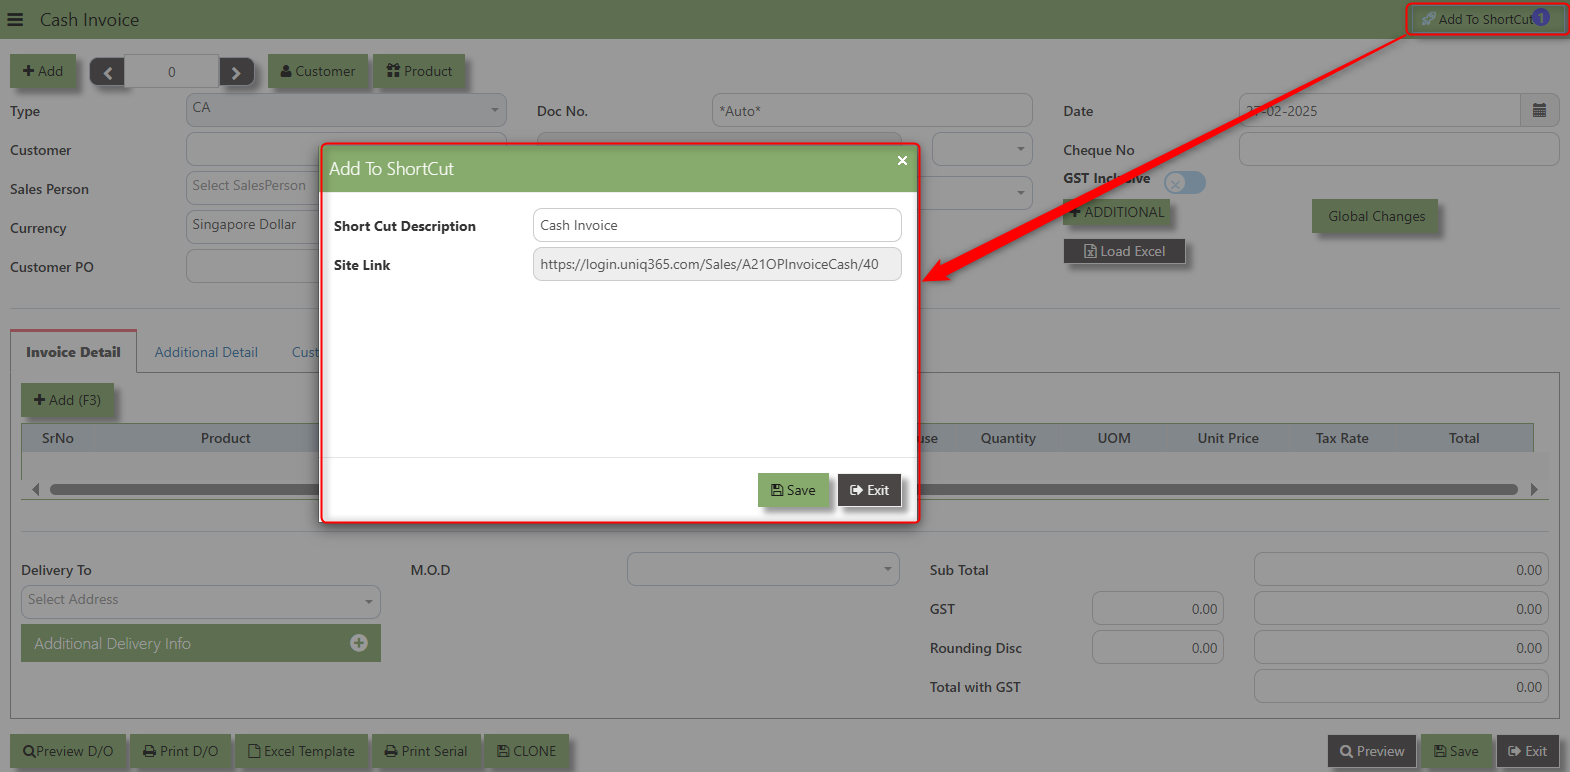
2. Enter Short Cut Description
3. Click SAVE then click OK.
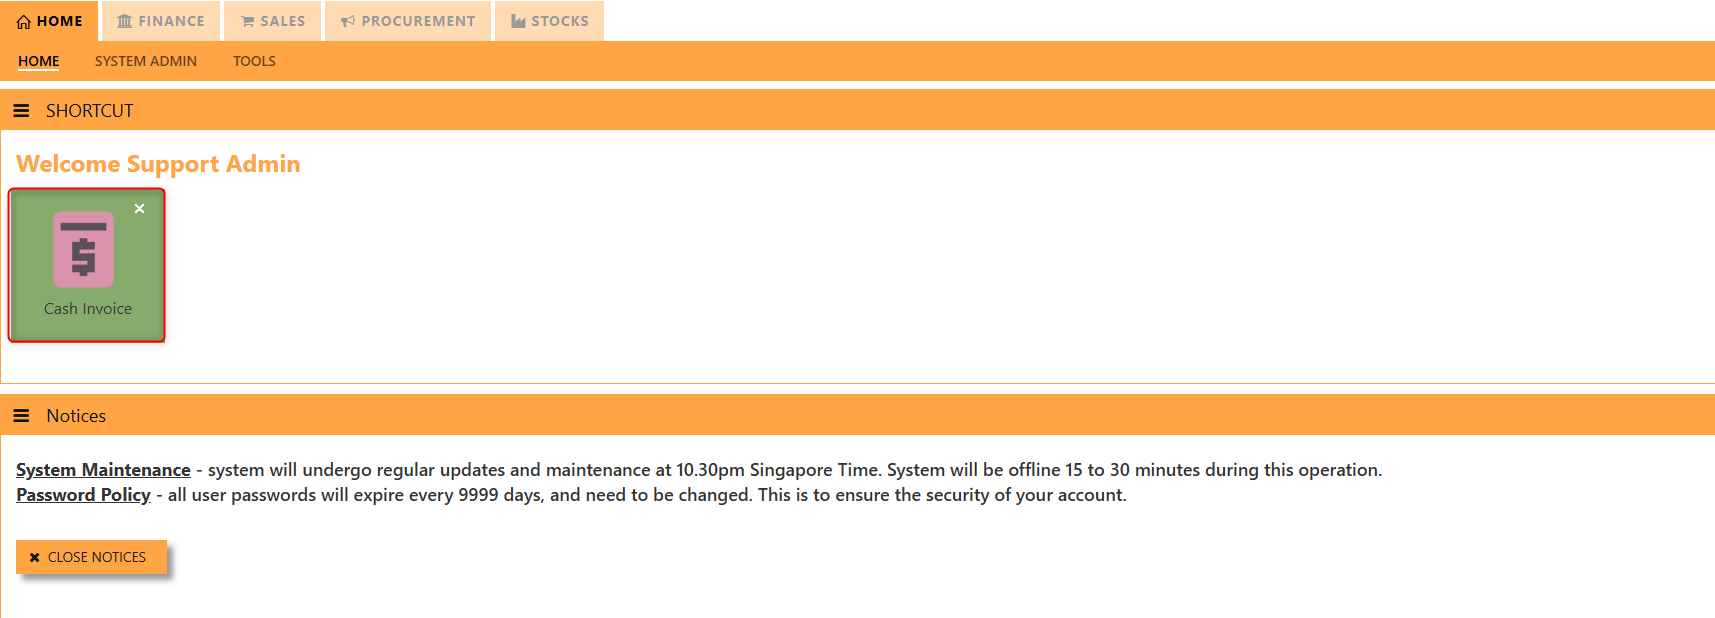
4. User may look to the Homepage for the added function or page. Click on HOME - HOME - SHORTCUT for the screen below.
___________________________________________________________________________________________________________________________________________
The Customer button provides quick access to detailed supplier profiles under Customer maintenance.

The Product button provides quick access to product and service maintenance
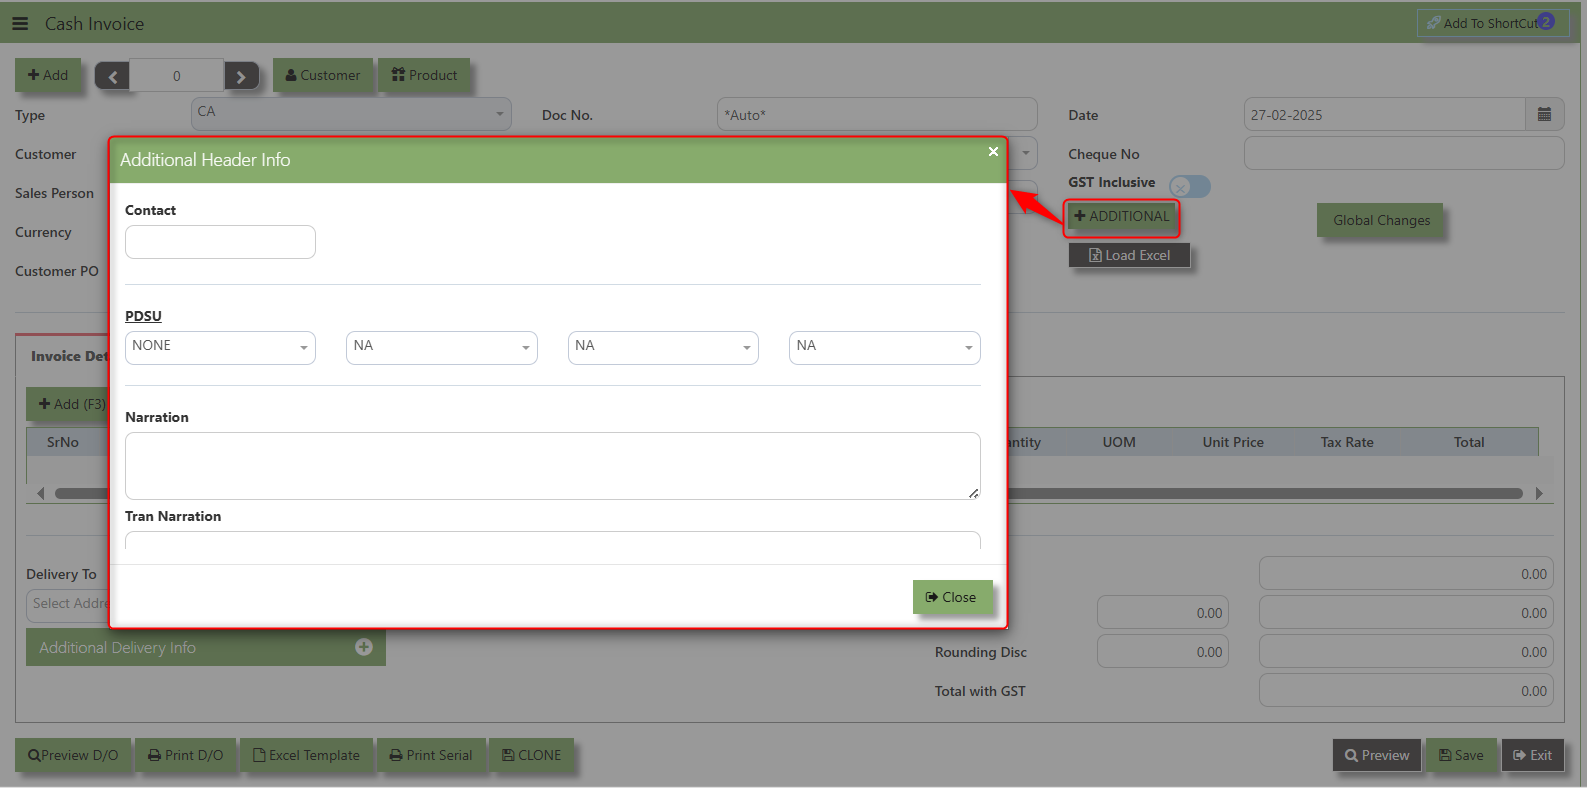
Additional Header Info button is typically used to capture and manage additional information related to the Sales Credit Invoice at the header level (i.e., Delivery date, Del Term , Indicative WH , Country, Lead Time, Contact, PDSU, Narration and Transaction Narration). This feature allows users to add extra data or notes that are relevant to the entire sales invoice on order.
The GST Inclusive checkbox indicates whether the unit price in the CA include Goods and Services Tax (GST) or not.
- When ticked (GST Inclusive): provided in the Sales Order already includes the applicable GST amount. The GST amount will not be calculated or displayed separately, as it's already accounted for in the quoted price.
- When not ticked (GST Exclusive): The unit price is considered exclusive of GST. The system will calculate and add the GST based on the applicable tax rate, and the final total will be the sum of the base price plus the GST amount
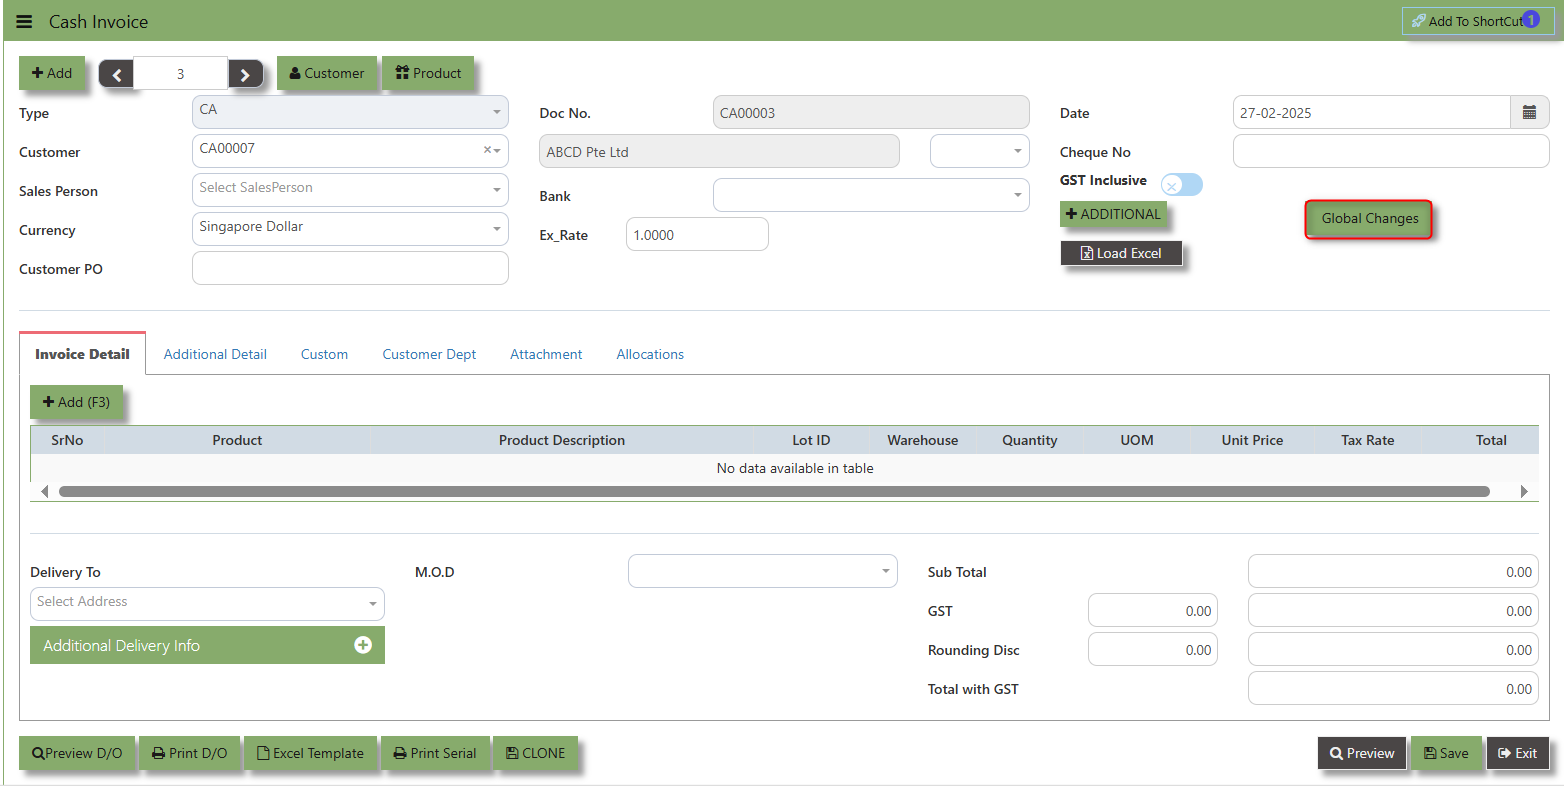
The Global Changes Button provides access on the Discount menu in the Sales Cash Invoice . By clicking this button, users can add the current Cash Invoice discount using Global Discount Amount, or Percentage Discount.
How to use Global Changes?
1.Click "Global Changes" and system will open below windows:
2. Add a Discount to the transaction if its Global Discount Amount or Percentage Discount.
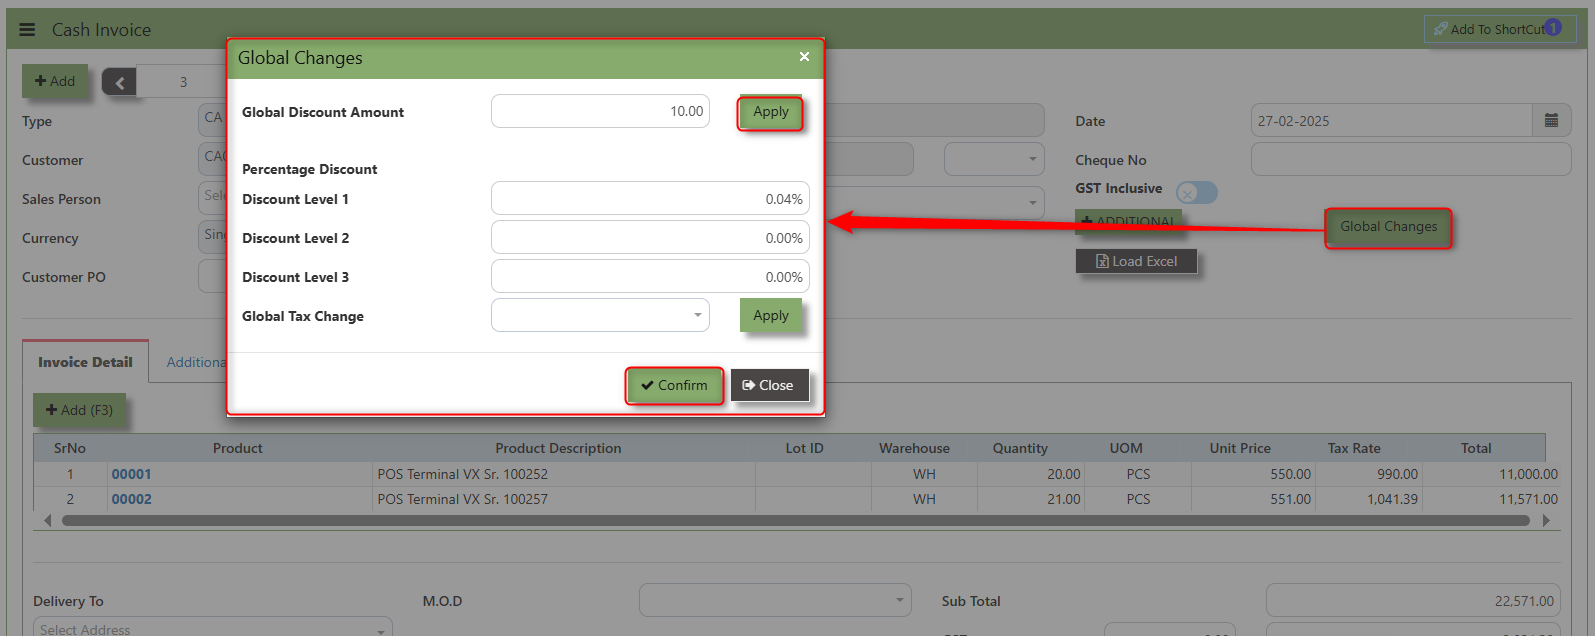
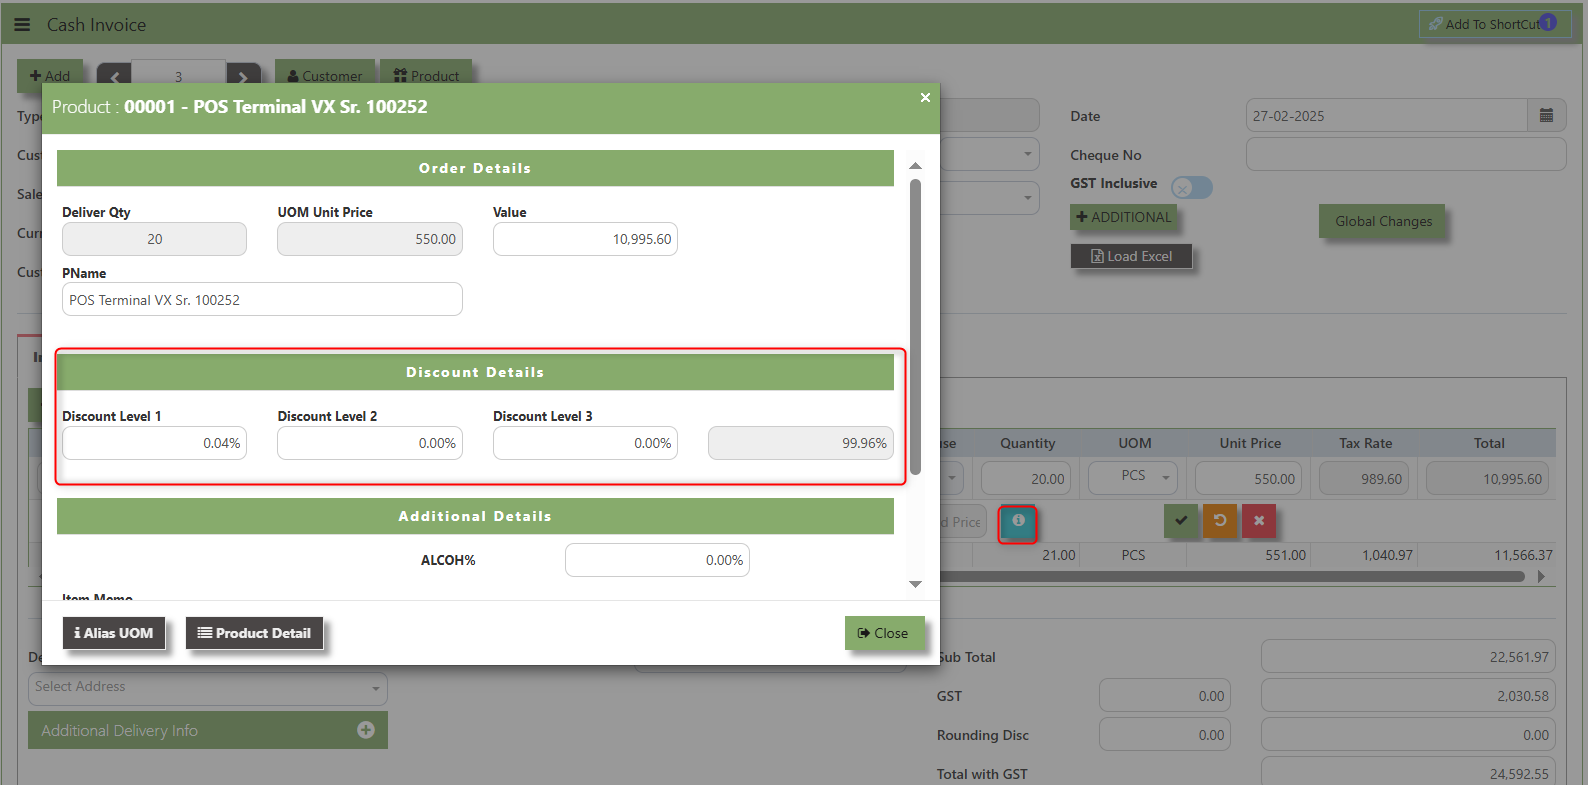
3. Click Apply and Confirm button, the discount will be automatically captured in the line item and in the transaction.
Load Excel - When users have an Excel file from Excel Template with Cash invoice information (ie Warehouse, Product, Pname, UOM, Quantity, Unit Price, GST type, Detail Memo) the "Load Excel" button allows them to upload and import this data directly into the system. This eliminates the need for manual entry of the data into the system's Cash Invoice fields.
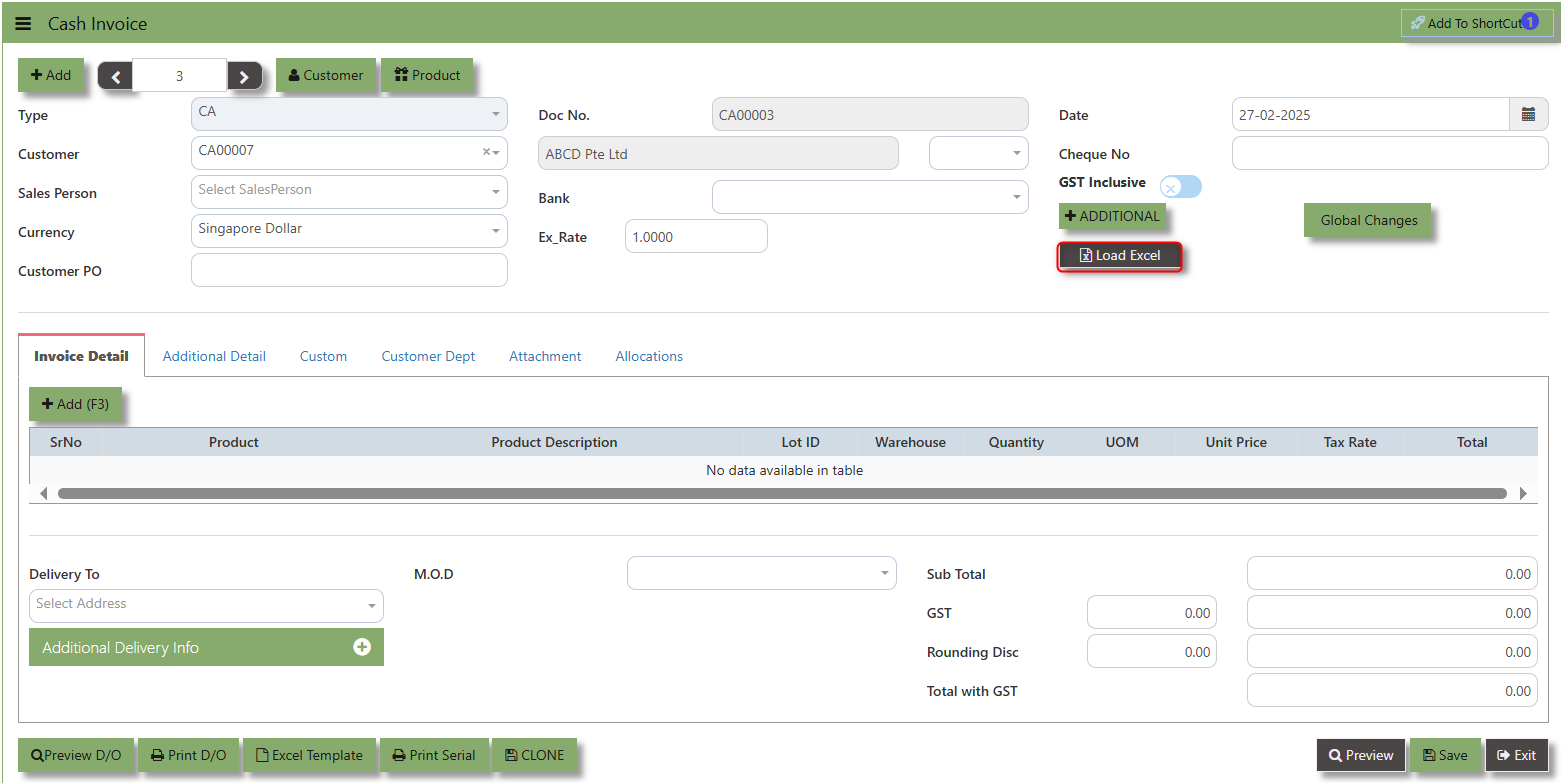
How to use Load Excel?
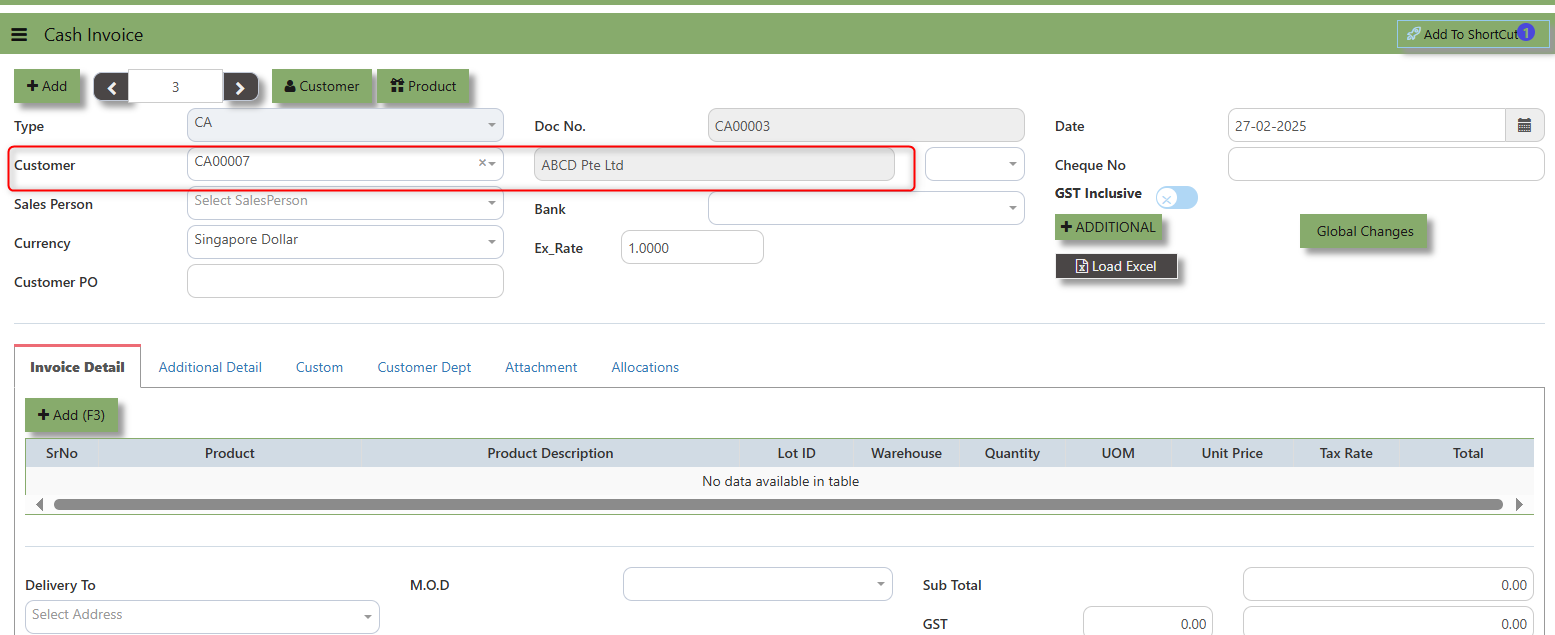
1. Click the Customer - drop-down list to select Customer Name
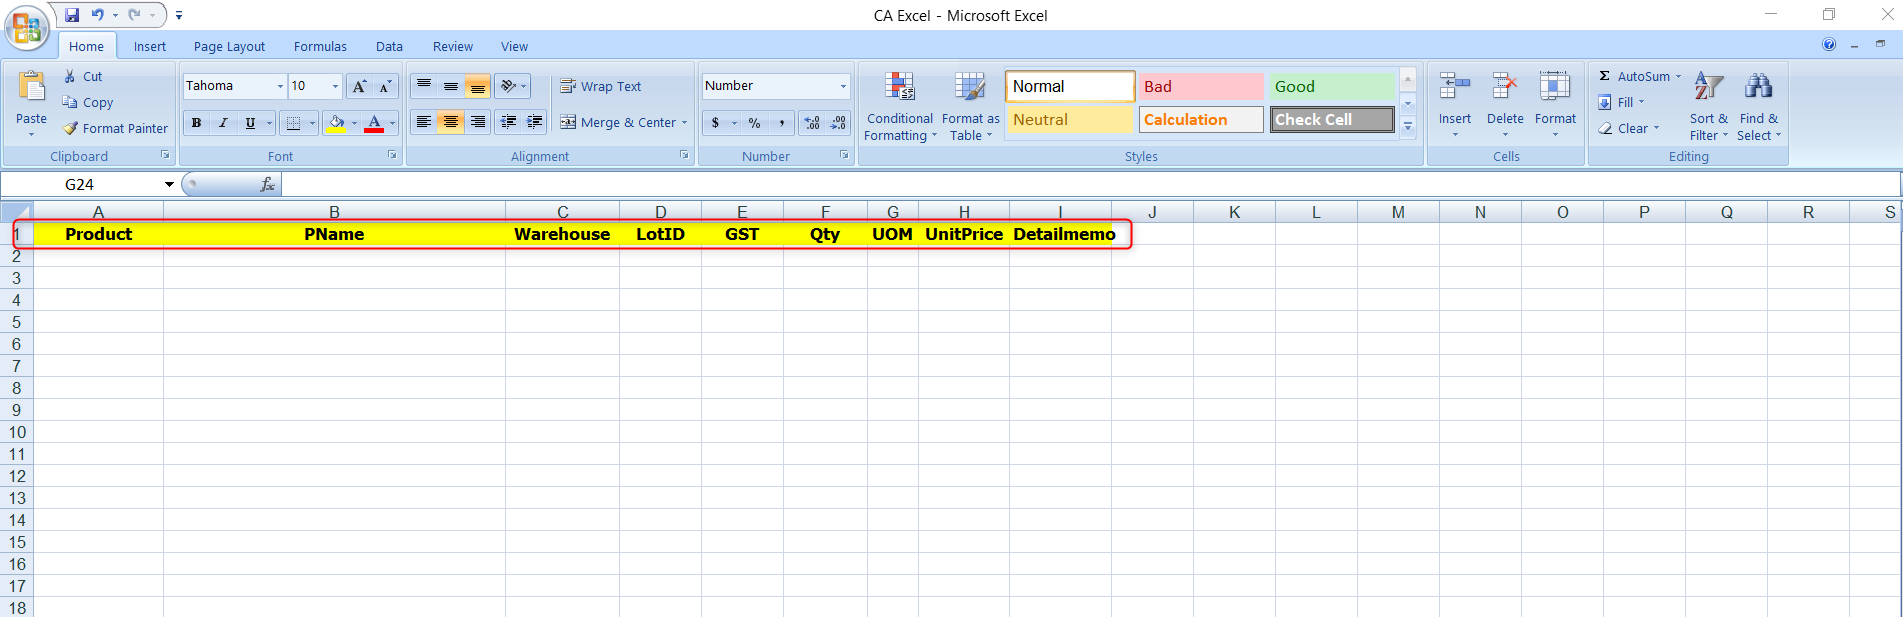
2. Download the Excel Template and ensure the Excel file you plan to upload is formatted correctly. It should contain all the necessary fields required for sales order, such as:
- Warehouse
- Product Code
- Product Name
- LotID
- GST Type
- Quantity
- UOM
- Unit Price
- Detail Memo
3. Click the Load Excel button to open the file upload interface. This may open a file browser or prompt you to select the Excel file you want to upload.
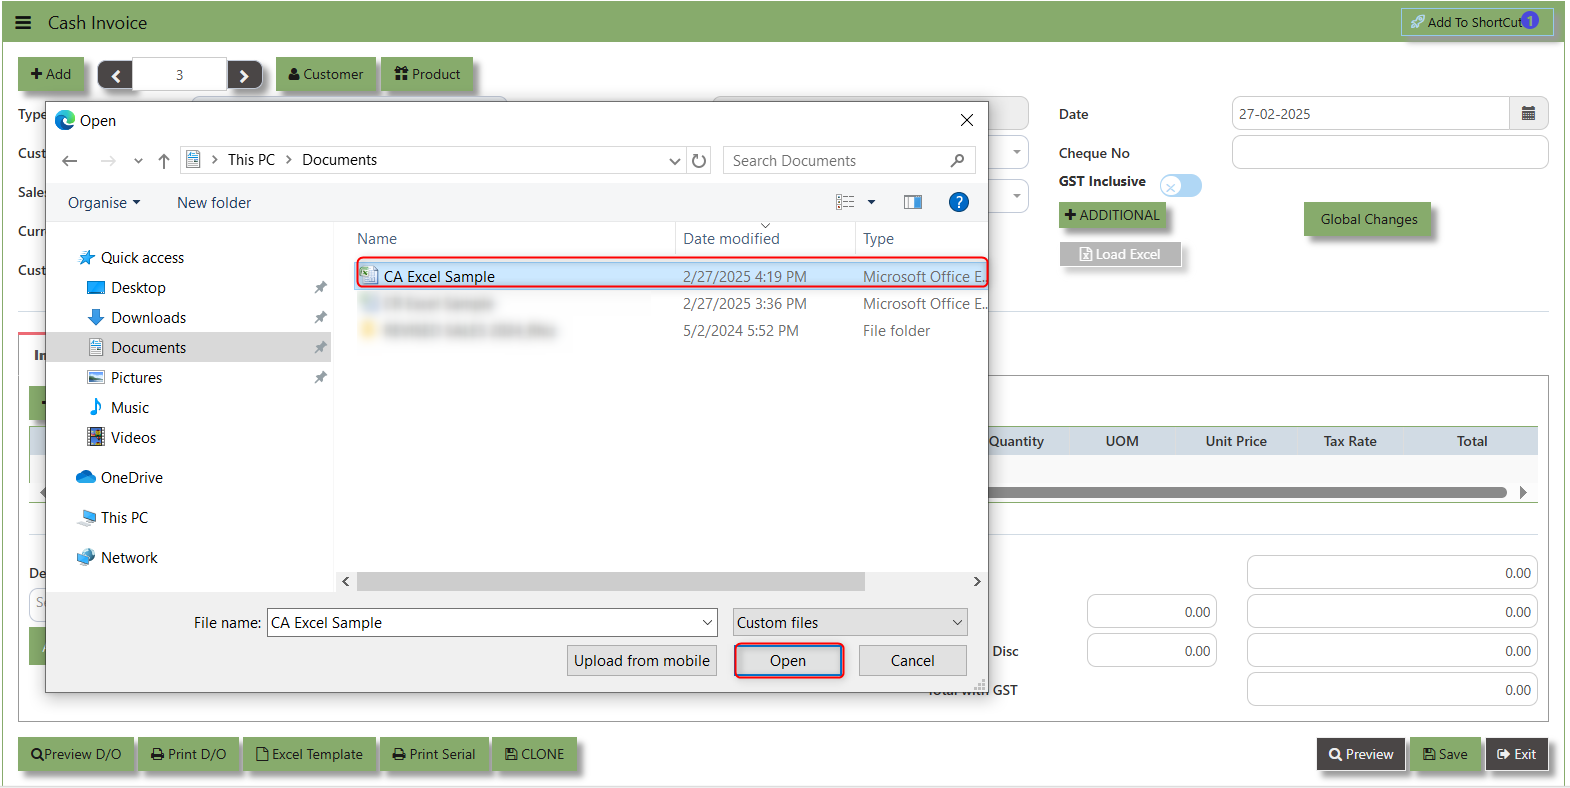
4. Once the filed uploaded, system will prompt a message that record has been imported successfully.
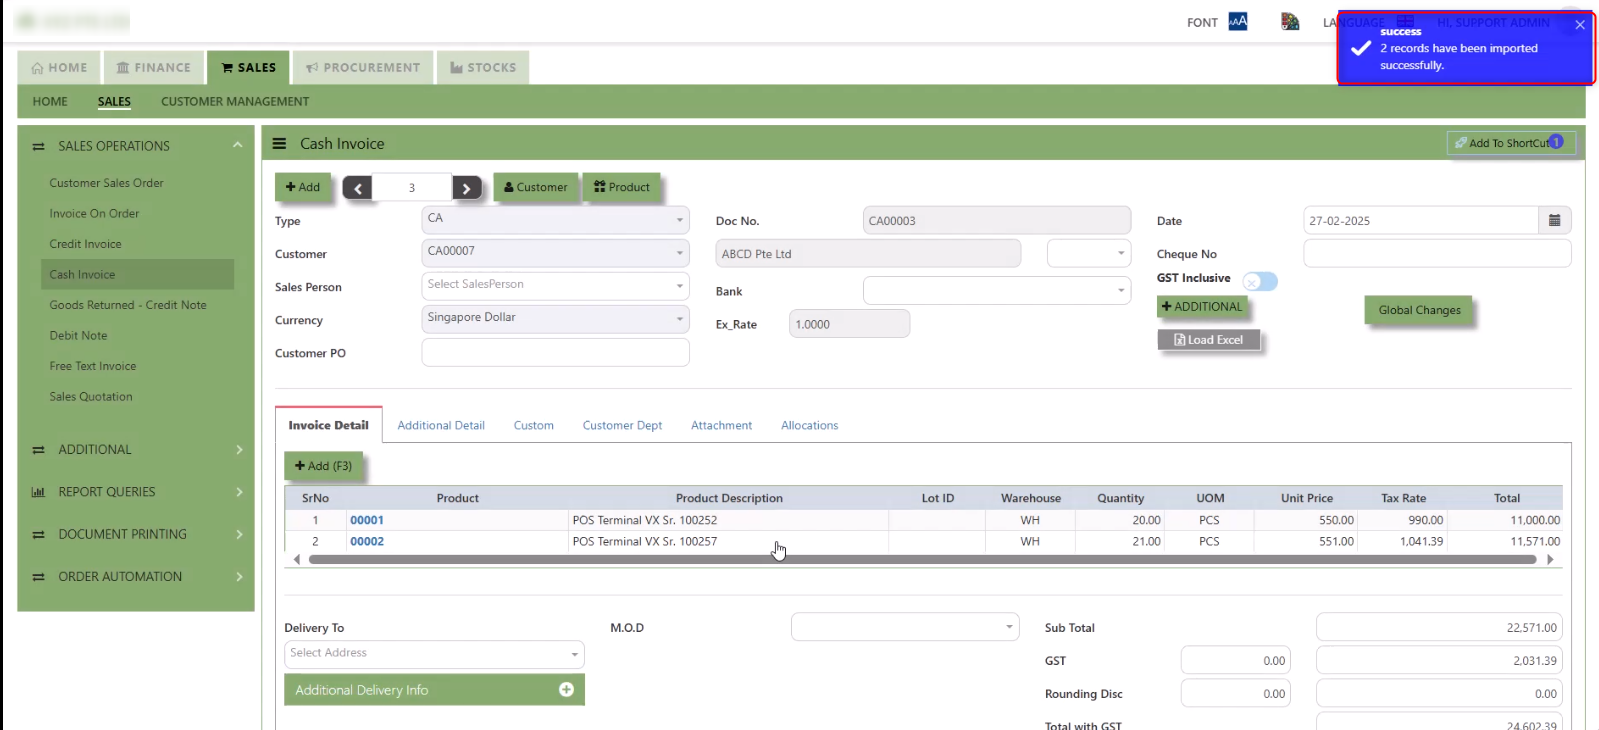
5. After the import is complete, review the imported credit invoice in the system to ensure everything has been transferred correctly. This might include checking that the order details, such as item descriptions, quantities, prices, and customers, are accurate.
6. Once the data is imported successfully and checking is done, you can proceed to save the sales order as required by your workflow. This may involve further approvals or other processes depending on the organization's procedures.
___________________________________________________________________________________________________________________________________________
Additional Detail Tab a section where the additional information is entered . This tab ensures that all relevant details regarding the Narration, Inco Terms , billing address warranty terms Selling conditions , and special instruction are captured in the system to facilitate smooth and accurate.
How to set Additional Detail?
1. Click on SALES – SALES OPERATIONS – CASH INVOICE- ADDITIONAL DETAILS TAB for the screen below.
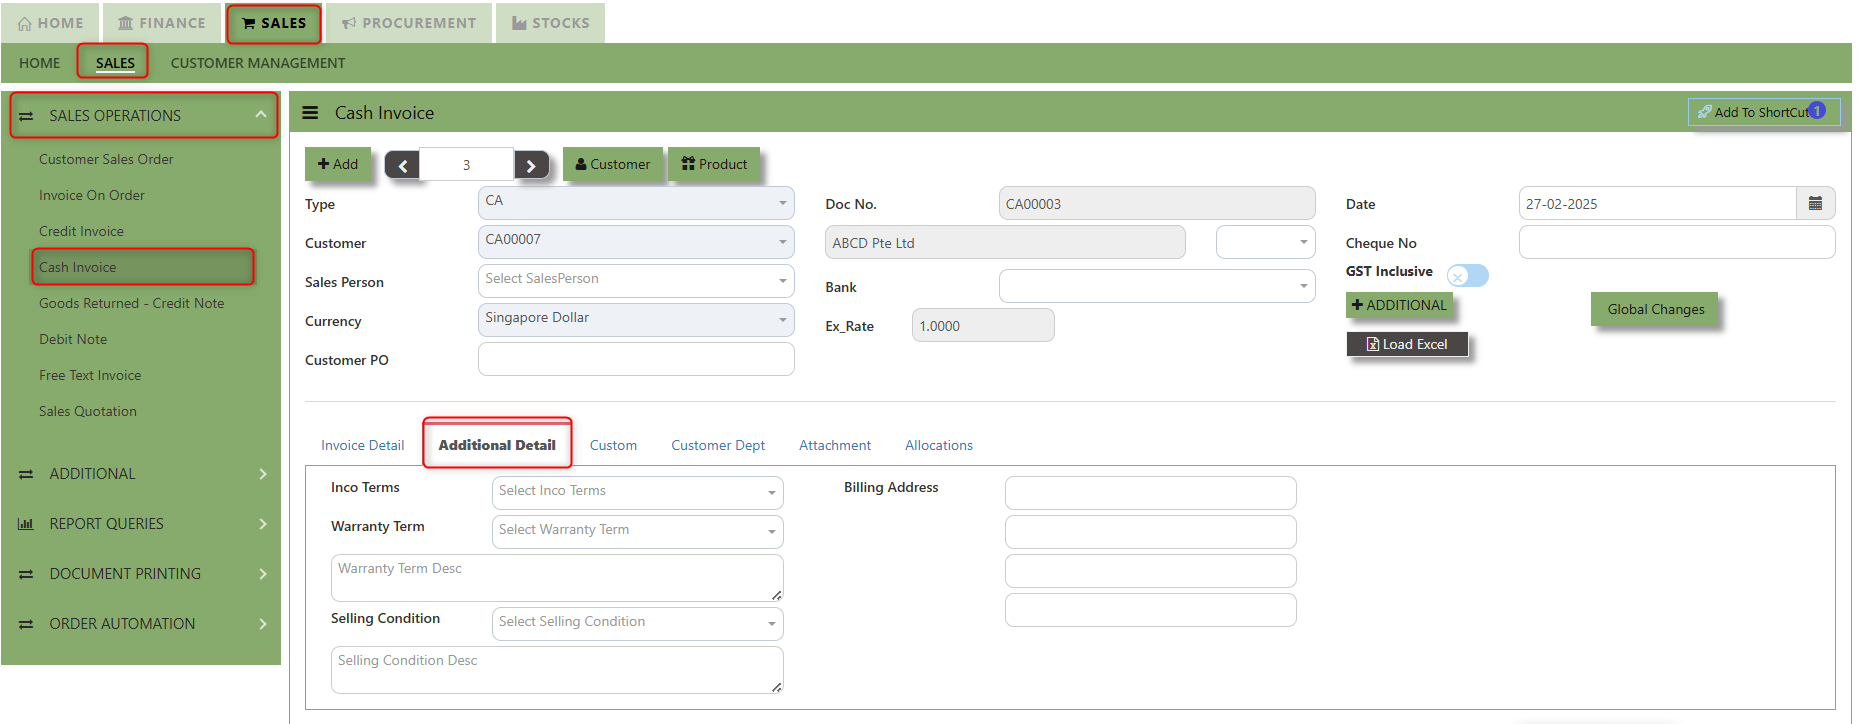
2. Input the below details for the below fields:
-
- Narration
- Billing Address
- Inco Terms
- Warranty Terms
- Selling Condition
- Inquiry Received Date
- Quotation Sent Date
3. Once keyed in the necessary details, click the next tab and will automatically save all the information.
___________________________________________________________________________________________________________________________________________
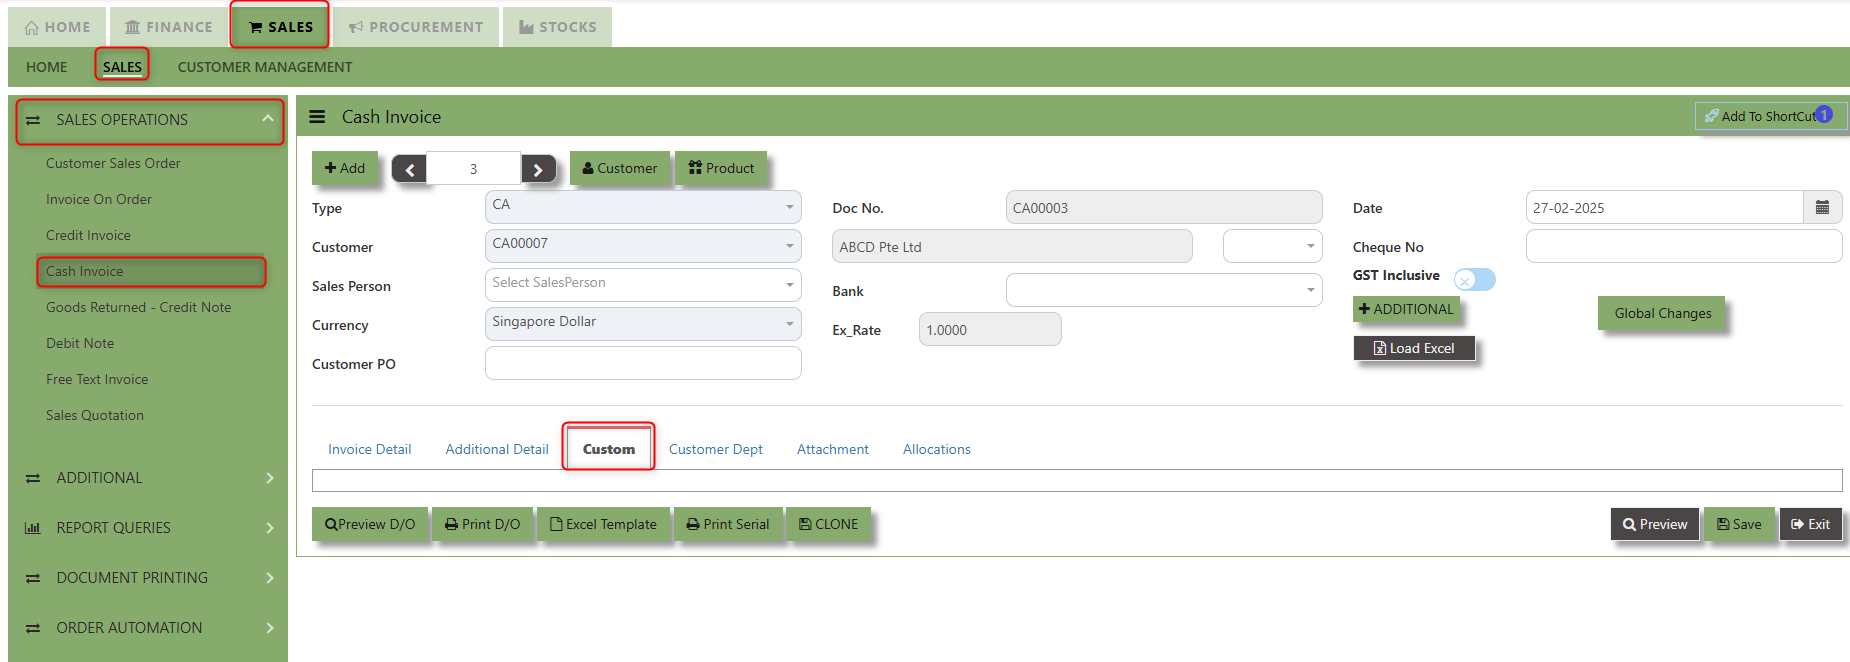
"Custom Tab" provides a space for users to input customized data or additional fields that are specific to their business processes and requirements.
- Click on SALES – SALES OPERATIONS – CASH INVOICE - CUSTOM TAB for the screen below.
___________________________________________________________________________________________________________________________________________
"Customer Dept Tab" section where the Customer Department information is entered. This tab ensures that all relevant details regarding Customer Department details which is linked to the Customer Maintenance under Department Tab
- Click on SALES – SALES OPERATIONS – CASH INVOICE - CUSTOMER DEPT TAB for the screen below.
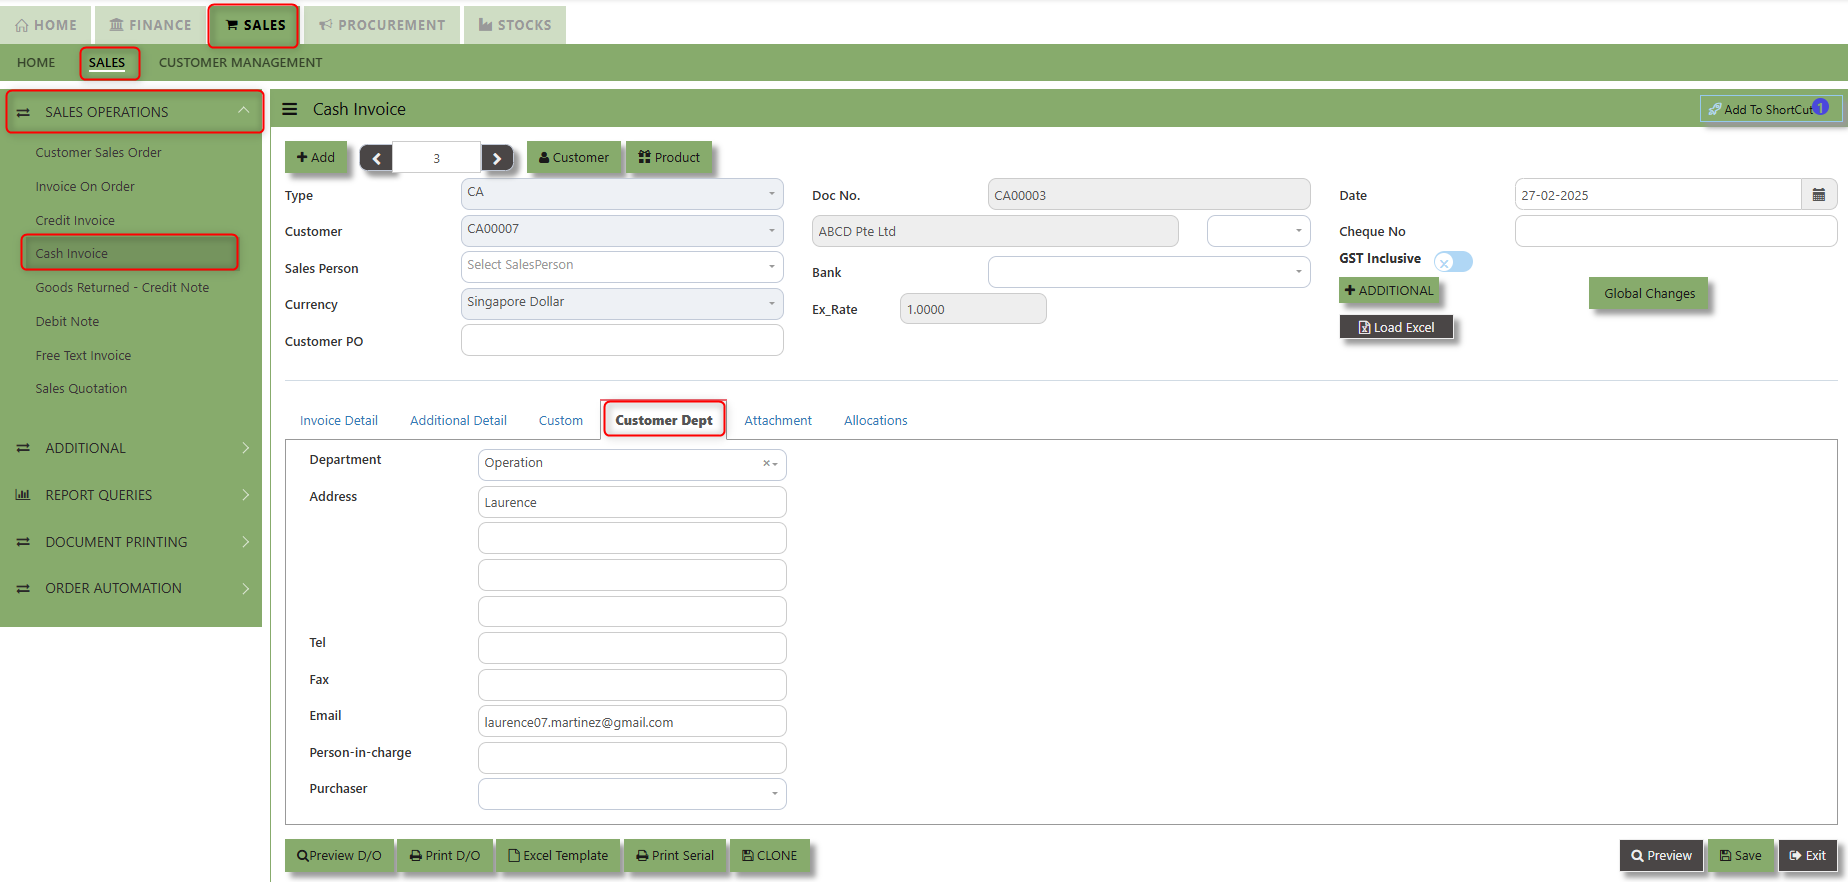
The drop down selection for Customer Dept and Purchaser is maintained in Customer Maintenance under Department Tab
__________________________________________________________________________________________________________________________________________
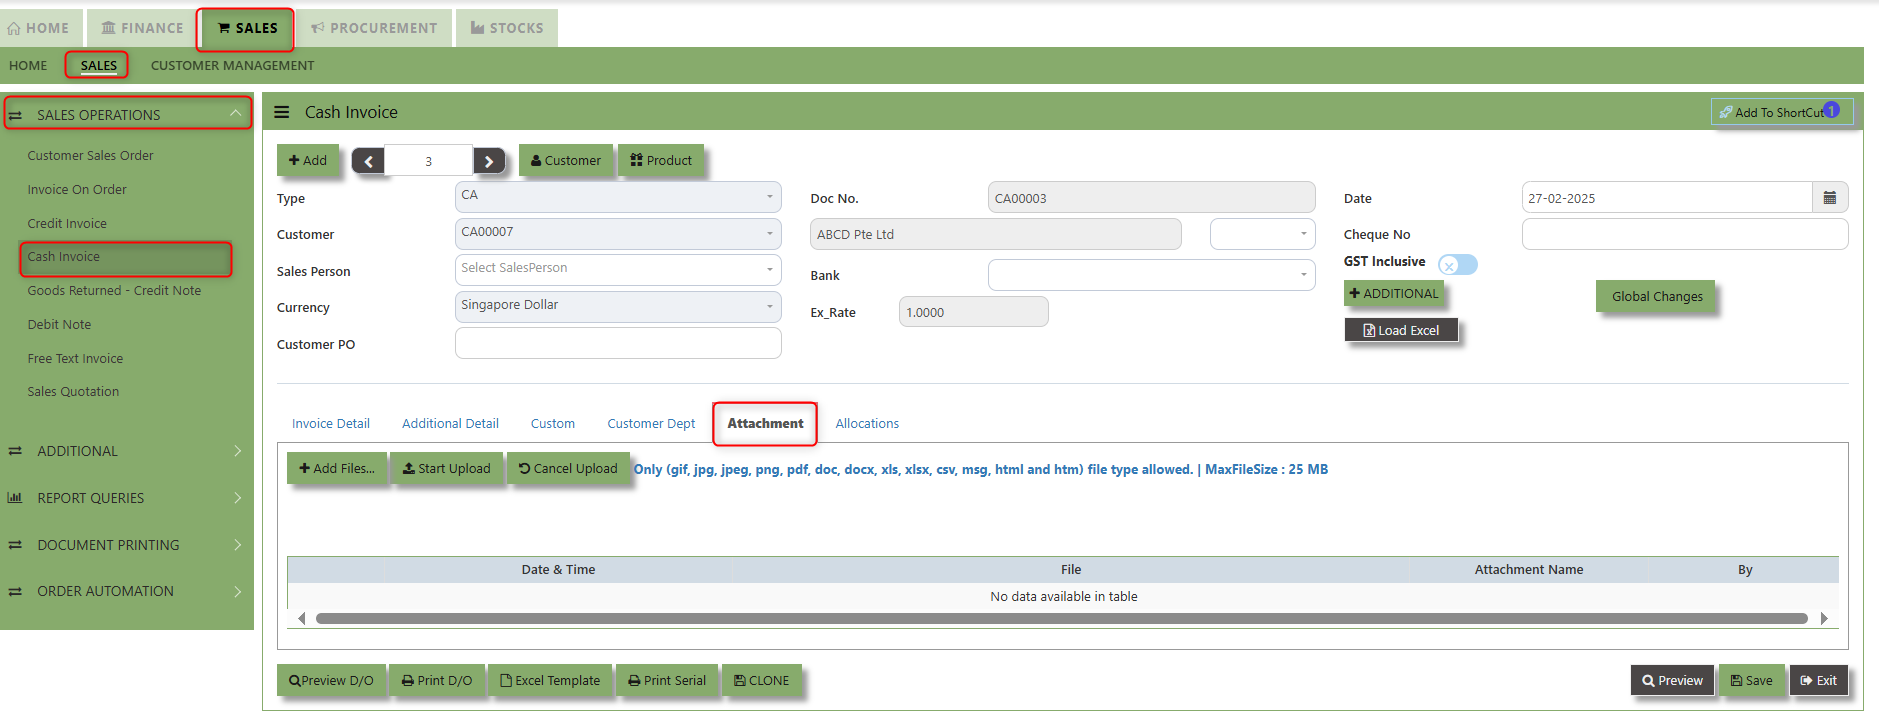
"Attachment Tab" allows users to attach various files and documents related to the Cash Invoice. By attaching relevant files, users ensure that all purchase-related information is kept in one place, making the sales process smoother, more transparent, and easier to track.
How to use Attachment Tab?
1. Click on SALES – SALES OPERATIONS – CASH INVOICE – ATTACHEMENT TAB for the screen below.
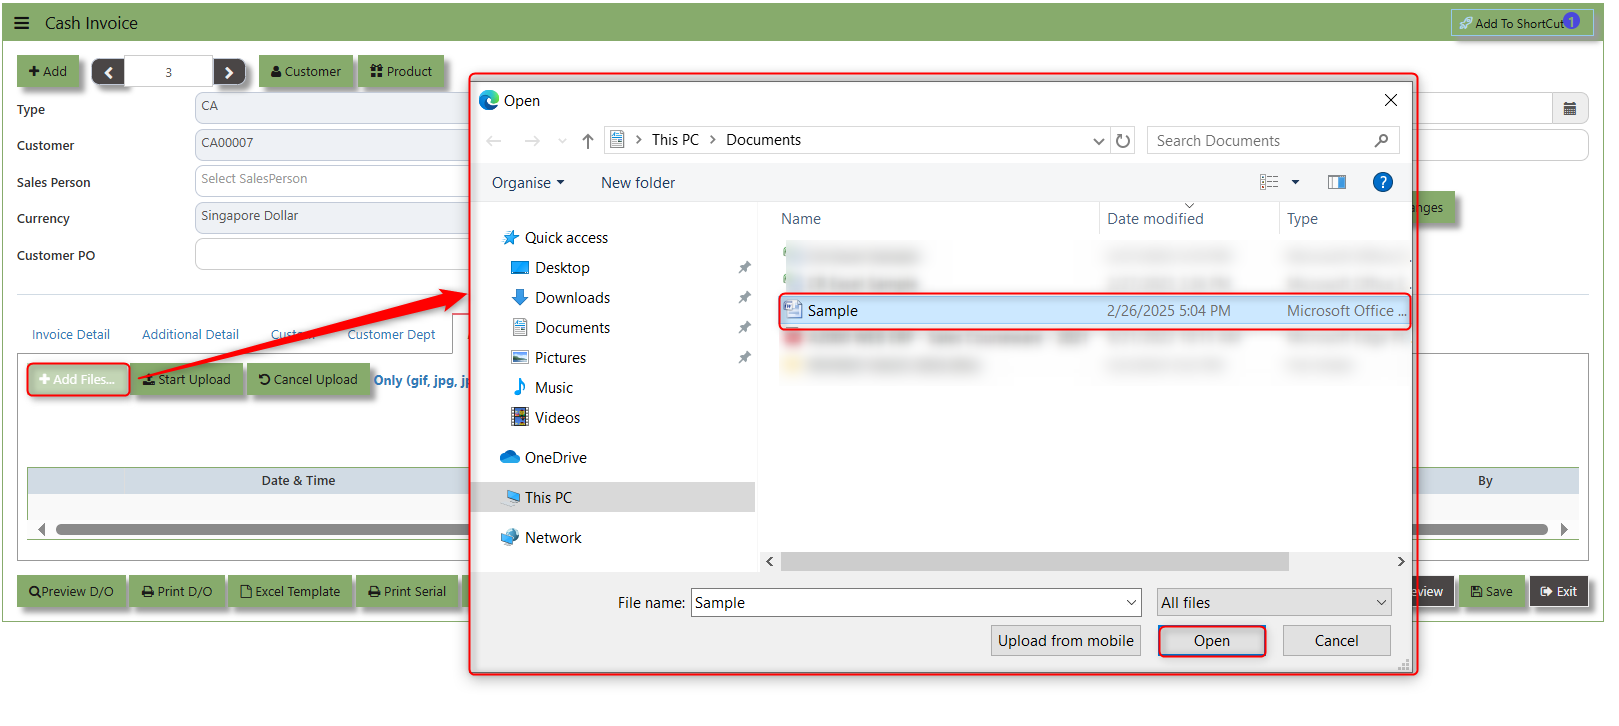
2. Click +Add files and windows will prompt then choose the file you want to upload by clicking open. Kindly take note the file types and maximum size requirements in uploading: Only (gif, jpg, jpeg, png, pdf, doc, docx, xls, xlsx, csv, msg, html and htm) file type allowed. | MaxFileSize : 25 MB
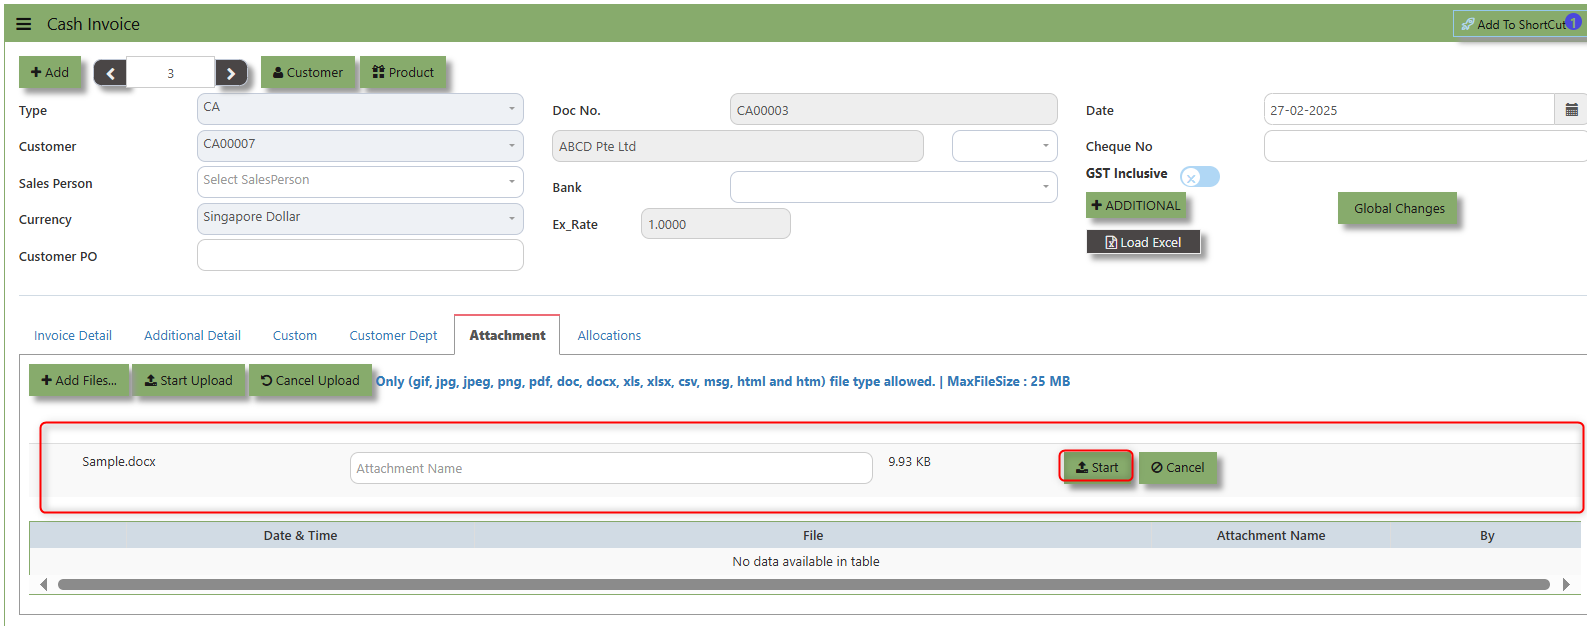
3. Key in the Attachment Name then click start to upload
4.Once the file attached, click "SAVE" button
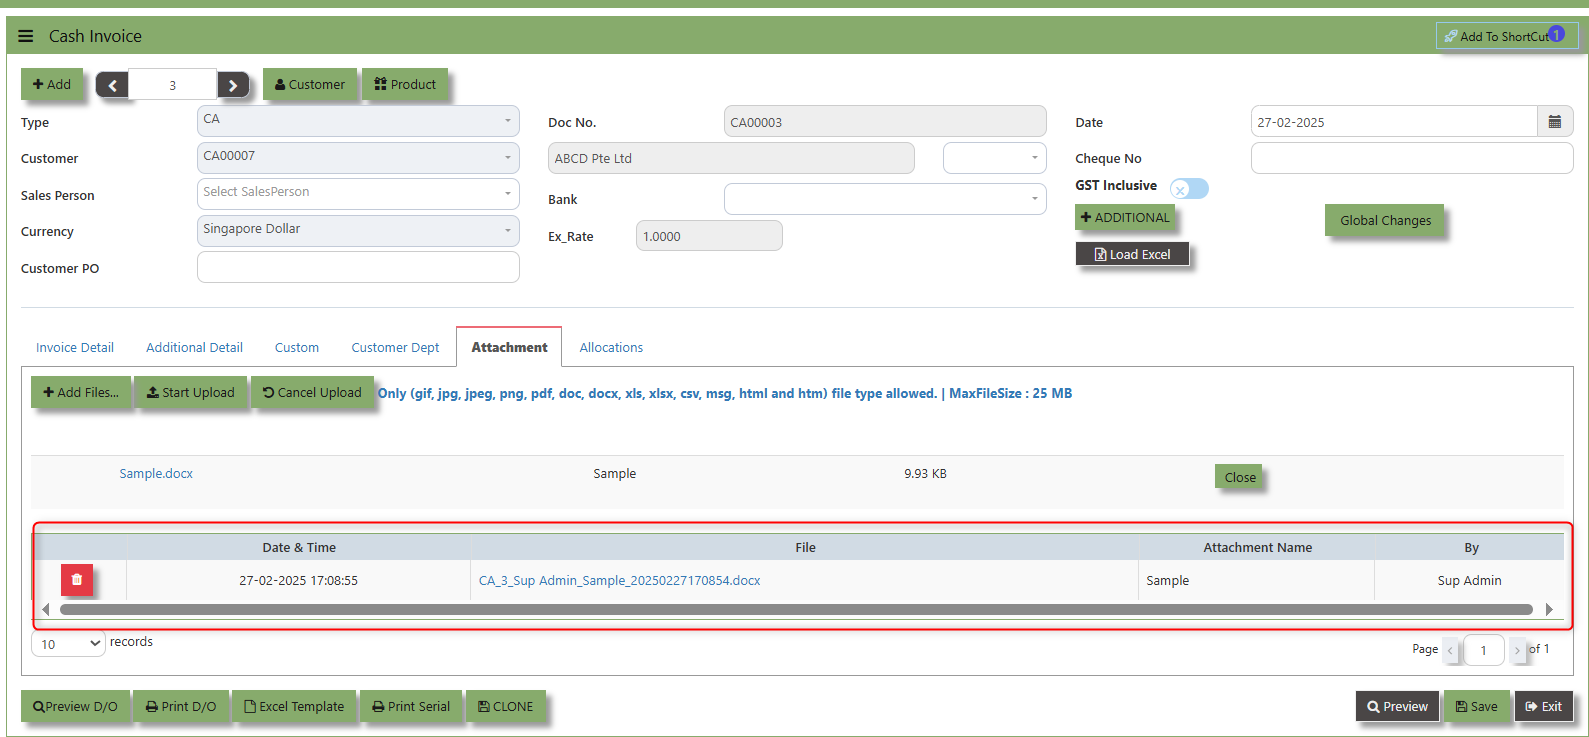
User may opt to cancel the uploading by clicking the "Cancel Upload" button and delete the file uploaded by clicking the "Bin icon" at the line detail.
___________________________________________________________________________________________________________________________________________
The Allocations Tab is used to manage and allocate the amounts or costs associated with the purchase invoice. Click on SALES – SALES OPERATIONS – CASH INVOICE - ATTACHMENT TAB for the screen below.
Goods Returned Return (Credit Note)
This is used to create a Credit Note to Customers when goods are returned. This will update the GL and the stock status. If you have noticed, the credit note can also be used to knock off previous invoices. (By clicking on the batch allocation button)
How to Create Goods Returned – Credit Note?
- Click on SALES – SALES – SALES OPERATIONS – GOODS RETURN CREDIT NOTE for the screen below.

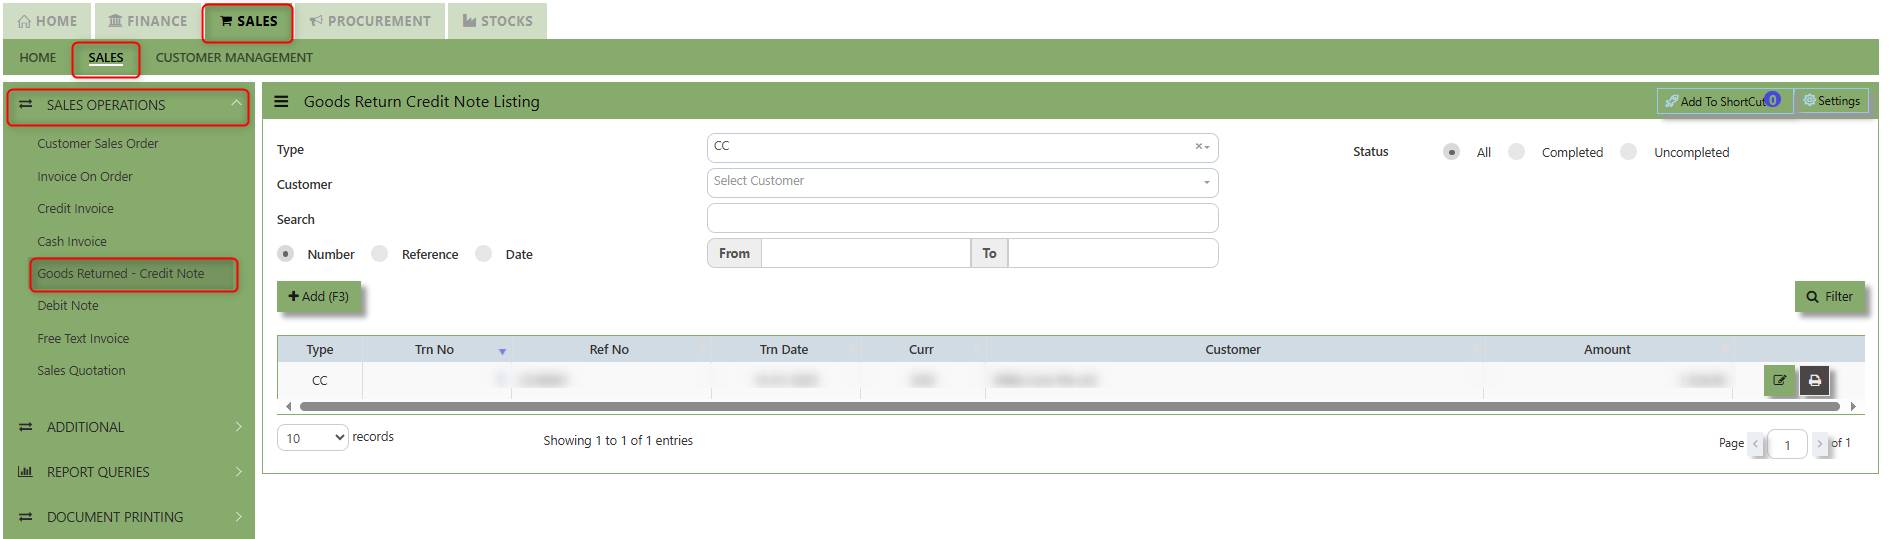
- Click Add (F3) to create new record.
- Click the Type - drop-down to select transaction type – CC (Goods Returned – Credit Note).
- After the transaction type selection, use the tab button to go to the Doc No. and Date fields.
- Click the Customer - drop-down list to select Customer Name, followed by the Sales Person, PDS, Currency, Rate, RMA Ref and Narration if applicable.
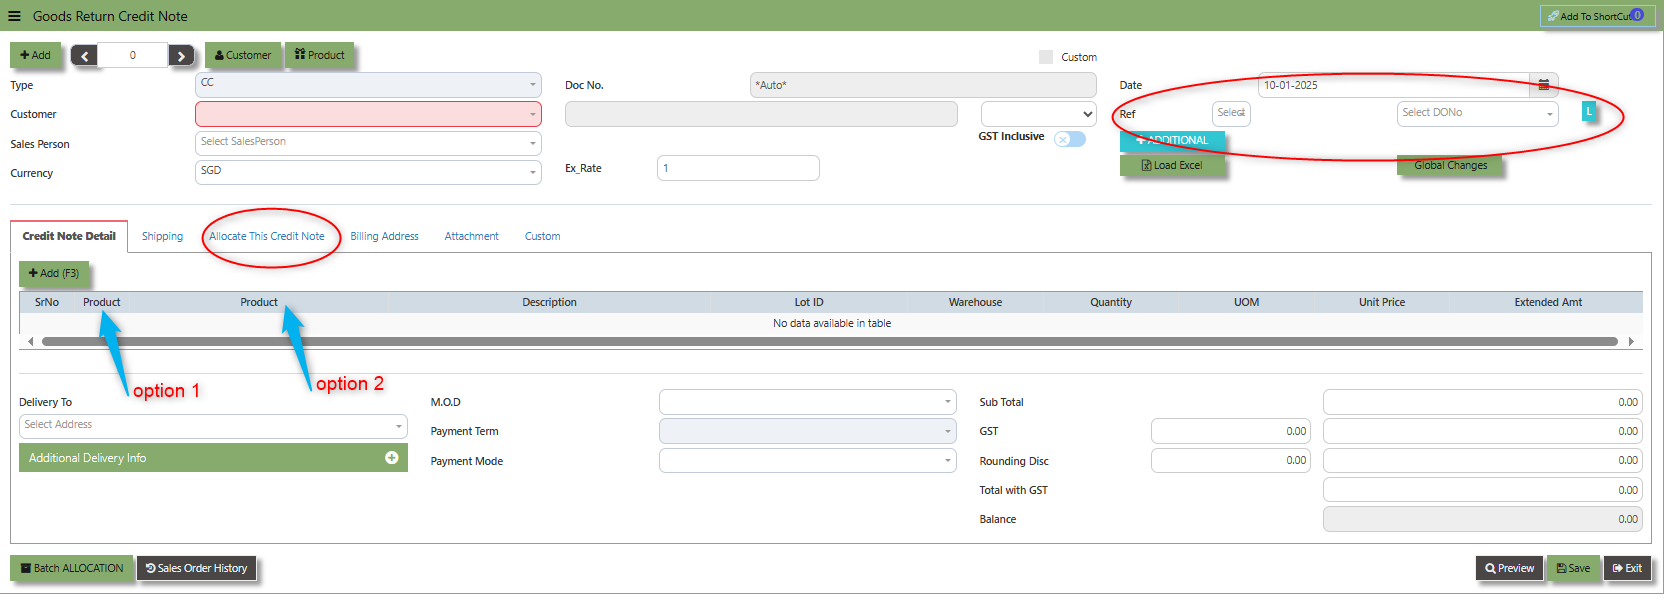
- For this transaction type, the system has two options with regard to selecting the line items in the Details section (refer to highlighting Option 1,1a & Option 2 on print screen)
- Option 1: Select the Transaction Code & Number from the Delivery Ref column, before going to the “Option 1a” drop-down to select the items which will come from the transaction in the Delivery Ref.
- Option 2: Ignore the Option 1 function and use the Product drop-down list to select the items to be
returned. For this option, user should take note of the return cost calculated by the system and where necessary, you can amend the value of the return cost for the individual item.
- After completing the above steps for sales return, user can use the “Batch Allocation” button to allocate the outstanding invoice amount.

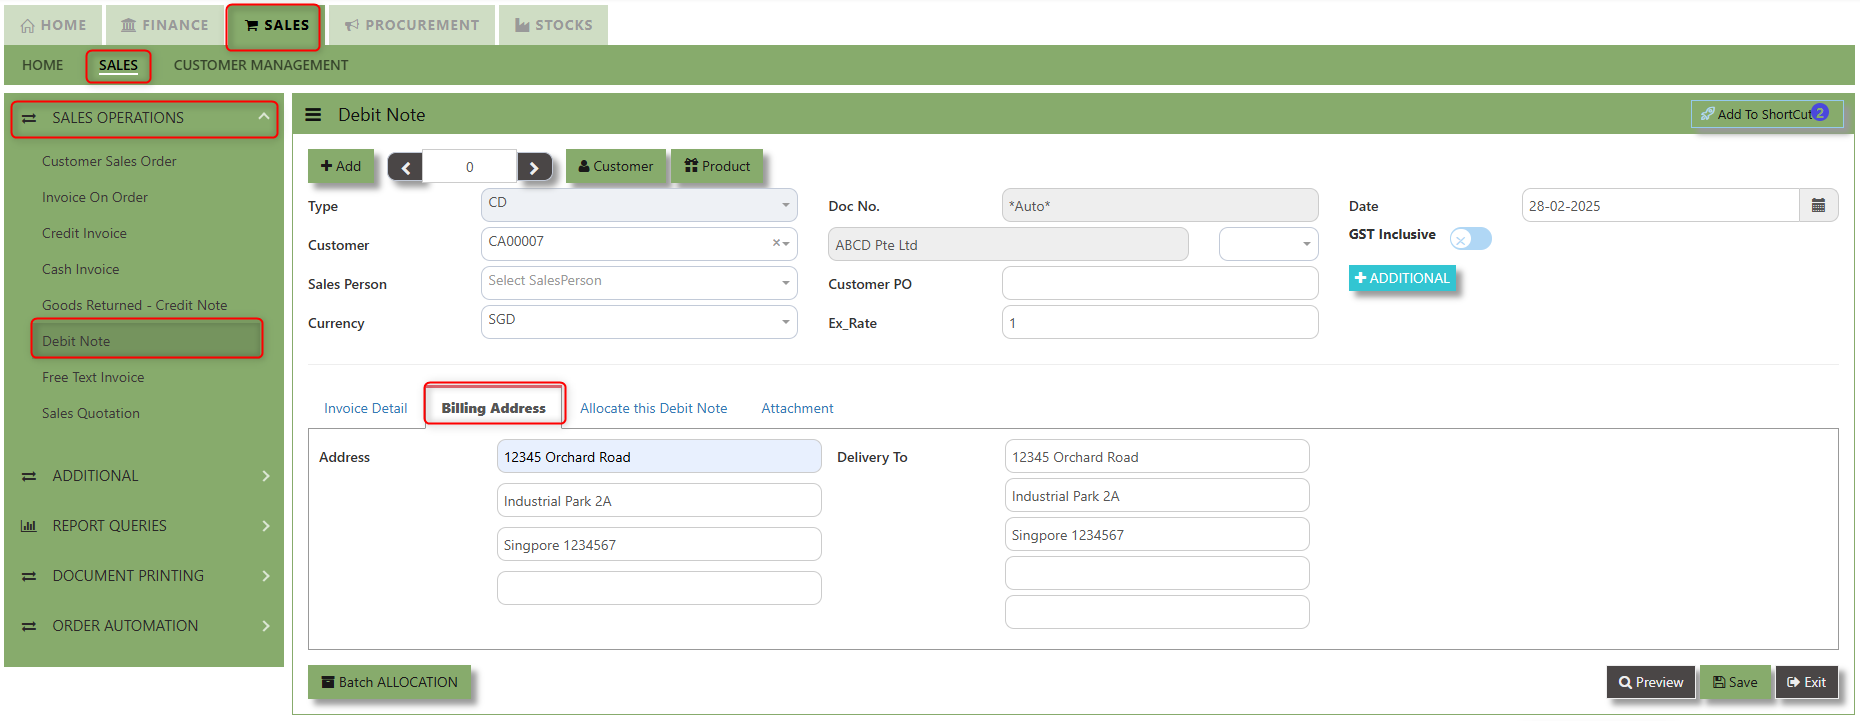
Debit Note
This is a direct Debit Note and involves selling product directly to Customers. It updates the GL and Inventory status. Please note that you can also use this debit note to knock off any credit notes raised.
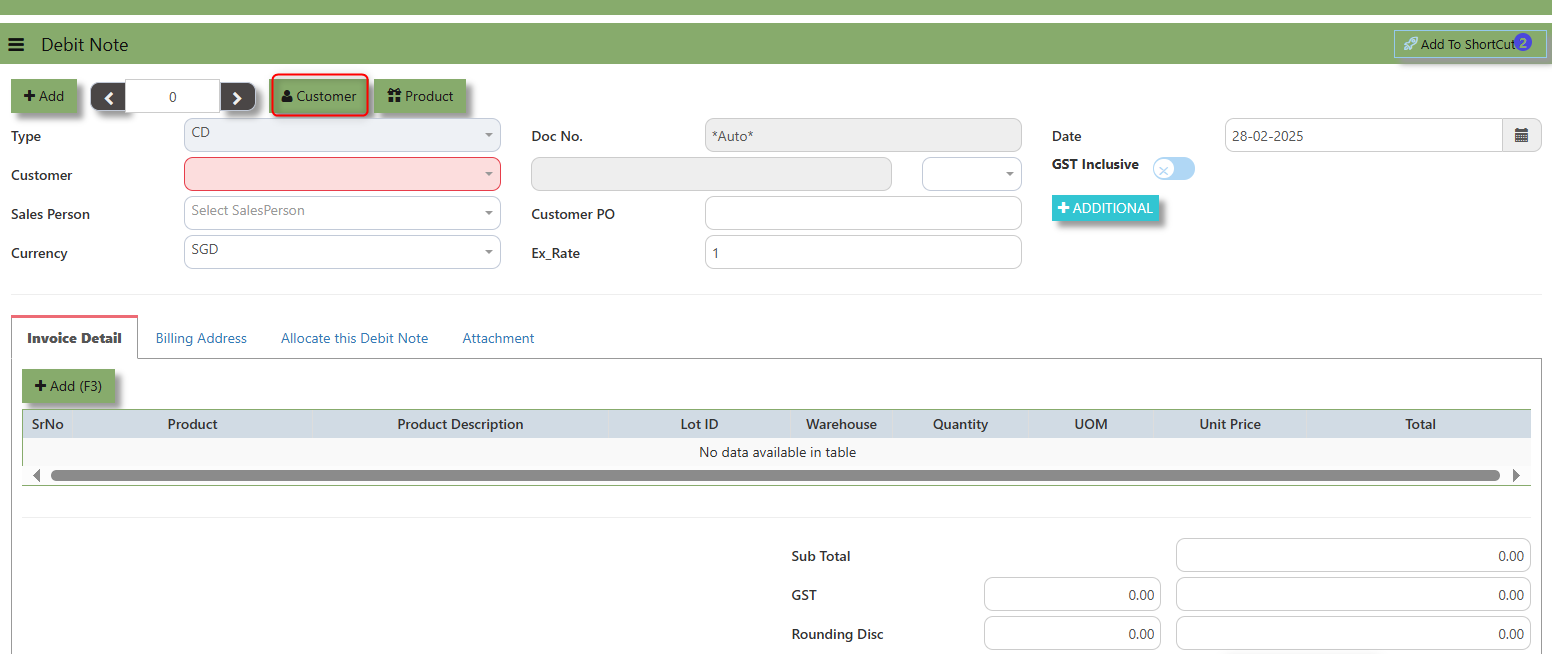
How to Create Debit Note?
1.Click on SALES – SALES OPERATIONS – DEBIT NOTE for the screen below..
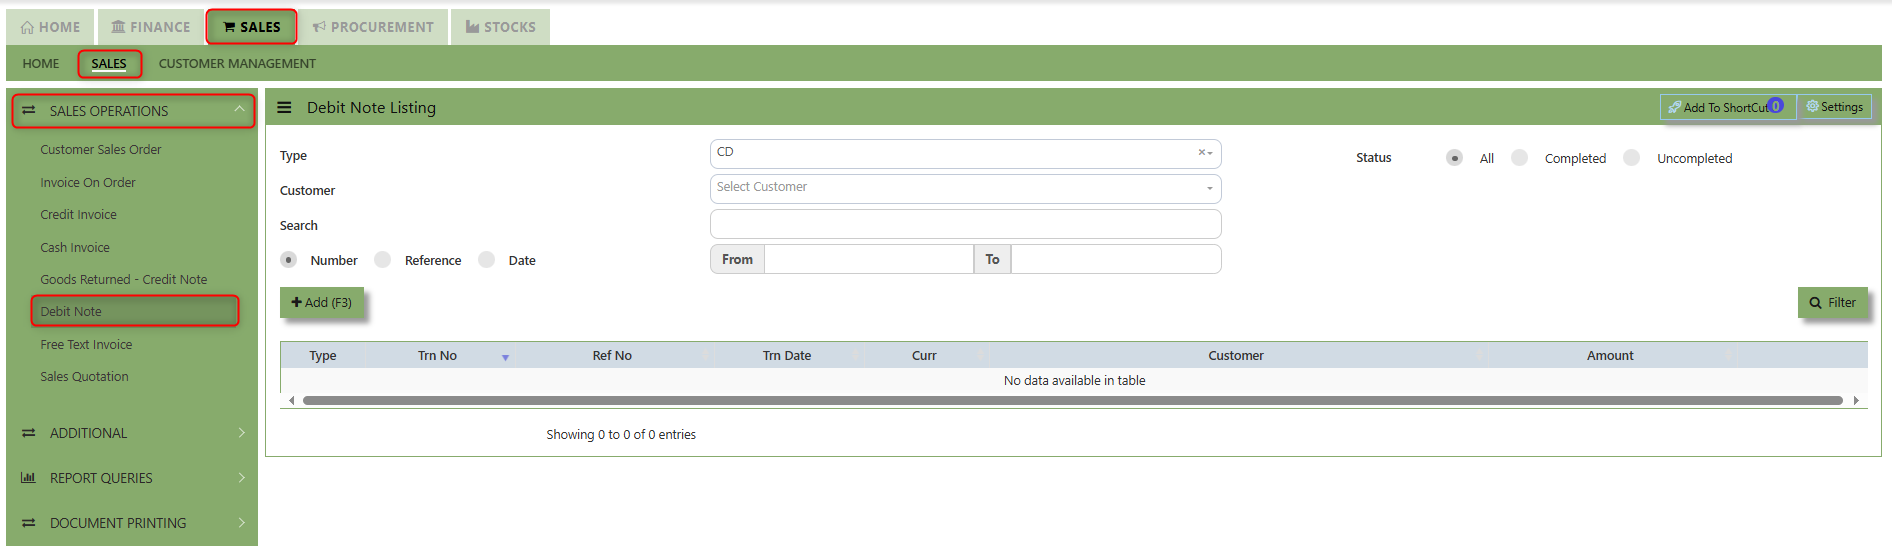
2. Click Add (F3) to create new record.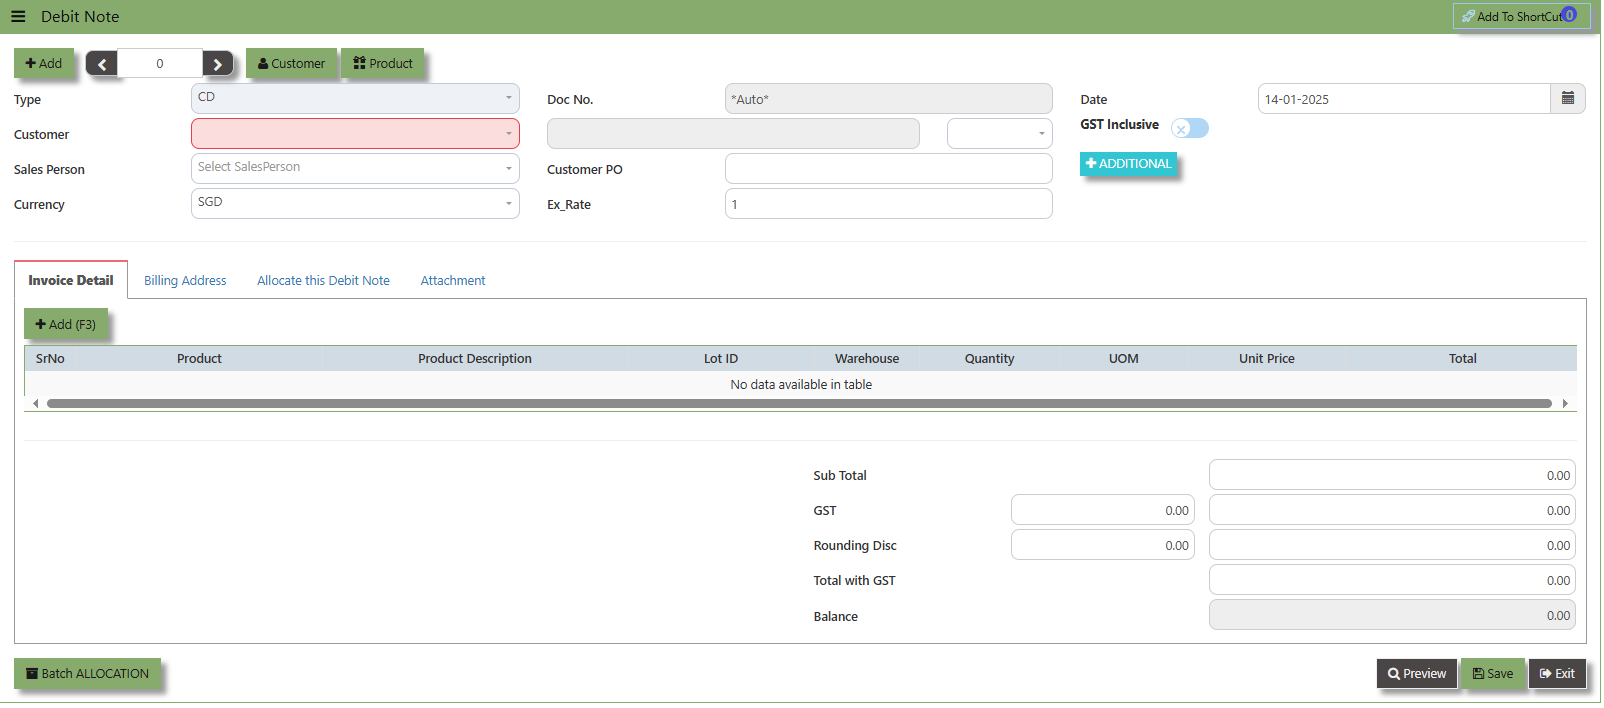
3. Click the Customer - drop-down list to select Customer Name, followed by the Sales Person, PDS, Currency, Rate, Location and Narration if applicable.
4. After updating the header information, go to the Details section to select the items from the Product drop-down list.
Save the transaction after this is done.
5. The Debit Note also has allocation function. Click on the “Batch Allocation” button for allocation.
__________________________________________________________________________________________________________________________________________
Add to Shortcut - Used to create a shortcut for quick access to a specific Sales Transaction. By clicking this button, users can add the current transaction to a list of shortcuts, allowing them to access the invoice or related functionality quickly and efficiently, without needing to search for it each time.
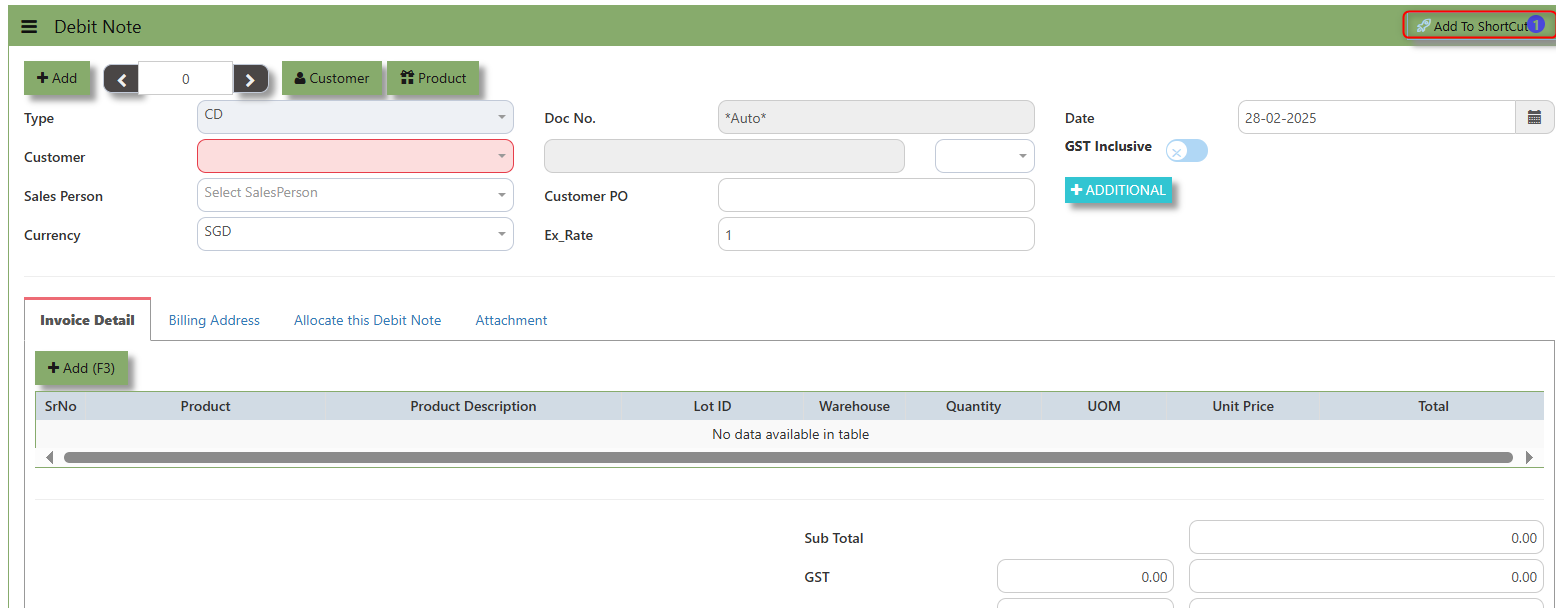
How to use Add to Shortcut?
1. Click "Add to Shortcut" and system will open below windows:
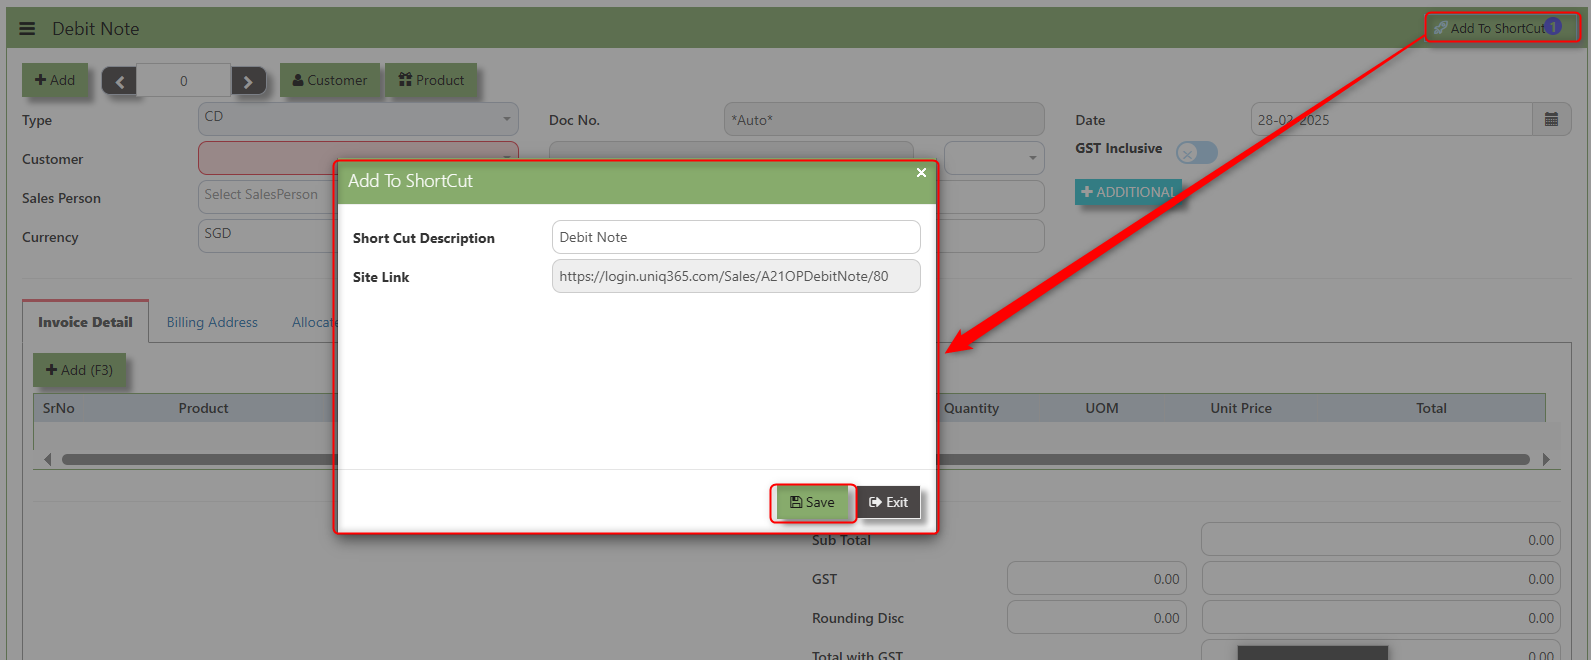
2. Enter Short Cut Description
3. Click SAVE then click OK.
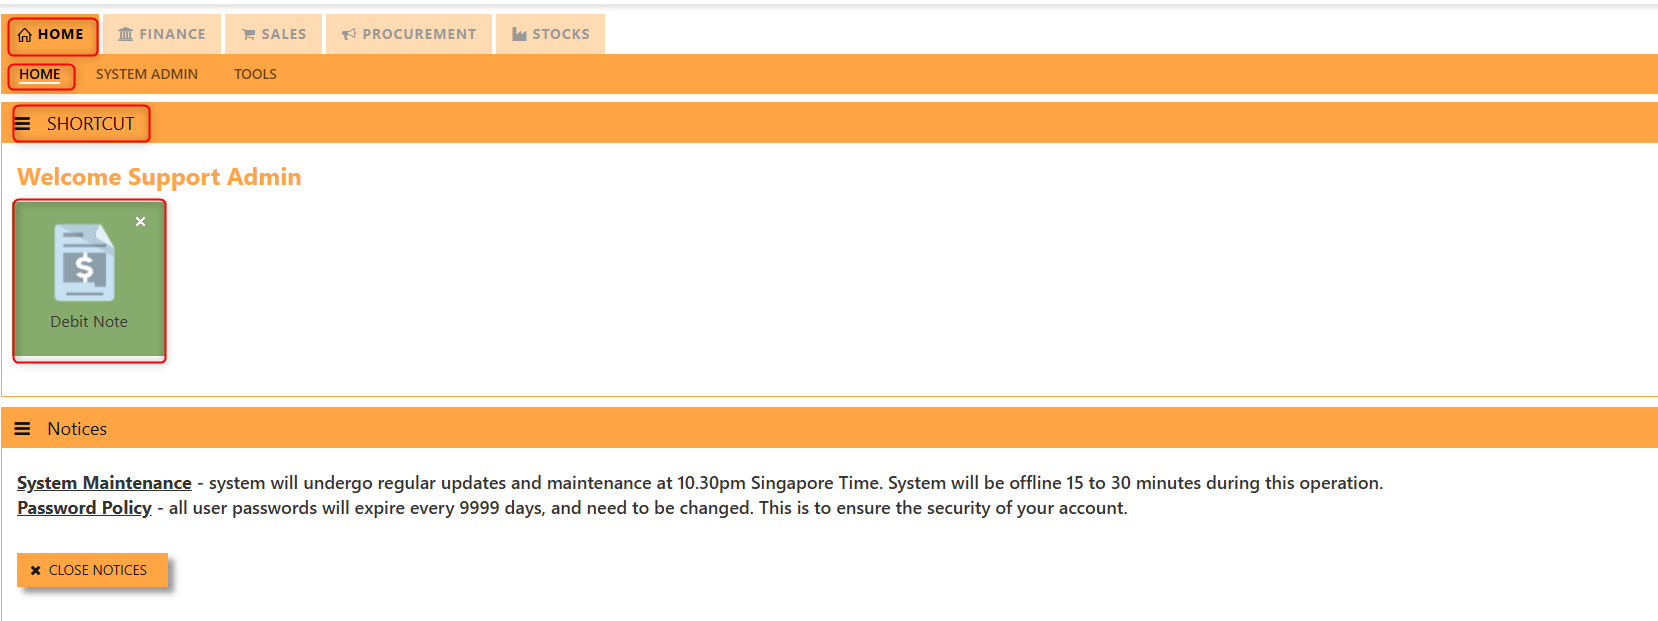
4. User may look to the Homepage for the added function or page. Click on HOME - HOME - SHORTCUT for the screen below.
__________________________________________________________________________________________________________________________________________
The Customer button provides quick access to detailed customer details under Customer maintenance.
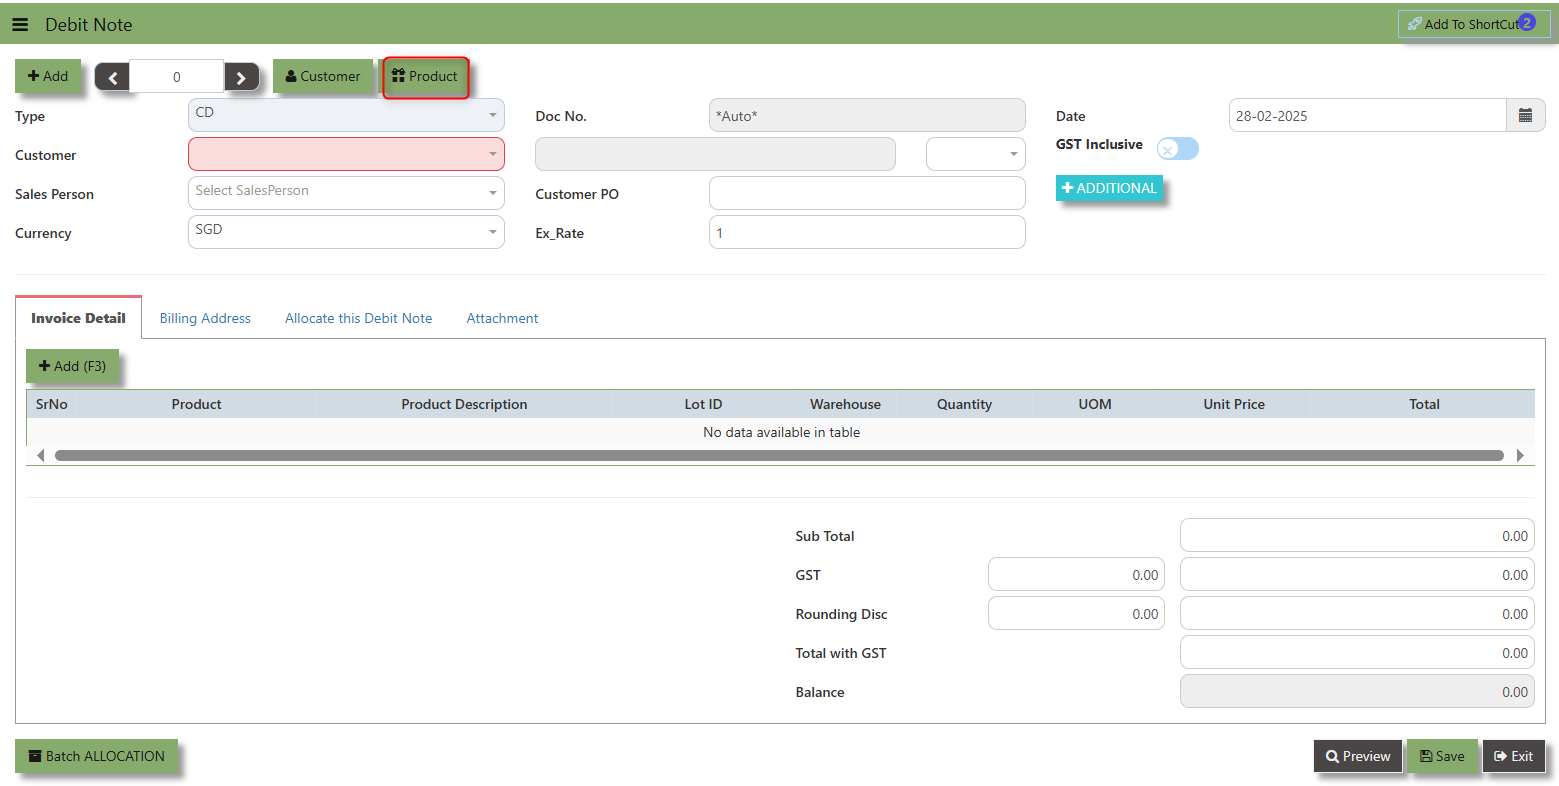
The Product button provides quick access to product and service maintenance.
The GST Inclusive checkbox indicates whether the unit price in the CD include Goods and Services Tax (GST) or not.
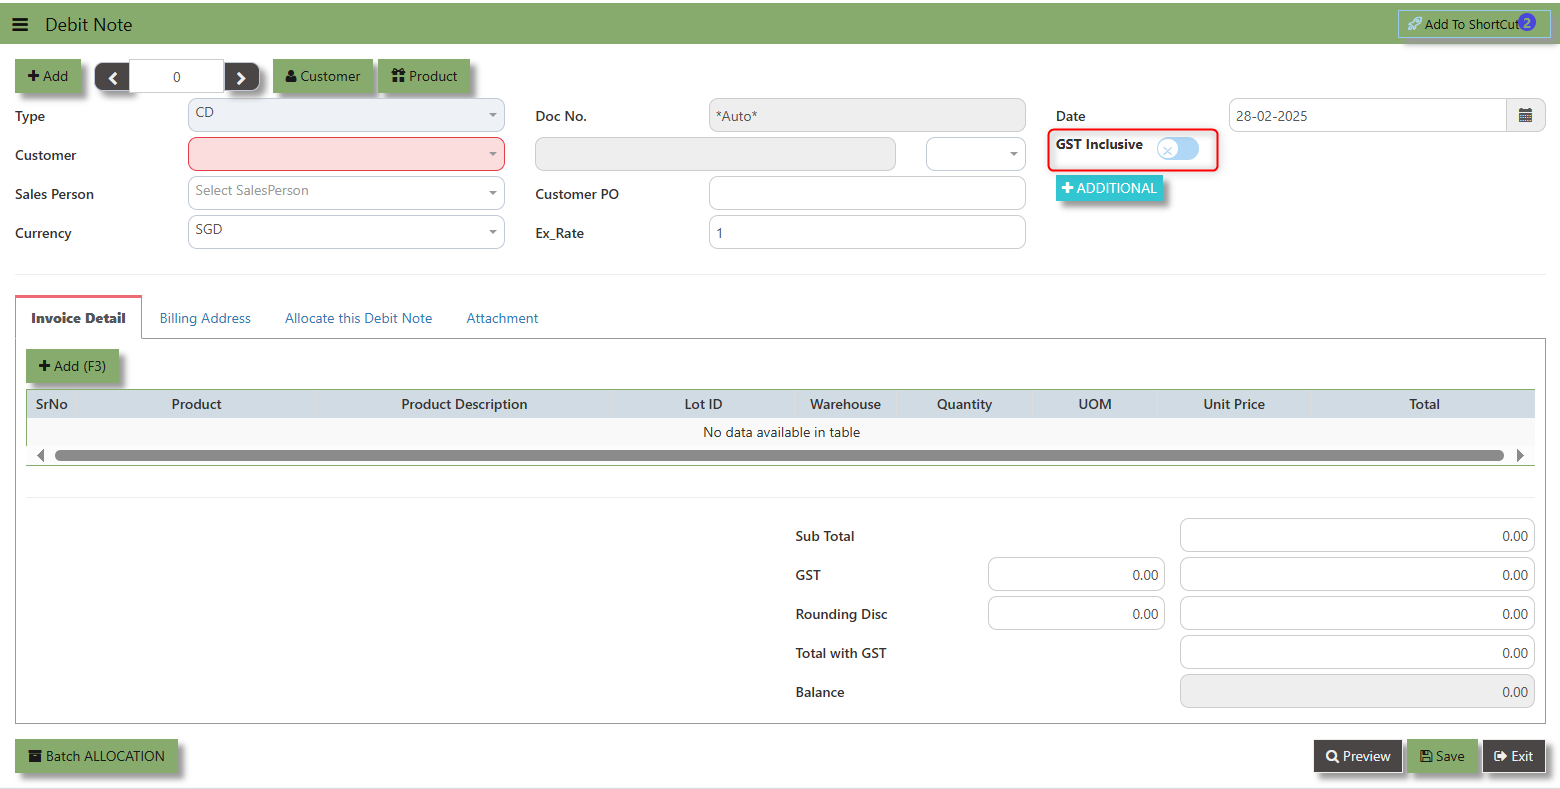
- When ticked (GST Inclusive): provided in the Sales Debit Note already includes the applicable GST amount. The GST amount will not be calculated or displayed separately, as it's already accounted for in the quoted price.
- When not ticked (GST Exclusive): The unit price is considered exclusive of GST. The system will calculate and add the GST based on the applicable tax rate, and the final total will be the sum of the base price plus the GST amount
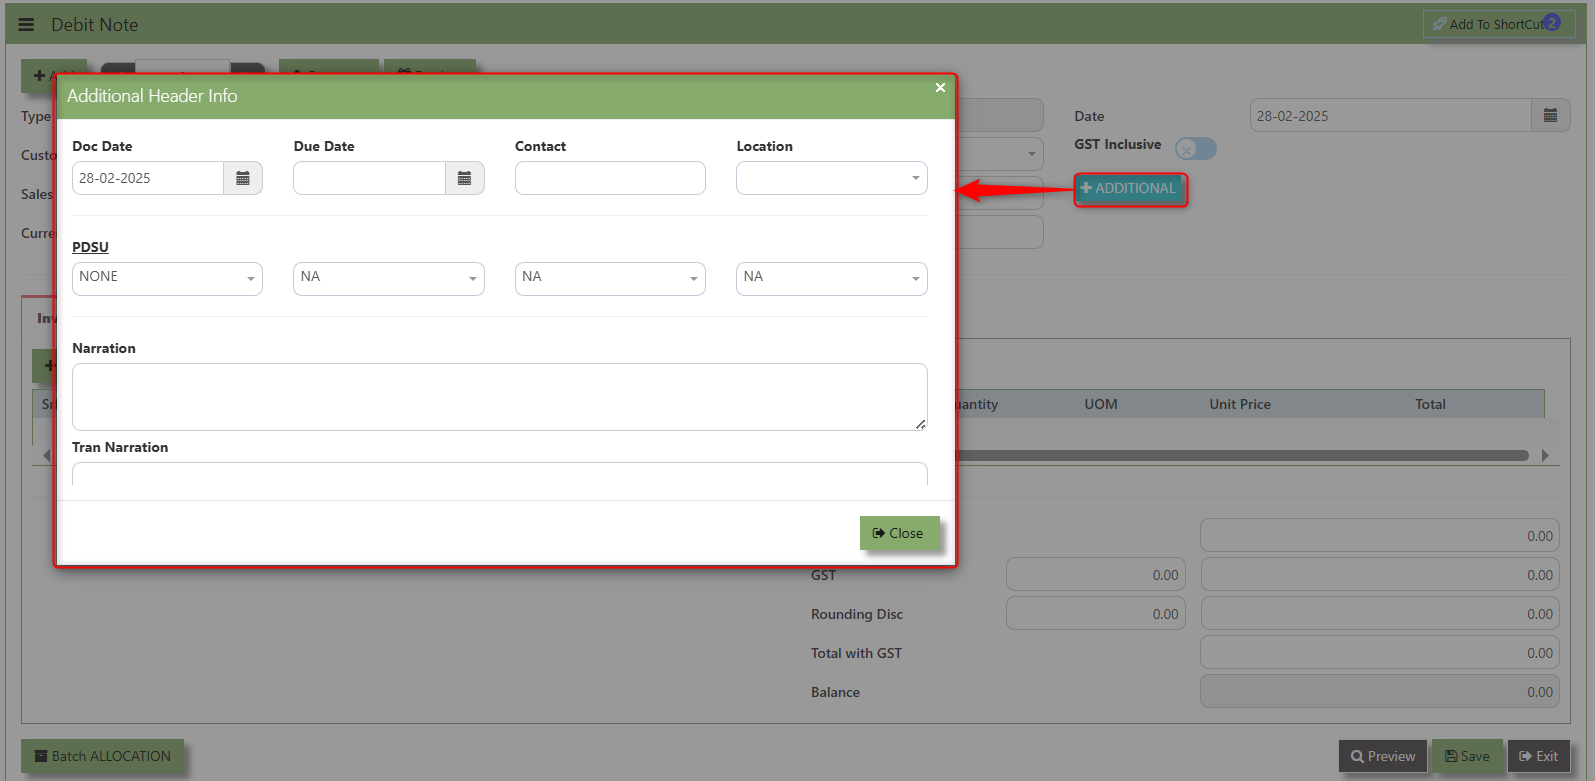
Additional Header Info button is typically used to capture and manage additional information related to the debit at the header level (i.e., Doc Date, Due date , Contact, Location Contact, PDSU, Narration and Transaction Narration). This feature allows users to add extra data or notes that are relevant to the entire sales invoice on order.
___________________________________________________________________________________________________________________________________________
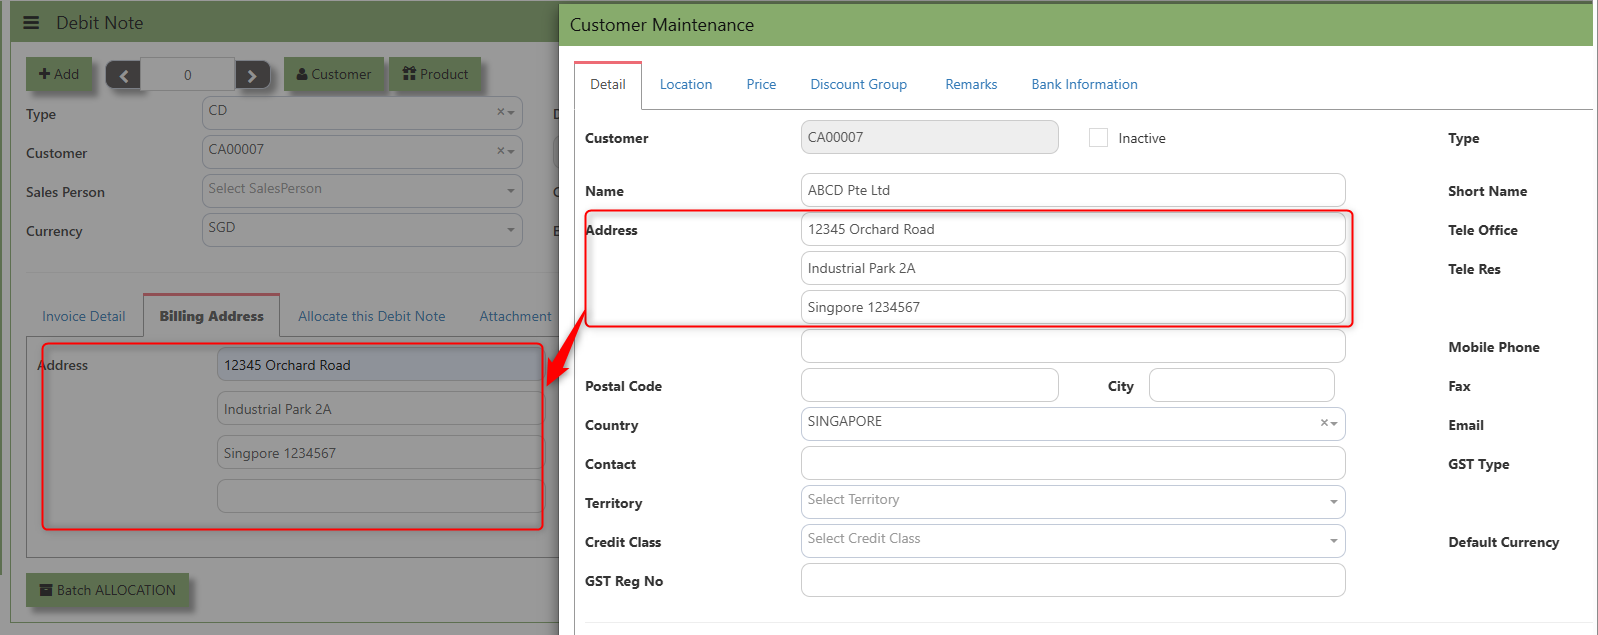
"Billing Address Tab" - section where the Billing Address is maintained. This tab ensures that the Billing Details will is displayed and can be editable according to the customer details.
2. The Billing address is defaulted from Customer Maintenance which is the Customer address, it was also editable is needed.
__________________________________________________________________________________________________________________________________________
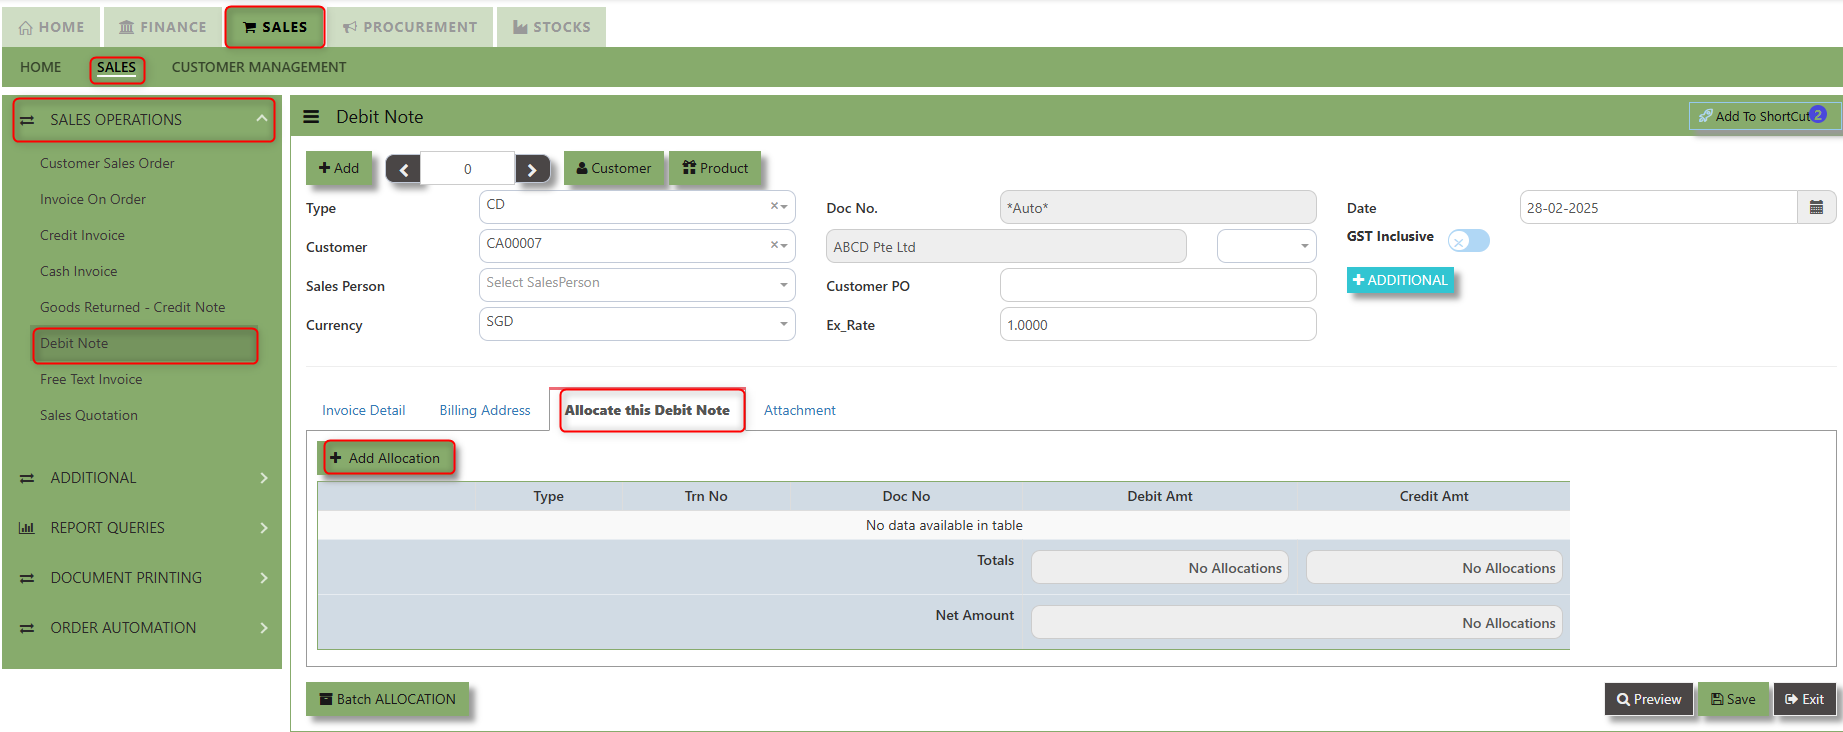
"Allocate Debit Note Tab" is a feature in UNIQ365 that allows users to allocate debit note to specific invoices or transactions.
___________________________________________________________________________________________________________________________________________
"Attachment Tab" allows users to attach various files and documents related to the debit note. By attaching relevant files, users ensure that all purchase-related information is kept in one place, making the sales process smoother, more transparent, and easier to track.
How to use Attachment Tab?
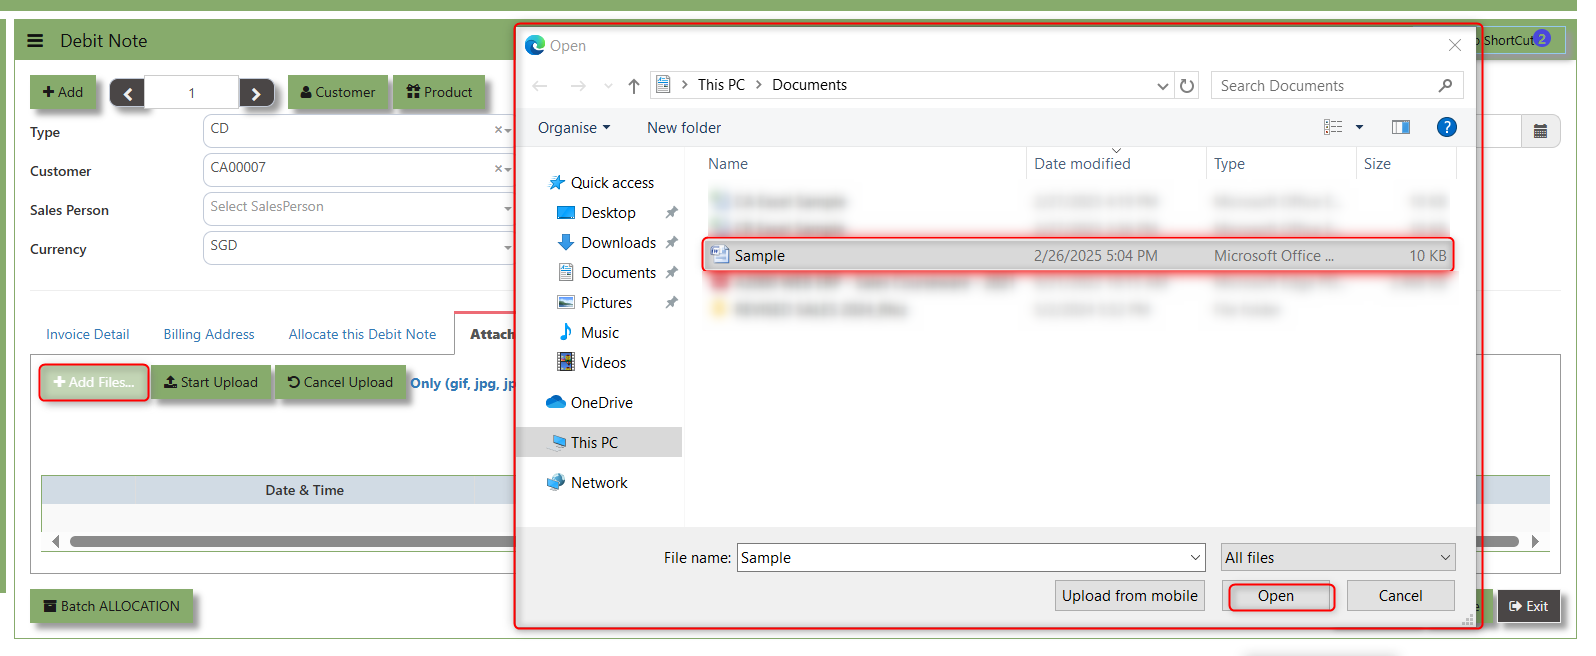
1. Click on SALES – SALES OPERATIONS – DEBIT NOTE – ATTACHEMENT TAB for the screen below.
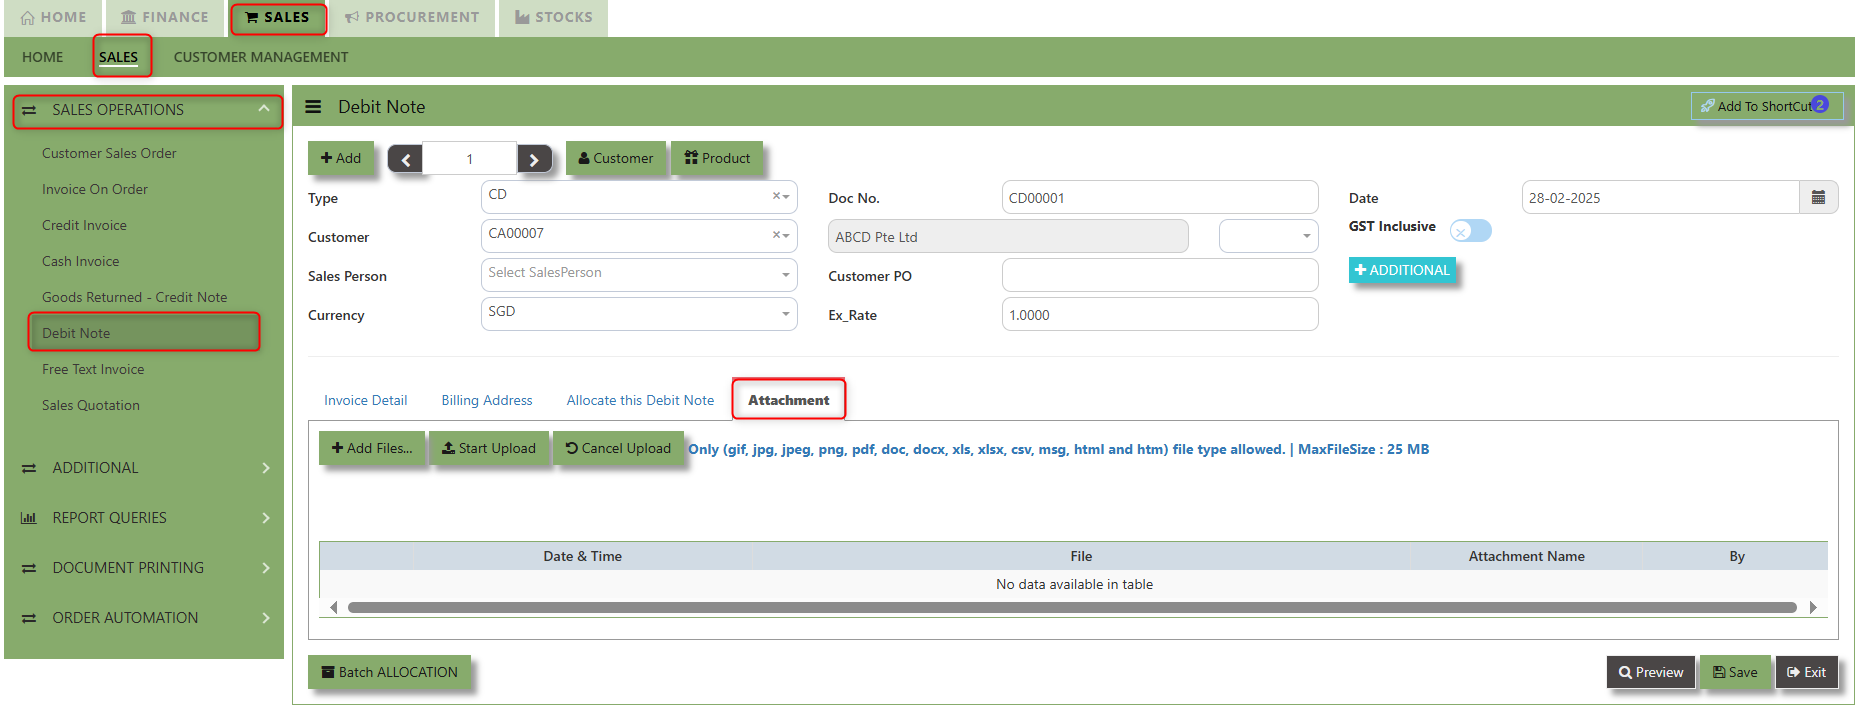
2. Click +Add files and windows will prompt then choose the file you want to upload by clicking open. Kindly take note the file types and maximum size requirements in uploading: Only (gif, jpg, jpeg, png, pdf, doc, docx, xls, xlsx, csv, msg, html and htm) file type allowed. | MaxFileSize : 25 MB
3. Key in the Attachment Name then click start to upload.
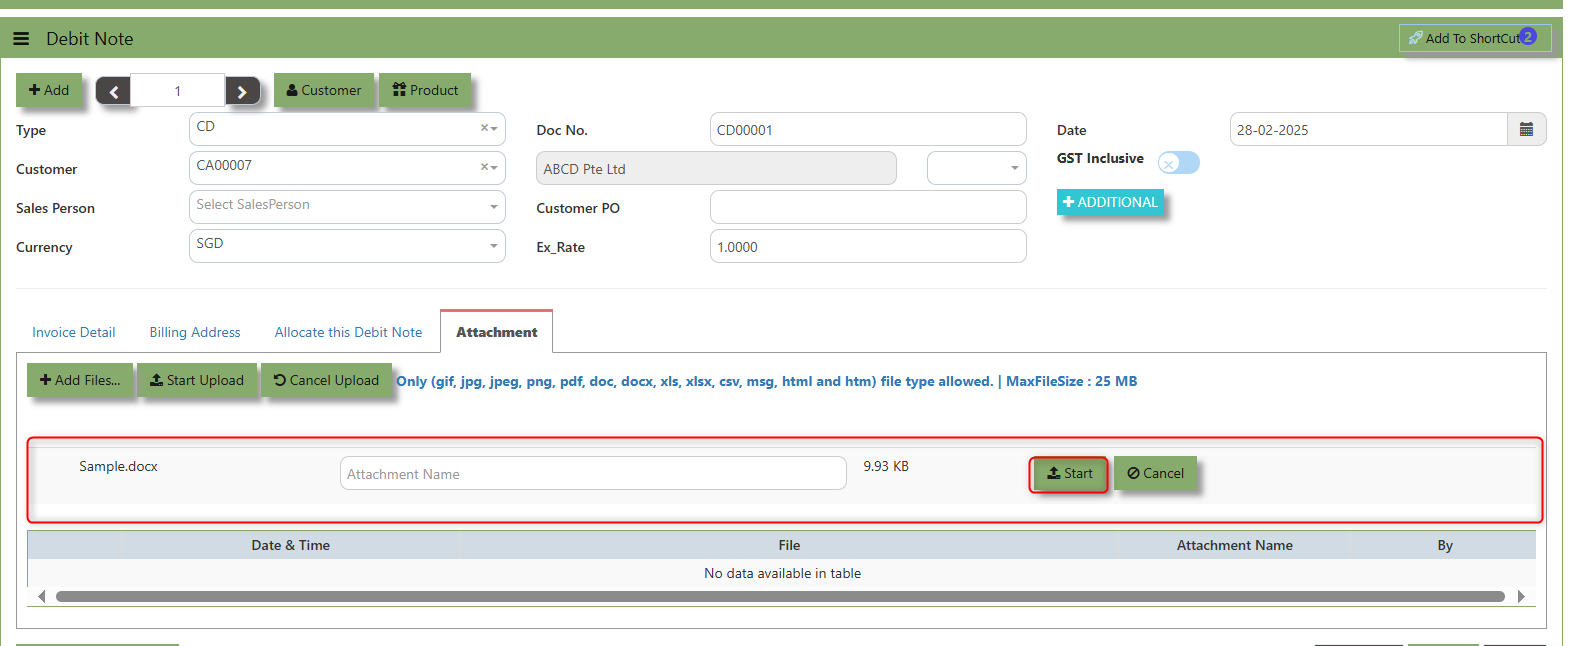
4 Once the file attached, click "SAVE" button

User may opt to cancel the uploading by clicking the "Cancel Upload" button and delete the file uploaded by clicking the "Bin icon" at the line detail.
___________________________________________________________________________________________________________________________________________
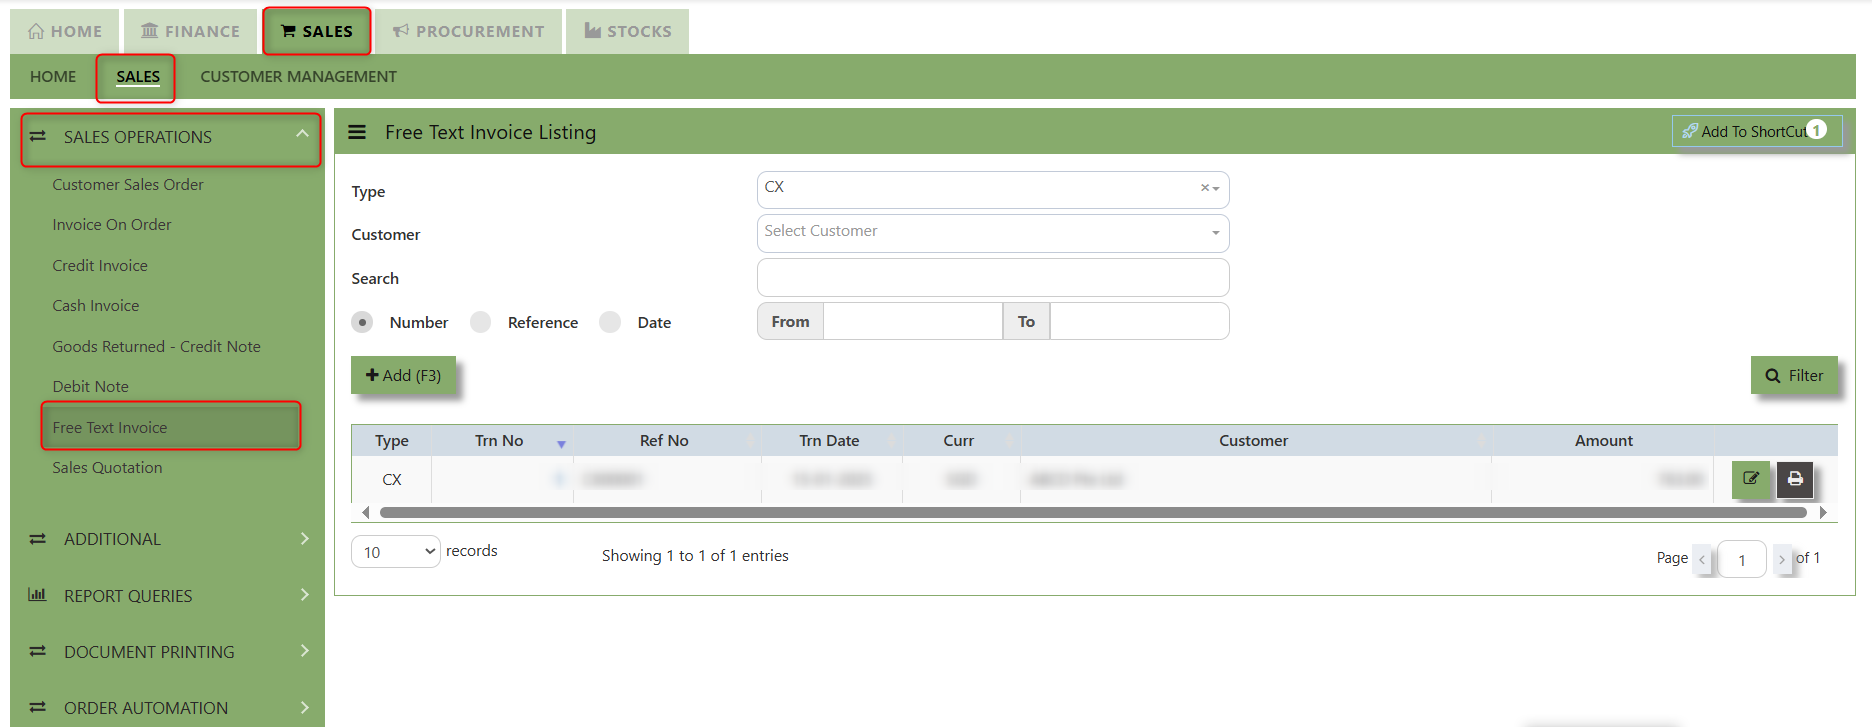
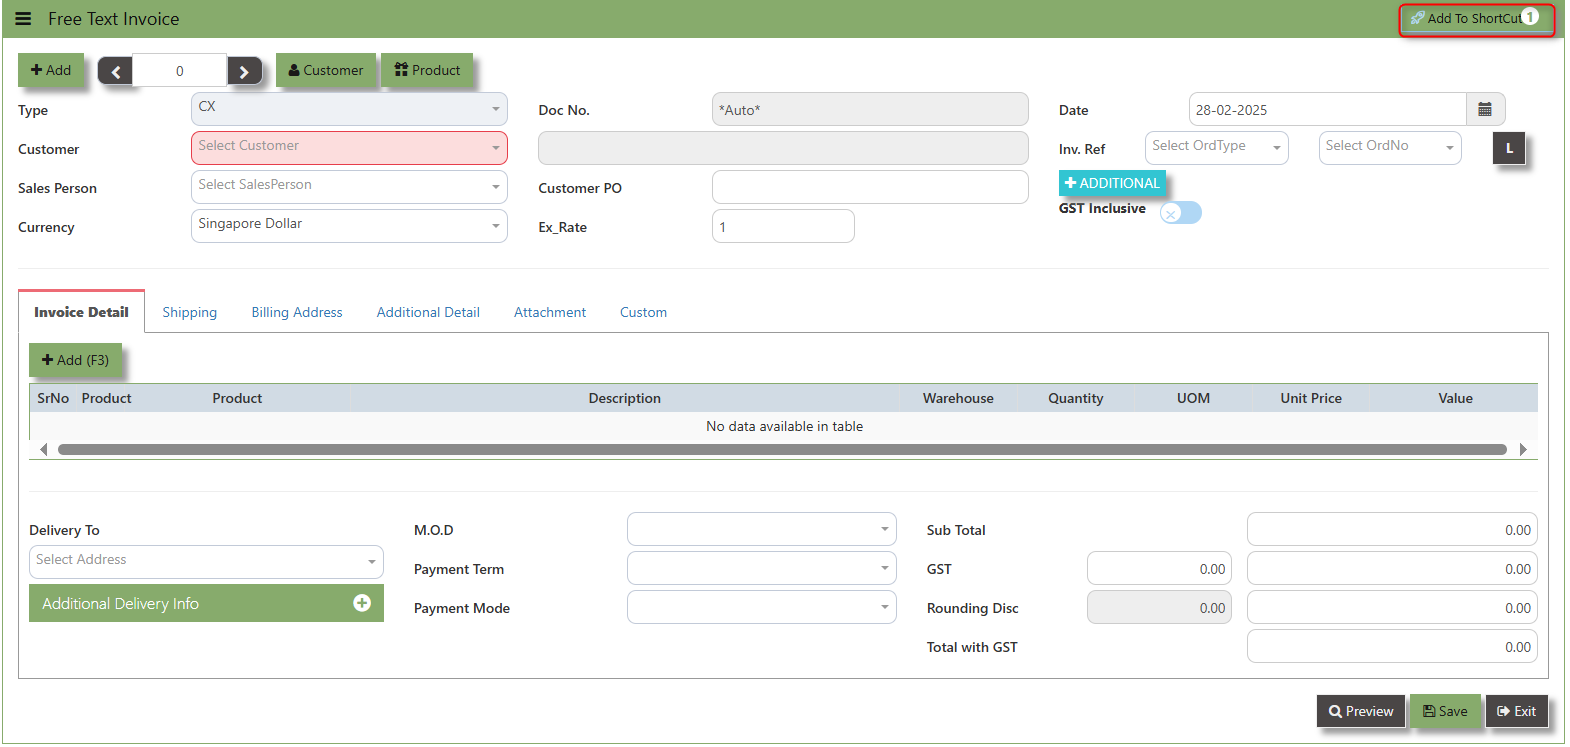
Free Text Invoice
The Free Text Invoice is an invoice that is not attached to a sales order and does not require a sales order or packing slip.
How to create Free text invoice?
1.Click on SALES – SALES – SALES OPERATIONS – FREE TEXT INVOICE for the screen below
2. Click on Add button or press F3 to create a new transaction
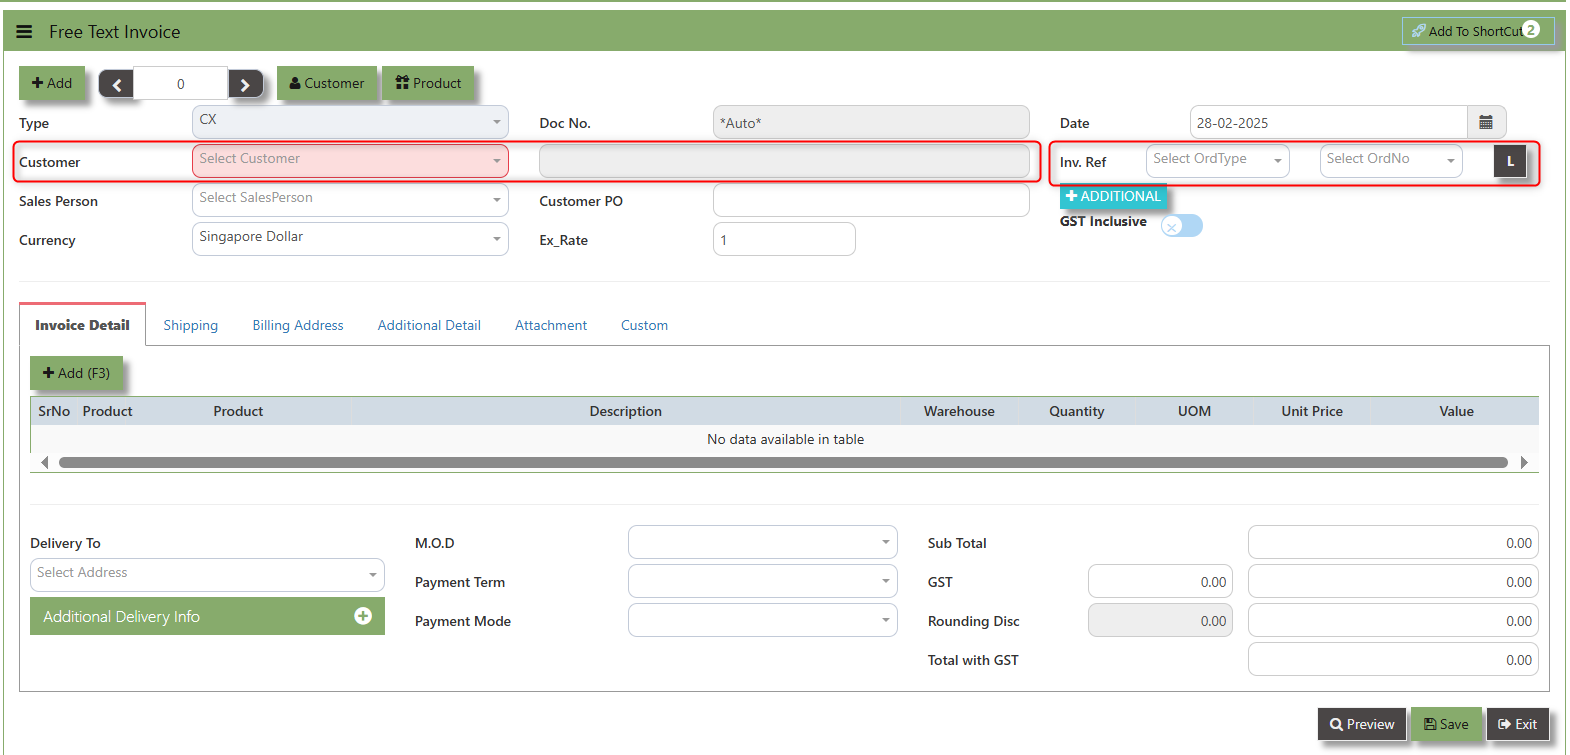
3. Click the Type - drop-down to select transaction type – CX (Free text Invoice).
4. After the transaction type selection, use the tab button to go to the Doc No. and Date fields
5. Click the Customer - drop-down list to select Customer Name, followed by the Sales Person, , Currency, Exchange Rate and Customer PO if applicable.
6. After completing the above steps, you can go to the Inv. Ref to select specific transaction to load in CX, check the loaded transactions details. Save the transaction after this is done.
___________________________________________________________________________________________________________________________________________
Add to Shortcut - Used to create a shortcut for quick access to a specific Sales Transaction . By clicking this button, users can add the current Sales Transaction to a list of shortcuts, allowing them to access the invoice or related functionality quickly and efficiently, without needing to search for it each time.
How to use Add to ShortCut?
1. Click "Add to ShortCut" and system will open below windows:
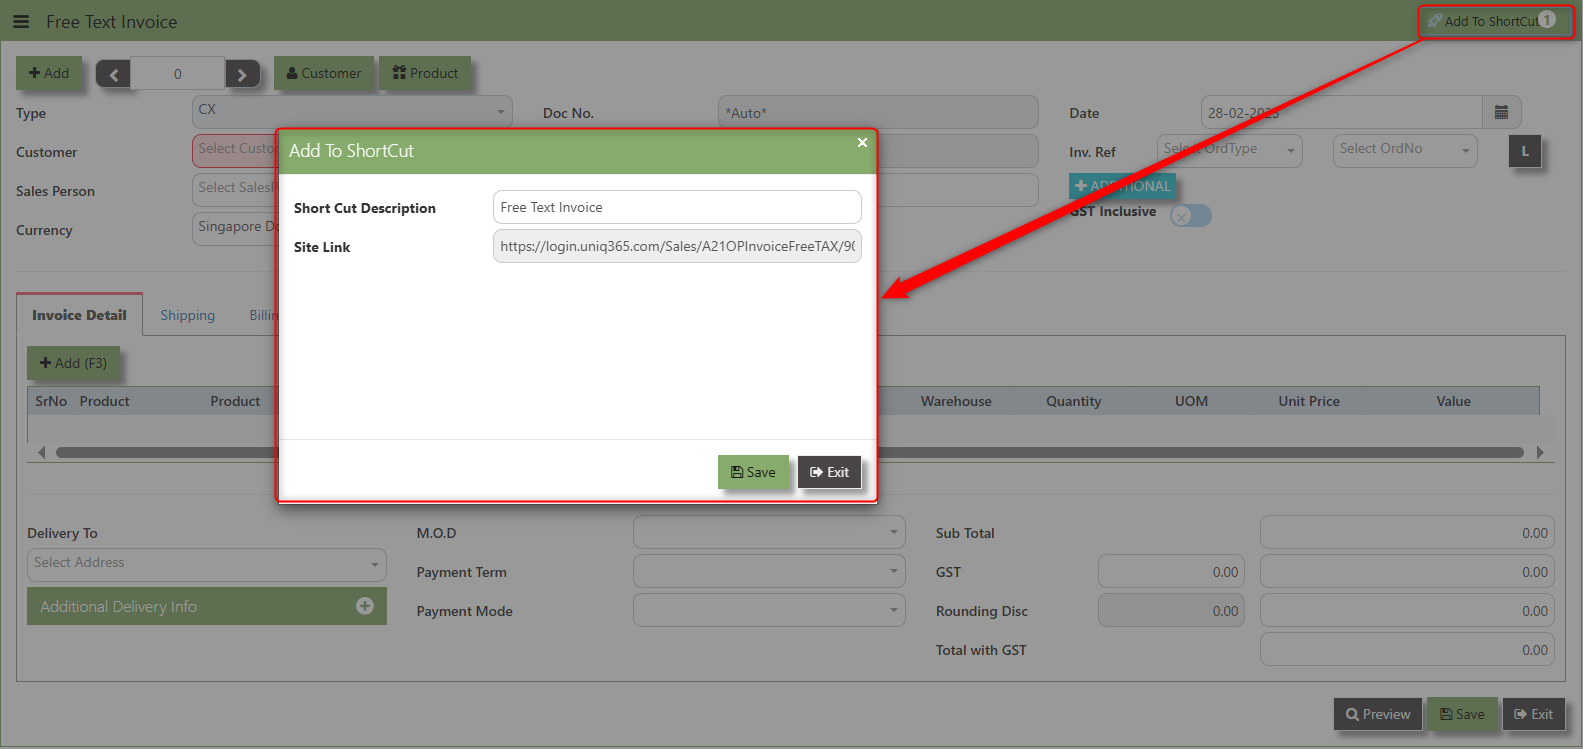
2. Enter Short Cut Description
3. Click SAVE then click OK.
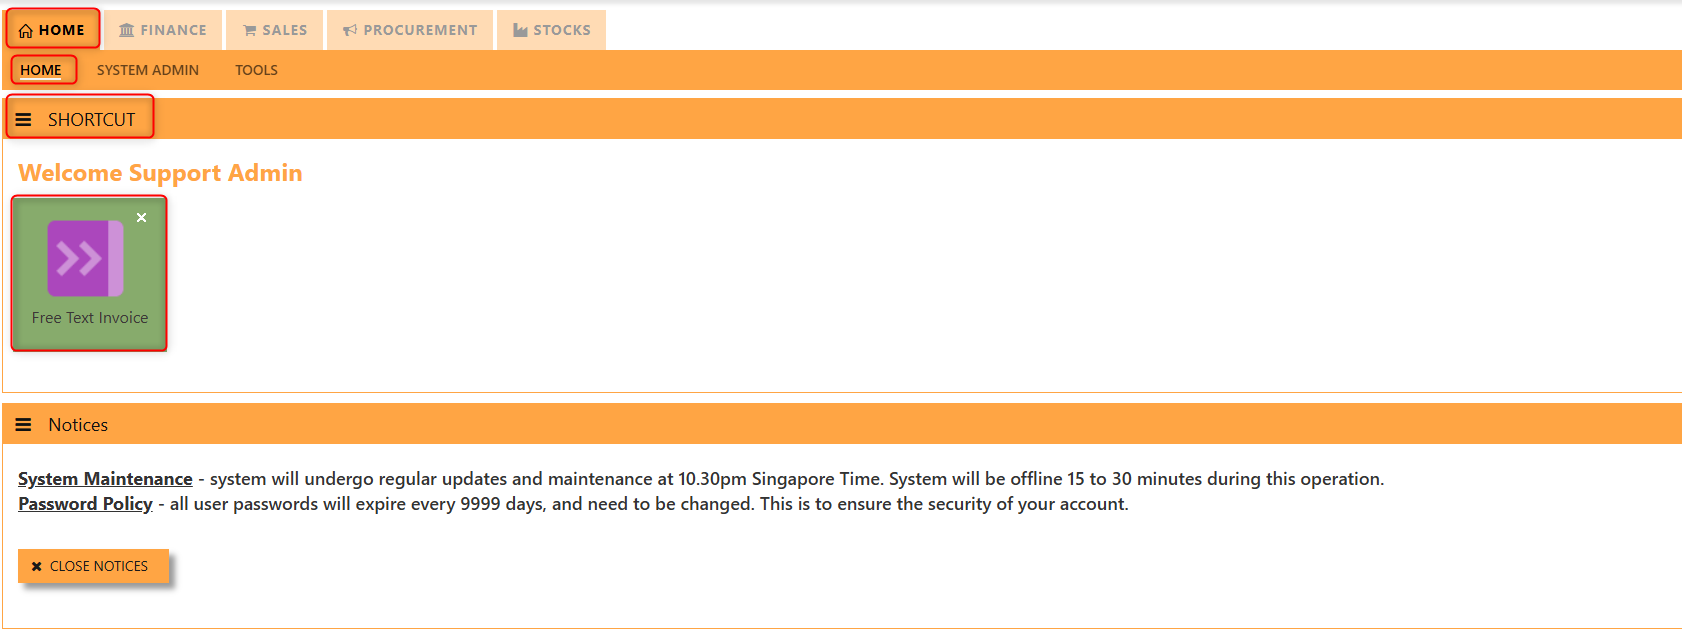
4. User may look to the Homepage for the added function or page. Click on HOME - HOME - SHORTCUT for the screen below
 ___________________________________________________________________________________________________________________________________________
The Customer button provides quick access to detailed supplier profiles under Customer maintenance.

The Product button provides quick access to product and service maintenance.

The GST Inclusive checkbox indicates whether the unit price in the CO include Goods and Services Tax (GST) or not.
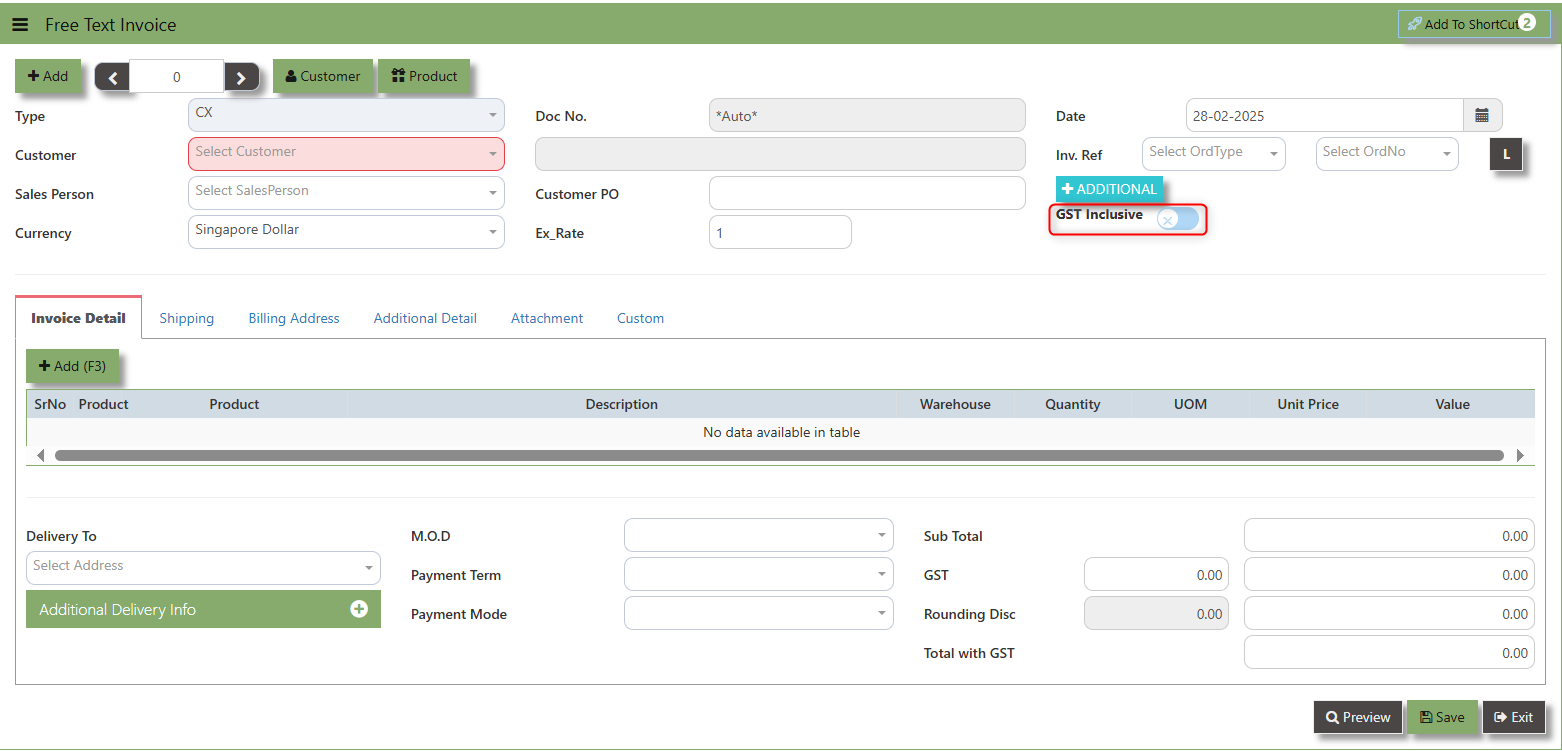
- when ticked (GST Inclusive): provided in the SAles transaction already includes the applicable GST amount.
- When not ticked (GST Exclusive): The unit price is considered exclusive of GST. The system will calculate and add the GST based on the applicable tax rate, and the final total will be the sum of the base price plus the GST amount.
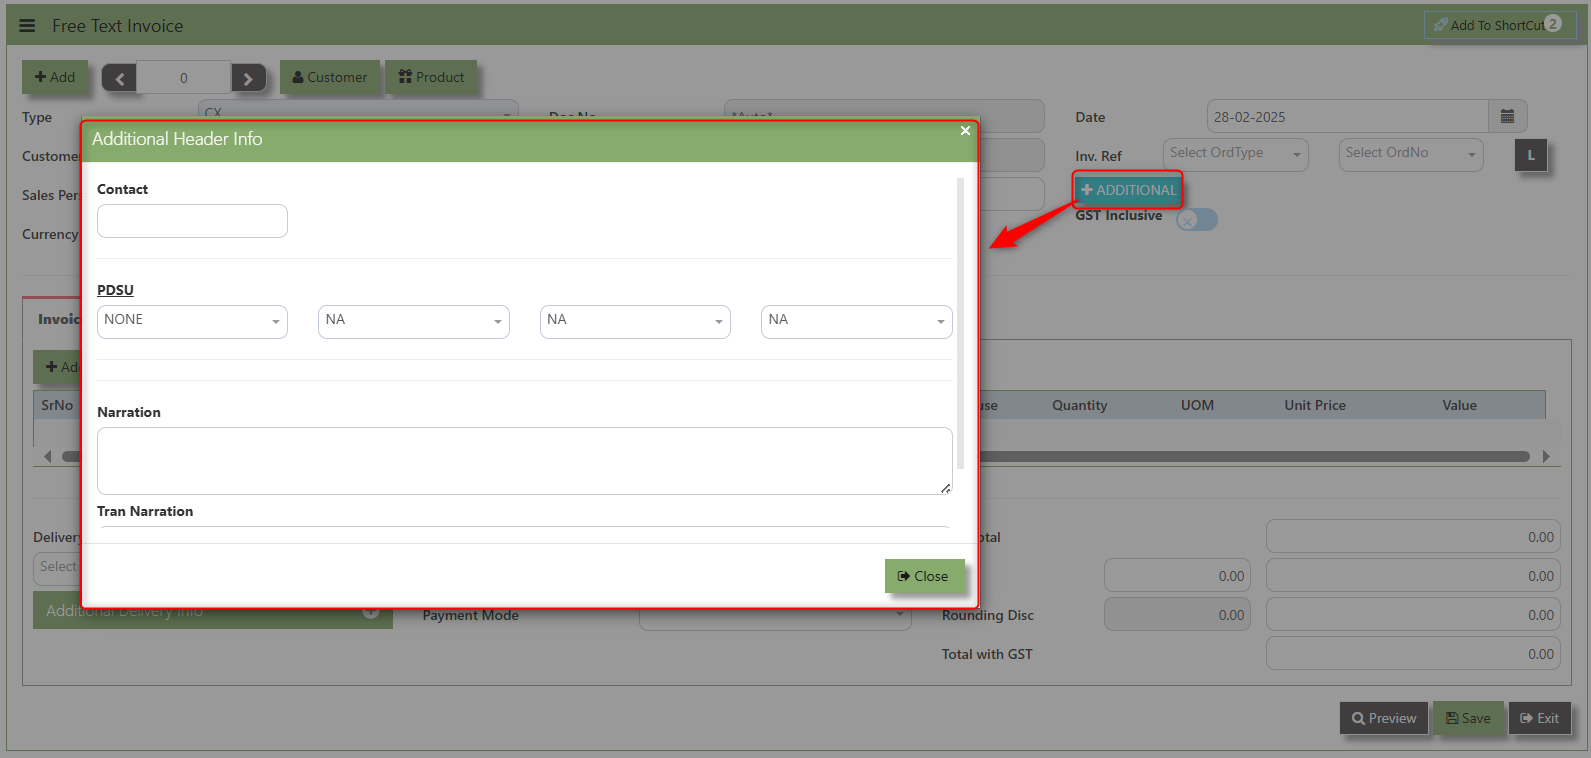
Additional Header Info button is typically used to capture and manage additional information related to the sales order at the header level (i.e., Delivery date, Del Term , Indicative WH , Country, Lead Time, Contact, PDSU, Narration and Transaction Narration). This feature allows users to add extra data or notes that are relevant to the entire sales order.
___________________________________________________________________________________________________________________________________________
Shipping Tab a section where specific shipping-related information is entered and managed for the sold goods or services. This tab ensures that all relevant details regarding the shipment, delivery location, and delivery expectations are captured in the system to facilitate smooth and accurate order fulfilment.
How to set Shipping Info?
1. Click on SALES – SALES OPERATIONS – CUSTOMER SALES ORDER - SHIPPING TAB for the screen below.
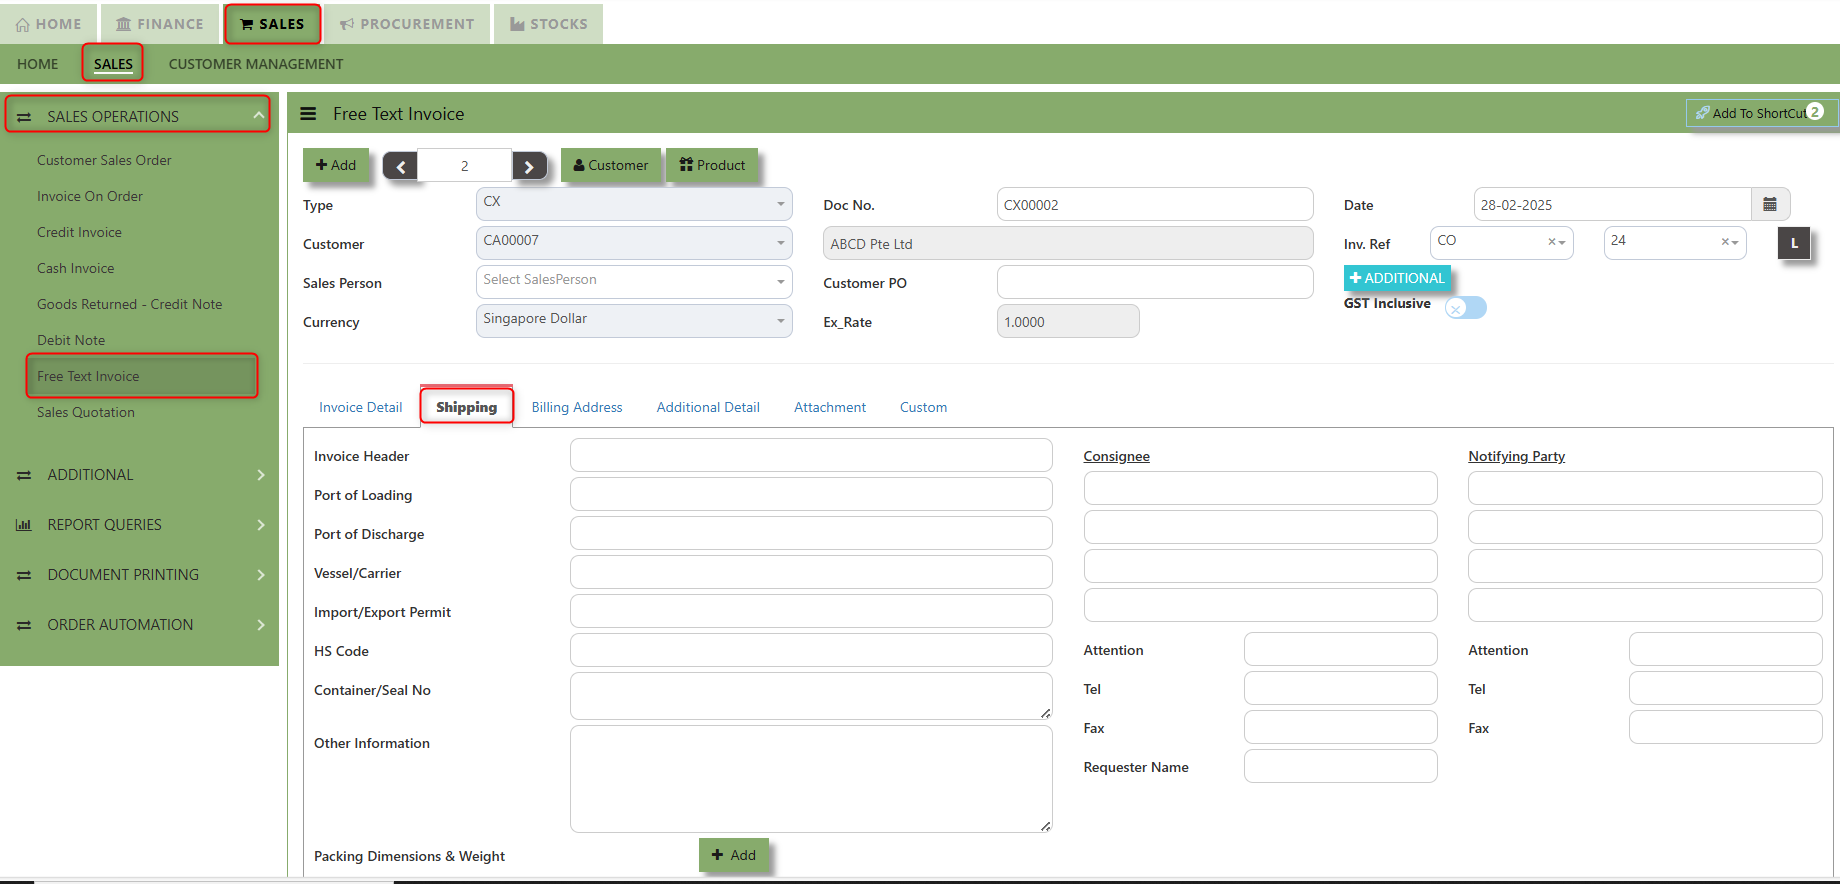
2. Input the below details for the below fields:
-
- Invoice Header
- Port of Loading
- Port of Discharge
- Vessel/Carrier
- Import/Export Permit
- HS Code
- Container/Seal No
- Other Information
- Consignee
- Attention
- Tel
- Fax
- Notifying Party
- Attention
- Tel
- Fax
3. Once keyed in the necessary details, click the next tab and will automatically save all the information then system will prompt you a message.
___________________________________________________________________________________________________________________________________________
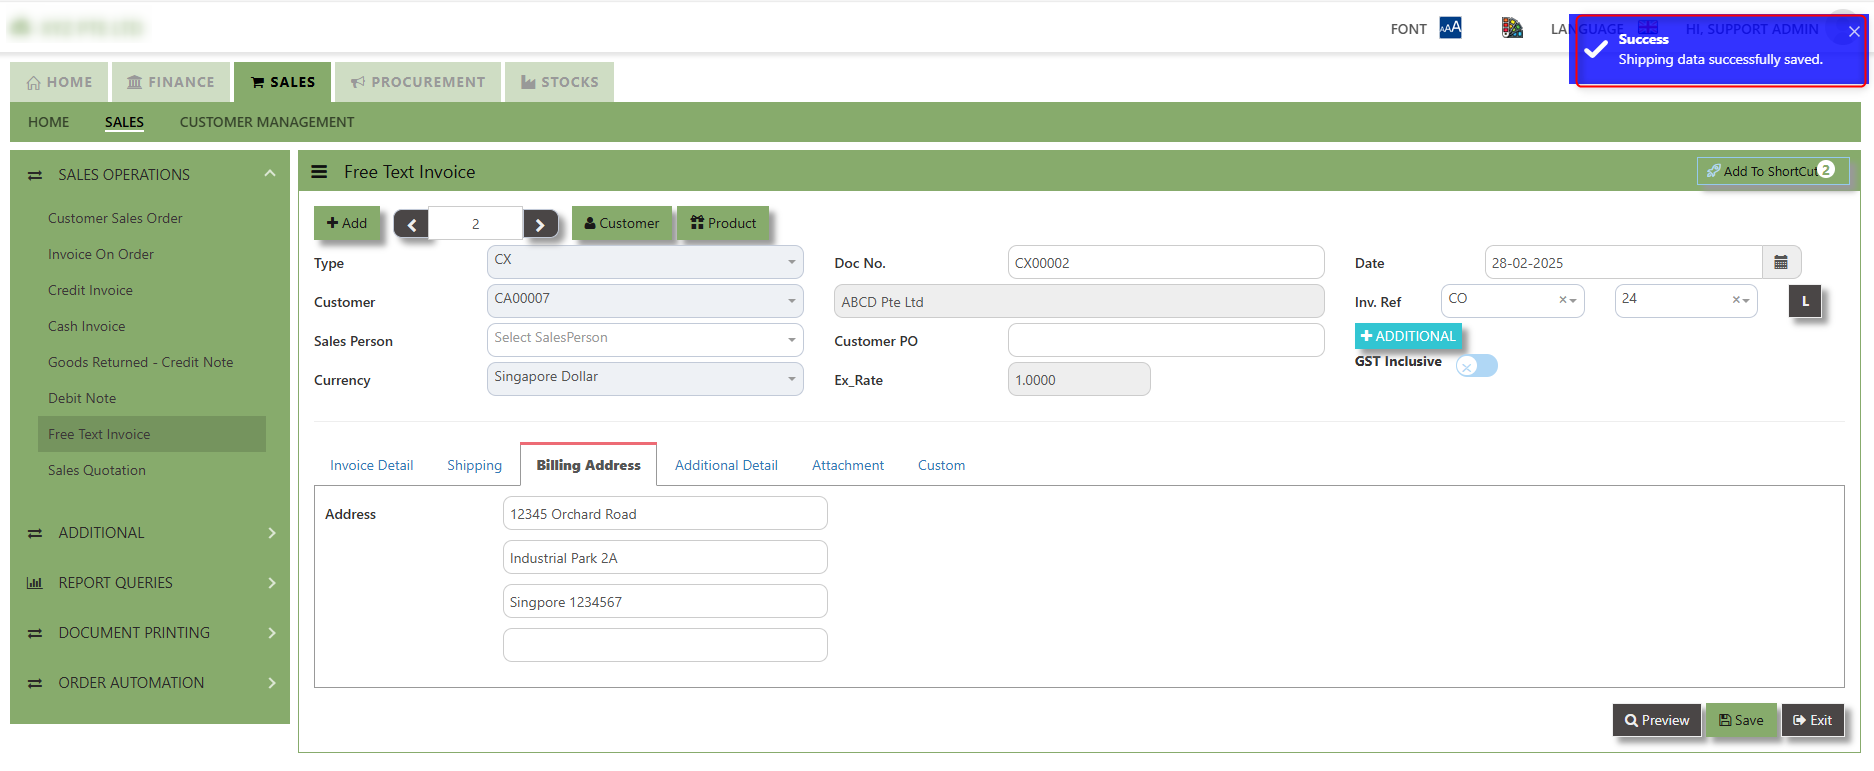
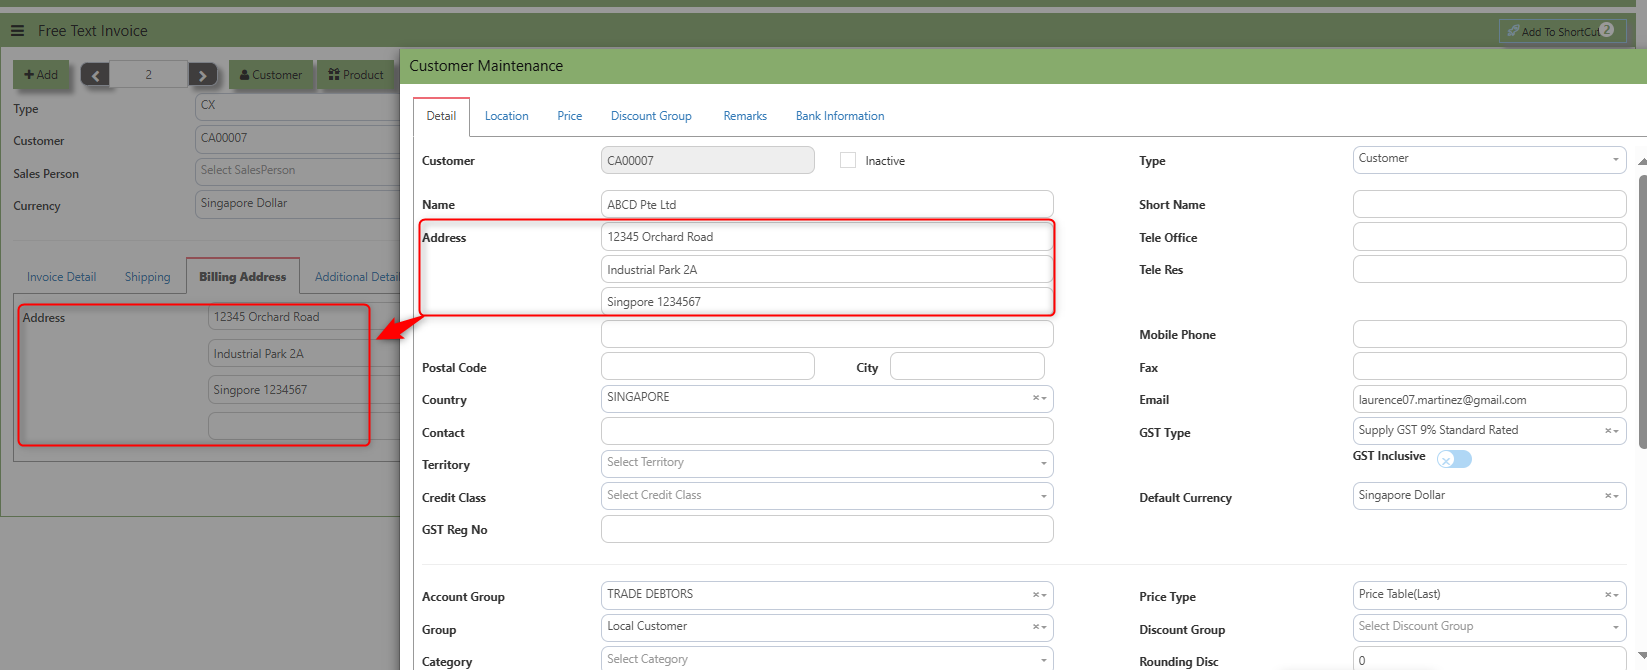
Billing Address - section where the Billing Address is maintained. This tab ensures that the Billing Details will is displayed and can be editable according the customer details.
How to set Billing Address?
1. Click on SALES – SALES OPERATIONS – FREE TEXT INVOICE - BILLING ADDRESS TAB for the screen below.
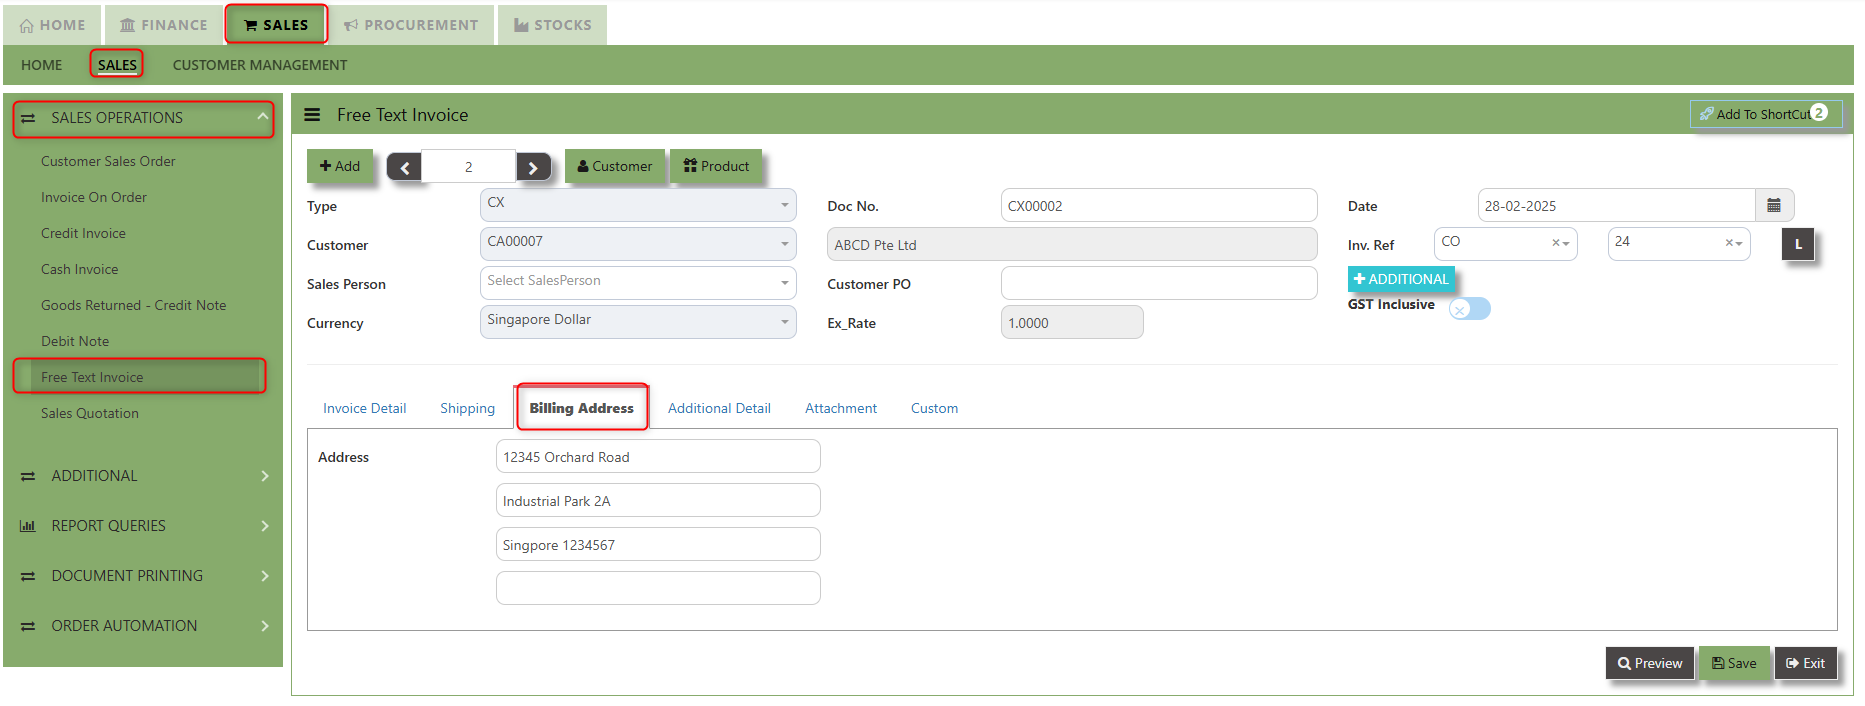
2. The Billing address is defaulted from Customer Maintenance which is the Customer address, it was also editable is needed.
___________________________________________________________________________________________________________________________________________
Additional Detail Tab a section where the additional information is entered . This tab ensures that all relevant details regarding the Narration, Inco Terms , billing address warranty terms Selling conditions , and special instruction are captured in the system to facilitate smooth and accurate sales quotation.
How to set Additional Detail?
1. Click on SALES – SALES OPERATIONS – FREE TEXT INVOICE - BILLING ADDRESS TAB for the screen below.
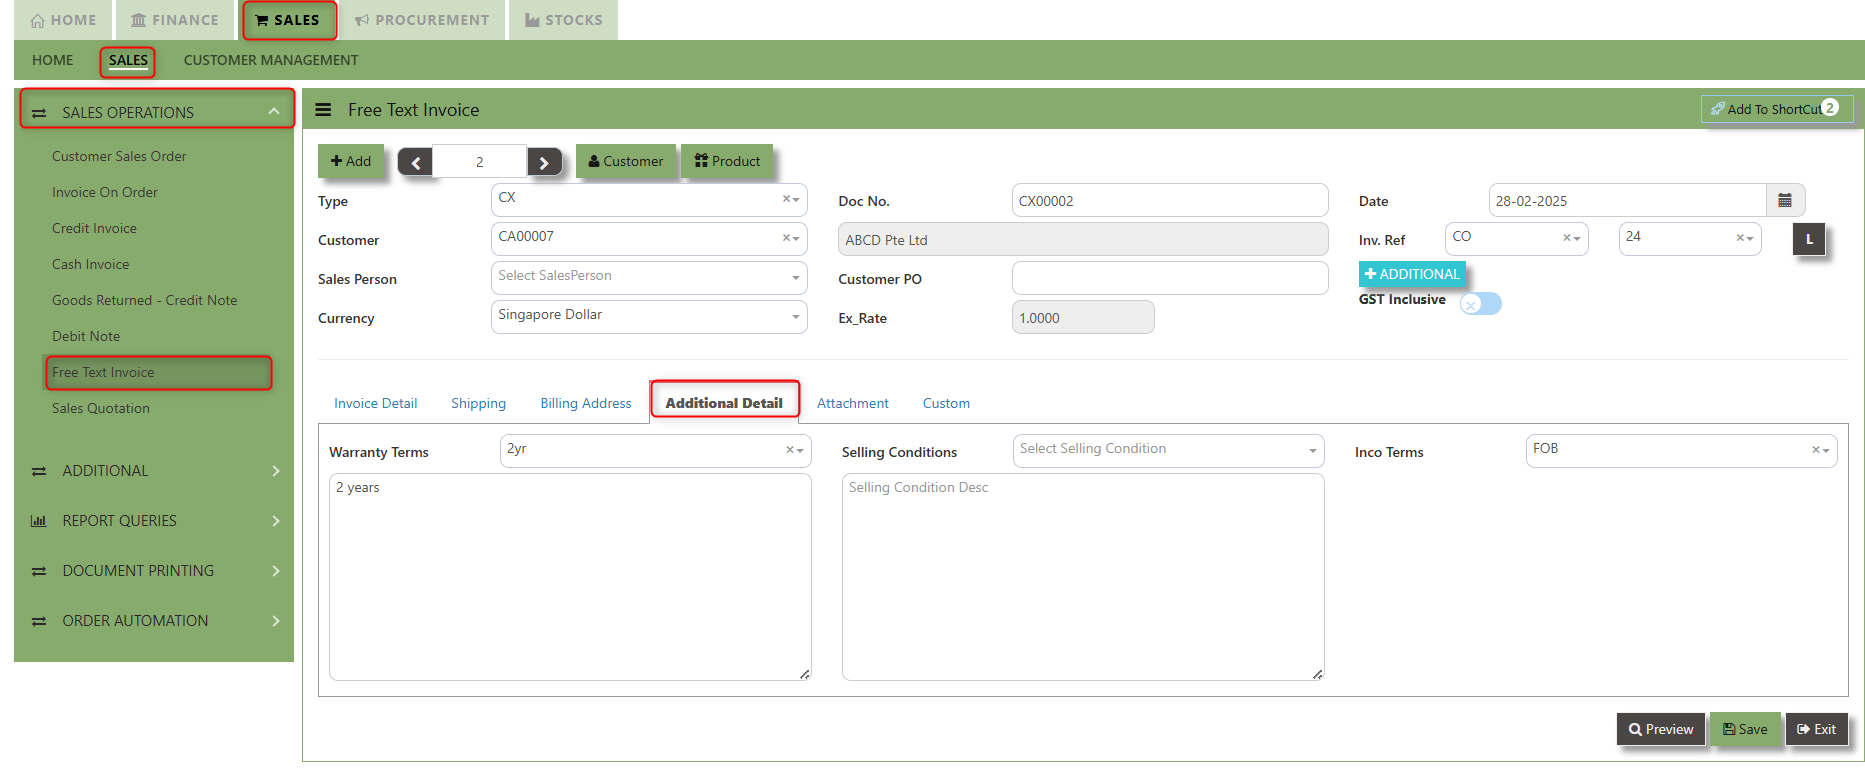
2. Input the below details for the below fields
-
- Warranty Terms
- Selling Condition
- Inco Terms
3. Once keyed in the necessary details, click the next tab and will automatically save all the information.
___________________________________________________________________________________________________________________________________________
"Attachment Tab" allows users to attach various files and documents related to the sales order. By attaching relevant files, users ensure that all purchase-related information is kept in one place, making the sales process smoother, more transparent, and easier to track.
How to use Attachment Tab?
1. Click on SALES – SALES OPERATIONS – FREE TEXT INVOICE – ATTACHEMENT TAB for the screen below.
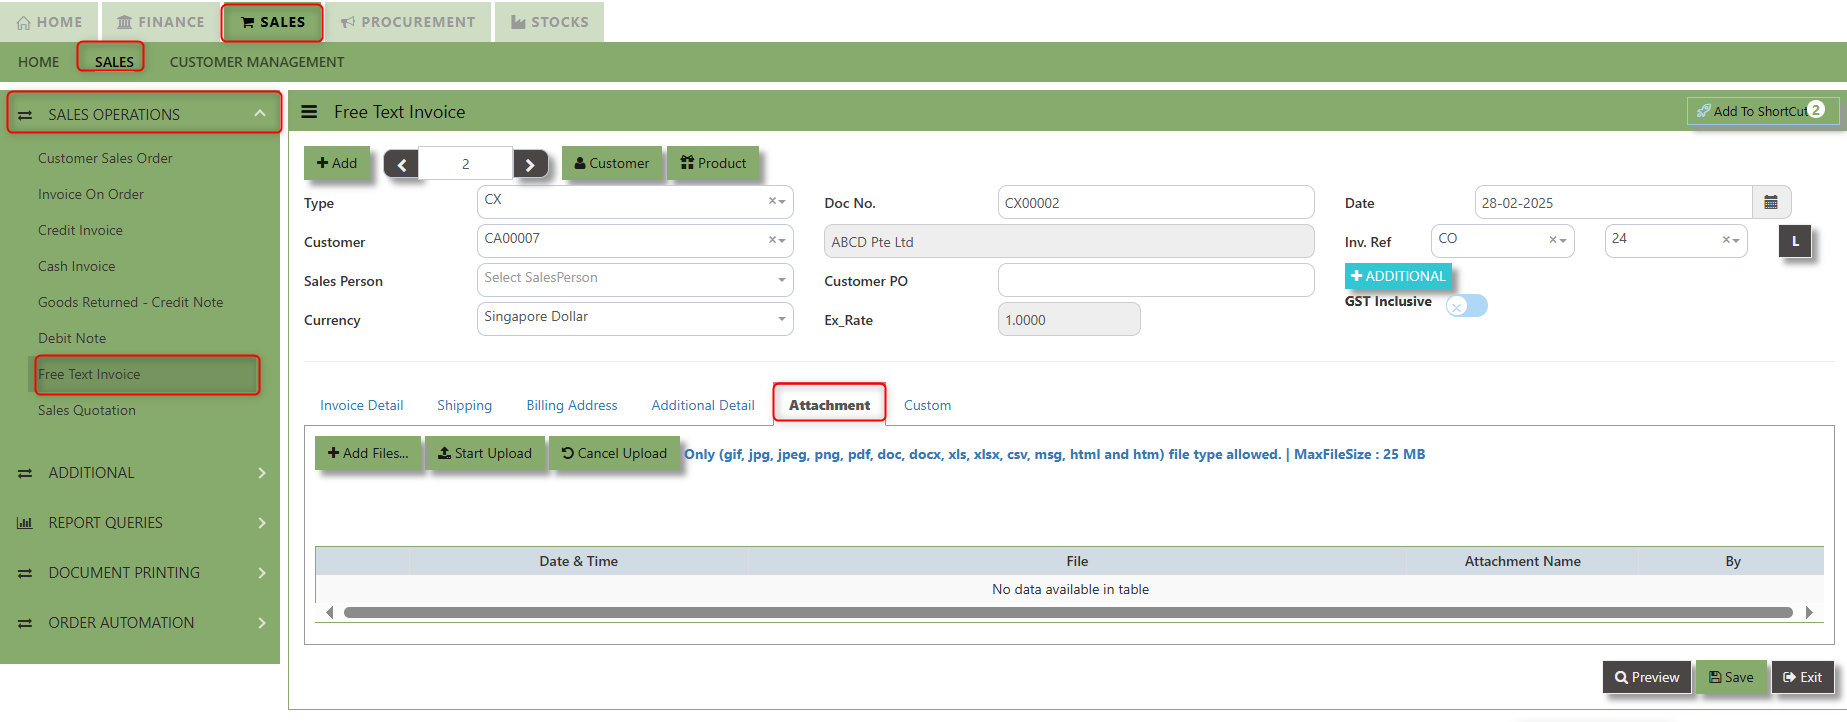
2. Click +Add files and windows will prompt then choose the file you want to upload by clicking open. Kindly take note the file types and maximum size requirements in uploading: Only (gif, jpg, jpeg, png, pdf, doc, docx, xls, xlsx, csv, msg, html and htm) file type allowed. | MaxFileSize : 25 MB
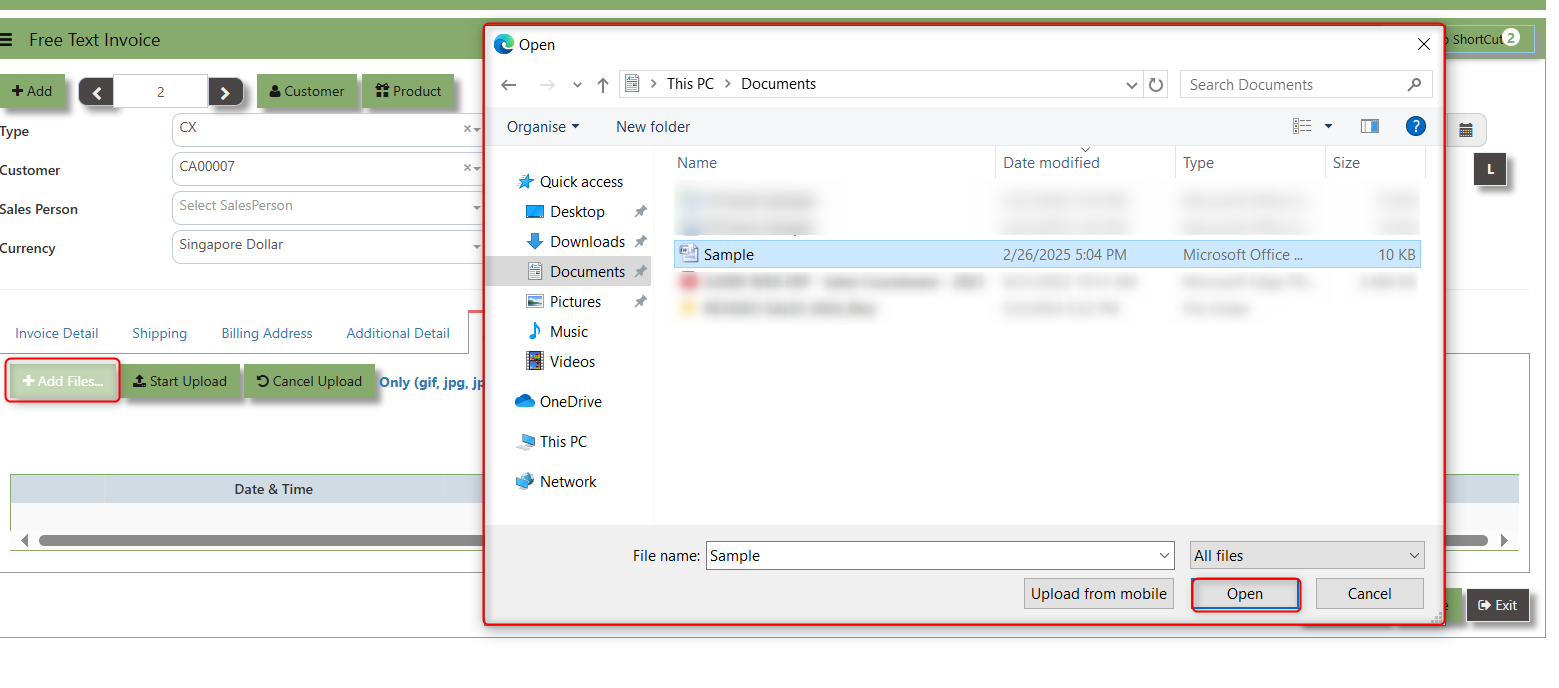
3. Key in the Attachment Name then click start to upload.
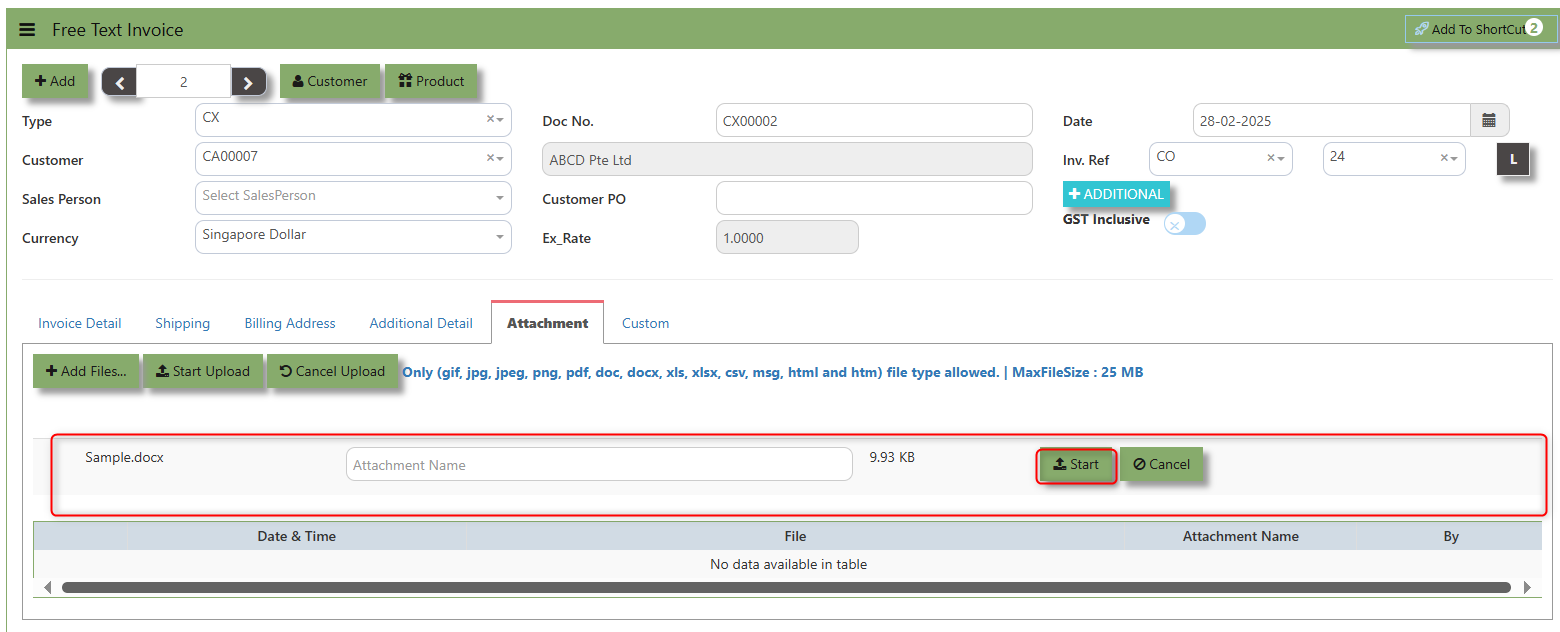
4.Once the file attached, click "SAVE" button

User may opt to cancel the uploading by clicking the "Cancel Upload" button and delete the file uploaded by clicking the "Bin icon" at the line detail.
___________________________________________________________________________________________________________________________________________
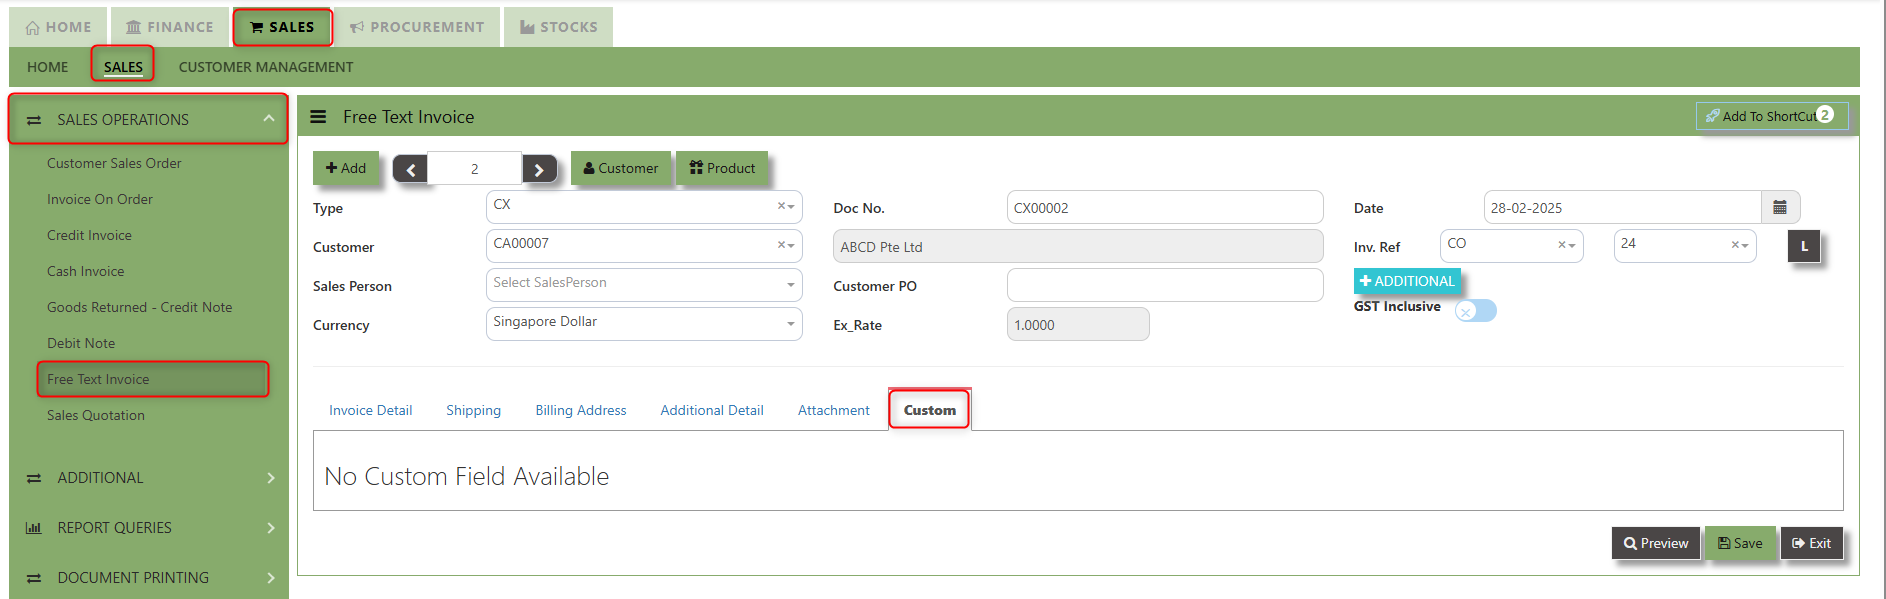
"Custom Tab" provides a space for users to input customized data or additional fields that are specific to their business processes and requirements.
Click on SALES – SALES OPERATIONS – FREE TEXT INVOICE - CUSTOM TAB for the screen below.
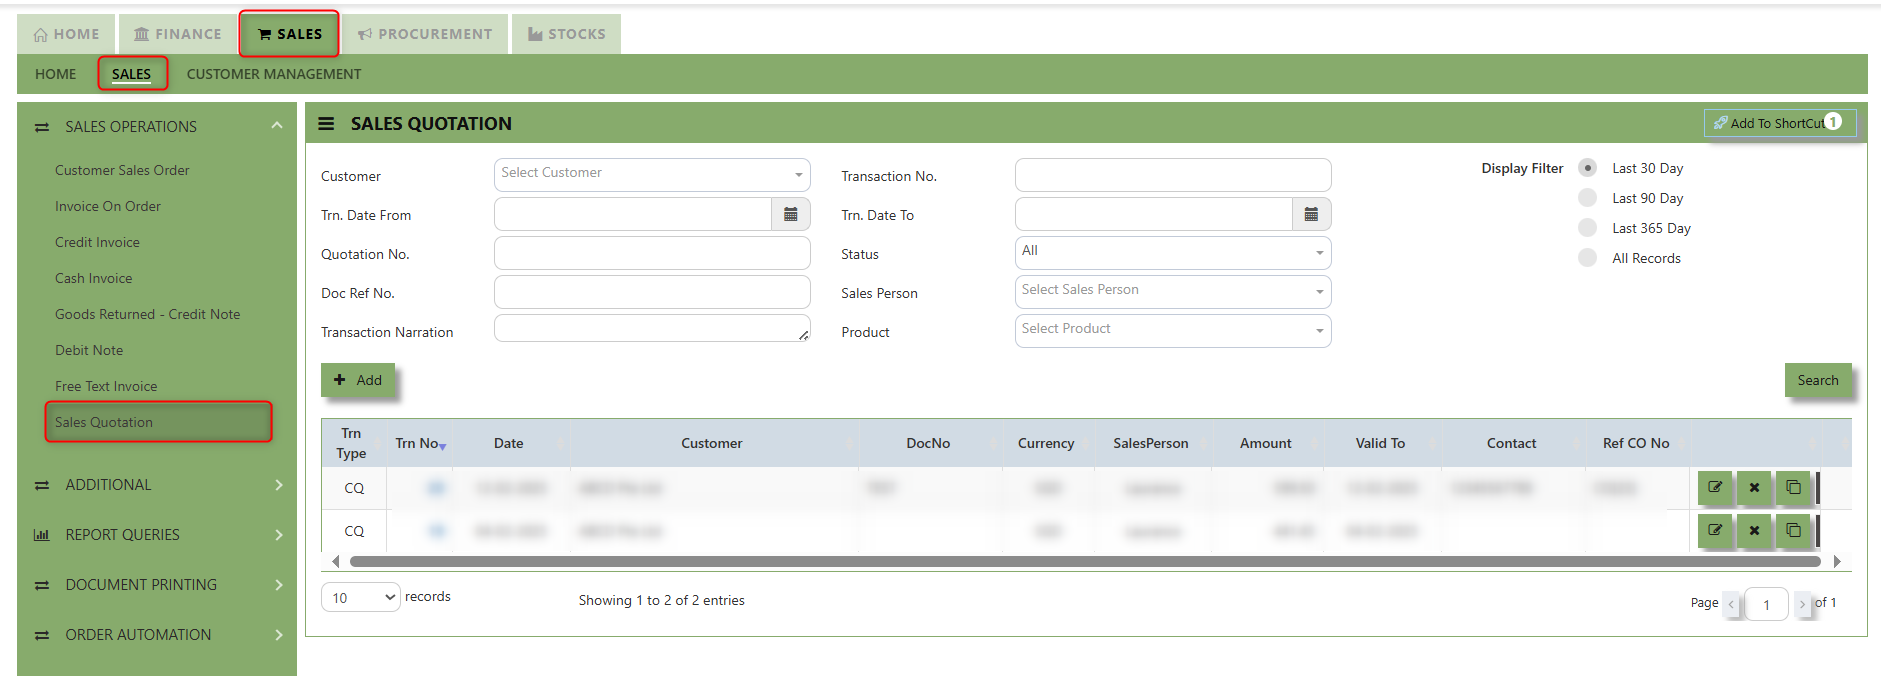
Sales Quotation
The Sales Quotation form is essentially an administrative document to confirm the approval of a stock request before an order is made. Creation of a Customer Quotation does not perform any accounts posting & is used only as an administrative document to send to the Customer as quotation. Creation of a Customer Quotation will generate a “CQ” number.
How to set Customer Quotation?
1.Click on SALES – SALES OPERATIONS – CUSTOMER SALES ORDER for the screen below.
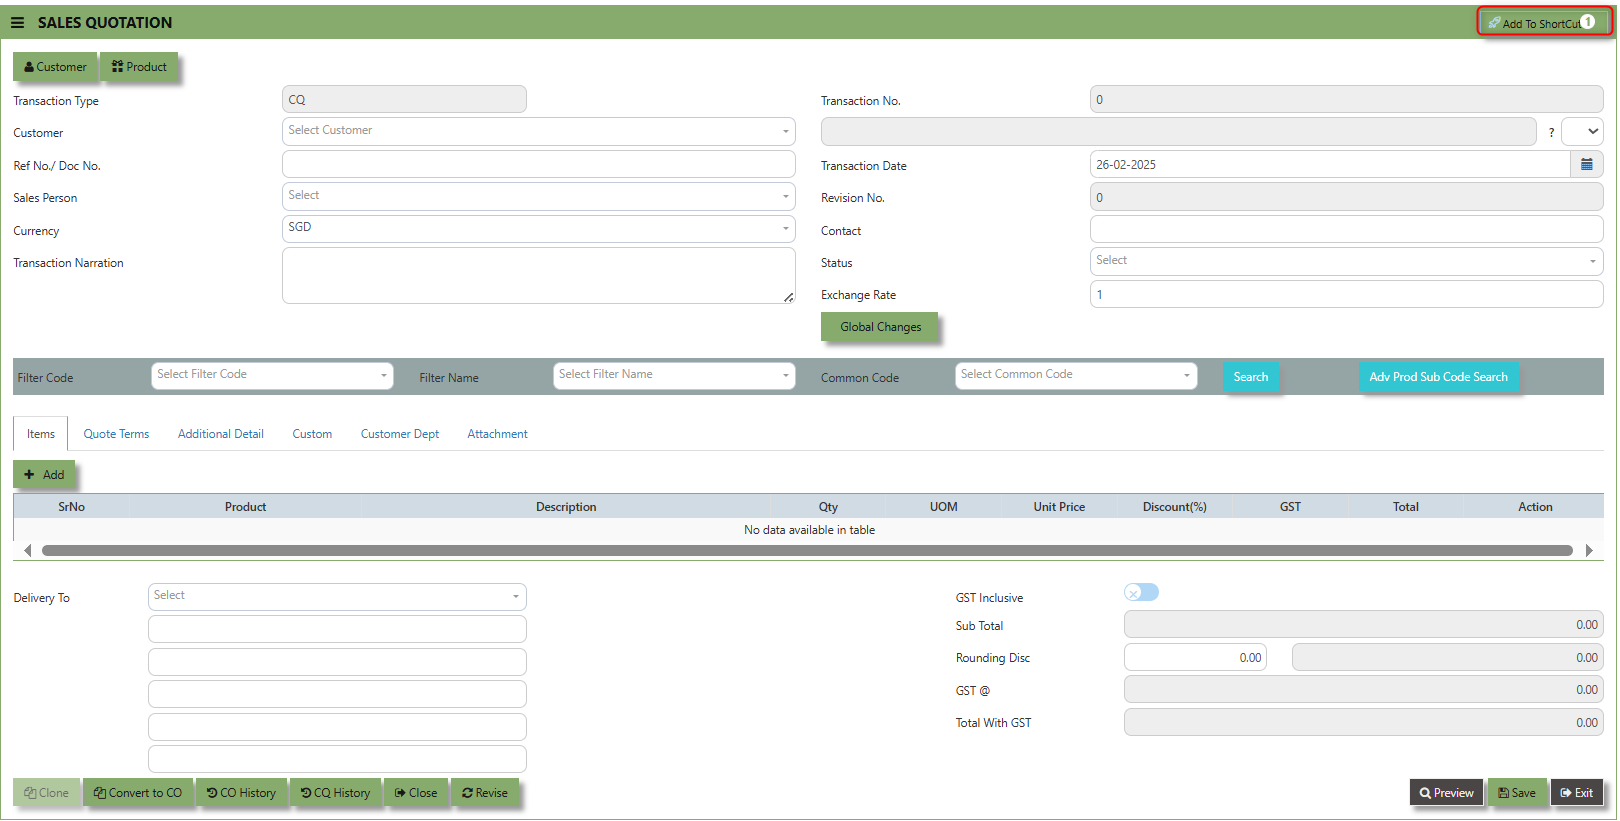
2. Click on Add button or press F3 to create a new transaction.

2. Click the Customer - drop-down list to select Customer Name, followed by the Sales Person, PDS, Currency, Rate,
Validity Period, Validity Date, Payment Term, Status, Deliver Term & Lead Time if applicable.
3. After all the header information has been entered, go to the Quotation Details section to select the product from the
Product Code and Name drop-down list. User can also enter information into the Additional Details and Customer Department. Save the transaction after this is done.
___________________________________________________________________________________________________________________________________________
Add to Shortcut - Used to create a shortcut for quick access to a specific Sales Transaction . By clicking this button, users can add the current Sales Quotation to a list of shortcuts, allowing them to access the invoice or related functionality quickly and efficiently, without needing to search for it each time.
How to use Add to ShortCut?
1. Click "Add to ShortCut" and system will open below windows:
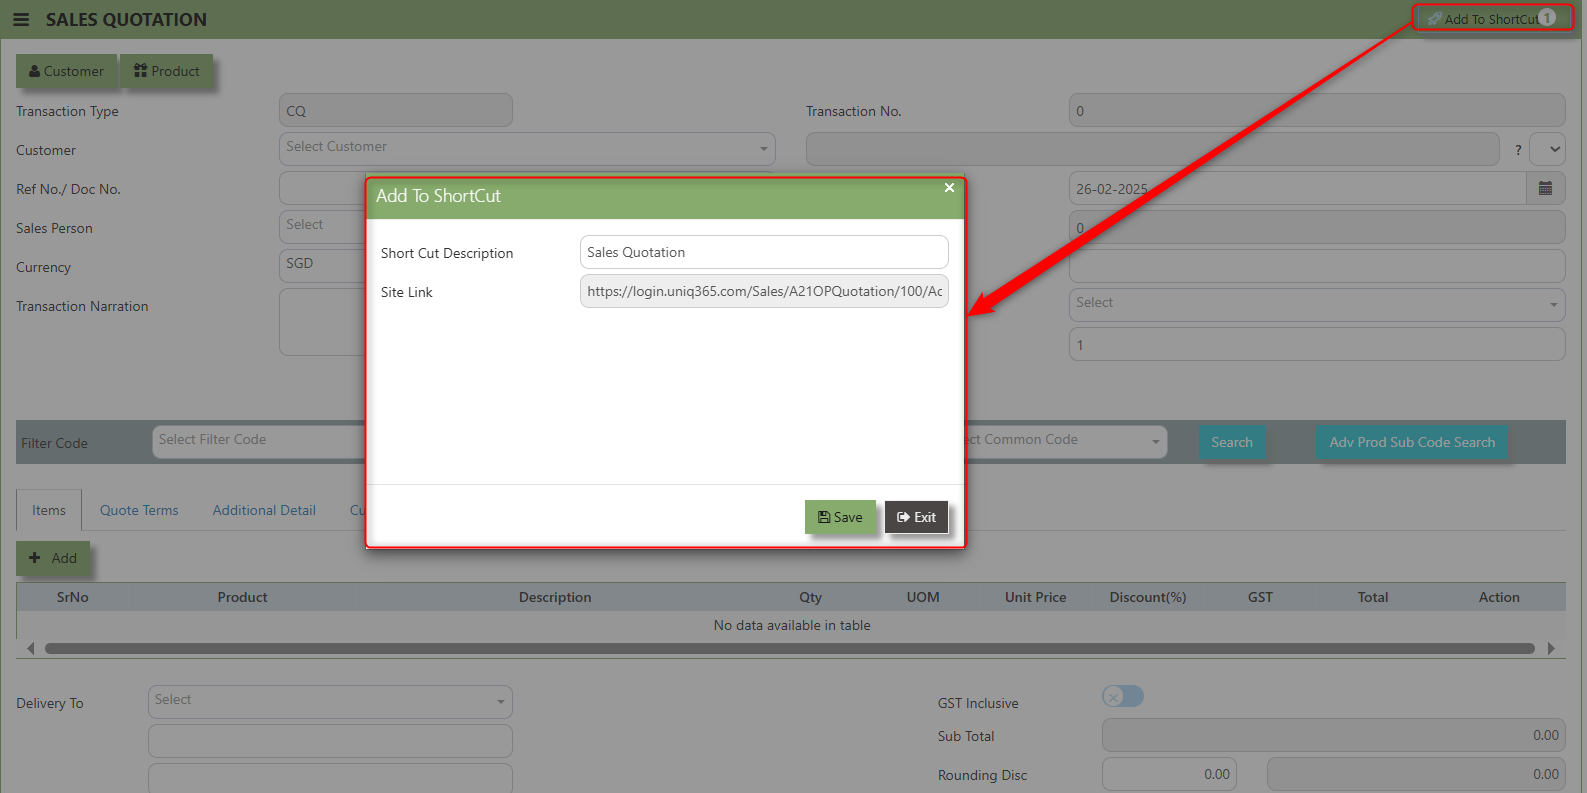
2. Enter Short Cut Description
3. Click SAVE then click OK.
4. User may look to the Homepage for the added function or page. Click on HOME - HOME - SHORTCUT for the screen below.
___________________________________________________________________________________________________________________________________________
The Customer button provides quick access to detailed supplier profiles under Customer maintenance.
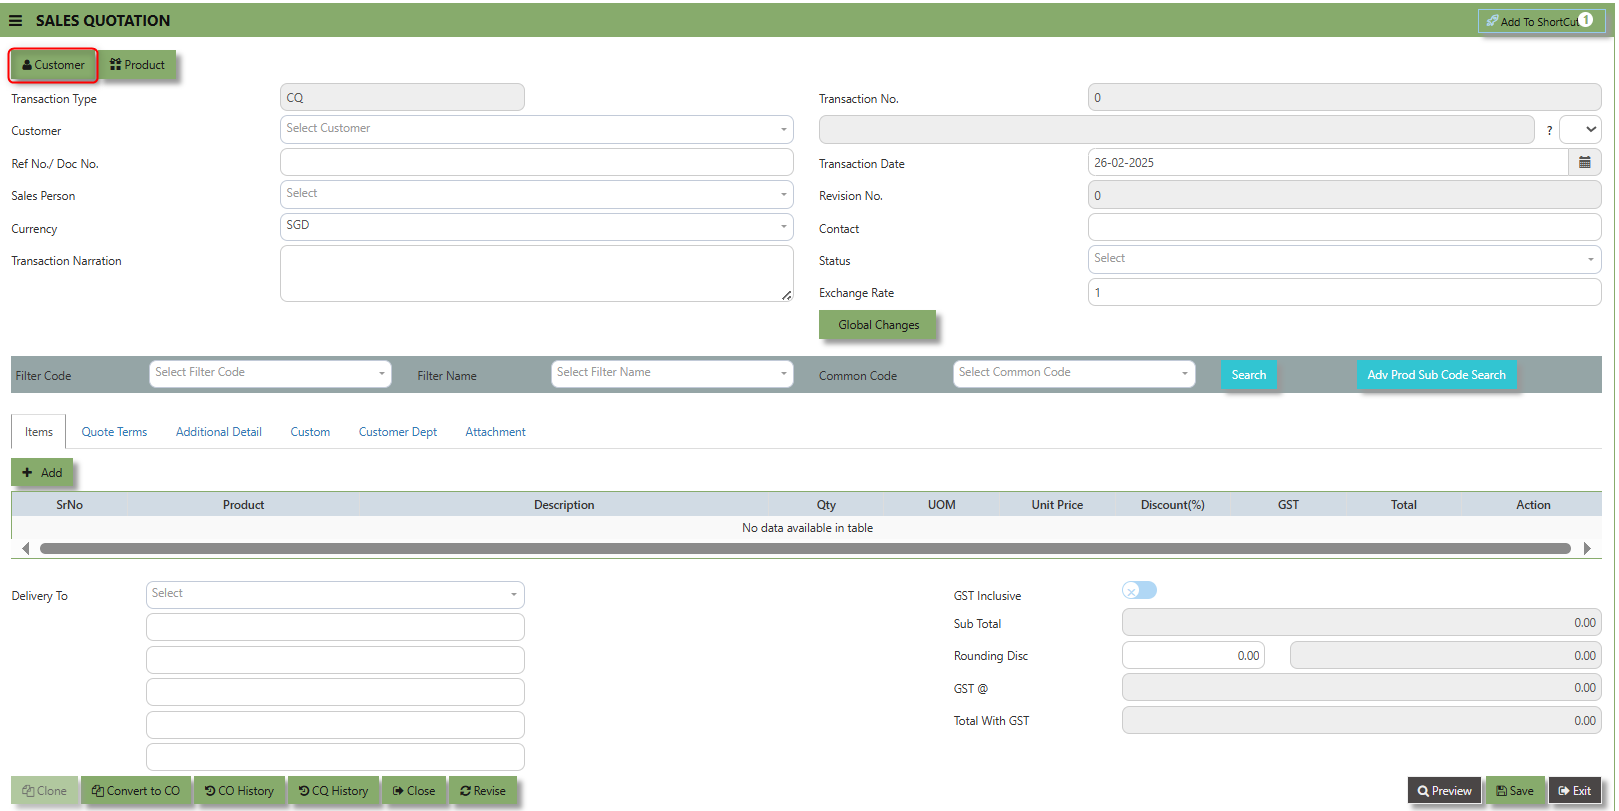
The Product button provides quick access to product and service maintenance.

___________________________________________________________________________________________________________________________________________
The Global Changes Button provides access on the Discount menu in the Sales Quotation . By clicking this button, users can add the current Sales Quotation discount using Global Discount Amount, or Percentage Discount.
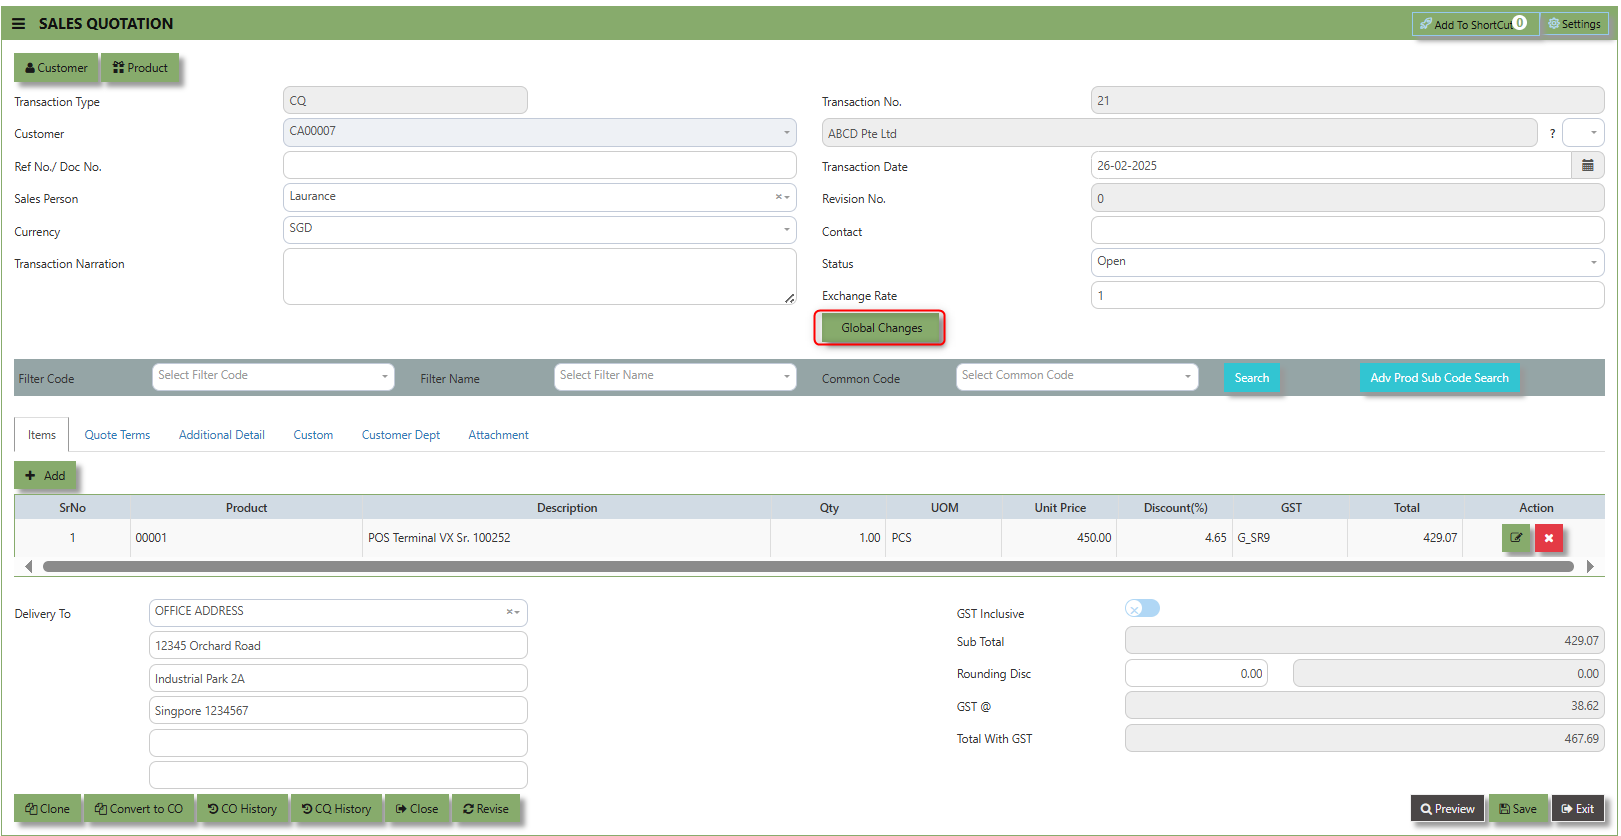
How to use Global Changes?
1.Click "Global Changes" and system will open below windows:
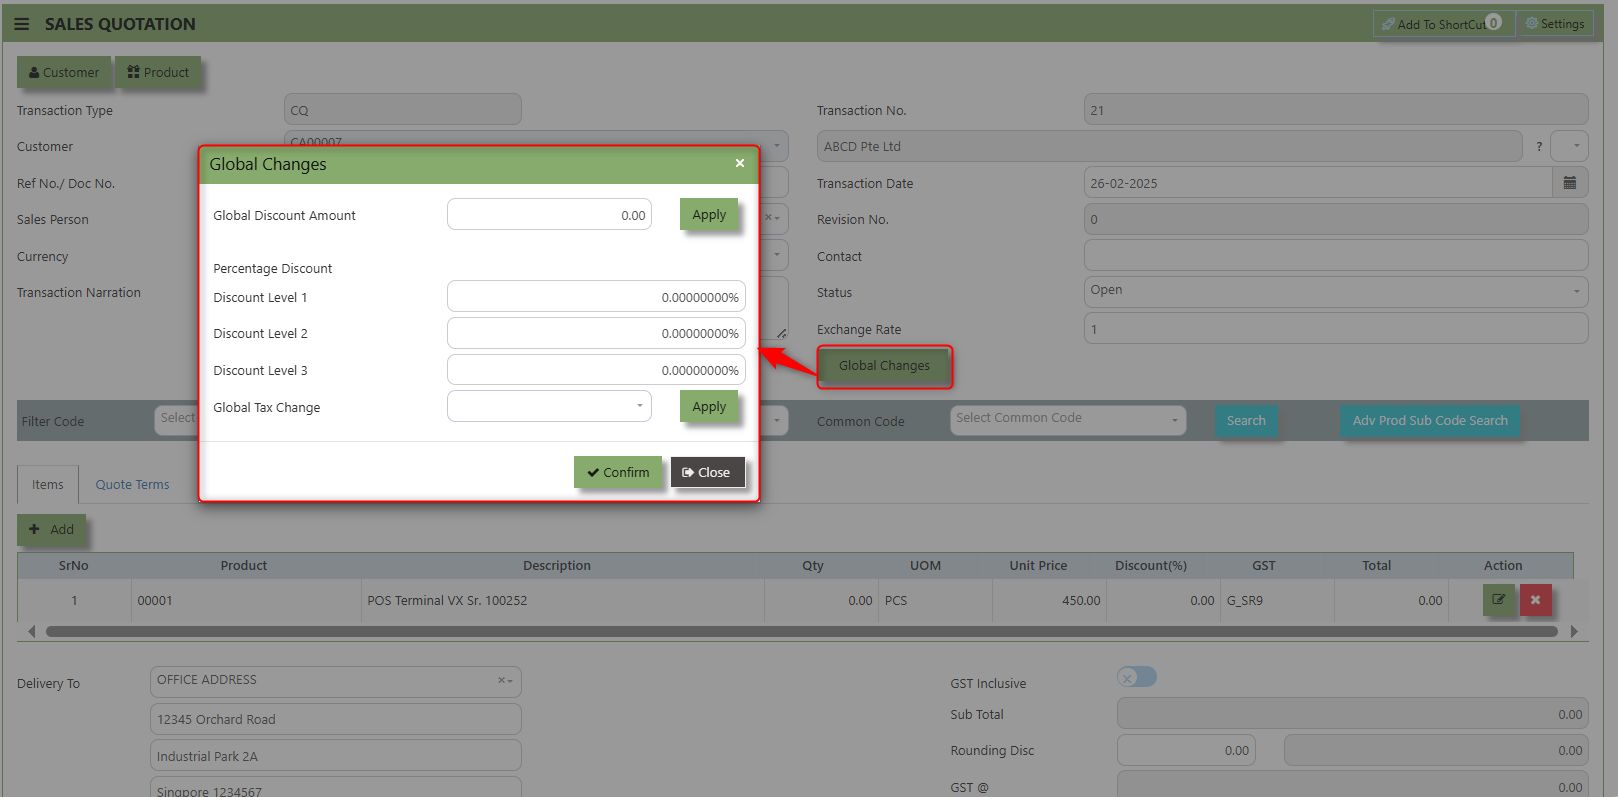
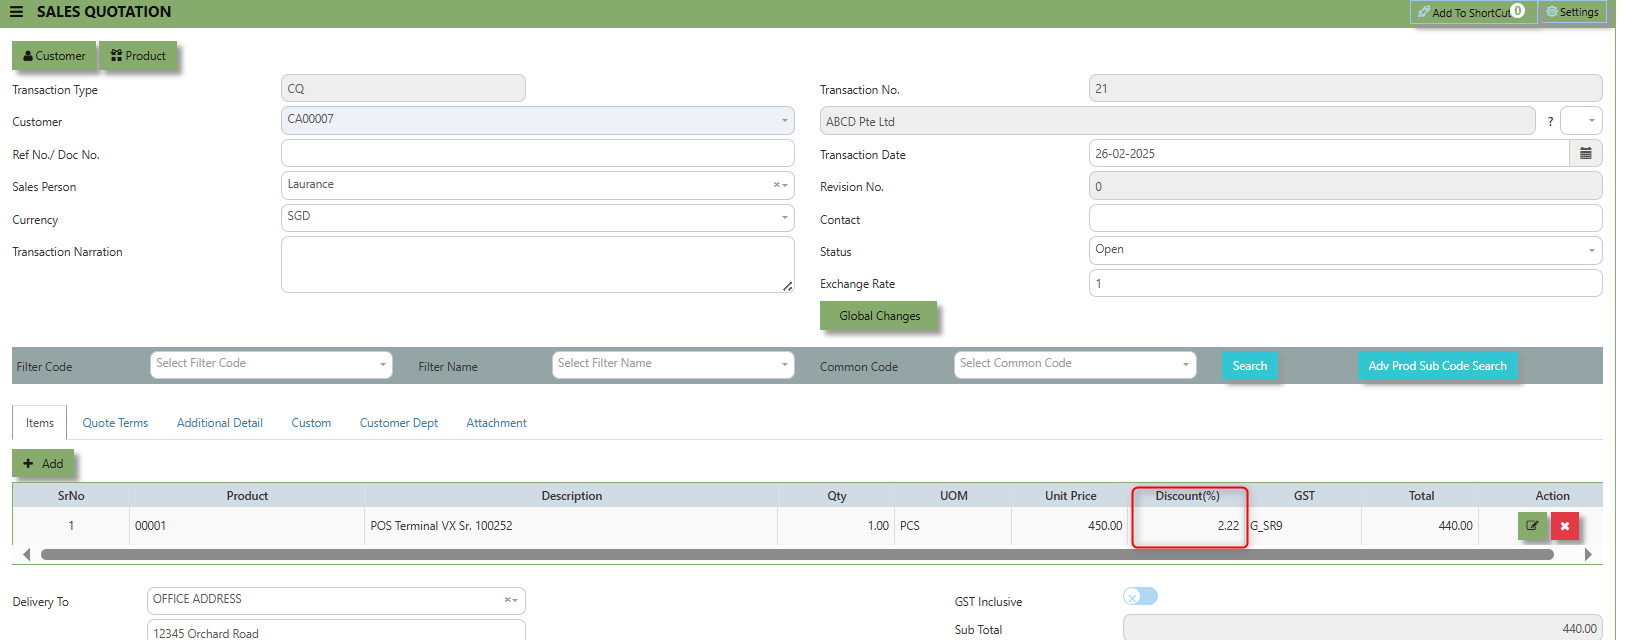
2. Add a Discount to the transaction if its Global Discount Amount or Percentage Discount.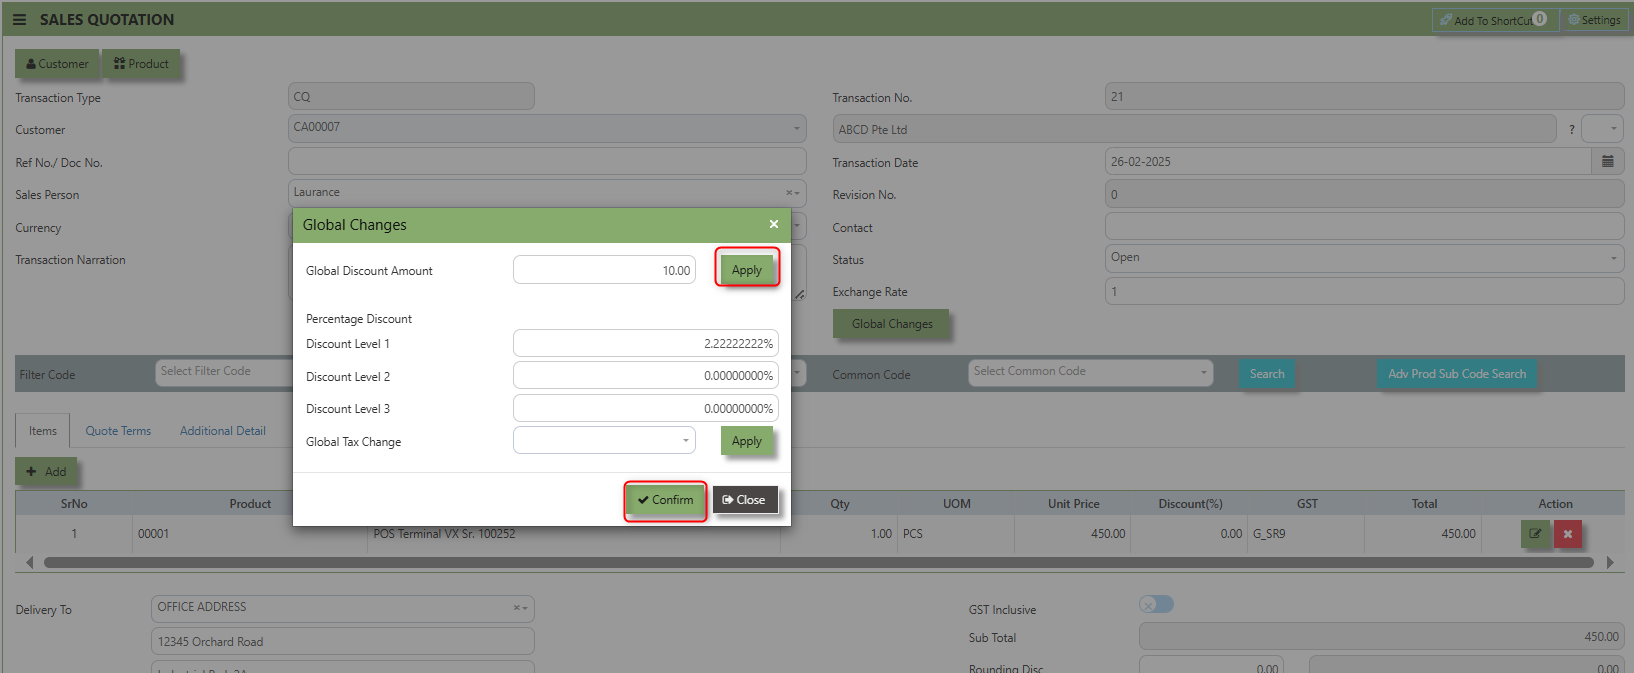
3. Click Apply and Confirm button, the discount will be automatically captured in the line item and in the transaction.
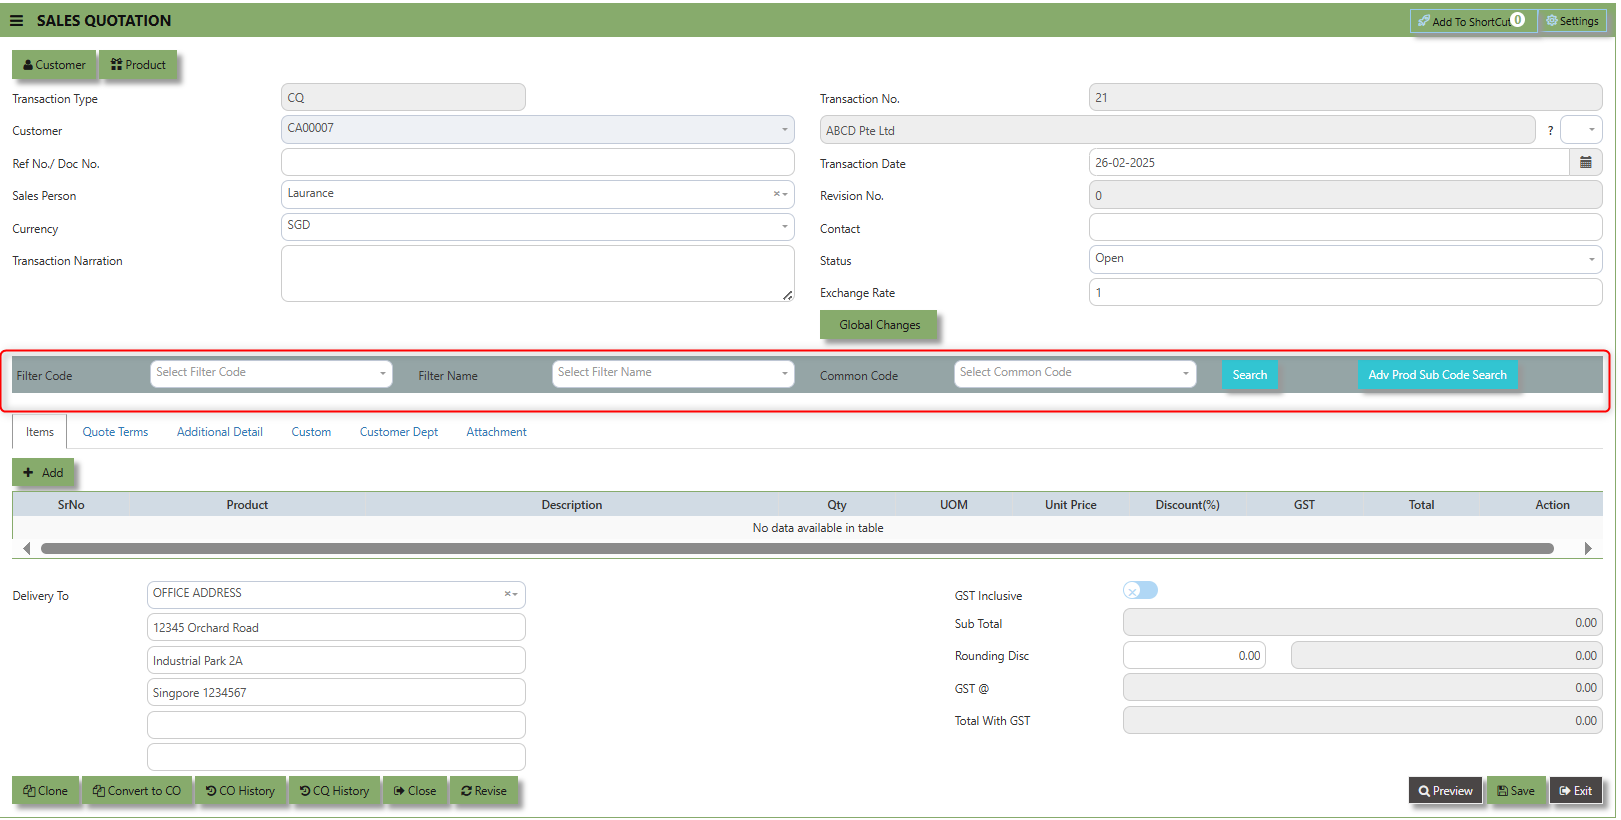
Search and Select Function - this function allows the user to search and select the existing product in the Product Maintenance.
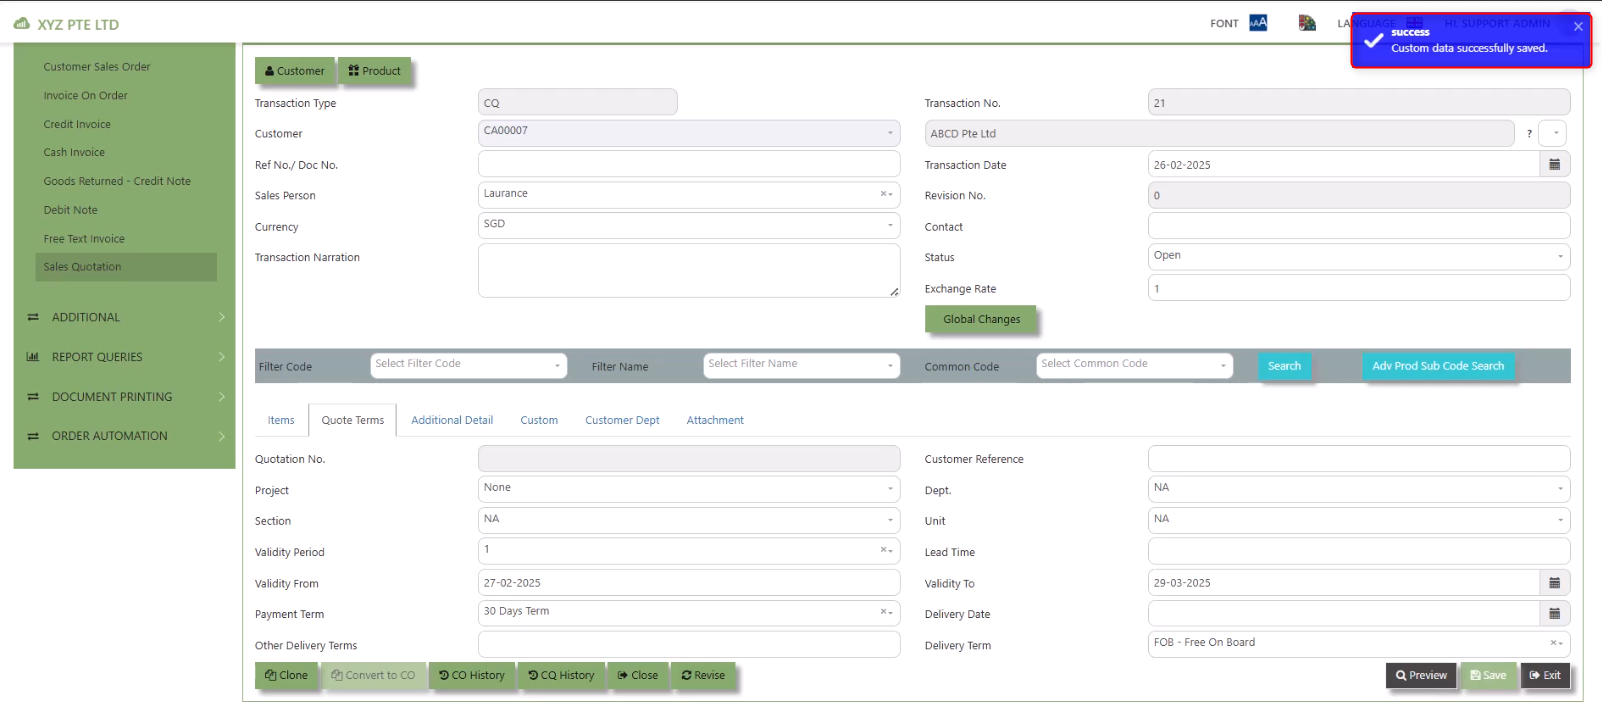
Quote Terms a section where specific quote related information is entered . This tab ensures that all relevant details regarding the sales quotation such as Quotation Number, Customer Reference, PDSU, Validity Period, Payment Term, Other Delivery Term, and delivery date are captured in the system to facilitate smooth and accurate quotation.
How to set Quote Terms?
1. Click on SALES – SALES OPERATIONS – SALES QOUTATION - QUOTE TERMS for the screen below.

2. Input the below details for the below fields:
-
- Quotation Number
- Customer Reference
- PDSU
- Validity Period,
- Payment Term,
- Other Delivery Term
- Delivery Term
- Delivery Date
3. Once keyed in the necessary details, click the next tab and will automatically save all the information then system will prompt you a message.
___________________________________________________________________________________________________________________________________________
Additional Detail Tab a section where the additional information is entered . This tab ensures that all relevant details regarding the Narration, Inco Terms , billing address warranty terms Selling conditions , and special instruction are captured in the system to facilitate smooth and accurate sales quotation.
How to set Additional Detail?
1. Click on SALES – SALES OPERATIONS –SALES QUOTATION - ADDITIONAL DETAILS for the screen below.
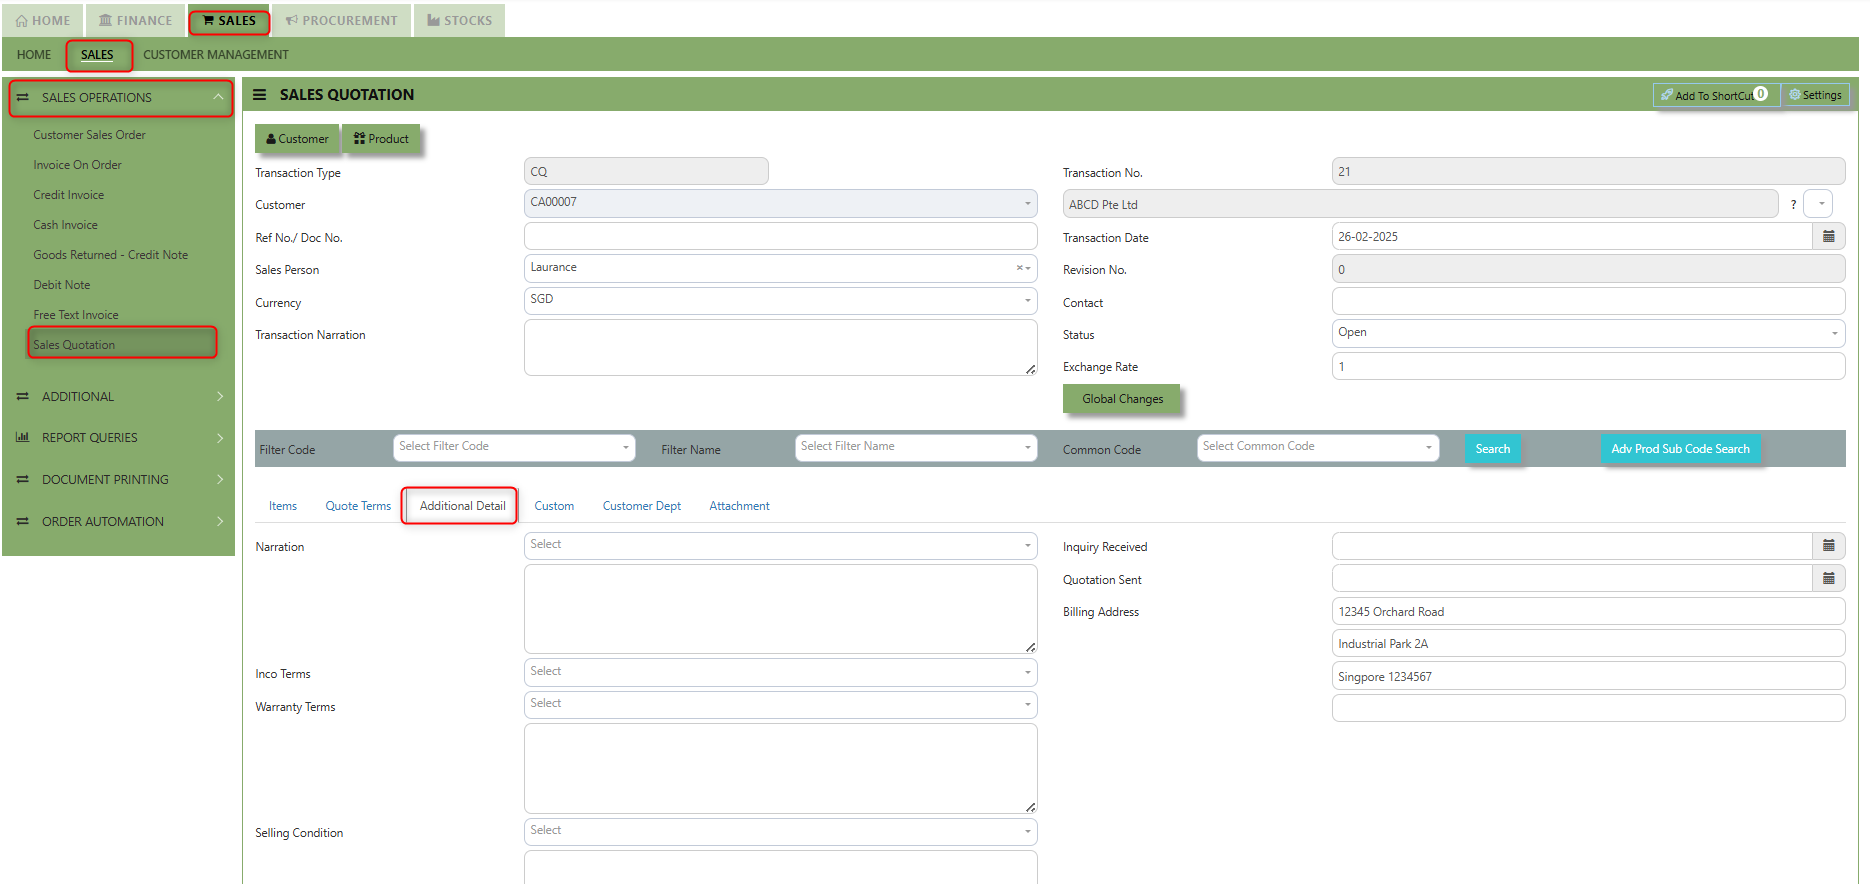
2. Input the below details for the below fields:
-
- Narration
- Billing Address
- Inco Terms
- Warranty Terms
- Selling Condition
- Inquiry Received Date
- Quotation Sent Date
3. Once keyed in the necessary details, click the next tab and will automatically save all the information.
___________________________________________________________________________________________________________________________________________
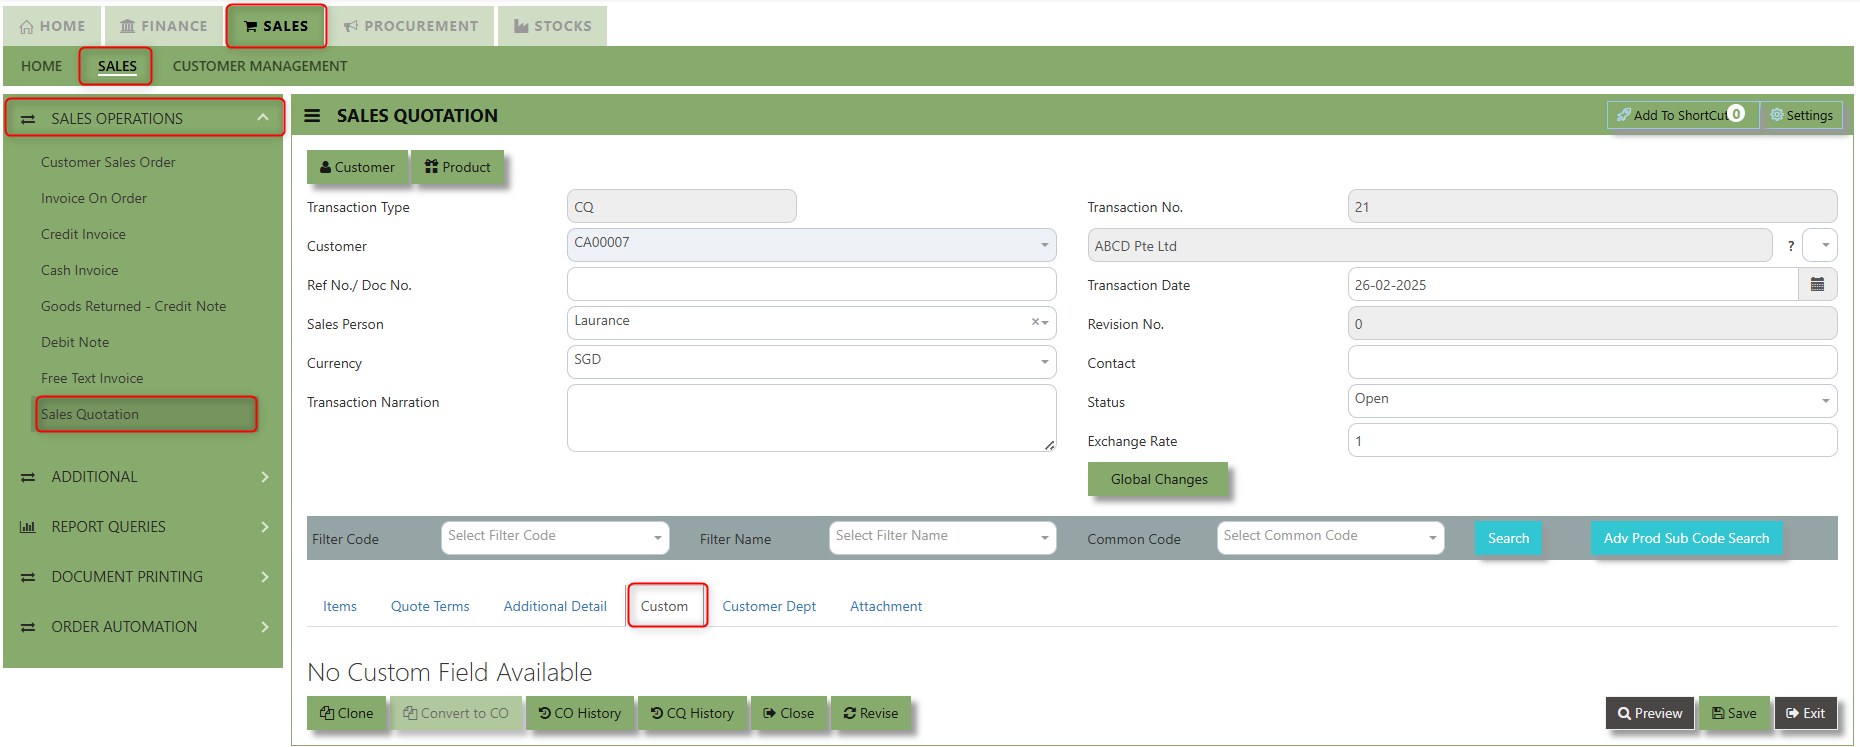
"Custom Tab" provides a space for users to input customized data or additional fields that are specific to their business processes and requirements.
- Click on SALES – SALES OPERATIONS – SALES QUOTATION - CUSTOM for the screen below.

___________________________________________________________________________________________________________________________________________
"Customer Dept Tab" section where the Customer Department information is entered. This tab ensures that all relevant details regarding Customer Department details which is linked to the Customer Maintenance under Department Tab
- Click on SALES – SALES OPERATIONS – SALES QUOTATION - CUSTOMER DEPT for the screen below.
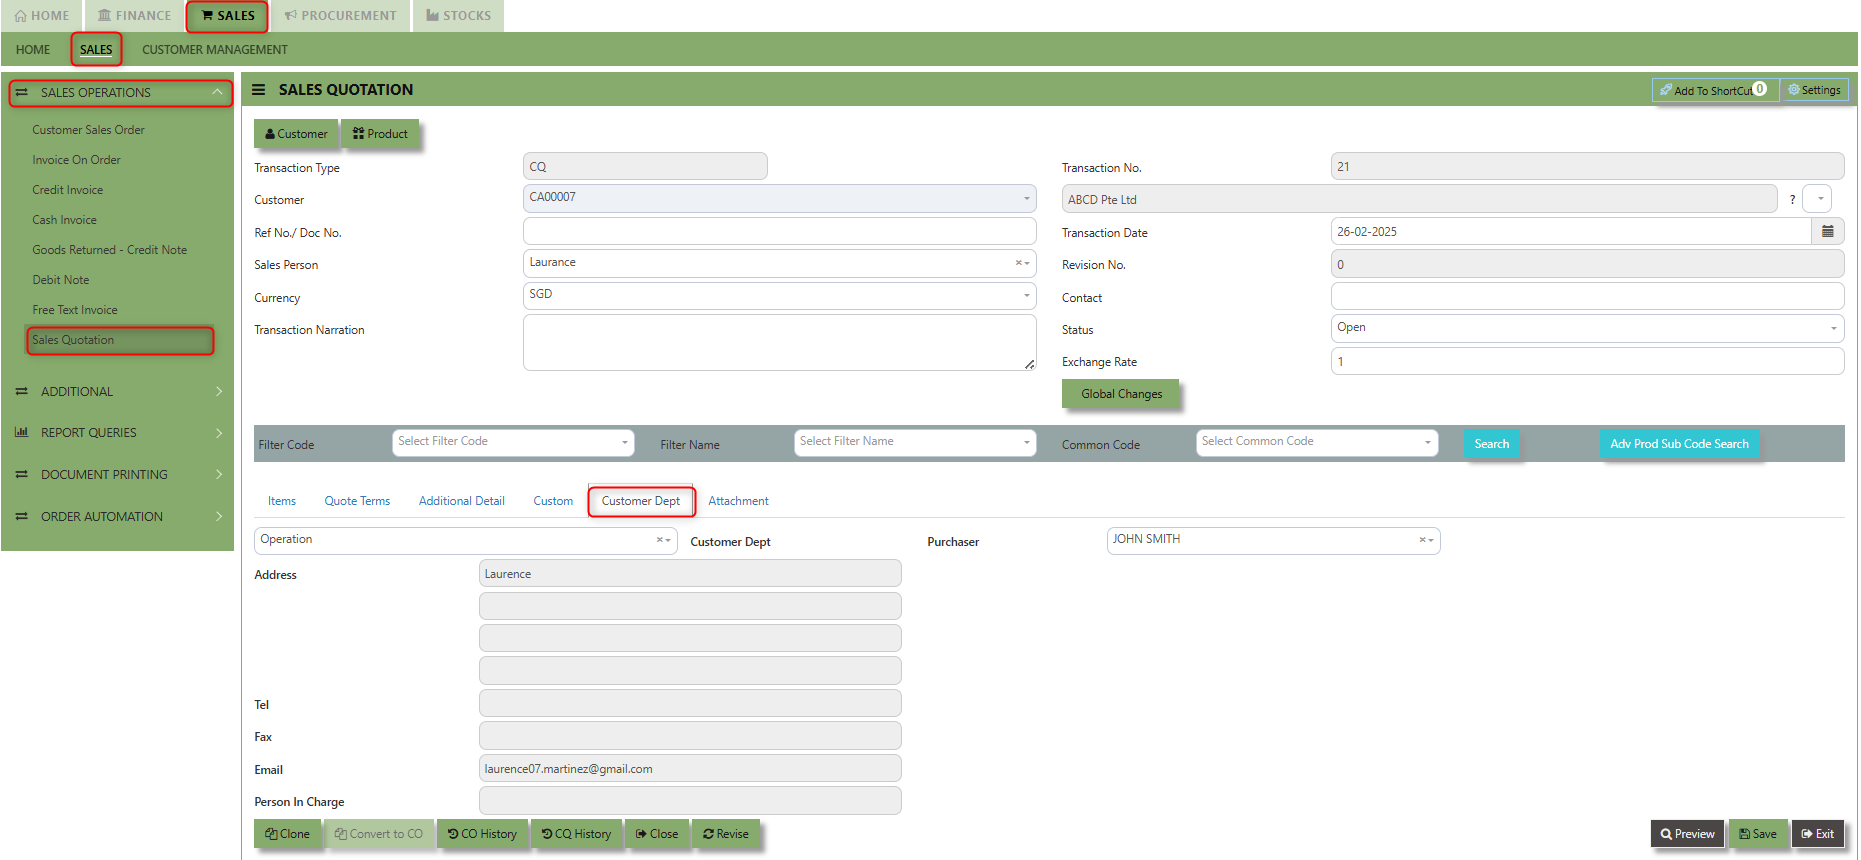
The drop down selection for Customer Dept and Purchaser is maintained in Customer Maintenance under Department Tab

___________________________________________________________________________________________________________________________________________
"Attachment Tab" allows users to attach various files and documents related to the sales order. By attaching relevant files, users ensure that all purchase-related information is kept in one place, making the sales process smoother, more transparent, and easier to track.
How to use Attachment Tab?
1. Click on SALES – SALES OPERATIONS – SALES QUOTATION - ATTACHMENT TAB for the screen below.
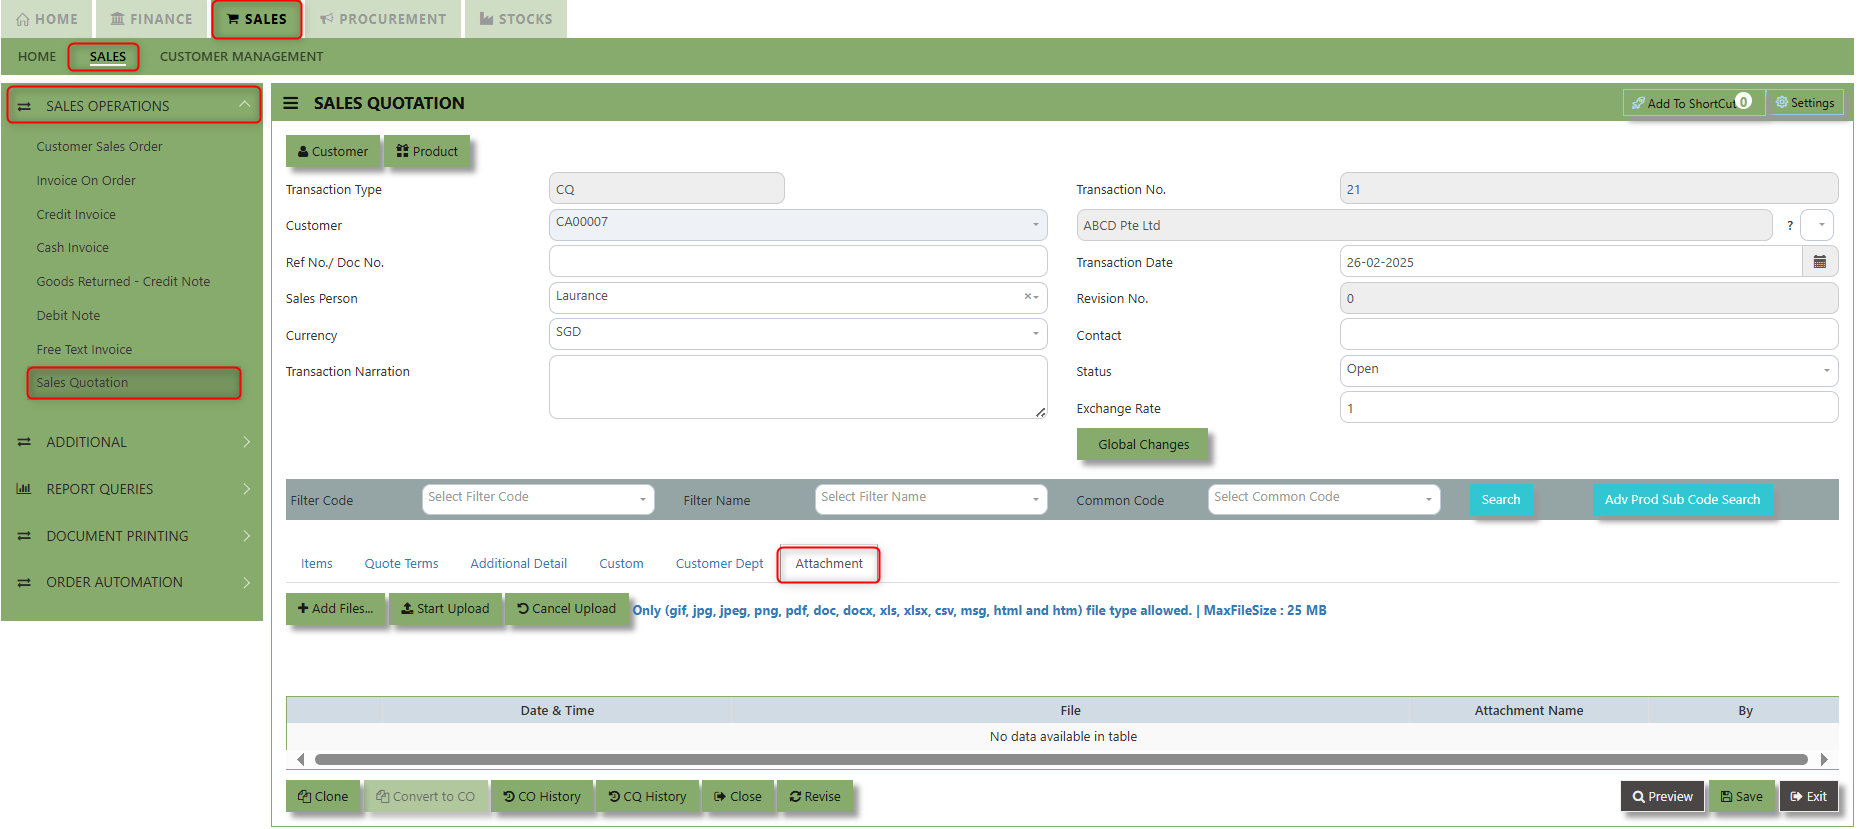
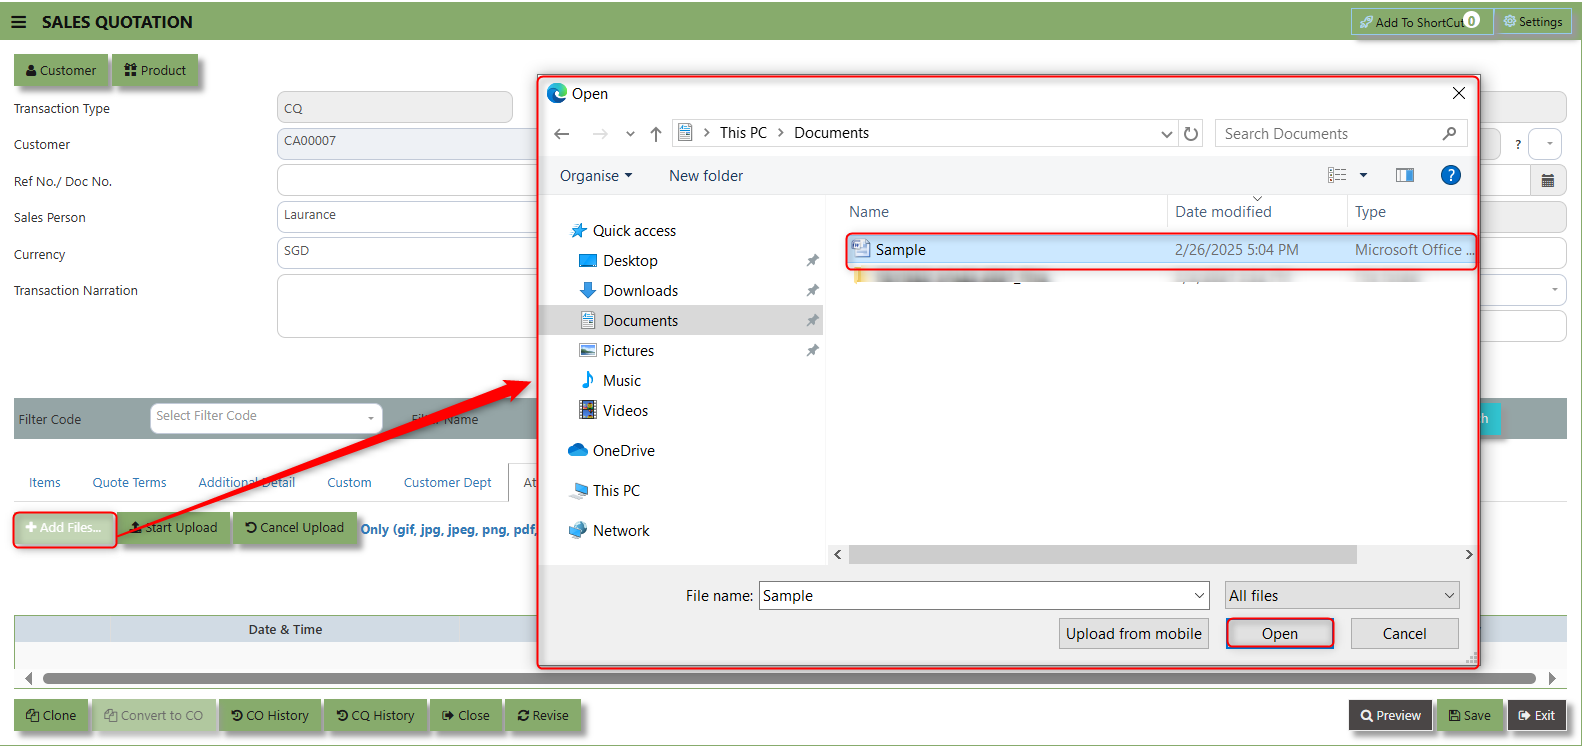
2. Click +Add files and windows will prompt then choose the file you want to upload by clicking open. Kindly take note the file types and maximum size requirements in uploading: Only (gif, jpg, jpeg, png, pdf, doc, docx, xls, xlsx, csv, msg, html and htm) file type allowed. | MaxFileSize : 25 MB
3. Key in the Attachment Name then click start to upload.
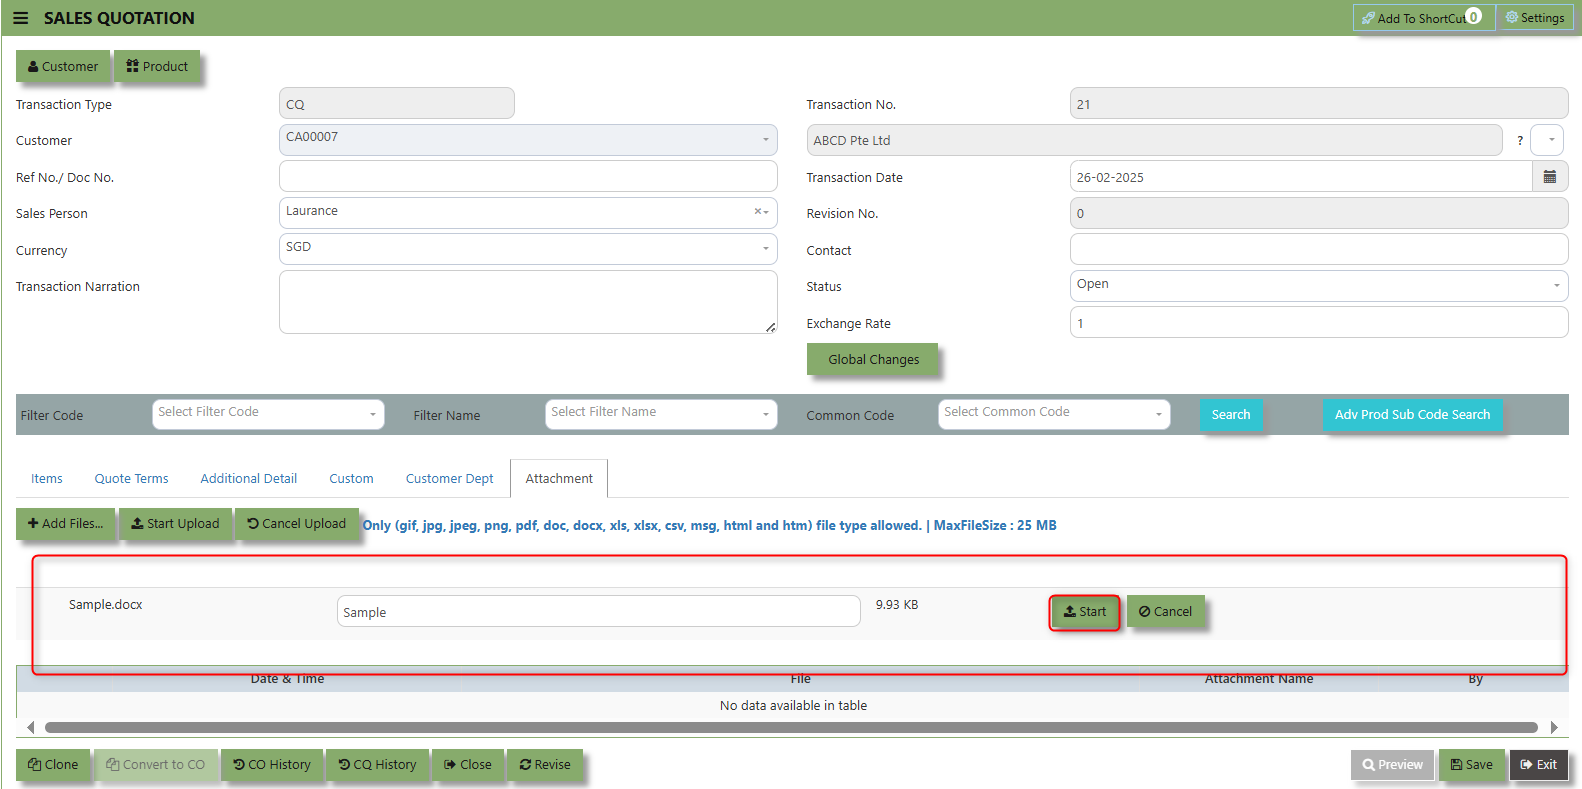
4. Once the file attached, click "SAVE" button
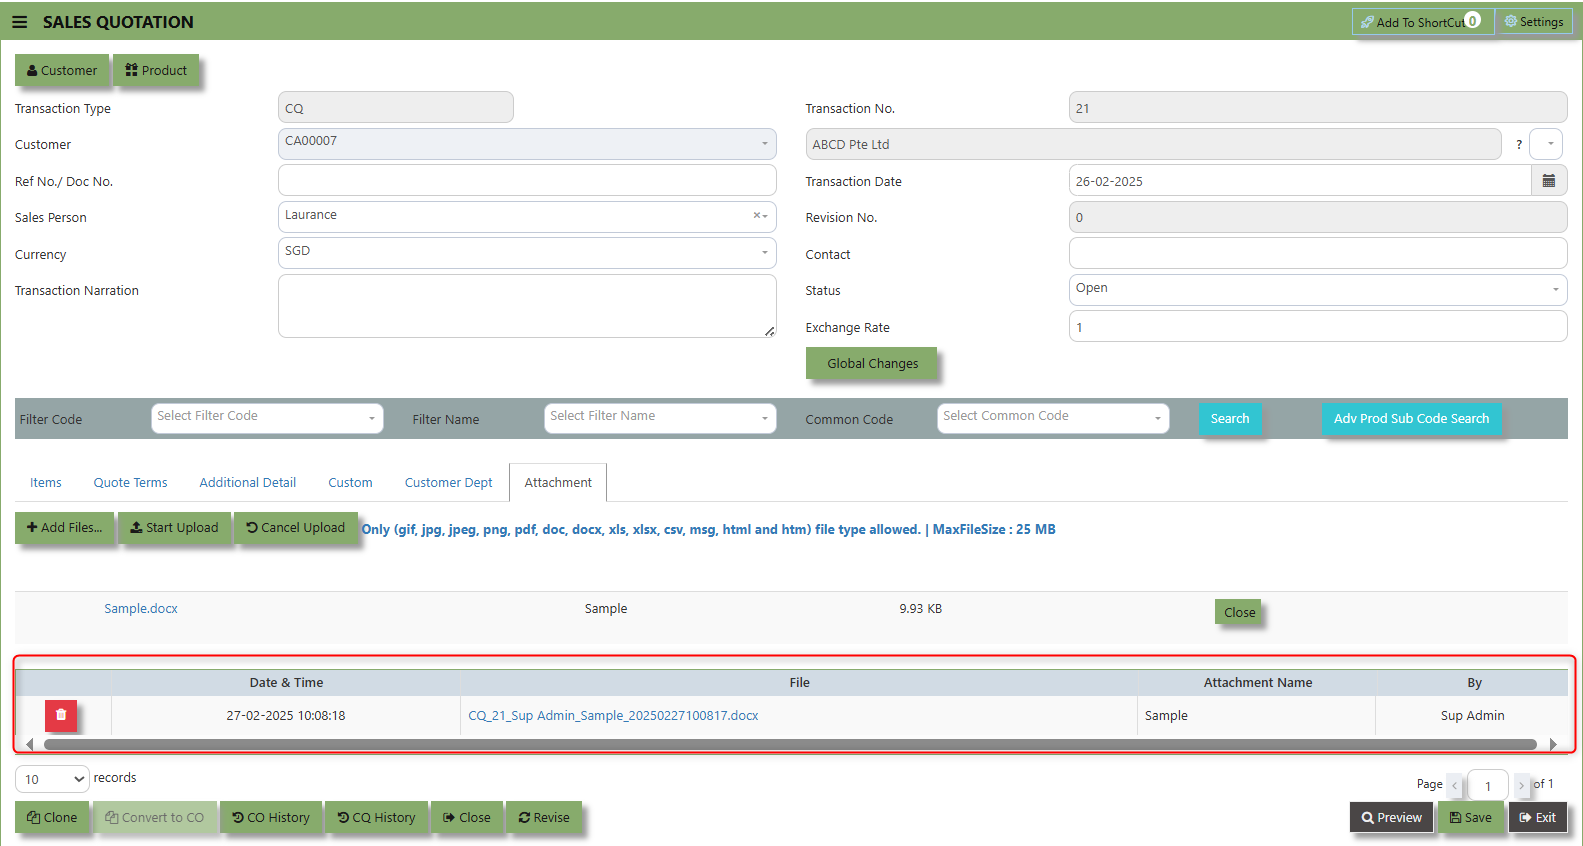
User may opt to cancel the uploading by clicking the "Cancel Upload" button and delete the file uploaded by clicking the "Bin icon" at the line detail.