
Create New Product
The Product Management tab comprises the following options that are crucial in setting up and using the STOCKS Module:
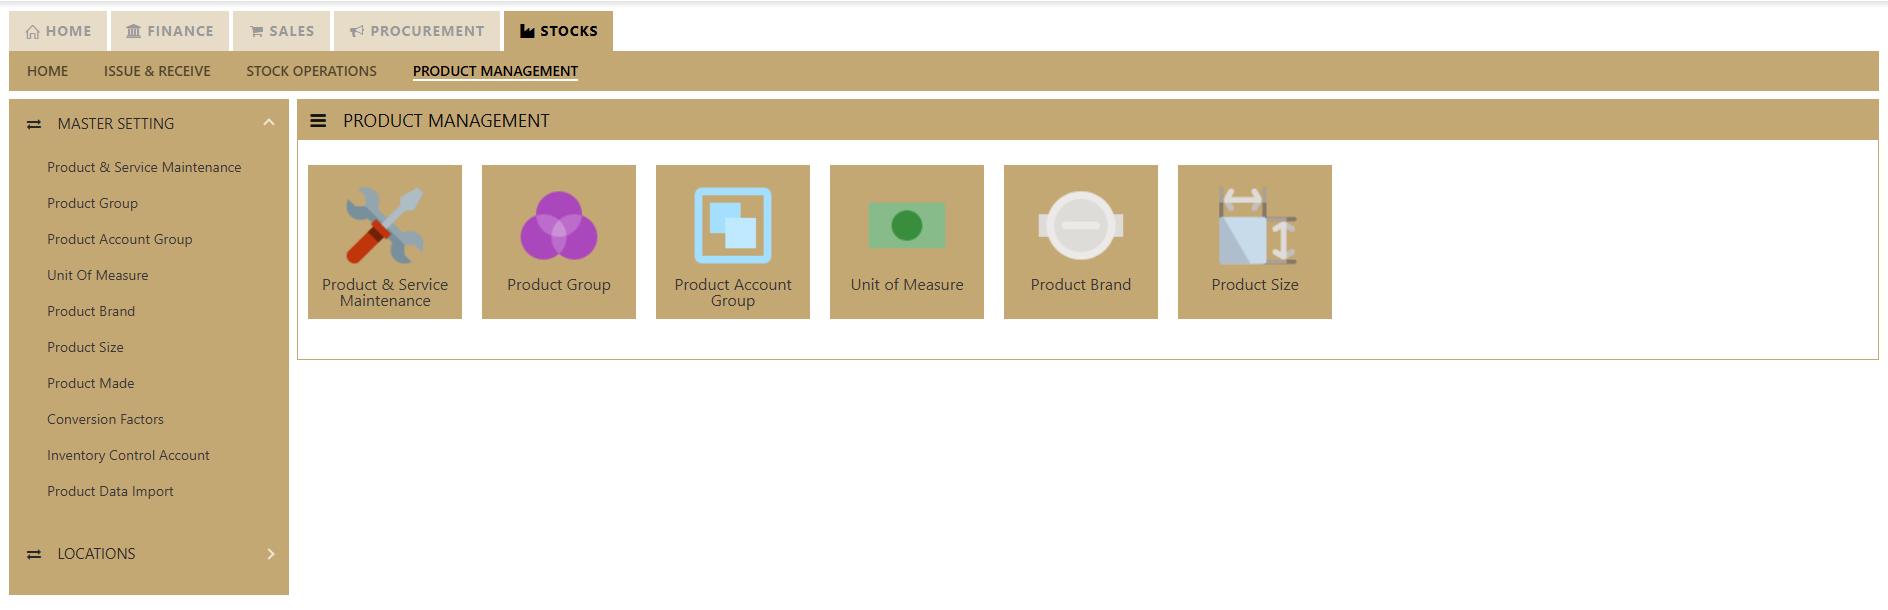
- Product & Service Maintenance
- Product Group
- Product Account Group
- Unit of Measure
- Product Brand
- Product Size
- Product Made
- Conversion Factors
- Inventory Control Account
- Product Data Import
Important: Before proceeding to create a new product or service code, we need to setup some Optional fields (such as Product Group, Size, Model, and Made, Discount Group, Customer/Supplier IM Group and Product Price Group), as well as some Mandatory fields (such as Product Account Group, Inventory Control Account, Units of Measures and Conversion Factors).
Product & Service Maintenance
How to Set-up Product Maintenance?
In UNIQ365, product and service maintenance are essential for effective inventory and financial management. By accurately adding and managing product and service details, users can ensure seamless tracking, reporting, and accounting within the system. This functionality helps maintain up-to-date records, streamline operations, and support decision-making for inventory and sales.
1. Click on Stock– Product Management – Product & Service Maintenance icon for following Inventory listing screen.
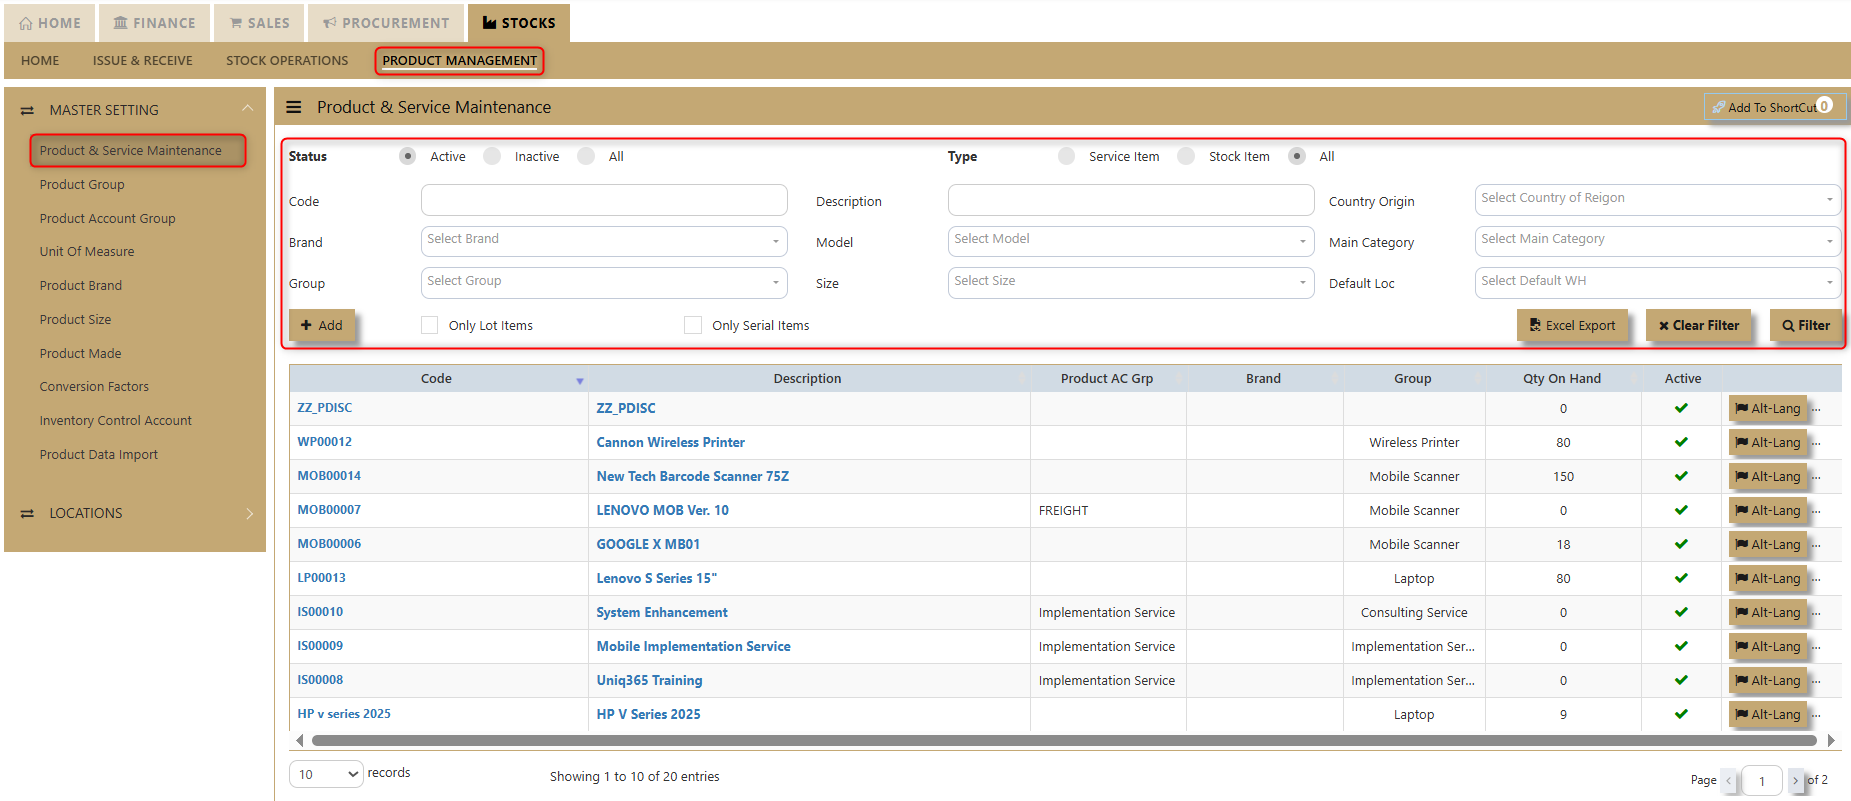
Status Filter -Allows users to choose what status to display in the system interface. Options typically include Active, Inactive, or All.
Type Filter - Used to filter items based on their category, such as stock, service, or all items.
Code, Brand, and Group Filters - Users can input specific product codes, brands, and groups to filter results.
Description, Model, and Size Filters - Allows filtering based on the product description, model, or size.
Country of Origin, Main Category, and Default Location Filters - Users can use these filters to further refine the search by country of origin, main category, or default location.
Excel Export Button - This will let user download all the products and services added within the System and convert into excel format.
How to add new Products and Services in Product & Service Maintenance?

1. Product Info. Click the Add button for new inventory. The user will be redirected to the Product Info page.
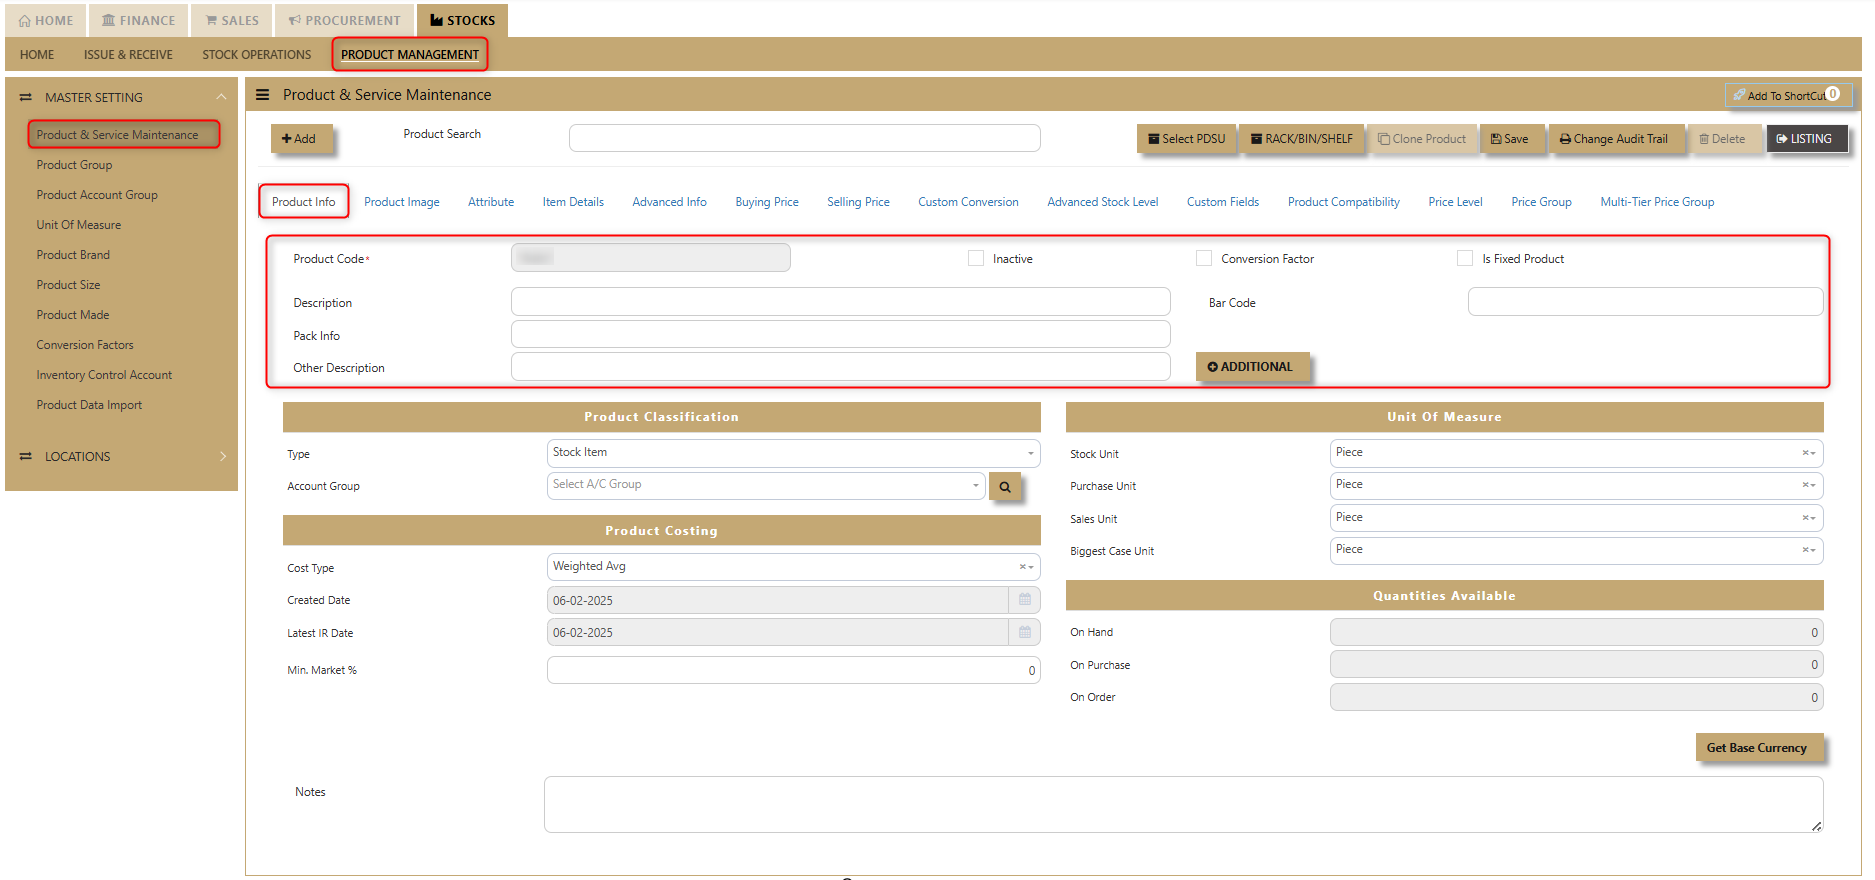
i. Fill in the following components:
Product Code - The code for the new product is autogenerated by the system.
Description - Enter the product name (maximum 50 alphanumeric characters).
Pack Info - Enter any relevant pack information.
Other Description - Enter additional details (unlimited lines, maximum of 40 alphanumeric characters per line).
Barcode - Enter the product barcode
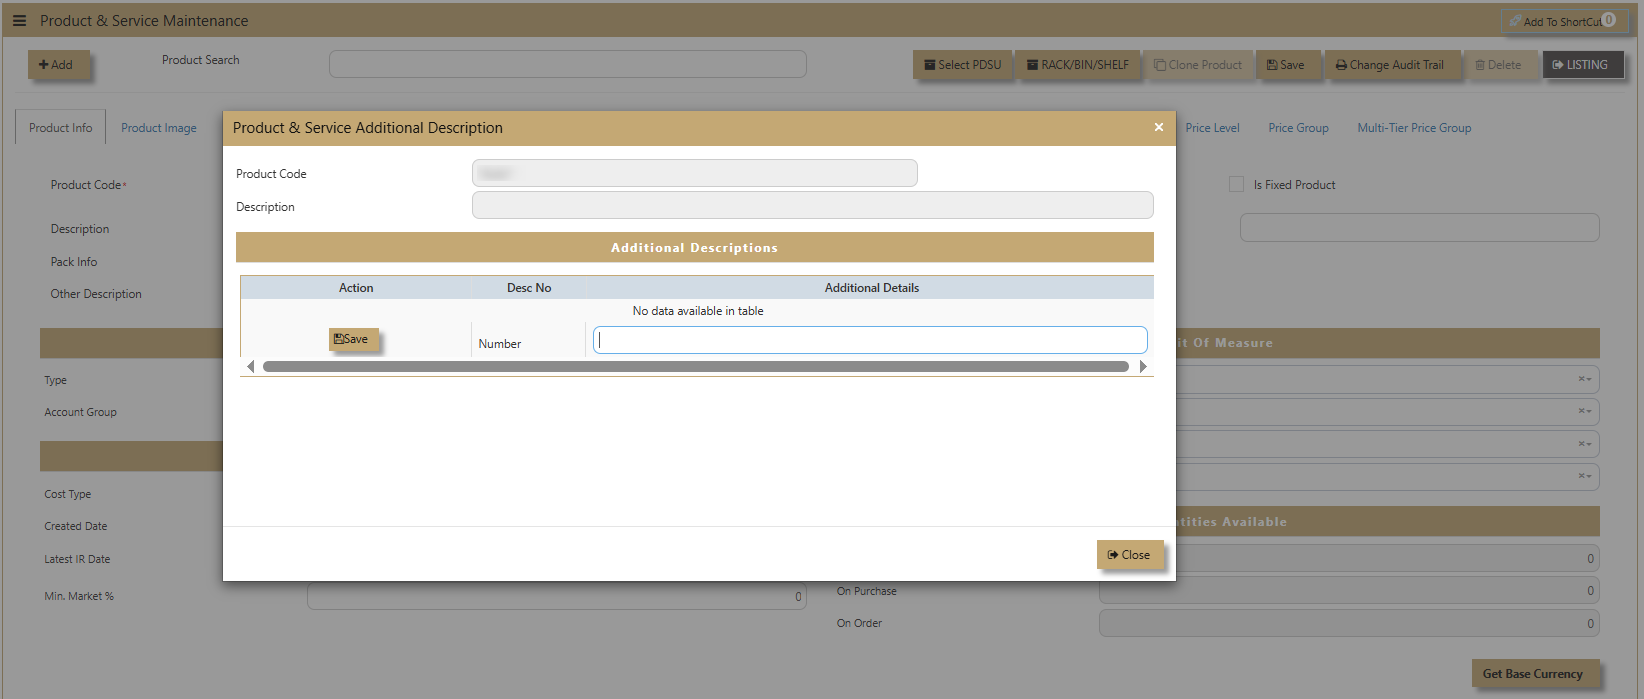
ii. Click the Additional button if there is extra information to link with the new product.
2. Product Info - Product Classification. UNIQ365 helps organize and categorize products for better inventory and financial management. It consists of two key components:
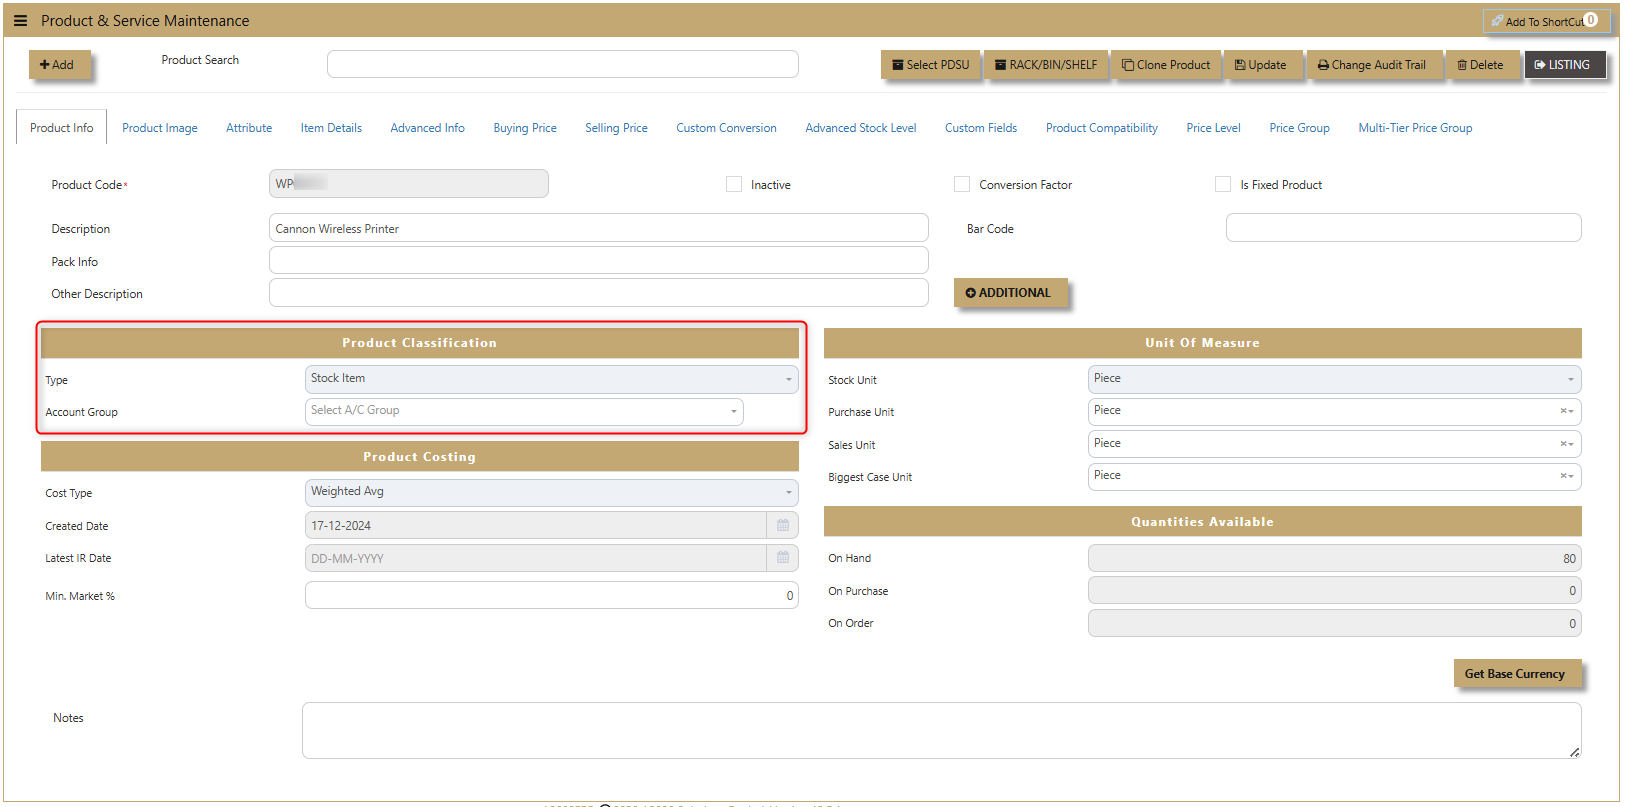
Product Type - Specifies whether the product is a Stock Item or a Service.
Account Group - If any auto account posting depends on Product, then click to select the relevant Accounts Group defined under Inventory/Maintenance/Product Account Group.
Example: Stock-Computer Hardwares, Stock-Softwares, Stock Accessories, Stock-Others.
3. Product Info - Product Costing. UNIQ365 accurately determine and manage the cost of their products, ensuring effective pricing and profitability. This feature plays a key role in cost control, helping to track expenses and set competitive prices.
Note: Please ensure that only one costing type is needed to be attached to all the products.
- Standard Costing. The cost entered in the product master as Standard cost is taken for updating cost of sales.
- Weighted Average. The cost for each product is maintained and the current weighted average cost is used for updating cost of sales.
- FIFO. First In First Out method of costing uses the cost for the first set of available item for updating cost of sales.
- LIFO. Last In First Out method of costing uses the cost for the last set of available item for updating cost of sales.
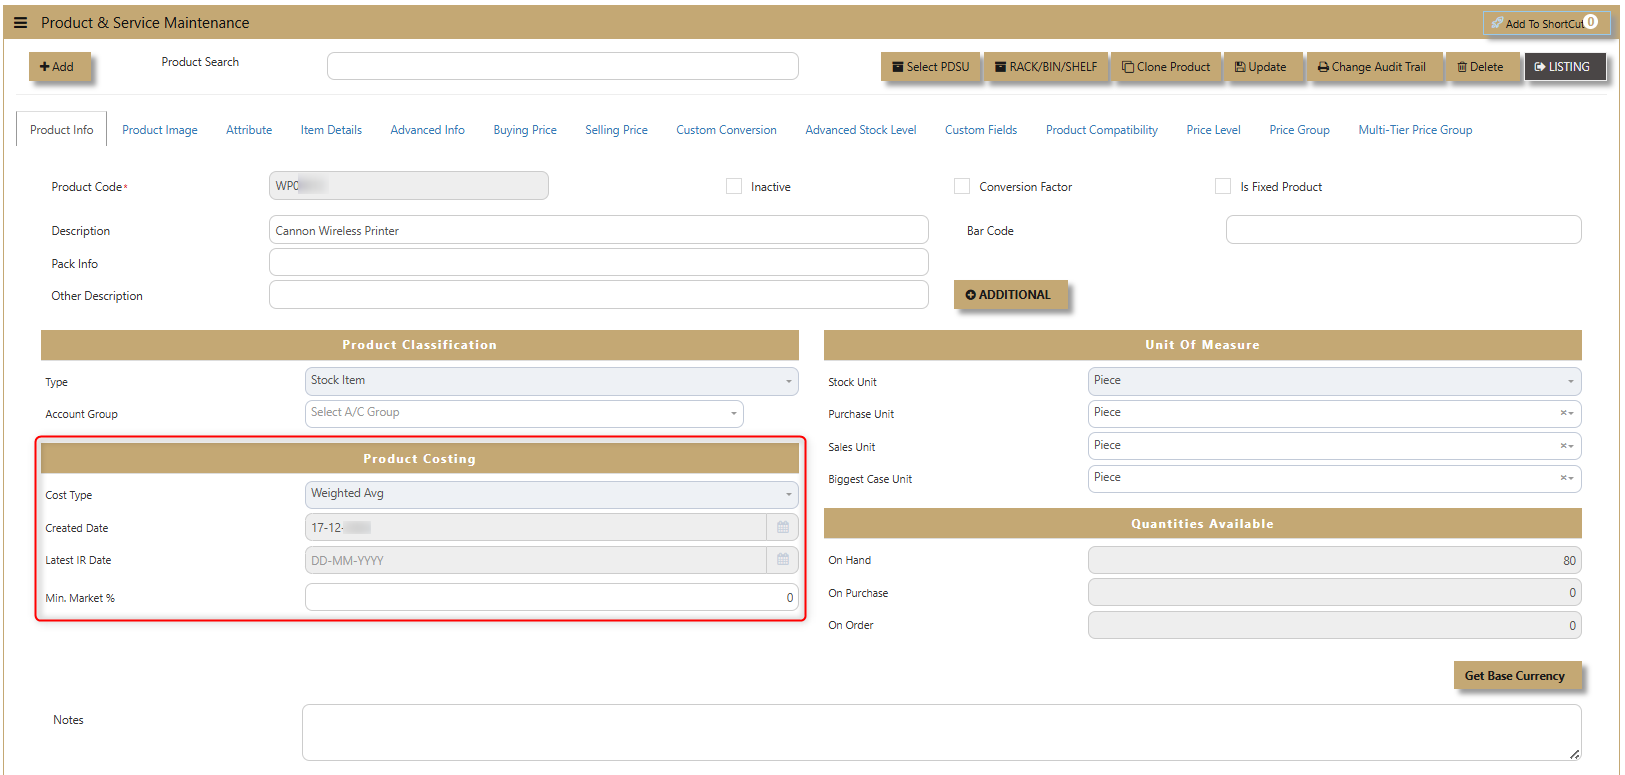
Cost Type - Used by the business process (FIFO, Weighted Average, LIFO & Standard Cost).
Standard - This field is where we set up the Standard cost of the product if Costing type is set to Standard Cost.
Weighted Average - A non-entry field. Displays the Weighted Average cost of the product.'
Created Date - The date the product was added to the system.
Latest IR Date - The most recent Inventory Receipt date.
Min Market % - The minimum market percentage for pricing.
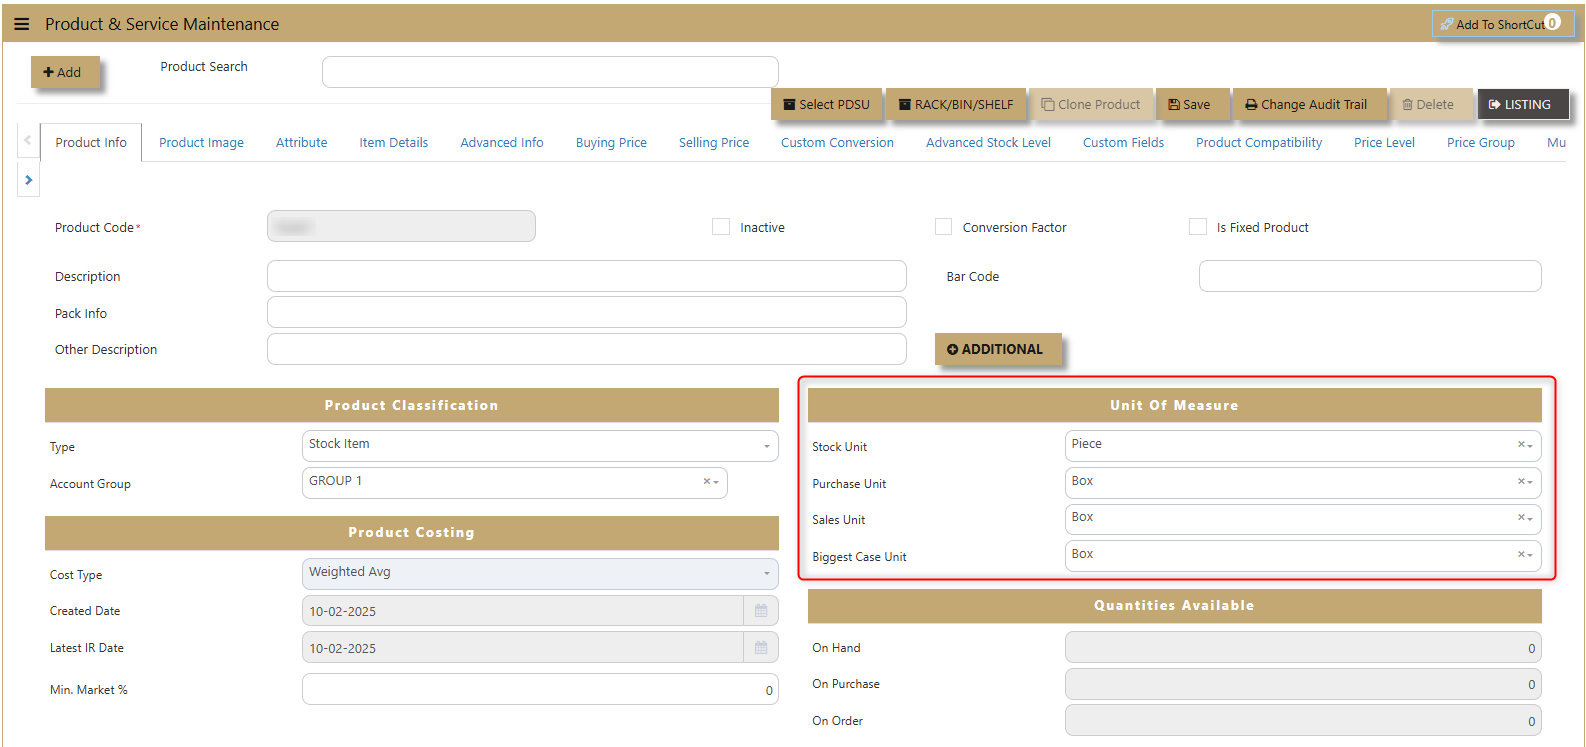
4. Product Info - Unit of Measure (UOM) UNIQ365 used to quantify and track products, such as pieces, boxes, or kilograms. It ensures consistency in inventory management, allowing seamless conversion between units for accurate tracking, pricing, and reporting. This also has its own maintenance tab.
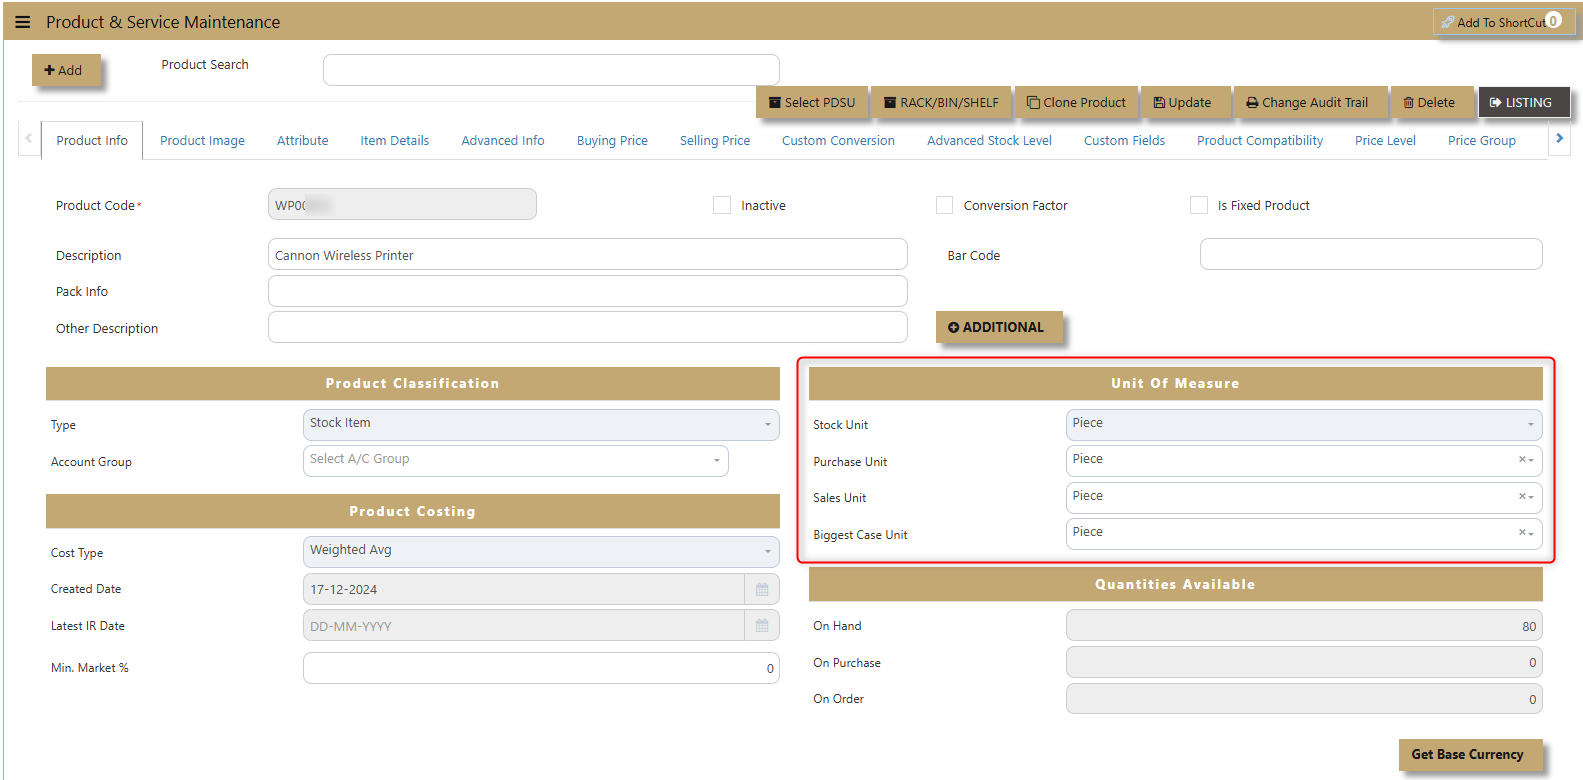
Stock Unit - Enter desired unit of measure for Stock unit. This is the unit that will be used in calculations for quantities in subsequent inventory related reports.
Purchase Unit - If different from Stock Unit a Stock Conversion Factor record must exist.
Sales Unit - If different from Stock Unit a Stock Conversion Factor record must exist.
Biggest Case Unit -The largest packaging unit, used for bulk inventory management and converting stock quantities into larger cases or cartons.
5. Product Info - Quantities Available. In UNIQ365 the total quantity of a product that is available for use, sale, or inventory tracking, taking into account various stages of the product lifecycle. It helps businesses monitor and manage stock levels efficiently. Its 3 components have non-entry field.
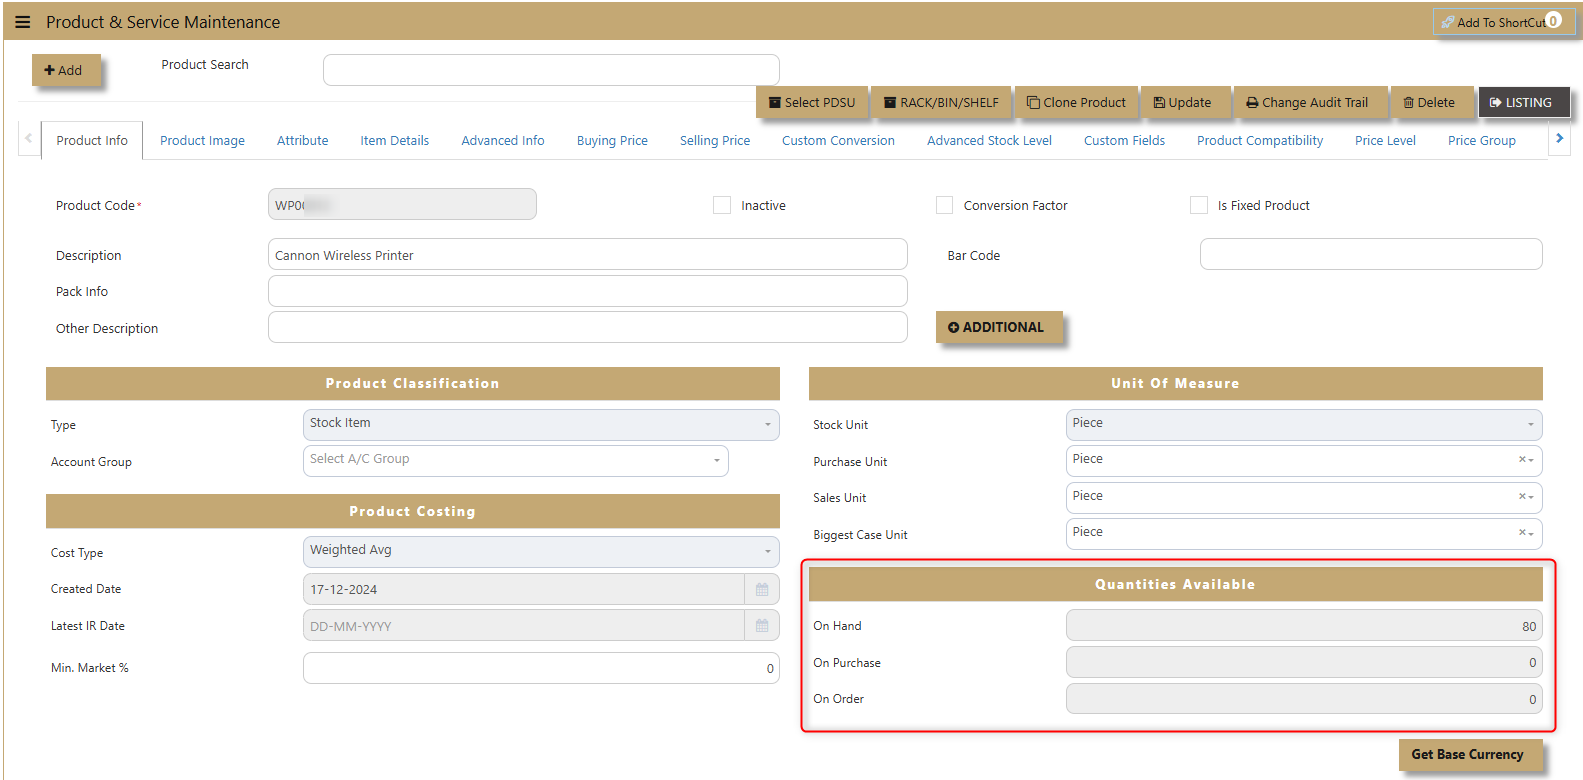
On Hand - The quantity of the product currently in stock and physically available in the warehouse or storage.
On Purchase -The quantity of the product that has been ordered from suppliers but has not yet been received.
On Order -The quantity of the product that is pending or backordered and is expected to be delivered in the future.
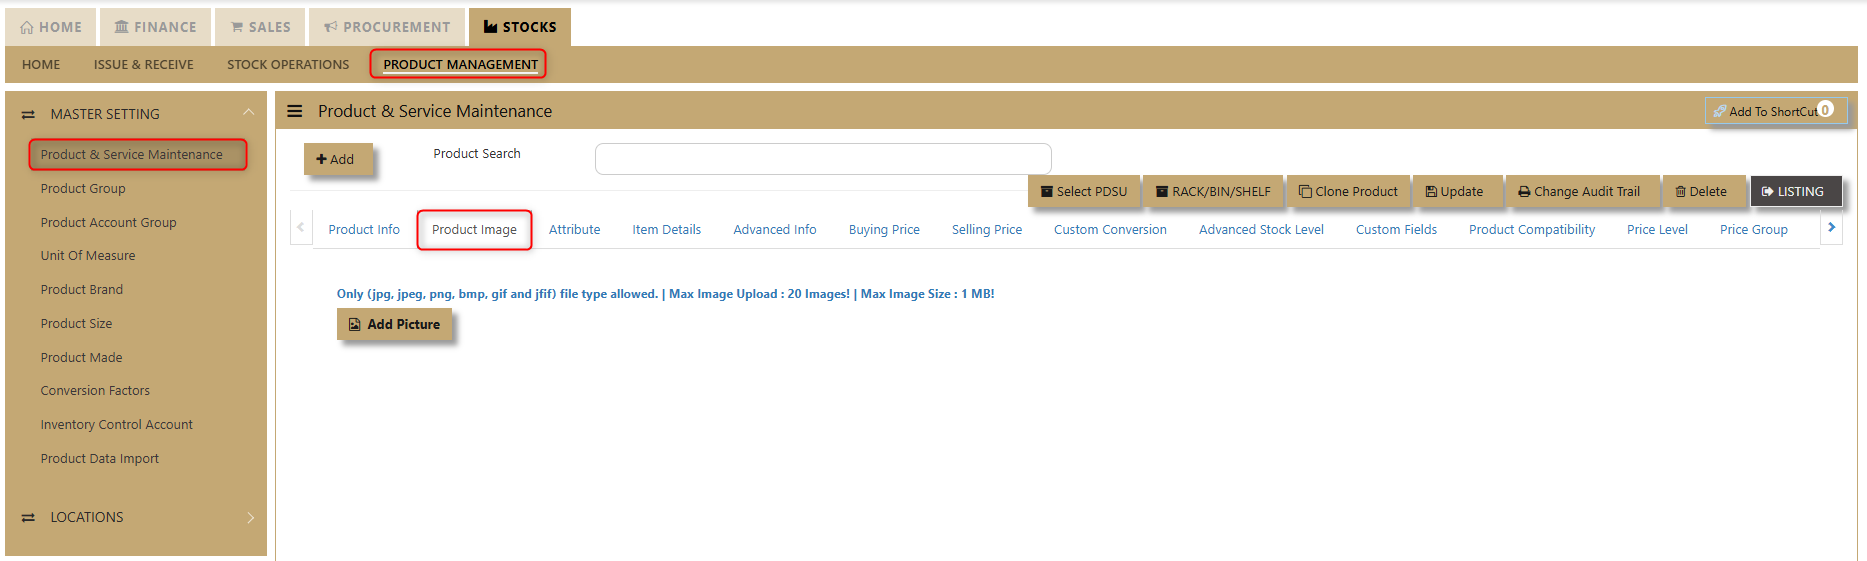
How to use Product Image?
Product Image. allows users to upload a picture for each product, helping with visual identification and inventory management.
How to setup Attribute?
1. Attribute. Allows businesses to define specific product variations with specialized attributes for better management and tracking. When dealing with products such as serialized items, dimensional UOM (Units of Measure), working assets, and items with expiry dates, businesses can configure these attributes to ensure accurate tracking and control.

Serialized Item – Tick for products that need to track serial numbers.
Dimensional UOM – Products can be managed based on dimensions (e.g., weight, volume).
Working Assets – Items that are part of the company's assets can be tracked for maintenance or depreciation.
Tracking Expiry Date – Useful for goods with expiry, ensuring items are sold or used before they expire.
Unique ID Items – Every item can be assigned a unique identifier for precise tracking.
Duty-Free – For products exempt from duties or taxes, helping with proper classification.
Lot Item – Tick for products that need lot tracking.
Rebate Items – Items that come with discount/rebate options, facilitating financial tracking and reporting.
2. Attribute - Optional. This provides users with the flexibility to fill out additional details about products based on their specific needs. These fields allow for more granular product information, enabling businesses to customize their product records.
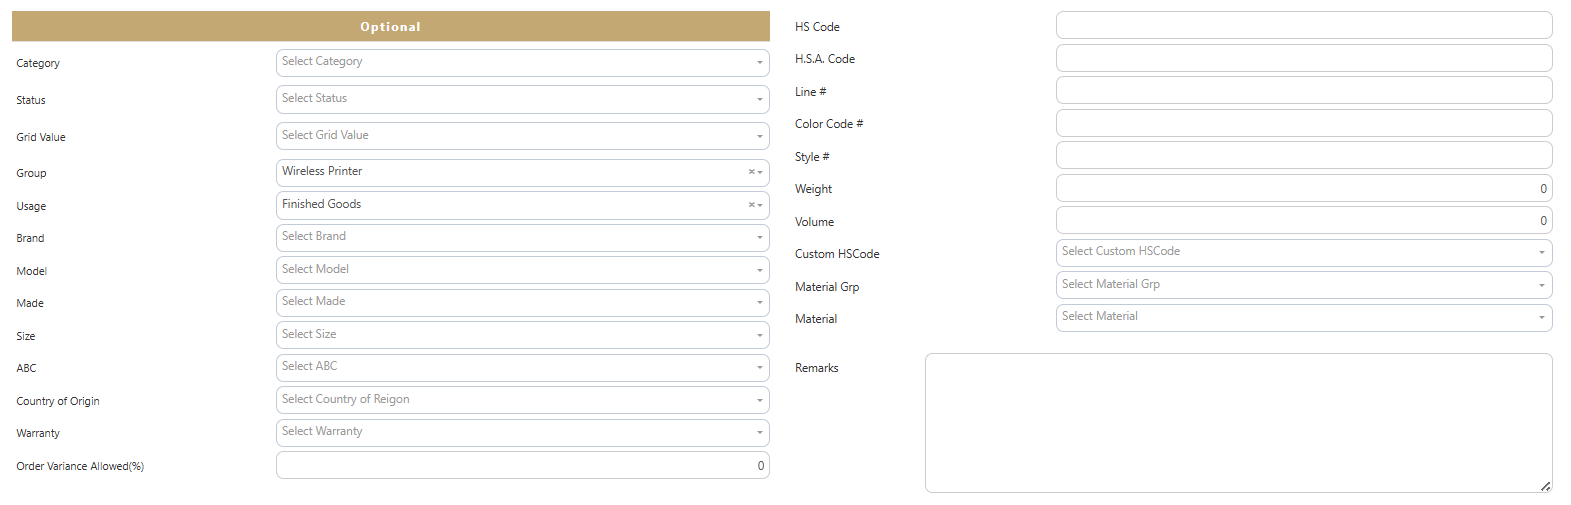
Category - classifies the product under a specific group
Status - indicates the current state of the product (e.g., active, inactive)
Grid Value - a specific reference or pricing value for the product.
Group - product classification based on groups usually maintained on its own tab.
Usage - describes how the product is intended to be used (e.g., Raw Material, Assembly, Finished Goods & Others)
Brand, Model, Made, Size - specifies the brand, model number, manufacturing details, and size of the product defined in its own tabs in Products & Service Maintenance.
ABC - represents the product's classification.
Country of Origin - specifies the product's country of manufacture or origin.
Warranty - provides details about the product’s warranty.
Order Variance Allowed - indicates if variations in orders are permitted.
Color Code #, Style # - refers to the color code and style identification of the product.
Line # - refers to the specific line in a product order.
HS Code, HSA Code, Custom HS Code - a classification code used for customs and international trade.
Weight, Volume - the physical weight & volume of the product.
Material Group - details the material grouping for the product.
Material - specifies the material composition of the product.
Remarks - allows for additional notes or comments.
How to use Item Details?
Item Details. Allows users to add additional information about products, providing a more comprehensive product record.
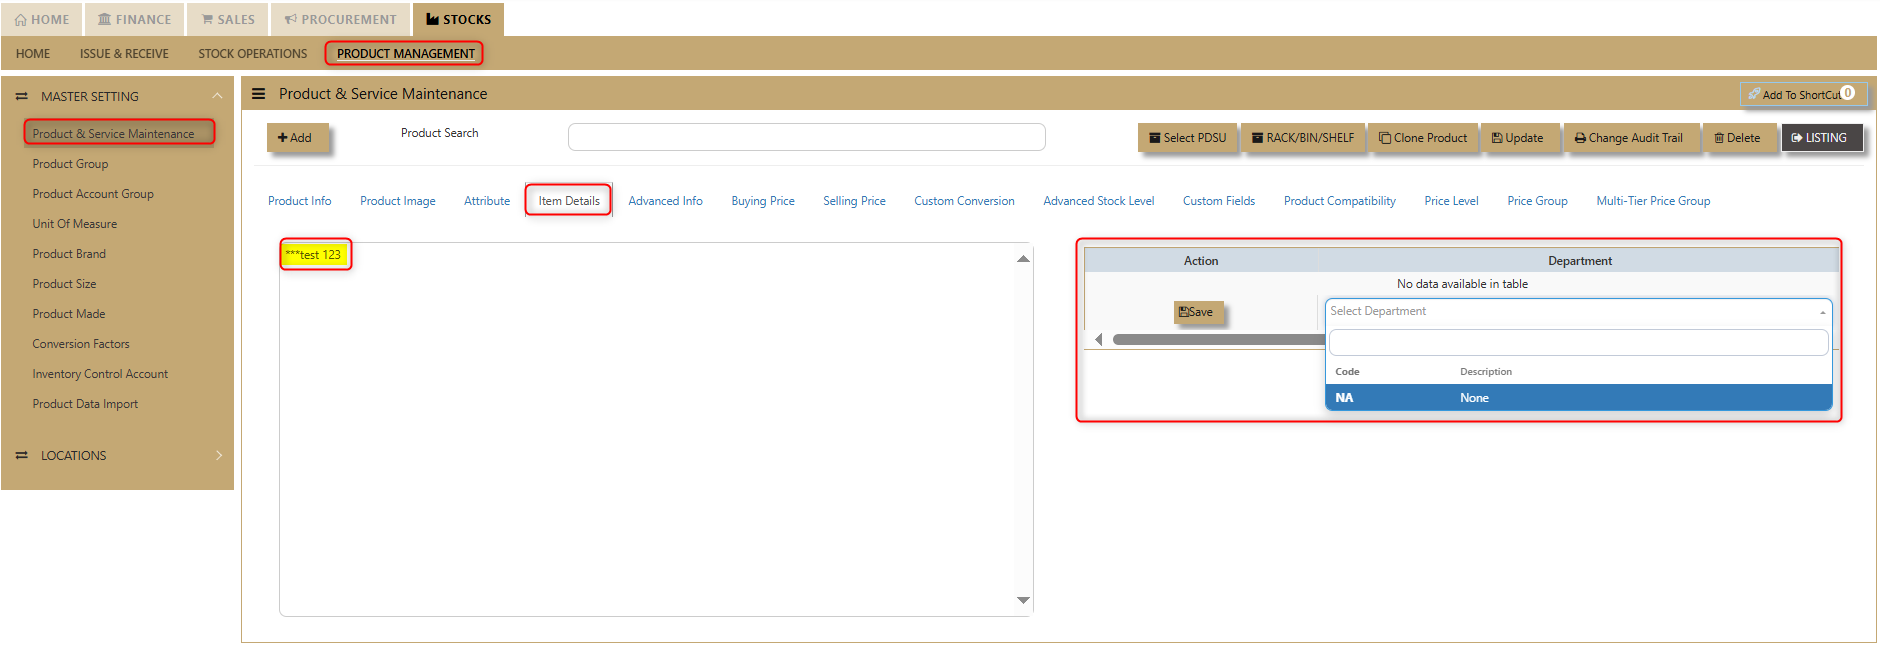
This feature enables businesses to capture key details such as the department responsible for managing the product, along with any other relevant data. By using this tab, users can ensure that all necessary product information is organized and easily accessible for efficient inventory management and reporting.
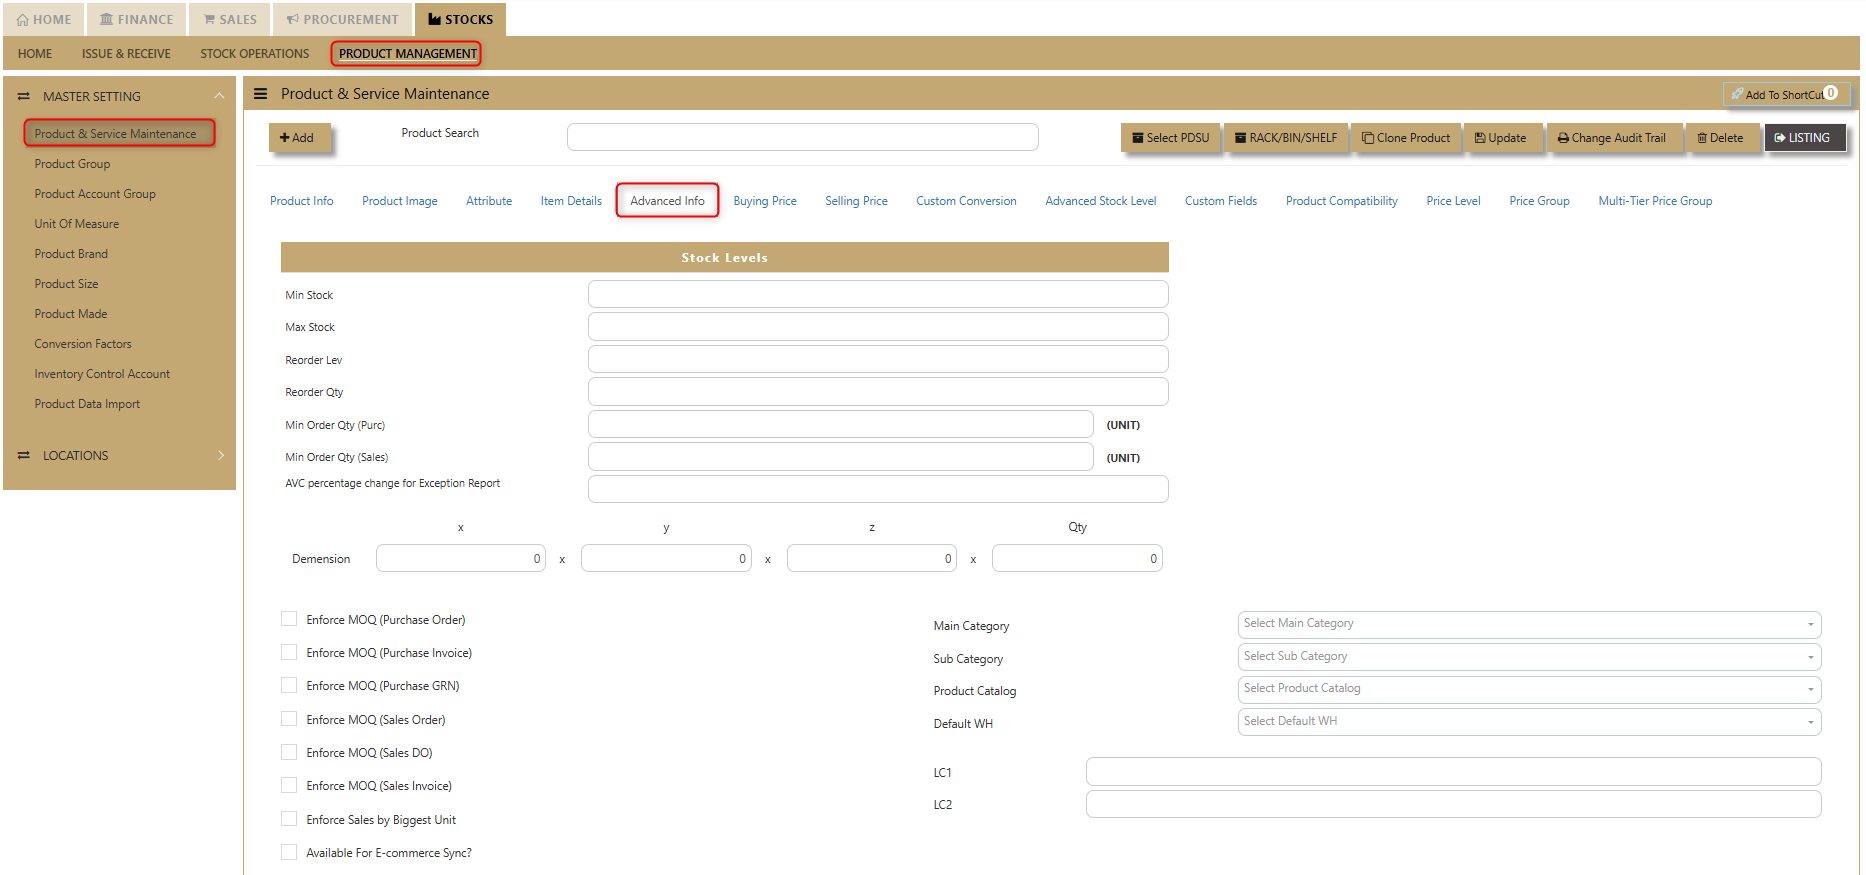
How to use Advanced Info?
How to use Buying Price?
How to use Selling Price?
How to use Custom Conversion?
What is Advanced Stock Level?
How to setup Product Compatibility?
How to use Price Level?
How to use Price Group?
How to use Multi-Tier Price Group?
Product Group
How to Create Product Group?
- Click on Stock – Product Management – Product Group icon for the following screen.

2. Enter the Product Groups as per the above example.
Important: Product groups are mainly used as additional analysis tool for various reports in the system. Some of the most commonly used reports are Sales Analysis-Product Group Wise and Inventory reports that can be sorted by Product groups.
Product Account Group
How to Set-up Product Account Group?
a. Click on Stock – Product Management – Product Account Group icon for following screen.
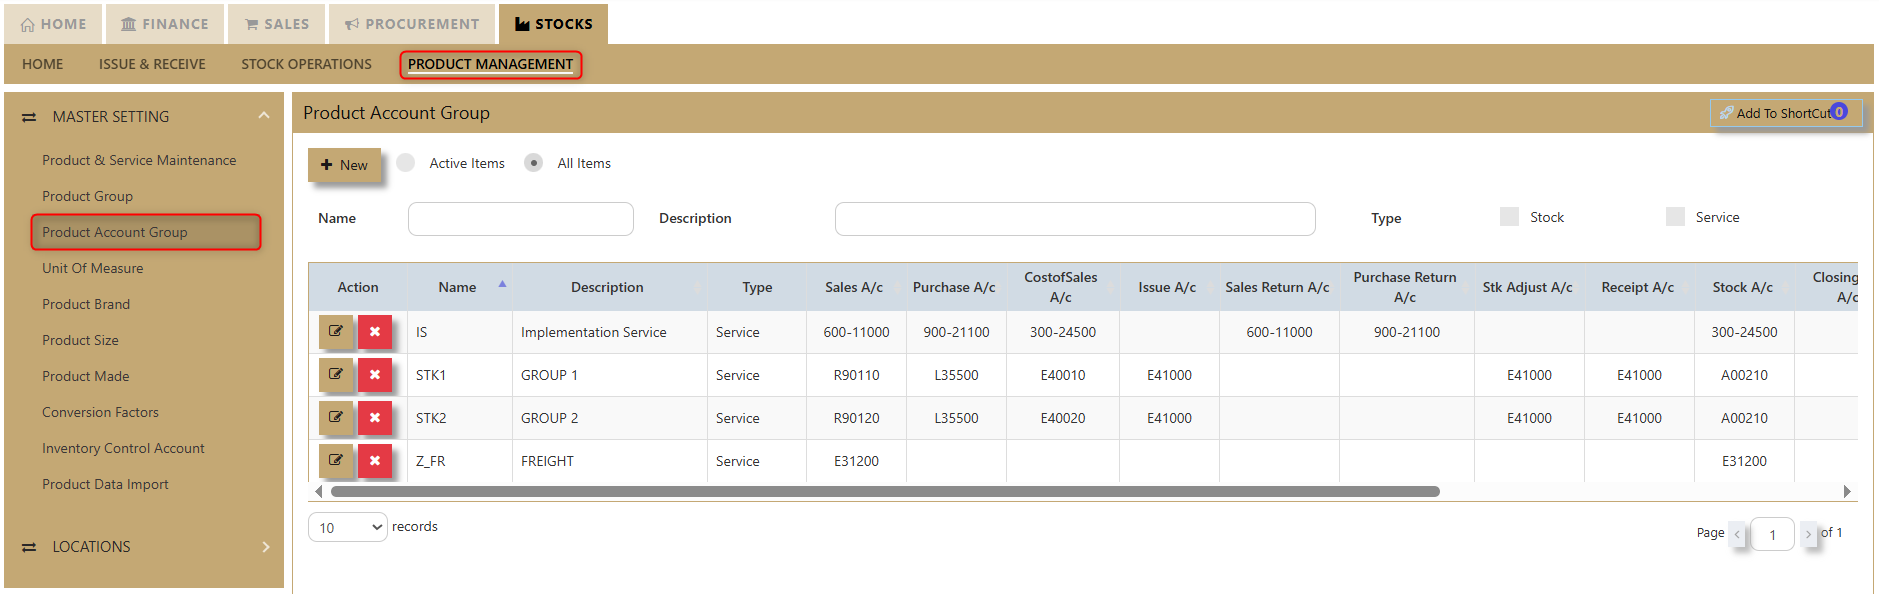
This setup is mandatory when the posting type selected in the Inventory Account Posting Settings is configured as by Product Account Group. To verify or configure this setting, users should navigate to their system settings and access Account Posting Settings.
b. How to Add a New Item to Your Product Account Group
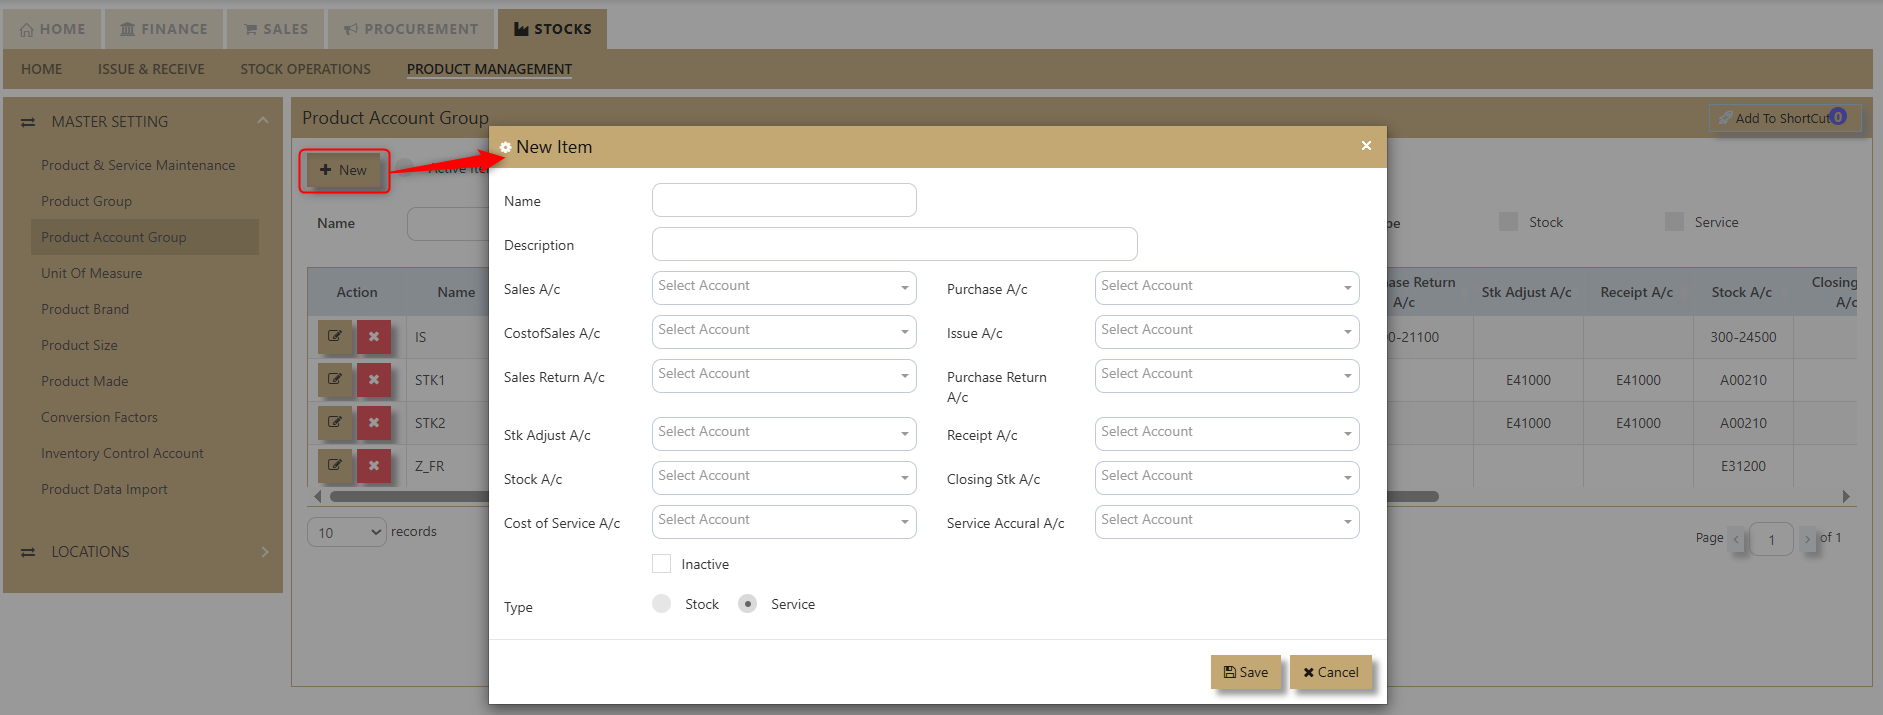
-
Click the New Icon:
In the upper-left portion of the screen, click the New icon to begin. -
Fill in the Item Information:
A table will appear where you need to enter the following details:- New Item Name
- Description
- Sales Account
- Cost of Sales Account
- Sales Return Account
- Stock Adjustment Account
- Stock Surcharge Account
- Cost of Service Account
- Purchase Account
- Issue Account
- Purchase Return Account
- Receipt Account
- Closing Stock Account
- Service Accrual Account
-
Select Corresponding Accounts:
For each category, choose the appropriate account based on your business processes. -
Select Item Type:
In the 'Type' section, tick the boxes for Service and/or Stock, depending on the nature of your item. -
Mark as Inactive (if applicable):
If the item is no longer in use, you can check the Inactive option. -
Save the Information:
After filling in all the necessary fields, click Save. Your new item will now be added to your product account group.
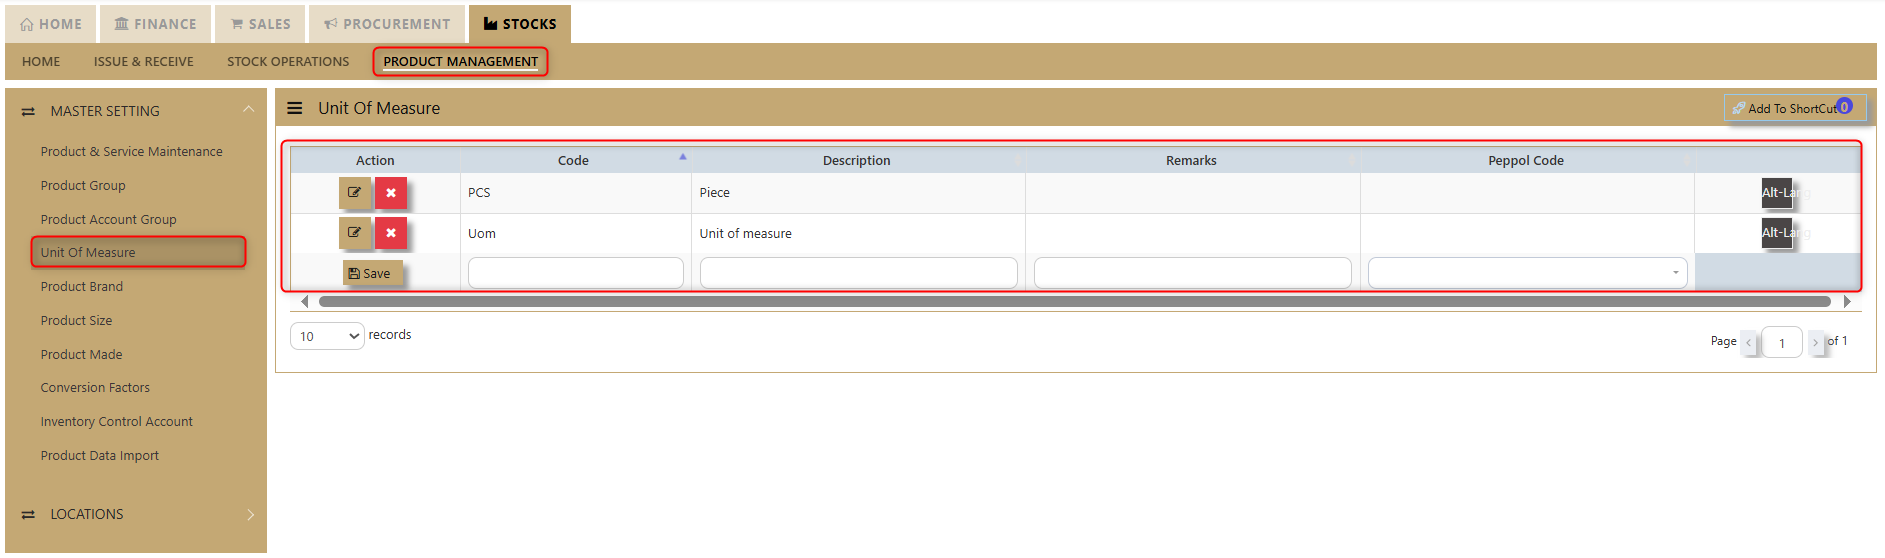
Unit of Measure
How to setup Units of Measure?
The most important product UOM that need to maintain integrity is the STOCK UOM. It is the basis of this UOM that the system calculates costing and conversion factors etc. All Sales and Purchase UOMs in the system can be changed, but depending on the situation, the user may or may not change the STOCK UOMs in the system.
1.1 Product has no transaction yet
If there are no prior transactions, you may change the UOM for this product freely. Simply go to Product Maintenance and click on the Stock UOM and change at will.
1.2 Product already have existing transaction
If there are already transaction(s), you are not allowed to change the STOCK UOM. Example, if this is already cost in system at $5 per bottle, and the UOM is changed to carton of 24, the system will start to have wrong cost à $5 per carton of 24.
Managing UOMs
2.1 Create new UOM
- Go to Stocks – Product Management – Unit of Measure
- Create the UOM code and the UOM Description – and user have a new UOM now
2.2 Products with different UOM
- Go to Stocks – Product Management – Unit of Measure
- Select (or create) a product and click on the UOM tab
- Select the Stock UOM and alternative UOMs and enter the Conversion Factor. (This tab is discussed below)
- You may enter unlimited number of conversions here.
- After this is set, you may transact in any of the UOM that is specified here
Changing UOM if transaction(s) exist
- User can only create new product code with the new UOM. Perform an IT transaction; issue of the items in bottles and receive the item (in new code) in carton. After that is completed, and the old code is zeroized, simply inactivate the old code.
Product Brand, Size, Made
How to Create Product Brand/Size/Made?
Product Brand
Click on Stocks – Product Management – Product Brand icon for the following screen.
Product Size
Click on Stocks – Product Management – Product Size icon for the following screen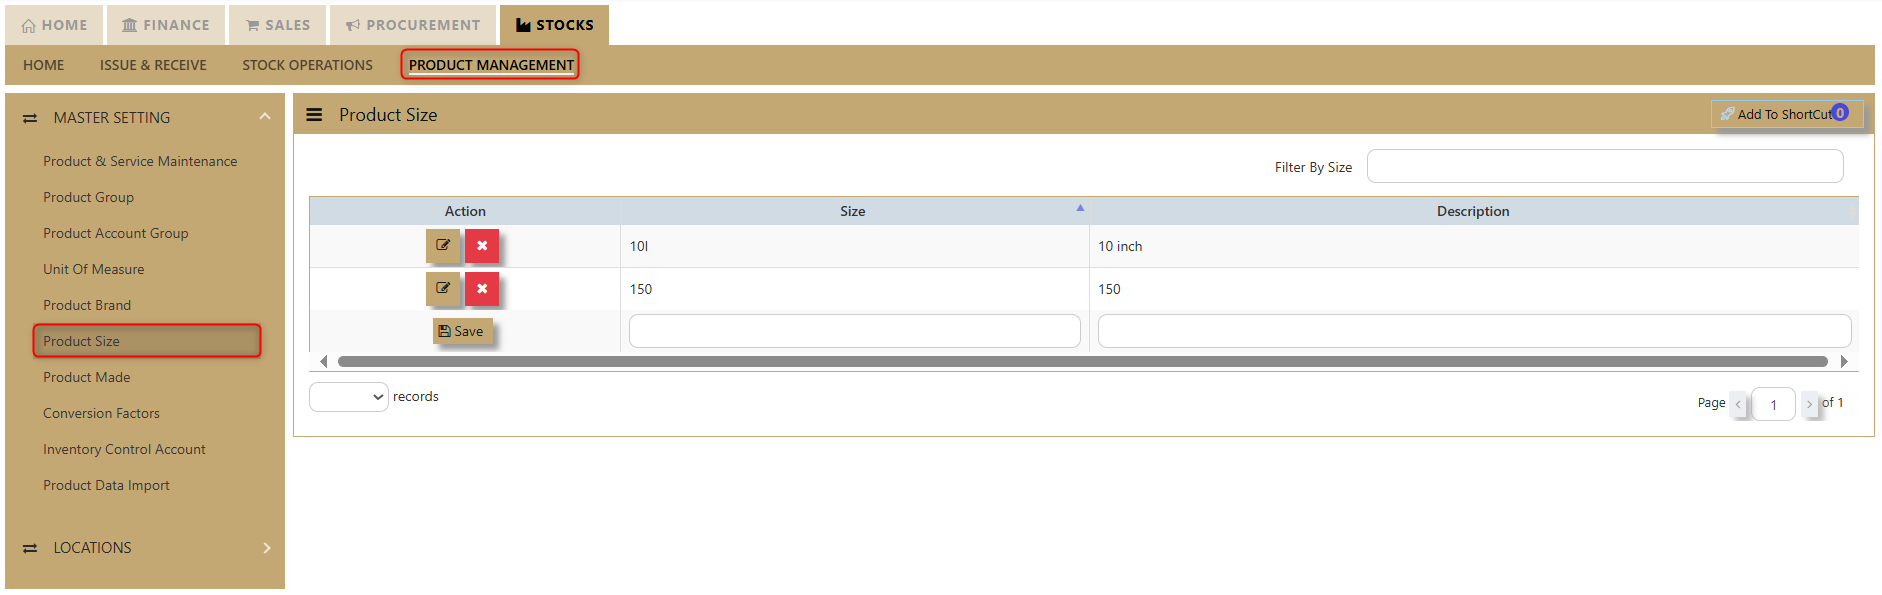
Product Made
Click on Stocks – Product Management – Product Made icon for the following screen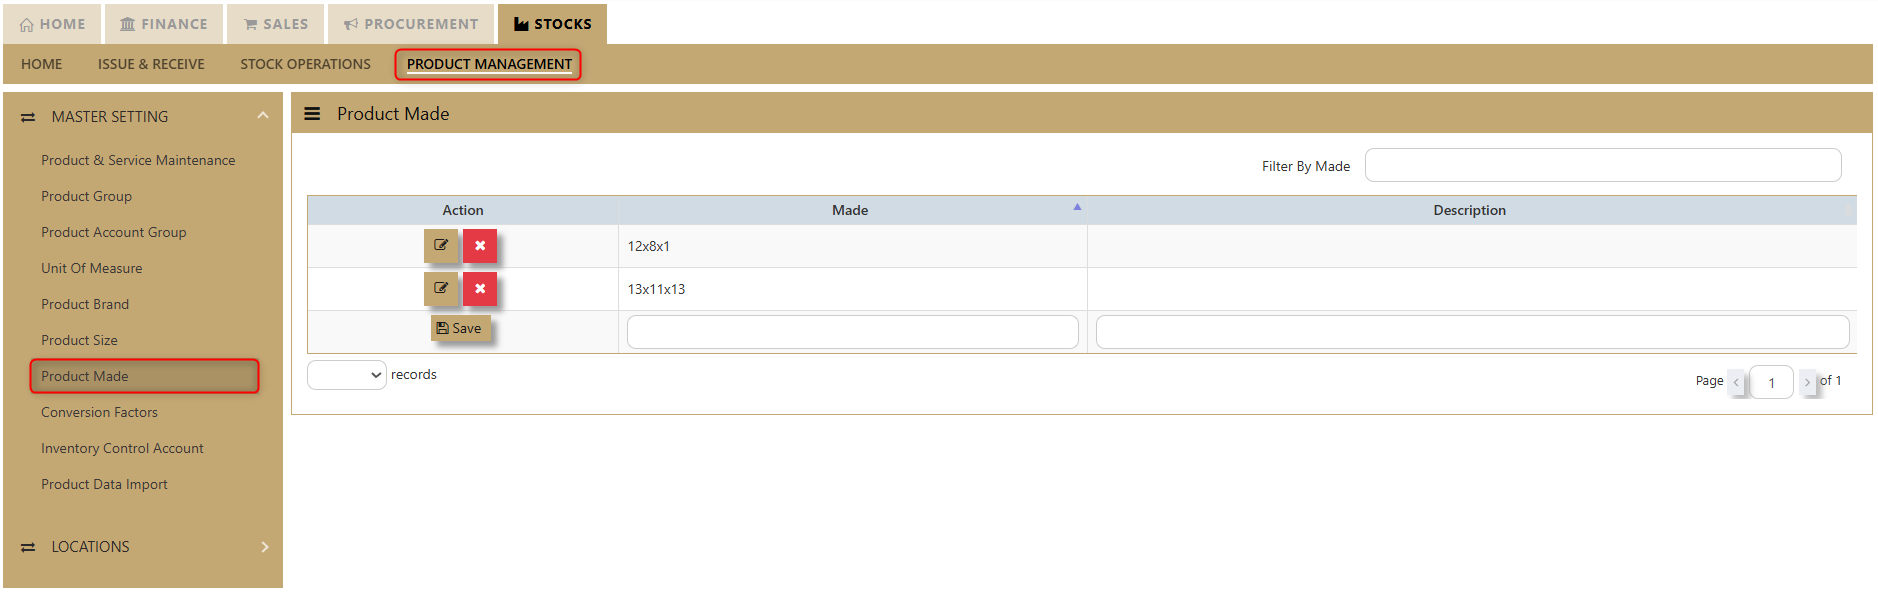
- Enter the Size, Brand, Model, and Made options as shown in the examples above.
- The codes are limited to 4 alphanumeric characters.
- The descriptions are limited to 40 alphanumeric characters.
Important: Size, Model, Brand and Made are mainly used as additional analysis tools for various reports in the system. Some of the most commonly used reports are Sales Analysis-Product Size Model Wise and Inventory reports that can be sorted by Model and Brand.
Conversion Factors
How to Set-up Stock Conversion Factors?
Conversion Factor
Click on Stock– Product Management – Conversion Factors icon for following screen. Take note that this setting is for general conversion which will apply to all the products.
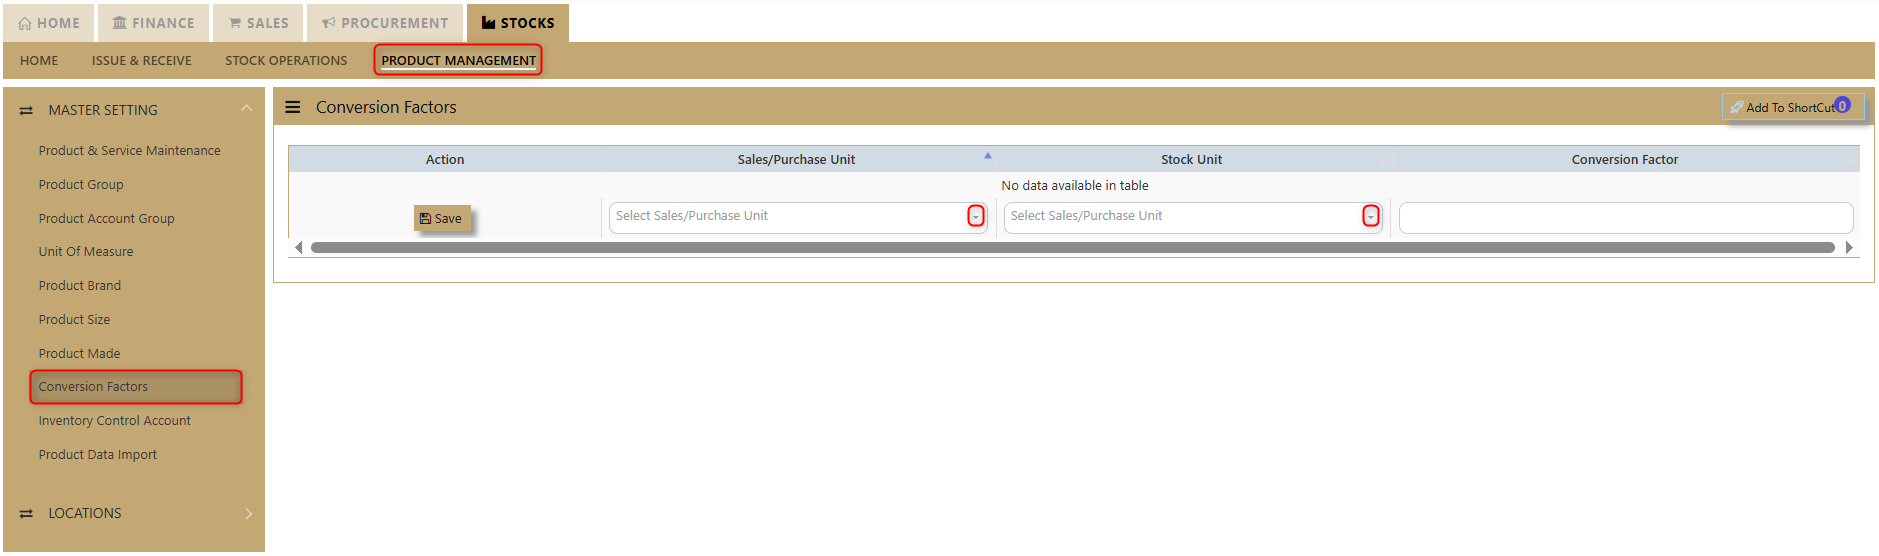
Custom Conversion Factor
If conversion is specific to each product, the setting is done in Custom Conversion Factor tab of each product in Stock – Product Management – Products & Service Maintenance.
Situational: For instance, user wants to buy stock ‘ballpen’ in box then sell in piece. There are 2 units of measurement [otherwise known as UOM] which are box and piece.
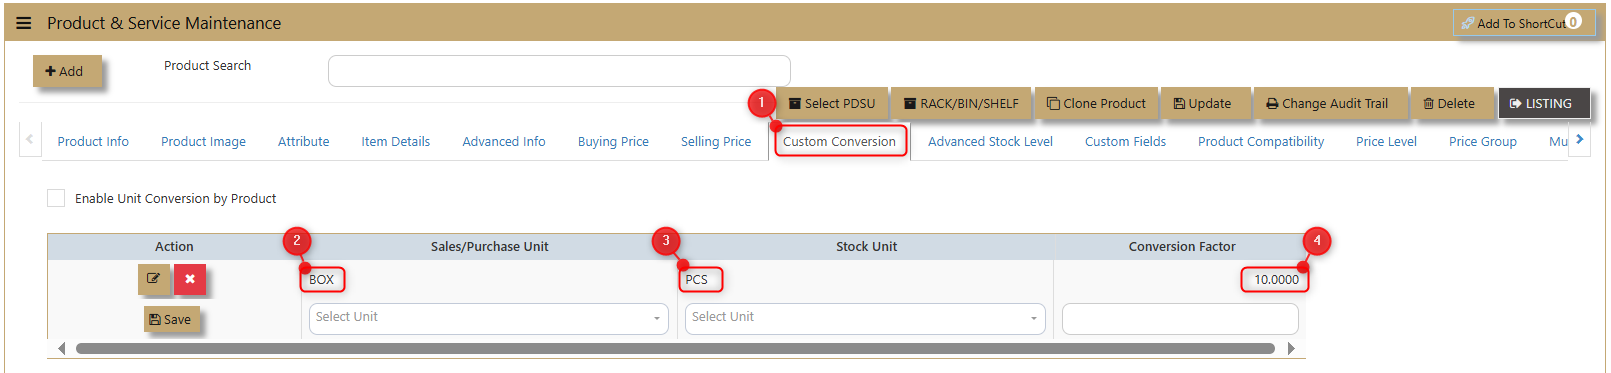
In your custom conversion tab, you will see “stock unit’’, note that stock unit in conversion tab should be same what is your maintained stock unit for that product.
Inventory Control Account
How to Set-up Inventory Control Account?
Click on Stock – Maintenance – Inventory Control Account for following screen.
In UNIQ365, this option determines how the GL is to be updated when saving transactions. You need to specify the chart of account codes for Sales, Purchase and Inventory transactions.
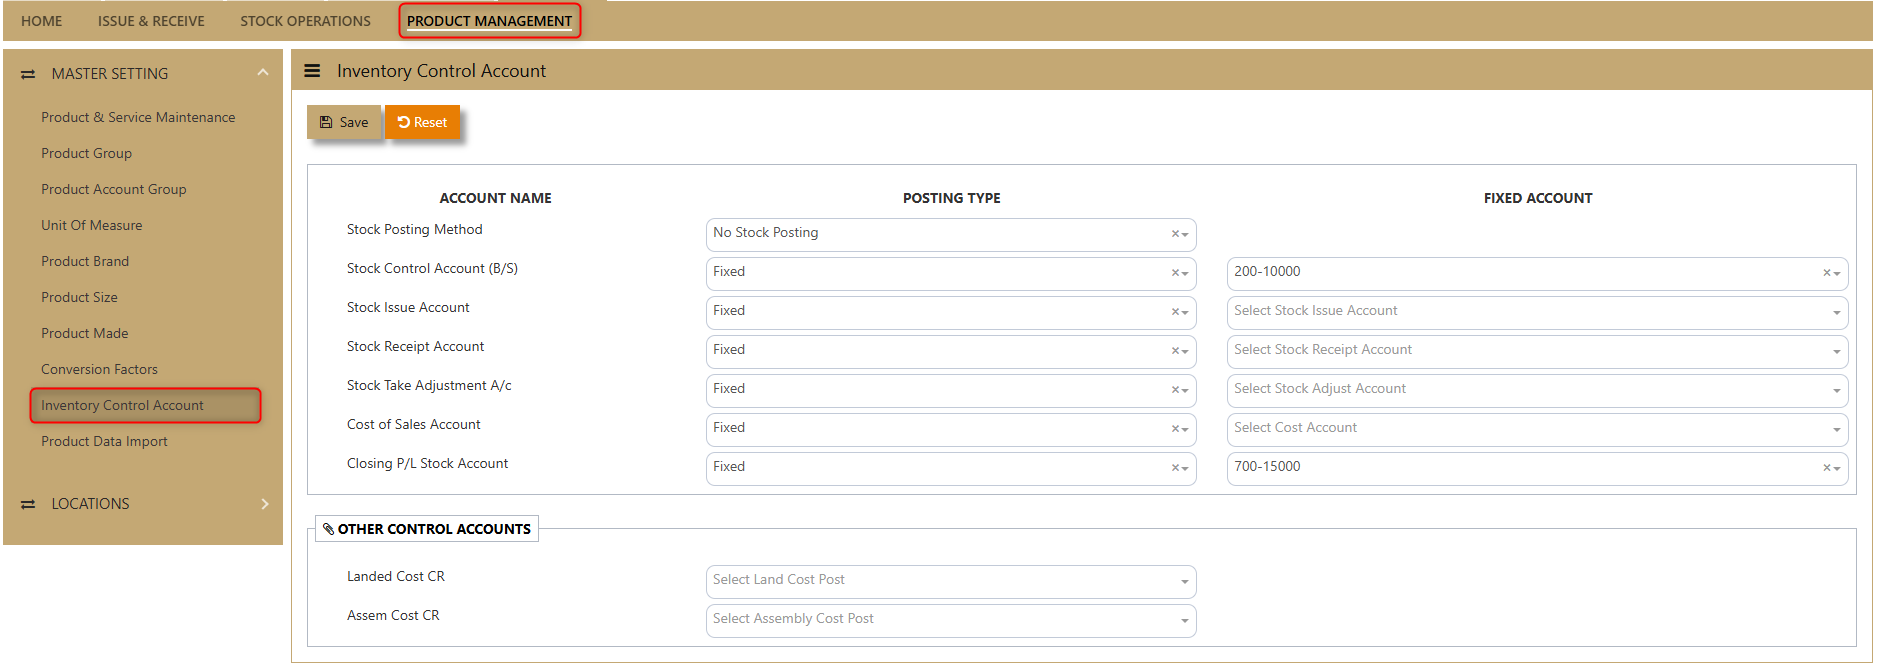
Important: Being a packaged solution, UNIQ365 caters for almost any type of industries with 3 types of stock posting options.
1. No Stock Posting
2. Cost of Sales Posting
3. Closing Stock Posting
Stock Posting Methods
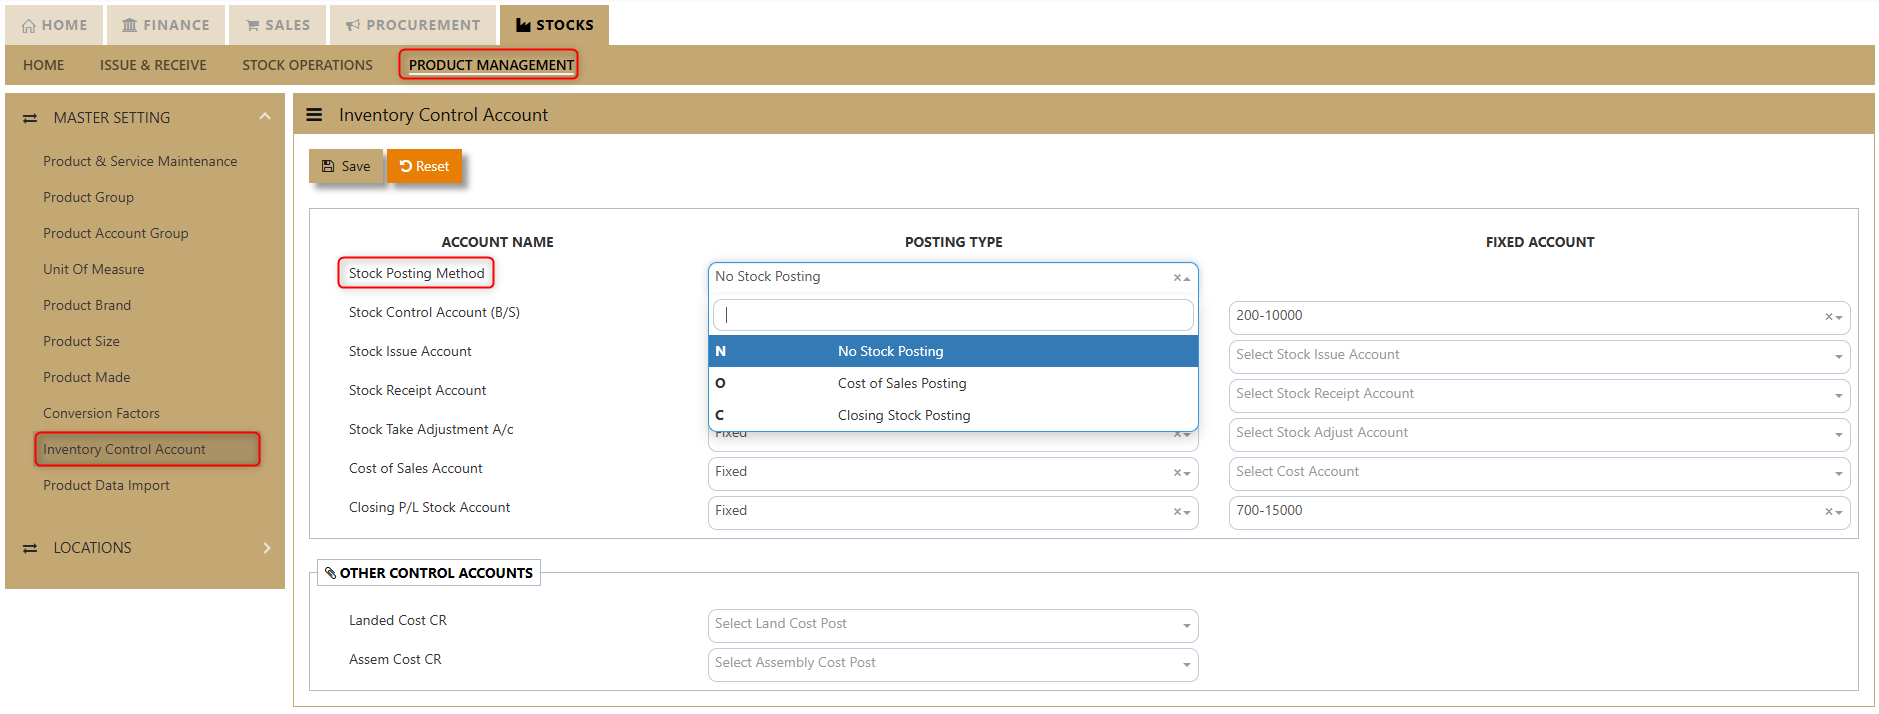
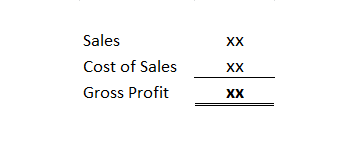
1. No Stock Posting
- Inventory module is not linked to GL.
- All the movement of the stock could still be captured in inventory module.
- User needs to post a journal entry manually to Closing stock & Opening stock accounts for month end closing or year-end closing.
- Normally, Profit and Loss Account will be presented as follows:
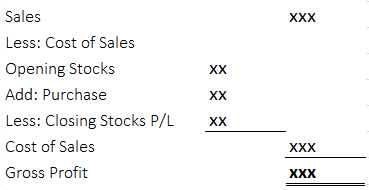
In this case, Purchase Account will be categorized under Expense account.
Below is an example of a double entry for: -
a. Purchase Invoice amounted to $500.00
| Debit | Credit | |
| Purchase Account | S$500 | |
| Trade Creditor Control | S$500 |
b. Sales Invoice amounted to $1,000.00
| Debit | Credit | |
| Trade Debtor Control | S$1000 | |
| Sales Account | S$1000 |
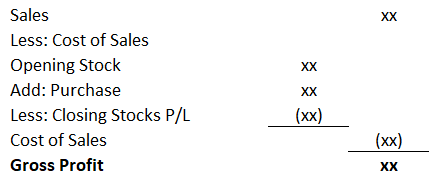
2. Cost of Sales Posting
- Inventory module is linked to GL.
- Closing stock will be automatically updated when Sales,
- Purchase or Inventory transactions are performed.
Profit and Loss Account will be presented as follows:
- In this case, Purchase Account will be categorized under Liabilities account.
Below is an example of a double entry for:-
a. Purchase Invoice amounted to $500.00
| Debit | Credit | |
| Purchase Account | ||
| Trade Creditor Control | ||
| Closing Stock B/S |
b. Sales Invoice amount of $1000
| Debit | Credit | |
| Trade Debtor Control | S$1000 | |
| Sales Account | S$1000 |
3. Closing Stock Posting
- Inventory module is linked to GL.
- Closing stock will be automatically updated when Sales, Purchase or Inventory transactions are performed.
- Normally, Profit and Loss Account will be presented as follows:
- In this case, Purchase Account will be categorized under Expense account.
- Below is an example of a double entry for: -
a. Purchase Invoice amounted to $500.00
| Debit | Credit | |
| Purchase Account | S$500.00 | |
| Trade Creditor Control | S$500.00 | |
| Stock B/S | S$500.00 | |
| Closing Stock A/C (P&L) | S$500.00 |
b. Sales Invoice amount of $1000
| Debit | Credit | |
| Trade Debtor Control | S$1000 | |
| Sales Account | S$1000 | |
| Stock B/S | S$500.00 | |
| Closing Stock A/C (P&L) | S$500.00 |
You need to fix the relevant GL Account for Stock Control A/c (B/S), Stock Issue Account, Stock Receipt Account and Closing Stock Account.
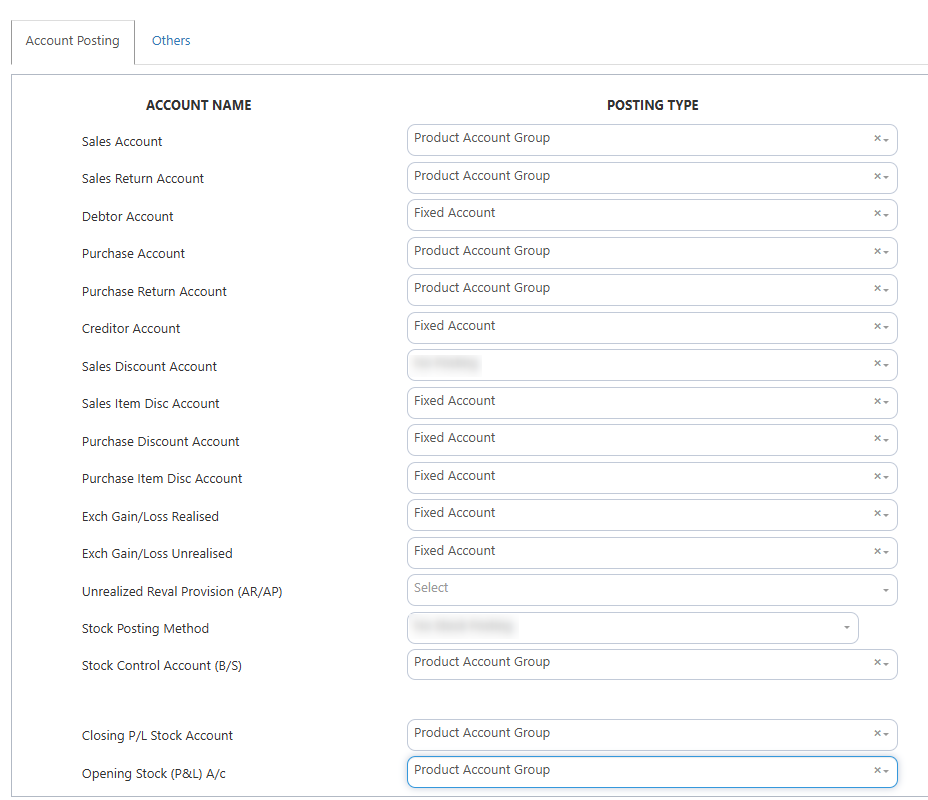
Important: After you have decided on the Stock Posting Method, you can now set up the auto posting for the Stock Control Account (B/S), Stock Issue Account, Stock Receipt Account, Stock Take Adjustment A/c, Cost of Sales A/c &
Closing P/L Stock Account based on the guidelines set above.Guide: The setting is Fixed if you only have one account but should be set as Product if you have multiple accounts. For example, if you have multiple Stock accounts (i.e. Stock-Computer Hardwares, Stock Software, Stock-Accessories, Stock-Others).
Product Data Import
Warehouse Locations