# Online User Guide (1.0_1224)
# Getting Started
# Introduction - Uniq365

### What is Uniq365?
Uniq365 is a cloud-based Enterprise Resource Planning (ERP) solution designed to streamline business operations for small and medium-sized enterprises (SMEs) in Asia. Developed by A2000 Solutions Pte Ltd, a Singapore-based company established in 1996, Uniq365 offers a comprehensive suite of tools to enhance productivity and efficiency.
The platform includes features such as full accounting capabilities, sales and purchasing modules, inventory control, tax management, multi-currency support, and integration with InvoiceNow for seamless invoicing. Additionally, Uniq365 provides a DocHub repository for document management and WhatsApp integration for improved communication.
As a cloud-based system, Uniq365 enables businesses to access their data anytime and anywhere, facilitating real-time decision-making and operational flexibility. The solution is tailored to meet the specific needs of SMEs, offering scalable and adaptable tools to support business growth and digital transformation.
For a visual overview of Uniq365, you can watch the following video: [https://www.youtube.com/watch?v=HafSj46LV68&t=4s](https://www.youtube.com/watch?v=HafSj46LV68&t=4s)
# How Uniq365 Works
### How does Uniq365 work?

Uniq365 is a cloud-based Enterprise Resource Planning (ERP) system designed to streamline business operations, particularly for small and medium-sized enterprises (SMEs). Developed by A2000 Solutions Pte Ltd, a Singapore-based software development company, Uniq365 offers a comprehensive suite of tools to manage various business functions.
**Key Features of Uniq365:**
- **Full Accounting:** Provides complete accounting functionalities to manage financial transactions and reporting.
- **InvoiceNow Ready:** Supports electronic invoicing, enabling seamless and efficient invoice processing.
- **DocHub Repository:** Offers a dedicated platform for storing and organizing financial documents, facilitating easy access and management
- **XBRL Reporting:** Assists in generating reports in the eXtensible Business Reporting Language (XBRL) format, ensuring compliance with regulatory standards.
- **Sales and Purchasing Modules:** Manages sales orders, purchasing processes, and inventory control to optimize supply chain operations.
- **Tax Management:** Simplifies tax calculations and compliance, reducing the risk of errors.
- **Multi-Currency Support:** Enables transactions in multiple currencies, beneficial for businesses operating in international markets.
- **WhatsApp Integration:** Facilitates communication by integrating with WhatsApp, allowing for quick interactions with clients and team members.
- **365/24/7 Usage:** Being cloud-based, Uniq365 is accessible anytime and anywhere, providing flexibility and continuous availability.
By digitizing business operations, Uniq365 aims to improve productivity and efficiency, offering scalable solutions that can be tailored to the unique needs of businesses. Its cloud-based nature ensures that data is accessible in real-time, promoting informed decision-making and streamlined workflows.
For a visual overview, you might find this video helpful: [https://www.youtube.com/watch?v=HafSj46LV68](https://www.youtube.com/watch?v=HafSj46LV68)
# Account Book Creation
# Overview
# Signup for Uniq365
#### We have 2 ways to Sign up for Uniq365. One is via the Manual Registration using **PARTNERS SUBSCRIPTION PORTAL** and second would be the **PARTNERS SUBSCRIPTION URL.**
PARTNERS SUBSCRIPTION URL
#### **Partner Subscription URL can be found in the Partners Subscription Portal.**
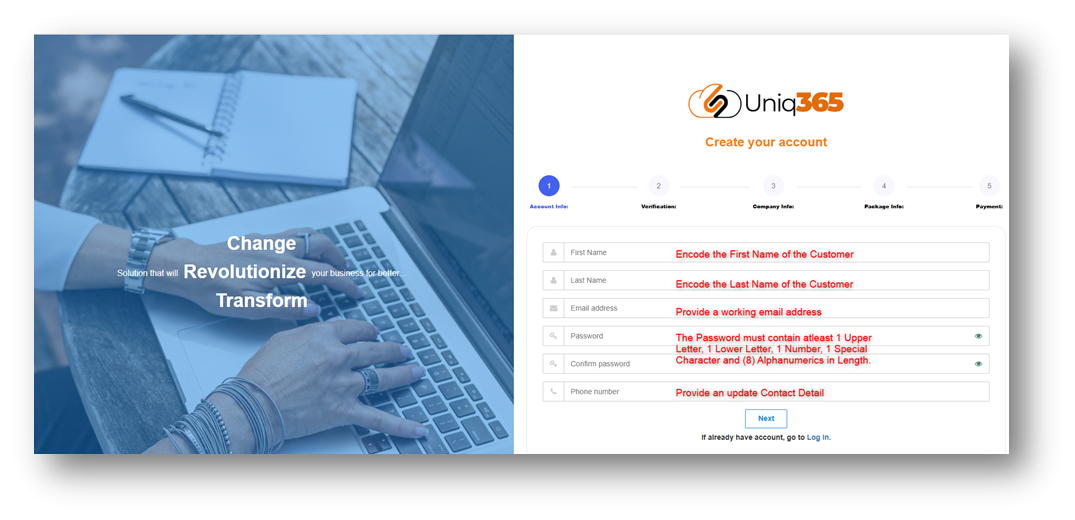
**a. STEP 1, provide the required field in the Account Info with the given information. Once, done Click the NEXT Button.**
- **First Name.** Fill in the First Name
- **Last Name.** Fill in the Last Name
- **Email address**. Supply the information with an active email address. Any form of email will do.
- **Password.** It must include at least 1 upper letter, 1 lower letter, and 1 number, 1 special character and 8 alphanumeric(s) in length.
- **Phone number**. Supply the information with an active and valid phone number
[](https://doc.uniq365.com/uploads/images/gallery/2025-03/7pBimage.png)
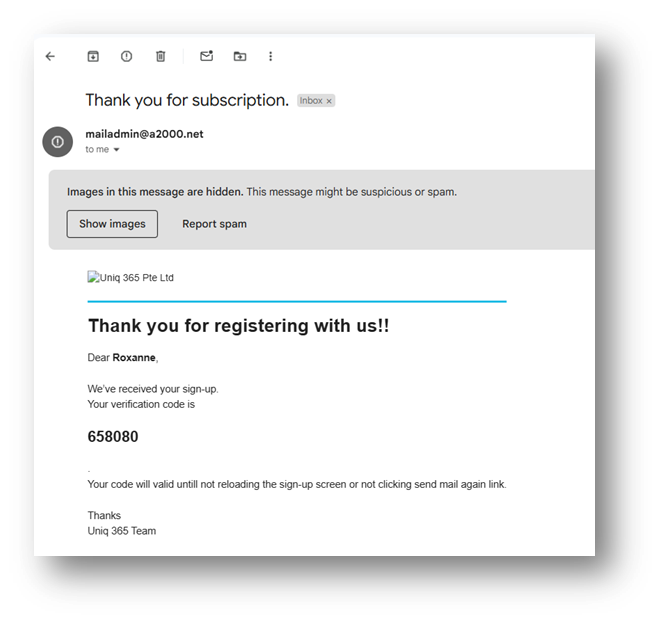
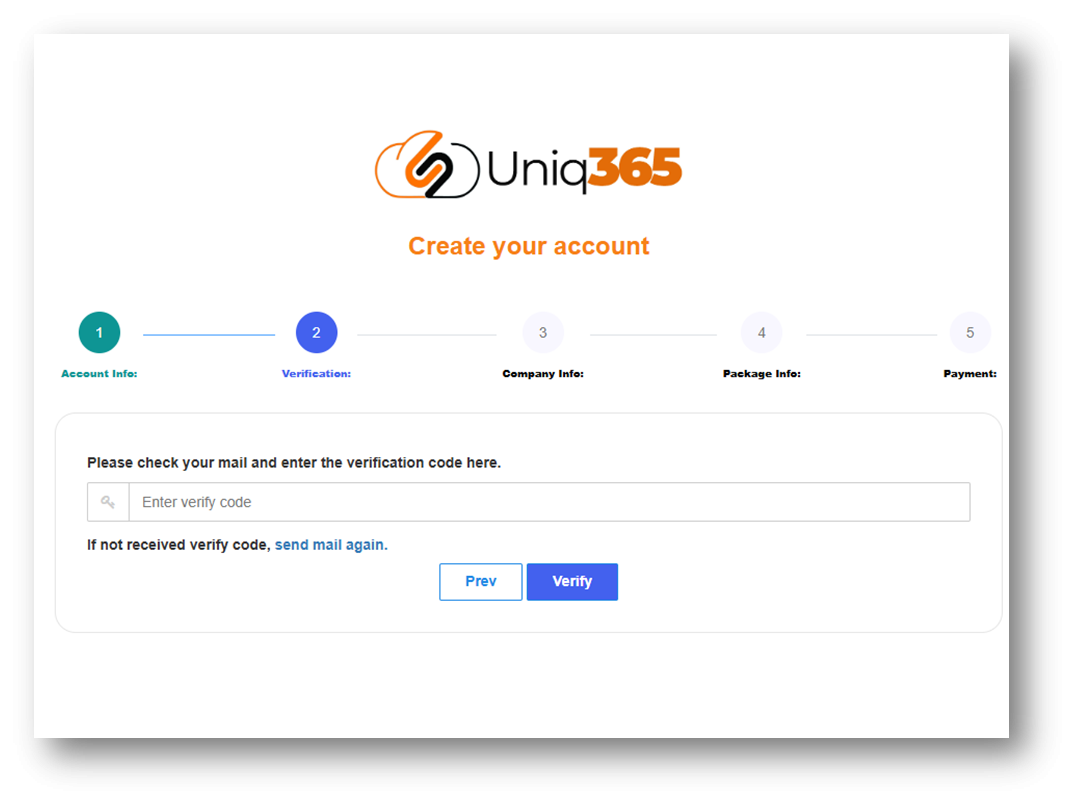
**b. STEP 2, Under the Verification step a verification code will be then emailed on the registered contact details.**
[](https://doc.uniq365.com/uploads/images/gallery/2025-03/tYUimage.png)
Encode the verification code that you will received on your provided email and click **VERIFY**.
[](https://doc.uniq365.com/uploads/images/gallery/2025-03/Vb8image.png)
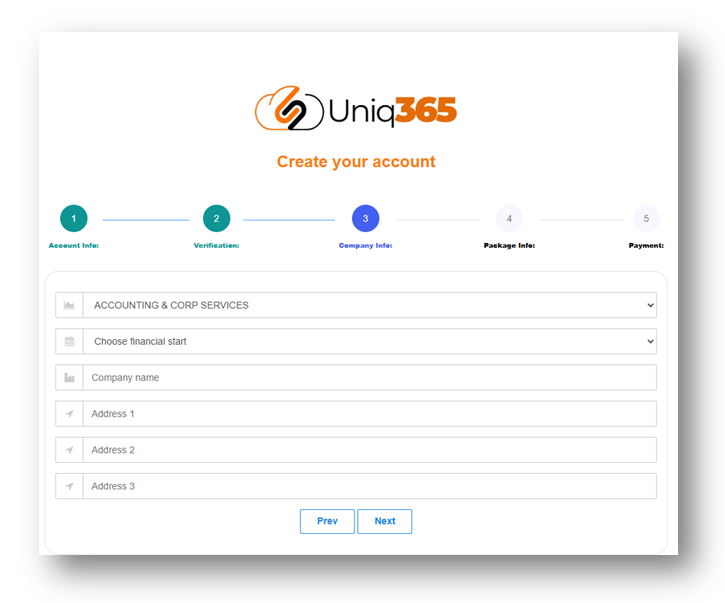
**c. STEP 3, Provide the Company Information Needed.**
- **Industry type.** Choose from the dropdown the industry that your company belongs to.
- **Financial Start.** Enter the start of your financial period.
- **Company Name.** Encode the name of your company.
- **Address.** Encode the complete address of your company.
Once all the required information are encoded click **NEXT** to proceed with the Next Step.
[](https://doc.uniq365.com/uploads/images/gallery/2025-03/Elgimage.png)
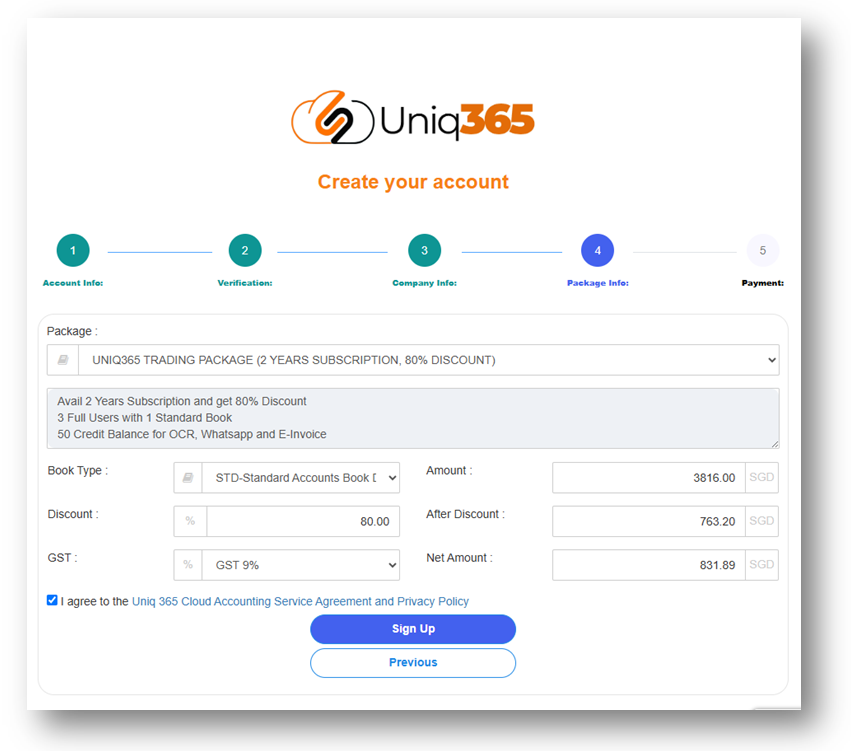
**d. STEP 4, Verify the Package Info for the summary.**
- **Subscription Package.** Select the subscription package you want to avail.
- **Subscription Package Details.** Once the subscription package is selected, details regarding how many users, years of subscription and other inclusion of the package will appear.
- **Amounts and discount.** The amount that will be paid as well as the discount availed will be shown.
[](https://doc.uniq365.com/uploads/images/gallery/2025-03/yAZimage.png)
After verifying all the information, **TICK** the Uniq365 ERP Service Agreement and Privacy Policy.
If you agree to the policy, please tick the box so you can proceed to sign up.
Before you clicked, **Sign Up**, please makes sure that all your details from 1-4 are correct because once you clicked you can never go back with the previous as it will re-direct you to the next phase which is Payment Confirmation.
**e. STEP 5, Encode the Payment Information as required.**
Currently the payment Option that is available in UNIQ365 is Credit Card and PayNow.
[](https://doc.uniq365.com/uploads/images/gallery/2025-03/FlGimage.png)
PARTNERS SUBSCRIPTION PORTAL
##### **Uniq365 Partner's Subscription Portal** is a dedicated online platform designed for partners to manage their customer's subscription-related activities. This portal typically provides a range of features that allow partners to interact with the services or products they are subscribed to, track usage, and perform administrative tasks.
**The link can be access provided below.**
[https://member.uniq365.com/Membership/MemberShipIndirectUsers/Login](https://member.uniq365.com/Membership/MemberShipIndirectUsers/Login)
\_\_\_\_\_\_\_\_\_\_\_\_\_\_\_\_\_\_\_\_\_\_\_\_\_\_\_\_\_\_\_\_\_\_\_\_\_\_\_\_\_\_\_\_\_\_\_\_\_\_\_\_\_\_\_\_\_\_\_\_\_\_\_\_\_\_\_\_\_\_\_\_\_\_\_\_\_\_\_\_\_\_\_\_\_\_\_\_\_\_\_\_\_\_\_\_\_\_\_\_\_\_\_\_\_\_\_\_\_\_\_\_\_\_\_\_\_\_\_\_\_\_\_\_\_\_\_\_\_\_\_\_\_\_\_\_\_\_
**a. Login in the PARTNER SUBSCRIPTION PORTAL using the provided** link: [https://member.uniq365.com/Membership/MemberShipIndirectUsers/Login](https://member.uniq365.com/Membership/MemberShipIndirectUsers/Login)
Input the email address and Password accordingly.
[](https://doc.uniq365.com/uploads/images/gallery/2025-03/OVwimage.png)
**b. Under the Customers TAB Click the +ADD Button, then it will prompt the steps that you need to do in order to proceed with creating a customer.**
[](https://doc.uniq365.com/uploads/images/gallery/2025-03/saCimage.png)
**c. STEP 1, Encode the CUSTOMER DETAILS needed.**
**Fill in the following information required:**
- Usercode.
- Username.
- Email Address.
- Phone Number.
- Password.
- Confirm Password.
- Company Name.
- Company Address.
- Select Package.
Once all these following information are filled after selecting package it will direct you to **STEP 5 for Payment.**
**STEPS 2-4** will be following the default for the package that has been selected in the first step. If you want to review the following inclusions of the package you may revisit Steps 2-4.
[](https://doc.uniq365.com/uploads/images/gallery/2025-03/AJ3image.png)
**d. STEP 2, USER DETAILS**
[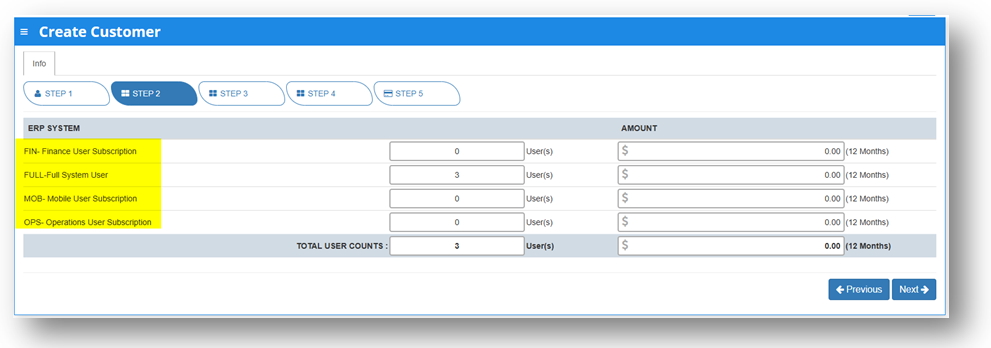](https://doc.uniq365.com/uploads/images/gallery/2025-03/YBCimage.png)
In Step 2: User details, partners can modify the number of users for each type.
**TYPES OF USERS**
- **FINANCE USER**. User who are assigned this access can only access the finance tab, which comprises the General Ledger, Cash Book, Accounts Receivables and Accounts Payable module.
- **OPERATIONS USER**. User who are assigned this access can only access the operational tabs, which comprises the Sales, Procurement and Inventory module.
- **MOBILE USER**. User who are assigned this access can only access the system via a mobile device to run mobile sales and warehouse functions.
- **FULL USER.** User who are assigned this access can only access the all the tabs and modules which are accessible to FINANCE, OPERATIONS and MOBILE users
-
CAN I ADD/REDUCE NEW USERS AT ANYTIME?
Yes, you may add any number of new users in your Subscription Plan. Any users added half-way in the subscription period will be pro-rated to the duration left till the next expiry. For example, in 3 months into your subscription period you may add a new user. This new user will be billed for only 9 months till the end of the mother-contract
No, you may not reduce the number of users halfway through a subscription period. You must wait till the end of subscription period and then reduce according to your needs, only during renewal.
**e. STEP 3, Account Book Details, Extra Storage & Special Application(Customization) if ANY.**
Depending on the package they have selected, the details on the quantity of storage and account books will be displayed here.
In any event, they can access more storage if they've used up all of their subscription storage by modifying the desired add-ons for this steps.
[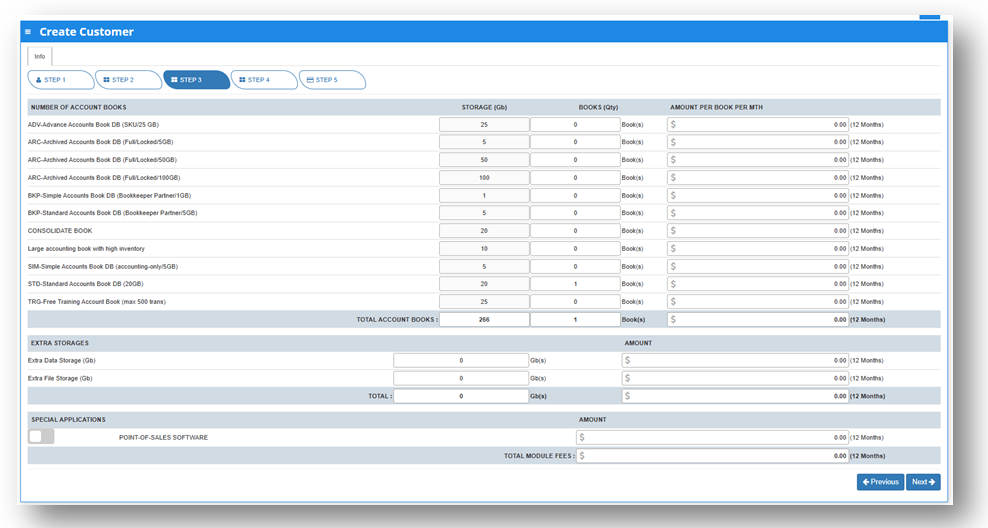](https://doc.uniq365.com/uploads/images/gallery/2025-03/RKyimage.png)
**f. STEP4,OCR, SMS, WHATSAPP AND E-INVOICE LIMIT.**
Any excess of usage in the package that the customer availed it will be subject to corresponding charges.
[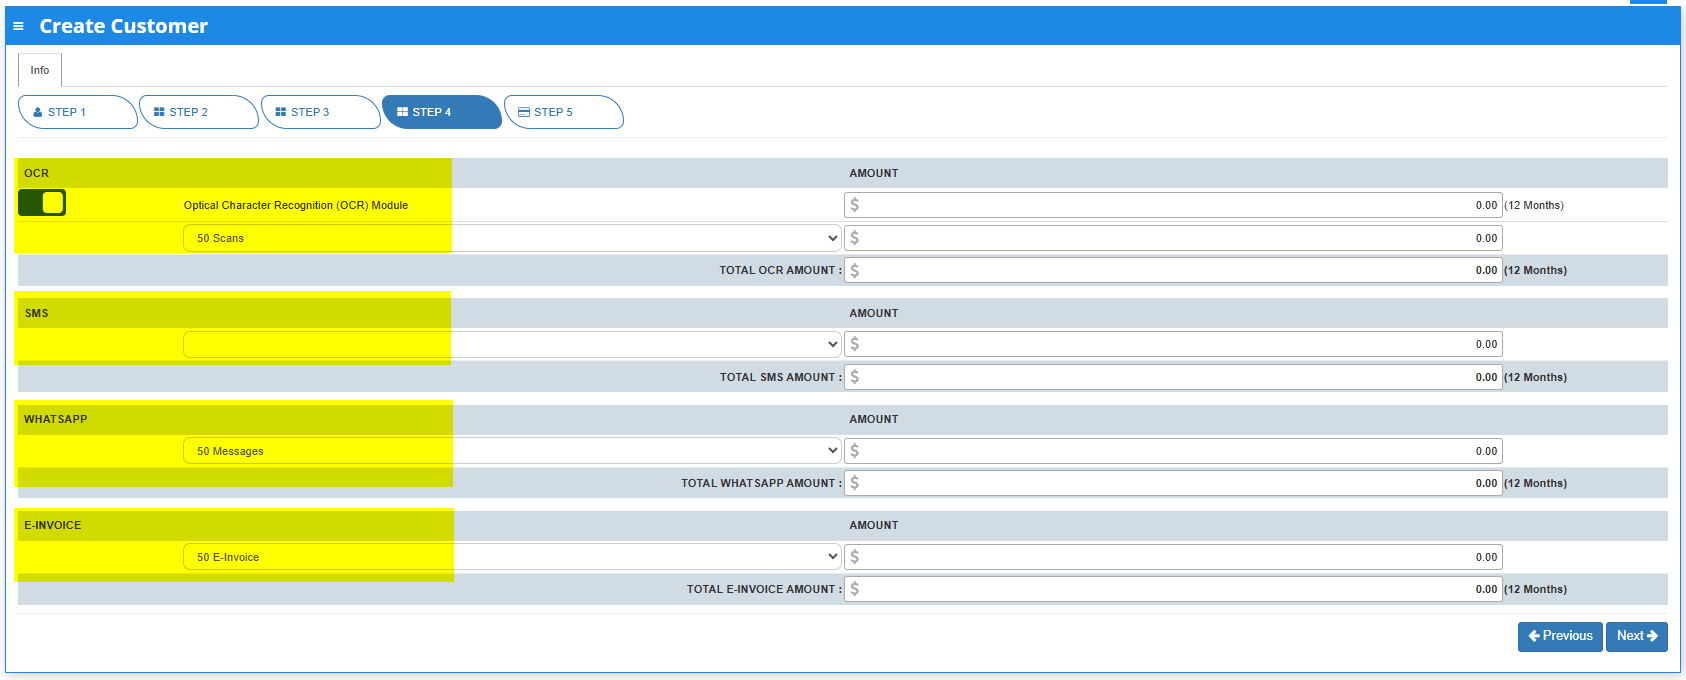](https://doc.uniq365.com/uploads/images/gallery/2025-03/saNimage.png)
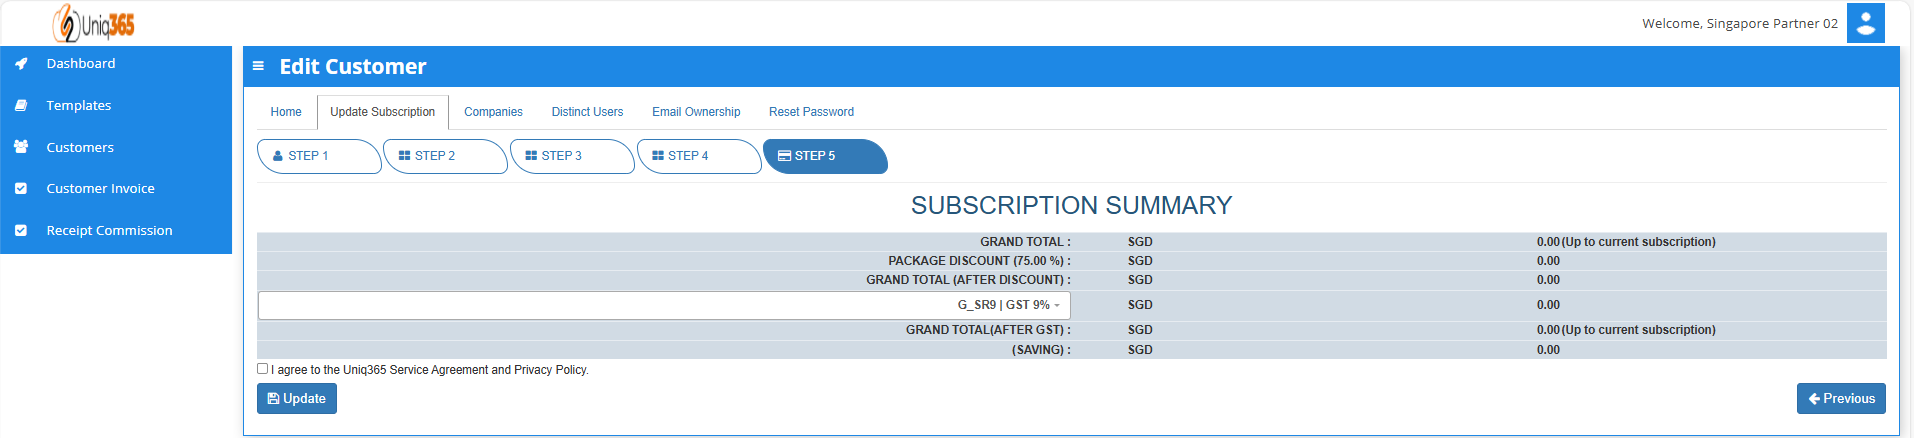
**g. STEP 5: SUBSCRIPTION SUMMARY**
- Select the payment type in the dropdown, options are either monthly or yearly.
- Tick the box to agree to the A2000ERP Service Agreement & Privacy Policy before saving.
[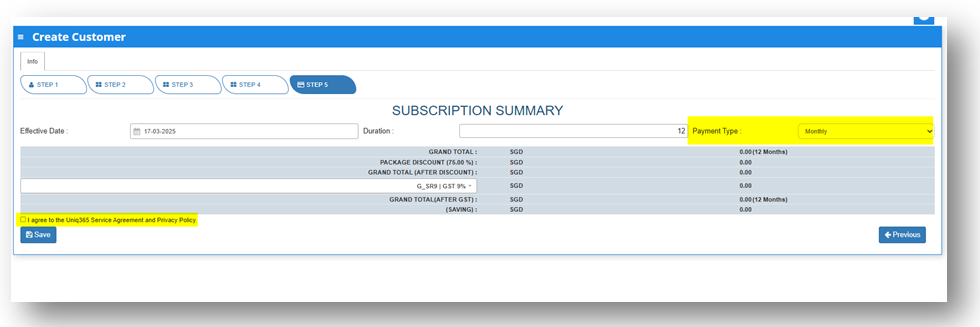](https://doc.uniq365.com/uploads/images/gallery/2025-03/HHkimage.png)
- After saving information, a pop-up message will appear so you can select the account book type and the industry type .
[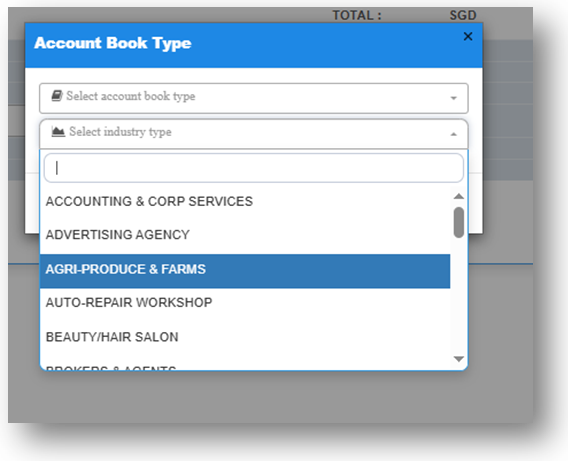](https://doc.uniq365.com/uploads/images/gallery/2025-03/iYjimage.png)
- Once hit save, a message will prompt indicating that system is currently generating account book. Please wait and do not do anything. If there is any interruption during the generation of account book, please reach out to us.
[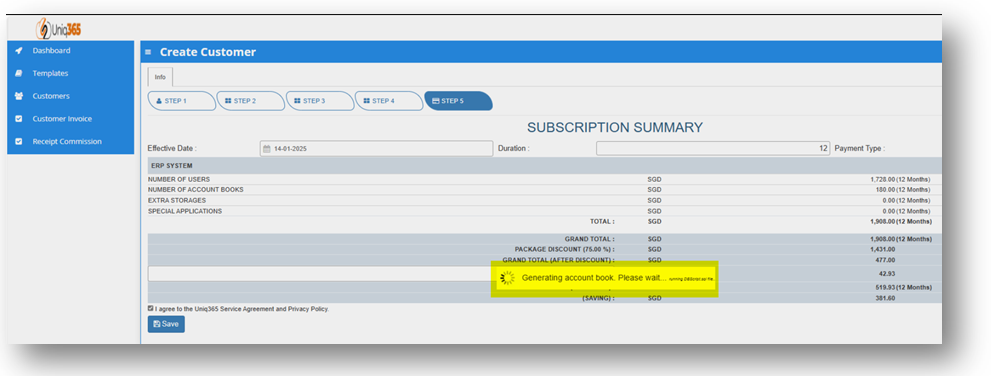](https://doc.uniq365.com/uploads/images/gallery/2025-03/IwPimage.png)
**h. To verify for the newly created Customer. Navigate on the Customer's list.**
[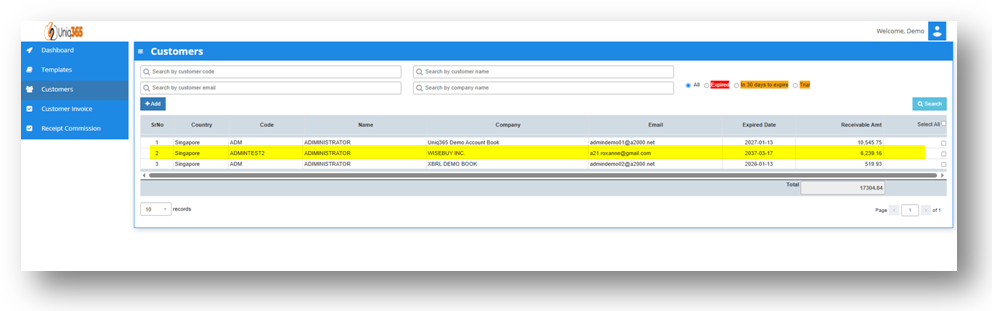](https://doc.uniq365.com/uploads/images/gallery/2025-03/PNVimage.png)
How To Clone an Existing Accountbook
##### This manual will going to teach you how to Clone an Accountbook.
\_\_\_\_\_\_\_\_\_\_\_\_\_\_\_\_\_\_\_\_\_\_\_\_\_\_\_\_\_\_\_\_\_\_\_\_\_\_\_\_\_\_\_\_\_\_\_\_\_\_\_\_\_\_\_\_\_\_\_\_\_\_\_\_\_\_\_\_\_\_\_\_\_\_\_\_\_\_\_\_\_\_\_\_\_\_\_\_\_\_\_\_\_\_\_\_\_\_\_\_\_\_\_\_\_\_\_\_\_\_\_\_\_\_\_\_\_\_\_\_\_\_\_\_\_\_\_\_\_\_\_\_\_\_\_\_\_\_\_
1\. Login in the Customer Subscription Portal using this provided link.
[https://member.uniq365.com/Membership/MemberShip/Login](https://member.uniq365.com/Membership/MemberShip/Login)
Encode the Email and Password Accordingly.
[](https://doc.uniq365.com/uploads/images/gallery/2025-03/Xabimage.png)
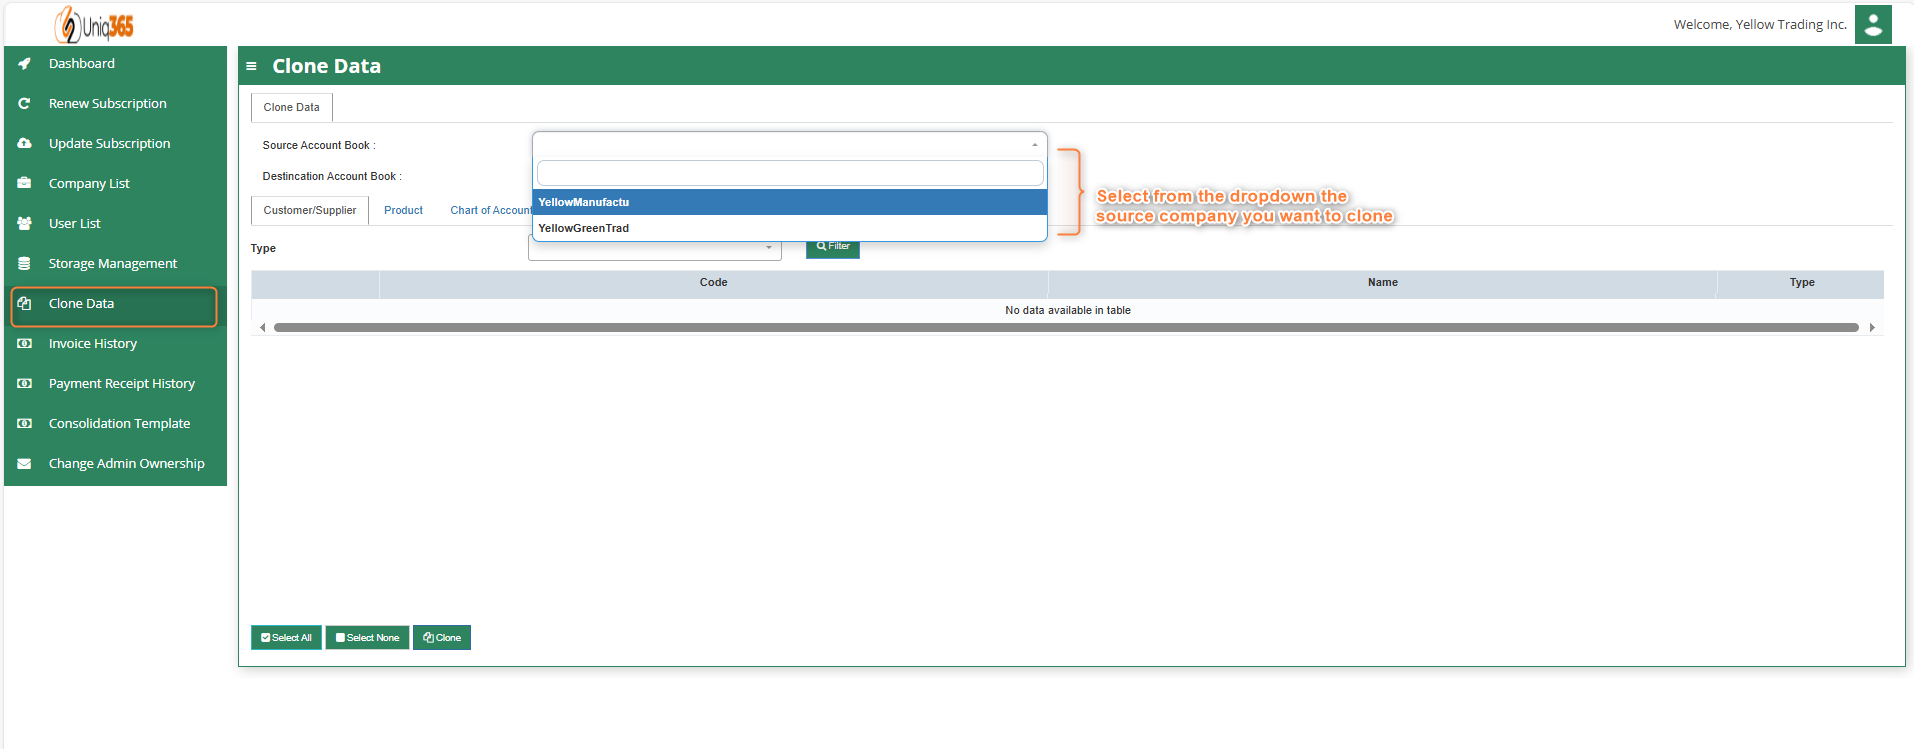
2\. Navigate to CLONE DATA and fill up the required fields.
Fill up the following fields:
- Source Accountbook - Pertaining to the Accountbook that you want to copy for the master files.
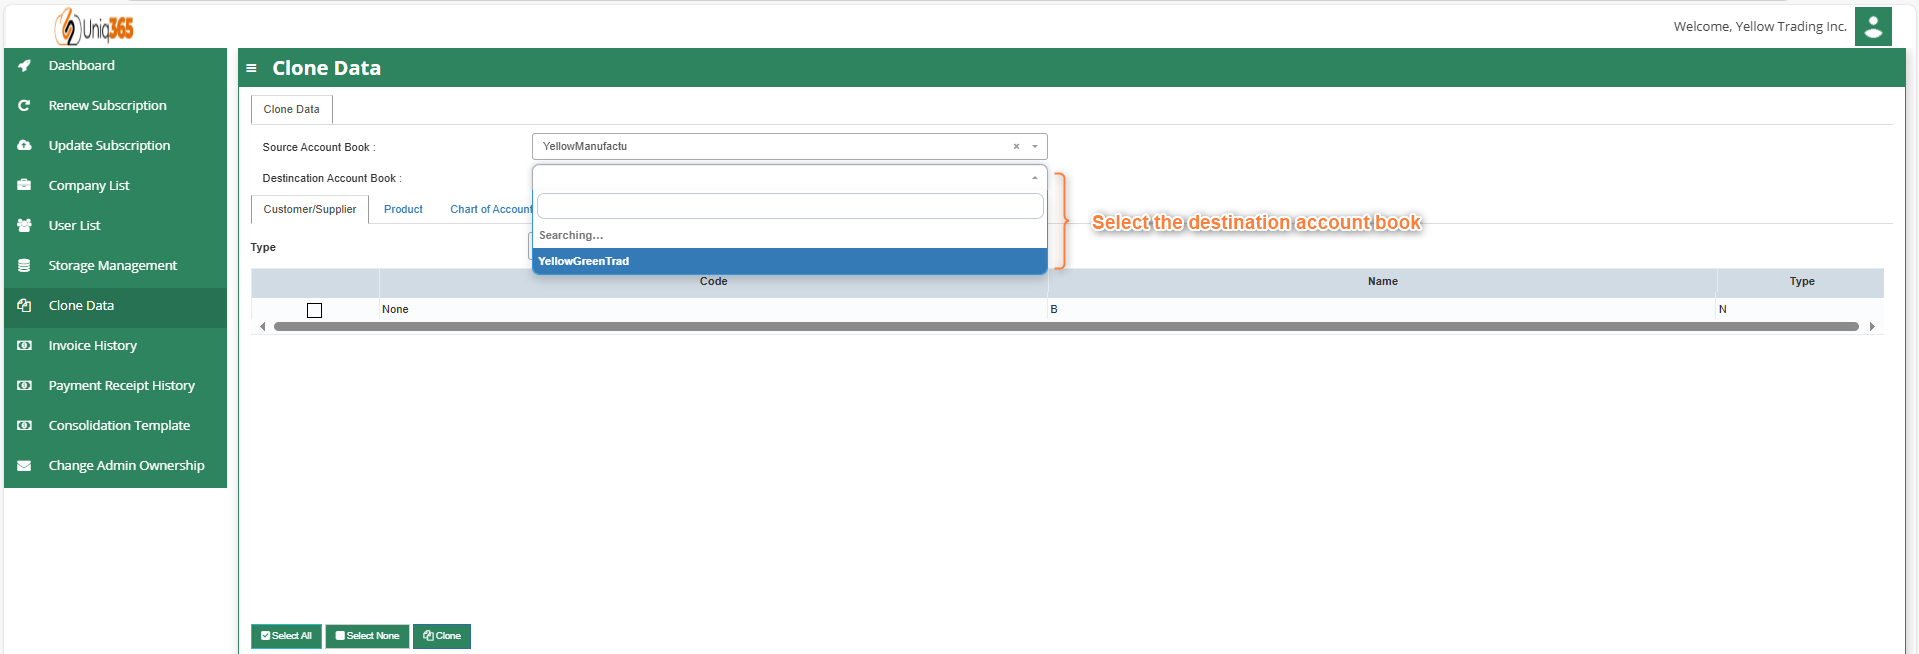
- Destination Accountbook - Pertaining to the Accountbook destination for cloning purposes.
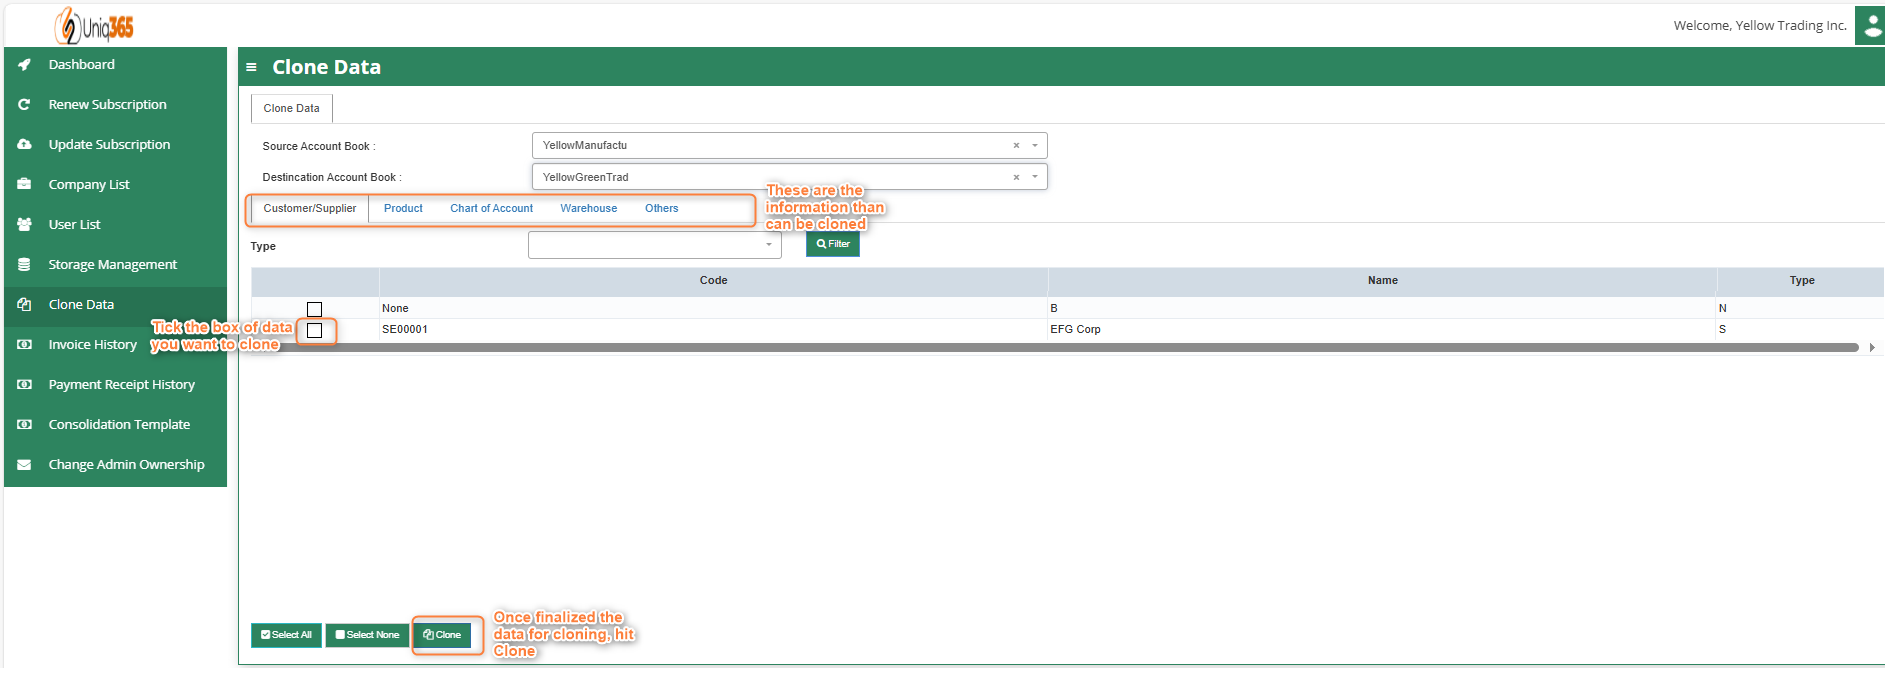
- Customer Supplier Configuration
Select the Customer/Supplier that you want to add on the new accountbook.
You can Select all or only select prefered customer/supplier.
- Product Configuration
Select Product that you want to add on the new Accountbook.
You can Select all or only select preferred Products.
- Chart of Accounts Configuration
Select specific COA that you want to add on the new Accountbook.
You can Select all or only select preferred COA.
Has the option to delete existing COA Accounts prior to cloning process.
- Warehouse Configuration
Select specific Warehouse that you want to add on the new Accountbook.
You can Select all or only select preferred Warehouse.
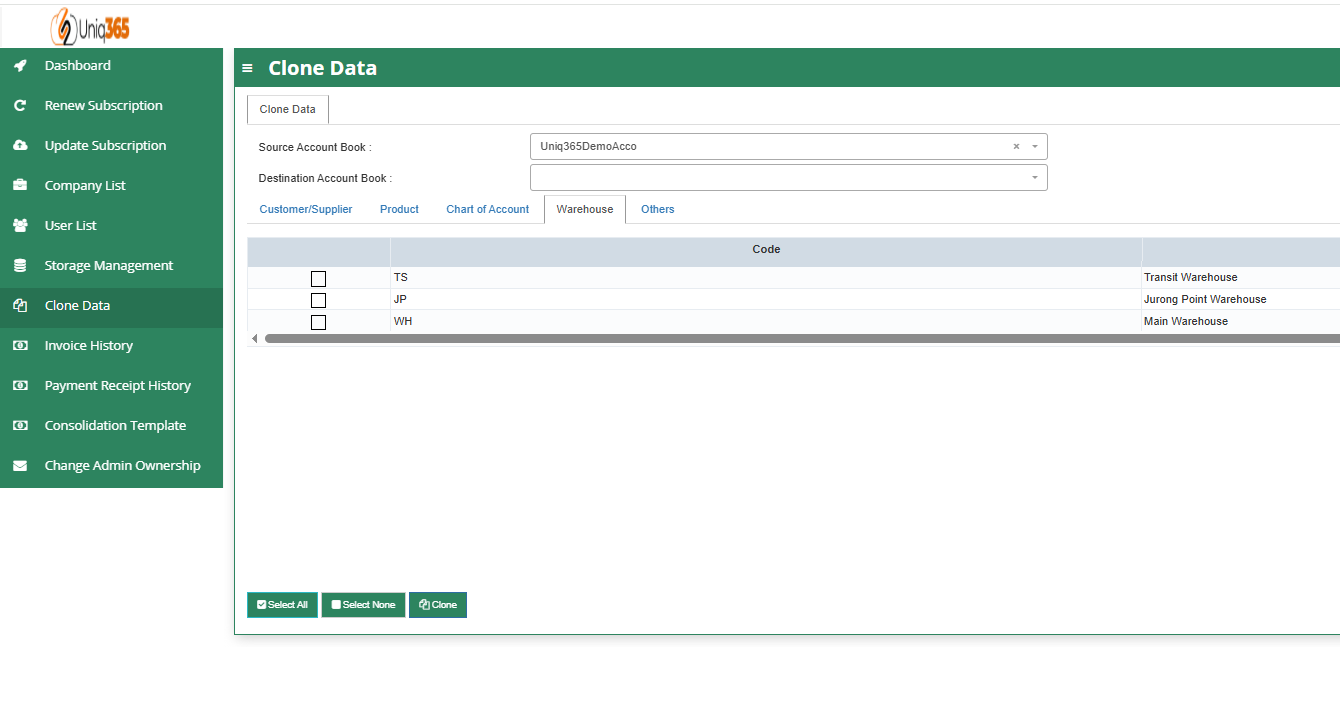
- Others Configuration
Select specific Master tables to be carry forward on the new clone Accountbook.

3\. Once all are properly configured CLICK the CLONE Button to proceed with the process. Once done check the Company Listing if the new cloned Accountbook is created.
How to Add a New Accountbook in the Customer Subscription Portal
##### This manual will going to teach you how to create a new additional Accountbook in the Customer Portal.
\_\_\_\_\_\_\_\_\_\_\_\_\_\_\_\_\_\_\_\_\_\_\_\_\_\_\_\_\_\_\_\_\_\_\_\_\_\_\_\_\_\_\_\_\_\_\_\_\_\_\_\_\_\_\_\_\_\_\_\_\_\_\_\_\_\_\_\_\_\_\_\_\_\_\_\_\_\_\_\_\_\_\_\_\_\_\_\_\_\_\_\_\_\_\_\_\_\_\_\_\_\_\_\_\_\_\_\_\_\_\_\_\_\_\_\_\_\_\_\_\_\_\_\_\_\_\_\_\_\_\_\_\_\_\_\_\_\_\_
1. Login in the Customer Subscription Portal using this provided link.
[https://member.uniq365.com/Membership/MemberShip/Login](https://member.uniq365.com/Membership/MemberShip/Login)
Encode the Email and Password Accordingly.
[](https://doc.uniq365.com/uploads/images/gallery/2025-03/Xabimage.png)
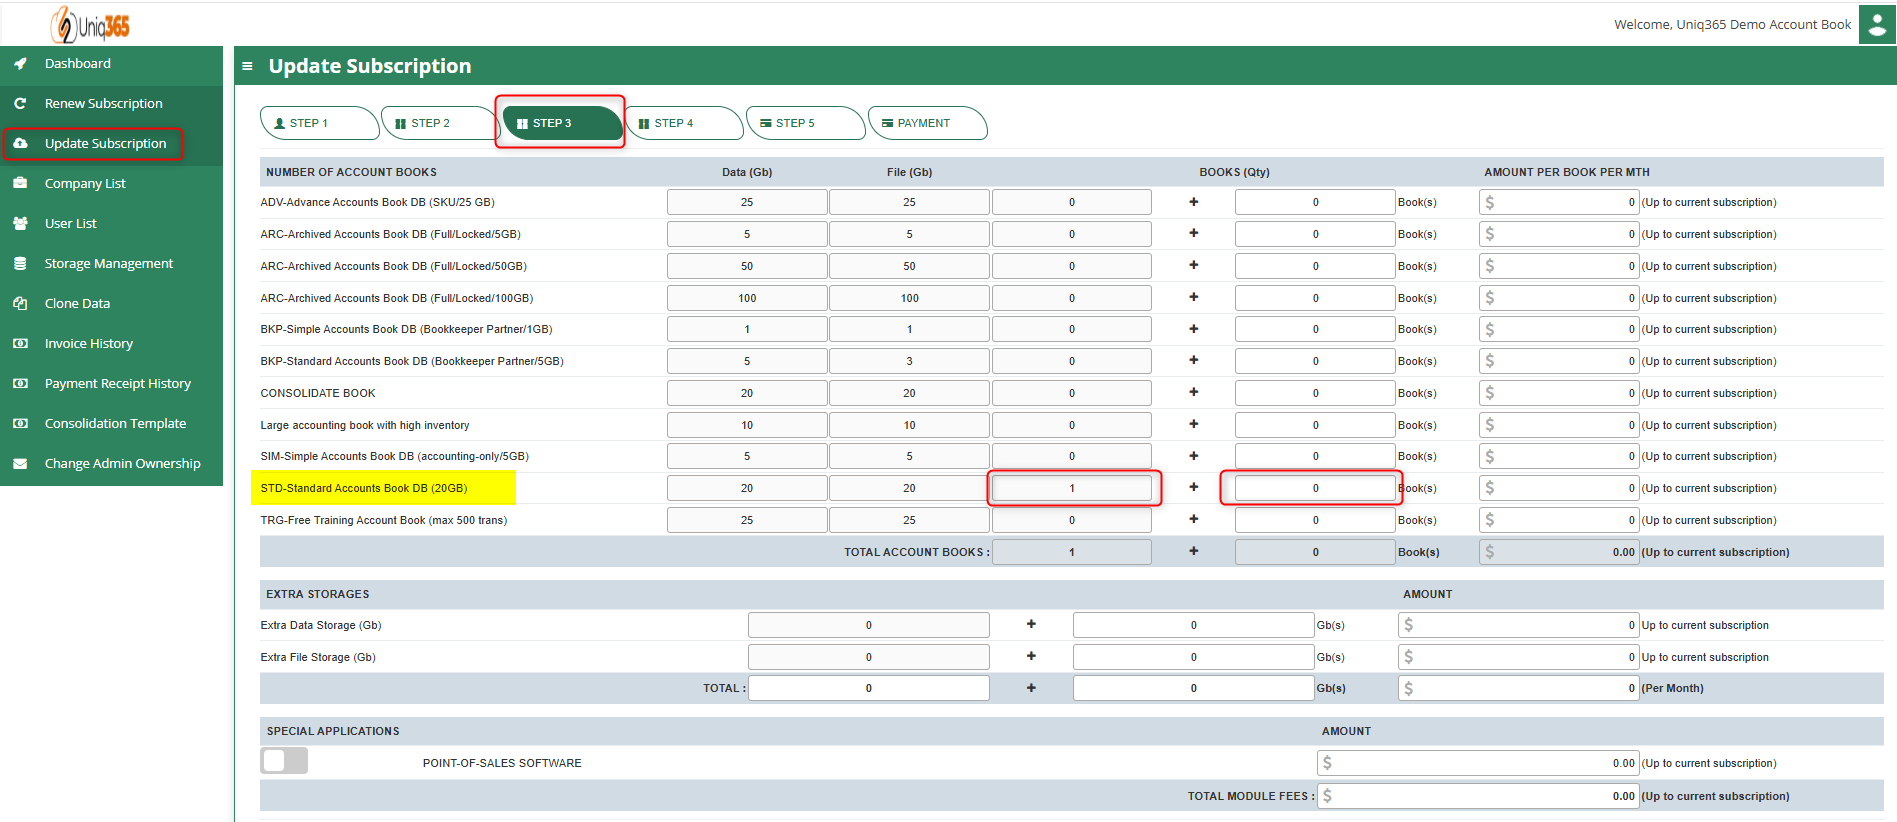
2. Before Accountbook Creation, check first the Allowable Accountbook for Creation.
You can navigate in **UPDATE SUBSCRIPTION -> STEP 3 -> Look for the value STD-Standard Accounts Book DB (20GB)** and update accordingly.
You only have to configure this if you have no available balance for accountbook in the Customer Subscription Portal. Continue to STEP 4, STEP 5 and Payment to update successfully.
3. Once you've already added new Accountbook on the Subscription, You can now Add the new book.
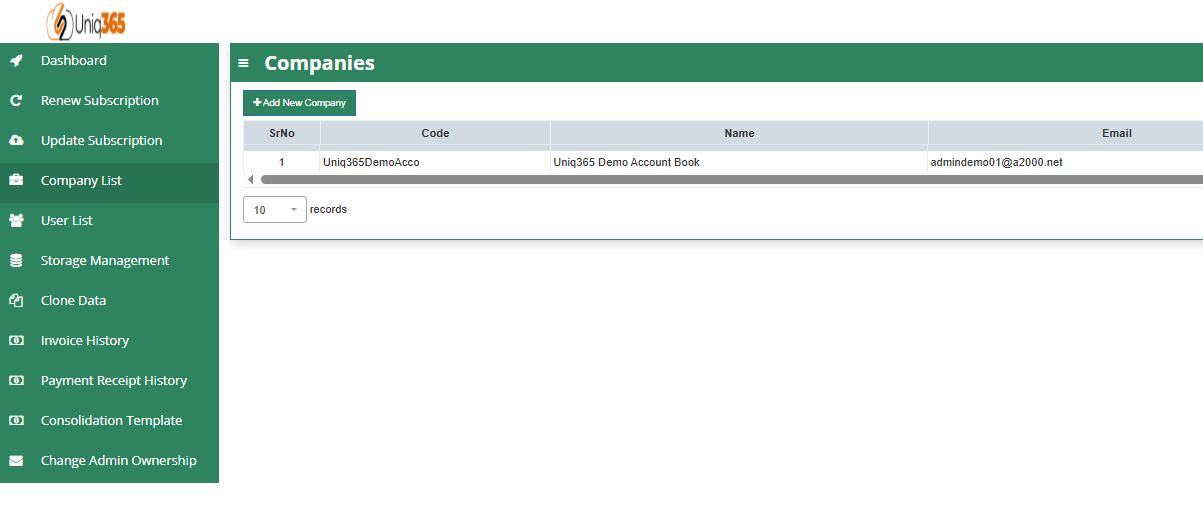
Navigate to **Company List -> Click +Add New Company**

Encode the Required Information on the new Accountbook. Once Done, Click the SAVE Button.
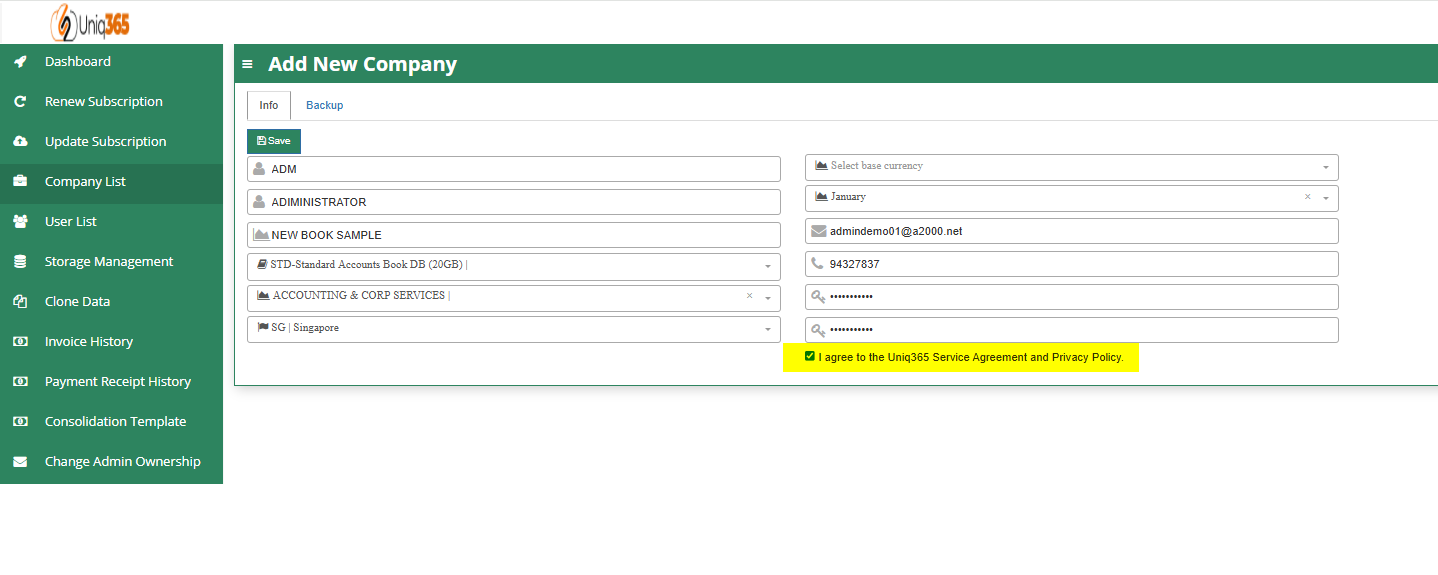
4. Go back to the Company List to verify the newly created Accountbook.
CAN I ADD/REDUCE NEW USERS AT ANYTIME?
Yes, you may add any number of new users in your Subscription Plan. Any users added half-way in the subscription period will be pro-rated to the duration left till the next expiry. For example, in 3 months into your subscription period you may add a new user. This new user will be billed for only 9 months till the end of the mother-contract
No, you may not reduce the number of users halfway through a subscription period. You must wait till the end of subscription period and then reduce according to your needs, only during renewal.
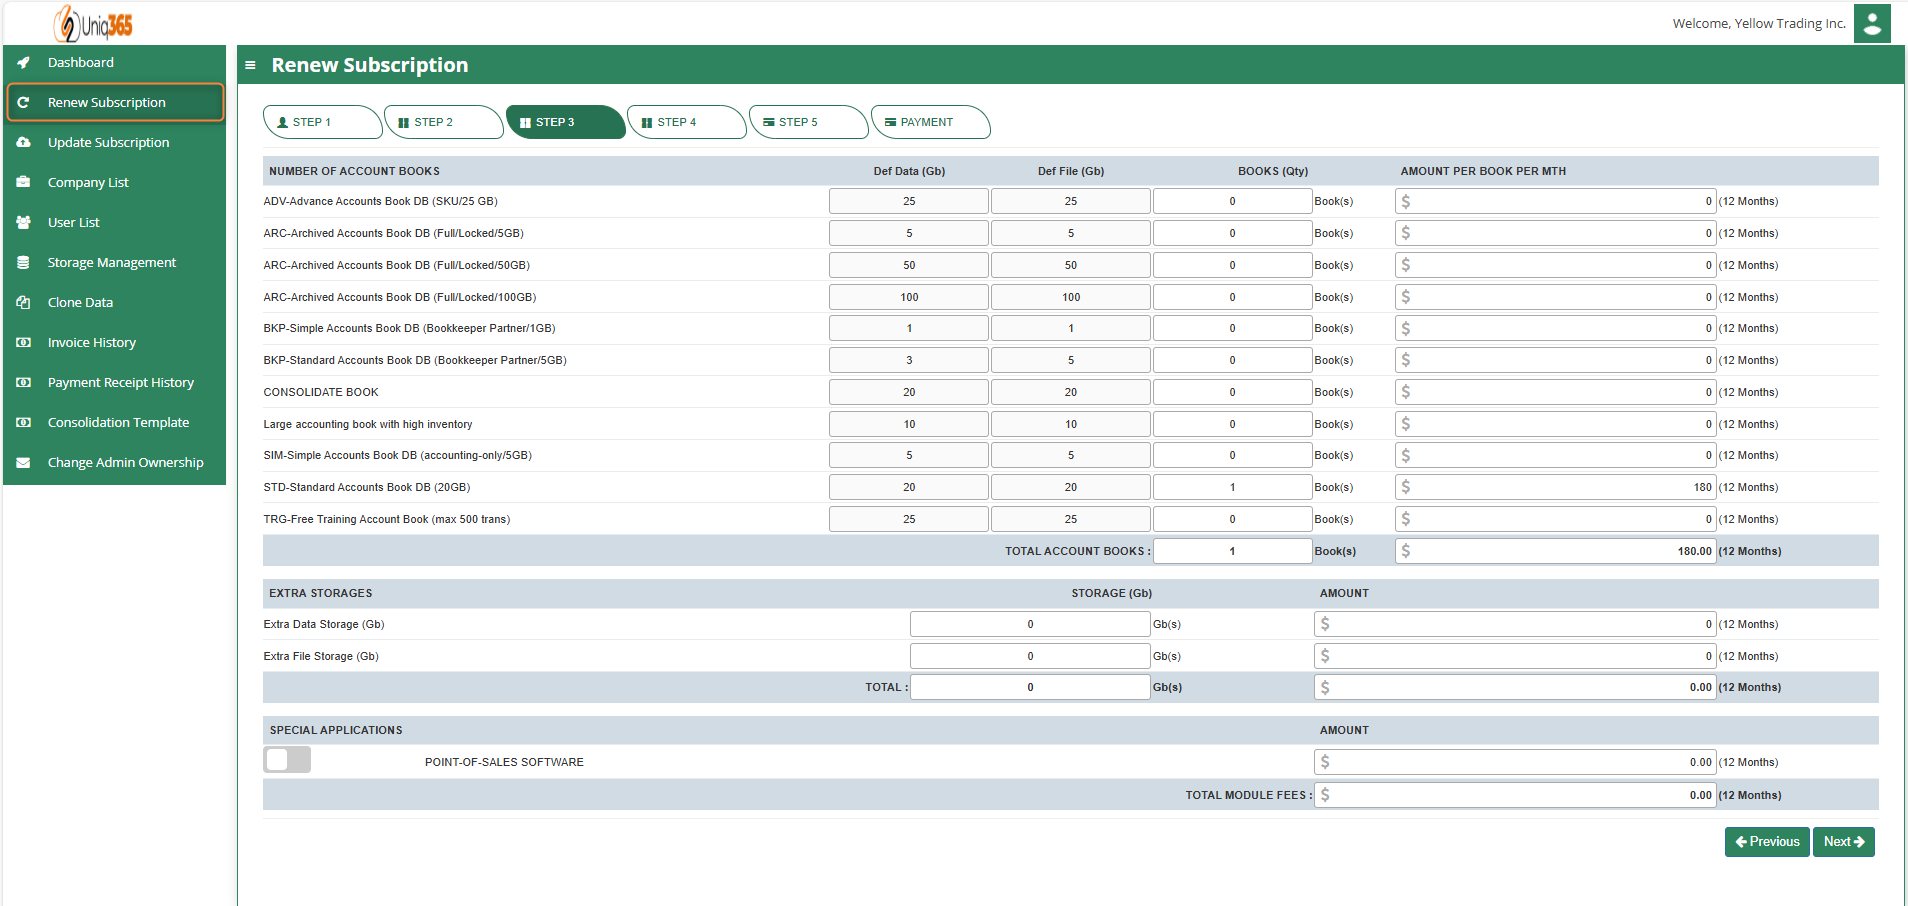
**3. STEP 3, ACCOUNTBOOK DETAILS, EXTRA STORAGE & SPECIAL APPLICATION(CUSTOMIZATION)**
Depending on the package they have selected, the details on the quantity of storage and account books will be displayed here.
In any event, they can access more storage if they've used up all of their subscription storage by modifying the desired add-ons for this steps.
[](https://doc.uniq365.com/uploads/images/gallery/2025-03/RKyimage.png)
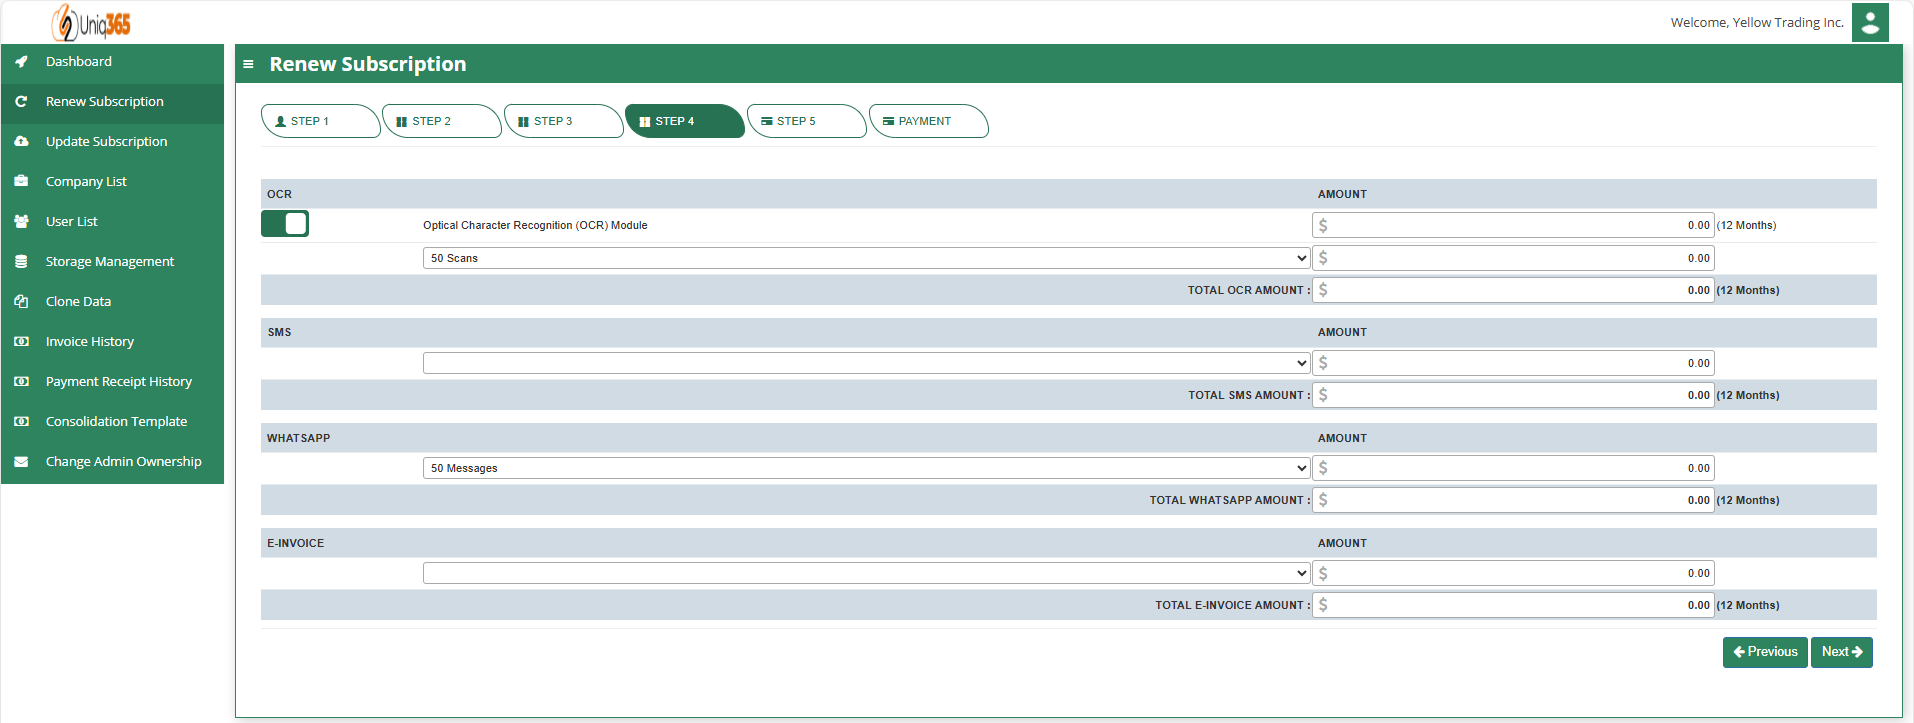
**4. STEP 4,OCR, SMS, WHATSAPP AND E-INVOICE LIMIT**
Any excess of usage in the package that the customer availed it will be subject to corresponding charges.
[](https://doc.uniq365.com/uploads/images/gallery/2025-03/saNimage.png)
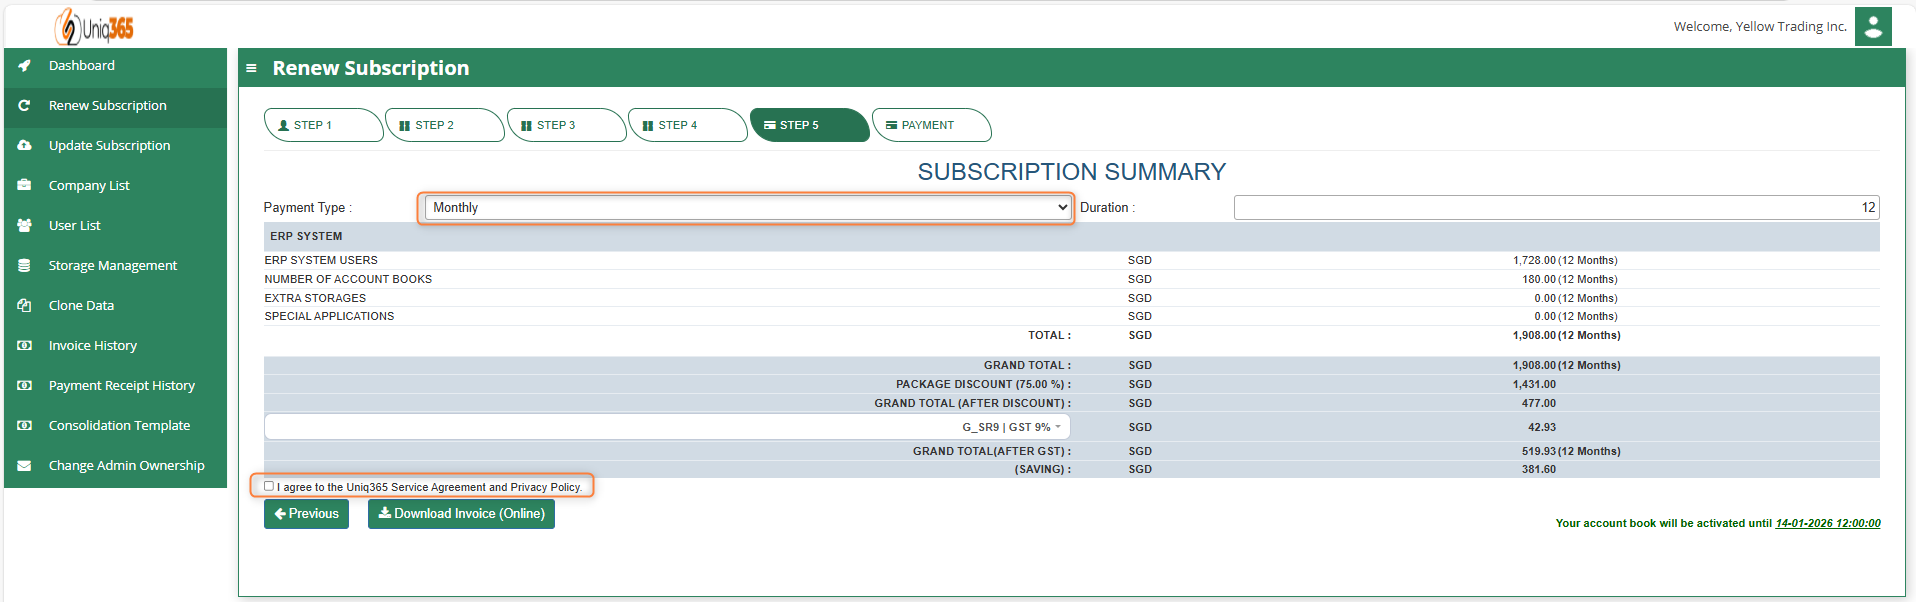
**5. Step 5, SUBSCRIPTION SUMMARY** The Subscription Summary will give you an overview of the Summary Payment from Total Number of Users, Total Number of Accountbook, Total Storages and Summary of Special Applications including OCR.
- Payment Type will be classified by Monthly and Yearly as an Option which includes identification of Duration.
- Once all are in place and countercheck, the user needs to agree with the **Uniq365** **Service Agreement & Privacy Policy** before renewing.
- An indication of the validity timeline of the renewal is also indicated on the below right most part of the user interface.
[](https://doc.uniq365.com/uploads/images/gallery/2025-03/zLaimage.png)
6\. STEP 6, PAYMENT
Renewal Payment Option via CREDIT CARD or PAYNOW.
# Customer Portal - Update Subscription
#### Update Subscription is where the UNIQ365 Customers can process any amendments of their current/existing subscription. They have the option to update their desired number of User Types and classification, No of Books to Configure and enable other custom functionality.
\_\_\_\_\_\_\_\_\_\_\_\_\_\_\_\_\_\_\_\_\_\_\_\_\_\_\_\_\_\_\_\_\_\_\_\_\_\_\_\_\_\_\_\_\_\_\_\_\_\_\_\_\_\_\_\_\_\_\_\_\_\_\_\_\_\_\_\_\_\_\_\_\_\_\_\_\_\_\_\_\_\_\_\_\_\_\_\_\_\_\_\_\_\_\_\_\_\_\_\_\_\_\_\_\_\_\_\_\_\_\_\_\_\_\_\_\_\_\_\_\_\_\_\_\_\_\_\_\_\_\_\_\_\_\_\_\_\_\_\_\_\_\_\_
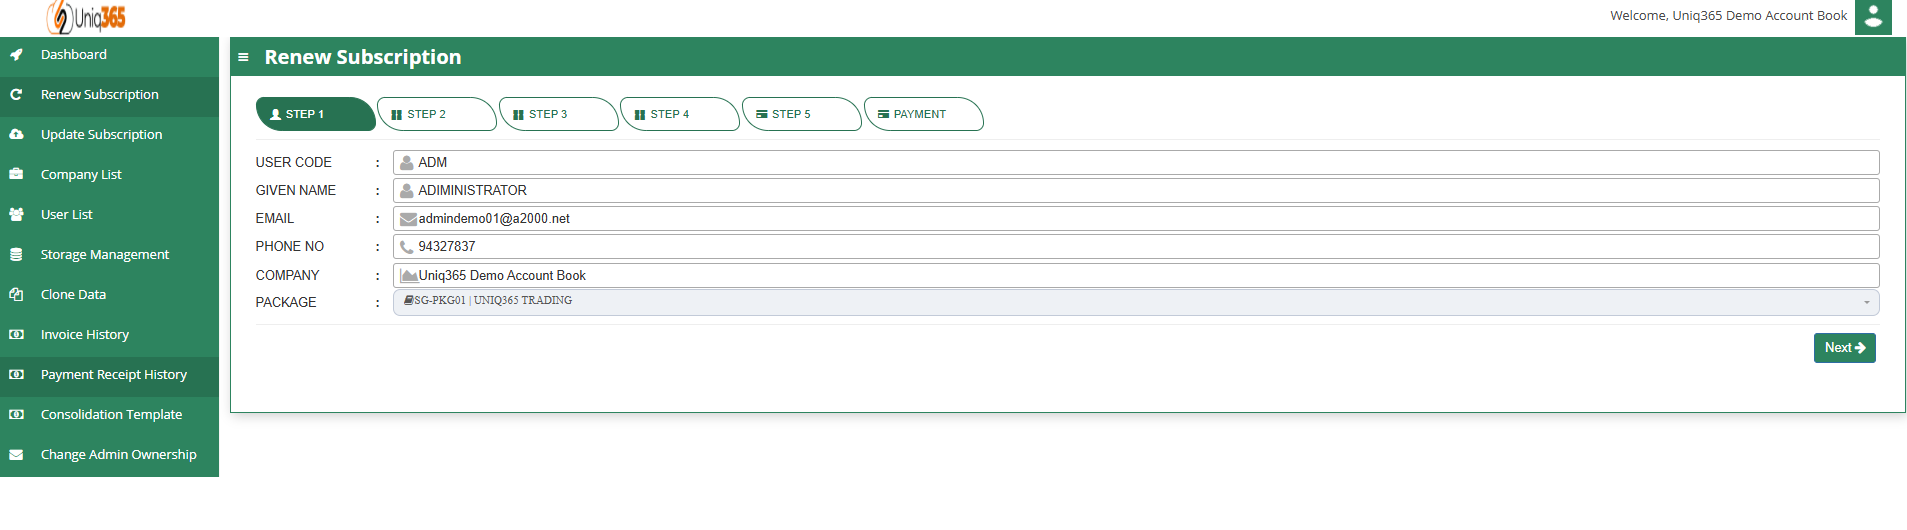
**1. STEP 1, CUSTOMER DETAILS** It shows the primary Customer Details such as User Code, Given Name, Email, Phone No, Company and Package Selection.
[](https://doc.uniq365.com/uploads/images/gallery/2025-03/evBimage.png)
**2. STEP 2, USER TYPE DETAILS** In this step you can revise the number of users (Add/Reduce) If you are reducing the number of users, please deactivate the users from the respective account book(s) first. You cannot reduce the subscription users below the number of distinct users in all your account books.
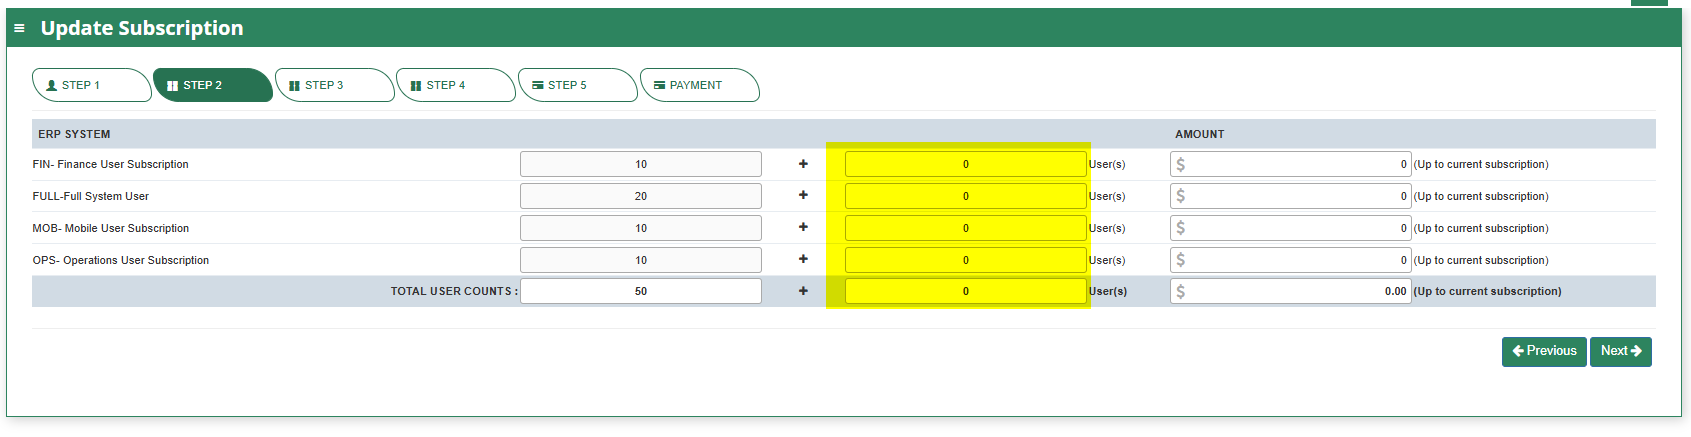
**TYPES OF USERS**
- **FINANCE USER**. User who are assigned this access can only access the finance tab, which comprises the General Ledger, Cash Book, Accounts Receivables and Accounts Payable module.
- **OPERATIONS USER**. User who are assigned this access can only access the operational tabs, which comprises the Sales, Procurement and Inventory module.
- **MOBILE USER**. User who are assigned this access can only access the system via a mobile device to run mobile sales and warehouse functions.
- **FULL USER.** User who are assigned this access can only access the all the tabs and modules which are accessible to FINANCE, OPERATIONS and MOBILE users
-
CAN I ADD/REDUCE NEW USERS AT ANYTIME?
Yes, you may add any number of new users in your Subscription Plan. Any users added half-way in the subscription period will be pro-rated to the duration left till the next expiry. For example, in 3 months into your subscription period you may add a new user. This new user will be billed for only 9 months till the end of the mother-contract
No, you may not reduce the number of users halfway through a subscription period. You must wait till the end of subscription period and then reduce according to your needs, only during renewal.
**3. STEP 3, ACCOUNTBOOK DETAILS, EXTRA STORAGE & SPECIAL APPLICATION(CUSTOMIZATION)**
Depending on the package they have selected, the details on the quantity of storage and account books will be displayed here.
In any event, they can access more storage if they've used up all of their subscription storage by modifying the desired add-ons for this steps.
[ 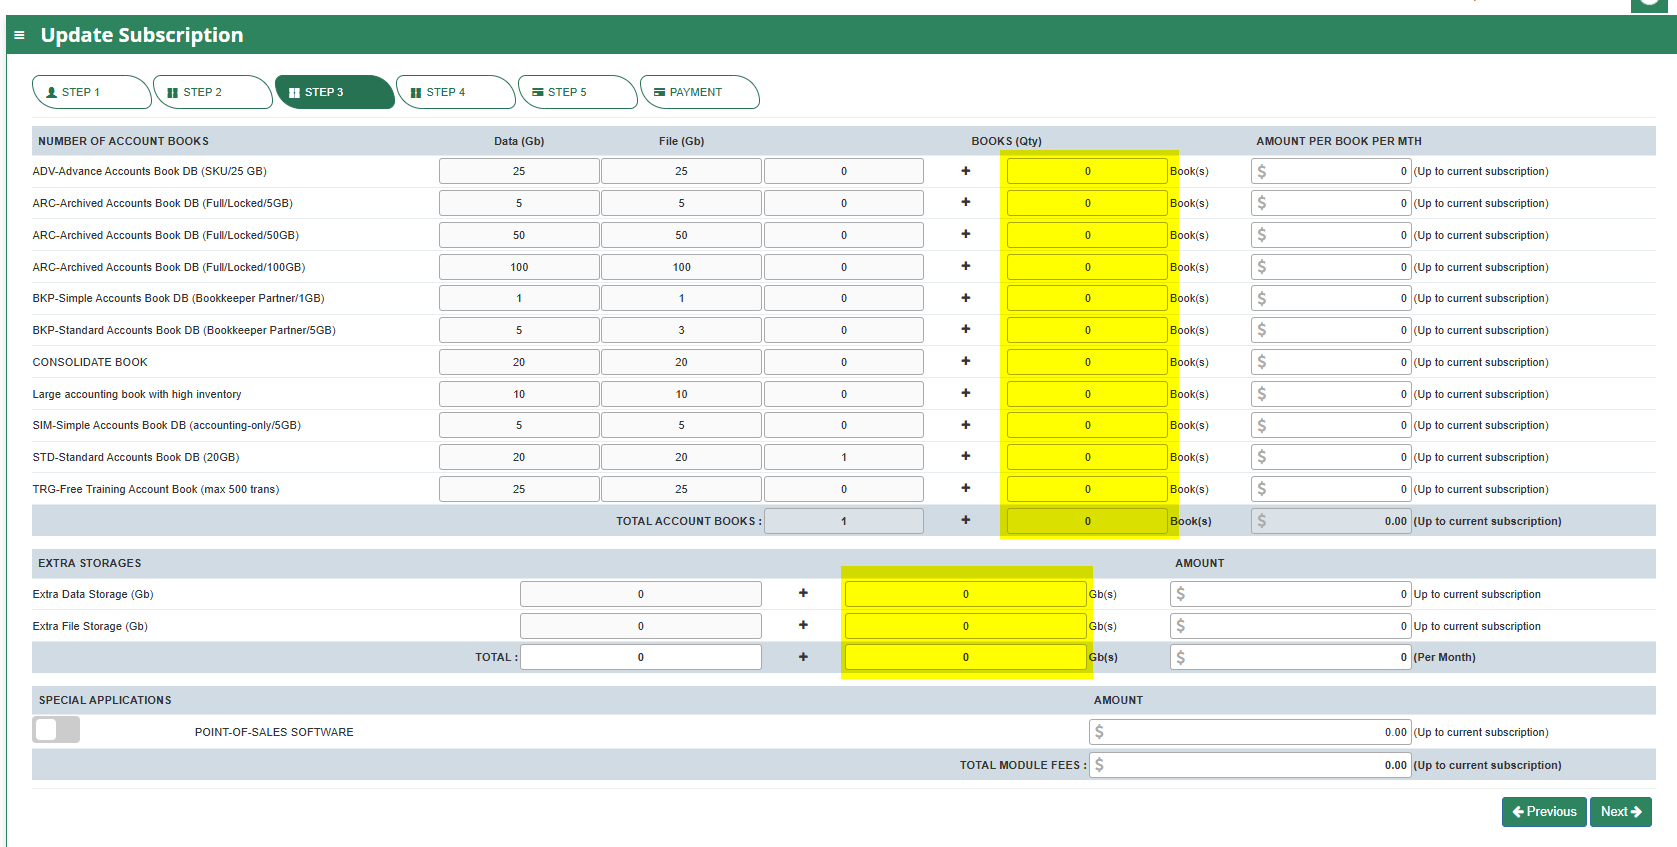](https://doc.uniq365.com/uploads/images/gallery/2025-03/7S6image.png)
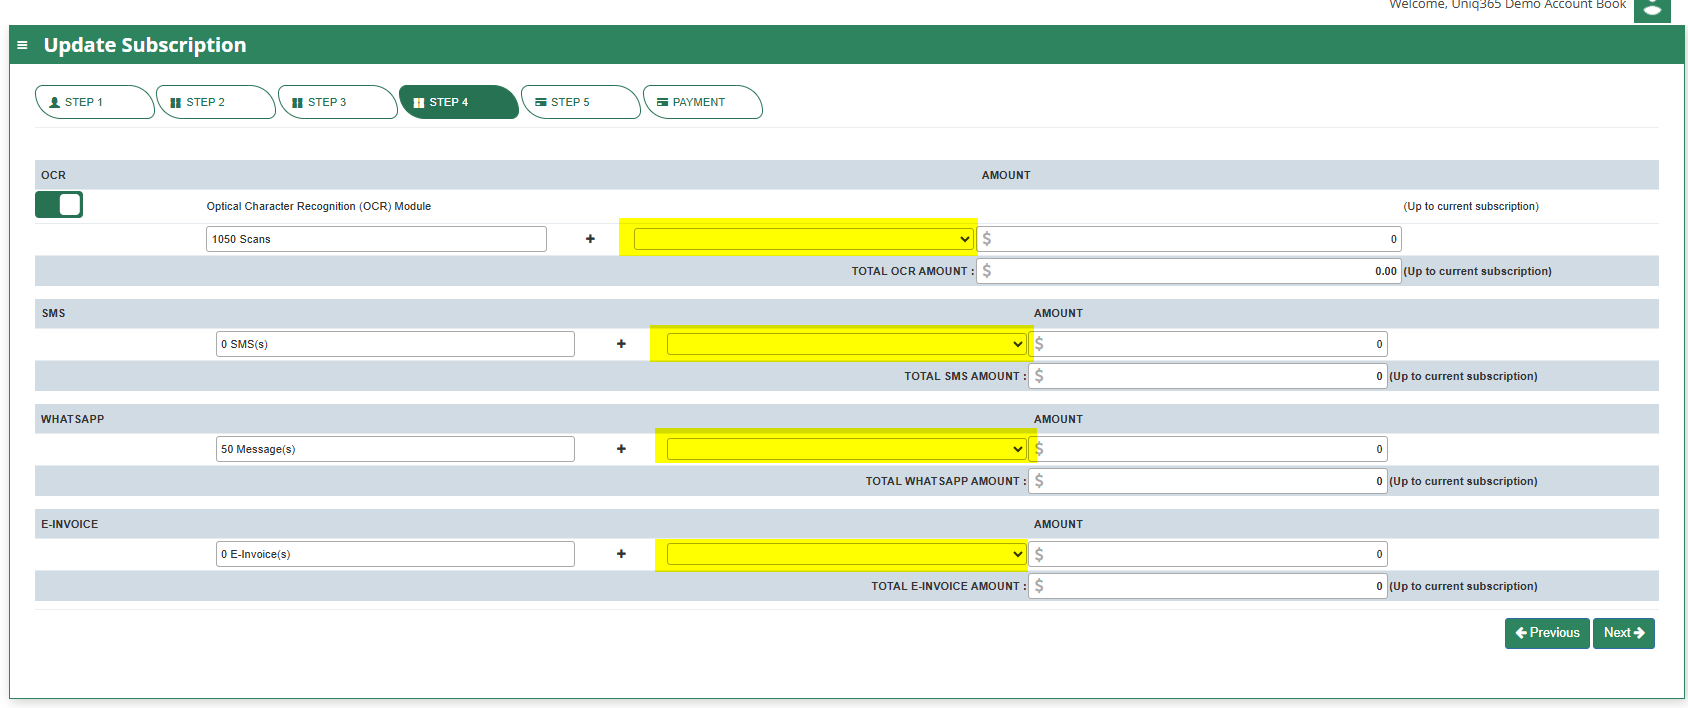
**4. STEP 4,OCR, SMS, WHATSAPP AND E-INVOICE LIMIT**
Any excess of usage in the package that the customer availed it will be subject to corresponding charges.
**5. Step 5, SUBSCRIPTION SUMMARY** The Subscription Summary will give you an overview of the Summary Payment from Total Number of Users, Total Number of Accountbook, Total Storages and Summary of Special Applications including OCR.
- Payment Type will be classified by Monthly and Yearly as an Option which includes identification of Duration.
- Once all are in place and countercheck, the user needs to agree with the **Uniq365 Service Agreement & Privacy Policy** before renewing.
- An indication of the validity timeline of the renewal is also indicated on the below right most part of the user interface.
[](https://doc.uniq365.com/uploads/images/gallery/2025-03/zLaimage.png)
6\. STEP 6, PAYMENT
Renewal Payment Option via CREDIT CARD or PAYNOW.
# Access Uniq365
# Overview
# Login to Uniq365
# Switching Books
# Mobile App Access
# Change Password
# Member & Subscription
# Overview
# Subscription Plans & Prices
Account Book Subscriptions
User Subscription
Text here
Special Applications
Subscription Renewal
Upgrade & Plan Add-on
Payment History
User Management
DASHBOARD
**[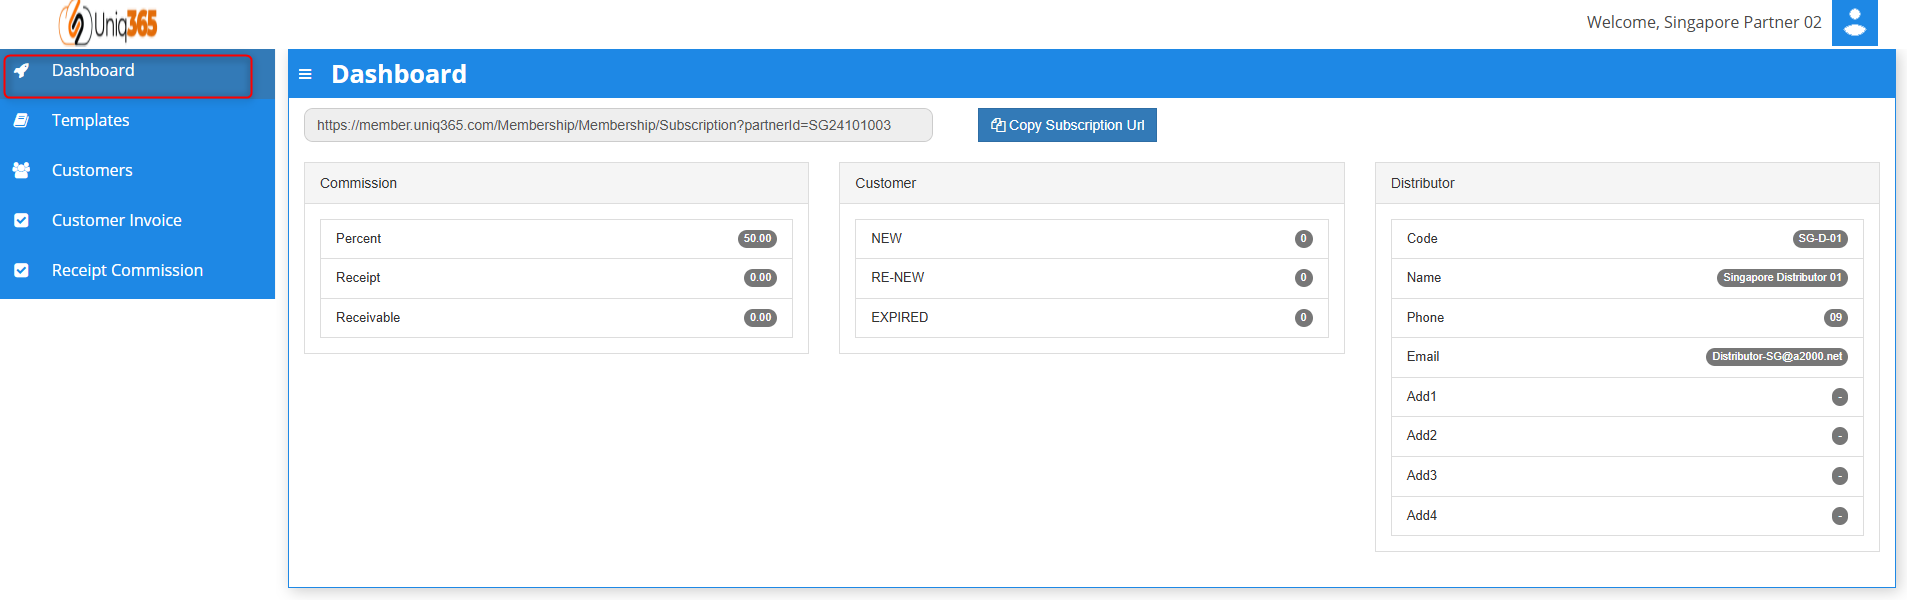](https://doc.uniq365.com/uploads/images/gallery/2025-01/wYbimage.png)Copy Subscription URL.** Every partner has their own link that they can put into their website for hassle free subscription of Uniq365. This website will redirect their customers to Customer Subscription Portal.
**Commission.** In the commission part of the dashboard the partner will be able to see the Percent, Receipt and their Receivable for monitoring.
**Customer.** In the customer part of the dashboard the partner can monitor the current status of the subscription of their customer. This is to monitor the number of customers who are new, for renewal or expired.
**Distributor. **In the distributor part of the dashboard, it shows basic information of the distributor.
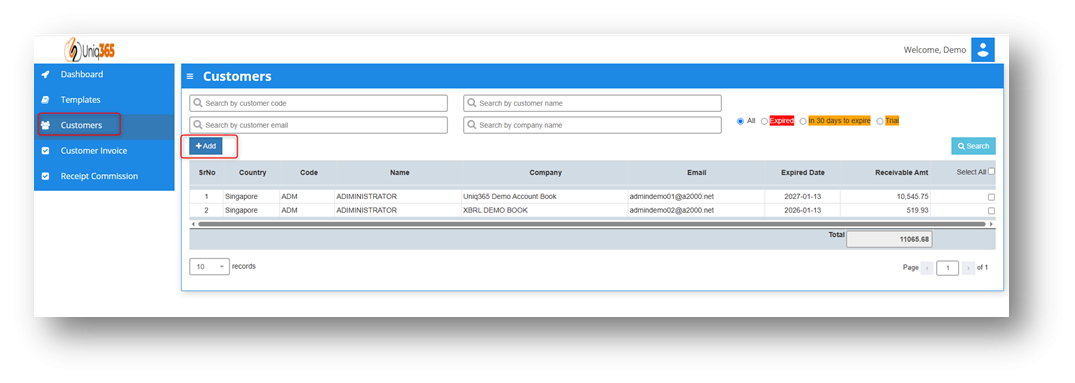
CUSTOMERS
[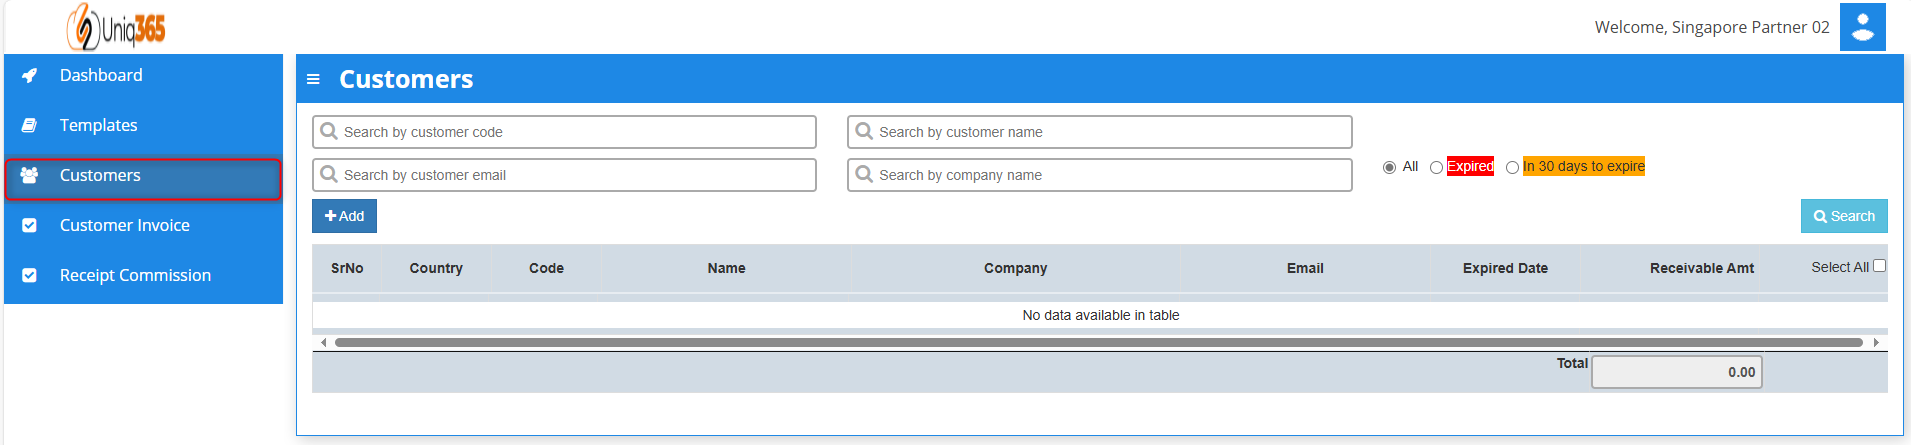](https://doc.uniq365.com/uploads/images/gallery/2025-01/0Zjimage.png)On this tab it shows all the list of the partner’s customer. It shows company information such as Country, Code, Name of the Person to contact, Company Name, Email, Expiration Date and the receivable amount from customer.
##### **HOW TO ADD CUSTOMERS**
[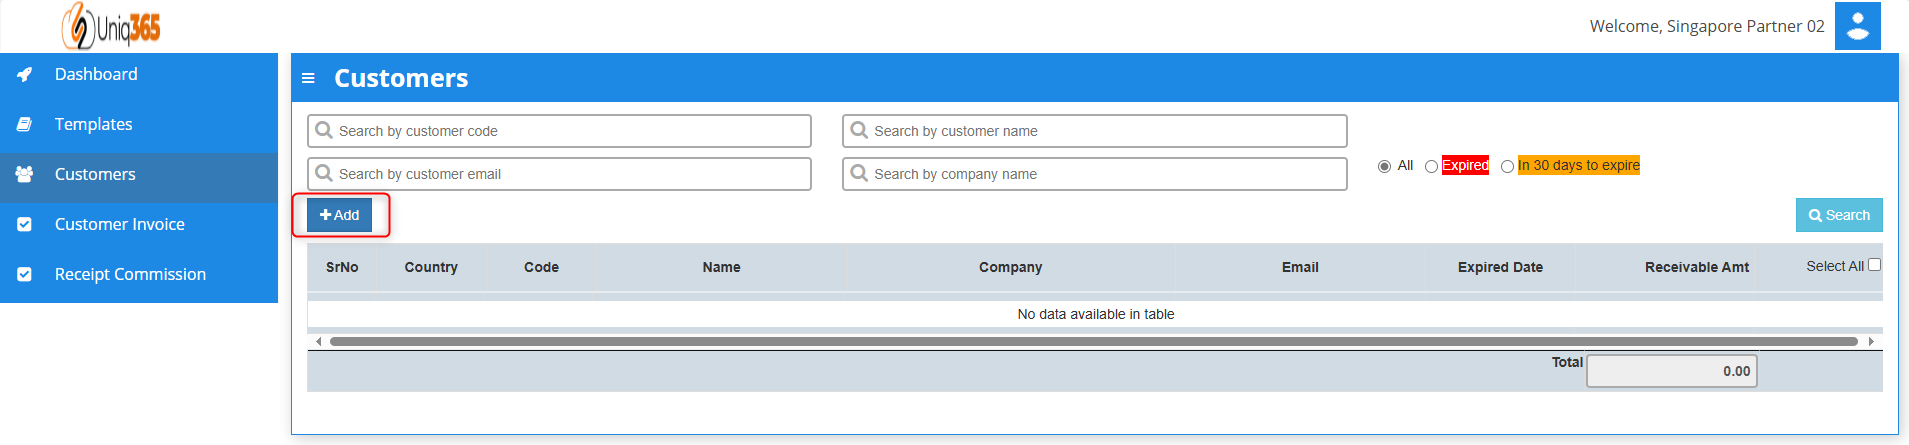](https://doc.uniq365.com/uploads/images/gallery/2025-01/t4aimage.png)
Under customer tab you can click add then it will prompt the steps that you need to do in order to proceed with creating a customer.
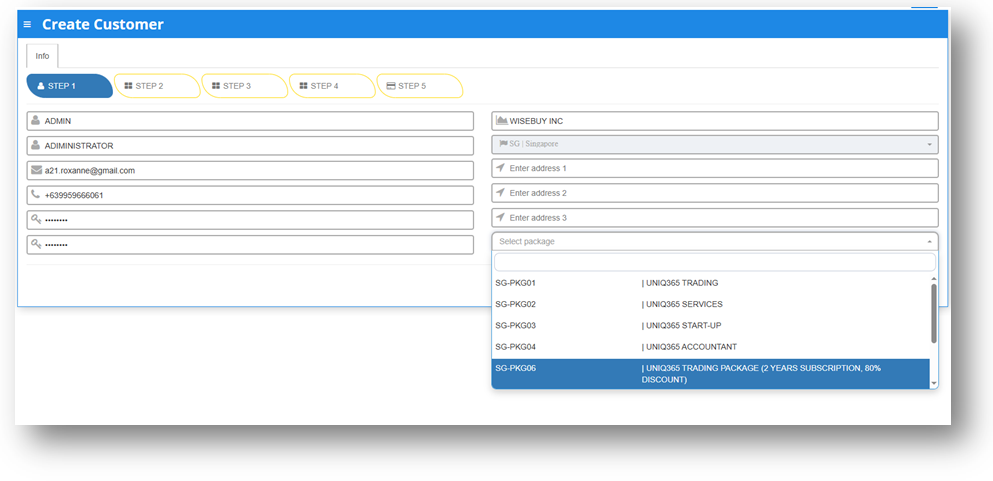
##### **STEP 1: CUSTOMER DETAILS**
**[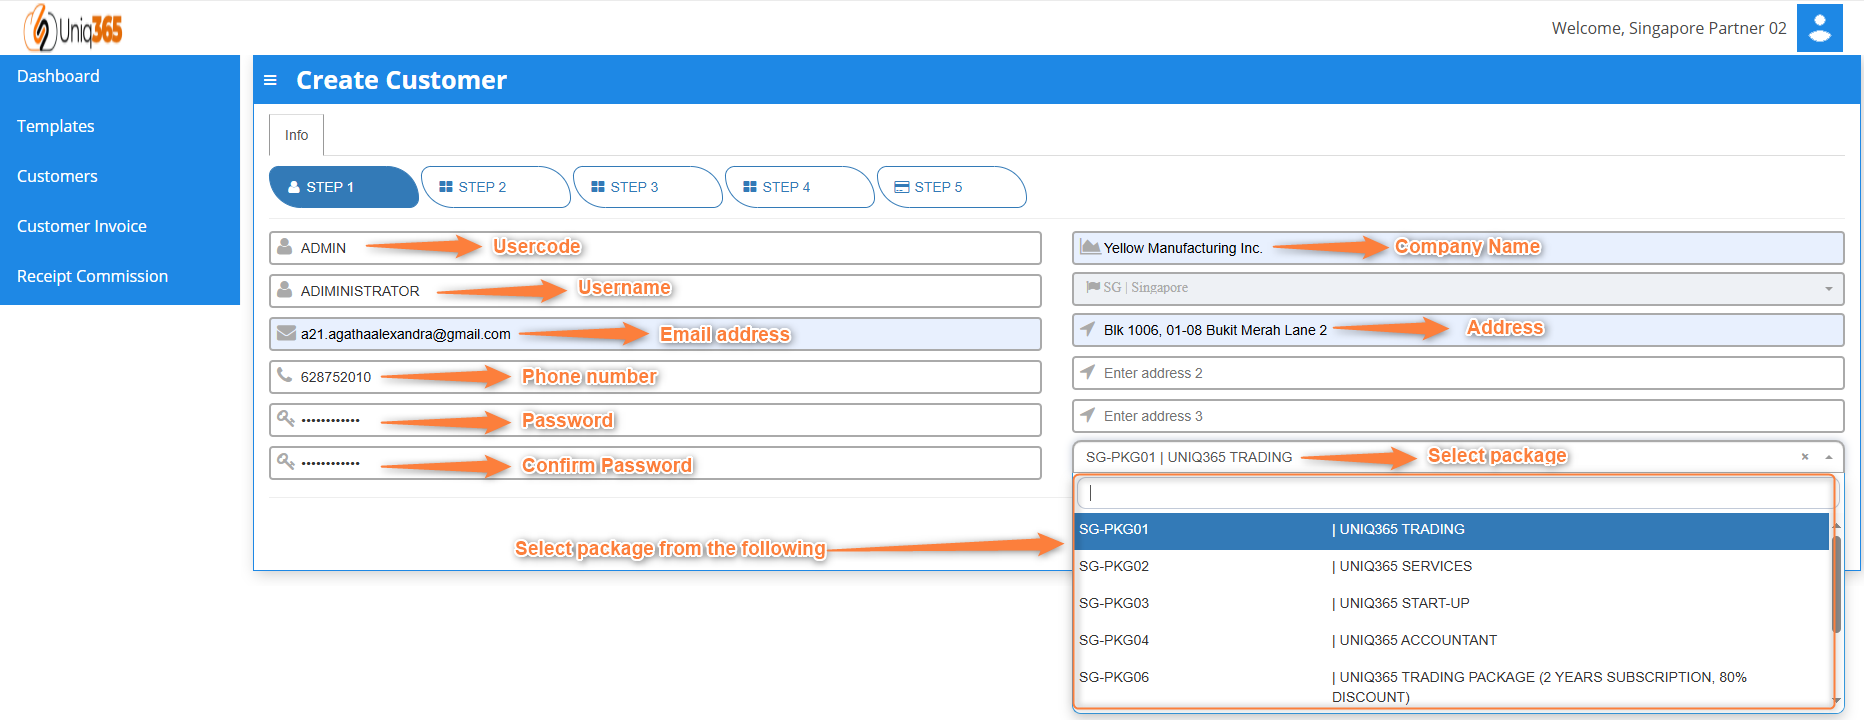](https://doc.uniq365.com/uploads/images/gallery/2025-01/ngximage.png)**
**Fill in the above information**
- Usercode.
- Username.
- Email Address.
- Phone Number.
- Password.
- Confirm Password.
- Company Name.
- Company Address.
- Select Package.
Once all these following information are filled after selecting package it will direct you to **STEP 5 for Payment.** Steps 2-4 will be following the default for the package that has been selected in the first step. If you want to review the following inclusions of the package you may revisit Steps 2-4.
##### **STEP 2: USER DETAILS**
[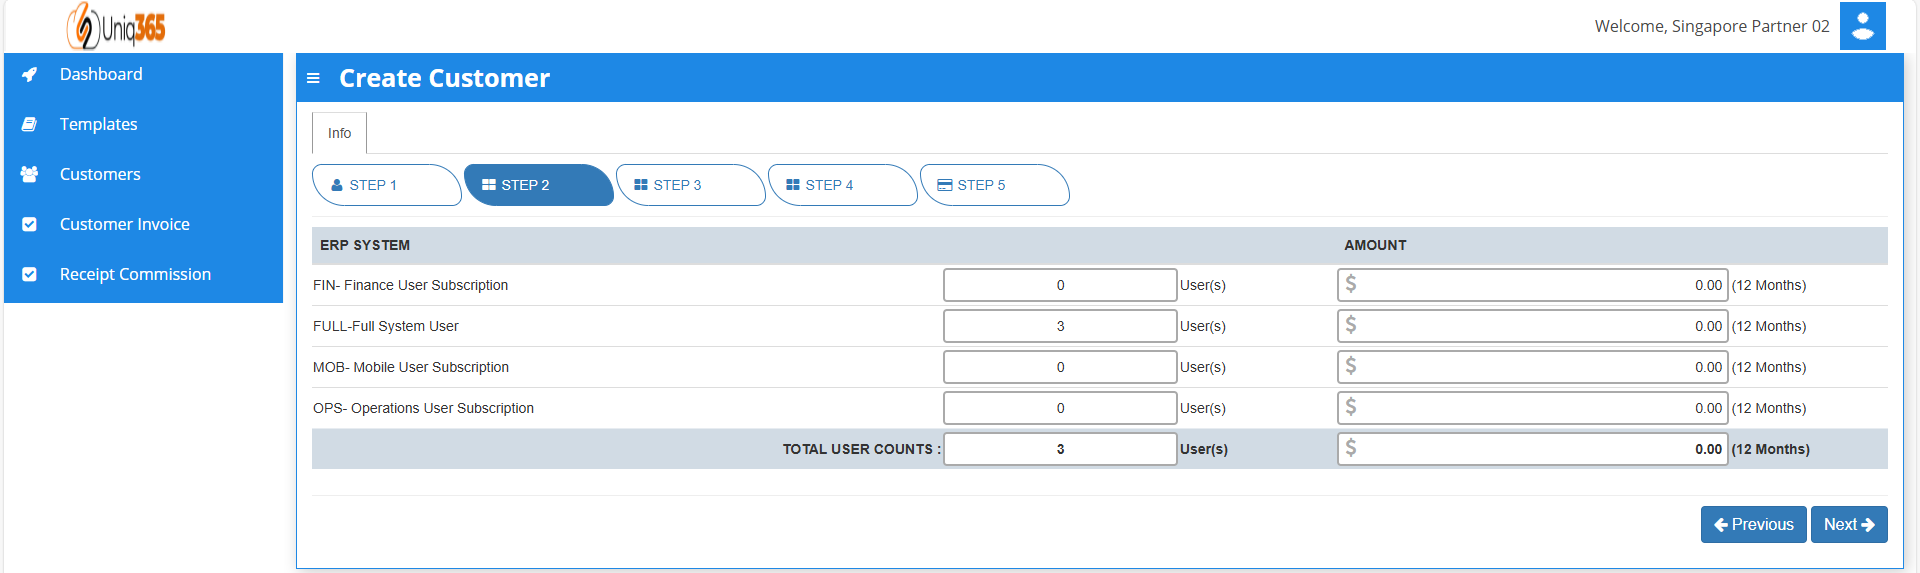](https://doc.uniq365.com/uploads/images/gallery/2025-01/Yjcimage.png)
In Step 2: User details, partners can modify the number of users for each type.
##### **TYPES OF USERS**
A. **FINANCE USER**. User who are assigned this access can only access the finance tab, which comprises the General Ledger, Cash Book, Accounts Receivables and Accounts Payable module.
B. **OPERATIONS USER**. User who are assigned this access can only access the operational tabs, which comprises the Sales, Procurement and Inventory module.
C. **MOBILE USER**. User who are assigned this access can only access the system via a mobile device to run mobile sales and warehouse functions.
D. **FULL USER.** User who are assigned this access can only access the all the tabs and modules which are accessible to FINANCE, OPERATIONS and MOBILE users
##### **CAN I ADD/REDUCE NEW USERS AT ANYTIME?**
Yes, you may add any number of new users in your Subscription Plan. Any users added half-way in the subscription period will be pro-rated to the duration left till the next expiry. For example, in 3 months into your subscription period you may add a new user. This new user will be billed for only 9 months till the end of the mother-contract.
No, you may not reduce the number of users halfway through a subscription period. You must wait till the end of subscription period and then reduce according to your needs, only during renewal.
##### **STEP 3: ACCOUNT BOOK DETAILS, EXTRA STORAGE & SPECIAL APPLICATION IF ANY**
[](https://doc.uniq365.com/uploads/images/gallery/2025-01/nMlimage.png)
Depending on the package they have selected, the details on the quantity of storage and account books will be displayed here. In any event, they can access more storage if they've used up all of their subscription storage by modifying the desired add ons on this step.
##### **STEP 4: OCR, SMS, WHATS APP AND E-INVOICE LIMIT.**
[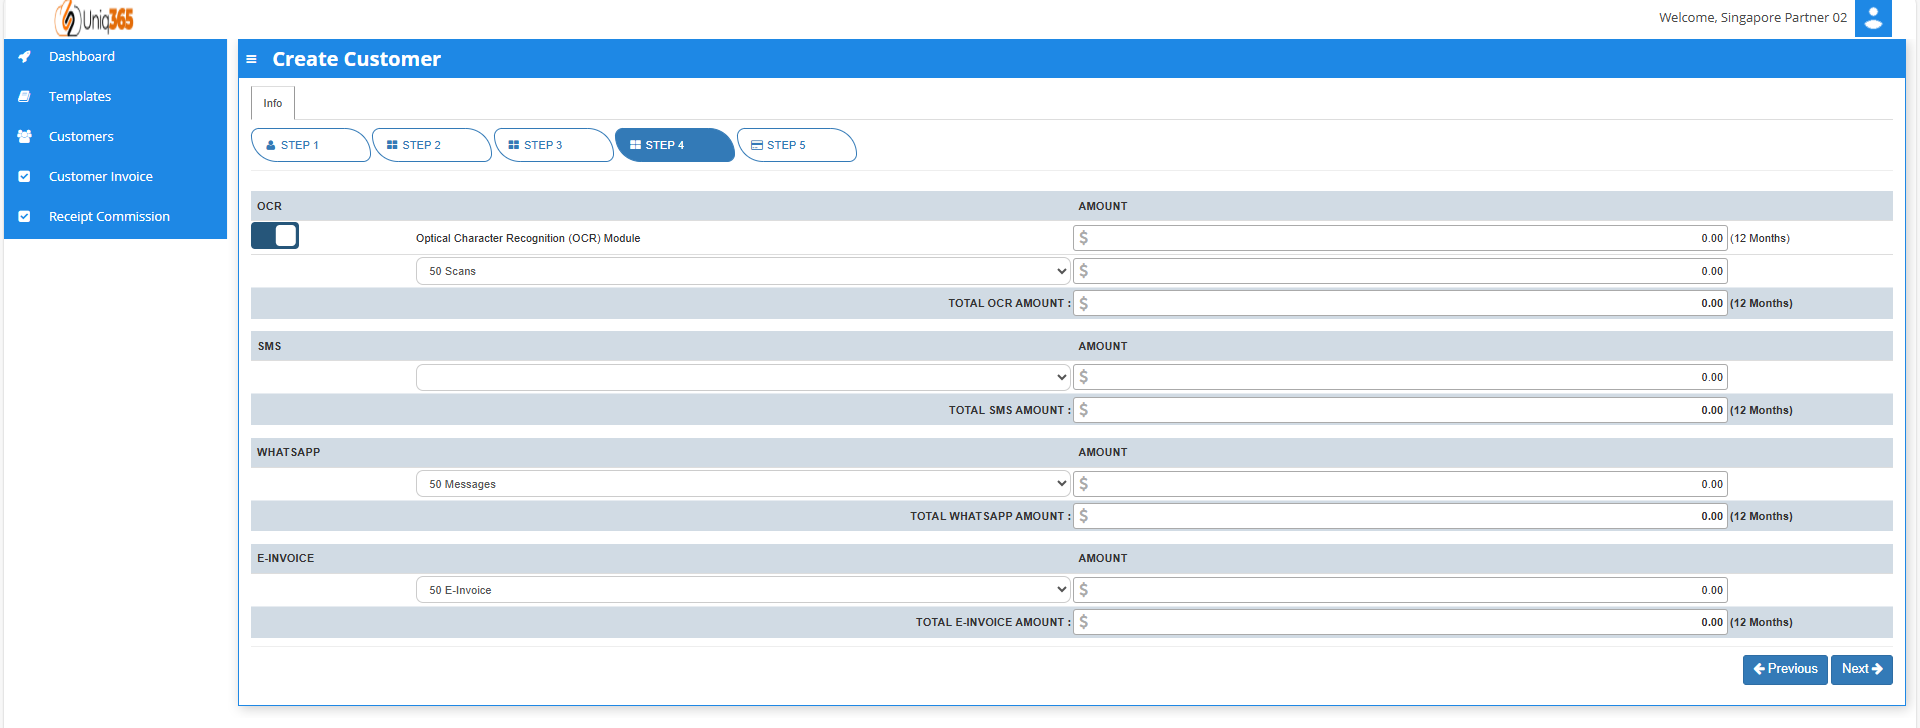](https://doc.uniq365.com/uploads/images/gallery/2025-01/I65image.png)
In Step 4, Any excess of usage in the package that the customer availed it will be subject to corresponding charges.
##### **STEP 5:** **SUBSCRIPTION SUMMARY**
[](https://doc.uniq365.com/uploads/images/gallery/2025-01/Sxgimage.png)
- Select the payment type in the dropdown, options are either monthly or yearly.
- Tick the box to agree to the A2000ERP Service Agreement & Privacy Policy before saving.
[](https://doc.uniq365.com/uploads/images/gallery/2025-01/32Jimage.png)
- After saving information, a pop-up message will appear so you can select the account book type and the industry type.[](https://doc.uniq365.com/uploads/images/gallery/2025-01/Mthimage.png)
- Once hit save, a message will prompt indicating that system is currently generating account book. Please wait and do not do anything. If there is any interruption during the generation of account book, please reach out to us.
CUSTOMER INVOICE
[](https://doc.uniq365.com/uploads/images/gallery/2025-01/Bcvimage.png)
[](https://doc.uniq365.com/uploads/images/gallery/2025-01/z1Dimage.png)
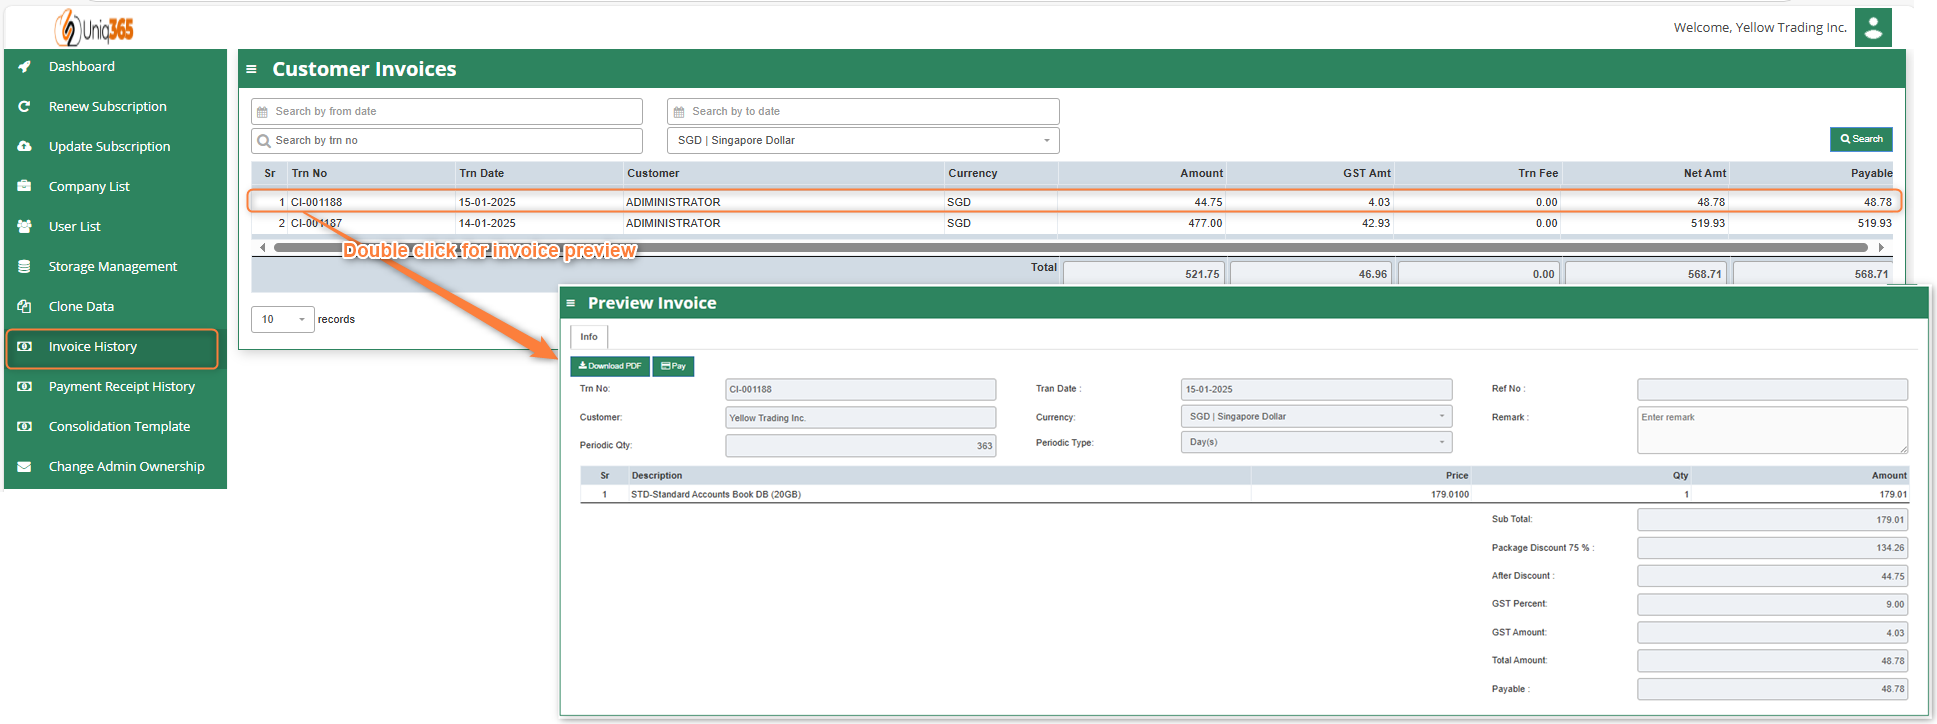
Once the subscription package has been finalized. Partners may assist in printing invoice double click any column in the line and download the preview of invoice. They can download the invoice, but the billing and collection will be done by the distributors.
RECEIPT COMMISSION
[](https://doc.uniq365.com/uploads/images/gallery/2025-01/iIqimage.png)
All the receipts of commission from customers and distributors will reflect here. Once the distributor processed the commission it will be visible here in the receipt invoices.
##### **HOW TO VIEW CUSTOMER INFORMATION**
**[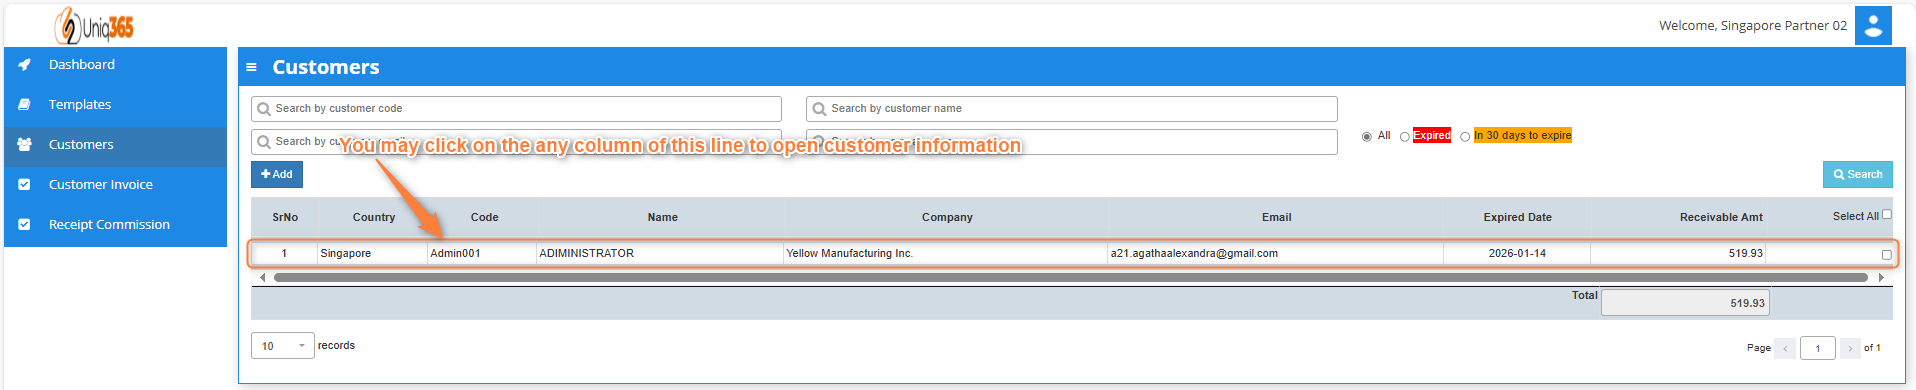](https://doc.uniq365.com/uploads/images/gallery/2025-01/ilRimage.png)** To view the full information of the customer, you may double click on any column in the customer line to edit customer information.
[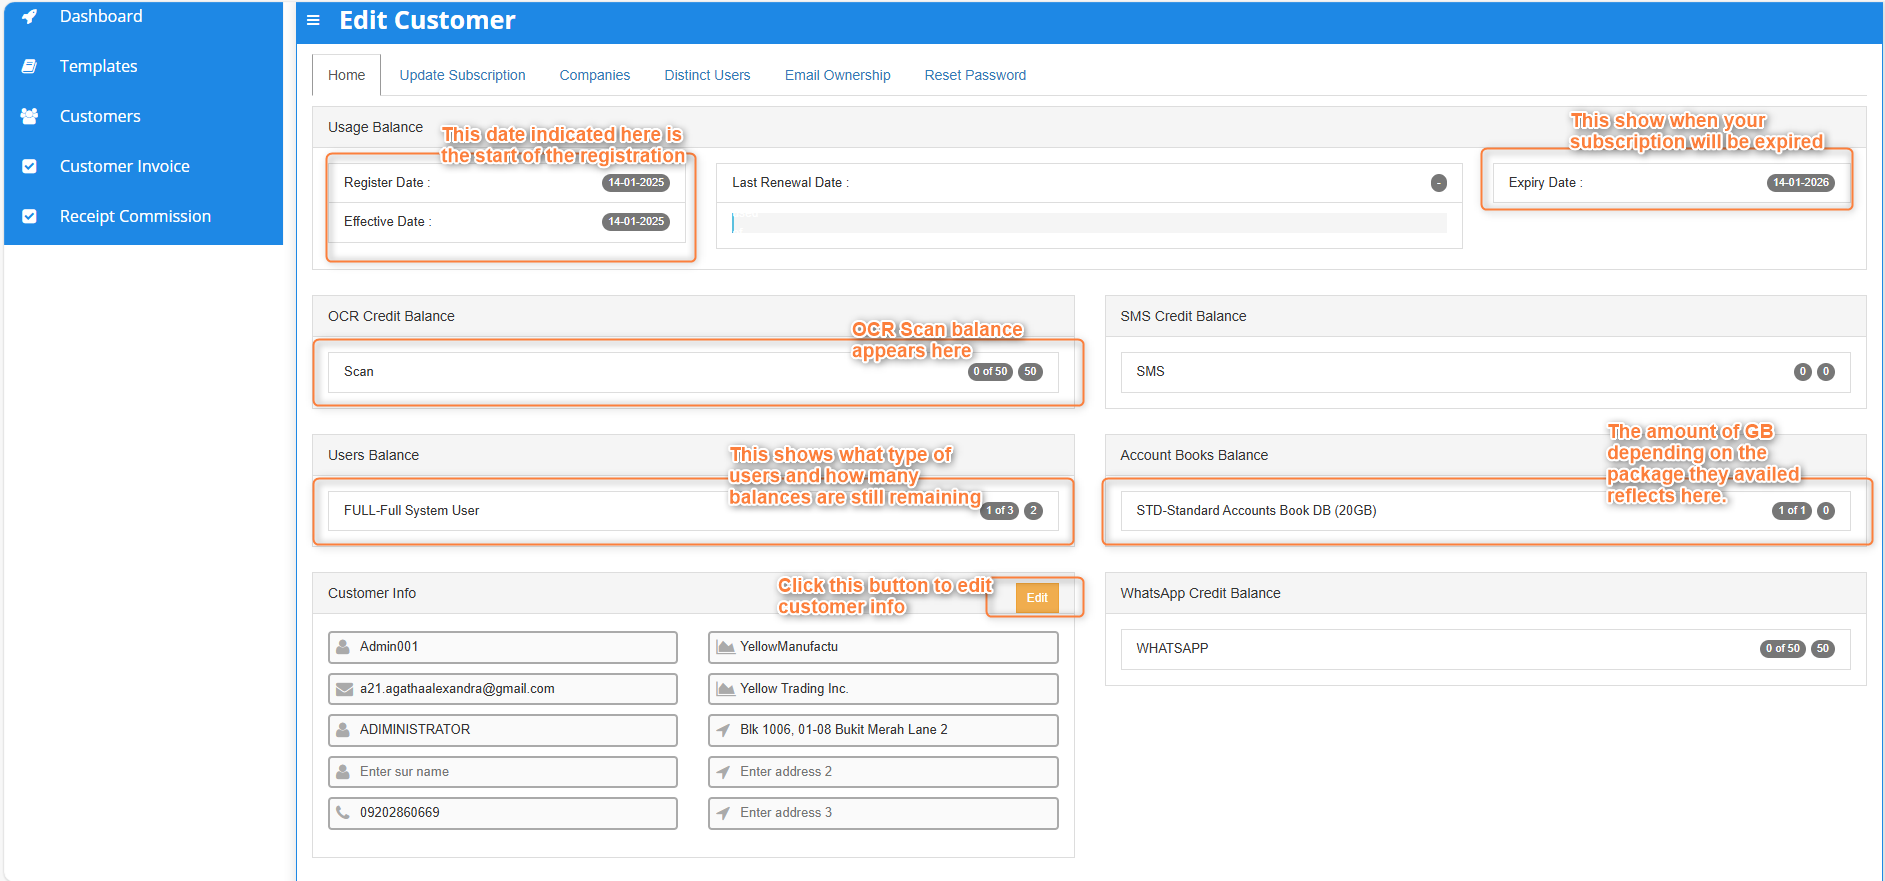](https://doc.uniq365.com/uploads/images/gallery/2025-01/k7yimage.png)
Under customer's home tab, you will be able to see the customer profile and usage balances.
**STEP 1**: Customer Details
[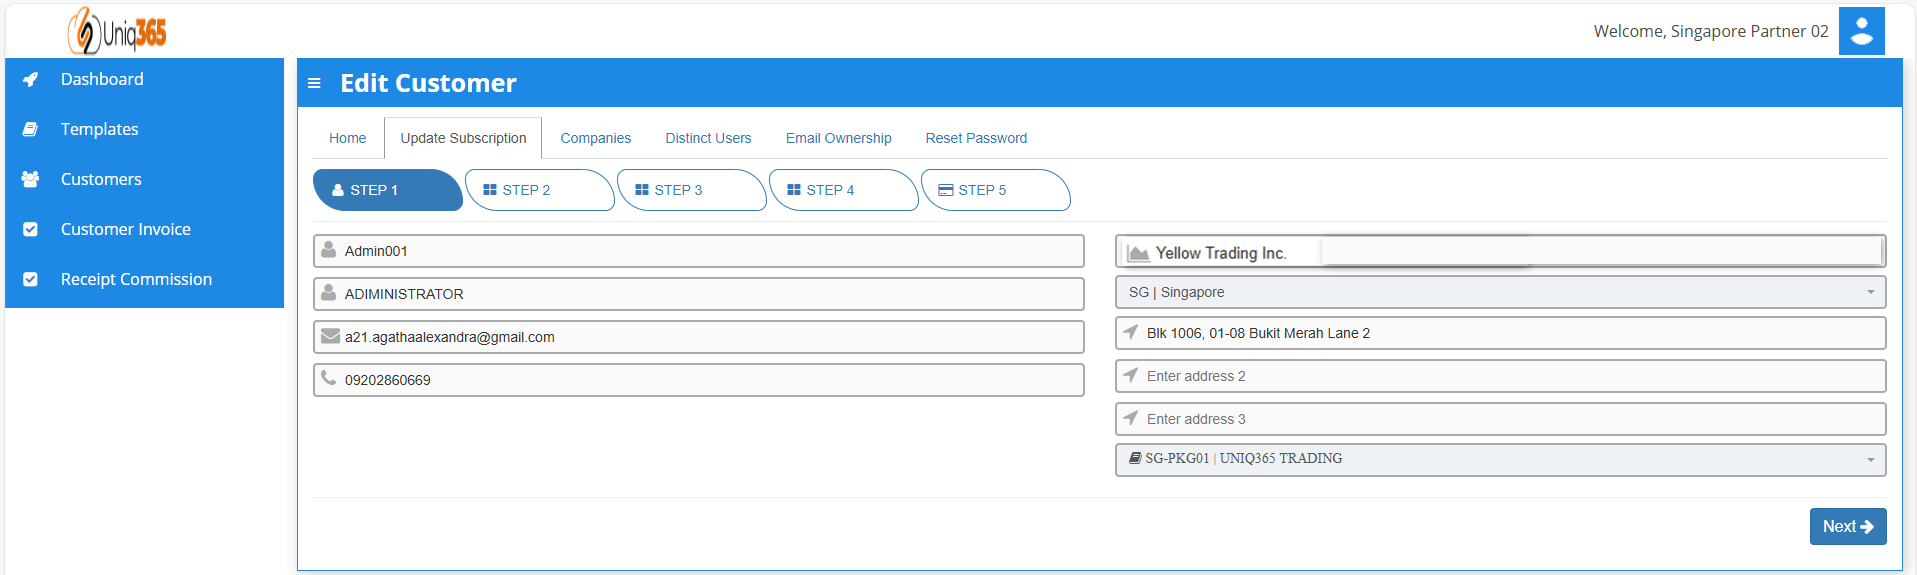](https://doc.uniq365.com/uploads/images/gallery/2025-01/Ysrimage.png)
Under the Update Subscription, the following steps are familiar as it is similar to adding a customer. You will be able to update the current subscription of the customer.
**STEP 2:** User Details
[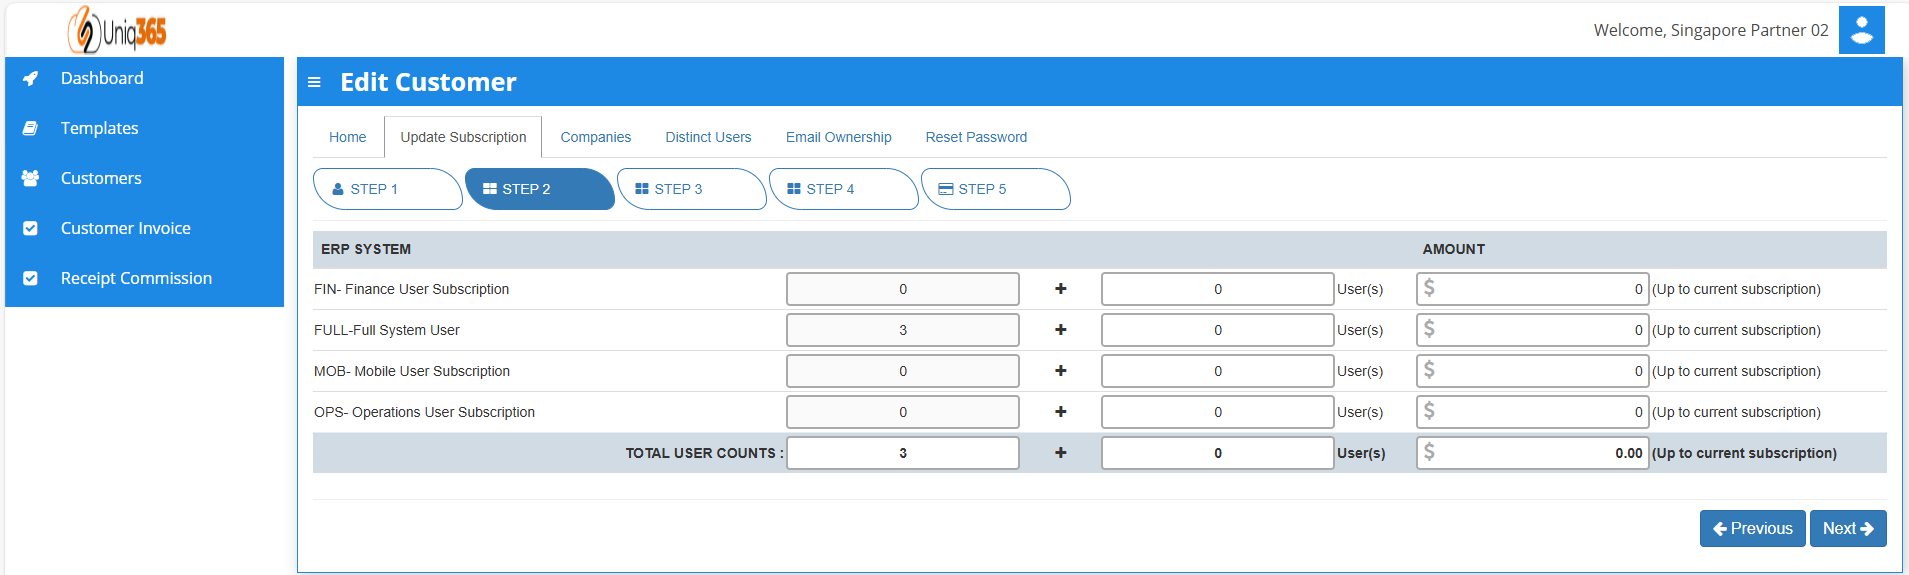](https://doc.uniq365.com/uploads/images/gallery/2025-01/Rd1image.png)
You may add any number of new users in your Subscription Plan. Any users added half-way in the subscription period will be pro-rated to the duration left till the next expiry.
**STEP 3:** Account Book Details, Extra Storage & Special Application If Any
[](https://doc.uniq365.com/uploads/images/gallery/2025-01/FHFimage.png)
The information for the number of account book and storage will be reflected here depending on the package that they have availed. If in any case that they have reached their subscribed storage they can avail extra storages as desired.
**STEP 4:** OCR, SMS, WhatsApp And E-Invoice Limit.
[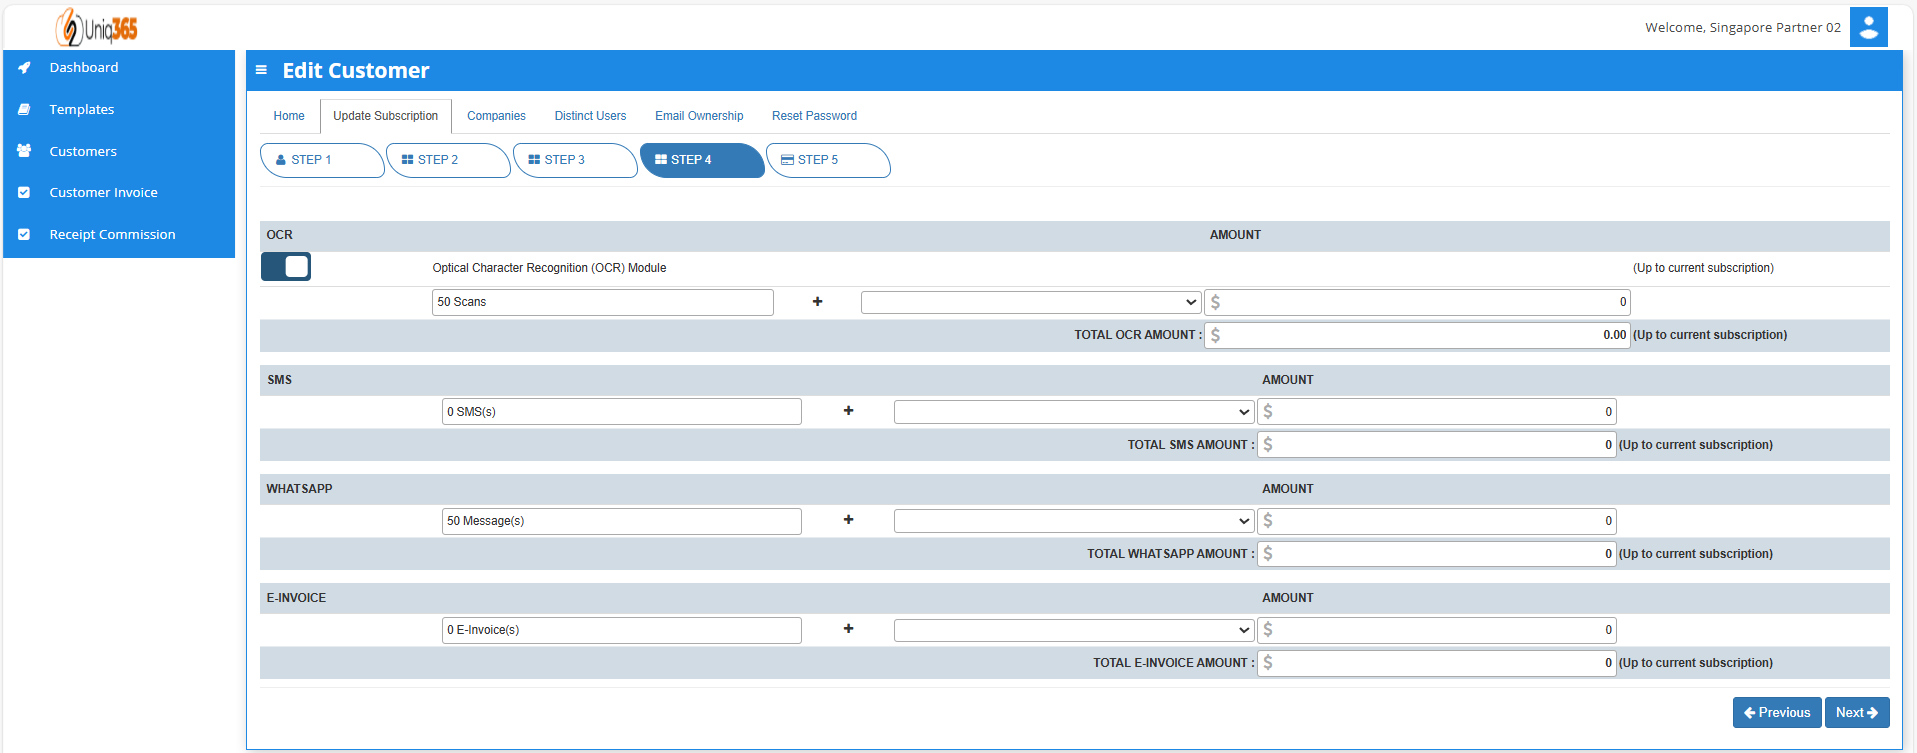](https://doc.uniq365.com/uploads/images/gallery/2025-01/efNimage.png)
For the OCR and WhatsApp feature, 50 scans and 50 messages, respectively are considered free, if in any case their transaction will exceed that they can modify here with corresponding charges.
**STEP 5:** Subscription Summary
[](https://doc.uniq365.com/uploads/images/gallery/2025-01/VR4image.png)
DASHBOARD
##### [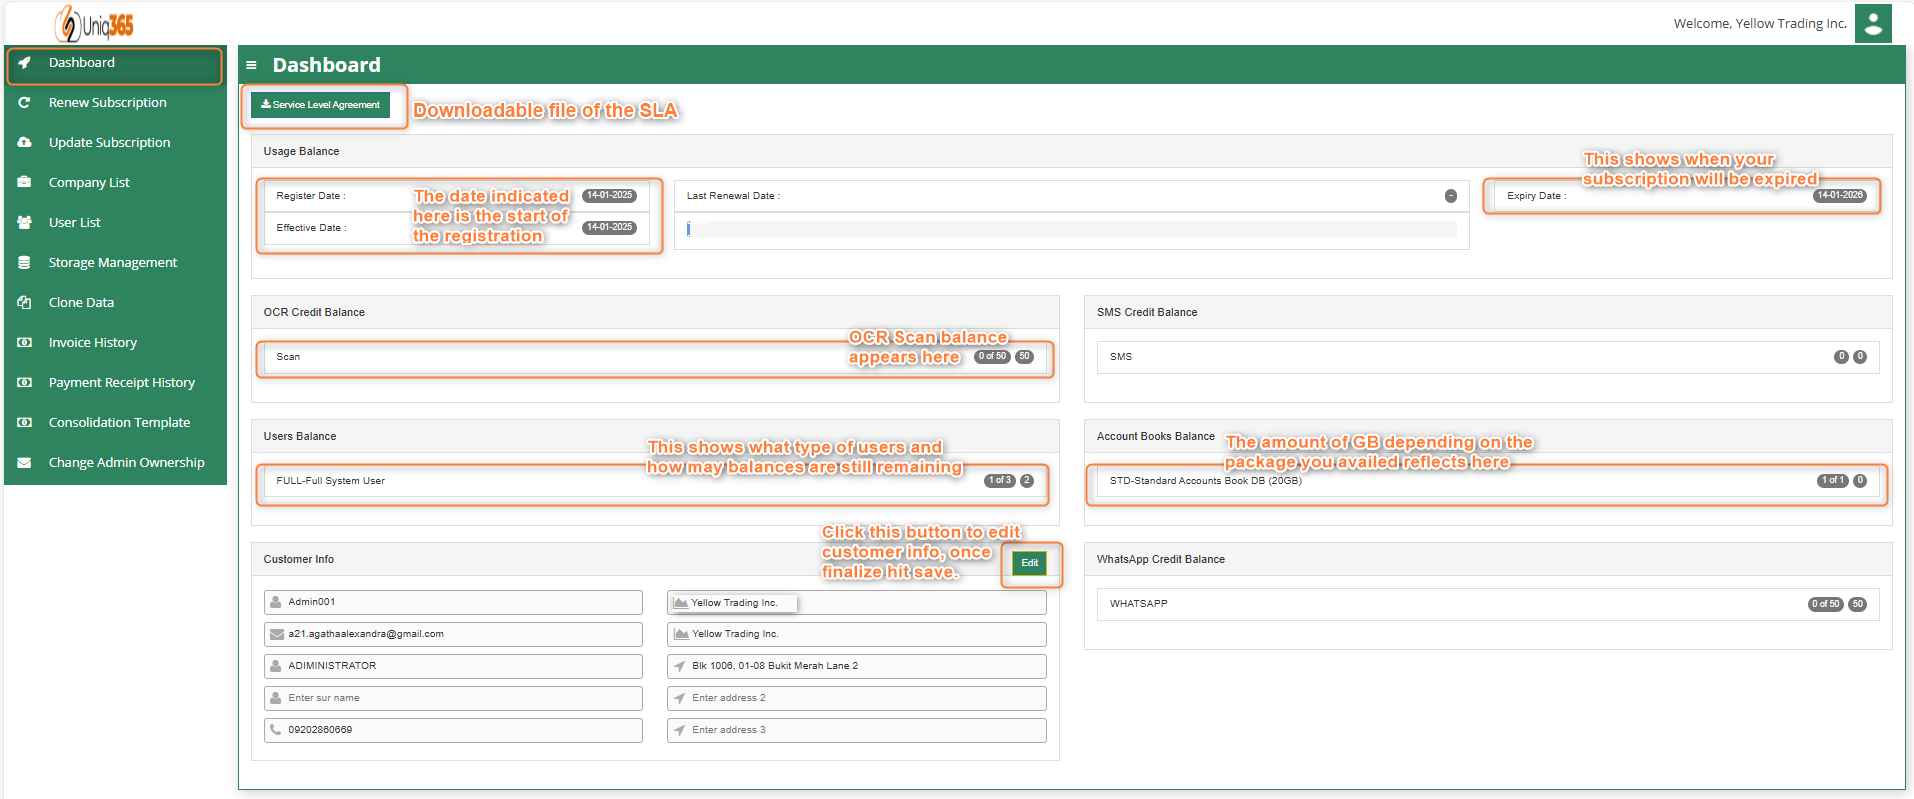](https://doc.uniq365.com/uploads/images/gallery/2025-01/hsMimage.png)
This shows summary of the customer's account information such as the usage, users, OCR, SMS, WhatsApp balances and other subscription that they are availing. This dashboard shows a comprehensive overview of your subscription date, expiration and usage statistics, and other important subscription-related information. It also allows you to update your information.
The **Service Level Agreement (SLA)** can be downloaded in this tab. A service-level agreement is an agreement between two or more parties, where one is the customer, and the others are service providers. This is to assert particular aspects of the service, quality, availability, responsibilities that are agreed between the service provider and the service user.
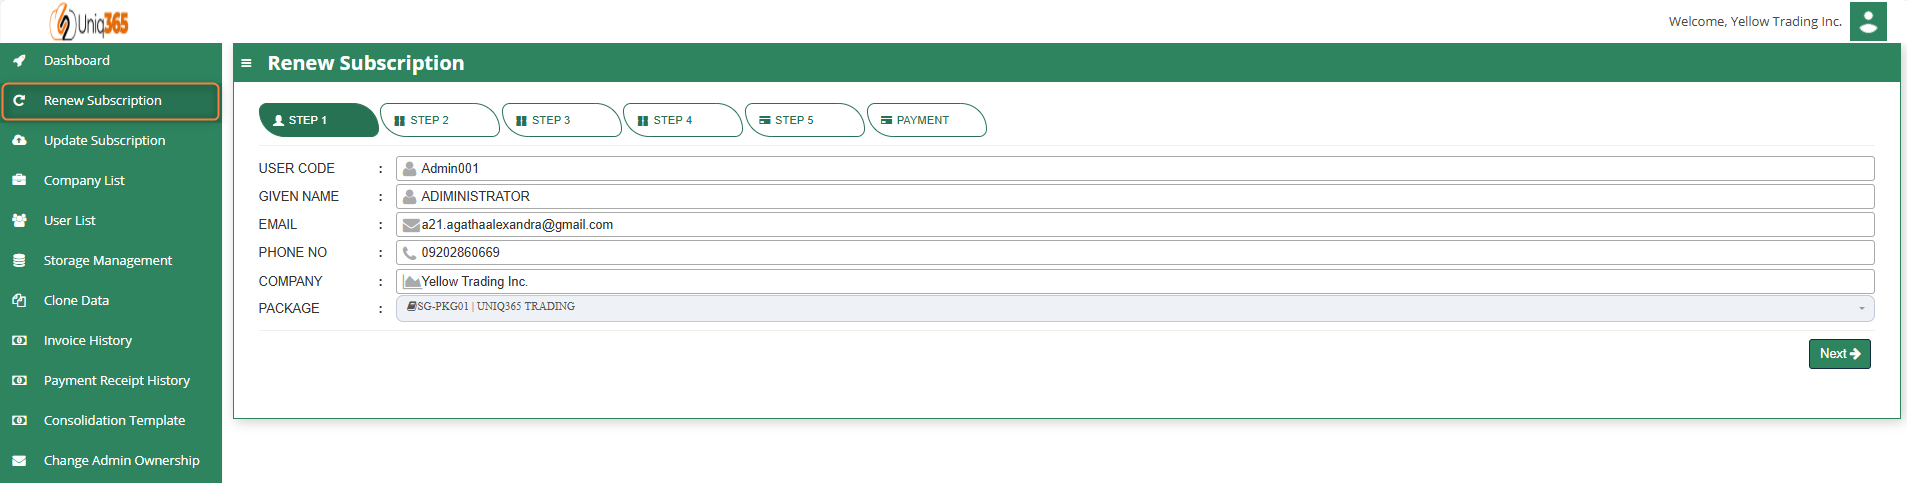
HOW TO RENEW SUBSCRIPTION?
You may renew your subscription any time before the subscription period ends. The system will send reminders of your due subscription 30 days, 15 days, 7 days before your expiry. Your users will also see this reminder when they log into the system. To renew you need to login under the SUBSCRIPTION ADMIN and follow the steps in the renewal process. This ADMIN is the highest authority and has the absolute access to the entire system and is the only one who can manage this subscription.
[](https://doc.uniq365.com/uploads/images/gallery/2025-01/avNimage.png)
##### **RENEW SUBSCRIPTION**
**Step 1: **Customer Details
[](https://doc.uniq365.com/uploads/images/gallery/2025-01/53pimage.png)
**Step 2:** User Details
In this step you can revise the number of users (Add/Reduce) If you are reducing the number of users, please deactivate the users from the respective account book(s) first. You cannot reduce the subscription users below the number of distinct users in all your account books.
##### **TYPE OF USERS**
When renewing the subscription, you can choose the type of User Access you want to assign your users. For users who do not need the full system, they can subscribe to the lower cost user type. There are 4 main **TYPES OF USERS** available, and they are:
A. **FINANCE USER**. User who are assigned this access can only access the finance tab, which comprises the General Ledger, Cash Book, Accounts Receivables and Accounts Payable module.
B. **OPERATIONS USER**. User who are assigned this access can only access the operational tabs, which comprises the Sales, Procurement and Inventory module
C. **MOBILE USER.** User who are assigned this access can only access the system via a mobile device to run mobile sales and warehouse functions
D. **FULL USER.** User who are assigned this access can only access the all the tabs and modules which are accessible to FINANCE, OPERATIONS and MOBILE users.
##### **CAN I ADD/REDUCE NEW USERS AT ANYTIME?**
Yes, you may add any number of new users in your Subscription Plan. Any users added half-way in the subscription period will be pro-rated to the duration left till the next expiry. For example, in 3 months into your subscription period you may add a new user. This new user will be billed for only 9 months till the end of the mother-contract.
No, you may not reduce the number of users halfway through a subscription period. You must wait till the end of subscription period and then reduce according to your needs, only during renewal.
[](https://doc.uniq365.com/uploads/images/gallery/2025-01/BcIimage.png)
**Step 3:** Account book details, Extra storage & Special application if any. Depending on the package they have selected, the details on the quantity of storage and account books will be displayed here. In any event, they can access more storage if they've used up all of their subscription storage by modifying the desired add ons on this step.
[](https://doc.uniq365.com/uploads/images/gallery/2025-01/BMQimage.png)
** ****Step 4**: OCR, SMS, WhatsApp And E-Invoice Limit.
Any excess of usage in the package that the customer availed it will be subject to corresponding charges.
[](https://doc.uniq365.com/uploads/images/gallery/2025-01/gb3image.png)
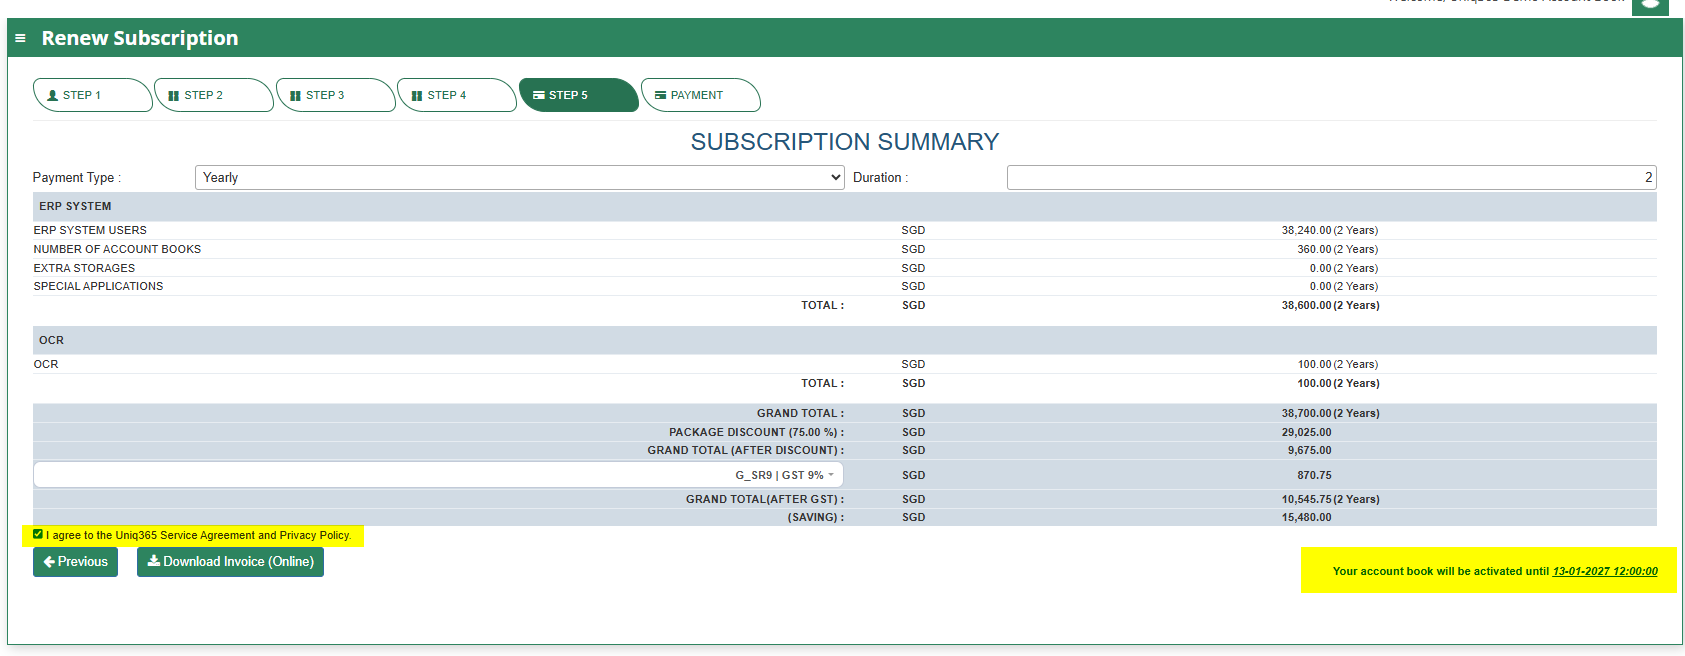
**Step 5:** Subscription Summary-
- Select the payment type
- Agree the A2000ERP Service Agreement & Privacy Policy before renewing.
- For renewal - use Credit Card or PayNow.
- You will be redirected to the payment gateway to make payment
- Once renewed, you can download the Invoice from the Invoice history and can see the revised expiry date from the Dashboard.
UPDATE SUBSCRIPTION
The process for updating a subscription is similar to the renewal process but focuses on making specific changes to the existing plan rather than simply renewing it. This allows customers to add services according to their current needs. The update process typically involves logging into the account, selecting the desired changes, reviewing the impact on pricing and billing, confirming the changes, and processing any necessary payments.
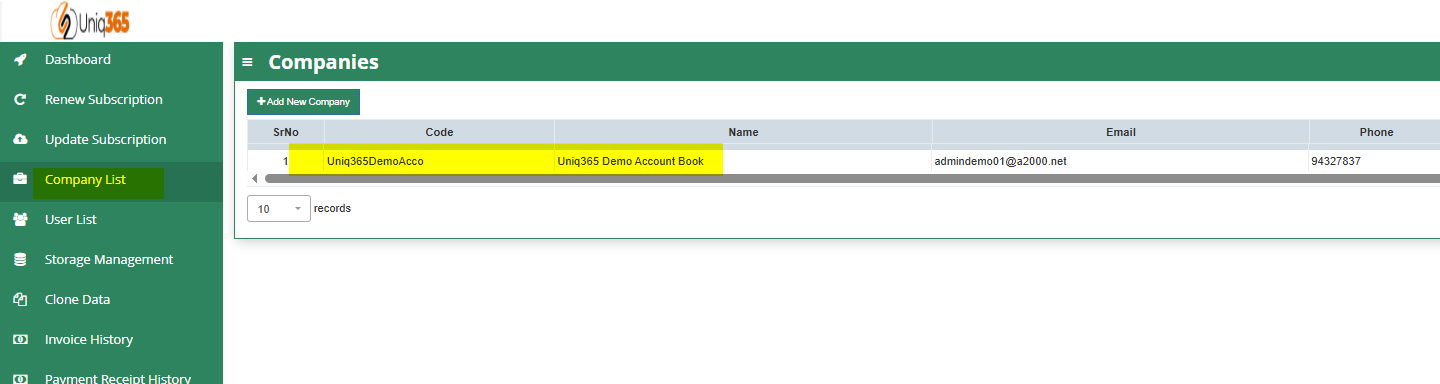
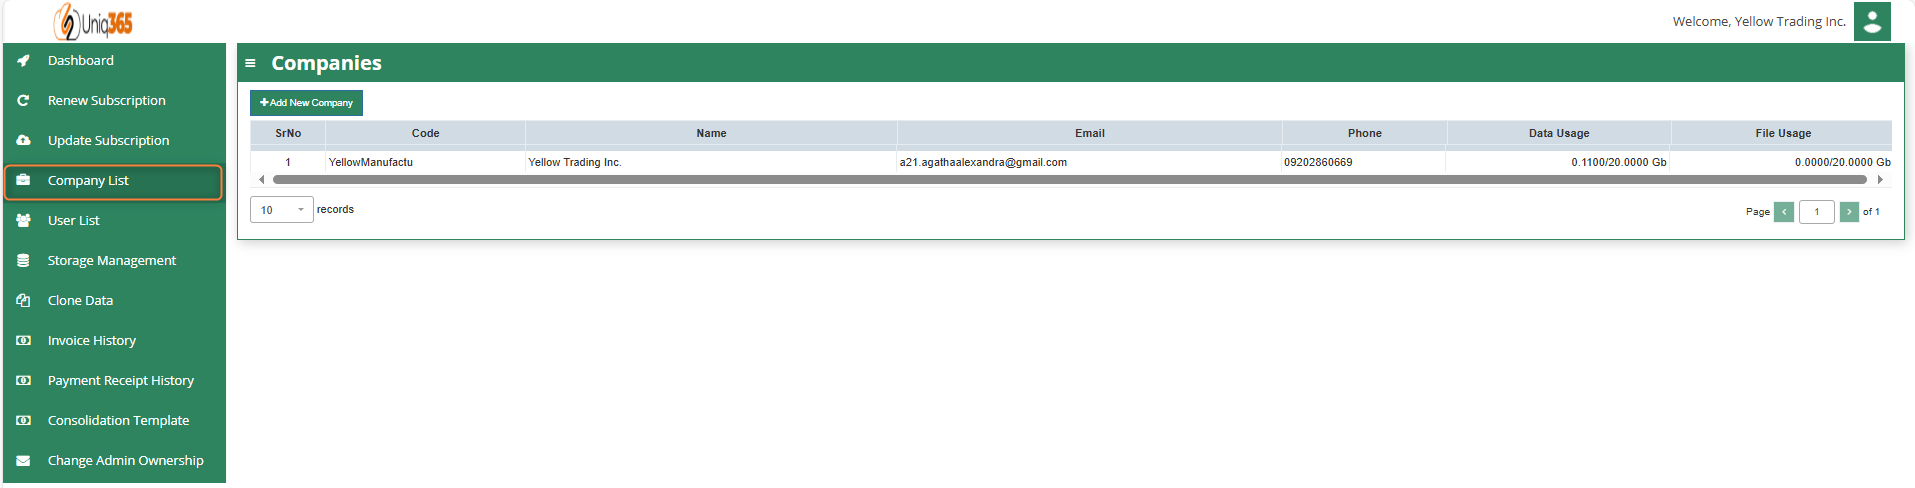
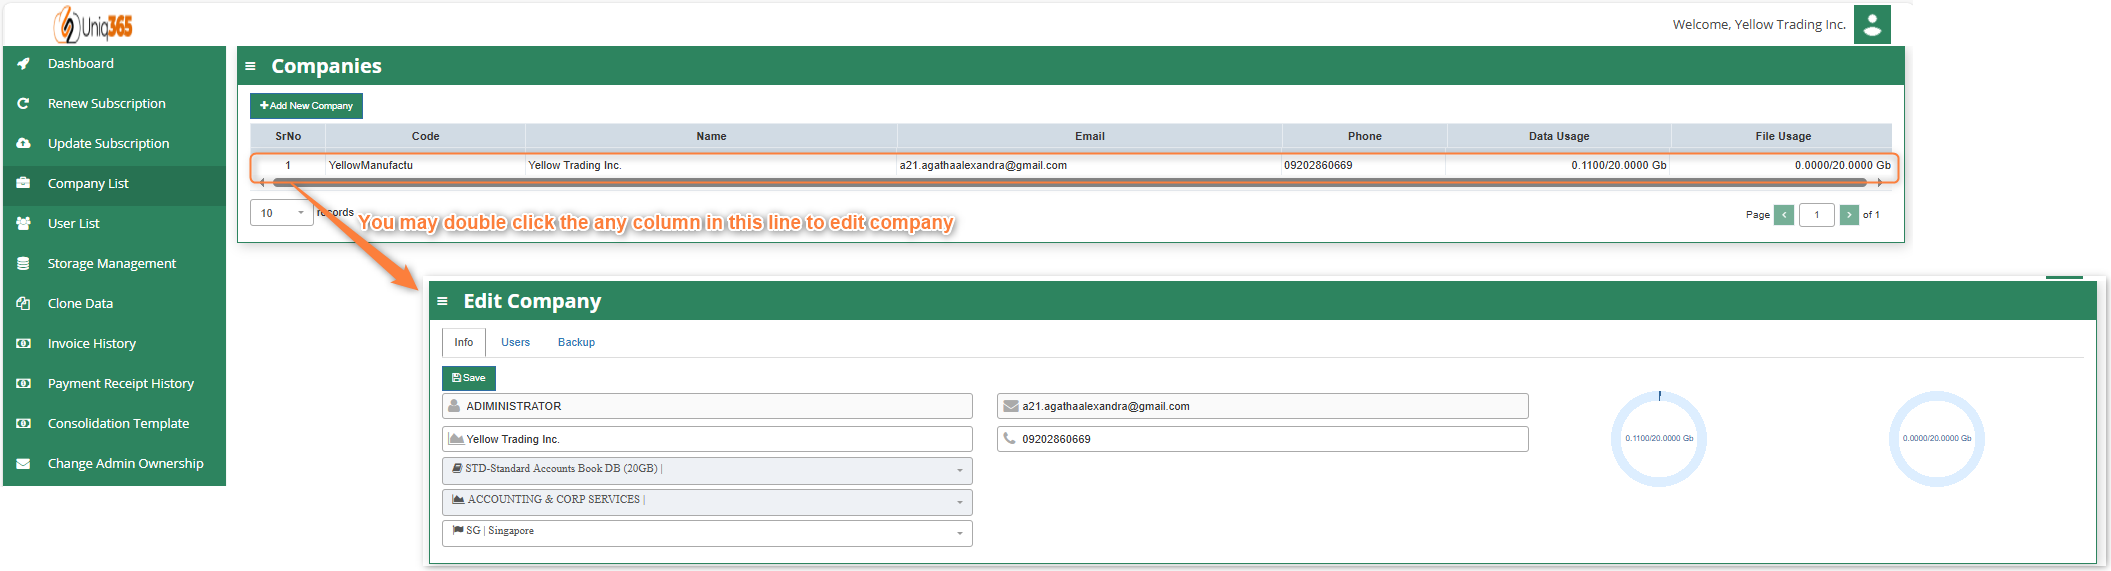
COMPANY LIST
[](https://doc.uniq365.com/uploads/images/gallery/2025-01/05limage.png)
Under company list, the Company Name, Email, Phone, Data Usage and File Usage can be viewed. You may double click to edit the company info.
[](https://doc.uniq365.com/uploads/images/gallery/2025-01/dnPimage.png)
[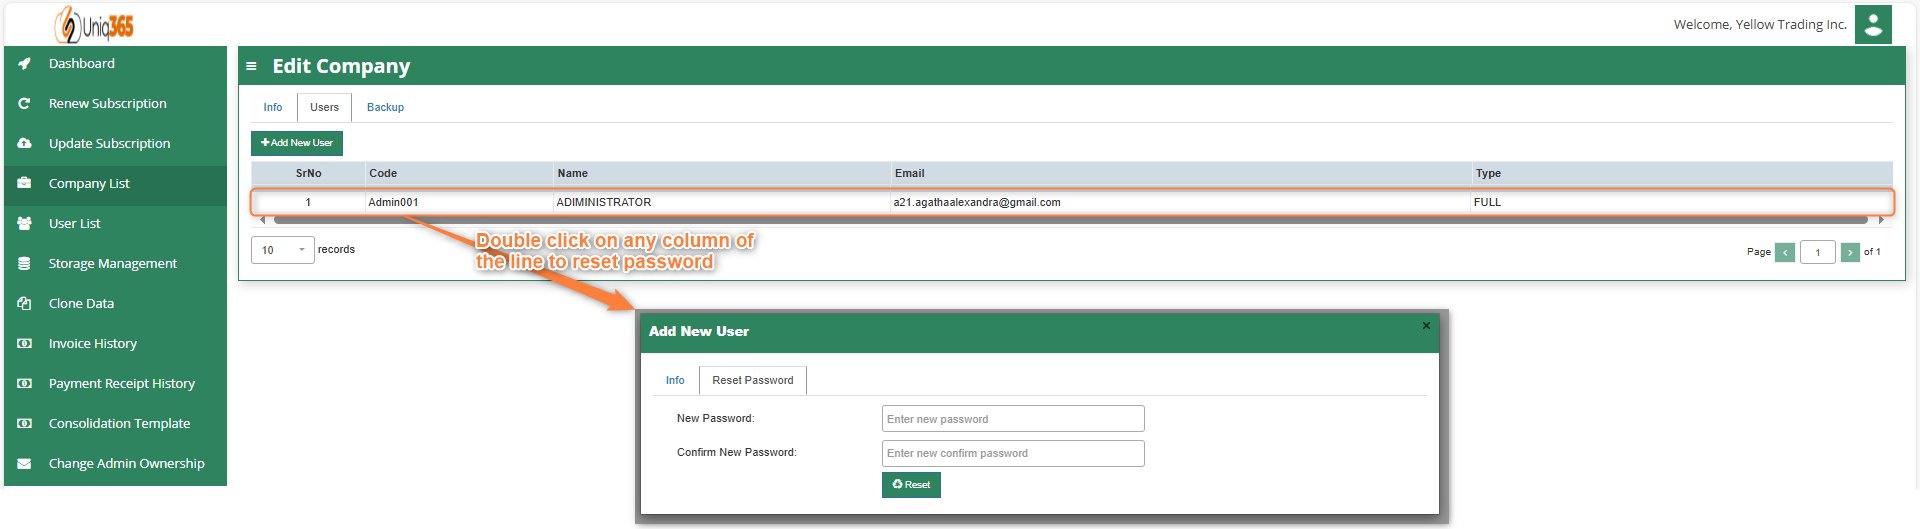](https://doc.uniq365.com/uploads/images/gallery/2025-01/DwVimage.png)
Under Company List, Users you can update the password. Just double click to individually modify the password for the account book.
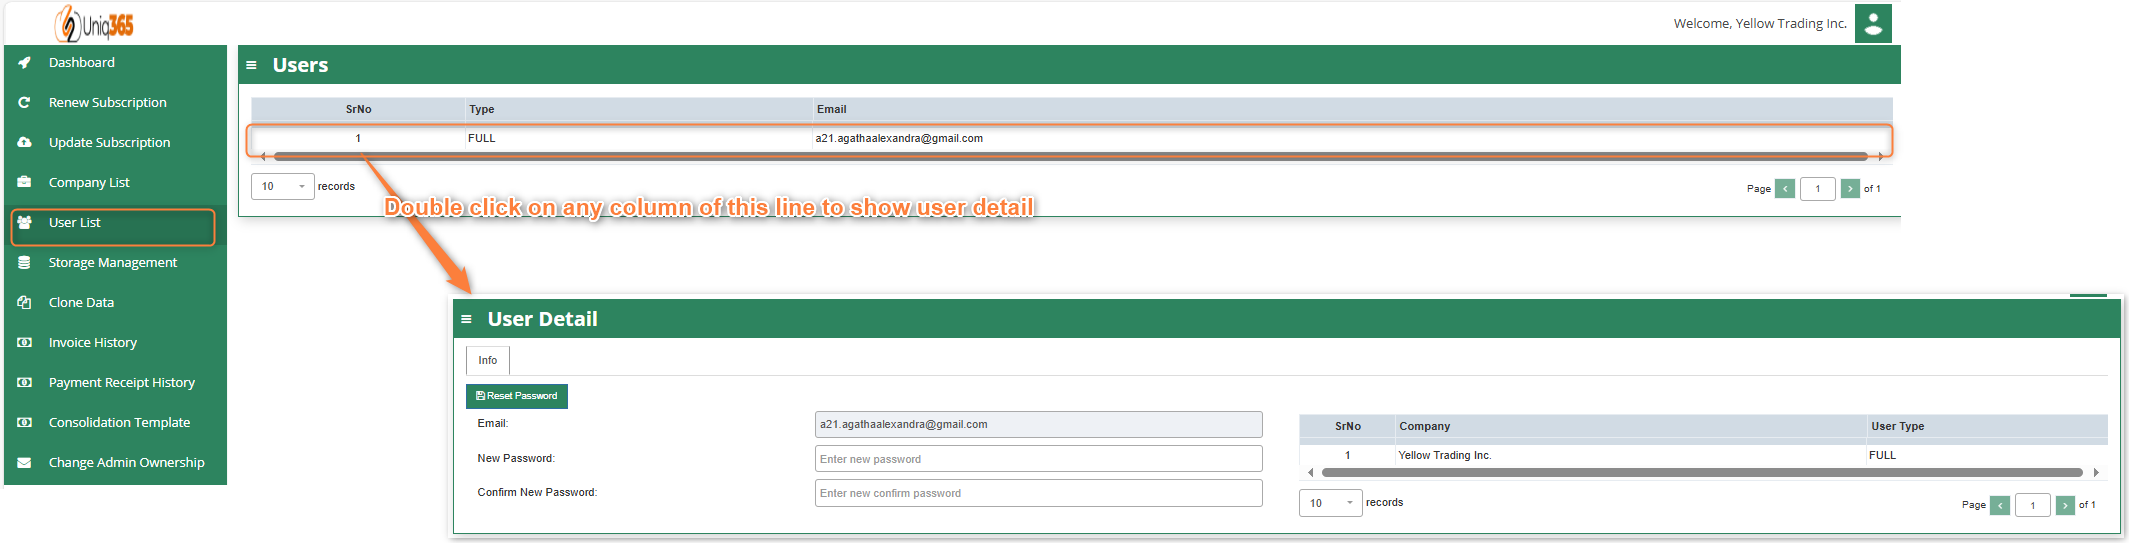
USER LIST
[](https://doc.uniq365.com/uploads/images/gallery/2025-01/nLcimage.png)
All the users can be viewed in this list. Using the reset password under user list, the customer will be able to mass update the password in all of the company. If you want to change one company only you can utilize company list reset password.
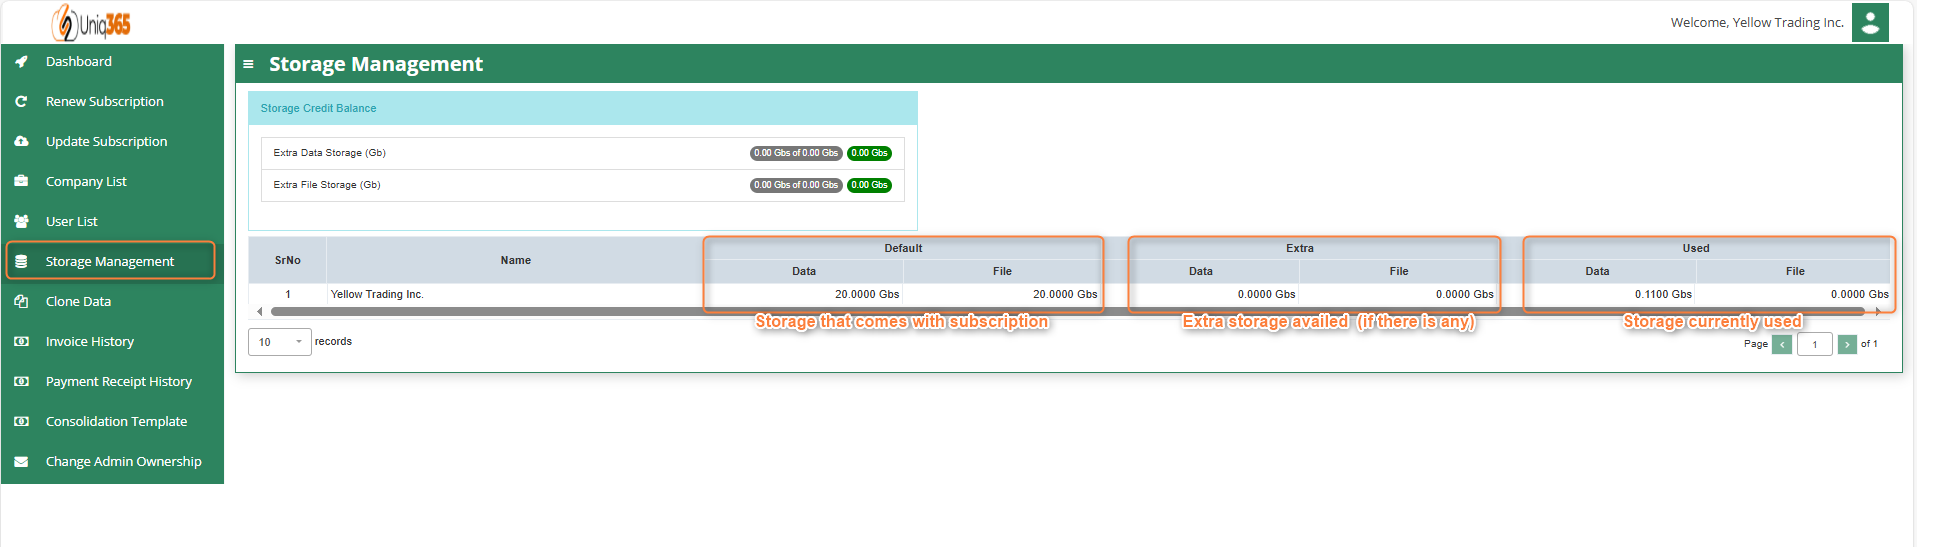
STORAGE MANAGEMENT
[](https://doc.uniq365.com/uploads/images/gallery/2025-01/qedimage.png)
**Default Storage.** refers to the standard amount of storage provided as part of your subscription plan. This storage typically covers the core data needs of the organization, including essential transactional records, financial data, and operational information, with a set limit on the volume of data that can be stored.
**Extra Storage.** refers to the additional space allocated to accommodate growing data requirements This extra storage is essential for handling increased volumes of transactional data, historical records, backups, and the addition of new modules or business units within the ERP system. It helps ensure that the system can continue to function efficiently without running out of space, preventing potential data loss, system slowdowns, or disruptions.
**Used Storage.** Refers to the amount of data space occupied by the various modules and records within the system, including transactional data, financial records, inventory details, customer information, and employee data. This storage contains sales orders, invoices, and product catalogs, as well as like logs, reports, and system backups.
CLONE DATA
[](https://doc.uniq365.com/uploads/images/gallery/2025-01/Hrjimage.png)
Under Clone Data tab, customer can replicate and manage a data from sourcebook to destination account book. It helps businesses to clone Customer/Supplier, Product, Chart of Account, Warehouse, and other data to streamline financial operations, from recording transactions to generating financial reports.
[](https://doc.uniq365.com/uploads/images/gallery/2025-01/rxJimage.png)
**Step 1:** Select a source account book, this is where the base account book.
[](https://doc.uniq365.com/uploads/images/gallery/2025-01/puvimage.png)
**Step 2:** Select a destination account book.
**Step 3:** Choose from the data tab information you want to clone
**Step 4:** Once finalized the data for cloning, hit Clone.
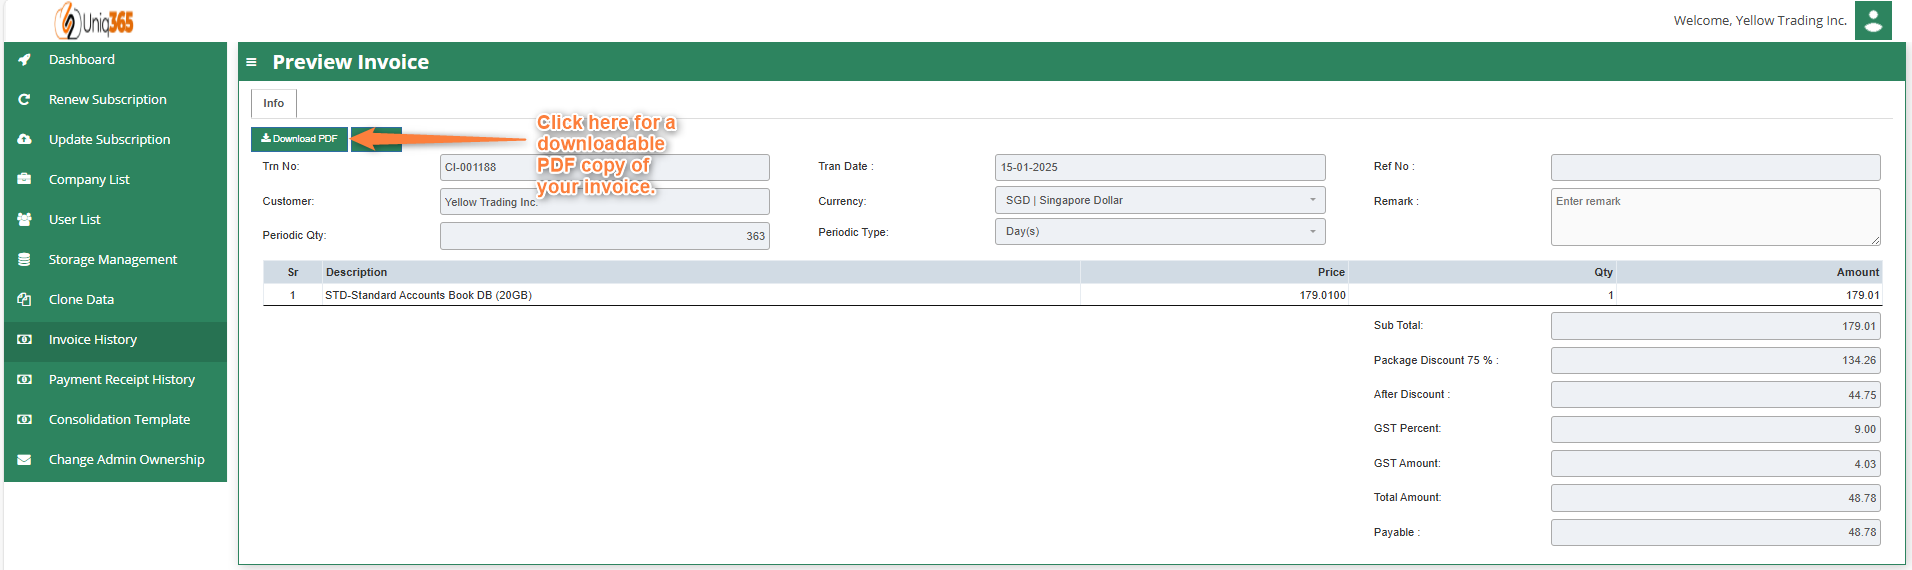
##### **INVOICE HISTORY**
[](https://doc.uniq365.com/uploads/images/gallery/2025-01/C4wimage.png)
Invoice history provides a comprehensive view of all transactions of the customer may it be subscription, renewal or availing additional subscription. Customer can view their invoice and print using this tab.
[](https://doc.uniq365.com/uploads/images/gallery/2025-01/Yzfimage.png)
Click download invoice and it will be downloaded to your device.
[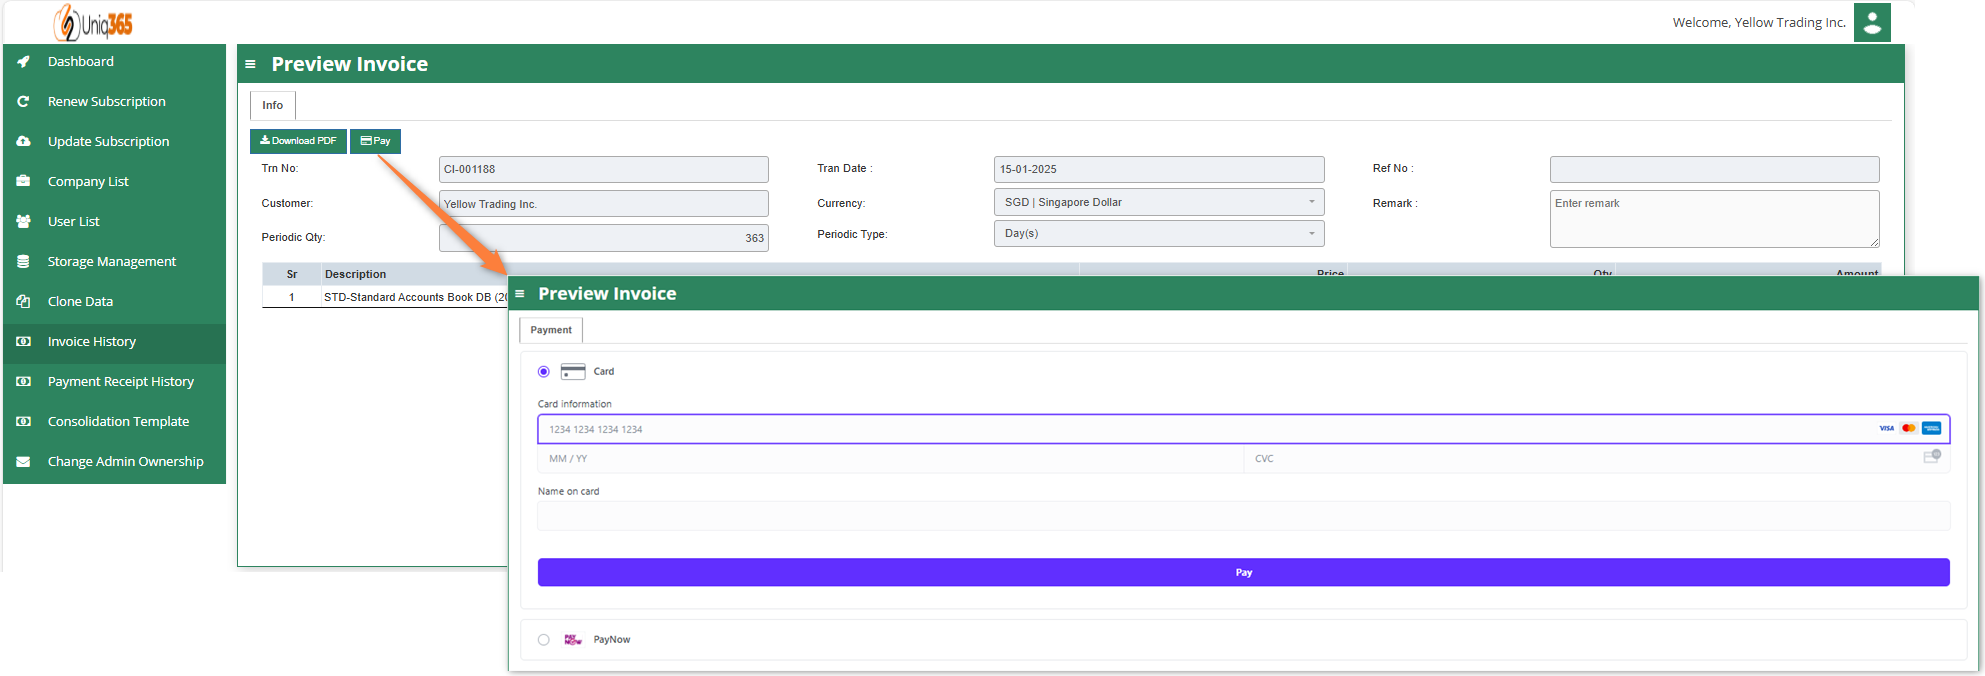](https://doc.uniq365.com/uploads/images/gallery/2025-01/Ejrimage.png)
Once you click Pay, you will be redirected to the payment gateway to make payment.
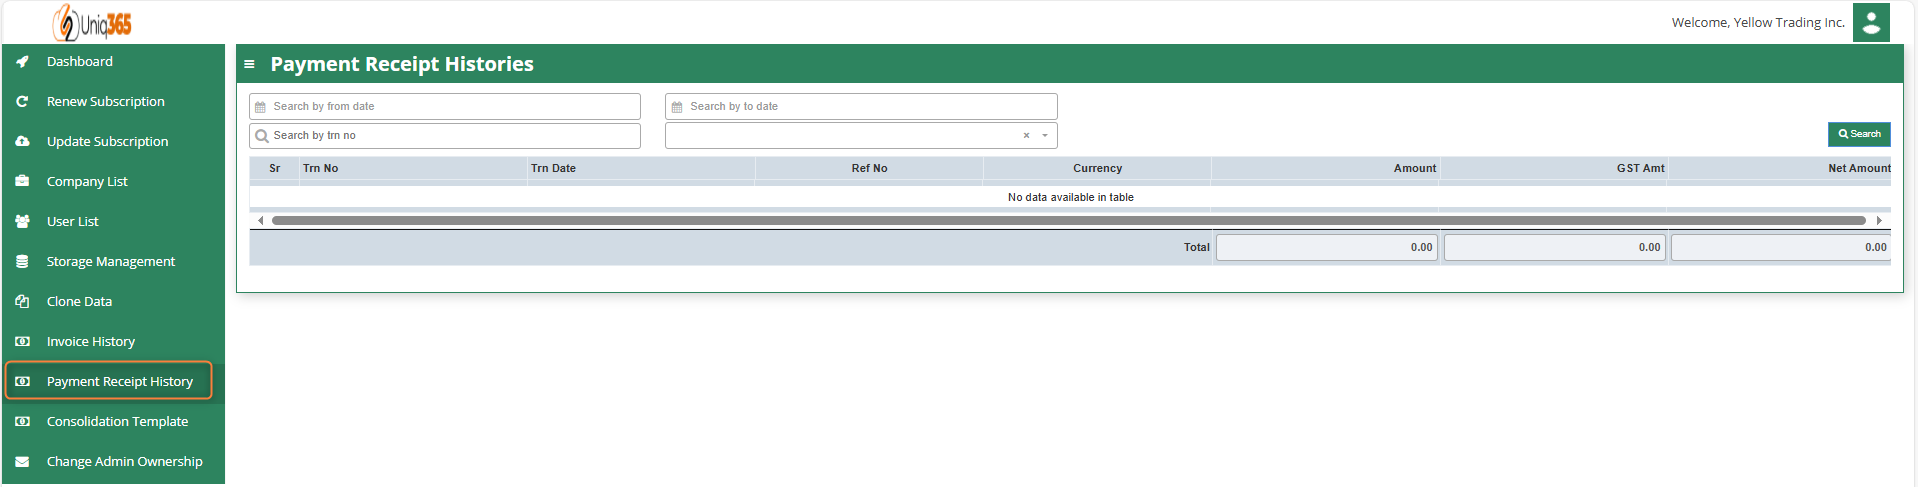
PAYMENT REVIEW HISTORY
[](https://doc.uniq365.com/uploads/images/gallery/2025-01/SCKimage.png)
Once the payment has been processed, it will reflect in the payment history.
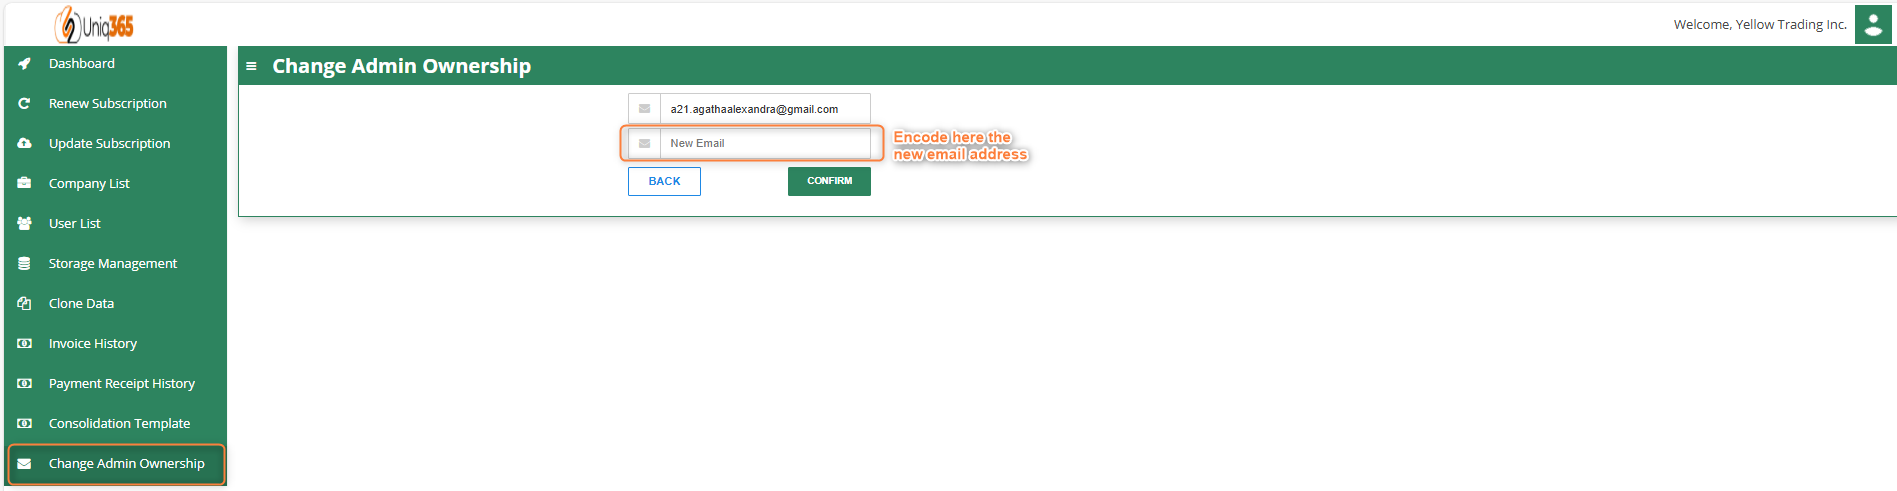
CHANGE ADMIN OWNERSHIP
[](https://doc.uniq365.com/uploads/images/gallery/2025-01/svMimage.png)
If there is change in ownership customer can modify the email address in the Change Admin Ownership tab so that new admin will be recognized by the system.
Supplier Purchase Order (SO)
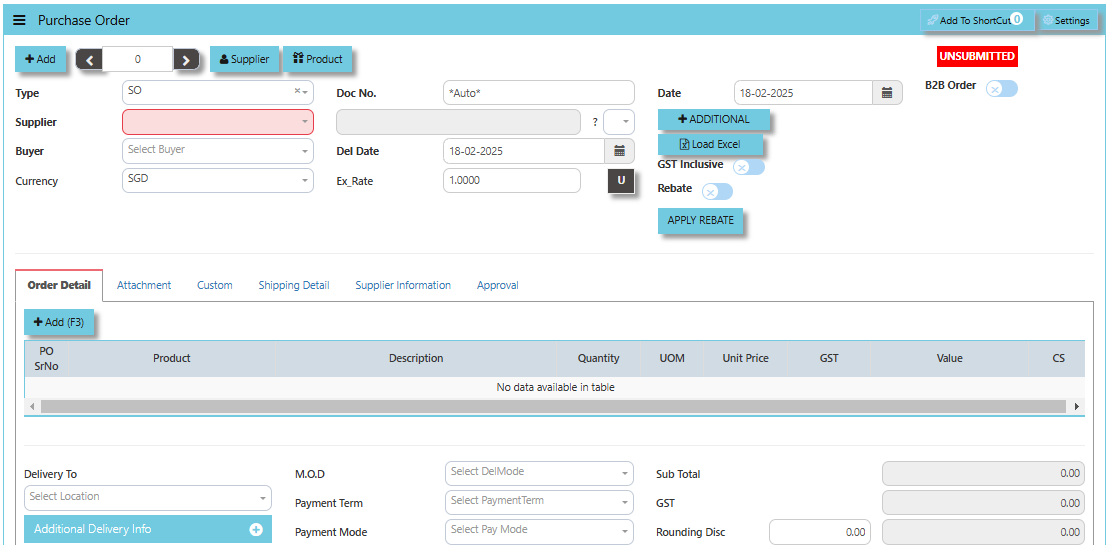
##### In Uniq365, you can indicate the Supplier Delivery Mode in the Supplier Maintenance or Transactions. You can also sort or filter reports by Delivery Mode. The **Purchase Order** in the Purchase Module serves as a document to update the system that goods are on order. No ledger postings take place at this point. Purchase Order is denoted by the transaction type “SO”.
\_\_\_\_\_\_\_\_\_\_\_\_\_\_\_\_\_\_\_\_\_\_\_\_\_\_\_\_\_\_\_\_\_\_\_\_\_\_\_\_\_\_\_\_\_\_\_\_\_\_\_\_\_\_\_\_\_\_\_\_\_\_\_\_\_\_\_\_\_\_\_\_\_\_\_\_\_\_\_\_\_\_\_\_\_\_\_\_\_\_\_\_\_\_\_\_\_\_\_
##### **How to create Supplier Purchase Order?**
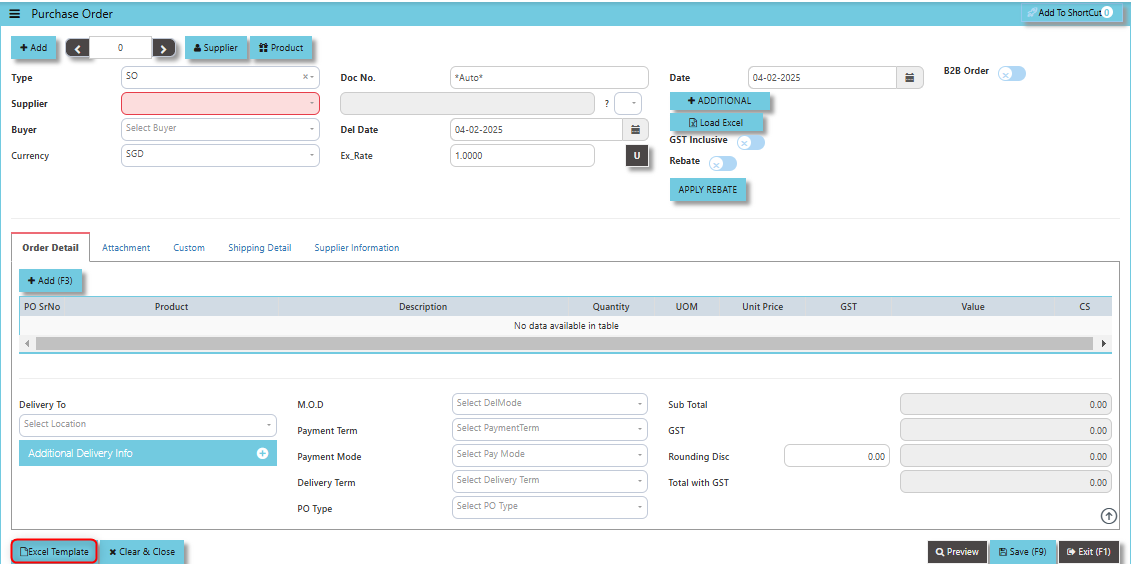
1. Click on PROCUREMENT – PURCHASING – SUPPLIER BILLS - PURCHASE ORDER for the screen below.
[](https://doc.uniq365.com/uploads/images/gallery/2025-01/DU7image.png)
2. Click Add (F3) to create new record.
[](https://doc.uniq365.com/uploads/images/gallery/2025-02/DPeimage.png)
3. Click Type - drop-down to select transaction type – SO (Purchases Order).
4\. After transaction type selection, use the tab button to go to the Ref No., Date, and other fields.
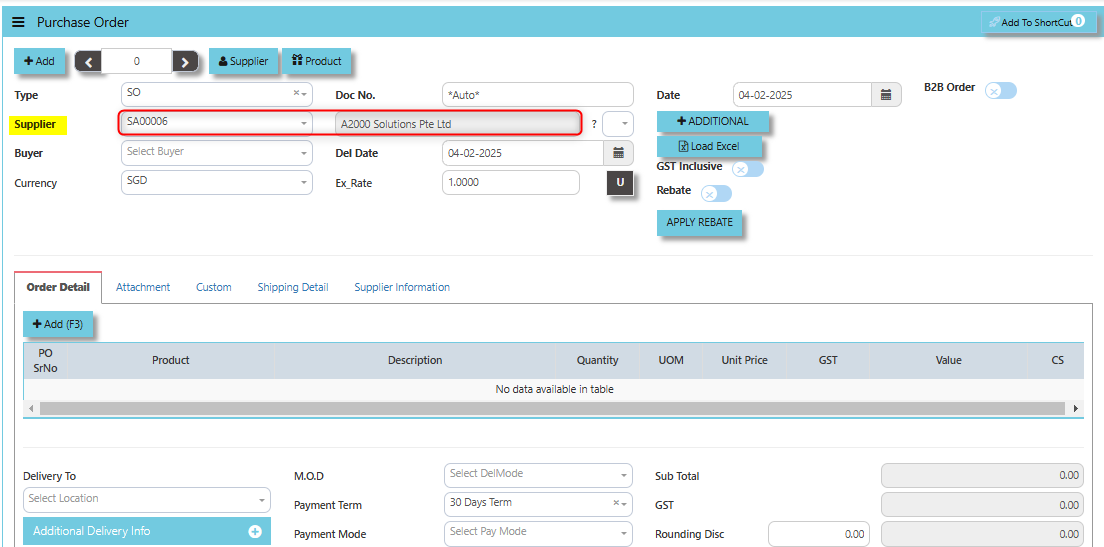
5\. Click the Supplier - drop-down list to select Supplier Name, followed by the Buyer, PDS, Currency, Rate, Narration, Delivery Date & Lead Time if applicable.
6\. After all the header information has been entered, go to the Details section to select the Product Code and Name for that Purchase Order. Save the transaction after this is done.
\_\_\_\_\_\_\_\_\_\_\_\_\_\_\_\_\_\_\_\_\_\_\_\_\_\_\_\_\_\_\_\_\_\_\_\_\_\_\_\_\_\_\_\_\_\_\_\_\_\_\_\_\_\_\_\_\_\_\_\_\_\_\_\_\_\_\_\_\_\_\_\_\_\_\_\_\_\_\_\_\_\_\_\_\_\_\_\_\_\_\_\_\_\_\_\_\_\_\_\_\_\_\_\_\_\_\_\_\_\_\_\_\_\_\_\_\_\_\_\_\_\_\_\_\_\_\_\_\_\_\_\_\_\_\_\_\_\_\_
The **Supplier** button provides quick access to detailed supplier profiles under supplier maintenance.
[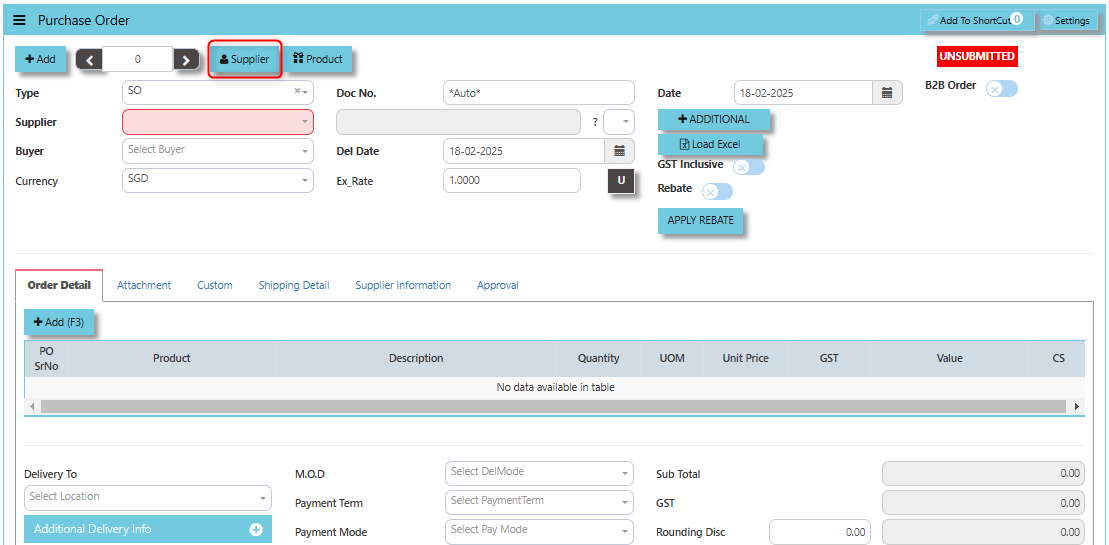](https://doc.uniq365.com/uploads/images/gallery/2025-02/iBPimage.png)
The **Product** button provides quick access to product and service maintenance.
[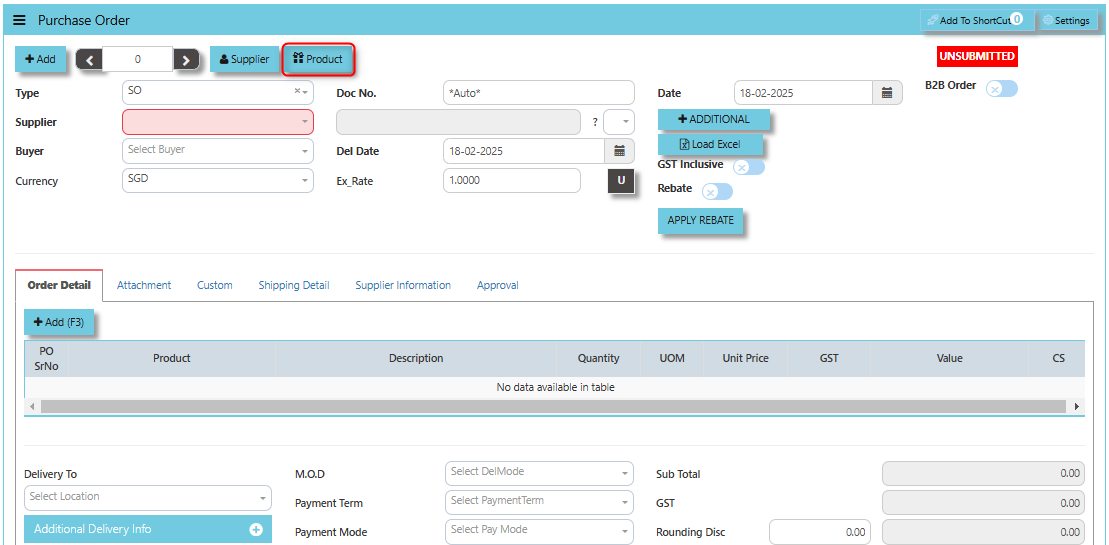](https://doc.uniq365.com/uploads/images/gallery/2025-02/WZLimage.png)
**"B2B Order"** checkbox typically indicates a special setting or status related to Business-to-Business (B2B) transactions. When this option is ticked or checked, it often triggers specific functionalities or workflows that pertain to B2B purchasing. When the "B2B Order" option is ticked, it likely signifies that the purchase order is being placed as part of a B2B transaction, meaning the order is between two businesses rather than a business and a consumer.
[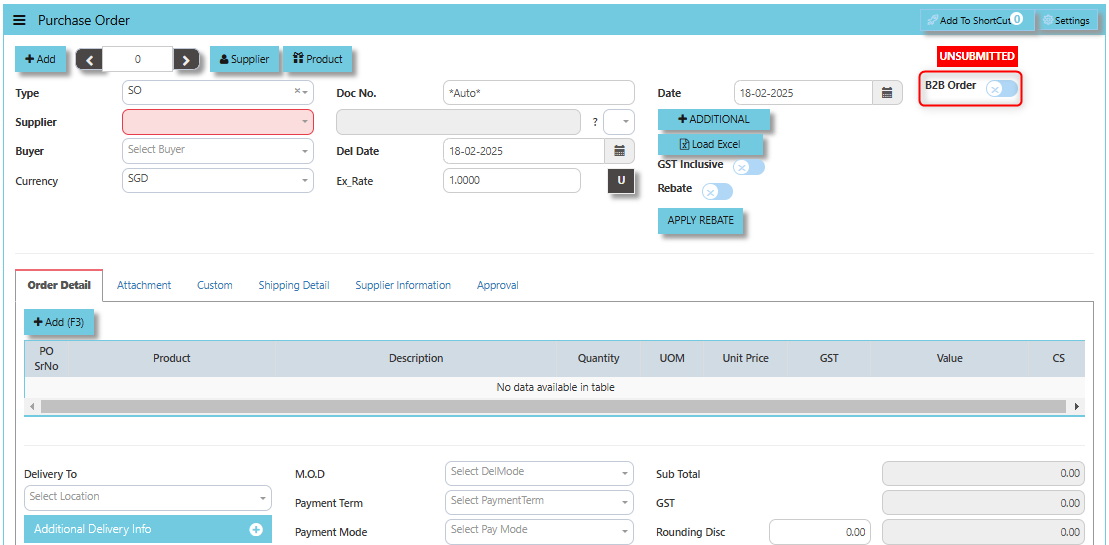](https://doc.uniq365.com/uploads/images/gallery/2025-02/fRFimage.png)
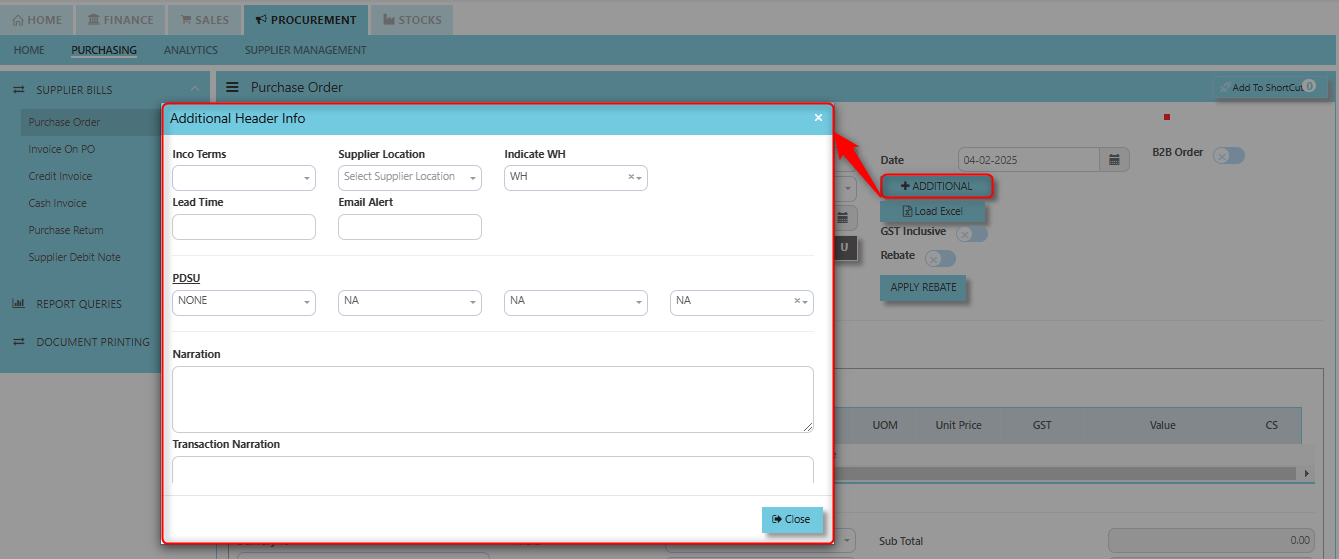
**"Additional Header Info"** button is typically used to capture and manage **a**dditional information related to the purchase order at the header level (i.e., Inco Terms, Supplier Location, Indicate WH, Lead Time, Email Alert, PDSU, Narration and Transaction Narration). This feature allows users to add extra data or notes that are relevant to the entire purchase order.
[](https://doc.uniq365.com/uploads/images/gallery/2025-02/khHimage.png)
**Excel Template** - The button allows users to download a pre-configured Excel template for entering or importing data related to the purchase order. The template is usually formatted to match the system's required structure for purchase orders, ensuring consistency and data accuracy.
[](https://doc.uniq365.com/uploads/images/gallery/2025-02/uBEimage.png)
**Load Excel** - When users have an Excel file with purchase order information (such as item names, quantities, prices, supplier details, etc.), the **"Load Excel"** button allows them to upload and import this data directly into the system. This eliminates the need for manual entry of the data into the system's purchase order fields.
[](https://doc.uniq365.com/uploads/images/gallery/2025-02/rfeimage.png)
\_\_\_\_\_\_\_\_\_\_\_\_\_\_\_\_\_\_\_\_\_\_\_\_\_\_\_\_\_\_\_\_\_\_\_\_\_\_\_\_\_\_\_\_\_\_\_\_\_\_\_\_\_\_\_\_\_\_\_\_\_\_\_\_\_\_\_\_\_\_\_\_\_\_\_\_\_\_\_\_\_\_\_\_\_\_\_\_\_\_\_\_\_\_\_\_\_\_\_\_\_\_\_\_\_\_\_\_\_\_\_\_\_\_\_\_\_\_\_\_\_\_\_\_\_\_\_\_\_\_\_\_\_\_\_\_\_\_\_
##### **How to use Load Excel?**
1. Click the Supplier - drop-down list to select Supplier Name.
[](https://doc.uniq365.com/uploads/images/gallery/2025-02/ojrimage.png)
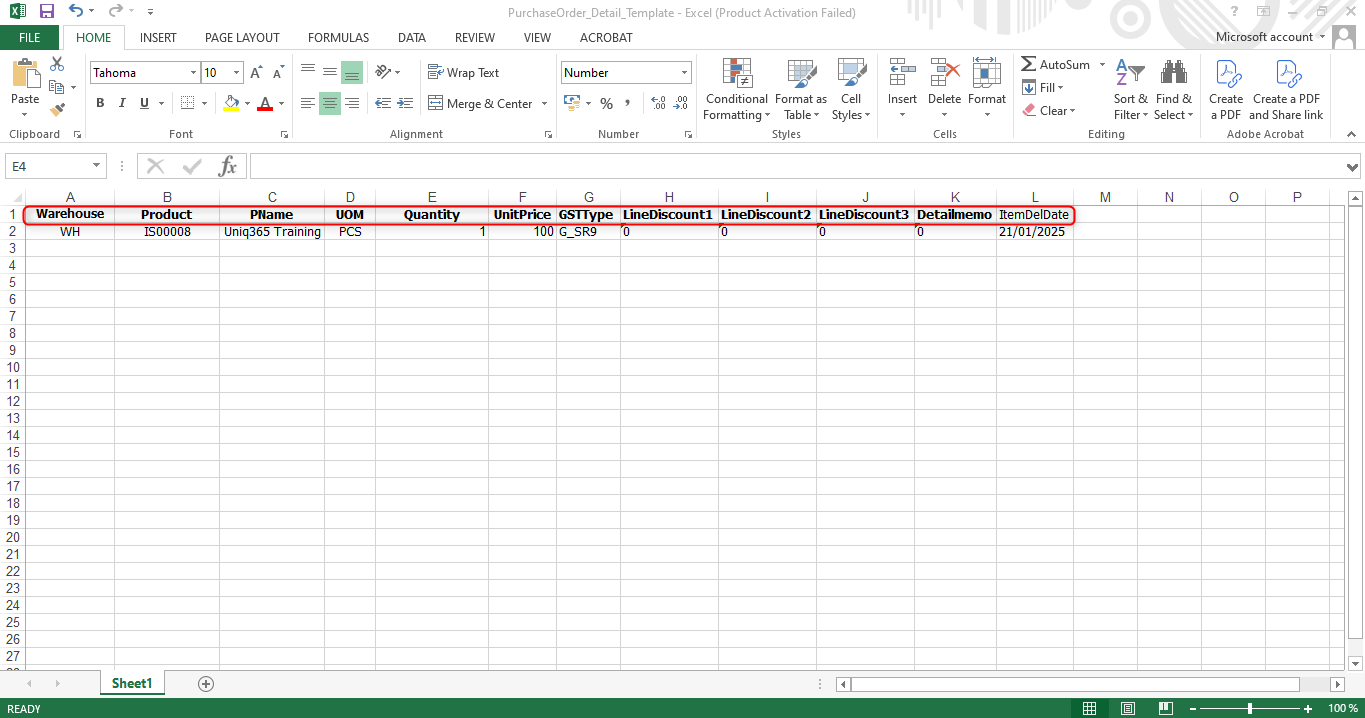
2. Download the Excel Template and ensure the Excel file you plan to upload is formatted correctly. It should contain all the necessary fields required for a purchase order, such as:
- Warehouse
- Product Code
- Product Name
- UOM
- Quantity
- Unit Price
- GST Type
- Line Discount 1, 2 & 3
- Detail Memo
- Item Delivery Date
[](https://doc.uniq365.com/uploads/images/gallery/2025-01/n3aimage.png)
3. Click the **"Load Excel"** button to open the file upload interface. This may open a file browser or prompt you to select the Excel file you want to upload.
[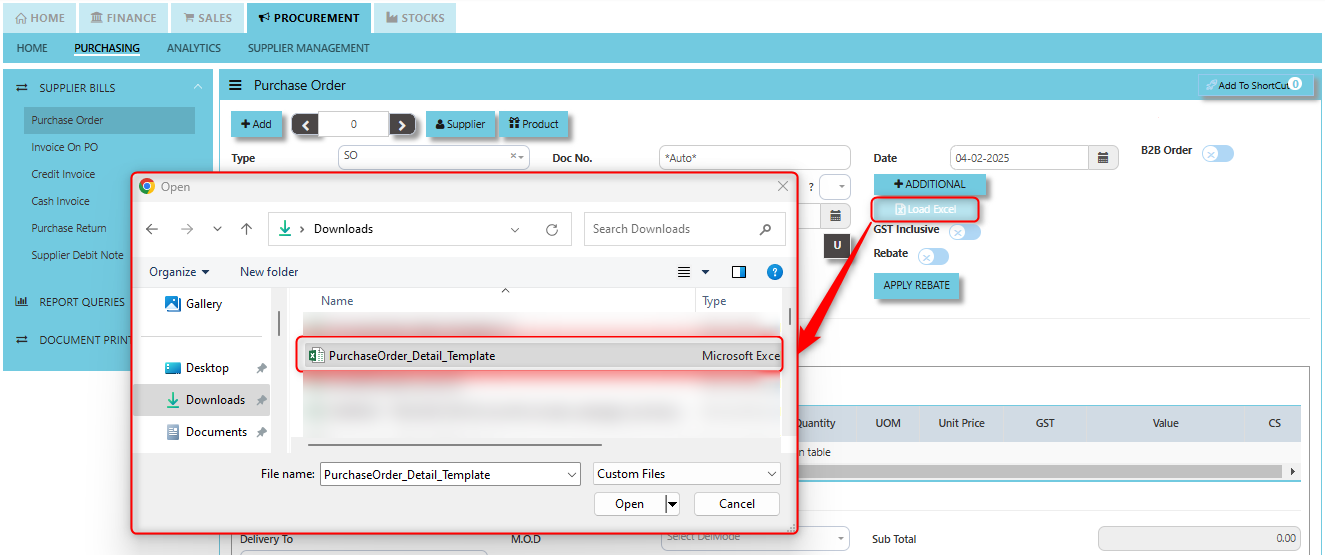](https://doc.uniq365.com/uploads/images/gallery/2025-02/Wpiimage.png)
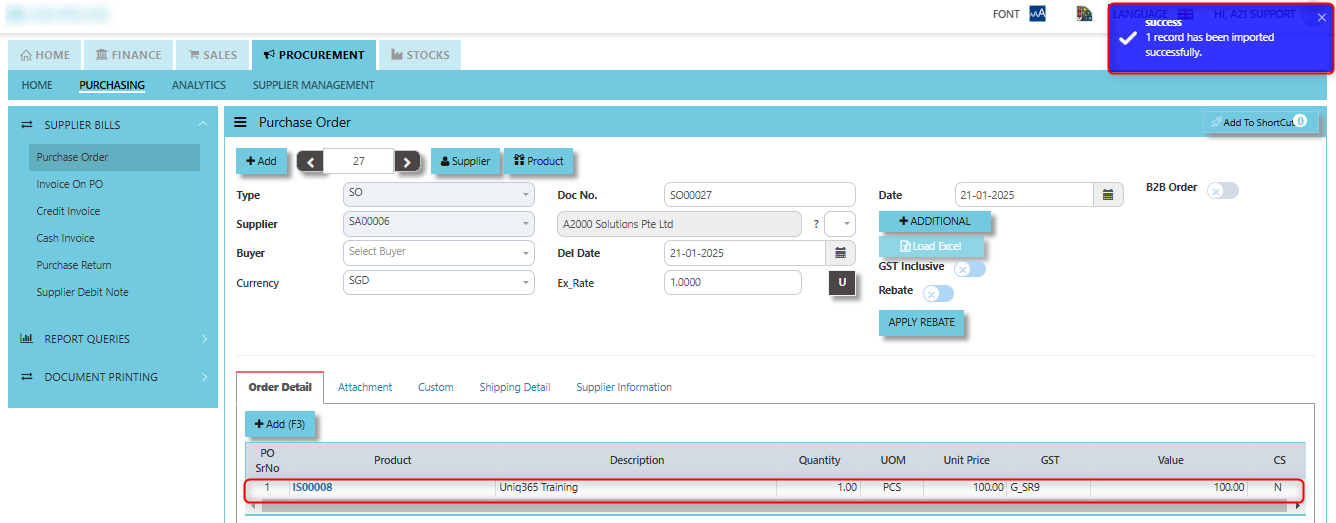
4. Once the filed uploaded, system will prompt a message that record has been imported successfully.
[](https://doc.uniq365.com/uploads/images/gallery/2025-02/wBnimage.png)
5. After the import is complete, review the imported purchase orders in the system to ensure everything has been transferred correctly. This might include checking that the order details, such as item descriptions, quantities, prices, and suppliers, are accurate.
6. Once the data is imported successfully and checking is done, you can proceed to **save** the purchase order as required by your workflow. This may involve further approvals or other processes depending on the organization's procedures.
\_\_\_\_\_\_\_\_\_\_\_\_\_\_\_\_\_\_\_\_\_\_\_\_\_\_\_\_\_\_\_\_\_\_\_\_\_\_\_\_\_\_\_\_\_\_\_\_\_\_\_\_\_\_\_\_\_\_\_\_\_\_\_\_\_\_\_\_\_\_\_\_\_\_\_\_\_\_\_\_\_\_\_\_\_\_\_\_\_\_\_\_\_\_\_\_\_\_\_\_\_\_\_\_\_\_\_\_\_\_\_\_\_\_\_\_\_\_\_\_\_\_\_\_\_\_\_\_\_\_\_\_\_\_\_\_\_\_\_
**Update (U Button)**: When you click the **U button**, It may be used to update the status of the purchase order after changes have been made.
[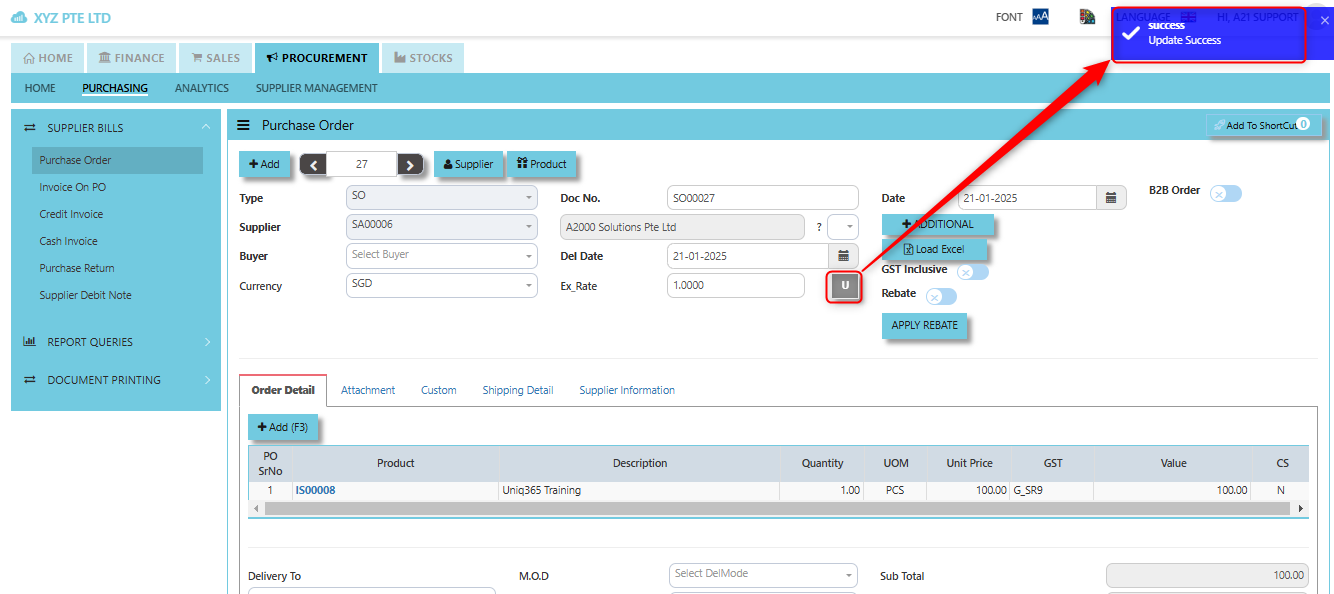](https://doc.uniq365.com/uploads/images/gallery/2025-02/yQoimage.png)
The **GST Inclusive** checkbox indicates whether the prices quoted by the supplier in the PO include **Goods and Services Tax (GST)** or not.
[](https://doc.uniq365.com/uploads/images/gallery/2025-02/FUtimage.png)
- **When ticked (GST Inclusive)**: provided in the PO already includes the applicable GST amount. The GST amount will not be calculated or displayed separately, as it's already accounted for in the quoted price.
- **When not ticked (GST Exclusive)**: The **purchase price** is considered exclusive of GST. The system will calculate and add the GST based on the applicable tax rate, and the final total will be the sum of the base price plus the GST amount.
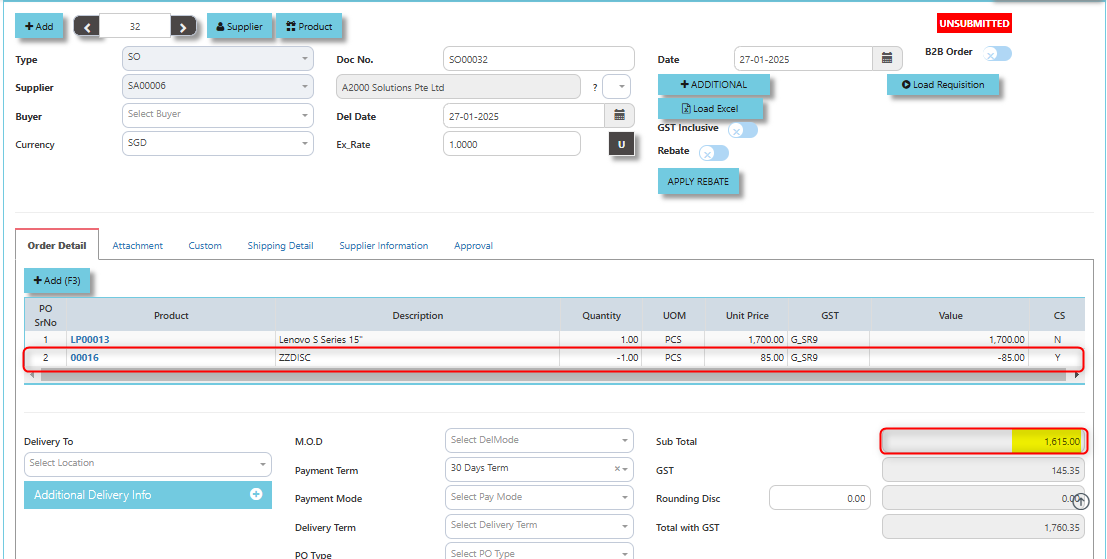
The **"Apply Rebate"** is typically used to apply any available rebates or discounts to the total order value. This button allows users to apply that rebate to reduce the overall cost of the purchase order.
[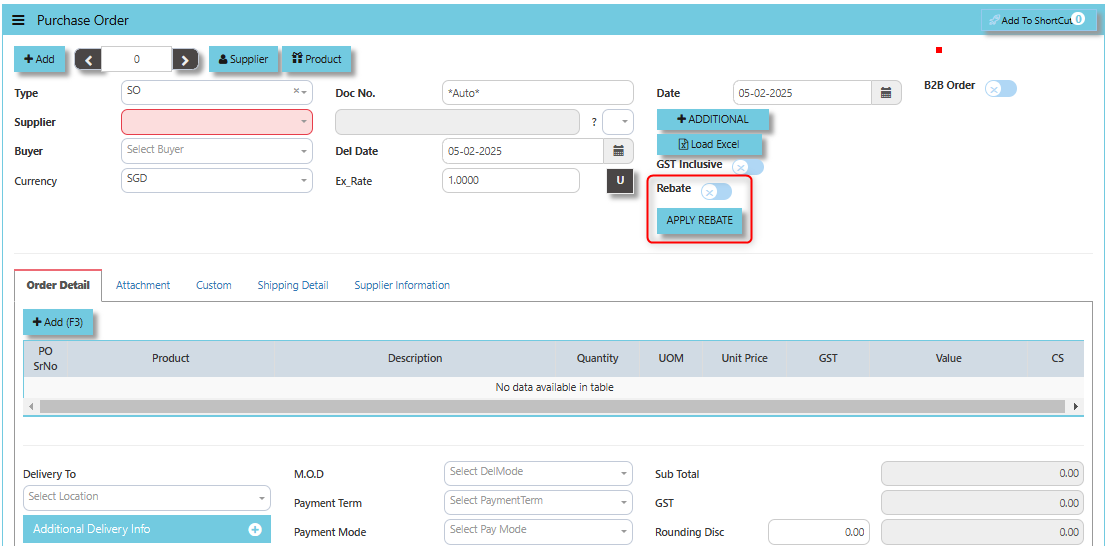](https://doc.uniq365.com/uploads/images/gallery/2025-02/W6Rimage.png)
\_\_\_\_\_\_\_\_\_\_\_\_\_\_\_\_\_\_\_\_\_\_\_\_\_\_\_\_\_\_\_\_\_\_\_\_\_\_\_\_\_\_\_\_\_\_\_\_\_\_\_\_\_\_\_\_\_\_\_\_\_\_\_\_\_\_\_\_\_\_\_\_\_\_\_\_\_\_\_\_\_\_\_\_\_\_\_\_\_\_\_\_\_\_\_\_\_\_\_\_\_\_\_\_\_\_\_\_\_\_\_\_\_\_\_\_\_\_\_\_\_\_\_\_\_\_\_\_\_\_\_\_\_\_\_\_\_\_\_
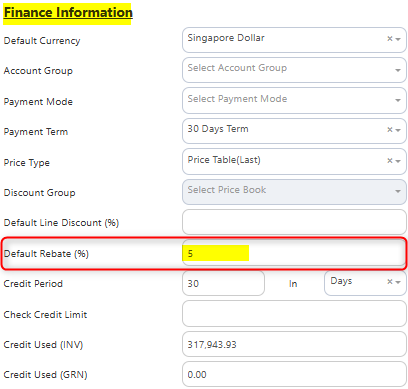
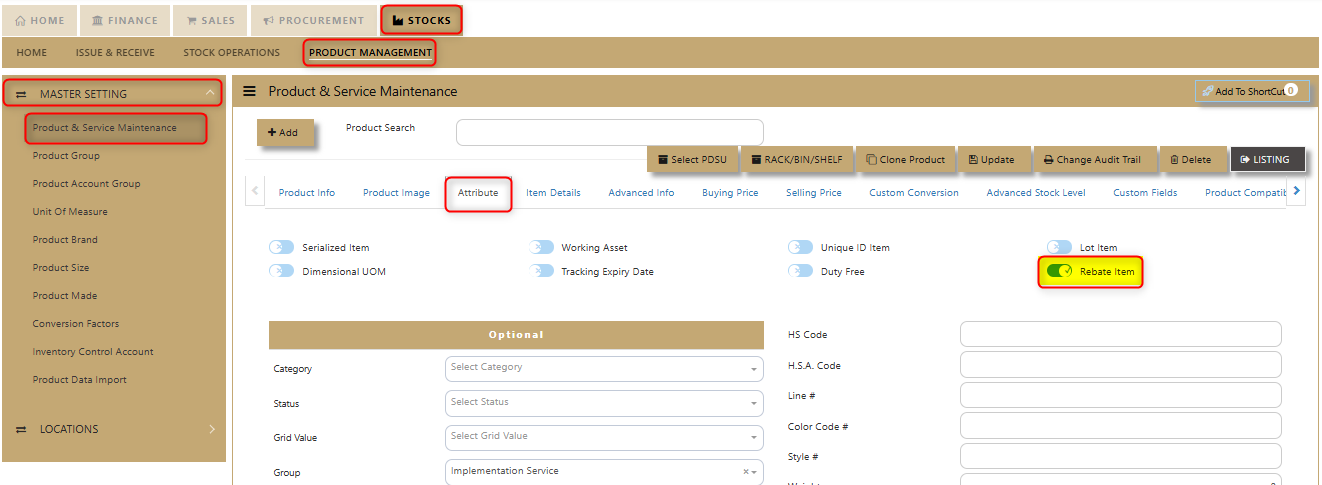
##### **How to Apply Rebate?**
1. Under the Supplier Maintenance - Finance Information enable the Rebate Percentage Type in the percentage you want to include.
[](https://doc.uniq365.com/uploads/images/gallery/2025-01/VZhimage.png)
2. Enable the Rebate Item under Product Maintenance. Click on STOCKS - PRODUCT MANAGEMENT - MASTER SETTING - PRODUCT & SERVICE MAINTENANCE - ATTRIBUTE TAB
[](https://doc.uniq365.com/uploads/images/gallery/2025-01/r1zimage.png)
3. Encode the rebate Product/Service to calibrate the percentage discount. A dialogue box will prompt to verify the Rebate to be applied. Configure accordingly on your desired rebate percentage and Click “Apply Rebate” once done.
[](https://doc.uniq365.com/uploads/images/gallery/2025-01/5BQimage.png)
4. Upon encoding the output will go as like the below image for the computed Sub Total.
[](https://doc.uniq365.com/uploads/images/gallery/2025-01/gVdimage.png)
\_\_\_\_\_\_\_\_\_\_\_\_\_\_\_\_\_\_\_\_\_\_\_\_\_\_\_\_\_\_\_\_\_\_\_\_\_\_\_\_\_\_\_\_\_\_\_\_\_\_\_\_\_\_\_\_\_\_\_\_\_\_\_\_\_\_\_\_\_\_\_\_\_\_\_\_\_\_\_\_\_\_\_\_\_\_\_\_\_\_\_\_\_\_\_\_\_\_\_\_\_\_\_\_\_\_\_\_\_\_\_\_\_\_\_\_\_\_\_\_\_\_\_\_\_\_\_\_\_\_\_\_\_\_\_\_\_\_\_
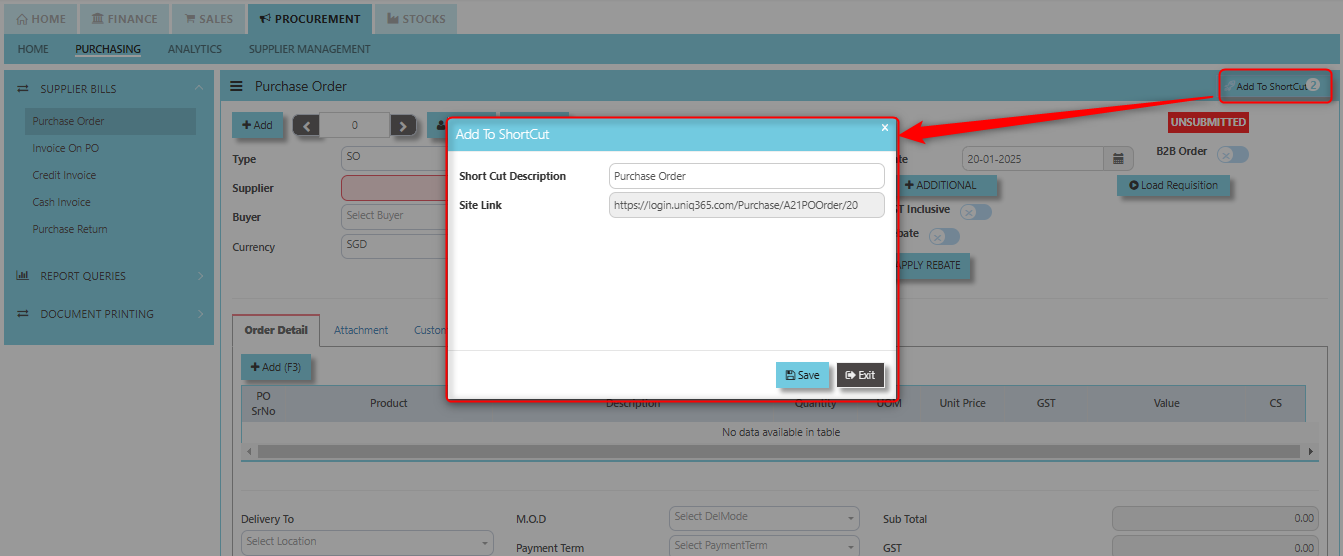
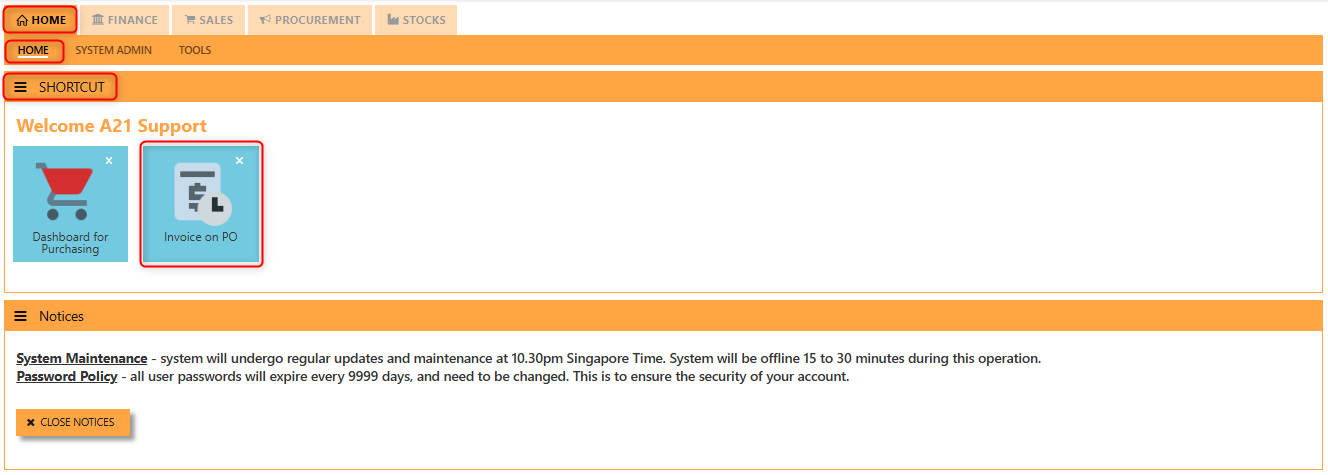
**Add to ShortCut -** Used to create a shortcut for quick access to a specific purchase order or purchase-related functionality within the ERP system. When you click this button, the selected purchase order or screen can be added to a personalized list of shortcuts, which allows users to quickly navigate to that specific purchase order or function without having to search for it every time.
[](https://doc.uniq365.com/uploads/images/gallery/2025-01/jgnimage.png)
##### **How to use Add to ShortCut?**
1. Click "**Add to ShortCut"** and system will open below windows:
[](https://doc.uniq365.com/uploads/images/gallery/2025-01/4VHimage.png)
2. Enter Short Cut Description
3\. Click SAVE then click OK.
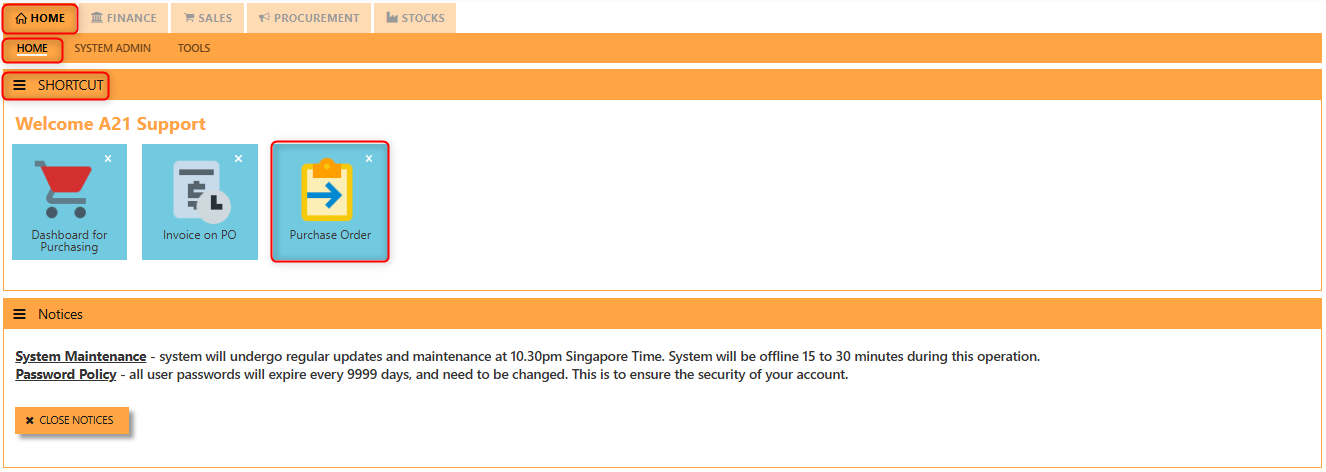
4\. User may look to the Homepage for the added function or page. Click on HOME - HOME - SHORTCUT for the screen below.
[](https://doc.uniq365.com/uploads/images/gallery/2025-01/gBQimage.png)
\_\_\_\_\_\_\_\_\_\_\_\_\_\_\_\_\_\_\_\_\_\_\_\_\_\_\_\_\_\_\_\_\_\_\_\_\_\_\_\_\_\_\_\_\_\_\_\_\_\_\_\_\_\_\_\_\_\_\_\_\_\_\_\_\_\_\_\_\_\_\_\_\_\_\_\_\_\_\_\_\_\_\_\_\_\_\_\_\_\_\_\_\_\_\_\_\_\_\_\_\_\_\_\_\_\_\_\_\_\_\_\_\_\_\_\_\_\_\_\_\_\_\_\_\_\_\_\_\_\_\_\_\_\_\_\_\_\_\_
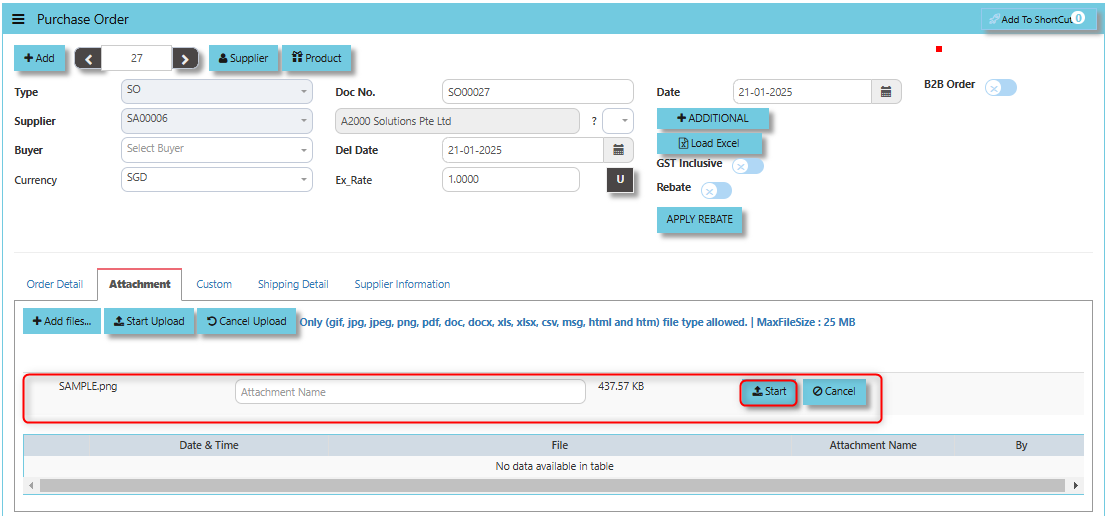
**"Attachment Tab"** allows users to attach various files and documents related to the purchase order. By attaching relevant files, users ensure that all purchase-related information is kept in one place, making the procurement process smoother, more transparent, and easier to track.
##### **How to use Attachment Tab?**
1. Click on PROCUREMENT - PURCHASING - SUPER BILLS - PURCHASE ORDER - ATTACHMENT TAB for the screen below.
[](https://doc.uniq365.com/uploads/images/gallery/2025-02/nJ2image.png)
2. Click +Add files and windows will prompt then choose the file you want to upload by clicking open. Kindly take note the file types and maximum size requirements in uploading: ***Only (gif, jpg, jpeg, png, pdf, doc, docx, xls, xlsx, csv, msg, html and htm) file type allowed. | MaxFileSize : 25 MB***
[](https://doc.uniq365.com/uploads/images/gallery/2025-02/XURimage.png)
3. Key in the Attachment Name then click start to upload.
[](https://doc.uniq365.com/uploads/images/gallery/2025-02/oVPimage.png)
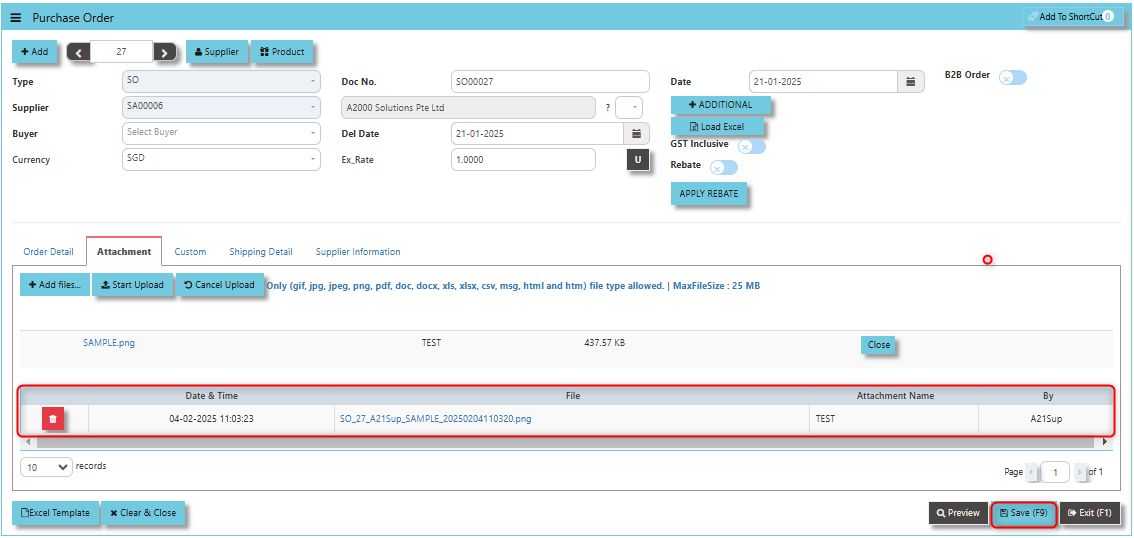
4. Once the file attached, click "SAVE" button
[](https://doc.uniq365.com/uploads/images/gallery/2025-02/CLpimage.png)
User may opt to cancel the uploading by clicking the **"Cancel Upload"** button and delete the file uploaded by clicking the **"Bin icon"** at the line detail.
\_\_\_\_\_\_\_\_\_\_\_\_\_\_\_\_\_\_\_\_\_\_\_\_\_\_\_\_\_\_\_\_\_\_\_\_\_\_\_\_\_\_\_\_\_\_\_\_\_\_\_\_\_\_\_\_\_\_\_\_\_\_\_\_\_\_\_\_\_\_\_\_\_\_\_\_\_\_\_\_\_\_\_\_\_\_\_\_\_\_\_\_\_\_\_\_\_\_\_\_\_\_\_\_\_\_\_\_\_\_\_\_\_\_\_\_\_\_\_\_\_\_\_\_\_\_\_\_\_\_\_\_\_\_\_\_\_\_\_
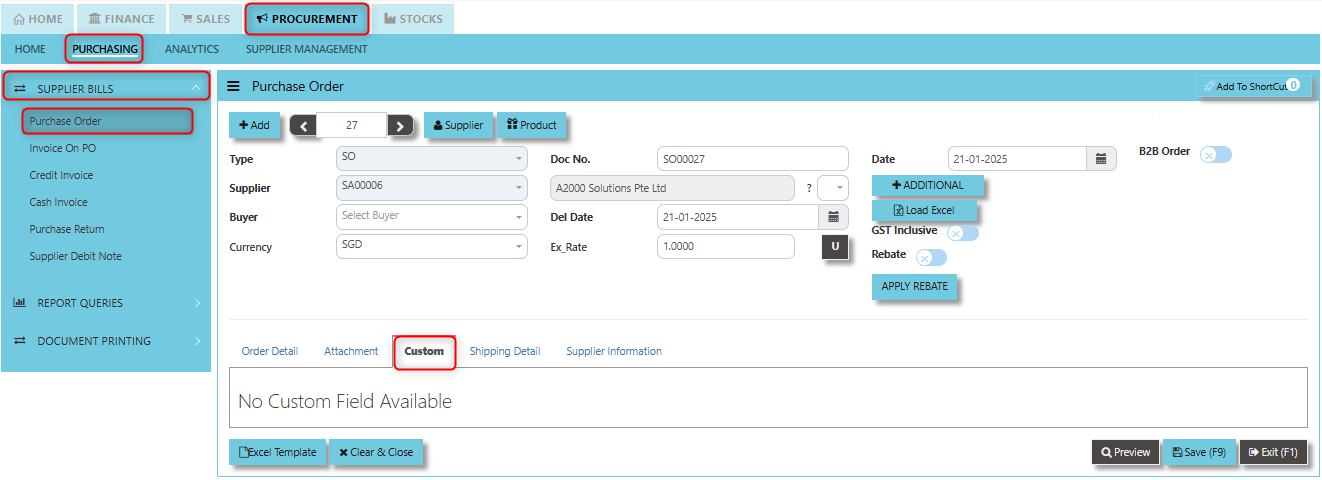
**"Custom Tab"** allows user to add custom fields or sections to a purchase order form. This feature is intended to accommodate specific business requirements or processes that are not covered by the standard fields in the system.
[](https://doc.uniq365.com/uploads/images/gallery/2025-02/uNrimage.png)
\_\_\_\_\_\_\_\_\_\_\_\_\_\_\_\_\_\_\_\_\_\_\_\_\_\_\_\_\_\_\_\_\_\_\_\_\_\_\_\_\_\_\_\_\_\_\_\_\_\_\_\_\_\_\_\_\_\_\_\_\_\_\_\_\_\_\_\_\_\_\_\_\_\_\_\_\_\_\_\_\_\_\_\_\_\_\_\_\_\_\_\_\_\_\_\_\_\_\_\_\_\_\_\_\_\_\_\_\_\_\_\_\_\_\_\_\_\_\_\_\_\_\_\_\_\_\_\_\_\_\_\_\_\_\_\_\_\_\_
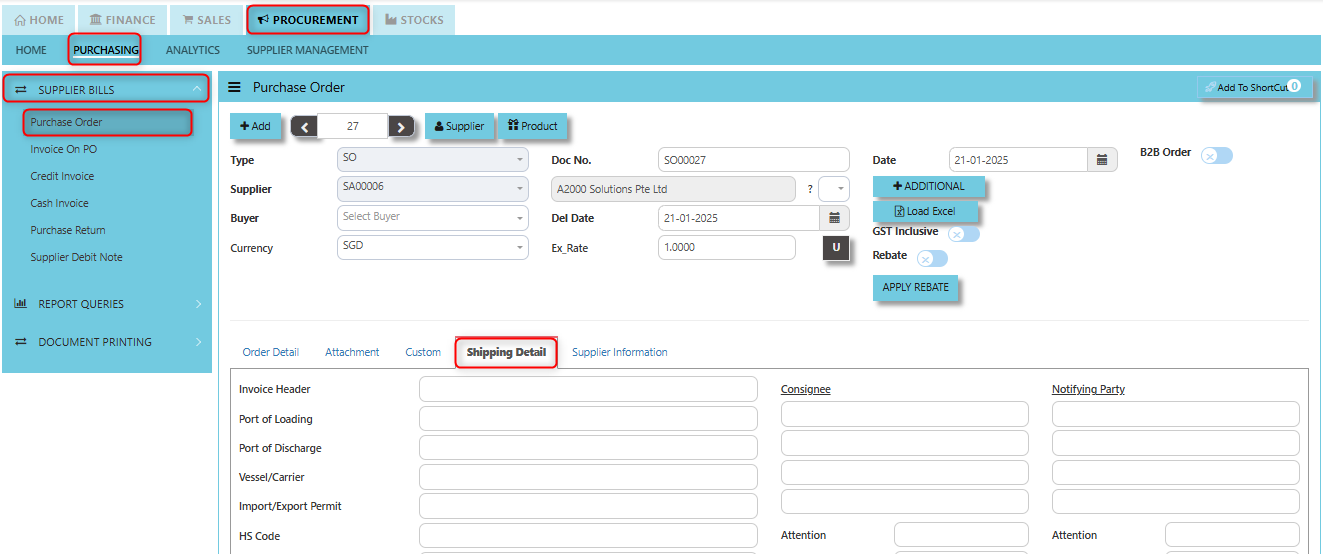
**"Shipping Detail Tab"** a section where specific shipping-related information is entered and managed for the purchased goods or services. This tab ensures that all relevant details regarding the shipment, delivery location, and delivery expectations are captured in the system to facilitate smooth and accurate order fulfillment.
##### **How to set Shipping Detail?**
1. Click on PROCUREMENT - PURCHASING - SUPPLIER BILLS -PURCHASE ORDER - SHIPPING DETAIL for the screen below.
[](https://doc.uniq365.com/uploads/images/gallery/2025-02/mYZimage.png)
2. Input the details for the below fields:
- Invoice Header
- Port of Loading
- Port of Discharge
- Vessel/Carrier
- Import/Export Permit
- HS Code
- Container/Seal No
- Other Information
- Consignee
- Attention
- Tel
- Fax
- Notifying Party
- Attention
- Tel
- Fax
- Est. Date of Delivery (ETD)
- Est. Date Sailing (ETS)
- Est. Date Arrival (ETA)
3. Once keyed in the necessary details, click the next tab and will automatically save all the information then system will prompt you a message.
[](https://doc.uniq365.com/uploads/images/gallery/2025-02/gs7image.png)
\_\_\_\_\_\_\_\_\_\_\_\_\_\_\_\_\_\_\_\_\_\_\_\_\_\_\_\_\_\_\_\_\_\_\_\_\_\_\_\_\_\_\_\_\_\_\_\_\_\_\_\_\_\_\_\_\_\_\_\_\_\_\_\_\_\_\_\_\_\_\_\_\_\_\_\_\_\_\_\_\_\_\_\_\_\_\_\_\_\_\_\_\_\_\_\_\_\_\_\_\_\_\_\_\_\_\_\_\_\_\_\_\_\_\_\_\_\_\_\_\_\_\_\_\_\_\_\_\_\_\_\_\_\_\_\_\_\_\_
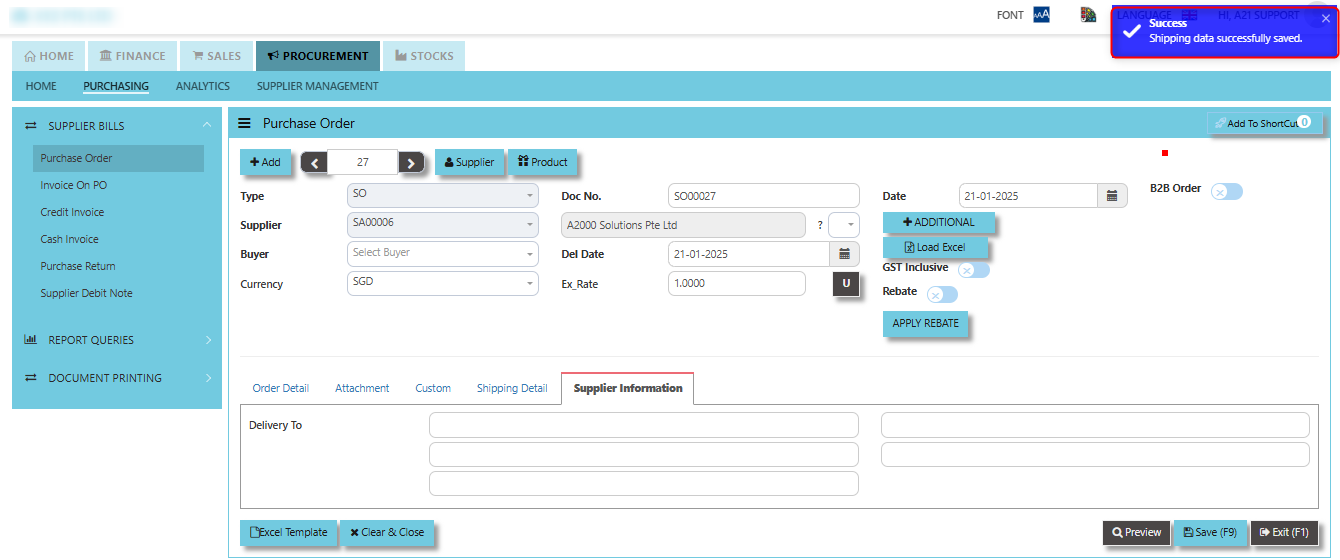
**"Supplier Information Tab"** provides essential details about the supplier or vendor responsible for fulfilling the purchase order.
##### **How to set Supplier Information?**
1. Click on PROCUREMENT - PURCHASING - SUPPLIER BILLS - PURCHASE ORDER - SUPPLIER INFORMATION for the screen below.
[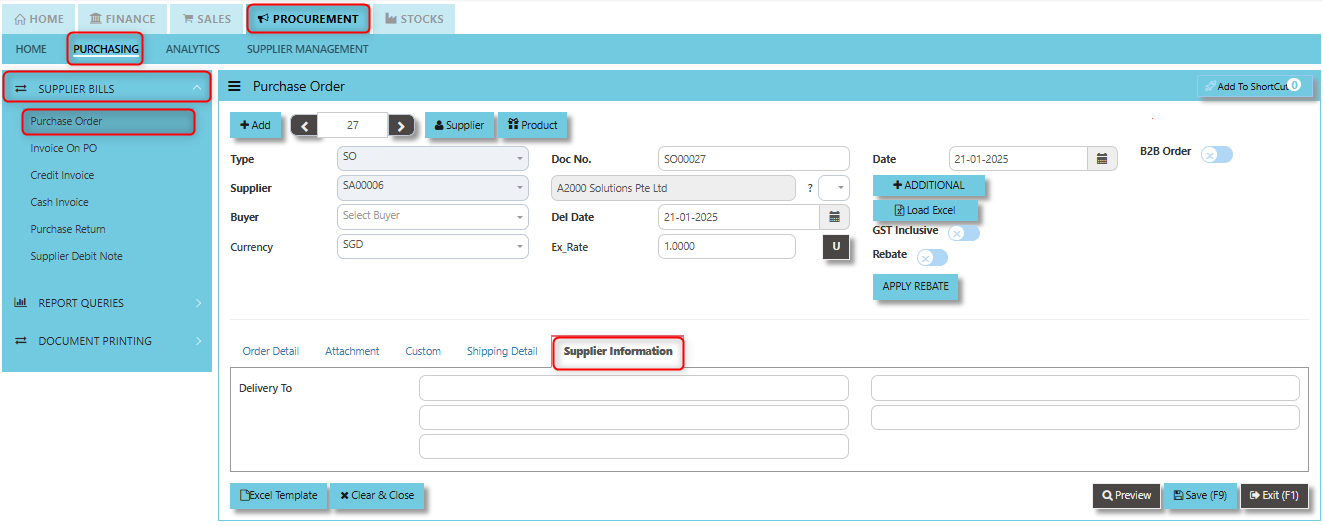](https://doc.uniq365.com/uploads/images/gallery/2025-02/ARaimage.png)
2. Key in the details of "Delivery To"
3\. Once keyed in the necessary details, click "SAVE"
\_\_\_\_\_\_\_\_\_\_\_\_\_\_\_\_\_\_\_\_\_\_\_\_\_\_\_\_\_\_\_\_\_\_\_\_\_\_\_\_\_\_\_\_\_\_\_\_\_\_\_\_\_\_\_\_\_\_\_\_\_\_\_\_\_\_\_\_\_\_\_\_\_\_\_\_\_\_\_\_\_\_\_\_\_\_\_\_\_\_\_\_\_\_\_\_\_\_\_\_\_\_\_\_\_\_\_\_\_\_\_\_\_\_\_\_\_\_\_\_\_\_\_\_\_\_\_\_\_\_\_\_\_\_\_\_\_\_\_
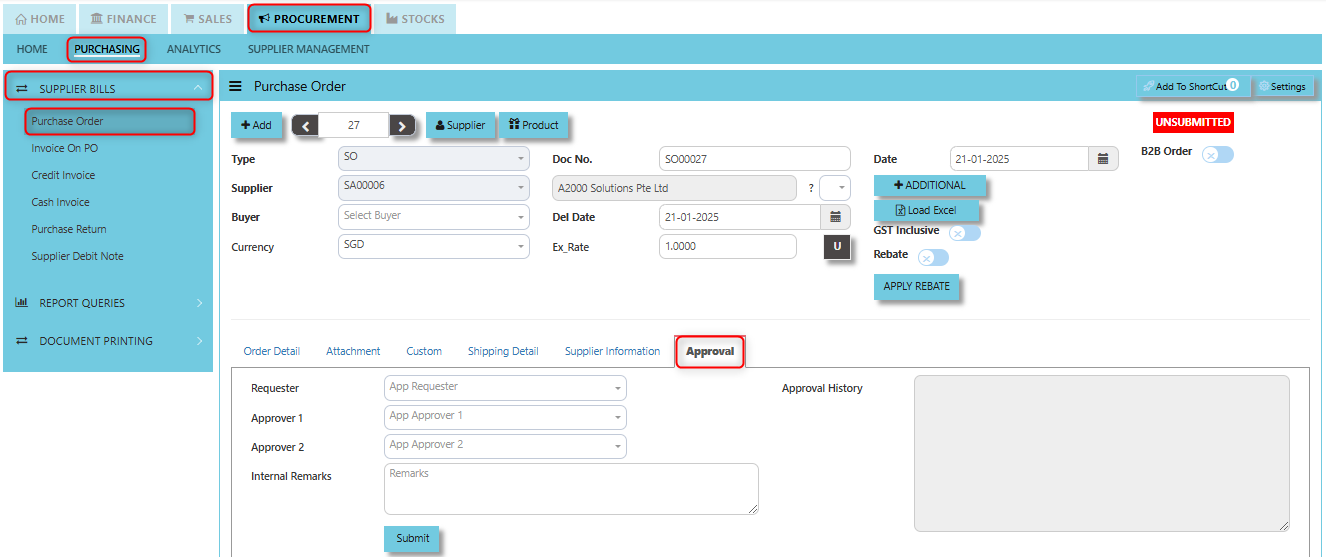
The **Approval tab** ensures that purchase orders are thoroughly reviewed and authorized in compliance with the company's purchasing policies and procedures before any procurement activity is carried out.
[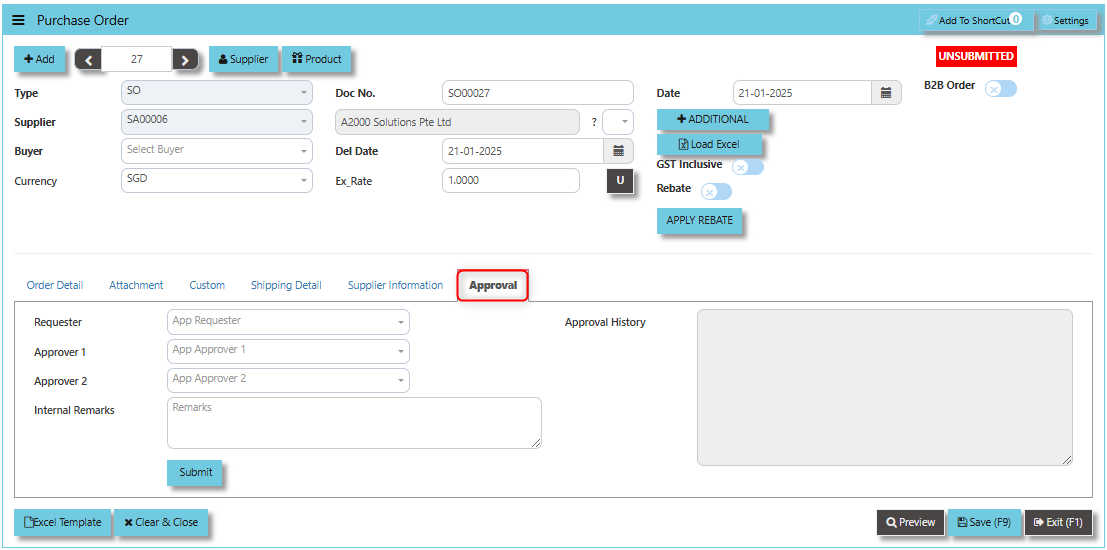](https://doc.uniq365.com/uploads/images/gallery/2025-02/mERimage.png)
##### **How to use Approval Tab?**
1. Click PROCUREMENT - PURCHASING - SUPPLIER BILLS - PURCHASE ORDER - APPROVAL TAB for the screen below.
[](https://doc.uniq365.com/uploads/images/gallery/2025-02/svXimage.png)
2. Select requester for the said created purchase order
[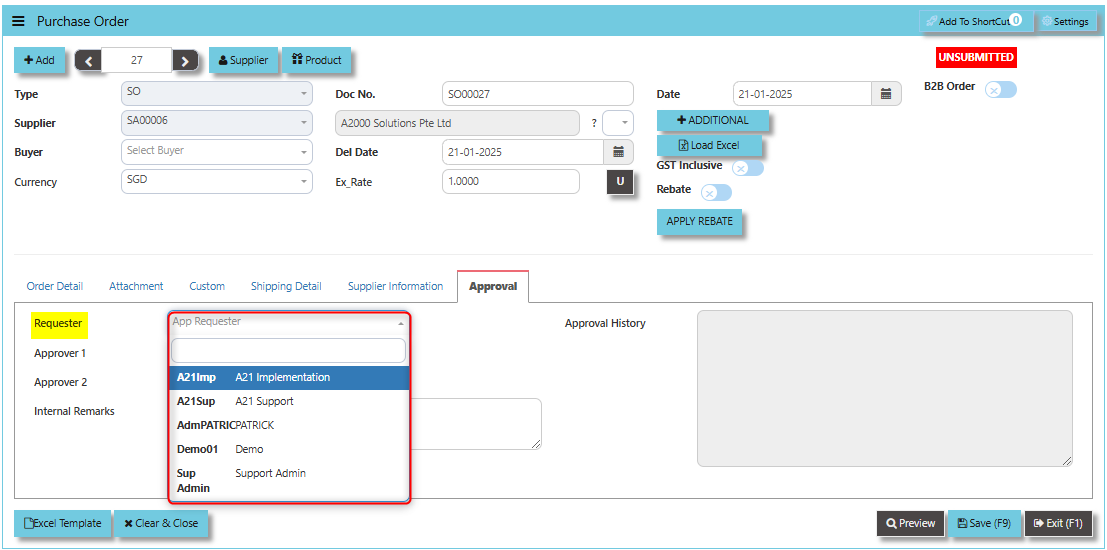](https://doc.uniq365.com/uploads/images/gallery/2025-02/vttimage.png)
3. Select for Approval 1. If the process requires an Approval 2 user may select but should not be same approver under Approval 1.
[](https://doc.uniq365.com/uploads/images/gallery/2025-02/i99image.png)
4. Input any remarks associated to the purchase order.
[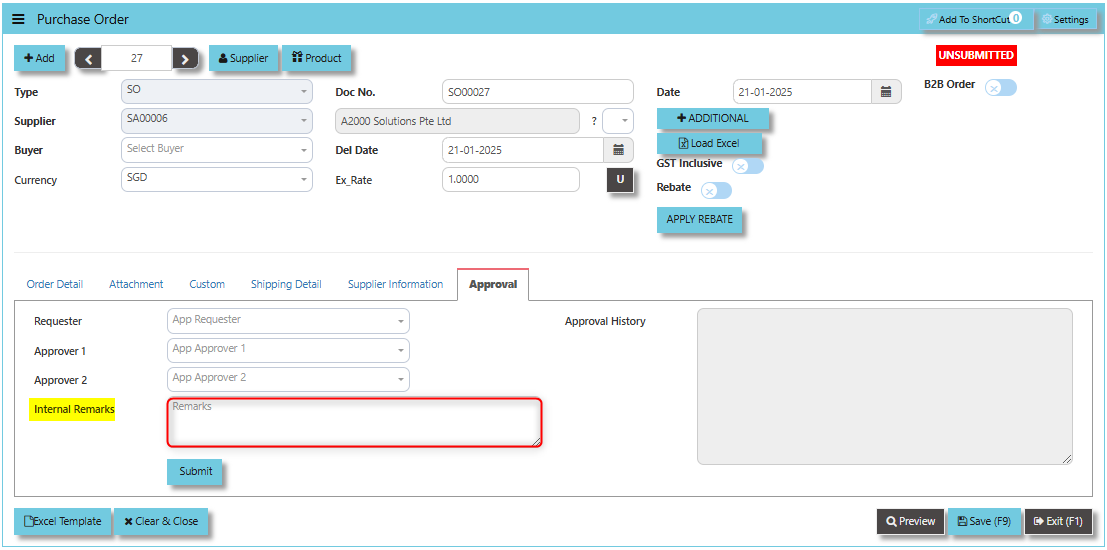](https://doc.uniq365.com/uploads/images/gallery/2025-02/GZ2image.png)
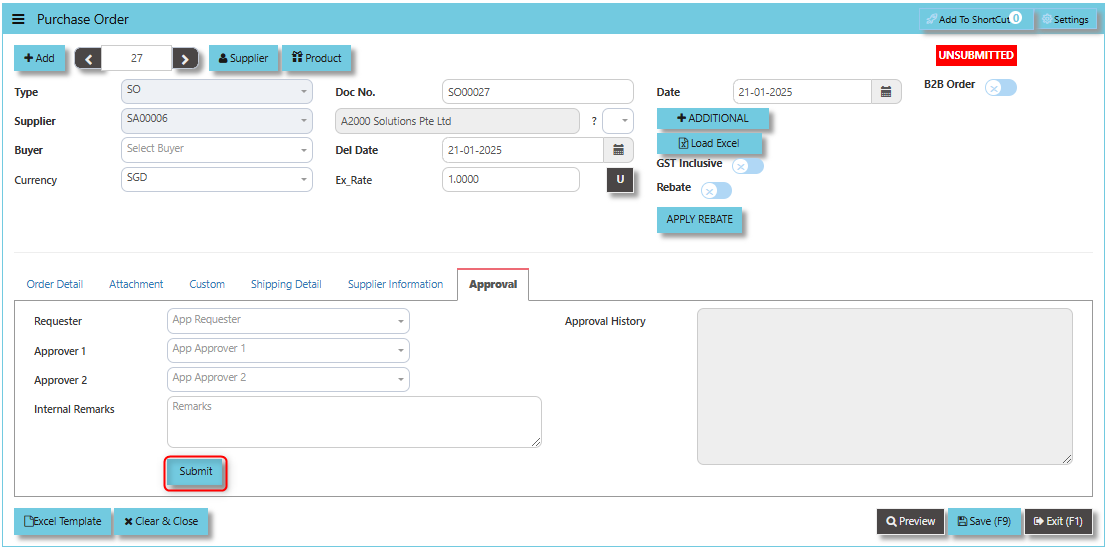
5. Click "SUBMIT" then OK and system will prompt that data has been submitted for approval.
[](https://doc.uniq365.com/uploads/images/gallery/2025-02/pRkimage.png)
6. Transaction screen will show you the historical record under Approval History field.
[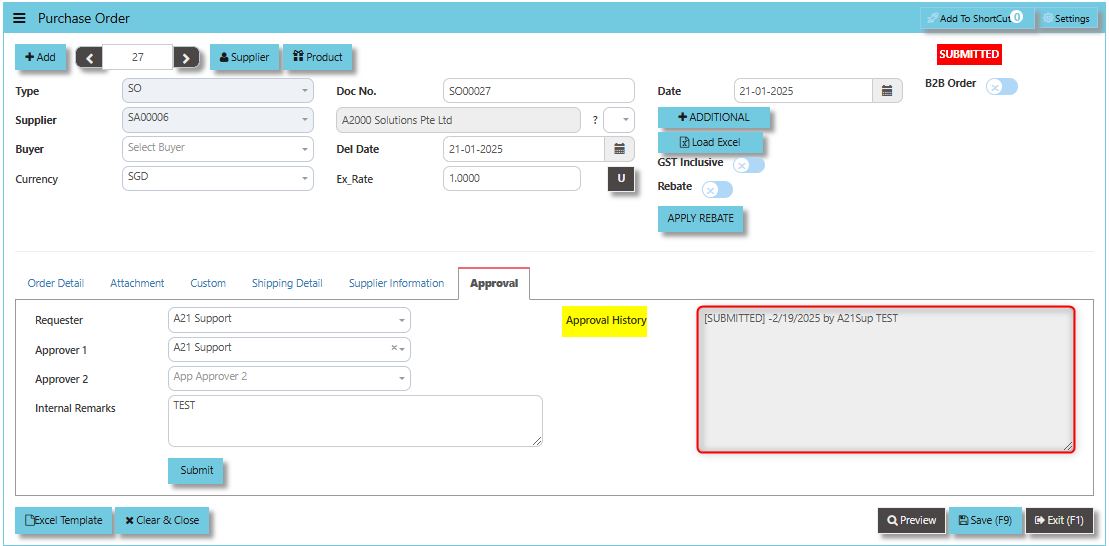](https://doc.uniq365.com/uploads/images/gallery/2025-02/BzVimage.png)
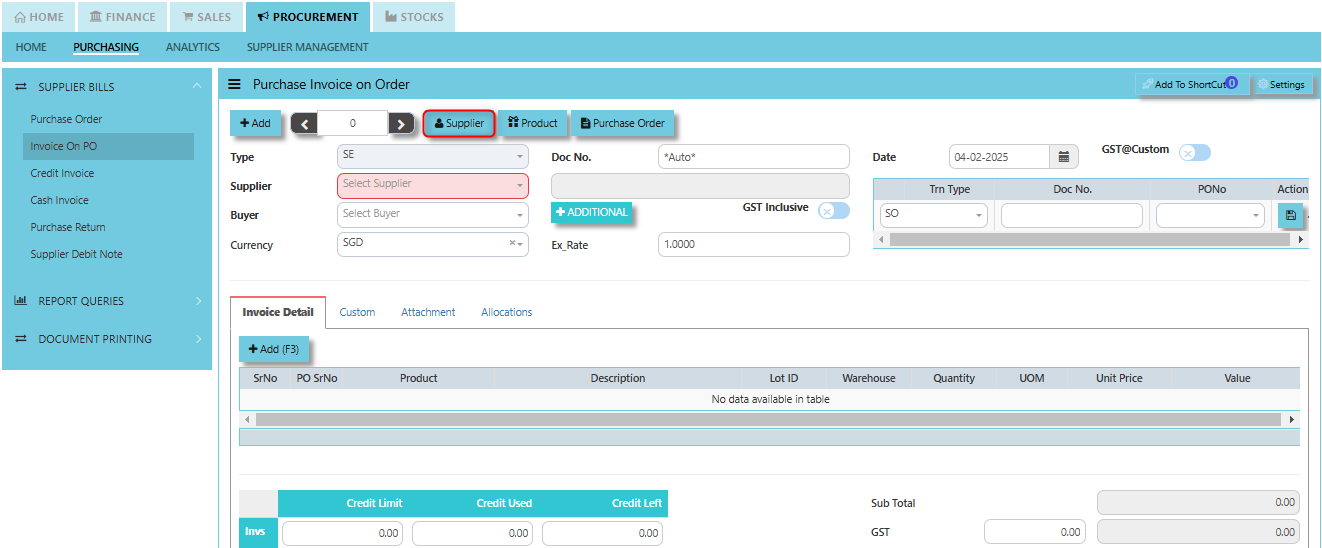
Invoice on PO (SE)
##### Following the Purchase Operation, you will create the **Supplier Invoice on Order**. Enter the required fields before selecting the Purchase Order at the top right hand corner of the screen. The product line items must be verified and entered one by one. After entering all the item details, click on the Save button. The GL and Inventory will be updated.
\_\_\_\_\_\_\_\_\_\_\_\_\_\_\_\_\_\_\_\_\_\_\_\_\_\_\_\_\_\_\_\_\_\_\_\_\_\_\_\_\_\_\_\_\_\_\_\_\_\_\_\_\_\_\_\_\_\_\_\_\_\_\_\_\_\_\_\_\_\_\_\_\_\_\_\_\_\_\_\_\_\_\_\_\_\_\_\_\_\_\_\_\_\_\_\_\_\_\_
##### **How to create Invoice on Order?**
1. Click on PROCUREMENT – PURCHASING – SUPPLIER BILLS - INVOICE ON PO for the screen below.
[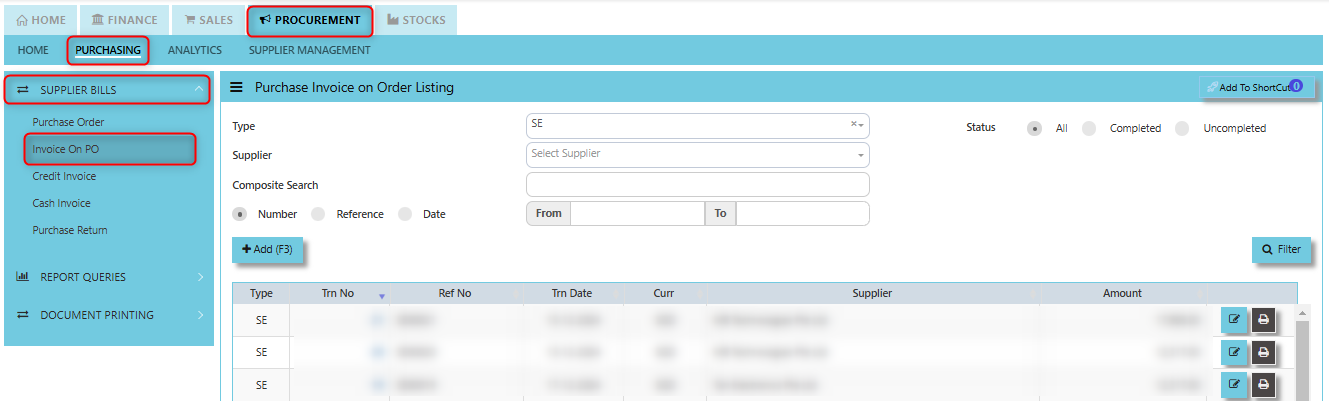](https://doc.uniq365.com/uploads/images/gallery/2025-01/GIHimage.png)
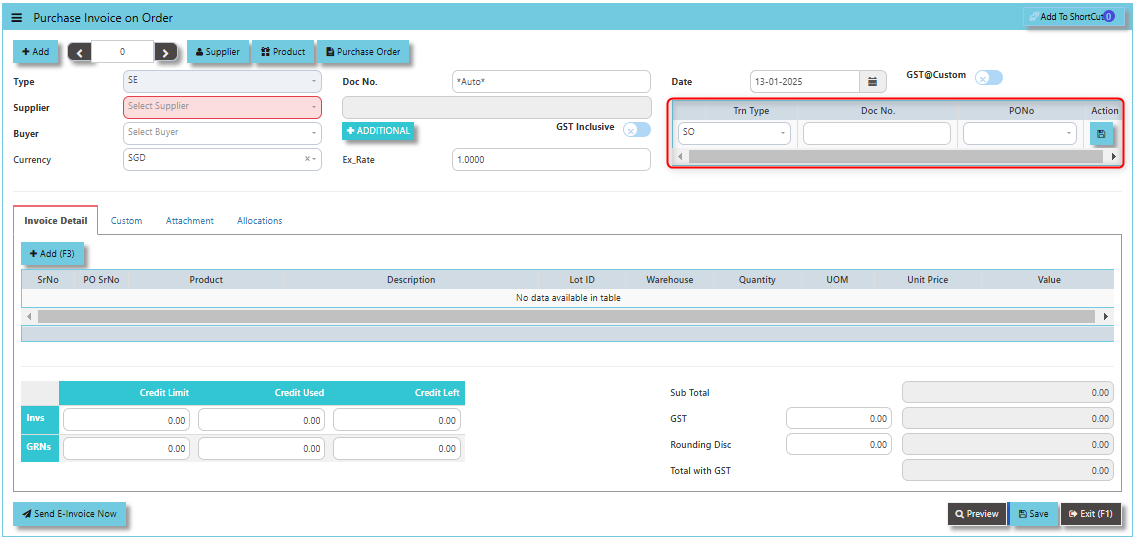
2. Click Add (F3) to create new record.
[](https://doc.uniq365.com/uploads/images/gallery/2025-01/YI7image.png)
3. Click Type - drop-down to select transaction type – SE (Invoice on Order).
4\. After transaction type selection, use the tab button to go to the Ref No., Date and other fields.
5\. Click the Supplier - drop-down list to select Supplier Name, followed by the Buyer, PDS, Currency and Exchange Rate.
6\. After the above steps are done, click on the Order No. drop- down list to select a Purchase Order (SO) (refer to the highlighted screen).
7\. After selecting the SO transaction from the Order No. column, user can use the “L” button beside the Order No. to load all the product items at one go. Alternatively, you can use the Ref column which appears at product line details, to enter the items from the Purchase Order one by one. After all the items are called out, save the transaction.
\_\_\_\_\_\_\_\_\_\_\_\_\_\_\_\_\_\_\_\_\_\_\_\_\_\_\_\_\_\_\_\_\_\_\_\_\_\_\_\_\_\_\_\_\_\_\_\_\_\_\_\_\_\_\_\_\_\_\_\_\_\_\_\_\_\_\_\_\_\_\_\_\_\_\_\_\_\_\_\_\_\_\_\_\_\_\_\_\_\_\_\_\_\_\_\_\_\_\_\_\_\_\_\_\_\_\_\_\_\_\_\_\_\_\_\_\_\_\_\_\_\_\_\_\_\_\_\_\_\_\_\_\_\_\_\_\_\_\_
**Add to ShortCut -** Used to create a shortcut for quick access to a specific purchase invoice or purchase invoice-related functionality. By clicking this button, users can add the current purchase invoice to a list of shortcuts, allowing them to access the invoice or related functionality quickly and efficiently, without needing to search for it each time.
[](https://doc.uniq365.com/uploads/images/gallery/2025-01/1E5image.png)
##### **How to use Add to ShortCut?**
1. Click "**Add to ShortCut"** and system will open below windows:
[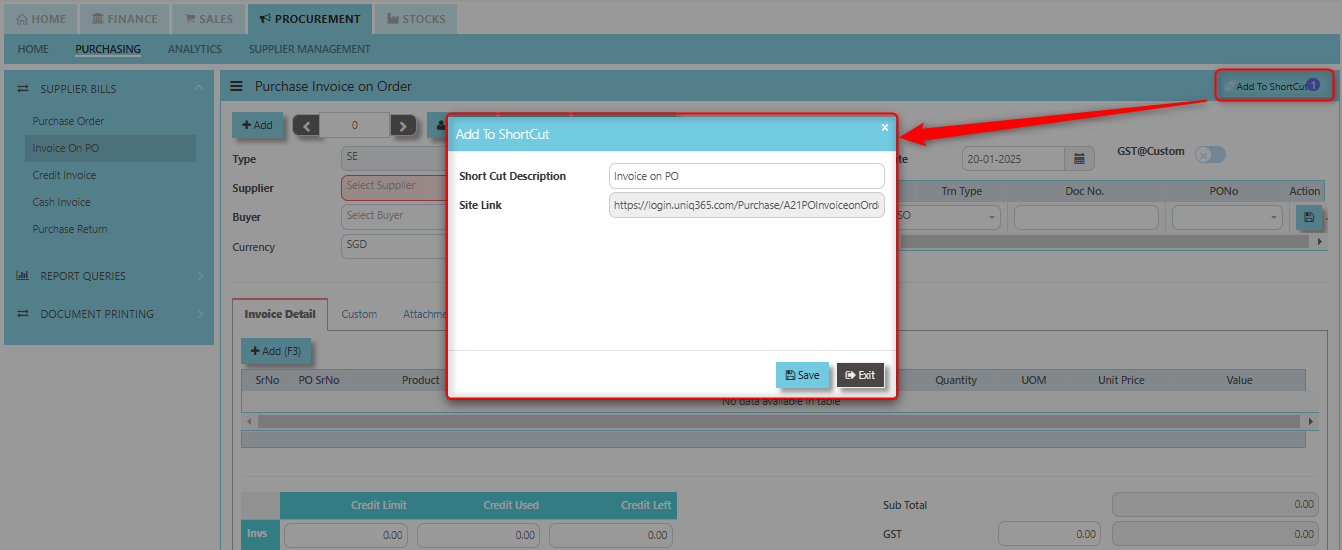](https://doc.uniq365.com/uploads/images/gallery/2025-01/ZIEimage.png)
2. Enter Short Cut Description
3\. Click SAVE then click OK.
4\. User may look to the Homepage for the added function or page. Click on HOME - HOME - SHORTCUT for the screen below.
[](https://doc.uniq365.com/uploads/images/gallery/2025-01/0P6image.png)
\_\_\_\_\_\_\_\_\_\_\_\_\_\_\_\_\_\_\_\_\_\_\_\_\_\_\_\_\_\_\_\_\_\_\_\_\_\_\_\_\_\_\_\_\_\_\_\_\_\_\_\_\_\_\_\_\_\_\_\_\_\_\_\_\_\_\_\_\_\_\_\_\_\_\_\_\_\_\_\_\_\_\_\_\_\_\_\_\_\_\_\_\_\_\_\_\_\_\_\_\_\_\_\_\_\_\_\_\_\_\_\_\_\_\_\_\_\_\_\_\_\_\_\_\_\_\_\_\_\_\_\_\_\_\_\_\_\_\_
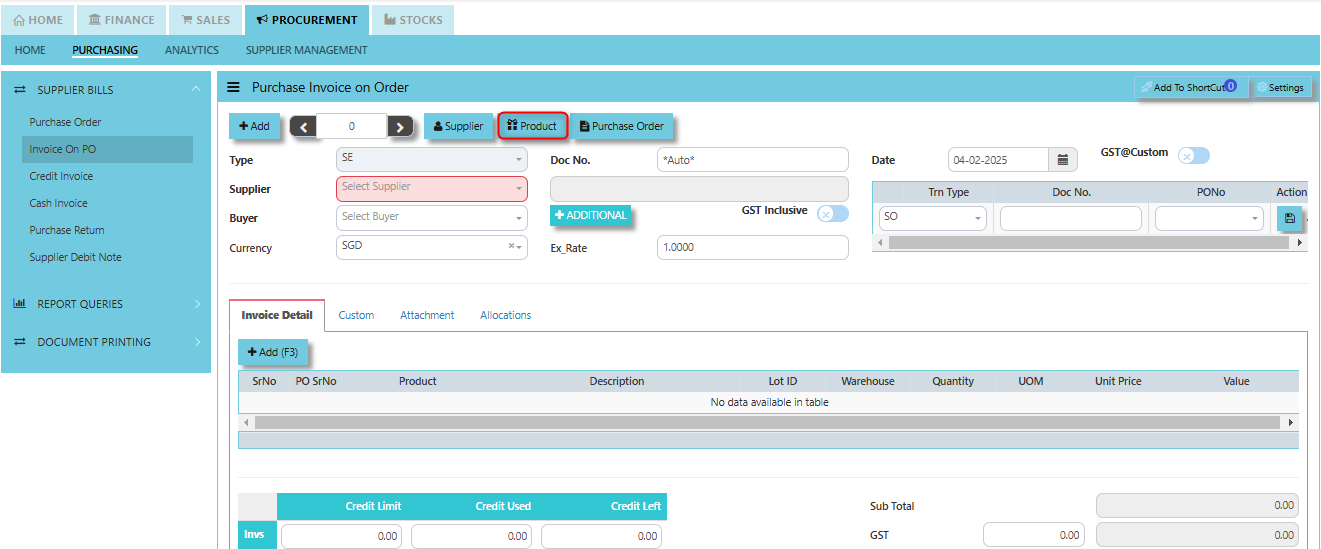
**"Supplier Button"** enables users to add specific supplier data under Supplier Maintenance.
[](https://doc.uniq365.com/uploads/images/gallery/2025-02/YRbimage.png)
**"Product Button"** enables users to add specific products under Product & Service Maintenance.
[](https://doc.uniq365.com/uploads/images/gallery/2025-02/UfZimage.png)
**"Purchase Order" Button** serves as a mechanism to link or reference the related purchase order to the invoice being processed.
[](https://doc.uniq365.com/uploads/images/gallery/2025-02/F19image.png)
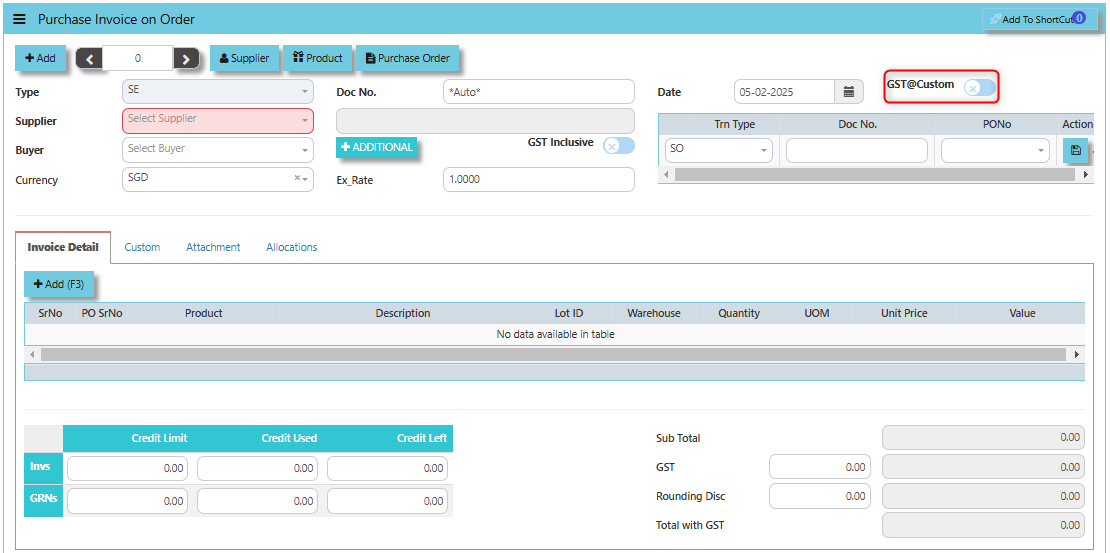
The **GST @Custom** checkbox typically used to enable custom GST rates for a specific transaction, rather than applying a standard or predefined GST rate.
- **When ticked (GST @Custom enabled)**: It allows the user to manually input a custom GST rate for the goods or services listed on the purchase invoice. Modify the tax calculation for the invoice as required, based on the custom rate.
[](https://doc.uniq365.com/uploads/images/gallery/2025-02/FU1image.png)
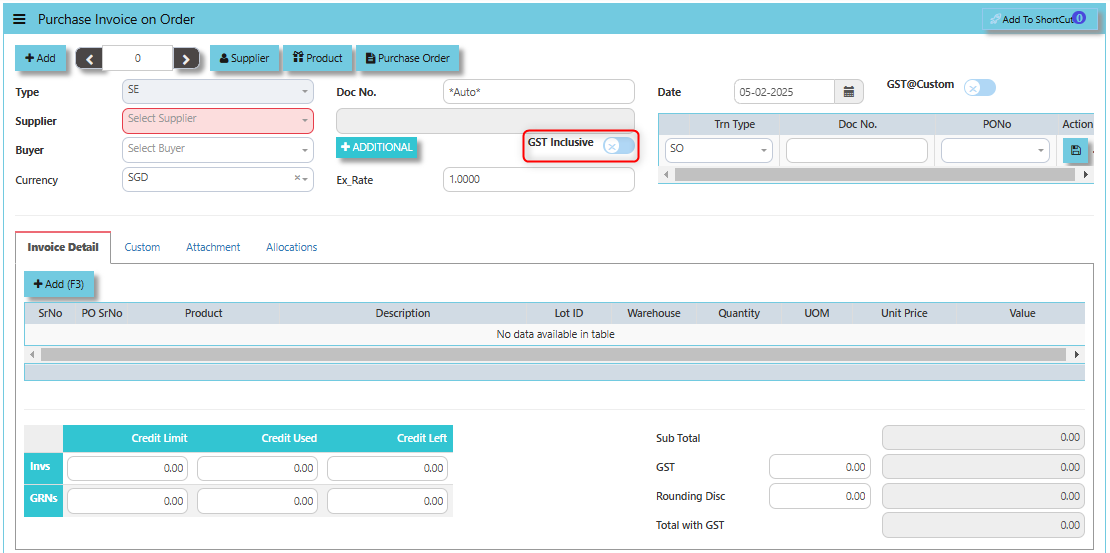
The **GST Inclusive** checkbox determines whether the GST amount is included within the total amount of the goods or services on the invoice or if it is calculated separately.
- **GST Inclusive Checkbox (When ticked):** If the GST is included in the price, the system will automatically calculate the base price (the price excluding GST) and the GST amount based on the total value.
- **When not ticked (GST Exclusive)**: The system will calculate the GST separately based on the base price of the items and add it to the total amount of the invoice.
[](https://doc.uniq365.com/uploads/images/gallery/2025-02/orLimage.png)
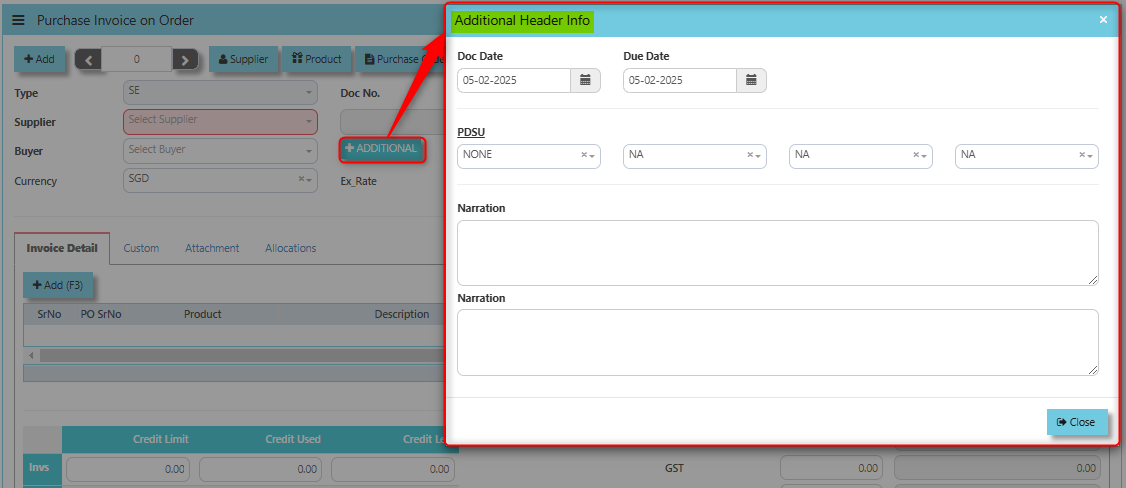
The **Additional Header Info** button allows users to enter and view additional details or supplementary information at the header level of the purchase invoice.
[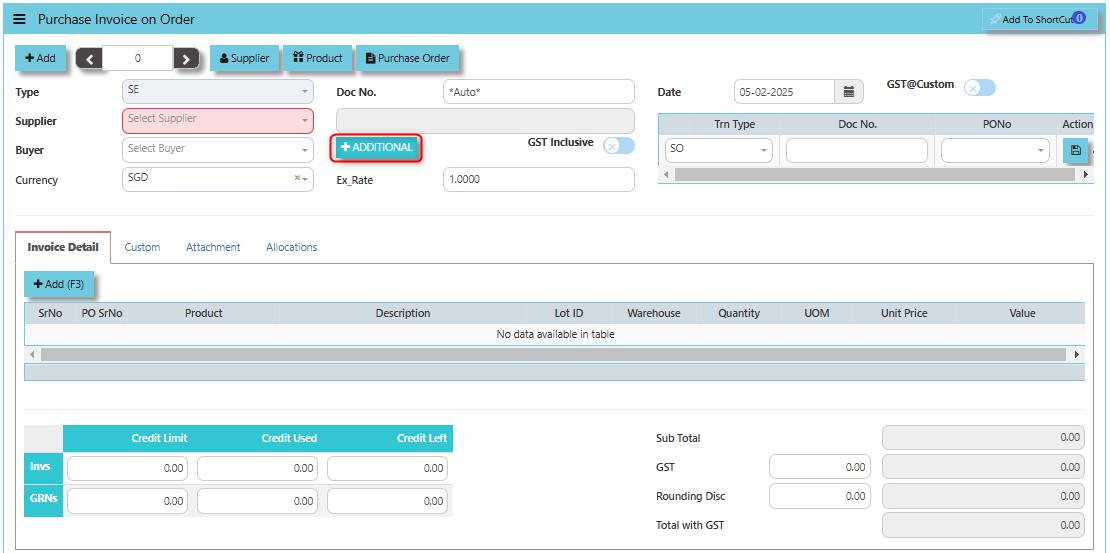](https://doc.uniq365.com/uploads/images/gallery/2025-02/WDbimage.png)
Once clicked the said button, user may input the below additional information:
- Doc Date
- Due Date
- PDSU
- Narrations
[](https://doc.uniq365.com/uploads/images/gallery/2025-02/EHgimage.png)
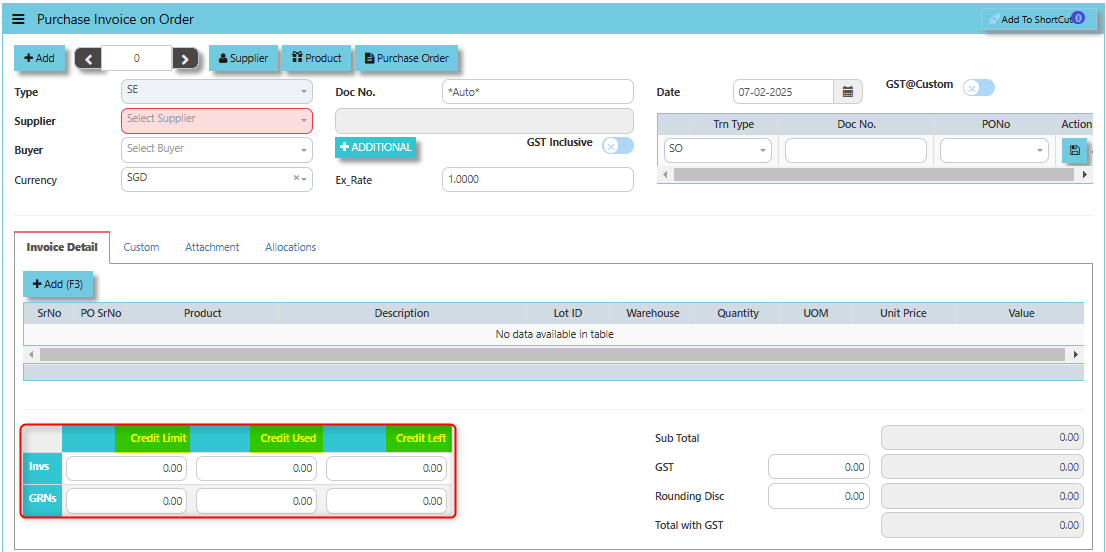
The terms **Credit Limit**, **Credit Used**, and **Credit Left** typically relate to the management of financial transactions and the control of purchasing activities. These are usually associated with the vendor or supplier accounts, and each of them plays a role in controlling and monitoring the financial aspects of procurement.
- **Credit Limit** -This is the maximum amount of credit that a vendor or supplier is willing to extend to your organization.
- **Credit** **Used** - This refers to the amount of credit that has already been used by the company on purchases from a specific vendor or supplier.
- **Credit Left** - This is the remaining amount of credit that is still available to be used with the vendor after subtracting the credit used from the total credit limit.
[](https://doc.uniq365.com/uploads/images/gallery/2025-02/qj3image.png)
**"Send E-Invoice Now" Button**: serves the purpose of immediately sending an electronic invoice (e-invoice) to the relevant party, typically the supplier or vendor, once the purchase invoice has been generated.
[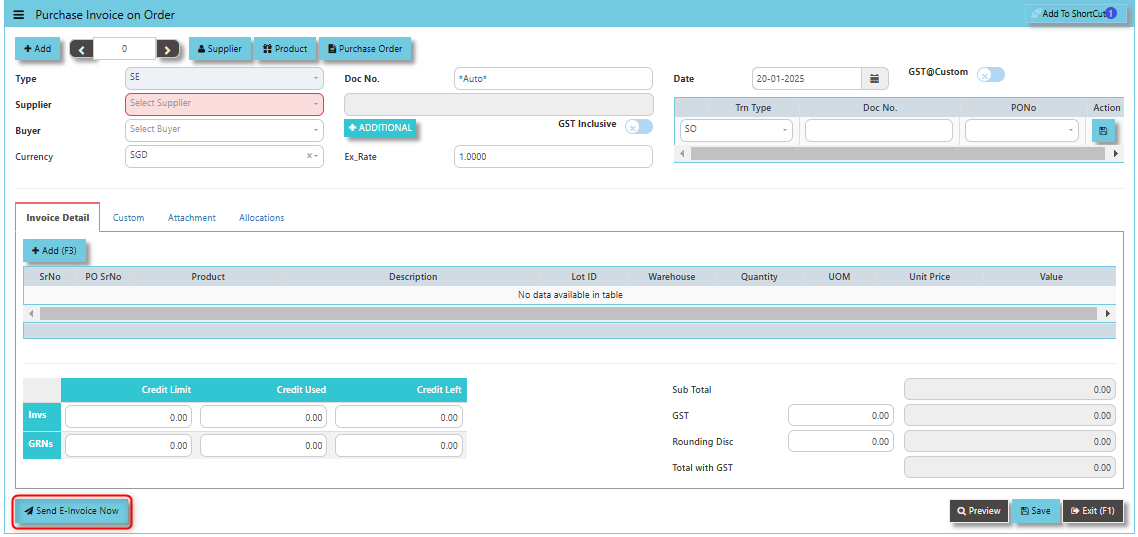](https://doc.uniq365.com/uploads/images/gallery/2025-01/jAGimage.png)
Supplier company should get **"Peppol ID"** as a pre-requisite for this function and user can maintain under supplier maintenance of the specific supplier. click on PROCUREMENT - SUPPLIER MANAGEMENT - MASTER SETTING - SUPPLIER MAINTENANCE - PEPPOL ID
[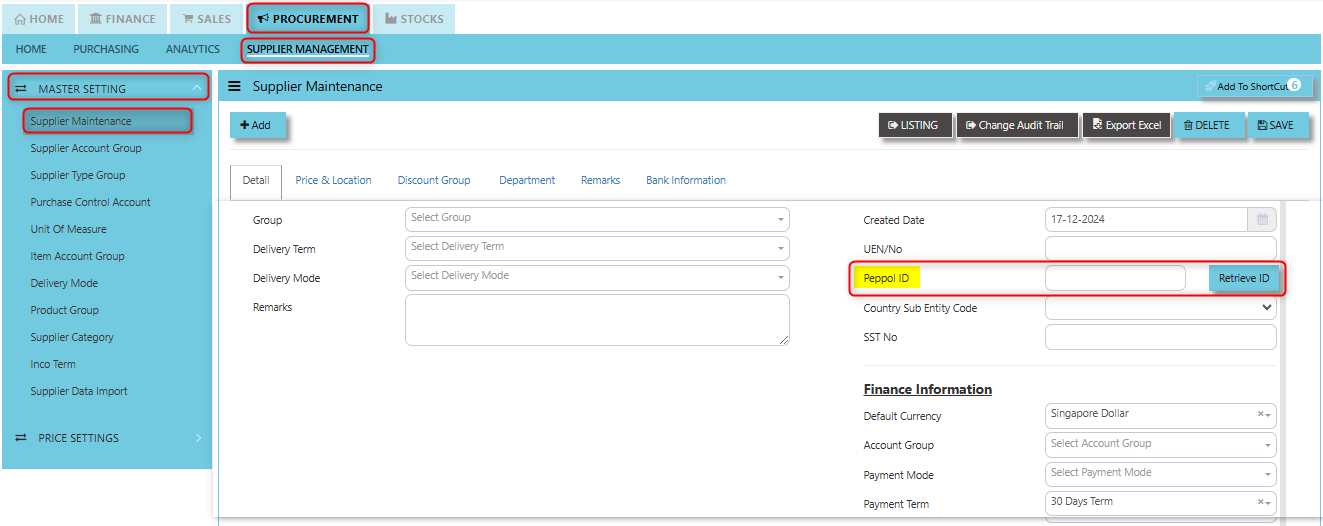](https://doc.uniq365.com/uploads/images/gallery/2025-01/RgVimage.png)
\_\_\_\_\_\_\_\_\_\_\_\_\_\_\_\_\_\_\_\_\_\_\_\_\_\_\_\_\_\_\_\_\_\_\_\_\_\_\_\_\_\_\_\_\_\_\_\_\_\_\_\_\_\_\_\_\_\_\_\_\_\_\_\_\_\_\_\_\_\_\_\_\_\_\_\_\_\_\_\_\_\_\_\_\_\_\_\_\_\_\_\_\_\_\_\_\_\_\_\_\_\_\_\_\_\_\_\_\_\_\_\_\_\_\_\_\_\_\_\_\_\_\_\_\_\_\_\_\_\_\_\_\_\_\_\_\_\_\_
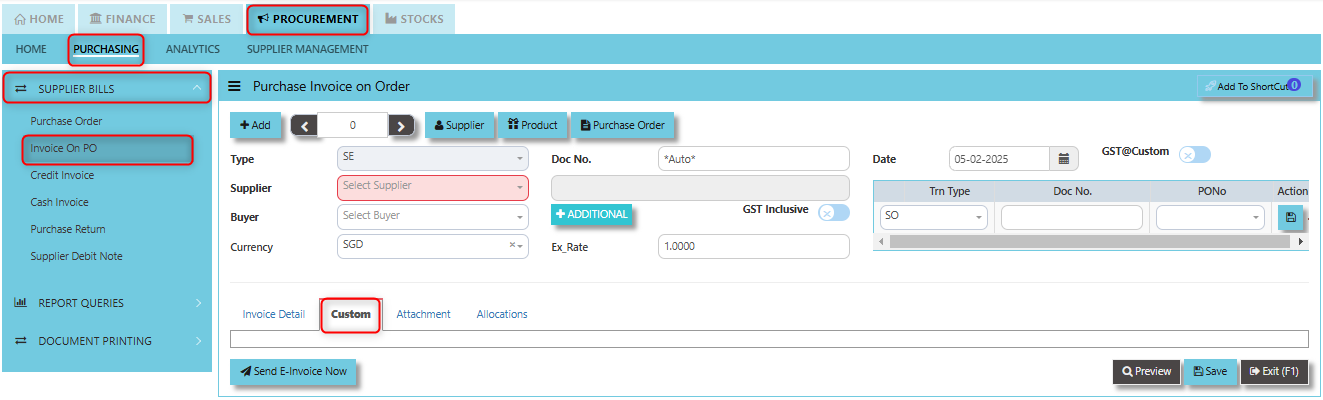
**Custom Tab** provides a space for users to input customized data or additional fields that are specific to their business processes and requirements.
- Click on PROCUREMENT - PURCHASING - SUPPLIER BILLS - INVOICE ON PO - CUSTOM TAB
[](https://doc.uniq365.com/uploads/images/gallery/2025-02/MG7image.png)
\_\_\_\_\_\_\_\_\_\_\_\_\_\_\_\_\_\_\_\_\_\_\_\_\_\_\_\_\_\_\_\_\_\_\_\_\_\_\_\_\_\_\_\_\_\_\_\_\_\_\_\_\_\_\_\_\_\_\_\_\_\_\_\_\_\_\_\_\_\_\_\_\_\_\_\_\_\_\_\_\_\_\_\_\_\_\_\_\_\_\_\_\_\_\_\_\_\_\_\_\_\_\_\_\_\_\_\_\_\_\_\_\_\_\_\_\_\_\_\_\_\_\_\_\_\_\_\_\_\_\_\_\_\_\_\_\_\_\_
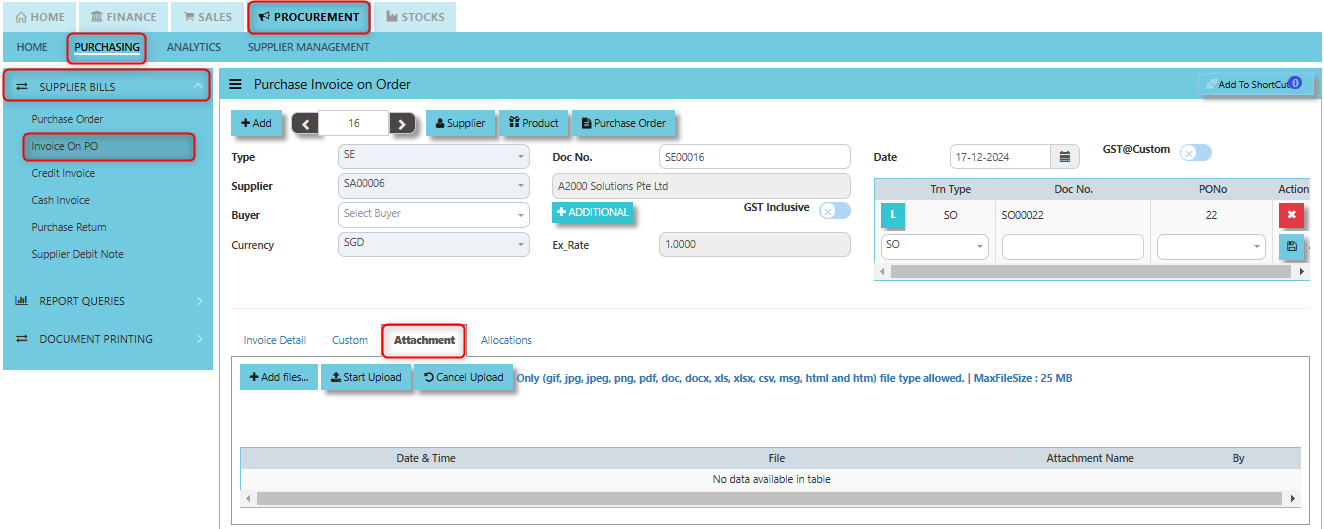
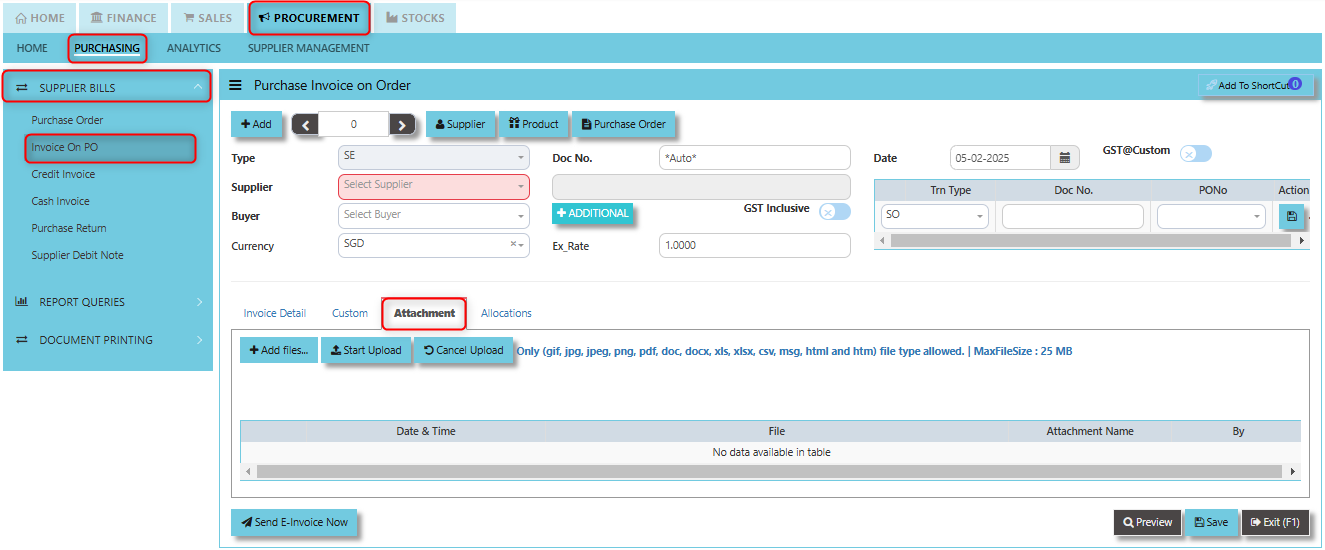
**Attachment Tab** allows users to attach and manage relevant documents or files related to a specific purchase invoice. This feature helps streamline the process by ensuring that all supporting documentation is easily accessible and linked directly to the invoice within the system.
##### **How to attach file?**
1. Click on PROCUREMENT - PURCHASING - SUPPLIER BILLS - INVOICE ON PO - ATTACHMENT TAB for the screen below.
[](https://doc.uniq365.com/uploads/images/gallery/2025-02/82himage.png)
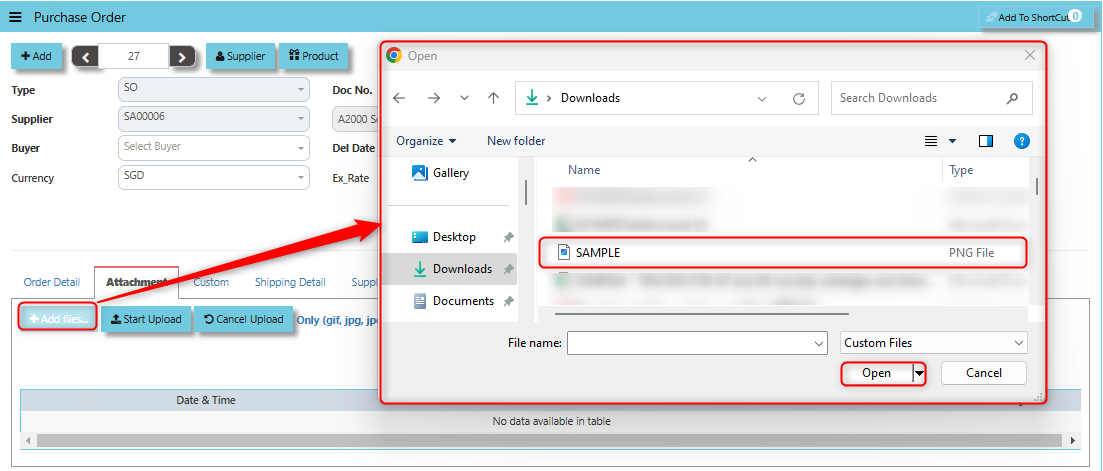
2. Click +Add files and windows will prompt then choose the file you want to upload by clicking open. Kindly take note the file types and maximum size requirements in uploading: ***Only (gif, jpg, jpeg, png, pdf, doc, docx, xls, xlsx, csv, msg, html and htm) file type allowed. | MaxFileSize : 25 MB***
[](https://doc.uniq365.com/uploads/images/gallery/2025-02/URXimage.png)
3. Key in the Attachment Name then click start to upload.
[](https://doc.uniq365.com/uploads/images/gallery/2025-02/mbgimage.png)
4. Once the file attached, click "SAVE" button
[](https://doc.uniq365.com/uploads/images/gallery/2025-02/at5image.png)
\_\_\_\_\_\_\_\_\_\_\_\_\_\_\_\_\_\_\_\_\_\_\_\_\_\_\_\_\_\_\_\_\_\_\_\_\_\_\_\_\_\_\_\_\_\_\_\_\_\_\_\_\_\_\_\_\_\_\_\_\_\_\_\_\_\_\_\_\_\_\_\_\_\_\_\_\_\_\_\_\_\_\_\_\_\_\_\_\_\_\_\_\_\_\_\_\_\_\_\_\_\_\_\_\_\_\_\_\_\_\_\_\_\_\_\_\_\_\_\_\_\_\_\_\_\_\_\_\_\_\_\_\_\_\_\_\_\_\_
The **Allocations Tab** is used to manage and allocate the amounts or costs associated with the purchase invoice. Click on PROCUREMENT - PURCHASING - SUPPLIER BILLS - INVOICE ON PO - ATTACHMENT TAB for the screen below.
[](https://doc.uniq365.com/uploads/images/gallery/2025-02/9Yiimage.png)
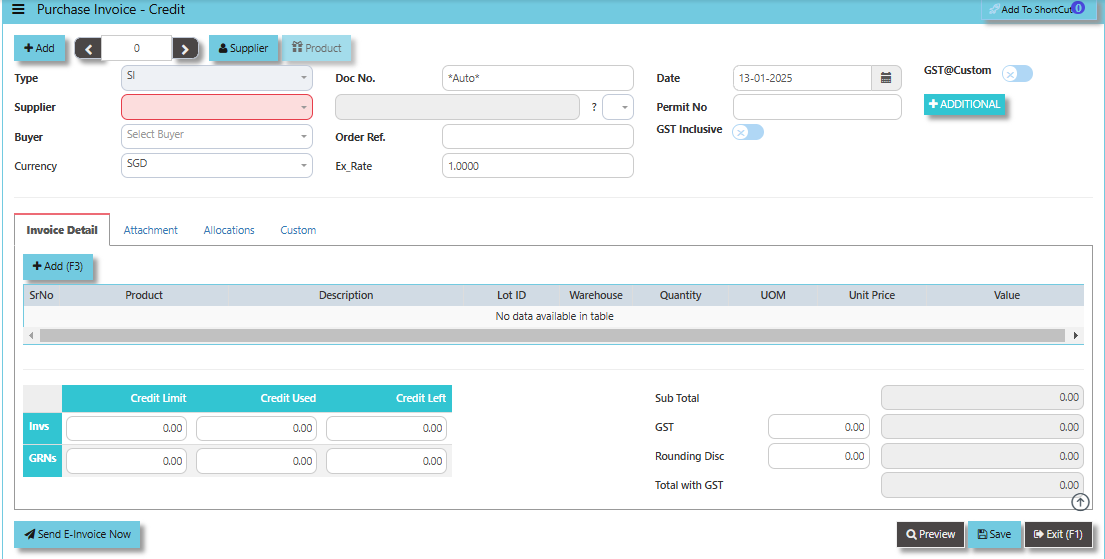
Credit Invoice (SI)
##### A Supplier Credit Invoice directly updates the inventory status and post a direct transaction for invoicing. It will also update the Accounts Payable at the same time.
\_\_\_\_\_\_\_\_\_\_\_\_\_\_\_\_\_\_\_\_\_\_\_\_\_\_\_\_\_\_\_\_\_\_\_\_\_\_\_\_\_\_\_\_\_\_\_\_\_\_\_\_\_\_\_\_\_\_\_\_\_\_\_\_\_\_\_\_\_\_\_\_\_\_\_\_\_\_\_\_\_\_\_\_\_\_\_\_\_\_\_\_\_\_\_\_\_\_\_
##### **How to set create Credit Invoice?**
1. Click on PROCUREMENT – PURCHASING – SUPPLIER BILLS - CREDIT INVOICE for the screen below.
[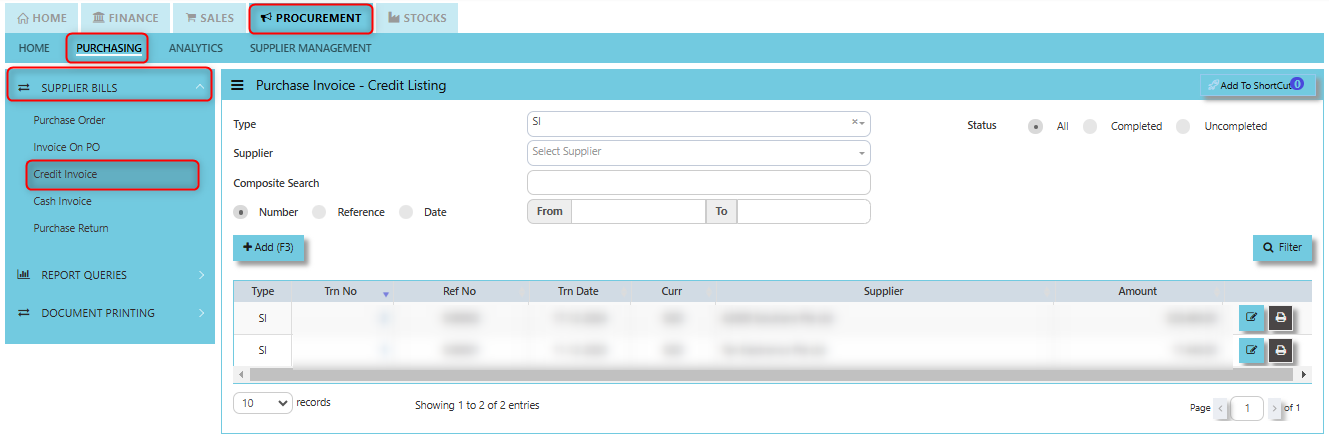](https://doc.uniq365.com/uploads/images/gallery/2025-01/fmiimage.png)
2. Click Add (F3) to create new record.
[](https://doc.uniq365.com/uploads/images/gallery/2025-01/dOvimage.png)
3. Click the Type - drop-down to select transaction type – SI (Credit Invoice).
4\. After selecting the transaction type, use the tab button to go to the Ref No., Date and other fields.
5\. Click the Supplier - drop-down list to select Supplier Name, followed by the Buyer, PDS, Currency, Exchange Rate, Our D/O, Order Ref No. and Narration if applicable.
6\. After completing the above steps, go to Invoice Details to enter the product code, name, quantity, and unit price. Save the transaction.
\_\_\_\_\_\_\_\_\_\_\_\_\_\_\_\_\_\_\_\_\_\_\_\_\_\_\_\_\_\_\_\_\_\_\_\_\_\_\_\_\_\_\_\_\_\_\_\_\_\_\_\_\_\_\_\_\_\_\_\_\_\_\_\_\_\_\_\_\_\_\_\_\_\_\_\_\_\_\_\_\_\_\_\_\_\_\_\_\_\_\_\_\_\_\_\_\_\_\_\_\_\_\_\_\_\_\_\_\_\_\_\_\_\_\_\_\_\_\_\_\_\_\_\_\_\_\_\_\_\_\_\_\_\_\_\_\_\_\_
**Add to ShortCut -** Serves the purpose of creating a shortcut for quick access to a specific credit note or purchase invoice credit transaction. By clicking this button, users can add the current credit note or credit invoice related to a purchase to their personalized shortcut list, allowing them to access it instantly without having to search for it repeatedly.
[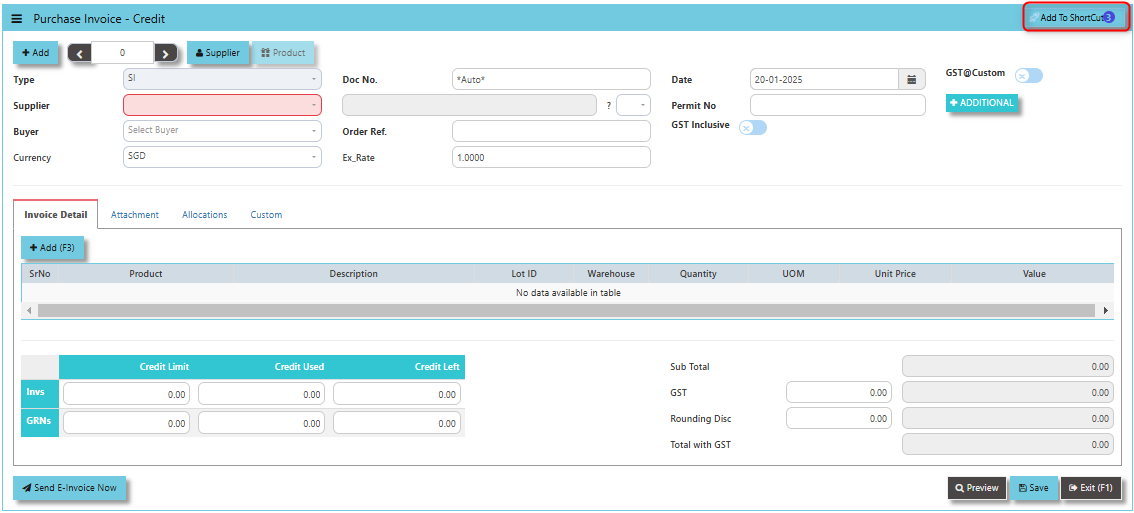](https://doc.uniq365.com/uploads/images/gallery/2025-01/pcpimage.png)
##### **How to use Add to ShortCut?**
1. Click "**Add to ShortCut"** and system will open below windows:
[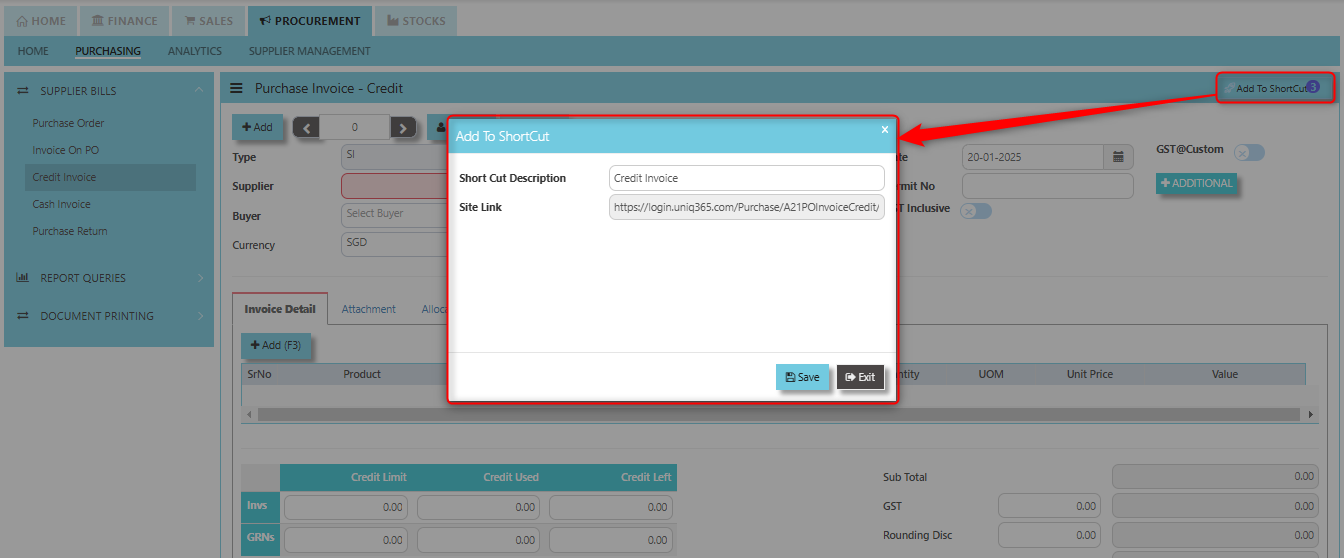](https://doc.uniq365.com/uploads/images/gallery/2025-01/oLnimage.png)
2. Enter Short Cut Description
3\. Click SAVE then click OK.
4\. User may look to the Homepage for the added function or page. Click on HOME - HOME - SHORTCUT for the screen below.
[](https://doc.uniq365.com/uploads/images/gallery/2025-01/v8Zimage.png)
\_\_\_\_\_\_\_\_\_\_\_\_\_\_\_\_\_\_\_\_\_\_\_\_\_\_\_\_\_\_\_\_\_\_\_\_\_\_\_\_\_\_\_\_\_\_\_\_\_\_\_\_\_\_\_\_\_\_\_\_\_\_\_\_\_\_\_\_\_\_\_\_\_\_\_\_\_\_\_\_\_\_\_\_\_\_\_\_\_\_\_\_\_\_\_\_\_\_\_\_\_\_\_\_\_\_\_\_\_\_\_\_\_\_\_\_\_\_\_\_\_\_\_\_\_\_\_\_\_\_\_\_\_\_\_\_\_\_\_
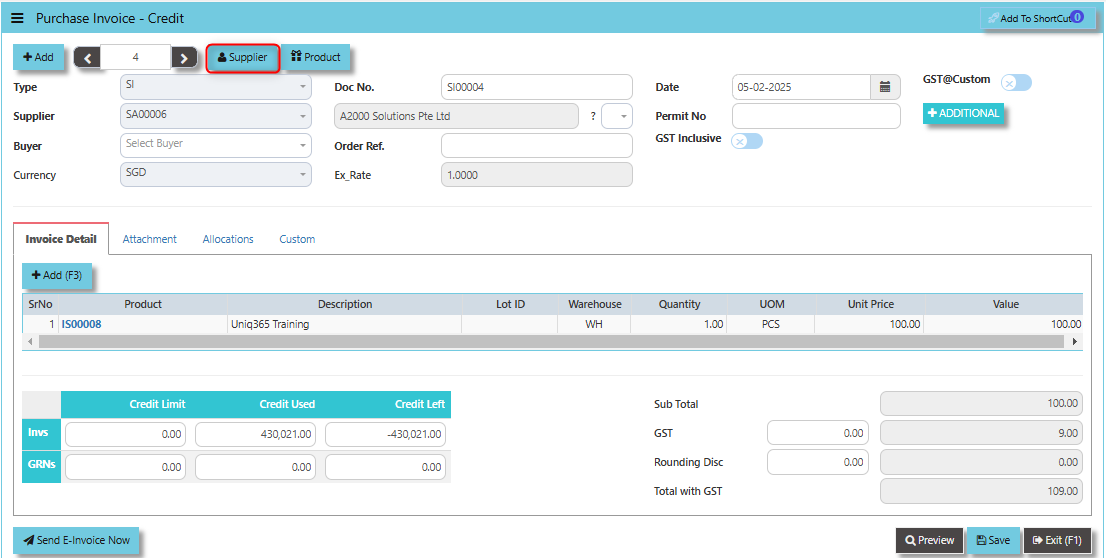
By clicking the **Supplier Button**, users can view or select the **supplier's details** (e.g., name, contact information, and payment terms) from the system's supplier database.
[](https://doc.uniq365.com/uploads/images/gallery/2025-02/2YAimage.png)
The **Product Button** It helps link and easy access to the Product and Service Maintenance for new creation of Items/Services.
[](https://doc.uniq365.com/uploads/images/gallery/2025-02/hdaimage.png)
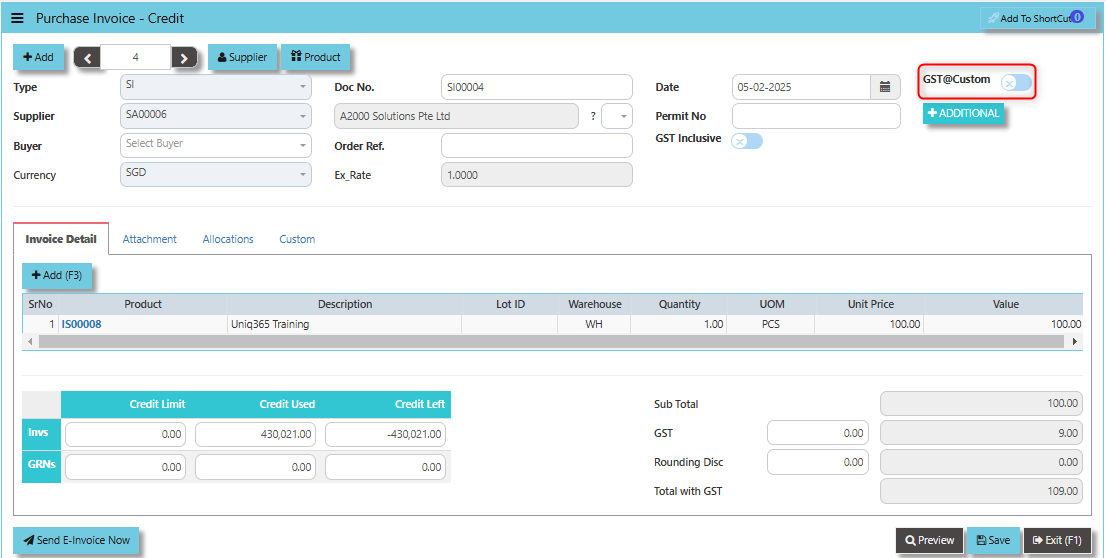
The **GST@Custom** checkbox used to manage and apply customized GST (Goods and Services Tax) rates or rules to the credit invoice, which may differ from the standard GST rates. When the GST@Custom checkbox is ticked, the system will calculate the GST based on the custom rate entered or configured for that specific transaction, rather than using the default GST rate.
[](https://doc.uniq365.com/uploads/images/gallery/2025-02/jBVimage.png)
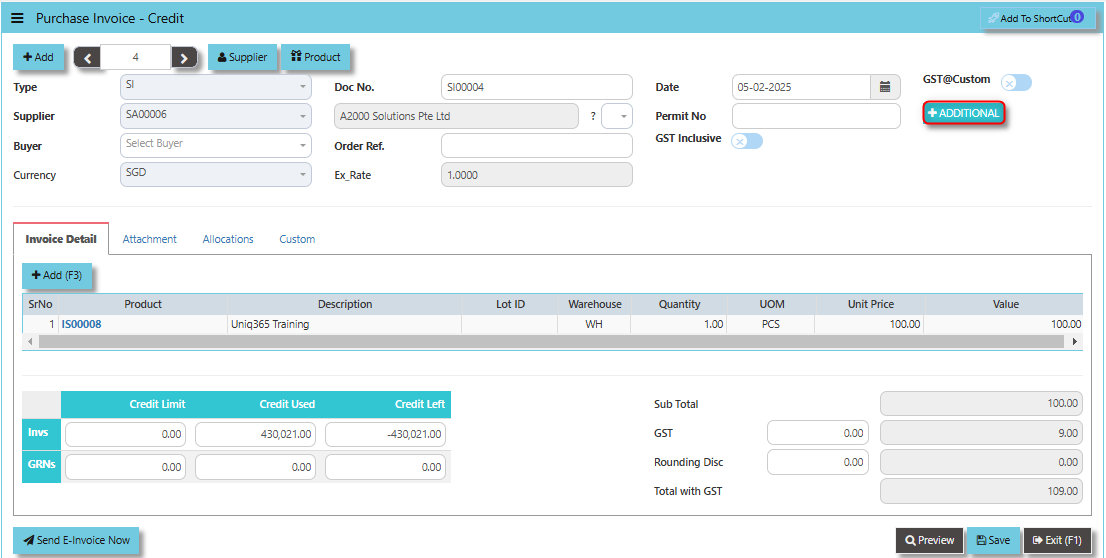
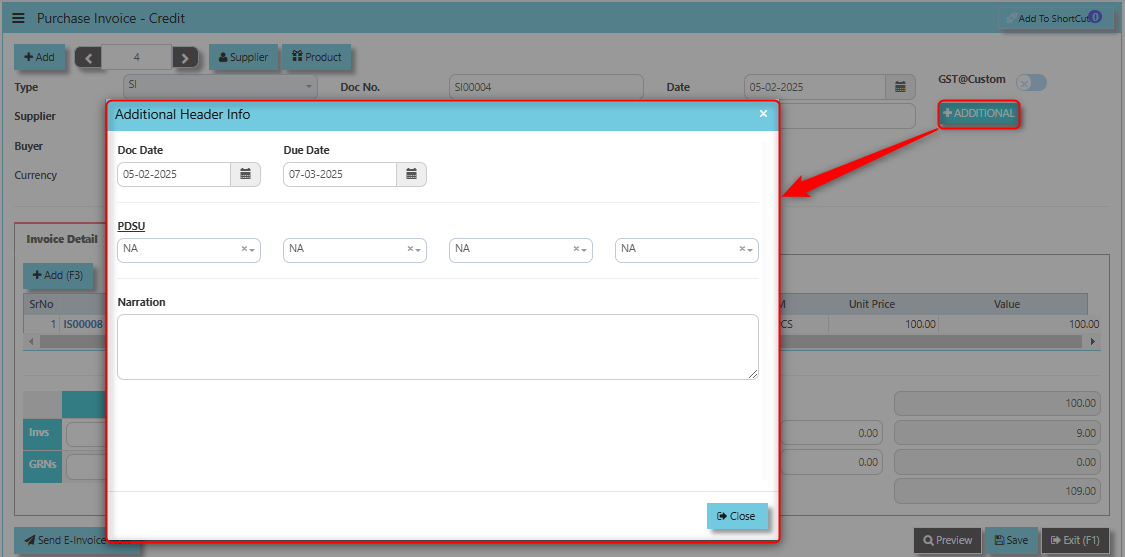
The **Additional Header Info** button allows users to enter or view extra, customizable details at the header level of the credit invoice. This button is designed to capture supplementary information that may not be included in the standard fields of the credit invoice but is important for the transaction or for internal tracking.
[](https://doc.uniq365.com/uploads/images/gallery/2025-02/tomimage.png)
Once clicked the said button, user may input the necessary details for the below fields:
- Doc Date
- Due Date
- PDSU
- Narration
[](https://doc.uniq365.com/uploads/images/gallery/2025-02/LRwimage.png)
When the **GST Inclusive** checkbox is ticked, it means that the GST amount is already included in the total amount on the credit invoice. This informs the system that the value provided is the final amount including both the product or service cost and the GST.
[](https://doc.uniq365.com/uploads/images/gallery/2025-02/4Ukimage.png)
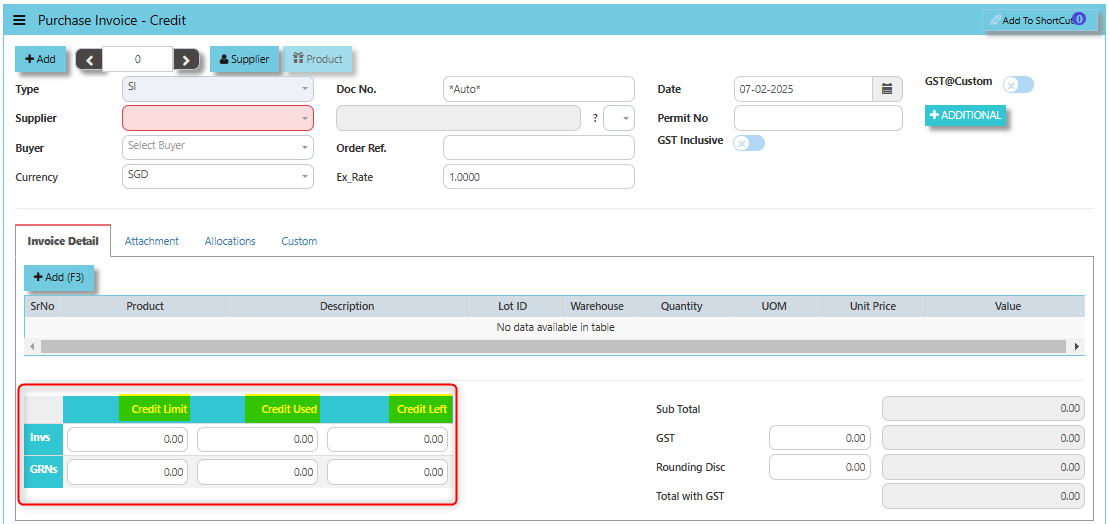
The terms **Credit Limit, Credit Used and Credit Left** play a key role in managing financials and transactions, particularly when there are adjustments or returns to be made to suppliers.
- The **Credit Limit** in the context of a credit invoice refers to the maximum amount of credit a supplier is willing to extend to the organization for refunds, adjustments, or returns.
- **Credit Used **refers to the amount of credit that has already been applied or used in credit invoices to reduce the organization's outstanding obligations to the supplier.
- The **Credit Left** refers to the remaining amount of credit available to the organization after the application of credit invoices, which can be used in future adjustments, returns, or refunds.
[](https://doc.uniq365.com/uploads/images/gallery/2025-02/Vc9image.png)
**"Send E-Invoice Now" Button**: Used to immediately send the credit note or purchase invoice credit to the supplier or vendor in an electronic format. This functionality automates the process of transmitting the credit note, making it quicker, more efficient, and ensuring compliance with e-invoicing regulations in regions where applicable.
[](https://doc.uniq365.com/uploads/images/gallery/2025-01/rafimage.png)
Supplier company should get **"Peppol ID"** as a pre-requisite for this function and user can maintain under supplier maintenance of the specific supplier. Click on PROCUREMENT - SUPPLIER MANAGEMENT - MASTER SETTING - SUPPLIER MAINTENANCE - PEPPOL ID
[](https://doc.uniq365.com/uploads/images/gallery/2025-01/dpfimage.png)
\_\_\_\_\_\_\_\_\_\_\_\_\_\_\_\_\_\_\_\_\_\_\_\_\_\_\_\_\_\_\_\_\_\_\_\_\_\_\_\_\_\_\_\_\_\_\_\_\_\_\_\_\_\_\_\_\_\_\_\_\_\_\_\_\_\_\_\_\_\_\_\_\_\_\_\_\_\_\_\_\_\_\_\_\_\_\_\_\_\_\_\_\_\_\_\_\_\_\_\_\_\_\_\_\_\_\_\_\_\_\_\_\_\_\_\_\_\_\_\_\_\_\_\_\_\_\_\_\_\_\_\_\_\_\_\_\_\_\_
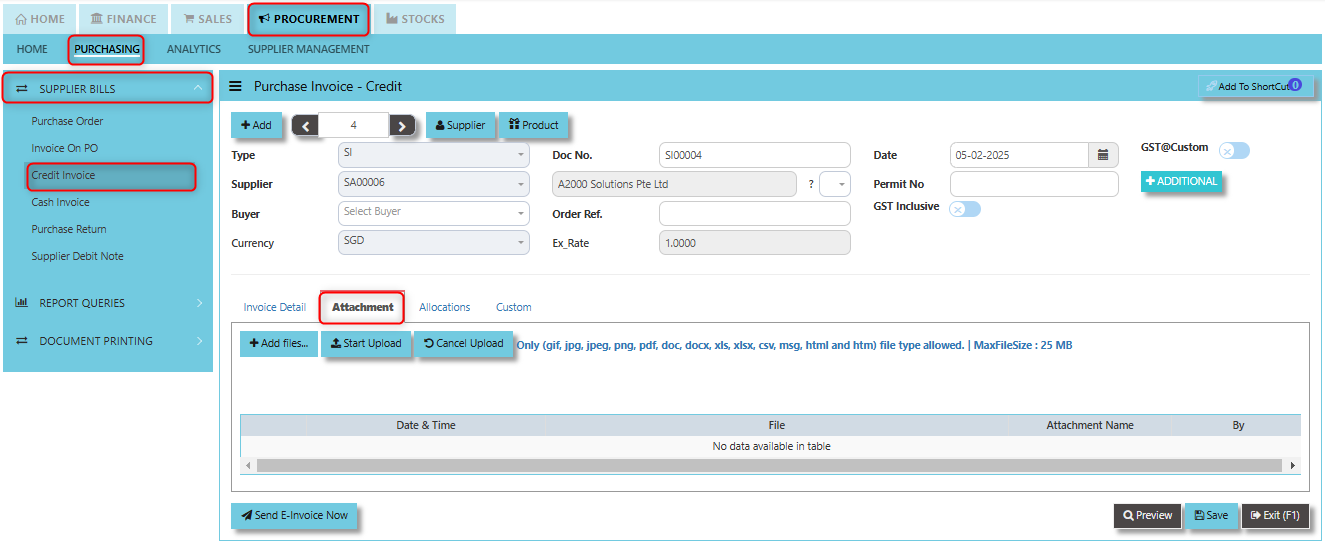
The **Attachment Tab** allows users to attach supporting documents or files related to the credit invoice. This feature helps in storing, organizing, and referencing any relevant documents associated with the credit transaction, making the entire process more efficient and transparent.
##### **How to use Attachment Tab?**
1. Click on PROCUREMENT - PURCHASING - SUPPLIER BILLS - CREDIT INVOICE - ATTACHMENT TAB for the screen below.
[](https://doc.uniq365.com/uploads/images/gallery/2025-02/A68image.png)
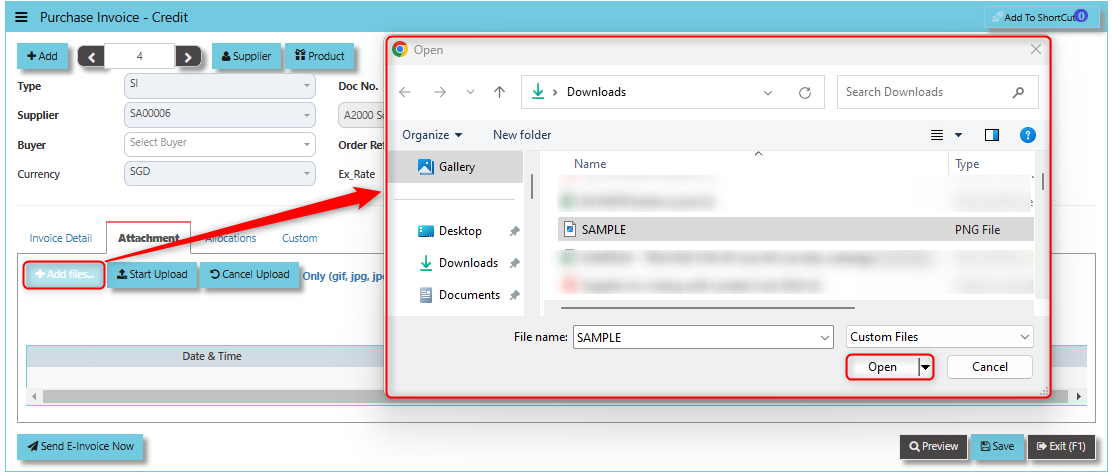
2. Click +Add files and windows will prompt then choose the file you want to upload by clicking open. Kindly take note the file types and maximum size requirements in uploading: ***Only (gif, jpg, jpeg, png, pdf, doc, docx, xls, xlsx, csv, msg, html and htm) file type allowed. | MaxFileSize : 25 MB***
[](https://doc.uniq365.com/uploads/images/gallery/2025-02/uF1image.png)
3. Key in the Attachment Name then click start to upload.
[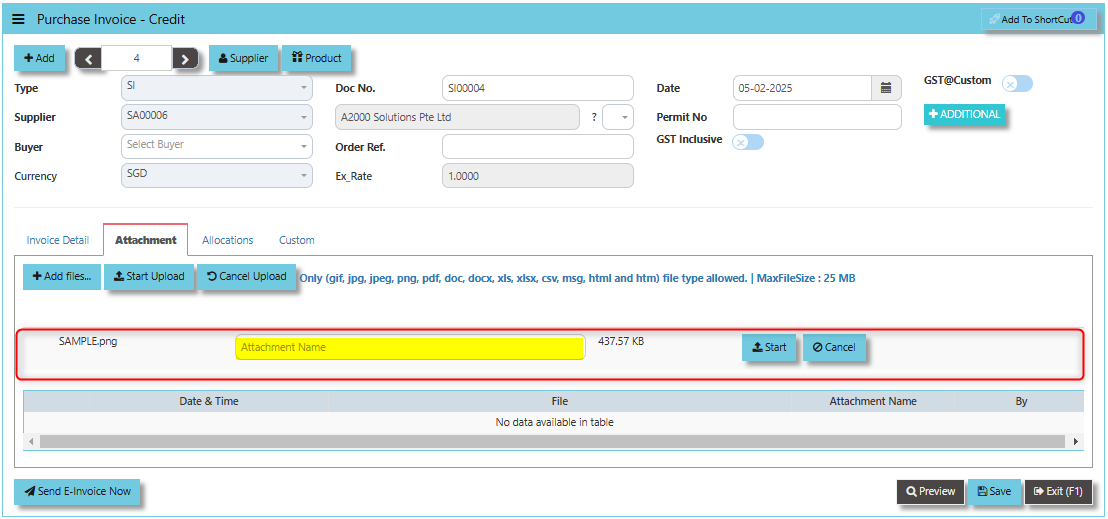](https://doc.uniq365.com/uploads/images/gallery/2025-02/jftimage.png)
4. Once the file attached, click "SAVE" button
[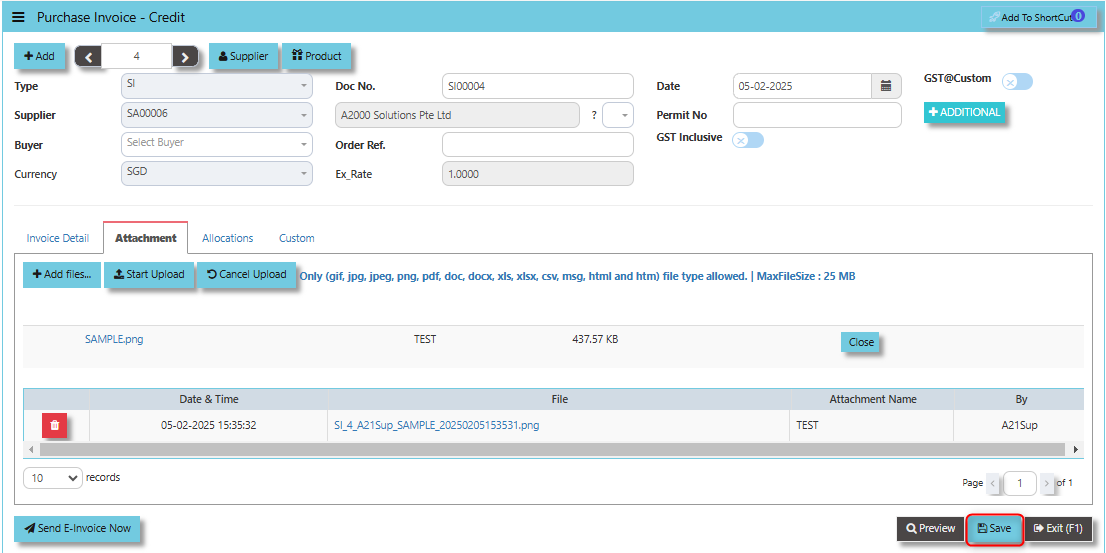](https://doc.uniq365.com/uploads/images/gallery/2025-02/8Vximage.png)
User may opt to cancel the uploading by clicking the **"Cancel Upload"** and delete the uploaded file by utilizing the **"Bin Icon"** at the left corner of line detail.
\_\_\_\_\_\_\_\_\_\_\_\_\_\_\_\_\_\_\_\_\_\_\_\_\_\_\_\_\_\_\_\_\_\_\_\_\_\_\_\_\_\_\_\_\_\_\_\_\_\_\_\_\_\_\_\_\_\_\_\_\_\_\_\_\_\_\_\_\_\_\_\_\_\_\_\_\_\_\_\_\_\_\_\_\_\_\_\_\_\_\_\_\_\_\_\_\_\_\_\_\_\_\_\_\_\_\_\_\_\_\_\_\_\_\_\_\_\_\_\_\_\_\_\_\_\_\_\_\_\_\_\_\_\_\_\_\_\_\_
The **Allocations Tab** allows users to allocate or apply the credit amount to specific purchase orders (POs) or purchase invoices. This helps in linking the credit invoice to the correct purchase transaction, ensuring that the financial records are adjusted accurately.
- Click on PROCUREMENT - PUCHASING - SUPPLIER BILLS - CREDIT INVOICE - AALLOCATIONS TAB for the screen below.
[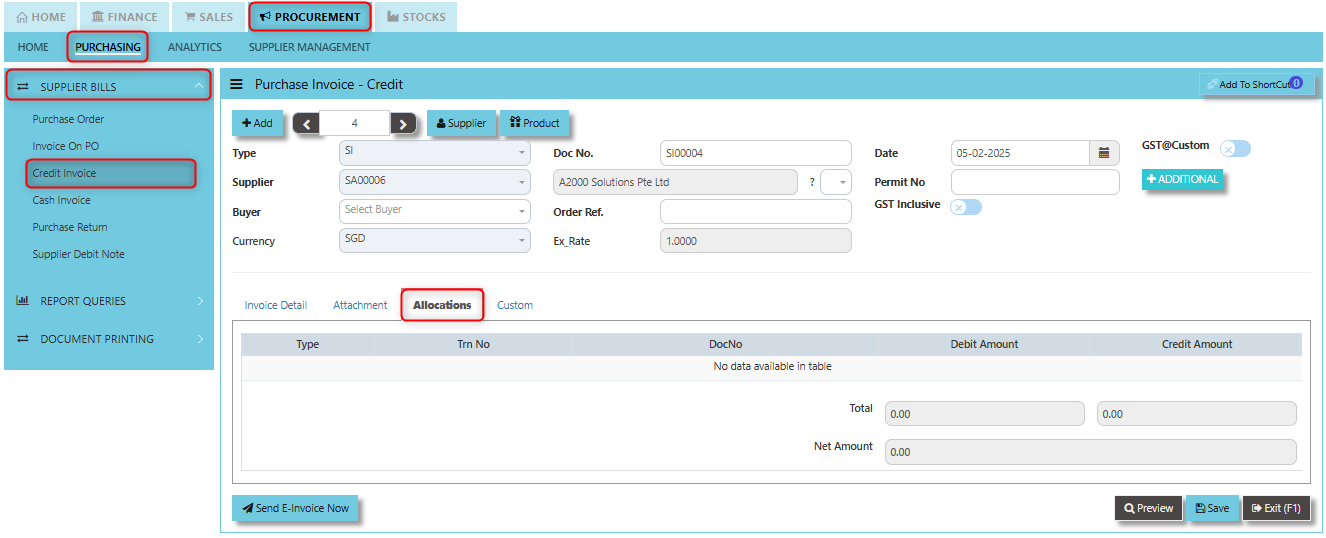](https://doc.uniq365.com/uploads/images/gallery/2025-02/ZMjimage.png)
\_\_\_\_\_\_\_\_\_\_\_\_\_\_\_\_\_\_\_\_\_\_\_\_\_\_\_\_\_\_\_\_\_\_\_\_\_\_\_\_\_\_\_\_\_\_\_\_\_\_\_\_\_\_\_\_\_\_\_\_\_\_\_\_\_\_\_\_\_\_\_\_\_\_\_\_\_\_\_\_\_\_\_\_\_\_\_\_\_\_\_\_\_\_\_\_\_\_\_\_\_\_\_\_\_\_\_\_\_\_\_\_\_\_\_\_\_\_\_\_\_\_\_\_\_\_\_\_\_\_\_\_\_\_\_\_\_\_\_
**Custom Tab** provides flexibility for users to enter additional data or modify the layout and structure of the credit invoice to accommodate special business processes, reporting, or compliance needs.
- Click on PROCUREMENT - PURCHASING - SUPPLIER BILLS - CREDIT INVOICE - CUSTOM TAB for the screen below.
[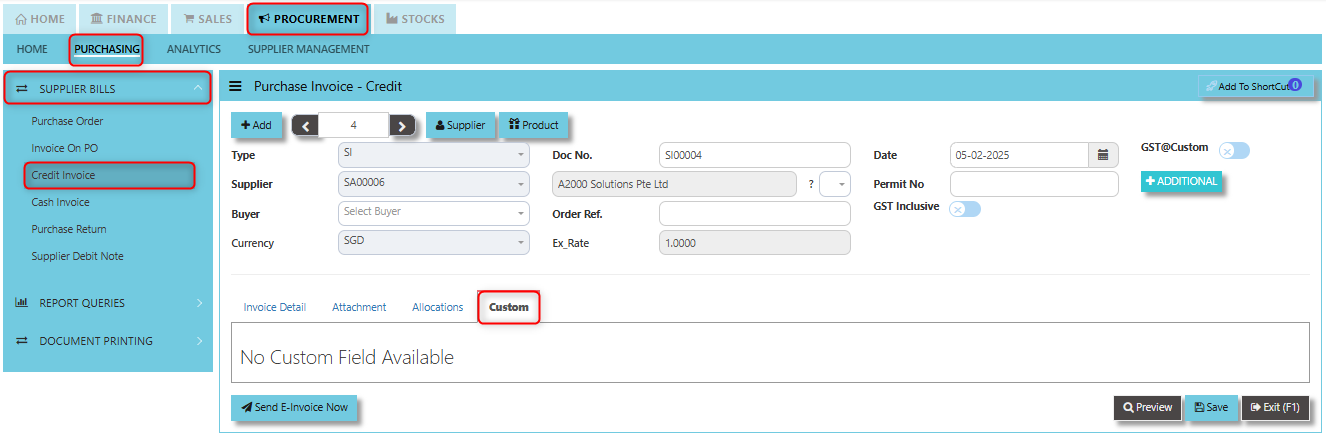](https://doc.uniq365.com/uploads/images/gallery/2025-02/R6qimage.png)
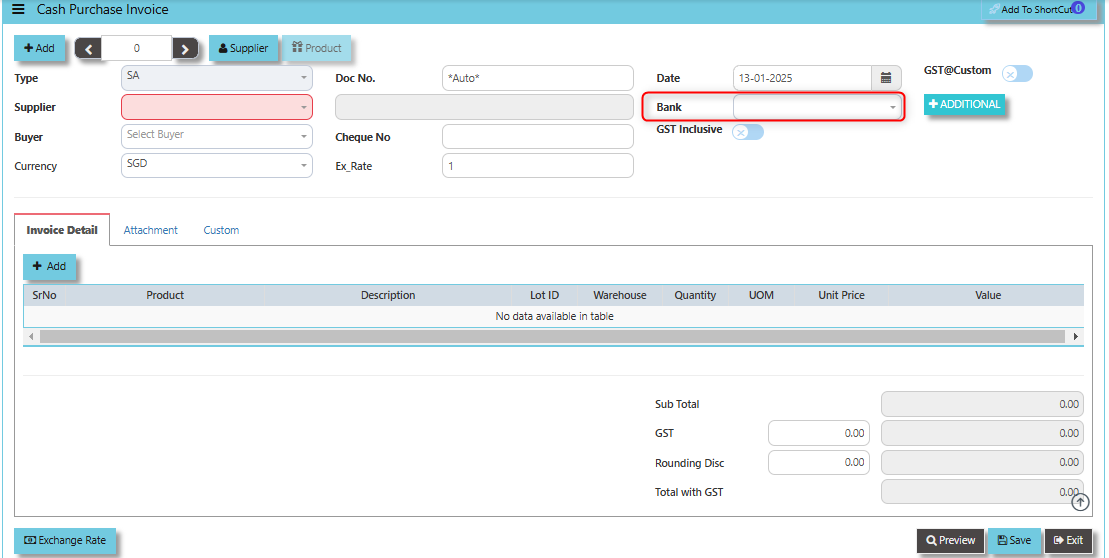
Cash Invoice (SA)
##### Unlike the Purchase Credit Invoice, the Supplier Invoice – Cash directly credit the bank as it is a direct cash transaction. This transaction updates the inventory as well as the GL. The Bank code is mandatory and must be specified before saving the transaction.
\_\_\_\_\_\_\_\_\_\_\_\_\_\_\_\_\_\_\_\_\_\_\_\_\_\_\_\_\_\_\_\_\_\_\_\_\_\_\_\_\_\_\_\_\_\_\_\_\_\_\_\_\_\_\_\_\_\_\_\_\_\_\_\_\_\_\_\_\_\_\_\_\_\_\_\_\_\_\_\_\_\_\_\_\_\_\_\_\_\_\_\_\_\_\_\_\_\_\_
##### **How to set create Cash Invoice?**
1. Click on PROCUREMENT – PURCHASING – SUPPLIER BILLS - CASH INVOICE for the screen below.
[](https://doc.uniq365.com/uploads/images/gallery/2025-01/mCSimage.png)
2. Click Add (F3) to create new record.
[](https://doc.uniq365.com/uploads/images/gallery/2025-01/UtMimage.png)
3. Click the Type - drop-down to select transaction type – SA (Cash Invoice).
4\. After the transaction type selection, use the tab button to go to the Ref No., Date and other fields.
5\. Click the Supplier - drop-down list to select Supplier Name, followed by the Buyer, PDS, Currency and Exchange Rate.
6\. The “Bank Code” is an important field and must be entered, followed by the Cheque Number (refer the highlighted screen).
7\. Once all the header information has been entered, go to the Details section to select the product code and name from the drop-down list. Save the transaction after this is done.
\_\_\_\_\_\_\_\_\_\_\_\_\_\_\_\_\_\_\_\_\_\_\_\_\_\_\_\_\_\_\_\_\_\_\_\_\_\_\_\_\_\_\_\_\_\_\_\_\_\_\_\_\_\_\_\_\_\_\_\_\_\_\_\_\_\_\_\_\_\_\_\_\_\_\_\_\_\_\_\_\_\_\_\_\_\_\_\_\_\_\_\_\_\_\_\_\_\_\_\_\_\_\_\_\_\_\_\_\_\_\_\_\_\_\_\_\_\_\_\_\_\_\_\_\_\_\_\_\_\_\_\_\_\_\_\_\_\_\_
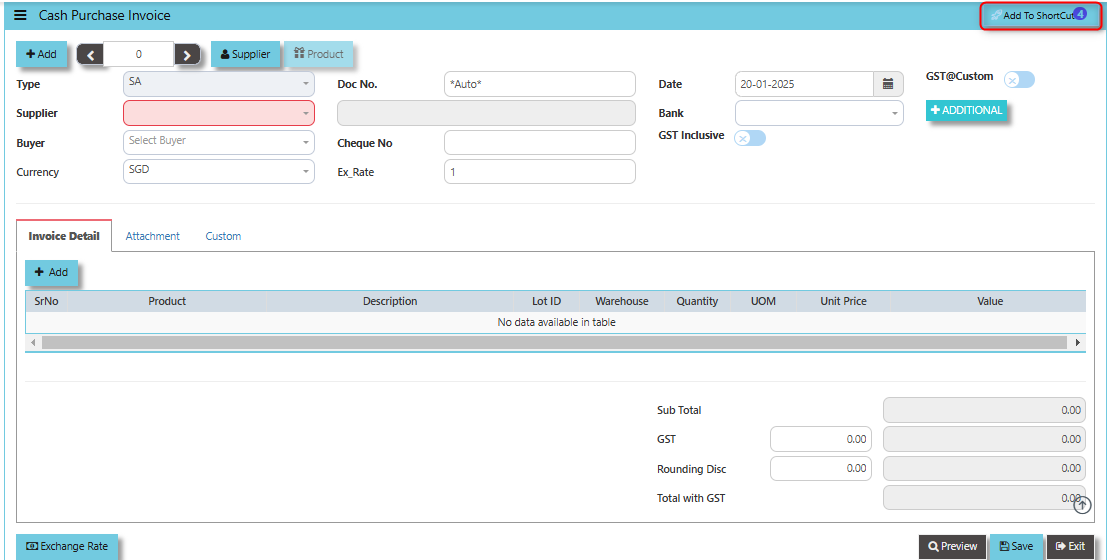
**Add to ShortCut -** By clicking the "Add to Shortcut" button, the cash purchase invoice or related feature (such as the specific purchase transaction or screen) is saved to the user's personalized shortcut list. This allows for faster navigation in the future, eliminating the need to go through multiple menus to access the same page or function.
[](https://doc.uniq365.com/uploads/images/gallery/2025-01/Fbeimage.png)
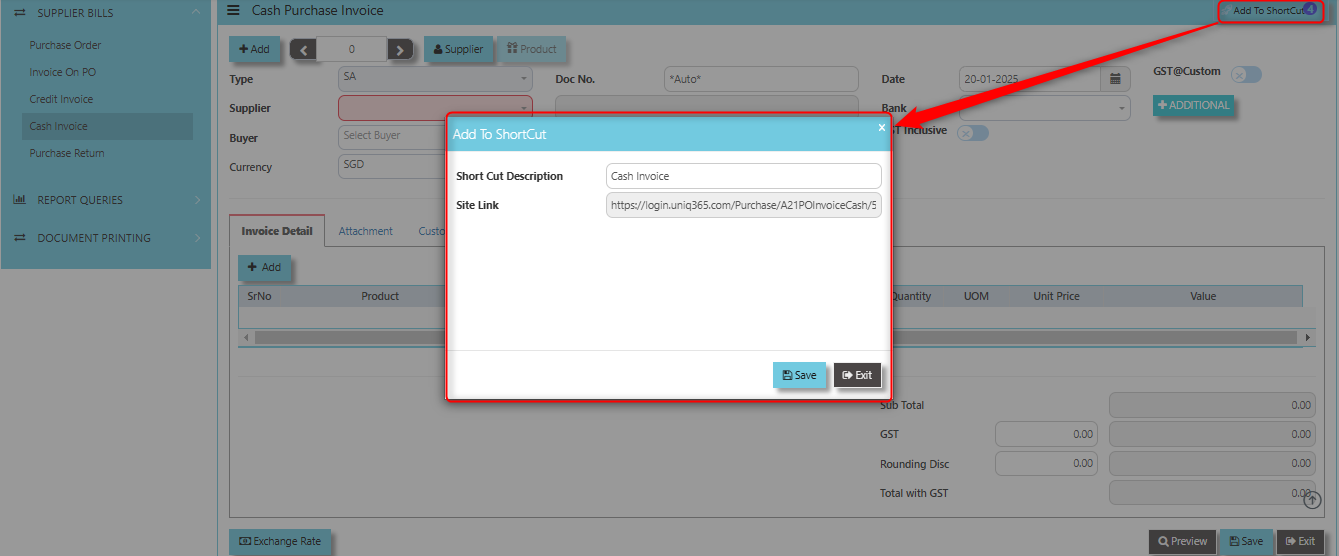
##### **How to use Add to ShortCut?**
1. Click "**Add to ShortCut"** and system will open below windows:
[](https://doc.uniq365.com/uploads/images/gallery/2025-01/cW7image.png)
2. Enter Short Cut Description
3\. Click SAVE then click OK.
4\. User may look to the Homepage for the added function or page. Click on HOME - HOME - SHORTCUT for the screen below.
[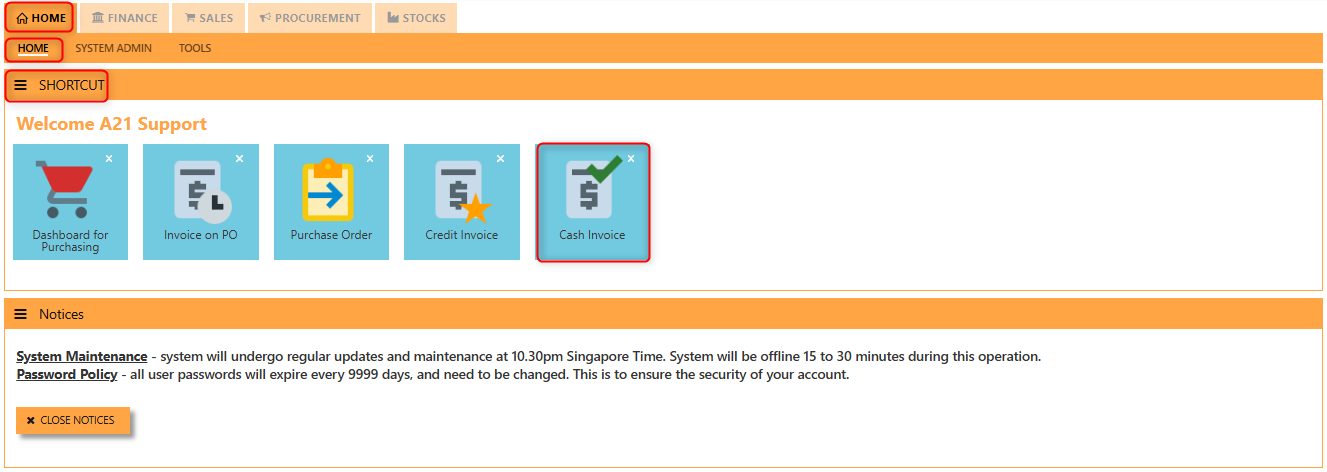](https://doc.uniq365.com/uploads/images/gallery/2025-01/nD4image.png)
\_\_\_\_\_\_\_\_\_\_\_\_\_\_\_\_\_\_\_\_\_\_\_\_\_\_\_\_\_\_\_\_\_\_\_\_\_\_\_\_\_\_\_\_\_\_\_\_\_\_\_\_\_\_\_\_\_\_\_\_\_\_\_\_\_\_\_\_\_\_\_\_\_\_\_\_\_\_\_\_\_\_\_\_\_\_\_\_\_\_\_\_\_\_\_\_\_\_\_\_\_\_\_\_\_\_\_\_\_\_\_\_\_\_\_\_\_\_\_\_\_\_\_\_\_\_\_\_\_\_\_\_\_\_\_\_\_\_\_
By clicking the **Supplier Button**, users can view or select the **supplier's details** (e.g., name, contact information, and payment terms) from the system's supplier database.
[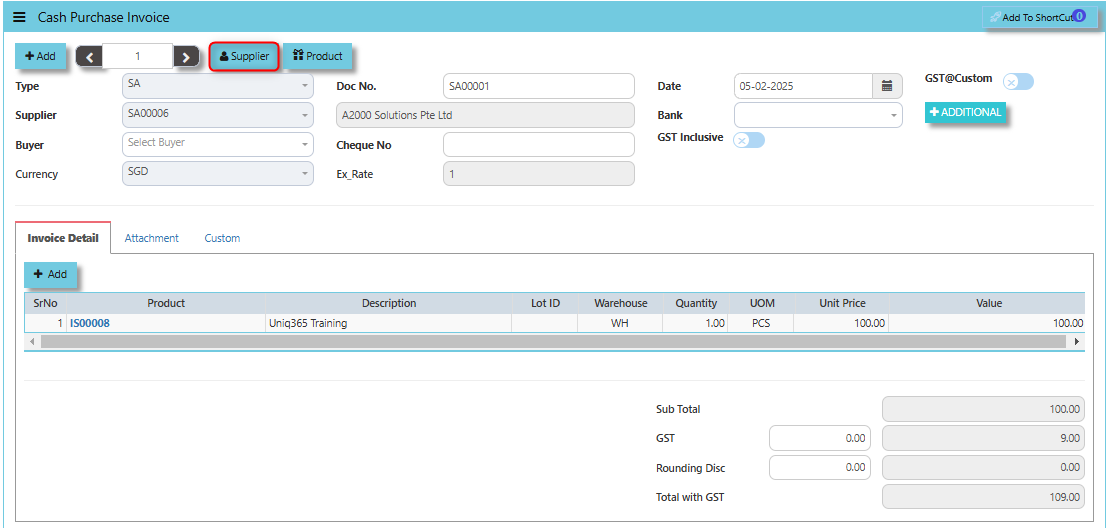](https://doc.uniq365.com/uploads/images/gallery/2025-02/lqCimage.png)
The **Product Button** It helps link and easy access to the Product and Service Maintenance for new creation of Items/Services.
[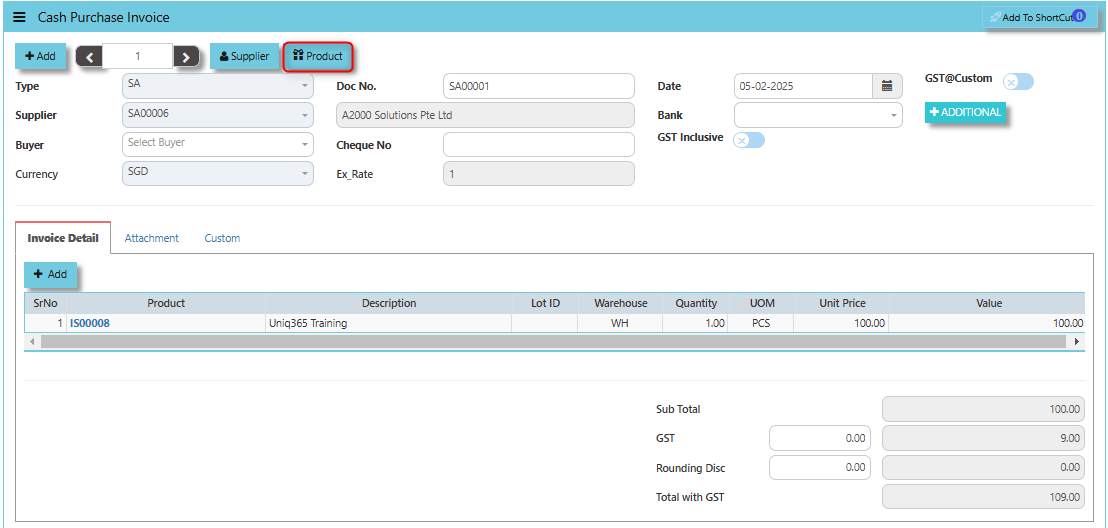](https://doc.uniq365.com/uploads/images/gallery/2025-02/lk5image.png)
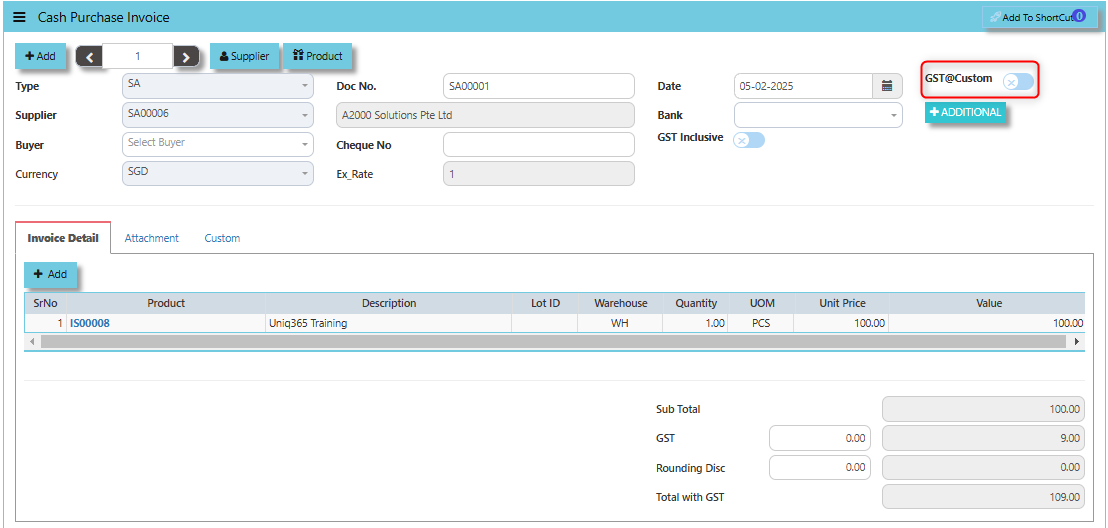
The **GST@Custom** checkbox typically used to manage the application of custom GST rates or tax treatment for specific purchases made with cash. This feature allows users to handle scenarios where the standard GST rates do not apply, or where there is a need to apply a special GST rate for a particular transaction.
[](https://doc.uniq365.com/uploads/images/gallery/2025-02/I4iimage.png)
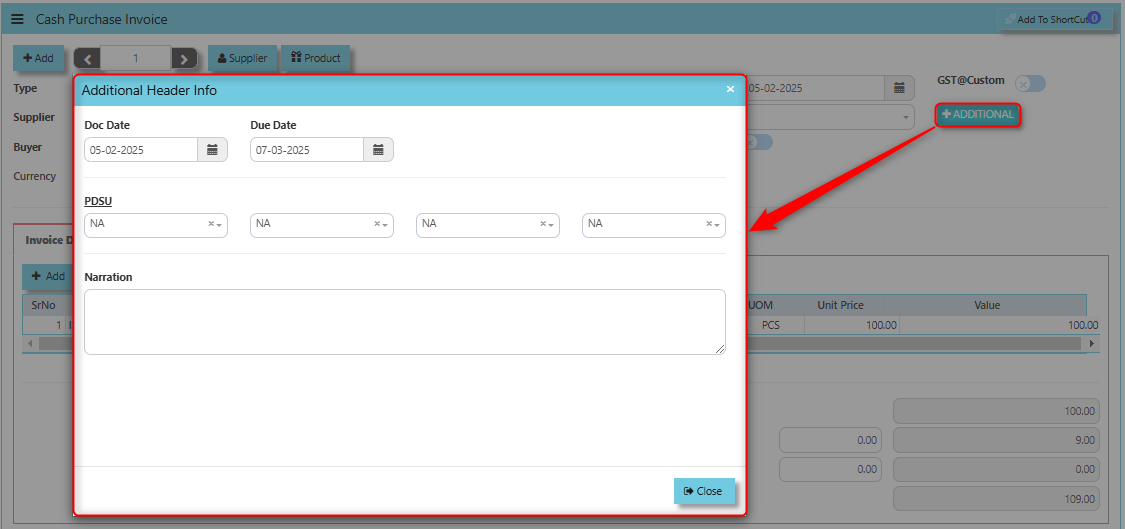
The **Additional Header Info** button allows users to add or view additional information or custom fields related to the purchase invoice at the header level. This button typically provides a way to capture supplementary details that are relevant to the overall transaction, which may not be included in the standard fields of the invoice.
[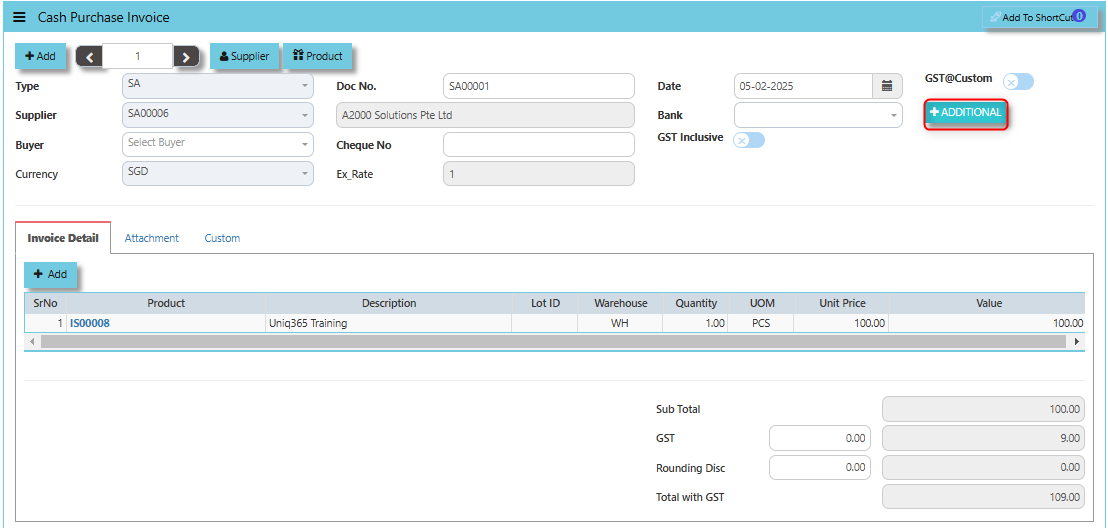](https://doc.uniq365.com/uploads/images/gallery/2025-02/8Lsimage.png)
Once clicked the Additional Button, user may input the necessary details for the below fields:
- Doc Date
- Due Date
- PDSU
- Narration
[](https://doc.uniq365.com/uploads/images/gallery/2025-02/3imimage.png)
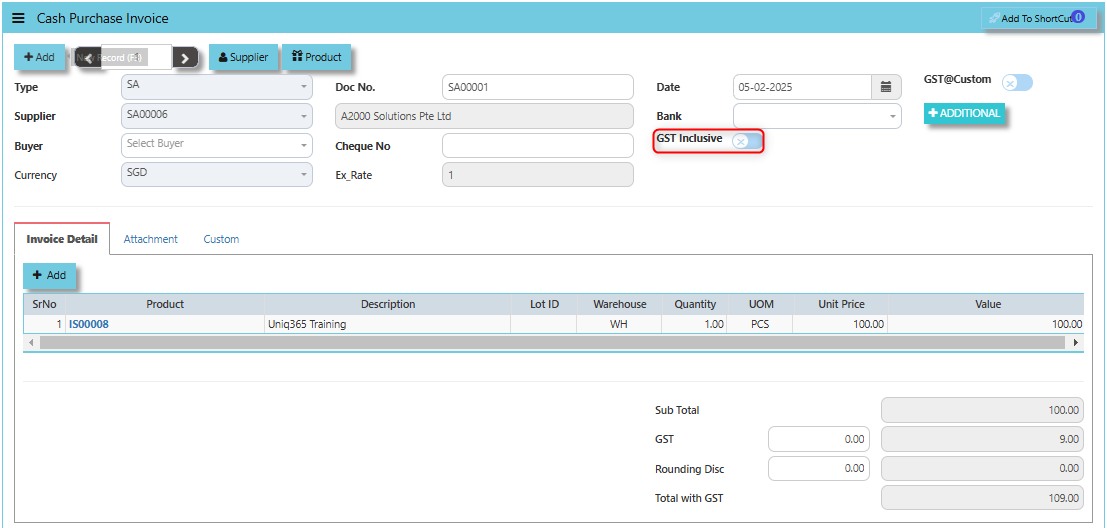
When the **GST Inclusive** checkbox is ticked, it means that the purchase price provided by the supplier already includes GST. In other words, the GST amount has already been factored into the total price of the items or services being purchased.
[](https://doc.uniq365.com/uploads/images/gallery/2025-02/XDLimage.png)
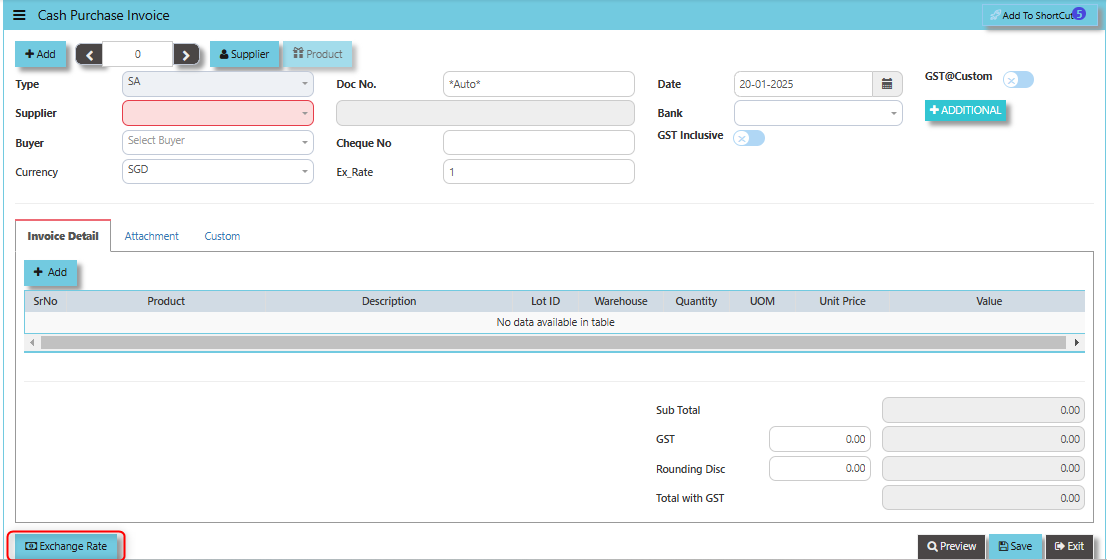
**"Exchange Rate" button** - Used to define or update the exchange rate when the invoice involves foreign currency transactions. This feature allows users to accurately convert the purchase invoice amount from the foreign currency into the company’s base currency, based on the prevailing exchange rate at the time of the transaction.
[](https://doc.uniq365.com/uploads/images/gallery/2025-01/bApimage.png)
\_\_\_\_\_\_\_\_\_\_\_\_\_\_\_\_\_\_\_\_\_\_\_\_\_\_\_\_\_\_\_\_\_\_\_\_\_\_\_\_\_\_\_\_\_\_\_\_\_\_\_\_\_\_\_\_\_\_\_\_\_\_\_\_\_\_\_\_\_\_\_\_\_\_\_\_\_\_\_\_\_\_\_\_\_\_\_\_\_\_\_\_\_\_\_\_\_\_\_\_\_\_\_\_\_\_\_\_\_\_\_\_\_\_\_\_\_\_\_\_\_\_\_\_\_\_\_\_\_\_\_\_\_\_\_\_\_\_\_
The **Attachment Tab** is used to manage and store digital attachments related to the purchase invoice. This feature allows users to link and upload various types of files, documents, or supporting materials that are associated with a particular cash purchase transaction.
##### **How to use Attachment Tab?**
1. Click on PROCUREMENT - PURCHASING - SUPPLIER BILLS - CASH INVOICE - ATTACHMENT TAB for the screen below.
[](https://doc.uniq365.com/uploads/images/gallery/2025-02/8Miimage.png)
2. Click +Add files and windows will prompt then choose the file you want to upload by clicking open. Kindly take note the file types and maximum size requirements in uploading: ***Only (gif, jpg, jpeg, png, pdf, doc, docx, xls, xlsx, csv, msg, html and htm) file type allowed. | MaxFileSize : 25 MB***
[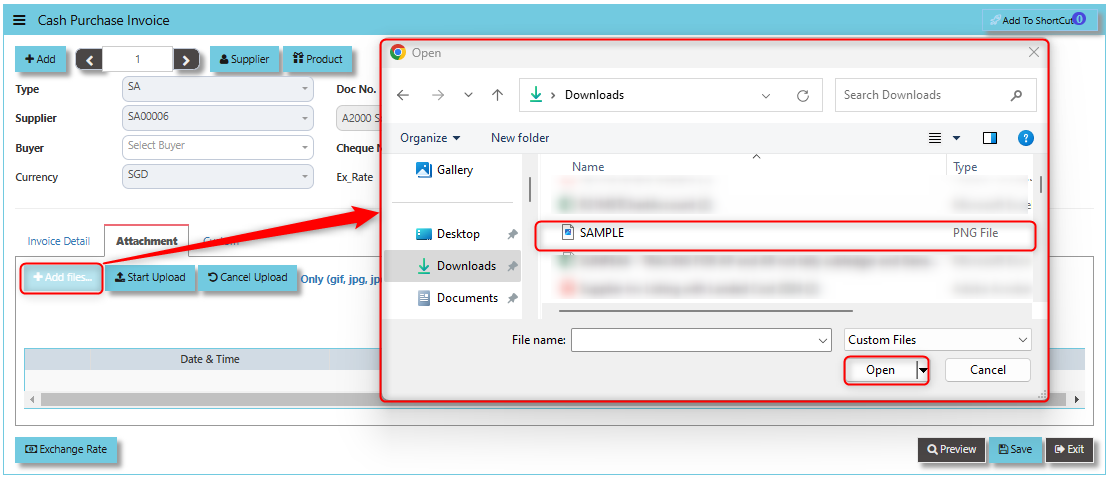](https://doc.uniq365.com/uploads/images/gallery/2025-02/iqFimage.png)
3. Key in the Attachment Name then click start to upload.
[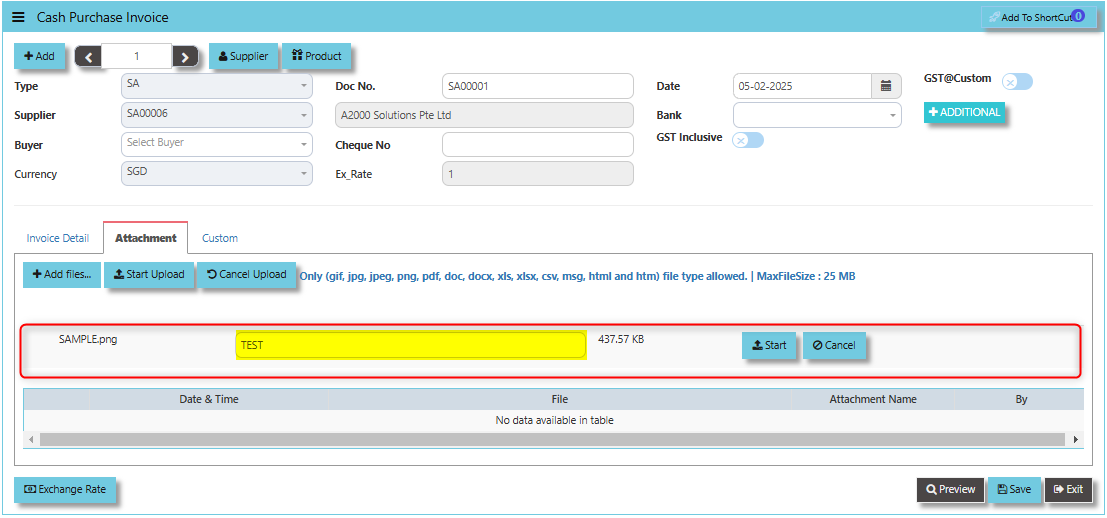](https://doc.uniq365.com/uploads/images/gallery/2025-02/JJDimage.png)
4. Once the file attached, click "SAVE" button
[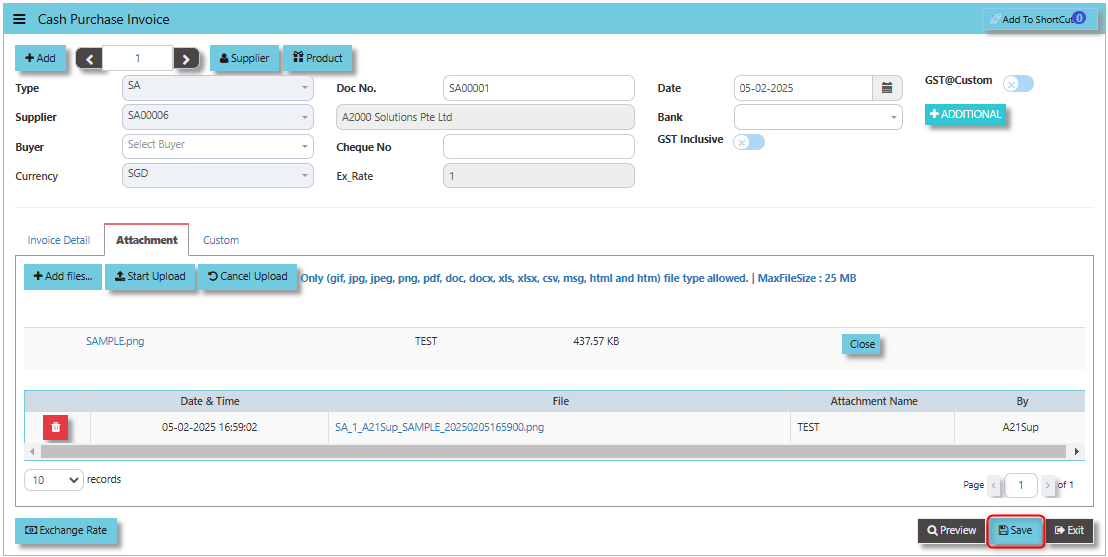](https://doc.uniq365.com/uploads/images/gallery/2025-02/JRsimage.png)
User may opt to cancel the uploading by clicking the **"Cancel Upload"** and delete the uploaded file by utilizing the **"Bin Icon"** at the left corner of line detail.
\_\_\_\_\_\_\_\_\_\_\_\_\_\_\_\_\_\_\_\_\_\_\_\_\_\_\_\_\_\_\_\_\_\_\_\_\_\_\_\_\_\_\_\_\_\_\_\_\_\_\_\_\_\_\_\_\_\_\_\_\_\_\_\_\_\_\_\_\_\_\_\_\_\_\_\_\_\_\_\_\_\_\_\_\_\_\_\_\_\_\_\_\_\_\_\_\_\_\_\_\_\_\_\_\_\_\_\_\_\_\_\_\_\_\_\_\_\_\_\_\_\_\_\_\_\_\_\_\_\_\_\_\_\_\_\_\_\_\_
**"Custom Tab"** typically used for customizable fields that allow businesses to capture specific information relevant to their unique processes. This tab provides flexibility for users to add or store additional data or custom attributes that are not part of the default structure of the cash purchase invoice.
- Click on PROCUREMENT - PURCHASING - SUPPLIER BILLS - CASH INVOICE - CUSTOM TAB for the screen below.
[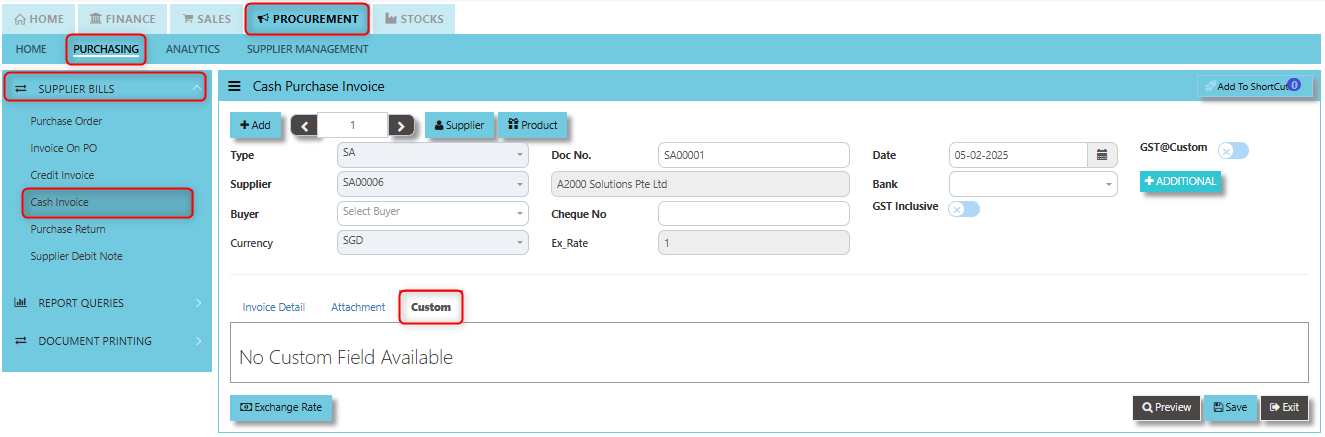](https://doc.uniq365.com/uploads/images/gallery/2025-02/FCXimage.png)
Purchase Return (SC)
##### This is used to create a Credit Note to suppliers when Goods are returned. This will update the GL and the stock status.
\_\_\_\_\_\_\_\_\_\_\_\_\_\_\_\_\_\_\_\_\_\_\_\_\_\_\_\_\_\_\_\_\_\_\_\_\_\_\_\_\_\_\_\_\_\_\_\_\_\_\_\_\_\_\_\_\_\_\_\_\_\_\_\_\_\_\_\_\_\_\_\_\_\_\_\_\_\_\_\_\_\_\_\_\_\_\_\_\_\_\_\_\_\_\_\_\_\_\_
##### **How to set create Purchase Return?**
1. Click on PROCUREMENT – PURCHASING – SUPPLIER BILLS - PURCHASE RETURN for the screen below.
[](https://doc.uniq365.com/uploads/images/gallery/2025-01/9LOimage.png)
2. Click Add (F3) to create new record.
[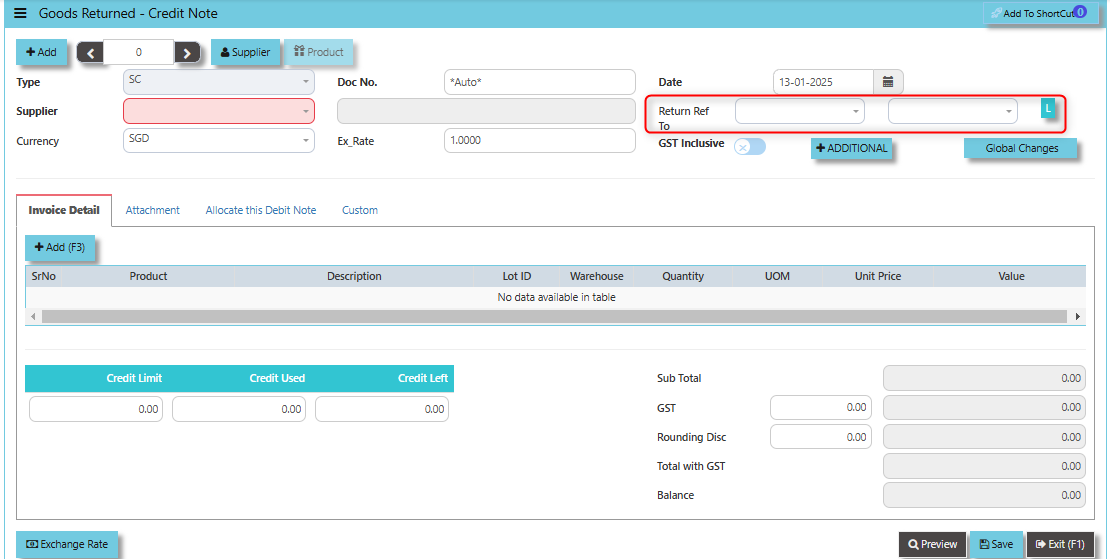](https://doc.uniq365.com/uploads/images/gallery/2025-01/U3Nimage.png)
3. Click Type - drop-down to select transaction type – SC (Goods Returned – Credit Note).
4\. After transaction type selection, use the tab button to go to the Ref No., Date, and other fields.
5\. Click the Supplier - drop-down list to select Supplier Name, followed by the Buyer, PDS, Currency, Exchange Rate, RMA Ref and Narration if applicable.
\_\_\_\_\_\_\_\_\_\_\_\_\_\_\_\_\_\_\_\_\_\_\_\_\_\_\_\_\_\_\_\_\_\_\_\_\_\_\_\_\_\_\_\_\_\_\_\_\_\_\_\_\_\_\_\_\_\_\_\_\_\_\_\_\_\_\_\_\_\_\_\_\_\_\_\_\_\_\_\_\_\_\_\_\_\_\_\_\_\_\_\_\_\_\_\_\_\_\_\_\_\_\_\_\_\_\_\_\_\_\_\_\_\_\_\_\_\_\_\_\_\_\_\_\_\_\_\_\_\_\_\_\_\_\_\_\_\_\_
**Add to ShortCut -** Clicking this button allows users to add a specific supplier's profile or page to a **shortcut list**. Once added, this shortcut enables the user to quickly navigate to the supplier’s details directly from a dashboard or main menu, without having to search for the supplier each time.
[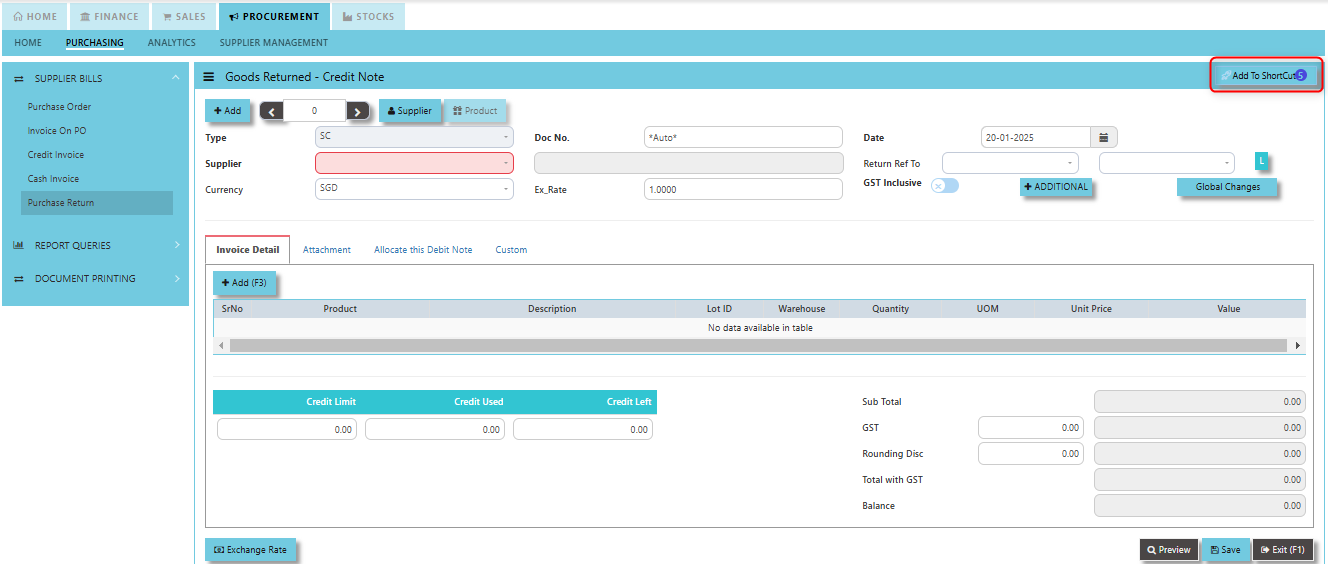](https://doc.uniq365.com/uploads/images/gallery/2025-01/ouUimage.png)
##### **How to use Add to ShortCut?**
1. Click "**Add to ShortCut"** and system will open below windows:
[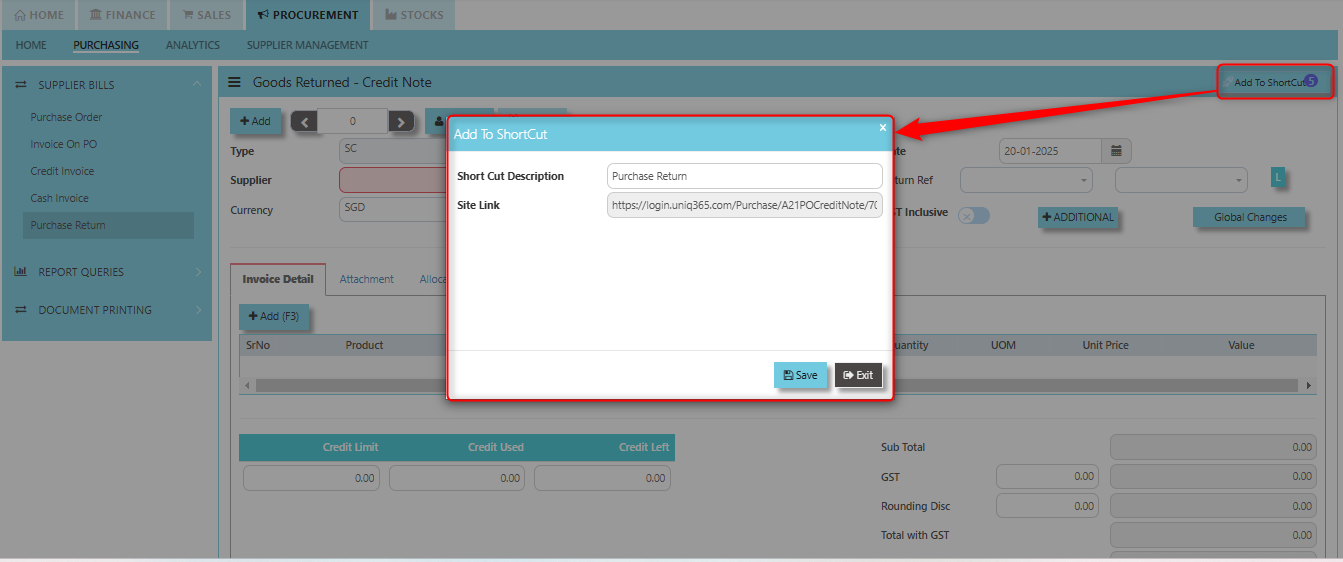](https://doc.uniq365.com/uploads/images/gallery/2025-01/QLdimage.png)
2. Enter Short Cut Description
3\. Click SAVE then click OK.
4\. User may look to the Homepage for the added function or page. Click on HOME - HOME - SHORTCUT for the screen below.
[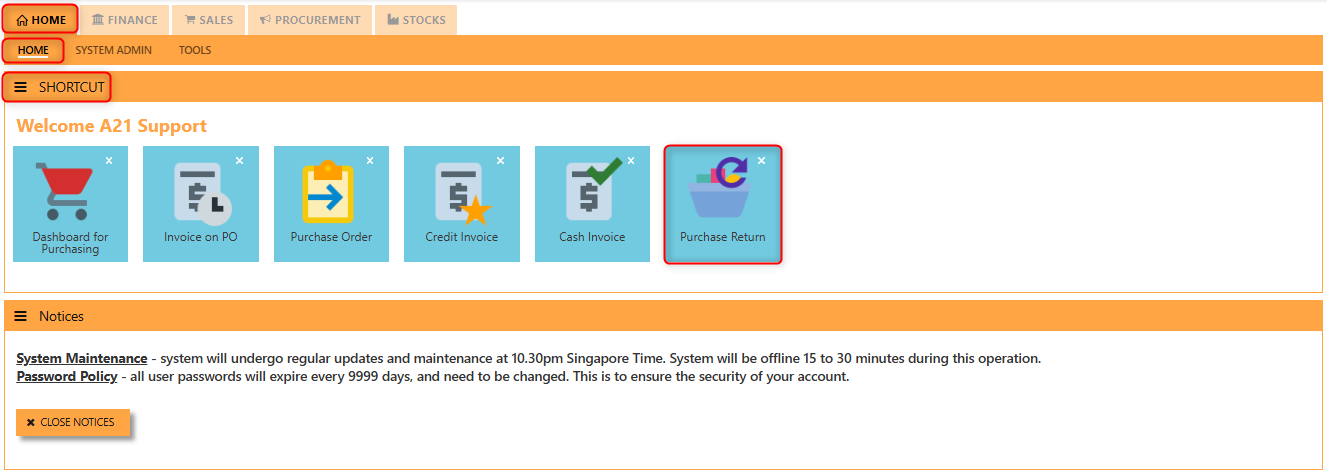](https://doc.uniq365.com/uploads/images/gallery/2025-01/6gwimage.png)
\_\_\_\_\_\_\_\_\_\_\_\_\_\_\_\_\_\_\_\_\_\_\_\_\_\_\_\_\_\_\_\_\_\_\_\_\_\_\_\_\_\_\_\_\_\_\_\_\_\_\_\_\_\_\_\_\_\_\_\_\_\_\_\_\_\_\_\_\_\_\_\_\_\_\_\_\_\_\_\_\_\_\_\_\_\_\_\_\_\_\_\_\_\_\_\_\_\_\_\_\_\_\_\_\_\_\_\_\_\_\_\_\_\_\_\_\_\_\_\_\_\_\_\_\_\_\_\_\_\_\_\_\_\_\_\_\_\_\_
**"Exchange Rate"** **Button** - used to define or update the exchange rate when a goods return or credit note transaction involves foreign currency. This allows users to convert the value of the returned goods or the credit amount from the supplier’s currency into the company’s base or local currency based on the applicable exchange rate.
[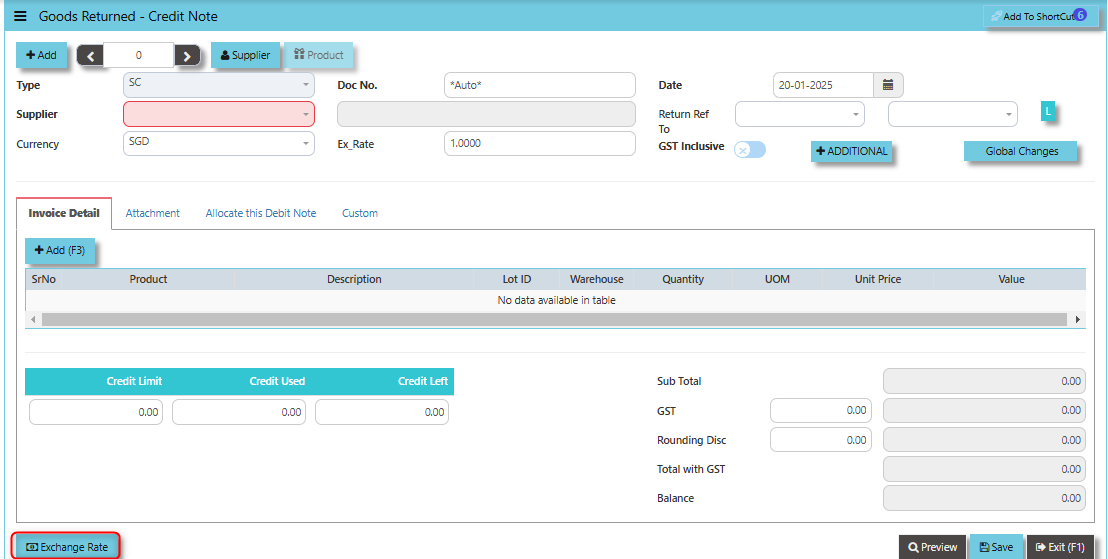](https://doc.uniq365.com/uploads/images/gallery/2025-01/TRRimage.png)
**"Supplier Button"** provides users with a quick and efficient way to manage and update supplier information when processing goods returns and credit notes. Clicking the Supplier button allows users to directly access the **Supplier Maintenance** screen or module.
[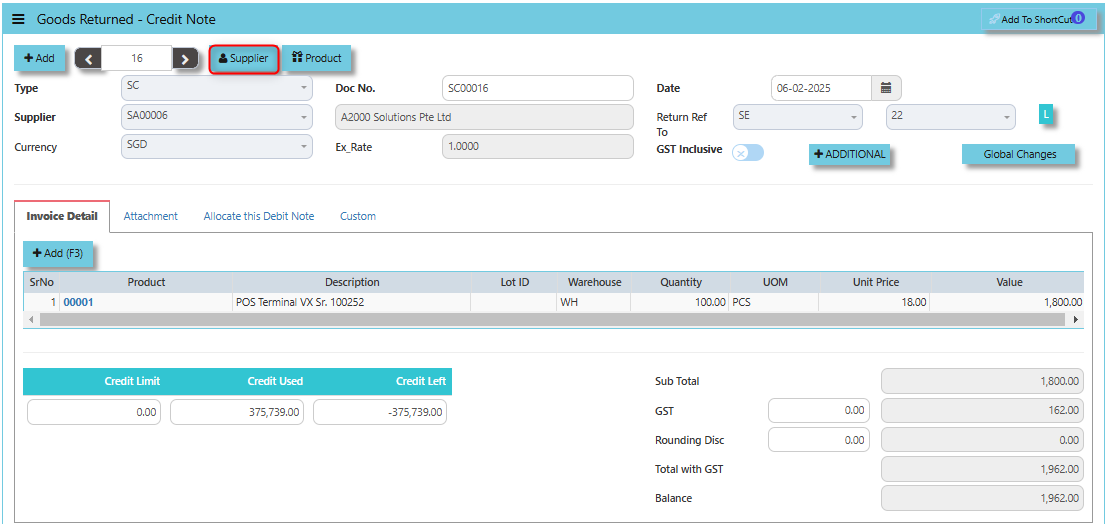](https://doc.uniq365.com/uploads/images/gallery/2025-02/icCimage.png)
By clicking the **Product button**, users can quickly access the **Product & Service Maintenance** module. This allows them to add new item, review and manage product details related to the returned items, such as product descriptions, quantities, and pricing. This is especially useful when dealing with returns for specific products.
[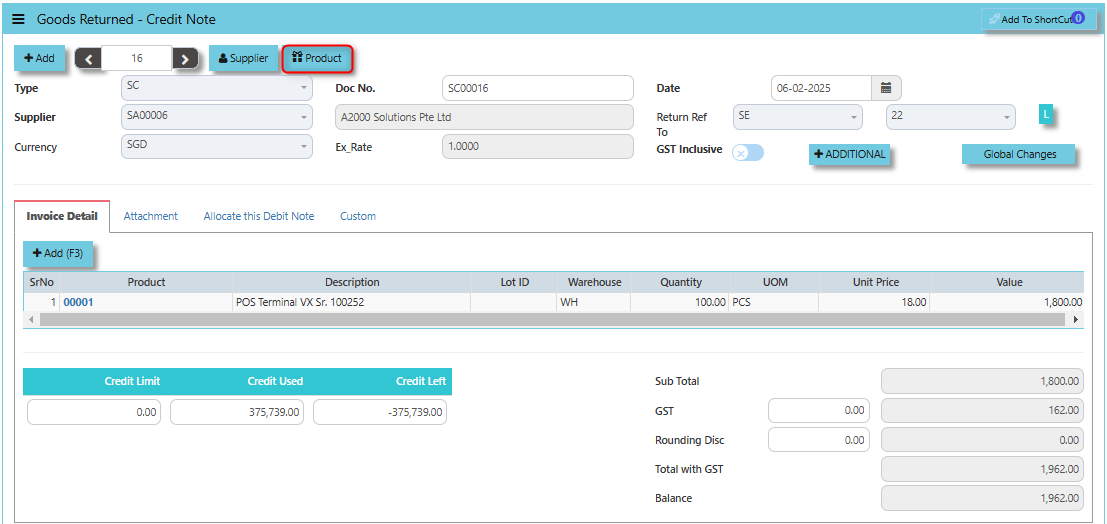](https://doc.uniq365.com/uploads/images/gallery/2025-02/3aJimage.png)
When the **GST Inclusive checkbox** is ticked, the system assumes that the GST is already included in the original price of the goods being returned. This means the total amount for the returned goods (including GST) is treated as a single value, and there is no separate GST calculation for the return. The system will consider the entire amount (including GST) when processing the credit note.
[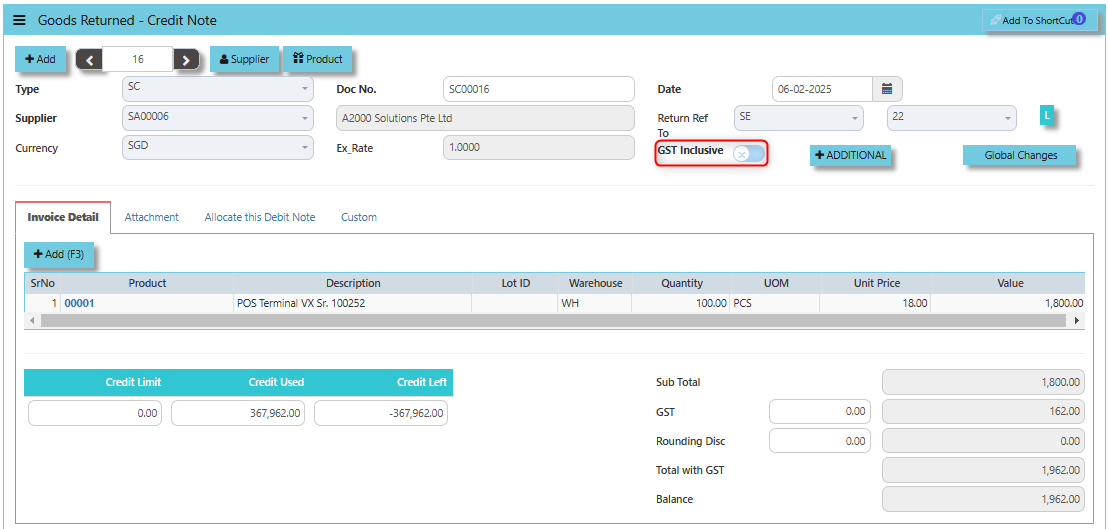](https://doc.uniq365.com/uploads/images/gallery/2025-02/45limage.png)
The **Additional Header Info button** provides users with the ability to add extra, customizable information to the header of the credit note document. This feature enhances the flexibility and detail of the credit note process.
[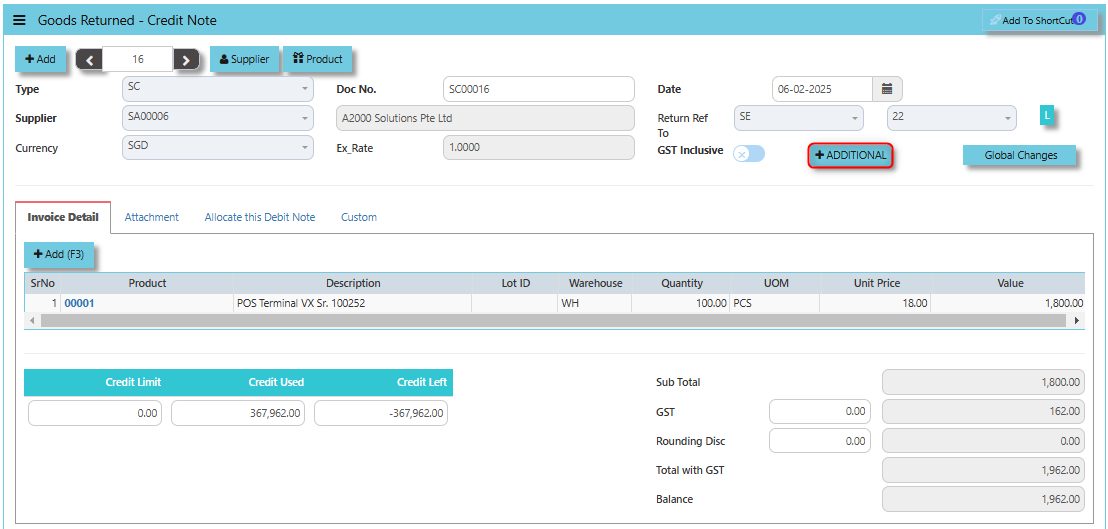](https://doc.uniq365.com/uploads/images/gallery/2025-02/Qwoimage.png)
Once clicked, there is a window will prompt and user may input the necessary details for the below fields.
- RMA Ref
- Doc Date
- Due Date
- PDSU
- Narration
[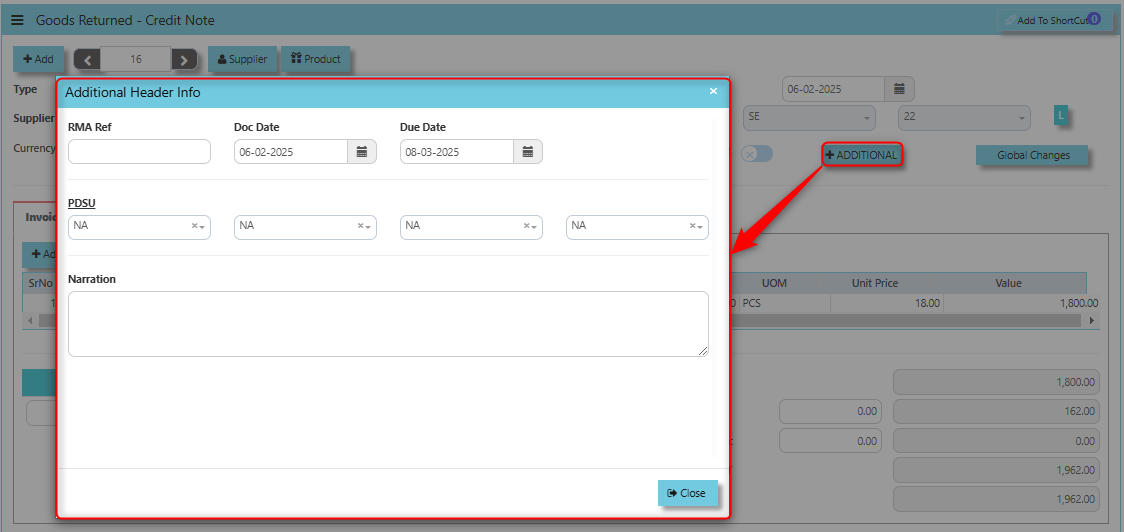](https://doc.uniq365.com/uploads/images/gallery/2025-02/yOVimage.png)
\_\_\_\_\_\_\_\_\_\_\_\_\_\_\_\_\_\_\_\_\_\_\_\_\_\_\_\_\_\_\_\_\_\_\_\_\_\_\_\_\_\_\_\_\_\_\_\_\_\_\_\_\_\_\_\_\_\_\_\_\_\_\_\_\_\_\_\_\_\_\_\_\_\_\_\_\_\_\_\_\_\_\_\_\_\_\_\_\_\_\_\_\_\_\_\_\_\_\_\_\_\_\_\_\_\_\_\_\_\_\_\_\_\_\_\_\_\_\_\_\_\_\_\_\_\_\_\_\_\_\_\_\_\_\_\_\_\_\_
**Global Changes Button** allows users to efficiently apply or modify discounts across multiple returned items in a credit note.
[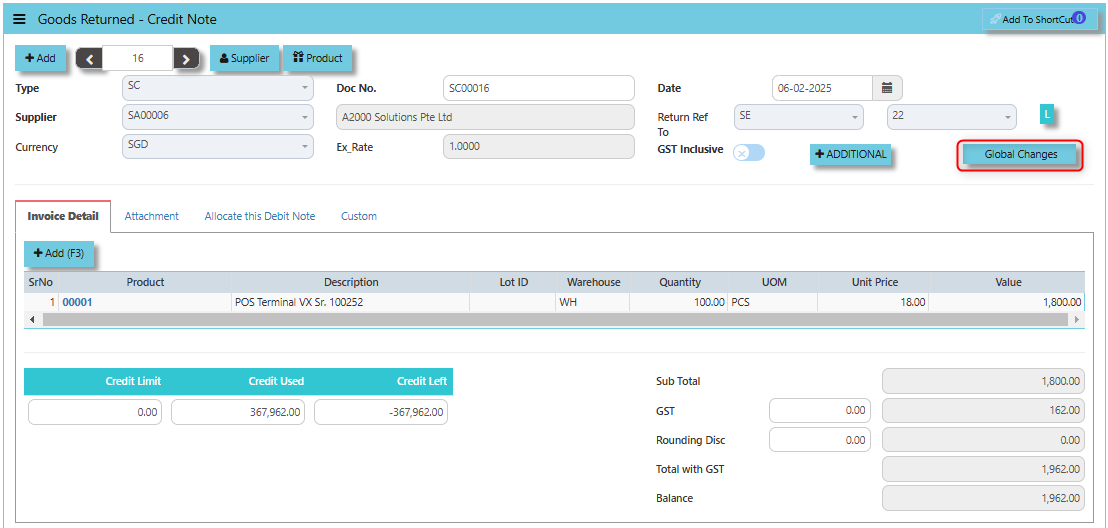](https://doc.uniq365.com/uploads/images/gallery/2025-02/6Heimage.png)
##### **How to use Global Changes Button?**
1. Click Global Changes button and a dialogue box will prompt to verify the Global Discount to be applied. Configure accordingly on your desired discount amount then click "Apply" and will auto fill the percentage discount level field. User may opt to add Global Tax change to be applied then click "Confirm" once done.
[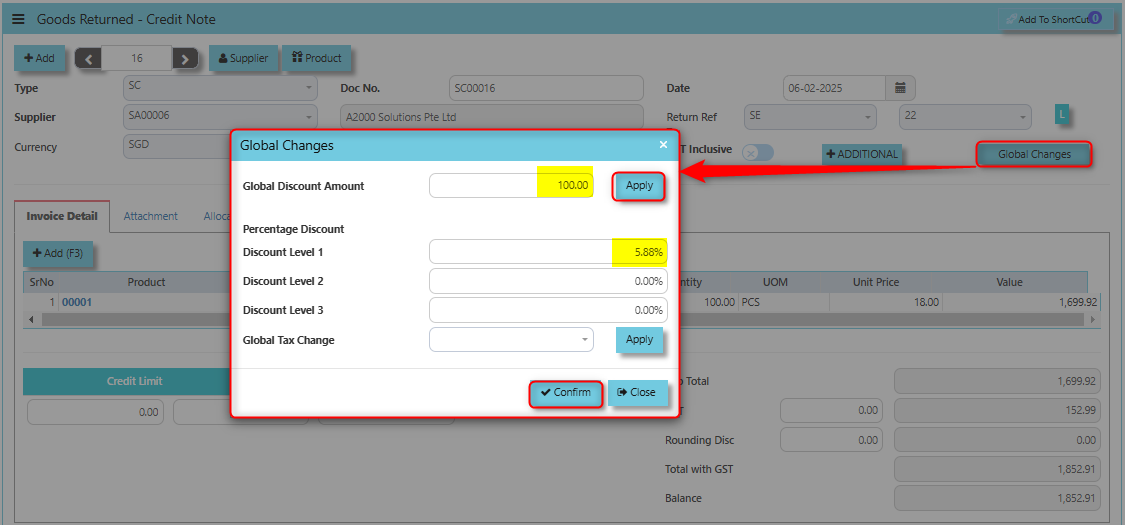](https://doc.uniq365.com/uploads/images/gallery/2025-02/bxYimage.png)
2. Once clicked "Confirm", system will prompt a message that data has been successfully saved.
[](https://doc.uniq365.com/uploads/images/gallery/2025-02/OdZimage.png)
\_\_\_\_\_\_\_\_\_\_\_\_\_\_\_\_\_\_\_\_\_\_\_\_\_\_\_\_\_\_\_\_\_\_\_\_\_\_\_\_\_\_\_\_\_\_\_\_\_\_\_\_\_\_\_\_\_\_\_\_\_\_\_\_\_\_\_\_\_\_\_\_\_\_\_\_\_\_\_\_\_\_\_\_\_\_\_\_\_\_\_\_\_\_\_\_\_\_\_\_\_\_\_\_\_\_\_\_\_\_\_\_\_\_\_\_\_\_\_\_\_\_\_\_\_\_\_\_\_\_\_\_\_\_\_\_\_\_\_
The **Credit Limit**, **Credit Used**, and **Credit Left** in the context of a Purchase Return (when goods are returned to the supplier) are important for managing financial adjustments and maintaining control over supplier accounts.
- The **Credit Limit** refers to the maximum amount of credit that a supplier is willing to extend to the organization for returns or exchanges of purchased goods.
- The **Credit Used** refers to the total value of returns (or credits) that have already been processed and applied to the organization's account with the supplier.
- The **Credit Left** is the amount of credit that remains available to be used for future purchase returns or exchanges. It is calculated by subtracting the **Credit Used** from the **Credit Limit**.
[](https://doc.uniq365.com/uploads/images/gallery/2025-02/iSRimage.png)
The **Exchange Rate button** allows users to manage the currency exchange rates for transactions when returning goods purchased from international suppliers. Its main function is to ensure that the return is properly accounted for when the original purchase and the return are in different currencies or the exchange rate has changed between the purchase date and the return date.
[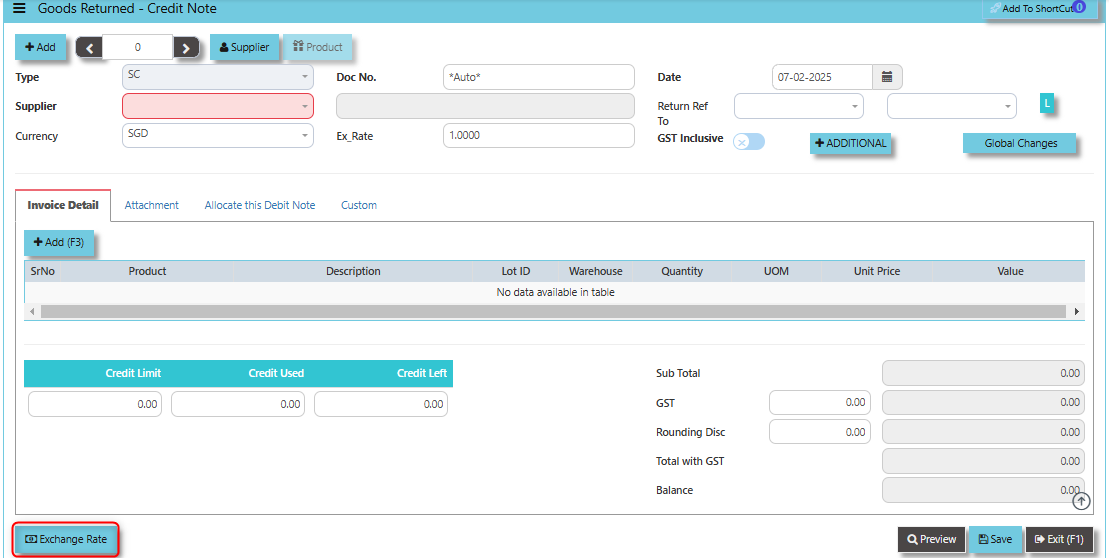](https://doc.uniq365.com/uploads/images/gallery/2025-02/3Raimage.png)
\_\_\_\_\_\_\_\_\_\_\_\_\_\_\_\_\_\_\_\_\_\_\_\_\_\_\_\_\_\_\_\_\_\_\_\_\_\_\_\_\_\_\_\_\_\_\_\_\_\_\_\_\_\_\_\_\_\_\_\_\_\_\_\_\_\_\_\_\_\_\_\_\_\_\_\_\_\_\_\_\_\_\_\_\_\_\_\_\_\_\_\_\_\_\_\_\_\_\_\_\_\_\_\_\_\_\_\_\_\_\_\_\_\_\_\_\_\_\_\_\_\_\_\_\_\_\_\_\_\_\_\_\_\_\_\_\_\_\_
The **Attachment Tab** allows users to attach and store relevant documents or files that are associated with the credit note for returned goods. This function helps in maintaining a comprehensive and organized record of all supporting materials related to the return process.
##### **How to use Attachment Tab?**
1. Click on PROCUREMENT - PURCHASING - SUPPLIER BILLS - PURCHASE RETURN - ATTACHMENT TAB for the screen below.
[](https://doc.uniq365.com/uploads/images/gallery/2025-02/4T0image.png)
2. Click +Add files and windows will prompt then choose the file you want to upload by clicking open. Kindly take note the file types and maximum size requirements in uploading: ***Only (gif, jpg, jpeg, png, pdf, doc, docx, xls, xlsx, csv, msg, html and htm) file type allowed. | MaxFileSize : 25 MB***
[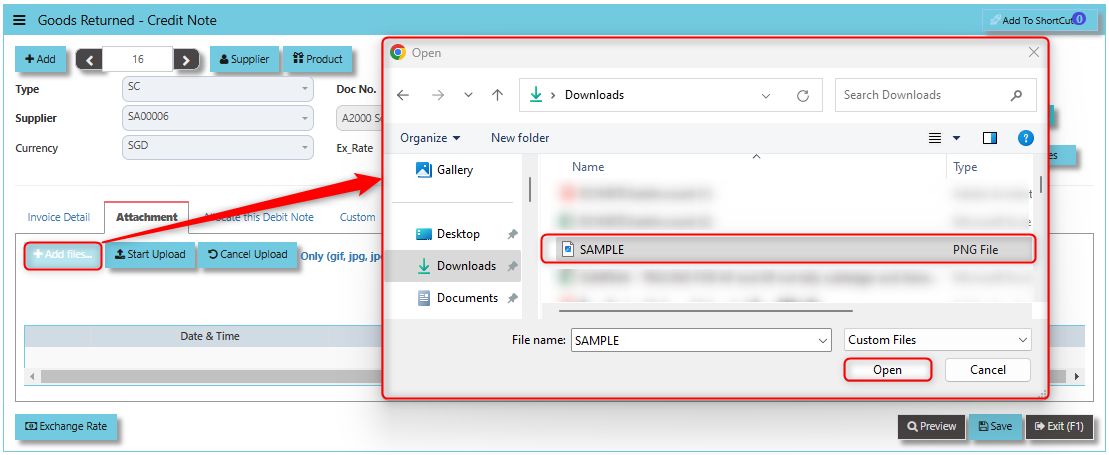](https://doc.uniq365.com/uploads/images/gallery/2025-02/NSJimage.png)
3. Key in the Attachment Name then click start to upload.
[](https://doc.uniq365.com/uploads/images/gallery/2025-02/qKJimage.png)
4. Once the file attached, click "SAVE" button
[](https://doc.uniq365.com/uploads/images/gallery/2025-02/cbMimage.png)
User may opt to cancel the uploading by clicking the **"Cancel Upload"** and delete the uploaded file by utilizing the **"Bin Icon"** at the left corner of line detail.
\_\_\_\_\_\_\_\_\_\_\_\_\_\_\_\_\_\_\_\_\_\_\_\_\_\_\_\_\_\_\_\_\_\_\_\_\_\_\_\_\_\_\_\_\_\_\_\_\_\_\_\_\_\_\_\_\_\_\_\_\_\_\_\_\_\_\_\_\_\_\_\_\_\_\_\_\_\_\_\_\_\_\_\_\_\_\_\_\_\_\_\_\_\_\_\_\_\_\_\_\_\_\_\_\_\_\_\_\_\_\_\_\_\_\_\_\_\_\_\_\_\_\_\_\_\_\_\_\_\_\_\_\_\_\_\_\_\_\_
**Allocation Tab** used to manage and allocate the financial impact of the goods return and the associated credit note. It helps users properly match and allocate the returned goods to the correct transaction types like PC, PD, PI, PV, SD, SE and SI.
##### **How to use Allocation Tab?**
1. Click on PROCUREMENT - PURCHASING - SUPPLIER BILLS - PURCHASE RETURN - ALLOCATION TAB for the screen below.
[](https://doc.uniq365.com/uploads/images/gallery/2025-02/lu4image.png)
2. Click +Add Allocation button. Select the Trn Type, Trn Number, Doc Number associated to the Credit Note input the Debit and Credit Amount then click the "Check" button to save the line detail.
[](https://doc.uniq365.com/uploads/images/gallery/2025-02/iSuimage.png)
3. Click "SAVE" and user may look into the upper right note of trn screen where specific transaction that credit note is associated.
[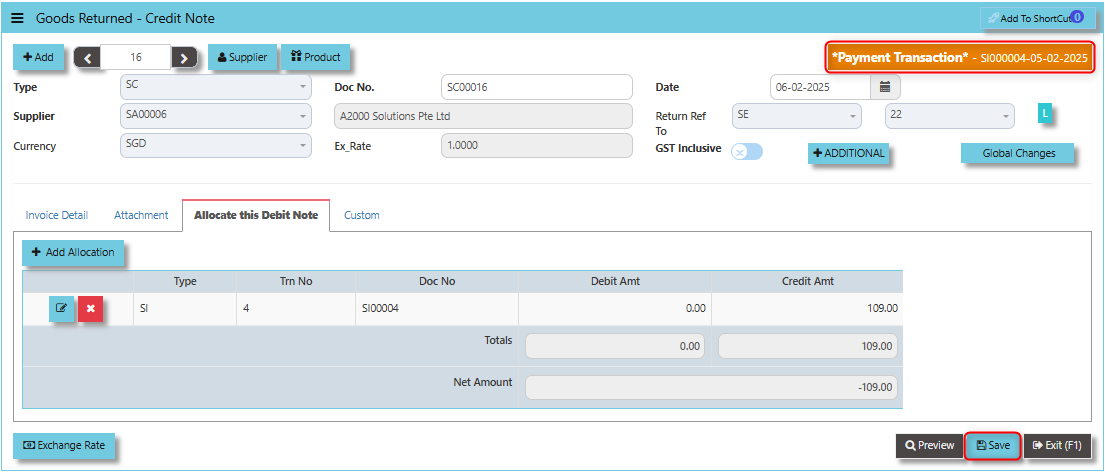](https://doc.uniq365.com/uploads/images/gallery/2025-02/Pvcimage.png)
\_\_\_\_\_\_\_\_\_\_\_\_\_\_\_\_\_\_\_\_\_\_\_\_\_\_\_\_\_\_\_\_\_\_\_\_\_\_\_\_\_\_\_\_\_\_\_\_\_\_\_\_\_\_\_\_\_\_\_\_\_\_\_\_\_\_\_\_\_\_\_\_\_\_\_\_\_\_\_\_\_\_\_\_\_\_\_\_\_\_\_\_\_\_\_\_\_\_\_\_\_\_\_\_\_\_\_\_\_\_\_\_\_\_\_\_\_\_\_\_\_\_\_\_\_\_\_\_\_\_\_\_\_\_\_\_\_\_\_
The **Custom Tab** provides users with the ability to add custom fields or personalized data related to the goods return and credit note transaction. Click on PROCUREMENT - PURCHASING - SUPPLIER BILLS - PURCHASE RETURN - CUSTOM TAB for the screen below.
[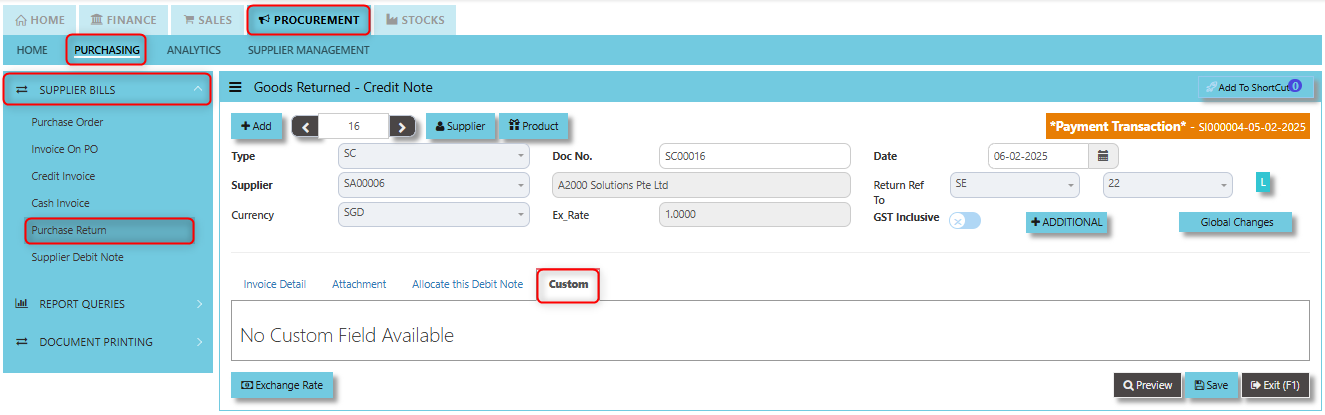](https://doc.uniq365.com/uploads/images/gallery/2025-02/SIMimage.png)
Supplier Debit Note (SD)
##### This is a direct Debit Note which sells product directly to suppliers. Its updates the GL and Inventory status.
\_\_\_\_\_\_\_\_\_\_\_\_\_\_\_\_\_\_\_\_\_\_\_\_\_\_\_\_\_\_\_\_\_\_\_\_\_\_\_\_\_\_\_\_\_\_\_\_\_\_\_\_\_\_\_\_\_\_\_\_\_\_\_\_\_\_\_\_\_\_\_\_\_\_\_\_\_\_\_\_\_\_\_\_\_\_\_\_\_\_\_\_\_\_\_\_\_\_\_
#### **How to set create Supplier Debit Note?**
1. Click on PROCUREMENT – PURCHASING – SUPPLIER BILLS - SUPPLIER DEBIT NOTE for the screen below.
[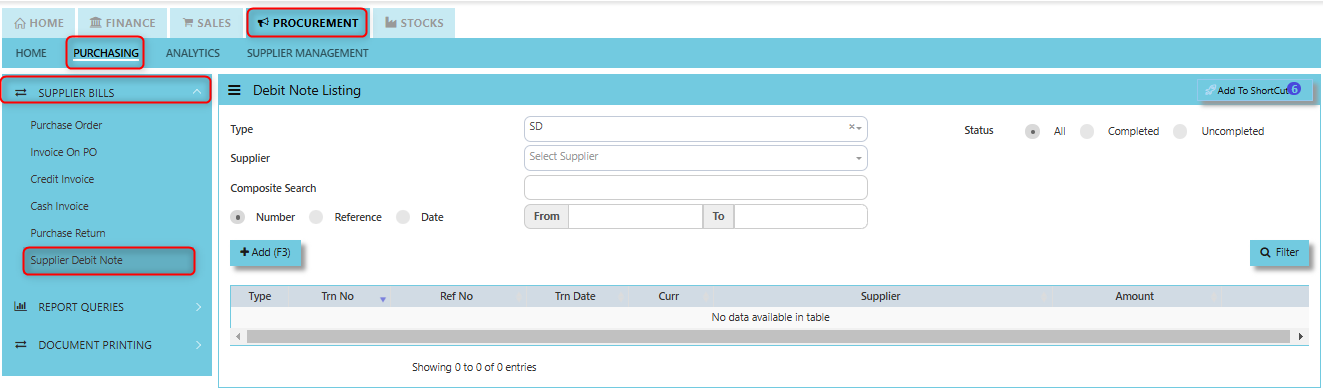](https://doc.uniq365.com/uploads/images/gallery/2025-01/WHEimage.png)
2. Click Add (F3) to create new record.
[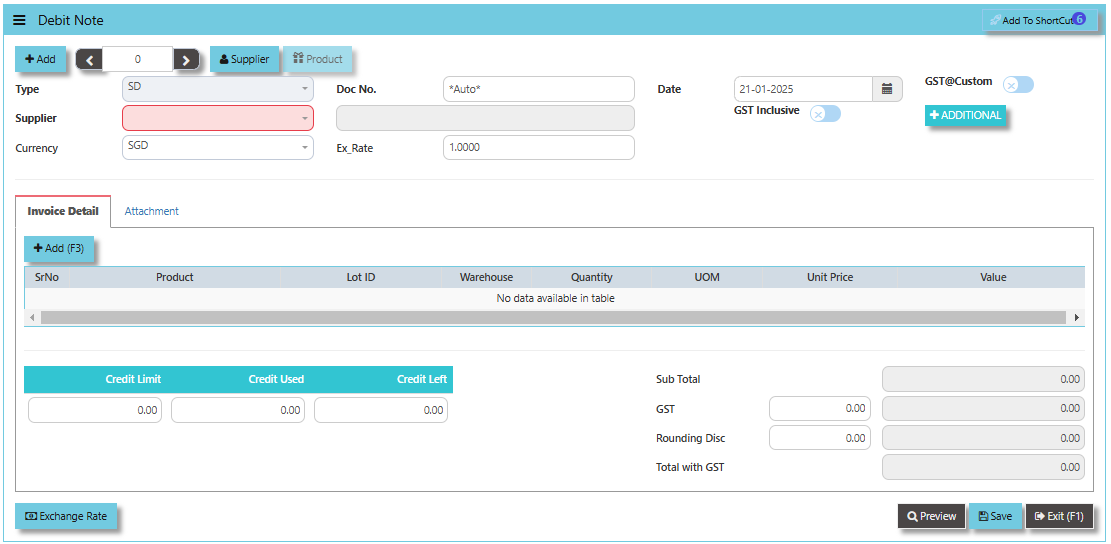](https://doc.uniq365.com/uploads/images/gallery/2025-01/jlqimage.png)
3. Click Type - drop-down to select transaction type – SD (Debit Note).
4\. After transaction type selection, use the tab button to go to the Ref No., Date, and other fields.
5\. Click the Supplier drop-down list to select Supplier Name, followed by the Buyer, PDS, Currency, Exchange Rate and Narration if applicable.
6\. After updating the header information, go to Details section to enter the product items. Save the transaction after this is done.
\_\_\_\_\_\_\_\_\_\_\_\_\_\_\_\_\_\_\_\_\_\_\_\_\_\_\_\_\_\_\_\_\_\_\_\_\_\_\_\_\_\_\_\_\_\_\_\_\_\_\_\_\_\_\_\_\_\_\_\_\_\_\_\_\_\_\_\_\_\_\_\_\_\_\_\_\_\_\_\_\_\_\_\_\_\_\_\_\_\_\_\_\_\_\_\_\_\_\_\_\_\_\_\_\_\_\_\_\_\_\_\_\_\_\_\_\_\_\_\_\_\_\_\_\_\_\_\_\_\_\_\_\_\_\_\_\_\_\_
The **Add to Shortcut** functionality provides a personalized experience, allowing users to tailor their Uniq365 dashboard or menu system to their specific roles and tasks. For users who regularly process or review Supplier Debit Notes, having a shortcut can save time by enabling direct access to the document or screen. This can speed up repetitive tasks, such as updating or adjusting debit notes, reviewing supplier credits, or verifying supplier transactions.
[](https://doc.uniq365.com/uploads/images/gallery/2025-01/ux0image.png)
##### **How to use Add to ShortCut?**
1. Click "**Add to ShortCut"** and system will open below windows:
[](https://doc.uniq365.com/uploads/images/gallery/2025-02/cdiimage.png)
2. Enter Short Cut Description
3\. Click SAVE then click OK.
4\. User may look to the Homepage for the added function or page. Click on HOME - HOME - SHORTCUT for the screen below.
[](https://doc.uniq365.com/uploads/images/gallery/2025-02/2VBimage.png)
The **GST@Custom** checkbox allows users to apply a custom GST rate for the debit note transaction, which might differ from the standard GST rate.
[](https://doc.uniq365.com/uploads/images/gallery/2025-02/jOpimage.png)
The **GST Inclusive** checkbox plays a crucial role in determining how GST is handled in the debit note process:
- **When ticked**, it indicates that the GST is already included in the amount, and the system will decompose the total value to calculate the net amount and GST portion.
- **When not ticked**, the system treats the provided amount as exclusive of GST and will calculate and add the GST separately on the net value.
[](https://doc.uniq365.com/uploads/images/gallery/2025-02/Croimage.png)
The **Additional Header Info Button** typically serves to provide users with the ability to add or view additional information that is relevant to the debit note transaction.
[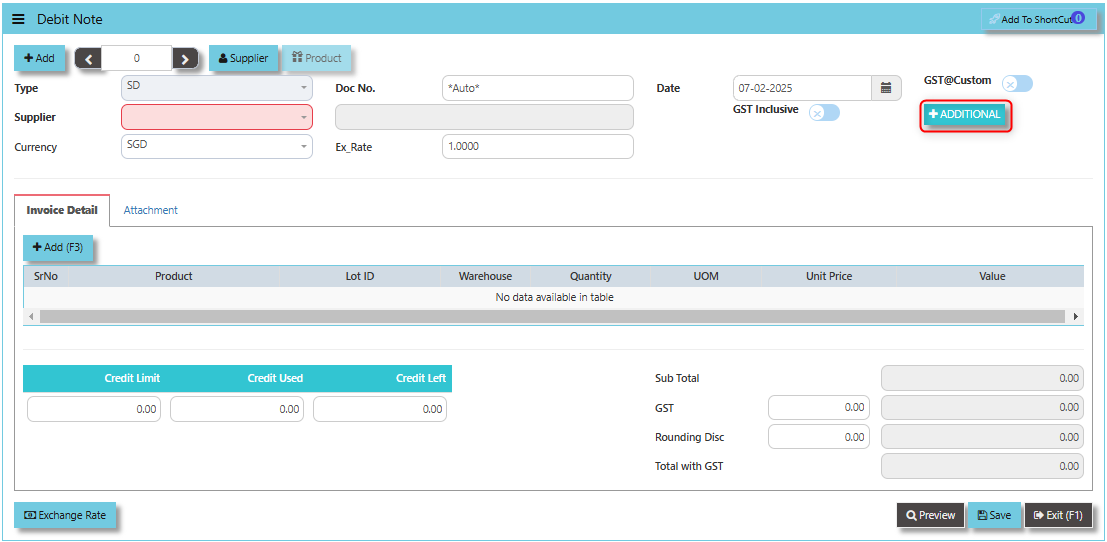](https://doc.uniq365.com/uploads/images/gallery/2025-02/REHimage.png)
Once clicked, a dialogue box will prompt and user may fille the details as follows:
[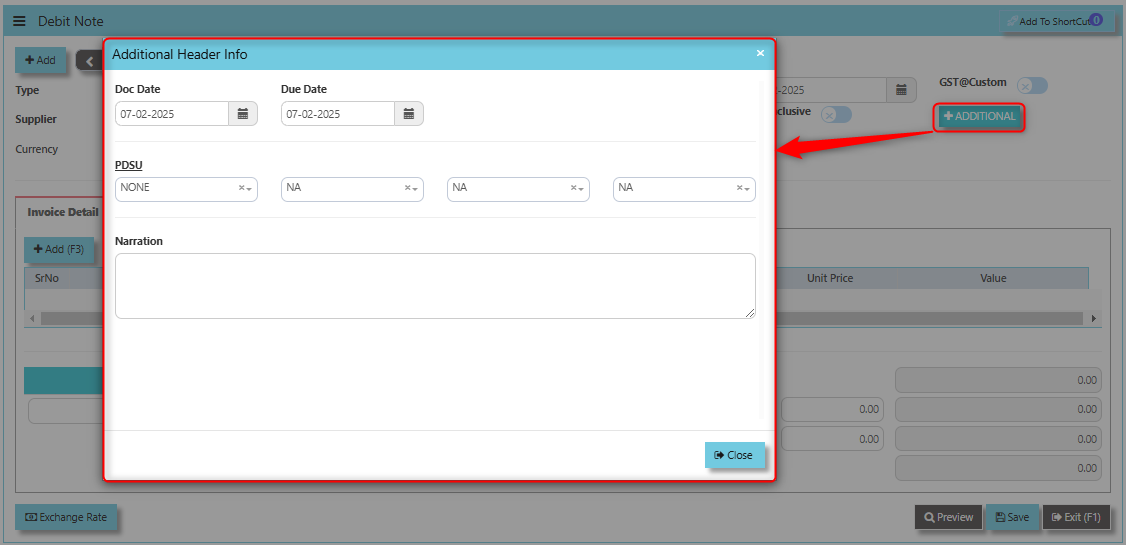](https://doc.uniq365.com/uploads/images/gallery/2025-02/Hphimage.png)
The **Credit Limit**, **Credit Used**, and **Credit Left** fields play a critical role in managing the credit terms between the company and its suppliers.
- **Credit Limit**: The maximum amount of credit extended by the supplier to the company.
- **Credit Used**: The total amount of credit the company has consumed from the supplier, including purchases and adjustments like debit notes.
- **Credit Left**: The remaining available credit, calculated by subtracting the **Credit Used** from the **Credit Limit**.
[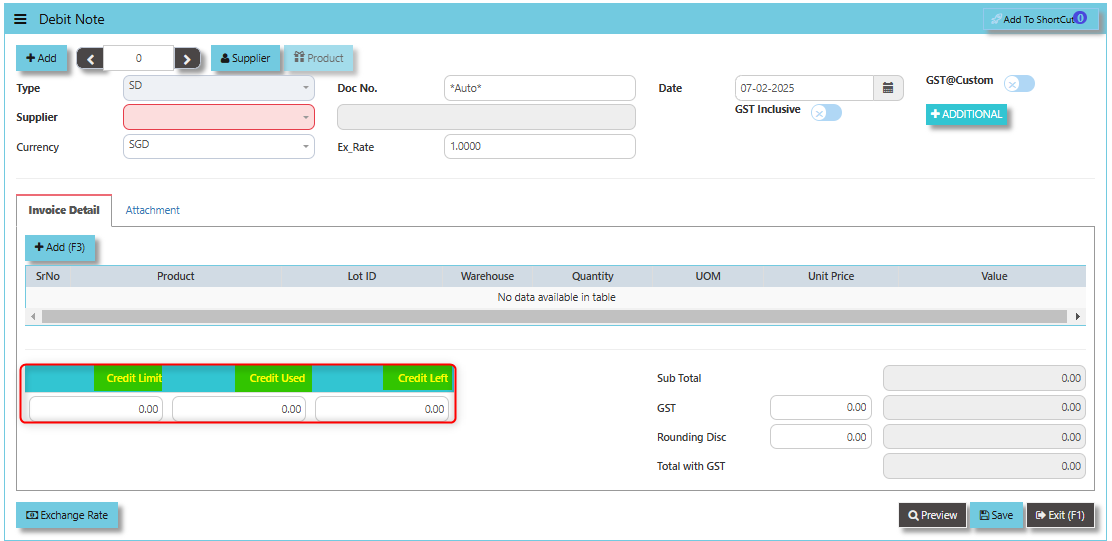](https://doc.uniq365.com/uploads/images/gallery/2025-02/BL9image.png)
The **Exchange Rate** button allows for the conversion of the Debit Note value from the supplier's currency to your company's base currency. It ensures that the debit is accurately recorded in your accounts payable or other financial records.
[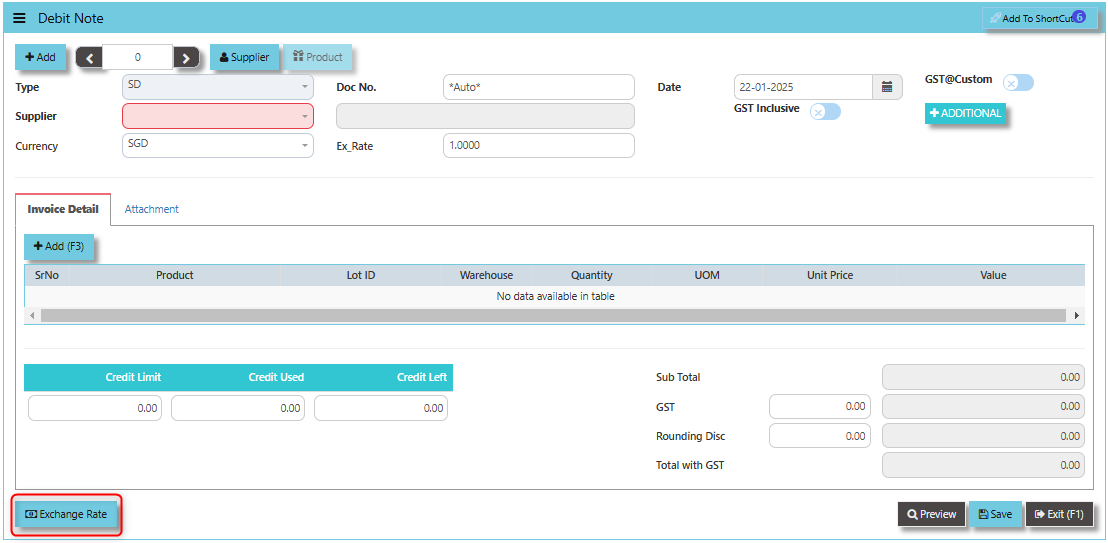](https://doc.uniq365.com/uploads/images/gallery/2025-01/OdVimage.png)
\_\_\_\_\_\_\_\_\_\_\_\_\_\_\_\_\_\_\_\_\_\_\_\_\_\_\_\_\_\_\_\_\_\_\_\_\_\_\_\_\_\_\_\_\_\_\_\_\_\_\_\_\_\_\_\_\_\_\_\_\_\_\_\_\_\_\_\_\_\_\_\_\_\_\_\_\_\_\_\_\_\_\_\_\_\_\_\_\_\_\_\_\_\_\_\_\_\_\_\_\_\_\_\_\_\_\_\_\_\_\_\_\_\_\_\_\_\_\_\_\_\_\_\_\_\_\_\_\_\_\_\_\_\_\_\_\_\_\_
The **Attachment Tab** designed to store and manage relevant documents and files associated with the Supplier Debit Note transaction.
##### **How to use Attachment Tab?**
1. Click on PROCUREMENT - PURCHASING - SUPPLIER BILLS - SUPPLIER DEBIT NOTE - ATTACHMENT TAB for the screen below.
[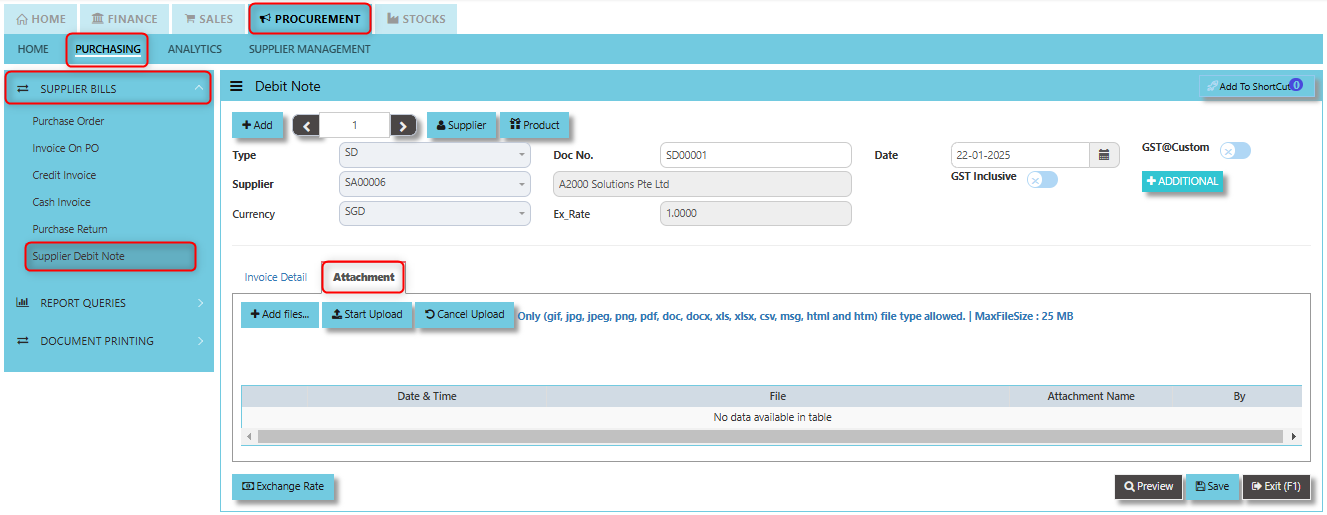](https://doc.uniq365.com/uploads/images/gallery/2025-02/p2Uimage.png)
2. Click +Add files and windows will prompt then choose the file you want to upload by clicking open. Kindly take note the file types and maximum size requirements in uploading: ***Only (gif, jpg, jpeg, png, pdf, doc, docx, xls, xlsx, csv, msg, html and htm) file type allowed. | MaxFileSize : 25 MB***
[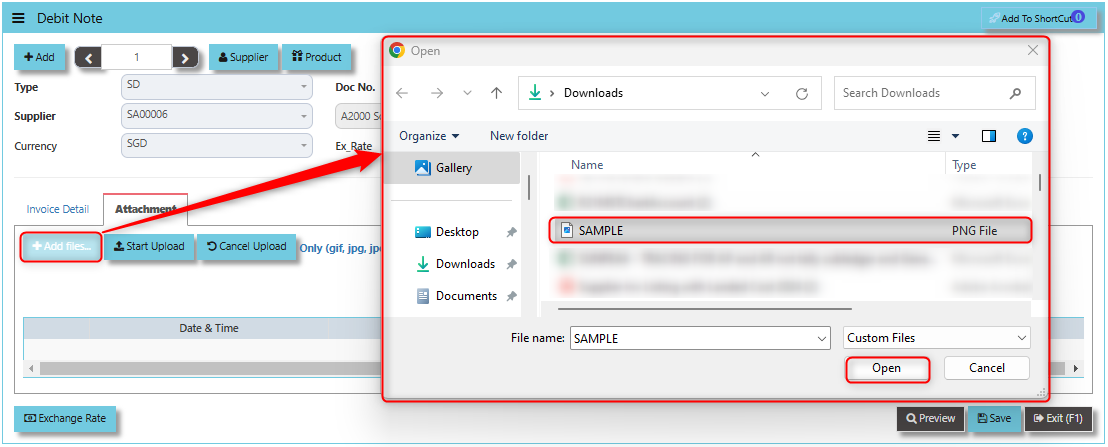](https://doc.uniq365.com/uploads/images/gallery/2025-02/rmKimage.png)
3. Key in the Attachment Name then click start to upload.
[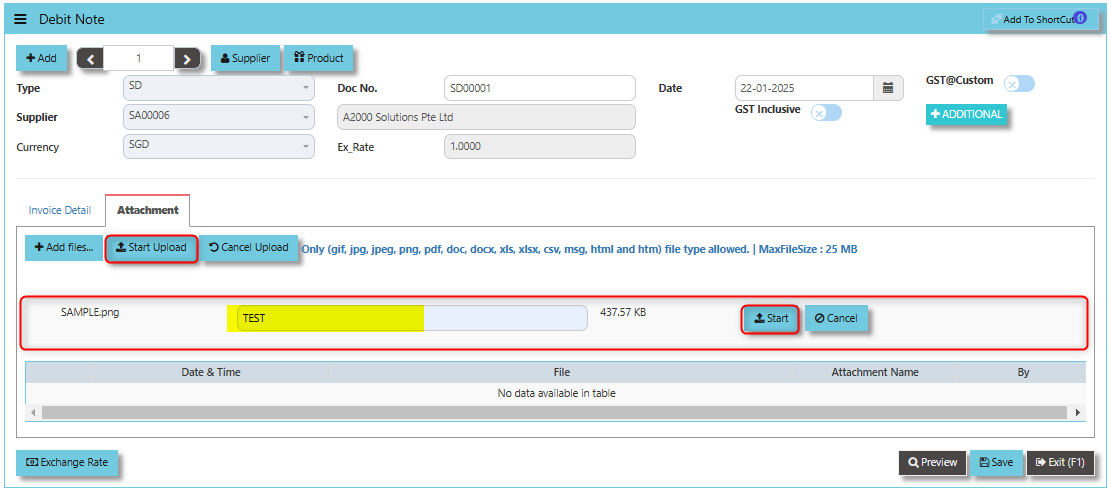](https://doc.uniq365.com/uploads/images/gallery/2025-02/UZhimage.png)
4. Once the file attached, click "SAVE" button
[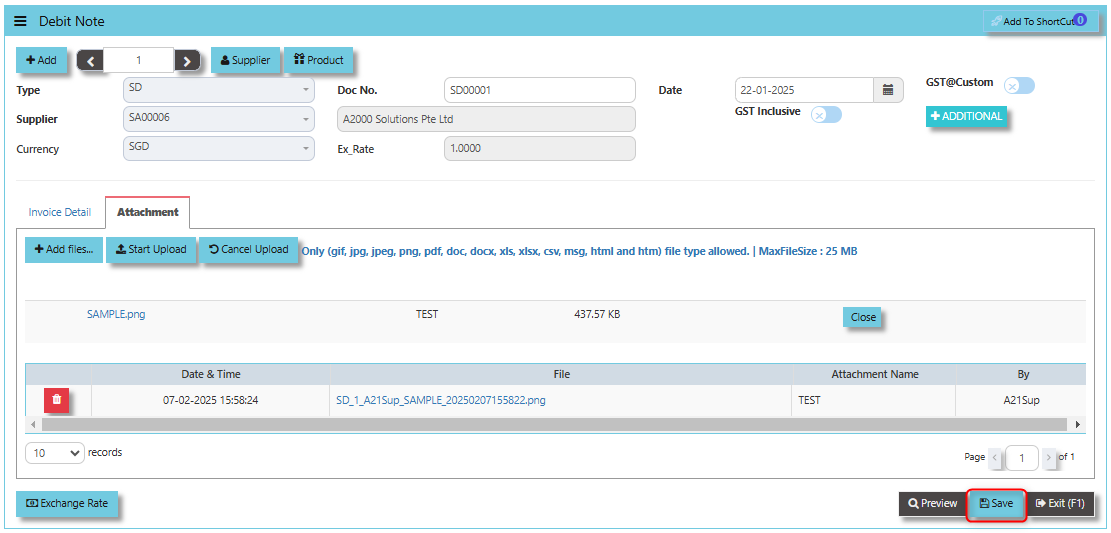](https://doc.uniq365.com/uploads/images/gallery/2025-02/2ONimage.png)
Purchase Analysis Report
##### The available reports in this section also have the capability to export to Microsoft Word, Excel and PDF. Users can filter the reports according to date, supplier, product, buyer. Detailed reports are available, and the reports can also be sorted by Supplier and Buyer.
\_\_\_\_\_\_\_\_\_\_\_\_\_\_\_\_\_\_\_\_\_\_\_\_\_\_\_\_\_\_\_\_\_\_\_\_\_\_\_\_\_\_\_\_\_\_\_\_\_\_\_\_\_\_\_\_\_\_\_\_\_\_\_\_\_\_\_\_\_\_\_\_\_\_\_\_\_\_\_\_\_\_\_\_\_\_\_\_\_\_\_\_\_\_\_\_\_\_\_
##### **How to view Purchase Analysis Report?**
- Click on PROCUREMENT – ANALYTICS – ANALYTICS - PURCHASE ANALYSIS REPORTS for the screen below.
[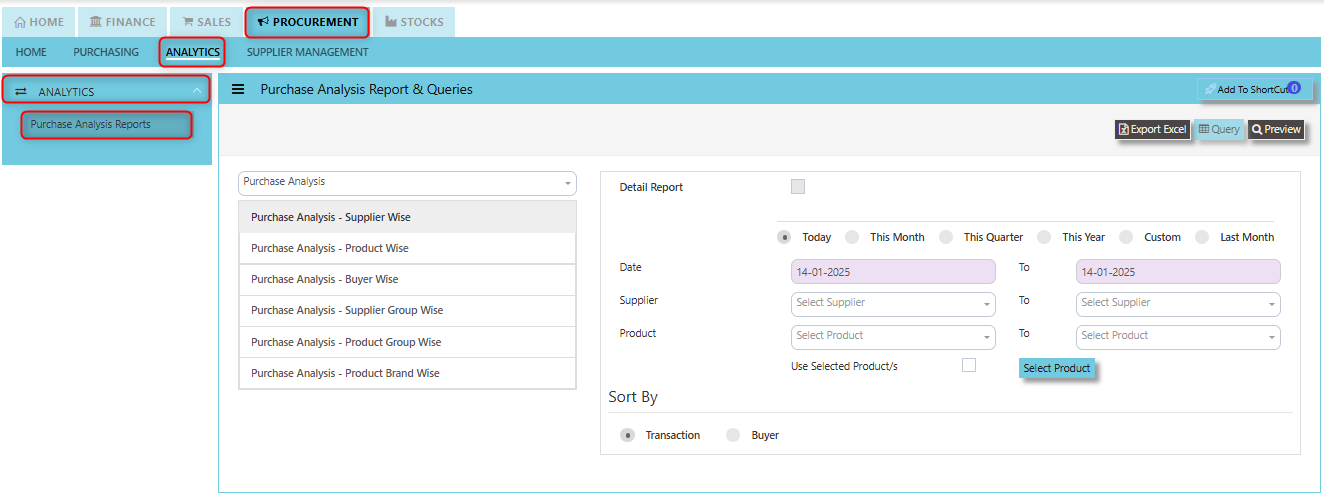](https://doc.uniq365.com/uploads/images/gallery/2025-01/Nk7image.png)
Supplier Maintenance
##### The **Supplier Maintenance** stores all the supplier information such as the supplier code, name, and addresses. The supplier code created in the Supplier Maintenance is used to present all the transactions entered for that supplier.
[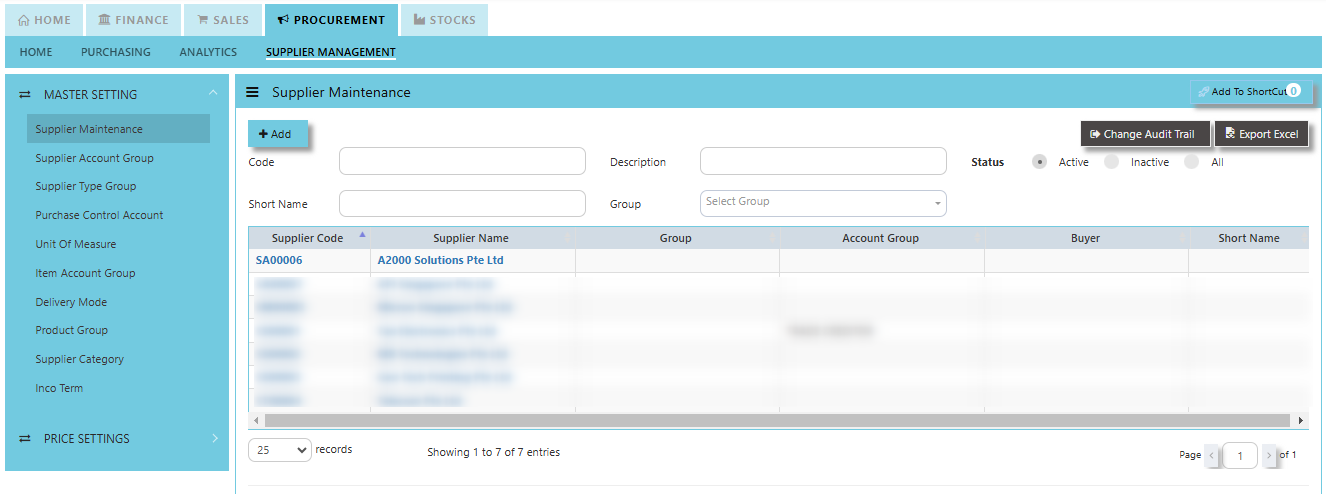](https://doc.uniq365.com/uploads/images/gallery/2025-01/jJLimage.png)
#### **How to create Supplier Maintenance?**
- Click on Procurement – Supplier Management – Supplier Maintenance icon for the following screen:
[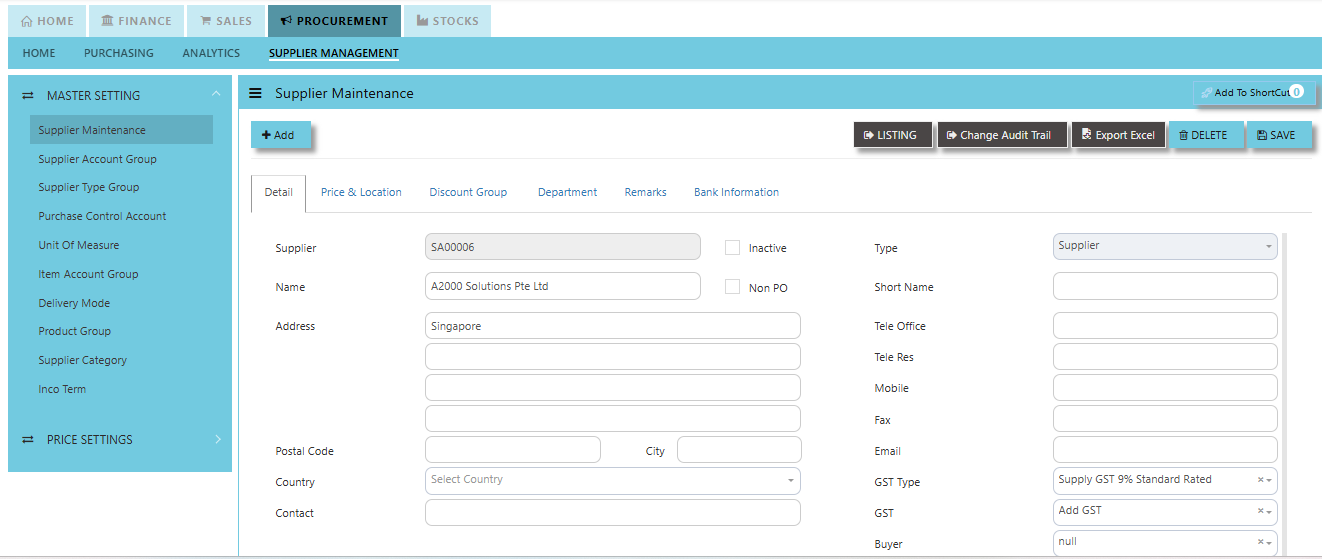](https://doc.uniq365.com/uploads/images/gallery/2025-01/zwDimage.png)
- This is where you add new suppliers or edit existing ones. Some of the fields are mandatory, such as the following:
##### Mandatory Information:
**Supplier** - Enter the code for the new supplier. The maximum is 10 alphanumeric characters.
**Name** - Enter the name of supplier. The maximum is 50 alphanumeric characters.
Key in the necessary information, such as addresses, telephone, fax and e-mail.
**Type** - Select S for supplier or B for both supplier and customer.
**Account Group** - If the account posting is set based on supplier, then select the relevant Account Group here which has been defined under Procurement – Supplier Management – Account Group.
**Group** - This is to select the Group defined under Procurement – Supplier Management – Supplier Type Group. This grouping is for the reports under Purchases\\Purchases Analysis Reports\\Supplier Group wise Purchases Analysis.
**Delivery Term** – This is to select the Delivery Term defined under Procurement – Supplier Management – Delivery Term
Example: FOB - Free on Board
CIF - Carriage, Insurance & Freight
**Delivery Mode** - Click to select the Delivery Mode defined under Procurement – Supplier Management – Delivery Mode
Example: Truck, Flight, Self-Collection
**Payment Term** - Click to select the Payment Term defined under Procurement – Supplier Management – Payment Terms
Example: 30 Days, 60Days, COD (Cash on delivery)
**Payment Mode** - Click to select the Payment Mode defined under Procurement – Supplier Management – Payment mode
Example: Cash Payment, Cheque Payment and TT
**Default Currency** - Select the currency that this supplier normally transacts in.
**Discount** - Enter the discount in percentage this supplier is enjoying. For example, if a wholesale supplier gets 30% off List Price, enter “30” in this field for that supplier. With this feature, you need not remember each and every of your supplier’s discount rate.
**Credit Period** - Enter the number of days, weeks, or months that this supplier enjoys as credit period.
**Credit Limit** - Enter the Credit Limit of supplier. The system will block the purchase transaction once the figure reaches the limit.
**Credit Used** - This is a non-editable field. It is updated automatically by the system every time the credit is used up.
**SP/Buyer** - Click to select the Purchaser defined under System Manager – System Utilities – Employee
**Price Type** - You may decide on pricing method for each and every supplier.
**Price Table (Purchases/Last)** - Every time an invoice is created for this supplier, the system will call out the selling price from the Supplier Maintenance Price Table.
**Group Table (Purchases/Last)** - Every time an invoice is created for this supplier, the system will call out the selling price from the Supplier Maintenance Group Table (defined under Purchase – Maintenance – Supplier Type Group). This group assumes that all items in the group carry the same purchase price.
**Product Setting** - Every time an invoice is created for this supplier, the system will show the selling price from the Product & Service Maintenance (Depends on the Price Type selected).
**Purchases** - Every time an invoice is created for this supplier, the system will call out the Purchase Price from the Product & Service Maintenance. The user will have to manually set and update the Purchase Price field there.
**Last Price** - If Last Price is selected, the price billed for a particular product will be saved in the Last Price column of the Price table. The next time the same product is entered in an invoice for that supplier, the Last Price will be automatically picked up.
**Location** - Create different delivery locations for this supplier.
**Price** - Records the history of selling price for this supplier if Price Table is selected for the Price Type.
Supplier Account Group
##### This feature is used for auto accounts posting when saving Purchase Transactions. Unlike other systems that are hard-coded, Uniq365 allows the user to set their own Supplier Accounts postings. The Supplier Account Group needs to be set if the account posting is by Supplier.
##### **How to Setup Supplier Account Group?**
- Click on Procurement – Supplier Management – Supplier Account Group icon for the following screen.
[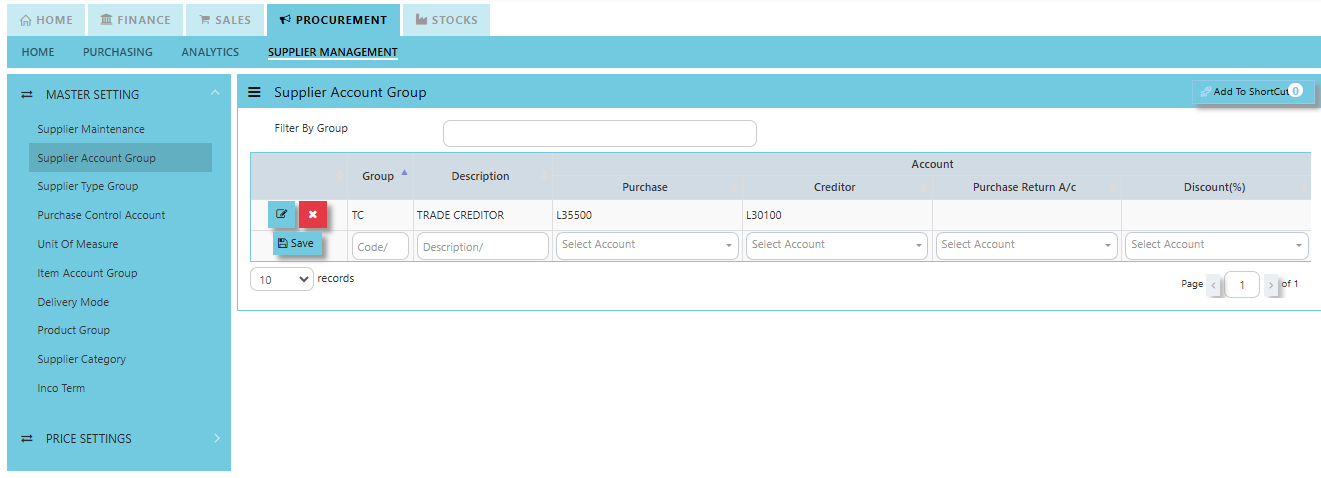](https://doc.uniq365.com/uploads/images/gallery/2025-01/p1simage.png)
- Enter the Code and Description to create the Supplier Account Group. After this is done, set the GL Chart of Account code for “Creditor A/C”, “Purchases A/C” & “Discount A/C”.
[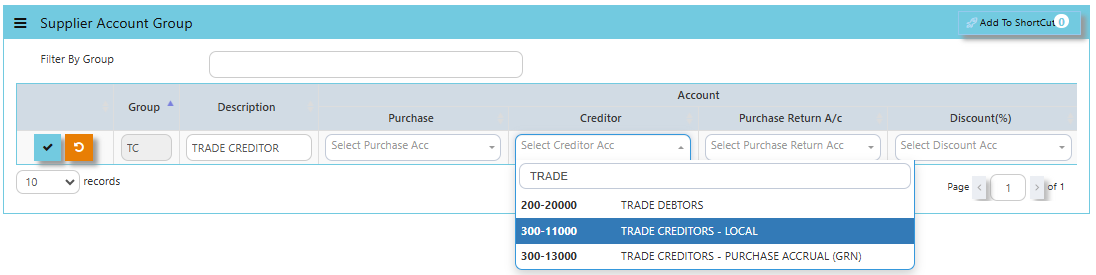](https://doc.uniq365.com/uploads/images/gallery/2025-01/Z29image.png)
Supplier Type Group
##### In Uniq365, this is where you create the Supplier Group which will be used to sort or filter reports (Optional).
##### **How to Setup Supplier Type Group?**
- Click on Procurement – Supplier Management - Supplier Type Group for the screen below.
[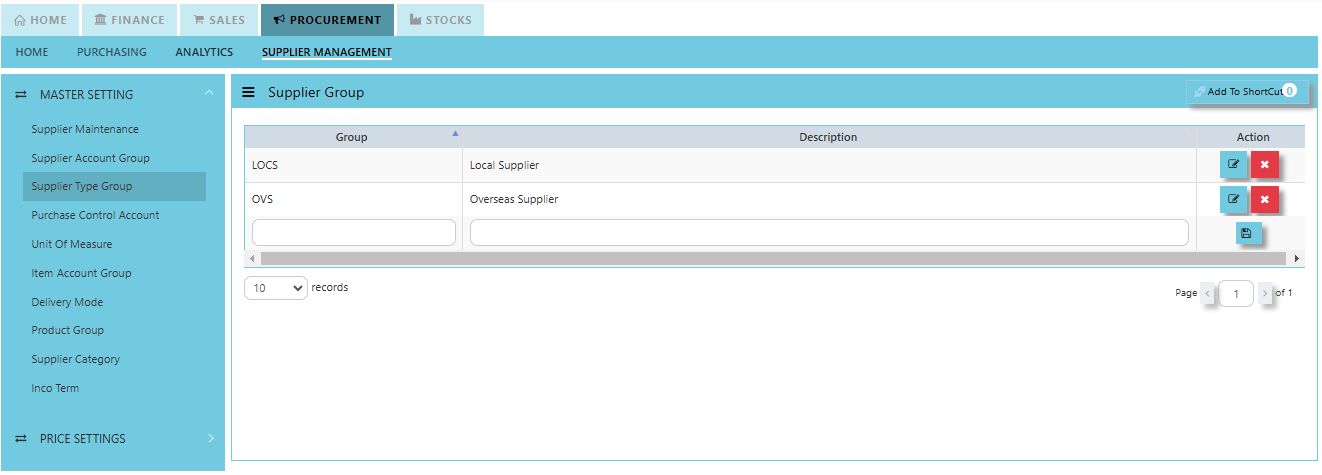](https://doc.uniq365.com/uploads/images/gallery/2025-01/noaimage.png)
Purchase Control Account
##### In Uniq365, this is where you can set the Purchase Control Accounts for the GL Auto Account Posting.
##### **How to set Purchase Control Account?**
- Click on Procurement – Supplier Management – Purchase Control Account for the screen below.
[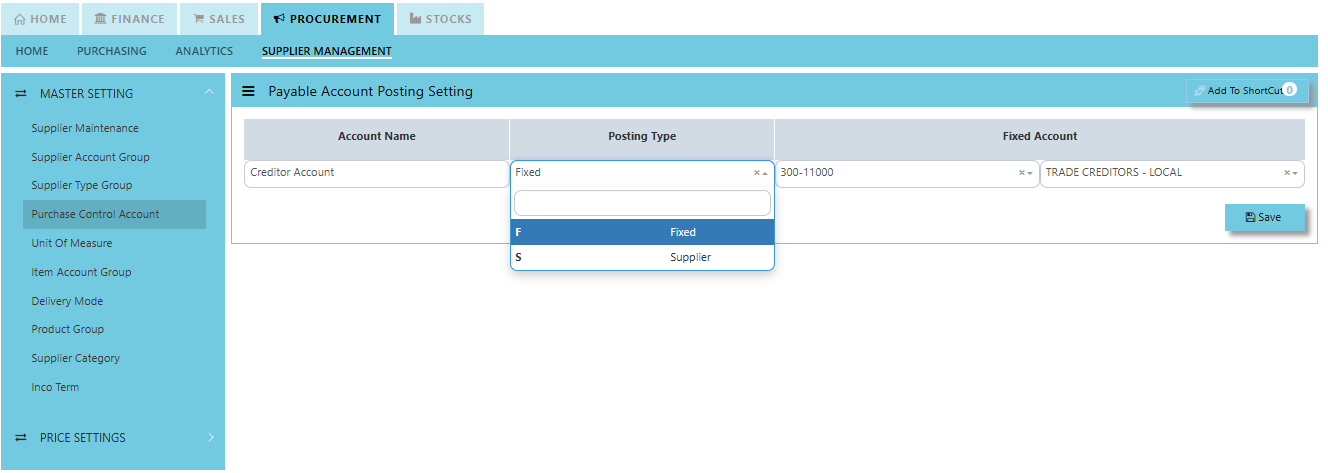](https://doc.uniq365.com/uploads/images/gallery/2025-01/Xl8image.png)
Unit of Measure
##### In Uniq365, this is where you indicate the Unit of Measure for the product in Procurement Module.
##### **How to create Unit of Measure?**
- Click on Procurement – Supplier Management – Unit of Measure for the screen below.
[](https://doc.uniq365.com/uploads/images/gallery/2025-01/wFvimage.png)
Item Account Group
##### The **Product Account Group** is used to categorize products into different accounting groups to manage the financial posting and treatment of transactions related to those products.
##### **How to create Product Account Group?**
- Click on Procurement – Supplier Management – Item Account Group for the screen below.
[](https://doc.uniq365.com/uploads/images/gallery/2025-01/pDximage.png)
Delivery Mode
##### In Uniq365, you can indicate the Supplier Delivery Mode in the Supplier Maintenance or Transactions. You can also sort or filter reports by Delivery Mode.
##### **How to create Delivery Mode?**
- Click on Procurement – Supplier Management – Delivery Mode for the screen below.
[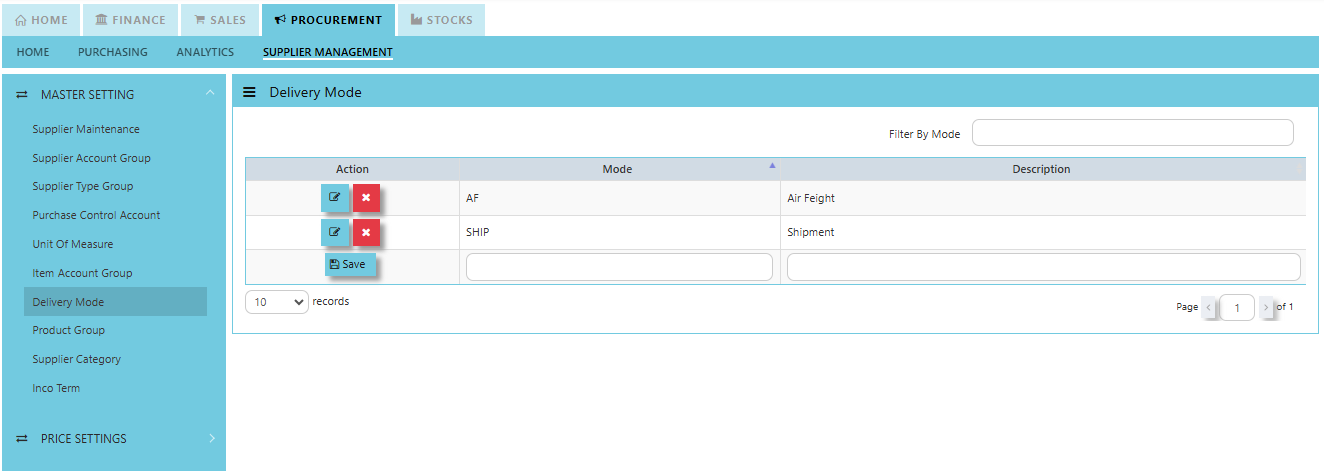](https://doc.uniq365.com/uploads/images/gallery/2025-01/Zleimage.png)
Product Group
##### In Uniq365, this is where you can set the Product Group for the classification or categorization of products based on shared characteristics and usage.
##### **How to set Product Group?**
- Click on Procurement – Supplier Management – Product Group for the screen below.
[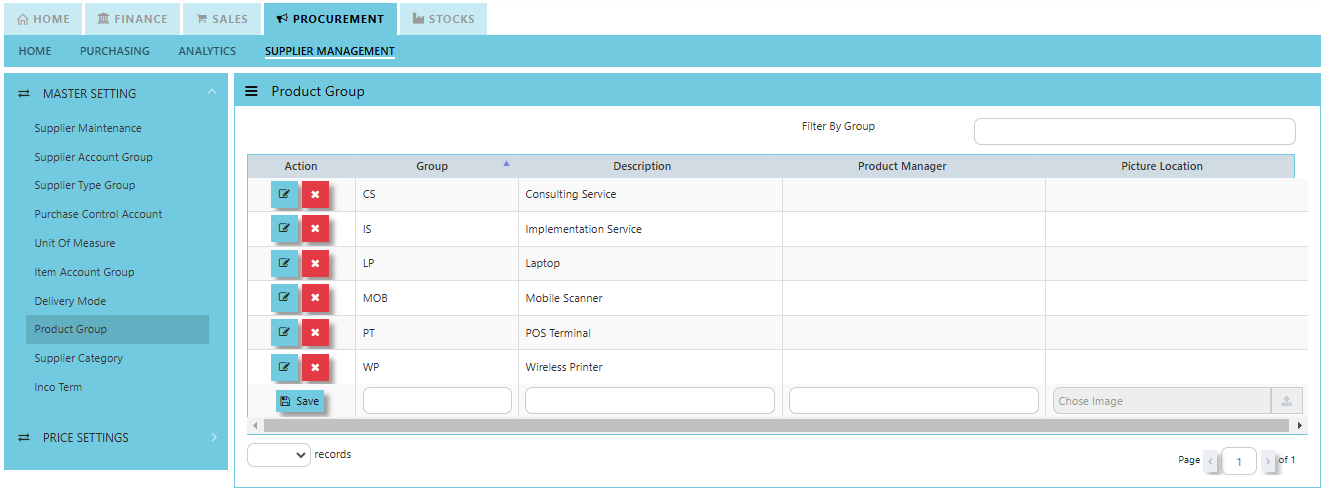](https://doc.uniq365.com/uploads/images/gallery/2025-01/vZXimage.png)
Supplier Category
##### In Uniq365, this is where you can set the Supplier Category for the classification used to group suppliers based on specific characteristics, such as the types of products or services they provide.
##### **How to set Product Group?**
- Click on Procurement – Supplier Management – Product Group for the screen below.
[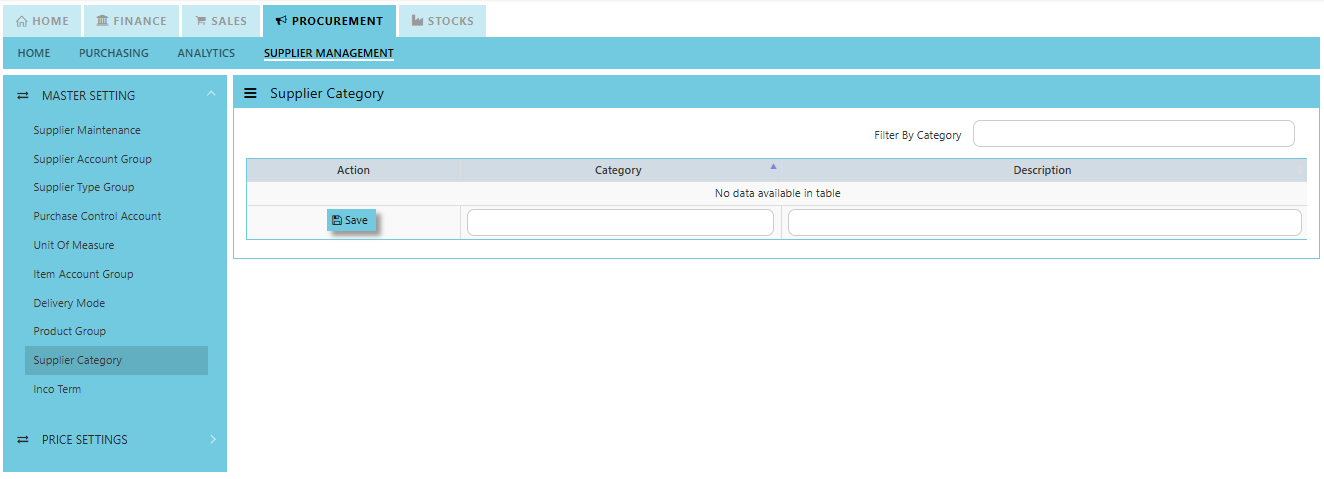](https://doc.uniq365.com/uploads/images/gallery/2025-01/QFximage.png)
Inco Term
##### In Uniq365, you can specify the Inco Terms in Supplier Quotation and Purchase Order Transactions. The Inco Terms will first need to be created in the Maintenance first before it can be used at the transaction level.
##### **How to create Inco Term?**
- Click on Procurement – Supplier Management – Inco Term for the screen below.
[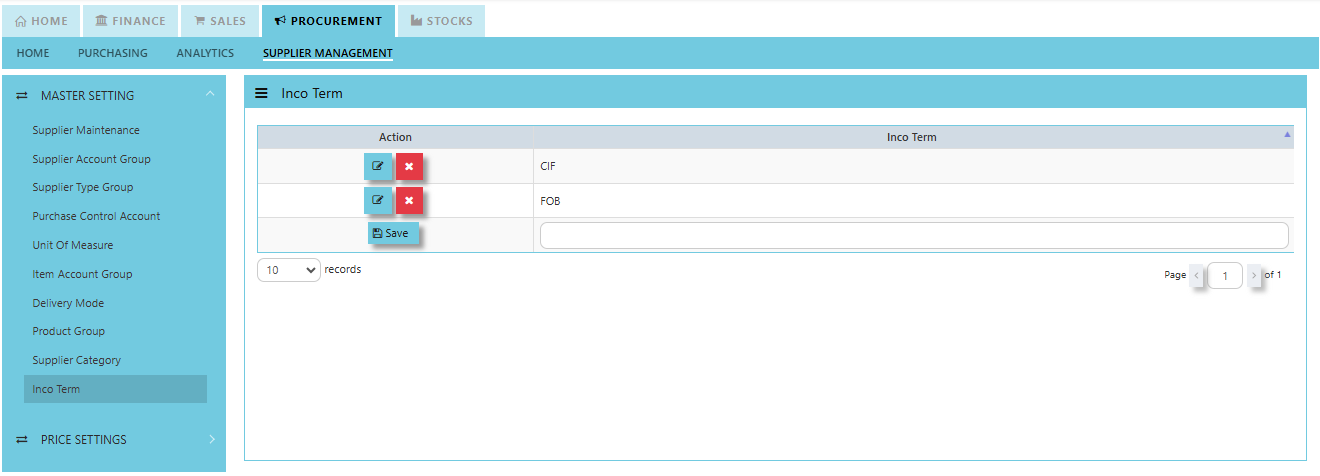](https://doc.uniq365.com/uploads/images/gallery/2025-01/DZ1image.png)
Supplier Price Book
##### In Uniq365, you may maintain a **Supplier Price Book** which is a record or catalog that contains the agreed-upon prices for products or services provided by a specific supplier. The price book typically includes a list of items or services, their associated prices, and any other terms or conditions related to the purchase, such as buying price, UOM and discounts.
##### **How to create Supplier Price Book?**
1. Click on Procurement – Supplier Management – Price Settings - Supplier Price Book for the screen below.
[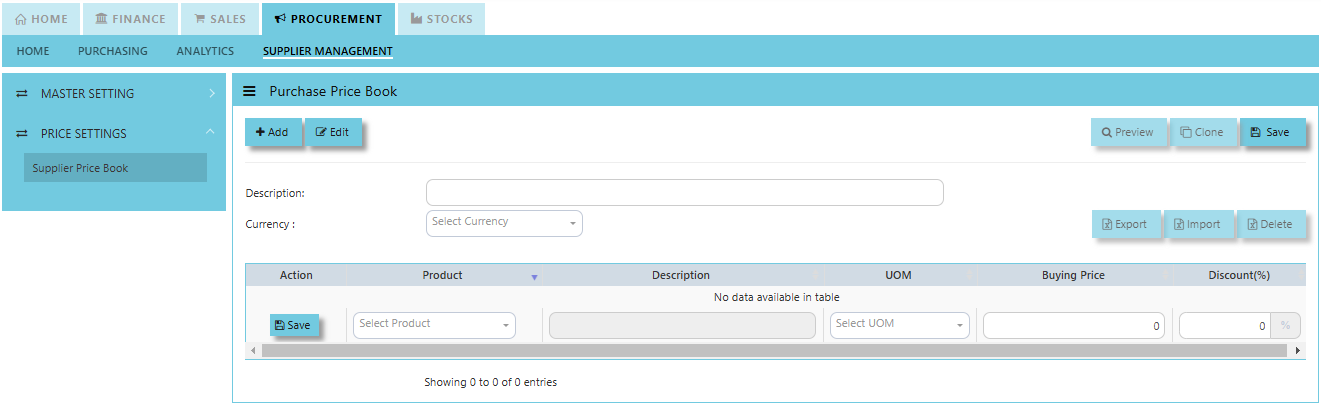](https://doc.uniq365.com/uploads/images/gallery/2025-01/yoximage.png)
2. Key in Description and Select Currency
[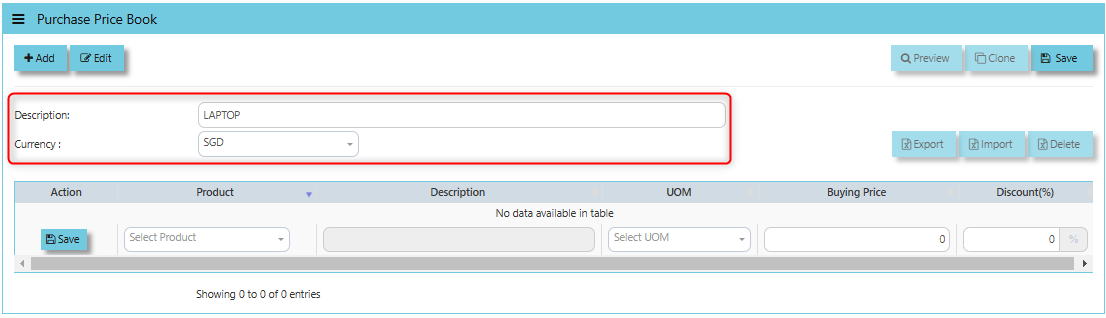](https://doc.uniq365.com/uploads/images/gallery/2025-03/aRpimage.png)
3. Select for the product then description and UOM will automatically appear and key in the price and discount if any.
[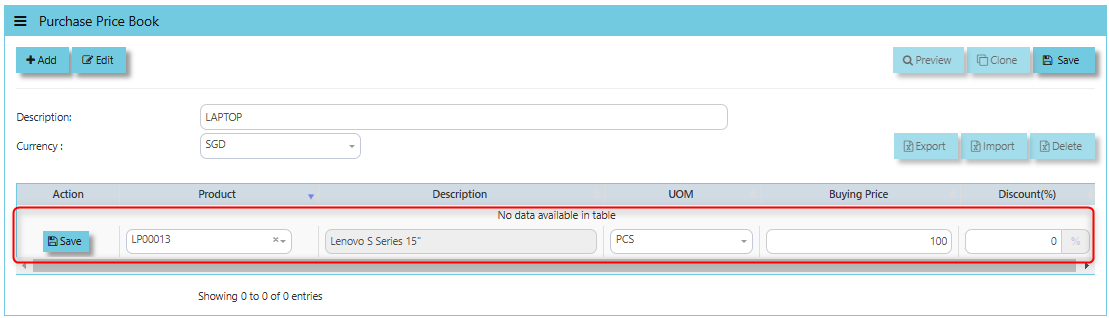](https://doc.uniq365.com/uploads/images/gallery/2025-03/VyMimage.png)
4. Click SAVE to maintain.
[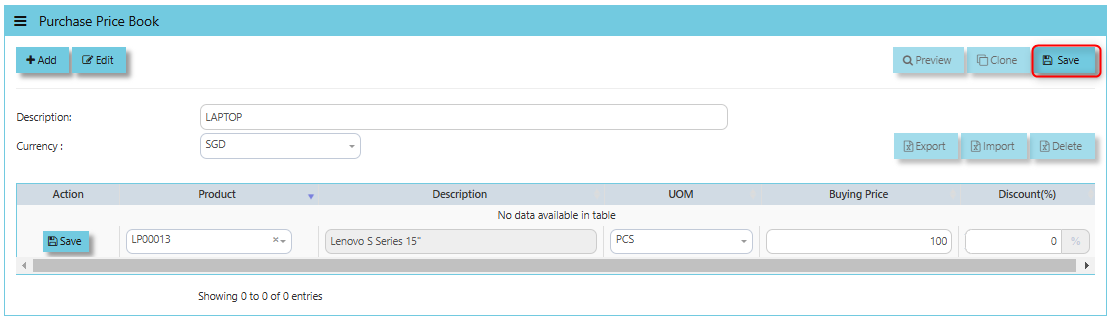](https://doc.uniq365.com/uploads/images/gallery/2025-03/GOBimage.png)
##### **How to use Import Function?**
**"Import"** button is typically used to upload or import price lists from suppliers in bulk.
1. Export the excel format by clicking the "Export Button"
[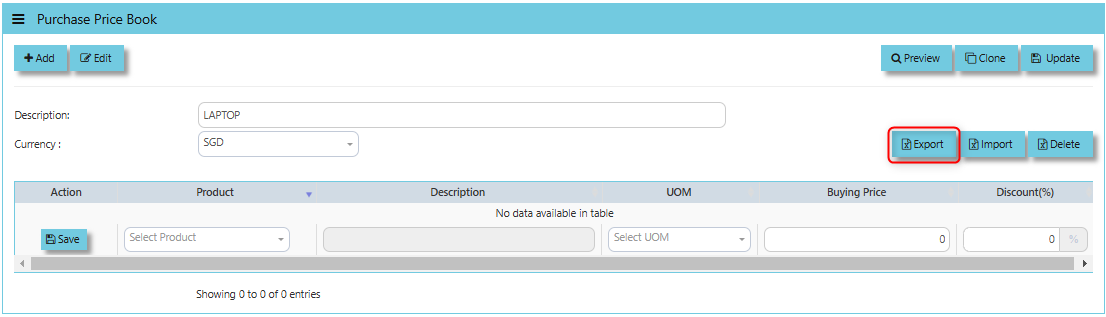](https://doc.uniq365.com/uploads/images/gallery/2025-03/lipimage.png)
2. Fill the necessary details base on excel format provided then save properly the file.
[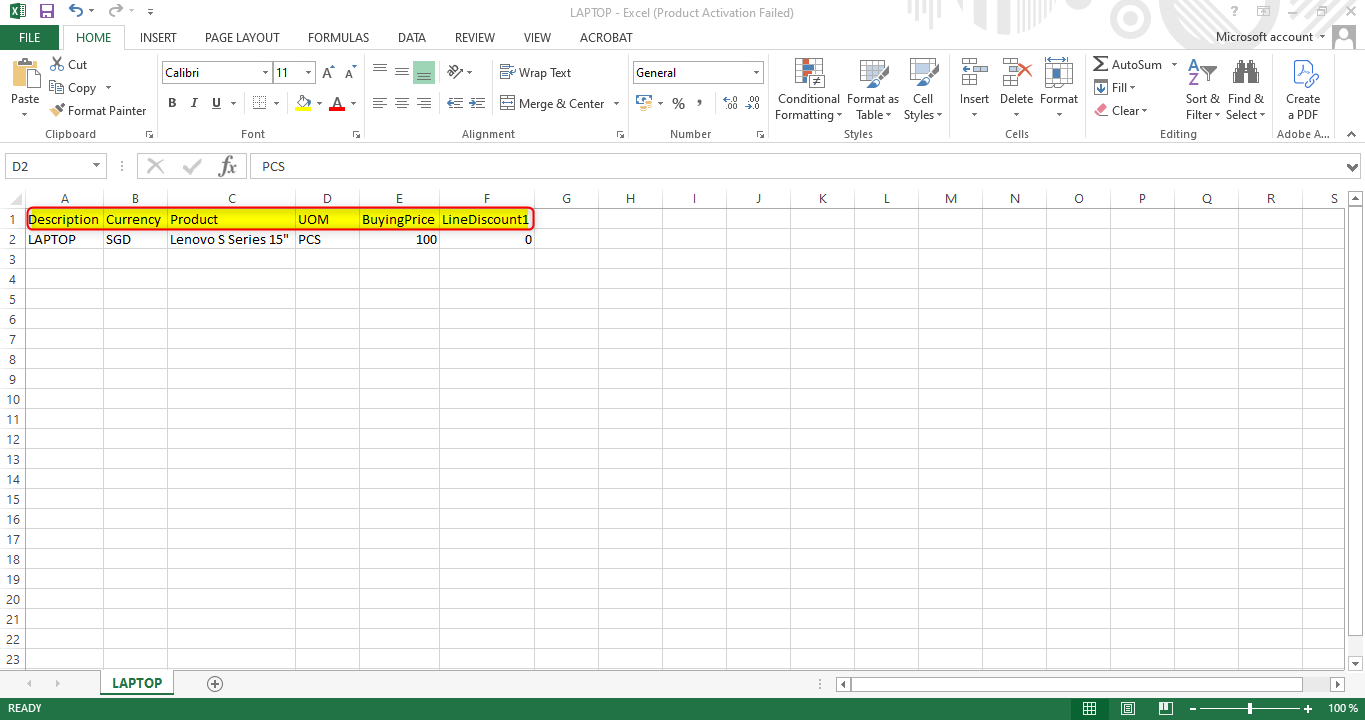](https://doc.uniq365.com/uploads/images/gallery/2025-03/I8Iimage.png)
3. Click the Import button to upload then click the browse.
[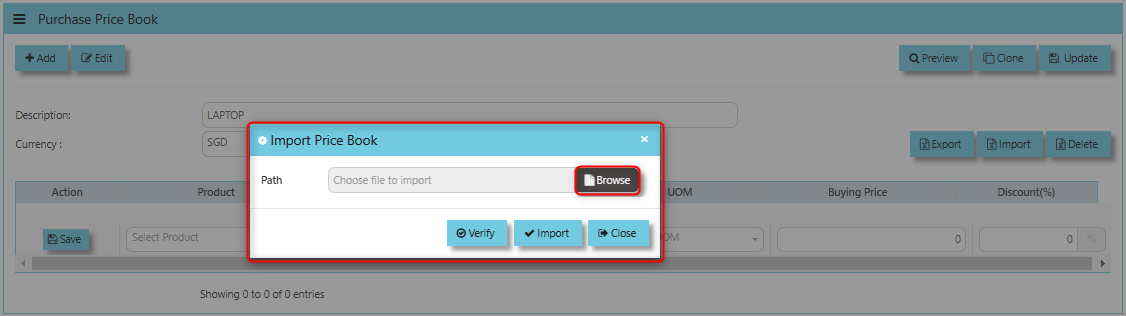](https://doc.uniq365.com/uploads/images/gallery/2025-03/TGQimage.png)
4. Once clicked the Browse then there will be windows prompt and select excel file to upload.
[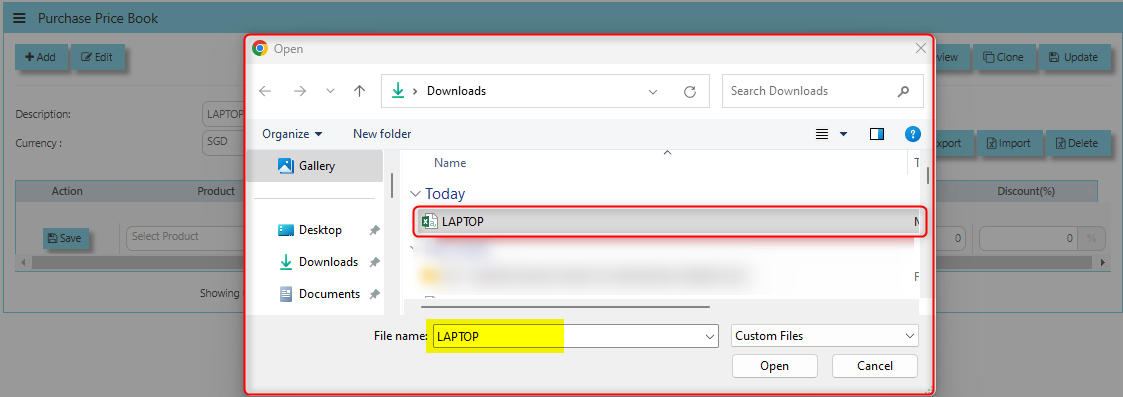](https://doc.uniq365.com/uploads/images/gallery/2025-03/B94image.png)
5. Click Verify once done verified the file, click import button to process uploading
[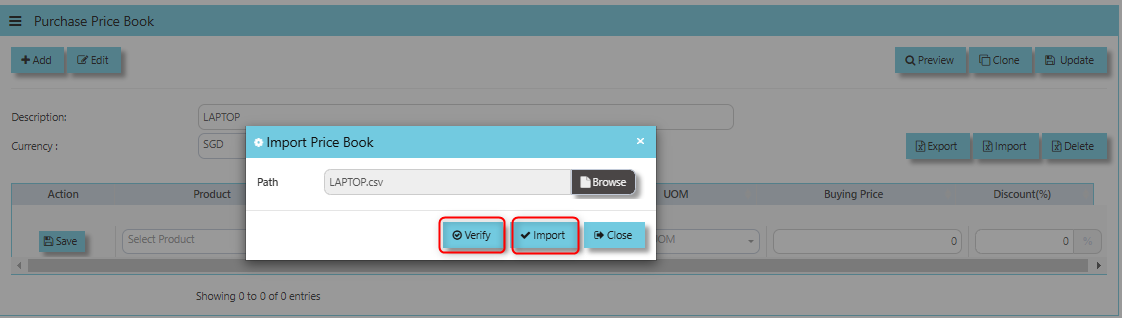](https://doc.uniq365.com/uploads/images/gallery/2025-03/n8nimage.png)
6. Once file imported below are the screen
[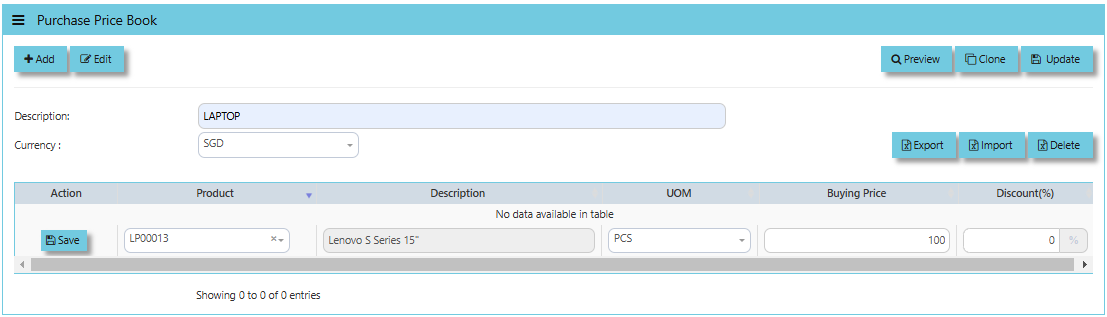](https://doc.uniq365.com/uploads/images/gallery/2025-03/1dUimage.png)
Below are the buttons that users may utilize:
- The **Preview button** allows you to view the contents of the imported file to ensure everything appears as expected before saving or applying it.
- The **Clone button** allows users to quickly create a new price book entry by duplicating an existing one.
- If user made any modifications to the supplier price book), clicking the **Update** button will save those changes to the system.
- The **Delete button** allows users to permanently remove a supplier’s price book or a specific price list entry from the system.
Supplier Status Query
##### Uniq365 accounting provides a very convenient interface which allows the user to drill down to the detailed transactions.
\_\_\_\_\_\_\_\_\_\_\_\_\_\_\_\_\_\_\_\_\_\_\_\_\_\_\_\_\_\_\_\_\_\_\_\_\_\_\_\_\_\_\_\_\_\_\_\_\_\_\_\_\_\_\_\_\_\_\_\_\_\_\_\_\_\_\_\_\_\_\_\_\_\_\_\_\_\_\_\_\_\_\_\_\_\_\_\_\_\_\_\_\_\_\_\_\_\_\_
##### **How to view Supplier Status Query?**
1. Click on PROCUREMENT – PURCHASING – REPORT QUERIES – SUPPLIER STATUS QUERY for the screen below.
[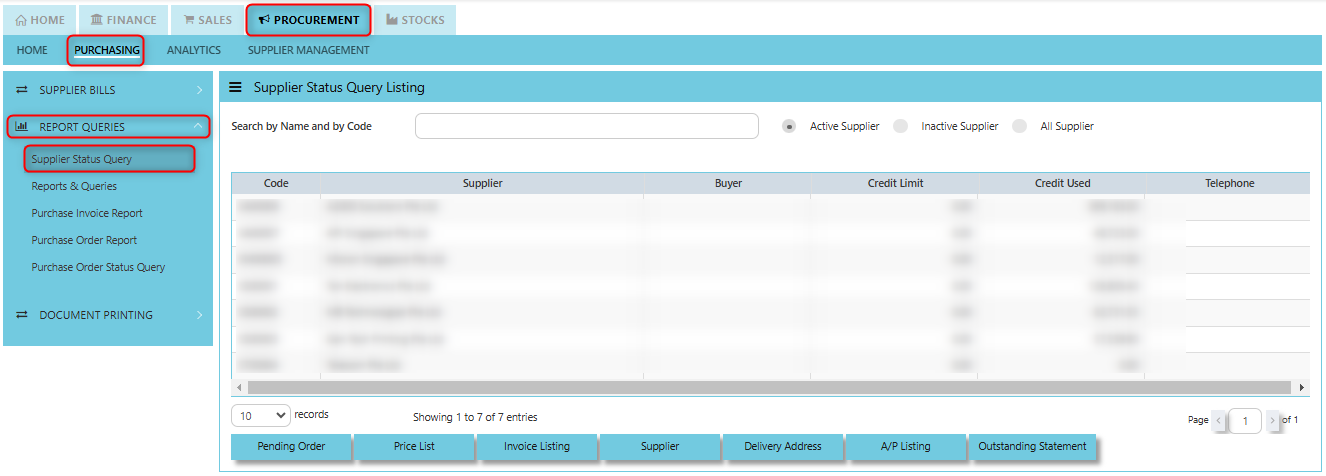](https://doc.uniq365.com/uploads/images/gallery/2025-01/egyimage.png)
3. You may filter by Active Supplier, Inactive Supplier and All Supplier by ticking it.
4. You may filter by individual suppliers. The following data can be drilled down to transaction level:
- Pending Orders
- Delivery Addresses
- Price List
- AR Listing
- Invoice Listing
- Outstanding Statement
5. Instead of listing all invoices, you may choose to display only those that are outstanding. From this report, you may also drill down to the document level by clicking Go To Transaction.
[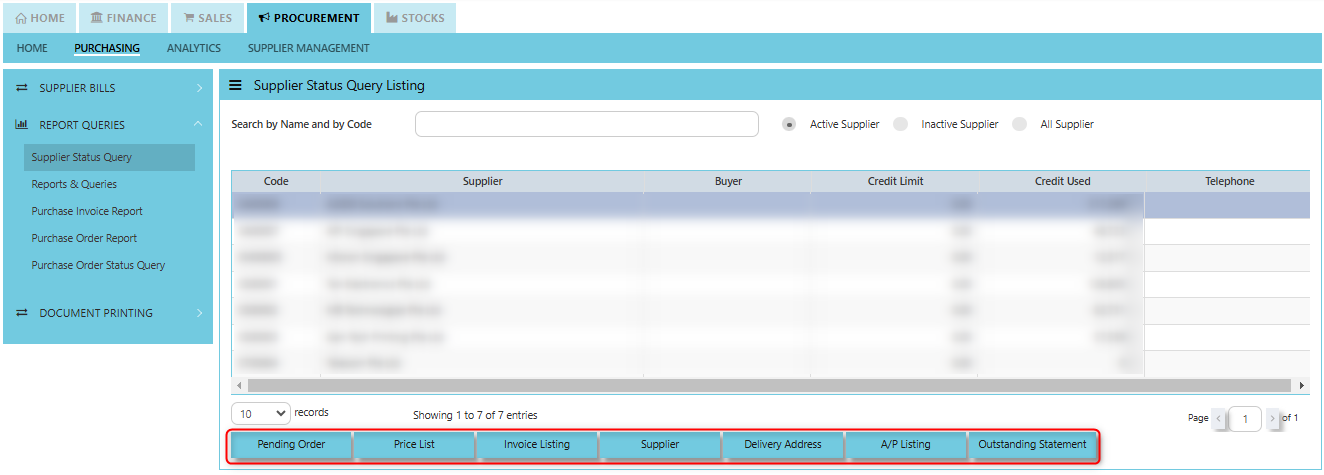](https://doc.uniq365.com/uploads/images/gallery/2025-01/yg6image.png)
\_\_\_\_\_\_\_\_\_\_\_\_\_\_\_\_\_\_\_\_\_\_\_\_\_\_\_\_\_\_\_\_\_\_\_\_\_\_\_\_\_\_\_\_\_\_\_\_\_\_\_\_\_\_\_\_\_\_\_\_\_\_\_\_\_\_\_\_\_\_\_\_\_\_\_\_\_\_\_\_\_\_\_\_\_\_\_\_\_\_\_\_\_\_\_\_\_\_\_\_\_\_\_\_\_\_\_\_\_\_\_\_\_\_\_\_\_\_\_\_\_\_\_\_\_\_\_\_\_\_\_\_\_\_\_\_\_\_\_
**Pending Orders Button** shows the orders that have been placed with suppliers but have not yet been fulfilled or processed. You may drill down or visit the transactions by clicking "Zoom In" button inside of this function.
**Price List Button** displays the price list provided by the supplier for various products or services.
**Invoice Listing Button** will show a list of invoices from suppliers. These invoices might be in various stages such as unpaid, paid, or pending.
**Supplier Button** allows the user to view or can be used to quickly access supplier maintenance of selected supplier. You may drill down or visit the transactions by clicking "Zoom In" button inside of this function.
**Delivery Address Button** displays the code, pending D/O and delivery addresses associated with the supplier.
**A/P Listing Button** displays a list of accounts payable transactions. These are amounts owed to suppliers for goods or services received. You may drill down or visit the transactions by clicking "Zoom In" button inside of this function.
**Outstanding Statement Button** provides an outstanding statement of the supplier’s account. It will summarize any unpaid balances or overdue amounts and can be used to review what is still owed to the supplier, including details such as Trn No., Reference, Currency, Double Entry, Balance, Balance Base and Total Amount. You may drill down or visit the transactions by clicking "Zoom In" button inside of this function.
Reports and Queries
##### Uniq365 Reports & Queries interface make it extremely easy for you to take a report in any way you need, whether it is by date, or PDS.
\_\_\_\_\_\_\_\_\_\_\_\_\_\_\_\_\_\_\_\_\_\_\_\_\_\_\_\_\_\_\_\_\_\_\_\_\_\_\_\_\_\_\_\_\_\_\_\_\_\_\_\_\_\_\_\_\_\_\_\_\_\_\_\_\_\_\_\_\_\_\_\_\_\_\_\_\_\_\_\_\_\_\_\_\_\_\_\_\_\_\_\_\_\_\_\_\_\_\_
##### **How to view Report and Queries?**
- Click on PROCUREMENT – PURCHASING – REPORT QUERIES – REPORT & QUERIES for the screen below.
[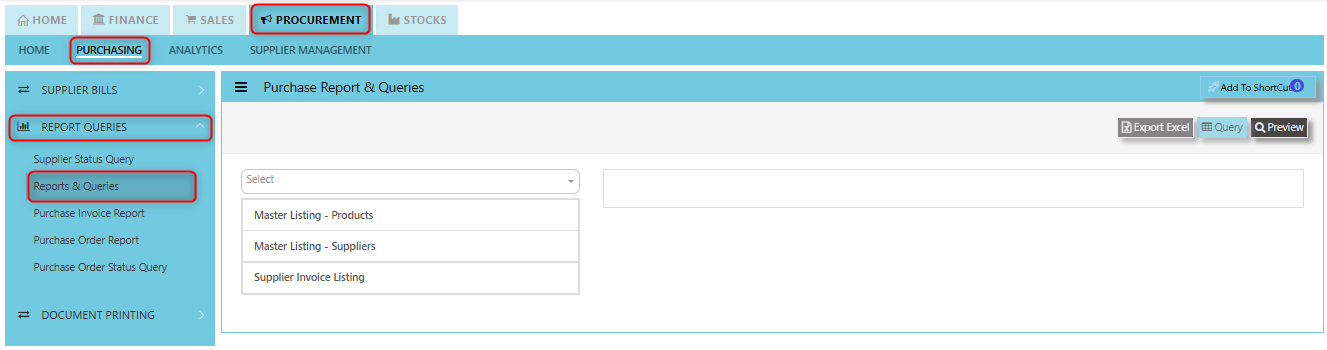](https://doc.uniq365.com/uploads/images/gallery/2025-01/IfJimage.png)
Purchase Invoice Report
##### In Uniq365, this report provides a detailed summary of all purchase invoices that have been generated within a specific time period or for a particular set of criteria and verify purchase transactions, manage supplier payments, and ensure the accuracy of financial records related to procurement activities.
##### This report provides a very convenient interface which allows user to drill down to the detailed transaction and user can create their own report format to generate by filtering information base on their own preferences. The available reports in the section also have the capability to export to Microsoft Word, Excel and PDF.
\_\_\_\_\_\_\_\_\_\_\_\_\_\_\_\_\_\_\_\_\_\_\_\_\_\_\_\_\_\_\_\_\_\_\_\_\_\_\_\_\_\_\_\_\_\_\_\_\_\_\_\_\_\_\_\_\_\_\_\_\_\_\_\_\_\_\_\_\_\_\_\_\_\_\_\_\_\_\_\_\_\_\_\_\_\_\_\_\_\_\_\_\_\_\_\_\_\_\_
##### **How to view Purchase Invoice Report?**
Click on PROCUREMENT – PURCHASING – REPORT QUERIES – PURCHASE INVOICE REPORT for the screen below.[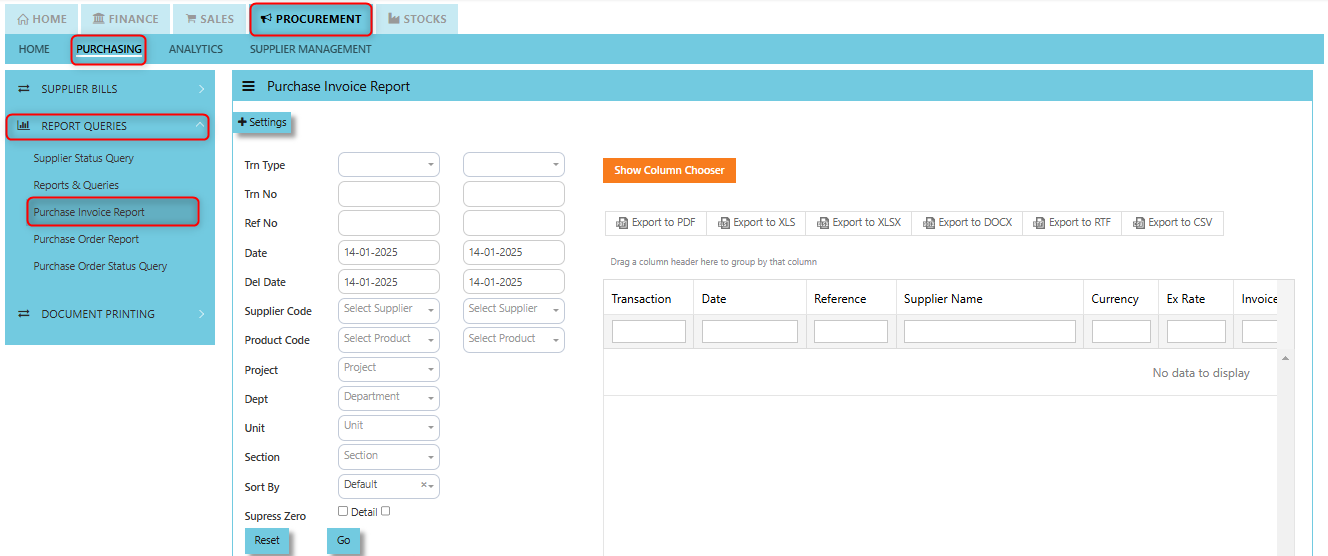](https://doc.uniq365.com/uploads/images/gallery/2025-01/yj6image.png)
\_\_\_\_\_\_\_\_\_\_\_\_\_\_\_\_\_\_\_\_\_\_\_\_\_\_\_\_\_\_\_\_\_\_\_\_\_\_\_\_\_\_\_\_\_\_\_\_\_\_\_\_\_\_\_\_\_\_\_\_\_\_\_\_\_\_\_\_\_\_\_\_\_\_\_\_\_\_\_\_\_\_\_\_\_\_\_\_\_\_\_\_\_\_\_\_\_\_\_\_\_\_\_\_\_\_\_\_\_\_\_\_\_\_\_\_\_\_\_\_\_\_\_\_\_\_\_\_\_\_\_\_\_\_\_\_\_\_\_
##### **How to use Purchase Invoice Report?**
1. Filter base on your preferences. You can filter it by below fields:
- Trn Type
- Trn No
- Ref No
- Date
- Delivery Date
- Supplier Code
- Product Code
- Project
- Dept
- Section
You can sort by Default or by Product. User may opt to tick Suppress Zero or Detail.
2. Click **"GO"** button to show the data to display
[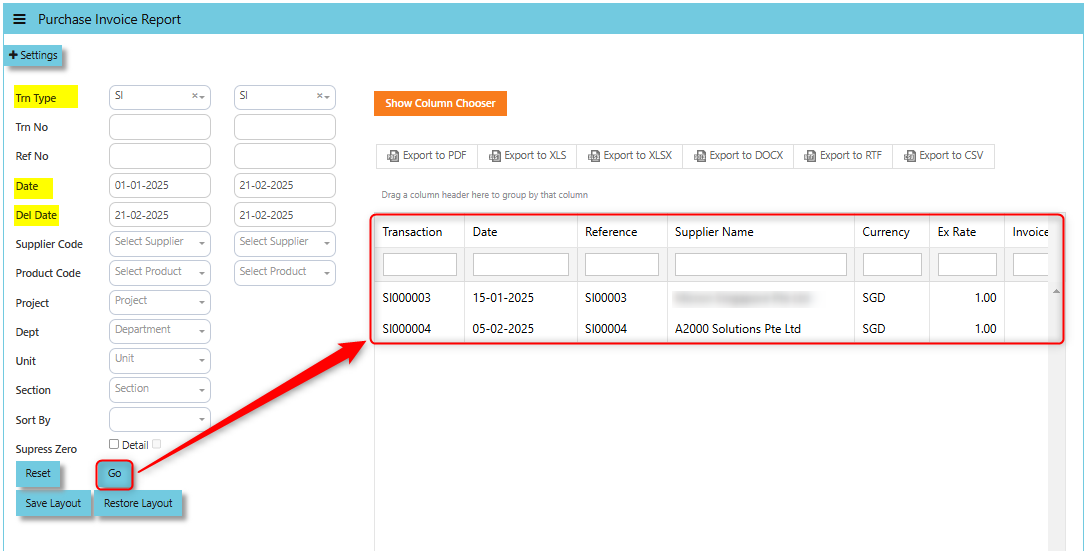](https://doc.uniq365.com/uploads/images/gallery/2025-02/H1fimage.png)
3. You can drag the column header to group by that column base on your report format preferences.
[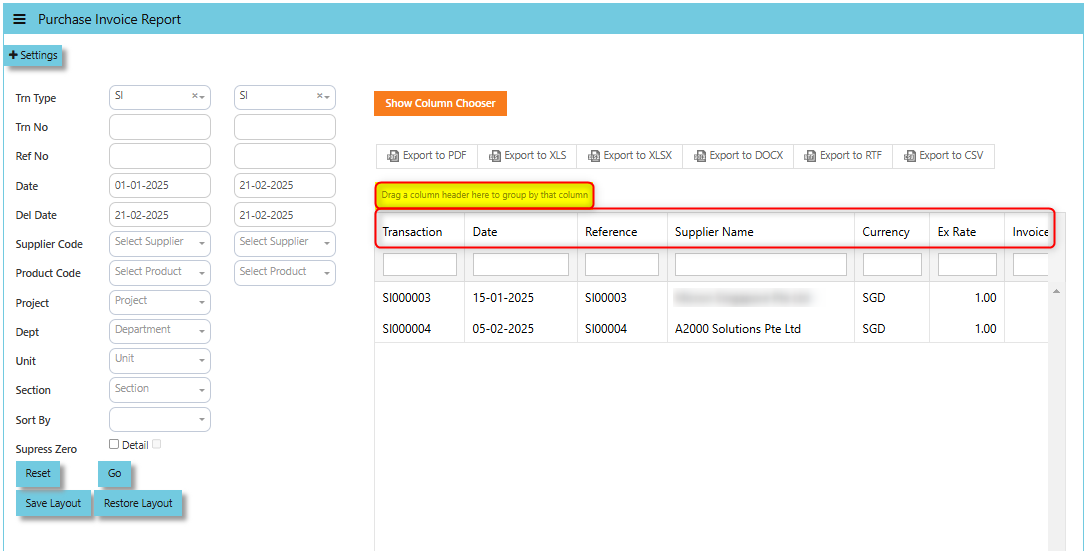](https://doc.uniq365.com/uploads/images/gallery/2025-02/5Lwimage.png)
User may use the **"Column Chooser"**, once clicked system prompt drop down-list of header columns and you can choose you want to reflect on your report format and click the **"Hide Column Chooser"** to close the Column Chooser.
[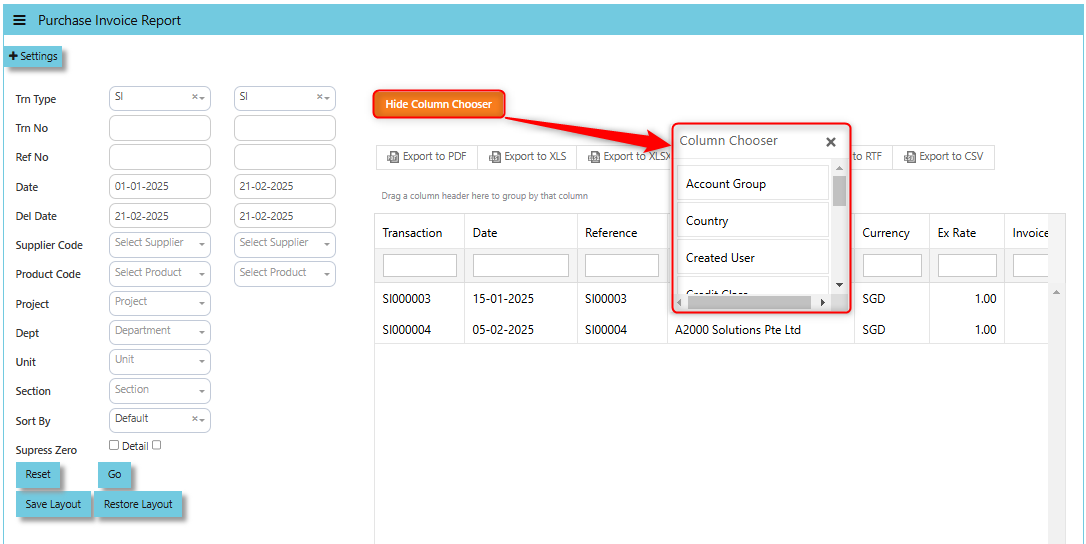](https://doc.uniq365.com/uploads/images/gallery/2025-02/mR6image.png)
4. Once all set, you can download and export the report in PDF, XLS, XLSX, DOCX, RTF, and CSV
[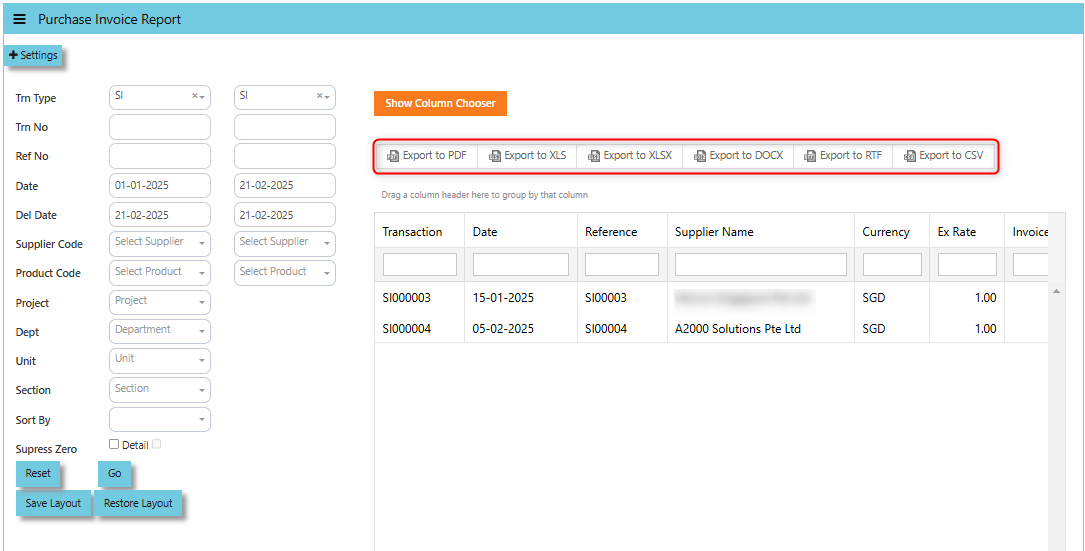](https://doc.uniq365.com/uploads/images/gallery/2025-02/TkSimage.png)
User may click the **"Reset"** button to back the standard report format generated.
**Save Layout** this function allows you to save in "Text Document" any customizations or changes made to the report's layout.
The **"Restore Layout"** button allows you to upload the "Text Document" of customizations you've made to the report's layout back to the default or original settings.
##### **How to use the Restore Layout Button?**
1. Select the Trn Type and Date or any details corresponding to text document file you will be uploaded.
[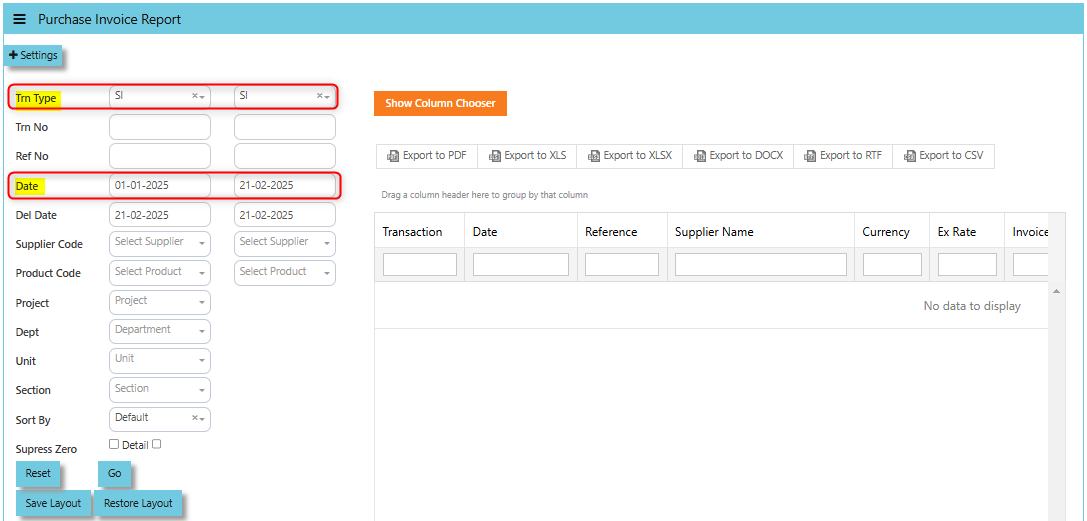](https://doc.uniq365.com/uploads/images/gallery/2025-02/wQpimage.png)
2. Click "Restore Layout" and there will windows open then select the file and click "Open" to upload.
[](https://doc.uniq365.com/uploads/images/gallery/2025-02/krlimage.png)
3. Once the file uploaded, data will be displayed.
[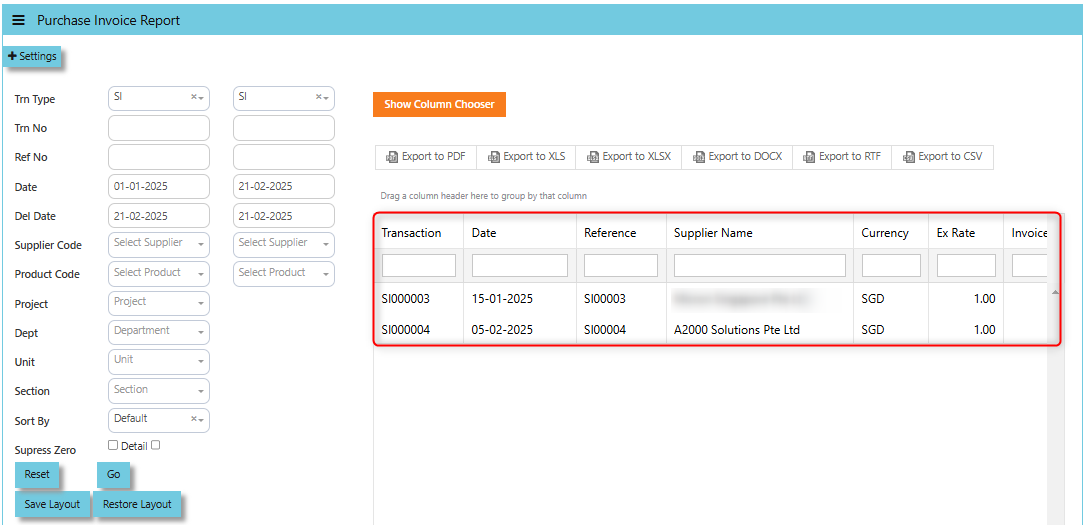](https://doc.uniq365.com/uploads/images/gallery/2025-02/3H0image.png)
The **User Access Settings** function refers to the ability to control who can view, modify, or access the report based on user roles and permissions within a system.
[](https://doc.uniq365.com/uploads/images/gallery/2025-02/Q0aimage.png)
Purchase Order Report
##### This is a standard report that provides detailed information about purchase orders (POs) created, processed, or pending within the system. It is typically part of the report queries and is used to track and analyze purchasing activities.
##### The user can dig down to the specific transaction using this report's very user-friendly layout, and they can even customize the report structure by filtering data according to their own preferences. Additionally, the section's accessible reports can be exported to PDF, Excel, and Microsoft Word.
\_\_\_\_\_\_\_\_\_\_\_\_\_\_\_\_\_\_\_\_\_\_\_\_\_\_\_\_\_\_\_\_\_\_\_\_\_\_\_\_\_\_\_\_\_\_\_\_\_\_\_\_\_\_\_\_\_\_\_\_\_\_\_\_\_\_\_\_\_\_\_\_\_\_\_\_\_\_\_\_\_\_\_\_\_\_\_\_\_\_\_\_\_\_\_\_\_\_\_
##### **How to view Purchase Order Report?**
- Click on PROCUREMENT – PURCHASING – REPORT QUERIES – PURCHASE ORDER REPORT for the screen below.
[](https://doc.uniq365.com/uploads/images/gallery/2025-01/d7Kimage.png)
\_\_\_\_\_\_\_\_\_\_\_\_\_\_\_\_\_\_\_\_\_\_\_\_\_\_\_\_\_\_\_\_\_\_\_\_\_\_\_\_\_\_\_\_\_\_\_\_\_\_\_\_\_\_\_\_\_\_\_\_\_\_\_\_\_\_\_\_\_\_\_\_\_\_\_\_\_\_\_\_\_\_\_\_\_\_\_\_\_\_\_\_\_\_\_\_\_\_\_\_\_\_\_\_\_\_\_\_\_\_\_\_\_\_\_\_\_\_\_\_\_\_\_\_\_\_\_\_\_\_\_\_\_\_\_\_\_\_\_
##### **How to use Purchase Order Report?**
1. Filter base on your preferences. You can filter it by below fields:
- Trn No
- Ref No
- Date
- Delivery Date
- Supplier Code
- Supplier Name
- Product Code
- Project
- Department
- Unit
- Section
You can sort by Default or by Product. User may opt to tick Pending or Detail.
2. Click **"GO"** button to show the data to display
[](https://doc.uniq365.com/uploads/images/gallery/2025-02/QTKimage.png)
3. You can drag the column header to group by that column base on your report format preferences.
User may use the **"Column Chooser"**, once clicked system prompt drop down-list of header columns and you can choose you want to reflect on your report format and click the **"Hide Column Chooser"** to close the Column Chooser.
[](https://doc.uniq365.com/uploads/images/gallery/2025-02/q3Oimage.png)
4. Once all set, you can download and export the report in PDF, XLS, XLSX, DOCX, RTF, and CSV
[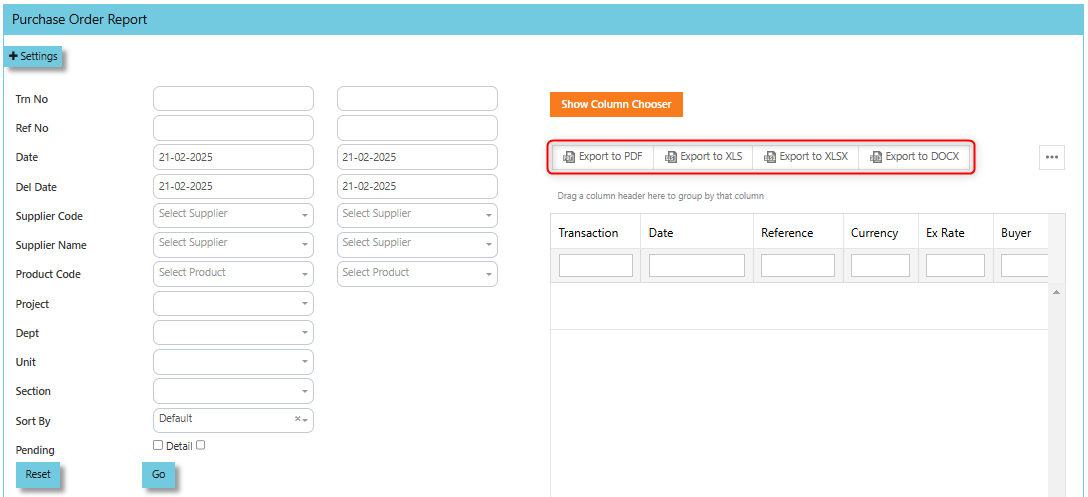](https://doc.uniq365.com/uploads/images/gallery/2025-02/p33image.png)
User may click the **"Reset"** button to back the standard report format generated.
Purchase Order Status Query
##### In Uniq365, **Purchase Order Status Query** is a specialized report or query that allows users to view and analyze the status of purchase orders (POs) in real-time. This report helps track the progress of POs and provides insights into whether an order is open, completed, partially received, canceled, or pending approval, among other statuses.
##### This feature offers a very user-friendly interface that lets the user dive down to the specific transactions and export to Microsoft Excel to generate a tracking report.
\_\_\_\_\_\_\_\_\_\_\_\_\_\_\_\_\_\_\_\_\_\_\_\_\_\_\_\_\_\_\_\_\_\_\_\_\_\_\_\_\_\_\_\_\_\_\_\_\_\_\_\_\_\_\_\_\_\_\_\_\_\_\_\_\_\_\_\_\_\_\_\_\_\_\_\_\_\_\_\_\_\_\_\_\_\_\_\_\_\_\_\_\_\_\_\_\_\_\_
##### **How to view Purchase Order Status Query?**
- Click on PROCUREMENT – PURCHASING – REPORT QUERIES – PURCHASE ORDER STATUS QUERY for the screen below.
[](https://doc.uniq365.com/uploads/images/gallery/2025-01/fLXimage.png)
\_\_\_\_\_\_\_\_\_\_\_\_\_\_\_\_\_\_\_\_\_\_\_\_\_\_\_\_\_\_\_\_\_\_\_\_\_\_\_\_\_\_\_\_\_\_\_\_\_\_\_\_\_\_\_\_\_\_\_\_\_\_\_\_\_\_\_\_\_\_\_\_\_\_\_\_\_\_\_\_\_\_\_\_\_\_\_\_\_\_\_\_\_\_\_\_\_\_\_\_\_\_\_\_\_\_\_\_\_\_\_\_\_\_\_\_\_\_\_\_\_\_\_\_\_\_\_\_\_\_\_\_\_\_\_\_\_\_\_
##### **How to use Purchase Order Status Query?**
1\. Choose transaction type, Transaction Date or Delivery Date then set the date range, select Supplier and Product then click "Filter" button to reflect the data. User may have an option to add filtration by entering Doc. No., Buyer, Customer PO, PDSU and tick "Show Only Open Orders".
[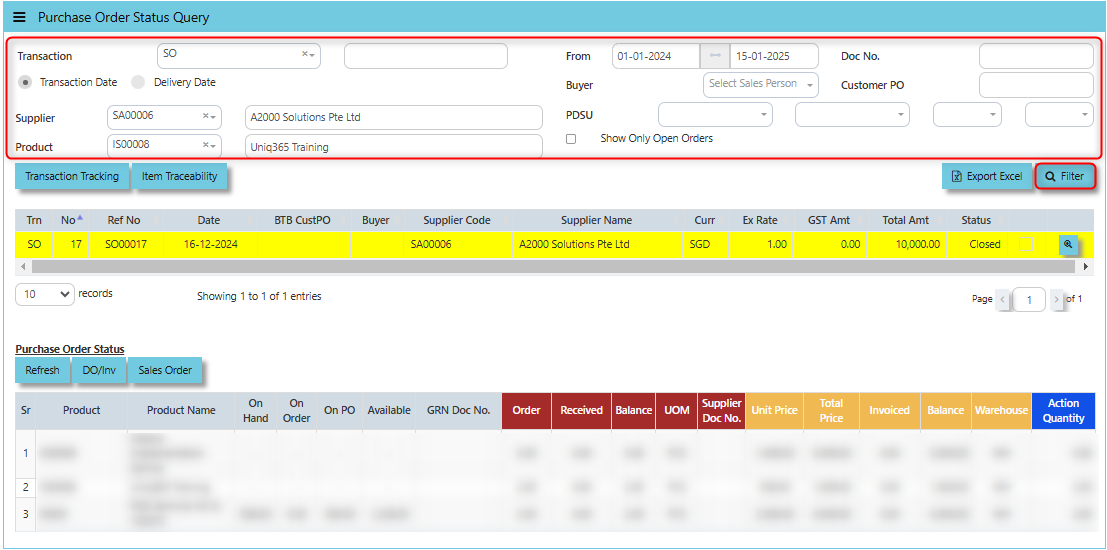](https://doc.uniq365.com/uploads/images/gallery/2025-01/pjSimage.png)
2\. By selecting the filtered line transaction, details will show under Purchase Order Status for user references.
[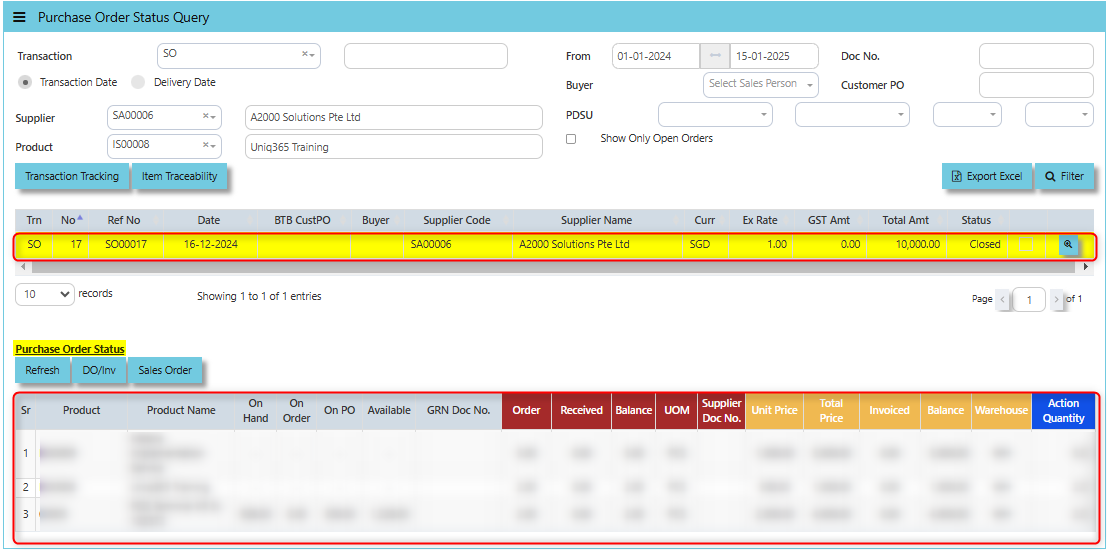](https://doc.uniq365.com/uploads/images/gallery/2025-01/LXmimage.png)
3\. Users allow to export the data displayed in the query or report into an Excel spreadsheet.
[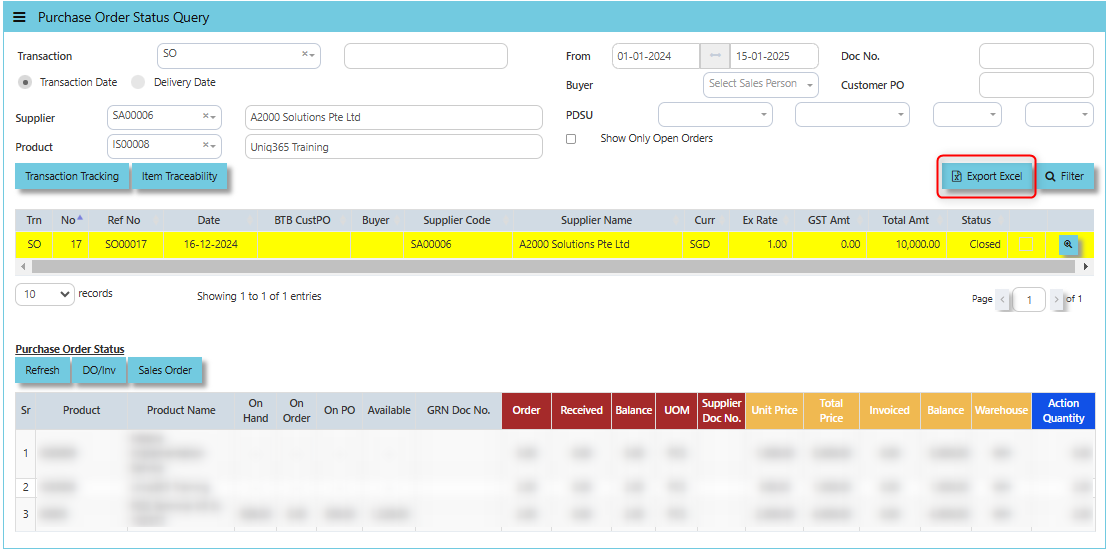](https://doc.uniq365.com/uploads/images/gallery/2025-01/hIhimage.png)
Under "Purchase Order Status" below are the buttons that users can utilize:
**Refresh Button** is used to update or reload the data displayed in the Purchase Order Status Query.
**DO/Inv Button** provides access to the **List of Delivery Orders (DO)** and **Invoices (Inv)** associated with the purchase orders.
**Sales Order Button** provides a quick link to the **Sales Order** connected to a purchase order, helping users track the fulfillment of customer orders from procurement to delivery.
Document Printing
##### Finally, the document printing option opens the menu for document printing.
\_\_\_\_\_\_\_\_\_\_\_\_\_\_\_\_\_\_\_\_\_\_\_\_\_\_\_\_\_\_\_\_\_\_\_\_\_\_\_\_\_\_\_\_\_\_\_\_\_\_\_\_\_\_\_\_\_\_\_\_\_\_\_\_\_\_\_\_\_\_\_\_\_\_\_\_\_\_\_\_\_\_\_\_\_\_\_\_\_\_\_\_\_\_\_\_\_\_\_
##### **How to use Document Printing?**
- Click on PROCUREMENT – PURCHASING – DOCUMENT PRINTING - DOCUMENT PRINTING for the screen below.
[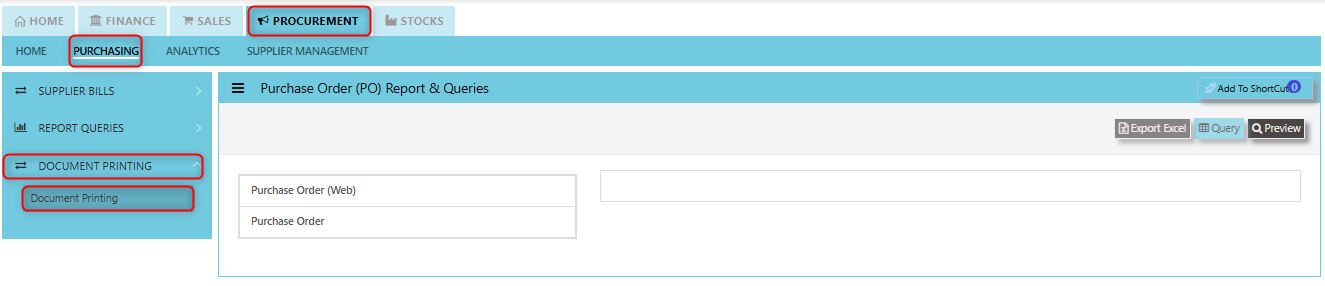](https://doc.uniq365.com/uploads/images/gallery/2025-01/Xksimage.png)
- This option allows user to select the printing of documents a range of document numbers. By previewing the selected report, users can able to **download** the detailed report into a PDF, XLS, XLSX, DOCX, CSV file, for further analysis, sharing, or record-keeping.
Customer Maintenance
##### The **Customer Maintenance** is the screen which stores all the Customer information. The customer code created in the Customer Maintenance is used to present all the transactions related to that individual Customer.
##### **How to Create New Customer?**
- Click on Sales – Customer Management – Master Setting – Customer Maintenance icon for the following screen.
[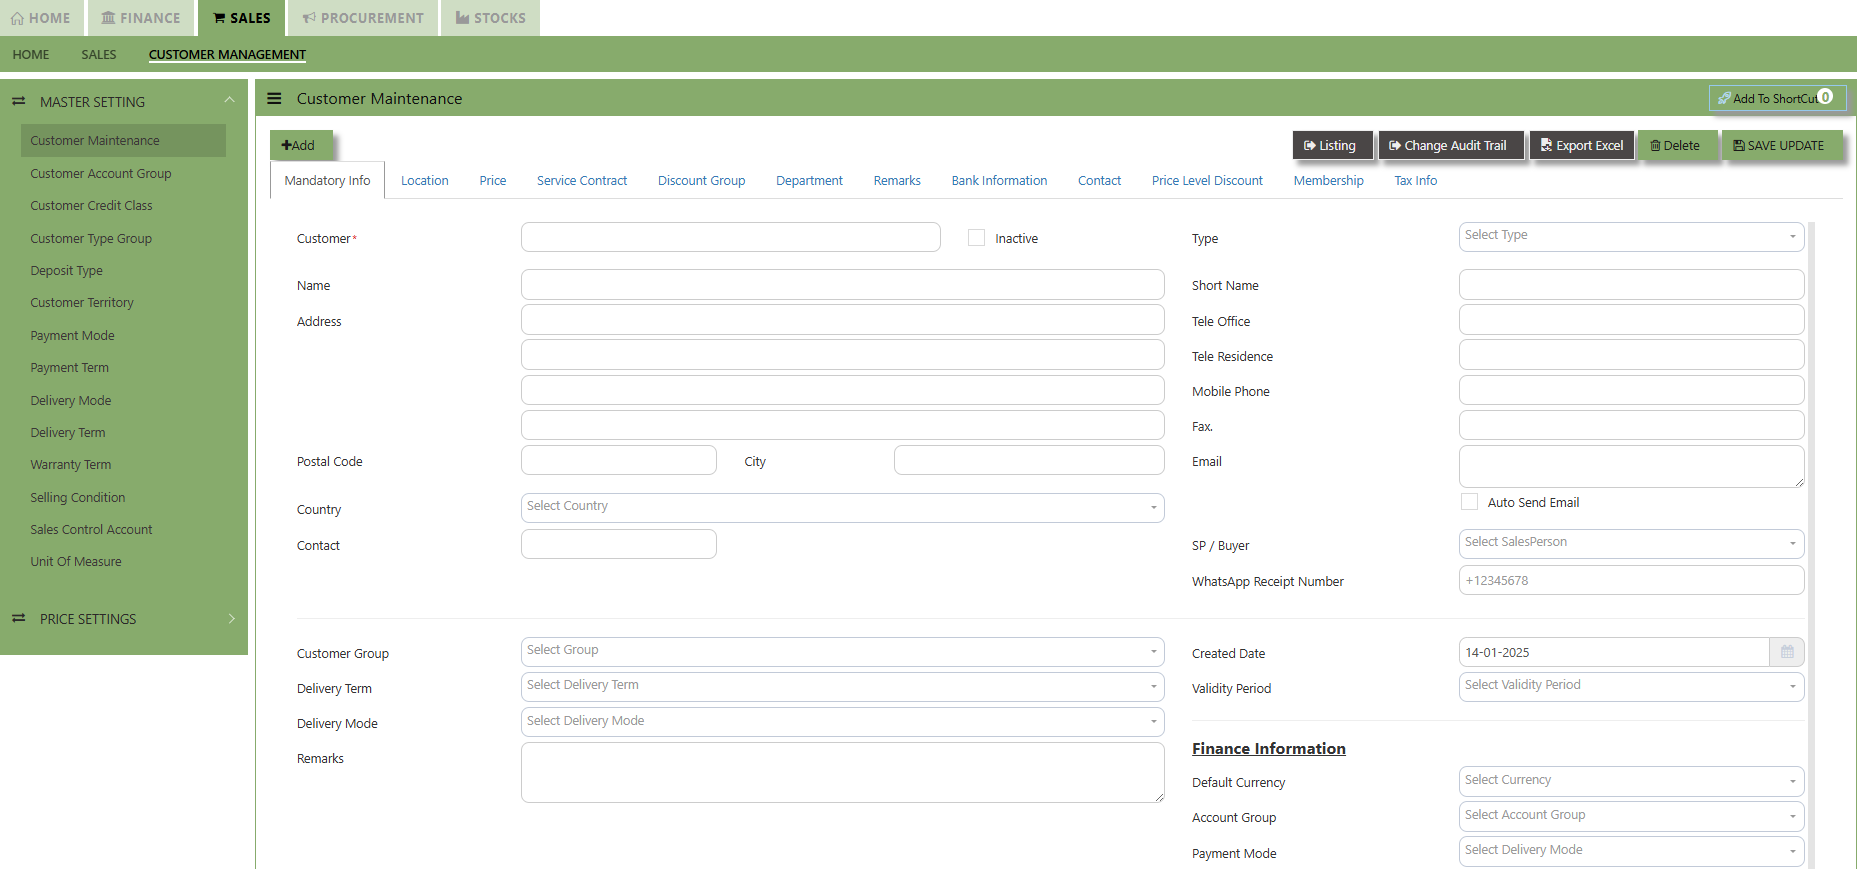](https://doc.uniq365.com/uploads/images/gallery/2025-01/gAPimage.png)
This is the place where you add new Customer or edit existing Customer. Some of the fields are mandatory, such
as the following :
- **Customer** - Enter the code for the new Customer. The maximum is 10 alphanumeric characters.
- **Name** - Enter the name of Customer. The maximum is 50 characters
- Key in the necessary Information, such as Address, Telephone, Fax, E-mail & etc.
- **Type** - Select C for Customer or B for both Customer & Supplier
- **SP** - Click to select the Salesperson defined under System Manager – System Utilities - Employee
- **Credit Class** - Click to select the credit class defined under Sales – Maintenance – Credit Class. This setting is for the reports under Receivable \\ Aging Analysis by credit class (Transaction date / due Date)
- **User** - Click to select the user defined under System Manager – System Utilities - User Maintenance
This setting is to prevent a user from accessing customers and their information which belong to other users.
- **Territory** - Click to select the credit class defined under Sales – Customer Management – Customer Territory
This setting is for the reports under Sales Module \\ Sales Analysis Report \\ Customer Territory Sales Analysis.
- **Price Type** - You may decide on a pricing method for each and every Customer
**A. Price Table (Sales/Last)** - Every time a transaction is created for this Customer, the system will call out the selling price from the Customer Maintenance Price Table.
User may look and maintain the price under **"Price"** tab. Click on SALES - CUSTOMER MANAGEMENT - MASTER SETTING - CUSTOMER MAINTENANCE - PRICE TAB for the screen below.
[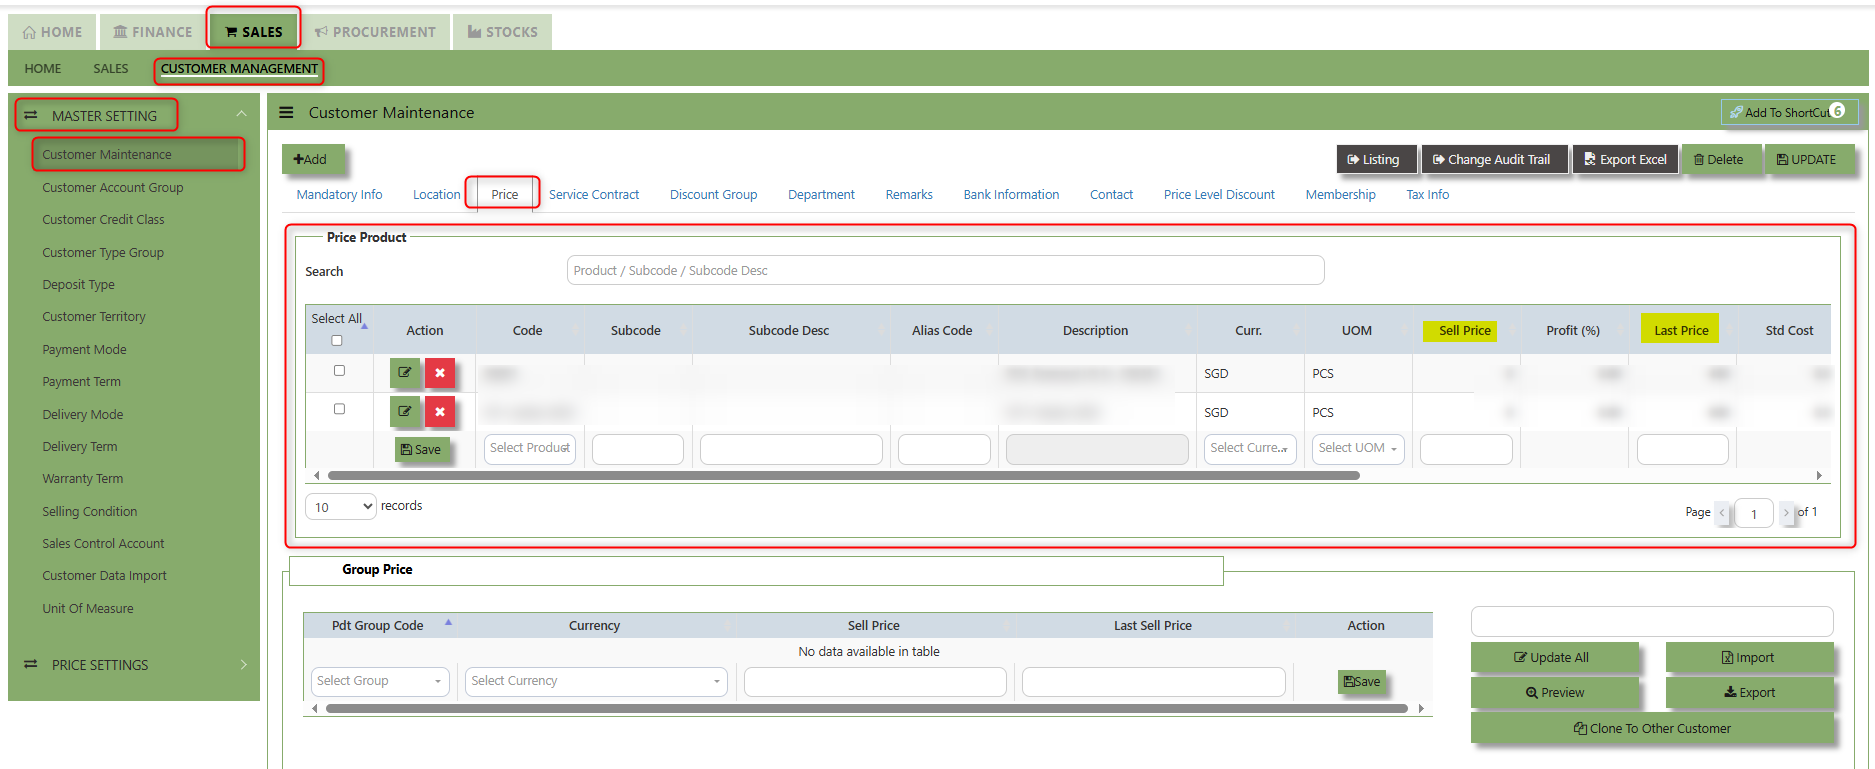](https://doc.uniq365.com/uploads/images/gallery/2025-01/eb1image.png)
**B. Group Table (Last)** - Every time an invoice is created for this Customer, the system will call out the selling price
from the Customer Maintenance Group Table (that is defined under Sales – Customer Management – Master Setting –Customer Type Group). This group assumes that all items in the group carry the same selling price.
User may look and maintain the price under **"Price"** tab. Click on SALES - CUSTOMER MANAGEMENT - MASTER SETTING - CUSTOMER MAINTENANCE - PRICE TAB for the screen below.
[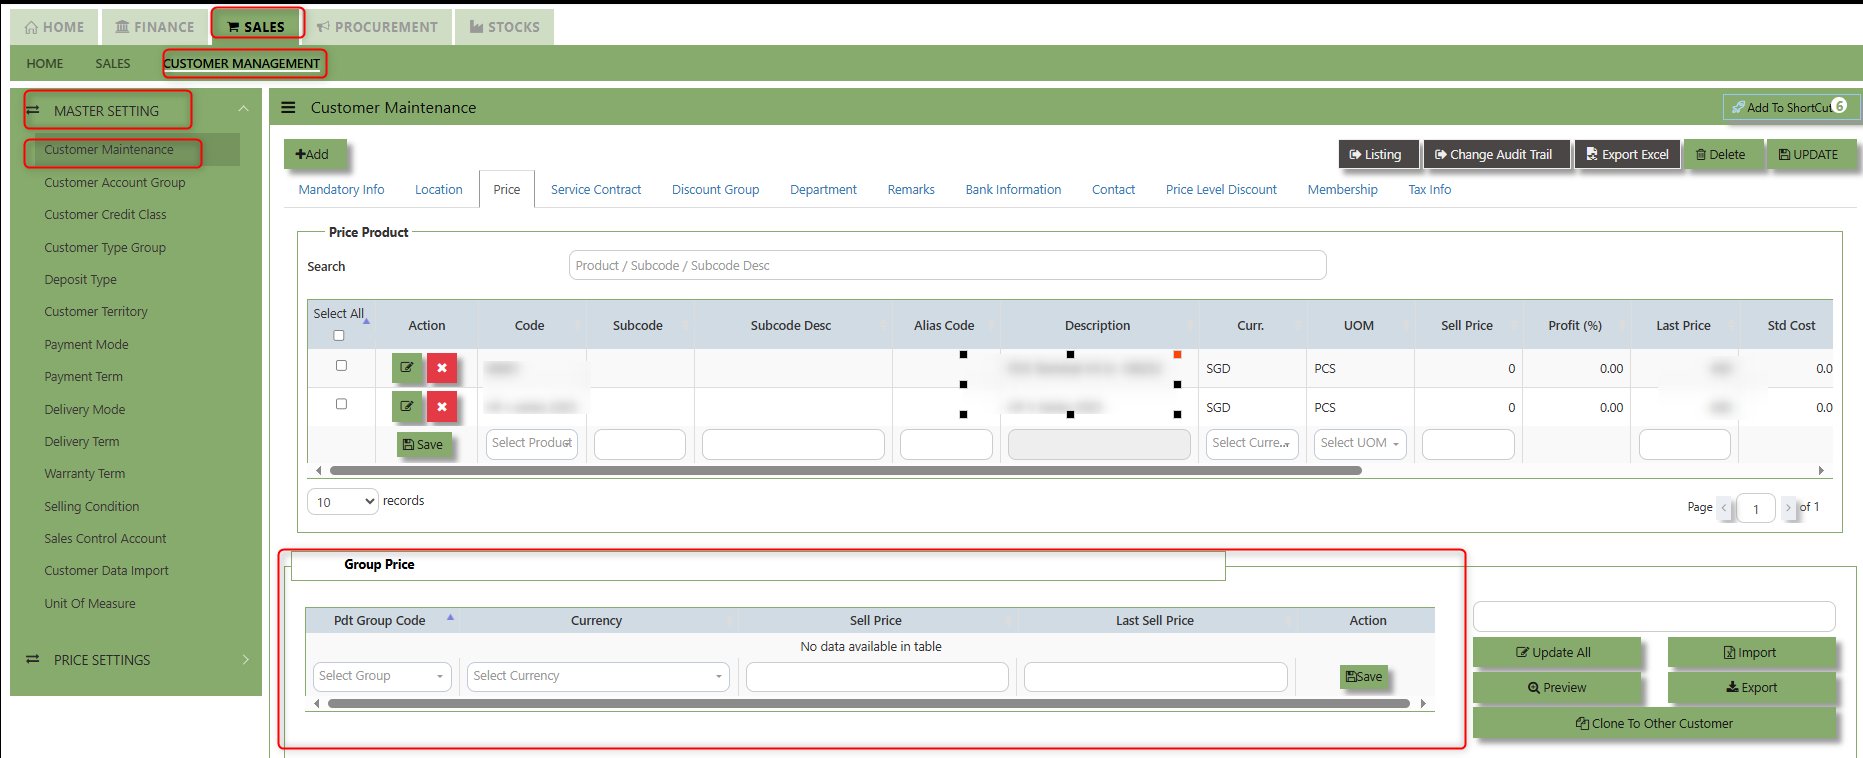](https://doc.uniq365.com/uploads/images/gallery/2025-01/9phimage.png)
**C. Multi-tier Trade Discount**
**D. Dealer -**
[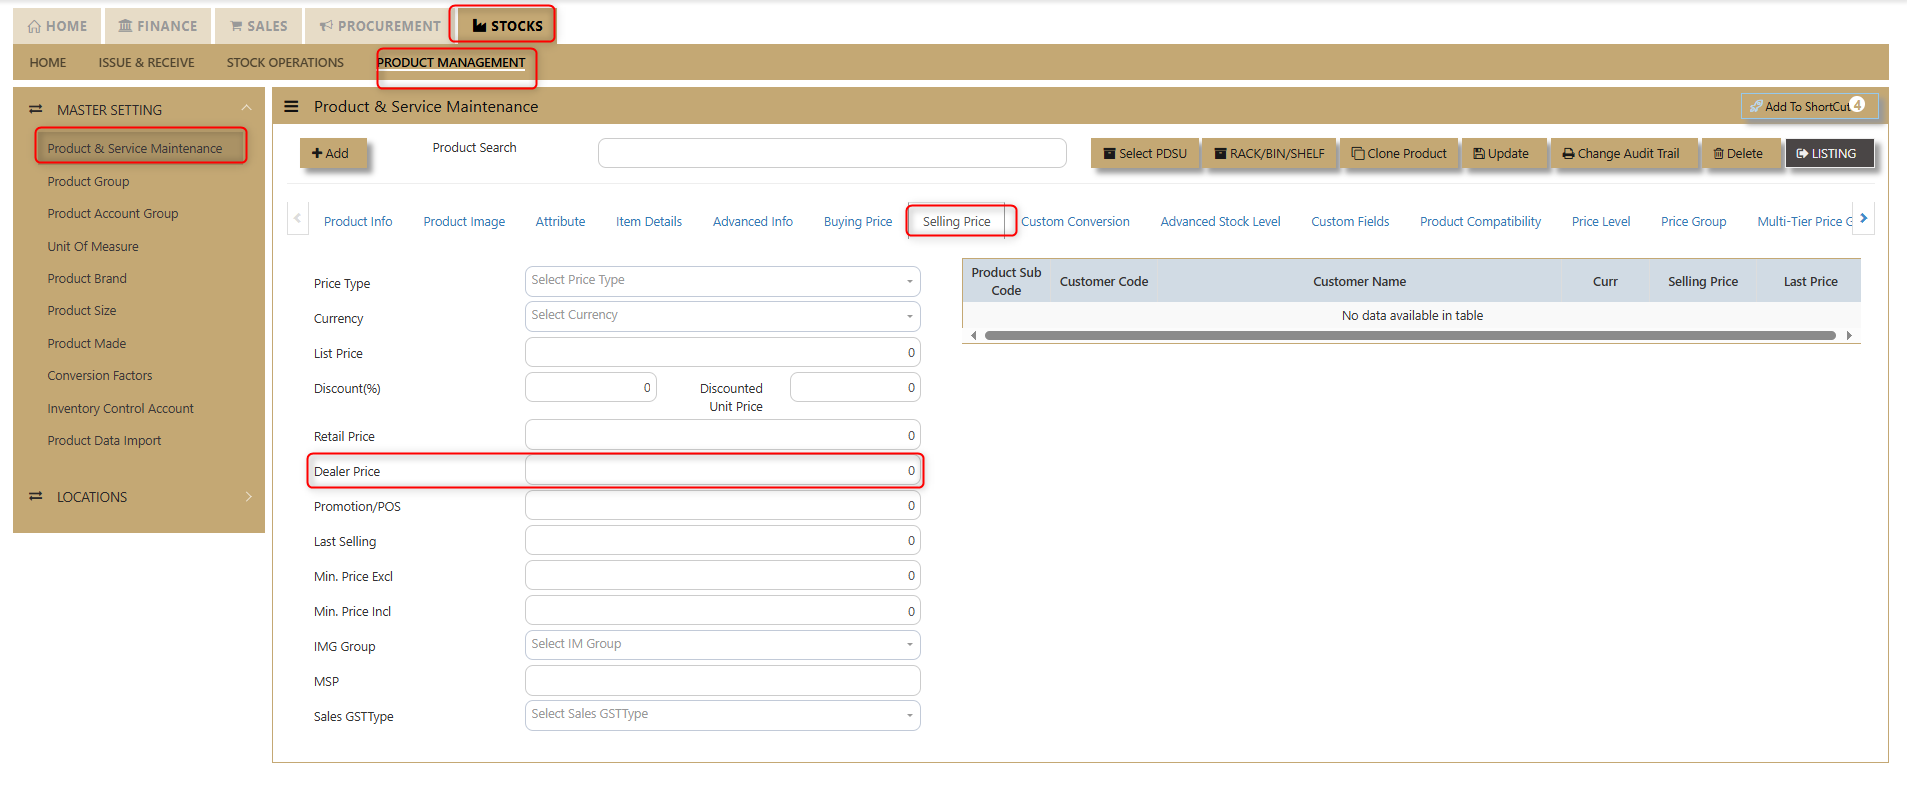](https://doc.uniq365.com/uploads/images/gallery/2025-01/CQoimage.png)
E. Last Price
F. Price Book
[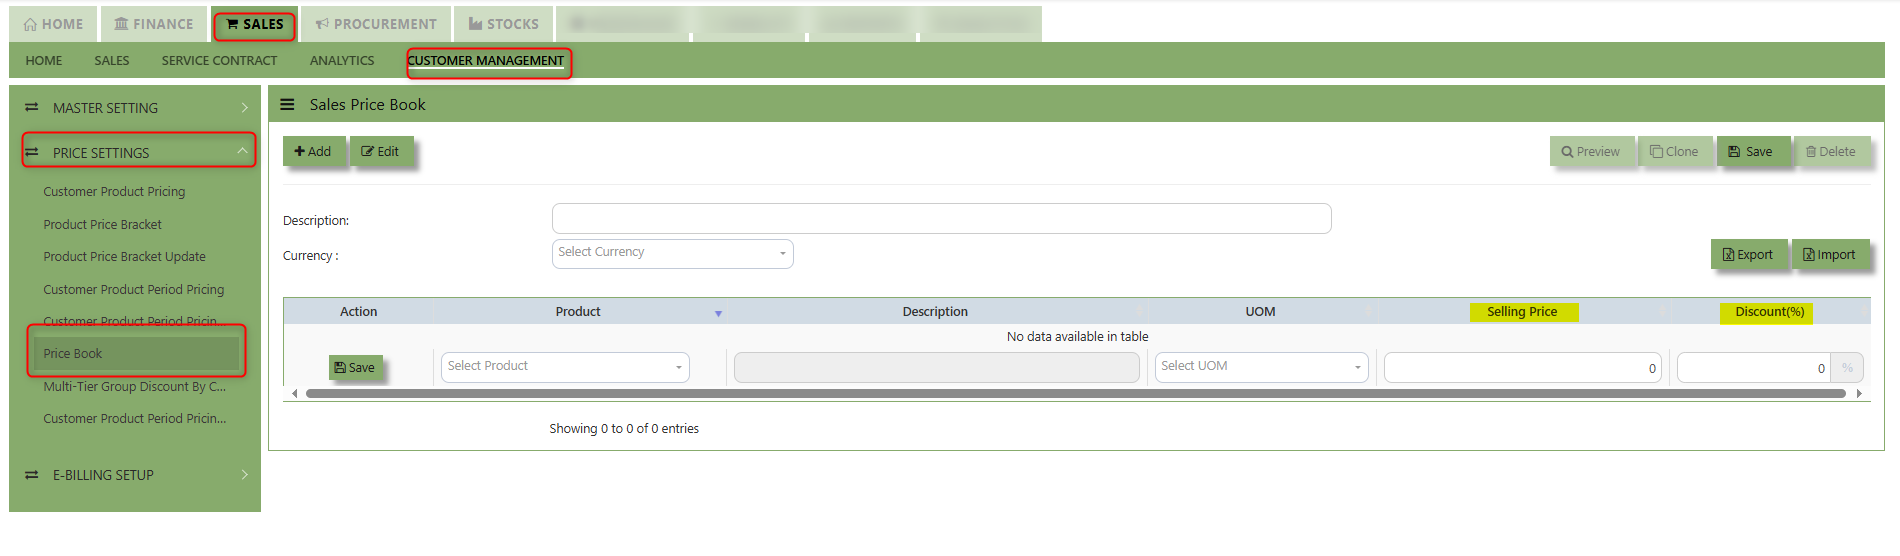](https://doc.uniq365.com/uploads/images/gallery/2025-01/imcimage.png)
G. Group table Sales
H. Price Level
I. BTB Indent Mark up price
j. Price Group
[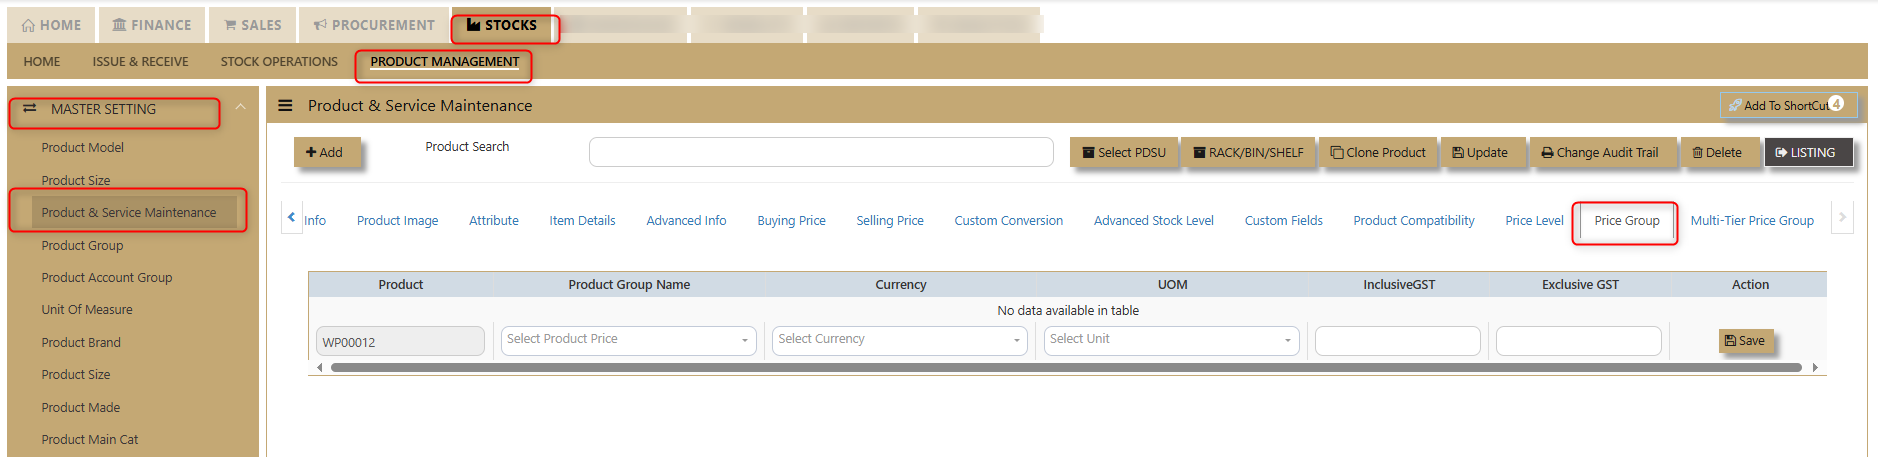](https://doc.uniq365.com/uploads/images/gallery/2025-01/Pe3image.png)
K. Multi-tier Price Group Bracket
[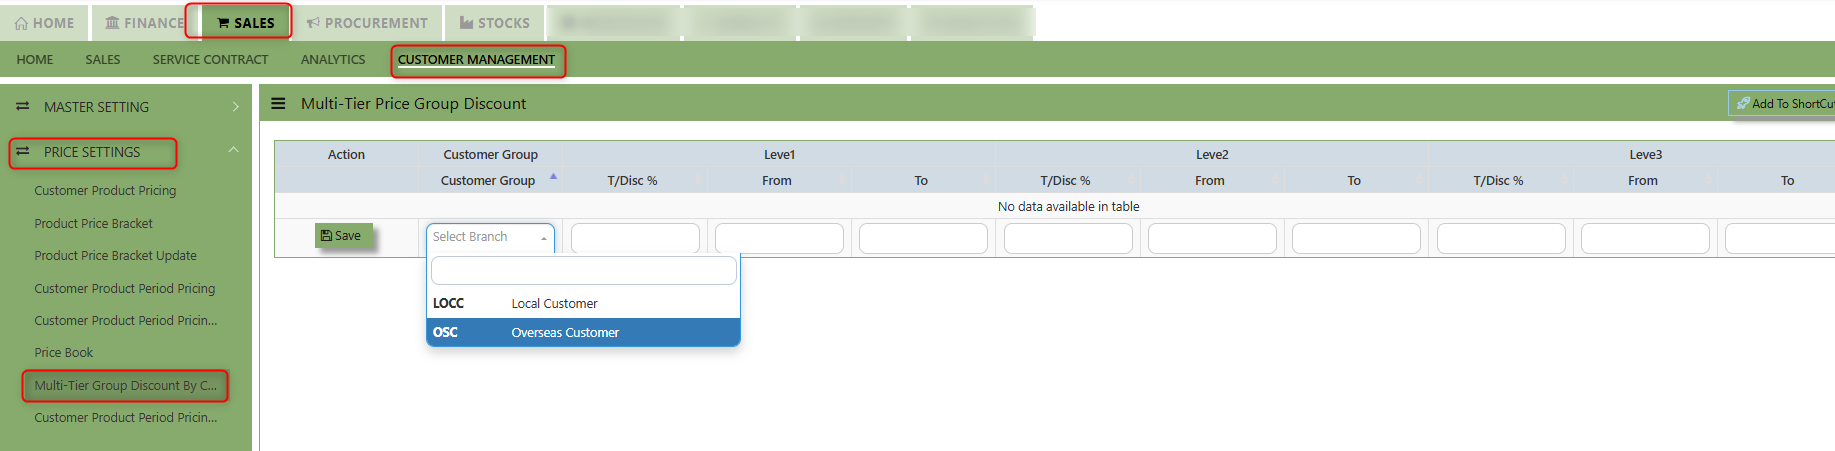](https://doc.uniq365.com/uploads/images/gallery/2025-01/l0oimage.png)
l. List price
**M. Bracket Price** - a pricing structure where the price of goods or services is determined based on predefined "brackets" or ranges.
N. Period Price
**O. Product Setting** - Every time an invoice is created for this Customer, the system will display the selling price from the Product & Service Maintenance (Depends on the Price Type selected)
User may look and maintain the price depends on the "Price Type" selected under **" Selling Price"** Tab of Product & Service Maintenance. Below are the types selection:
- - - **L List Price** - is the official price recommended by the manufacturer or supplier for a product. It serves as a baseline price
- **R Retail Price** - Retail price refers to the final price at which a product or service is sold to customers
- **D Dealer Price** - Also known as wholesale price, is the price at which a product is sold by a manufacturer or distributor
- **P Promotion Price** - A promotional price is a temporary discounted price offered
- **A Last Selling Price** - refers to the most recent price at which a product or Service was sold
- **M Minimum Price** -
**List Price/Sales Promotion/Dealer/Retail** - Every time a transaction is created for this Customer, the system will
display the selling price from the Product & Service Maintenance.
- **Deliver Term** - Click to select the Delivery Term defined under Sales – Customer Management – Delivery Term
Example: *FOB - Free On Board*
*CIF - Carriage, Insurance & Freight*
- **Delivery Mode** - Click to select the Delivery Mode defined under Sales – Customer Management – Delivery Mode
Example: *Truck, Flight, Self Collection*
- **Payment Term** - Click to select the Payment Mode defined under Sales – Customer Management – Payment Terms
Example: *30 Days, 60Days, COD (Cash on delivery)*
- **Group** - Click to select the Group defined under Sales – Customer Management – Customer Type Group
The group here is for the reports under Sales\\Sales Analysis Reports\\Customer Group wise Sales Analy*sis*
- **Account Group** - If the auto account posting is by Customer, then click to select the relevant Account Group defined under Sales – Customer Management – Customer Account Group
- **Default Currency** - Select the currency that this Customer normally transacts in.
*Location - Create different delivery locations for this Customer Price - Records the history of selling prices for this Customer if the price type (price table) is selected*
**Location** - Create different delivery locations for this Customer.
**Price** - Records the history of selling price for this Customer if Price Table is selected for the Price Type.
The **Price and Location Tab** serves as a key area for managing the pricing information and logistical details related to customers.
##### **How to set Location?**
- Click on SALES - CUSTOMER MANAGEMENT - MASTER SETTING - CUSTOMER MAINTENANCE - LOCATION TAB for the screen below.
[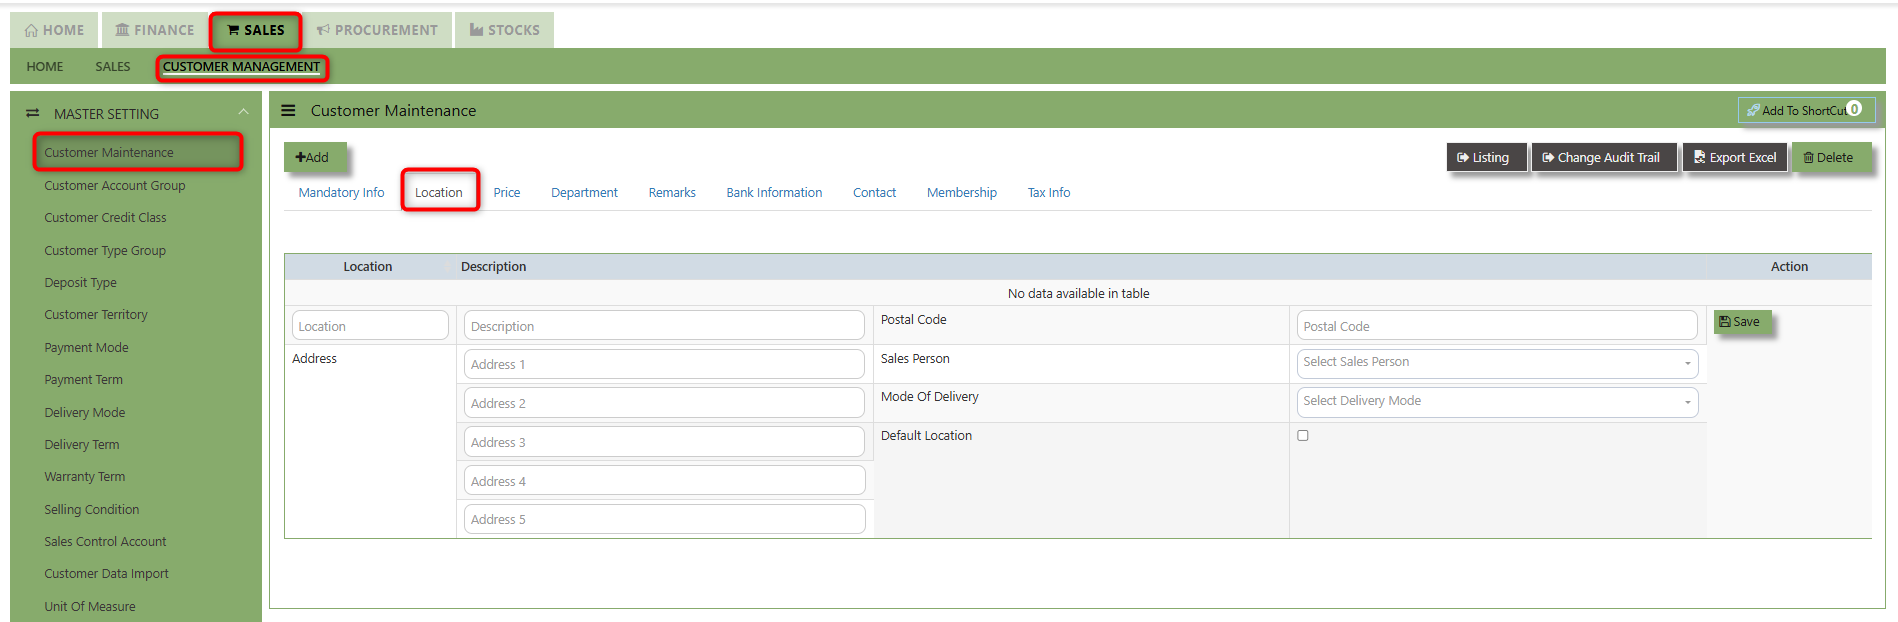](https://doc.uniq365.com/uploads/images/gallery/2025-02/hLcimage.png)
1\. Input the necessary details such as Address, Postal Code, Sales Person and Mode of Delivery. When the **"Default Location"** checkbox is ticked for a supplier, the system automatically associates that location with the customer's transactions.
2\. Key in the details of the below fields for Locations then click SAVE button of each line.
##### **How to set Price?**
Click on SALES - CUSTOMER MANAGEMENT - MASTER SETTING - CUSTOMER MAINTENANCE - PRICE TAB for the screen below.[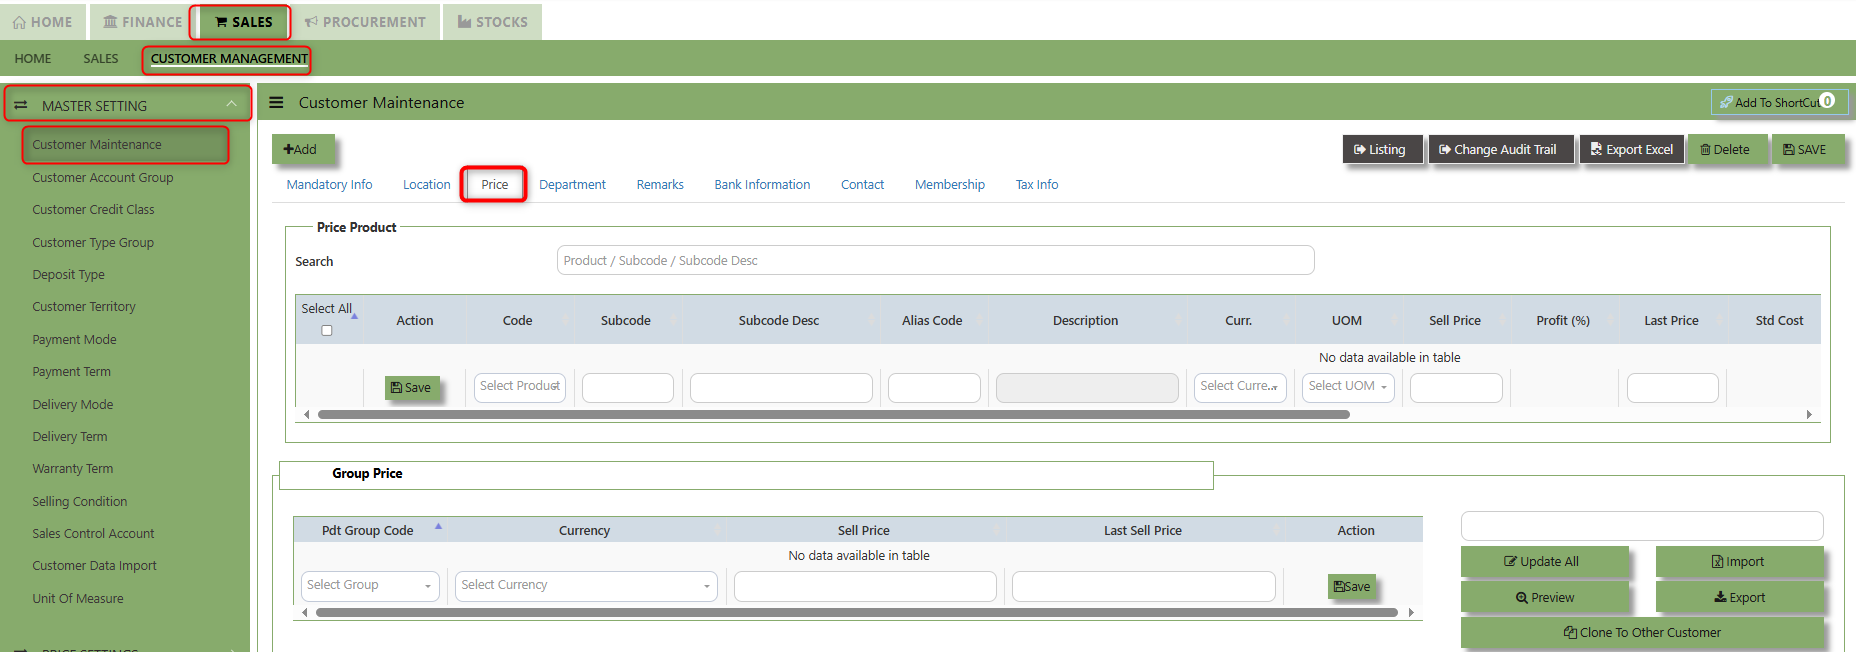](https://doc.uniq365.com/uploads/images/gallery/2025-02/lCCimage.png)
1. For **Price Product** input the necessary details such as Code, Subcode, Alias code, Description, Currency, UOM, Sell Price, Profit (%), Last Price, Standard Cost, Sell Discount, Date of Update, Date of Update, Dealer Price, Retail Price, List price and Promotional Price .
2. Key in the details of the below fields for Pricing then click SAVE button of each line.
[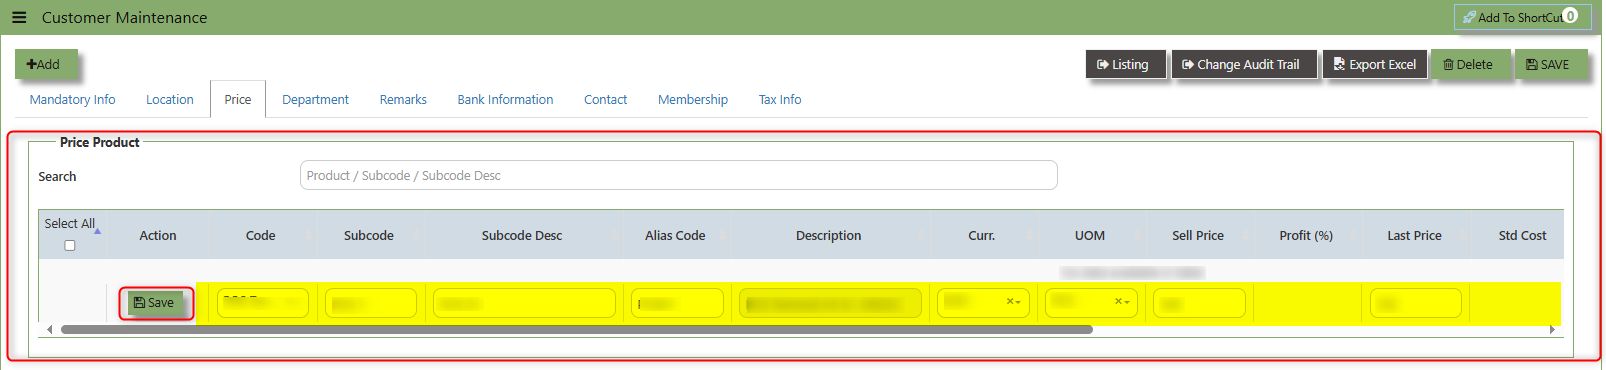](https://doc.uniq365.com/uploads/images/gallery/2025-02/I3dimage.png)
##### **How to set Department?**
- Click on SALES - CUSTOMER MANAGEMENT - MASTER SETTING - CUSTOMER MAINTENANCE - DEPARTMENT TAB for the screen below.
[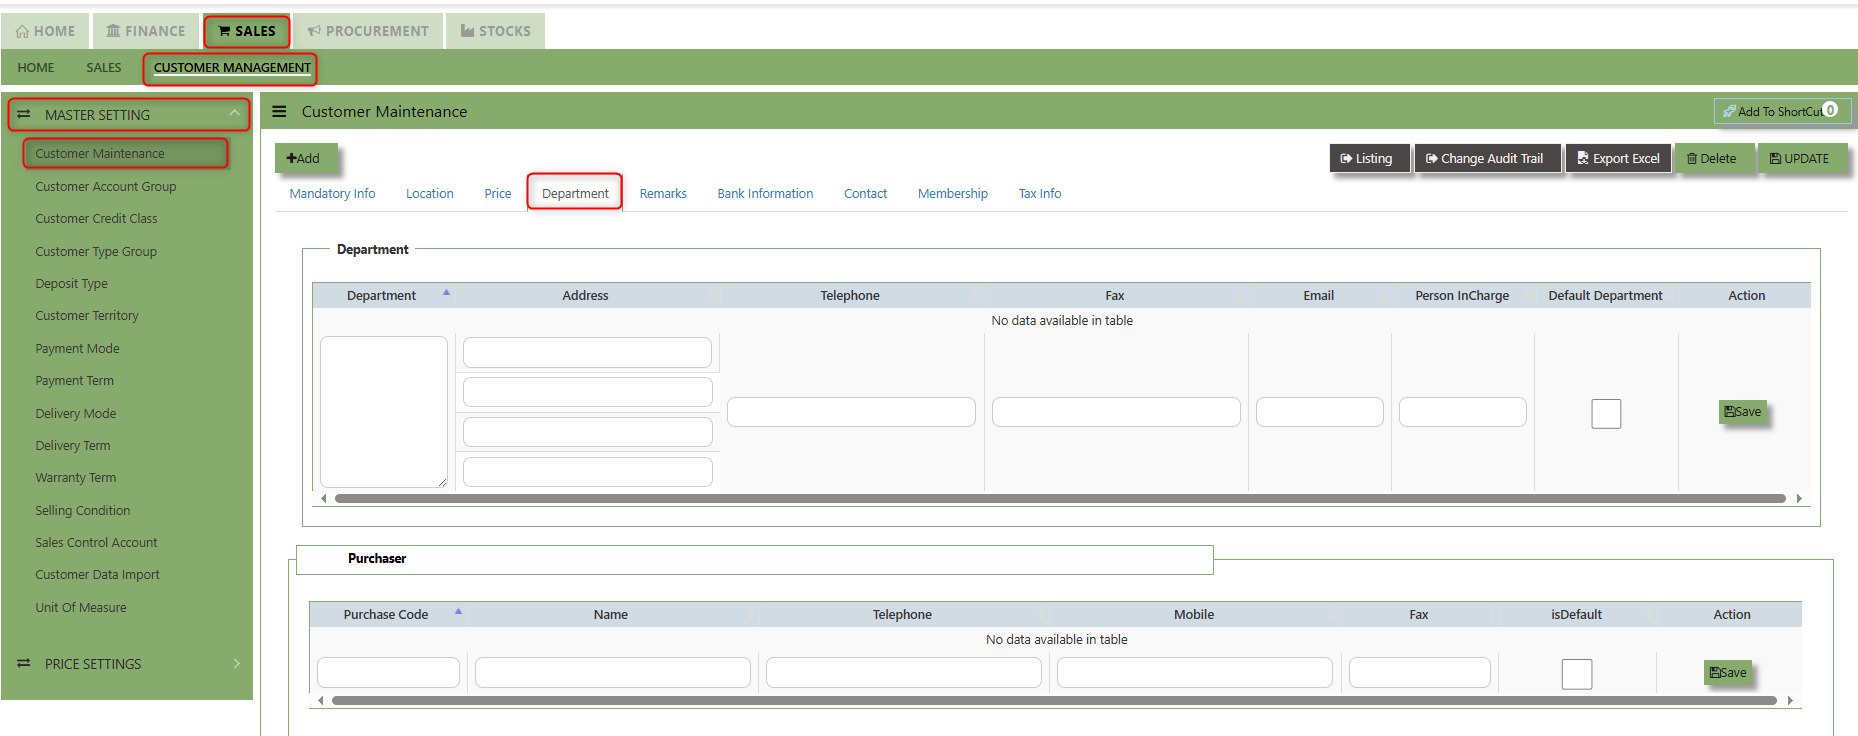](https://doc.uniq365.com/uploads/images/gallery/2025-02/uIfimage.png)
1. Enter the details for the below fields for Department:
- Department
- Address
- Telephone
- Fax
- Email
- Person InCharge
- **Default Department** - Serves to automatically assign a specific department within the organization to a customer during sales activities once enabled.
2. After keyed in the above necessary details, click SAVE to maintain the line detail.
3. Click SAVE in upper right corner of the screen.
[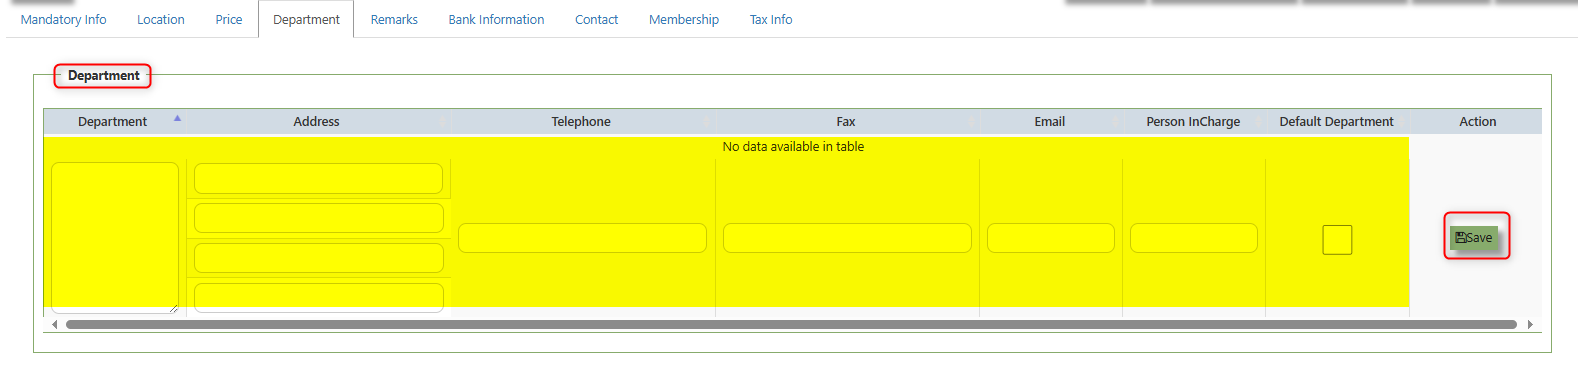](https://doc.uniq365.com/uploads/images/gallery/2025-02/IECimage.png)
1. Enter the details for the below fields for Purchaser:
- Purchase code
- Name
- Telephone
- mobile
- Email
- Fax
- **Default Department** - Serves to automatically assign a specific department within the organization to a supplier during procurement activities once enabled.
2. After keyed in the above necessary details, click SAVE to maintain the line detail.
3. Click SAVE in upper right corner of the screen.
[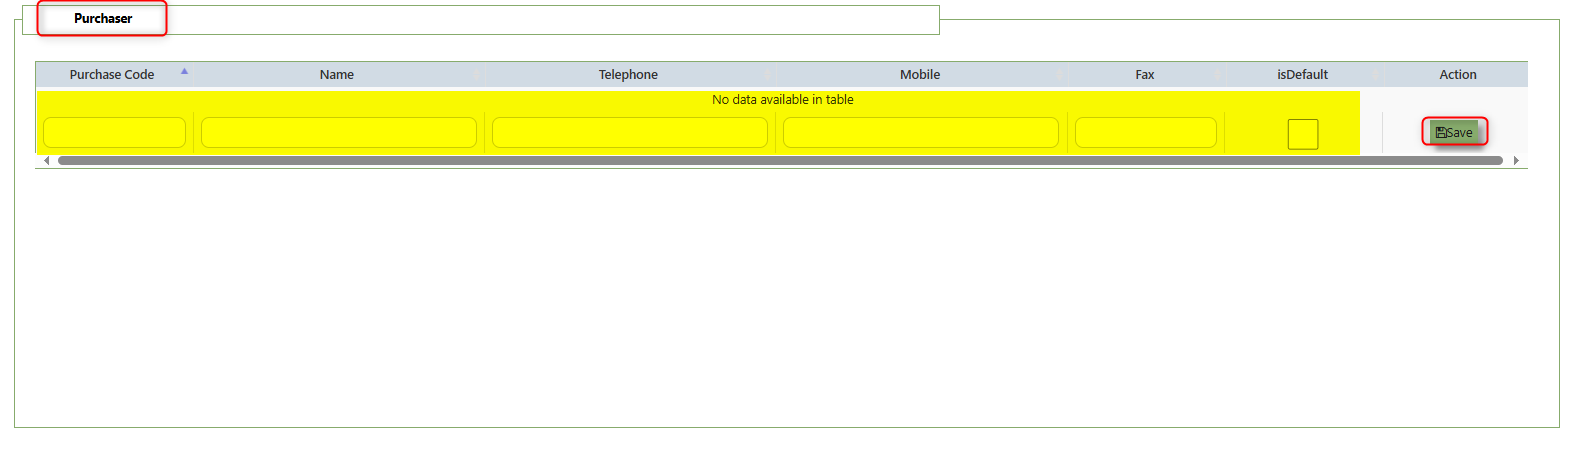](https://doc.uniq365.com/uploads/images/gallery/2025-02/ourimage.png)
> ***Important:*** Our system does not allow duplicate customer codes in Customer Maintenance, so before creating the coding for Customer Maintenance, please double check and make sure that there are no duplicates. As guidance for creating Customer codes, one example is “CA0001” for A2000 Pte Ltd.; “C” stands for Customer and “A” is the starting alphabet for the Customer name.
Customer Groups
##### This option lets you indicate the Customer Group if you intend to use reports that sort or filter by Customer Group (Optional).
##### **How to Setup Customer Type Group?**
- Click on Sales – Customer Management – Customer Type Group icon for the following screen
[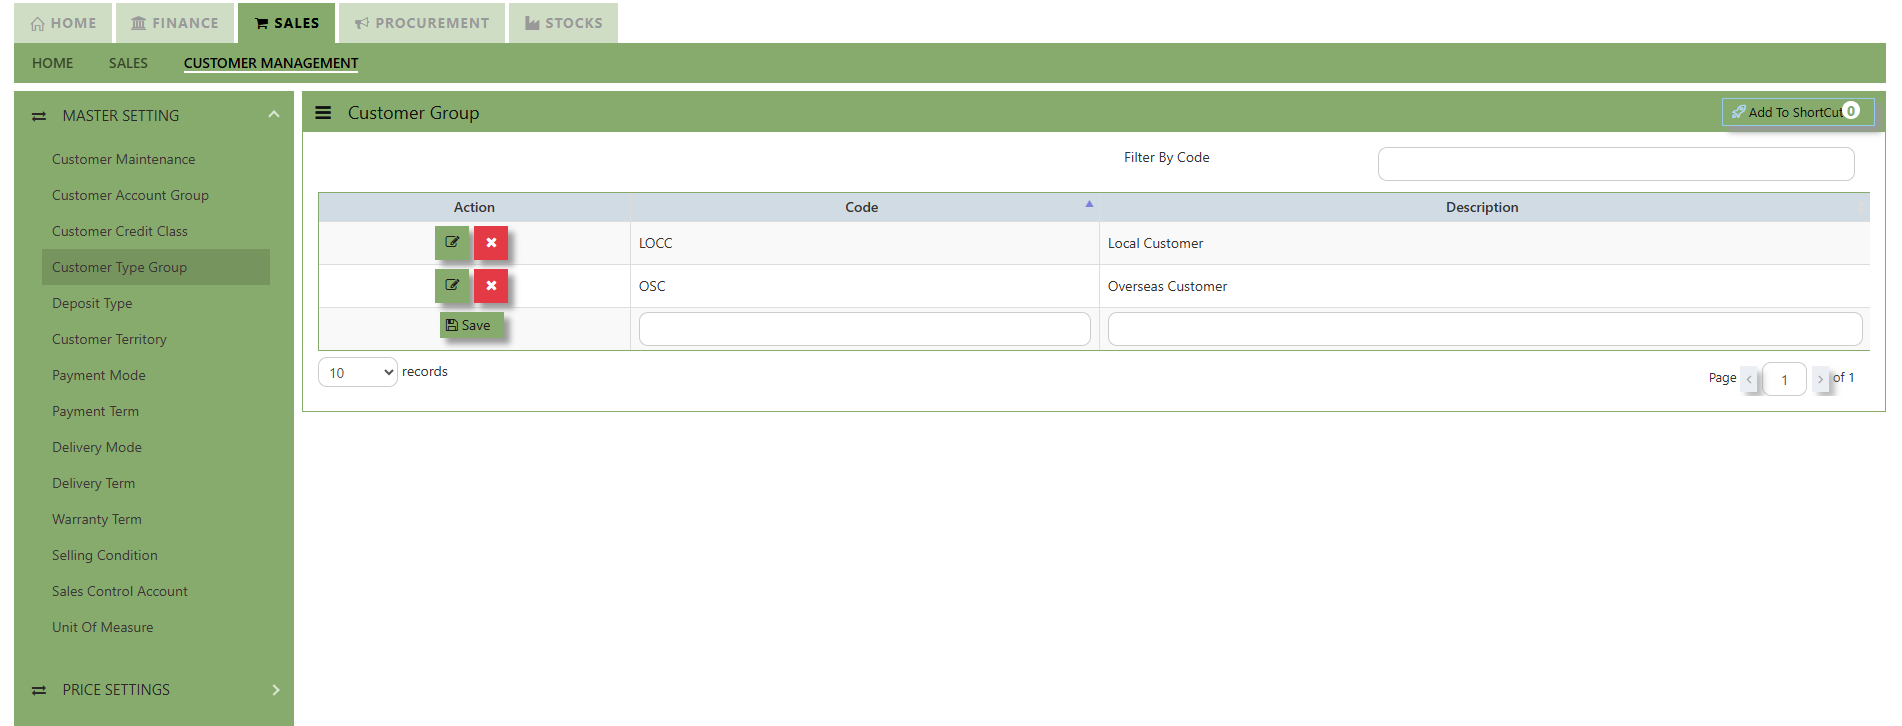](https://doc.uniq365.com/uploads/images/gallery/2025-01/EkGimage.png)
- Enter Customer Groups as shown in above example.
> ***Note:** If you did not use this grouping method for reporting, please ignore the options.*
Customer Account Groups
##### The Customer Account Group is used for auto posting function when the user creates Sales Transaction. Unlike other systems that are hard-coded, A2000 WEB ERP allows the accounts posting to be organized according to the users’ requirements through their own Customer Account Groups.
You can create different groups and set the account posting to be by
“**Customer Group**” if you need:
Exp: Trade Debtor A/C by Customer
Sales A/C by Customer
Discount A/C by Customer
Cost of Sales A/C by Customer
[](https://doc.uniq365.com/uploads/images/gallery/2025-01/Igoimage.png)
#### **How to Setup Customer A/C Group?**
- Click on Sales – Customer Management – Customer Account Group icon for the following screen.
[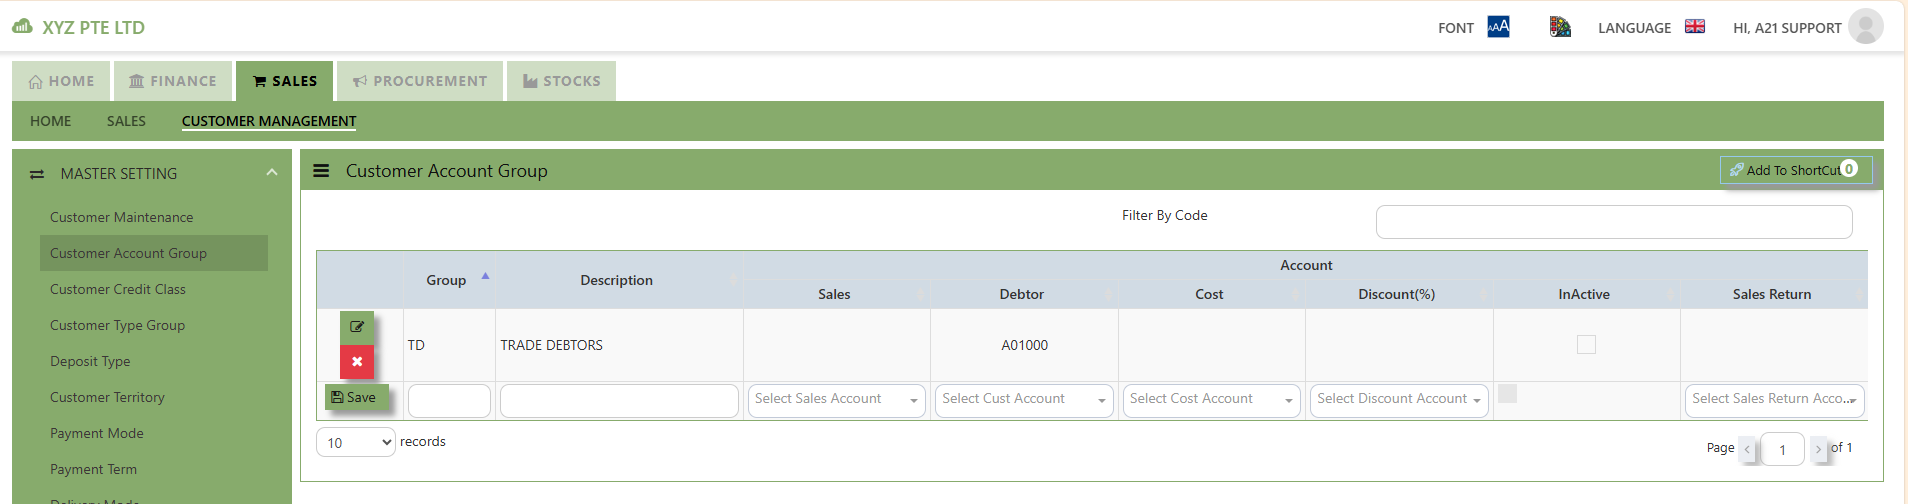](https://doc.uniq365.com/uploads/images/gallery/2025-01/wFIimage.png)
- Enter the Code & Description Name for Customer Account Group. After setting the codes and names, the user can map the GL Chart of Account code for “Trade Debtor A/C”, “Sales A/C”, “Discount A/C” & “Cost A/C”.
***Note: If you did not use for this posting method, please ignore the options.***
Payment Terms
##### This is where you indicate the Customer Payment Terms for Customers and Suppliers. The payment terms set for individual customers and suppliers are for the buckets in the Statement of Account & Aging reports.
##### **How to add Payment Terms?**
- Click on Sales – Customer Management – Payment Terms icon for the following screen.
[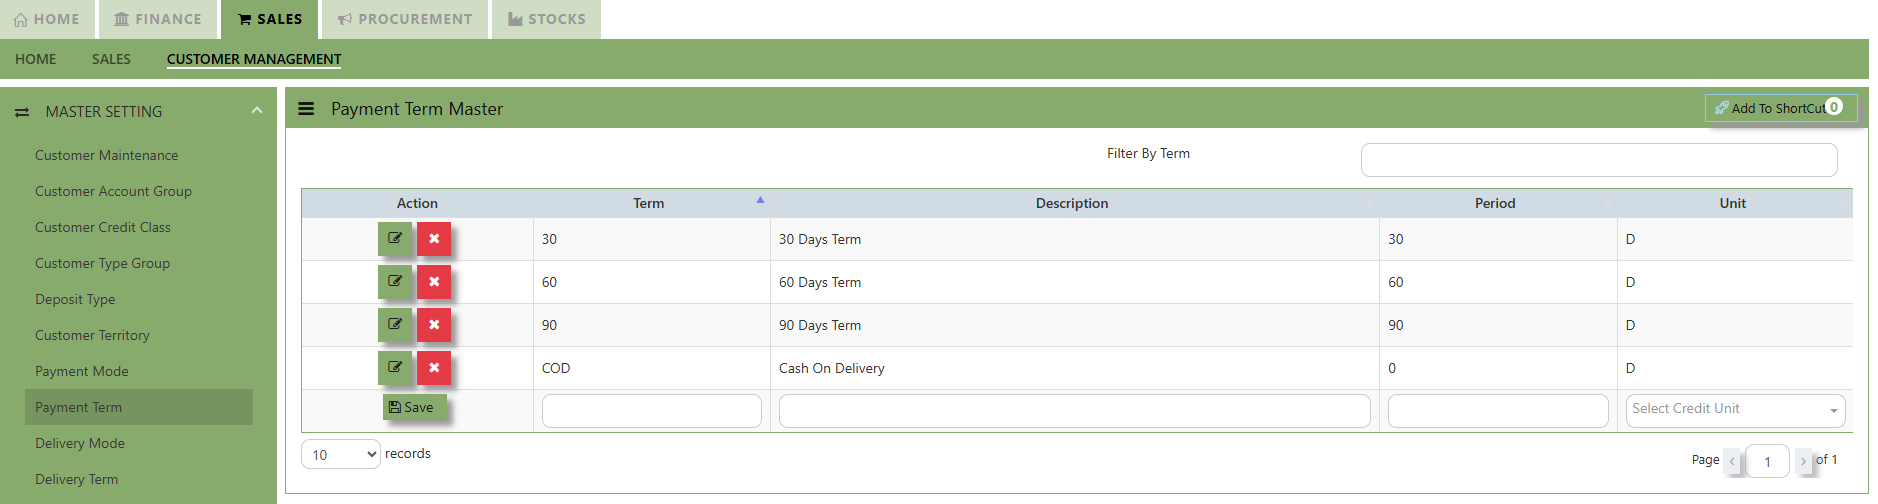](https://doc.uniq365.com/uploads/images/gallery/2025-01/aRFimage.png)
- Enter the above Terms of Payment as shown above. For more flexible settings, user can indicate the Payment Terms according to the report needed.
Exp: Add 7 Days, 45 days or 120 days…etc.
***Note: If you did not set the payment terms, you can not select the terms for individual customers and the system***
***will be unable to generate accurate Statement of Account & Aging reports.***
Payment Modes
This is where you indicate the Customer Payment Mode at Customer Maintenance for information purpose (Optional).
#### **How to Create Payment Mode?**
- Click on Sales – Customer Management – Payment Mode icon for the following screen.
[](https://doc.uniq365.com/uploads/images/gallery/2025-01/117image.png)
- Enter the Modes of Payment as shown in the example above. For more flexible settings, it will be part of the Advanced Training.
***Note: If you do not use this information for, please ignore the options.***
Territory
##### This is where you create the Customer Territories if you intend to use reports that sort or filter by Customer Territories (Optional).
##### **How to Create Territories?**
- Click on Sales – Customer Management – Customer Territory icon for the following screen.
[](https://doc.uniq365.com/uploads/images/gallery/2025-01/pLdimage.png)
- Enter the Customer Territories as shown in the example above. For more flexible settings, user can indicate the Customer Territories according to the report needed. It will be part of the Advanced Training.
-
***Note: If you did not use the grouping method for report sorting, please ignore the options.***
Delivery Mode
##### This is where you indicate the Customer Delivery Mode in the Customer Maintenance or Transactions for information purpose if you intend to use reports that sort or filter by Delivery Mode.
##### **How to Create Delivery Mode?**
- Click on Sales – Customer Management – Delivery Mode icon for the following screen.
[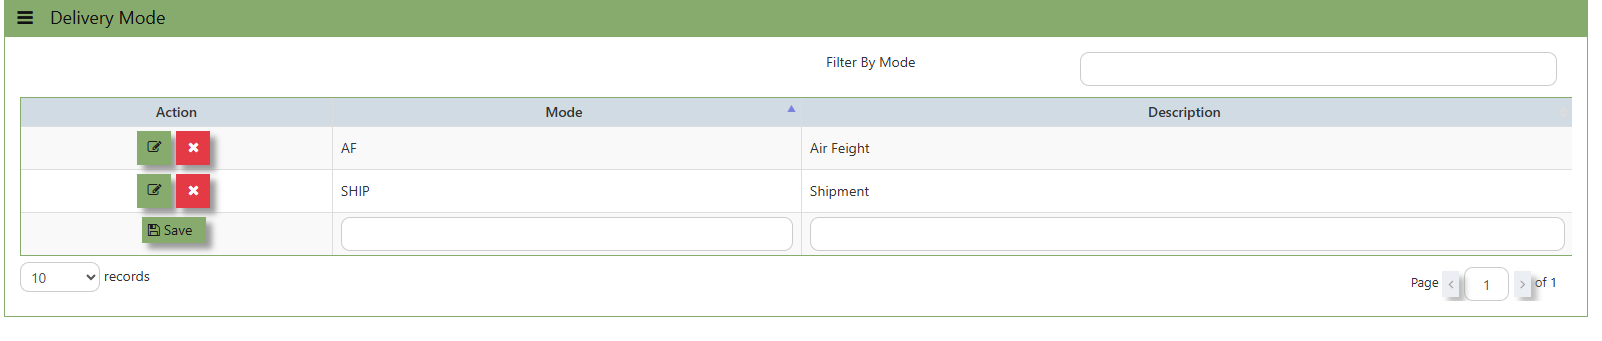](https://doc.uniq365.com/uploads/images/gallery/2025-01/Yzhimage.png)
- Enter the above Modes of Delivery as shown above. For more flexible settings, user can indicate the Delivery Mode according to the information needed.
- Exp: Lorry Numbers or Driver Names…etc.
***Note: If you do not use the entire information for transaction info and report sorting, please ignore the options.***
Delivery Term
##### This is where you indicate the Customer Delivery Term in the Customer Maintenance or Transactions for information purpose to define the conditions and responsibilities for shipping goods.
##### **How to Create Delivery Term?**
- Click to select the Delivery Term defined under Sales – Customer Management – Delivery Term [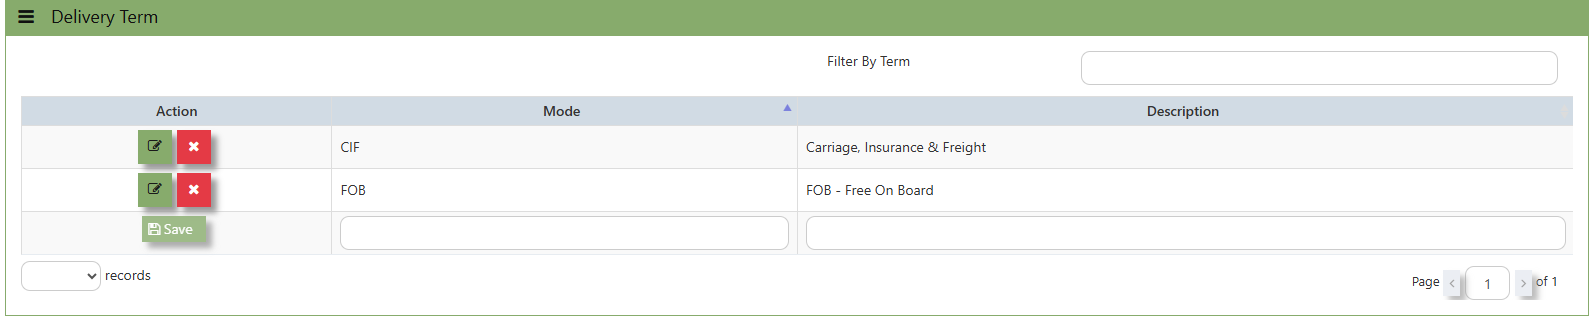](https://doc.uniq365.com/uploads/images/gallery/2025-01/lesimage.png)
- Enter the above Term of Delivery as shown above. For more flexible settings, user can indicate the Delivery Term according to the information needed.
- Example: FOB - Free On Board
CIF - Carriage, Insurance & Freight
Warranty Term
##### In Uniq 365, this is the place where you indicate the Customer Warranty Terms if you intend to use it in Customer Sales Invoice (Optional)
[](https://doc.uniq365.com/uploads/images/gallery/2025-01/AqTimage.png)
##### **How to Create Warranty Terms?**
- Click on Sales – Customer Management – Warranty Terms icon for the following screen. [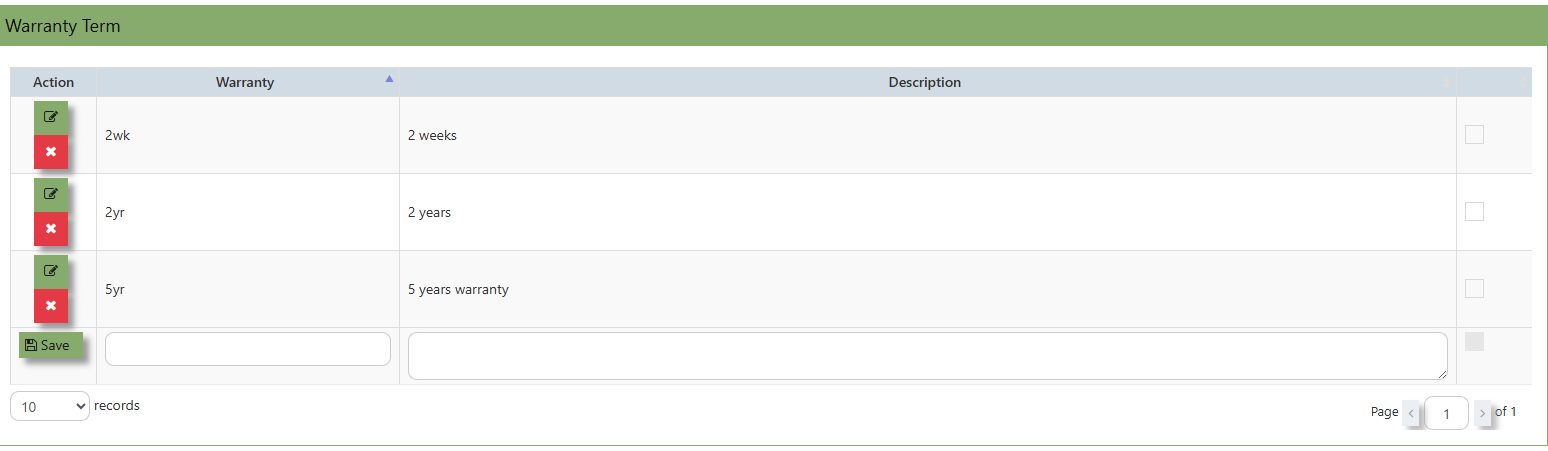](https://doc.uniq365.com/uploads/images/gallery/2025-01/67mimage.png)
- Enter the Warranty Terms as shown in the above example. For more flexible settings, user can enter the Warranty Code & Description according to what their company can identify with.
***Note: If you did not use the entire work flow for Sales Operations, please ignore the Options.***
Selling Condition
##### In Uniq 365, this is the place where you indicate the Selling Condition if you intend to use it in Customer Sales Invoice as below:-(Optional)
[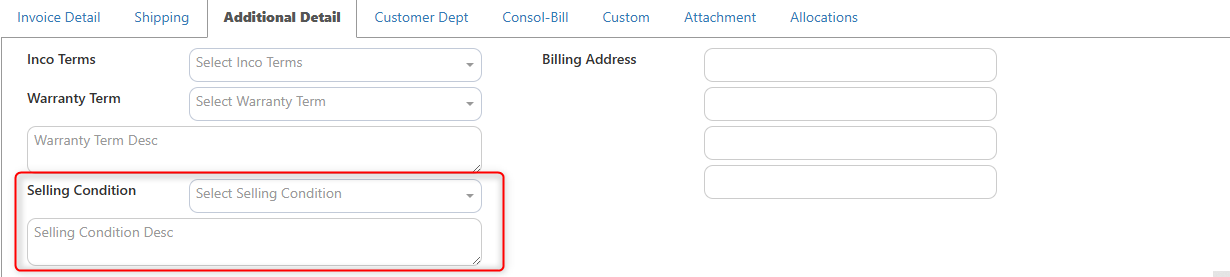](https://doc.uniq365.com/uploads/images/gallery/2025-01/rTSimage.png)
##### **How to Create Selling Condition?**
- Click on Sales – Customer Management – Selling Condition icon for the following screen.
Sales Order
##### The **Sales Order** at the Sales Operation Module screen will open the Sales Order screen as seen below. The Sales Order main function is to prepare a document to update the system that goods are on placement. No ledger postings will be made at this moment. Sales Order is denoted by transaction type “**CO**”.
**\_\_\_\_\_\_\_\_\_\_\_\_\_\_\_\_\_\_\_\_\_\_\_\_\_\_\_\_\_\_\_\_\_\_\_\_\_\_\_\_\_\_\_\_\_\_\_\_\_\_\_\_\_\_\_\_\_\_\_\_\_\_\_\_\_\_\_\_\_\_\_\_\_\_\_\_\_\_\_\_\_\_\_\_\_\_\_\_\_\_\_\_\_\_\_\_\_\_\_\_\_\_\_\_\_\_\_\_\_\_\_\_\_\_\_\_\_\_\_\_\_\_\_\_\_\_\_\_\_\_\_\_\_\_\_\_\_\_\_**
##### **How to set Customer Sales Order?**
1.Click on **SALES – SALES OPERATIONS – CUSTOMER SALES ORDER** for the screen below.
[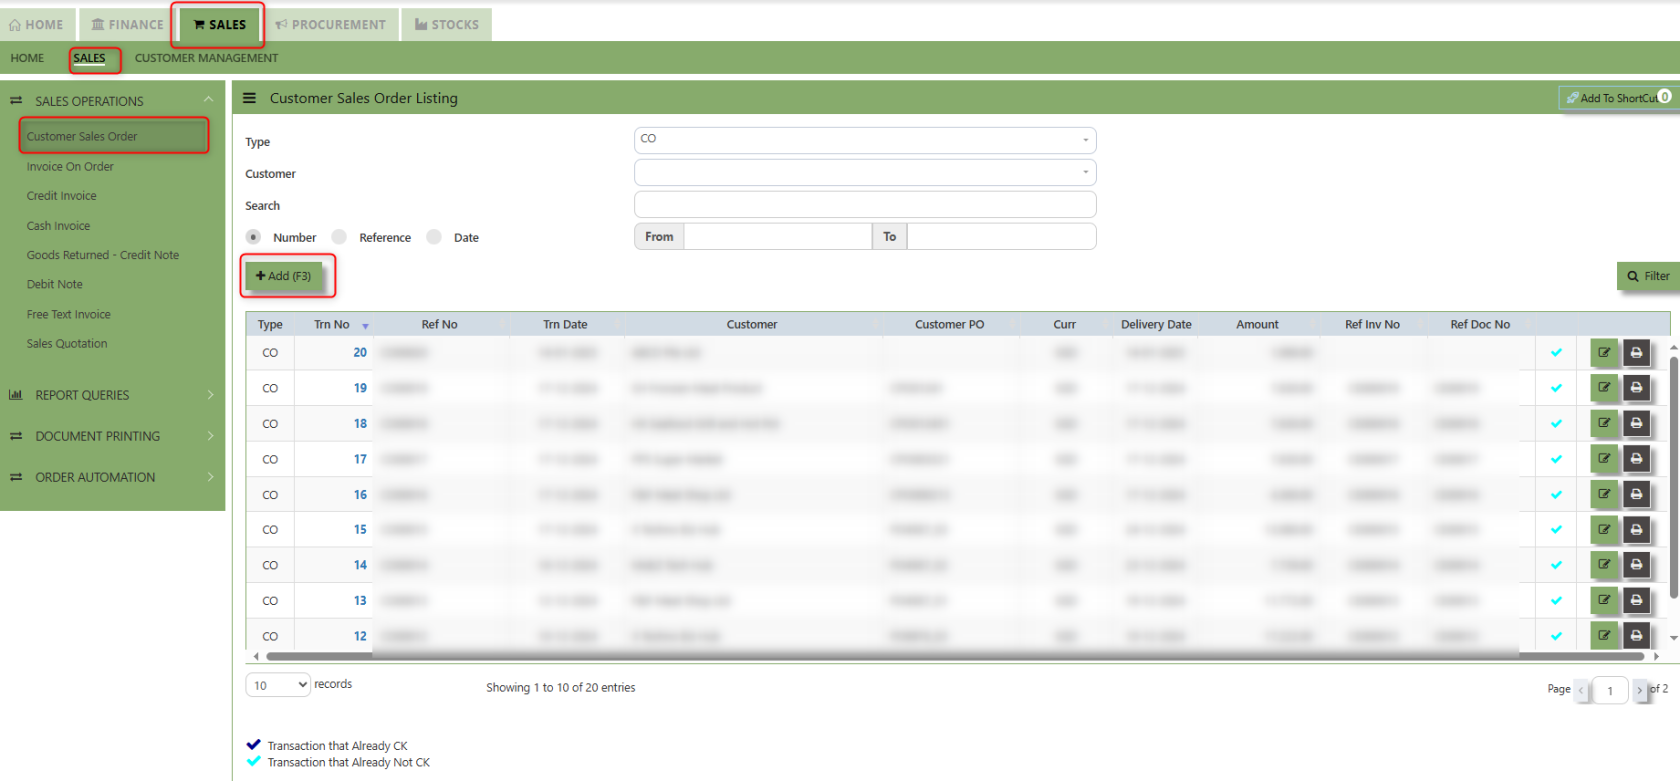](https://doc.uniq365.com/uploads/images/gallery/2025-01/3kcimage.png)
2\. Click on Add button or press F3 to create a new transaction.
[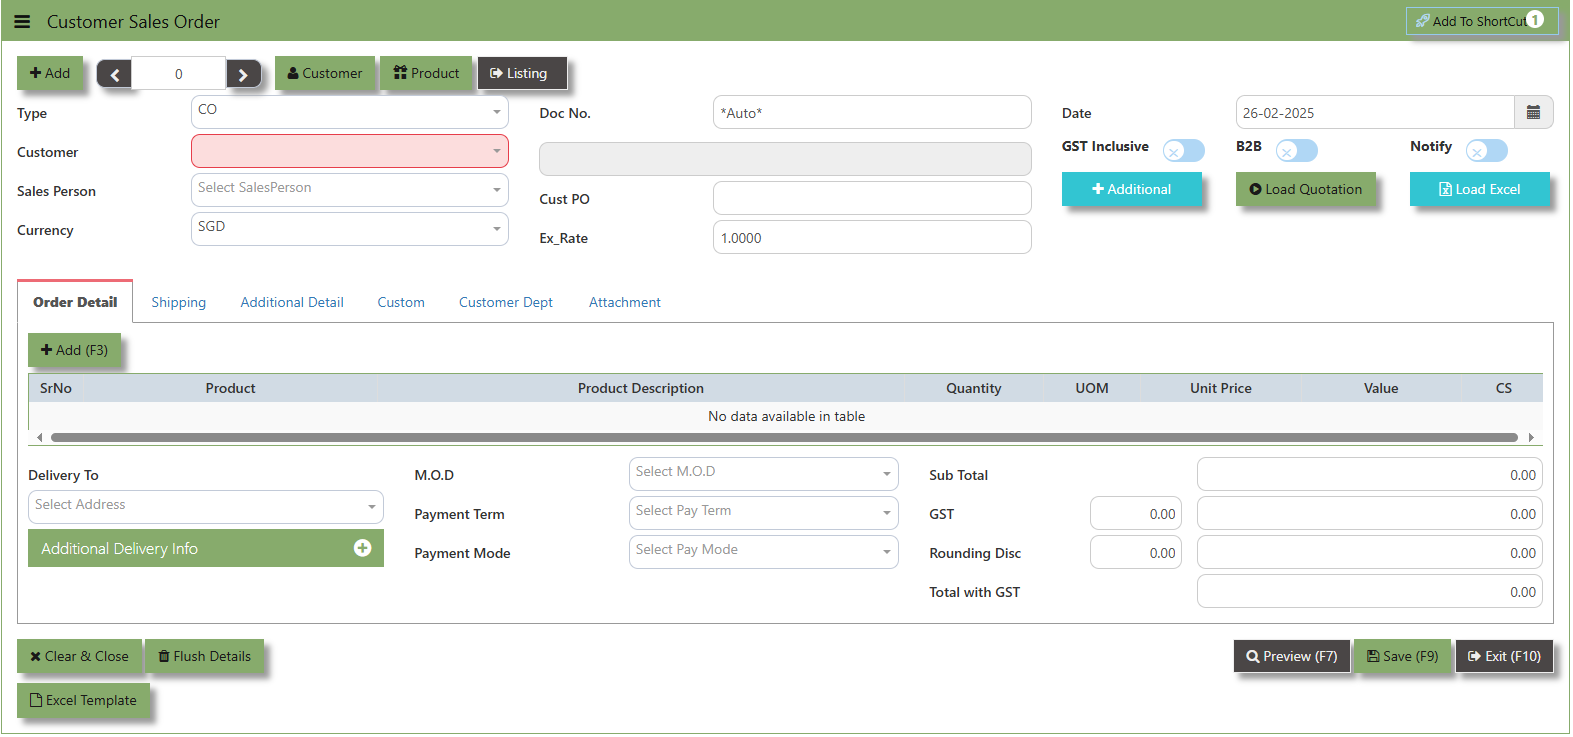](https://doc.uniq365.com/uploads/images/gallery/2025-02/5Hjimage.png)
3\. Click the Type - drop-down to select transaction type – CO (Sales Order).
4\. After the transaction type selection, you can use the tab button to go to the Ref No. column & Date fields.
5.Click Customer - drop-down to select Customer Name, followed by the Sales Person, PDS, Currency, Rate, Customer PO, Quotation, Delivery Date & Lead Time if applicable.
6.After all the header information has been entered, the user can go to the Order Detail section and select the product items for that transaction. Save the Sales Order transaction after it is completed.
\_\_\_\_\_\_\_\_\_\_\_\_\_\_\_\_\_\_\_\_\_\_\_\_\_\_\_\_\_\_\_\_\_\_\_\_\_\_\_\_\_\_\_\_\_\_\_\_\_\_\_\_\_\_\_\_\_\_\_\_\_\_\_\_\_\_\_\_\_\_\_\_\_\_\_\_\_\_\_\_\_\_\_\_\_\_\_\_\_\_\_\_\_\_\_\_\_\_\_\_\_\_\_\_\_\_\_\_\_\_\_\_\_\_\_\_\_\_\_\_\_\_\_\_\_\_\_\_\_\_\_\_\_\_\_\_\_\_\_
**Add to Shortcut -** Used to create a shortcut for quick access to a specific Sales Transaction . By clicking this button, users can add the current Sales Order to a list of shortcuts, allowing them to access the invoice or related functionality quickly and efficiently, without needing to search for it each time.
[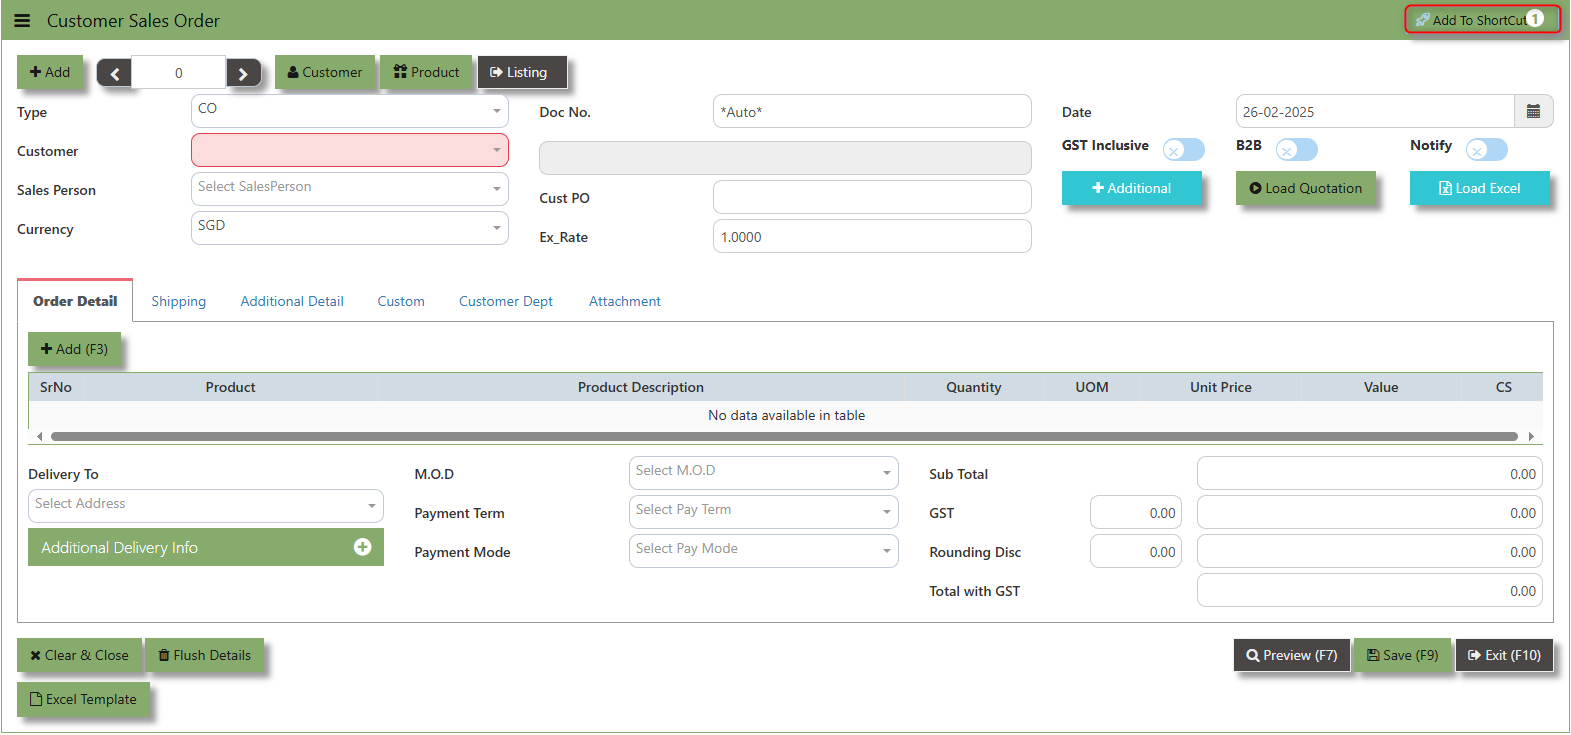](https://doc.uniq365.com/uploads/images/gallery/2025-02/CTBimage.png)
##### **How to use Add to ShortCut?**
1\. Click "**Add to ShortCut"** and system will open below windows:
[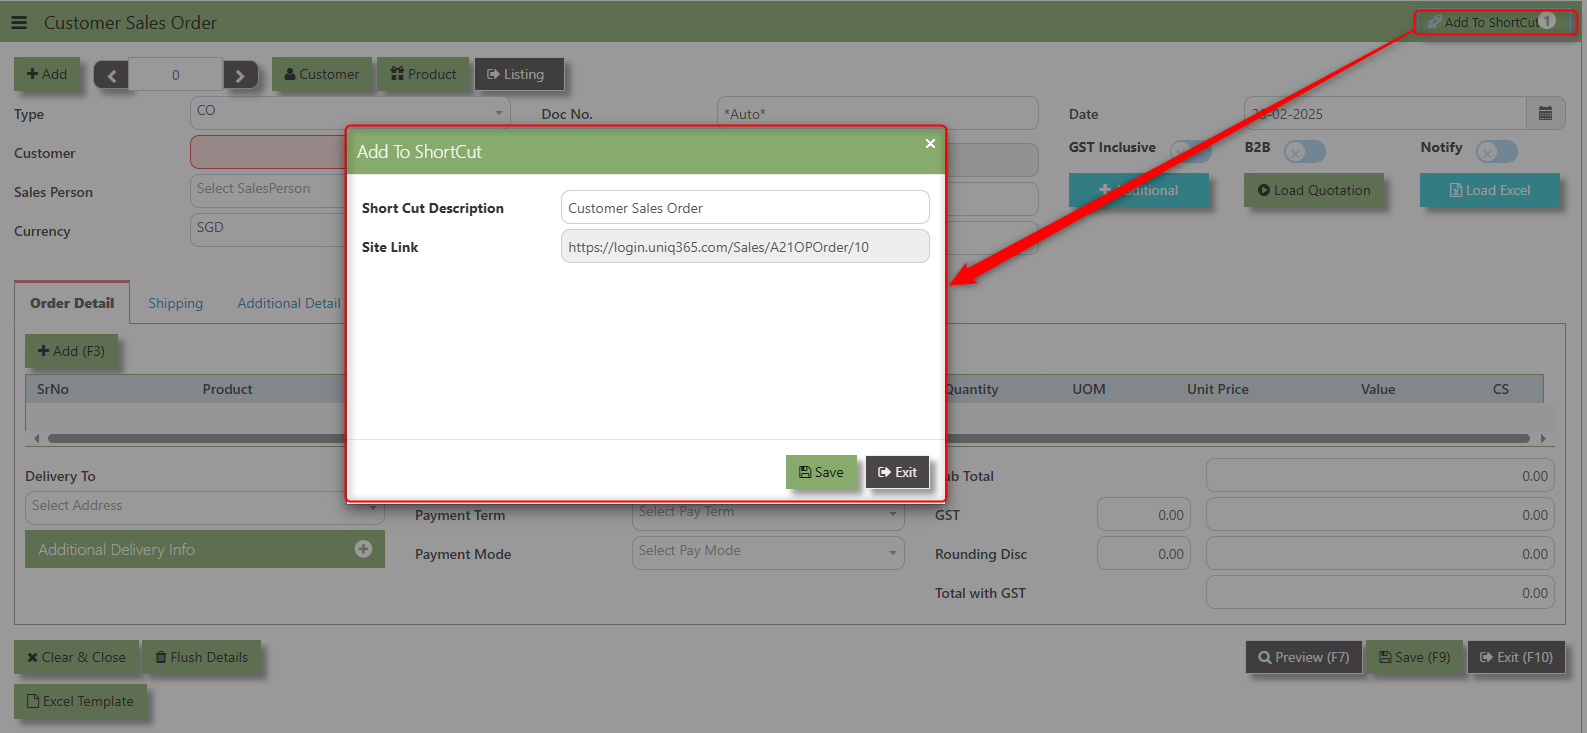](https://doc.uniq365.com/uploads/images/gallery/2025-02/Z2Yimage.png)
2\. Enter Short Cut Description
3\. Click SAVE then click OK.
4\. User may look to the Homepage for the added function or page. Click on HOME - HOME - SHORTCUT for the screen below.
[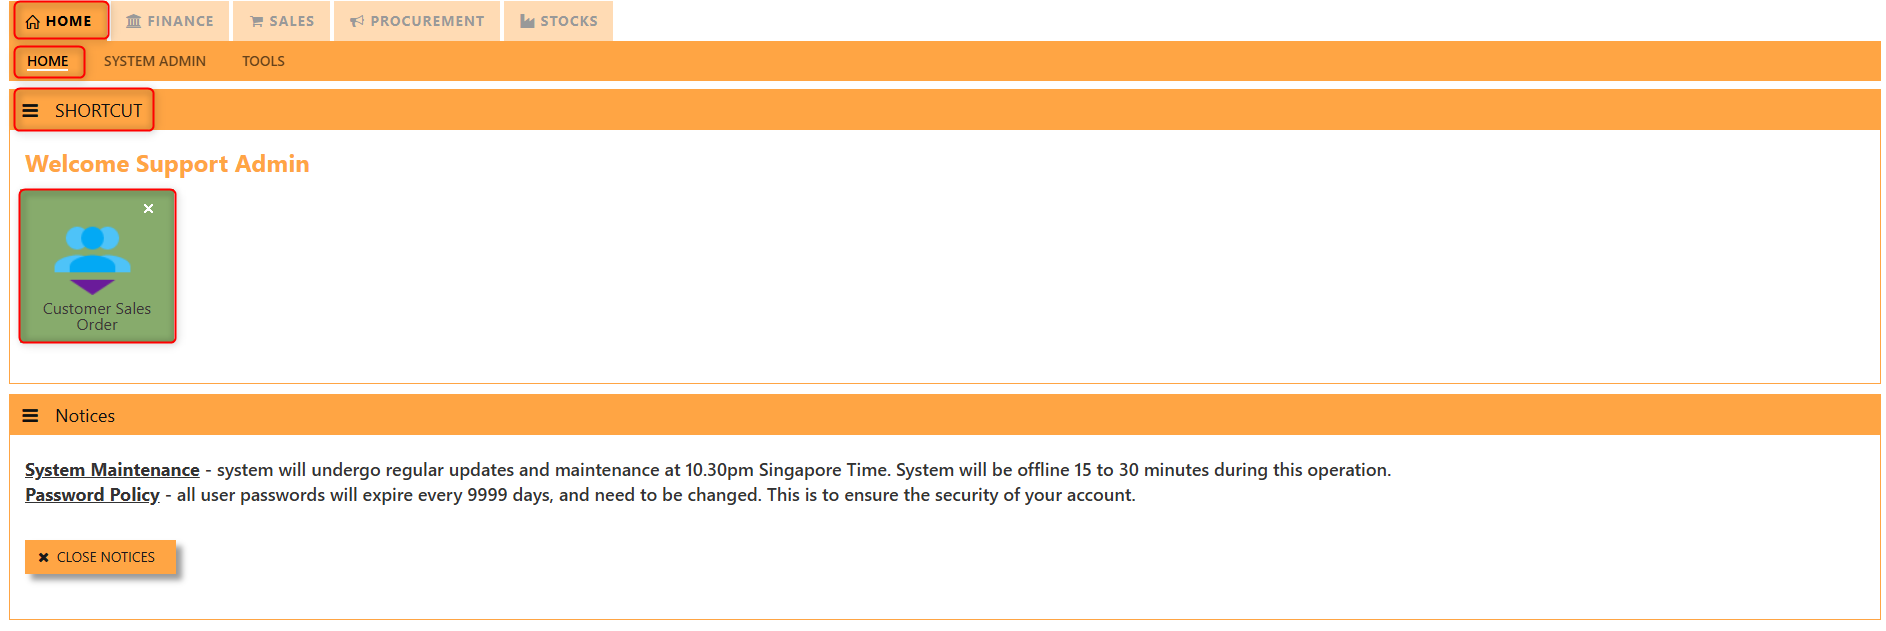](https://doc.uniq365.com/uploads/images/gallery/2025-02/U5cimage.png)
\_\_\_\_\_\_\_\_\_\_\_\_\_\_\_\_\_\_\_\_\_\_\_\_\_\_\_\_\_\_\_\_\_\_\_\_\_\_\_\_\_\_\_\_\_\_\_\_\_\_\_\_\_\_\_\_\_\_\_\_\_\_\_\_\_\_\_\_\_\_\_\_\_\_\_\_\_\_\_\_\_\_\_\_\_\_\_\_\_\_\_\_\_\_\_\_\_\_\_\_\_\_\_\_\_\_\_\_\_\_\_\_\_\_\_\_\_\_\_\_\_\_\_\_\_\_\_\_\_\_\_\_\_\_\_\_\_\_\_
The **Customer** button provides quick access to detailed supplier profiles under Customer maintenance.
[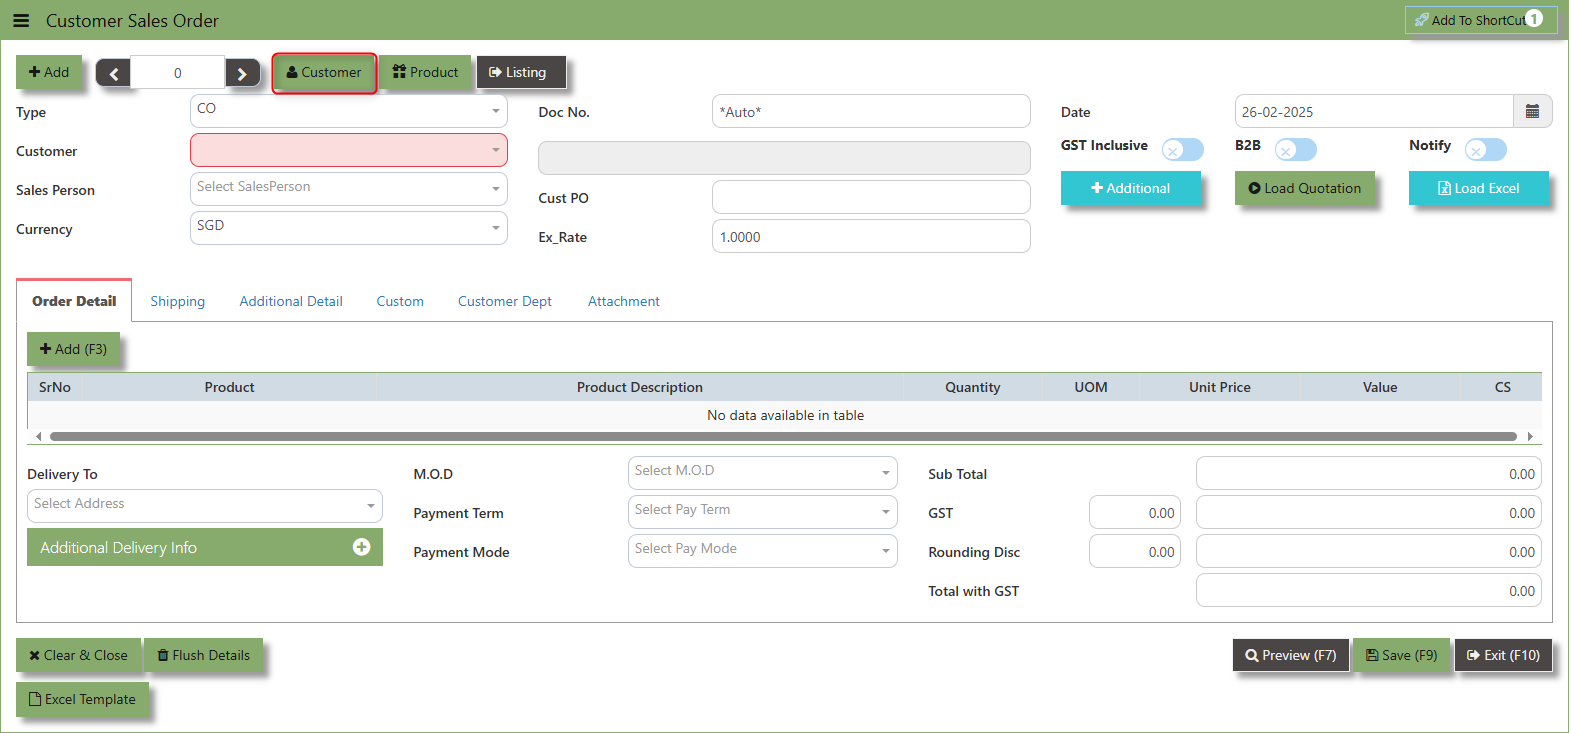](https://doc.uniq365.com/uploads/images/gallery/2025-02/0Primage.png)
The **Product** button provides quick access to product and service maintenance.
[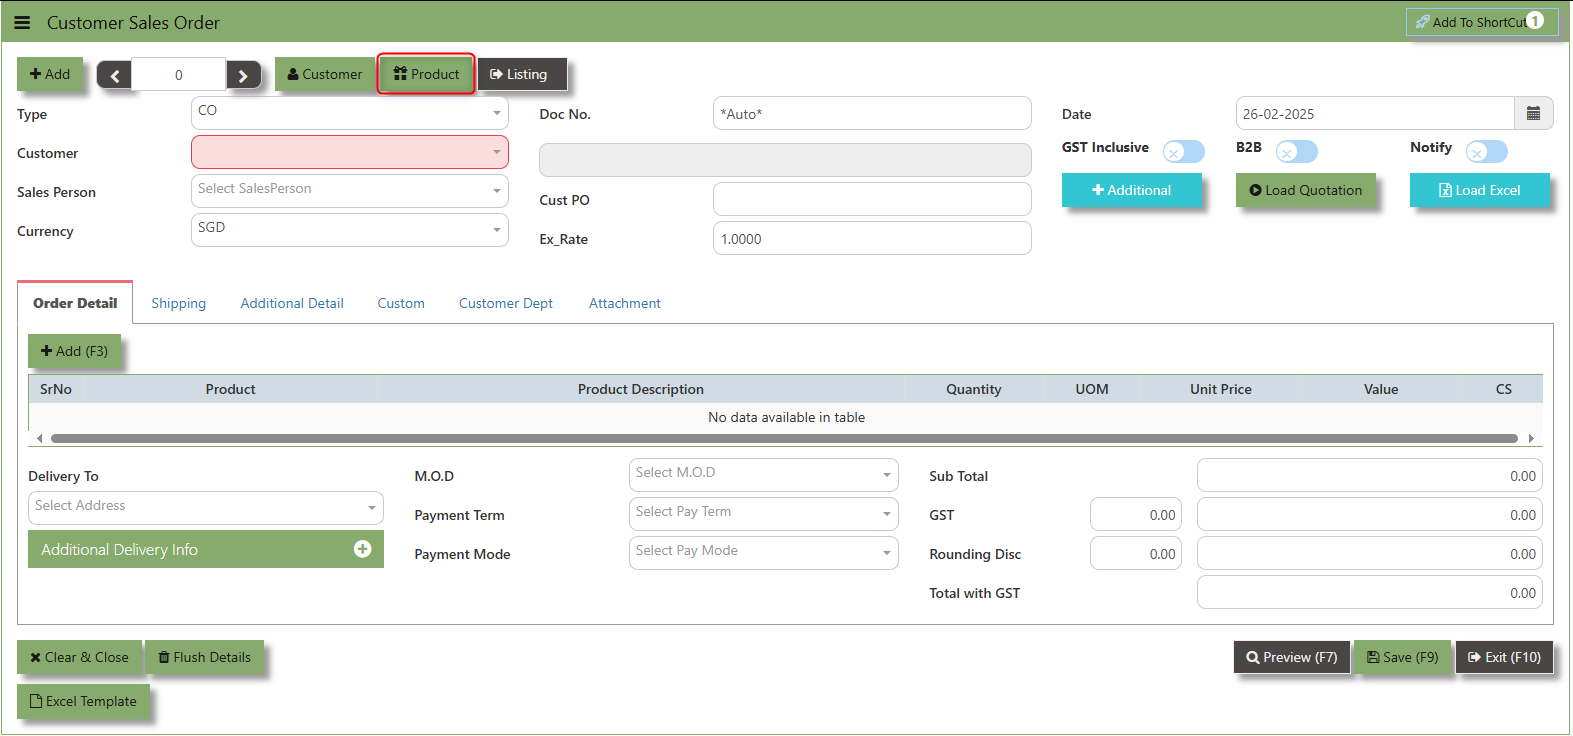](https://doc.uniq365.com/uploads/images/gallery/2025-02/kfPimage.png)
The **GST Inclusive** checkbox indicates whether the unit price in the CO include **Goods and Services Tax (GST)** or not.
[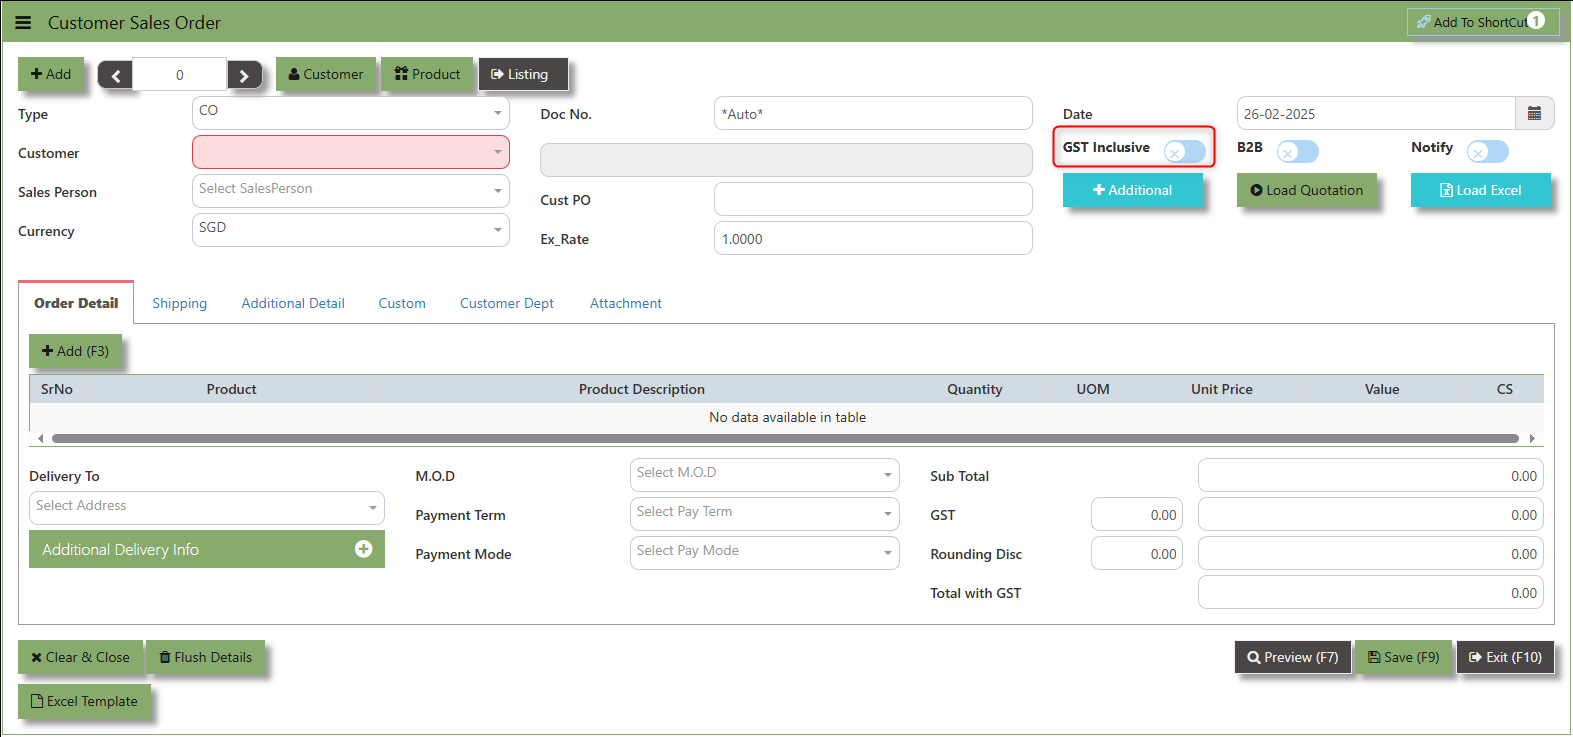](https://doc.uniq365.com/uploads/images/gallery/2025-02/fF0image.png)
- **When ticked (GST Inclusive)**: provided in the Sales Order already includes the applicable GST amount. The GST amount will not be calculated or displayed separately, as it's already accounted for in the quoted price.
- **When not ticked (GST Exclusive)**: The unit **price** is considered exclusive of GST. The system will calculate and add the GST based on the applicable tax rate, and the final total will be the sum of the base price plus the GST amount.
The **"B2B order"** is which specific sales order demand triggers supply creation and a link is established between the sales order and the supply.
[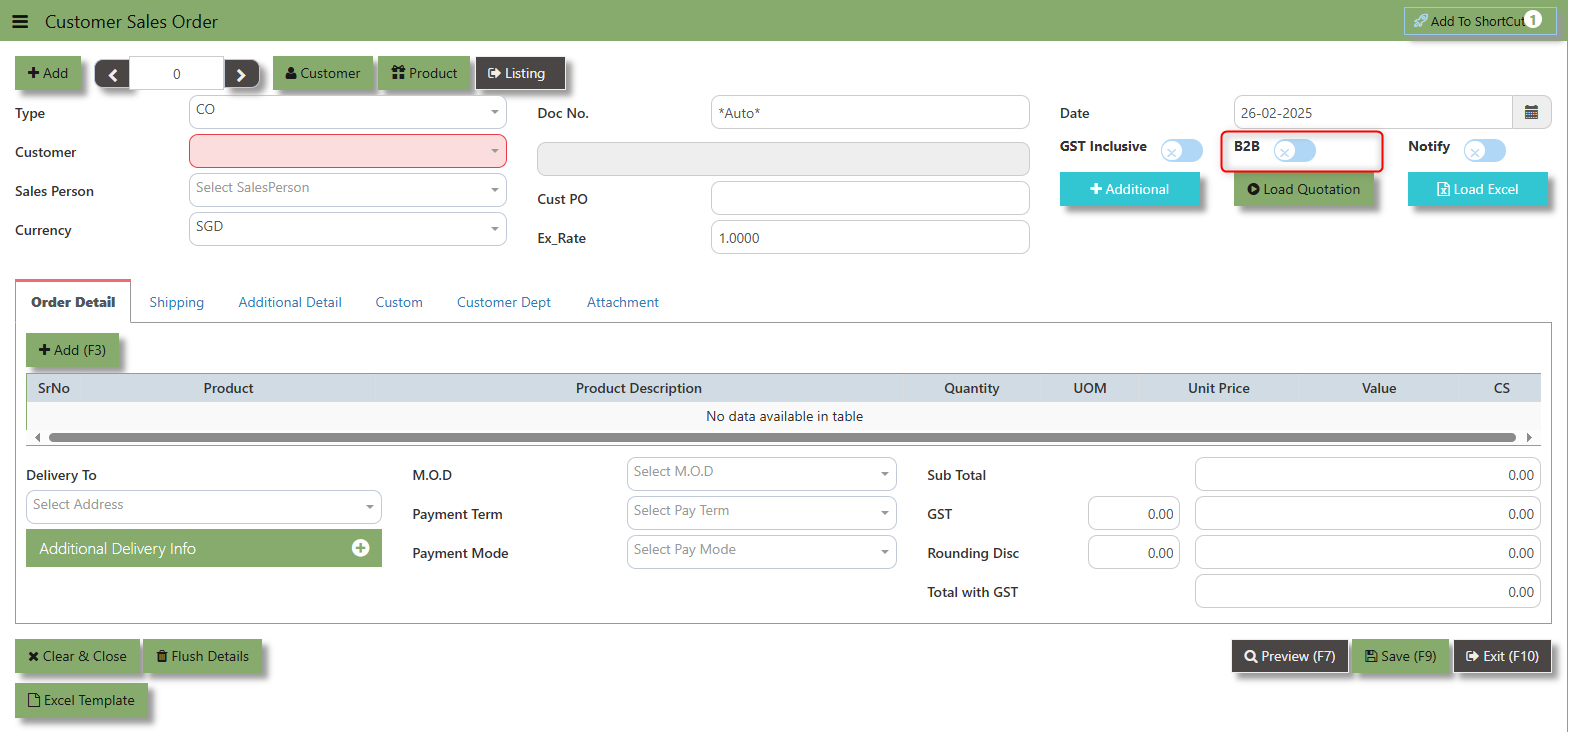](https://doc.uniq365.com/uploads/images/gallery/2025-02/Zavimage.png)
**Additional Header Info** button is typically used to capture and manage additional information related to the sales order at the header level (i.e., Delivery date, Del Term , Indicative WH , Country, Lead Time, Contact, PDSU, Narration and Transaction Narration). This feature allows users to add extra data or notes that are relevant to the entire sales order.
[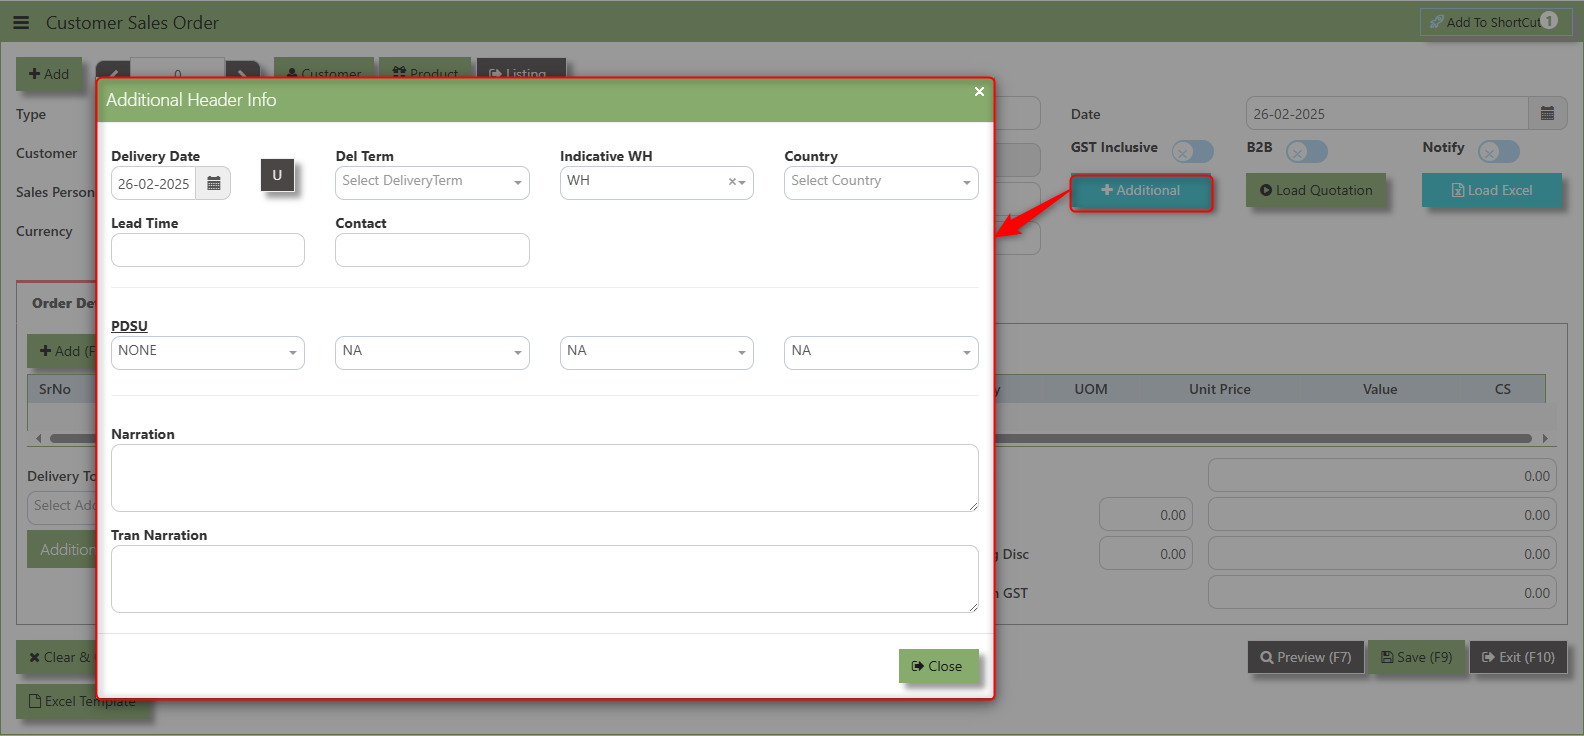](https://doc.uniq365.com/uploads/images/gallery/2025-02/Turimage.png)
**Excel Template** - The button allows users to download a pre-configured Excel template for entering or importing data related to the sales order. The template is usually formatted to match the system's required structure for Sales orders, ensuring consistency and data accuracy.
[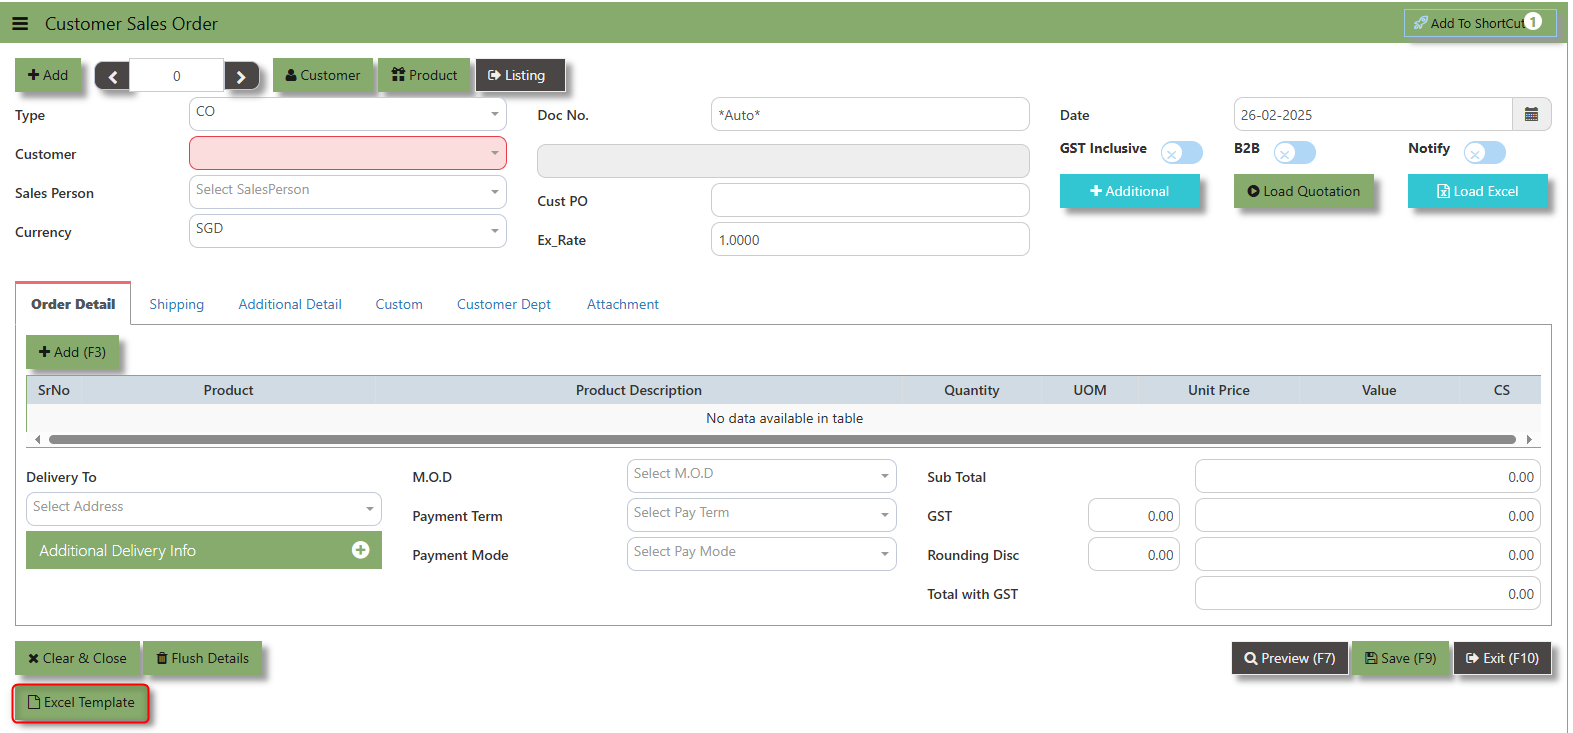](https://doc.uniq365.com/uploads/images/gallery/2025-02/65Iimage.png)
**Load Excel** - When users have an Excel file from Excel Template with Sales order information (ie Warehouse, Product, Pname, UOM, Quantity, Unit Price, GST type, Line Discount, Detail Memo) the **"Load Excel"** button allows them to upload and import this data directly into the system. This eliminates the need for manual entry of the data into the system's Sales order fields.
[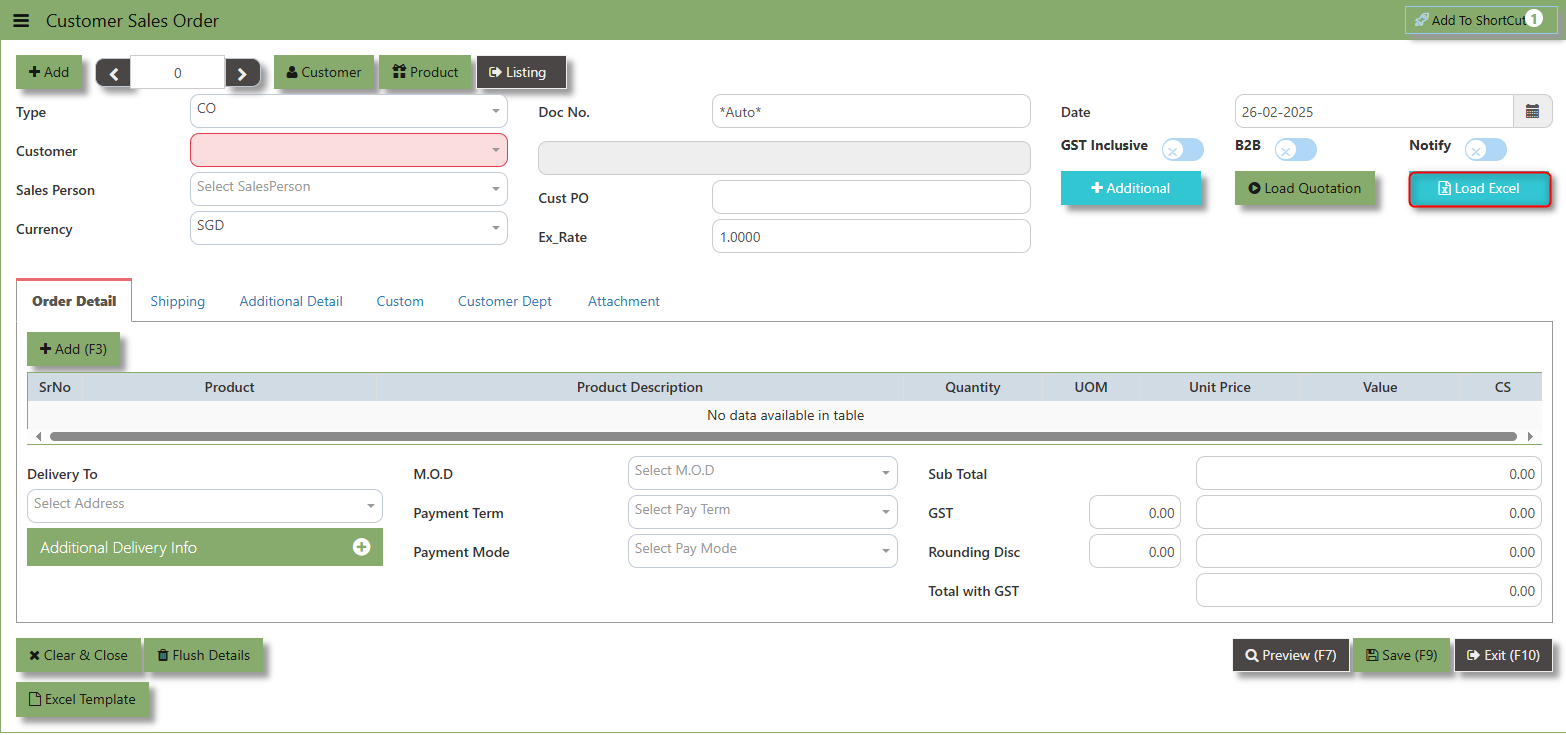](https://doc.uniq365.com/uploads/images/gallery/2025-02/3F6image.png)
##### **How to use Load Excel?**
1\. Click the Customer - drop-down list to select Customer Name
[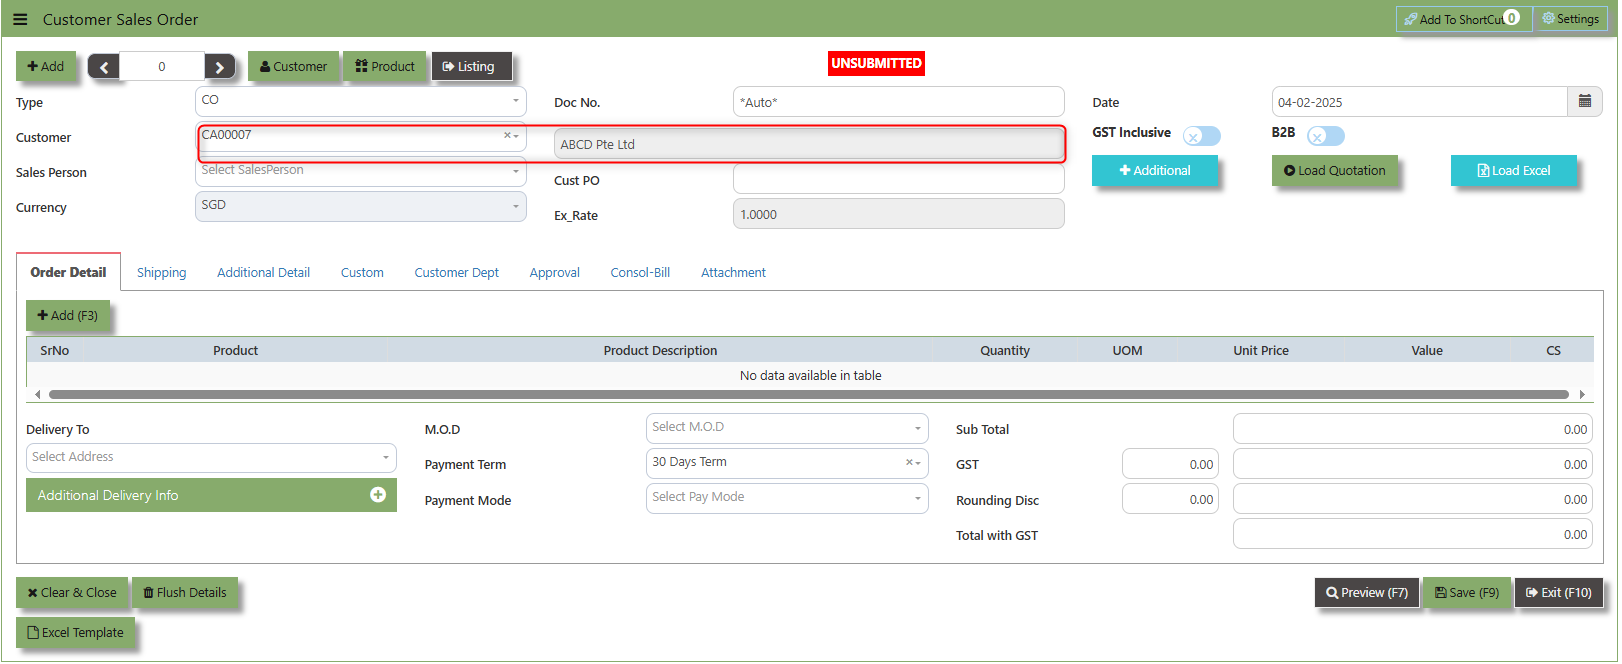](https://doc.uniq365.com/uploads/images/gallery/2025-02/Wtjimage.png)
2\. Download the Excel Template and ensure the Excel file you plan to upload is formatted correctly. It should contain all the necessary fields required for sales order, such as:
- Warehouse
- Product Code
- Product Name
- UOM
- Quantity
- Unit Price
- GST Type
- Line Discount 1, 2 & 3
- Detail Memo
- Item Delivery Date
- Alias UOM Detail 1 & 2
- Item Delivery Date
[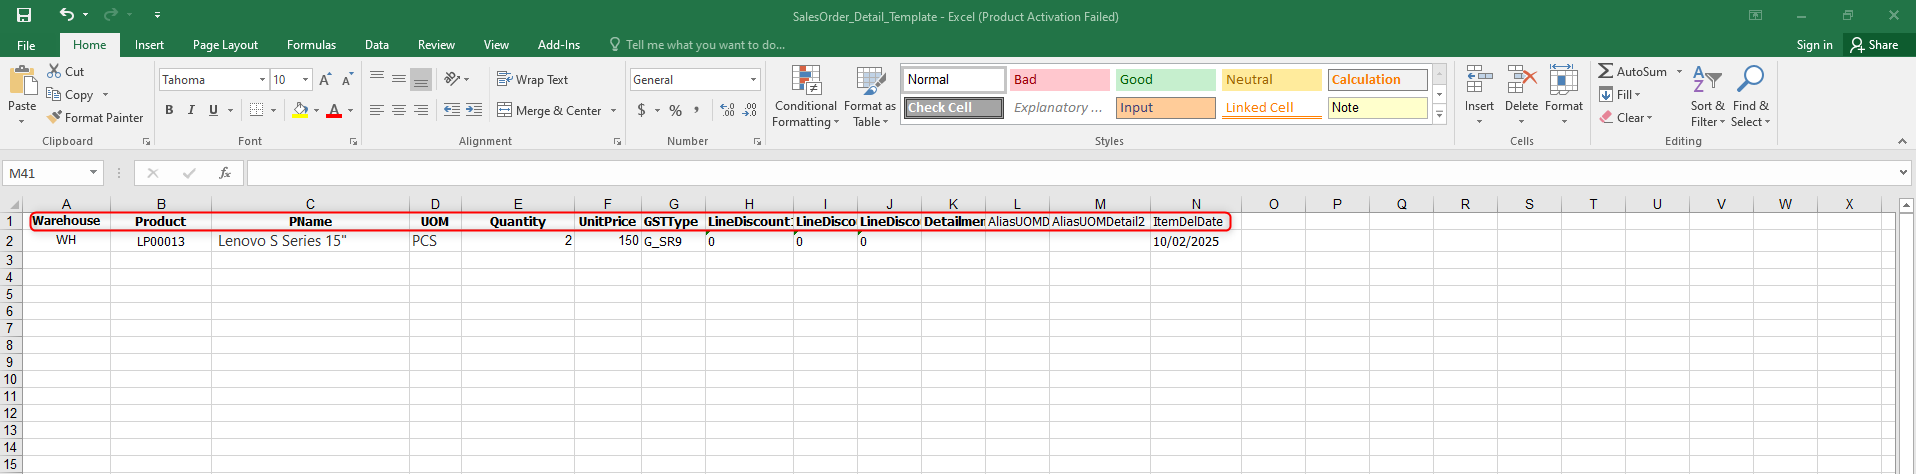](https://doc.uniq365.com/uploads/images/gallery/2025-02/7PZimage.png)
3\. Click the **Load Excel** button to open the file upload interface. This may open a file browser or prompt you to select the Excel file you want to upload.
[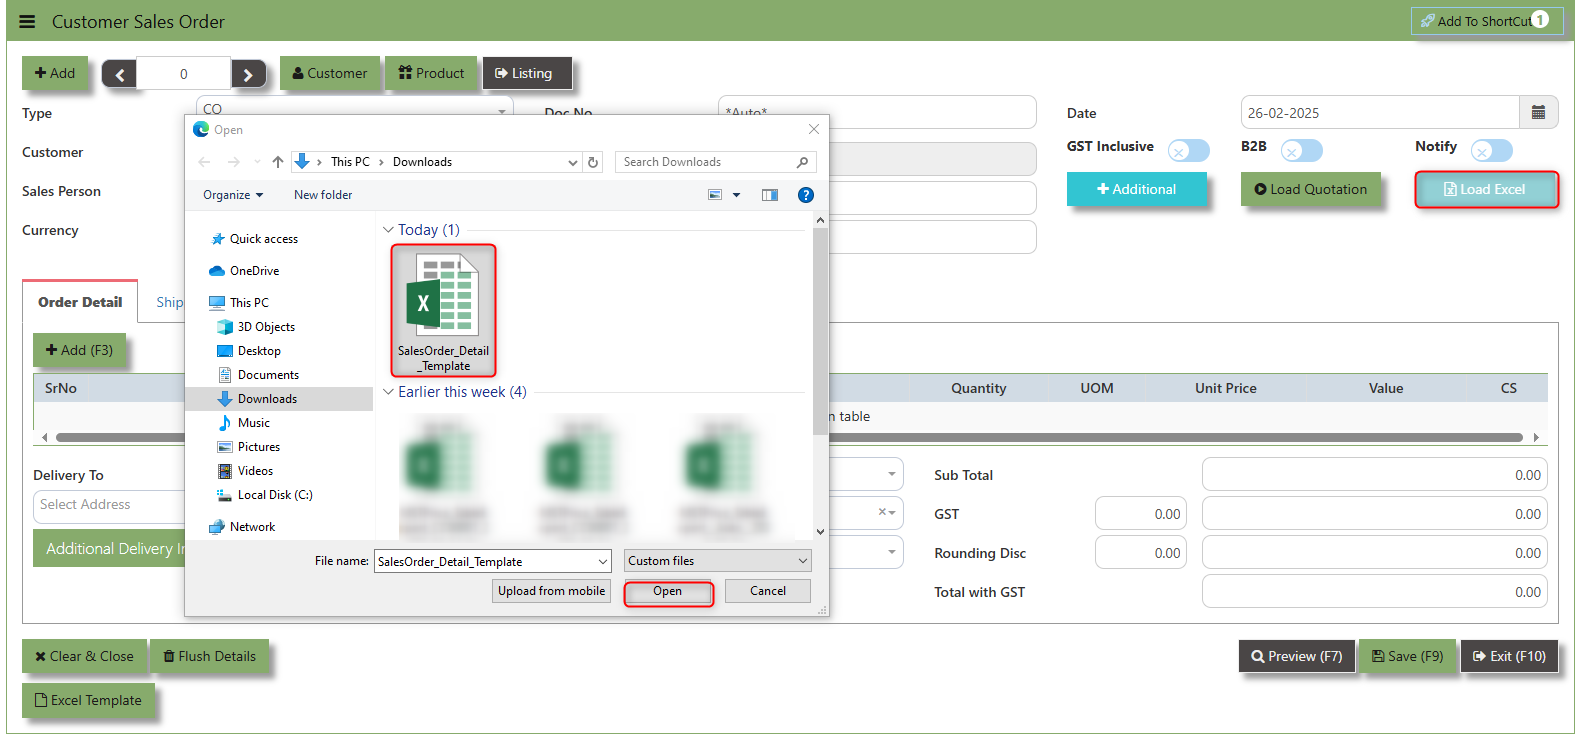](https://doc.uniq365.com/uploads/images/gallery/2025-02/shcimage.png)
4\. Once the filed uploaded, system will prompt a message that record has been imported successfully
[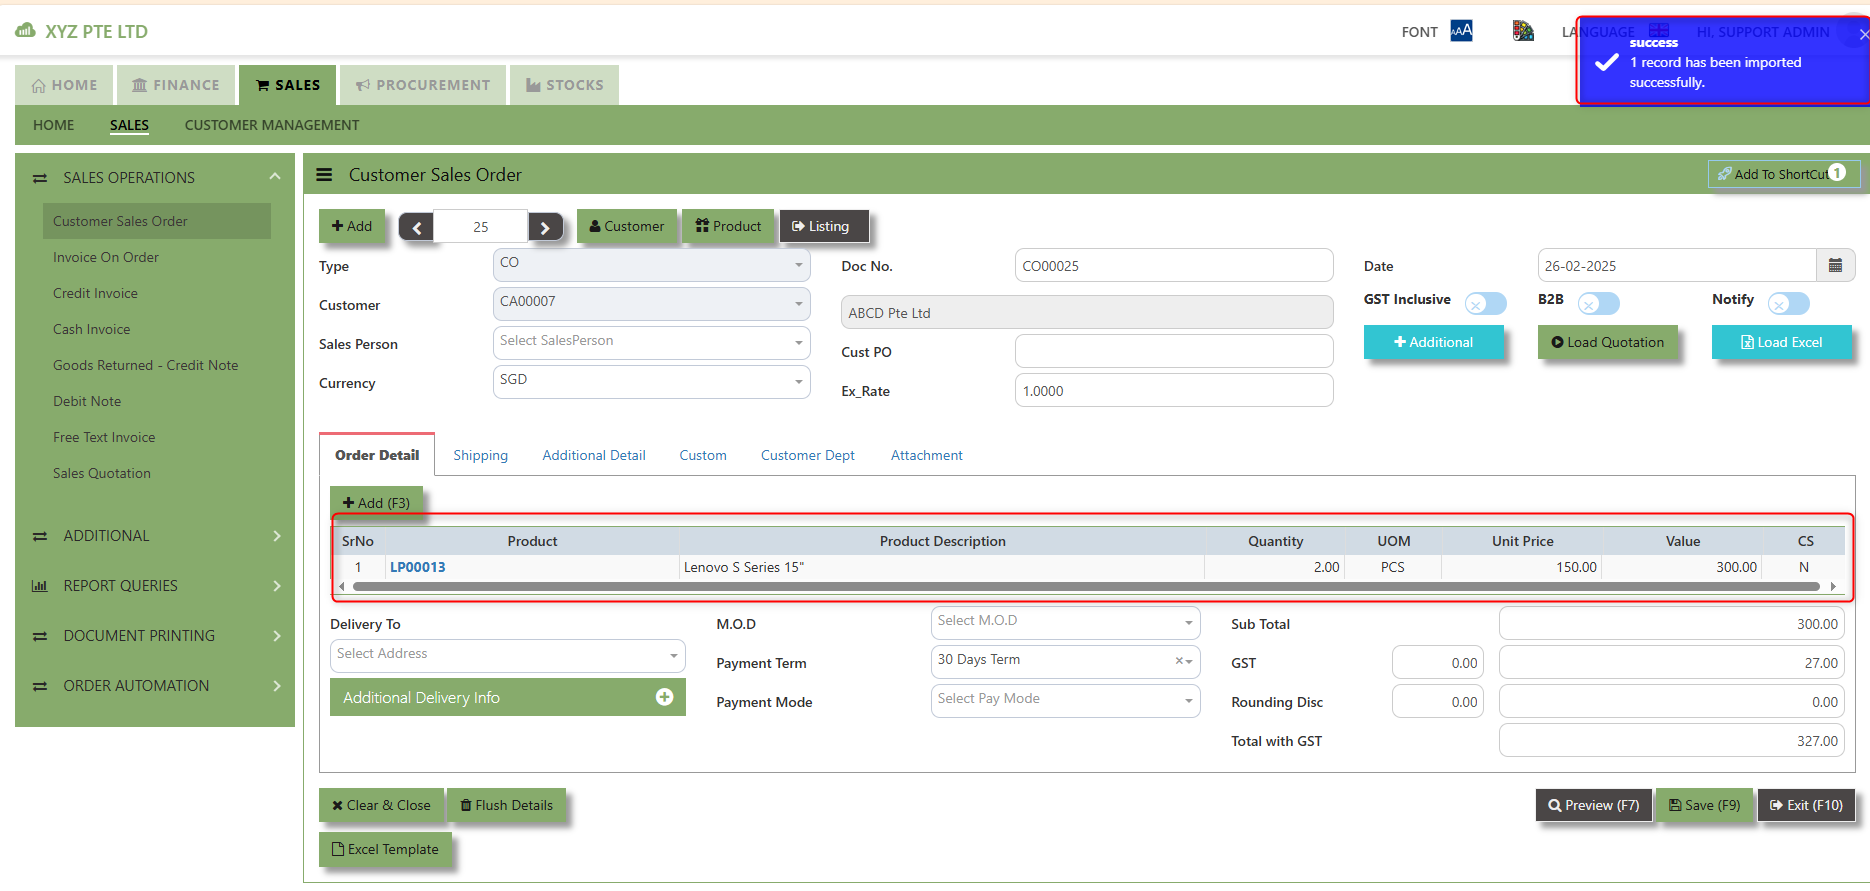](https://doc.uniq365.com/uploads/images/gallery/2025-02/KUDimage.png)
5\. After the import is complete, review the imported sales order in the system to ensure everything has been transferred correctly. This might include checking that the order details, such as item descriptions, quantities, prices, and suppliers, are accurate.
6\. Once the data is imported successfully and checking is done, you can proceed to **save** the sales order as required by your workflow. This may involve further approvals or other processes depending on the organization's procedures.
\_\_\_\_\_\_\_\_\_\_\_\_\_\_\_\_\_\_\_\_\_\_\_\_\_\_\_\_\_\_\_\_\_\_\_\_\_\_\_\_\_\_\_\_\_\_\_\_\_\_\_\_\_\_\_\_\_\_\_\_\_\_\_\_\_\_\_\_\_\_\_\_\_\_\_\_\_\_\_\_\_\_\_\_\_\_\_\_\_\_\_\_\_\_\_\_\_\_\_\_\_\_\_\_\_\_\_\_\_\_\_\_\_\_\_\_\_\_\_\_\_\_\_\_\_\_\_\_\_\_\_\_\_\_\_\_\_\_\_
Load Quotation - When users already done Sales Quotation the **"Load Quotation"** button allows them to load the sales quotation directly into the Sales order. This eliminates the need for manual entry of the data into the system's Sales order fields.
[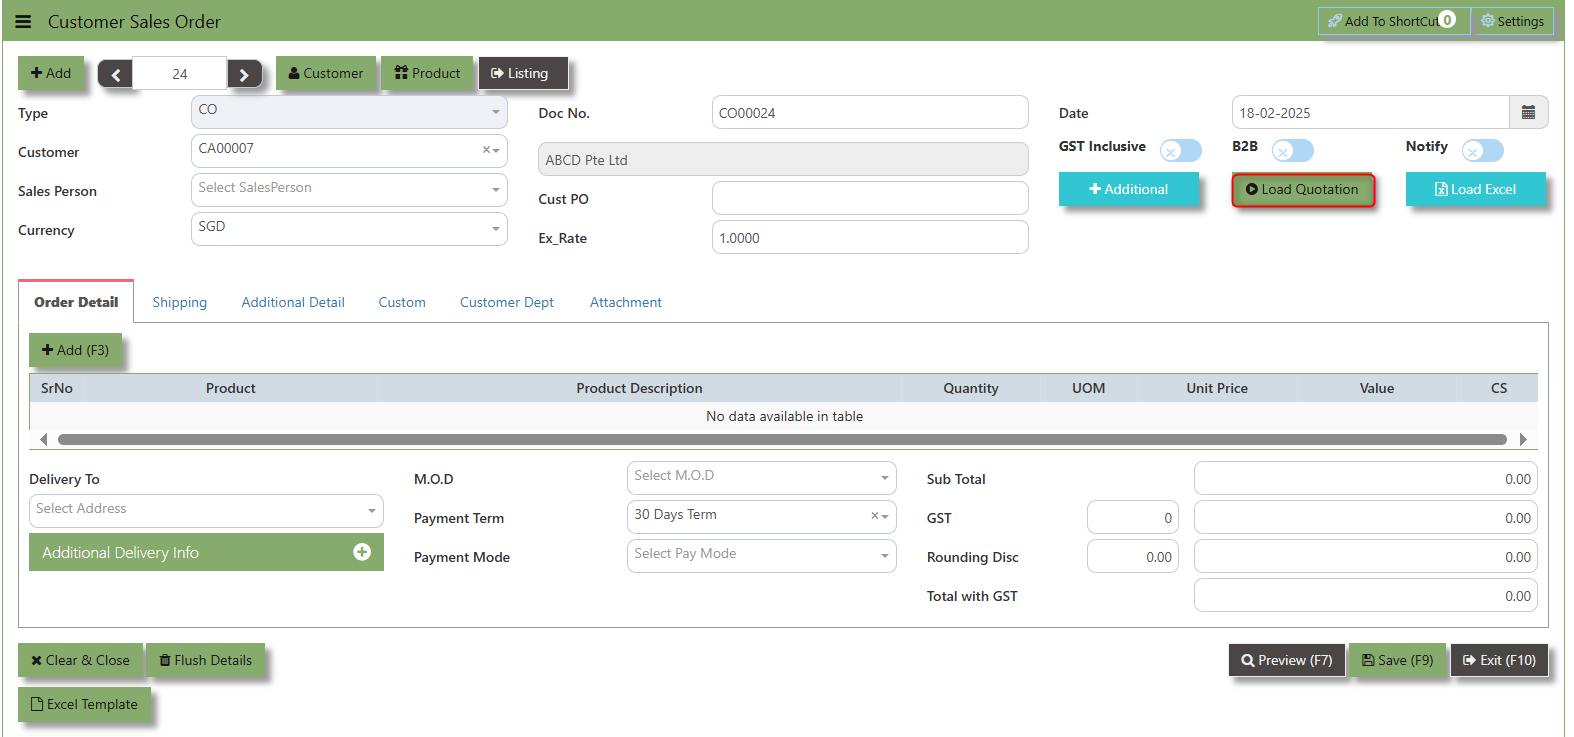](https://doc.uniq365.com/uploads/images/gallery/2025-02/fY3image.png)
How to use Load Quotation?
1.Click the Supplier - drop-down list to select Customer Name
[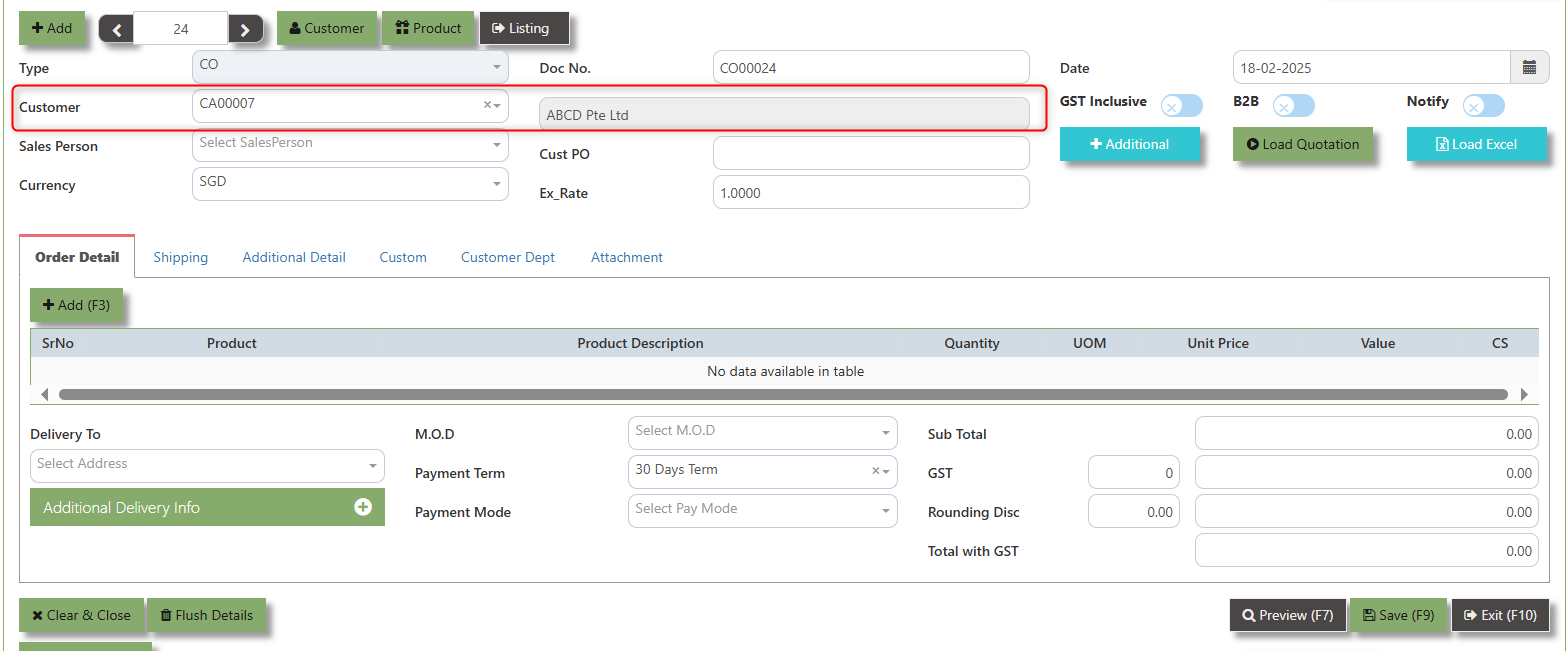](https://doc.uniq365.com/uploads/images/gallery/2025-02/dSoimage.png)
2\. Click the Load Quotation Button, select the Type and the Trn No of the sales quotation and click the diskette icon.
[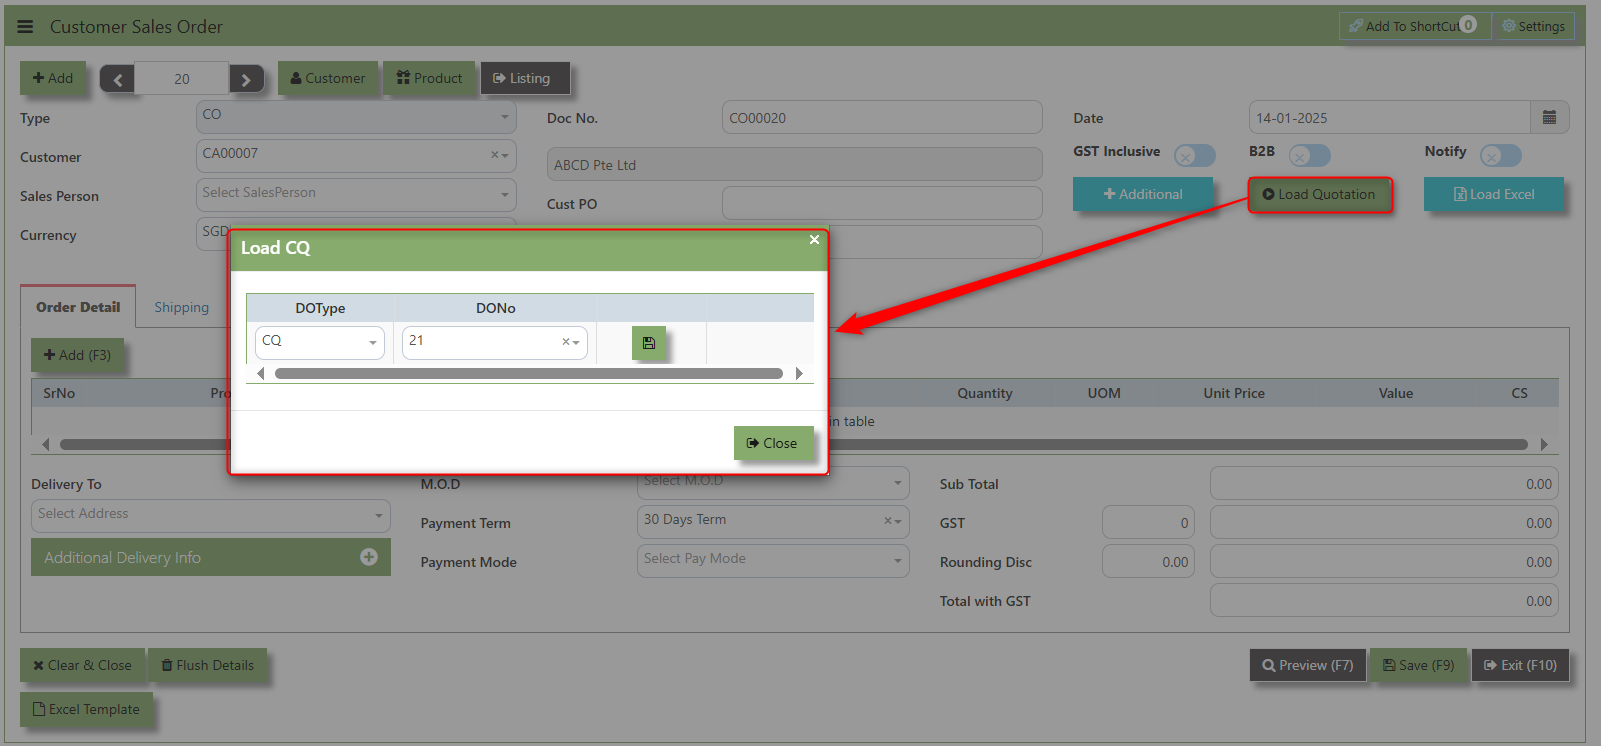](https://doc.uniq365.com/uploads/images/gallery/2025-02/Hh5image.png)
2\. Click the L Icon button to load the Transactions details of the Sales Quotation
[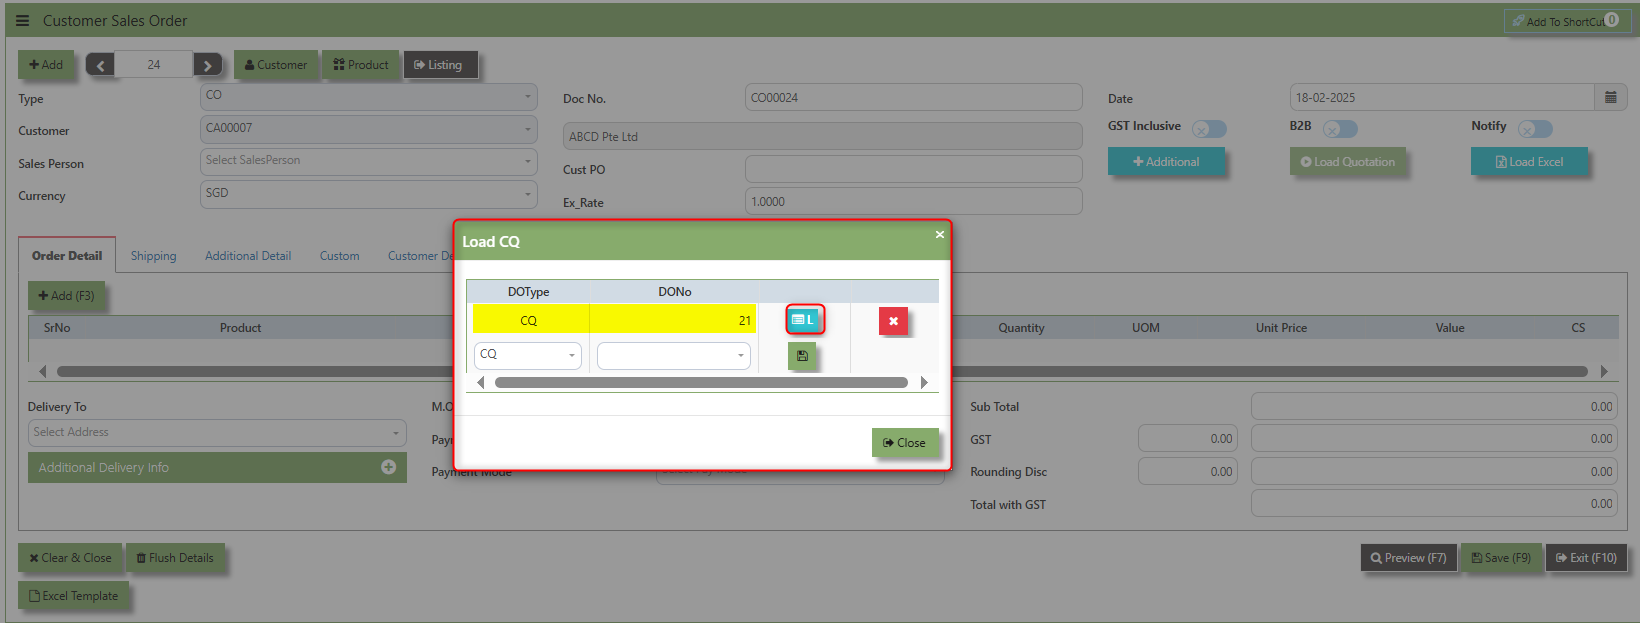](https://doc.uniq365.com/uploads/images/gallery/2025-02/F3Limage.png)
3.Once the Sales Quotation is loaded, system will prompt a message that the Data successfully loaded.
[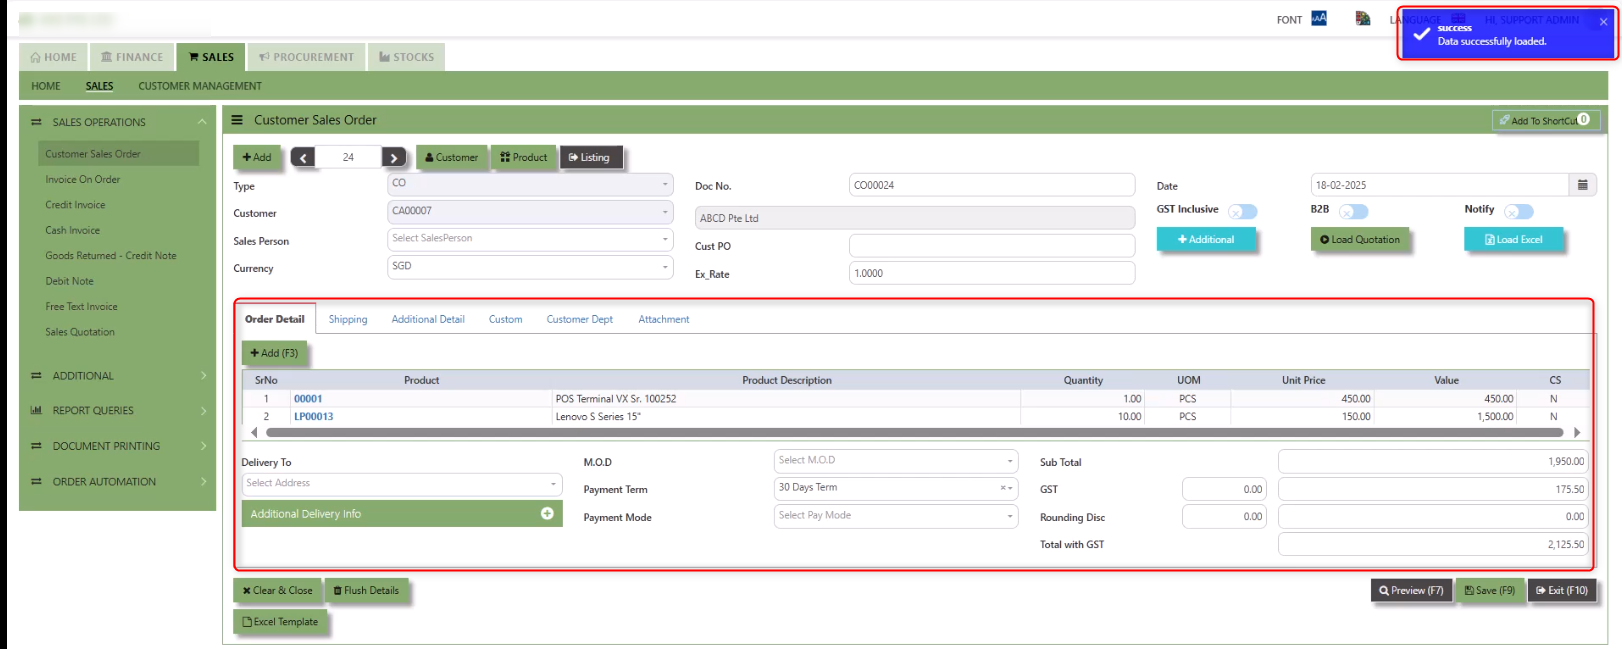](https://doc.uniq365.com/uploads/images/gallery/2025-02/ssHimage.png)
\_\_\_\_\_\_\_\_\_\_\_\_\_\_\_\_\_\_\_\_\_\_\_\_\_\_\_\_\_\_\_\_\_\_\_\_\_\_\_\_\_\_\_\_\_\_\_\_\_\_\_\_\_\_\_\_\_\_\_\_\_\_\_\_\_\_\_\_\_\_\_\_\_\_\_\_\_\_\_\_\_\_\_\_\_\_\_\_\_\_\_\_\_\_\_\_\_\_\_\_\_\_\_\_\_\_\_\_\_\_\_\_\_\_\_\_\_\_\_\_\_\_\_\_\_\_\_\_\_\_\_\_\_\_\_\_\_\_\_
**Shipping Tab** a section where specific shipping-related information is entered and managed for the sold goods or services. This tab ensures that all relevant details regarding the shipment, delivery location, and delivery expectations are captured in the system to facilitate smooth and accurate order fulfillment.
##### **How to set Shipping Info?**
1\. Click on SALES – SALES OPERATIONS – CUSTOMER SALES ORDER - SHIPPING TAB for the screen below.
[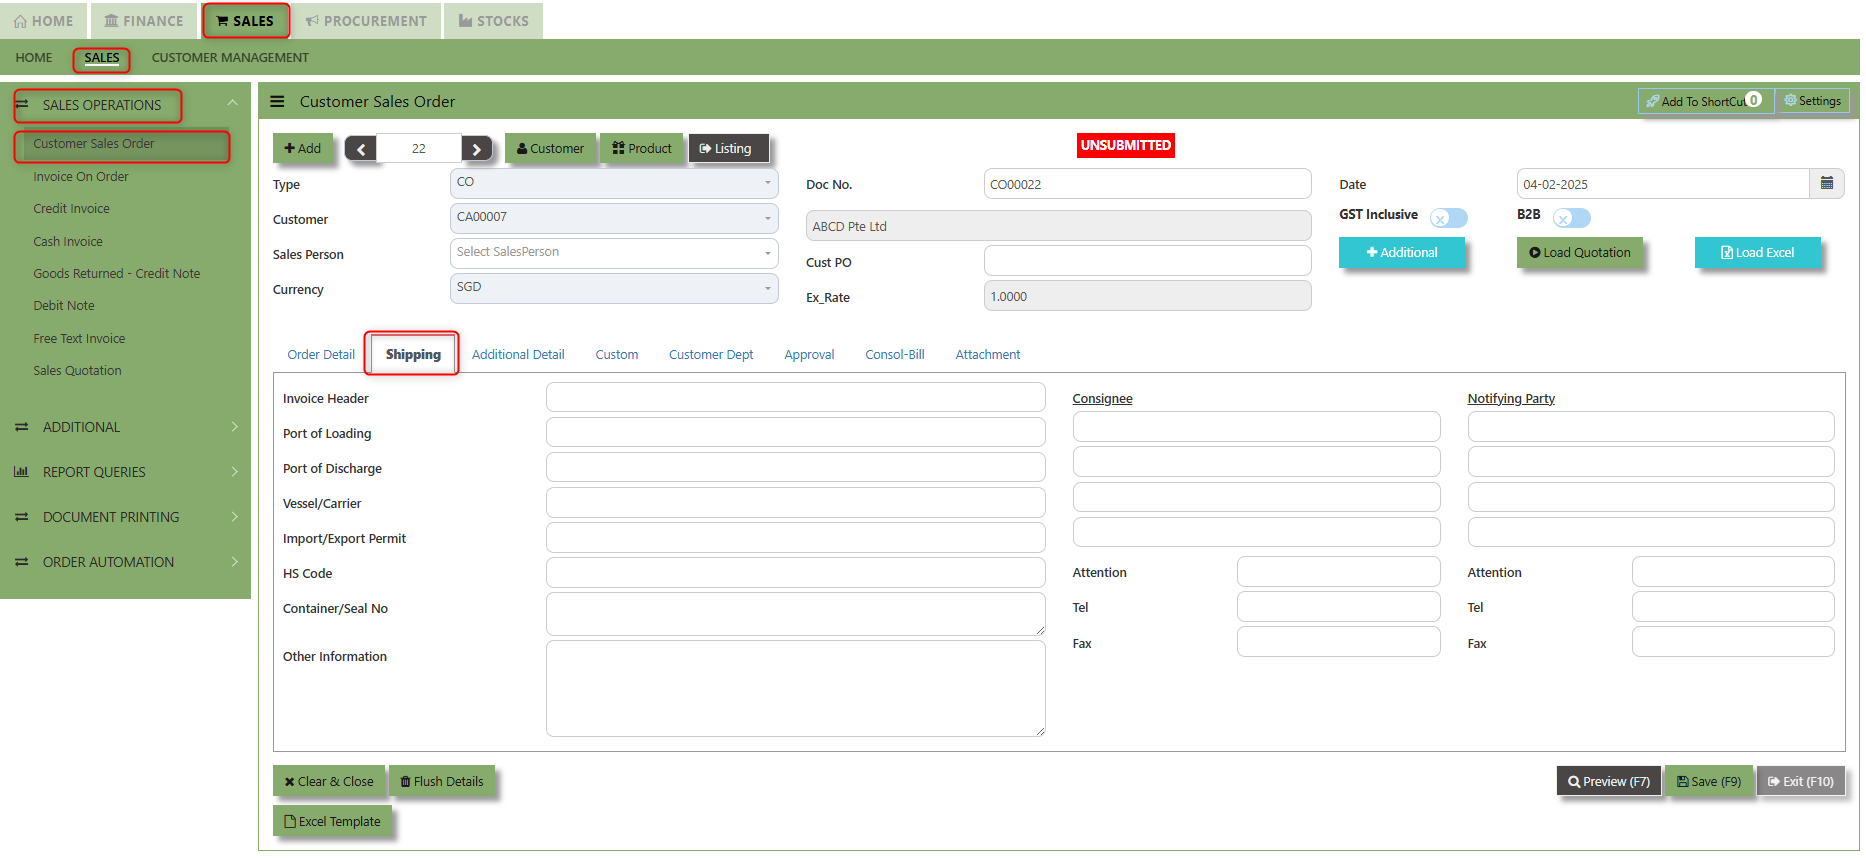](https://doc.uniq365.com/uploads/images/gallery/2025-02/HChimage.png)
2\. Input the below details for the below fields:
- - Invoice Header
- Port of Loading
- Port of Discharge
- Vessel/Carrier
- Import/Export Permit
- HS Code
- Container/Seal No
- Other Information
- Consignee
- Attention
- Tel
- Fax
- Notifying Party
- Attention
- Tel
- Fax
3\. Once keyed in the necessary details, click the next tab and will automatically save all the information then system will prompt you a message.
[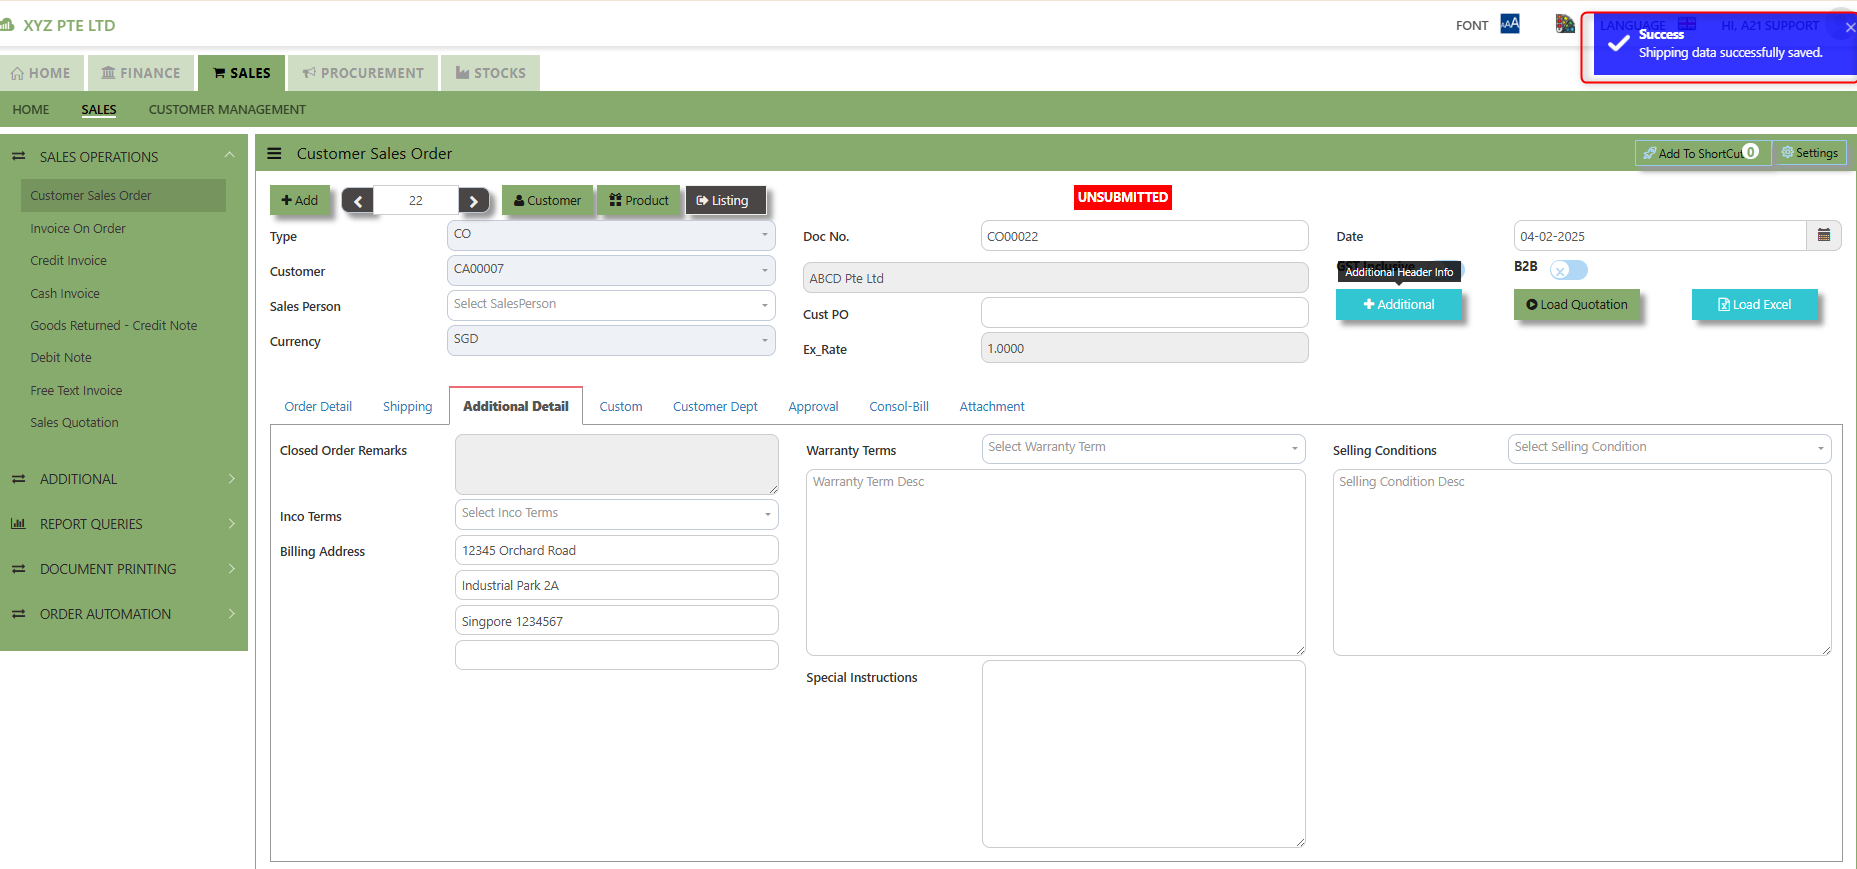](https://doc.uniq365.com/uploads/images/gallery/2025-02/8N3image.png)
\_\_\_\_\_\_\_\_\_\_\_\_\_\_\_\_\_\_\_\_\_\_\_\_\_\_\_\_\_\_\_\_\_\_\_\_\_\_\_\_\_\_\_\_\_\_\_\_\_\_\_\_\_\_\_\_\_\_\_\_\_\_\_\_\_\_\_\_\_\_\_\_\_\_\_\_\_\_\_\_\_\_\_\_\_\_\_\_\_\_\_\_\_\_\_\_\_\_\_\_\_\_\_\_\_\_\_\_\_\_\_\_\_\_\_\_\_\_\_\_\_\_\_\_\_\_\_\_\_\_\_\_\_\_\_\_\_\_\_
**Additional Detail Tab** a section where the additional information is entered and managed for the sold goods or services. This tab ensures that all relevant details regarding the Closed order remarks, Inco Terms , billing address warranty terms Selling conditions , and special instruction are captured in the system to facilitate smooth and accurate order fulfillment.
##### **How to set Additional Detail?**
1\. Click on SALES – SALES OPERATIONS – CUSTOMER SALES ORDER - ADDITIONAL DETAIL TAB for the screen below.
[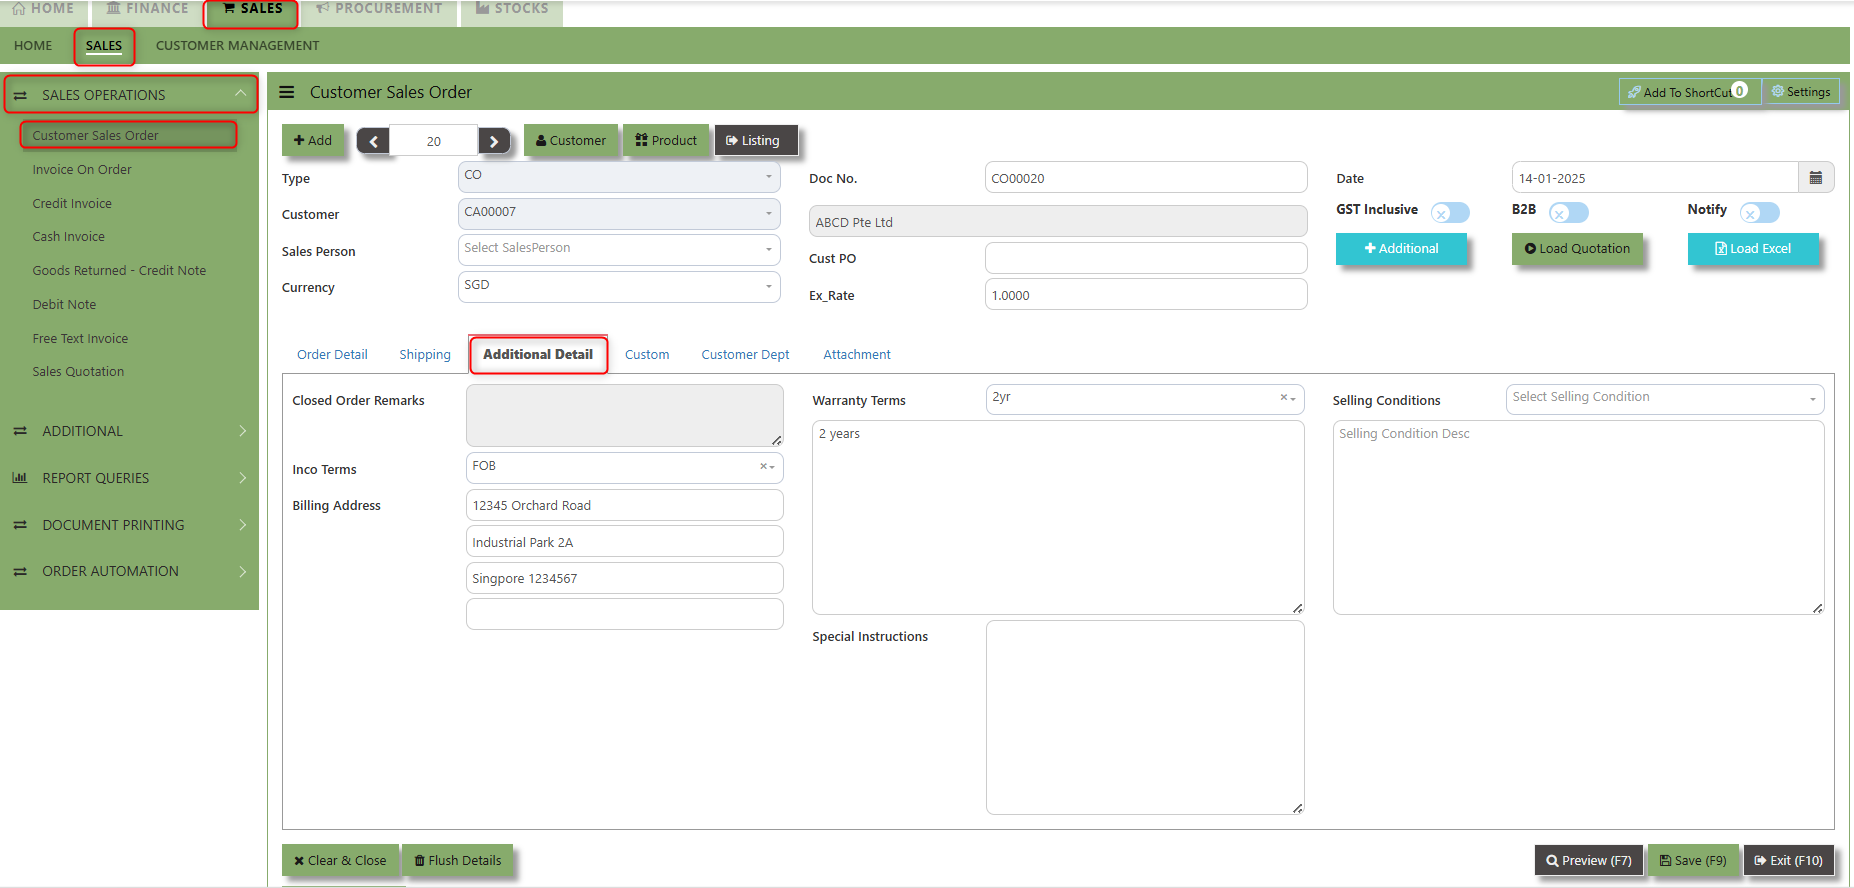](https://doc.uniq365.com/uploads/images/gallery/2025-02/w2ximage.png)
2. Input the below details for the below fields:
- - Inco terms
- Billing Address
- Warranty Terms
- Selling conditions
- Special instruction
3\. Once keyed in the necessary details, click the next tab and will automatically save all the information
\_\_\_\_\_\_\_\_\_\_\_\_\_\_\_\_\_\_\_\_\_\_\_\_\_\_\_\_\_\_\_\_\_\_\_\_\_\_\_\_\_\_\_\_\_\_\_\_\_\_\_\_\_\_\_\_\_\_\_\_\_\_\_\_\_\_\_\_\_\_\_\_\_\_\_\_\_\_\_\_\_\_\_\_\_\_\_\_\_\_\_\_\_\_\_\_\_\_\_\_\_\_\_\_\_\_\_\_\_\_\_\_\_\_\_\_\_\_\_\_\_\_\_\_\_\_\_\_\_\_\_\_\_\_\_\_\_\_\_
**"Custom Tab"** provides a space for users to input customized data or additional fields that are specific to their business processes and requirements.
- Click on SALES – SALES OPERATIONS – CUSTOMER SALES ORDER - CUSTOM TAB for the screen below.
[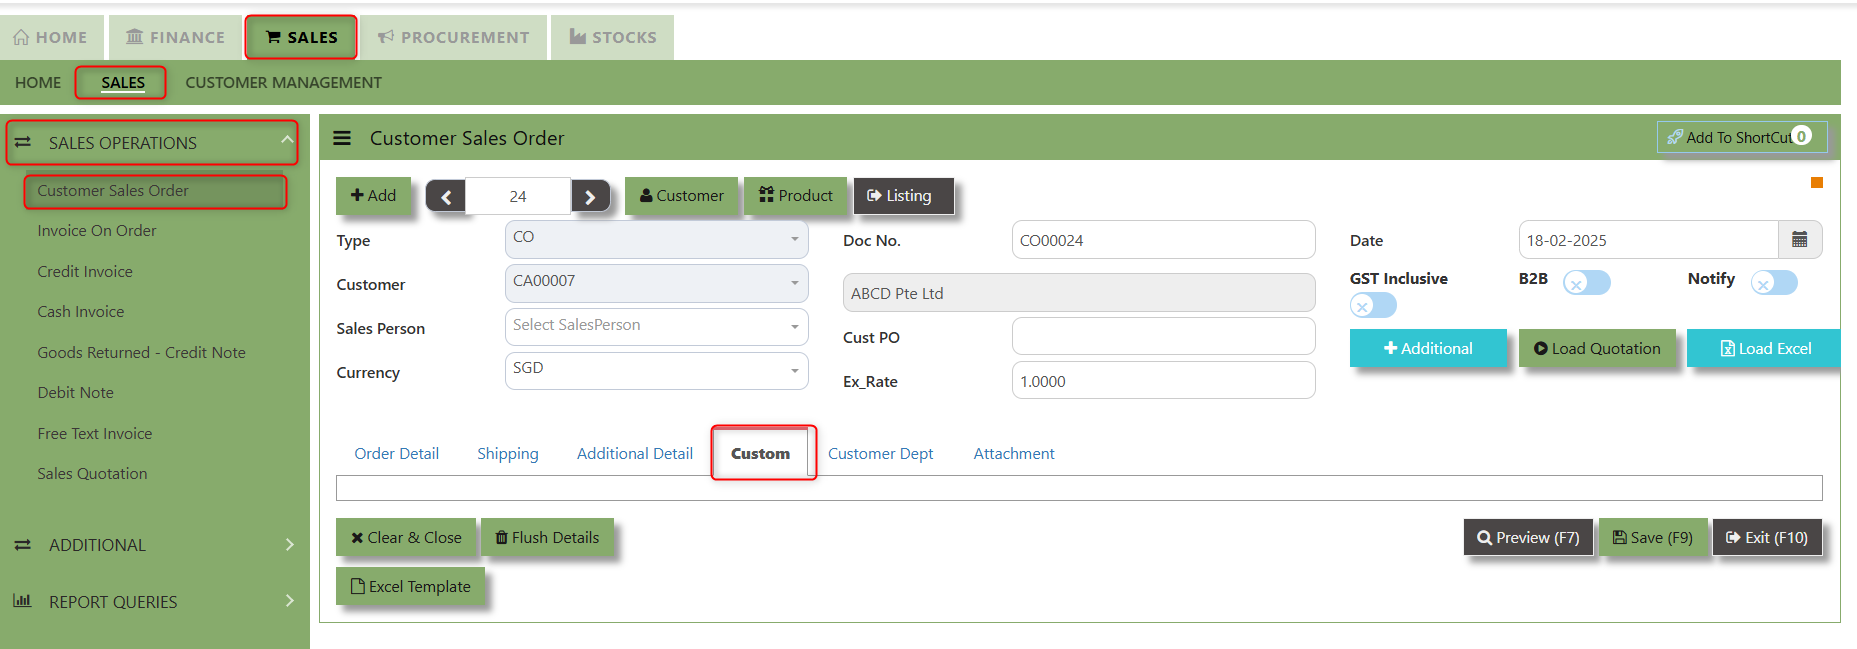](https://doc.uniq365.com/uploads/images/gallery/2025-02/Q1pimage.png)
\_\_\_\_\_\_\_\_\_\_\_\_\_\_\_\_\_\_\_\_\_\_\_\_\_\_\_\_\_\_\_\_\_\_\_\_\_\_\_\_\_\_\_\_\_\_\_\_\_\_\_\_\_\_\_\_\_\_\_\_\_\_\_\_\_\_\_\_\_\_\_\_\_\_\_\_\_\_\_\_\_\_\_\_\_\_\_\_\_\_\_\_\_\_\_\_\_\_\_\_\_\_\_\_\_\_\_\_\_\_\_\_\_\_\_\_\_\_\_\_\_\_\_\_\_\_\_\_\_\_\_\_\_\_\_\_\_\_\_
**"Customer Dept Tab"** section where the Customer Department information is entered. This tab ensures that all relevant details regarding Customer Department details which is linked to the Customer Maintenance under Department Tab
- Click on SALES – SALES OPERATIONS – CUSTOMER SALES ORDER - CUSTOMER DEPT TAB for the screen below.
[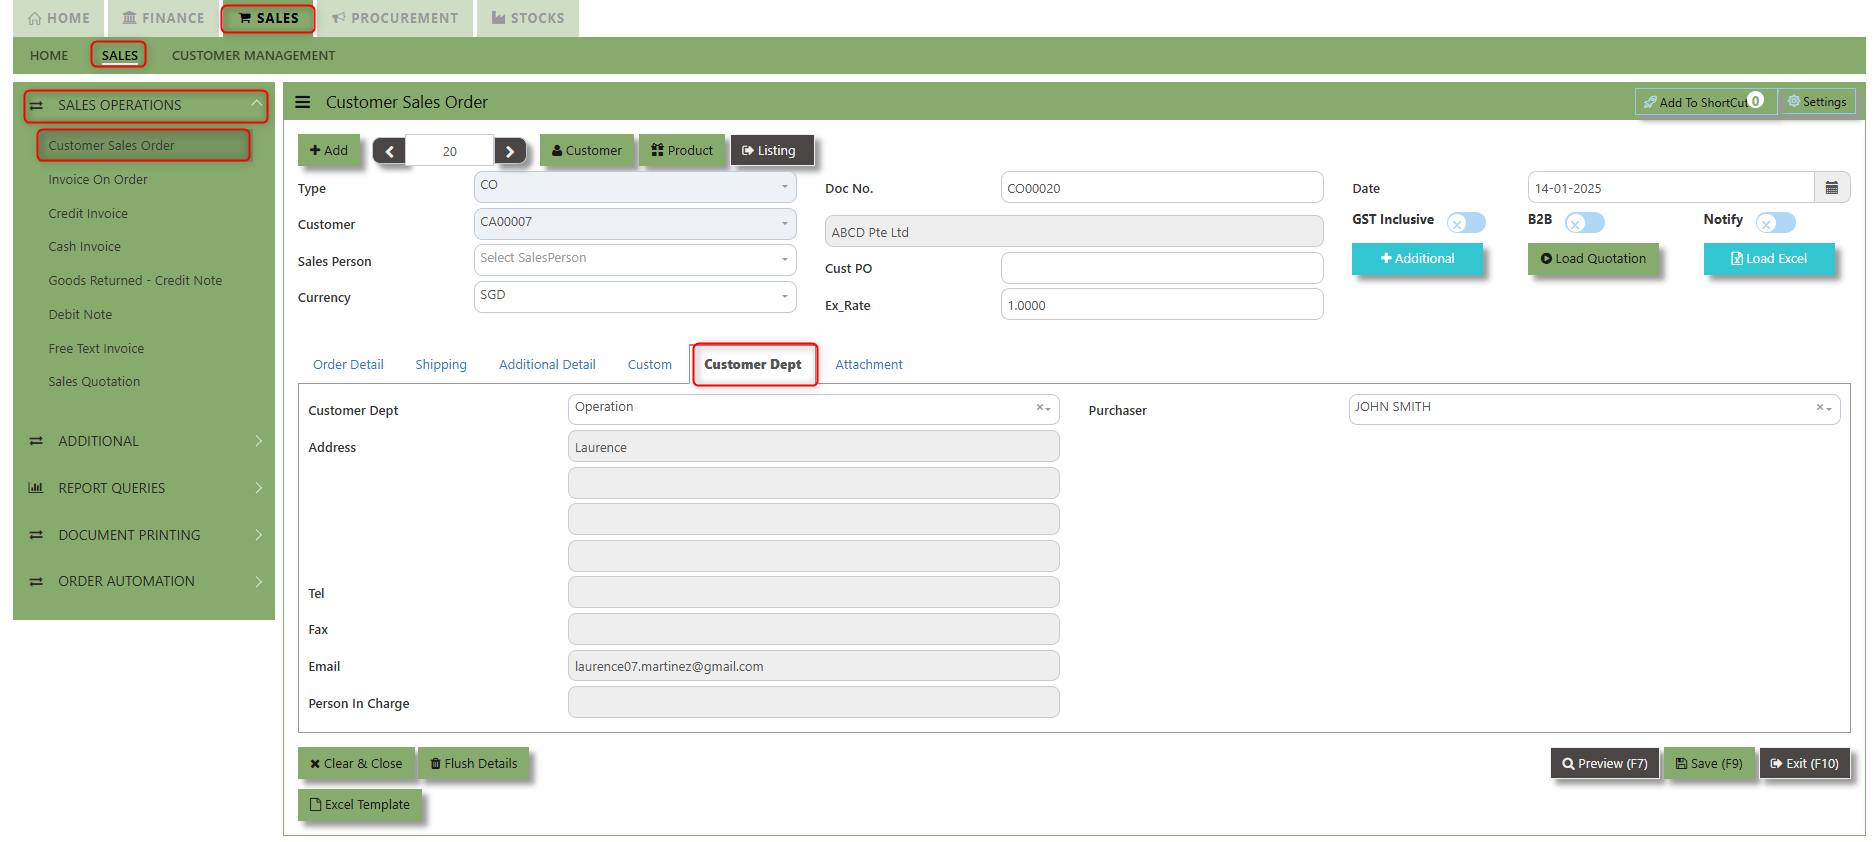](https://doc.uniq365.com/uploads/images/gallery/2025-02/uUMimage.png)
The drop down selection for Customer Dept and Purchaser is maintained in Customer Maintenance under Department Tab
[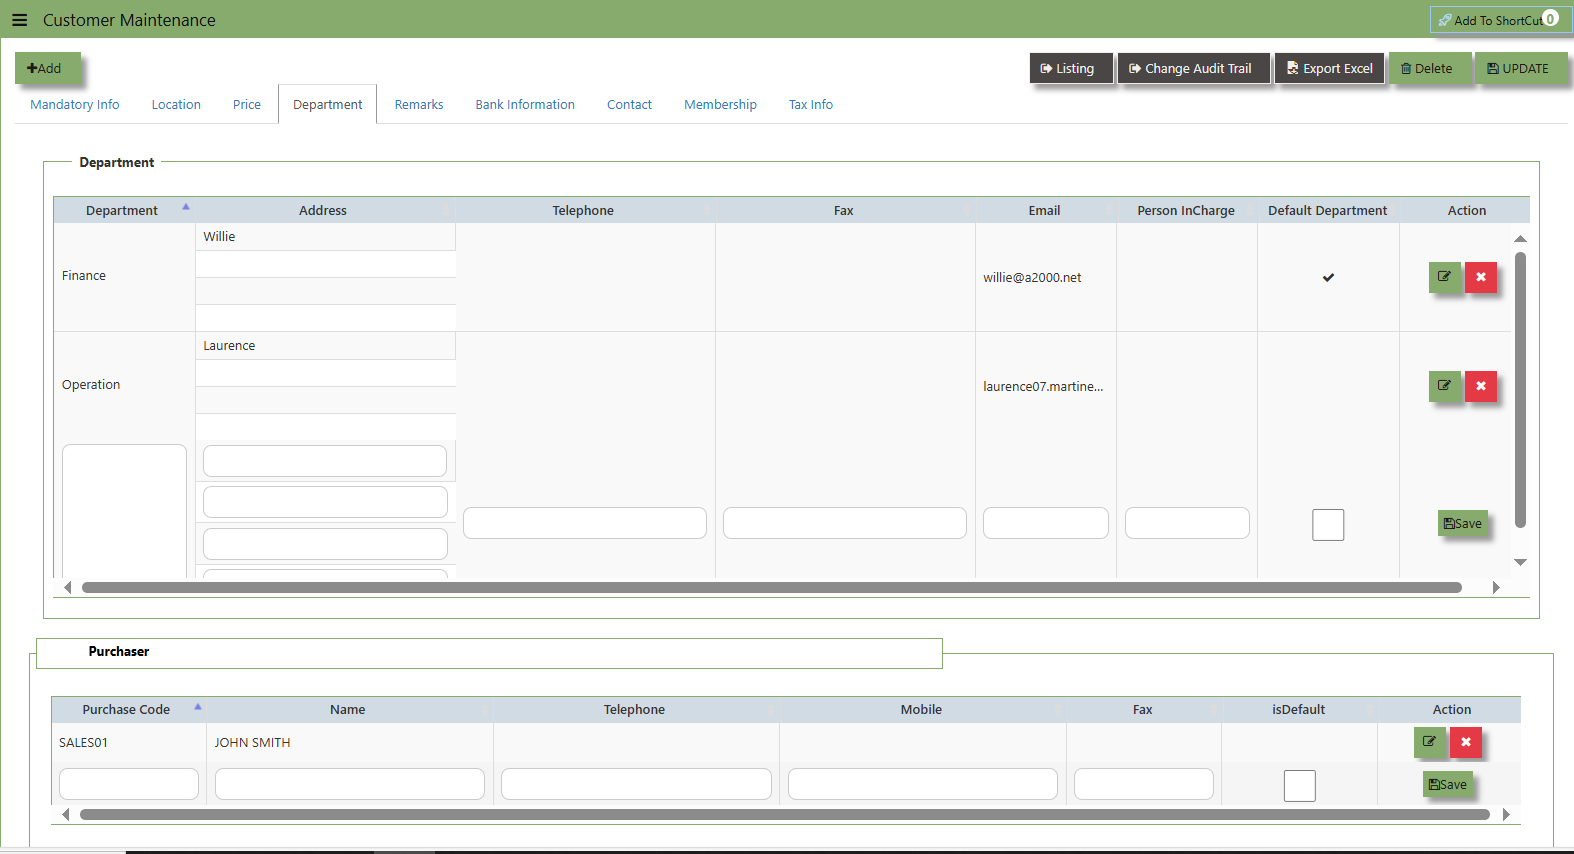](https://doc.uniq365.com/uploads/images/gallery/2025-02/DCeimage.png)
\_\_\_\_\_\_\_\_\_\_\_\_\_\_\_\_\_\_\_\_\_\_\_\_\_\_\_\_\_\_\_\_\_\_\_\_\_\_\_\_\_\_\_\_\_\_\_\_\_\_\_\_\_\_\_\_\_\_\_\_\_\_\_\_\_\_\_\_\_\_\_\_\_\_\_\_\_\_\_\_\_\_\_\_\_\_\_\_\_\_\_\_\_\_\_\_\_\_\_\_\_\_\_\_\_\_\_\_\_\_\_\_\_\_\_\_\_\_\_\_\_\_\_\_\_\_\_\_\_\_\_\_\_\_\_\_\_\_
**"Attachment Tab"** allows users to attach various files and documents related to the sales order. By attaching relevant files, users ensure that all purchase-related information is kept in one place, making the sales process smoother, more transparent, and easier to track.
##### **How to use Attachment Tab?**
1\. Click on SALES – SALES OPERATIONS – CUSTOMER SALES ORDER – ATTACHEMENT TAB for the screen below.
[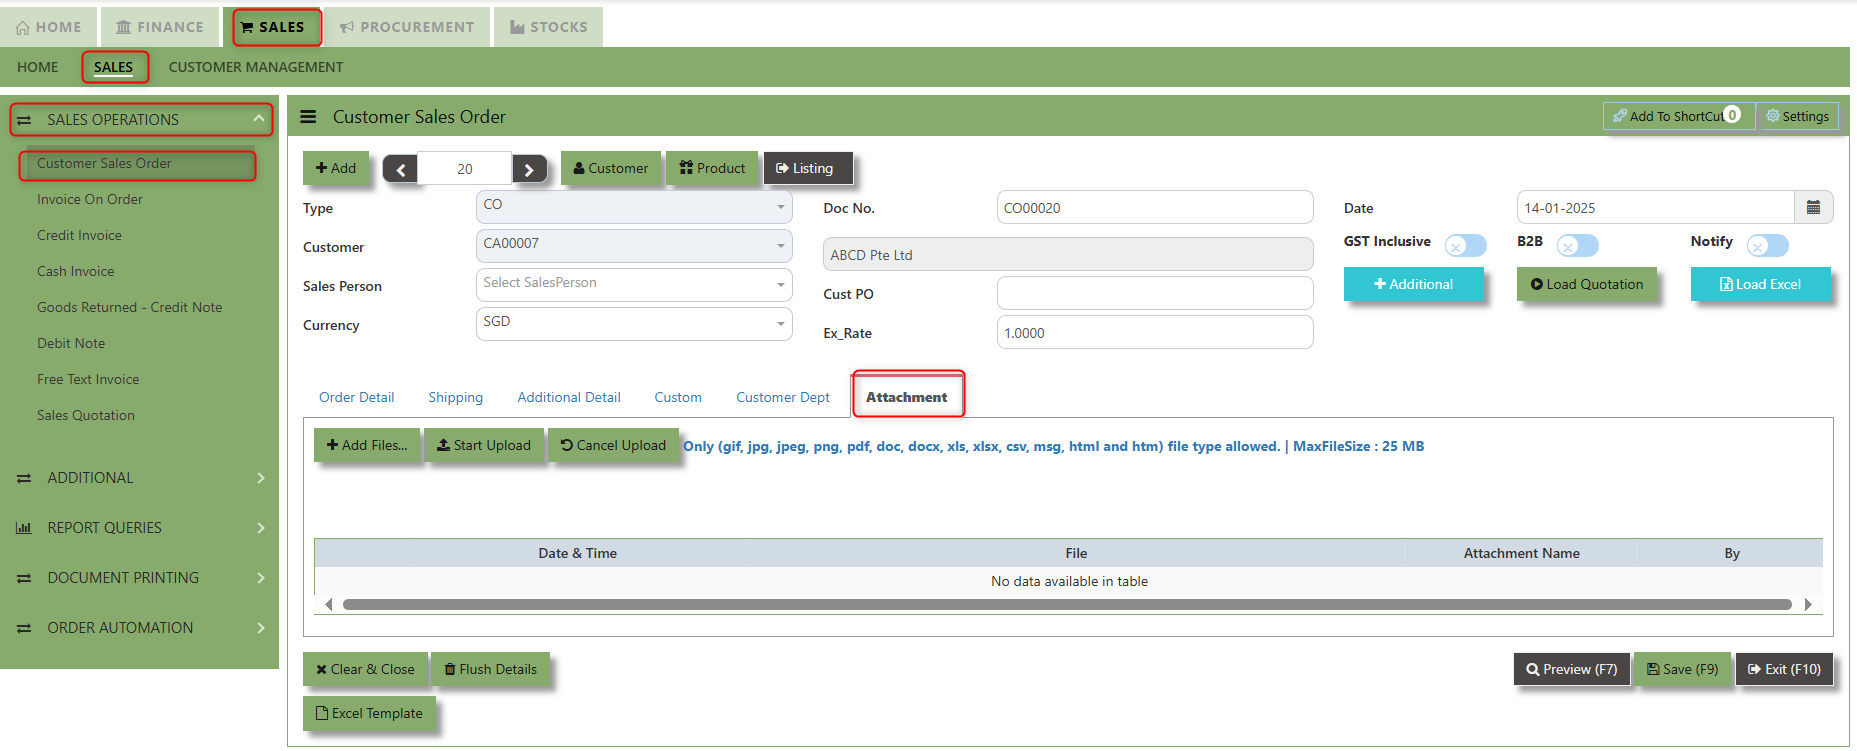](https://doc.uniq365.com/uploads/images/gallery/2025-02/wXLimage.png)
2\. Click +Add files and windows will prompt then choose the file you want to upload by clicking open. Kindly take note the file types and maximum size requirements in uploading: ***Only (gif, jpg, jpeg, png, pdf, doc, docx, xls, xlsx, csv, msg, html and htm) file type allowed. | MaxFileSize : 25 MB***
[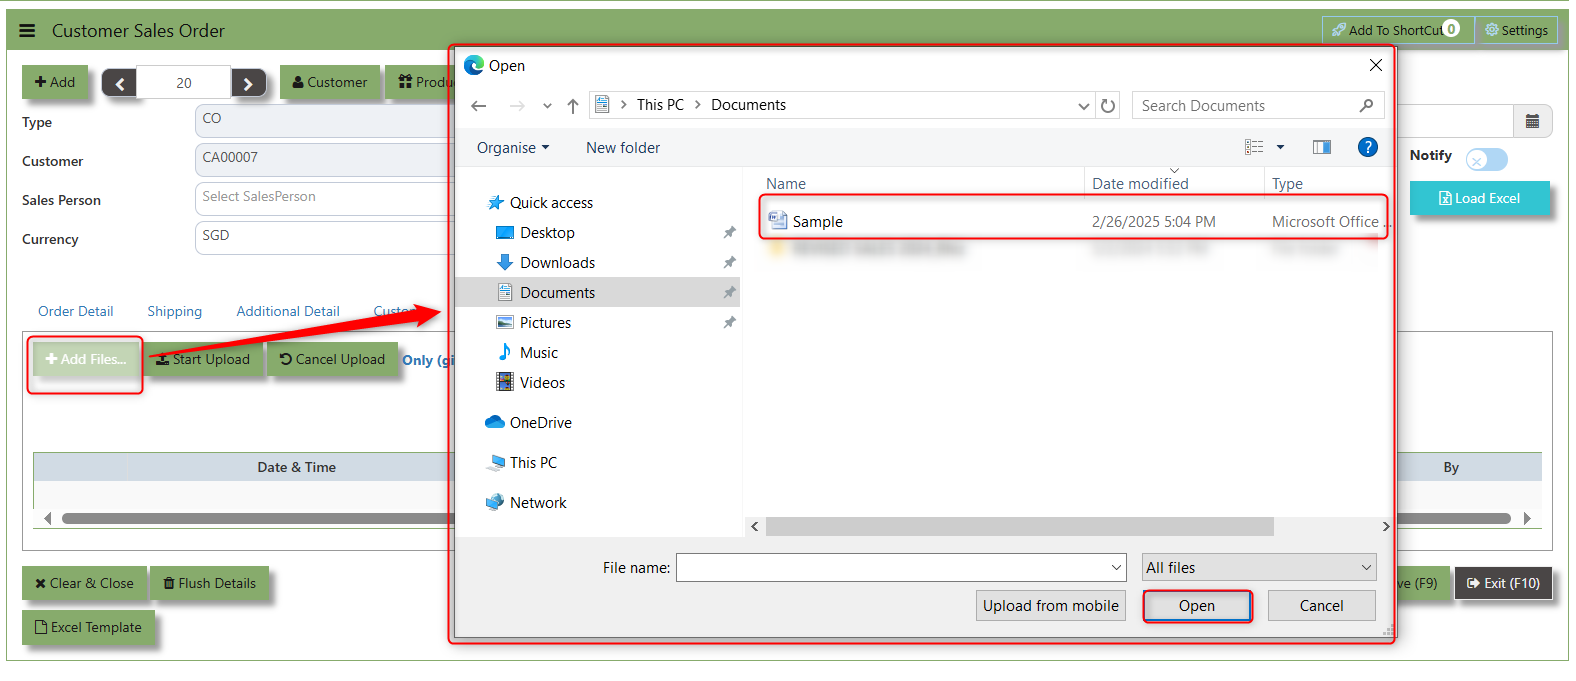](https://doc.uniq365.com/uploads/images/gallery/2025-02/ZMDimage.png)
3\. Key in the Attachment Name then click start to upload.
[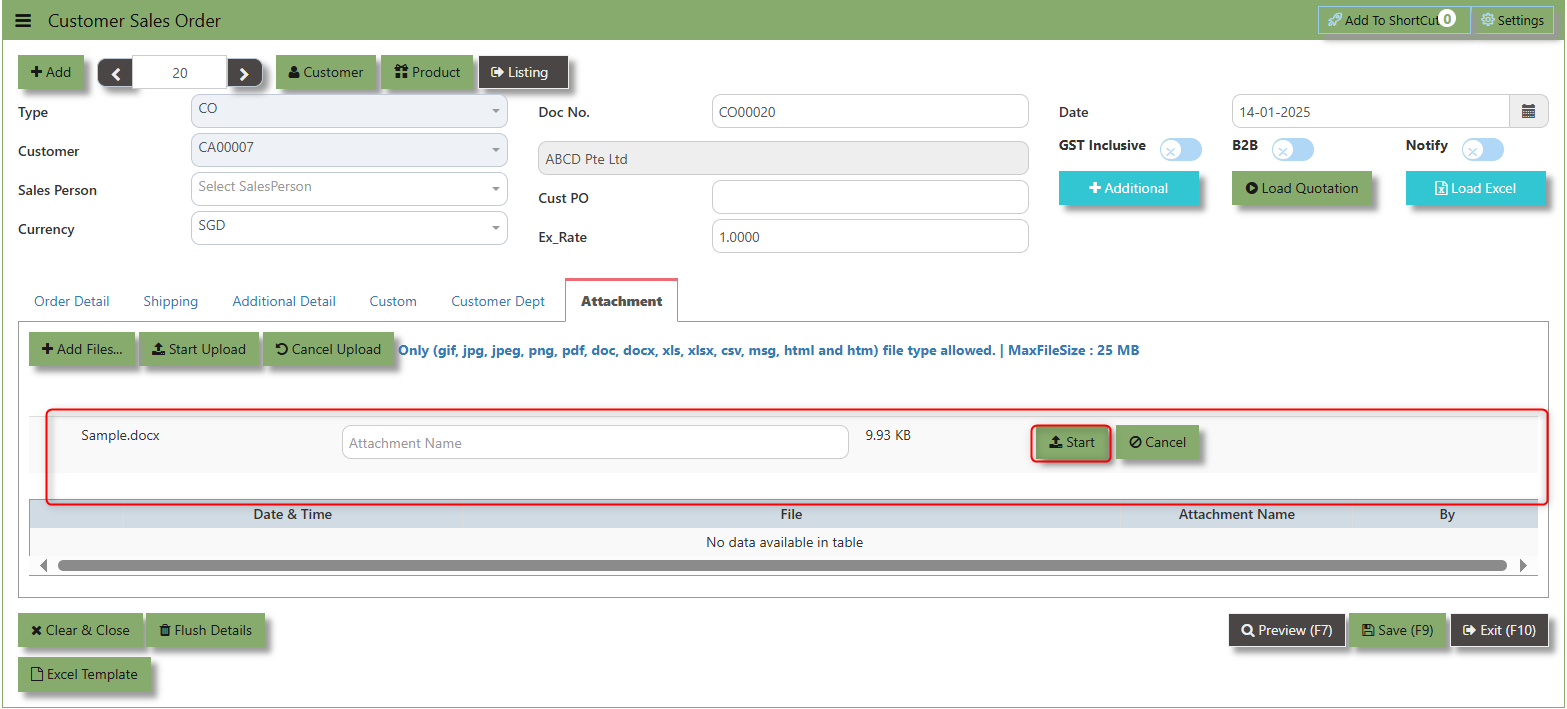](https://doc.uniq365.com/uploads/images/gallery/2025-02/sMmimage.png)
4.Once the file attached, click "SAVE" button
[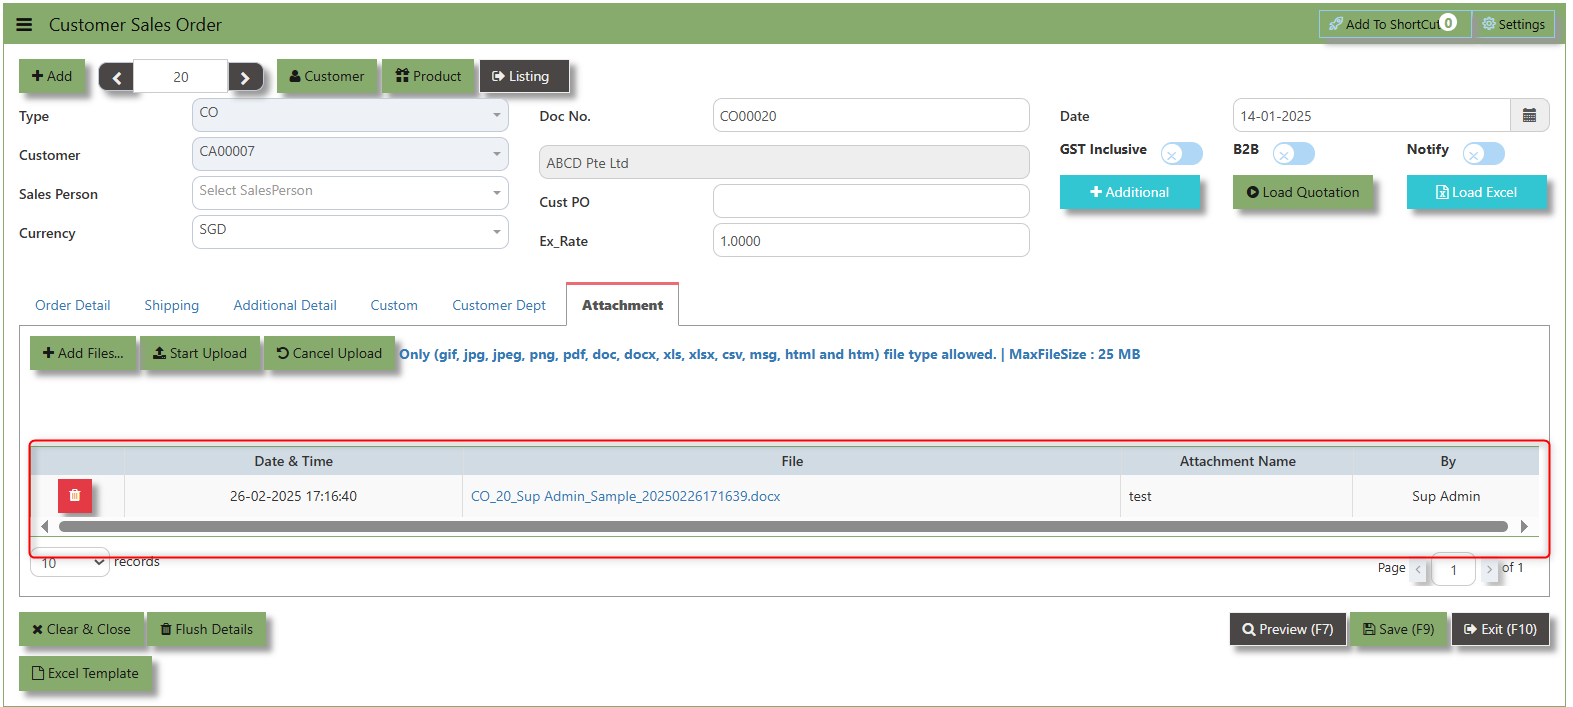](https://doc.uniq365.com/uploads/images/gallery/2025-02/cBKimage.png)
User may opt to cancel the uploading by clicking the **"Cancel Upload"** button and delete the file uploaded by clicking the **"Bin icon"** at the line detail.
Invoice on Order
##### After the Sales Order (Flow 2b), you will create Customer Invoice on Order. Enter the required fields such as the transaction type and customer for that invoice, before specifying the CO number at the top right hand corner of the screen. The line items from the sales order have to be verified and added in accordingly at the line detail level into the CE. After verifying all the details, click on the Save button to save the transaction. Postings are automatically carried out and the GL and Inventory status will be updated.
\_\_\_\_\_\_\_\_\_\_\_\_\_\_\_\_\_\_\_\_\_\_\_\_\_\_\_\_\_\_\_\_\_\_\_\_\_\_\_\_\_\_\_\_\_\_\_\_\_\_\_\_\_\_\_\_\_\_\_\_\_\_\_\_\_\_\_\_\_\_\_\_\_\_\_\_\_\_\_\_\_\_\_\_\_\_\_\_\_\_\_\_\_\_\_\_\_\_\_\_\_\_\_\_\_\_\_\_\_\_\_\_\_\_\_\_\_\_\_\_\_\_\_\_\_\_\_\_\_\_\_\_\_\_\_\_\_\_\_
##### **How to Create Invoice on Order?**
1.Click on **SALES – SALES – SALES OPERATIONS – INVOICE ON ORDER** for the screen below[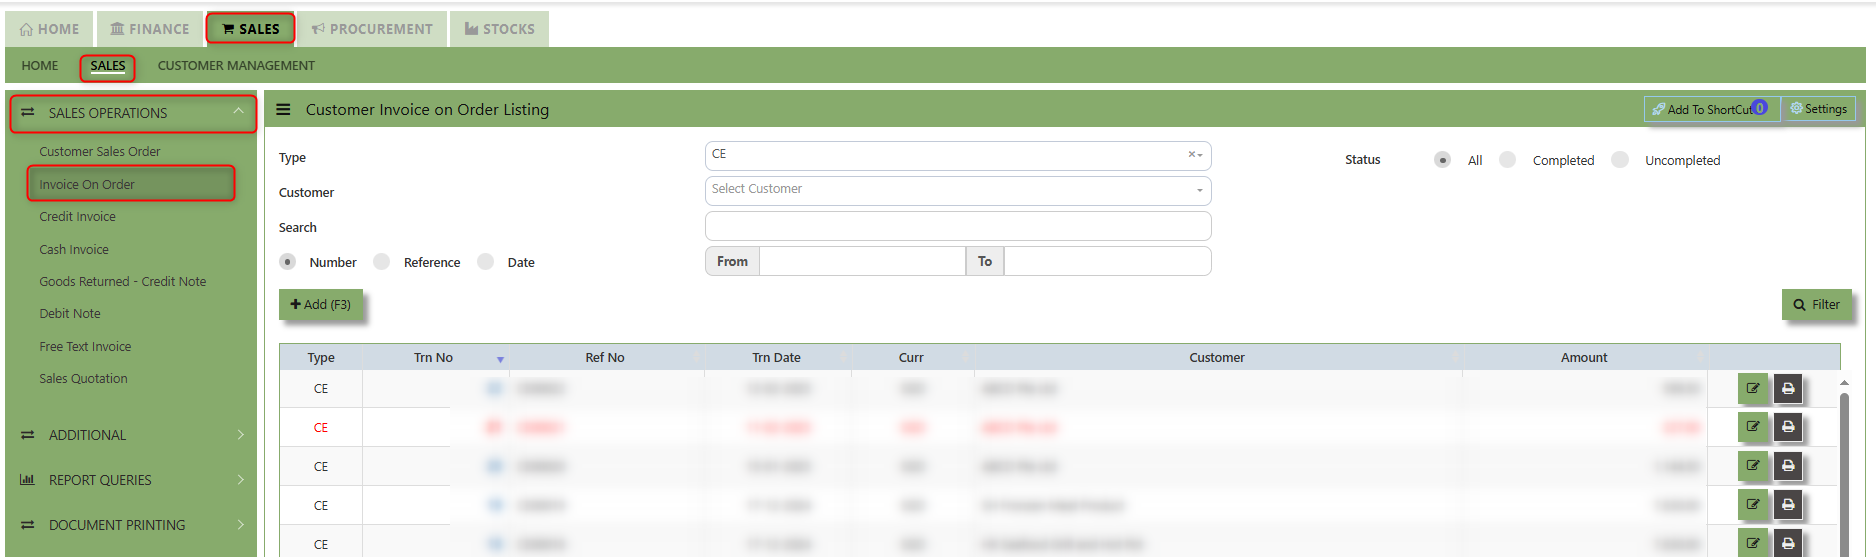](https://doc.uniq365.com/uploads/images/gallery/2025-02/ShKimage.png)
2\. Click on Add button or press F3 to create a new transaction.
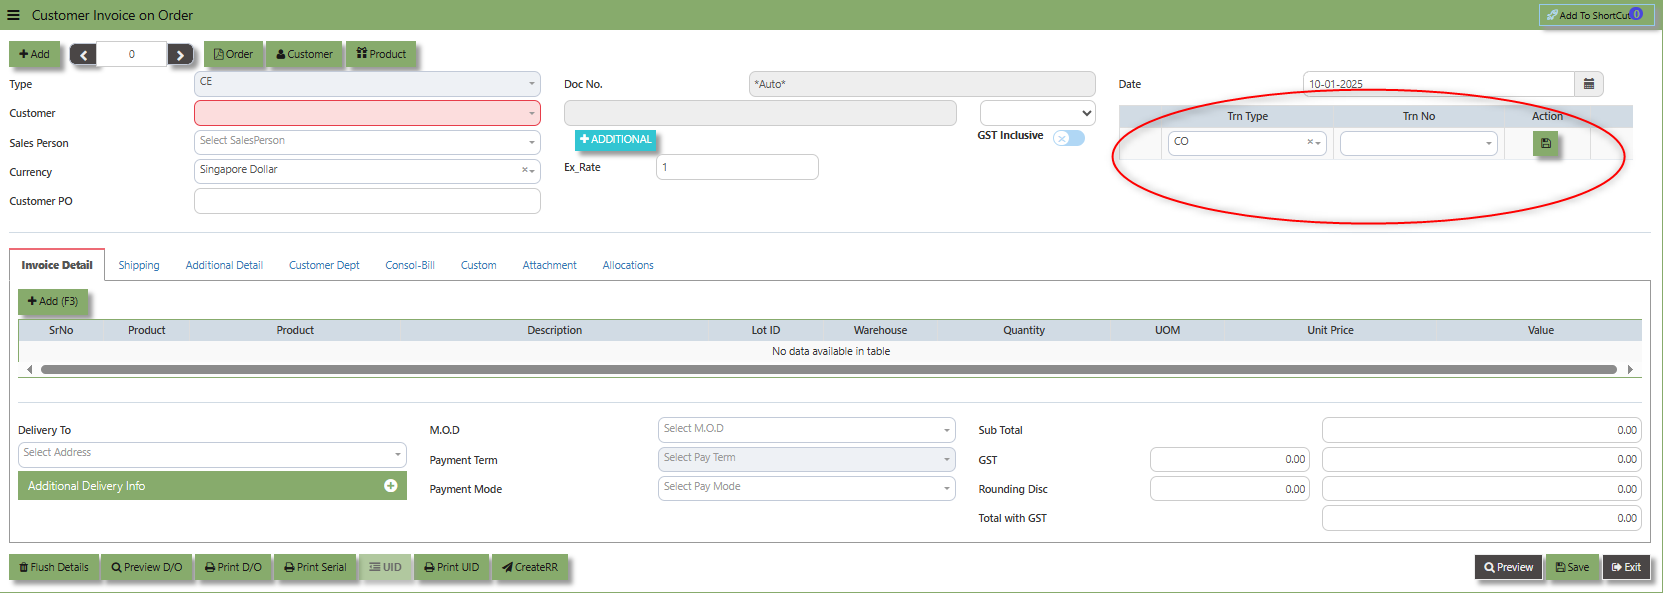
3\. After the transaction type selection, you can use the tab button to go to the Ref No. and Date fields to fill up the information.
4\. Click the Customer - drop-down to select Customer Name, followed by the Sales Person, PDS, Currency, Rate, Our DO and Order Ref No. if applicable.
5\. After completing the above steps, click the Order No. drop down list to select the Sales Order to be invoiced (refer to the highlighted screen).
6\. After selecting the Sales Order transaction from the Order No. column, user can use the “L” button to load all the product items. Alternatively, you can use the Ref column in the detail section to call out the product items one by one. Save the CE transaction after this is done.
\_\_\_\_\_\_\_\_\_\_\_\_\_\_\_\_\_\_\_\_\_\_\_\_\_\_\_\_\_\_\_\_\_\_\_\_\_\_\_\_\_\_\_\_\_\_\_\_\_\_\_\_\_\_\_\_\_\_\_\_\_\_\_\_\_\_\_\_\_\_\_\_\_\_\_\_\_\_\_\_\_\_\_\_\_\_\_\_\_\_\_\_\_\_\_\_\_\_\_\_\_\_\_\_\_\_\_\_\_\_\_\_\_\_\_\_\_\_\_\_\_\_\_\_\_\_\_\_\_\_\_\_\_\_\_\_\_\_\_
**Add to ShortCut -** Used to create a shortcut for quick access to a specific sales invoice or sales-related functionality. By clicking this button, users can add the current sales invoice on order to a list of shortcuts, allowing them to access the invoice or related functionality quickly and efficiently, without needing to search for it each time.
[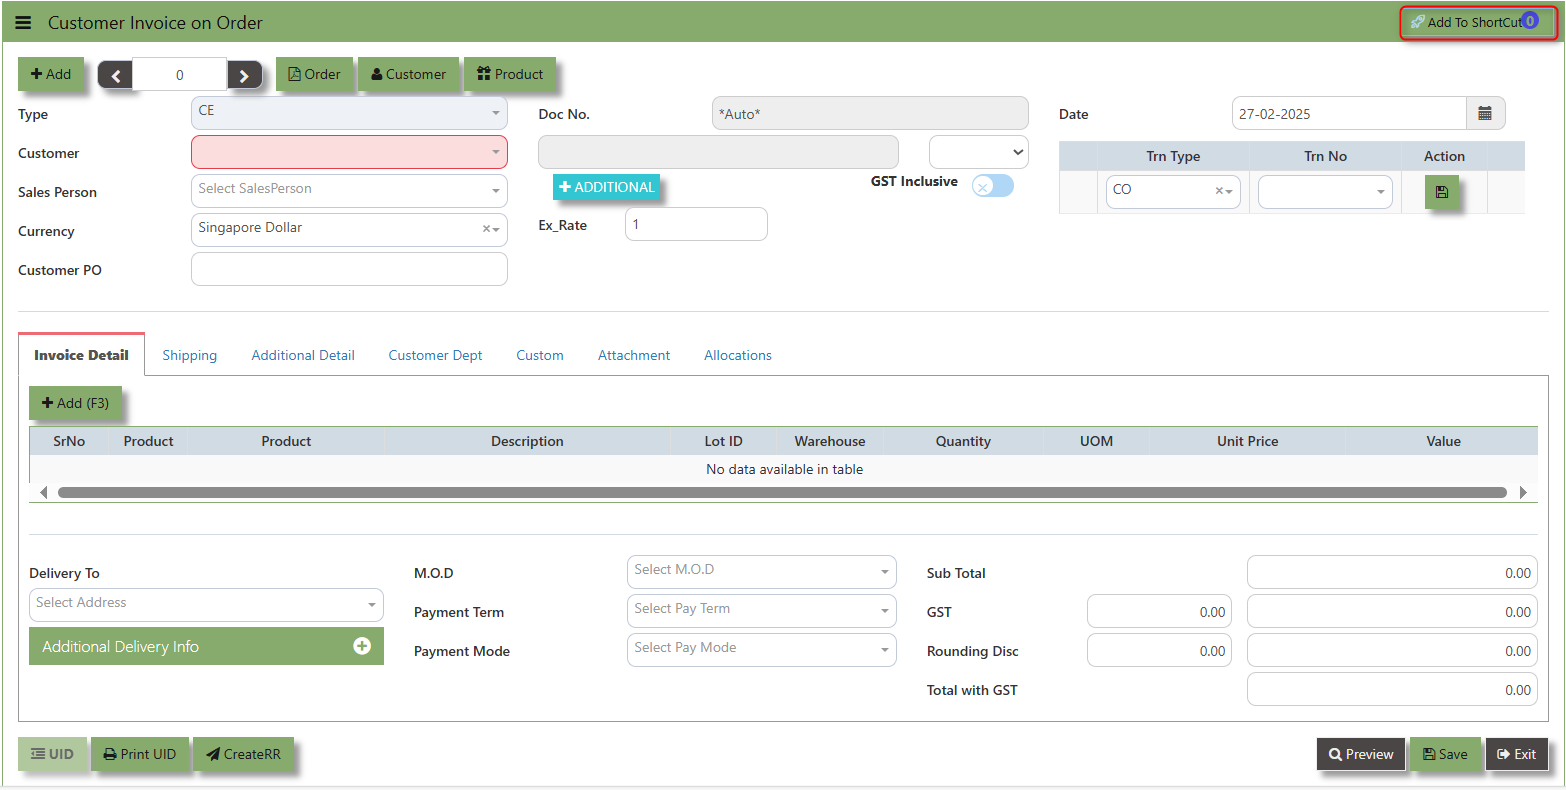](https://doc.uniq365.com/uploads/images/gallery/2025-02/frQimage.png)
##### **How to use Add to ShortCut?**
1\. Click "**Add to ShortCut"** and system will open below windows:
[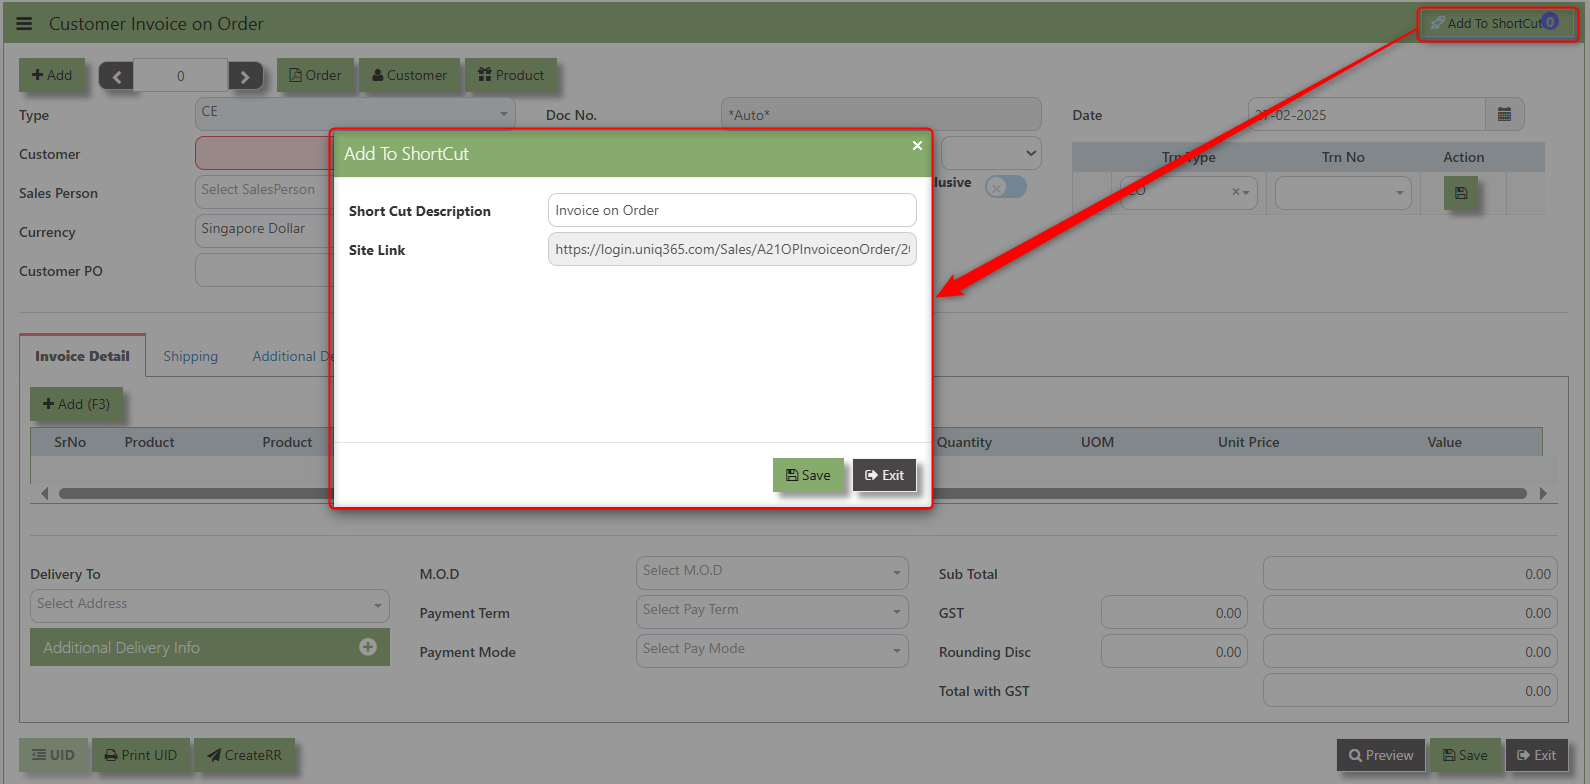](https://doc.uniq365.com/uploads/images/gallery/2025-02/4iWimage.png)
2\. Enter Short Cut Description
3\. Click SAVE then click OK.
4\. User may look to the Homepage for the added function or page. Click on HOME - HOME - SHORTCUT for the screen below.
[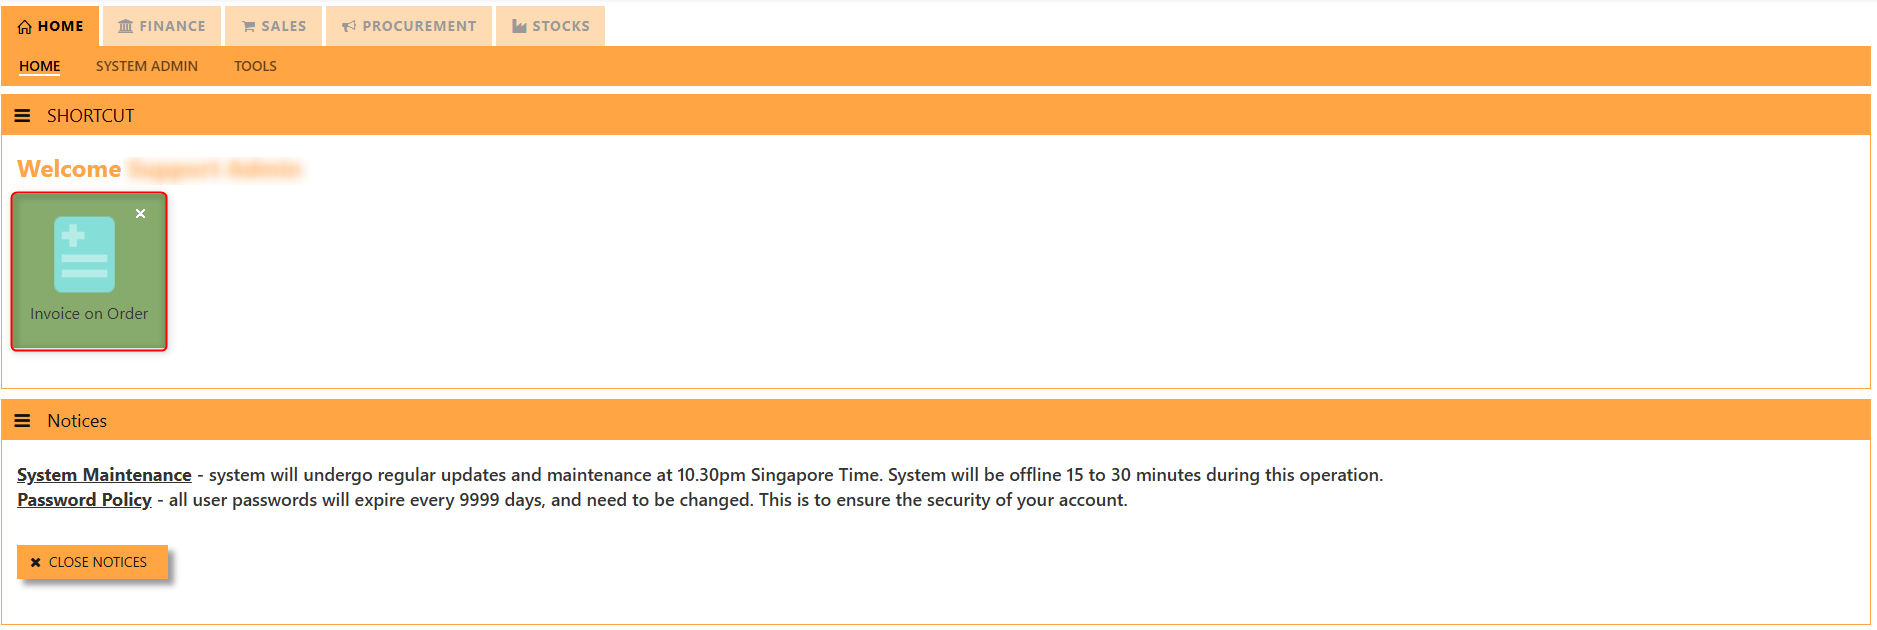](https://doc.uniq365.com/uploads/images/gallery/2025-02/HzZimage.png)
\_\_\_\_\_\_\_\_\_\_\_\_\_\_\_\_\_\_\_\_\_\_\_\_\_\_\_\_\_\_\_\_\_\_\_\_\_\_\_\_\_\_\_\_\_\_\_\_\_\_\_\_\_\_\_\_\_\_\_\_\_\_\_\_\_\_\_\_\_\_\_\_\_\_\_\_\_\_\_\_\_\_\_\_\_\_\_\_\_\_\_\_\_\_\_\_\_\_\_\_\_\_\_\_\_\_\_\_\_\_\_\_\_\_\_\_\_\_\_\_\_\_\_\_\_\_\_\_\_\_\_\_\_\_\_\_\_\_\_
The **Customer** button provides quick access to detailed supplier profiles under Customer maintenance.
[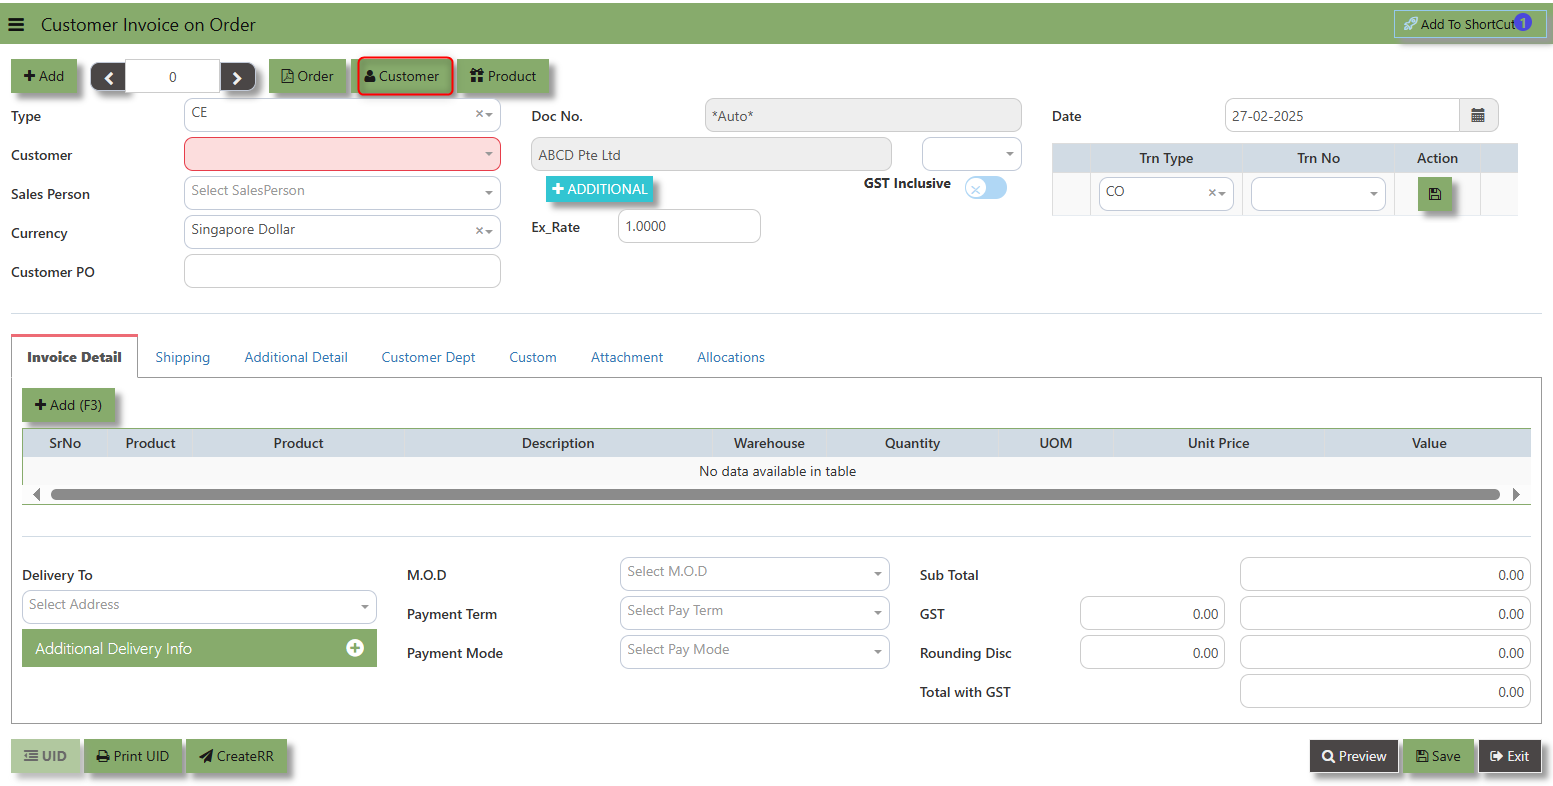](https://doc.uniq365.com/uploads/images/gallery/2025-02/75Simage.png)
The **Product** button provides quick access to product and service maintenance.
[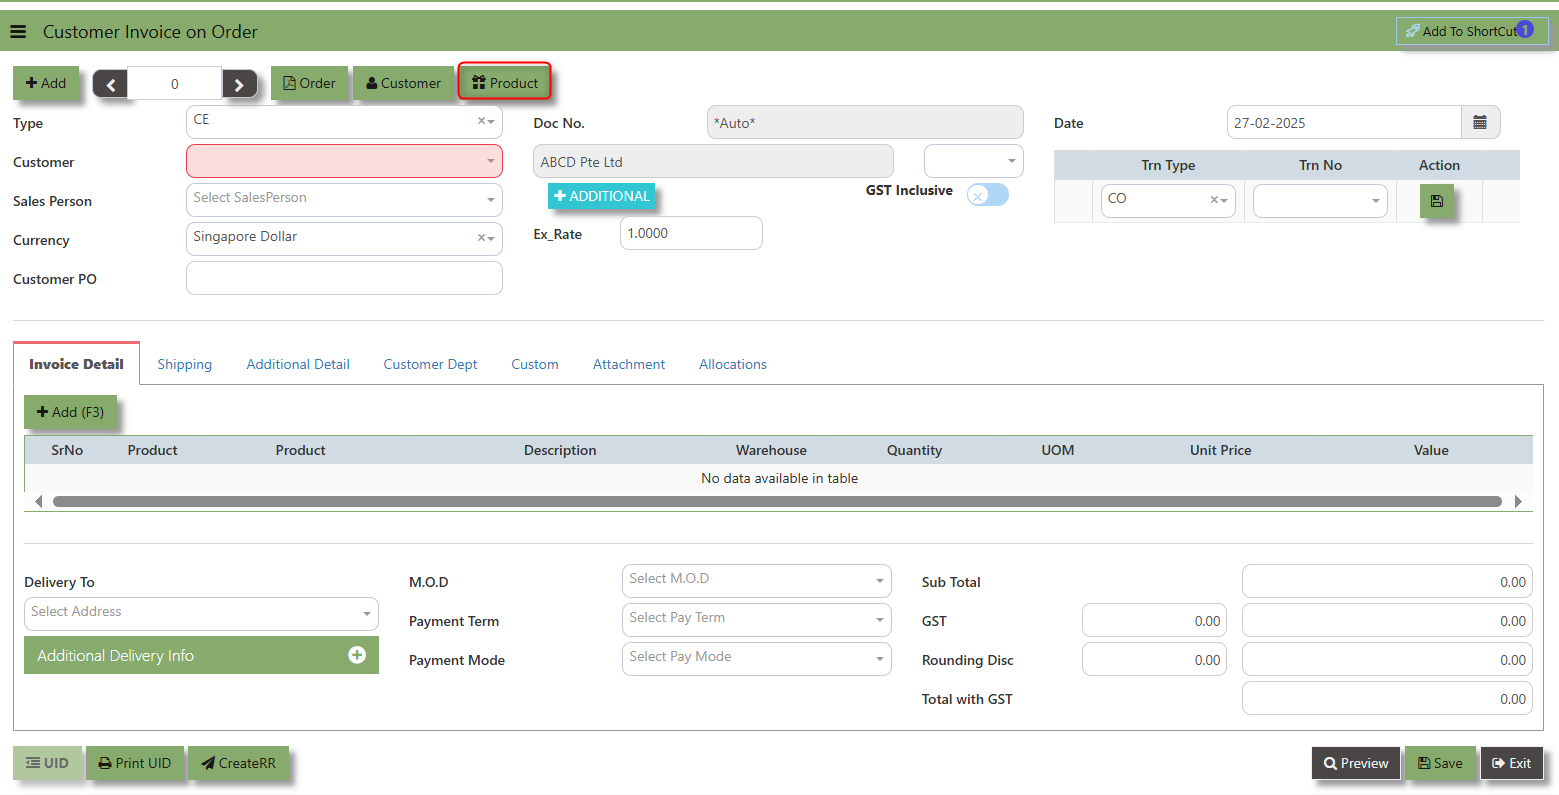](https://doc.uniq365.com/uploads/images/gallery/2025-02/uJ0image.png)
**Additional Header Info** button is typically used to capture and manage additional information related to the sales Invoice on order at the header level (i.e., Delivery date, Del Term , Indicative WH , Country, Lead Time, Contact, PDSU, Narration and Transaction Narration). This feature allows users to add extra data or notes that are relevant to the entire sales invoice on order.
[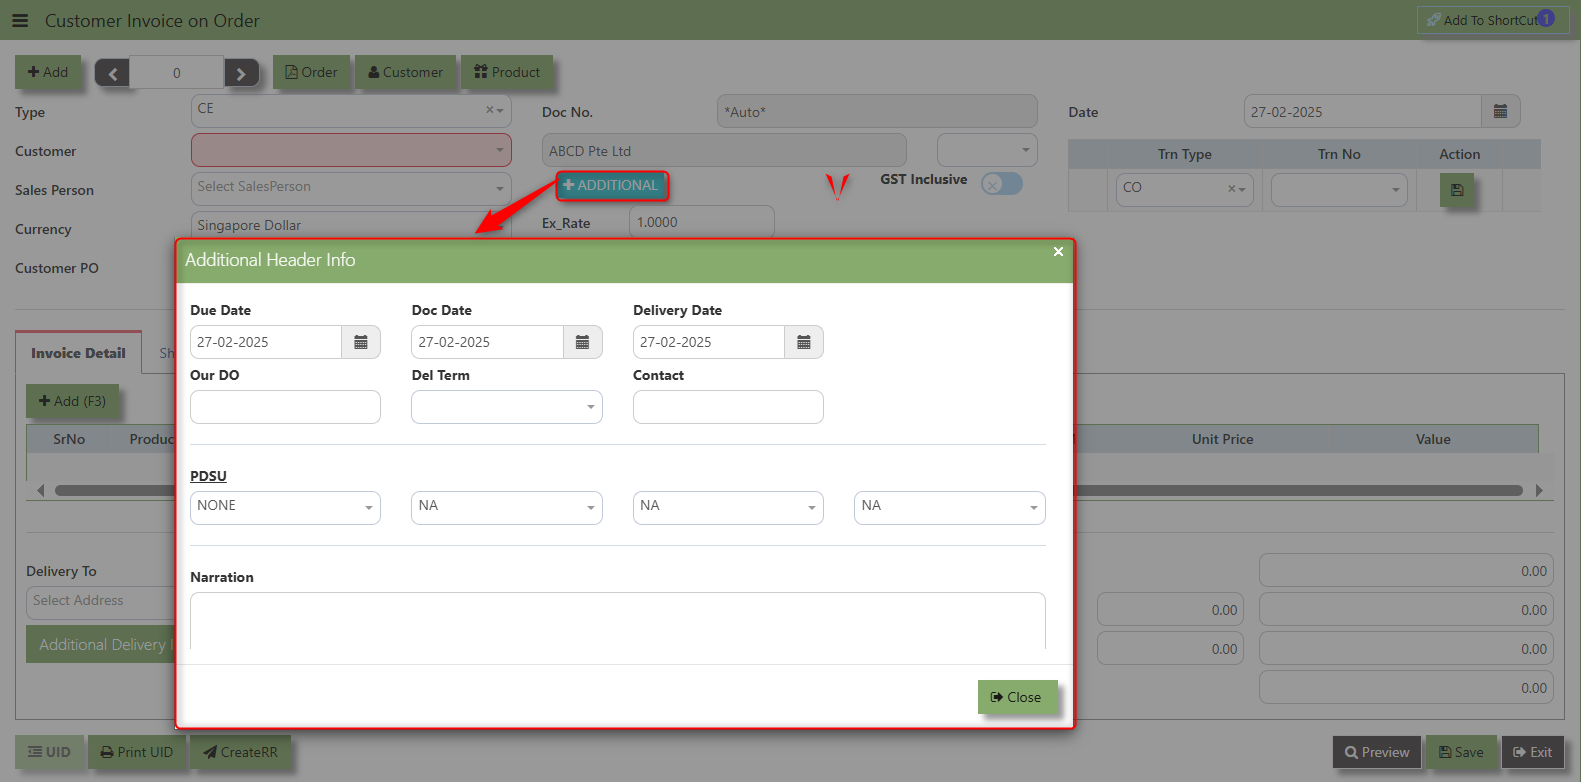](https://doc.uniq365.com/uploads/images/gallery/2025-02/1Wyimage.png)
The **GST Inclusive** checkbox indicates whether the unit price in the CR include **Goods and Services Tax (GST)** or not.
[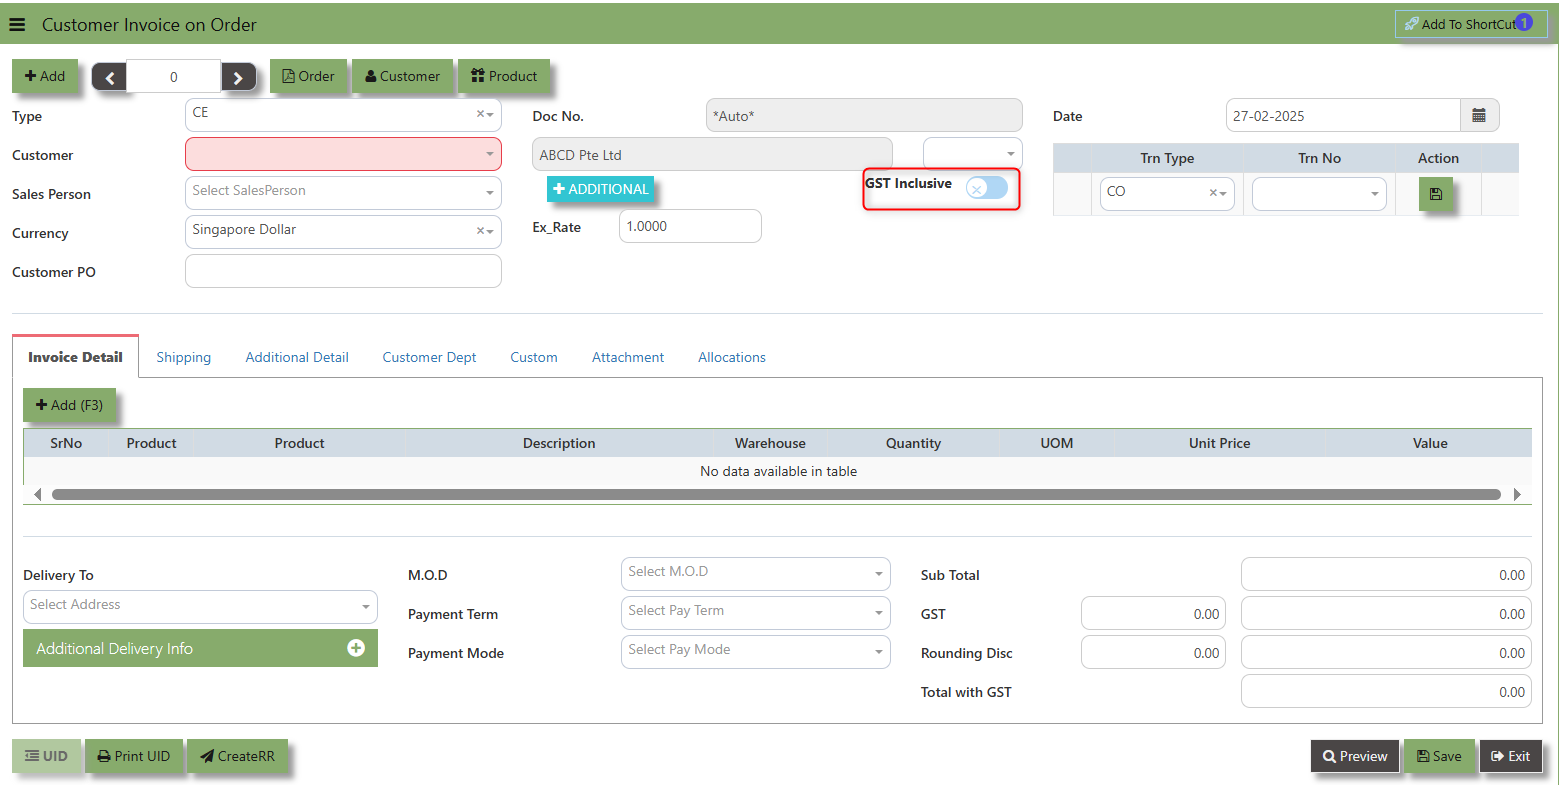](https://doc.uniq365.com/uploads/images/gallery/2025-02/wtcimage.png)
- **When ticked (GST Inclusive)**: provided in the Sales Order already includes the applicable GST amount. The GST amount will not be calculated or displayed separately, as it's already accounted for in the quoted price.
- **When not ticked (GST Exclusive)**: The unit **price** is considered exclusive of GST. The system will calculate and add the GST based on the applicable tax rate, and the final total will be the sum of the base price plus the GST amount.
\_\_\_\_\_\_\_\_\_\_\_\_\_\_\_\_\_\_\_\_\_\_\_\_\_\_\_\_\_\_\_\_\_\_\_\_\_\_\_\_\_\_\_\_\_\_\_\_\_\_\_\_\_\_\_\_\_\_\_\_\_\_\_\_\_\_\_\_\_\_\_\_\_\_\_\_\_\_\_\_\_\_\_\_\_\_\_\_\_\_\_\_\_\_\_\_\_\_\_\_\_\_\_\_\_\_\_\_\_\_\_\_\_\_\_\_\_\_\_\_\_\_\_\_\_\_\_\_\_\_\_\_\_\_\_\_\_\_\_
**Shipping Tab** a section where specific shipping-related information is entered and managed for the sold goods or services. This tab ensures that all relevant details regarding the shipment, delivery location, and delivery expectations are captured in the system to facilitate smooth and accurate order fulfillment.
##### **How to set Shipping Info?**
1\. Click on SALES – SALES OPERATIONS – SALES INVOICE ON ORDER - SHIPPING TAB for the screen below.
[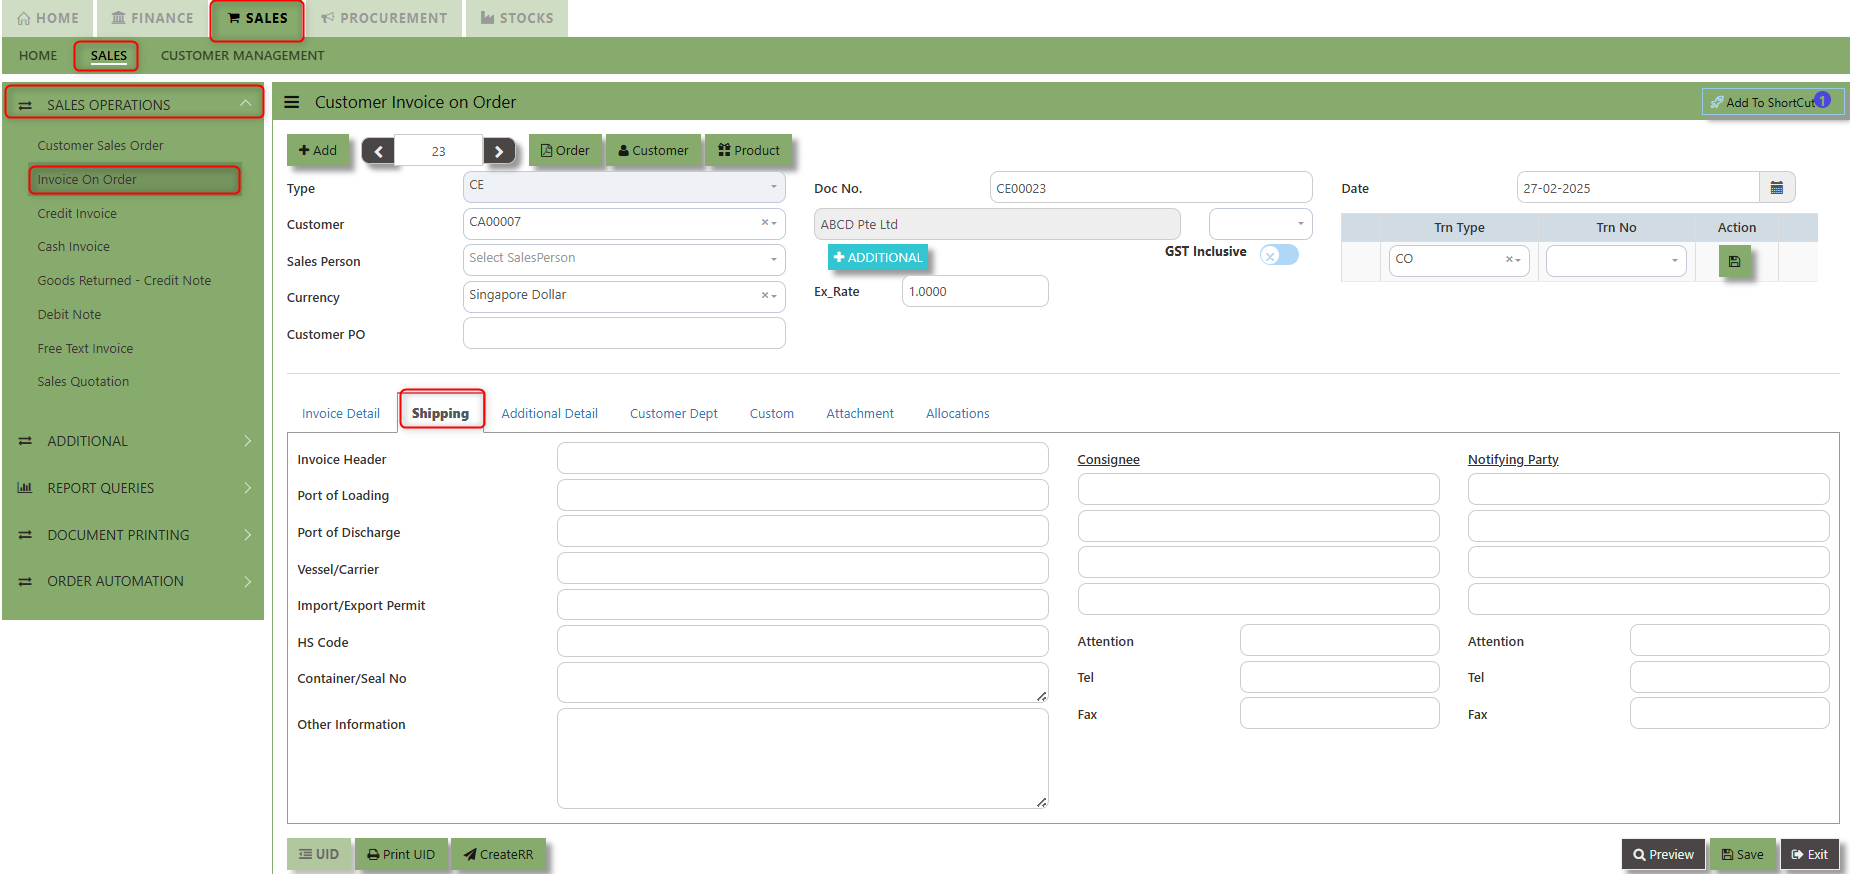](https://doc.uniq365.com/uploads/images/gallery/2025-02/IJUimage.png)
2\. Input the below details for the below fields:
- - Invoice Header
- Port of Loading
- Port of Discharge
- Vessel/Carrier
- Import/Export Permit
- HS Code
- Container/Seal No
- Other Information
- Consignee
- Attention
- Tel
- Fax
- Notifying Party
- Attention
- Tel
- Fax
3\. Once keyed in the necessary details, click the next tab and will automatically save all the information then system will prompt you a message.
[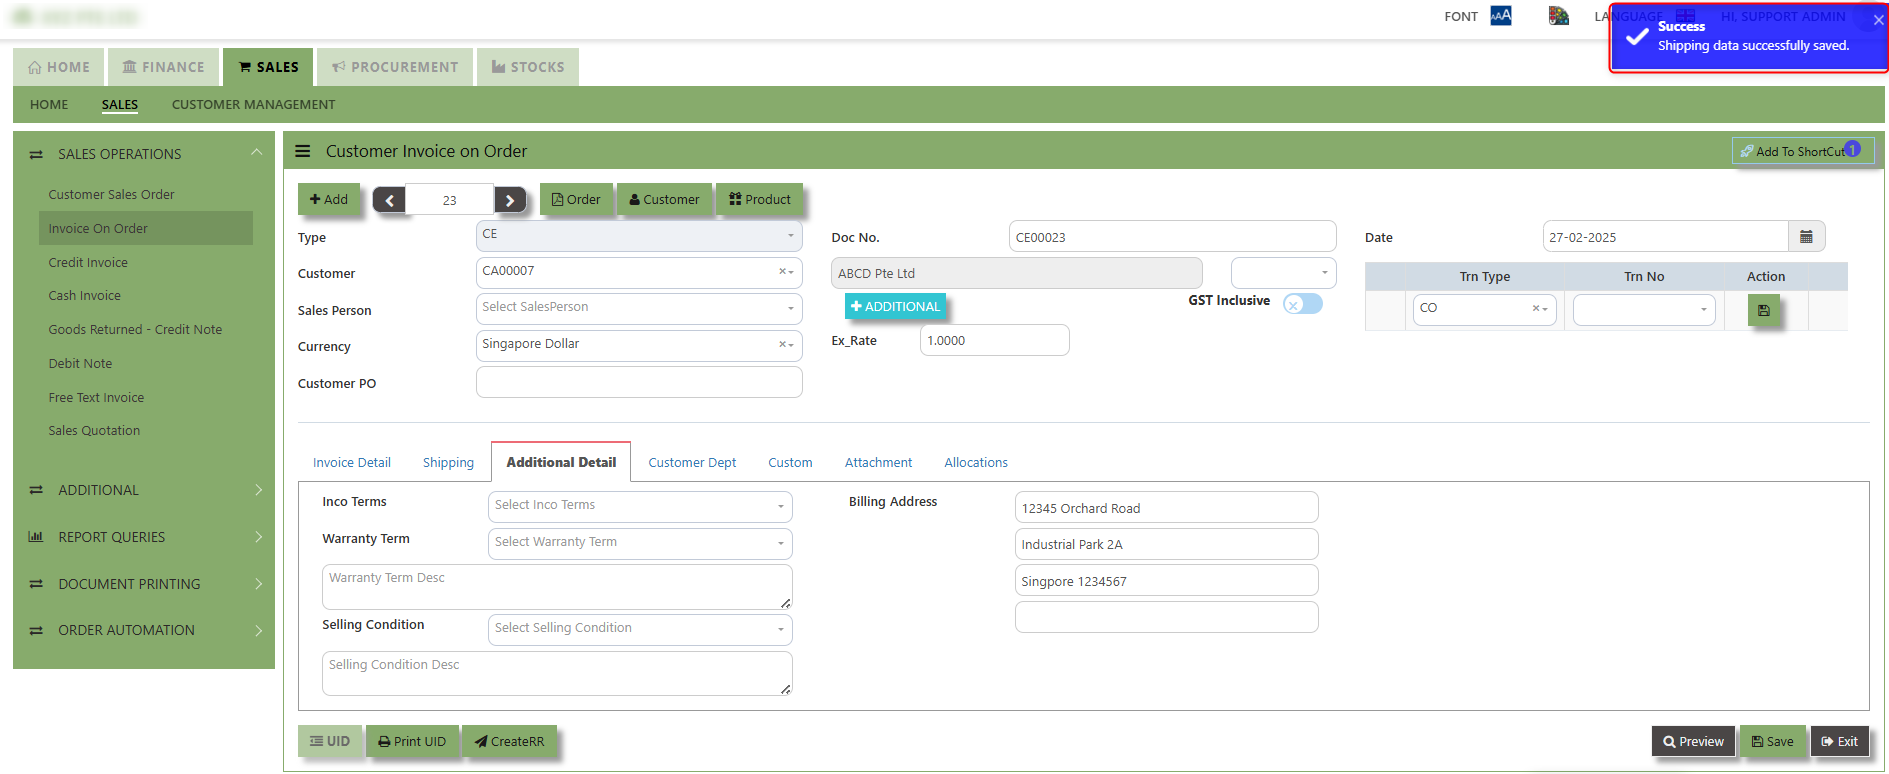](https://doc.uniq365.com/uploads/images/gallery/2025-02/ZBPimage.png)
\_\_\_\_\_\_\_\_\_\_\_\_\_\_\_\_\_\_\_\_\_\_\_\_\_\_\_\_\_\_\_\_\_\_\_\_\_\_\_\_\_\_\_\_\_\_\_\_\_\_\_\_\_\_\_\_\_\_\_\_\_\_\_\_\_\_\_\_\_\_\_\_\_\_\_\_\_\_\_\_\_\_\_\_\_\_\_\_\_\_\_\_\_\_\_\_\_\_\_\_\_\_\_\_\_\_\_\_\_\_\_\_\_\_\_\_\_\_\_\_\_\_\_\_\_\_\_\_\_\_\_\_\_\_\_\_\_\_\_
**Additional Detail Tab** a section where the additional information is entered and managed for the sold goods or services. This tab ensures that all relevant details regarding the Closed order remarks, Inco Terms , billing address warranty terms Selling conditions , and special instruction are captured in the system to facilitate smooth and accurate order fulfillment.
##### **How to set Additional Detail?**
1\. Click on SALES – SALES OPERATIONS – SALES INVOICE ON ORDER- ADDITIONAL DETAIL TAB for the screen below.
[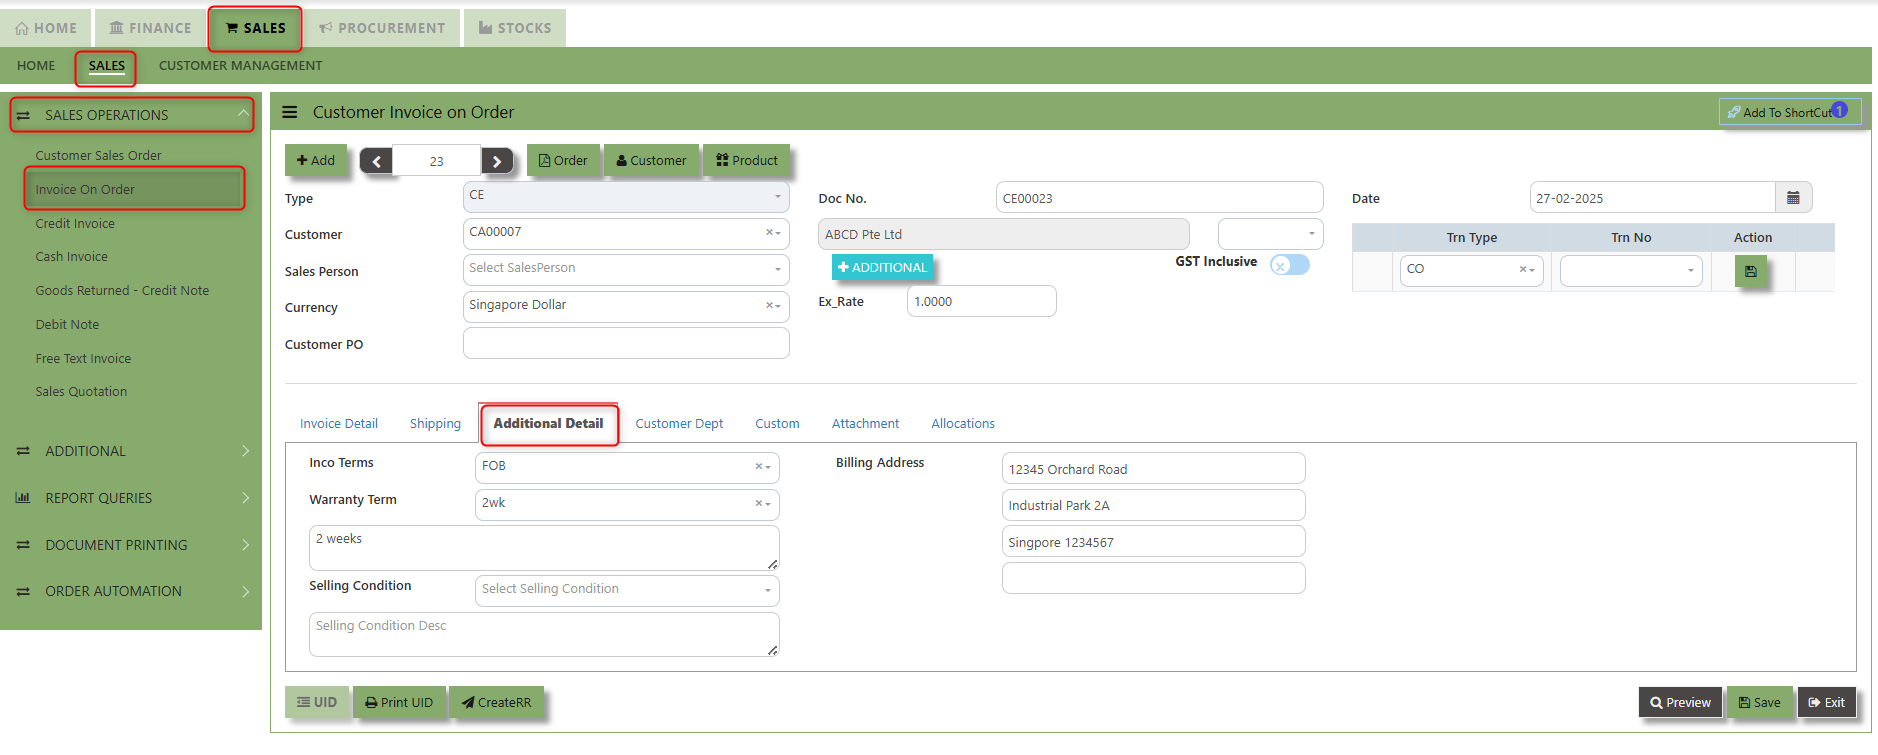](https://doc.uniq365.com/uploads/images/gallery/2025-02/FKfimage.png)
2\. Input the below details for the below fields:
- - Inco terms
- Billing Address
- Warranty Terms
- Selling conditions
- Special instruction
3\. Once keyed in the necessary details, click the next tab and will automatically save all the information
\_\_\_\_\_\_\_\_\_\_\_\_\_\_\_\_\_\_\_\_\_\_\_\_\_\_\_\_\_\_\_\_\_\_\_\_\_\_\_\_\_\_\_\_\_\_\_\_\_\_\_\_\_\_\_\_\_\_\_\_\_\_\_\_\_\_\_\_\_\_\_\_\_\_\_\_\_\_\_\_\_\_\_\_\_\_\_\_\_\_\_\_\_\_\_\_\_\_\_\_\_\_\_\_\_\_\_\_\_\_\_\_\_\_\_\_\_\_\_\_\_\_\_\_\_\_\_\_\_\_\_\_\_\_\_\_\_\_\_
**"Customer Dept Tab"** section where the Customer Department information is entered. This tab ensures that all relevant details regarding Customer Department details which is linked to the Customer Maintenance under Department Tab
- Click on SALES – SALES OPERATIONS – SALES INVOICE ON ORDER - CUSTOMER DEBT TAB for the screen below.
[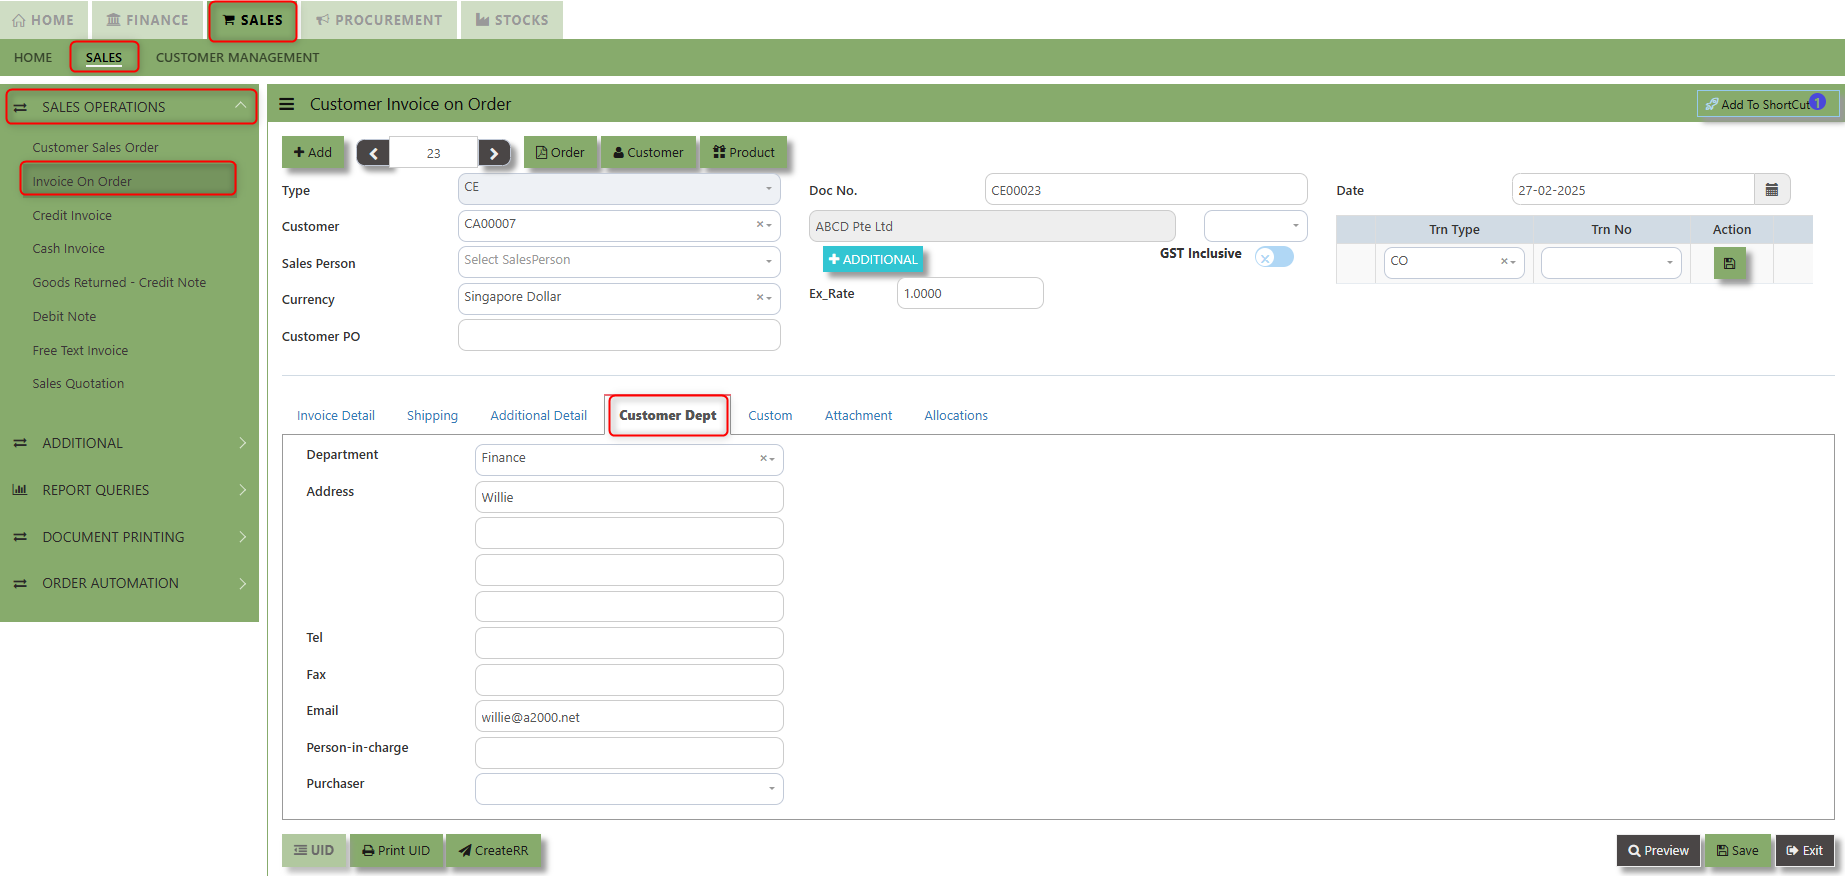](https://doc.uniq365.com/uploads/images/gallery/2025-02/ex1image.png)
The drop down selection for Customer Dept and Purchaser is maintained in Customer Maintenance under Department Tab
[](https://doc.uniq365.com/uploads/images/gallery/2025-02/jJqimage.png)
\_\_\_\_\_\_\_\_\_\_\_\_\_\_\_\_\_\_\_\_\_\_\_\_\_\_\_\_\_\_\_\_\_\_\_\_\_\_\_\_\_\_\_\_\_\_\_\_\_\_\_\_\_\_\_\_\_\_\_\_\_\_\_\_\_\_\_\_\_\_\_\_\_\_\_\_\_\_\_\_\_\_\_\_\_\_\_\_\_\_\_\_\_\_\_\_\_\_\_\_\_\_\_\_\_\_\_\_\_\_\_\_\_\_\_\_\_\_\_\_\_\_\_\_\_\_\_\_\_\_\_\_\_\_\_\_\_\_\_
**"Custom Tab"** provides a space for users to input customized data or additional fields that are specific to their business processes and requirements.
- Click on SALES – SALES OPERATIONS – SALES INVOICE ON ORDER - CUSTOM TAB for the screen below.
[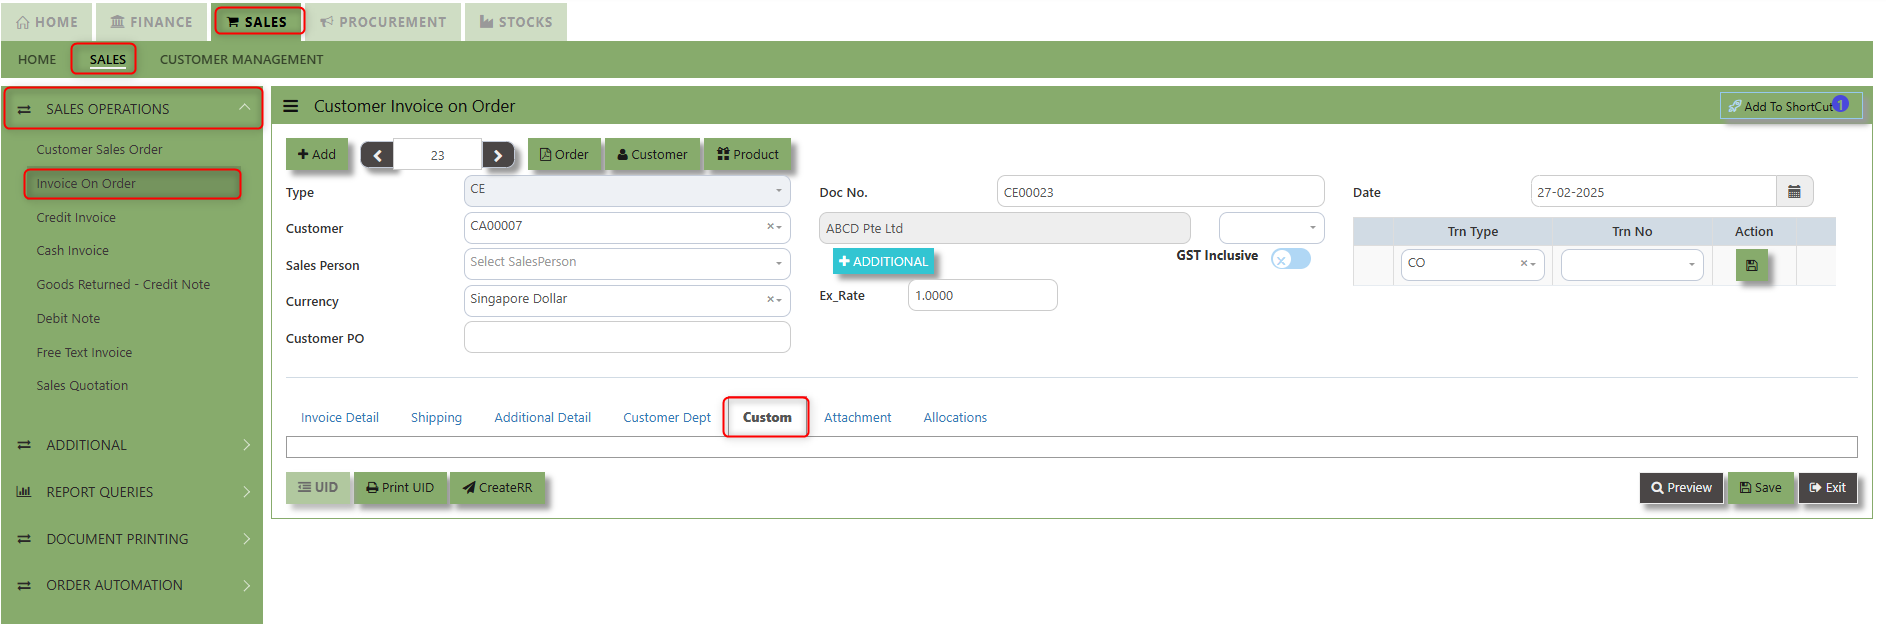](https://doc.uniq365.com/uploads/images/gallery/2025-02/IJiimage.png)
\_\_\_\_\_\_\_\_\_\_\_\_\_\_\_\_\_\_\_\_\_\_\_\_\_\_\_\_\_\_\_\_\_\_\_\_\_\_\_\_\_\_\_\_\_\_\_\_\_\_\_\_\_\_\_\_\_\_\_\_\_\_\_\_\_\_\_\_\_\_\_\_\_\_\_\_\_\_\_\_\_\_\_\_\_\_\_\_\_\_\_\_\_\_\_\_\_\_\_\_\_\_\_\_\_\_\_\_\_\_\_\_\_\_\_\_\_\_\_\_\_\_\_\_\_\_\_\_\_\_\_\_\_\_\_\_\_\_\_
**"Attachment Tab"** allows users to attach various files and documents related to the sales order. By attaching relevant files, users ensure that all purchase-related information is kept in one place, making the sales process smoother, more transparent, and easier to track.
##### **How to use Attachment Tab?**
1\. Click on SALES – SALES OPERATIONS – SALES INVOICE ON ORDER – ATTACHEMENT TAB for the screen below.
[](https://doc.uniq365.com/uploads/images/gallery/2025-02/8Iiimage.png)
2\. Click +Add files and windows will prompt then choose the file you want to upload by clicking open. Kindly take note the file types and maximum size requirements in uploading: ***Only (gif, jpg, jpeg, png, pdf, doc, docx, xls, xlsx, csv, msg, html and htm) file type allowed. | MaxFileSize : 25 MB***
[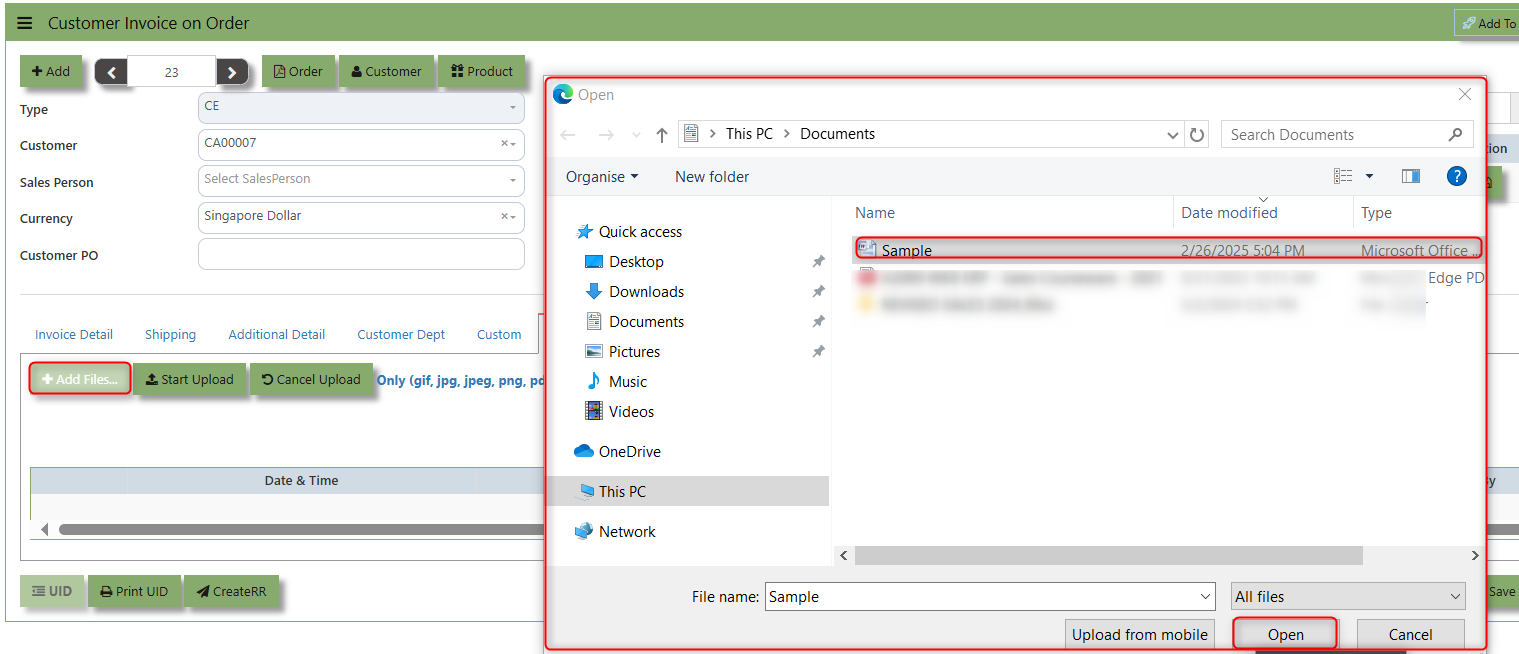](https://doc.uniq365.com/uploads/images/gallery/2025-02/dsIimage.png)
3\. Key in the Attachment Name then click start to upload.
[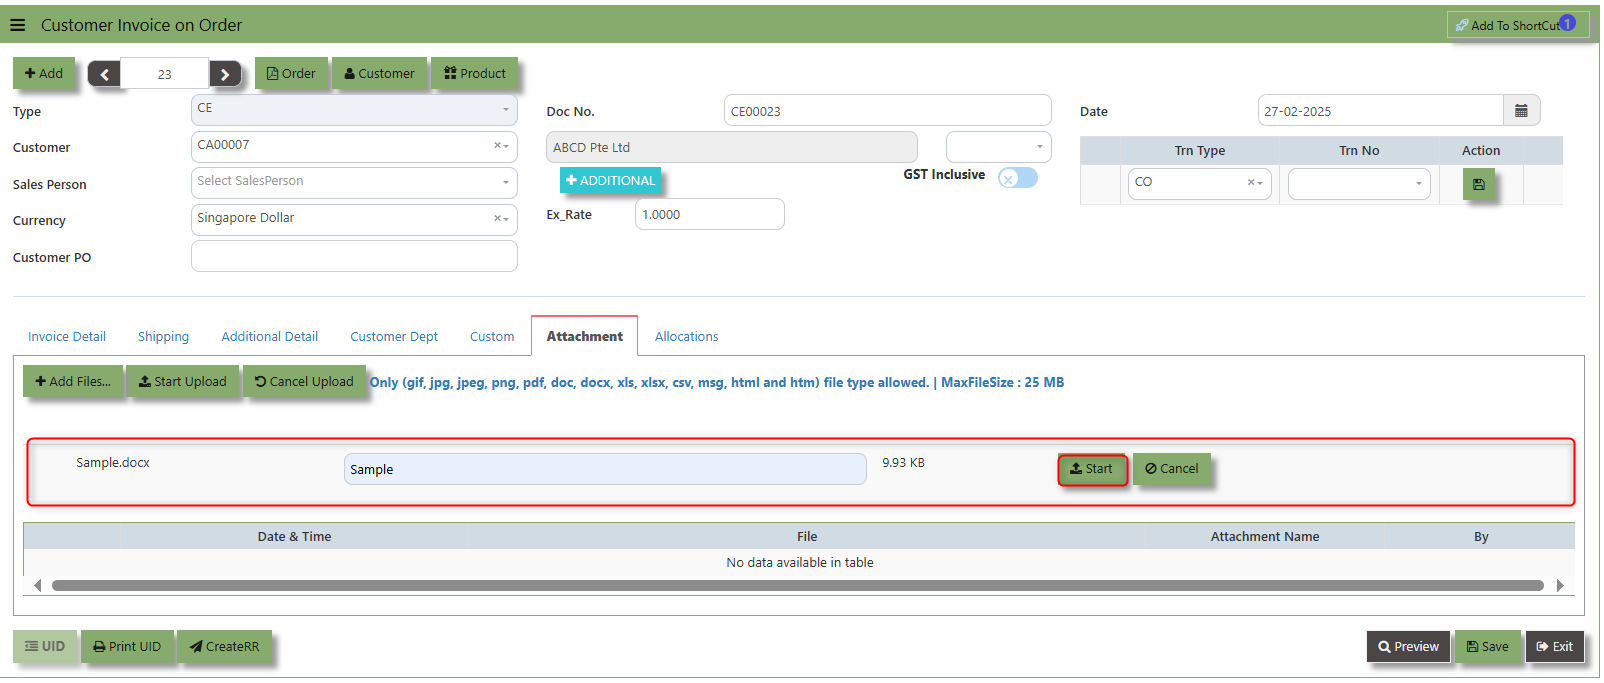](https://doc.uniq365.com/uploads/images/gallery/2025-02/PzGimage.png)
4. Once the file attached, click "SAVE" button
[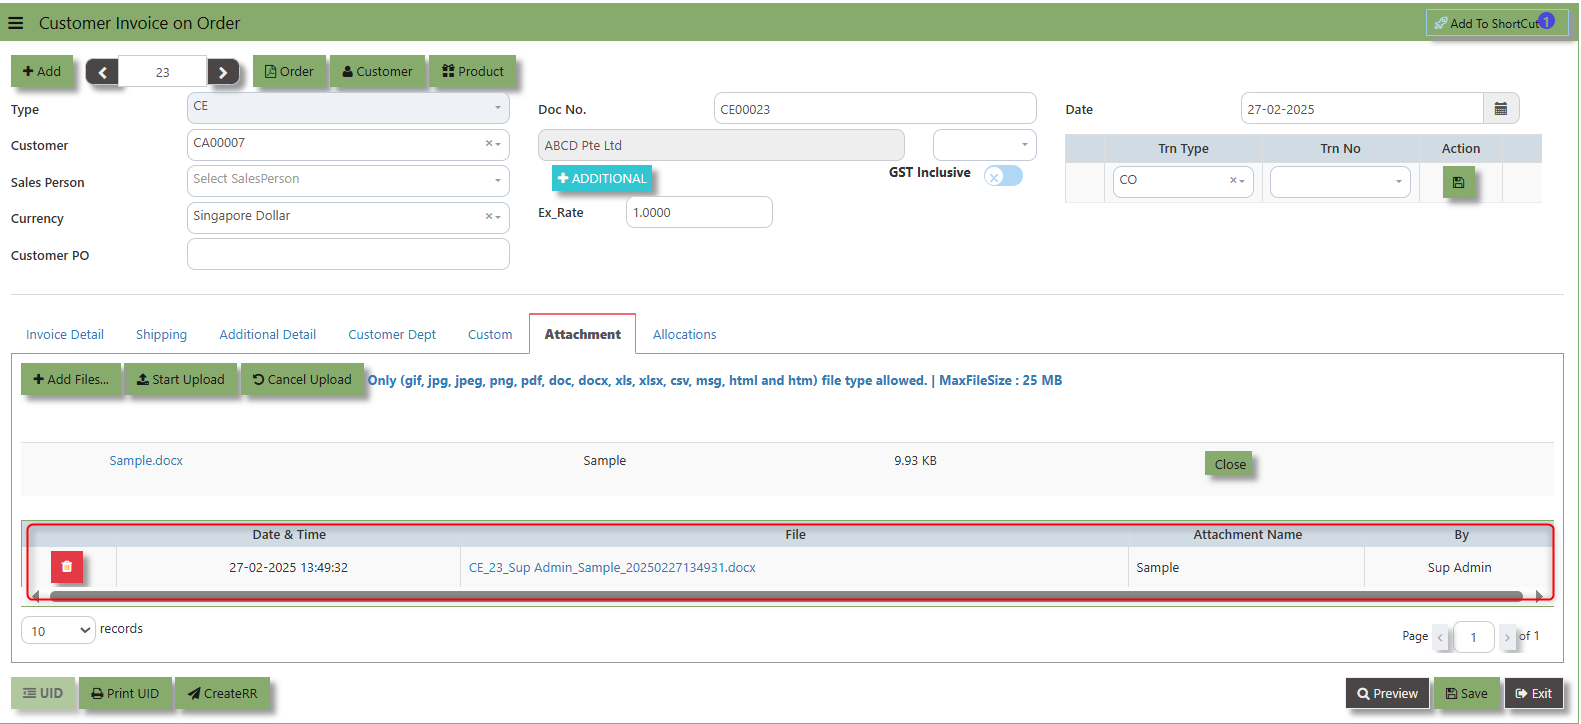](https://doc.uniq365.com/uploads/images/gallery/2025-02/9Plimage.png)
User may opt to cancel the uploading by clicking the **"Cancel Upload"** button and delete the file uploaded by clicking the **"Bin icon"** at the line detail.
\_\_\_\_\_\_\_\_\_\_\_\_\_\_\_\_\_\_\_\_\_\_\_\_\_\_\_\_\_\_\_\_\_\_\_\_\_\_\_\_\_\_\_\_\_\_\_\_\_\_\_\_\_\_\_\_\_\_\_\_\_\_\_\_\_\_\_\_\_\_\_\_\_\_\_\_\_\_\_\_\_\_\_\_\_\_\_\_\_\_\_\_\_\_\_\_\_\_\_\_\_\_\_\_\_\_\_\_\_\_\_\_\_\_\_\_\_\_\_\_\_\_\_\_\_\_\_\_\_\_\_\_\_\_\_\_\_\_\_
The **Allocations Tab** is used to manage and allocate the amounts or costs associated with the Customer Invoice on order. Click on SALES – SALES OPERATIONS – SALES INVOICE ON ORDER - ATTACHMENT TAB for the screen below.
[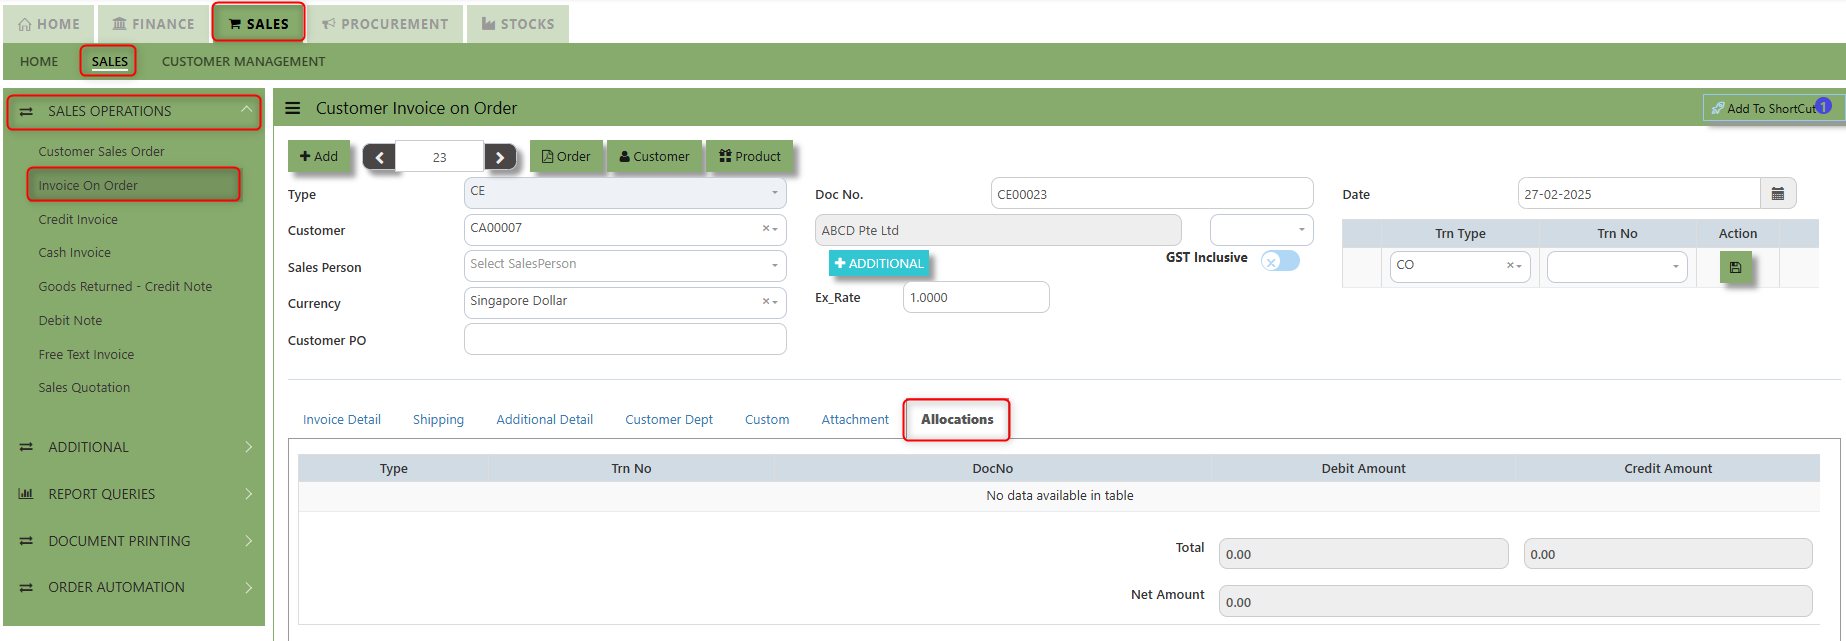](https://doc.uniq365.com/uploads/images/gallery/2025-02/MrUimage.png)
Credit Invoice
##### A Customer **Credit Invoice** directly updates the inventory status and represents a direct transaction for invoicing. It will also update the Accounts Receivables at the same time.
##### **How to Create Credit Invoice?**
1\. Click on **SALES – SALES – SALES OPERATIONS – CREDIT INVOICE** for the screen below.
[](https://doc.uniq365.com/uploads/images/gallery/2025-02/bmoimage.png)
2\. Click on Add button or press F3 to create a new transaction.
[](https://doc.uniq365.com/uploads/images/gallery/2025-02/nieimage.png)
3\. Click the Type - drop-down to select transaction type – CR (Credit Invoice).
4\. After selecting the transaction type, you can use the tab button go to the Ref No. and Date fields to fill up the information.
5\. Click the Customer - drop-down list to select the Customer for this invoice, followed by the Salesperson, PDS, Currency, Rate, Our D/O, Order Ref No. and Order Ref. Date if applicable.
6\. After completing the above steps, you can go to the Details section to select the product items from the product drop
down list, as well as to specify the quantity and unit price. Save the transaction after this is done.
\_\_\_\_\_\_\_\_\_\_\_\_\_\_\_\_\_\_\_\_\_\_\_\_\_\_\_\_\_\_\_\_\_\_\_\_\_\_\_\_\_\_\_\_\_\_\_\_\_\_\_\_\_\_\_\_\_\_\_\_\_\_\_\_\_\_\_\_\_\_\_\_\_\_\_\_\_\_\_\_\_\_\_\_\_\_\_\_\_\_\_\_\_\_\_\_\_\_\_\_\_\_\_\_\_\_\_\_\_\_\_\_\_\_\_\_\_\_\_\_\_\_\_\_\_\_\_\_\_\_\_\_\_\_\_\_\_\_\_
**Add to ShortCut -** Used to create a shortcut for quick access to a specific sales transaction. By clicking this button, users can add the current sales invoice on order to a list of shortcuts, allowing them to access the invoice or related functionality quickly and efficiently, without needing to search for it each time.
[](https://doc.uniq365.com/uploads/images/gallery/2025-02/RJLimage.png)
##### **How to use Add to ShortCut?**
1\. Click "**Add to ShortCut"** and system will open below windows:
[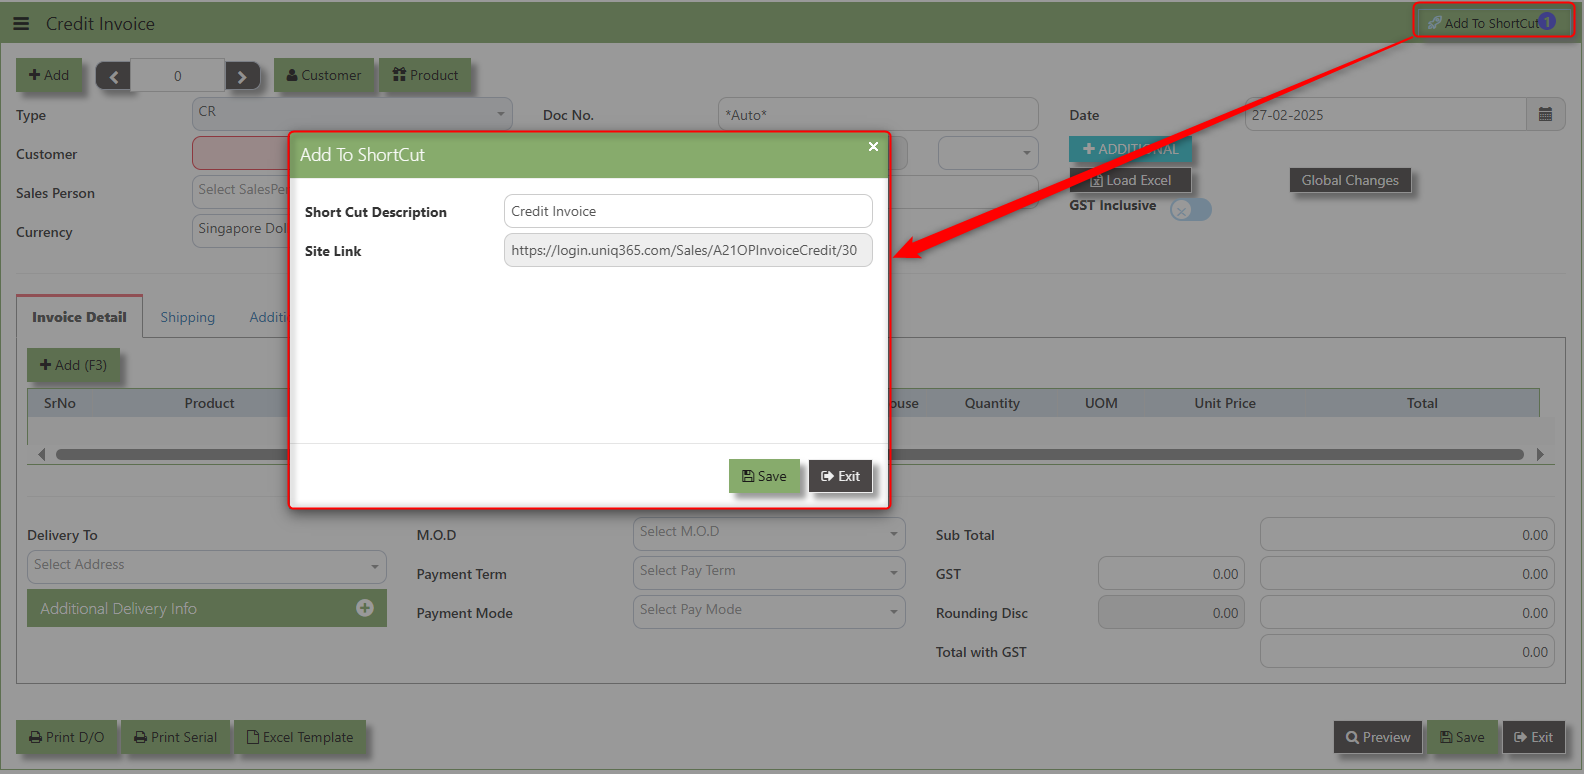](https://doc.uniq365.com/uploads/images/gallery/2025-02/Ya9image.png)
2\. Enter Short Cut Description
3\. Click SAVE then click OK.
4\. User may look to the Homepage for the added function or page. Click on HOME - HOME - SHORTCUT for the screen below.
[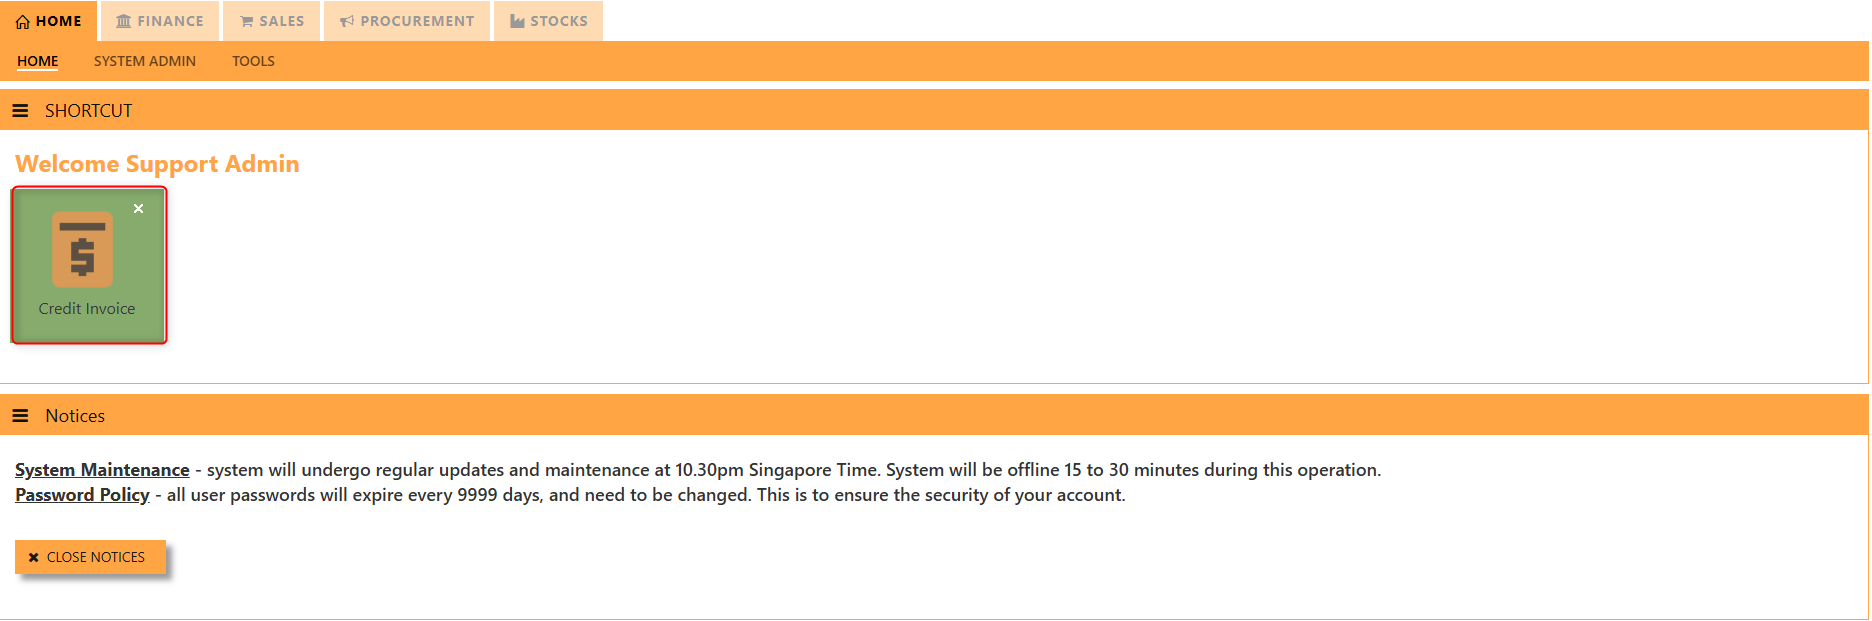](https://doc.uniq365.com/uploads/images/gallery/2025-02/HKUimage.png)
\_\_\_\_\_\_\_\_\_\_\_\_\_\_\_\_\_\_\_\_\_\_\_\_\_\_\_\_\_\_\_\_\_\_\_\_\_\_\_\_\_\_\_\_\_\_\_\_\_\_\_\_\_\_\_\_\_\_\_\_\_\_\_\_\_\_\_\_\_\_\_\_\_\_\_\_\_\_\_\_\_\_\_\_\_\_\_\_\_\_\_\_\_\_\_\_\_\_\_\_\_\_\_\_\_\_\_\_\_\_\_\_\_\_\_\_\_\_\_\_\_\_\_\_\_\_\_\_\_\_\_\_\_\_\_\_\_\_\_
The **Customer** button provides quick access to detailed supplier profiles under Customer maintenance.
[](https://doc.uniq365.com/uploads/images/gallery/2025-02/V4Cimage.png)
The **Product** button provides quick access to product and service maintenance
[](https://doc.uniq365.com/uploads/images/gallery/2025-02/qkFimage.png)
**Additional Header Info** button is typically used to capture and manage additional information related to the Sales Credit Invoice at the header level (i.e., Delivery date, Del Term , Indicative WH , Country, Lead Time, Contact, PDSU, Narration and Transaction Narration). This feature allows users to add extra data or notes that are relevant to the entire sales invoice on order.
[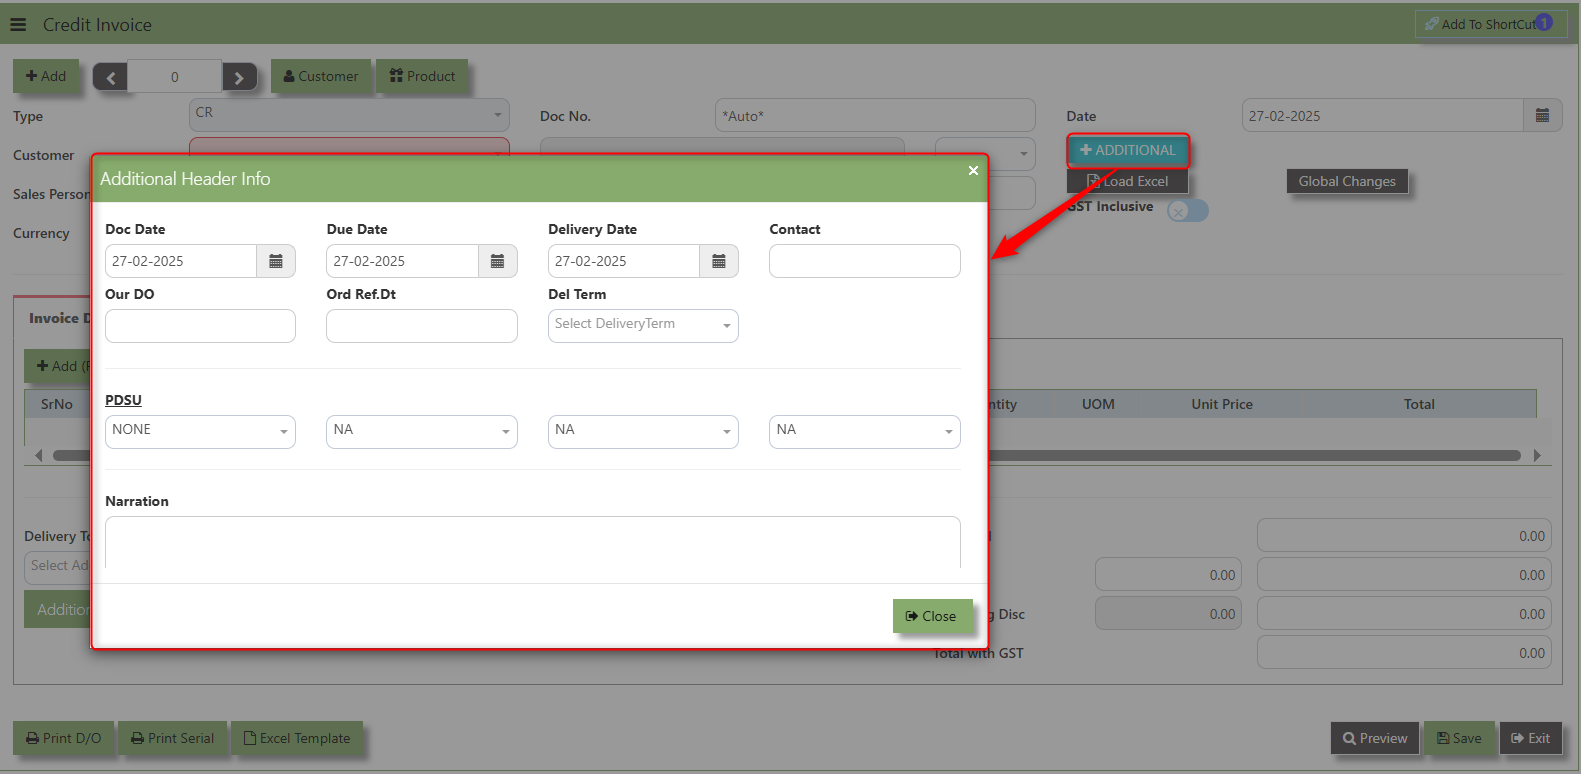](https://doc.uniq365.com/uploads/images/gallery/2025-02/wsaimage.png)
The **GST Inclusive** checkbox indicates whether the unit price in the CE include **Goods and Services Tax (GST)** or not.
[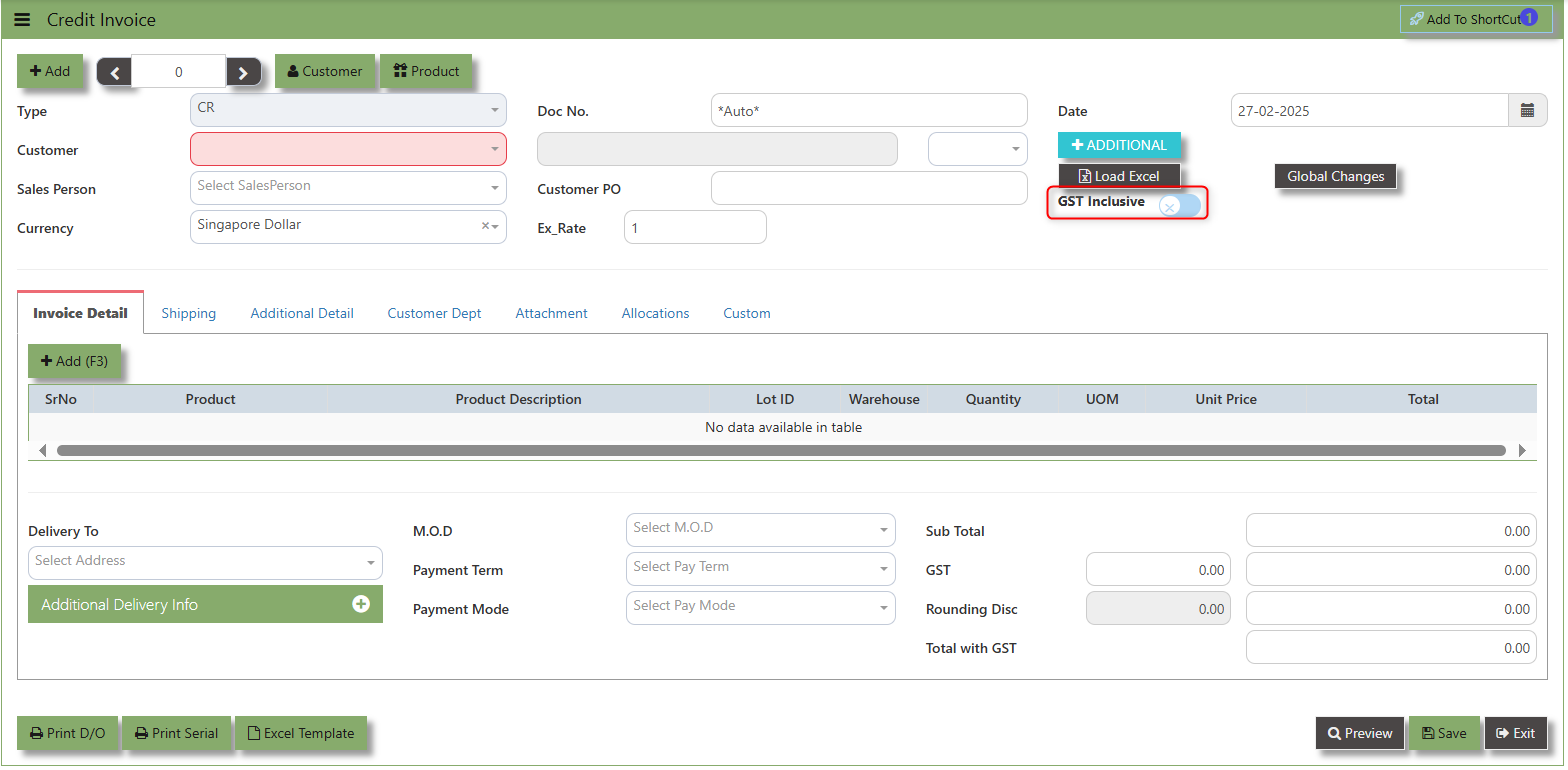](https://doc.uniq365.com/uploads/images/gallery/2025-02/wHLimage.png)
- **When ticked (GST Inclusive)**: provided in the Sales Order already includes the applicable GST amount. The GST amount will not be calculated or displayed separately, as it's already accounted for in the quoted price.
- **When not ticked (GST Exclusive)**: The unit **price** is considered exclusive of GST. The system will calculate and add the GST based on the applicable tax rate, and the final total will be the sum of the base price plus the GST amount.
**Global Changes Button** allows users to efficiently apply or modify discounts across multiple items in a credit note.
##### **How to use Global Changes?**
1.Click "Global Changes**"** and system will open below windows:
[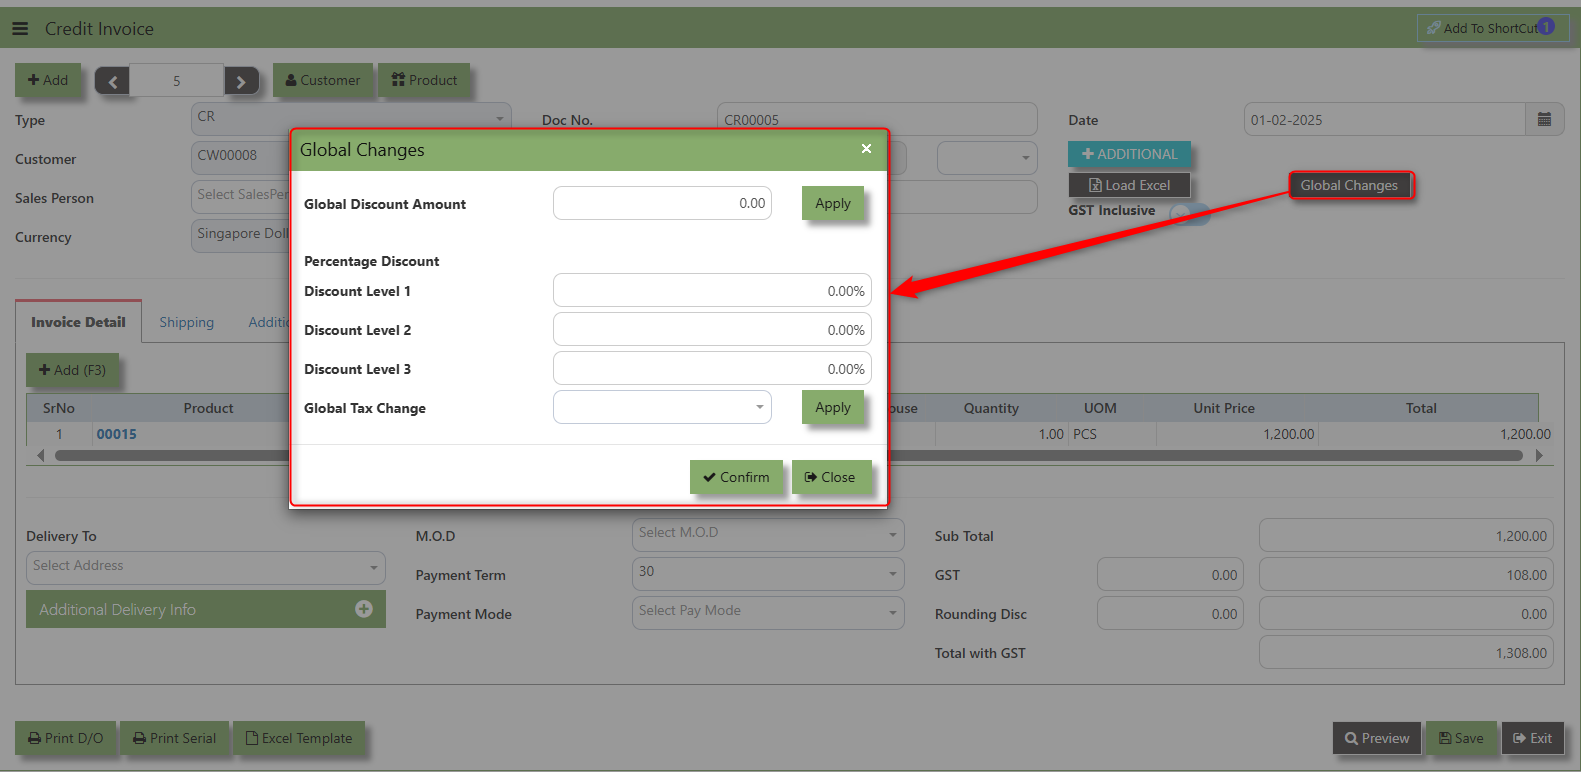](https://doc.uniq365.com/uploads/images/gallery/2025-02/kqMimage.png)
2\. Add a Discount to the transaction if its Global Discount Amount or Percentage Discount.
[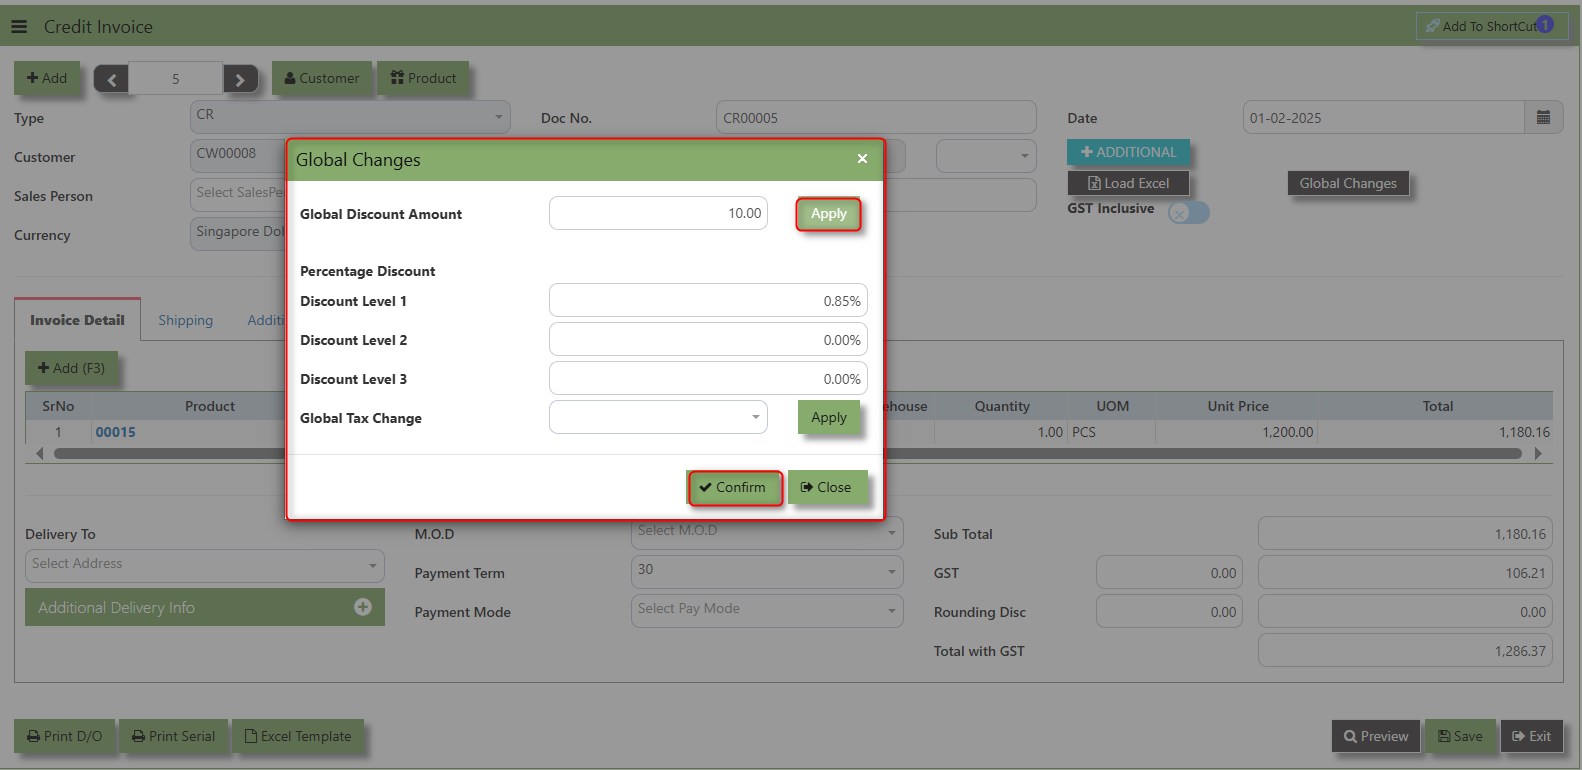](https://doc.uniq365.com/uploads/images/gallery/2025-02/gzIimage.png)
3\. Click Apply and Confirm button, the discount will be automatically captured in the line item and in the transaction.
[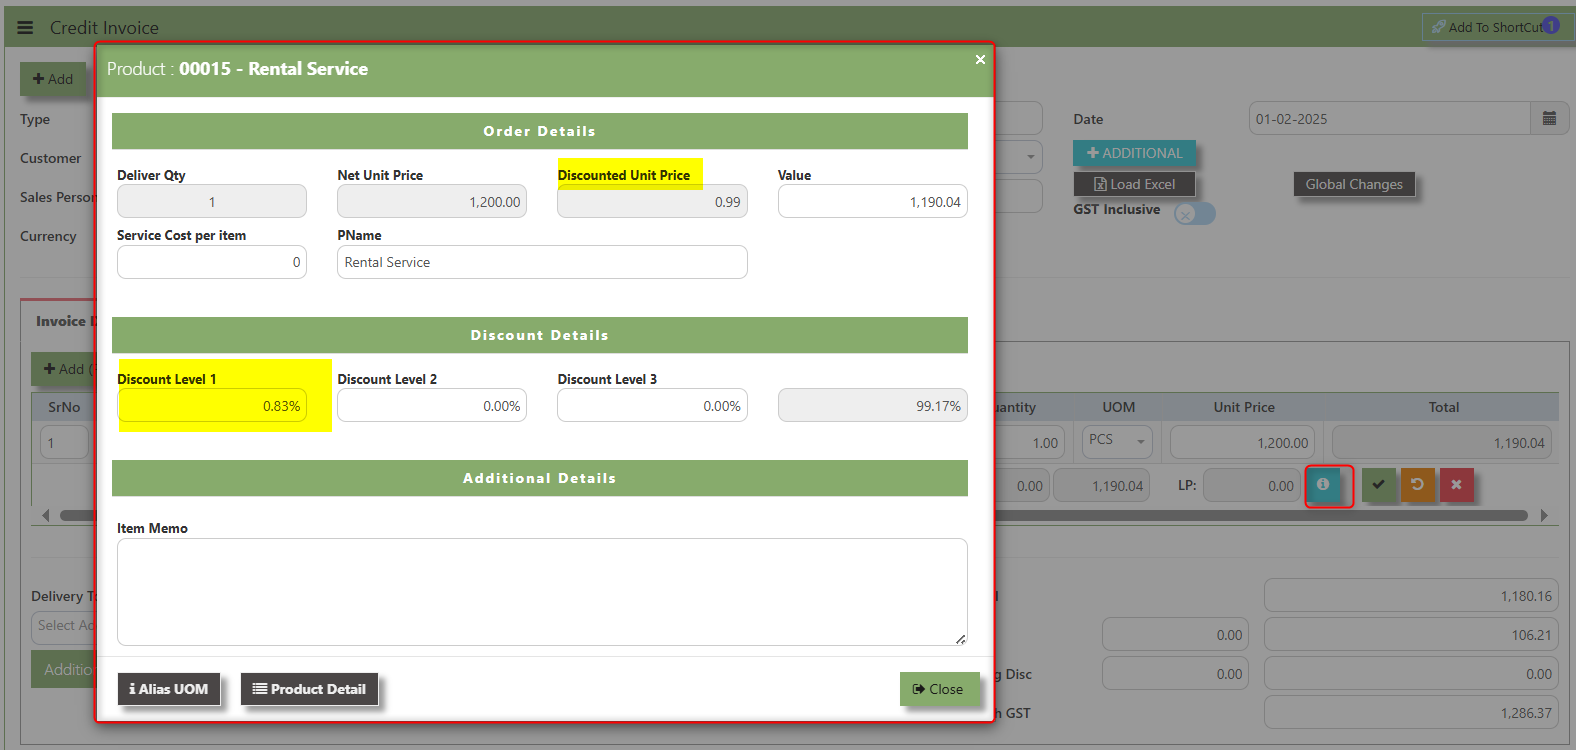](https://doc.uniq365.com/uploads/images/gallery/2025-02/D2Wimage.png)
**Load Excel** - When users have an Excel file from Excel Template with Credit Invoice information (ie Warehouse, Product, Pname, UOM, Quantity, Unit Price, GST type, Line Discount, Detail Memo) the **"Load Excel"** button allows them to upload and import this data directly into the system. This eliminates the need for manual entry of the data into the system's Credit Invoice fields.
[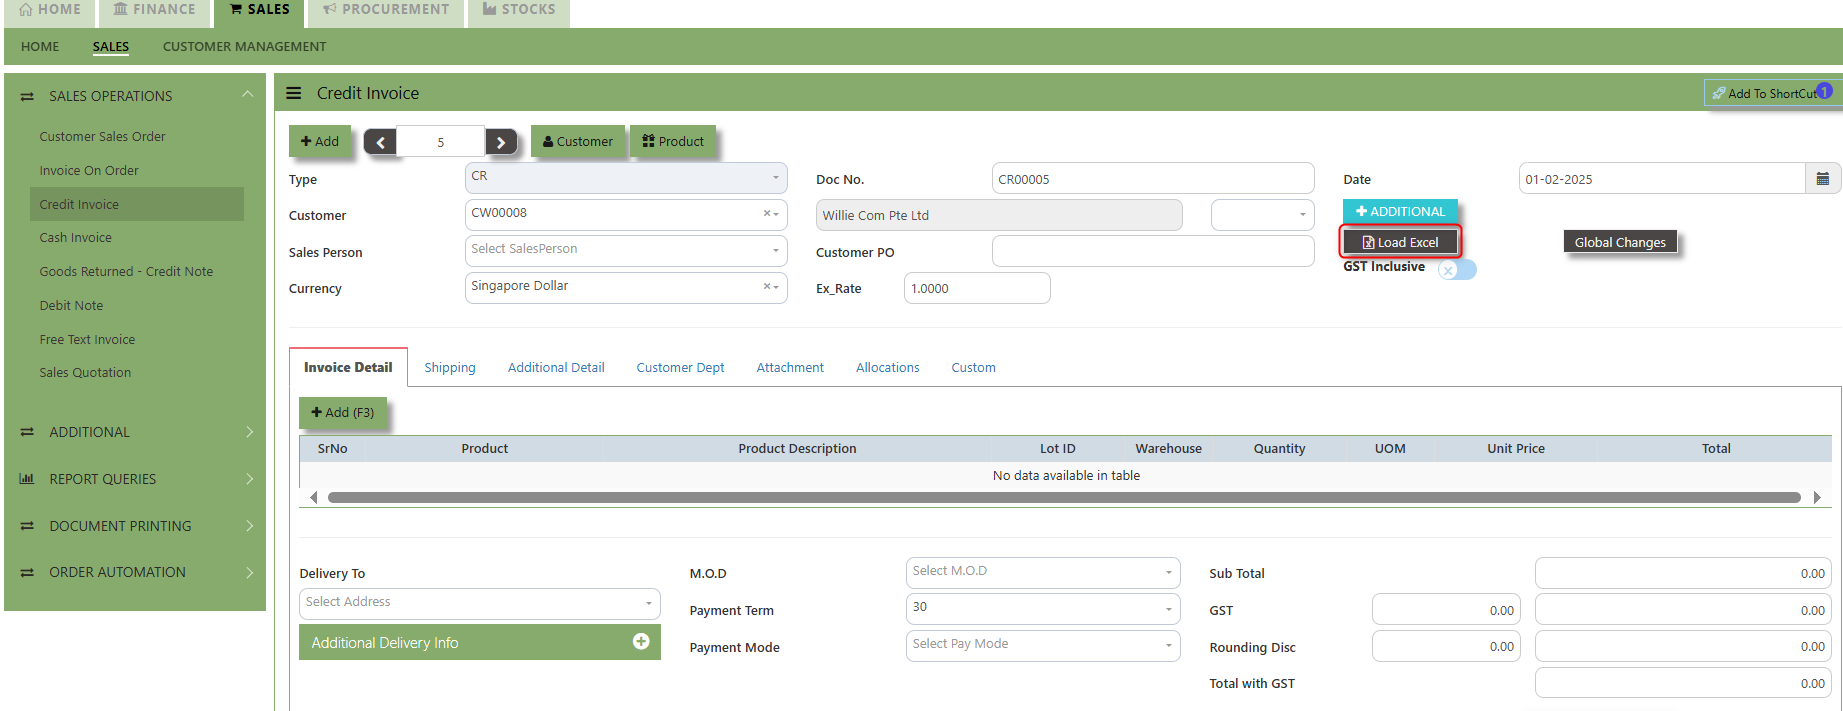](https://doc.uniq365.com/uploads/images/gallery/2025-02/Ijtimage.png)
##### **How to use Load Excel?**
1\. Click the Customer - drop-down list to select Customer Name
[](https://doc.uniq365.com/uploads/images/gallery/2025-02/jufimage.png)
2\. Download the Excel Template and ensure the Excel file you plan to upload is formatted correctly. It should contain all the necessary fields required for credit invoice, such as:
- Warehouse
- Product Code
- Product Name
- LotID
- GST Type
- Quantity
- UOM
- Unit Price
- Detail Memo
[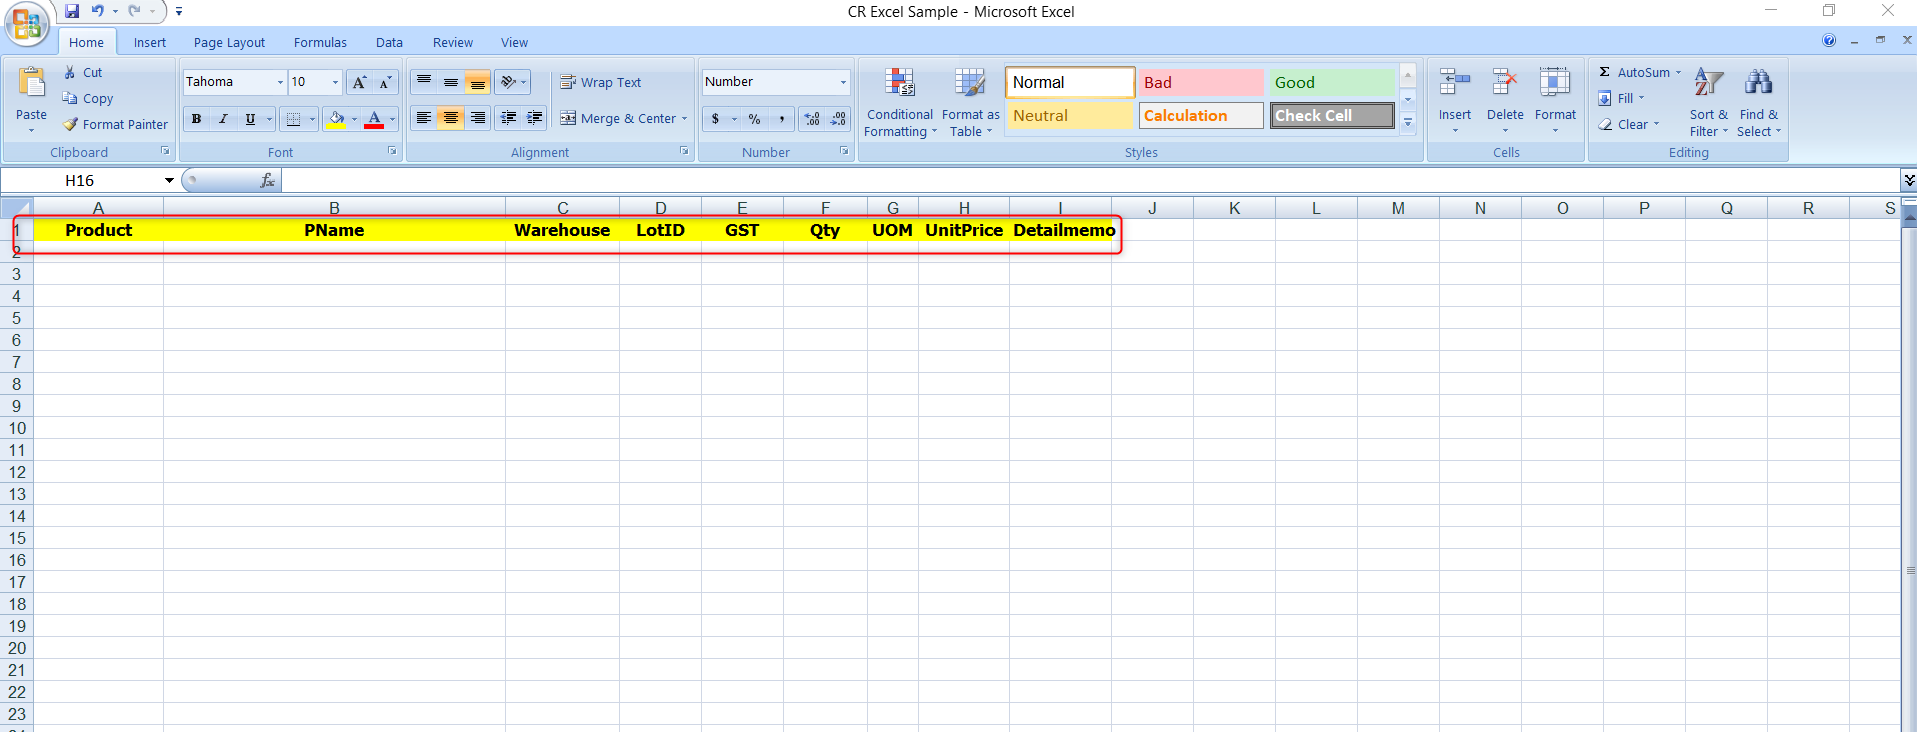](https://doc.uniq365.com/uploads/images/gallery/2025-02/XLJimage.png)
3\. Click the **Load Excel** button to open the file upload interface. This may open a file browser or prompt you to select the Excel file you want to upload.
[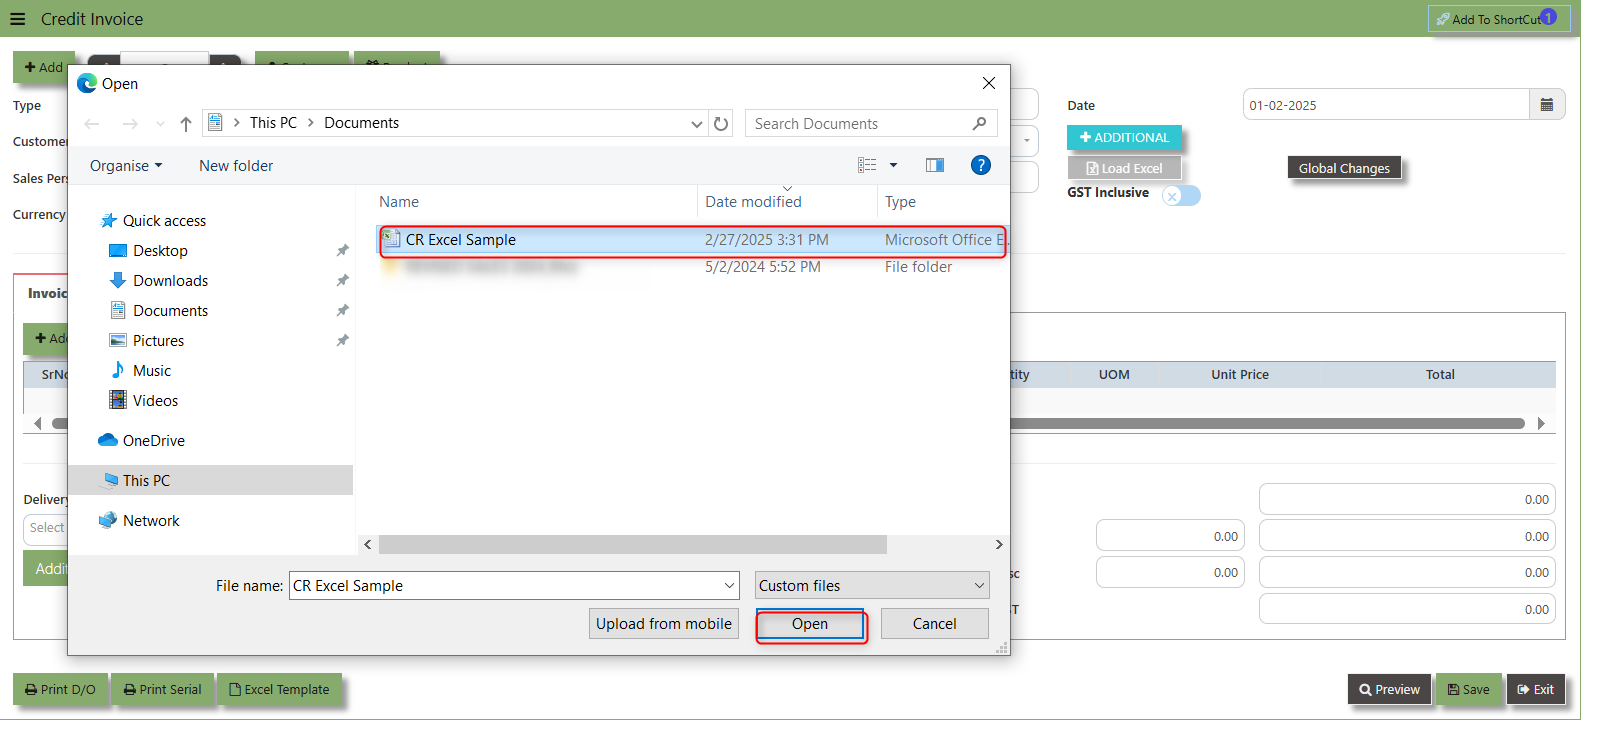](https://doc.uniq365.com/uploads/images/gallery/2025-02/nQmimage.png)
4\. Once the filed uploaded, system will prompt a message that record has been imported successfully.
5\. After the import is complete, review the imported credit invoice in the system to ensure everything has been transferred correctly. This might include checking that the order details, such as item descriptions, quantities, prices, and customers, are accurate.
6\. Once the data is imported successfully and checking is done, you can proceed to **save** the sales order as required by your workflow. This may involve further approvals or other processes depending on the organization's procedures.
\_\_\_\_\_\_\_\_\_\_\_\_\_\_\_\_\_\_\_\_\_\_\_\_\_\_\_\_\_\_\_\_\_\_\_\_\_\_\_\_\_\_\_\_\_\_\_\_\_\_\_\_\_\_\_\_\_\_\_\_\_\_\_\_\_\_\_\_\_\_\_\_\_\_\_\_\_\_\_\_\_\_\_\_\_\_\_\_\_\_\_\_\_\_\_\_\_\_\_\_\_\_\_\_\_\_\_\_\_\_\_\_\_\_\_\_\_\_\_\_\_\_\_\_\_\_\_\_\_\_\_\_\_\_\_\_\_\_\_
**Shipping Tab** a section where specific shipping-related information is entered and managed for the sold goods or services. This tab ensures that all relevant details regarding the shipment, delivery location, and delivery expectations are captured in the system to facilitate smooth and accurate order fulfillment.
##### **How to set Shipping Info?**
1\. Click on SALES – SALES OPERATIONS – CREDIT INVOICE - SHIPPING TAB for the screen below.
[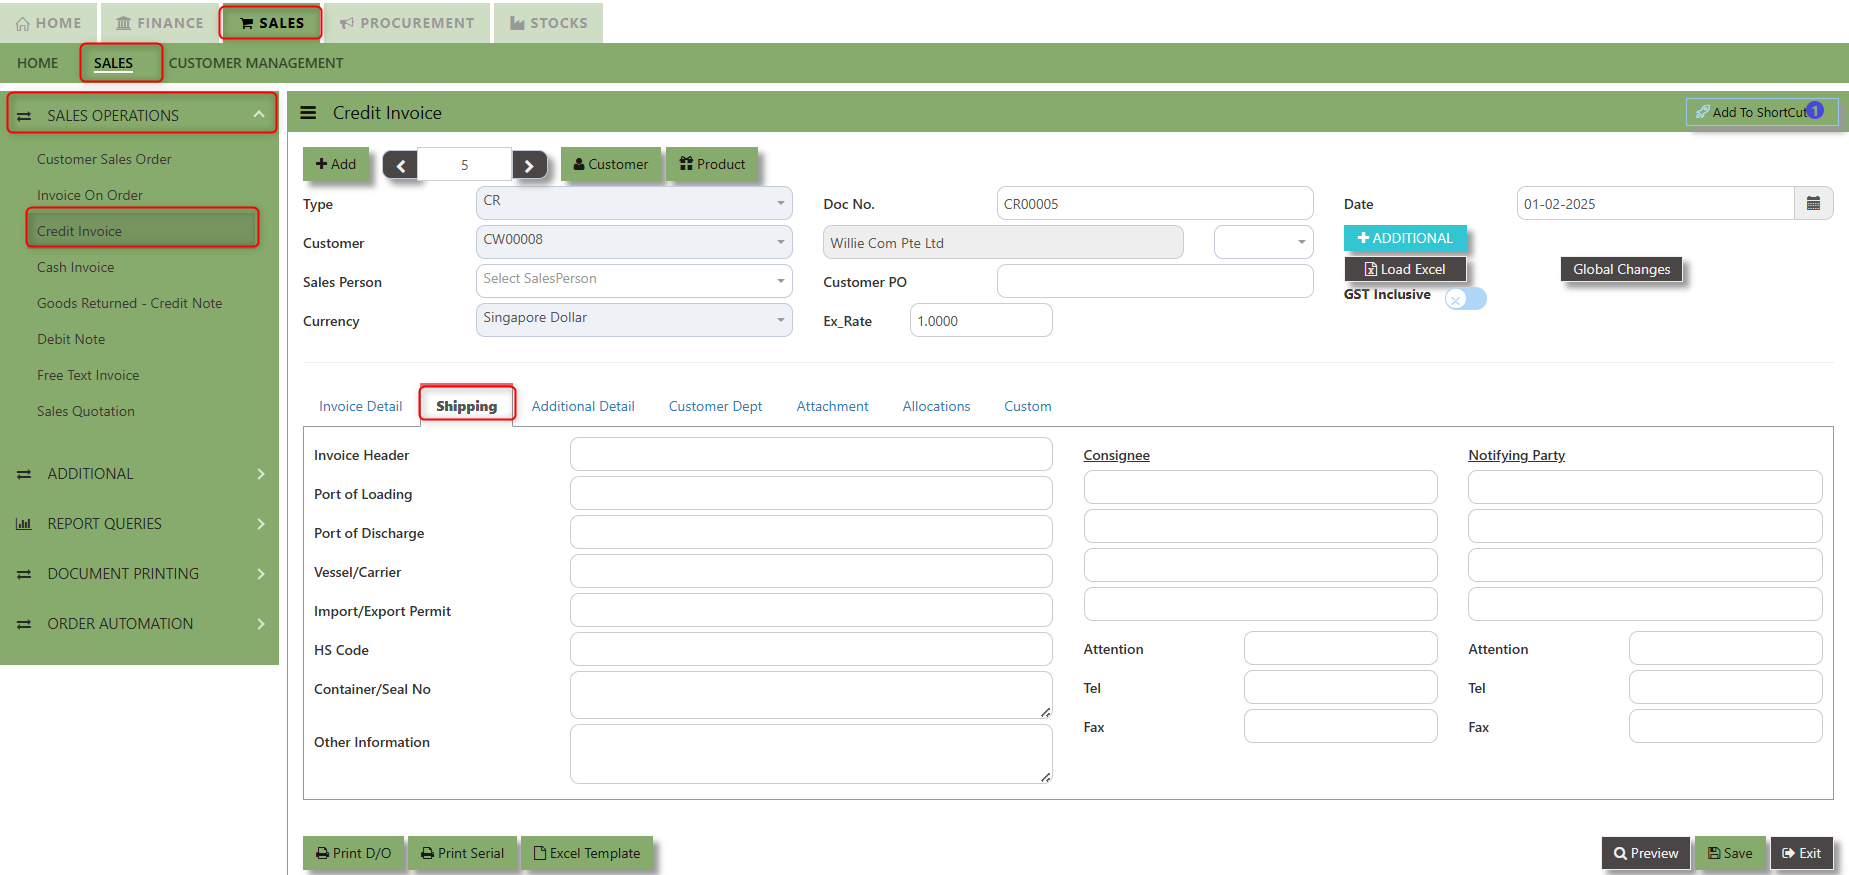](https://doc.uniq365.com/uploads/images/gallery/2025-02/xKmimage.png)
2\. Input the below details for the below fields:
- - Invoice Header
- Port of Loading
- Port of Discharge
- Vessel/Carrier
- Import/Export Permit
- HS Code
- Container/Seal No
- Other Information
- Consignee
- Attention
- Tel
- Fax
- Notifying Party
- Attention
- Tel
- Fax
3\. Once keyed in the necessary details, click the next tab and will automatically save all the information then system will prompt you a message.
[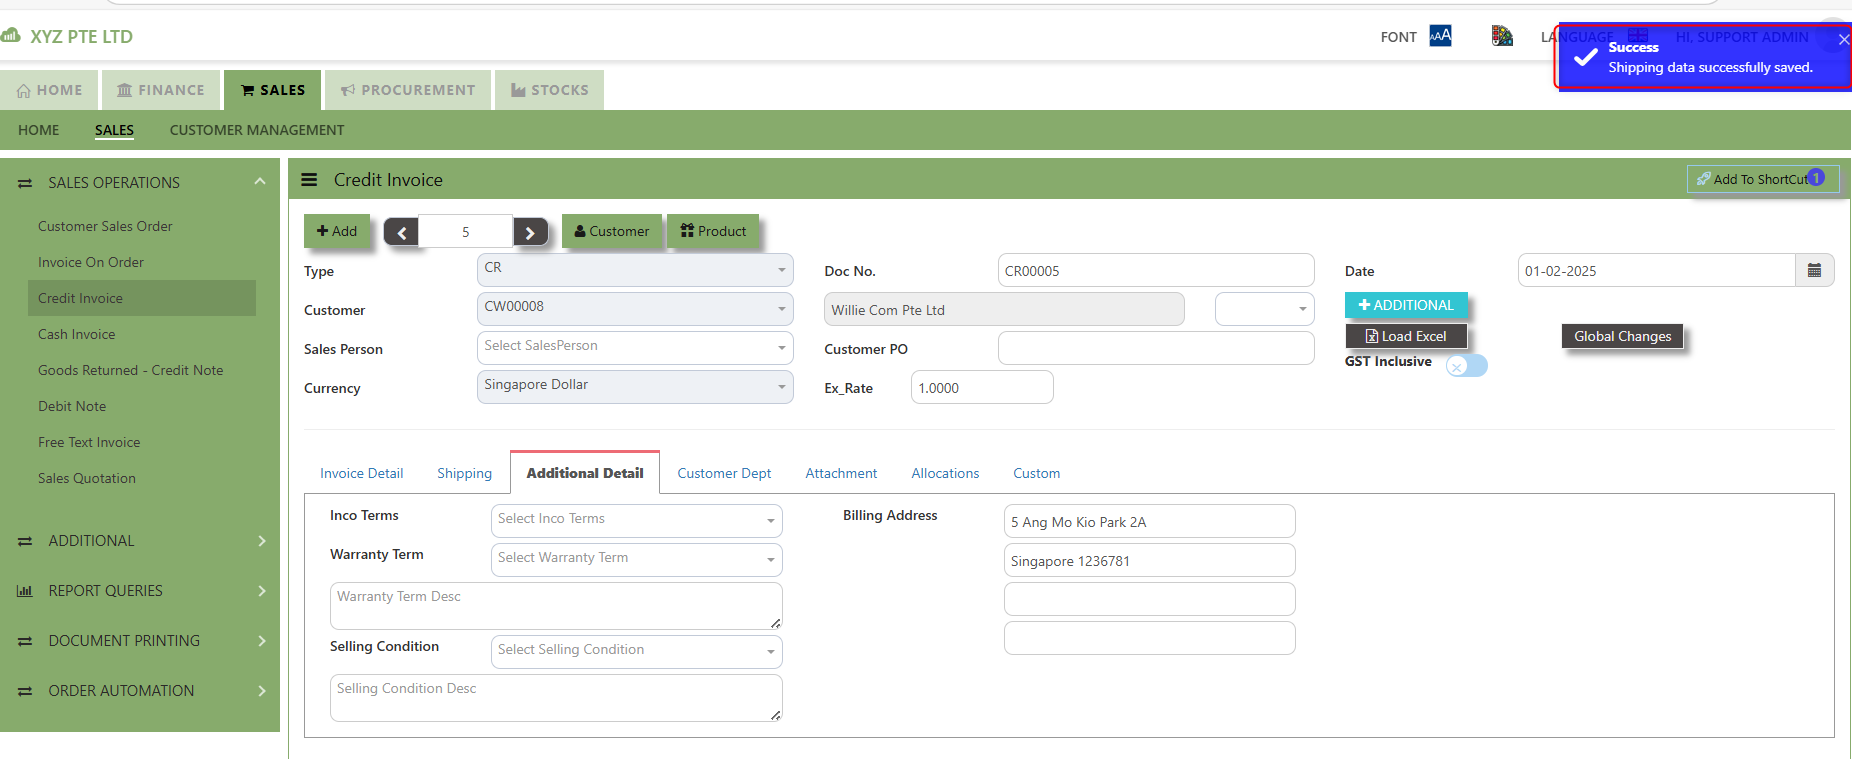](https://doc.uniq365.com/uploads/images/gallery/2025-02/nI2image.png)
\_\_\_\_\_\_\_\_\_\_\_\_\_\_\_\_\_\_\_\_\_\_\_\_\_\_\_\_\_\_\_\_\_\_\_\_\_\_\_\_\_\_\_\_\_\_\_\_\_\_\_\_\_\_\_\_\_\_\_\_\_\_\_\_\_\_\_\_\_\_\_\_\_\_\_\_\_\_\_\_\_\_\_\_\_\_\_\_\_\_\_\_\_\_\_\_\_\_\_\_\_\_\_\_\_\_\_\_\_\_\_\_\_\_\_\_\_\_\_\_\_\_\_\_\_\_\_\_\_\_\_\_\_\_\_\_\_\_\_
**Additional Detail Tab** a section where the additional information is entered . This tab ensures that all relevant details regarding the Narration, Inco Terms , billing address warranty terms Selling conditions , and special instruction are captured in the system to facilitate smooth and accurate sales quotation.
##### **How to set Additional Detail?**
1\. Click on SALES – SALES OPERATIONS –CREDIT INVOICE - ADDITIONAL DETAILS TAB for the screen below.
[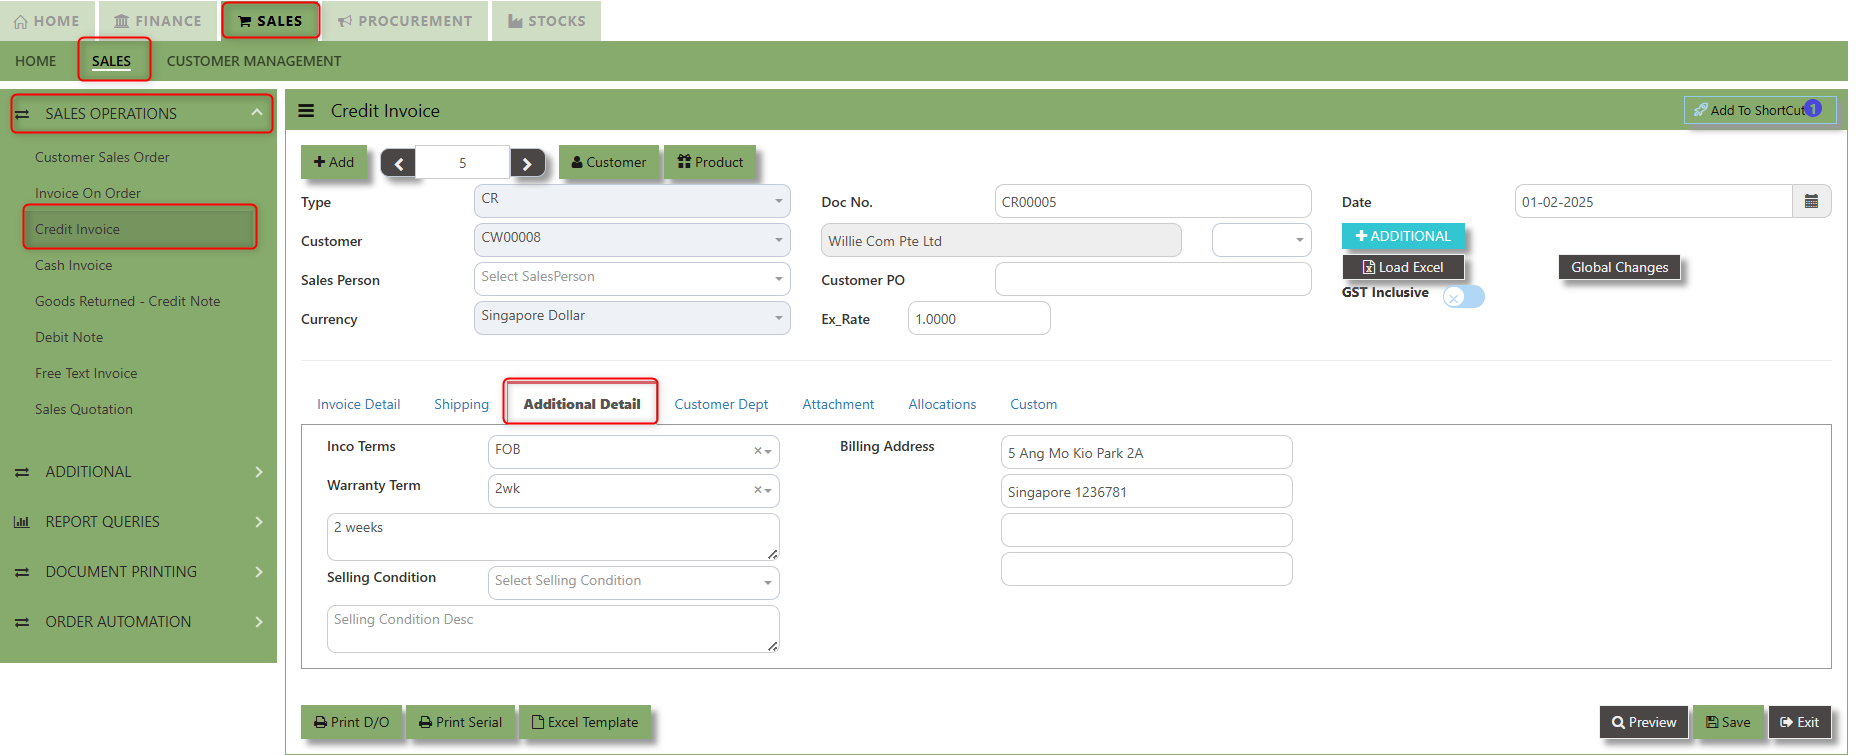](https://doc.uniq365.com/uploads/images/gallery/2025-02/NBlimage.png)
2\. Input the below details for the below fields:
- - Narration
- Billing Address
- Inco Terms
- Warranty Terms
- Selling Condition
- Inquiry Received Date
- Quotation Sent Date
3\. Once keyed in the necessary details, click the next tab and will automatically save all the information.
\_\_\_\_\_\_\_\_\_\_\_\_\_\_\_\_\_\_\_\_\_\_\_\_\_\_\_\_\_\_\_\_\_\_\_\_\_\_\_\_\_\_\_\_\_\_\_\_\_\_\_\_\_\_\_\_\_\_\_\_\_\_\_\_\_\_\_\_\_\_\_\_\_\_\_\_\_\_\_\_\_\_\_\_\_\_\_\_\_\_\_\_\_\_\_\_\_\_\_\_\_\_\_\_\_\_\_\_\_\_\_\_\_\_\_\_\_\_\_\_\_\_\_\_\_\_\_\_\_\_\_\_\_\_\_\_\_\_\_
**"Customer Dept Tab"** section where the Customer Department information is entered. This tab ensures that all relevant details regarding Customer Department details which is linked to the Customer Maintenance under Department Tab
- Click on SALES – SALES OPERATIONS – CREDIT INVOICE - CUSTOMER DEPT TAB for the screen below.
[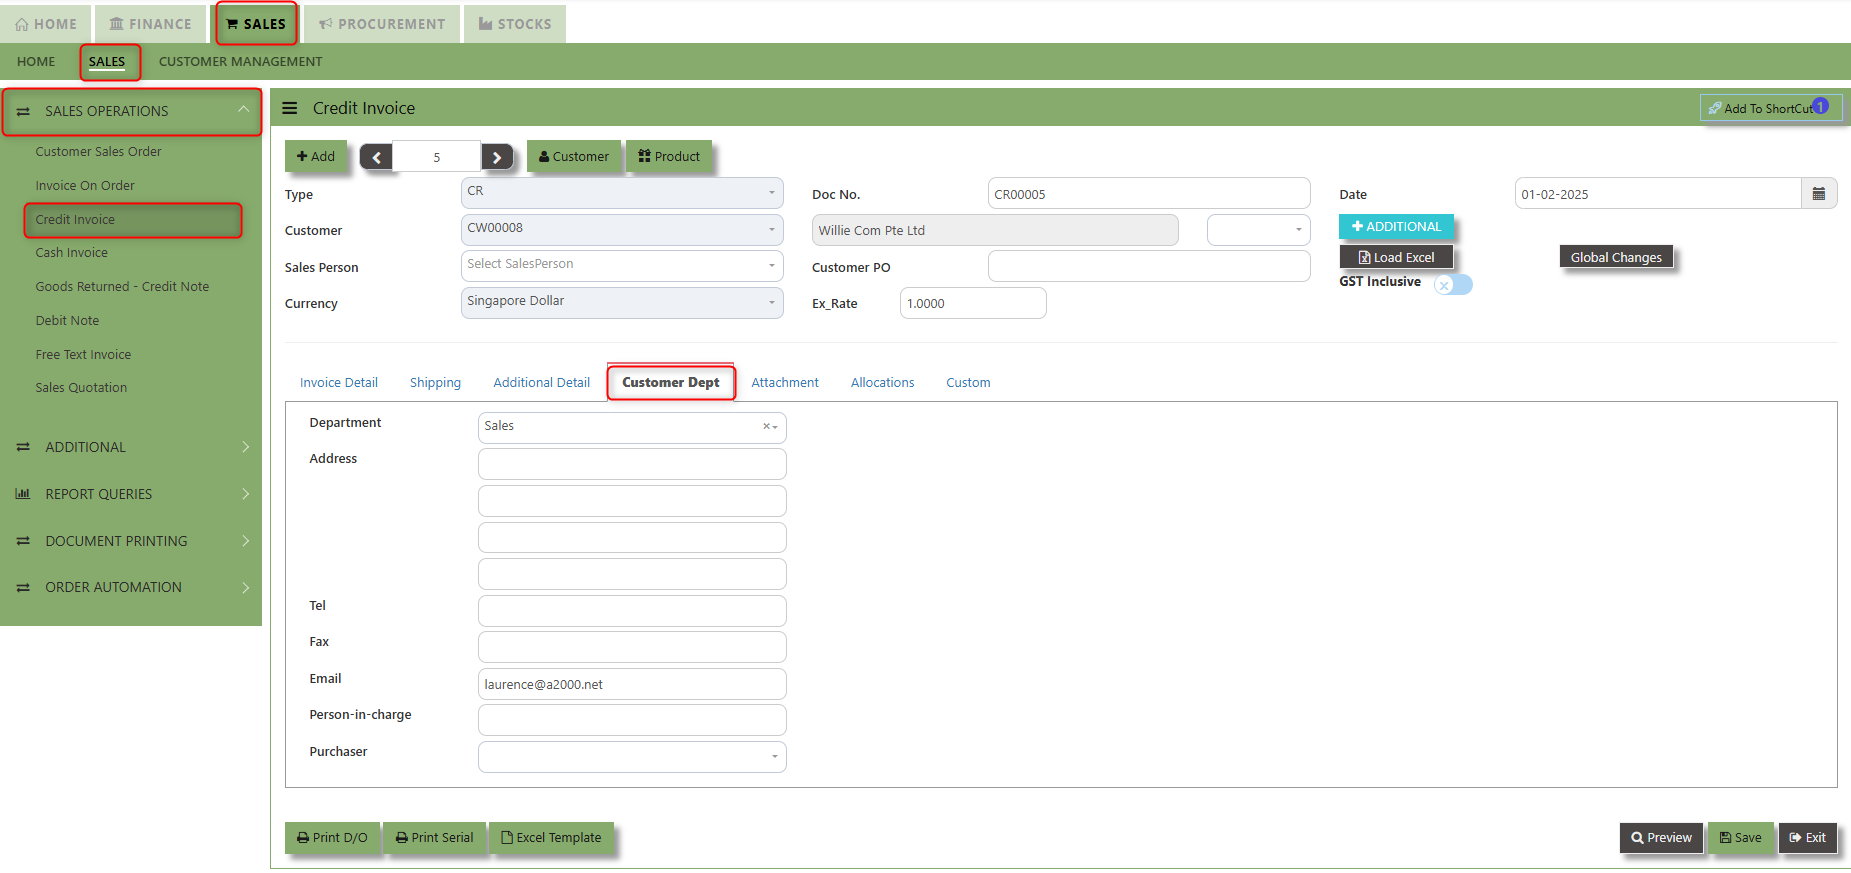](https://doc.uniq365.com/uploads/images/gallery/2025-02/0QYimage.png)
The drop down selection for Customer Dept and Purchaser is maintained in Customer Maintenance under Department Tab
[](https://doc.uniq365.com/uploads/images/gallery/2025-02/TR4image.png)
\_\_\_\_\_\_\_\_\_\_\_\_\_\_\_\_\_\_\_\_\_\_\_\_\_\_\_\_\_\_\_\_\_\_\_\_\_\_\_\_\_\_\_\_\_\_\_\_\_\_\_\_\_\_\_\_\_\_\_\_\_\_\_\_\_\_\_\_\_\_\_\_\_\_\_\_\_\_\_\_\_\_\_\_\_\_\_\_\_\_\_\_\_\_\_\_\_\_\_\_\_\_\_\_\_\_\_\_\_\_\_\_\_\_\_\_\_\_\_\_\_\_\_\_\_\_\_\_\_\_\_\_\_\_\_\_\_\_
**"Attachment Tab"** allows users to attach various files and documents related to the sales order. By attaching relevant files, users ensure that all purchase-related information is kept in one place, making the sales process smoother, more transparent, and easier to track.
##### **How to use Attachment Tab?**
1\. Click on SALES – SALES OPERATIONS – CREDIT INVOICE – ATTACHEMENT TAB for the screen below.
[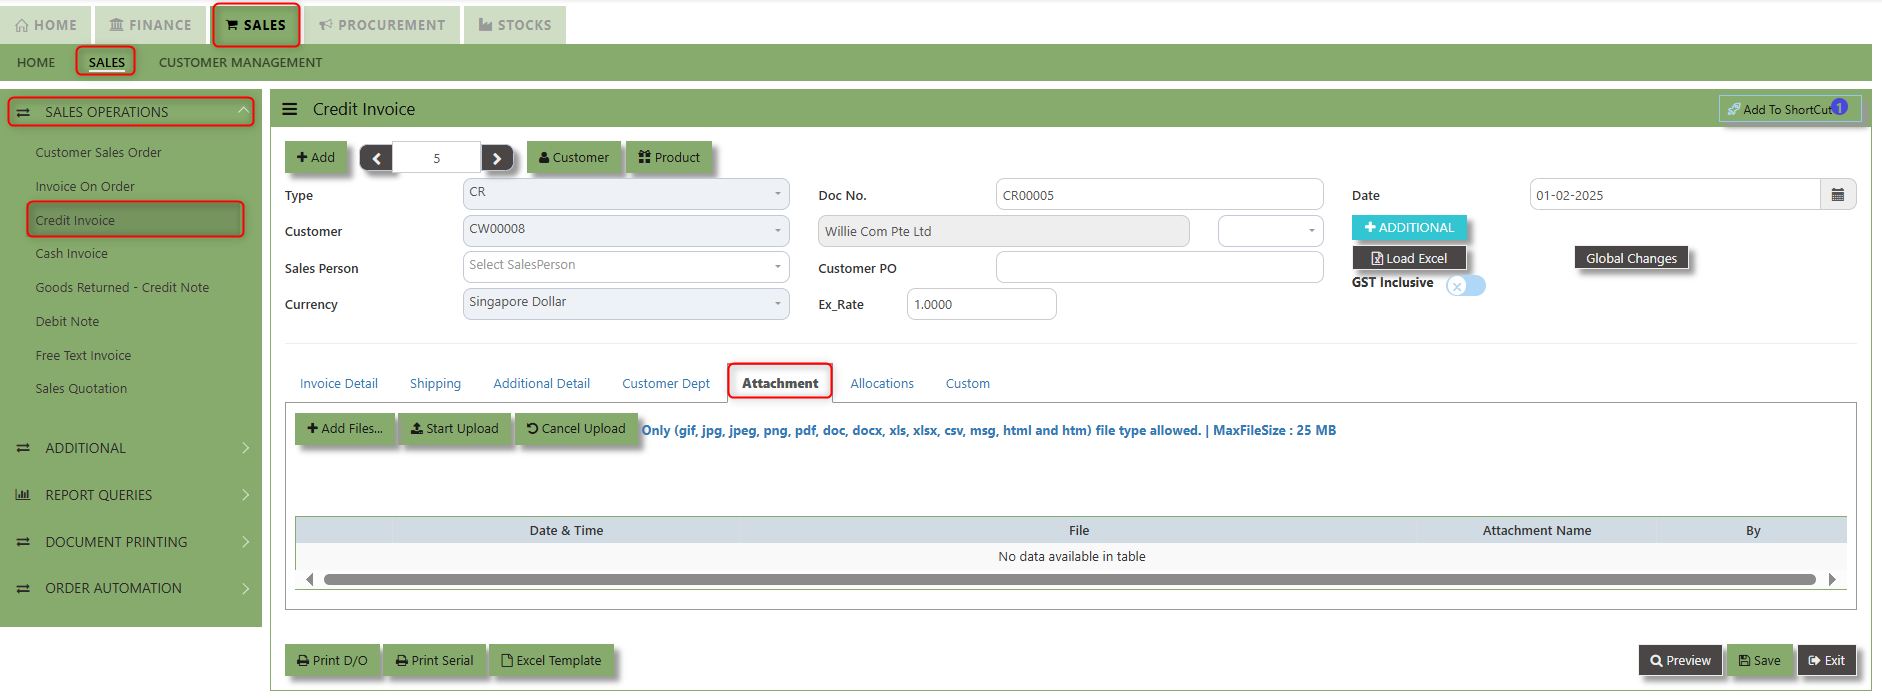](https://doc.uniq365.com/uploads/images/gallery/2025-02/avaimage.png)
2\. Click +Add files and windows will prompt then choose the file you want to upload by clicking open. Kindly take note the file types and maximum size requirements in uploading: ***Only (gif, jpg, jpeg, png, pdf, doc, docx, xls, xlsx, csv, msg, html and htm) file type allowed. | MaxFileSize : 25 MB***
[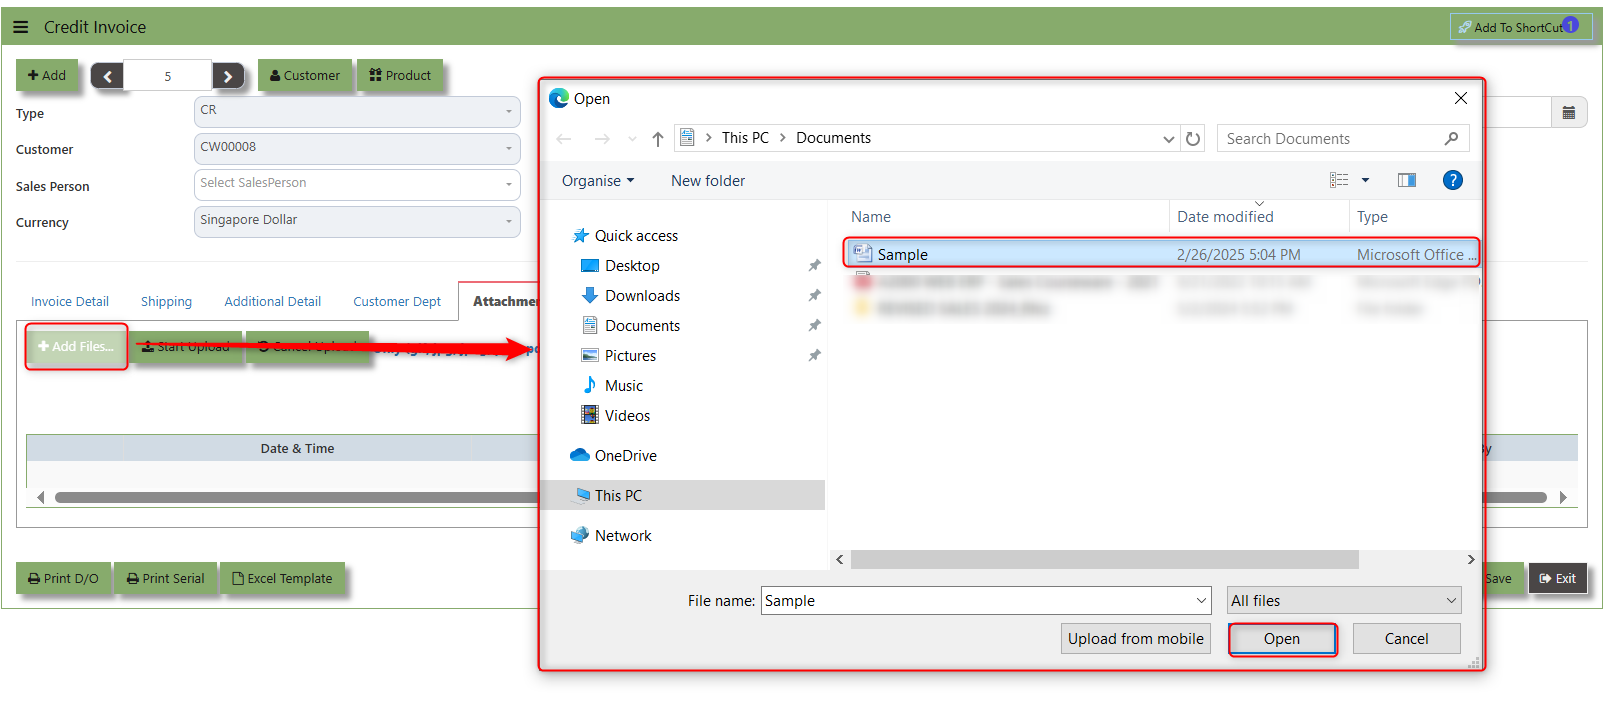](https://doc.uniq365.com/uploads/images/gallery/2025-02/D6Cimage.png)
3\. Key in the Attachment Name then click start to upload.
[](https://doc.uniq365.com/uploads/images/gallery/2025-02/b5zimage.png)
4.Once the file attached, click "SAVE" button
[](https://doc.uniq365.com/uploads/images/gallery/2025-02/IvUimage.png)
User may opt to cancel the uploading by clicking the **"Cancel Upload"** button and delete the file uploaded by clicking the **"Bin icon"** at the line detail.
\_\_\_\_\_\_\_\_\_\_\_\_\_\_\_\_\_\_\_\_\_\_\_\_\_\_\_\_\_\_\_\_\_\_\_\_\_\_\_\_\_\_\_\_\_\_\_\_\_\_\_\_\_\_\_\_\_\_\_\_\_\_\_\_\_\_\_\_\_\_\_\_\_\_\_\_\_\_\_\_\_\_\_\_\_\_\_\_\_\_\_\_\_\_\_\_\_\_\_\_\_\_\_\_\_\_\_\_\_\_\_\_\_\_\_\_\_\_\_\_\_\_\_\_\_\_\_\_\_\_\_\_\_\_\_\_\_\_\_
The **Allocations Tab** is used to manage and allocate the amounts or costs associated with the purchase invoice. Click on SALES – SALES OPERATIONS – CREDIT INVOICE - ATTACHMENT TAB for the screen below.
[](https://doc.uniq365.com/uploads/images/gallery/2025-02/xV6image.png)
\_\_\_\_\_\_\_\_\_\_\_\_\_\_\_\_\_\_\_\_\_\_\_\_\_\_\_\_\_\_\_\_\_\_\_\_\_\_\_\_\_\_\_\_\_\_\_\_\_\_\_\_\_\_\_\_\_\_\_\_\_\_\_\_\_\_\_\_\_\_\_\_\_\_\_\_\_\_\_\_\_\_\_\_\_\_\_\_\_\_\_\_\_\_\_\_\_\_\_\_\_\_\_\_\_\_\_\_\_\_\_\_\_\_\_\_\_\_\_\_\_\_\_\_\_\_\_\_\_\_\_\_\_\_\_\_\_\_\_
The **Allocations Tab** is used to manage and allocate the amounts or costs associated with the purchase invoice. Click on SALES – SALES OPERATIONS – CREDIT INVOICE - ATTACHMENT TAB for the screen below.
[](https://doc.uniq365.com/uploads/images/gallery/2025-02/KD2image.png)
Cash Invoice
##### Unlike the Credit Sales Invoice, the Customer Invoice – Cash directly debits the bank as it is a direct cash transaction. This transaction updates the inventory as well as the GL. The Bank code has to be selected when saving the transaction.
##### **How to Create Cash Invoice?**
1\. Click on **SALES – SALES – SALES OPERATIONS – CASH INVOICE** for the screen below.
[](https://doc.uniq365.com/uploads/images/gallery/2025-02/9ldimage.png)
2\. Click on Add button or press F3 to create a new transaction
[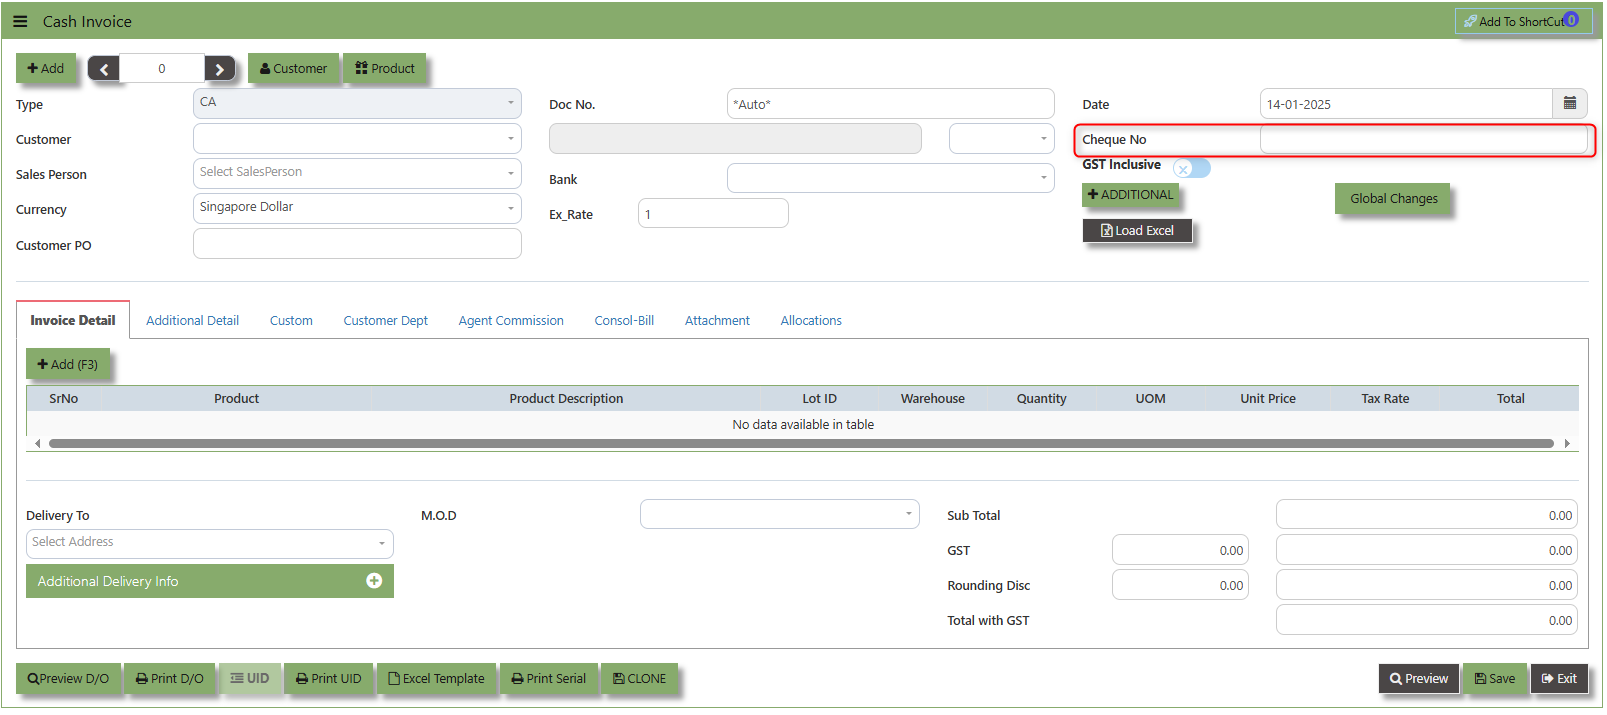](https://doc.uniq365.com/uploads/images/gallery/2025-01/Gdkimage.png)
3\. Click the Type - drop-down to select transaction type – CA(Cash Invoice).
4\. After selecting the transaction type, you can use the tab button to go to the Ref No. and Date fields to enter the information.
5\. Click the Customer - drop-down list to select the Customer, followed by the Sales Person, PDS, Currency and Rate.
6\. The “Cheque Number” is an important field which must be specified (refer to the highlighted screen)
7\. After the Bank code is selected, user can enter the information for Our D/O, Order Ref. No and Order Ref Date if applicable.
8\. Once all the header information has been entered, the user can proceed to the Details section to select the product items from the product drop down list, before specifying the warehouse, quantity and unit price. Save the transaction after this is done.
\_\_\_\_\_\_\_\_\_\_\_\_\_\_\_\_\_\_\_\_\_\_\_\_\_\_\_\_\_\_\_\_\_\_\_\_\_\_\_\_\_\_\_\_\_\_\_\_\_\_\_\_\_\_\_\_\_\_\_\_\_\_\_\_\_\_\_\_\_\_\_\_\_\_\_\_\_\_\_\_\_\_\_\_\_\_\_\_\_\_\_\_\_\_\_\_\_\_\_\_\_\_\_\_\_\_\_\_\_\_\_\_\_\_\_\_\_\_\_\_\_\_\_\_\_\_\_\_\_\_\_\_\_\_\_\_\_\_\_
**Add to ShortCut -** Used to create a shortcut for quick access to a specific sales transaction. By clicking this button, users can add the current sales invoice on order to a list of shortcuts, allowing them to access the invoice or related functionality quickly and efficiently, without needing to search for it each time.
[](https://doc.uniq365.com/uploads/images/gallery/2025-02/UC1image.png)
##### **How to use Add to ShortCut?**
1\. Click "**Add to ShortCut"** and system will open below windows:
[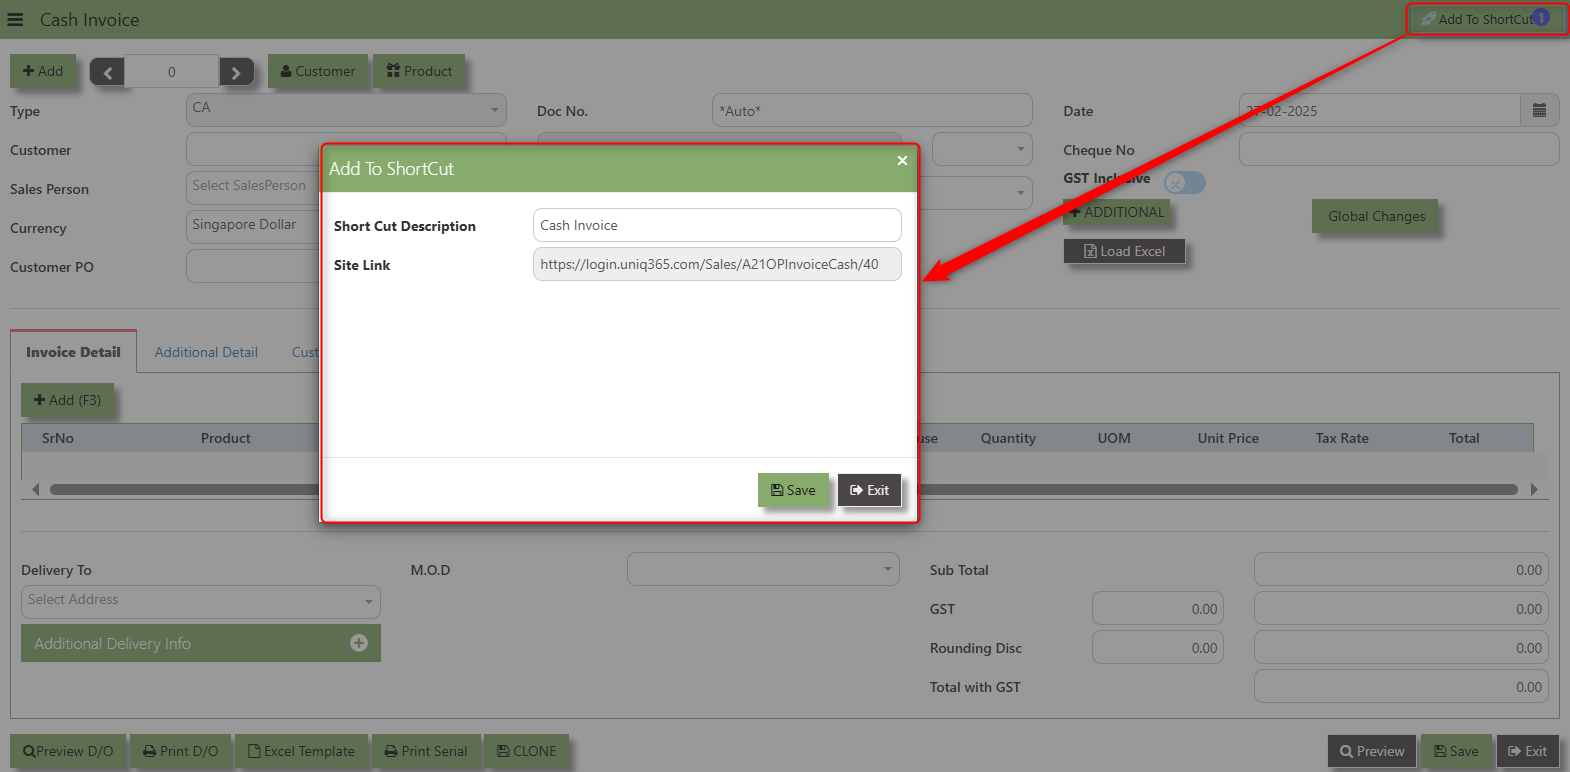](https://doc.uniq365.com/uploads/images/gallery/2025-02/mDdimage.png)
2\. Enter Short Cut Description
3\. Click SAVE then click OK.
4\. User may look to the Homepage for the added function or page. Click on HOME - HOME - SHORTCUT for the screen below.
[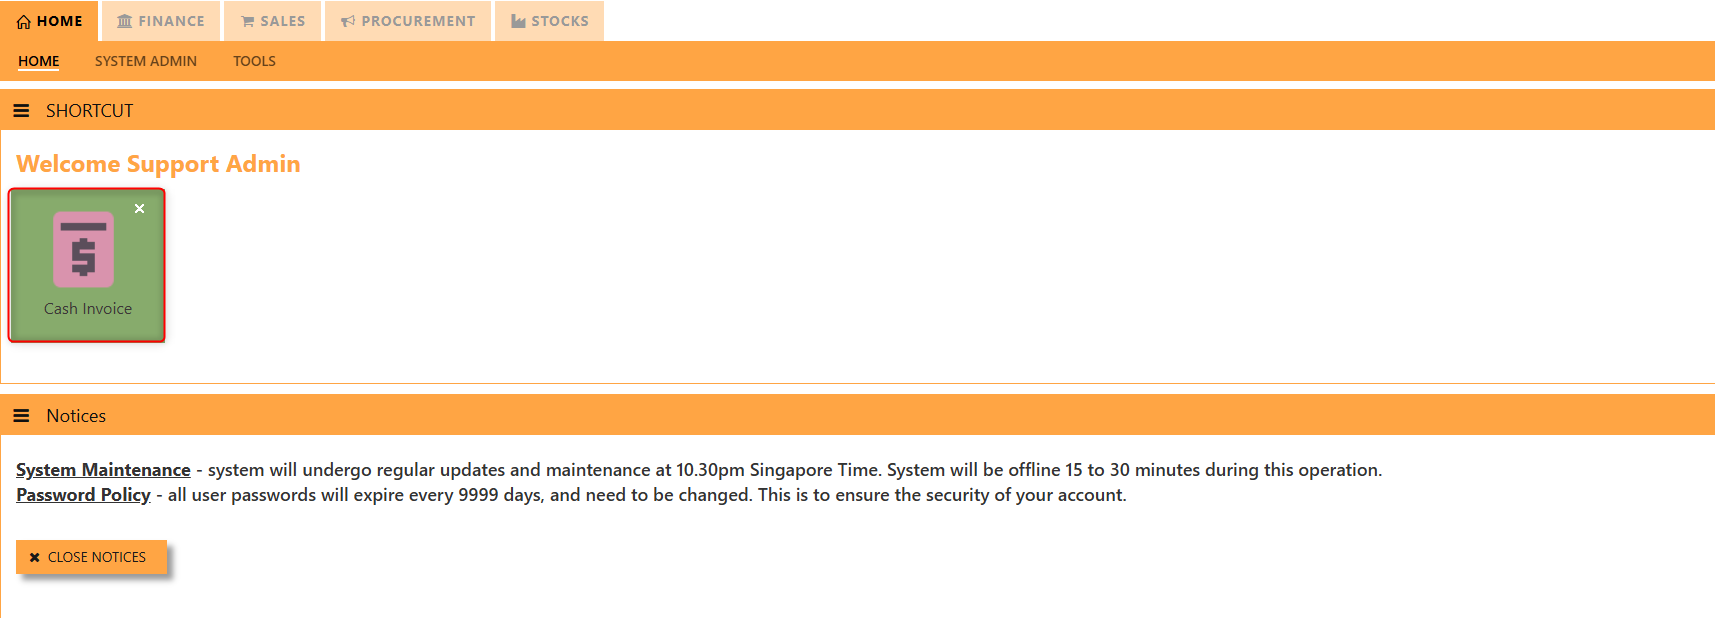](https://doc.uniq365.com/uploads/images/gallery/2025-02/So5image.png)
\_\_\_\_\_\_\_\_\_\_\_\_\_\_\_\_\_\_\_\_\_\_\_\_\_\_\_\_\_\_\_\_\_\_\_\_\_\_\_\_\_\_\_\_\_\_\_\_\_\_\_\_\_\_\_\_\_\_\_\_\_\_\_\_\_\_\_\_\_\_\_\_\_\_\_\_\_\_\_\_\_\_\_\_\_\_\_\_\_\_\_\_\_\_\_\_\_\_\_\_\_\_\_\_\_\_\_\_\_\_\_\_\_\_\_\_\_\_\_\_\_\_\_\_\_\_\_\_\_\_\_\_\_\_\_\_\_\_\_
The **Customer** button provides quick access to detailed supplier profiles under Customer maintenance.
[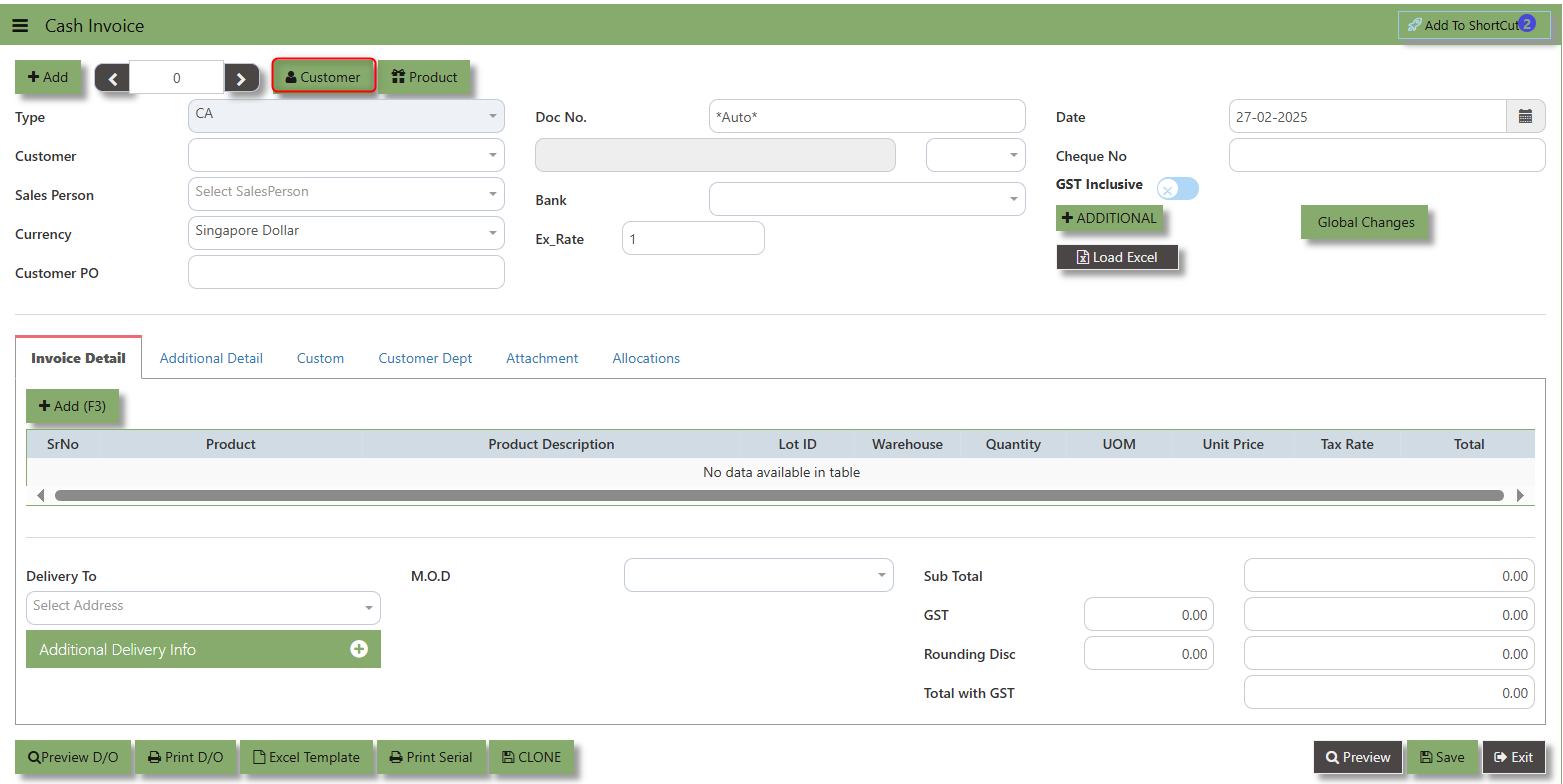](https://doc.uniq365.com/uploads/images/gallery/2025-02/a33image.png)
The **Product** button provides quick access to product and service maintenance
[](https://doc.uniq365.com/uploads/images/gallery/2025-02/e0bimage.png)
**Additional Header Info** button is typically used to capture and manage additional information related to the Sales Credit Invoice at the header level (i.e., Delivery date, Del Term , Indicative WH , Country, Lead Time, Contact, PDSU, Narration and Transaction Narration). This feature allows users to add extra data or notes that are relevant to the entire sales invoice on order.
[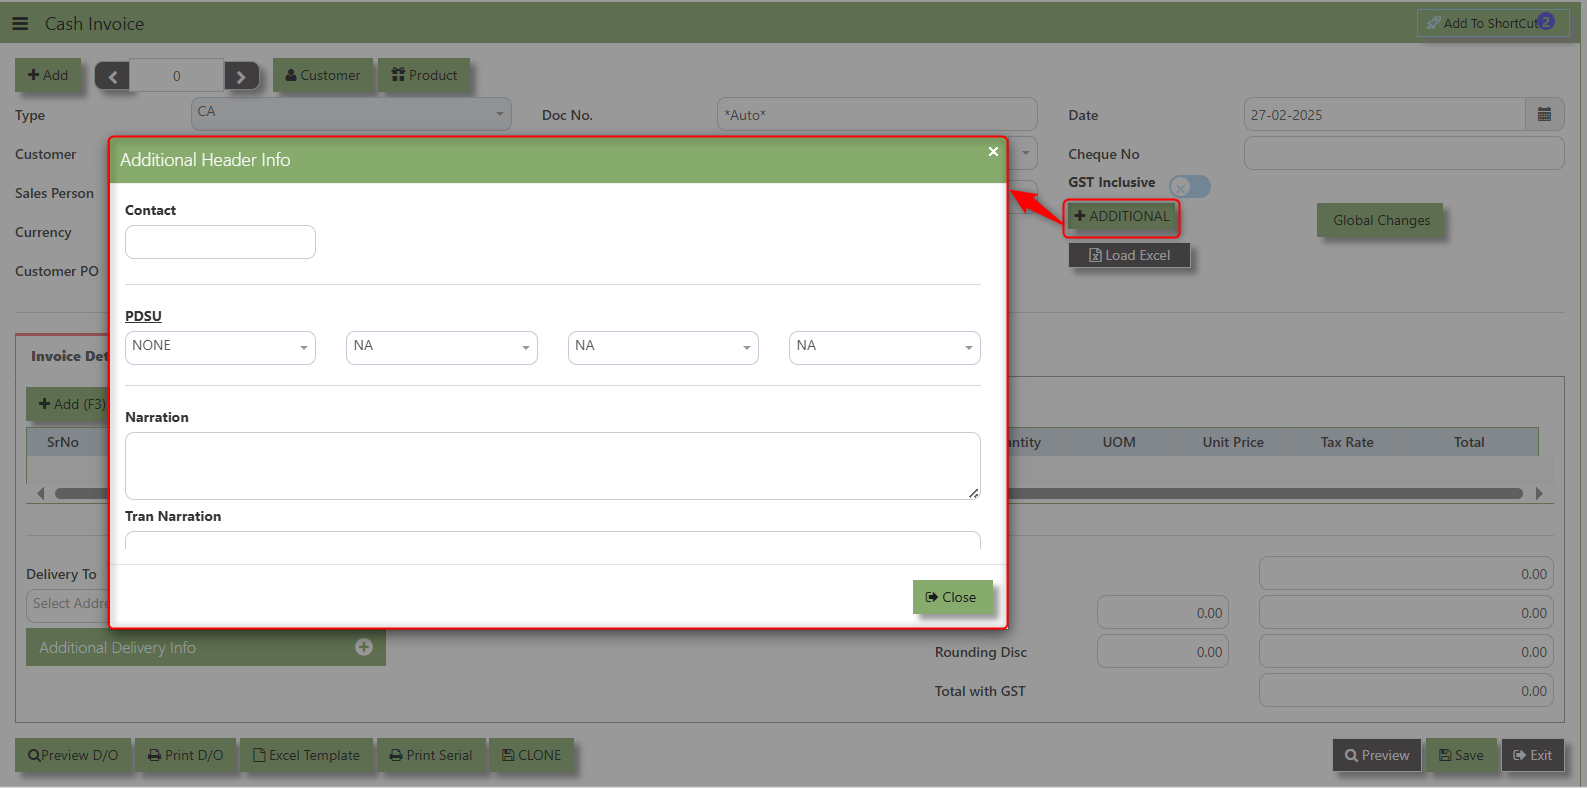](https://doc.uniq365.com/uploads/images/gallery/2025-02/9pAimage.png)
The **GST Inclusive** checkbox indicates whether the unit price in the CA include **Goods and Services Tax (GST)** or not.
[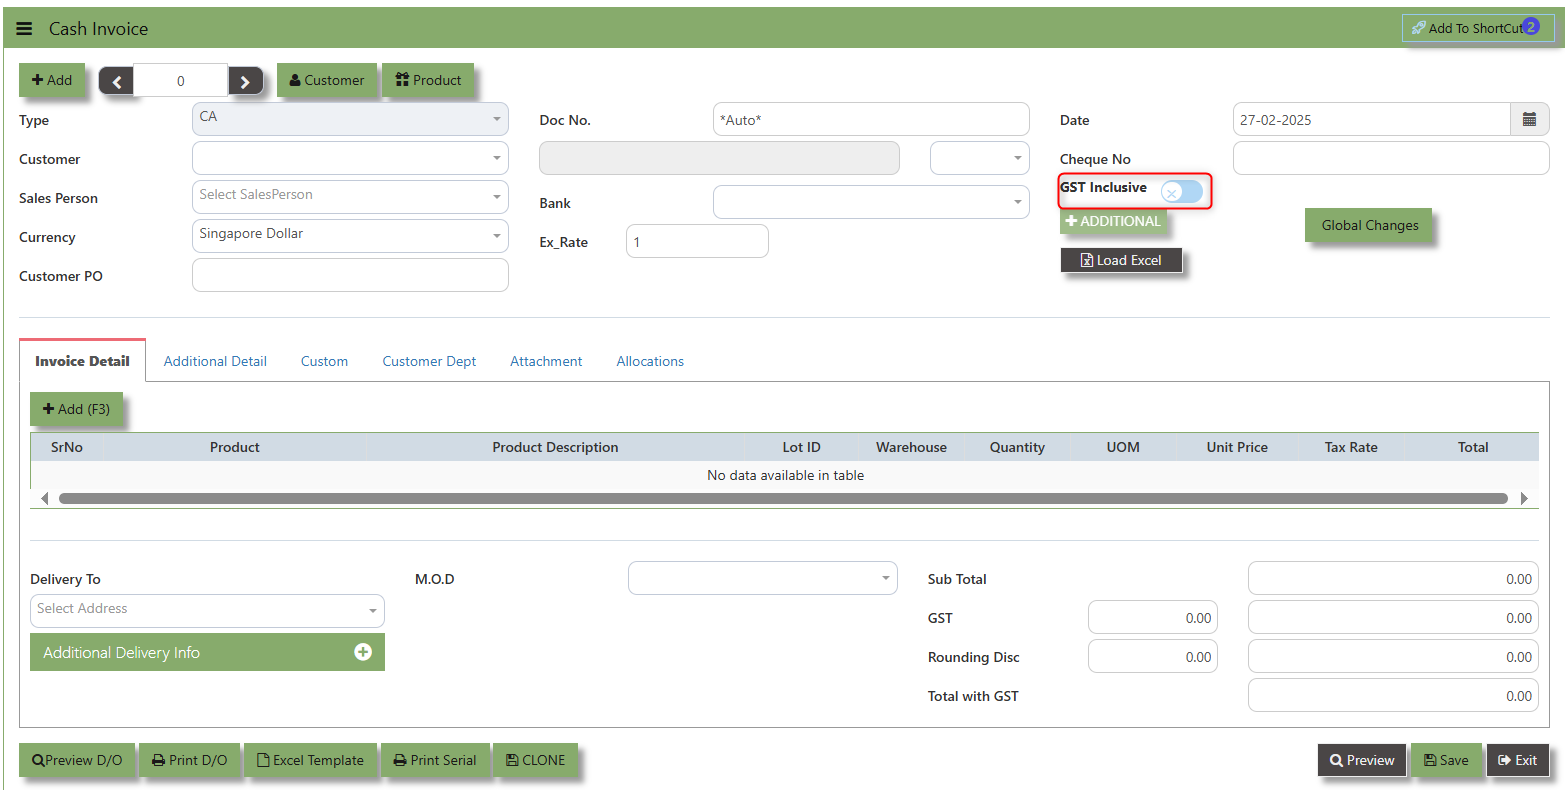](https://doc.uniq365.com/uploads/images/gallery/2025-02/0btimage.png)
- **When ticked (GST Inclusive)**: provided in the Sales Order already includes the applicable GST amount. The GST amount will not be calculated or displayed separately, as it's already accounted for in the quoted price.
- **When not ticked (GST Exclusive)**: The unit **price** is considered exclusive of GST. The system will calculate and add the GST based on the applicable tax rate, and the final total will be the sum of the base price plus the GST amount
The **Global Changes** Button provides access on the Discount menu in the Sales Cash Invoice . By clicking this button, users can add the current Cash Invoice discount using Global Discount Amount, or Percentage Discount.
[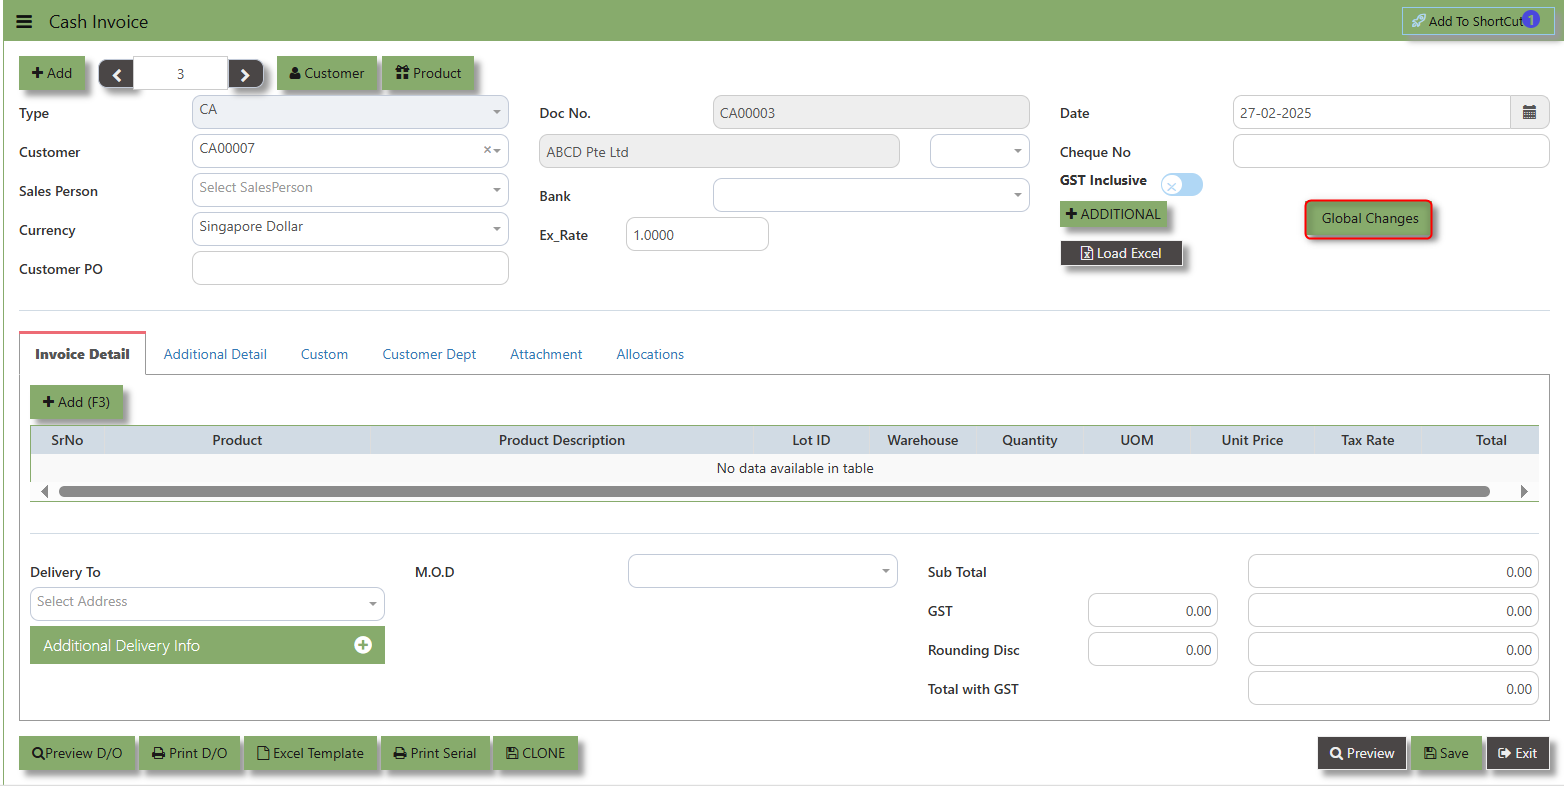](https://doc.uniq365.com/uploads/images/gallery/2025-02/TUkimage.png)
##### **How to use Global Changes?**
1.Click "Global Changes**"** and system will open below windows:
2\. Add a Discount to the transaction if its Global Discount Amount or Percentage Discount.
[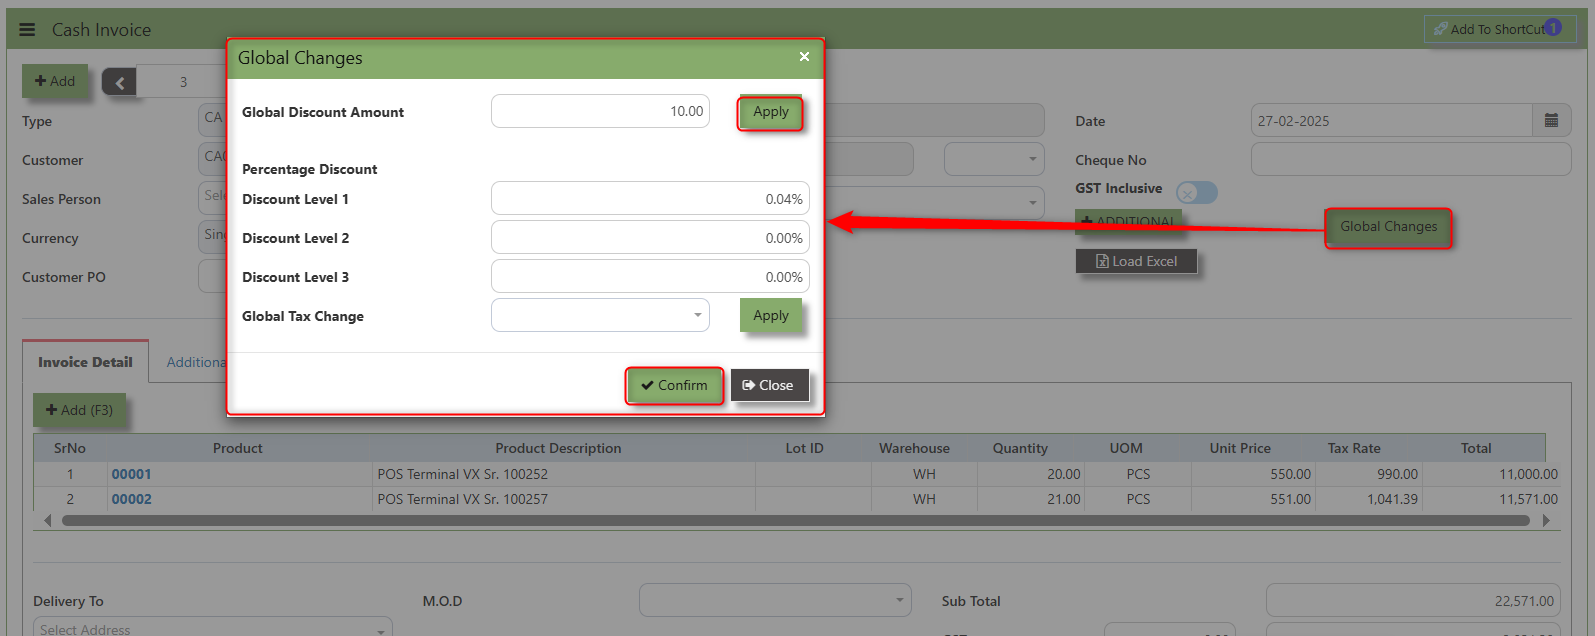](https://doc.uniq365.com/uploads/images/gallery/2025-02/IFcimage.png)
3\. Click Apply and Confirm button, the discount will be automatically captured in the line item and in the transaction.
[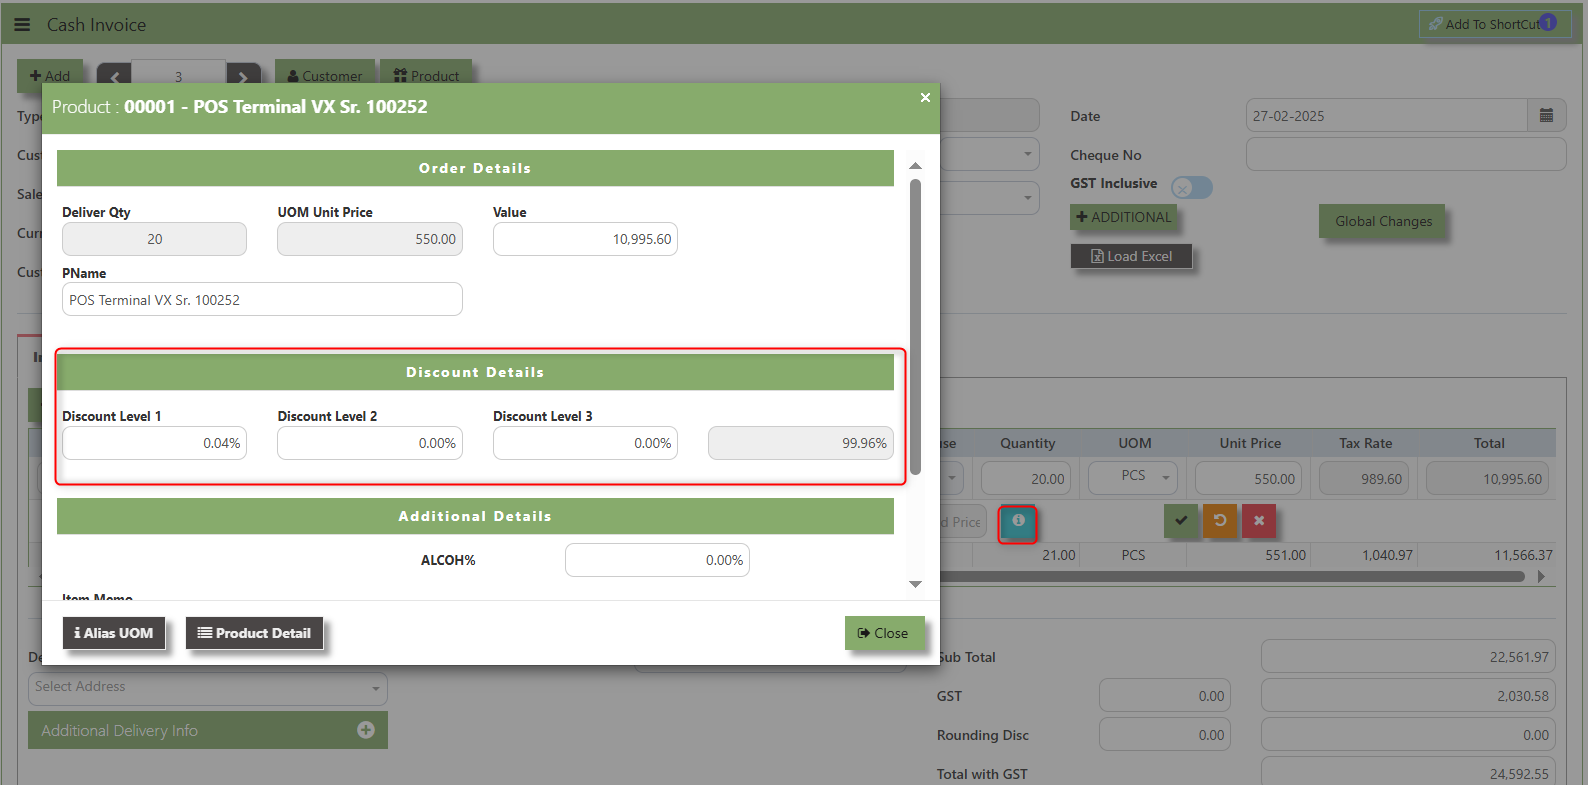](https://doc.uniq365.com/uploads/images/gallery/2025-02/V1pimage.png)
**Load Excel** - When users have an Excel file from Excel Template with Cash invoice information (ie Warehouse, Product, Pname, UOM, Quantity, Unit Price, GST type, Detail Memo) the **"Load Excel"** button allows them to upload and import this data directly into the system. This eliminates the need for manual entry of the data into the system's Cash Invoice fields.
[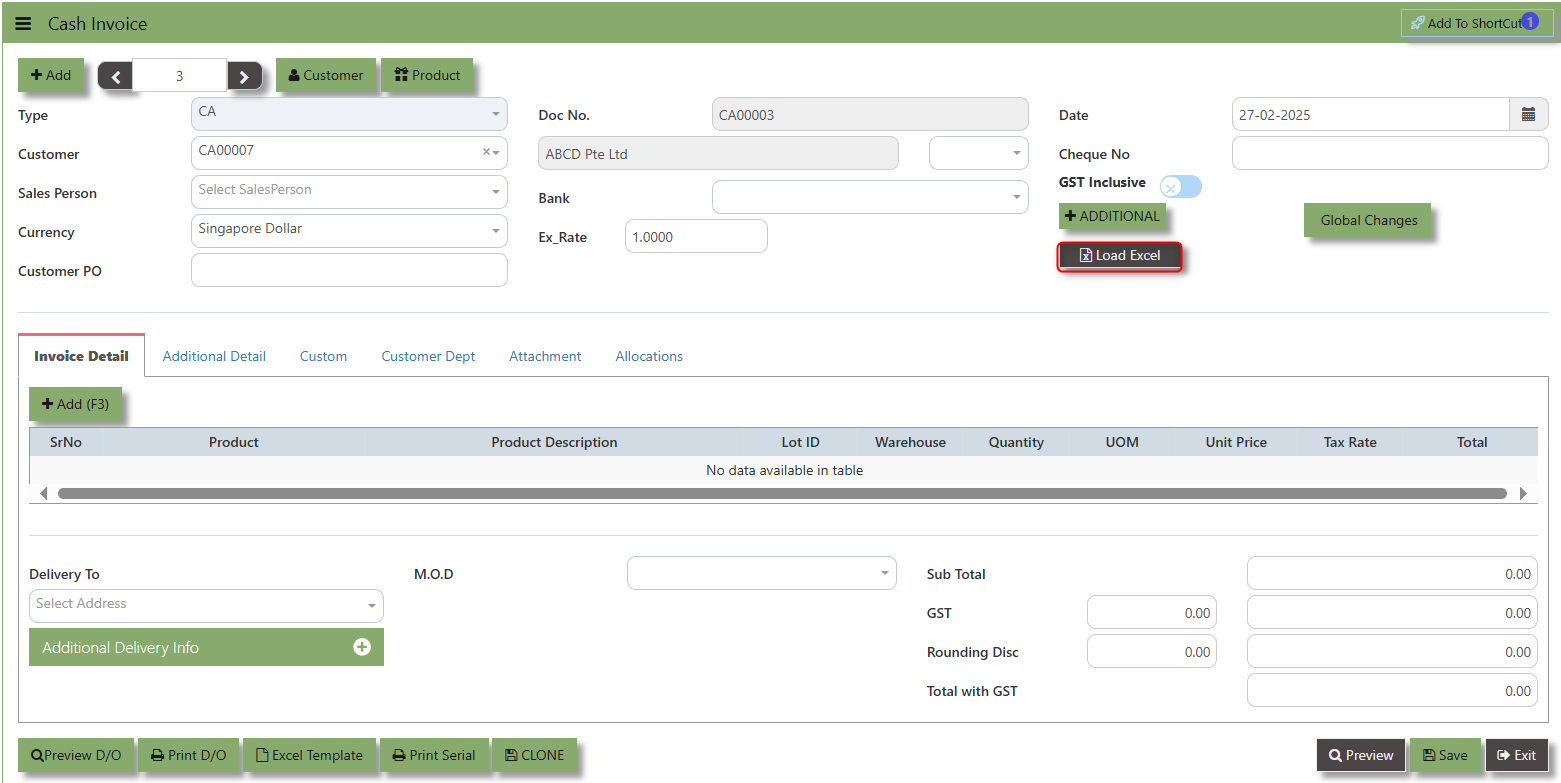](https://doc.uniq365.com/uploads/images/gallery/2025-02/4qiimage.png)
##### **How to use Load Excel?**
1\. Click the Customer - drop-down list to select Customer Name
[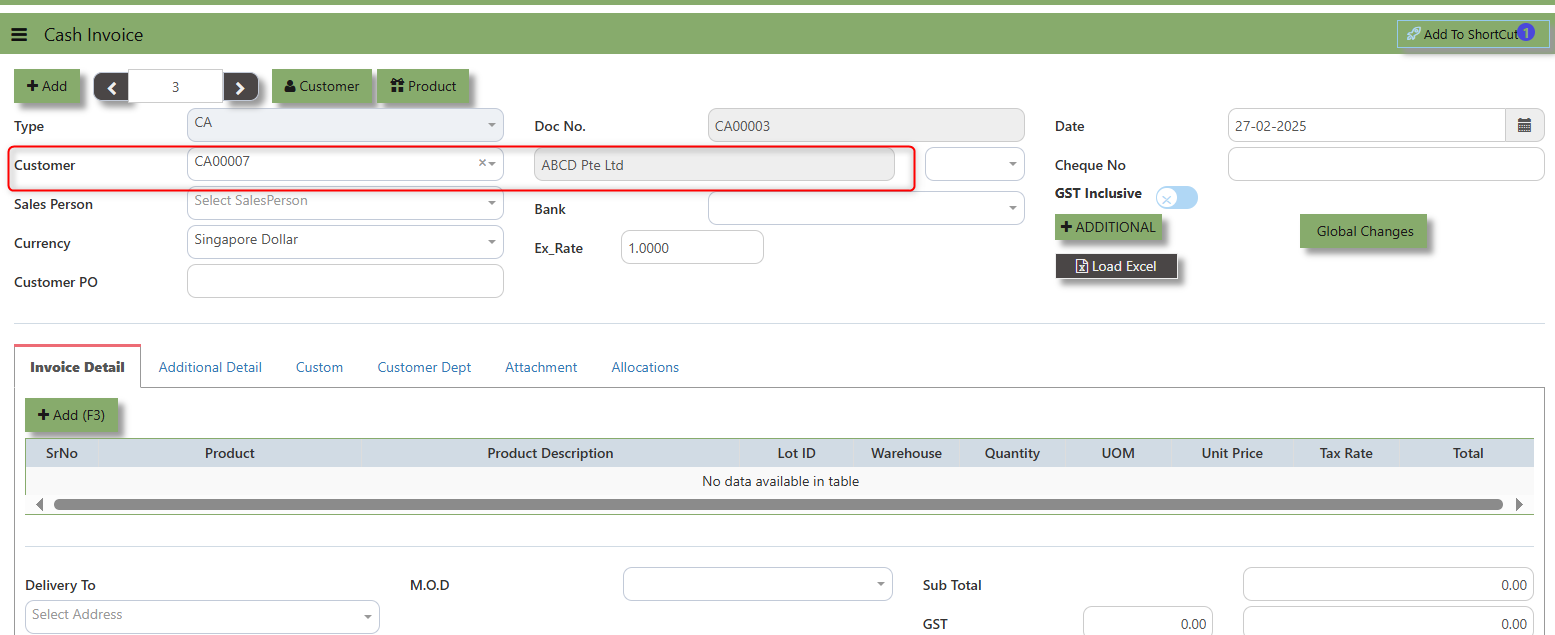](https://doc.uniq365.com/uploads/images/gallery/2025-02/Eueimage.png)
2. Download the Excel Template and ensure the Excel file you plan to upload is formatted correctly. It should contain all the necessary fields required for sales order, such as:
- Warehouse
- Product Code
- Product Name
- LotID
- GST Type
- Quantity
- UOM
- Unit Price
- Detail Memo
[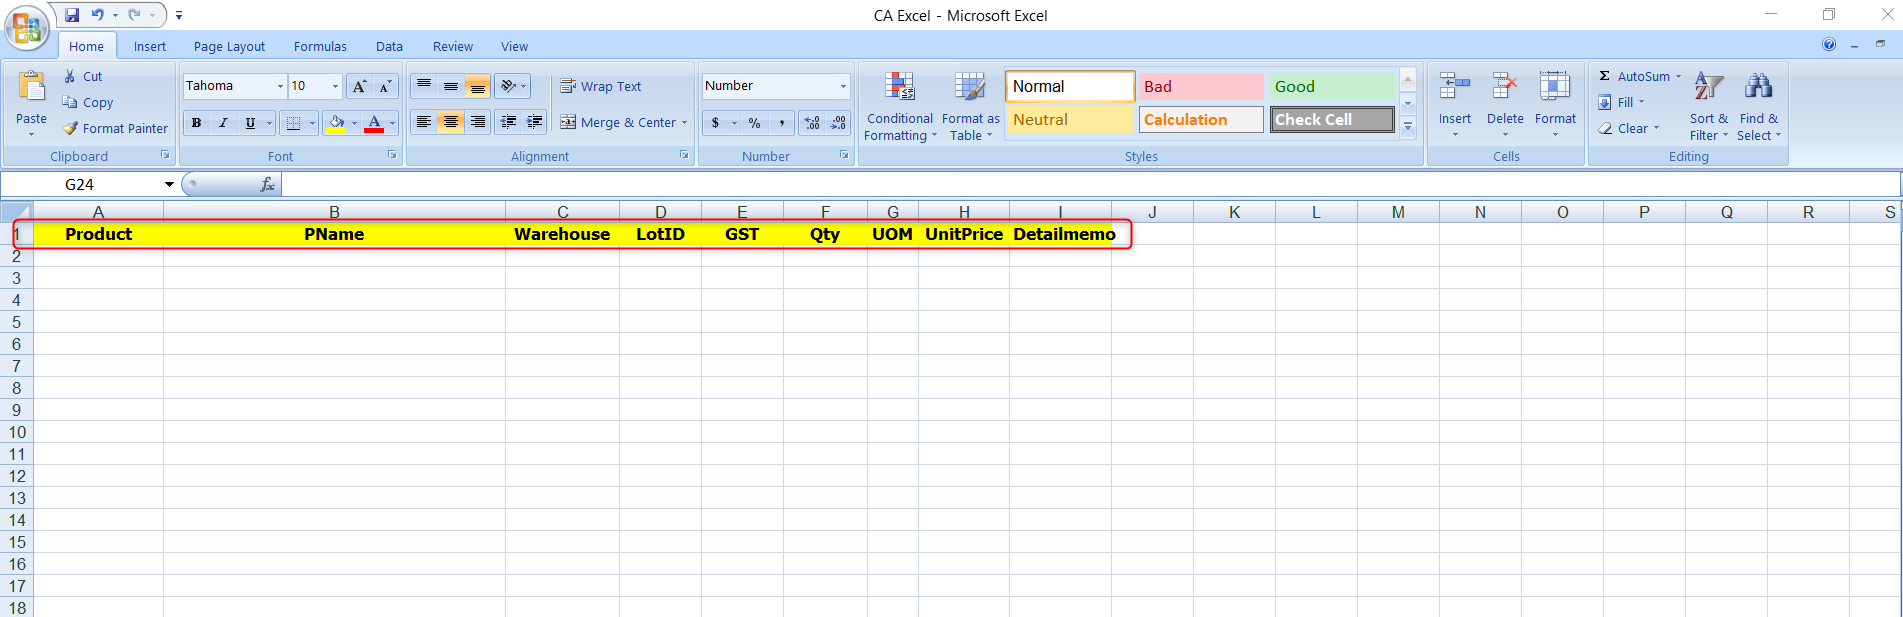](https://doc.uniq365.com/uploads/images/gallery/2025-02/Bl1image.png)
3\. Click the **Load Excel** button to open the file upload interface. This may open a file browser or prompt you to select the Excel file you want to upload.
[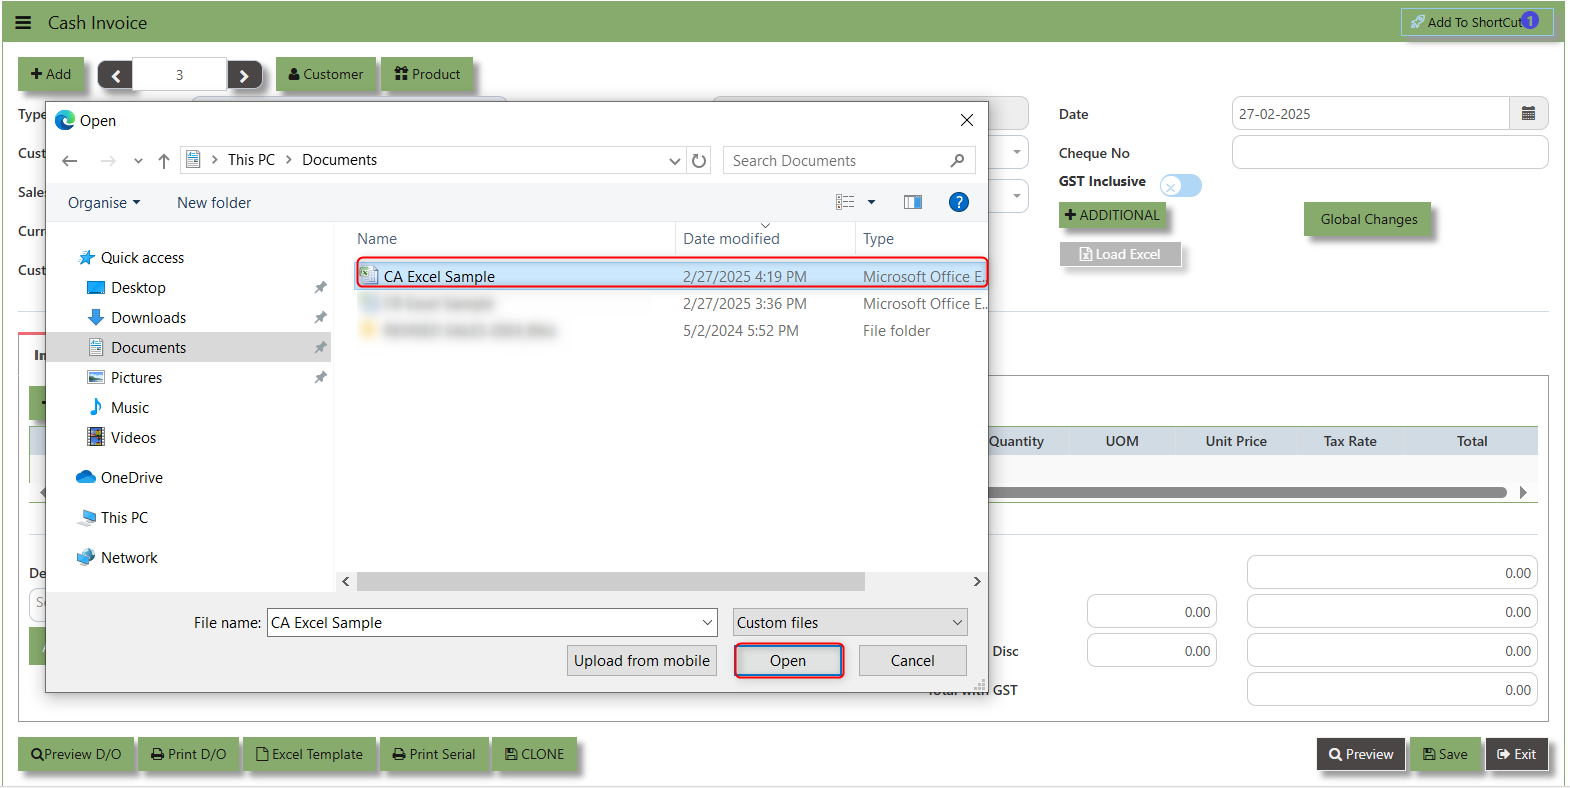](https://doc.uniq365.com/uploads/images/gallery/2025-02/FxRimage.png)
4\. Once the filed uploaded, system will prompt a message that record has been imported successfully.
[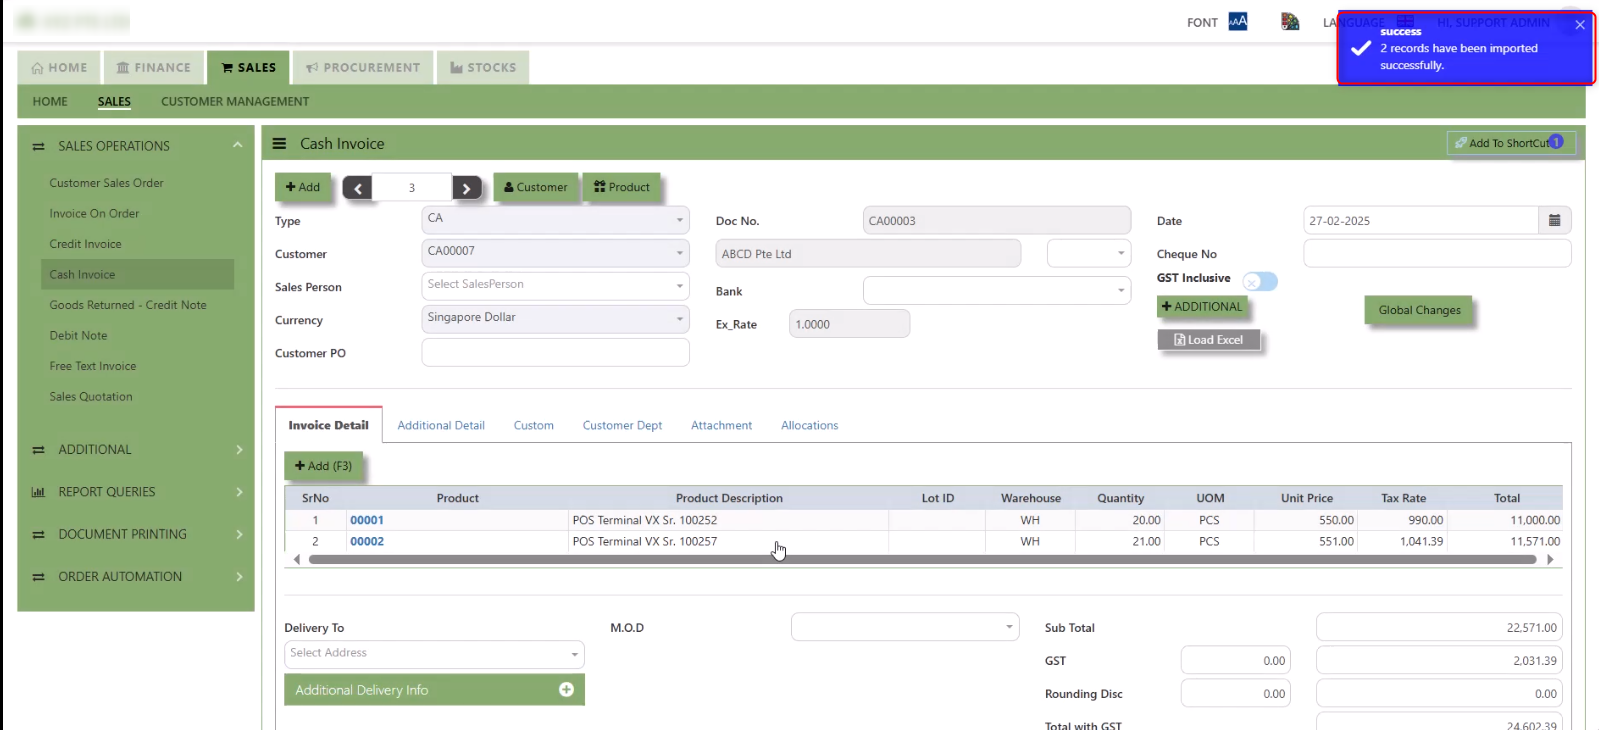](https://doc.uniq365.com/uploads/images/gallery/2025-02/9ttimage.png)
5\. After the import is complete, review the imported credit invoice in the system to ensure everything has been transferred correctly. This might include checking that the order details, such as item descriptions, quantities, prices, and customers, are accurate.
6\. Once the data is imported successfully and checking is done, you can proceed to **save** the sales order as required by your workflow. This may involve further approvals or other processes depending on the organization's procedures.
\_\_\_\_\_\_\_\_\_\_\_\_\_\_\_\_\_\_\_\_\_\_\_\_\_\_\_\_\_\_\_\_\_\_\_\_\_\_\_\_\_\_\_\_\_\_\_\_\_\_\_\_\_\_\_\_\_\_\_\_\_\_\_\_\_\_\_\_\_\_\_\_\_\_\_\_\_\_\_\_\_\_\_\_\_\_\_\_\_\_\_\_\_\_\_\_\_\_\_\_\_\_\_\_\_\_\_\_\_\_\_\_\_\_\_\_\_\_\_\_\_\_\_\_\_\_\_\_\_\_\_\_\_\_\_\_\_\_\_
**Additional Detail Tab** a section where the additional information is entered . This tab ensures that all relevant details regarding the Narration, Inco Terms , billing address warranty terms Selling conditions , and special instruction are captured in the system to facilitate smooth and accurate.
##### **How to set Additional Detail?**
1\. Click on SALES – SALES OPERATIONS – CASH INVOICE- ADDITIONAL DETAILS TAB for the screen below.
[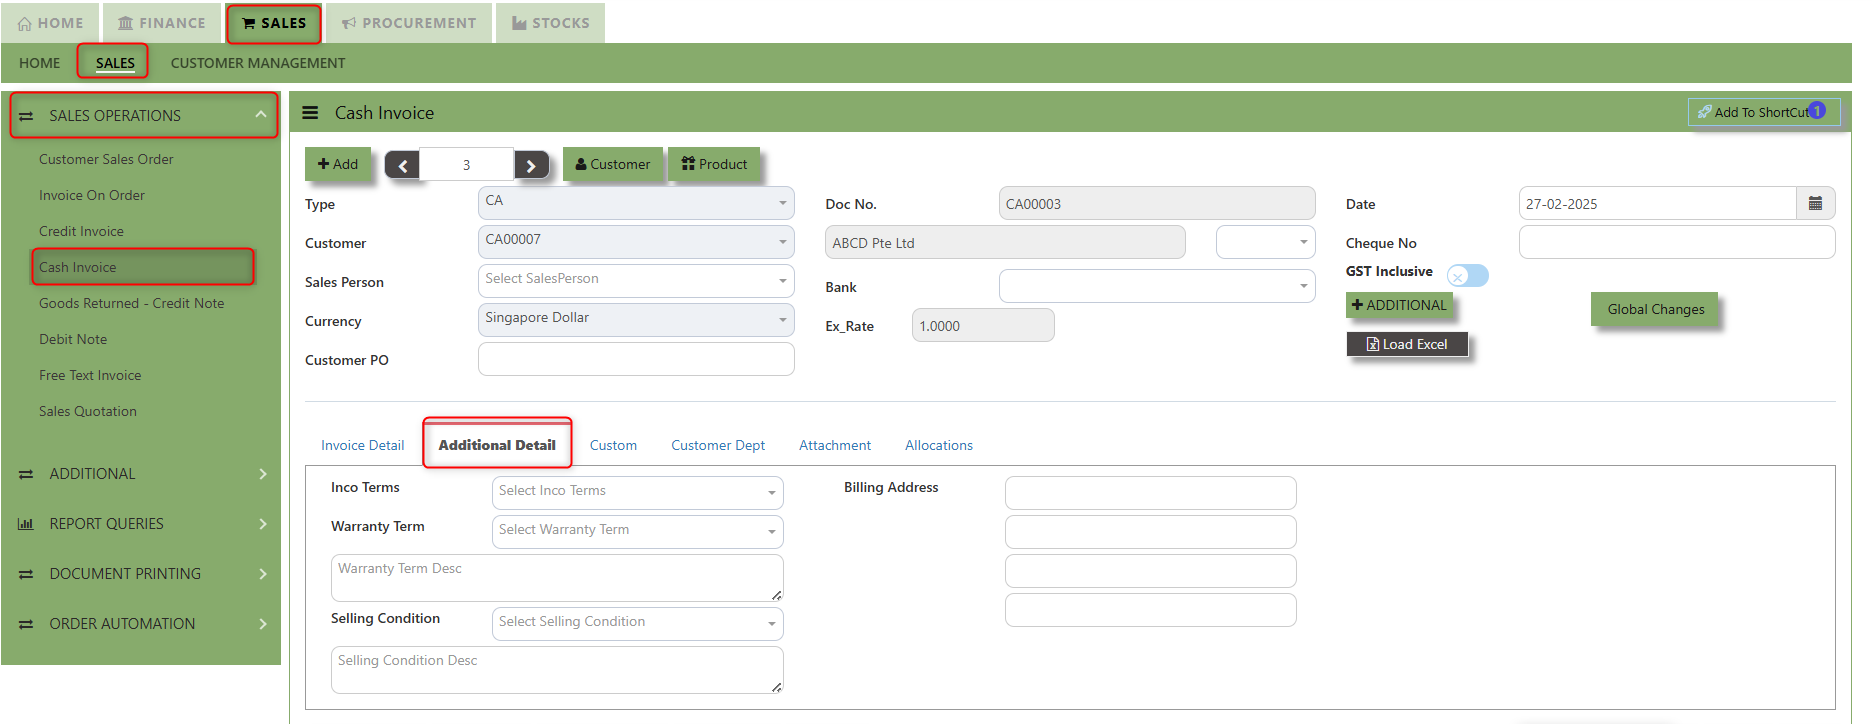](https://doc.uniq365.com/uploads/images/gallery/2025-02/Fngimage.png)
2\. Input the below details for the below fields:
- - Narration
- Billing Address
- Inco Terms
- Warranty Terms
- Selling Condition
- Inquiry Received Date
- Quotation Sent Date
3\. Once keyed in the necessary details, click the next tab and will automatically save all the information.
\_\_\_\_\_\_\_\_\_\_\_\_\_\_\_\_\_\_\_\_\_\_\_\_\_\_\_\_\_\_\_\_\_\_\_\_\_\_\_\_\_\_\_\_\_\_\_\_\_\_\_\_\_\_\_\_\_\_\_\_\_\_\_\_\_\_\_\_\_\_\_\_\_\_\_\_\_\_\_\_\_\_\_\_\_\_\_\_\_\_\_\_\_\_\_\_\_\_\_\_\_\_\_\_\_\_\_\_\_\_\_\_\_\_\_\_\_\_\_\_\_\_\_\_\_\_\_\_\_\_\_\_\_\_\_\_\_\_\_
**"Custom Tab"** provides a space for users to input customized data or additional fields that are specific to their business processes and requirements.
- Click on SALES – SALES OPERATIONS – CASH INVOICE - CUSTOM TAB for the screen below.
[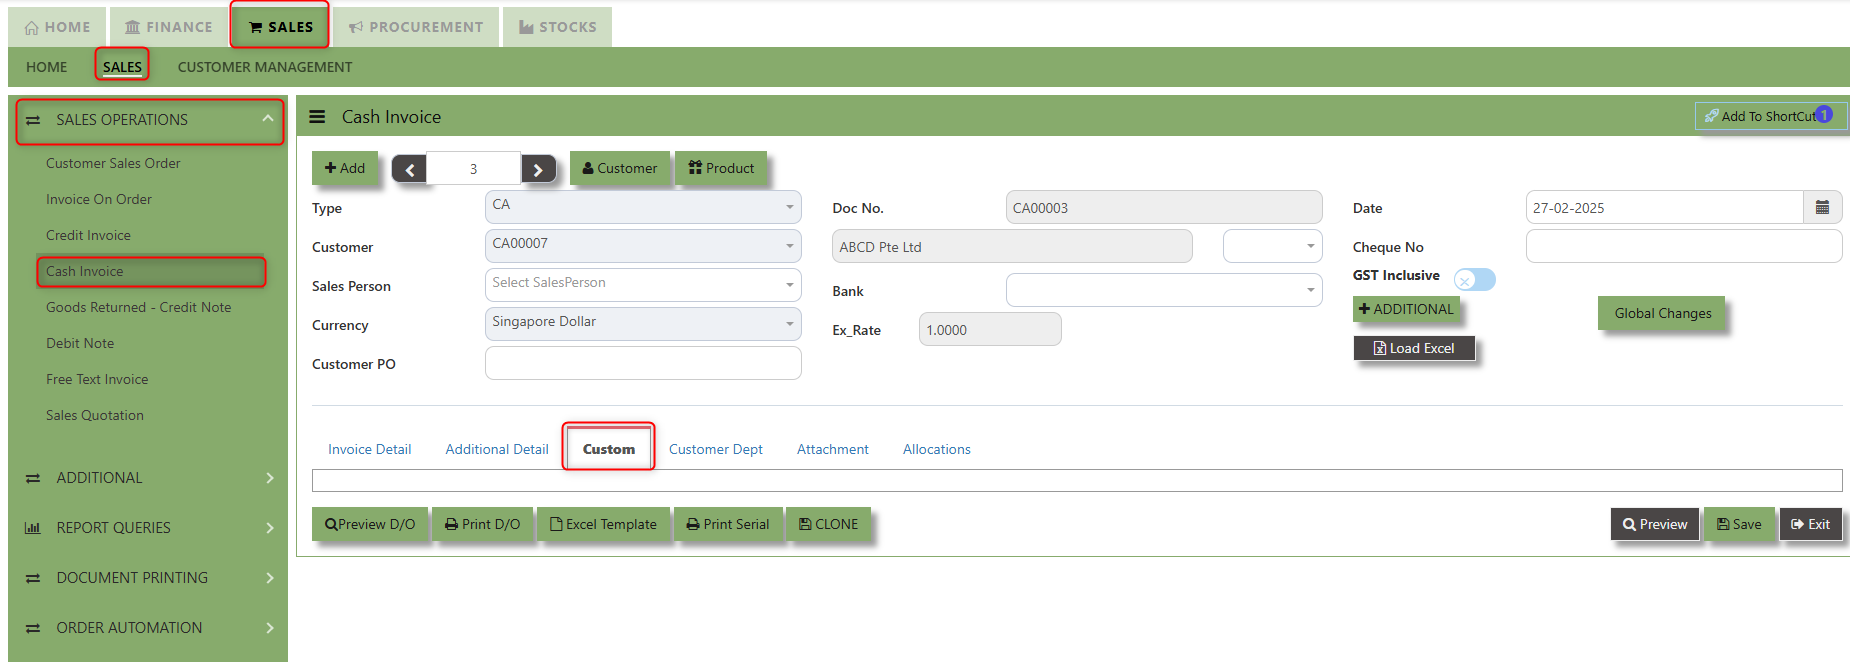](https://doc.uniq365.com/uploads/images/gallery/2025-02/sy0image.png)
\_\_\_\_\_\_\_\_\_\_\_\_\_\_\_\_\_\_\_\_\_\_\_\_\_\_\_\_\_\_\_\_\_\_\_\_\_\_\_\_\_\_\_\_\_\_\_\_\_\_\_\_\_\_\_\_\_\_\_\_\_\_\_\_\_\_\_\_\_\_\_\_\_\_\_\_\_\_\_\_\_\_\_\_\_\_\_\_\_\_\_\_\_\_\_\_\_\_\_\_\_\_\_\_\_\_\_\_\_\_\_\_\_\_\_\_\_\_\_\_\_\_\_\_\_\_\_\_\_\_\_\_\_\_\_\_\_\_\_
**"Customer Dept Tab"** section where the Customer Department information is entered. This tab ensures that all relevant details regarding Customer Department details which is linked to the Customer Maintenance under Department Tab
- Click on SALES – SALES OPERATIONS – CASH INVOICE - CUSTOMER DEPT TAB for the screen below.
[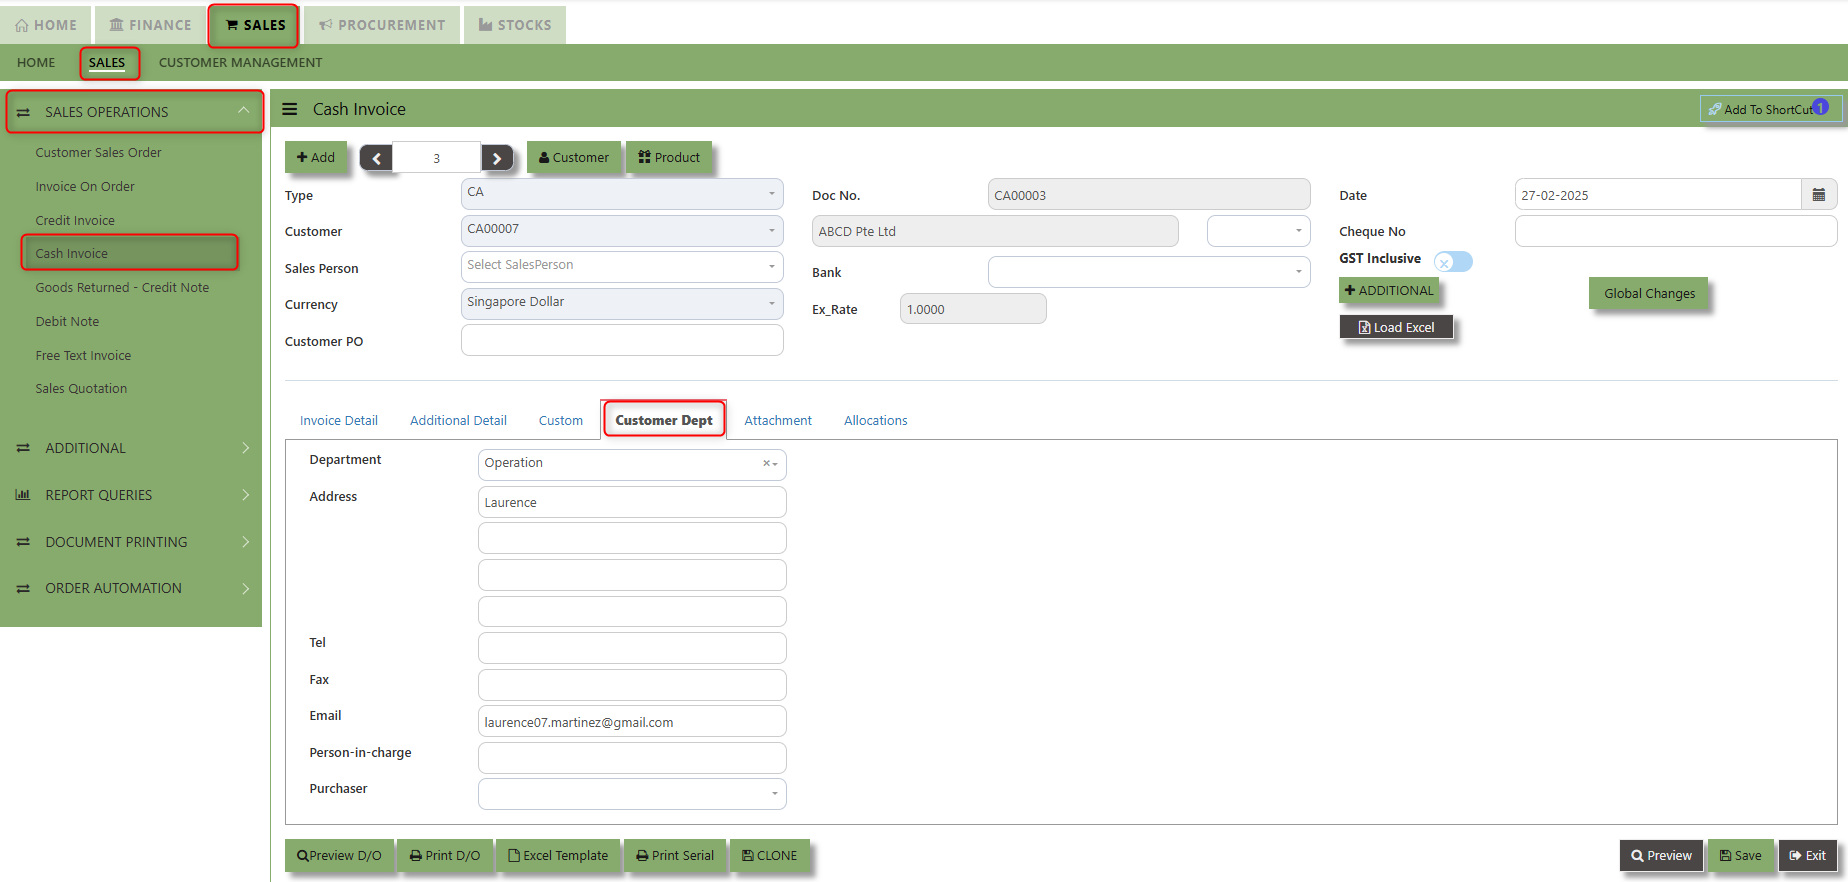](https://doc.uniq365.com/uploads/images/gallery/2025-02/5sIimage.png)
The drop down selection for Customer Dept and Purchaser is maintained in Customer Maintenance under Department Tab
[](https://doc.uniq365.com/uploads/images/gallery/2025-02/DCeimage.png)
\_\_\_\_\_\_\_\_\_\_\_\_\_\_\_\_\_\_\_\_\_\_\_\_\_\_\_\_\_\_\_\_\_\_\_\_\_\_\_\_\_\_\_\_\_\_\_\_\_\_\_\_\_\_\_\_\_\_\_\_\_\_\_\_\_\_\_\_\_\_\_\_\_\_\_\_\_\_\_\_\_\_\_\_\_\_\_\_\_\_\_\_\_\_\_\_\_\_\_\_\_\_\_\_\_\_\_\_\_\_\_\_\_\_\_\_\_\_\_\_\_\_\_\_\_\_\_\_\_\_\_\_\_\_\_\_\_\_
**"Attachment Tab"** allows users to attach various files and documents related to the Cash Invoice. By attaching relevant files, users ensure that all purchase-related information is kept in one place, making the sales process smoother, more transparent, and easier to track.
##### **How to use Attachment Tab?**
1\. Click on SALES – SALES OPERATIONS – CASH INVOICE – ATTACHEMENT TAB for the screen below.
[](https://doc.uniq365.com/uploads/images/gallery/2025-02/1Bjimage.png)
2\. Click +Add files and windows will prompt then choose the file you want to upload by clicking open. Kindly take note the file types and maximum size requirements in uploading: ***Only (gif, jpg, jpeg, png, pdf, doc, docx, xls, xlsx, csv, msg, html and htm) file type allowed. | MaxFileSize : 25 MB***
[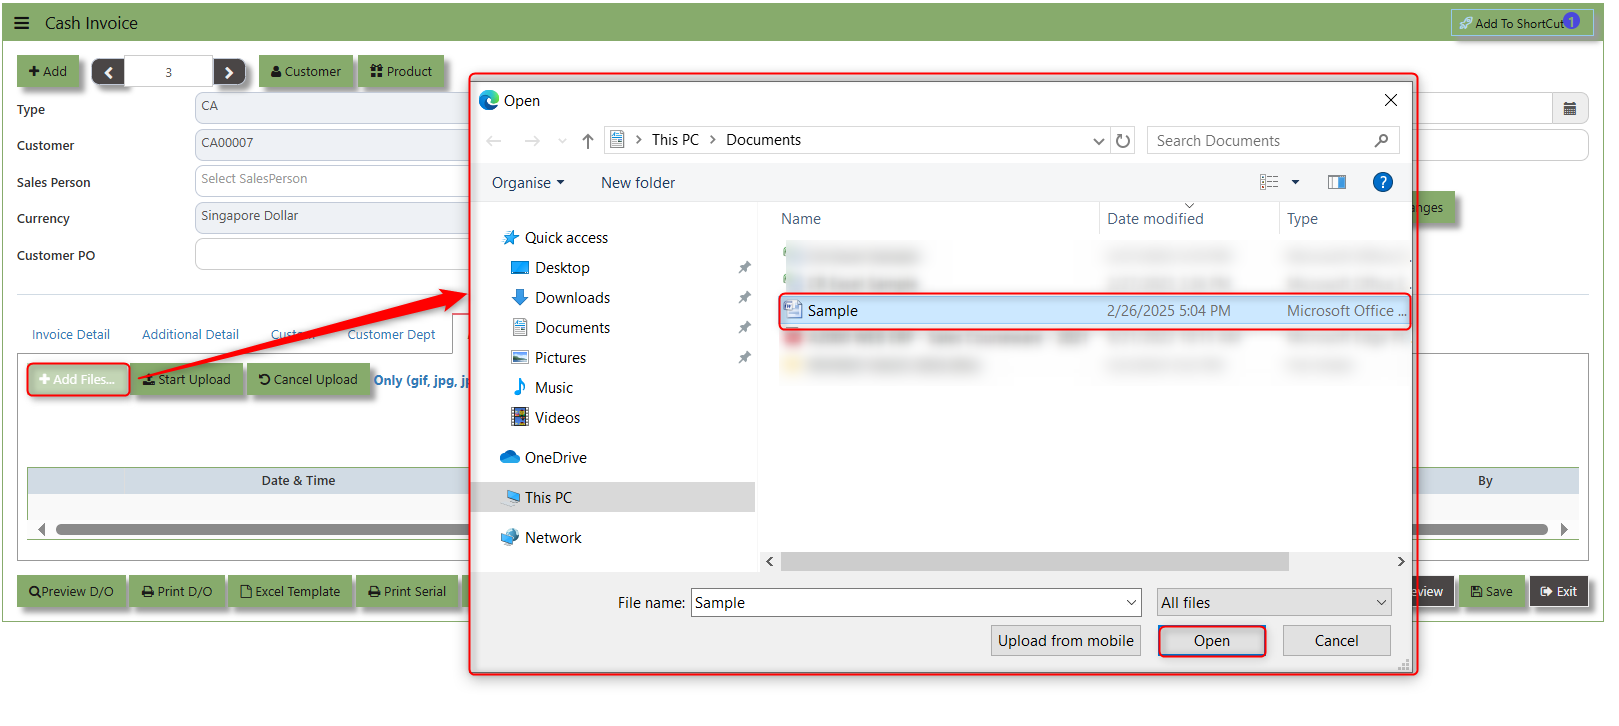](https://doc.uniq365.com/uploads/images/gallery/2025-02/fUTimage.png)
3\. Key in the Attachment Name then click start to upload
[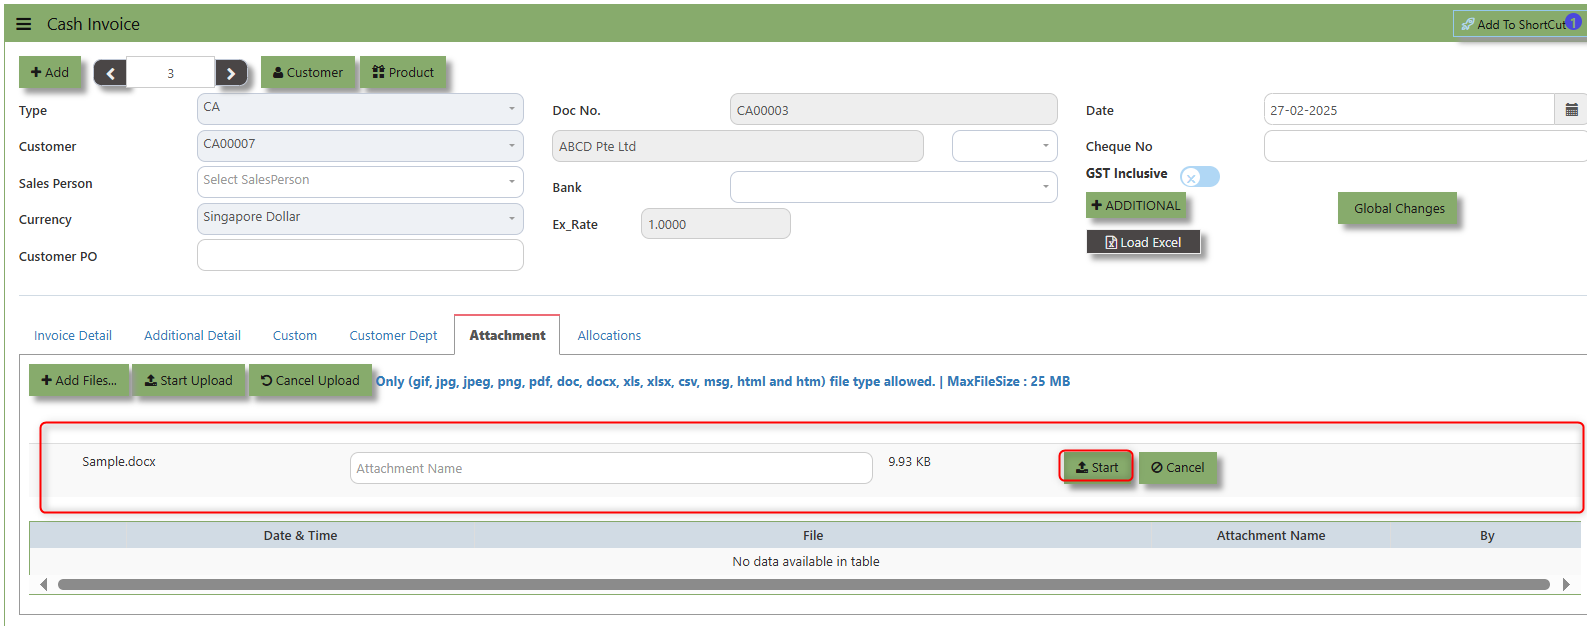](https://doc.uniq365.com/uploads/images/gallery/2025-02/xx1image.png)
4.Once the file attached, click "SAVE" button
[](https://doc.uniq365.com/uploads/images/gallery/2025-02/VXWimage.png)
User may opt to cancel the uploading by clicking the **"Cancel Upload"** button and delete the file uploaded by clicking the **"Bin icon"** at the line detail.
\_\_\_\_\_\_\_\_\_\_\_\_\_\_\_\_\_\_\_\_\_\_\_\_\_\_\_\_\_\_\_\_\_\_\_\_\_\_\_\_\_\_\_\_\_\_\_\_\_\_\_\_\_\_\_\_\_\_\_\_\_\_\_\_\_\_\_\_\_\_\_\_\_\_\_\_\_\_\_\_\_\_\_\_\_\_\_\_\_\_\_\_\_\_\_\_\_\_\_\_\_\_\_\_\_\_\_\_\_\_\_\_\_\_\_\_\_\_\_\_\_\_\_\_\_\_\_\_\_\_\_\_\_\_\_\_\_\_\_
The **Allocations Tab** is used to manage and allocate the amounts or costs associated with the purchase invoice. Click on SALES – SALES OPERATIONS – CASH INVOICE - ATTACHMENT TAB for the screen below.
[](https://doc.uniq365.com/uploads/images/gallery/2025-02/gxLimage.png)
Goods Returned Return (Credit Note)
##### This is used to create a Credit Note to Customers when goods are returned. This will update the GL and the stock status. If you have noticed, the credit note can also be used to knock off previous invoices. (By clicking on the batch allocation button)
\_\_\_\_\_\_\_\_\_\_\_\_\_\_\_\_\_\_\_\_\_\_\_\_\_\_\_\_\_\_\_\_\_\_\_\_\_\_\_\_\_\_\_\_\_\_\_\_\_\_\_\_\_\_\_\_\_\_\_\_\_\_\_\_\_\_\_\_\_\_\_\_\_\_\_\_\_\_\_\_\_\_\_\_\_\_\_\_\_\_\_\_\_\_\_\_\_\_\_\_\_\_\_\_\_\_\_\_\_\_\_\_\_\_\_\_\_\_\_\_\_\_\_\_\_\_\_\_\_\_\_\_\_\_\_\_\_\_\_
##### **How to Create Goods Returned – Credit Note?**
1.Click on **SALES – SALES – SALES OPERATIONS – GOODS RETURN CREDIT NOTE** for the screen below.
[](https://doc.uniq365.com/uploads/images/gallery/2025-02/6M7image.png)
2\. Click on Add button or press F3 to create a new transaction.
[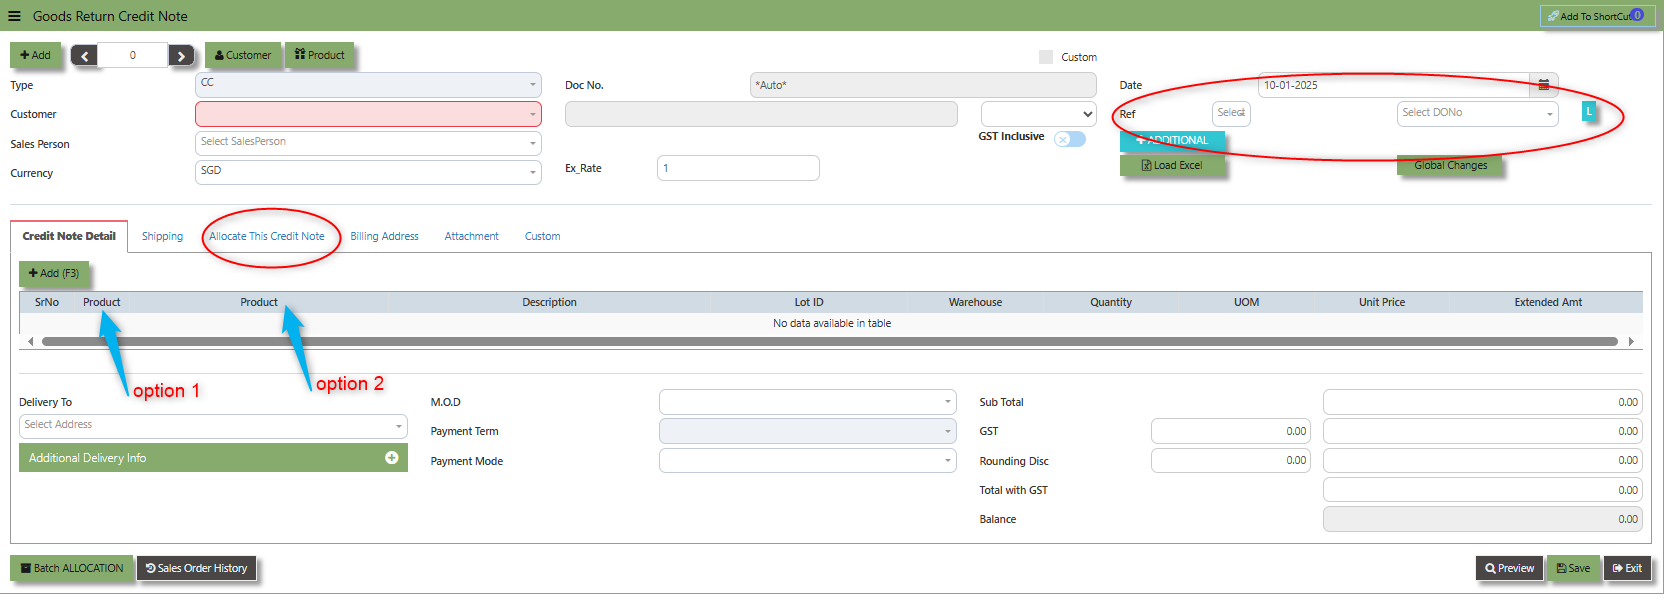](https://doc.uniq365.com/uploads/images/gallery/2025-01/dIyimage.png)
- Click the Type - drop-down to select transaction type – CC (Goods Returned – Credit Note).
- After the transaction type selection, use the tab button to go to the Doc No. and Date fields.
- Click the Customer - drop-down list to select Customer Name, followed by the Sales Person, PDS, Currency, Rate, RMA Ref and Narration if applicable.
- For this transaction type, the system has two options with regard to selecting the line items in the Details section (refer to highlighting Option 1,1a & Option 2 on print screen)
- **Option 1**: Select the Transaction Code & Number from the Delivery Ref column, before going to the “Option 1a” drop-down to select the items which will come from the transaction in the Delivery Ref.
- **Option 2:** Ignore the Option 1 function and use the Product drop-down list to select the items to be
returned. For this option, user should take note of the return cost calculated by the system and where necessary, you can amend the value of the return cost for the individual item.
- After completing the above steps for sales return, user can use the “Batch Allocation” button to allocate the outstanding invoice amount.
\_\_\_\_\_\_\_\_\_\_\_\_\_\_\_\_\_\_\_\_\_\_\_\_\_\_\_\_\_\_\_\_\_\_\_\_\_\_\_\_\_\_\_\_\_\_\_\_\_\_\_\_\_\_\_\_\_\_\_\_\_\_\_\_\_\_\_\_\_\_\_\_\_\_\_\_\_\_\_\_\_\_\_\_\_\_\_\_\_\_\_\_\_\_\_\_\_\_\_\_\_\_\_\_\_\_\_\_\_\_\_\_\_\_\_\_\_\_\_\_\_\_\_\_\_\_\_\_\_\_\_\_\_\_\_\_\_\_\_
**Add to Shortcut -** By clicking this button, users can add the current Sales Transaction in the shortcut menu in the main page.
[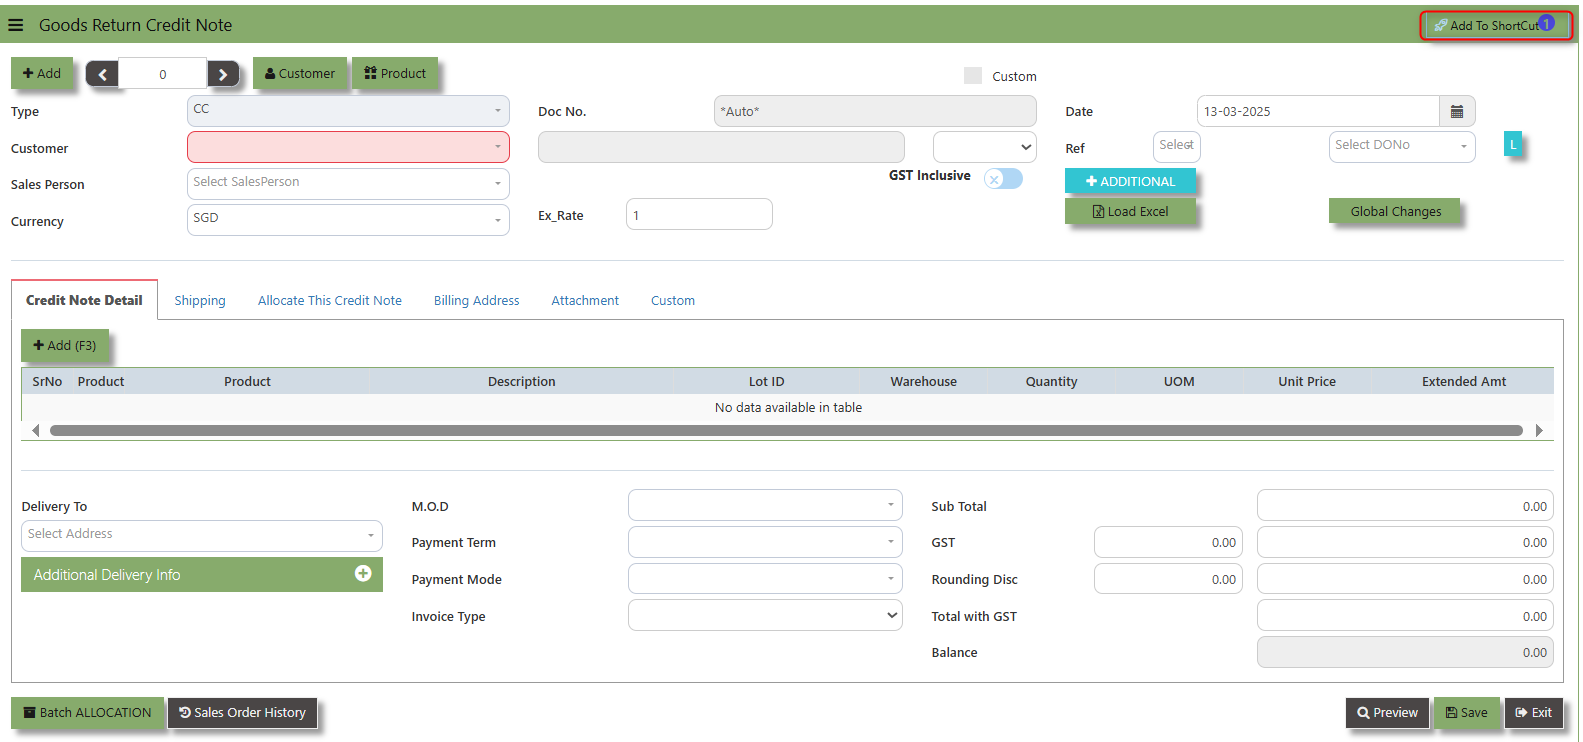](https://doc.uniq365.com/uploads/images/gallery/2025-03/UoLimage.png)
##### **How to use Add to ShortCut?**
1\. Click "**Add to ShortCut"** and system will open below windows:
[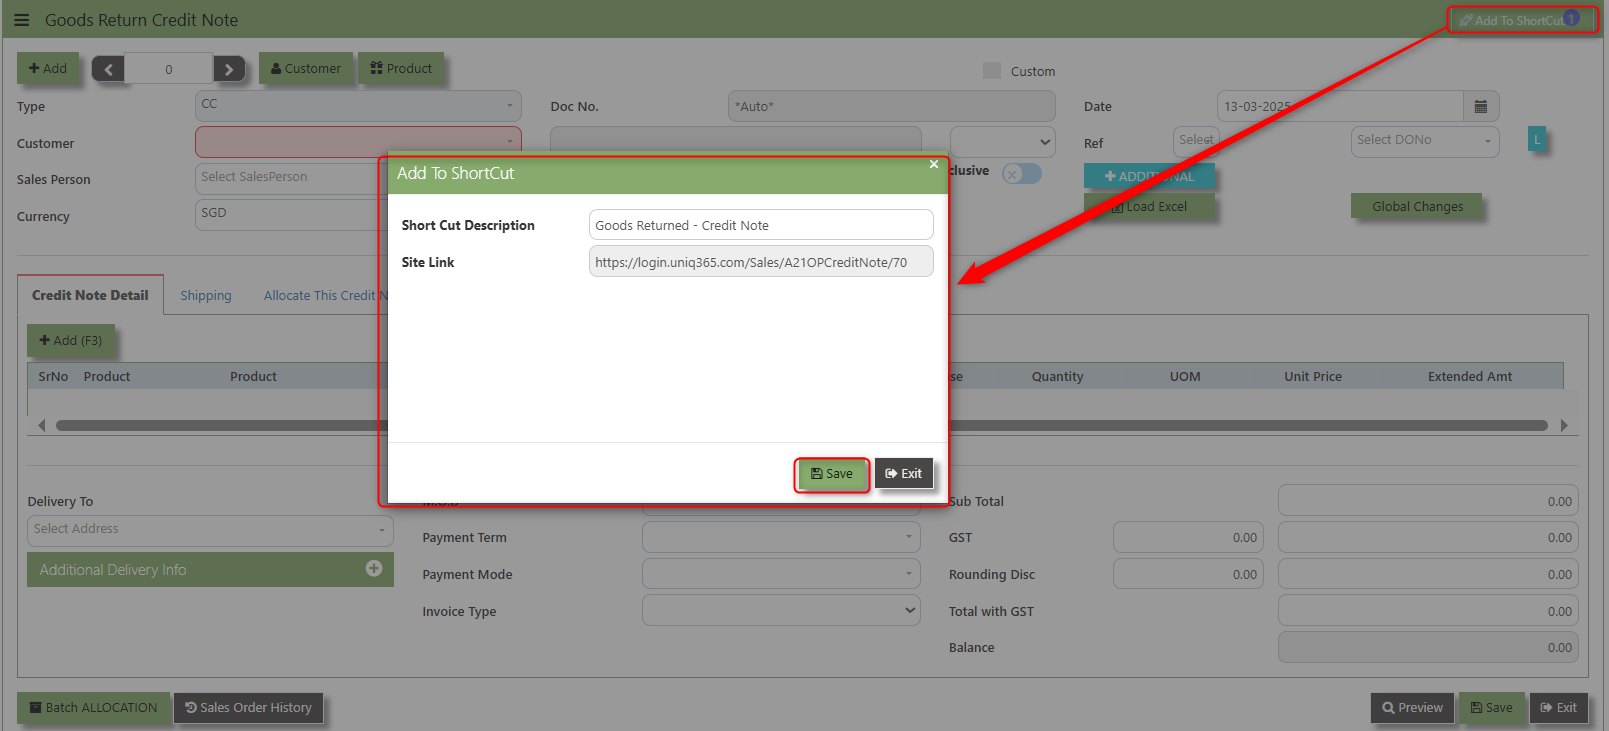](https://doc.uniq365.com/uploads/images/gallery/2025-03/AGhimage.png)
2\. Enter Short Cut Description
3\. Click SAVE then click OK.
4\. User may look to the Homepage for the added function or page. Click on HOME - HOME - SHORTCUT for the screen below.
[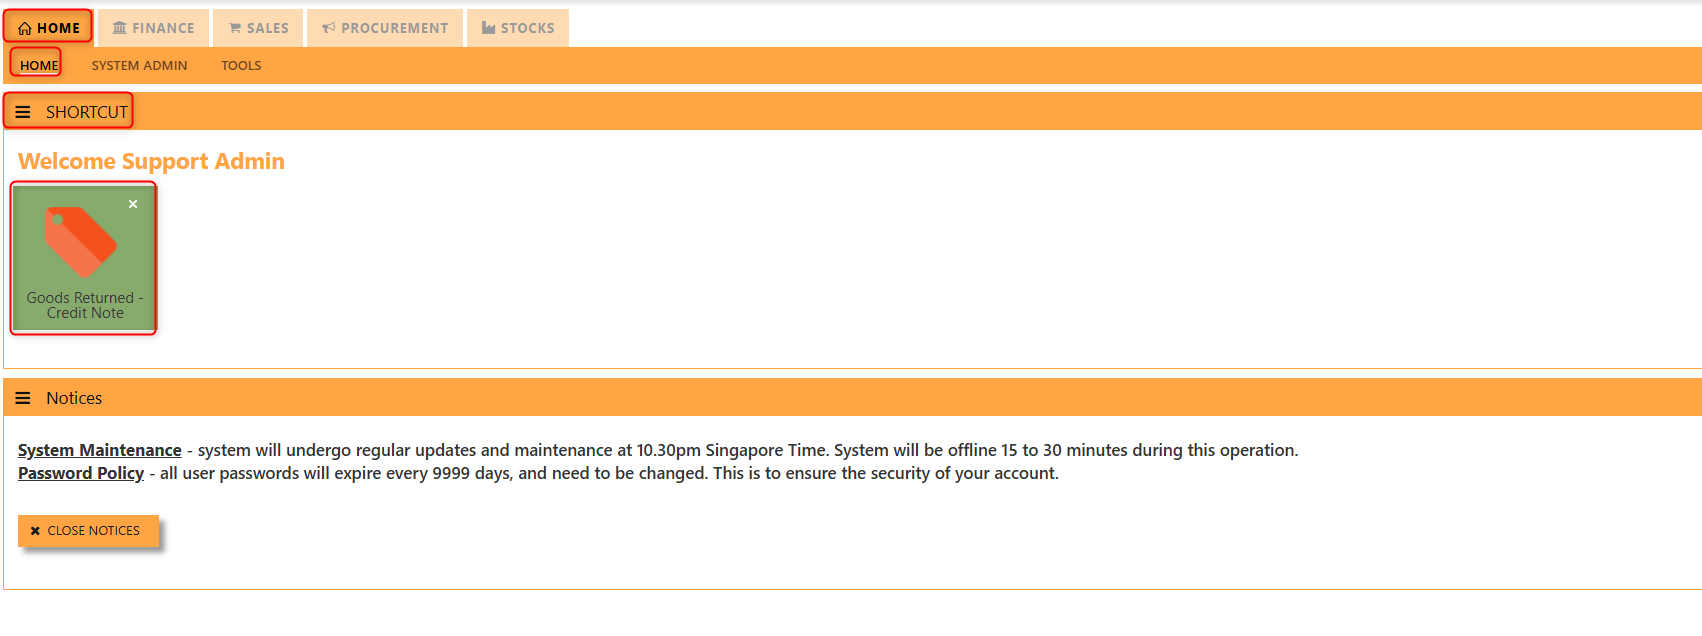](https://doc.uniq365.com/uploads/images/gallery/2025-03/0l2image.png)
\_\_\_\_\_\_\_\_\_\_\_\_\_\_\_\_\_\_\_\_\_\_\_\_\_\_\_\_\_\_\_\_\_\_\_\_\_\_\_\_\_\_\_\_\_\_\_\_\_\_\_\_\_\_\_\_\_\_\_\_\_\_\_\_\_\_\_\_\_\_\_\_\_\_\_\_\_\_\_\_\_\_\_\_\_\_\_\_\_\_\_\_\_\_\_\_\_\_\_\_\_\_\_\_\_\_\_\_\_\_\_\_\_\_\_\_\_\_\_\_\_\_\_\_\_\_\_\_\_\_\_\_\_\_\_\_\_\_\_
The **Customer** button provides quick access to detailed supplier profiles under Customer maintenance.
[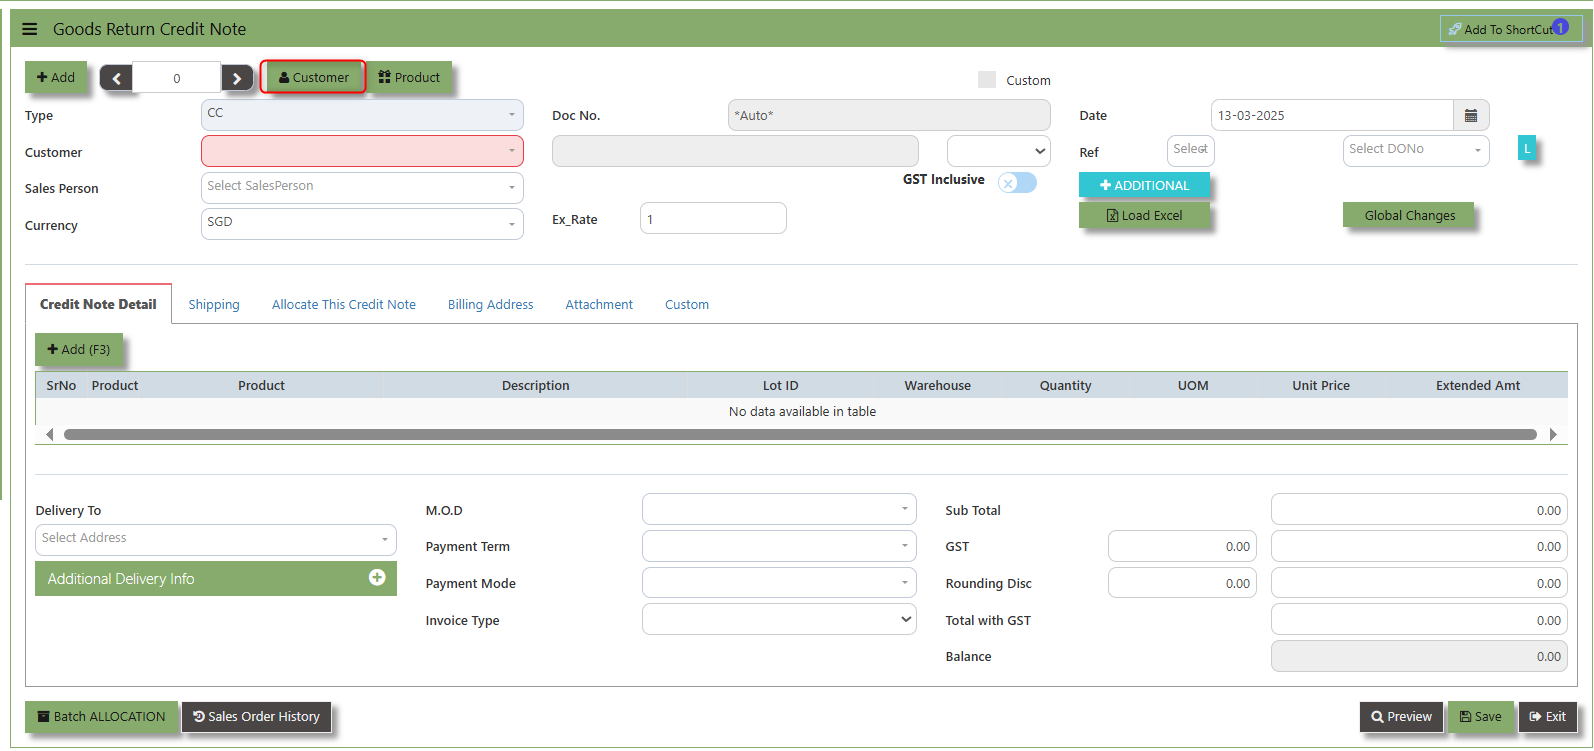](https://doc.uniq365.com/uploads/images/gallery/2025-03/9rTimage.png)
The **Product** button provides quick access to product and service maintenance.
[](https://doc.uniq365.com/uploads/images/gallery/2025-03/Z7vimage.png)
The **GST Inclusive** checkbox indicates whether the unit price in the CC include **Goods and Services Tax (GST)** or not.
[](https://doc.uniq365.com/uploads/images/gallery/2025-03/JL9image.png)
- **GST Inclusive Checkbox (When ticked):** If the GST is included in the price, the system will automatically calculate the base price (the price excluding GST) and the GST amount based on the total value.
- **When not ticked (GST Exclusive)**: The system will calculate the GST separately based on the base price of the items and add it to the total amount of the invoice.
**Additional Header Info** button is typically used to capture and manage additional information related to the sales order at the header level (i.e., Delivery date, Del Term , Indicative WH , Country, Lead Time, Contact, PDSU, Narration and Transaction Narration). This feature allows users to add extra data or notes that are relevant to the entire sales order.
[](https://doc.uniq365.com/uploads/images/gallery/2025-03/3rYimage.png)
Debit Note
##### This is a direct Debit Note and involves selling product directly to Customers. It updates the GL and Inventory status. Please note that you can also use this debit note to knock off any credit notes raised.
##### **How to Create Debit Note?**
1.Click on **SALES – SALES OPERATIONS – DEBIT NOTE** for the screen below..
[](https://doc.uniq365.com/uploads/images/gallery/2025-02/6Jhimage.png)
2\. Click Add (F3) to create new record.[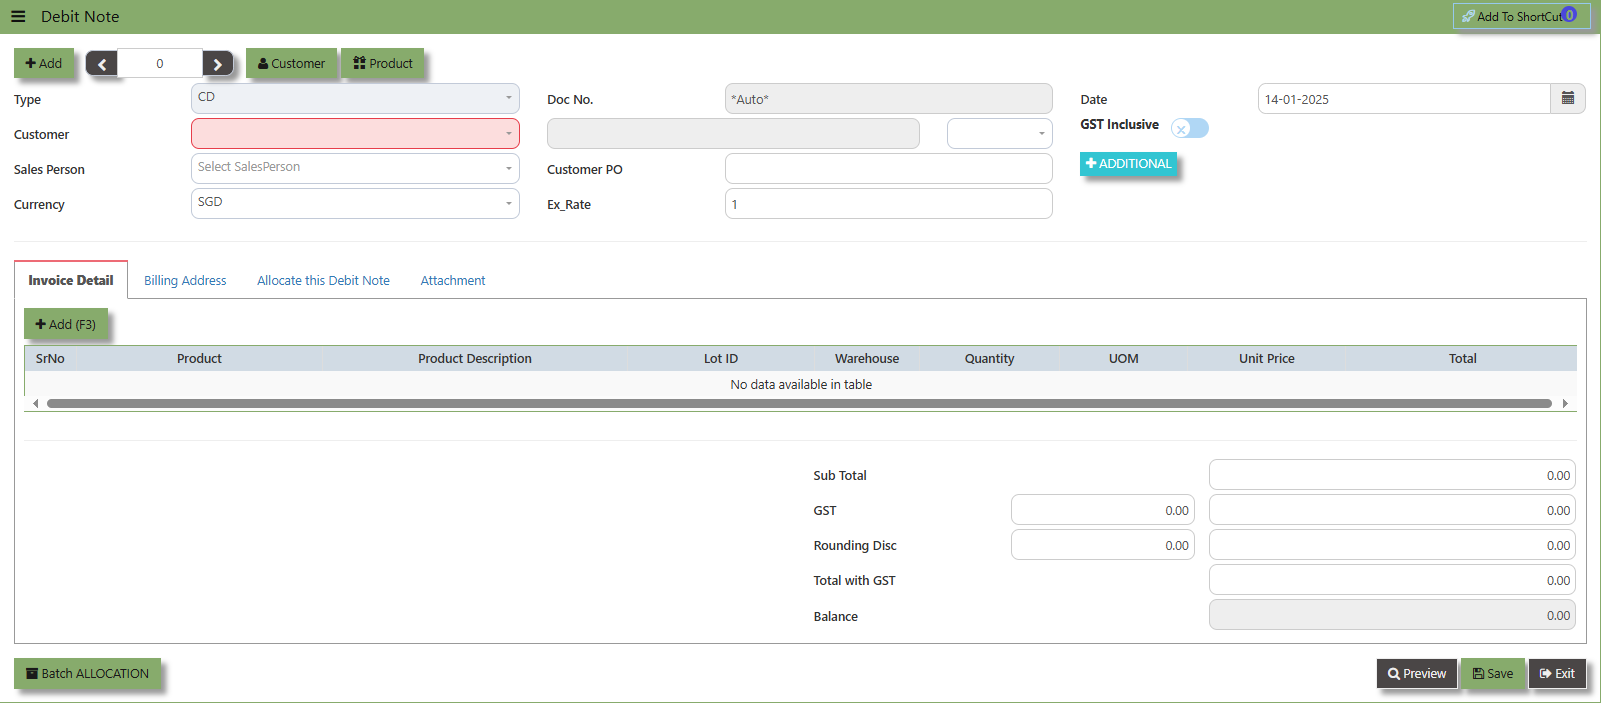](https://doc.uniq365.com/uploads/images/gallery/2025-01/urXimage.png)
3\. Click the Customer - drop-down list to select Customer Name, followed by the Sales Person, PDS, Currency, Rate, Location and Narration if applicable.
4\. After updating the header information, go to the Details section to select the items from the Product drop-down list.
Save the transaction after this is done.
5\. The Debit Note also has allocation function. Click on the “Batch Allocation” button for allocation.
\_\_\_\_\_\_\_\_\_\_\_\_\_\_\_\_\_\_\_\_\_\_\_\_\_\_\_\_\_\_\_\_\_\_\_\_\_\_\_\_\_\_\_\_\_\_\_\_\_\_\_\_\_\_\_\_\_\_\_\_\_\_\_\_\_\_\_\_\_\_\_\_\_\_\_\_\_\_\_\_\_\_\_\_\_\_\_\_\_\_\_\_\_\_\_\_\_\_\_\_\_\_\_\_\_\_\_\_\_\_\_\_\_\_\_\_\_\_\_\_\_\_\_\_\_\_\_\_\_\_\_\_\_\_\_\_\_\_
**Add to Shortcut -** Used to create a shortcut for quick access to a specific Sales Transaction. By clicking this button, users can add the current transaction to a list of shortcuts, allowing them to access the invoice or related functionality quickly and efficiently, without needing to search for it each time.
[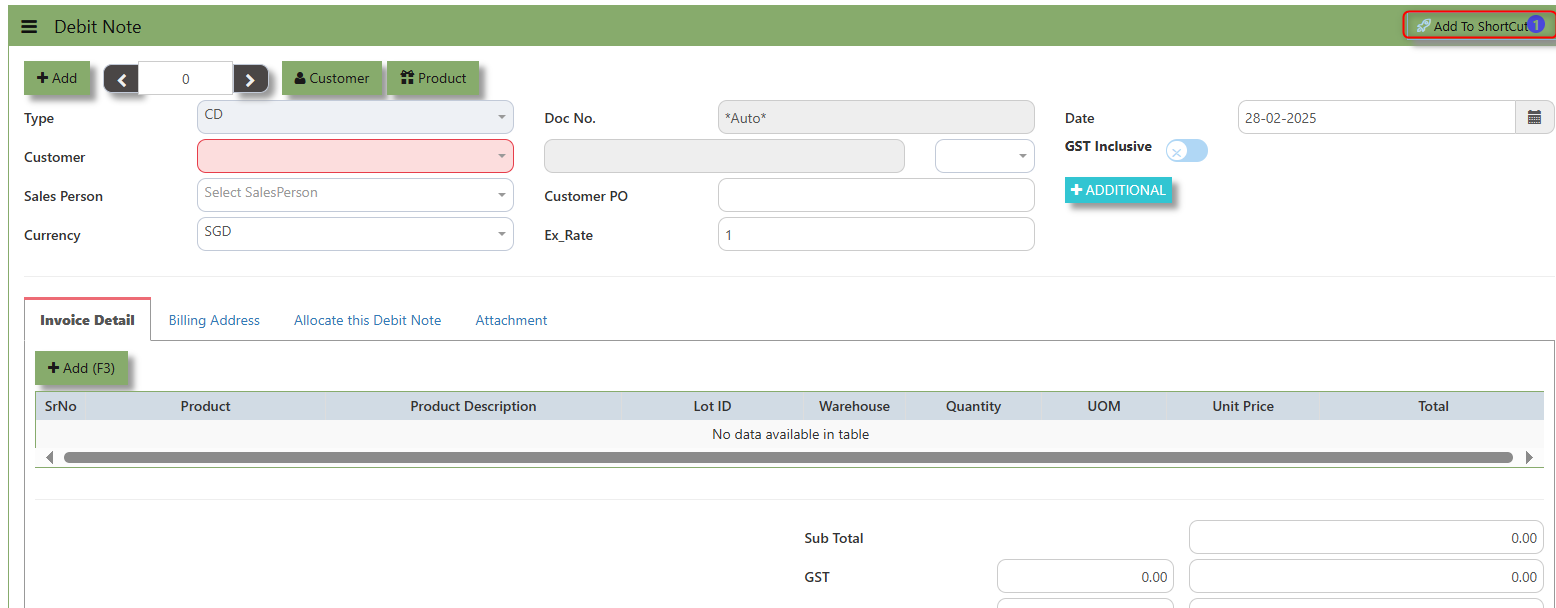](https://doc.uniq365.com/uploads/images/gallery/2025-02/VMDimage.png)
##### **How to use Add to Shortcut?**
1\. Click "**Add to Shortcut"** and system will open below windows:
[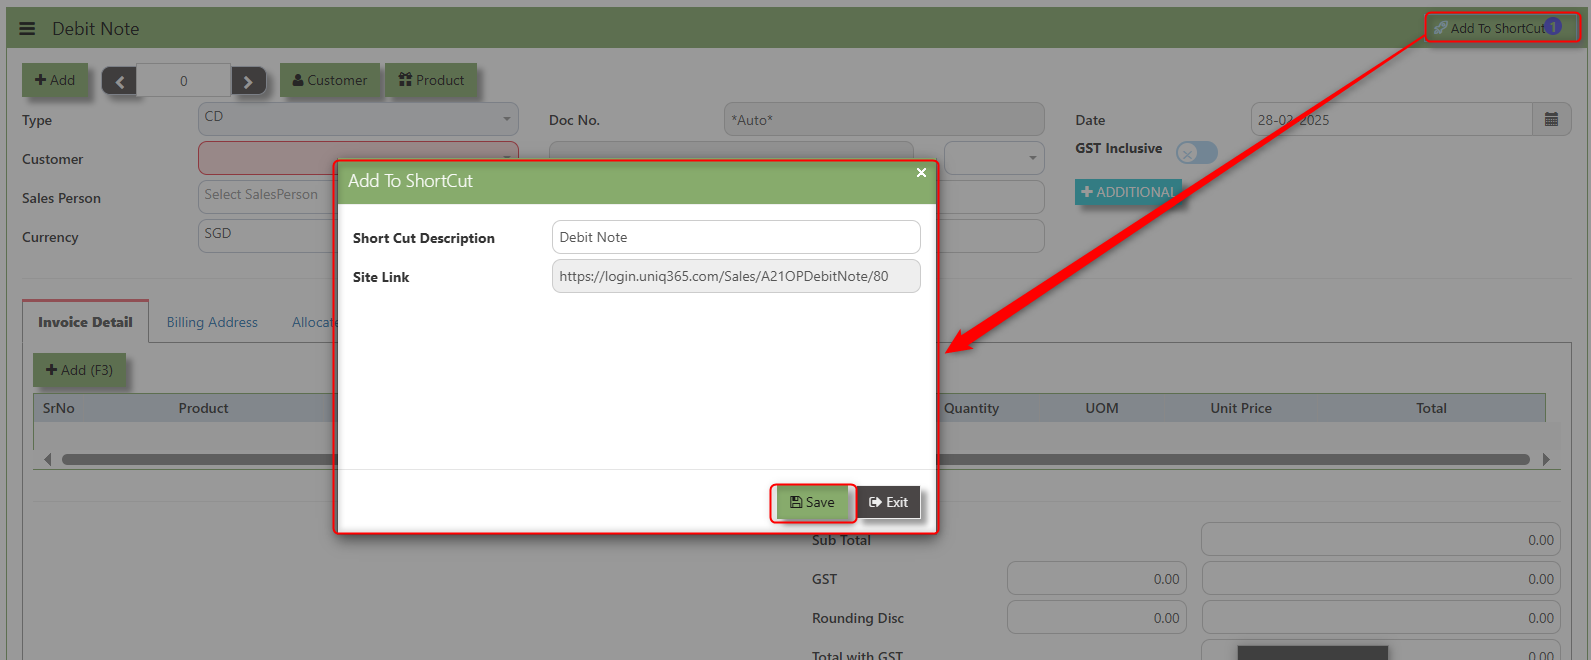](https://doc.uniq365.com/uploads/images/gallery/2025-02/poBimage.png)
2\. Enter Short Cut Description
3\. Click SAVE then click OK.
4\. User may look to the Homepage for the added function or page. Click on HOME - HOME - SHORTCUT for the screen below.
[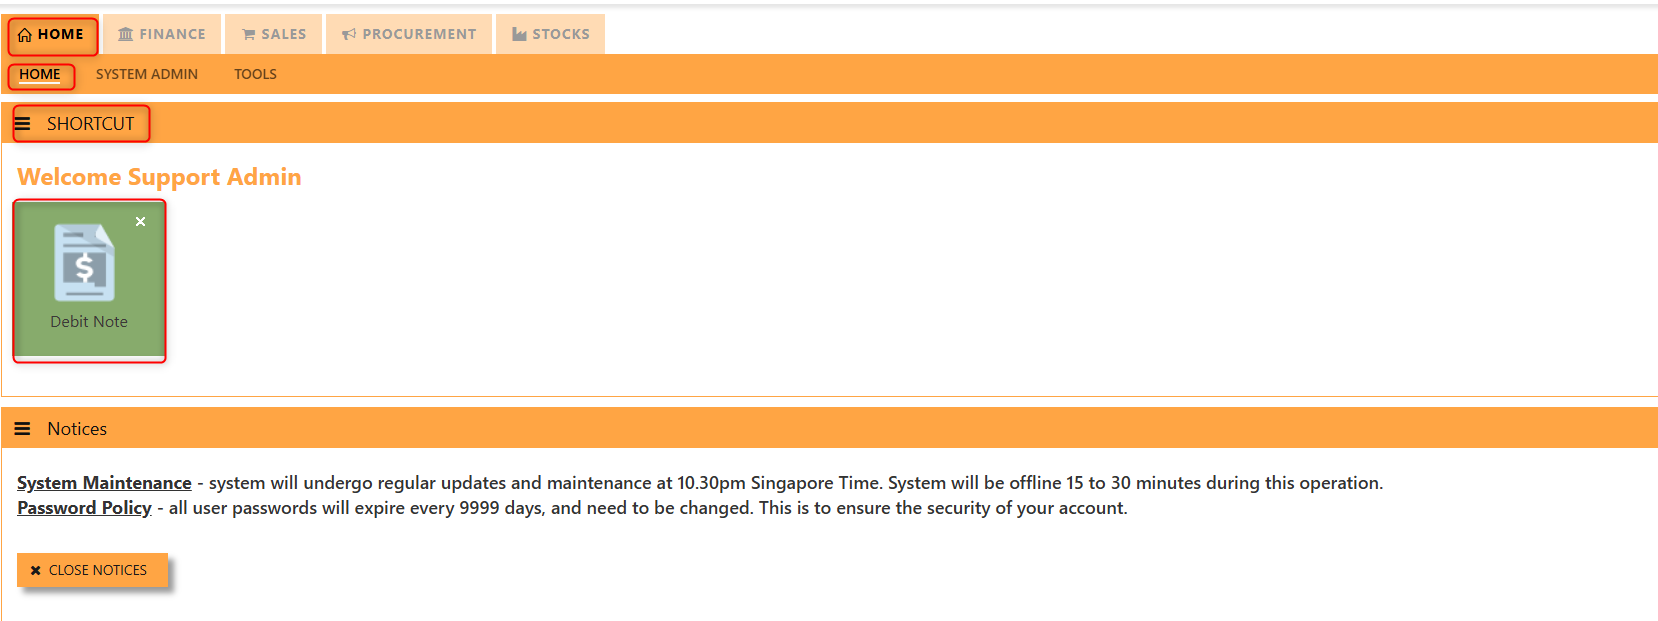](https://doc.uniq365.com/uploads/images/gallery/2025-02/Hbbimage.png)
\_\_\_\_\_\_\_\_\_\_\_\_\_\_\_\_\_\_\_\_\_\_\_\_\_\_\_\_\_\_\_\_\_\_\_\_\_\_\_\_\_\_\_\_\_\_\_\_\_\_\_\_\_\_\_\_\_\_\_\_\_\_\_\_\_\_\_\_\_\_\_\_\_\_\_\_\_\_\_\_\_\_\_\_\_\_\_\_\_\_\_\_\_\_\_\_\_\_\_\_\_\_\_\_\_\_\_\_\_\_\_\_\_\_\_\_\_\_\_\_\_\_\_\_\_\_\_\_\_\_\_\_\_\_\_\_\_\_
The **Customer** button provides quick access to detailed customer details under Customer maintenance.
[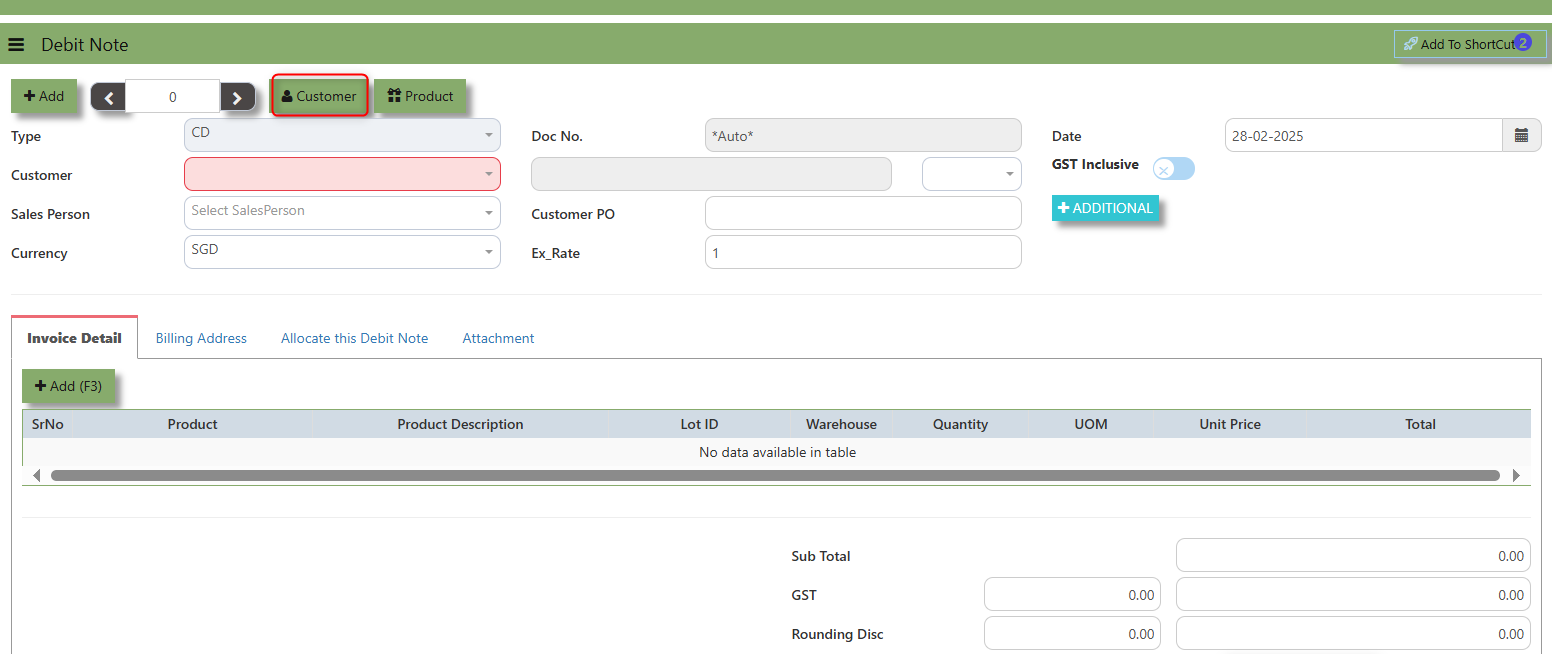](https://doc.uniq365.com/uploads/images/gallery/2025-02/fWSimage.png)
The **Product** button provides quick access to product and service maintenance.
[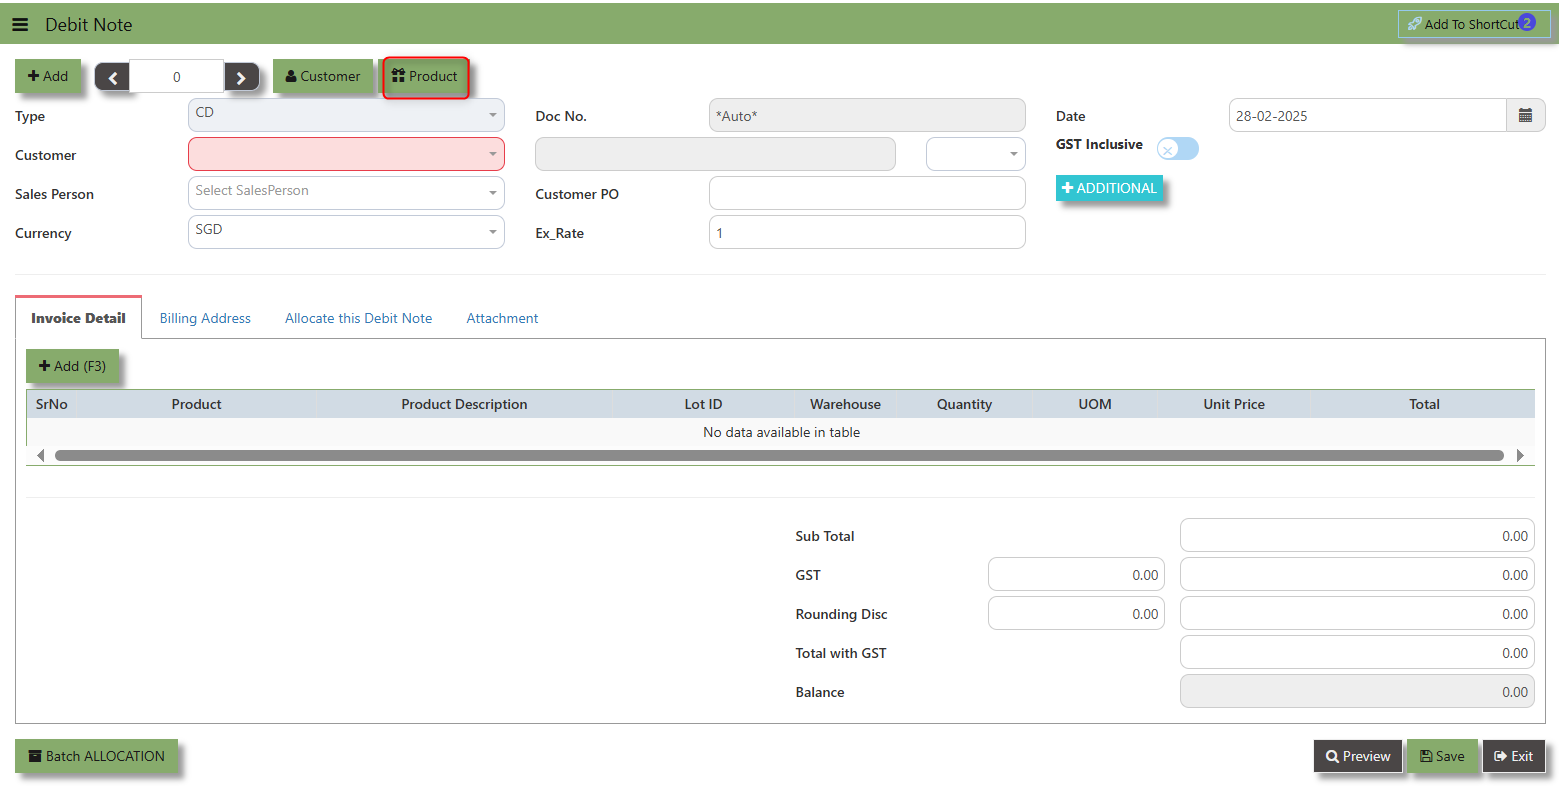](https://doc.uniq365.com/uploads/images/gallery/2025-02/SJLimage.png)
The **GST Inclusive** checkbox indicates whether the unit price in the CD include **Goods and Services Tax (GST)** or not.
[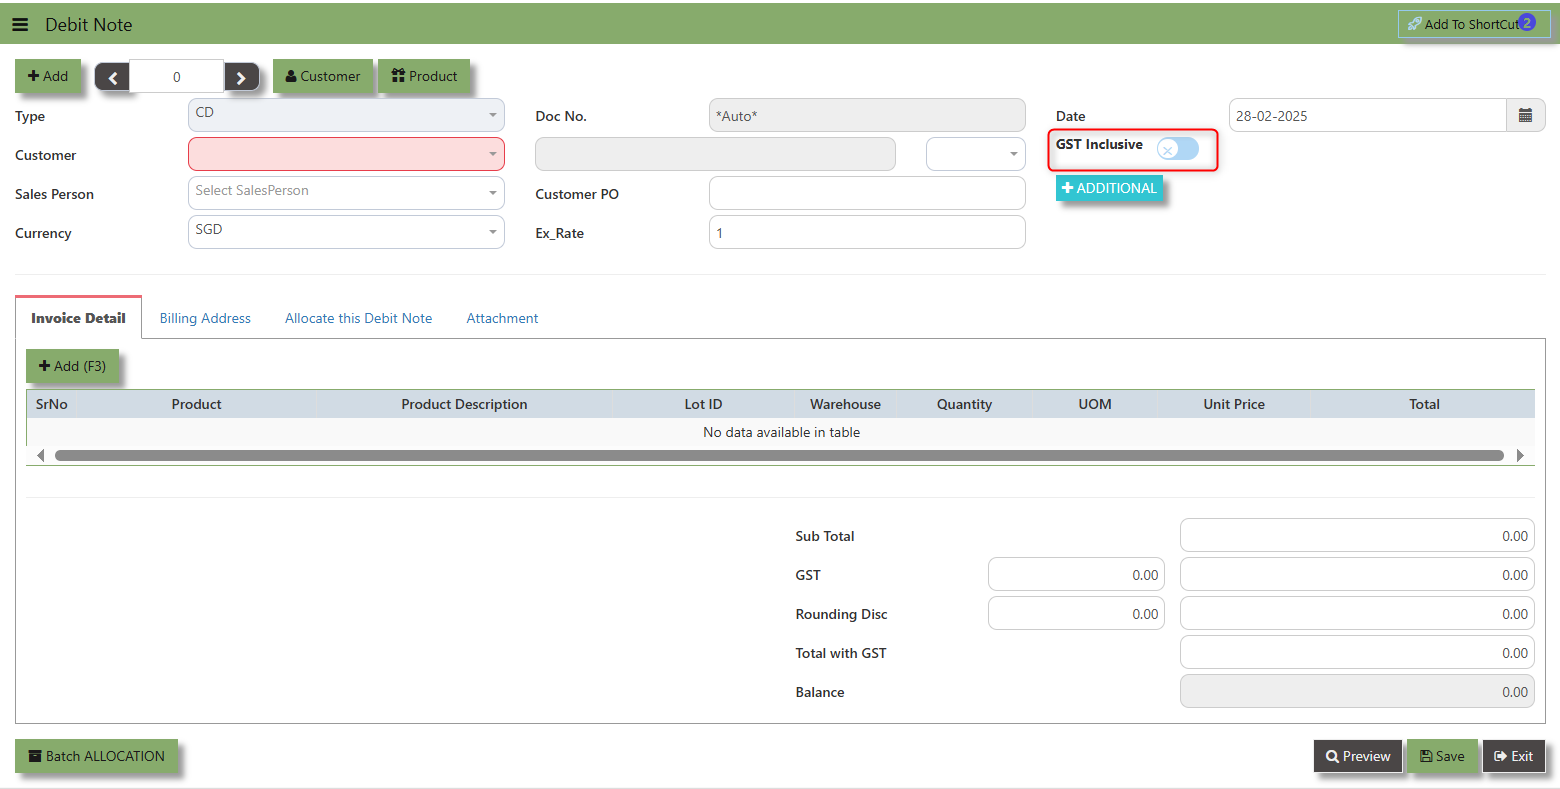](https://doc.uniq365.com/uploads/images/gallery/2025-02/2Okimage.png)
- **When ticked (GST Inclusive)**: provided in the Sales Debit Note already includes the applicable GST amount. The GST amount will not be calculated or displayed separately, as it's already accounted for in the quoted price.
- **When not ticked (GST Exclusive)**: The unit **price** is considered exclusive of GST. The system will calculate and add the GST based on the applicable tax rate, and the final total will be the sum of the base price plus the GST amount
**Additional Header Info** button is typically used to capture and manage additional information related to the debit at the header level (i.e., Doc Date, Due date , Contact, Location Contact, PDSU, Narration and Transaction Narration). This feature allows users to add extra data or notes that are relevant to the entire sales invoice on order.
[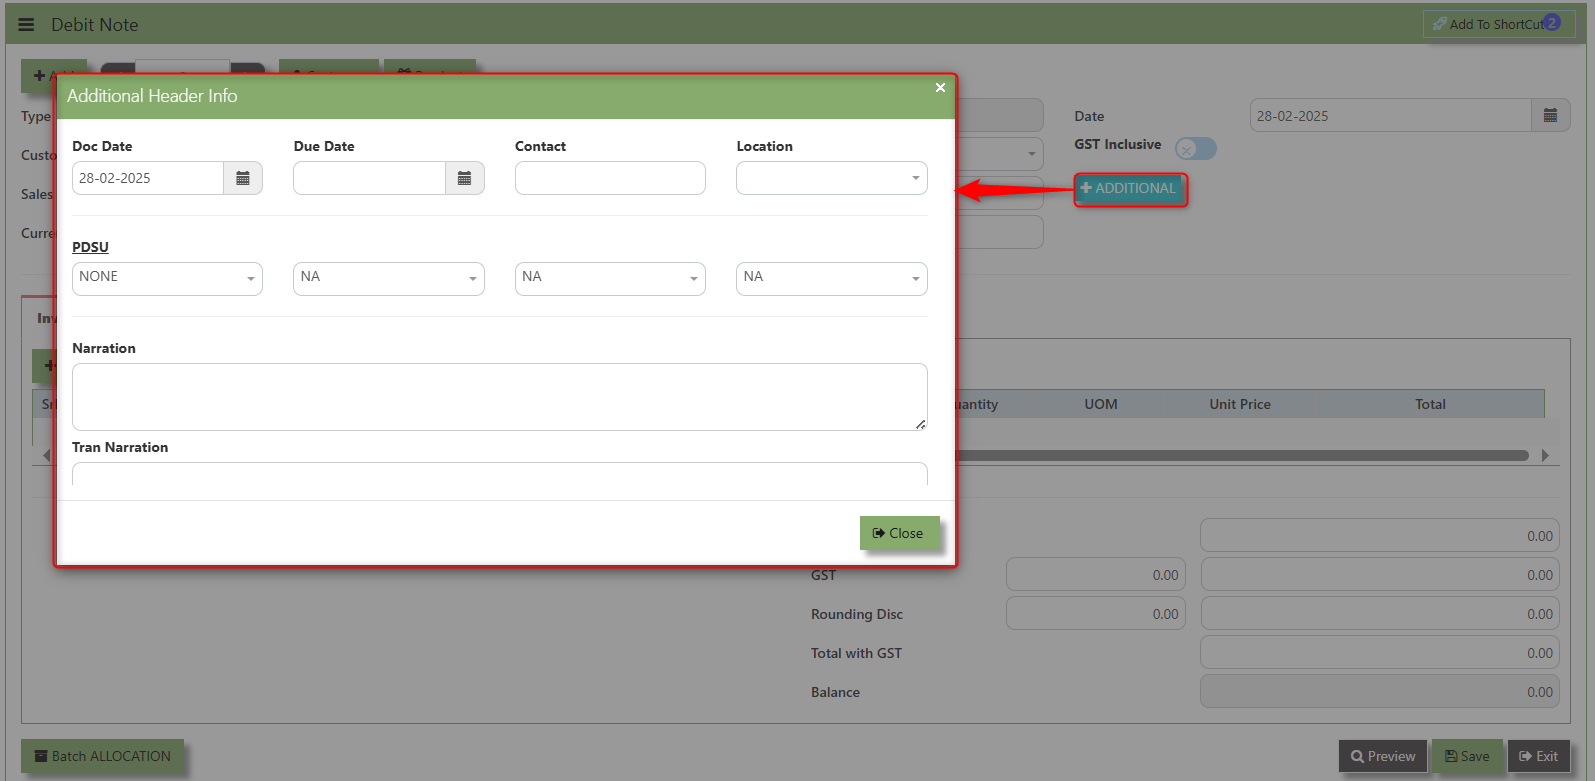](https://doc.uniq365.com/uploads/images/gallery/2025-02/tNpimage.png)
\_\_\_\_\_\_\_\_\_\_\_\_\_\_\_\_\_\_\_\_\_\_\_\_\_\_\_\_\_\_\_\_\_\_\_\_\_\_\_\_\_\_\_\_\_\_\_\_\_\_\_\_\_\_\_\_\_\_\_\_\_\_\_\_\_\_\_\_\_\_\_\_\_\_\_\_\_\_\_\_\_\_\_\_\_\_\_\_\_\_\_\_\_\_\_\_\_\_\_\_\_\_\_\_\_\_\_\_\_\_\_\_\_\_\_\_\_\_\_\_\_\_\_\_\_\_\_\_\_\_\_\_\_\_\_\_\_\_\_
**"Billing Address Tab"** - section where the Billing Address is maintained. This tab ensures that the Billing Details will is displayed and can be editable according to the customer details.
[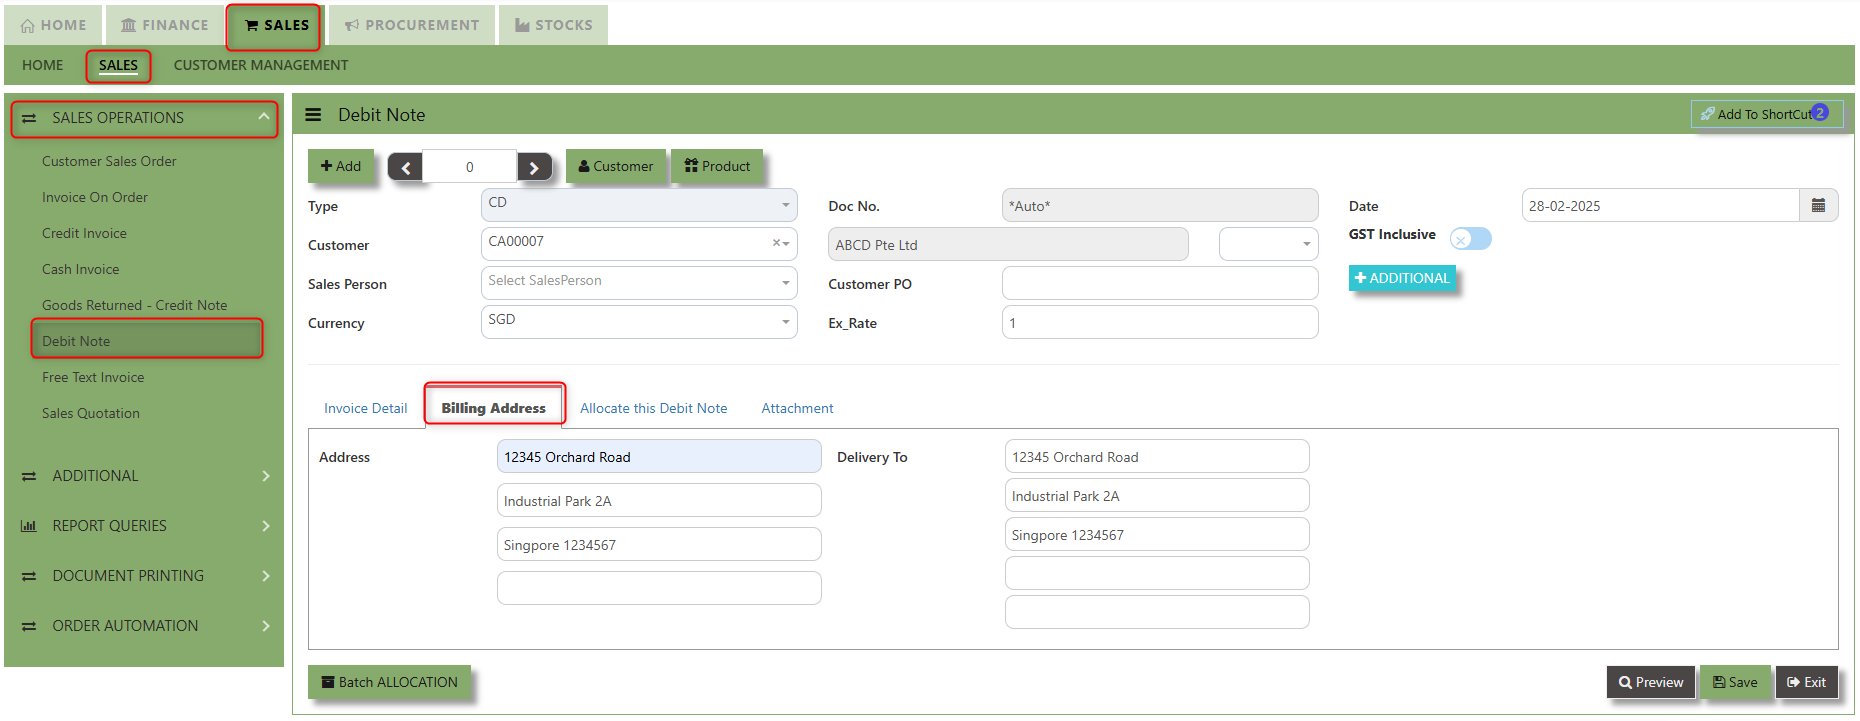](https://doc.uniq365.com/uploads/images/gallery/2025-02/UEjimage.png)
2\. The Billing address is defaulted from Customer Maintenance which is the Customer address, it was also editable is needed.
[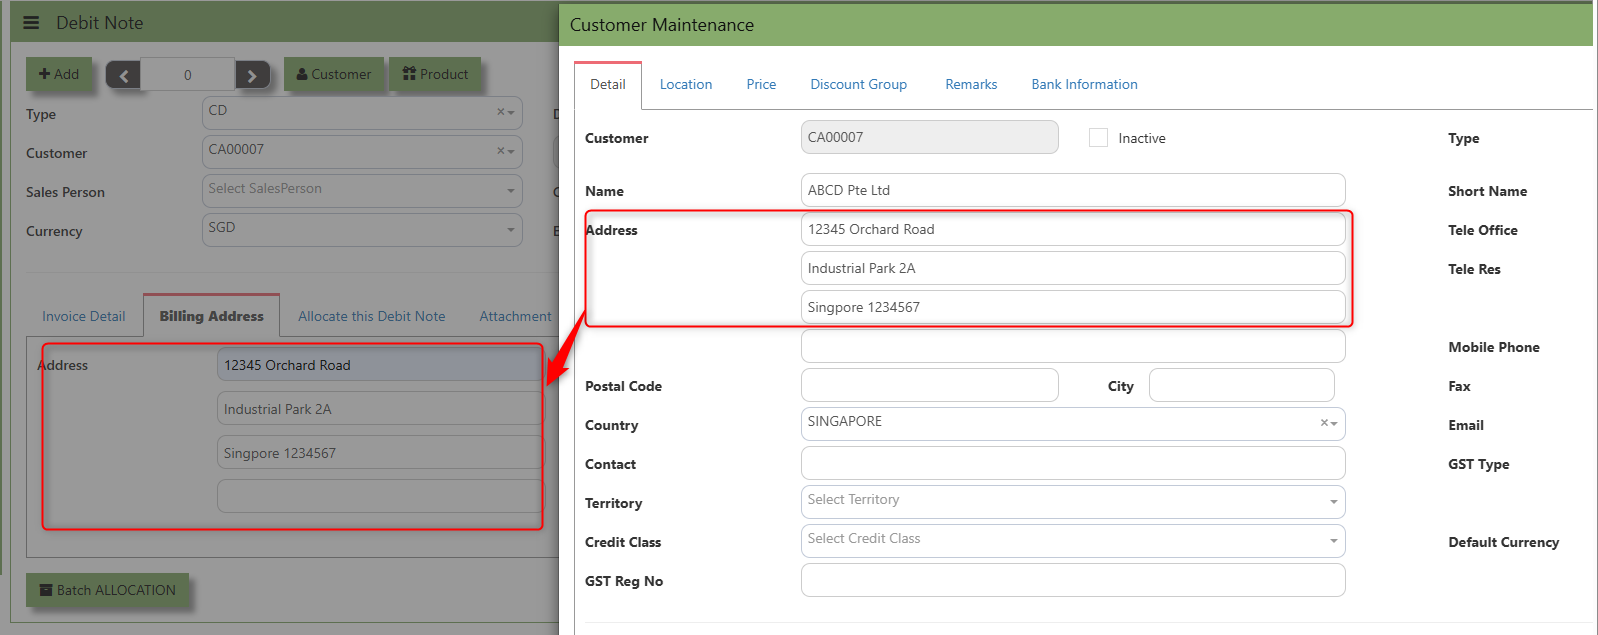](https://doc.uniq365.com/uploads/images/gallery/2025-02/vL4image.png)
\_\_\_\_\_\_\_\_\_\_\_\_\_\_\_\_\_\_\_\_\_\_\_\_\_\_\_\_\_\_\_\_\_\_\_\_\_\_\_\_\_\_\_\_\_\_\_\_\_\_\_\_\_\_\_\_\_\_\_\_\_\_\_\_\_\_\_\_\_\_\_\_\_\_\_\_\_\_\_\_\_\_\_\_\_\_\_\_\_\_\_\_\_\_\_\_\_\_\_\_\_\_\_\_\_\_\_\_\_\_\_\_\_\_\_\_\_\_\_\_\_\_\_\_\_\_\_\_\_\_\_\_\_\_\_\_\_\_
"Allocate Debit Note Tab" is a feature in UNIQ365 that allows users to allocate debit note to specific invoices or transactions.
[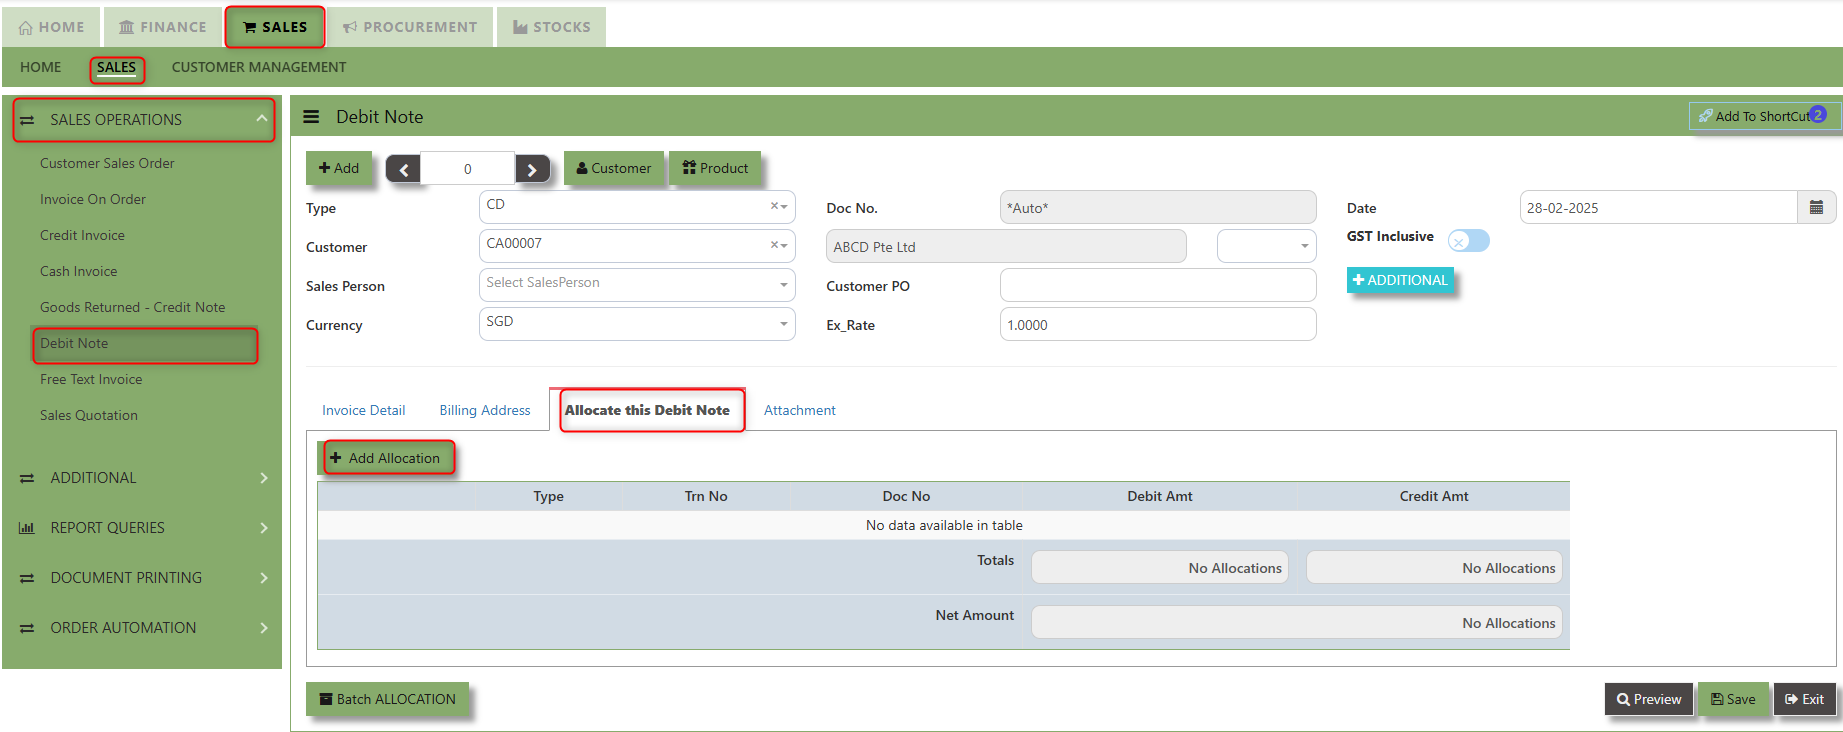](https://doc.uniq365.com/uploads/images/gallery/2025-02/1cbimage.png)
\_\_\_\_\_\_\_\_\_\_\_\_\_\_\_\_\_\_\_\_\_\_\_\_\_\_\_\_\_\_\_\_\_\_\_\_\_\_\_\_\_\_\_\_\_\_\_\_\_\_\_\_\_\_\_\_\_\_\_\_\_\_\_\_\_\_\_\_\_\_\_\_\_\_\_\_\_\_\_\_\_\_\_\_\_\_\_\_\_\_\_\_\_\_\_\_\_\_\_\_\_\_\_\_\_\_\_\_\_\_\_\_\_\_\_\_\_\_\_\_\_\_\_\_\_\_\_\_\_\_\_\_\_\_\_\_\_\_\_
**"Attachment Tab"** allows users to attach various files and documents related to the debit note. By attaching relevant files, users ensure that all purchase-related information is kept in one place, making the sales process smoother, more transparent, and easier to track.
##### **How to use Attachment Tab?**
1\. Click on SALES – SALES OPERATIONS – DEBIT NOTE – ATTACHEMENT TAB for the screen below.
[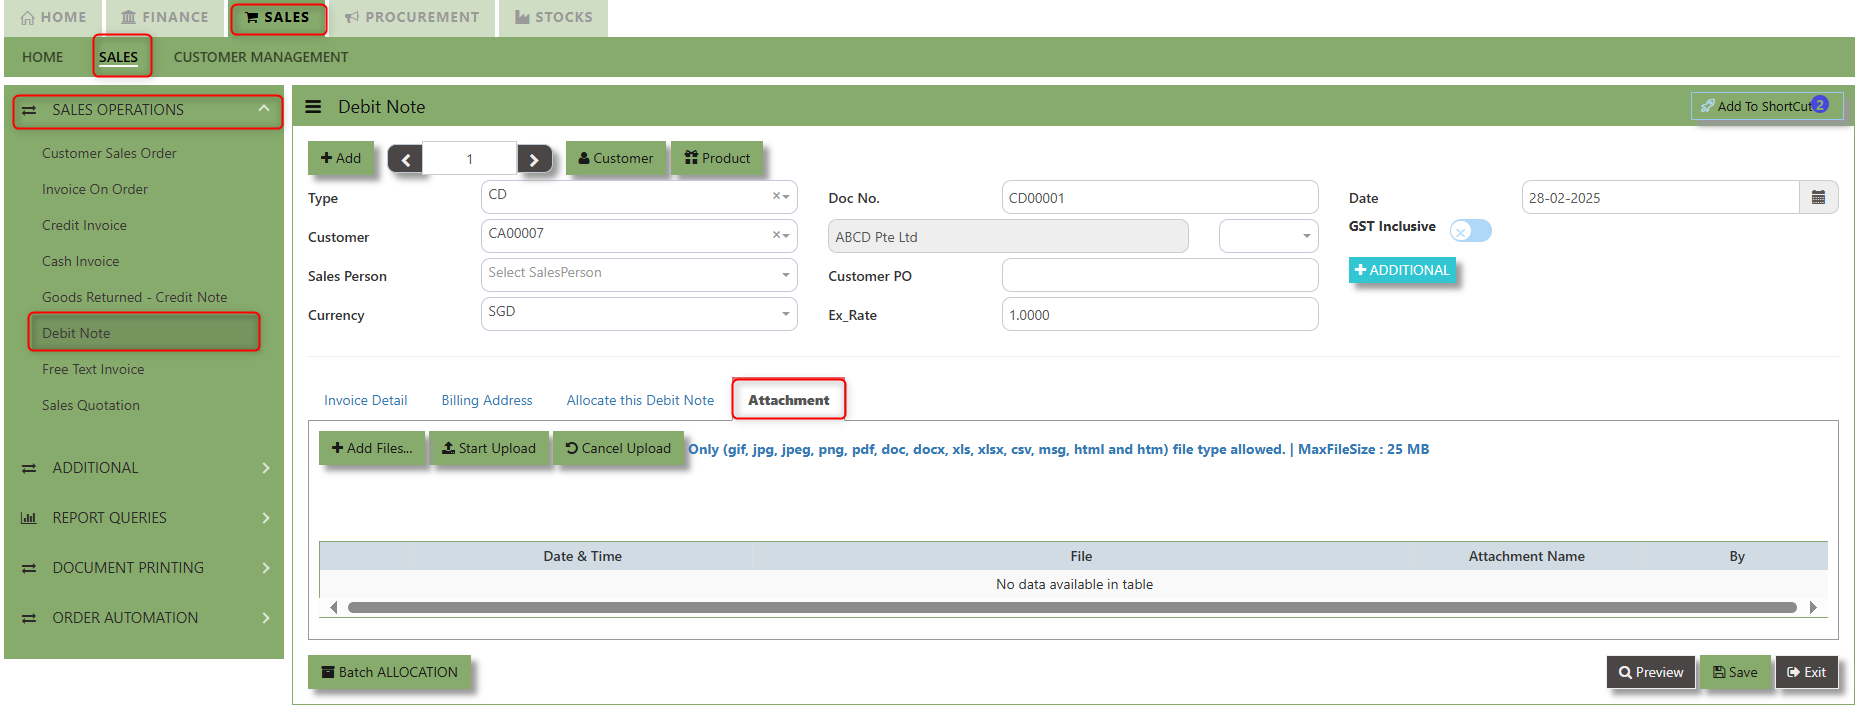](https://doc.uniq365.com/uploads/images/gallery/2025-02/riAimage.png)
2\. Click +Add files and windows will prompt then choose the file you want to upload by clicking open. Kindly take note the file types and maximum size requirements in uploading: ***Only (gif, jpg, jpeg, png, pdf, doc, docx, xls, xlsx, csv, msg, html and htm) file type allowed. | MaxFileSize : 25 MB***
[](https://doc.uniq365.com/uploads/images/gallery/2025-02/kXmimage.png)
3\. Key in the Attachment Name then click start to upload.
[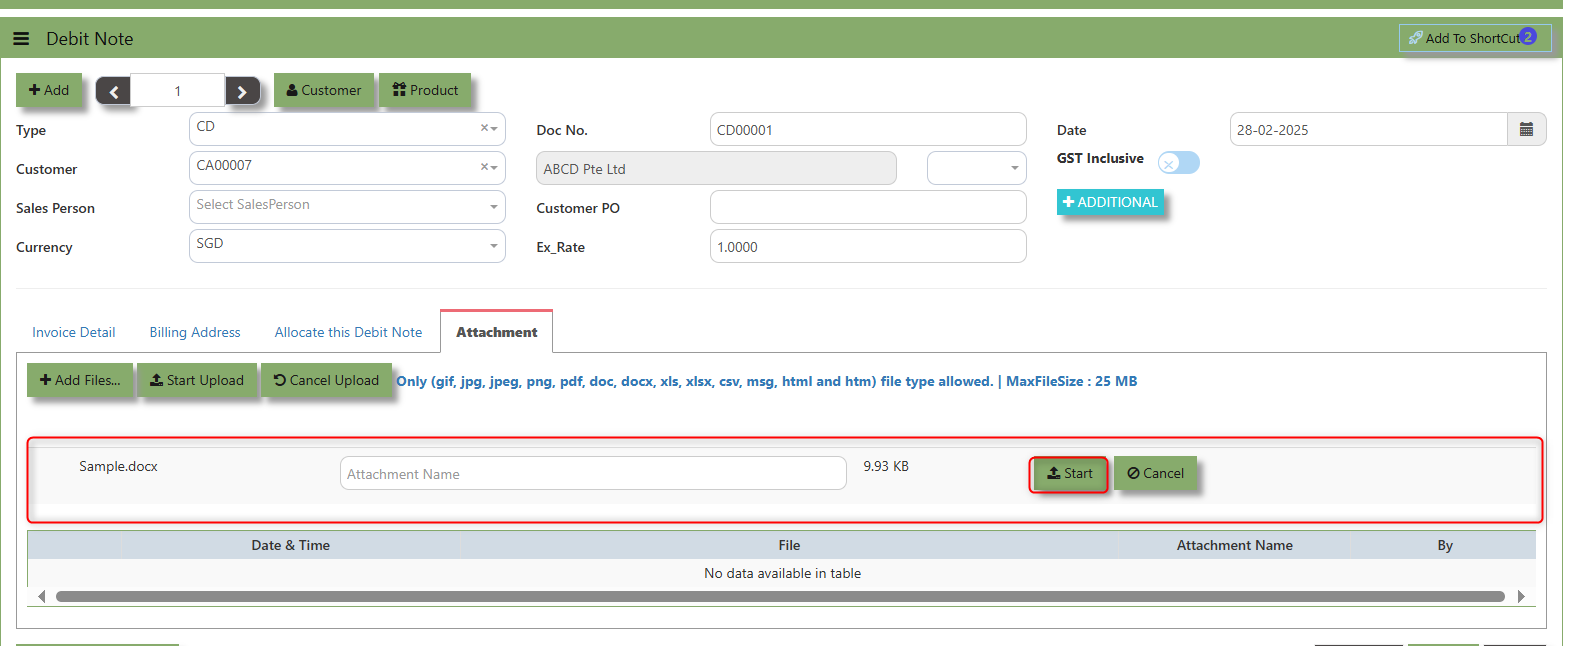](https://doc.uniq365.com/uploads/images/gallery/2025-02/PiWimage.png)
4 Once the file attached, click "SAVE" button
[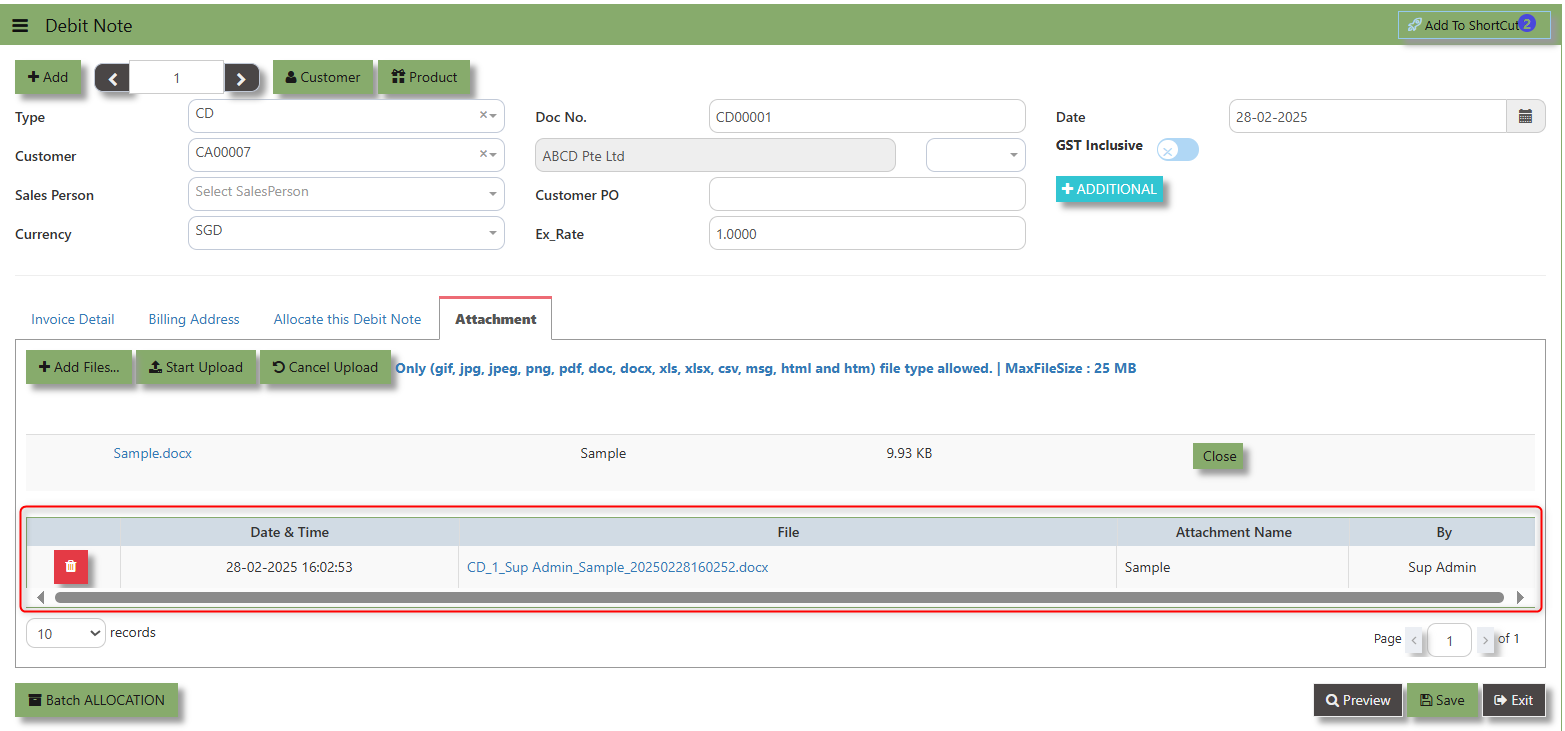](https://doc.uniq365.com/uploads/images/gallery/2025-02/4F1image.png)
User may opt to cancel the uploading by clicking the **"Cancel Upload"** button and delete the file uploaded by clicking the **"Bin icon"** at the line detail.
\_\_\_\_\_\_\_\_\_\_\_\_\_\_\_\_\_\_\_\_\_\_\_\_\_\_\_\_\_\_\_\_\_\_\_\_\_\_\_\_\_\_\_\_\_\_\_\_\_\_\_\_\_\_\_\_\_\_\_\_\_\_\_\_\_\_\_\_\_\_\_\_\_\_\_\_\_\_\_\_\_\_\_\_\_\_\_\_\_\_\_\_\_\_\_\_\_\_\_\_\_\_\_\_\_\_\_\_\_\_\_\_\_\_\_\_\_\_\_\_\_\_\_\_\_\_\_\_\_\_\_\_\_\_\_\_\_\_\_
Free Text Invoice
##### The Free Text Invoice is an invoice that is not attached to a sales order and does not require a sales order or packing slip.
##### **How to create Free text invoice?**
1.Click on **SALES – SALES – SALES OPERATIONS – FREE TEXT INVOICE** for the screen below
[](https://doc.uniq365.com/uploads/images/gallery/2025-02/p2ximage.png)
2\. Click on Add button or press F3 to create a new transaction
[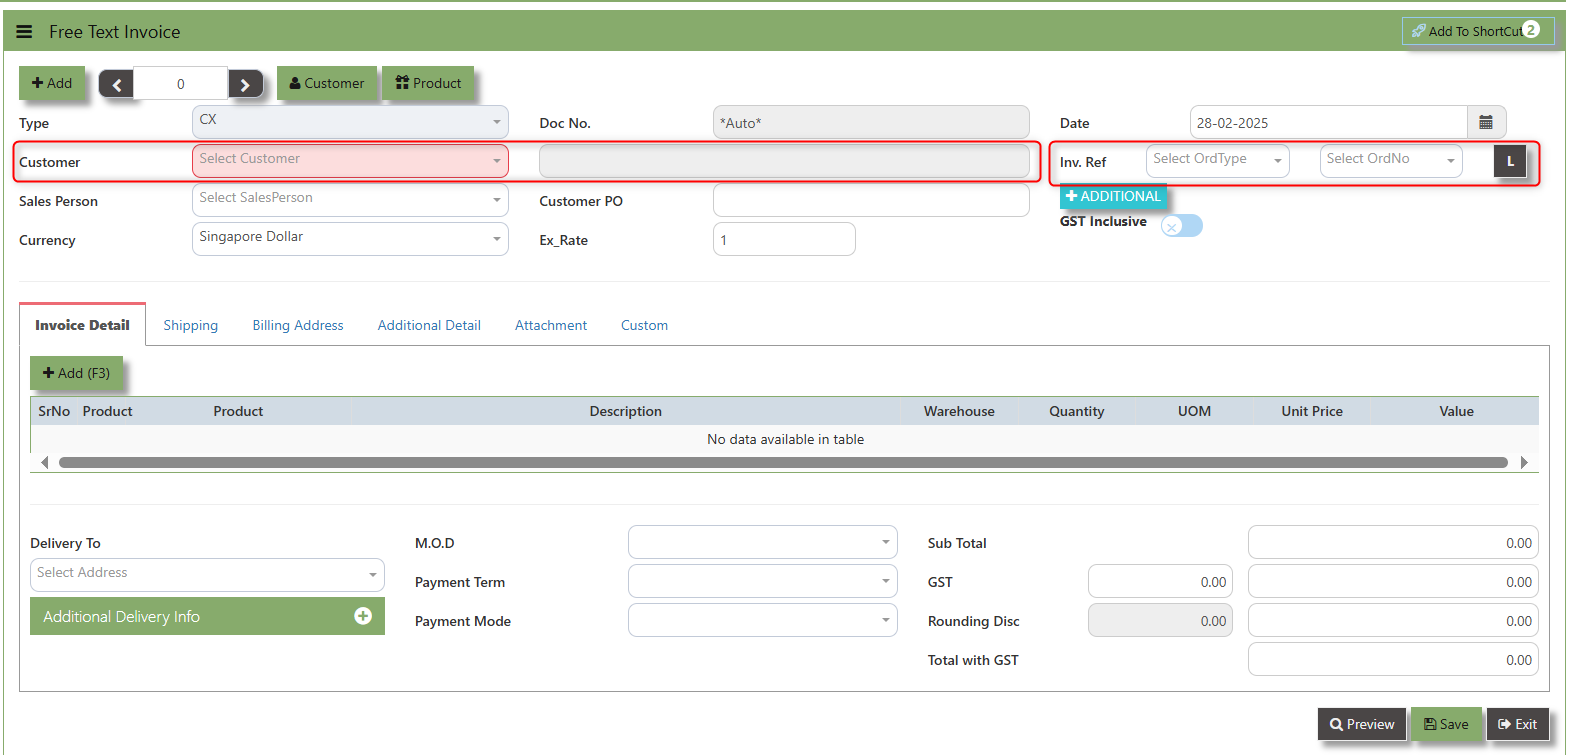](https://doc.uniq365.com/uploads/images/gallery/2025-02/ckUimage.png)
3\. Click the Type - drop-down to select transaction type – CX (Free text Invoice).
4\. After the transaction type selection, use the tab button to go to the Doc No. and Date fields
5\. Click the Customer - drop-down list to select Customer Name, followed by the Sales Person, , Currency, Exchange Rate and Customer PO if applicable.
6\. After completing the above steps, you can go to the Inv. Ref to select specific transaction to load in CX, check the loaded transactions details. Save the transaction after this is done.
\_\_\_\_\_\_\_\_\_\_\_\_\_\_\_\_\_\_\_\_\_\_\_\_\_\_\_\_\_\_\_\_\_\_\_\_\_\_\_\_\_\_\_\_\_\_\_\_\_\_\_\_\_\_\_\_\_\_\_\_\_\_\_\_\_\_\_\_\_\_\_\_\_\_\_\_\_\_\_\_\_\_\_\_\_\_\_\_\_\_\_\_\_\_\_\_\_\_\_\_\_\_\_\_\_\_\_\_\_\_\_\_\_\_\_\_\_\_\_\_\_\_\_\_\_\_\_\_\_\_\_\_\_\_\_\_\_\_\_
**Add to Shortcut -** Used to create a shortcut for quick access to a specific Sales Transaction . By clicking this button, users can add the current Sales Transaction to a list of shortcuts, allowing them to access the invoice or related functionality quickly and efficiently, without needing to search for it each time.
[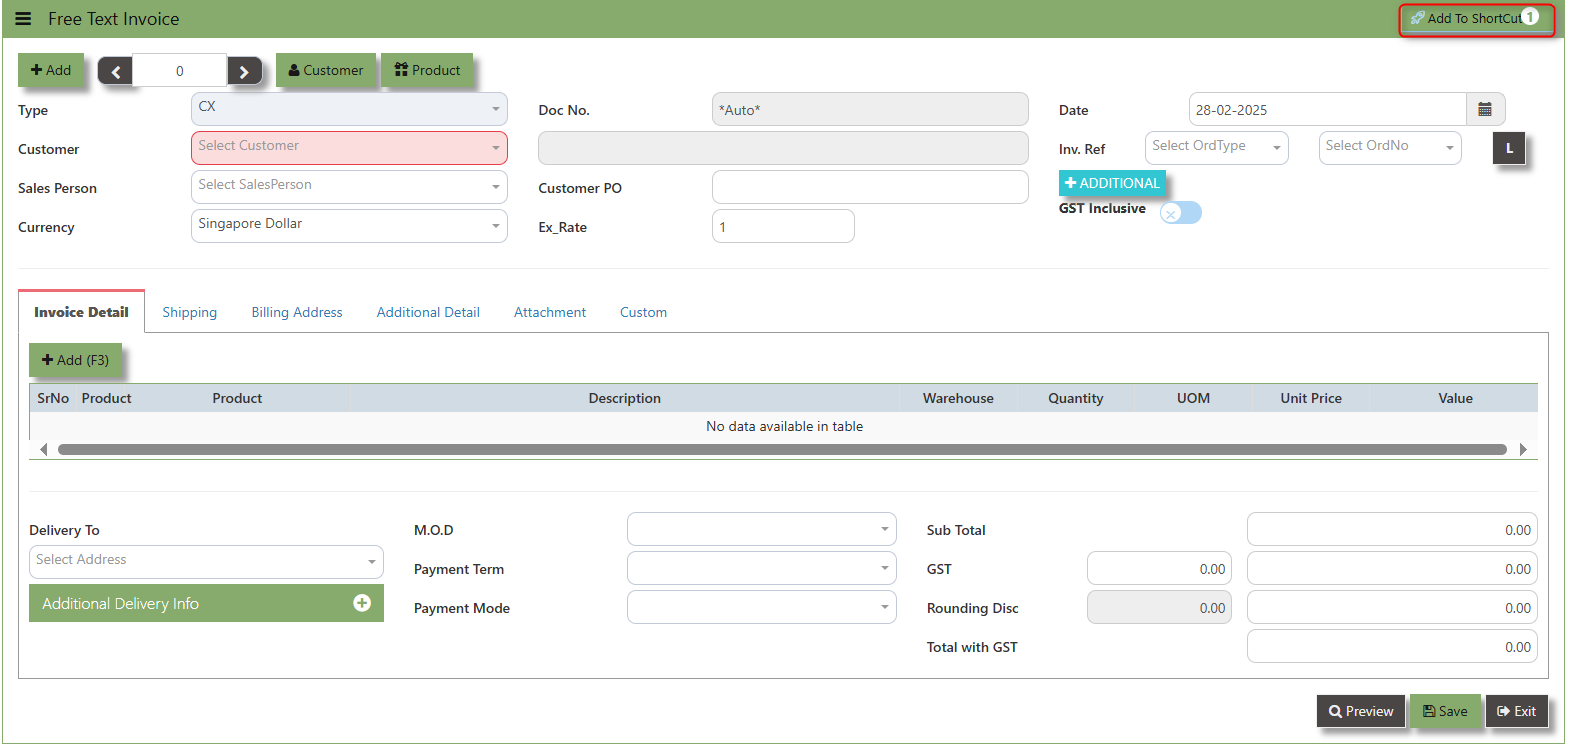](https://doc.uniq365.com/uploads/images/gallery/2025-02/gUuimage.png)
##### **How to use Add to ShortCut?**
1\. Click "**Add to ShortCut"** and system will open below windows:
[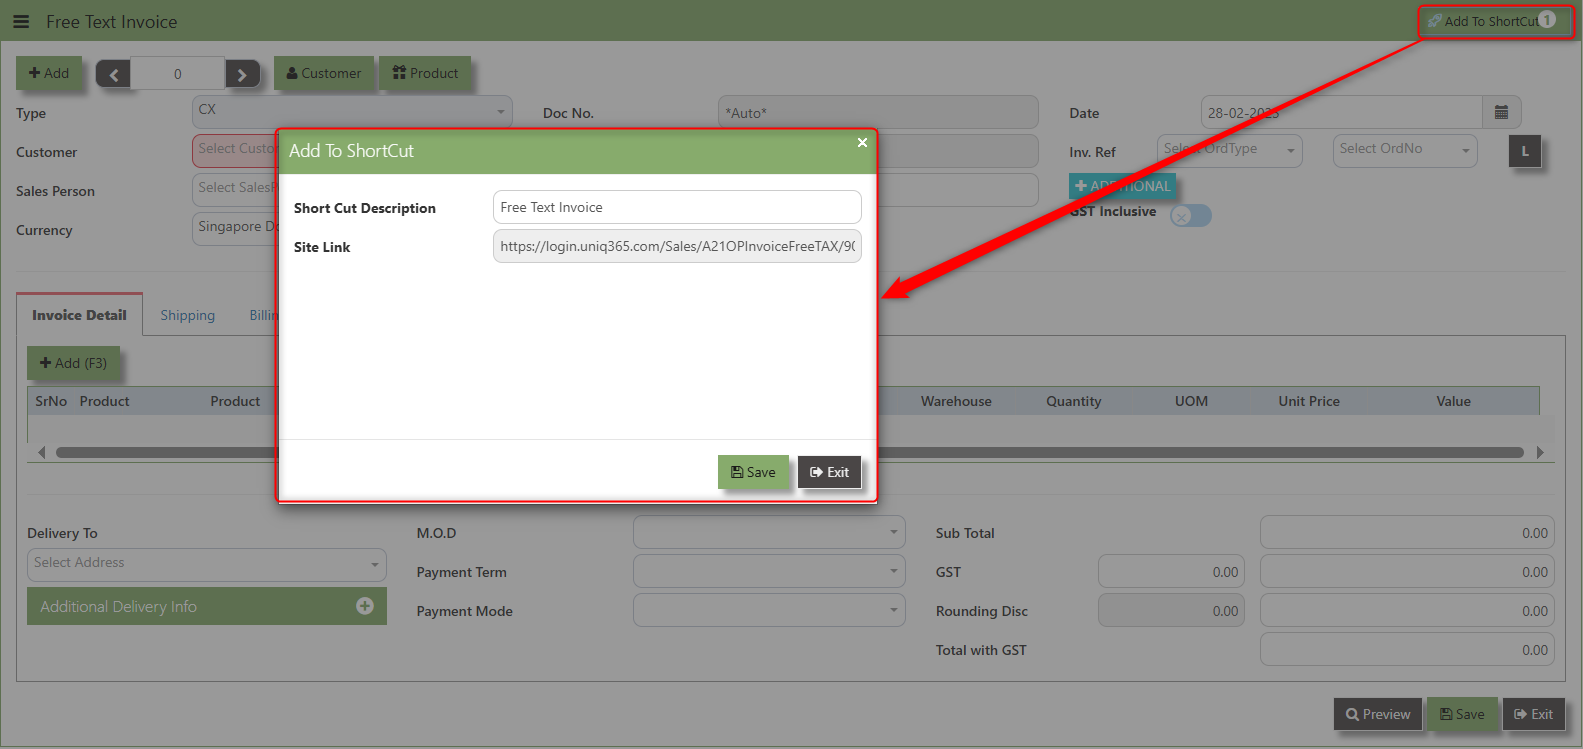](https://doc.uniq365.com/uploads/images/gallery/2025-02/Qonimage.png)
2\. Enter Short Cut Description
3\. Click SAVE then click OK.
4\. User may look to the Homepage for the added function or page. Click on HOME - HOME - SHORTCUT for the screen below
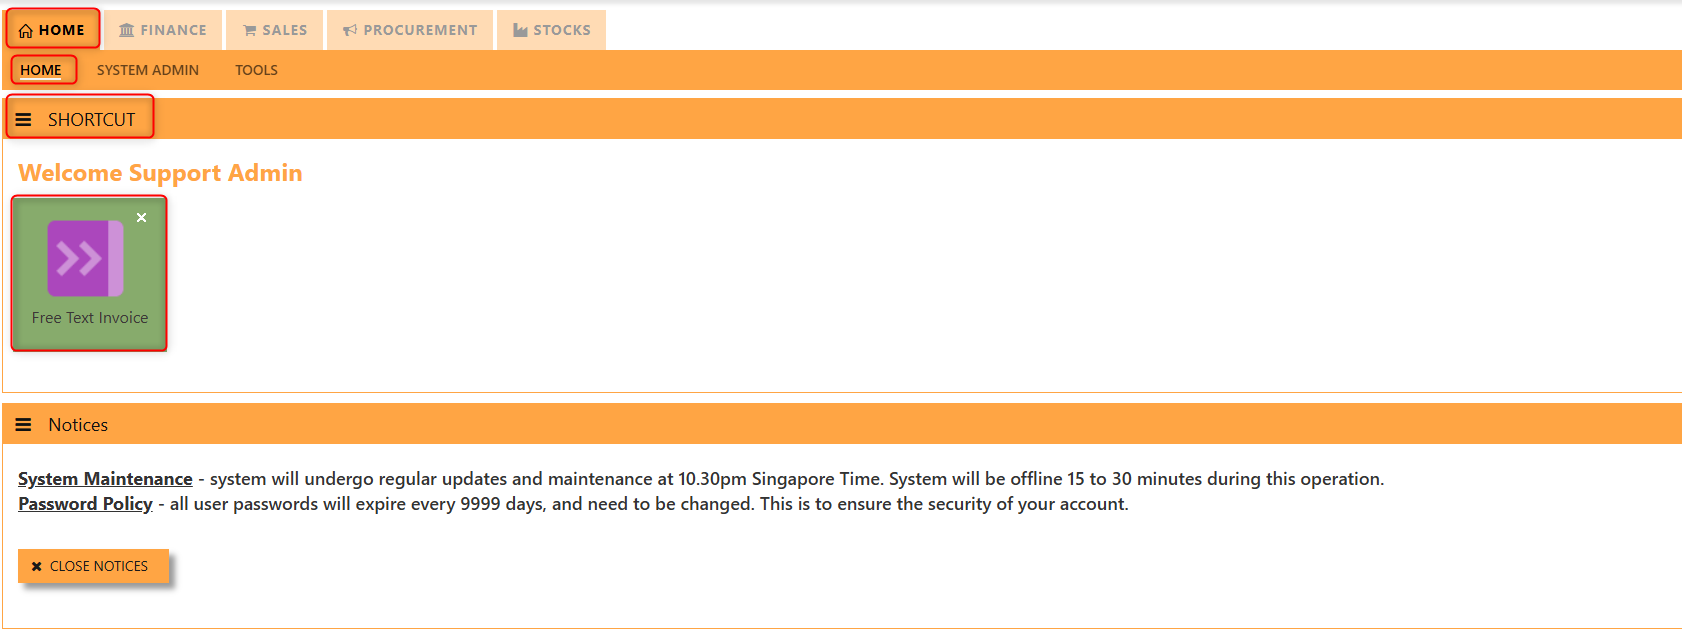\_\_\_\_\_\_\_\_\_\_\_\_\_\_\_\_\_\_\_\_\_\_\_\_\_\_\_\_\_\_\_\_\_\_\_\_\_\_\_\_\_\_\_\_\_\_\_\_\_\_\_\_\_\_\_\_\_\_\_\_\_\_\_\_\_\_\_\_\_\_\_\_\_\_\_\_\_\_\_\_\_\_\_\_\_\_\_\_\_\_\_\_\_\_\_\_\_\_\_\_\_\_\_\_\_\_\_\_\_\_\_\_\_\_\_\_\_\_\_\_\_\_\_\_\_\_\_\_\_\_\_\_\_\_\_\_\_\_\_
The **Customer** button provides quick access to detailed supplier profiles under Customer maintenance.
[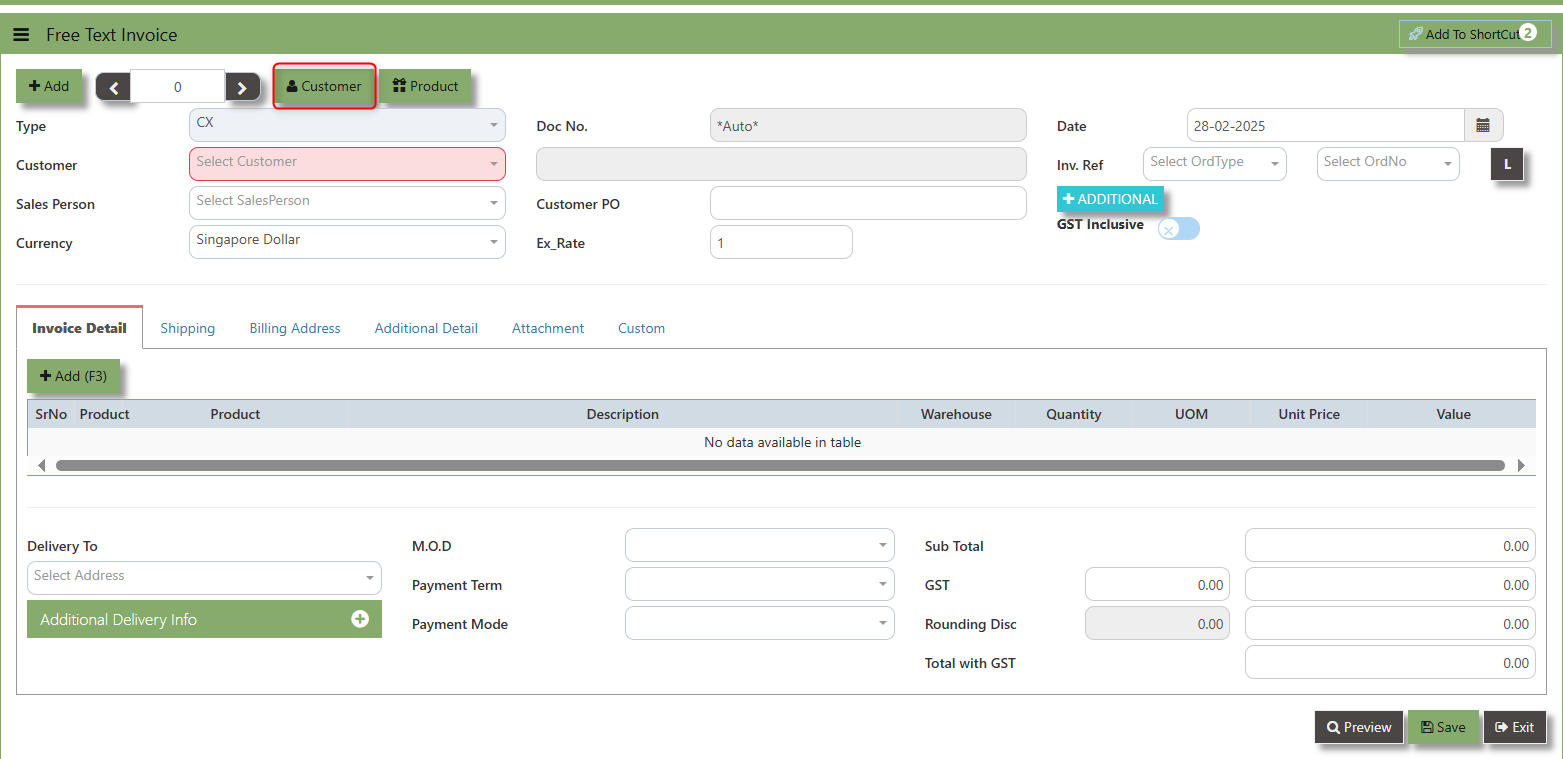](https://doc.uniq365.com/uploads/images/gallery/2025-02/NAwimage.png)
The **Product** button provides quick access to product and service maintenance.
[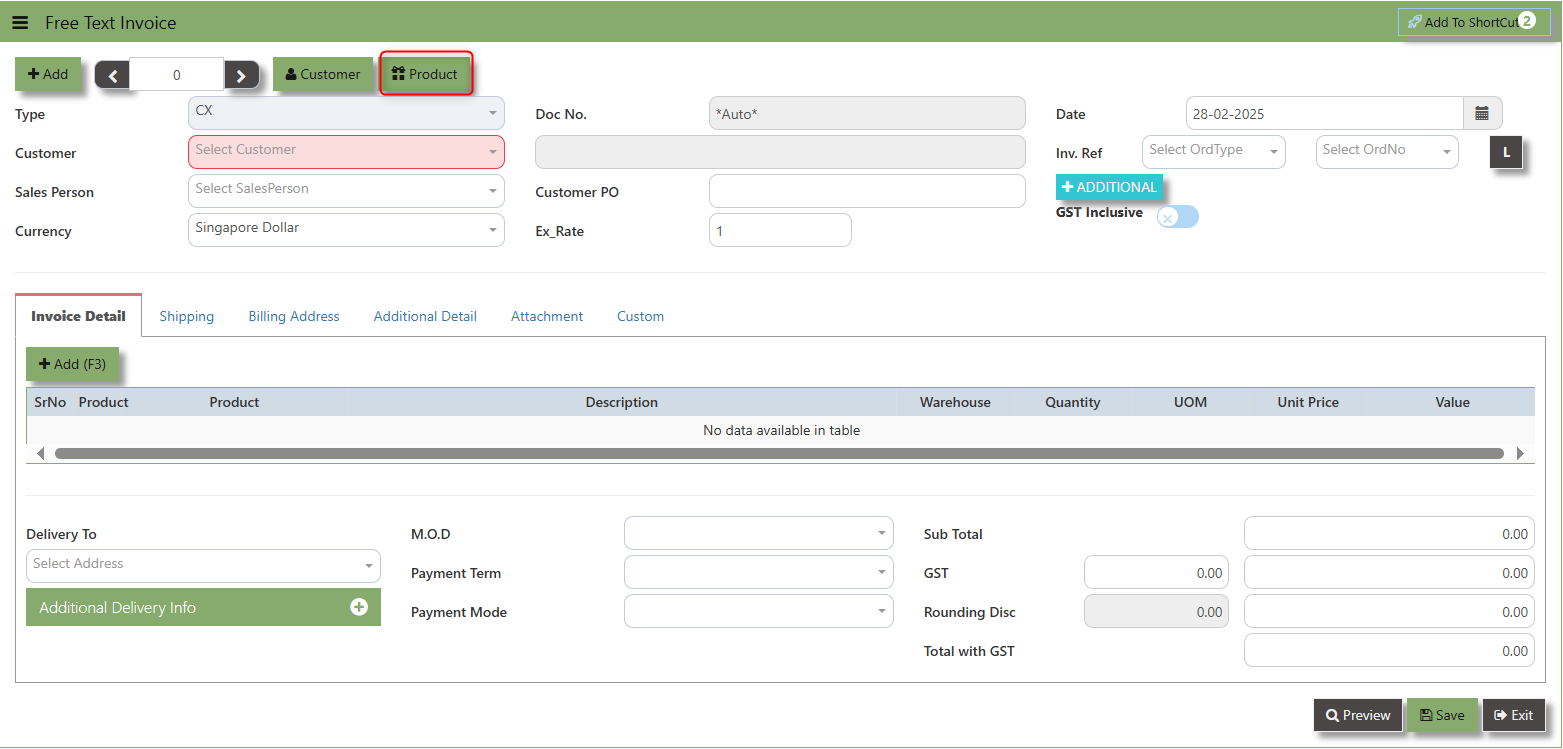](https://doc.uniq365.com/uploads/images/gallery/2025-02/ejgimage.png)
The **GST Inclusive** checkbox indicates whether the unit price in the CO include **Goods and Services Tax (GST)** or not.
[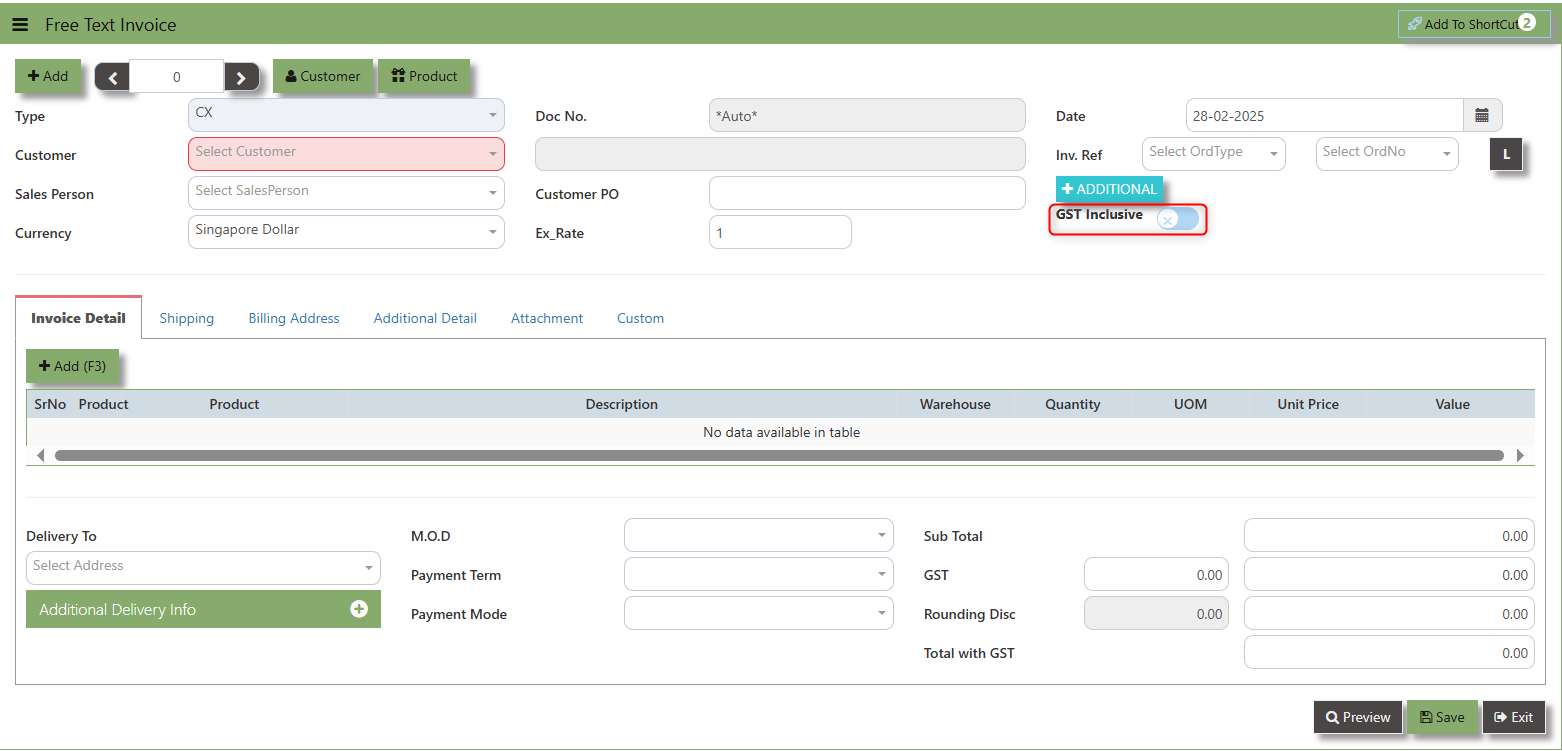](https://doc.uniq365.com/uploads/images/gallery/2025-02/zm6image.png)
- **when ticked (GST Inclusive)**: provided in the SAles transaction already includes the applicable GST amount.
- **When not ticked (GST Exclusive)**: The unit **price** is considered exclusive of GST. The system will calculate and add the GST based on the applicable tax rate, and the final total will be the sum of the base price plus the GST amount.
**Additional Header Info** button is typically used to capture and manage additional information related to the sales order at the header level (i.e., Delivery date, Del Term , Indicative WH , Country, Lead Time, Contact, PDSU, Narration and Transaction Narration). This feature allows users to add extra data or notes that are relevant to the entire sales order.
[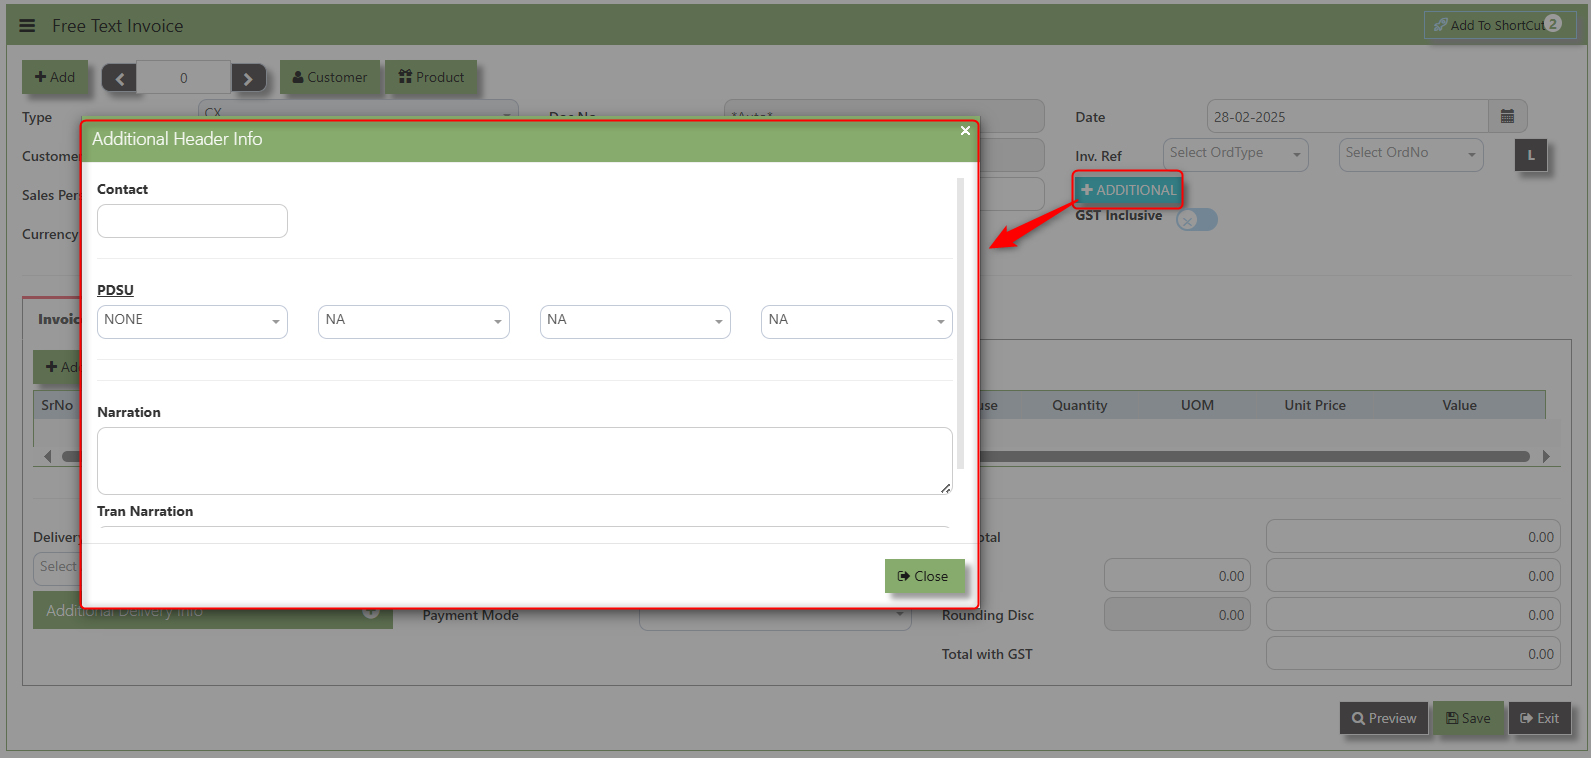](https://doc.uniq365.com/uploads/images/gallery/2025-02/ufoimage.png)
\_\_\_\_\_\_\_\_\_\_\_\_\_\_\_\_\_\_\_\_\_\_\_\_\_\_\_\_\_\_\_\_\_\_\_\_\_\_\_\_\_\_\_\_\_\_\_\_\_\_\_\_\_\_\_\_\_\_\_\_\_\_\_\_\_\_\_\_\_\_\_\_\_\_\_\_\_\_\_\_\_\_\_\_\_\_\_\_\_\_\_\_\_\_\_\_\_\_\_\_\_\_\_\_\_\_\_\_\_\_\_\_\_\_\_\_\_\_\_\_\_\_\_\_\_\_\_\_\_\_\_\_\_\_\_\_\_\_\_
**Shipping Tab** a section where specific shipping-related information is entered and managed for the sold goods or services. This tab ensures that all relevant details regarding the shipment, delivery location, and delivery expectations are captured in the system to facilitate smooth and accurate order fulfilment.
##### **How to set Shipping Info?**
1\. Click on SALES – SALES OPERATIONS – CUSTOMER SALES ORDER - SHIPPING TAB for the screen below.
[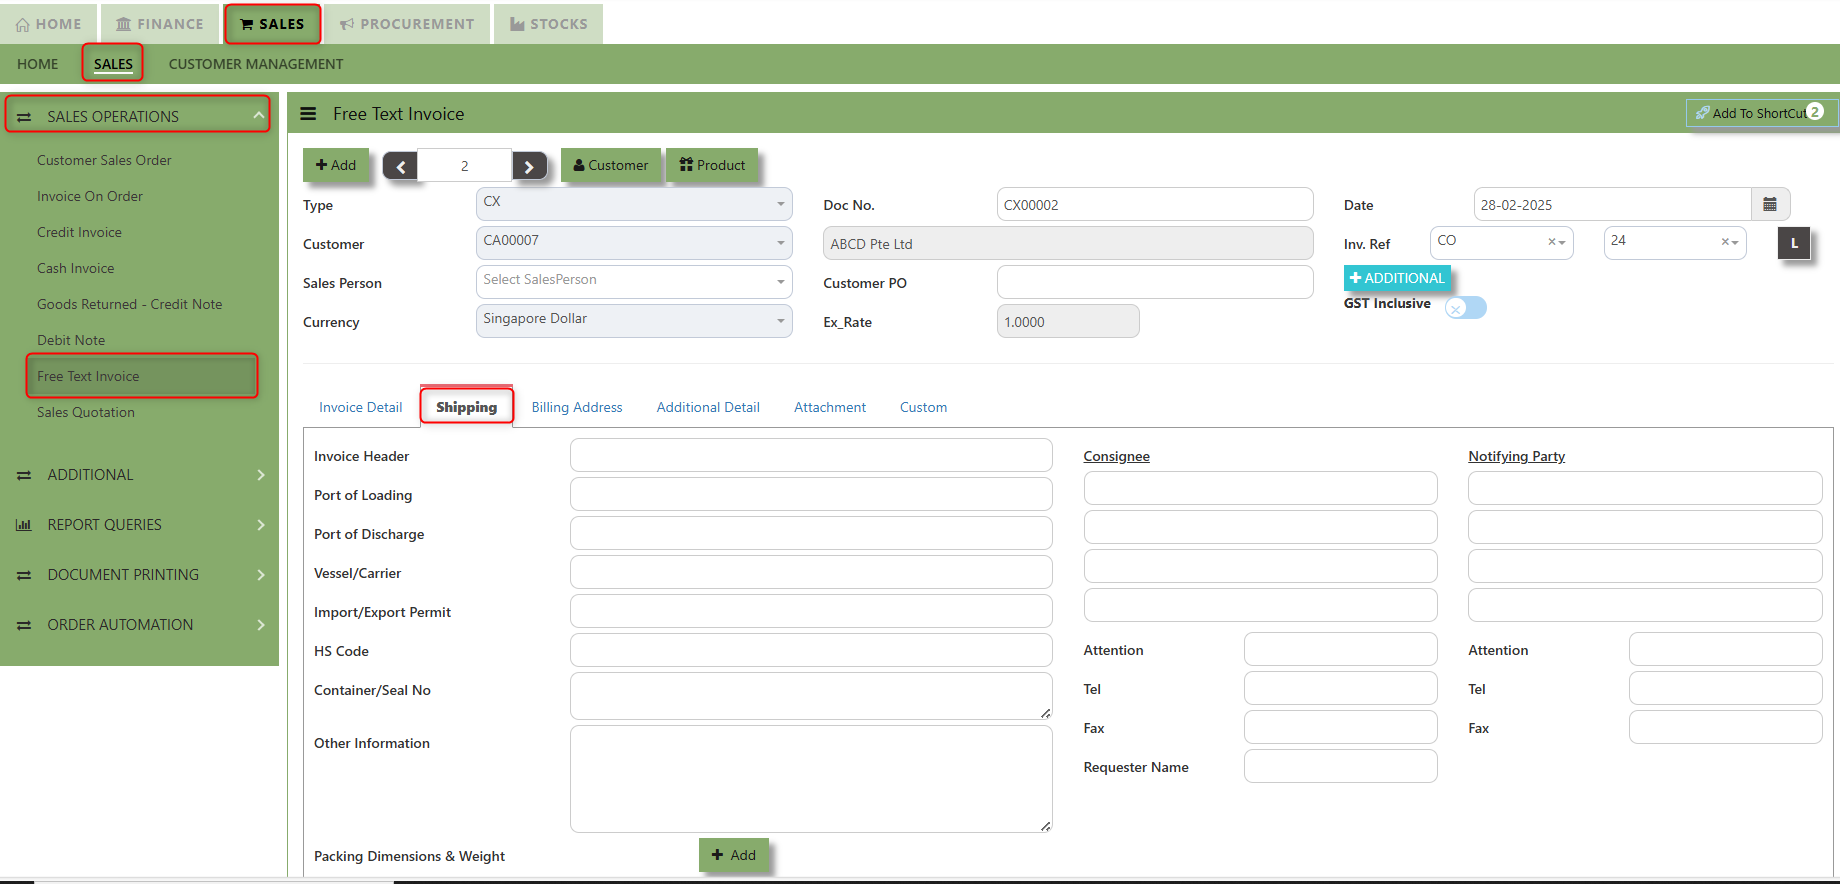](https://doc.uniq365.com/uploads/images/gallery/2025-02/szYimage.png)
2\. Input the below details for the below fields:
- - Invoice Header
- Port of Loading
- Port of Discharge
- Vessel/Carrier
- Import/Export Permit
- HS Code
- Container/Seal No
- Other Information
- Consignee
- Attention
- Tel
- Fax
- Notifying Party
- Attention
- Tel
- Fax
3\. Once keyed in the necessary details, click the next tab and will automatically save all the information then system will prompt you a message.
[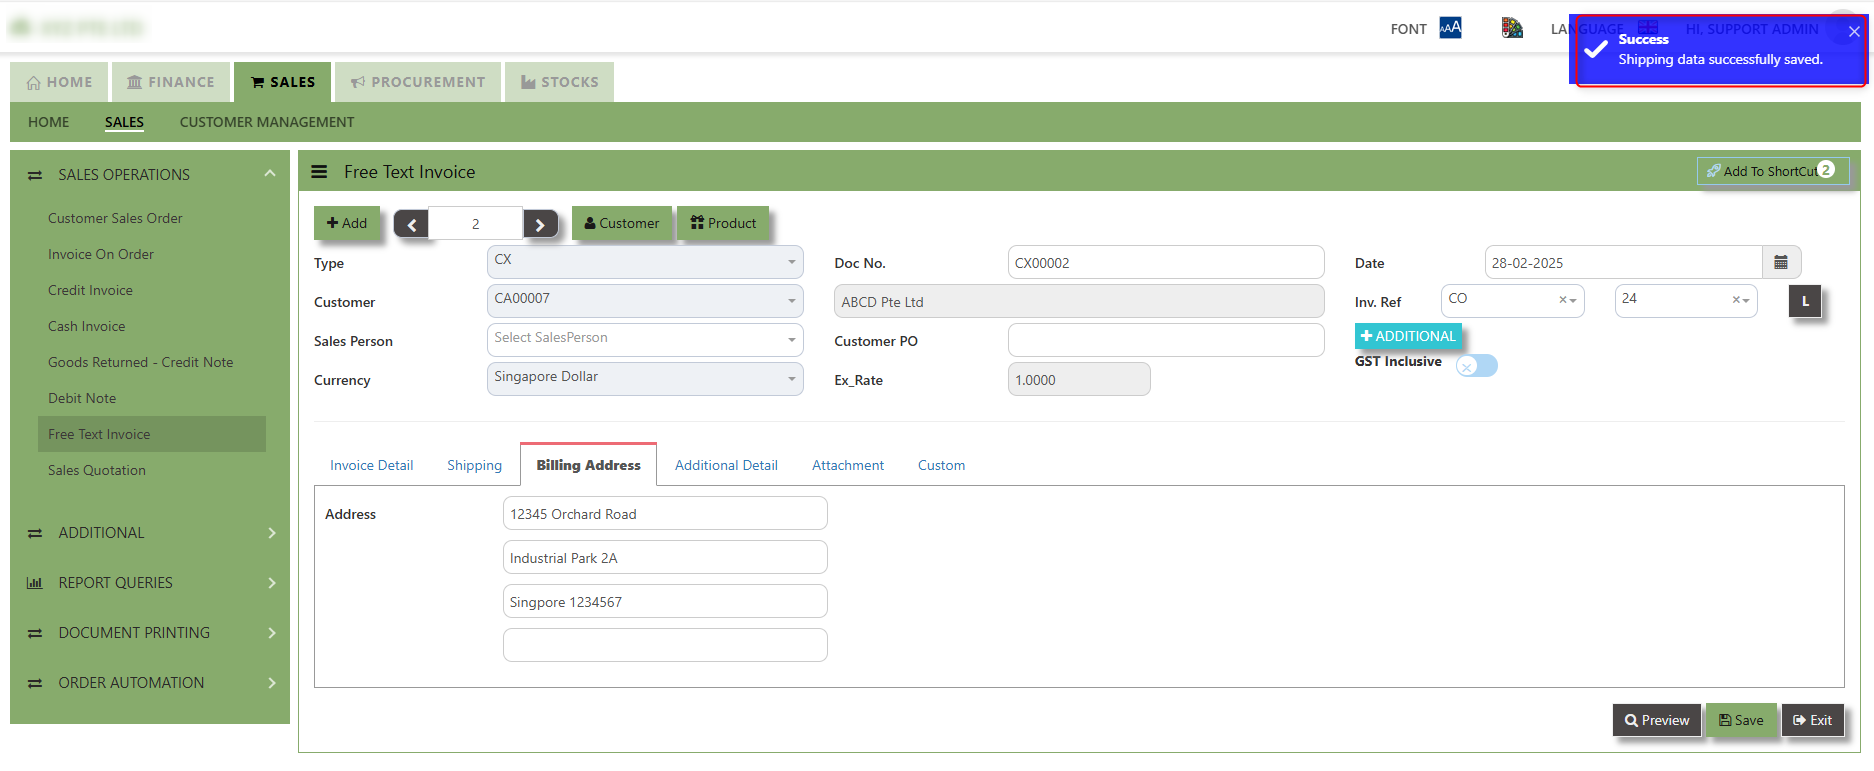](https://doc.uniq365.com/uploads/images/gallery/2025-02/OM1image.png)
\_\_\_\_\_\_\_\_\_\_\_\_\_\_\_\_\_\_\_\_\_\_\_\_\_\_\_\_\_\_\_\_\_\_\_\_\_\_\_\_\_\_\_\_\_\_\_\_\_\_\_\_\_\_\_\_\_\_\_\_\_\_\_\_\_\_\_\_\_\_\_\_\_\_\_\_\_\_\_\_\_\_\_\_\_\_\_\_\_\_\_\_\_\_\_\_\_\_\_\_\_\_\_\_\_\_\_\_\_\_\_\_\_\_\_\_\_\_\_\_\_\_\_\_\_\_\_\_\_\_\_\_\_\_\_\_\_\_\_
Billing Address - section where the Billing Address is maintained. This tab ensures that the Billing Details will is displayed and can be editable according the customer details.
##### **How to set Billing Address?**
**1.** Click on SALES – SALES OPERATIONS – FREE TEXT INVOICE - BILLING ADDRESS TAB for the screen below.
[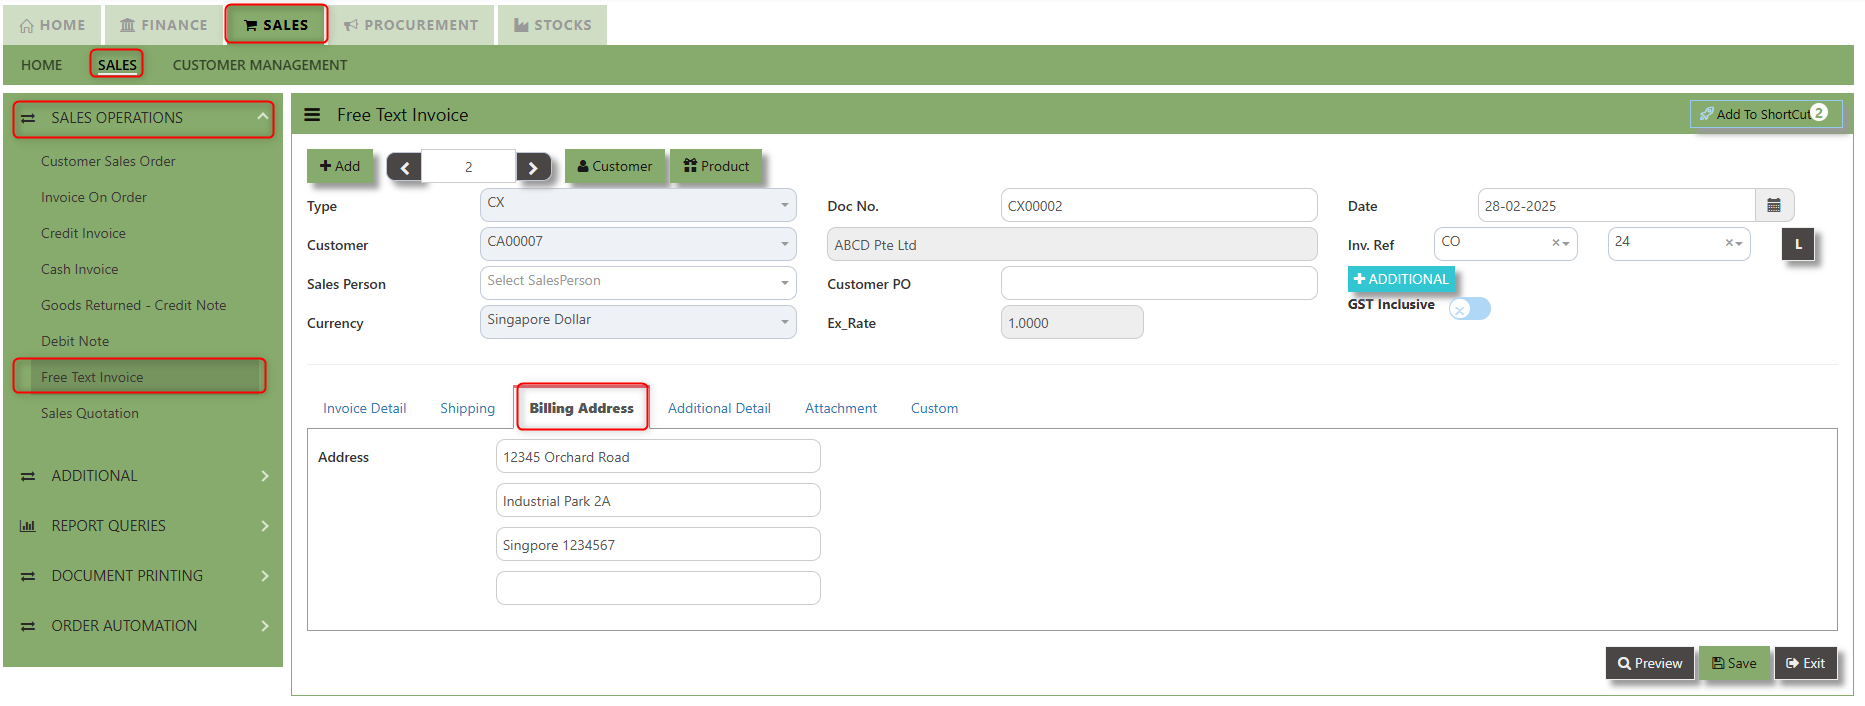](https://doc.uniq365.com/uploads/images/gallery/2025-02/K1pimage.png)
2\. The Billing address is defaulted from Customer Maintenance which is the Customer address, it was also editable is needed.
[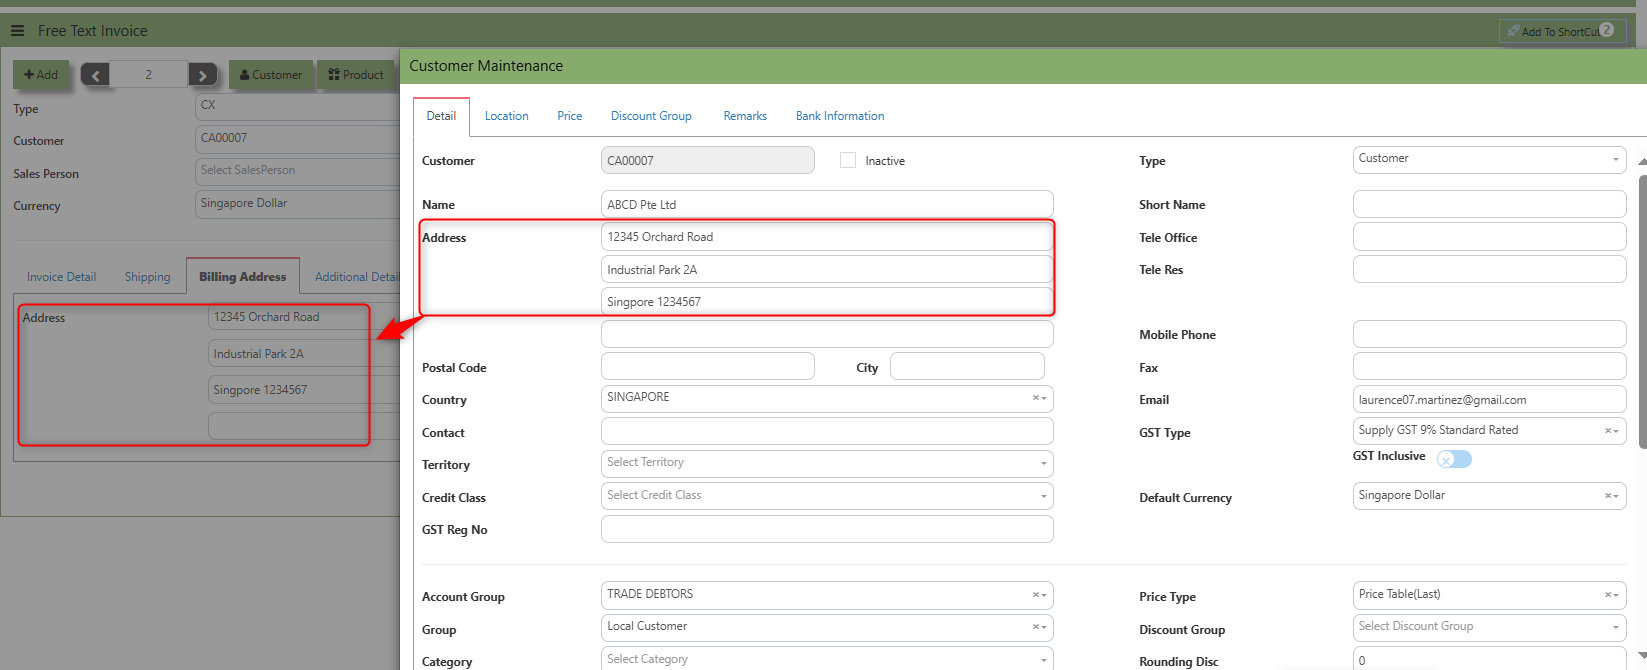](https://doc.uniq365.com/uploads/images/gallery/2025-02/J50image.png)
\_\_\_\_\_\_\_\_\_\_\_\_\_\_\_\_\_\_\_\_\_\_\_\_\_\_\_\_\_\_\_\_\_\_\_\_\_\_\_\_\_\_\_\_\_\_\_\_\_\_\_\_\_\_\_\_\_\_\_\_\_\_\_\_\_\_\_\_\_\_\_\_\_\_\_\_\_\_\_\_\_\_\_\_\_\_\_\_\_\_\_\_\_\_\_\_\_\_\_\_\_\_\_\_\_\_\_\_\_\_\_\_\_\_\_\_\_\_\_\_\_\_\_\_\_\_\_\_\_\_\_\_\_\_\_\_\_\_\_
**Additional Detail Tab** a section where the additional information is entered . This tab ensures that all relevant details regarding the Narration, Inco Terms , billing address warranty terms Selling conditions , and special instruction are captured in the system to facilitate smooth and accurate sales quotation.
##### **How to set Additional Detail?**
1\. Click on SALES – SALES OPERATIONS – FREE TEXT INVOICE - BILLING ADDRESS TAB for the screen below.
[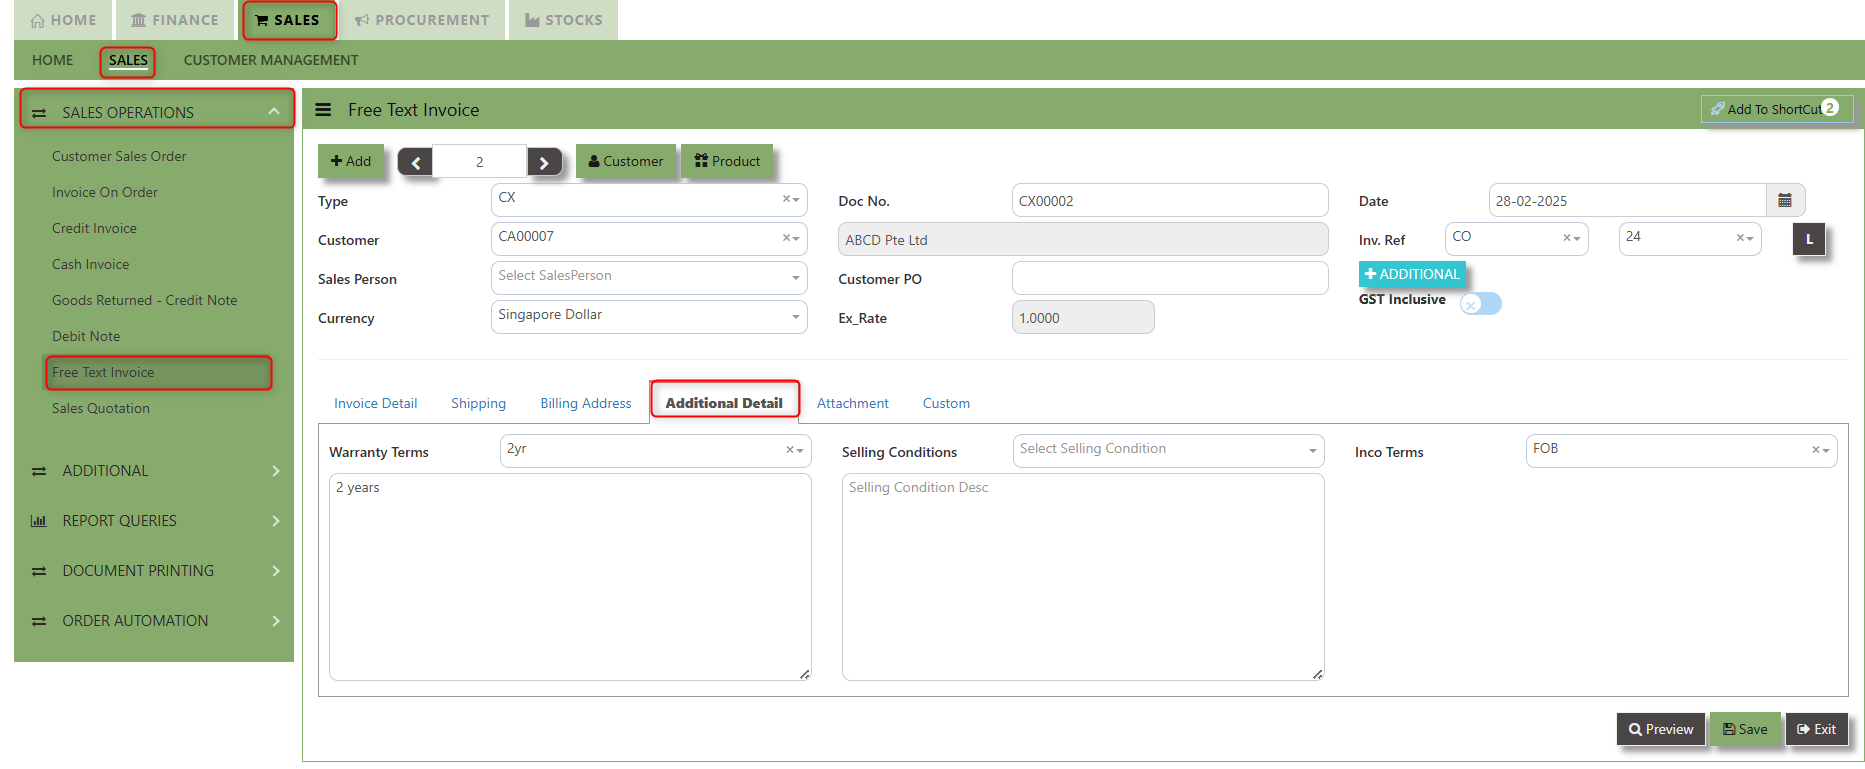](https://doc.uniq365.com/uploads/images/gallery/2025-02/3lgimage.png)
2\. Input the below details for the below fields
- - Warranty Terms
- Selling Condition
- Inco Terms
3\. Once keyed in the necessary details, click the next tab and will automatically save all the information.
\_\_\_\_\_\_\_\_\_\_\_\_\_\_\_\_\_\_\_\_\_\_\_\_\_\_\_\_\_\_\_\_\_\_\_\_\_\_\_\_\_\_\_\_\_\_\_\_\_\_\_\_\_\_\_\_\_\_\_\_\_\_\_\_\_\_\_\_\_\_\_\_\_\_\_\_\_\_\_\_\_\_\_\_\_\_\_\_\_\_\_\_\_\_\_\_\_\_\_\_\_\_\_\_\_\_\_\_\_\_\_\_\_\_\_\_\_\_\_\_\_\_\_\_\_\_\_\_\_\_\_\_\_\_\_\_\_\_\_
**"Attachment Tab"** allows users to attach various files and documents related to the sales order. By attaching relevant files, users ensure that all purchase-related information is kept in one place, making the sales process smoother, more transparent, and easier to track.
##### **How to use Attachment Tab?**
1\. Click on SALES – SALES OPERATIONS – FREE TEXT INVOICE – ATTACHEMENT TAB for the screen below.
[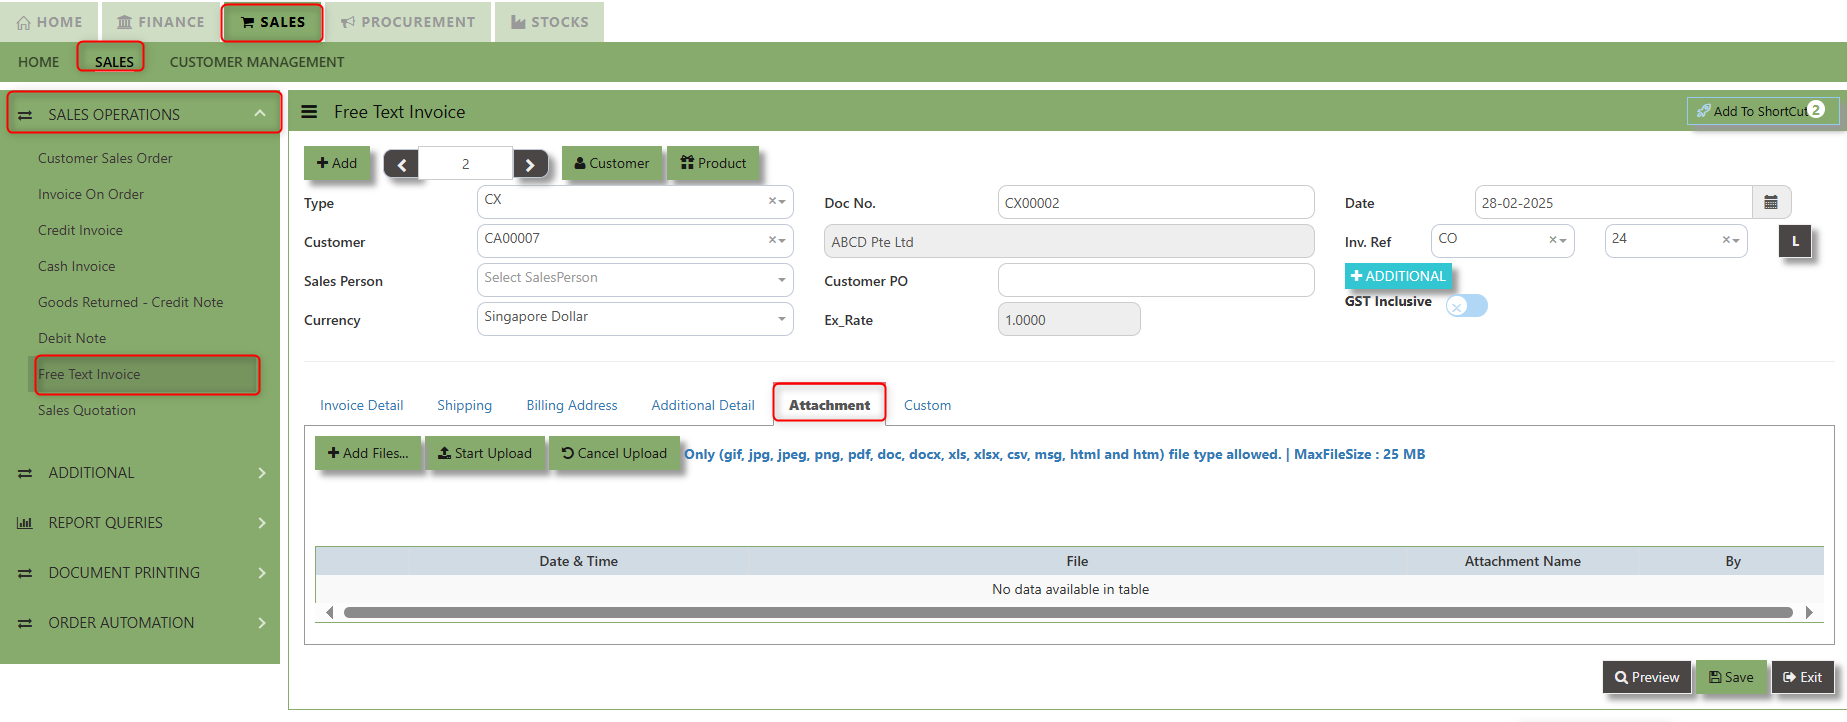](https://doc.uniq365.com/uploads/images/gallery/2025-02/R4Gimage.png)
2\. Click +Add files and windows will prompt then choose the file you want to upload by clicking open. Kindly take note the file types and maximum size requirements in uploading: ***Only (gif, jpg, jpeg, png, pdf, doc, docx, xls, xlsx, csv, msg, html and htm) file type allowed. | MaxFileSize : 25 MB***
[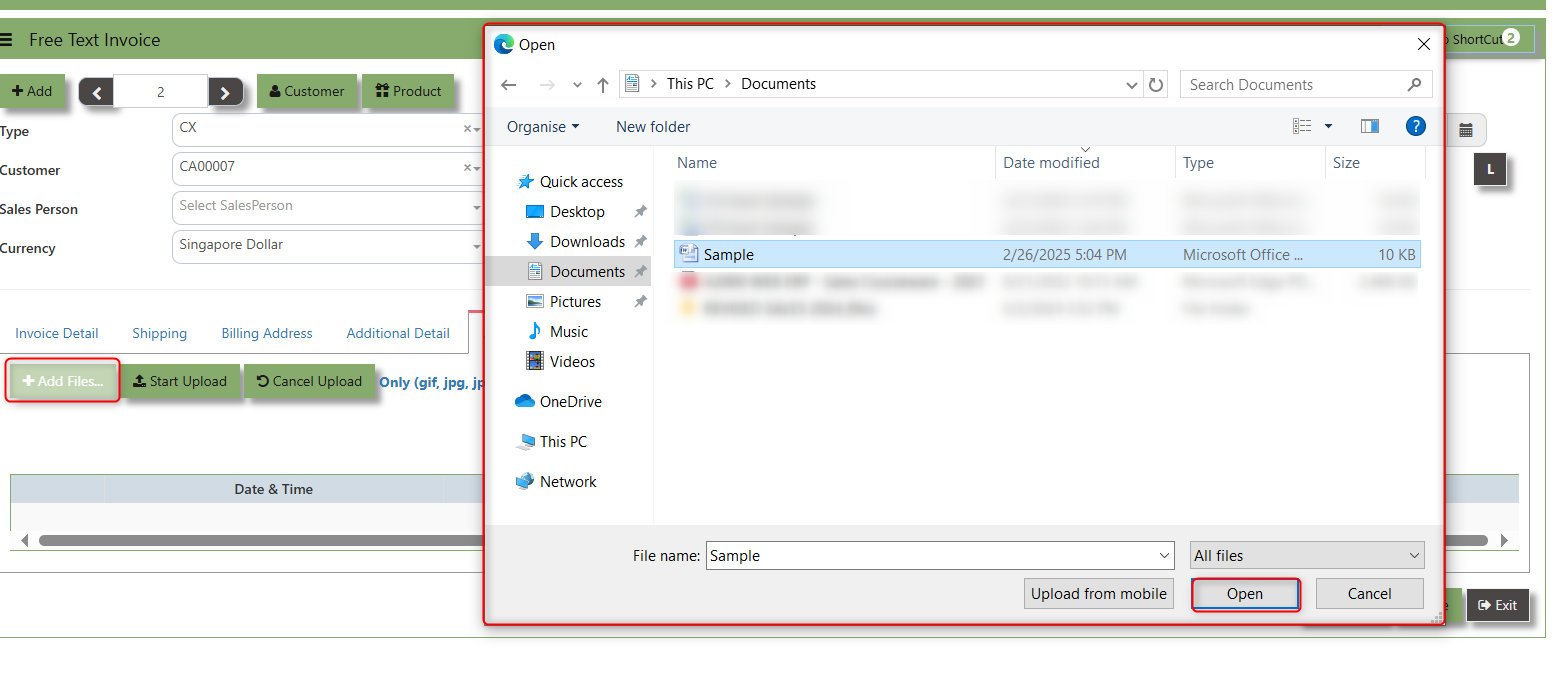](https://doc.uniq365.com/uploads/images/gallery/2025-02/32Bimage.png)
3\. Key in the Attachment Name then click start to upload.
[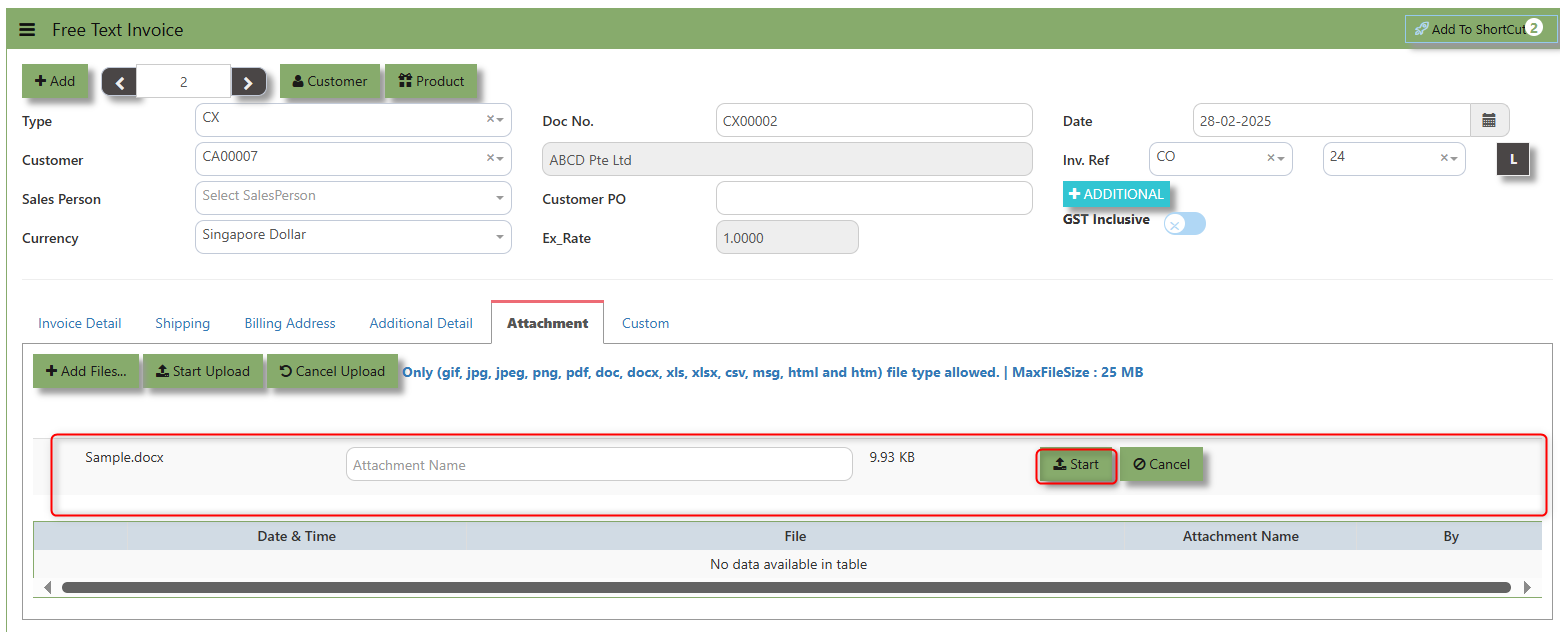](https://doc.uniq365.com/uploads/images/gallery/2025-02/gkuimage.png)
4.Once the file attached, click "SAVE" button
[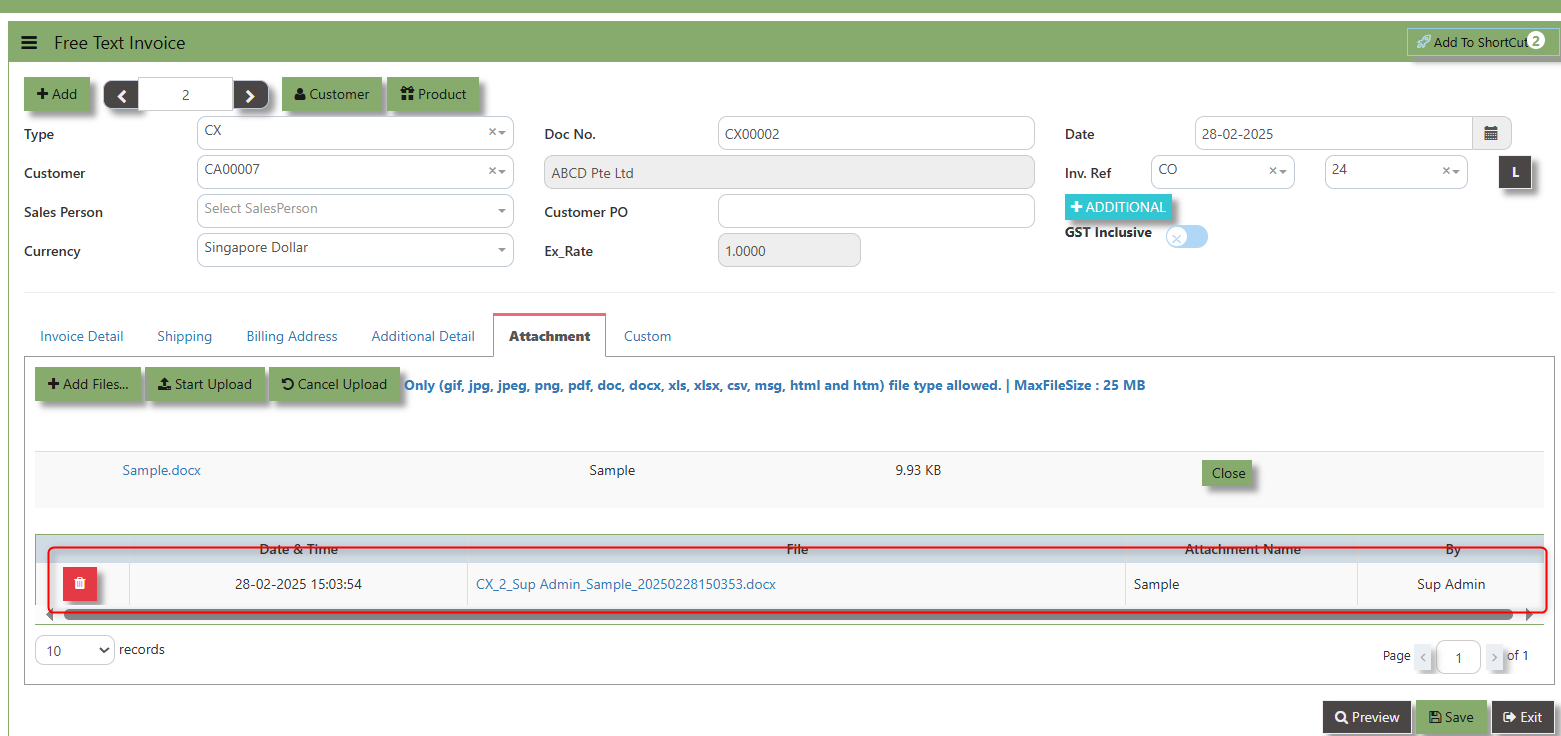](https://doc.uniq365.com/uploads/images/gallery/2025-02/ERMimage.png)
User may opt to cancel the uploading by clicking the **"Cancel Upload"** button and delete the file uploaded by clicking the **"Bin icon"** at the line detail.
\_\_\_\_\_\_\_\_\_\_\_\_\_\_\_\_\_\_\_\_\_\_\_\_\_\_\_\_\_\_\_\_\_\_\_\_\_\_\_\_\_\_\_\_\_\_\_\_\_\_\_\_\_\_\_\_\_\_\_\_\_\_\_\_\_\_\_\_\_\_\_\_\_\_\_\_\_\_\_\_\_\_\_\_\_\_\_\_\_\_\_\_\_\_\_\_\_\_\_\_\_\_\_\_\_\_\_\_\_\_\_\_\_\_\_\_\_\_\_\_\_\_\_\_\_\_\_\_\_\_\_\_\_\_\_\_\_\_\_
**"Custom Tab"** provides a space for users to input customized data or additional fields that are specific to their business processes and requirements.
Click on SALES – SALES OPERATIONS – FREE TEXT INVOICE - CUSTOM TAB for the screen below.
[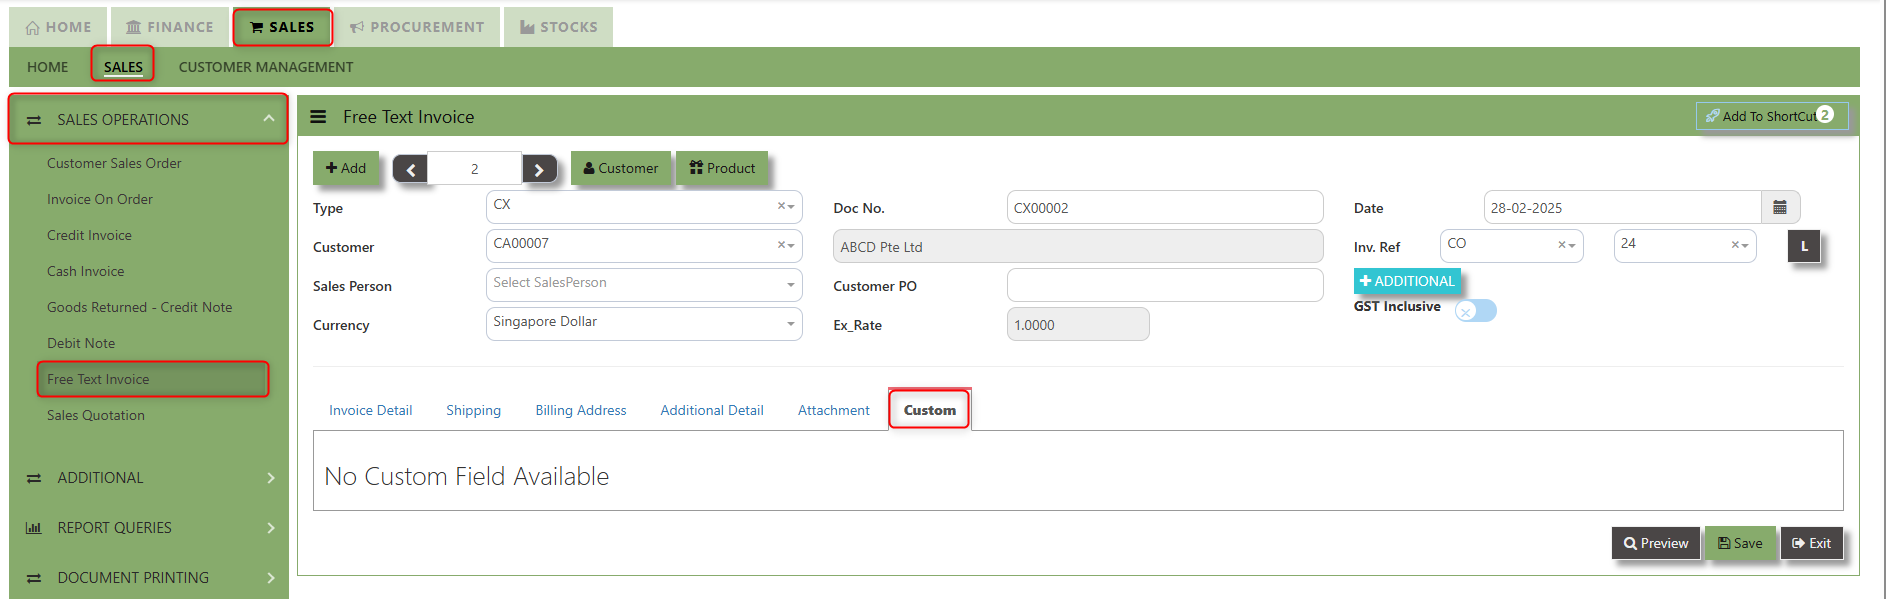](https://doc.uniq365.com/uploads/images/gallery/2025-02/Mkximage.png)
Sales Quotation
##### The Sales Quotation form is essentially an administrative document to confirm the approval of a stock request before an order is made. Creation of a Customer Quotation does not perform any accounts posting & is used only as an administrative document to send to the Customer as quotation. Creation of a Customer Quotation will generate a “CQ” number.
##### **How to set Customer Quotation?**
1.Click on **SALES – SALES OPERATIONS – CUSTOMER SALES ORDER** for the screen below.
[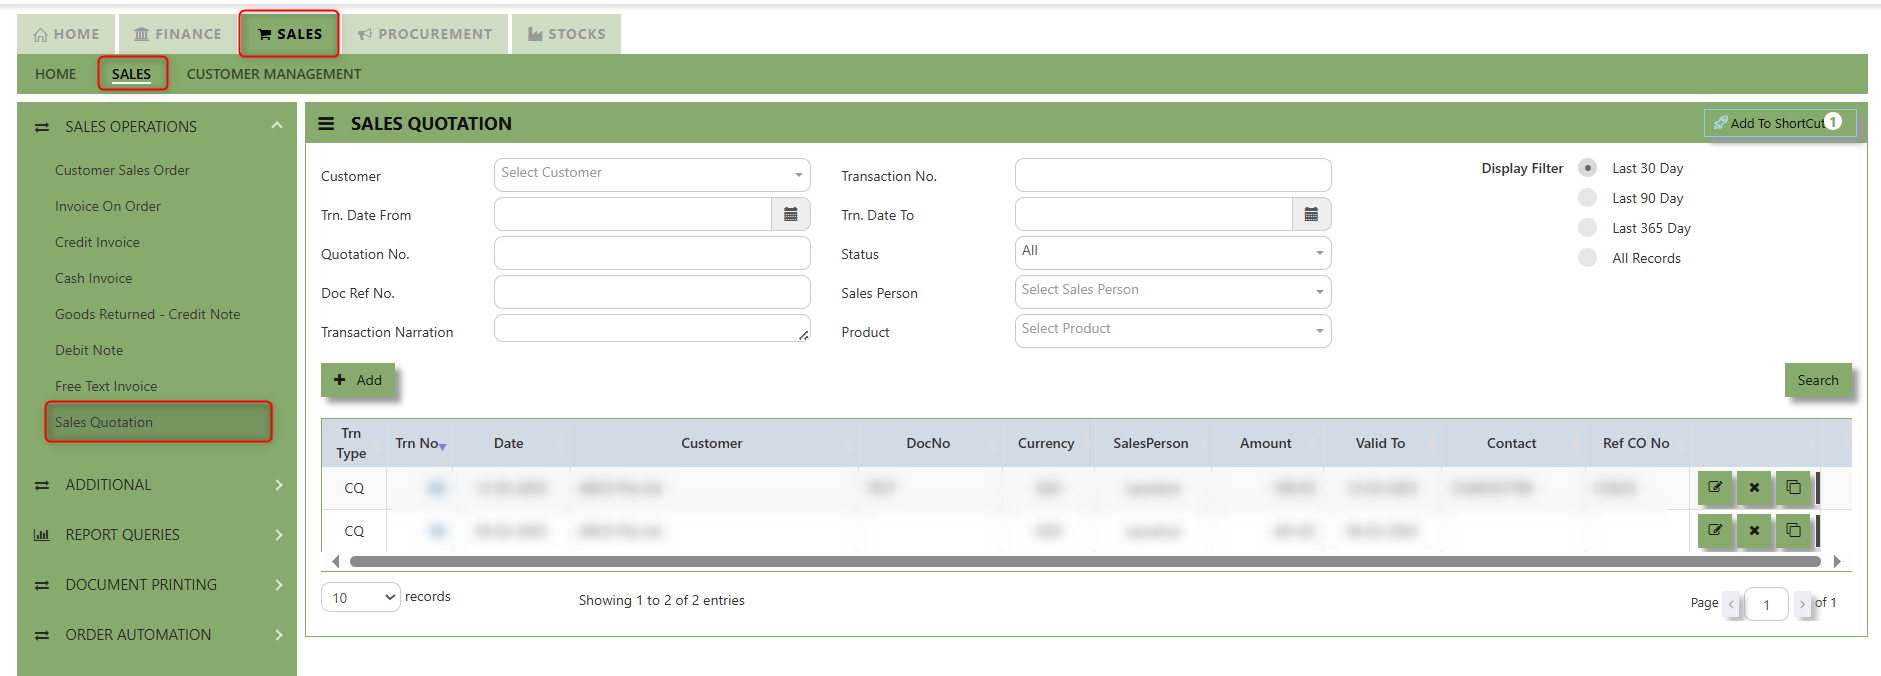](https://doc.uniq365.com/uploads/images/gallery/2025-02/e9Simage.png)
2\. Click on Add button or press F3 to create a new transaction.
[](https://doc.uniq365.com/uploads/images/gallery/2025-02/XWGimage.png)
2\. Click the Customer - drop-down list to select Customer Name, followed by the Sales Person, PDS, Currency, Rate,
Validity Period, Validity Date, Payment Term, Status, Deliver Term & Lead Time if applicable.
3\. After all the header information has been entered, go to the Quotation Details section to select the product from the
Product Code and Name drop-down list. User can also enter information into the Additional Details and Customer Department. Save the transaction after this is done.
\_\_\_\_\_\_\_\_\_\_\_\_\_\_\_\_\_\_\_\_\_\_\_\_\_\_\_\_\_\_\_\_\_\_\_\_\_\_\_\_\_\_\_\_\_\_\_\_\_\_\_\_\_\_\_\_\_\_\_\_\_\_\_\_\_\_\_\_\_\_\_\_\_\_\_\_\_\_\_\_\_\_\_\_\_\_\_\_\_\_\_\_\_\_\_\_\_\_\_\_\_\_\_\_\_\_\_\_\_\_\_\_\_\_\_\_\_\_\_\_\_\_\_\_\_\_\_\_\_\_\_\_\_\_\_\_\_\_\_
**Add to Shortcut -** Used to create a shortcut for quick access to a specific Sales Transaction . By clicking this button, users can add the current Sales Quotation to a list of shortcuts, allowing them to access the invoice or related functionality quickly and efficiently, without needing to search for it each time.
[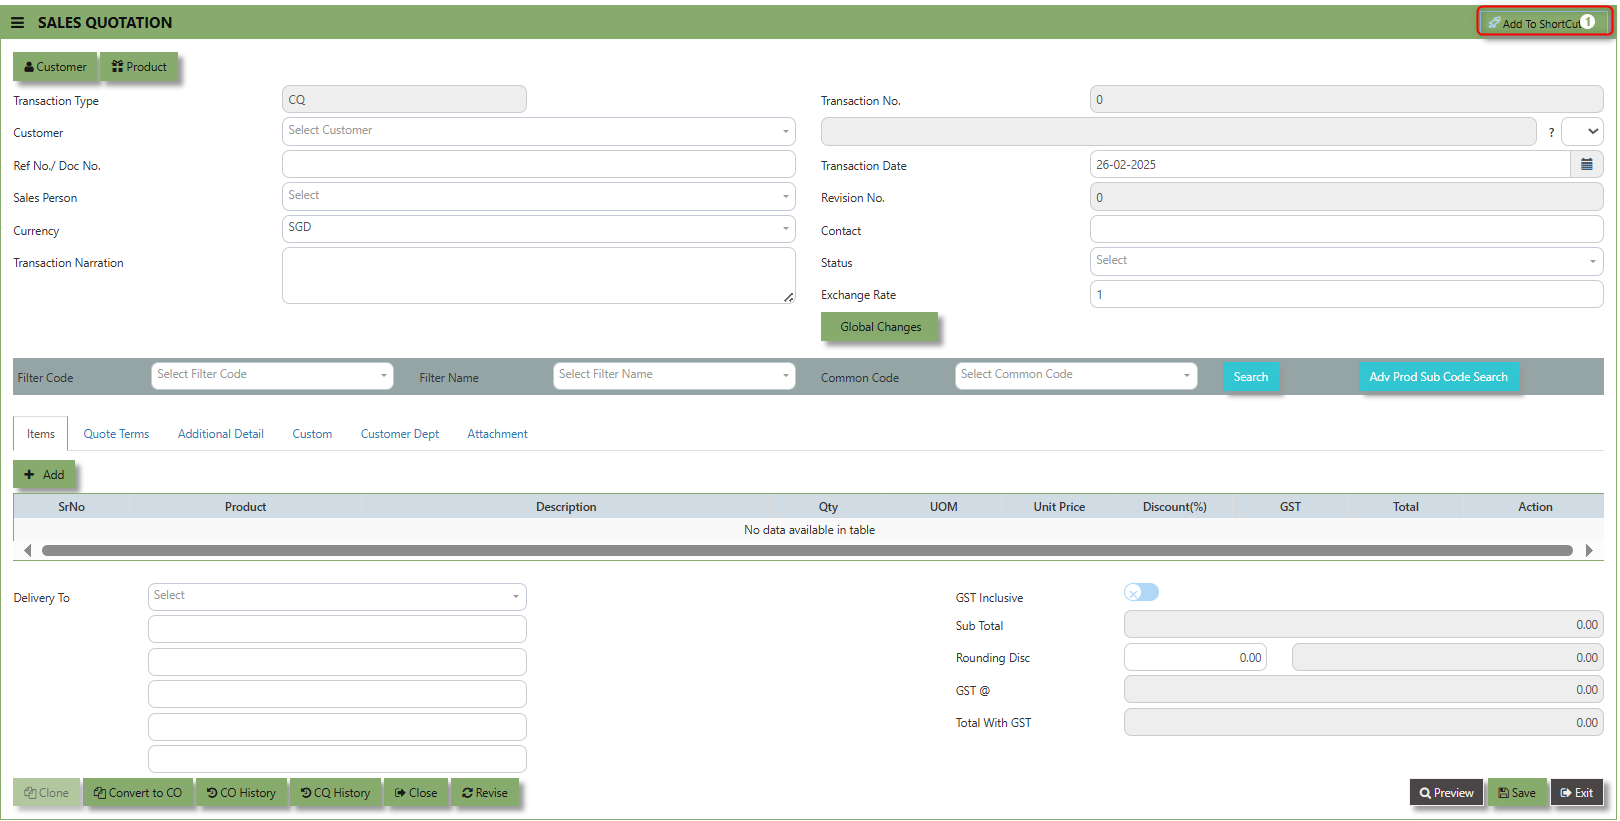](https://doc.uniq365.com/uploads/images/gallery/2025-02/bBsimage.png)
##### **How to use Add to ShortCut?**
1\. Click "**Add to ShortCut"** and system will open below windows:
[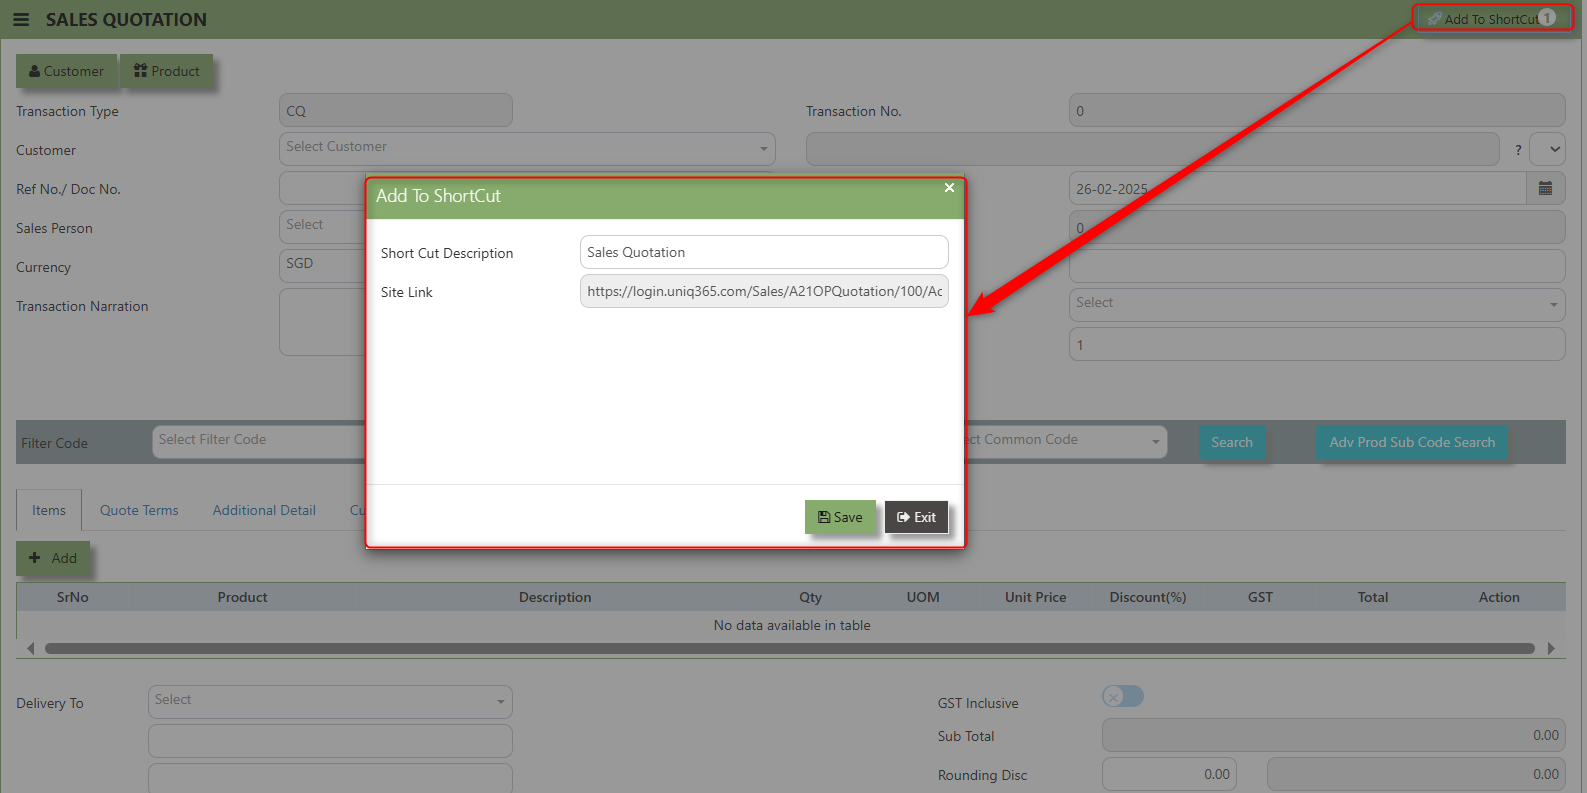](https://doc.uniq365.com/uploads/images/gallery/2025-02/Fzbimage.png)
2\. Enter Short Cut Description
3\. Click SAVE then click OK.
4\. User may look to the Homepage for the added function or page. Click on HOME - HOME - SHORTCUT for the screen below.
\_\_\_\_\_\_\_\_\_\_\_\_\_\_\_\_\_\_\_\_\_\_\_\_\_\_\_\_\_\_\_\_\_\_\_\_\_\_\_\_\_\_\_\_\_\_\_\_\_\_\_\_\_\_\_\_\_\_\_\_\_\_\_\_\_\_\_\_\_\_\_\_\_\_\_\_\_\_\_\_\_\_\_\_\_\_\_\_\_\_\_\_\_\_\_\_\_\_\_\_\_\_\_\_\_\_\_\_\_\_\_\_\_\_\_\_\_\_\_\_\_\_\_\_\_\_\_\_\_\_\_\_\_\_\_\_\_\_\_
The **Customer** button provides quick access to detailed supplier profiles under Customer maintenance.
[](https://doc.uniq365.com/uploads/images/gallery/2025-02/gTgimage.png)
The **Product** button provides quick access to product and service maintenance.
[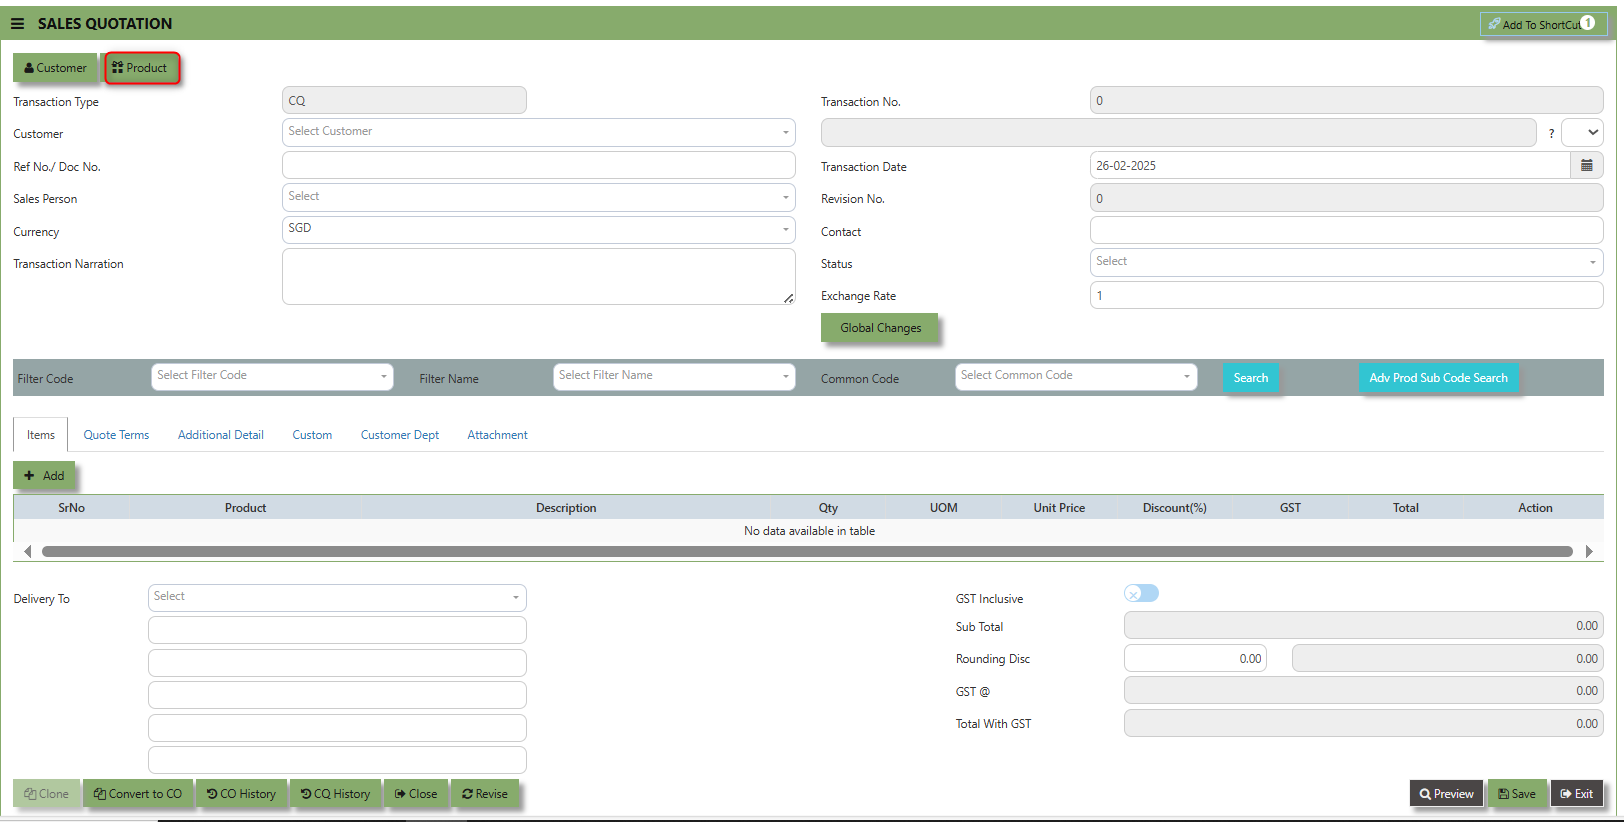](https://doc.uniq365.com/uploads/images/gallery/2025-02/Rzdimage.png)
\_\_\_\_\_\_\_\_\_\_\_\_\_\_\_\_\_\_\_\_\_\_\_\_\_\_\_\_\_\_\_\_\_\_\_\_\_\_\_\_\_\_\_\_\_\_\_\_\_\_\_\_\_\_\_\_\_\_\_\_\_\_\_\_\_\_\_\_\_\_\_\_\_\_\_\_\_\_\_\_\_\_\_\_\_\_\_\_\_\_\_\_\_\_\_\_\_\_\_\_\_\_\_\_\_\_\_\_\_\_\_\_\_\_\_\_\_\_\_\_\_\_\_\_\_\_\_\_\_\_\_\_\_\_\_\_\_\_\_
The **Global Changes** Button provides access on the Discount menu in the Sales Quotation . By clicking this button, users can add the current Sales Quotation discount using Global Discount Amount, or Percentage Discount.
[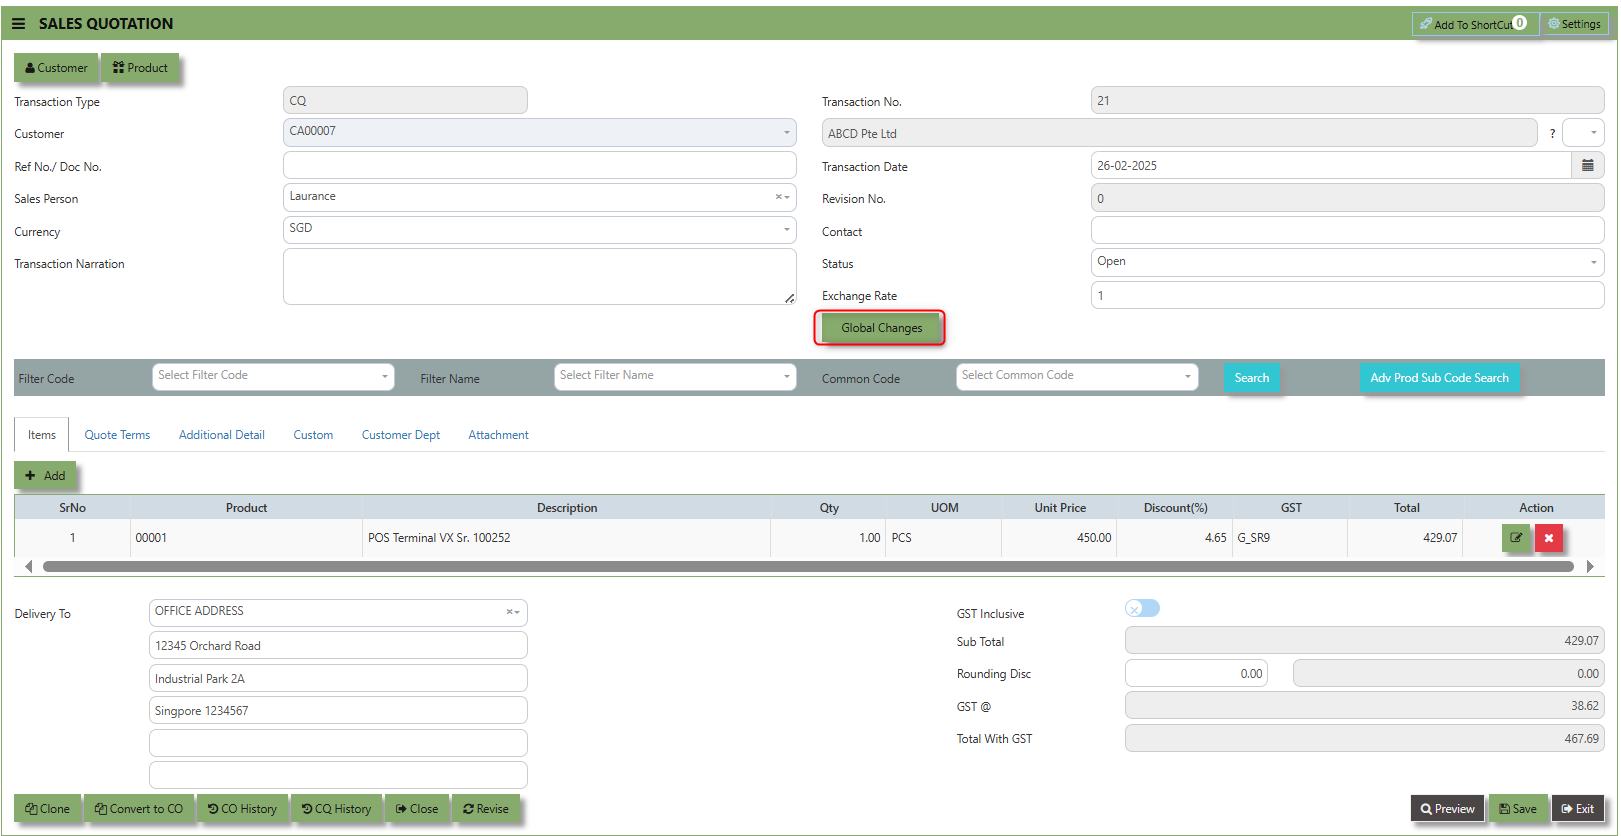](https://doc.uniq365.com/uploads/images/gallery/2025-02/8dYimage.png)
##### **How to use Global Changes?**
1.Click "Global Changes**"** and system will open below windows:
[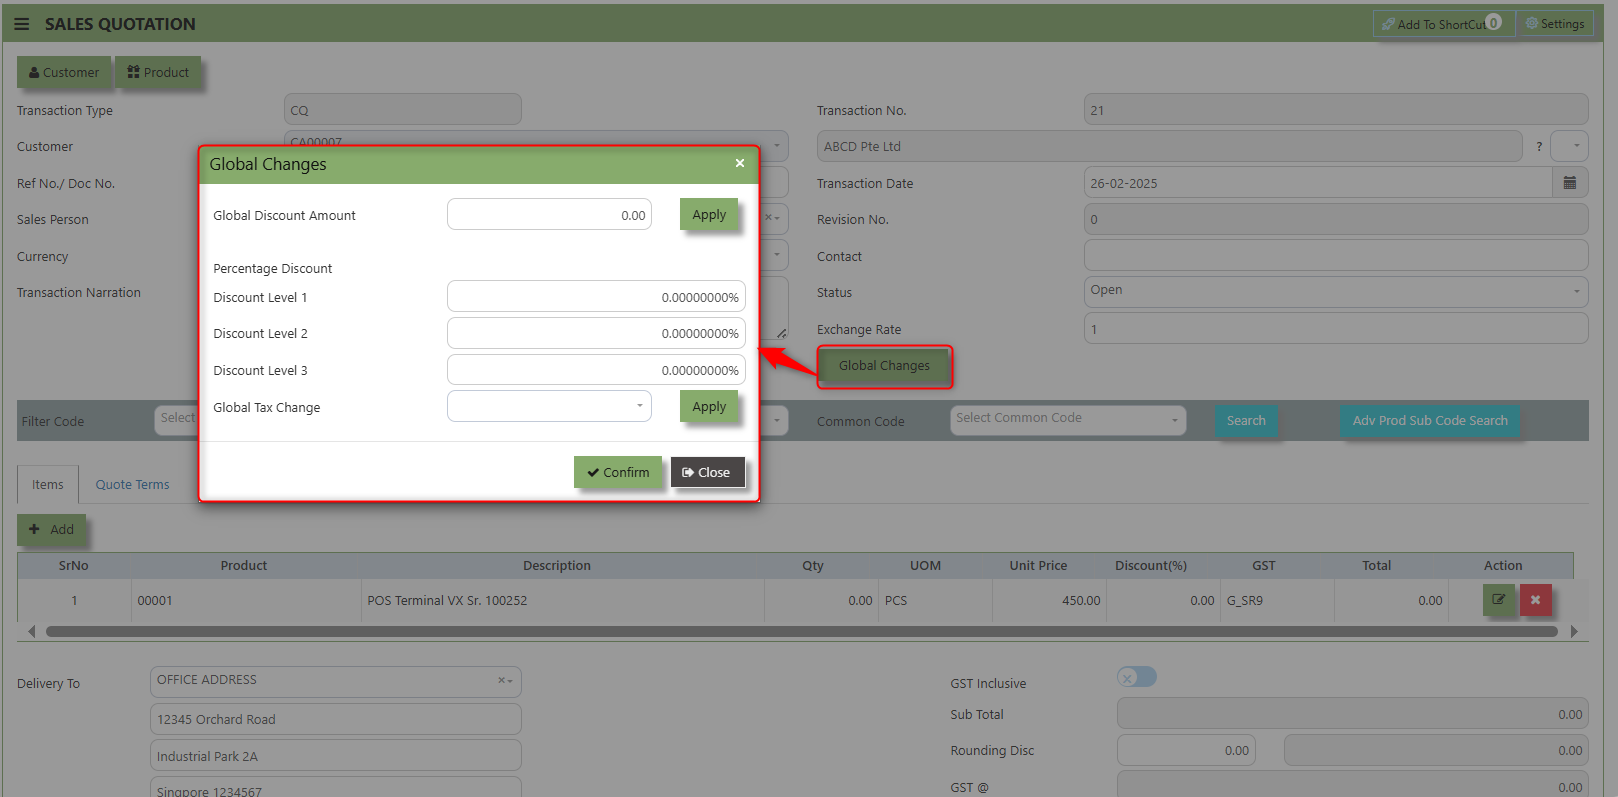](https://doc.uniq365.com/uploads/images/gallery/2025-02/AeCimage.png)
2\. Add a Discount to the transaction if its Global Discount Amount or Percentage Discount.[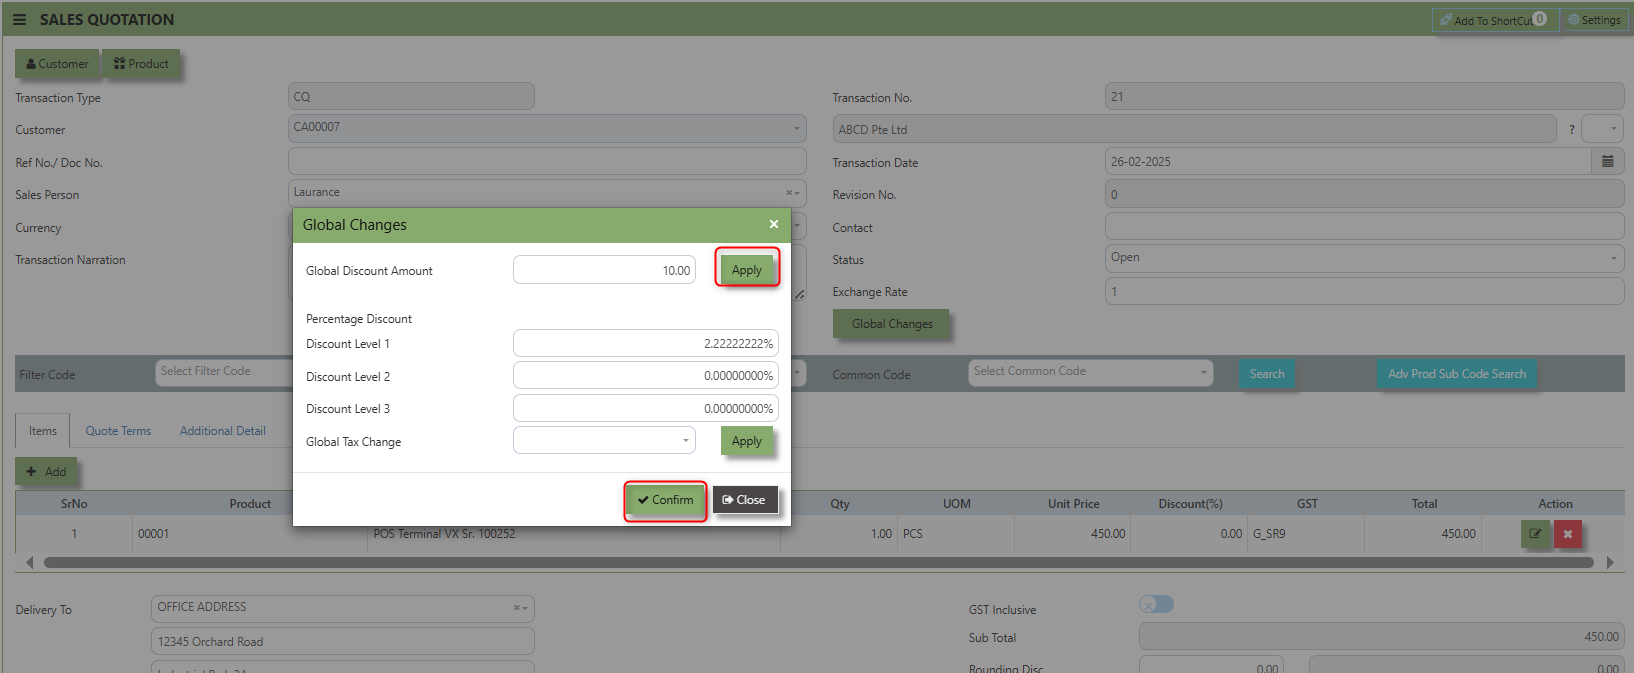](https://doc.uniq365.com/uploads/images/gallery/2025-02/2tJimage.png)
3\. Click Apply and Confirm button, the discount will be automatically captured in the line item and in the transaction.
[](https://doc.uniq365.com/uploads/images/gallery/2025-02/N14image.png)
**Search and Select Function** - this function allows the user to search and select the existing product in the Product Maintenance.
[](https://doc.uniq365.com/uploads/images/gallery/2025-02/mqTimage.png)
**Quote Terms** a section where specific quote related information is entered . This tab ensures that all relevant details regarding the sales quotation such as Quotation Number, Customer Reference, PDSU, Validity Period, Payment Term, Other Delivery Term, and delivery date are captured in the system to facilitate smooth and accurate quotation.
##### **How to set Quote Terms?**
1\. Click on SALES – SALES OPERATIONS – SALES QOUTATION - QUOTE TERMS for the screen below.
[](https://doc.uniq365.com/uploads/images/gallery/2025-02/DZ9image.png)
2. Input the below details for the below fields:
- - Quotation Number
- Customer Reference
- PDSU
- Validity Period,
- Payment Term,
- Other Delivery Term
- Delivery Term
- Delivery Date
3\. Once keyed in the necessary details, click the next tab and will automatically save all the information then system will prompt you a message.
[](https://doc.uniq365.com/uploads/images/gallery/2025-02/Z64image.png)
\_\_\_\_\_\_\_\_\_\_\_\_\_\_\_\_\_\_\_\_\_\_\_\_\_\_\_\_\_\_\_\_\_\_\_\_\_\_\_\_\_\_\_\_\_\_\_\_\_\_\_\_\_\_\_\_\_\_\_\_\_\_\_\_\_\_\_\_\_\_\_\_\_\_\_\_\_\_\_\_\_\_\_\_\_\_\_\_\_\_\_\_\_\_\_\_\_\_\_\_\_\_\_\_\_\_\_\_\_\_\_\_\_\_\_\_\_\_\_\_\_\_\_\_\_\_\_\_\_\_\_\_\_\_\_\_\_\_\_
**Additional Detail Tab** a section where the additional information is entered . This tab ensures that all relevant details regarding the Narration, Inco Terms , billing address warranty terms Selling conditions , and special instruction are captured in the system to facilitate smooth and accurate sales quotation.
##### **How to set Additional Detail?**
1\. Click on SALES – SALES OPERATIONS –SALES QUOTATION - ADDITIONAL DETAILS for the screen below.
[](https://doc.uniq365.com/uploads/images/gallery/2025-02/ASiimage.png)
2\. Input the below details for the below fields:
- - Narration
- Billing Address
- Inco Terms
- Warranty Terms
- Selling Condition
- Inquiry Received Date
- Quotation Sent Date
3\. Once keyed in the necessary details, click the next tab and will automatically save all the information.
\_\_\_\_\_\_\_\_\_\_\_\_\_\_\_\_\_\_\_\_\_\_\_\_\_\_\_\_\_\_\_\_\_\_\_\_\_\_\_\_\_\_\_\_\_\_\_\_\_\_\_\_\_\_\_\_\_\_\_\_\_\_\_\_\_\_\_\_\_\_\_\_\_\_\_\_\_\_\_\_\_\_\_\_\_\_\_\_\_\_\_\_\_\_\_\_\_\_\_\_\_\_\_\_\_\_\_\_\_\_\_\_\_\_\_\_\_\_\_\_\_\_\_\_\_\_\_\_\_\_\_\_\_\_\_\_\_\_\_
**"Custom Tab"** provides a space for users to input customized data or additional fields that are specific to their business processes and requirements.
- Click on SALES – SALES OPERATIONS – SALES QUOTATION - CUSTOM for the screen below.[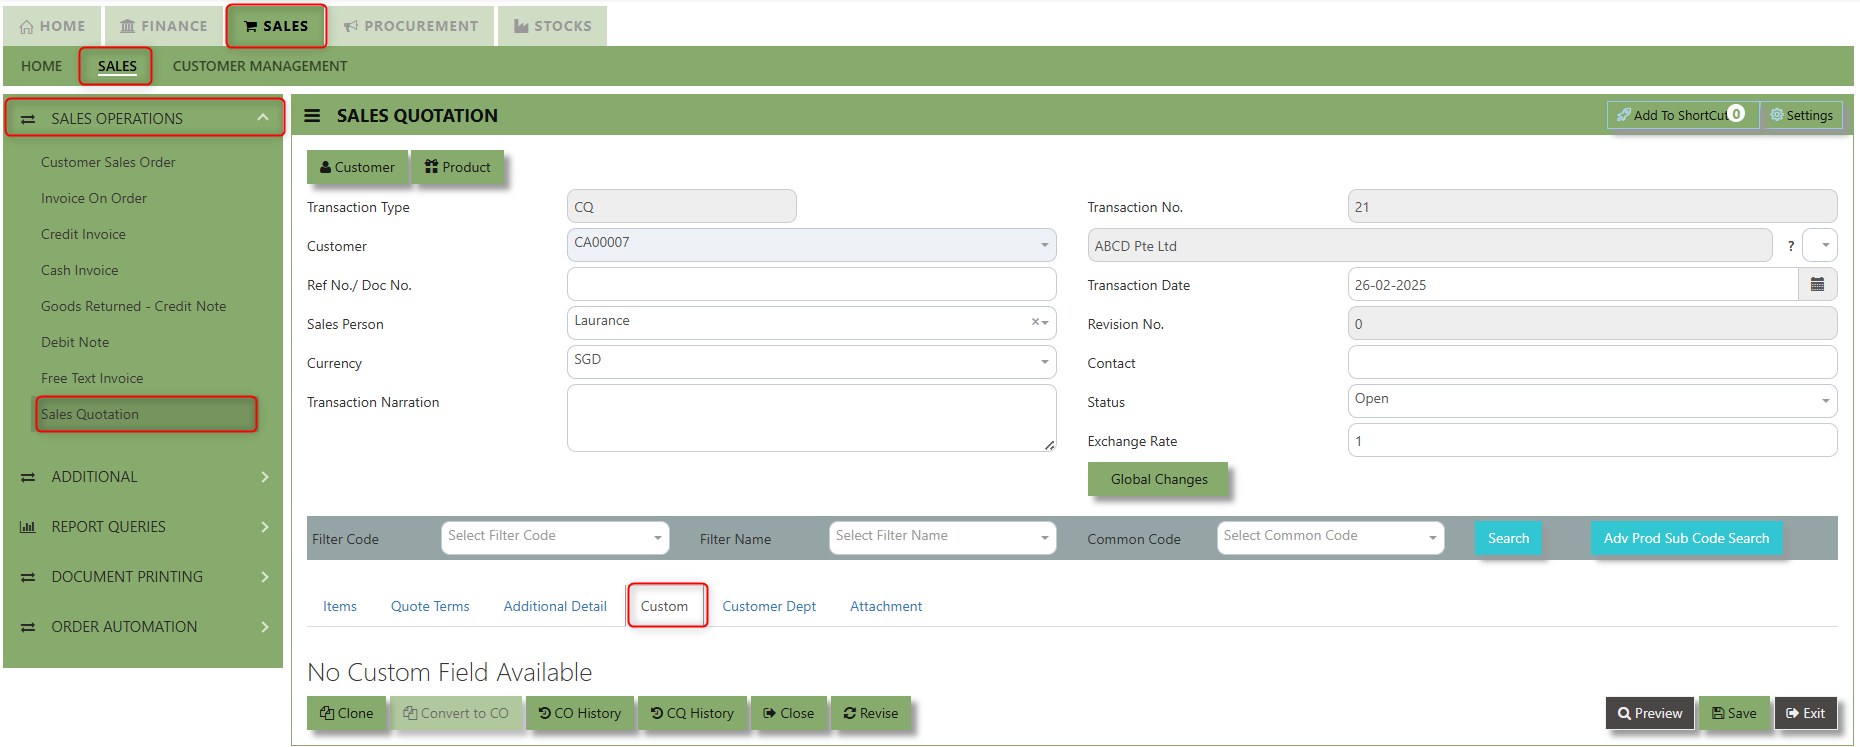](https://doc.uniq365.com/uploads/images/gallery/2025-02/i6mimage.png)
\_\_\_\_\_\_\_\_\_\_\_\_\_\_\_\_\_\_\_\_\_\_\_\_\_\_\_\_\_\_\_\_\_\_\_\_\_\_\_\_\_\_\_\_\_\_\_\_\_\_\_\_\_\_\_\_\_\_\_\_\_\_\_\_\_\_\_\_\_\_\_\_\_\_\_\_\_\_\_\_\_\_\_\_\_\_\_\_\_\_\_\_\_\_\_\_\_\_\_\_\_\_\_\_\_\_\_\_\_\_\_\_\_\_\_\_\_\_\_\_\_\_\_\_\_\_\_\_\_\_\_\_\_\_\_\_\_\_\_
**"Customer Dept Tab"** section where the Customer Department information is entered. This tab ensures that all relevant details regarding Customer Department details which is linked to the Customer Maintenance under Department Tab
- Click on SALES – SALES OPERATIONS – SALES QUOTATION - CUSTOMER DEPT for the screen below.
[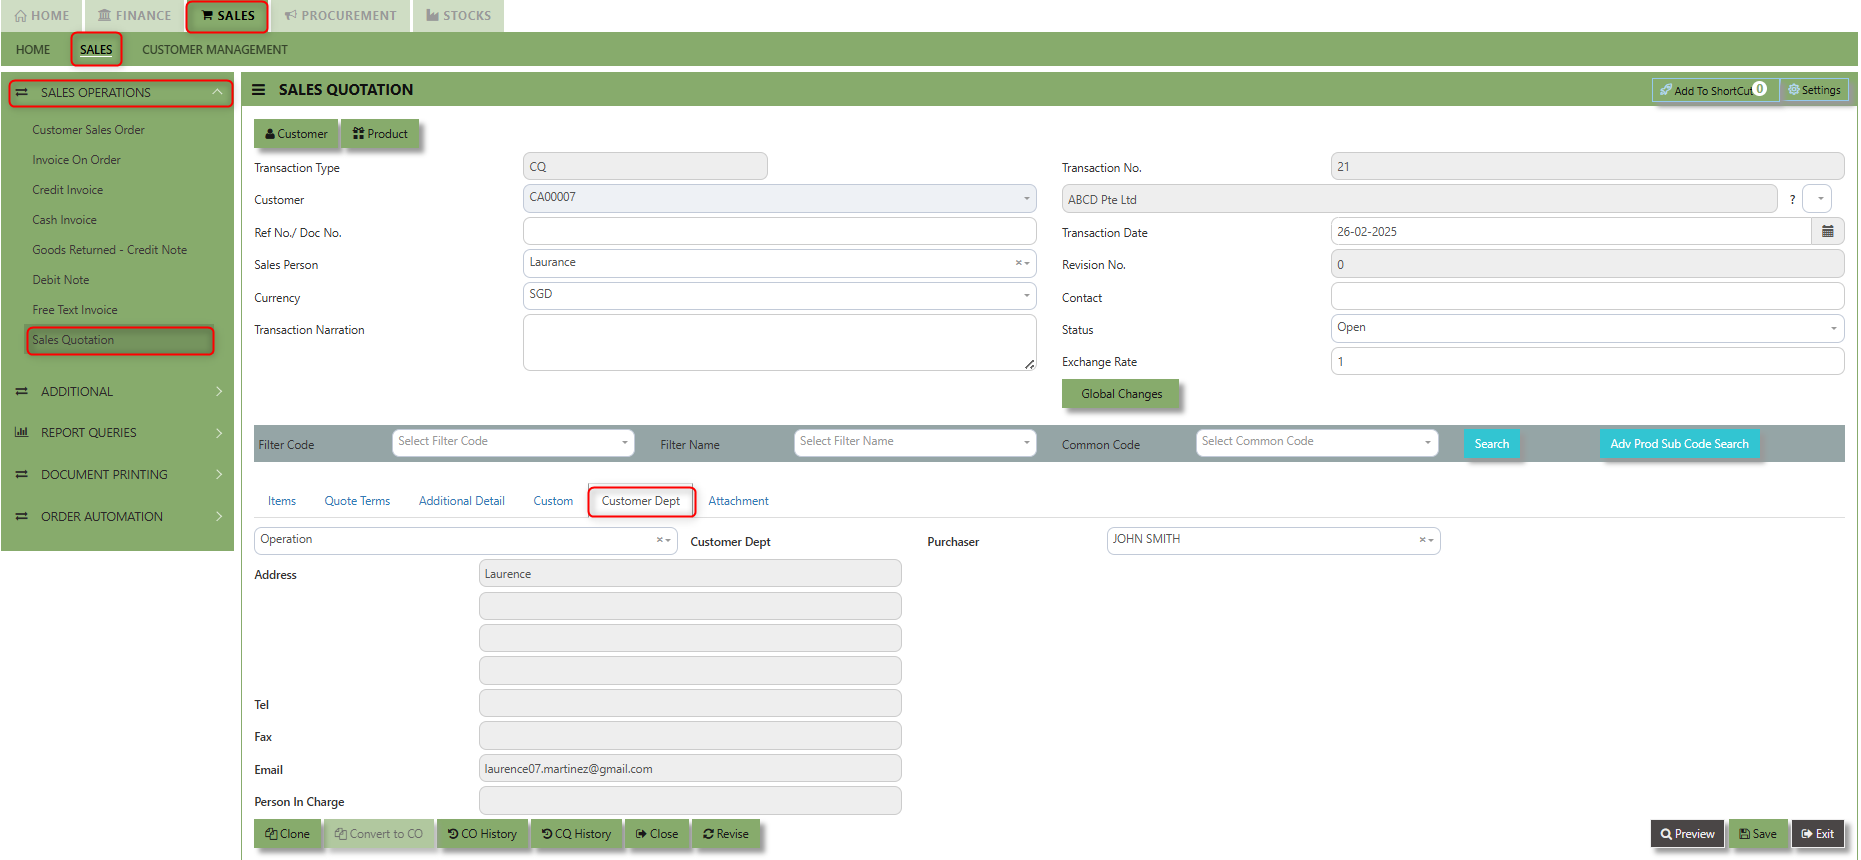](https://doc.uniq365.com/uploads/images/gallery/2025-02/guSimage.png)
The drop down selection for Customer Dept and Purchaser is maintained in Customer Maintenance under Department Tab
[](https://doc.uniq365.com/uploads/images/gallery/2025-02/Vw4image.png)
\_\_\_\_\_\_\_\_\_\_\_\_\_\_\_\_\_\_\_\_\_\_\_\_\_\_\_\_\_\_\_\_\_\_\_\_\_\_\_\_\_\_\_\_\_\_\_\_\_\_\_\_\_\_\_\_\_\_\_\_\_\_\_\_\_\_\_\_\_\_\_\_\_\_\_\_\_\_\_\_\_\_\_\_\_\_\_\_\_\_\_\_\_\_\_\_\_\_\_\_\_\_\_\_\_\_\_\_\_\_\_\_\_\_\_\_\_\_\_\_\_\_\_\_\_\_\_\_\_\_\_\_\_\_\_\_\_\_\_
**"Attachment Tab"** allows users to attach various files and documents related to the sales order. By attaching relevant files, users ensure that all purchase-related information is kept in one place, making the sales process smoother, more transparent, and easier to track.
##### **How to use Attachment Tab?**
1\. Click on SALES – SALES OPERATIONS – SALES QUOTATION - ATTACHMENT TAB for the screen below.
[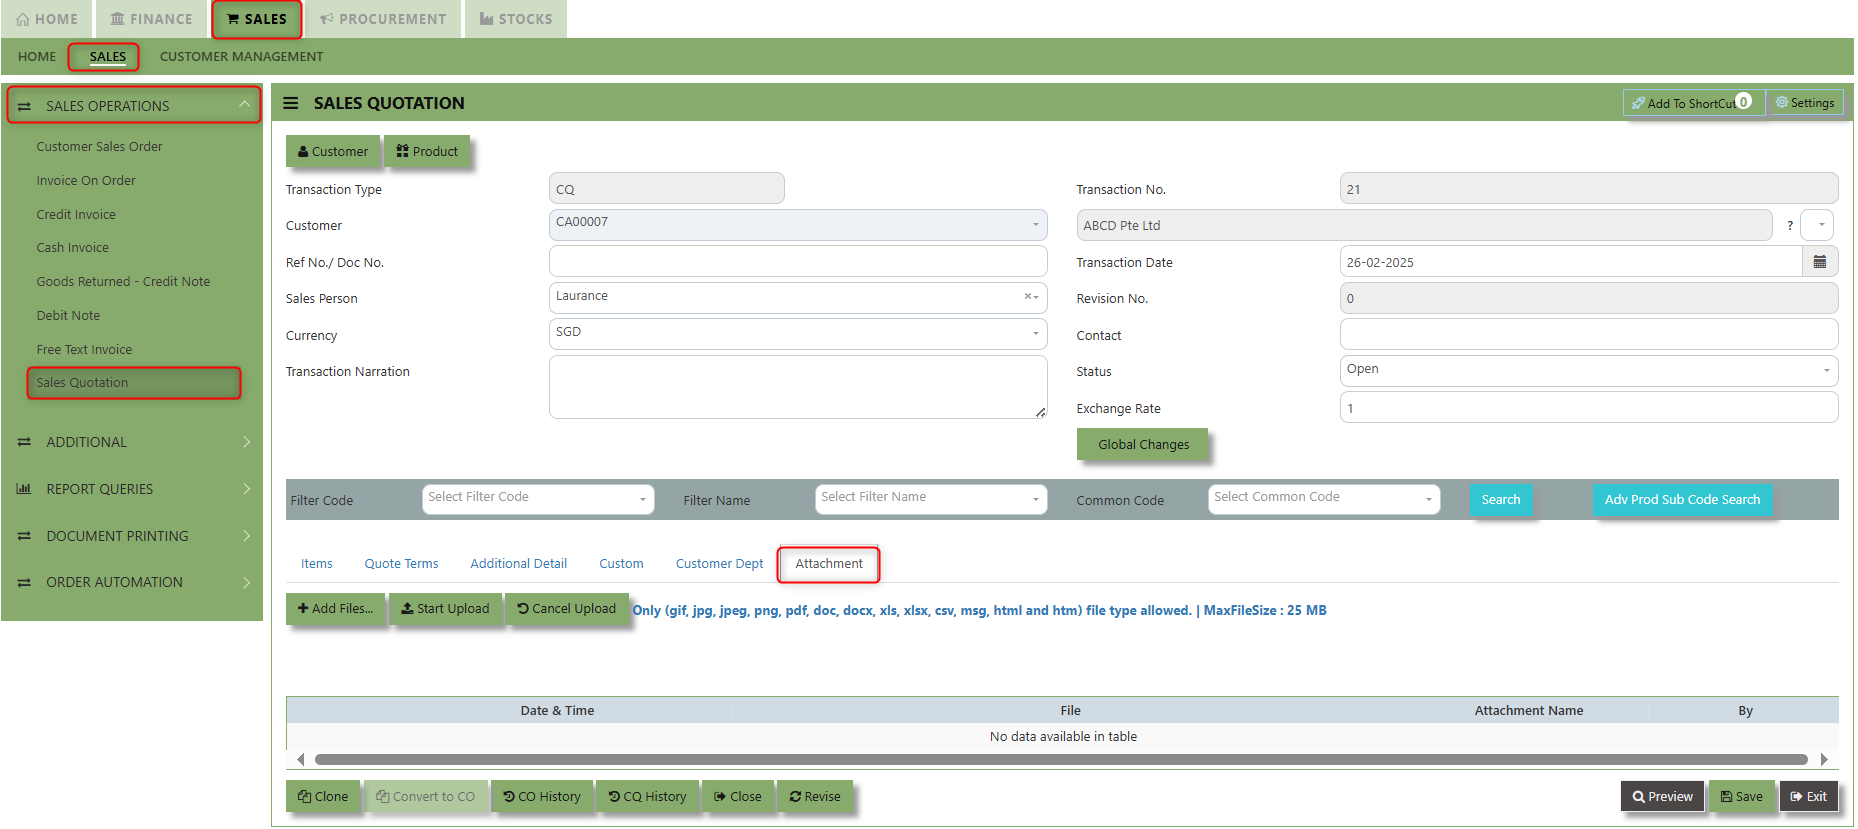](https://doc.uniq365.com/uploads/images/gallery/2025-02/JzXimage.png)
2\. Click +Add files and windows will prompt then choose the file you want to upload by clicking open. Kindly take note the file types and maximum size requirements in uploading: ***Only (gif, jpg, jpeg, png, pdf, doc, docx, xls, xlsx, csv, msg, html and htm) file type allowed. | MaxFileSize : 25 MB***
[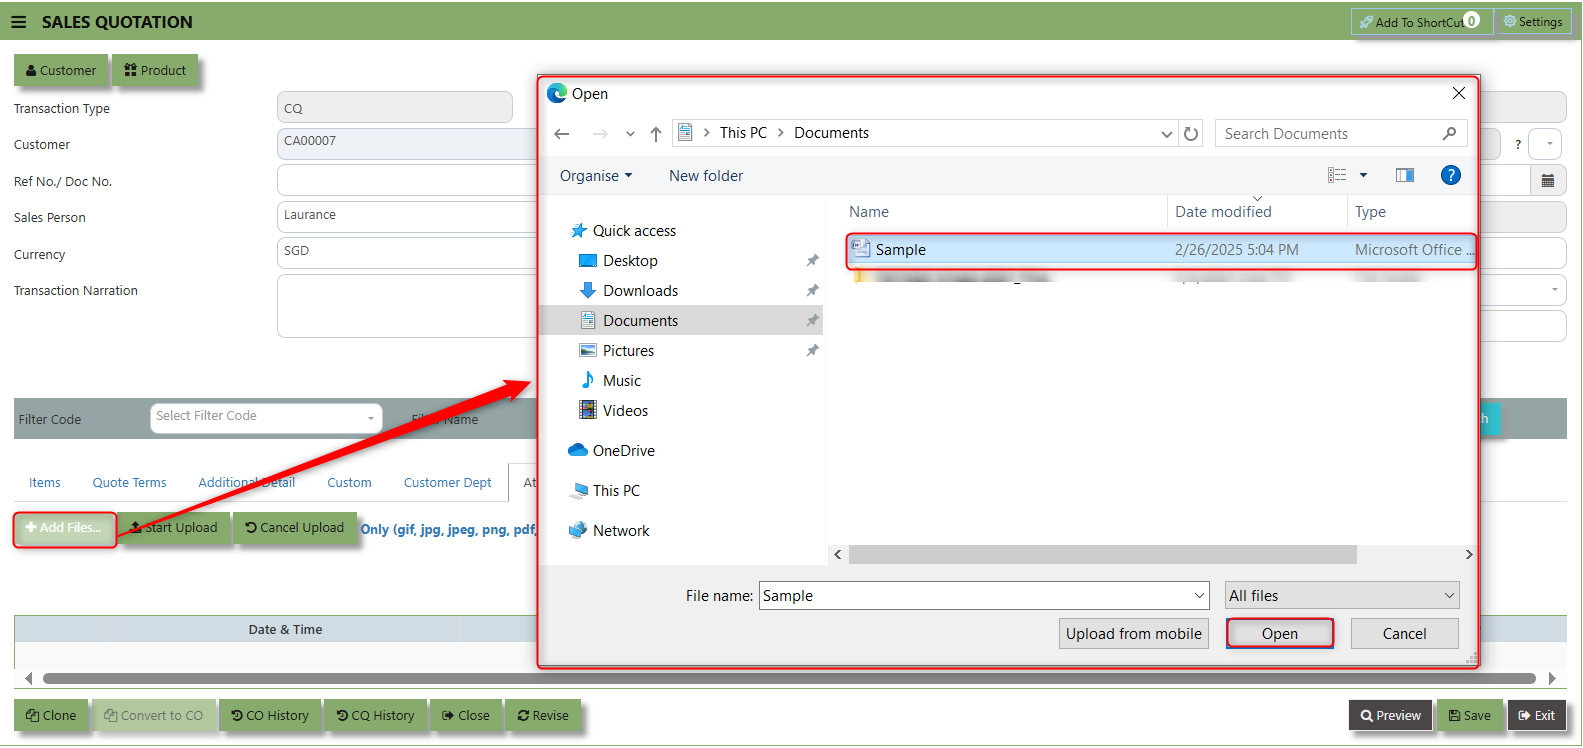](https://doc.uniq365.com/uploads/images/gallery/2025-02/6ugimage.png)
3\. Key in the Attachment Name then click start to upload.
[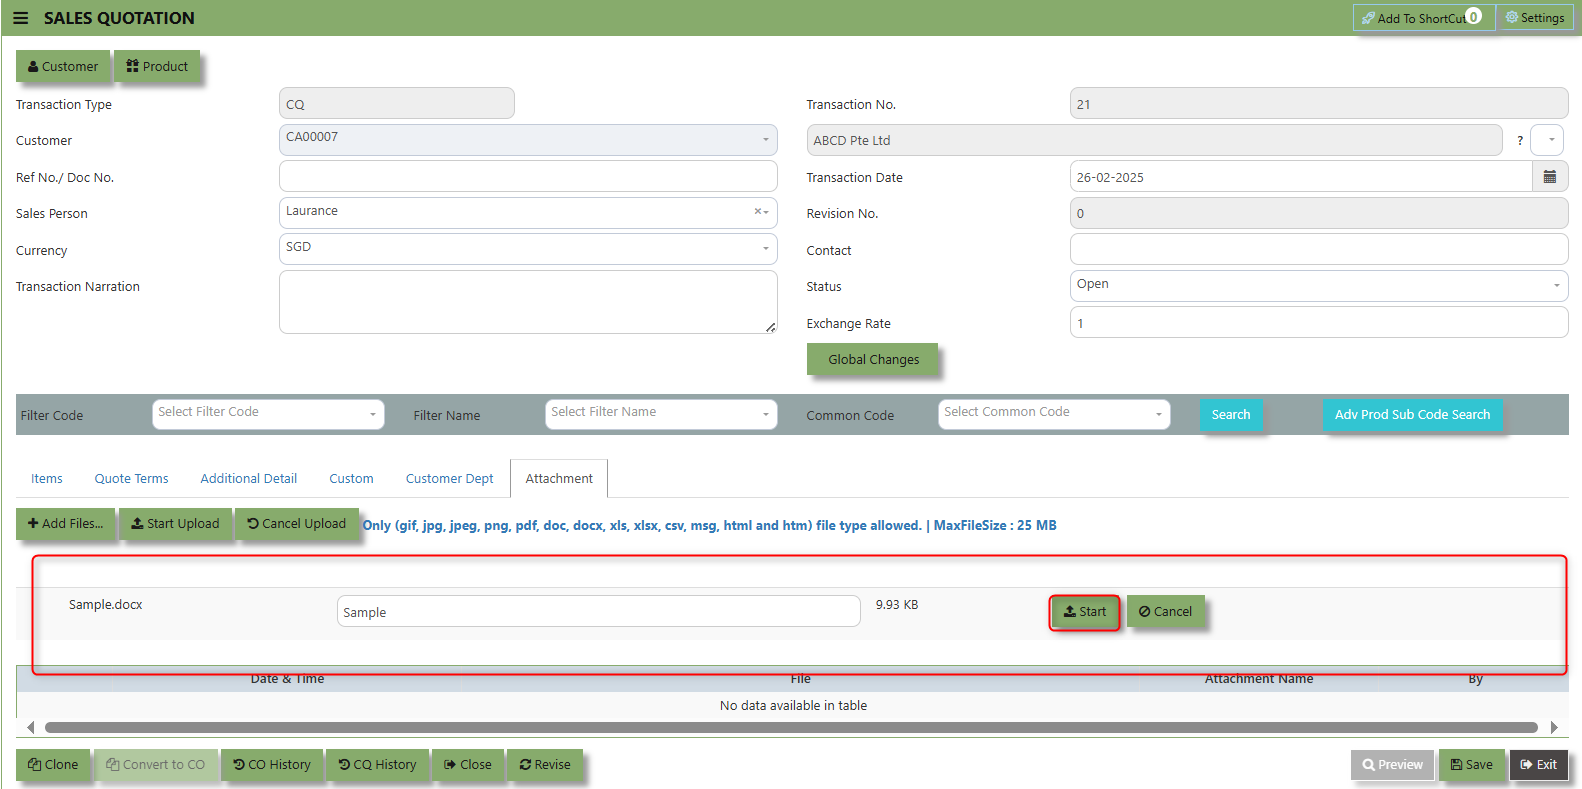](https://doc.uniq365.com/uploads/images/gallery/2025-02/uaDimage.png)
4\. Once the file attached, click "SAVE" button
[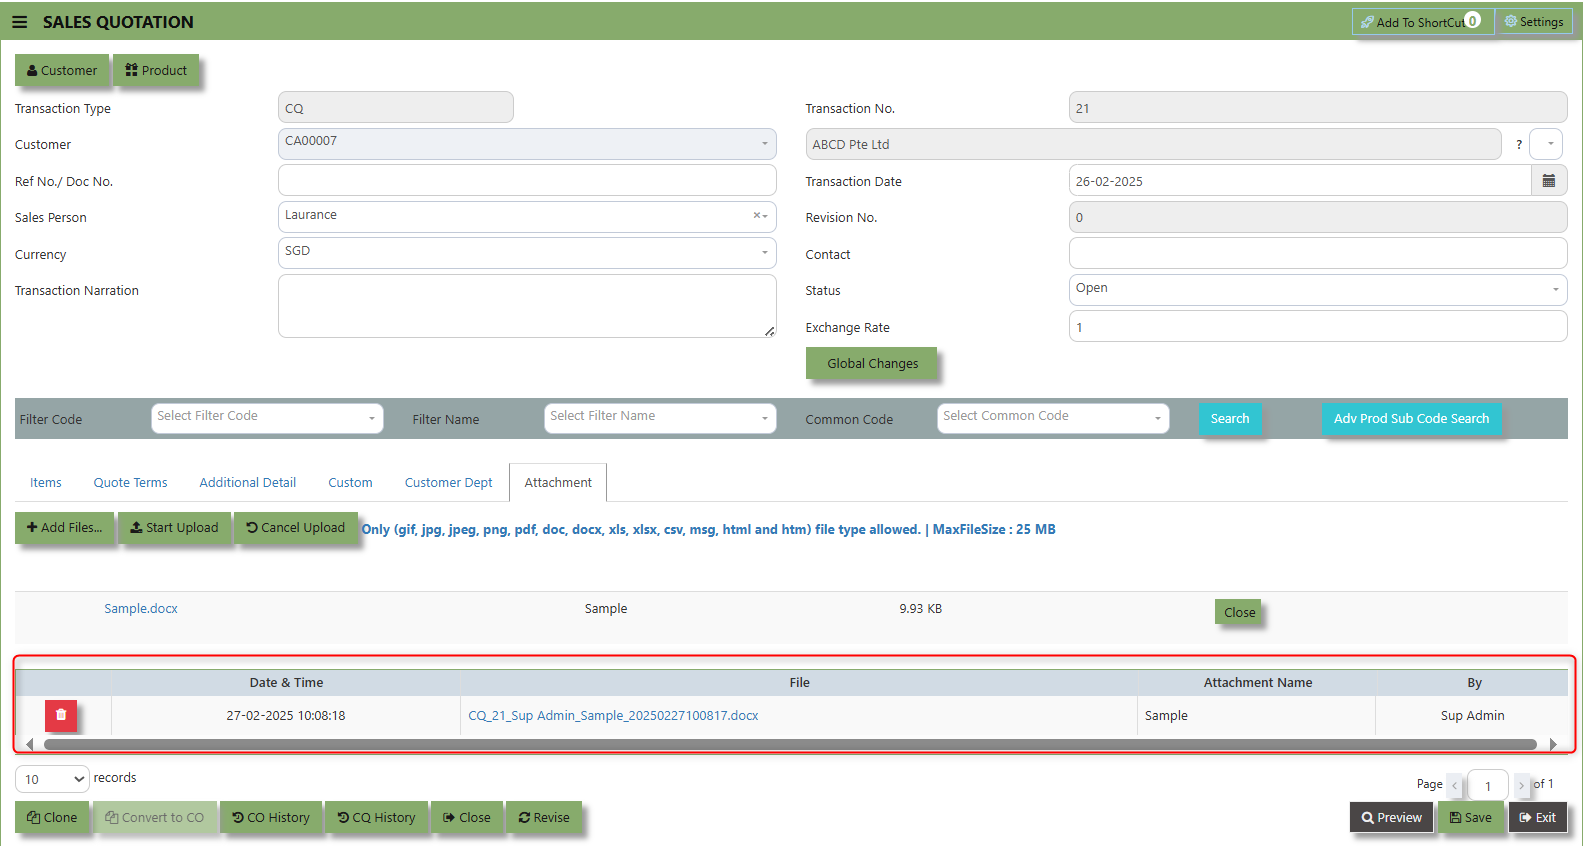](https://doc.uniq365.com/uploads/images/gallery/2025-02/d9ximage.png)
User may opt to cancel the uploading by clicking the **"Cancel Upload"** button and delete the file uploaded by clicking the **"Bin icon"** at the line detail.
Customer Status Query
##### UNIQ 365 accounting provides a very convenient interface allowing the user to drill down to the detailed transactions.
##### **How to View the Customer Status Query?**
1\. Click on SALES – SALES – REPORT & QUERIES – CUSTOMER STATUS QUERY for the screen below.
[](https://doc.uniq365.com/uploads/images/gallery/2025-02/LcSimage.png)
2.You may filter for individual Customers and the following reports can be drilled down to transaction level: (refer the
highlighted screen button.)[](https://doc.uniq365.com/uploads/images/gallery/2025-01/xNOimage.png)
- **Pending Orders Button -** shows the orders that have been placed with customers but have not yet been fulfilled or processed. You may drill down or visit the transactions by clicking "Zoom In" button inside of this function. [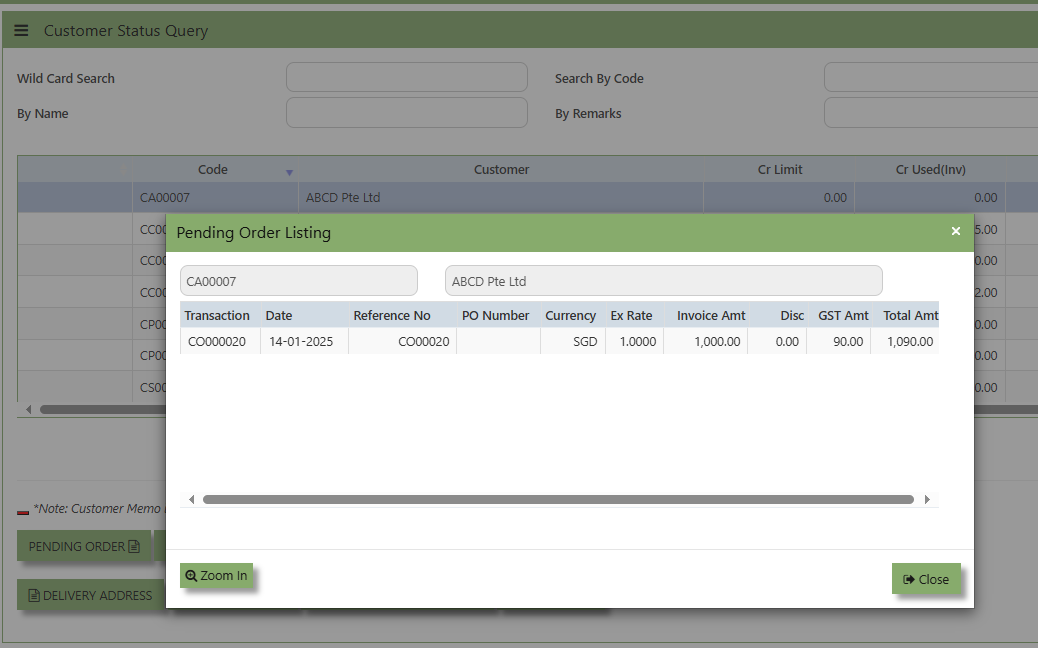](https://doc.uniq365.com/uploads/images/gallery/2025-01/5Mbimage.png)
- **Delivery Addresses Button -** displays the code, pending D/O and delivery addresses associated with the customer.
[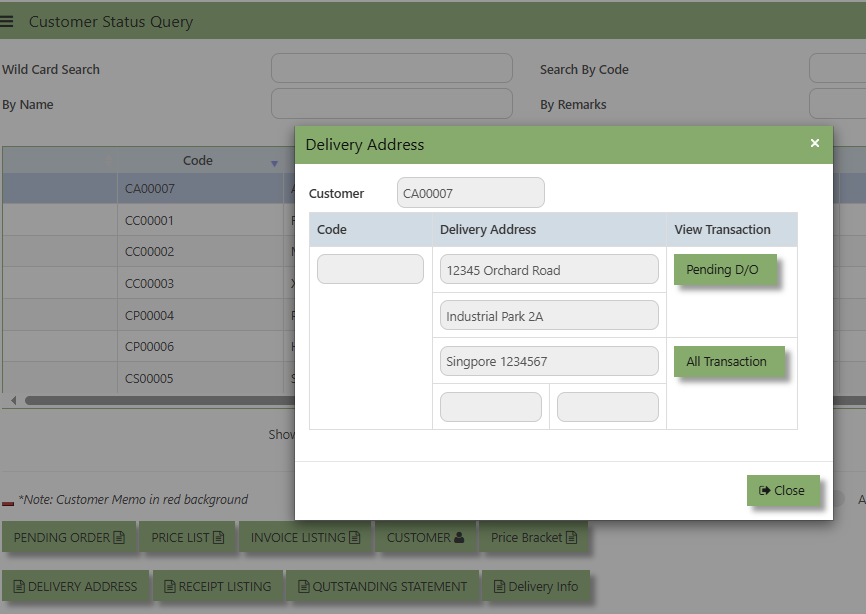](https://doc.uniq365.com/uploads/images/gallery/2025-01/y3Dimage.png)
- **Invoice Listing Button -** will show a list of invoices from customer. These invoices might be in various stages such as unpaid, paid, or pending.
[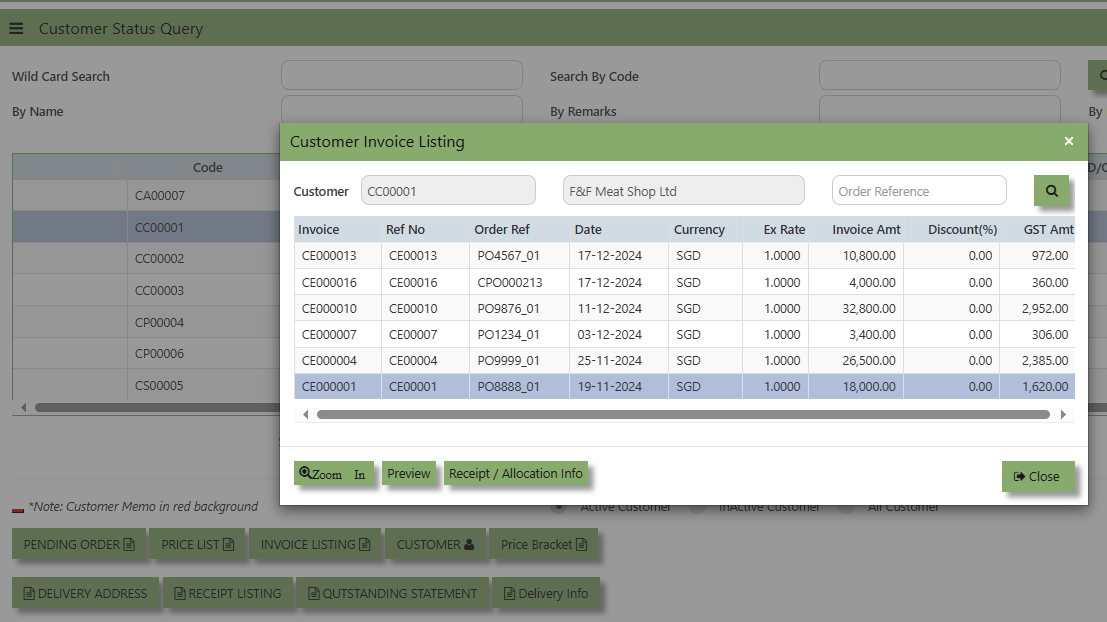](https://doc.uniq365.com/uploads/images/gallery/2025-01/UqCimage.png)
- **Customer Button -** Allows the user to view or can be used to quickly access customer maintenance of selected Customer. You may drill down or visit the transactions by clicking "Zoom In" button inside of this function.
[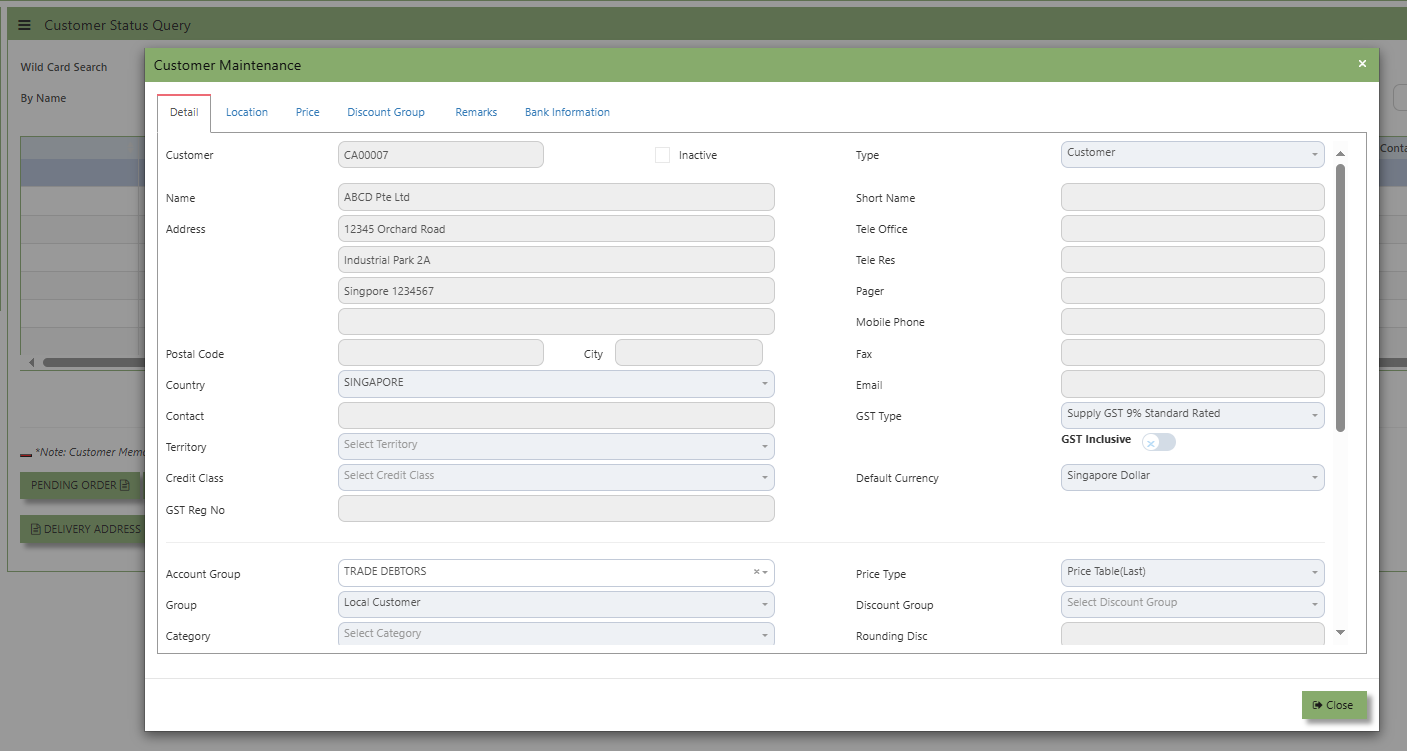](https://doc.uniq365.com/uploads/images/gallery/2025-01/M5Yimage.png)
- **Outstanding Statement** **Button -** provides an outstanding statement of the customer’s account. It will summarize any unpaid balances or overdue amounts and can be used to review what is outstanding of the customer, including details such as Trn No., Reference, Currency, Double Entry, Balance, Balance Base and Total Amount. You may drill down or visit the transactions by clicking "Zoom In" button inside of this function.
[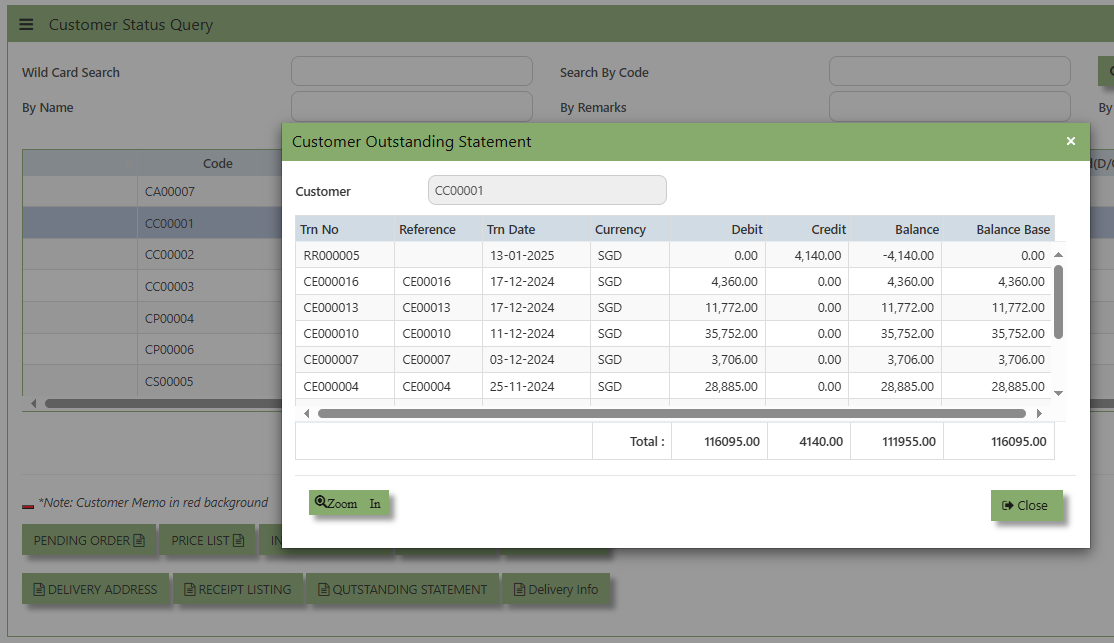](https://doc.uniq365.com/uploads/images/gallery/2025-01/02fimage.png)
- **Customer Receipt Button -** will show a list of receipt paid by the customer. You may drill down or visit the transactions by clicking "Zoom In" button inside of this function.
[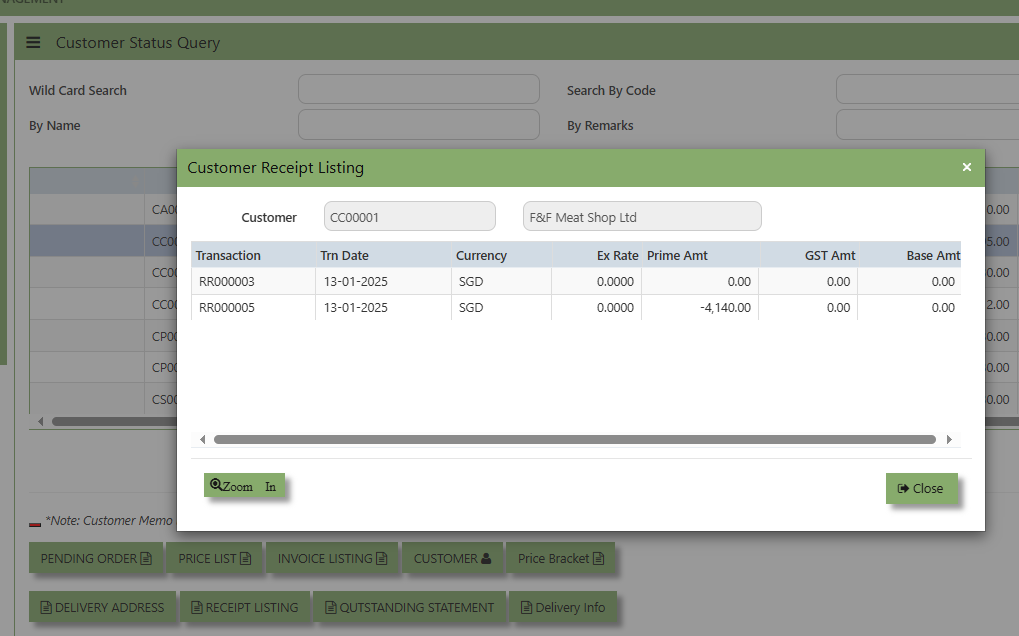](https://doc.uniq365.com/uploads/images/gallery/2025-01/hlvimage.png)
- **Delivery Info -** will show a list of invoices from customer sorted by Delivery Location. ou may drill down or visit the transactions by clicking "Zoom In" button inside of this function.
[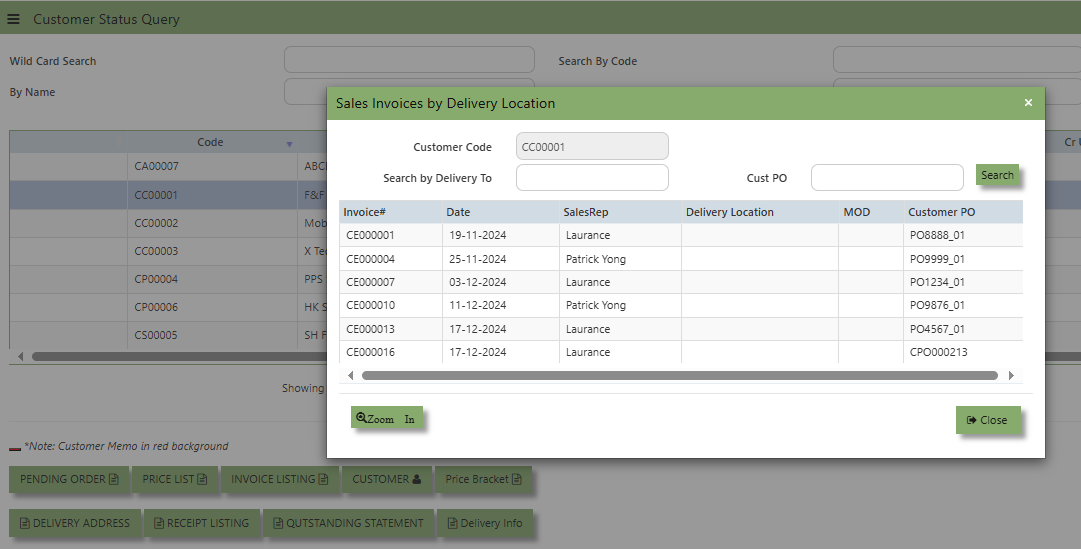](https://doc.uniq365.com/uploads/images/gallery/2025-01/N0fimage.png)
> Additional details on the transaction workflow will be covered as part of the Advanced Training.
Report & Queries
##### UNIQ 365 Reports & Queries interface make it extremely easy for you to take a report in any way you need. Whether it is by date or filtered by departmental or project codes, this option lets you have it. This convenient interface allows the user to drill down to the detail transactions.
##### **How to View the Report & Query?**
- Click on SALES – SALES – REPORT QUERIES – REPORT & QUERIES for the screen below .
[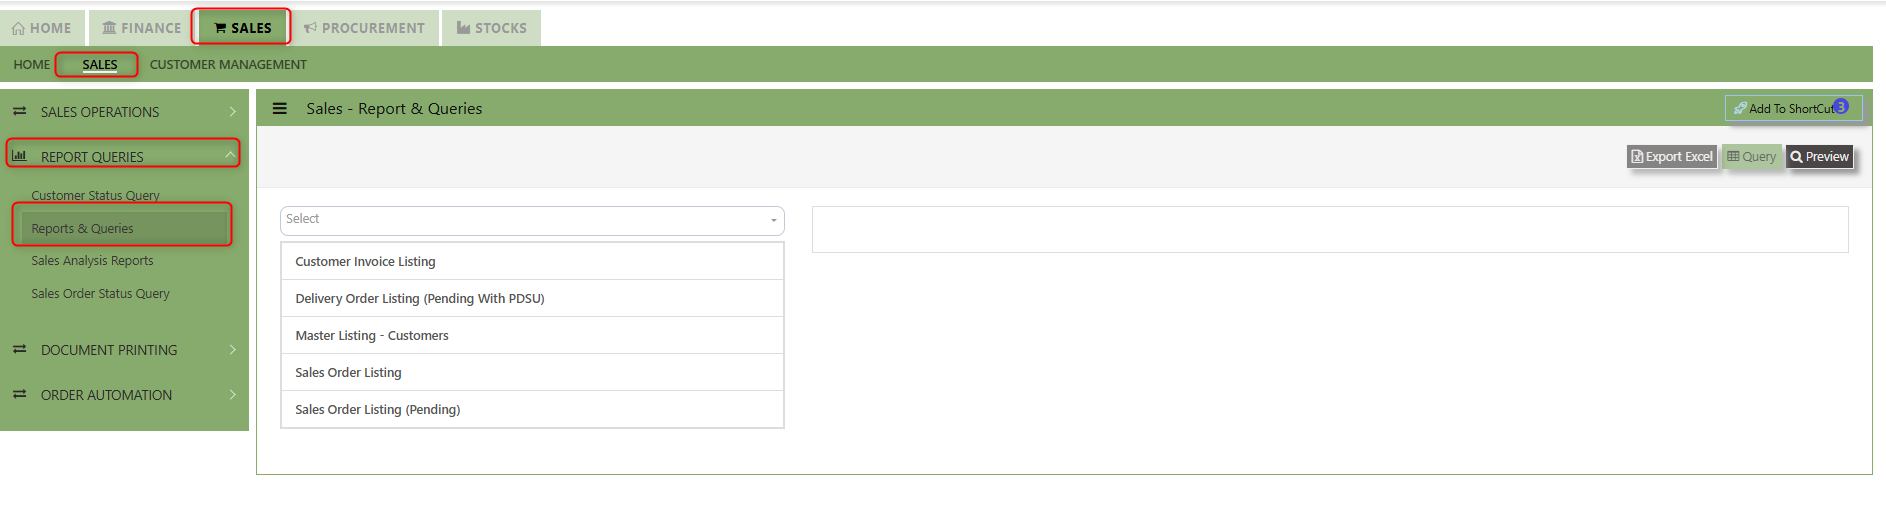](https://doc.uniq365.com/uploads/images/gallery/2025-02/sq5image.png)
- These reports may be sent to a Preview Screen pop up.
- You may seek by individual report and the following reports can be drilled-down to transaction level:
- Mater Listing - Customer [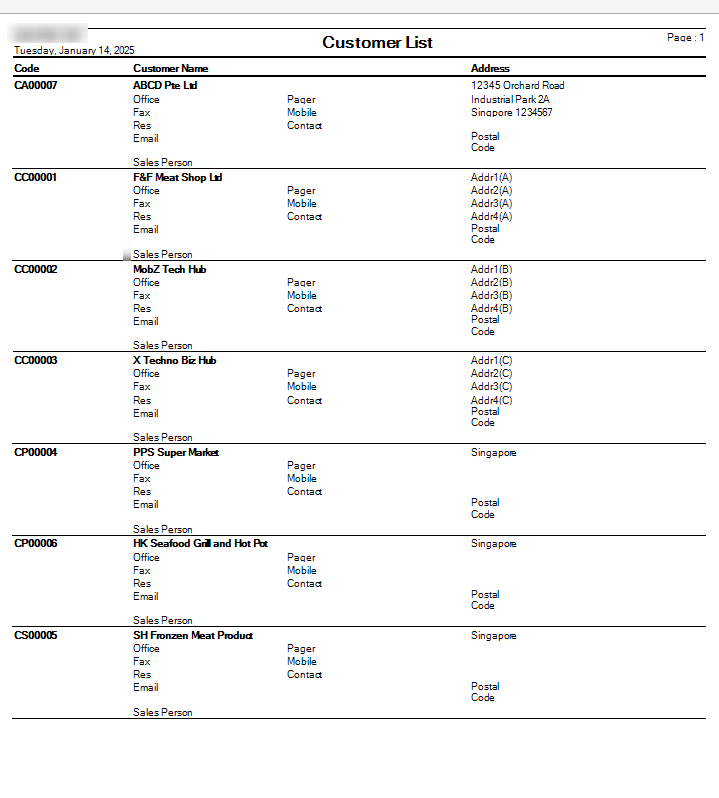](https://doc.uniq365.com/uploads/images/gallery/2025-01/aIhimage.png)
- Sales Order Listing [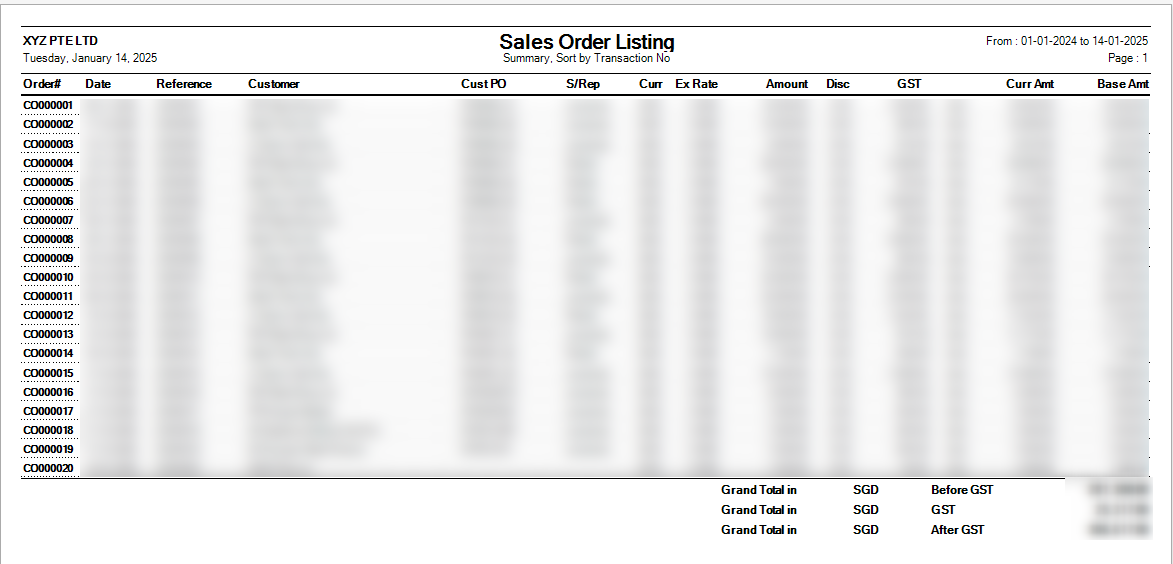](https://doc.uniq365.com/uploads/images/gallery/2025-01/ppNimage.png)
- Pending Sales Order [](https://doc.uniq365.com/uploads/images/gallery/2025-01/GzYimage.png)
- Pending Sales Delivery Order [](https://doc.uniq365.com/uploads/images/gallery/2025-01/bj7image.png)
- Customer Invoice Listing [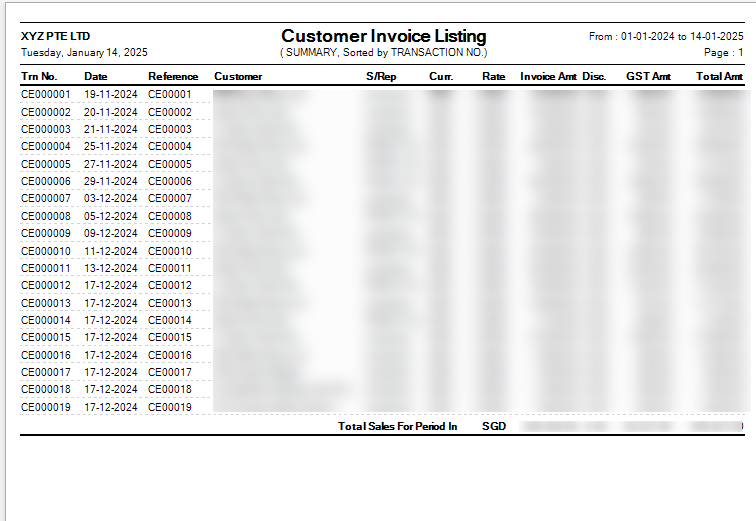](https://doc.uniq365.com/uploads/images/gallery/2025-01/Qwlimage.png)
- Instead of listing all invoices, you may choose to display only those that are outstanding. From this report, you may also drill down to the document level by clicking Go to Transaction.
- Additional details on the transaction workflow will be covered as part of the Advanced Training
Sales Analysis Report
##### These reports are meant to provide important Management Information System information for companies to analyze the trend, performance and pattern of their Sales transactions. These reports can be by summary or detailed.
##### **How to View the Sales Analysis Report?**
- Click on Sales Operation – Report & Queries – Sales Analysis Report icon for the following screen. [](https://doc.uniq365.com/uploads/images/gallery/2025-01/ULIimage.png)
- This option allows the user to view & print the Sales Analysis report in different categories.
- More details on the work flow will be covered as part of the Advanced Training.
Sales Order Status Query
##### In Uniq365, **Sales Order Status Query** is a specialized report or query that allows users to view and analyze the status of sales orders (SOs) in real-time. This report helps track the progress of SOs and provides insights into whether an order is open, completed, partially received, canceled, or pending approval, among other statuses.
##### **How to view Sales Order Status Query?**
- Click on SALES – SALES – REPORT QUERIES – SALES ORDER STATUS QUERY for the screen below.
[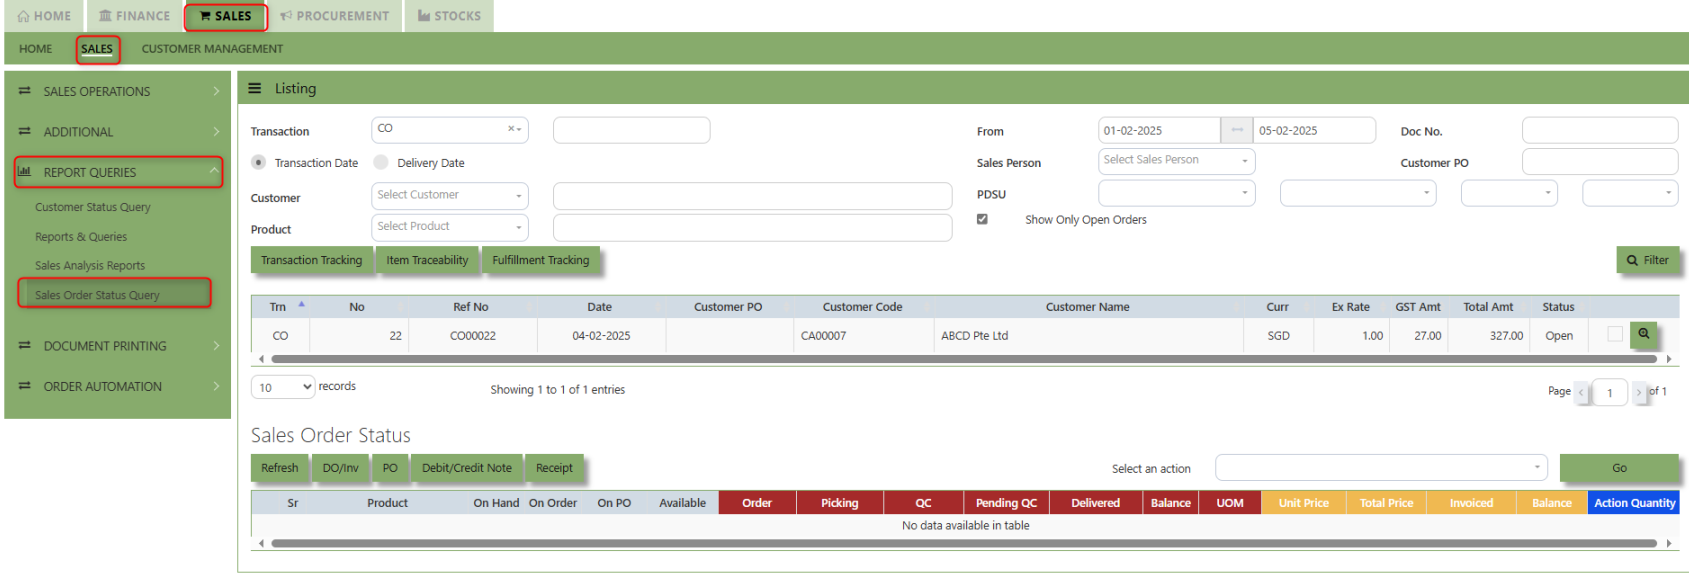](https://doc.uniq365.com/uploads/images/gallery/2025-02/wU9image.png)
##### **How to use Sales Order Status Query?**
1. Choose transaction type, Transaction Date or Delivery Date then set the date range, select Customer and Product then click "Filter" button to reflect the data. User may have an option to add filtration by entering Doc. No., Sales Person, Customer PO, PDSU and tick "Show Only Open Orders". [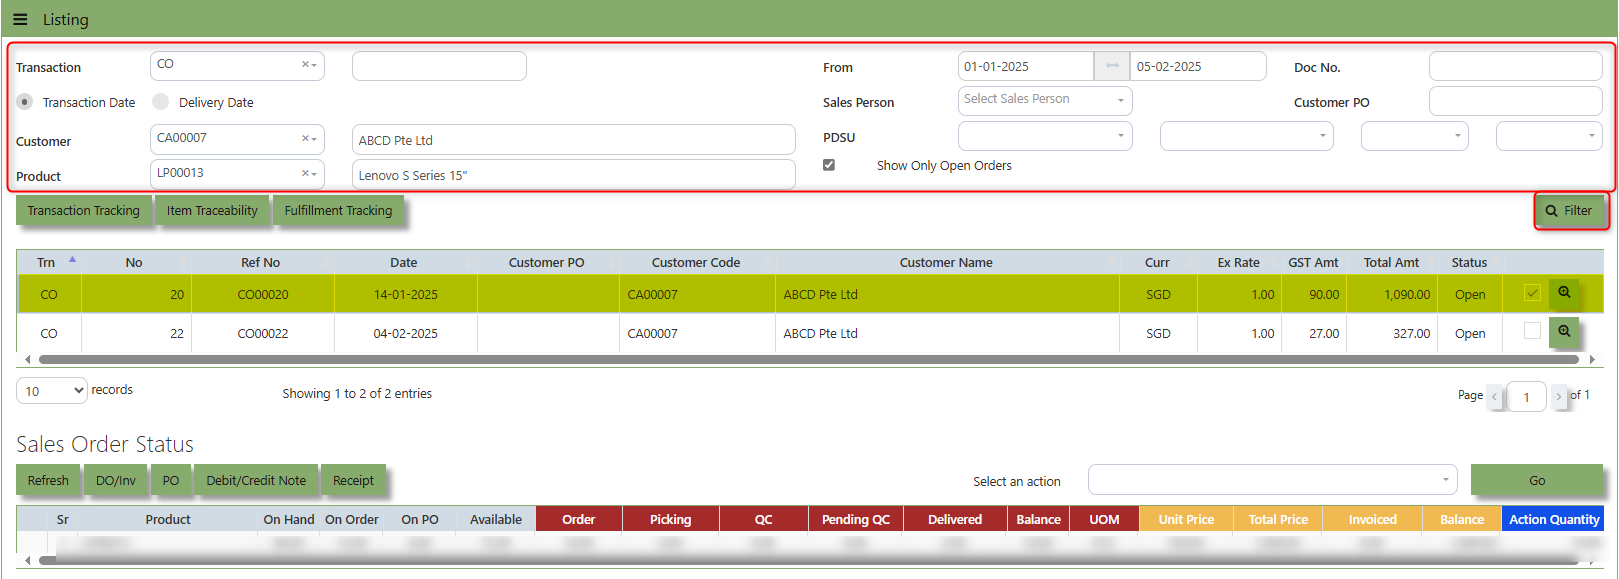](https://doc.uniq365.com/uploads/images/gallery/2025-02/hluimage.png)
2. By selecting the filtered line transaction, details will show under Sales Order Status for user references. [](https://doc.uniq365.com/uploads/images/gallery/2025-02/UrDimage.png)
Under "Sales Order Status" below are the buttons that users can utilize:
**Refresh Button** is used to update or reload the data displayed in the Sales Order Status Query.
**DO/Inv Button** provides access to the **List of Delivery Orders (DO)** and **Invoices (Inv)** associated with the Sales orders.
**PO Button** provides a quick link to the **Purchase Order** connected to a sales order, helping users track the fulfillment of purchase orders associated with the Sales order.
**Debit\\Credit Note Button** provides a quick link to the **Debit\\Credit Note** that connected to a sales order, helping users track the fulfillment List of Debit\\credit note associated with the Sales order.
**Receipt Button** provides a quick link to the **Receipt Transactions** that connected to a sales order, helping users track the fulfillment List of Receipt transactions associated with the Sales order.
Document Printing
##### Finally, the document printing option opens the menu for document printing.
##### **How to use Document Printing?**
- Click on SALES – SALES – DOCUMENT PRINTING for the screen below.
[](https://doc.uniq365.com/uploads/images/gallery/2025-01/2gsimage.png)
- This option allows user to select the printing of documents a range of document numbers. By previewing the selected report, users can able to **download** the detailed report into a PDF, XLS, XLSX, DOCX, CSV file, for further analysis, sharing, or record-keeping.
Product & Service Maintenance
##### **How to Set-up Product Maintenance?**
##### In Uniq365, product and service maintenance are essential for effective inventory and financial management. By accurately adding and managing product and service details, users can ensure seamless tracking, reporting, and accounting within the system. This functionality helps maintain up-to-date records, streamline operations, and support decision-making for inventory and sales.
1\. Click on **Stock– Product Management – Product & Service Maintenance** icon for following Inventory listing screen.
[](https://doc.uniq365.com/uploads/images/gallery/2025-02/glQimage.png)
**Status Filter** -Allows users to choose what status to display in the system interface. Options typically include Active, Inactive, or All.
**Type Filter** - Used to filter items based on their category, such as stock, service, or all items.
**Code, Brand, and Group Filters** - Users can input specific product codes, brands, and groups to filter results.
**Description, Model, and Size Filters** - Allows filtering based on the product description, model, or size.
**Country of Origin, Main Category, and Default Location Filters** - Users can use these filters to further refine the search by country of origin, main category, or default location.
**Excel Export Button** - This will let user download all the products and services added within the System and convert into excel format.
##### **How to add new Products and Services in Product & Service Maintenance?**
[](https://doc.uniq365.com/uploads/images/gallery/2025-02/AC5image.png)
1\. **Product Info.** Click the **Add** button for new inventory. The user will be redirected to the **Product Info** page.
[](https://doc.uniq365.com/uploads/images/gallery/2025-02/QNMimage.png)
i. Fill in the following components:
**Product Code** - The code for the new product is autogenerated by the system.
**Description** - Enter the product name (maximum 50 alphanumeric characters).
**Pack Info** - Enter any relevant pack information.
**Other Description** - Enter additional details (unlimited lines, maximum of 40 alphanumeric characters per line).
**Barcode** - Enter the product barcode
ii. Click the **Additional** button if there is extra information to link with the new product.
[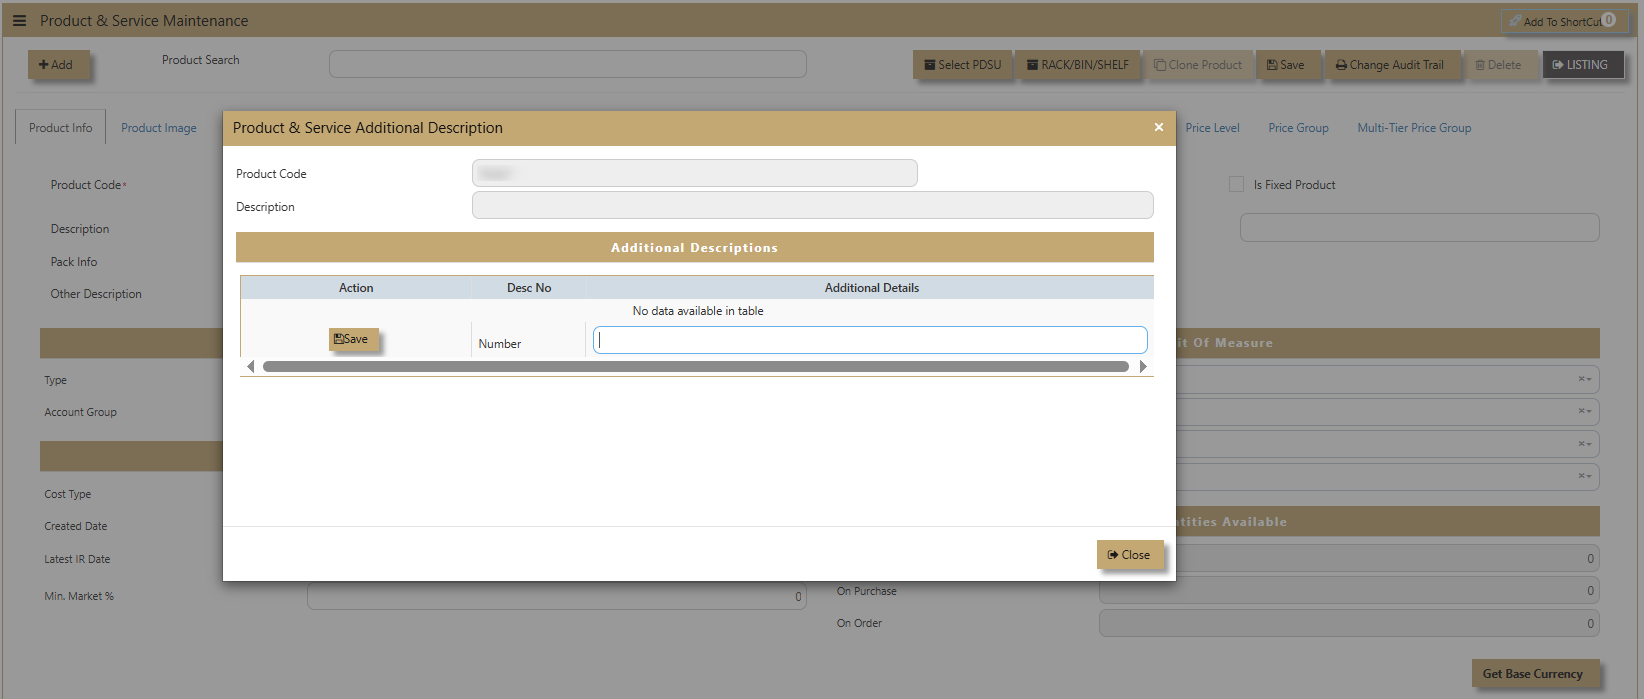](https://doc.uniq365.com/uploads/images/gallery/2025-02/W1nimage.png)
2\. **Product Info - Product Classification.** UNIQ365 helps organize and categorize products for better inventory and financial management. It consists of two key components:
[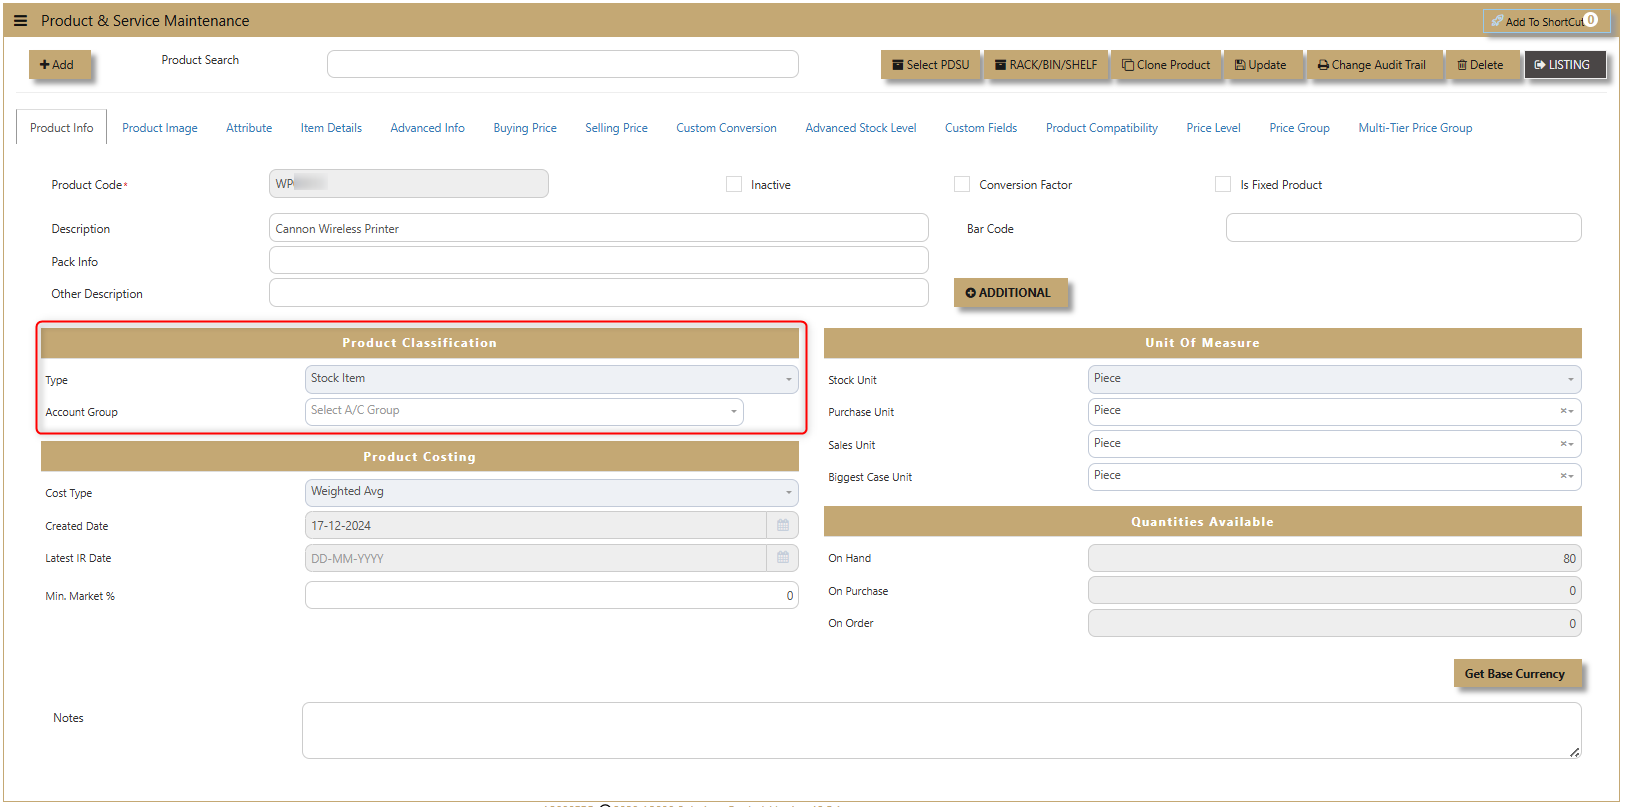](https://doc.uniq365.com/uploads/images/gallery/2025-02/jNaimage.png)
**Product Type** - Specifies whether the product is a **Stock Item** or a **Service**.
**Account Group** - If any auto account posting depends on Product, then click to select the relevant Accounts Group defined under Inventory/Maintenance/Product Account Group.
Example: Stock-Computer Hardwares, Stock-Softwares, Stock Accessories, Stock-Others.
3\. **Product Info - Product Costing.** UNIQ365 accurately determine and manage the cost of their products, ensuring effective pricing and profitability. This feature plays a key role in cost control, helping to track expenses and set competitive prices.
> Note: Please ensure that only one costing type is needed to be attached to all the products.
>
> - Standard Costing. The cost entered in the product master as Standard cost is taken for updating cost of sales.
> - Weighted Average. The cost for each product is maintained and the current weighted average cost is used for updating cost of sales.
> - FIFO. First In First Out method of costing uses the cost for the first set of available item for updating cost of sales.
> - LIFO. Last In First Out method of costing uses the cost for the last set of available item for updating cost of sales.
[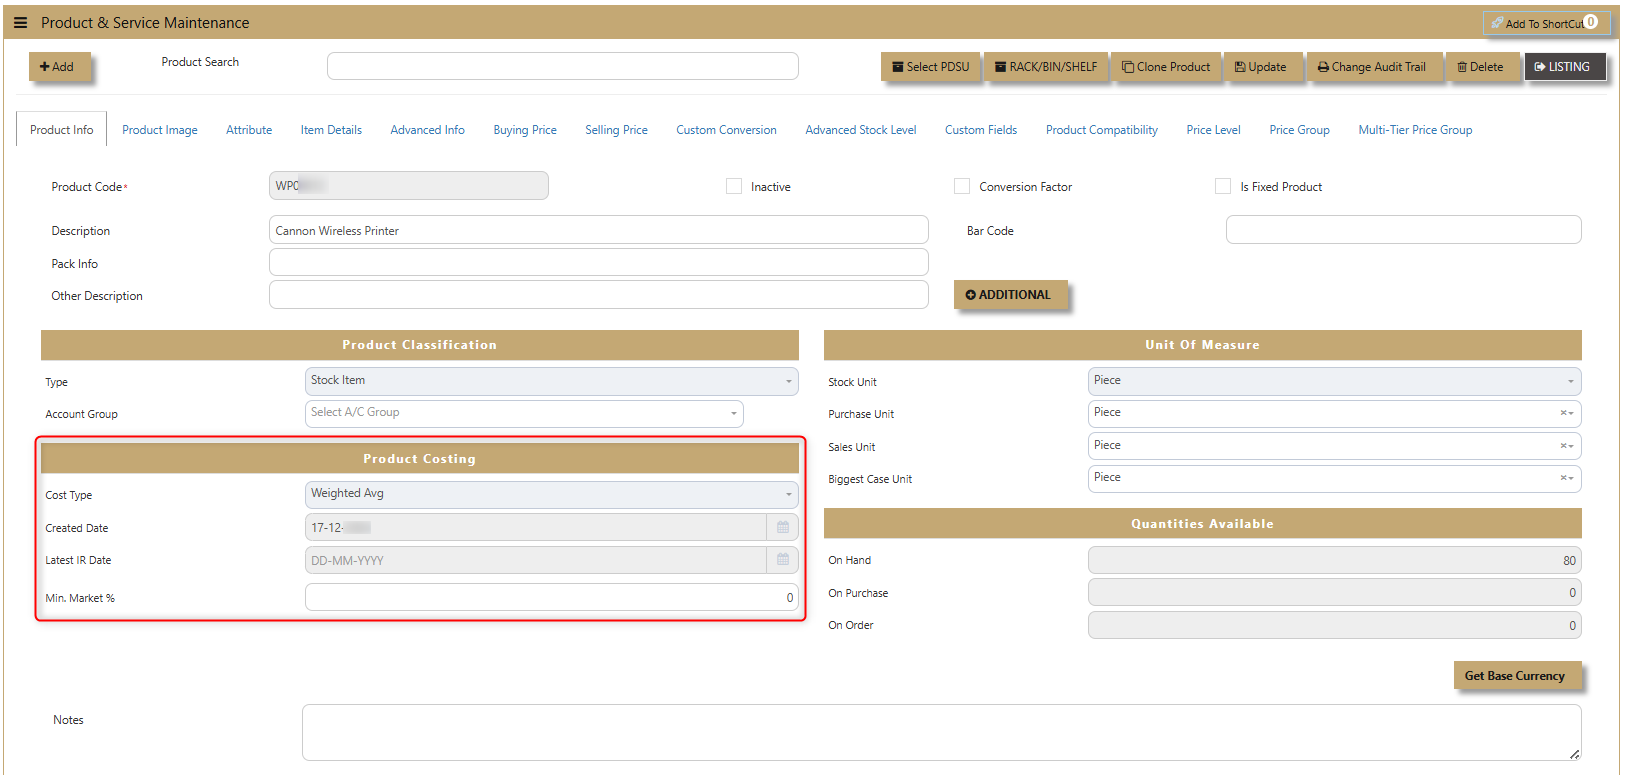](https://doc.uniq365.com/uploads/images/gallery/2025-02/4dGimage.png)
**Cost Type** - Used by the business process (FIFO, Weighted Average, LIFO & Standard Cost).
Standard - This field is where we set up the Standard cost of the product if Costing type is set to Standard Cost.
Weighted Average - A non-entry field. Displays the Weighted Average cost of the product.'
**Created Date** - The date the product was added to the system.
**Latest IR Date** - The most recent Inventory Receipt date.
**Min Market %** - The minimum market percentage for pricing.
4\. **Product Info - Unit of Measure (UOM)** UNIQ365 used to quantify and track products, such as pieces, boxes, or kilograms. It ensures consistency in inventory management, allowing seamless conversion between units for accurate tracking, pricing, and reporting. This also has its own maintenance tab.
[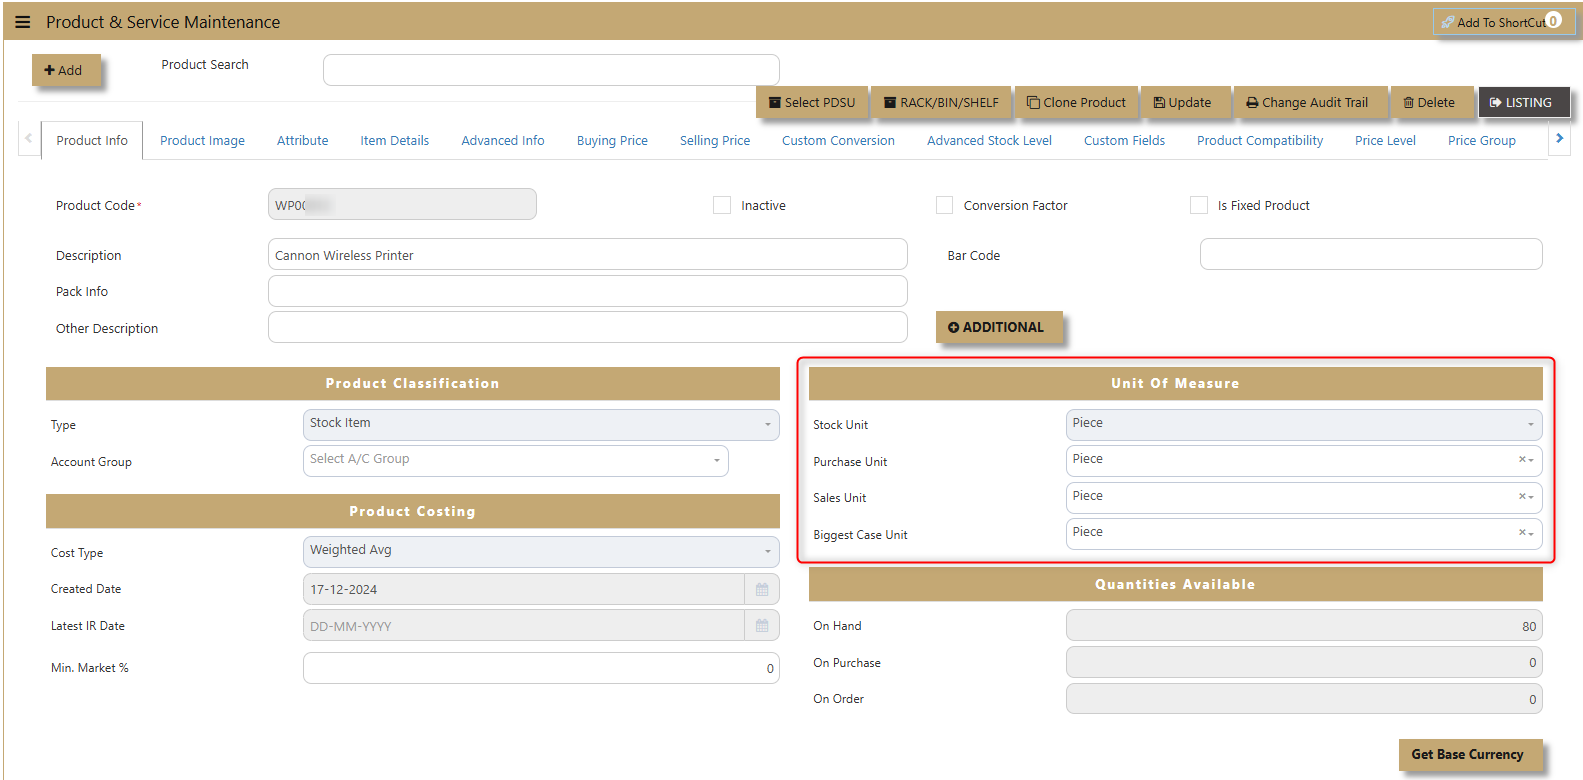](https://doc.uniq365.com/uploads/images/gallery/2025-02/yO2image.png)
**Stock Unit** - Enter desired unit of measure for Stock unit. This is the unit that will be used in calculations for quantities in subsequent inventory related reports.
**Purchase Unit** - If different from Stock Unit a Stock Conversion Factor record must exist.
**Sales Unit** - If different from Stock Unit a Stock Conversion Factor record must exist.
**Biggest Case Unit** -The largest packaging unit, used for bulk inventory management and converting stock quantities into larger cases or cartons.
5\. **Product Info - Quantities Available.** In UNIQ365 the total quantity of a product that is available for use, sale, or inventory tracking, taking into account various stages of the product lifecycle. It helps businesses monitor and manage stock levels efficiently. Its 3 components have non-entry field.
[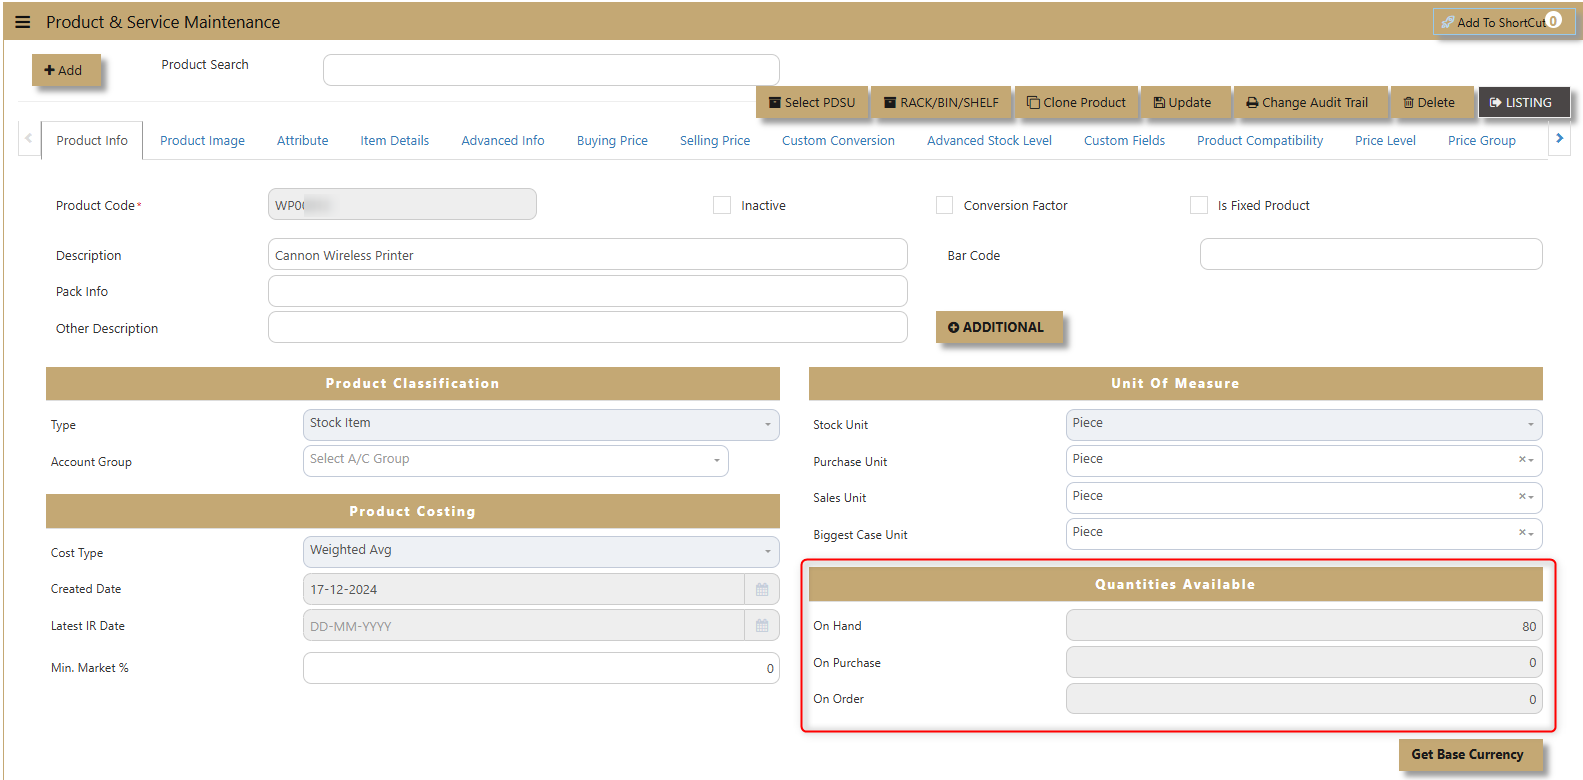](https://doc.uniq365.com/uploads/images/gallery/2025-02/Wjpimage.png)
**On Hand** - The quantity of the product currently in stock and physically available in the warehouse or storage.
**On Purchase** -The quantity of the product that has been ordered from suppliers but has not yet been received.
**On Order** -The quantity of the product that is pending or backordered and is expected to be delivered in the future.
##### **How to use Product Image?**
**Product Image.** allows users to upload a picture for each product, helping with visual identification and inventory management.
[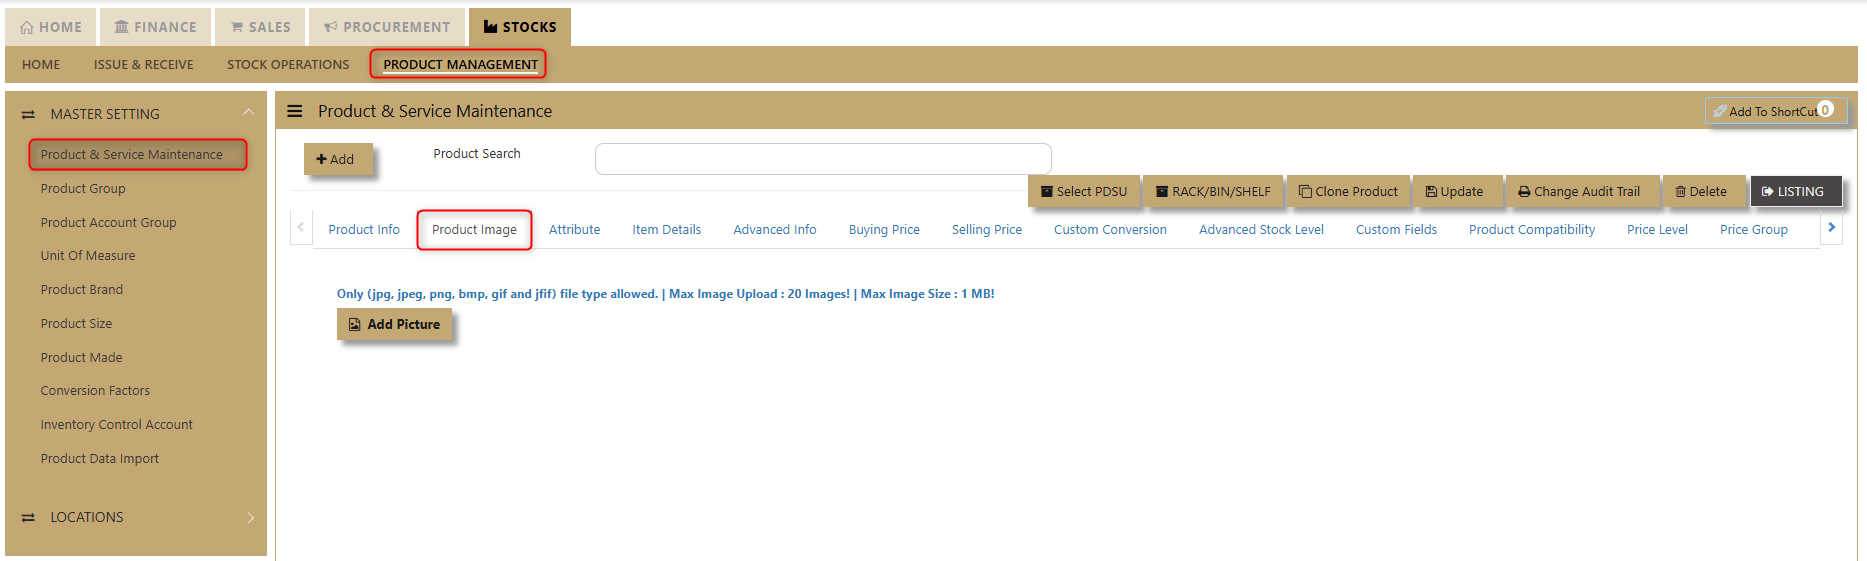](https://doc.uniq365.com/uploads/images/gallery/2025-02/3TVimage.png)
##### **How to setup Attribute?**
1\. **Attribute.** Allows businesses to define specific product variations with specialized attributes for better management and tracking. When dealing with products such as serialized items, dimensional UOM (Units of Measure), working assets, and items with expiry dates, businesses can configure these attributes to ensure accurate tracking and control.
[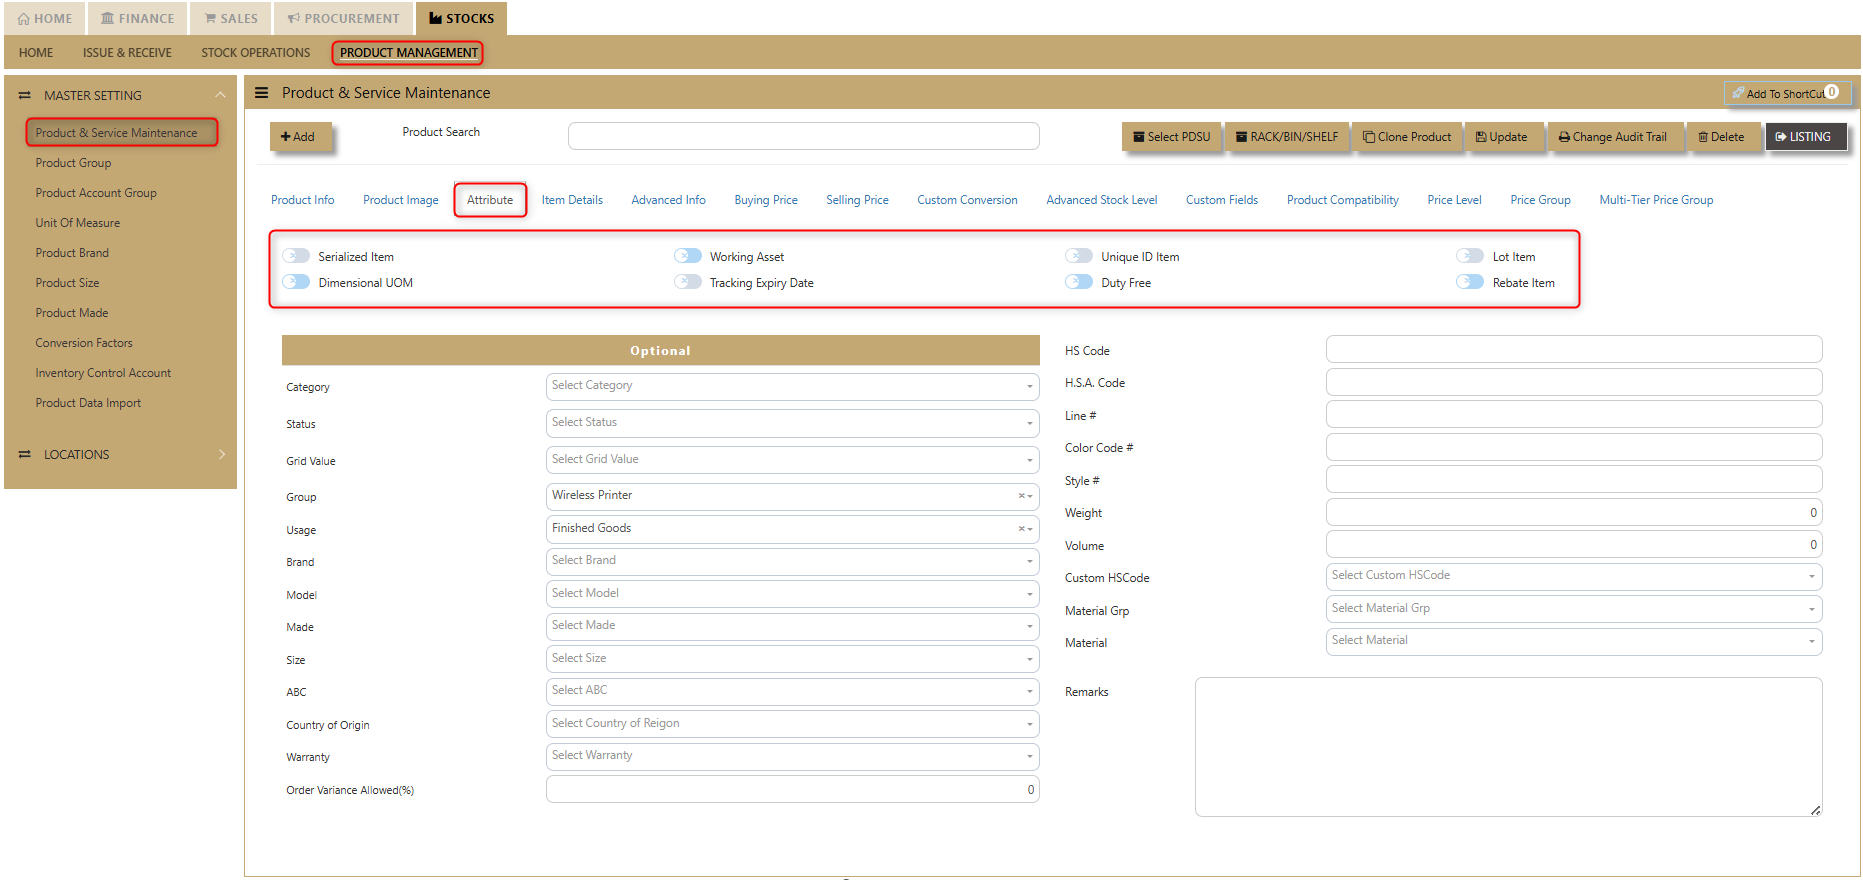](https://doc.uniq365.com/uploads/images/gallery/2025-02/y8ximage.png)
**Serialized Item** – Tick for products that need to track serial numbers.
**Dimensional UOM** – Products can be managed based on dimensions (e.g., weight, volume).
**Working Assets** – Items that are part of the company's assets can be tracked for maintenance or depreciation.
**Tracking Expiry Date** – Useful for goods with expiry, ensuring items are sold or used before they expire.
**Unique ID Items** – Every item can be assigned a unique identifier for precise tracking.
**Duty-Free** – For products exempt from duties or taxes, helping with proper classification.
**Lot Item** – Tick for products that need lot tracking.
**Rebate Items** – Items that come with discount/rebate options, facilitating financial tracking and reporting.
##### **How to use Serial Item Tracking?**
If the product is to be attached with a serialized number, click the box as shown in below screen.
[](https://doc.uniq365.com/uploads/images/gallery/2025-02/bdoimage.png)
An example of using this feature is the tracking of expensive product, which user may want to monitor for warranty purposes. Many companies maintain the unique serial numbers of Hard Disk Drives, Laser Printers etc and use them for control of movements.
Once a product is designated as Serial Type, every time a transaction involving this product is invoked, the serial number list will appear. Under stock-in transaction like a Purchase Invoice entered below, a list of serial numbers needs to be entered.
Serial numbers may also be entered using a range of serial numbers too. These must be numerical numbers so that a running sequence is possible. Clicking the check-box for “Range of Serial No” will enable the entry of a number range. Once the correct number of serial numbers is inputted, the button “Accept” will be enabled so that user can proceed on the transaction.
Conversely under a stock-out like sales invoice D/O, the system will prompt you to pick an available serial number to perform the stock out. An example below is a sales invoice picking out serial numbers: -
[](https://doc.uniq365.com/uploads/images/gallery/2025-02/ED0image.png)
The option for serialized item is based on the following assumptions: -
- The Stock Unit is the same as Sale & Purchase Units. If any of the units are different in the product master,
the tick box for Serial Type will be disabled.
- The item must be a Stock Item. If a Service Item is selected, the Serial Type box will also be disabled.
- No negative stock is permitted for serialized item
2\. **Attribute - Optional. **This provides users with the flexibility to fill out additional details about products based on their specific needs. These fields allow for more granular product information, enabling businesses to customize their product records.
[](https://doc.uniq365.com/uploads/images/gallery/2025-02/dfXimage.png)
**Category** - classifies the product under a specific group
**Status** - indicates the current state of the product (e.g., active, inactive)
**Grid Value** - a specific reference or pricing value for the product.
**Group** - product classification based on groups usually maintained on its own tab.
**Usage** - describes how the product is intended to be used (e.g., Raw Material, Assembly, Finished Goods & Others)
**Brand, Model, Made, Size** - specifies the brand, model number, manufacturing details, and size of the product defined in its own tabs in Products & Service Maintenance.
**ABC** - represents the product's classification.
**Country of Origin** - specifies the product's country of manufacture or origin.
**Warranty** - provides details about the product’s warranty.
**Order Variance Allowed** - indicates if variations in orders are permitted.
**Color Code #, Style #** - refers to the color code and style identification of the product.
**Line #** - refers to the specific line in a product order.
**HS Code, HSA Code, Custom HS Code** - a classification code used for customs and international trade.
**Weight, Volume** - the physical weight & volume of the product.
**Material Group** - details the material grouping for the product.
**Material** - specifies the material composition of the product.
**Remarks** - allows for additional notes or comments.
##### **How to use Item Details?**
**Item Details**. Allows users to add additional information about products, providing a more comprehensive product record.
[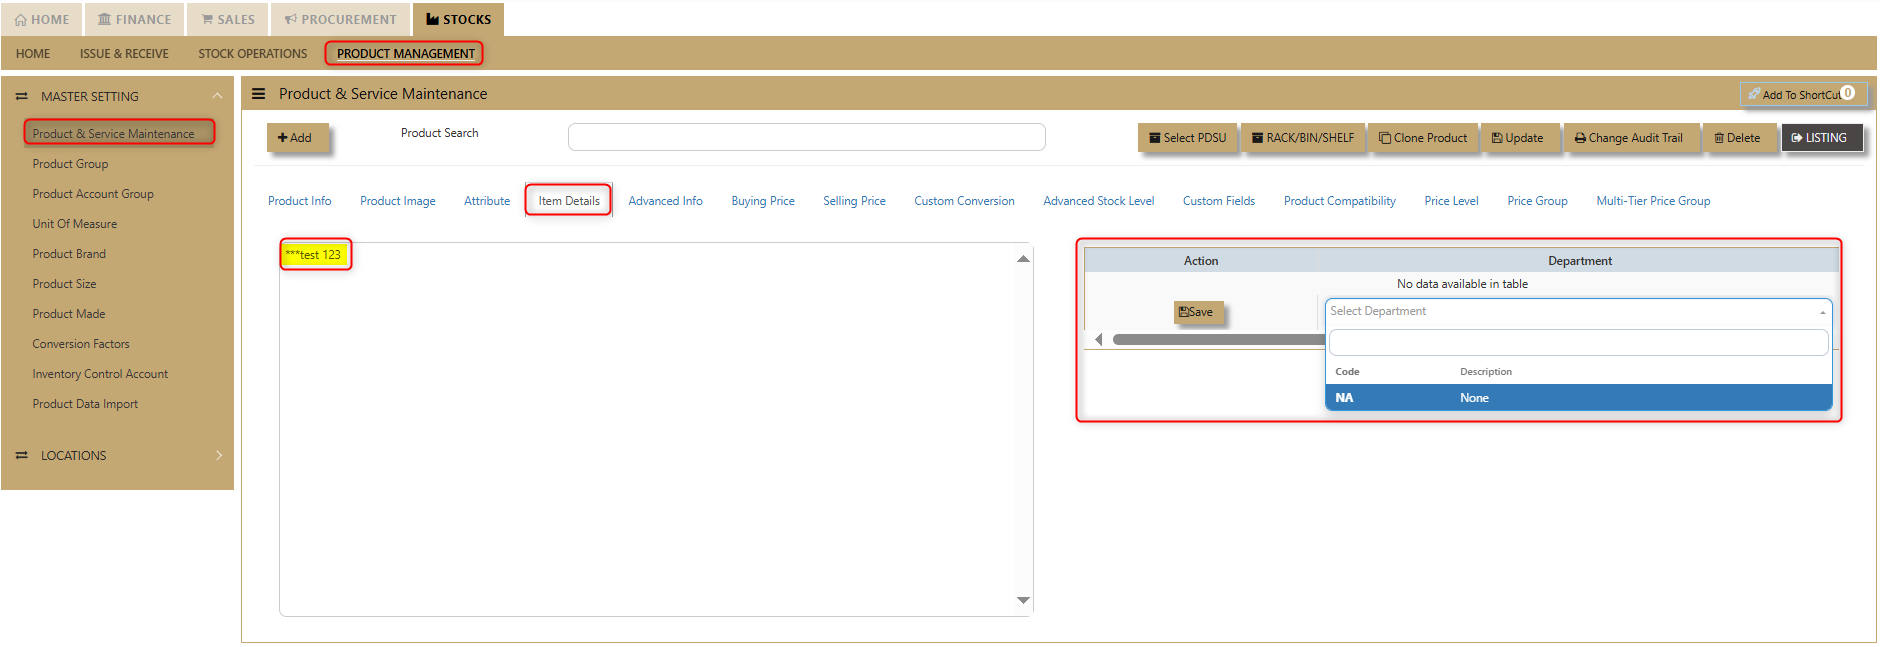](https://doc.uniq365.com/uploads/images/gallery/2025-02/YkPimage.png)
This feature enables businesses to capture key details such as the department responsible for managing the product, along with any other relevant data. By using this tab, users can ensure that all necessary product information is organized and easily accessible for efficient inventory management and reporting.
##### **How to use Advanced Info?**
To enter **Stock Levels.** This section allows users to define critical stock parameters, including the *Min Stock, Max Stock, Reorder Level, Reorder Qty, Min Order Qty (Purchase), Min Order Qty (Sales), and AVC Percentage Change* for the Exception Report. These values help track inventory thresholds, ensuring timely restocking, monitoring stock performance, and identifying exceptions that may require attention.
[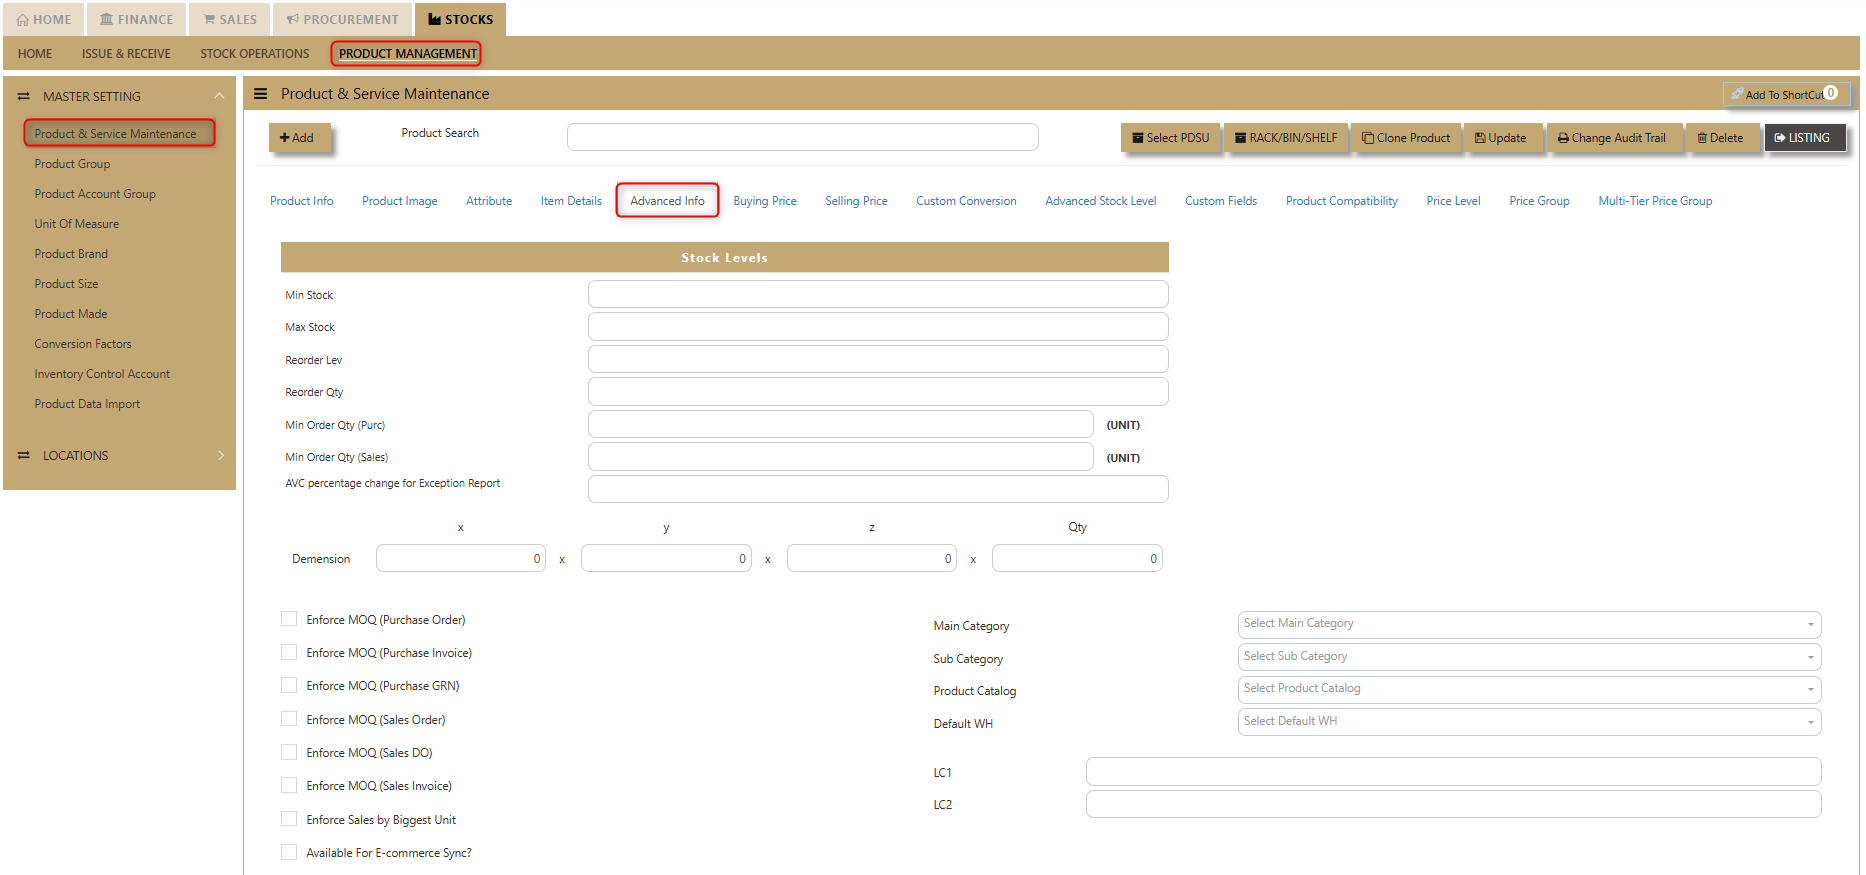](https://doc.uniq365.com/uploads/images/gallery/2025-02/R8ximage.png)
##### **How to use Buying Price?**
This feature allows users to manage essential product and service details, including D*ef Supplier, Price Type, Currency, Purchase Price, Last Purchase, IMG Group, and Purchase GST Type.* It ensures seamless updates of purchasing information, helping businesses track supplier details, pricing, taxes, and inventory with accuracy for optimized procurement and service management.
[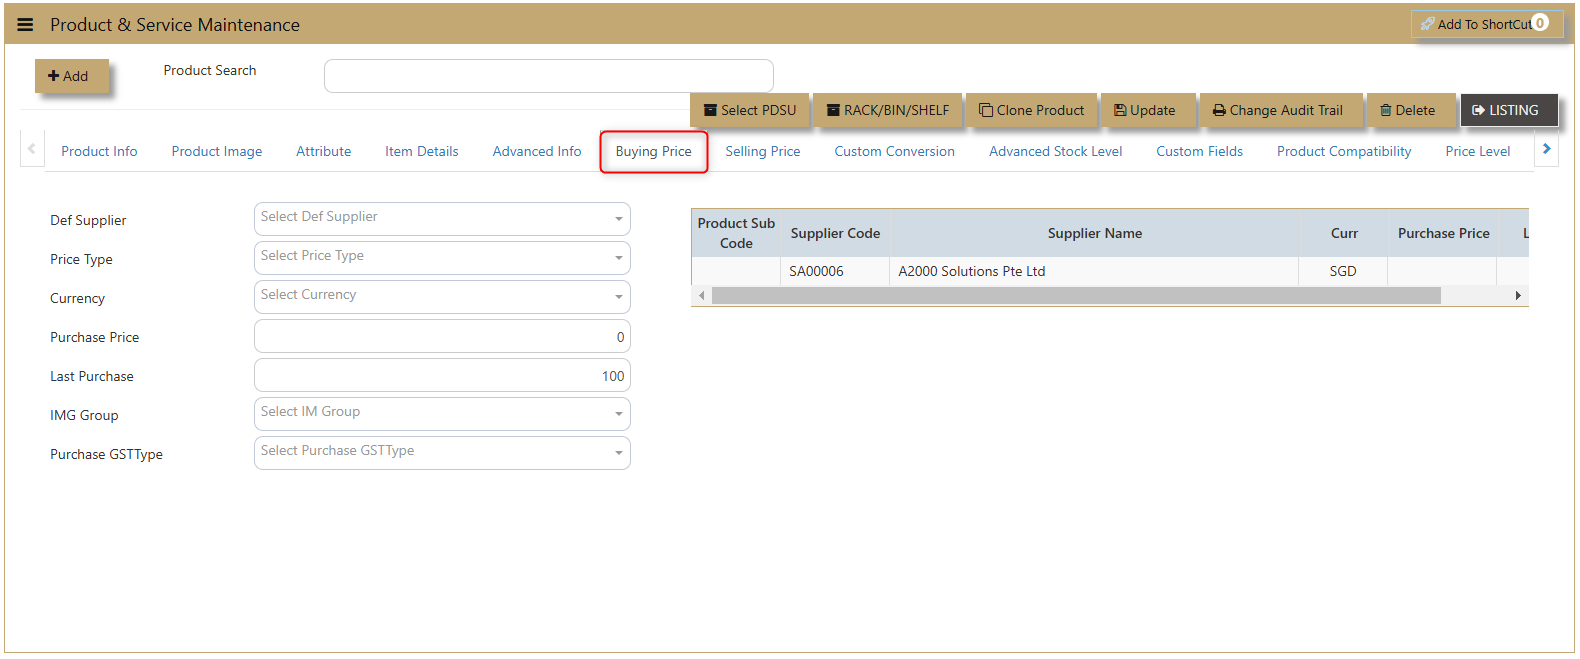](https://doc.uniq365.com/uploads/images/gallery/2025-02/v2Simage.png)
**Def Supplier** – Select the Supplier that this product is normally purchased from.
**Price Type** – Select any of the following: - Purchase Price, Last Purchase Price. (Note: Under Supplier Maintenance, if the Price Type selected is “Product Setting”, then the Price Type listed here will take effect when a Purchase transaction is made.)
**Currency** – Select the currency that this product is normally priced.
**Purchase Price** – Enter the appropriate price for this product.
**Last Purchase** – This field is automatically updated by the system, capturing the last Purchase price that this product was billed out.
**IM Group** – Select the Group defined in Inventory/Maintenance/Product IM Group.
##### **How to use Selling Price?**
This feature enables users to set and manage detailed selling price information, including *Price Type, Currency, List Price, Discount (%), Retail Price, Dealer Price, Promotion/POS, Last Selling Price, Min Price Exclusive, Min Price Inclusive, IMG Group, MSP, and Sales GST Type*. It provides a comprehensive approach to pricing strategies, allowing businesses to define and update pricing structures, discounts, and taxes efficiently for optimized sales and promotions.
[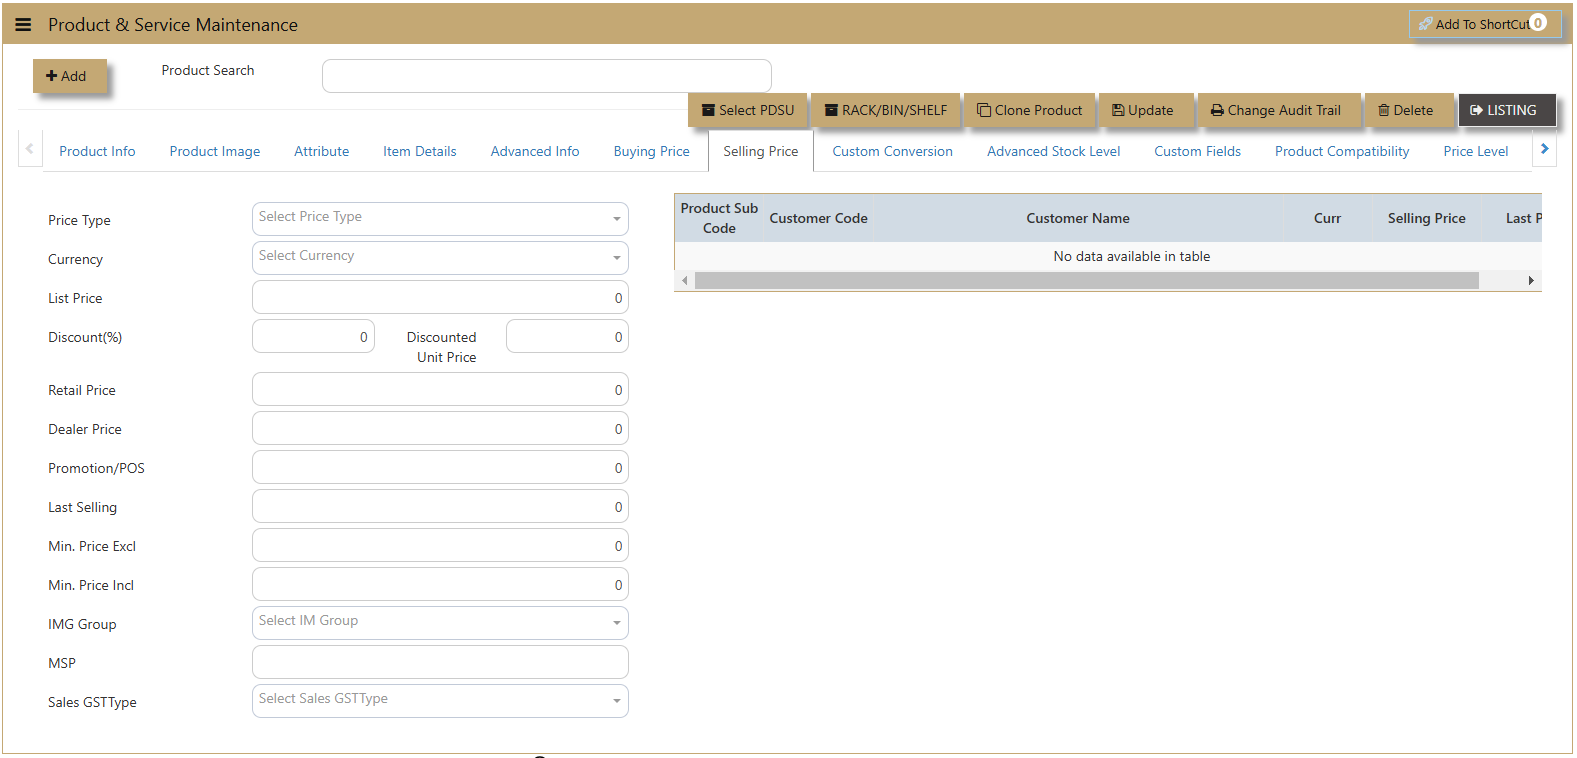](https://doc.uniq365.com/uploads/images/gallery/2025-02/M9Timage.png)
**Price Type** – Select any of the following: - List Price, Retail Price, Dealer Price, Promotion Price, Last Selling Price or Minimum Price. (Note: Under Customer Maintenance, if the Price Type selected is “Product Setting”, then the Price Type listed here will take effect when a Sales transaction is made.)
**Currency** – Select the currency that this product is normally priced.
**List Price / Retail Price / Dealer Price / Promotion / Min. Selling** – Enter the appropriate prices for this product under different pricing scales here.
**Last Selling** – This field is automatically updated by the system, capturing the last Selling price that this product was billed out.
**IM Group** – Select the Group defined in Inventory/Maintenance/Customer Supplier IM Group.
##### **What is Custom Conversion?**
**Custom Conversion Tab** allows users to configure and manage custom conversion settings tailored to their business needs. This feature is demonstrated on its dedicated tab, providing an intuitive interface for easy access and application of custom conversion rules to enhance workflows and data accuracy.
[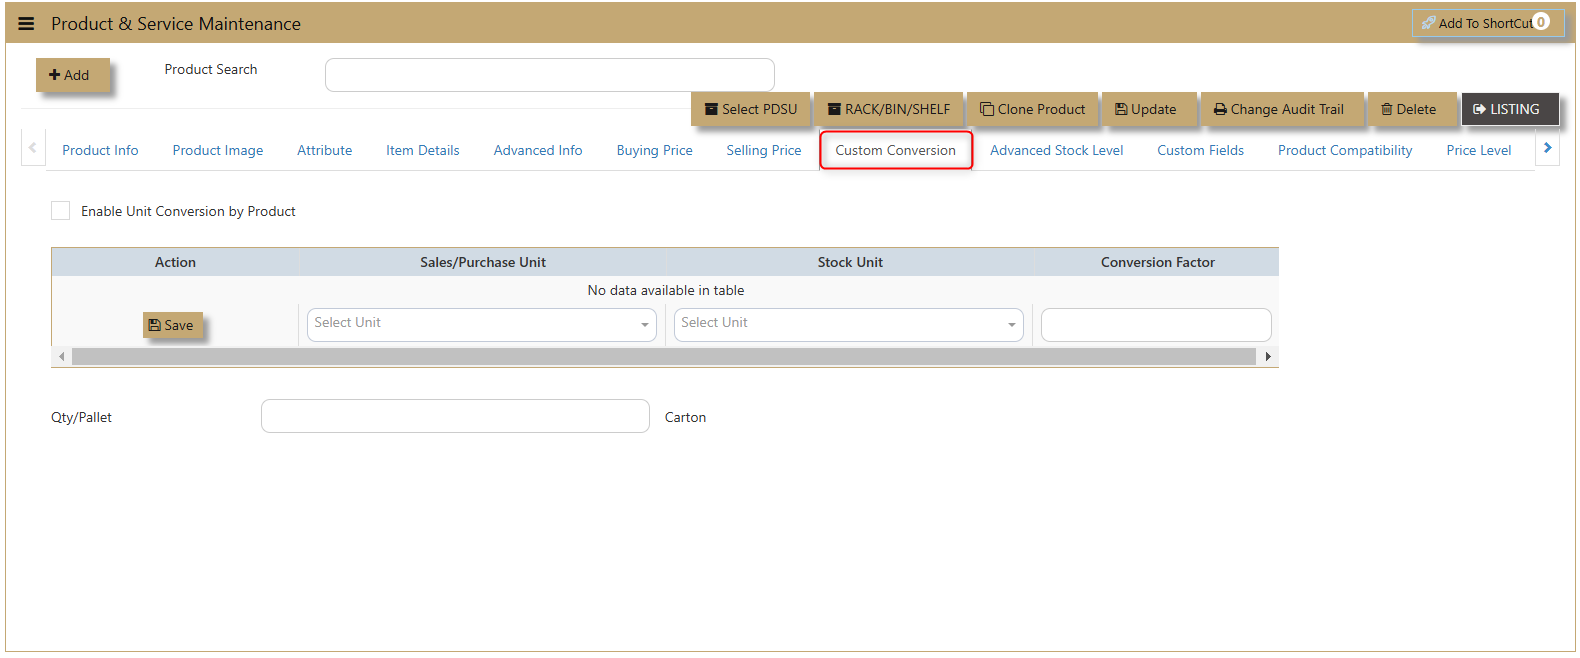](https://doc.uniq365.com/uploads/images/gallery/2025-02/Kwrimage.png)
##### **What is Advanced Stock Level?**
The **Advance Stock Level** feature allows users to set and manage stock levels by warehouse. Users can define the **Minimum** and **Maximum** stock for each warehouse, ensuring optimal inventory control across multiple locations for efficient stock management and timely replenishment.
[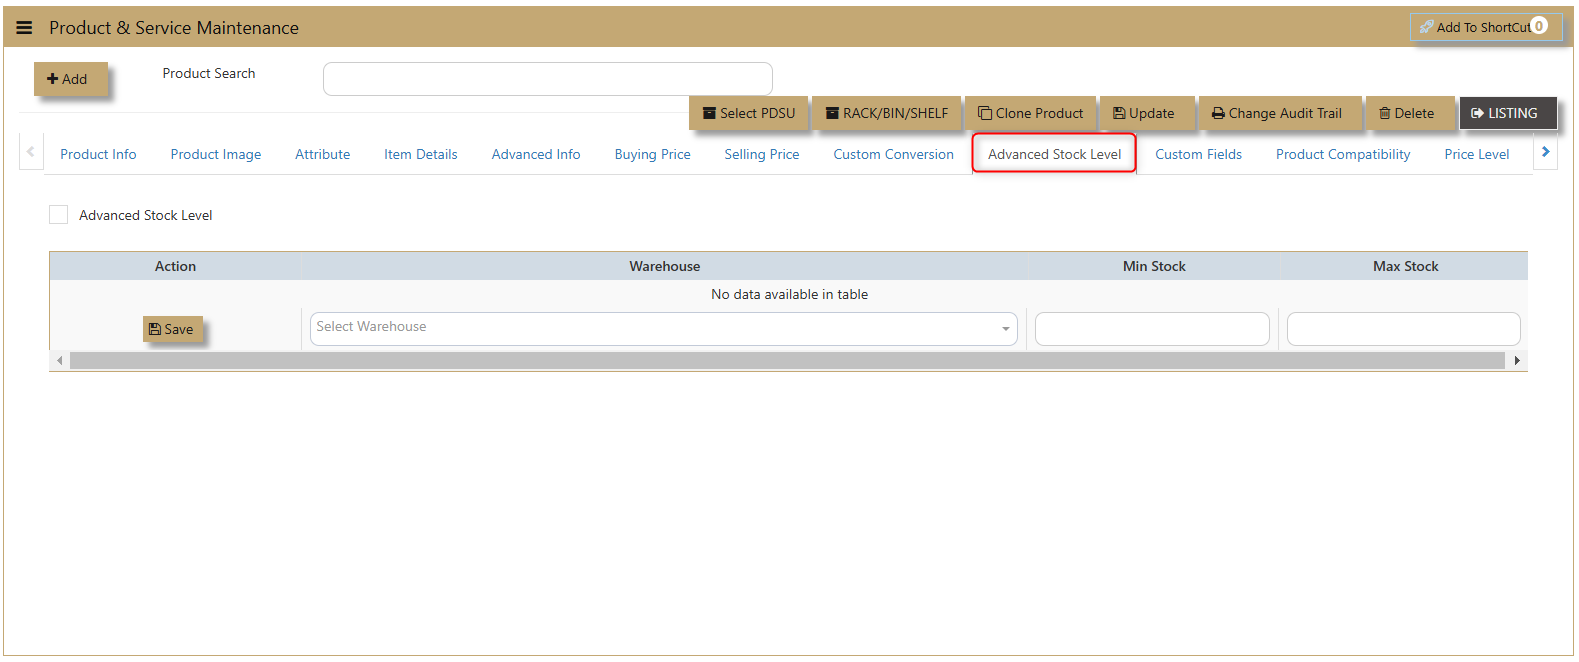](https://doc.uniq365.com/uploads/images/gallery/2025-02/kfpimage.png)
##### **How to use Product Compatibility?**
This feature lets users enter a **Product Code**, and the system will automatically retrieve the corresponding **Product Description** and display the available **Stock on Hand**. This simplifies inventory management and ensures accurate product details for smooth operations.
[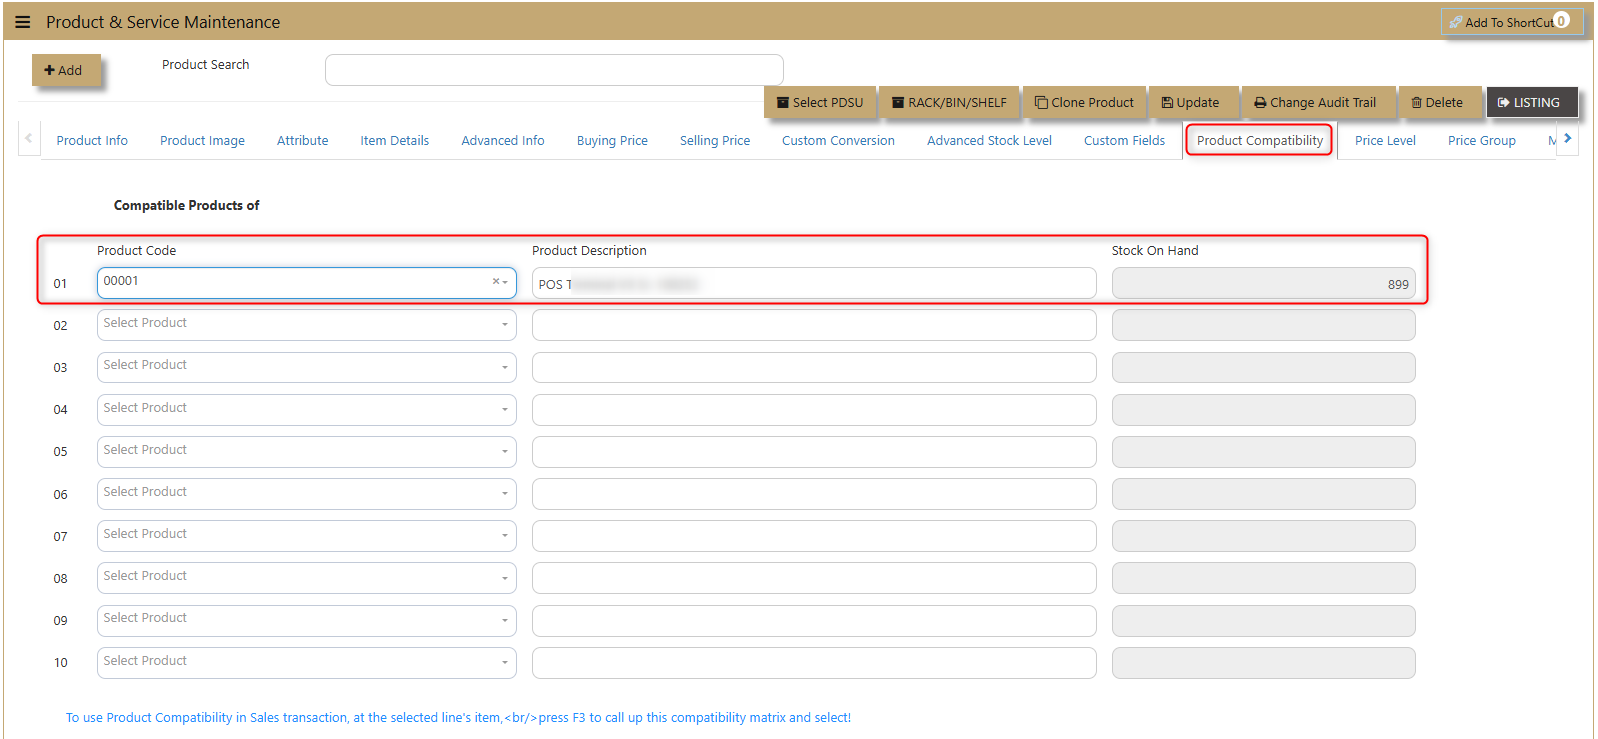](https://doc.uniq365.com/uploads/images/gallery/2025-02/avyimage.png)
##### **How to use Price Level?**
This pricing technique is commonly used in Distribution and Consignment business.
[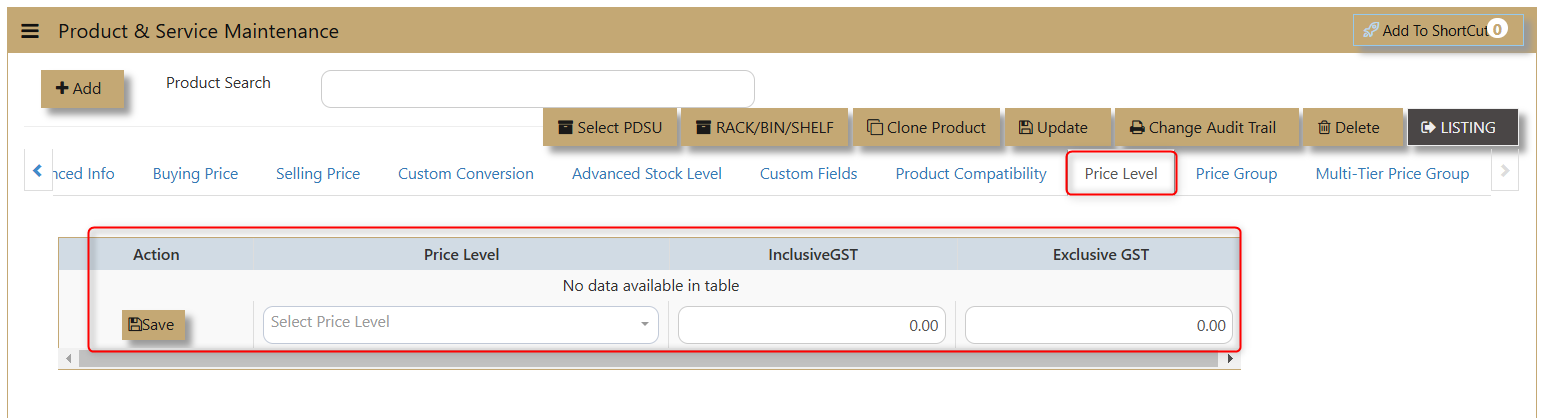](https://doc.uniq365.com/uploads/images/gallery/2025-02/Mfmimage.png)
1. **Setup.**
- The ID plays an important role in both customer and product setup.
- The system will auto-get the Unit price from Product maintenance and a subsequent Line discount will be auto-get from Customer maintenance.
- The system will auto-get the Unit price from Product maintenance and a subsequent Line discount will be auto-get from Customer maintenance.
2. **Matching of Price Level.**
To set the price level in both customer and product maintenance.
- Go to Price Level Discount tab of the customer maintenance to set. then, go back to Price Level Discount tab of the product maintenance to set.
[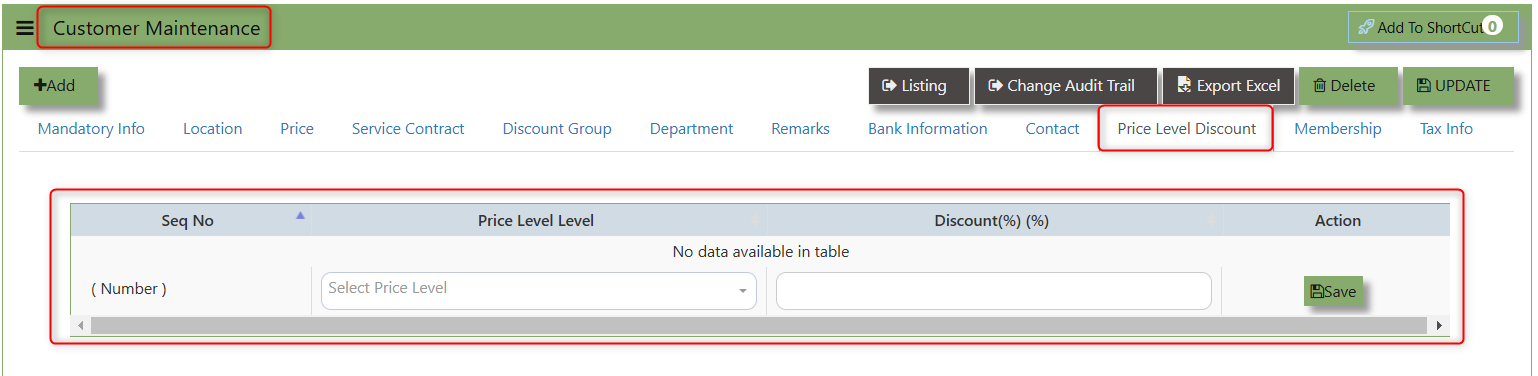](https://doc.uniq365.com/uploads/images/gallery/2025-02/w4Oimage.png)
##### **How to use Price Group?**
The **Price Group** feature allows users to view and manage product details, including Group Name, Currency, UOM (Unit of Measure), and both Inclusive GST and Exclusive GST pricing. Users can easily update and save these details for accurate and streamlined pricing management.
[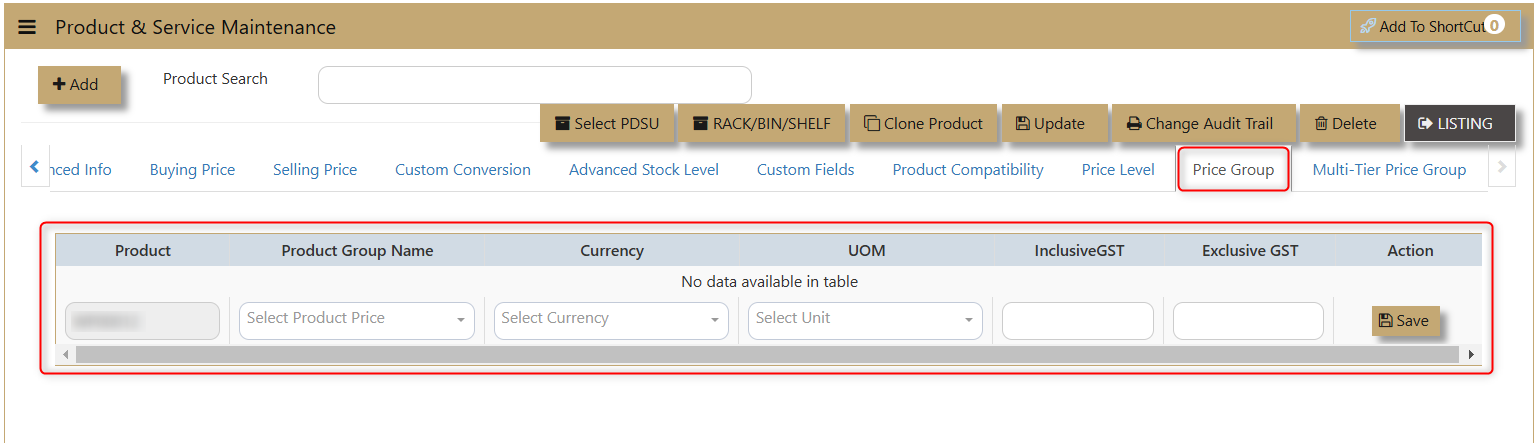](https://doc.uniq365.com/uploads/images/gallery/2025-02/k49image.png)
##### **How to use Multi-Tier Price Group?**
To set the minimum and maximum quantity for the default price and currency within the bracket. The process on this feature will be discussed further on Customer Maintenance since it is connected to it.
[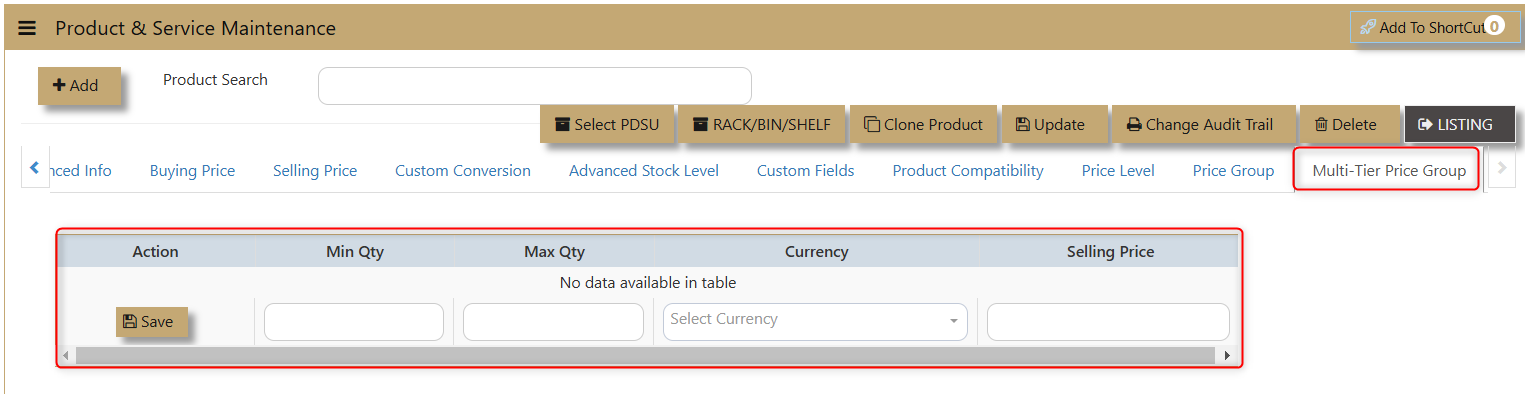](https://doc.uniq365.com/uploads/images/gallery/2025-02/CYvimage.png)
Product Group
##### **How to Create Product Group?**
1. Click on **Stock – Product Management – Product Group** icon for the following screen.
[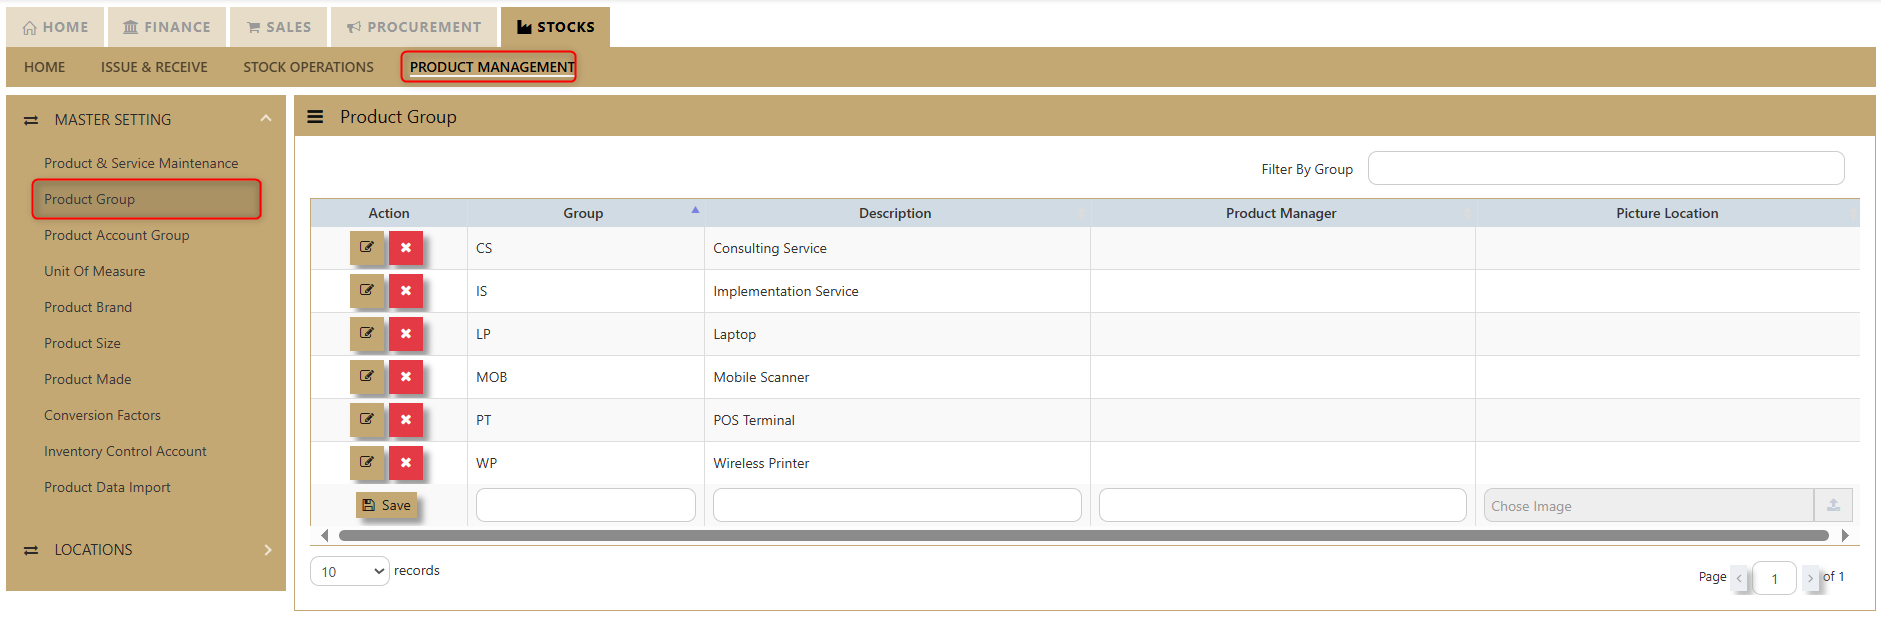](https://doc.uniq365.com/uploads/images/gallery/2025-01/Tugimage.png)
2\. Enter the Product Groups as per the above example.
> **Important:** Product groups are mainly used as additional analysis tool for various reports in the system. Some of the most commonly used reports are Sales Analysis-Product Group Wise and Inventory reports that can be sorted by Product groups.
Product Account Group
##### **How to Set-up Product Account Group?**
a. Click on **Stock – Product Management – Product Account Group** icon for following screen.
[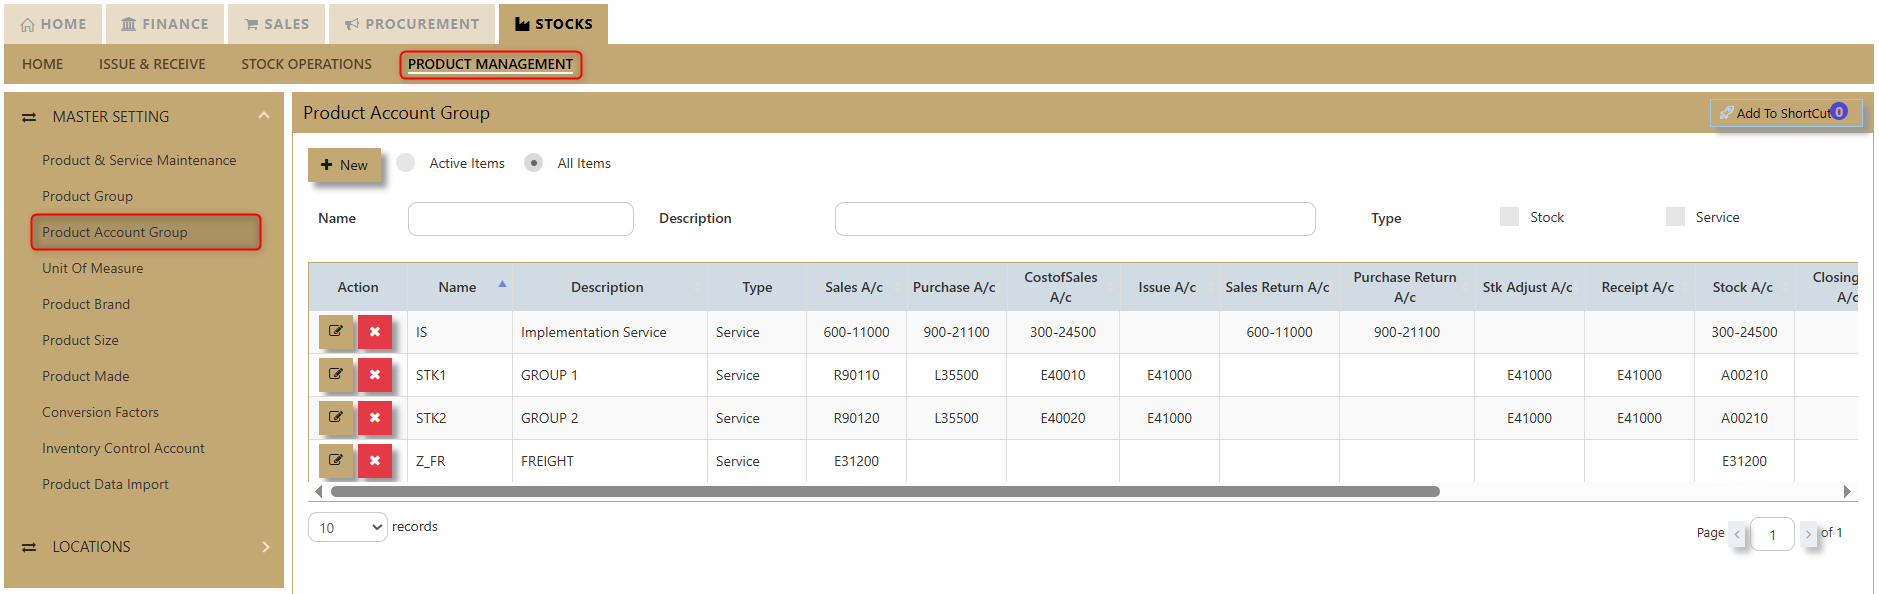](https://doc.uniq365.com/uploads/images/gallery/2025-02/hwcimage.png)
This setup is mandatory when the posting type selected in the **Inventory Account Posting Settings** is configured as by Product Account Group. To verify or configure this setting, users should navigate to their system settings and access **Account Posting Settings**.
[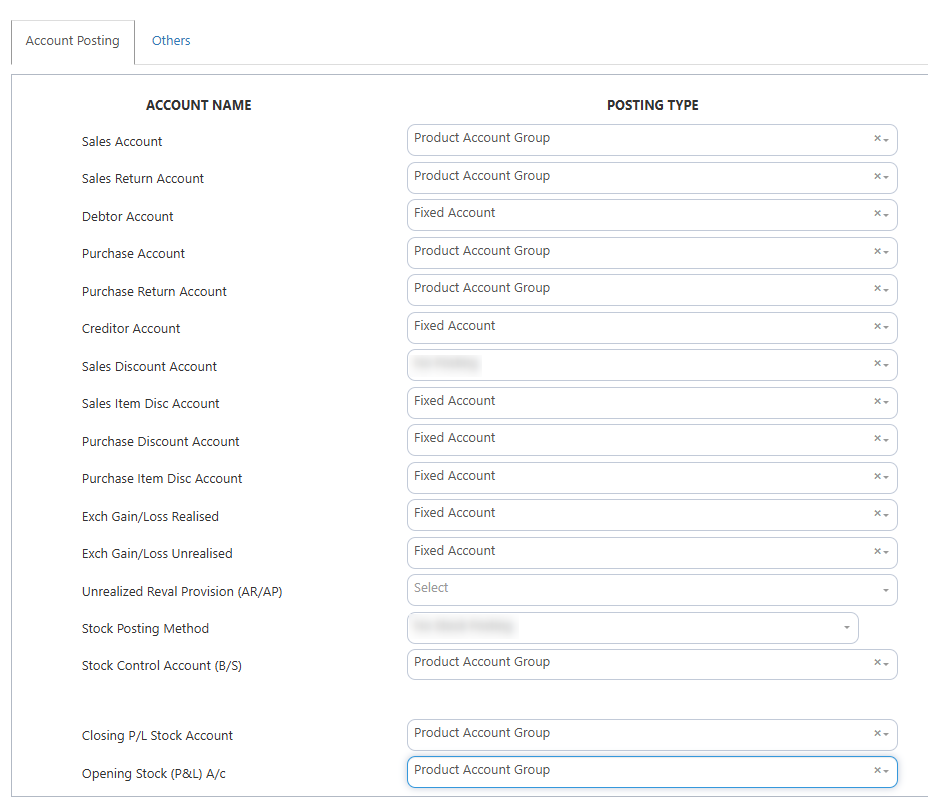](https://doc.uniq365.com/uploads/images/gallery/2025-02/RVMimage.png)
b. How to Add a **New Item** to Your Product Account Group
[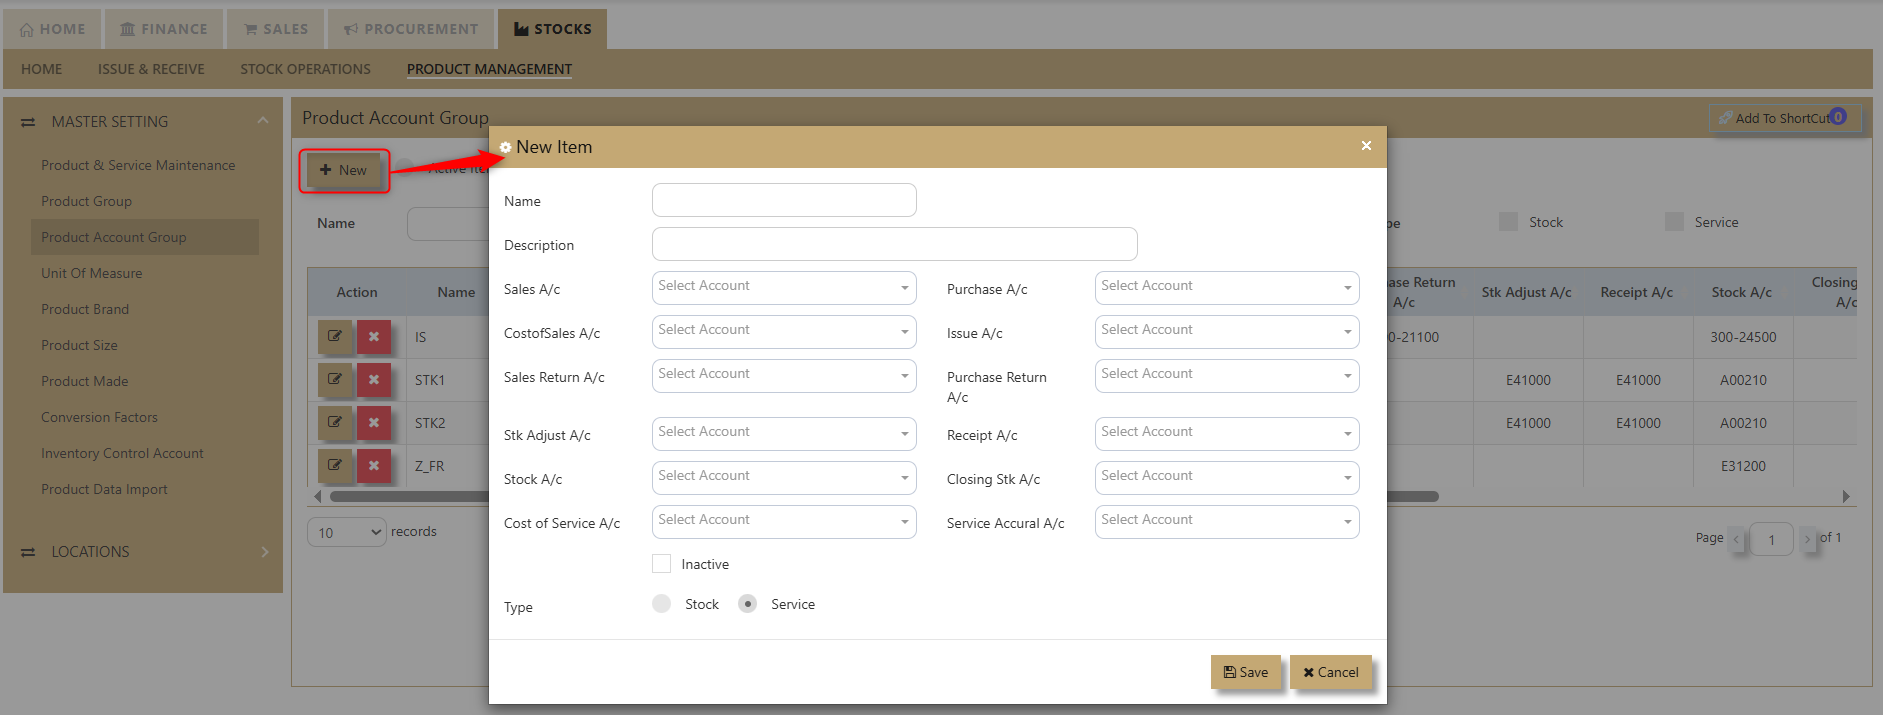](https://doc.uniq365.com/uploads/images/gallery/2025-02/xyyimage.png)
1. **Click the New Icon:**
In the upper-left portion of the screen, click the *New* icon to begin.
2. **Fill in the Item Information:**
A table will appear where you need to enter the following details:
- New Item Name
- Description
- Sales Account
- Cost of Sales Account
- Sales Return Account
- Stock Adjustment Account
- Stock Surcharge Account
- Cost of Service Account
- Purchase Account
- Issue Account
- Purchase Return Account
- Receipt Account
- Closing Stock Account
- Service Accrual Account
3. **Select Corresponding Accounts:**
For each category, choose the appropriate account based on your business processes.
4. **Select Item Type:**
In the 'Type' section, tick the boxes for **Service** and/or **Stock**, depending on the nature of your item.
5. **Mark as Inactive (if applicable):**
If the item is no longer in use, you can check the **Inactive** option.
6. **Save the Information:**
After filling in all the necessary fields, click *Save*. Your new item will now be added to your product account group.
Unit of Measure
##### **How to setup Units of Measure?**
The most important product UOM that need to maintain integrity is the STOCK UOM. It is the basis of this UOM that the system calculates costing and conversion factors etc. All Sales and Purchase UOMs in the system can be changed, but depending on the situation, the user may or may not change the STOCK UOMs in the system.
**1.1 Product has no transaction yet**
If there are no prior transactions, you may change the UOM for this product freely. Simply go to Product Maintenance and click on the Stock UOM and change at will.
**1.2 Product already have existing transaction**
If there are already transaction(s), you are **not allowed to change** the STOCK UOM. Example, if this is already cost in system at $5 per bottle, and the UOM is changed to carton of 24, the system will start to have wrong cost à $5 per carton of 24.
[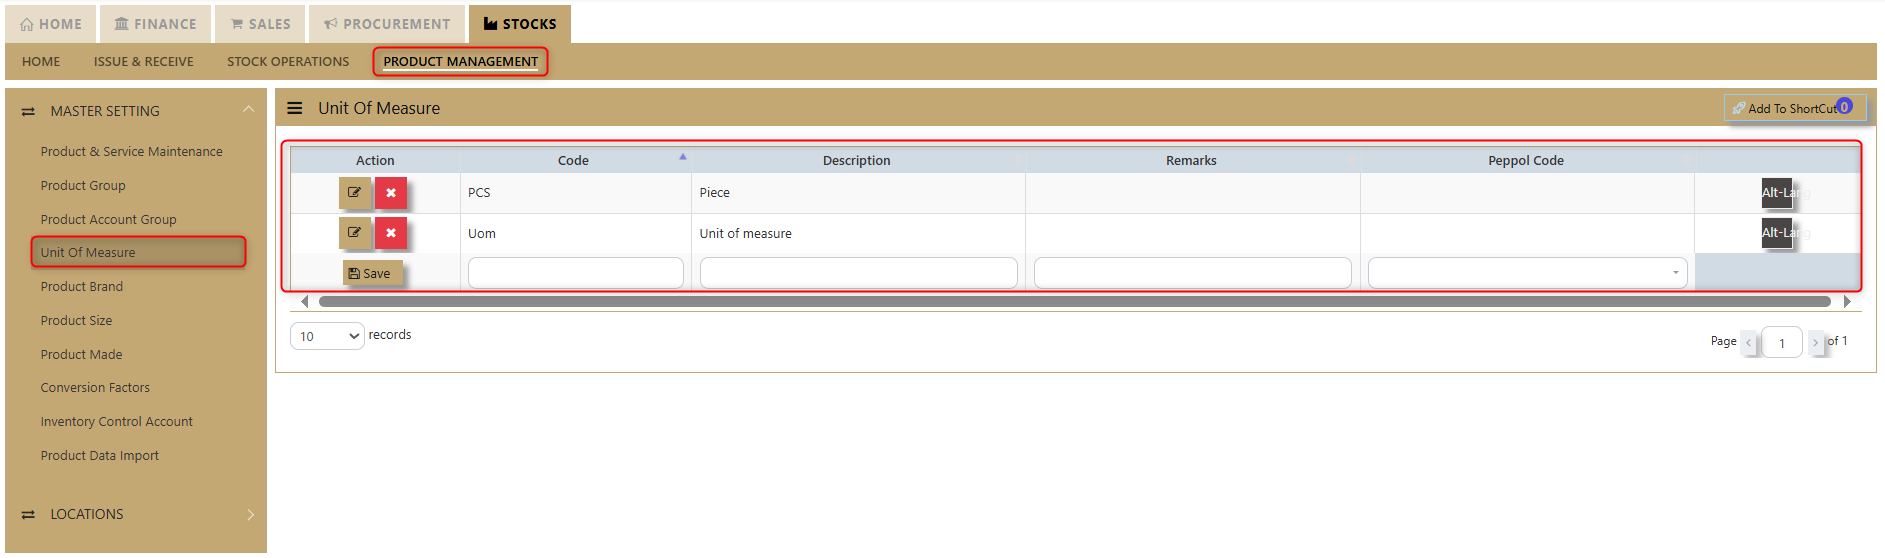](https://doc.uniq365.com/uploads/images/gallery/2025-02/EBcimage.png)
##### **Managing UOMs**
**2.1 Create new UOM**
- Go to **Stocks – Product Management – Unit of Measure**
- Create the UOM code and the UOM Description – and user have a new UOM now
**2.2 Products with different UOM**
- Go to **Stocks – Product Management – Unit of Measure**
- Select (or create) a product and click on the UOM tab
- Select the Stock UOM and alternative UOMs and enter the Conversion Factor. (This tab is discussed below)
- You may enter unlimited number of conversions here.
- After this is set, you may transact in any of the UOM that is specified here
##### **Changing UOM if transaction(s) exist**
- User can only create new product code with the new UOM. Perform an IT transaction; issue of the items in bottles and receive the item (in new code) in carton. After that is completed, and the old code is zeroized, simply inactivate the old code.
Product Brand, Size, Made
##### **How to Create Product Brand/Size/Made?**
##### **Product Brand**
Click on **Stocks – Product Management – Product Brand** icon for the following screen.[](https://doc.uniq365.com/uploads/images/gallery/2025-01/9lTimage.png)
##### **Product Size**
Click on **Stocks – Product Management – Product Size** icon for the following screen
[](https://doc.uniq365.com/uploads/images/gallery/2025-01/raWimage.png)
##### **Product Made**
Click on **Stocks – Product Management – Product Made** icon for the following screen[](https://doc.uniq365.com/uploads/images/gallery/2025-01/baIimage.png)
- Enter the Size, Brand, Model, and Made options as shown in the examples above.
- The codes are limited to 4 alphanumeric characters.
- The descriptions are limited to 40 alphanumeric characters.
> **Important**: Size, Model, Brand and Made are mainly used as additional analysis tools for various reports in the system. Some of the most commonly used reports are Sales Analysis-Product Size Model Wise and Inventory reports that can be sorted by Model and Brand.
Conversion Factors
##### **How to Set-up Stock Conversion Factors?**
##### **Conversion Factor**
Click on **Stock– Product Management – Conversion Factors** icon for following screen. Take note that this setting is for **general** conversion which will apply to all the products.
[](https://doc.uniq365.com/uploads/images/gallery/2025-02/Ar0image.png)
##### **Custom Conversion Factor**
If conversion is **specific** to each product, the setting is done in **Custom Conversion Factor** tab of each product in **Stock – Product Management – Products & Service Maintenance.**
**Situational:** For instance, user wants to buy stock ‘ballpen’ in box then sell in piece. There are 2 units of measurement \[otherwise known as UOM\] which are box and piece.
[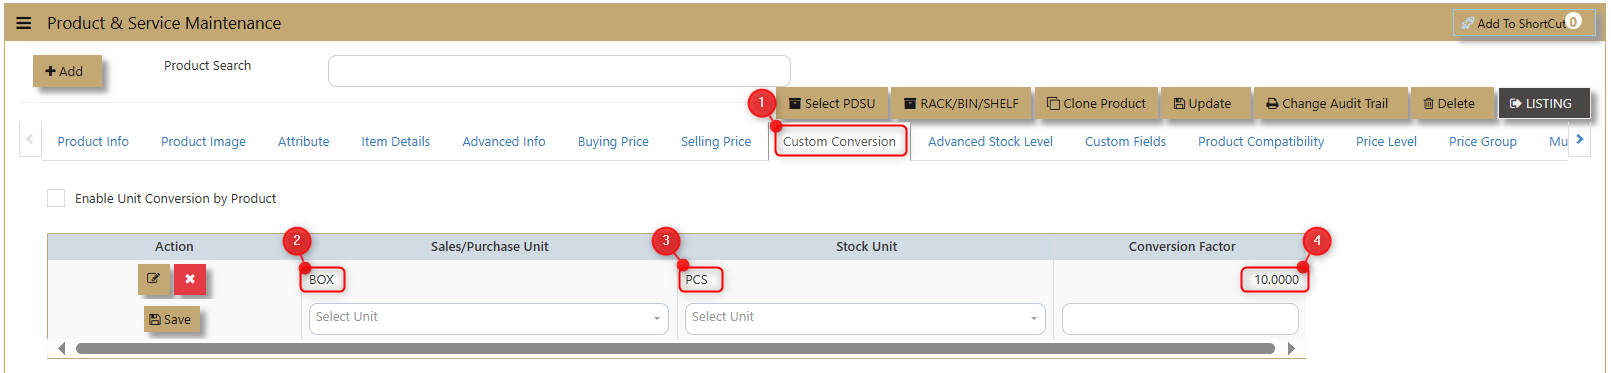](https://doc.uniq365.com/uploads/images/gallery/2025-02/1GEimage.png)
In your custom conversion tab, you will see “stock unit’’, note that stock unit in conversion tab should be same what is your maintained stock unit for that product.
[](https://doc.uniq365.com/uploads/images/gallery/2025-02/pquimage.png)
Inventory Control Account
##### **How to Set-up Inventory Control Account?**
Click on **Stock – Maintenance – Inventory Control Account** for following screen.
In UNIQ365, this option determines how the GL is to be updated when saving transactions. You need to specify the chart of account codes for Sales, Purchase and Inventory transactions.
[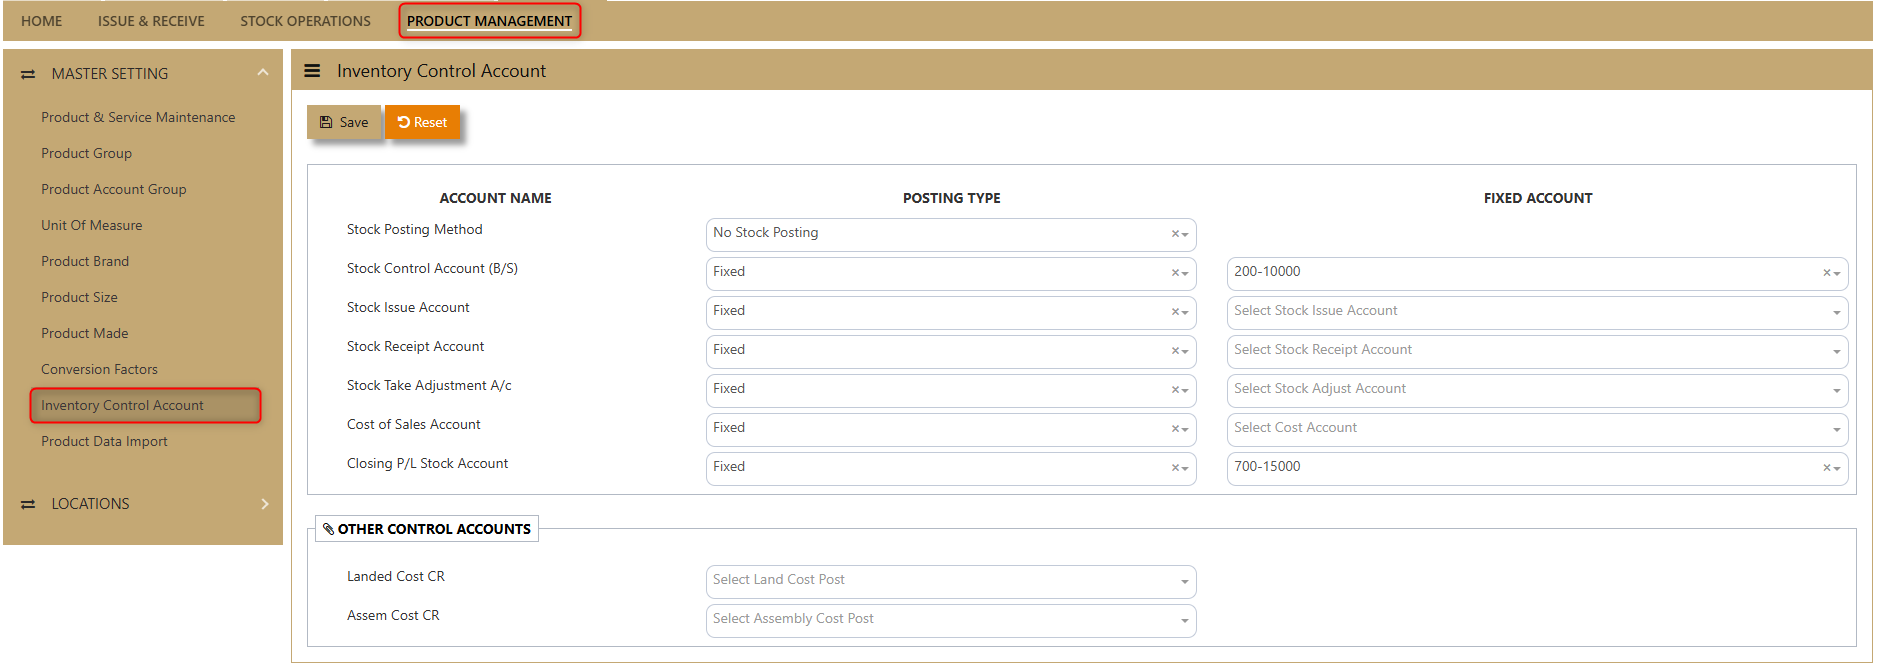](https://doc.uniq365.com/uploads/images/gallery/2025-01/ag2image.png)
> **Important**: Being a packaged solution, UNIQ365 caters for almost any type of industries with 3 types of stock posting options.
> 1. No Stock Posting
> 2. Cost of Sales Posting
> 3. Closing Stock Posting
##### **Stock Posting Methods**
[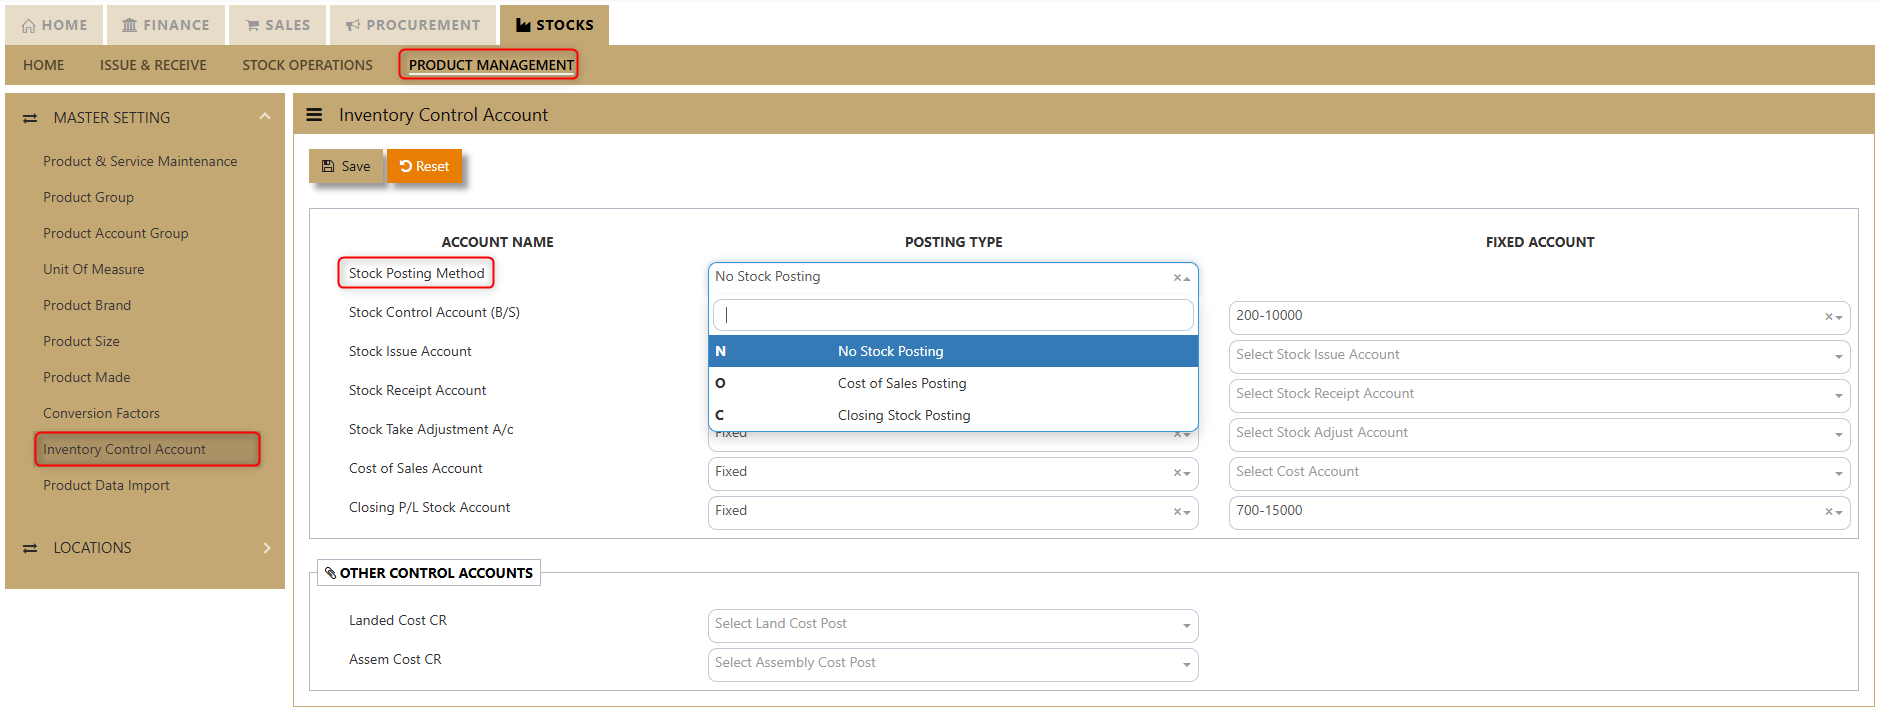](https://doc.uniq365.com/uploads/images/gallery/2025-01/TXnimage.png)
##### 1. **No Stock Posting**
- Inventory module is not linked to GL.
- All the movement of the stock could still be captured in inventory module.
- User needs to post a journal entry manually to Closing stock & Opening stock accounts for month end closing or year-end closing.
- Normally, Profit and Loss Account will be presented as follows:
[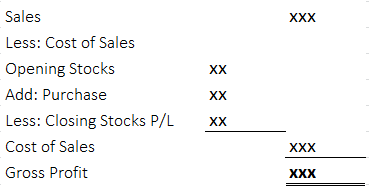](https://doc.uniq365.com/uploads/images/gallery/2025-01/Vwfimage.png)
In this case, Purchase Account will be categorized under Expense account.
Below is an example of a double entry for: -
a. Purchase Invoice amounted to $500.00
|
| Debit | Credit |
| Purchase Account | S$500 | |
| Trade Creditor Control | | S$500 |
b. Sales Invoice amounted to $1,000.00
|
| Debit | Credit |
| Trade Debtor Control | S$1000 |
|
| Sales Account |
| S$1000 |
##### 2. **Cost of Sales Posting**
- Inventory module is linked to GL.
- Closing stock will be automatically updated when Sales,
- Purchase or Inventory transactions are performed.
Profit and Loss Account will be presented as follows:
[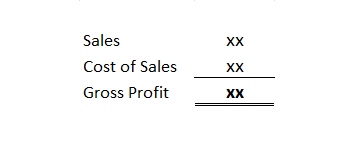](https://doc.uniq365.com/uploads/images/gallery/2025-01/ShUimage.png)
- In this case, Purchase Account will be categorized under Liabilities account.
Below is an example of a double entry for:-
a. Purchase Invoice amounted to $109.00
|
| Debit | Credit |
| Purchase Account | S$100 |
|
| Trade Creditor Control |
| S$109 |
| GST/VAT Tax | S$9 |
|
b. Sales Invoice amount of $1000.00
|
| Debit | Credit |
| Stock A/C (BS) | S$1000 |
|
| Purchase A/C |
| S$1000 |
##### 3. **Closing Stock Posting**
- Inventory module is linked to GL.
- Closing stock will be automatically updated when Sales, Purchase or Inventory transactions are performed.
- Normally, Profit and Loss Account will be presented as follows:
[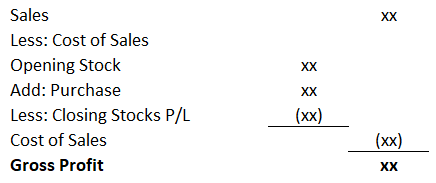](https://doc.uniq365.com/uploads/images/gallery/2025-02/tWbimage.png)
- In this case, Purchase Account will be categorized under Expense account.
- Below is an example of a double entry for: -
a. Purchase Invoice amounted to $500.00
|
| Debit | Credit |
| Purchase Account | S$500.00 |
|
| Trade Creditor Control |
| S$500.00 |
| Stock B/S | S$500.00 |
|
| Closing Stock A/C (P&L) |
| S$500.00 |
b. Sales Invoice amount of $1000
|
| Debit | Credit |
| Trade Debtor Control | S$1000 |
|
| Sales Account |
| S$1000 |
| Stock B/S | S$500.00 |
|
| Closing Stock A/C (P&L) |
| S$500.00 |
You need to fix the relevant GL Account for Stock Control A/c (B/S), Stock Issue Account, Stock Receipt Account and Closing Stock Account.
> **Important**: After you have decided on the Stock Posting Method, you can now set up the auto posting for the Stock Control Account (B/S), Stock Issue Account, Stock Receipt Account, Stock Take Adjustment A/c, Cost of Sales A/c &
> Closing P/L Stock Account based on the guidelines set above.
>
> **Guide**: The setting is Fixed if you only have one account but should be set as Product if you have multiple accounts. For example, if you have multiple Stock accounts (i.e. Stock-Computer Hardwares, Stock Software, Stock-Accessories, Stock-Others).
Product Data Import
##### **What is Product Data Import?**
##### **Product Data Import** allows users to easily upload product information. By simply uploading a file, the system automatically extracts and integrates all the necessary data. It’s a quick and hassle-free way for users to import everything they need in one go.
##### **How to use Product Data Import?**
Look for **Stocks - Product Management - Master Billing - Product Data Import** as shown:
[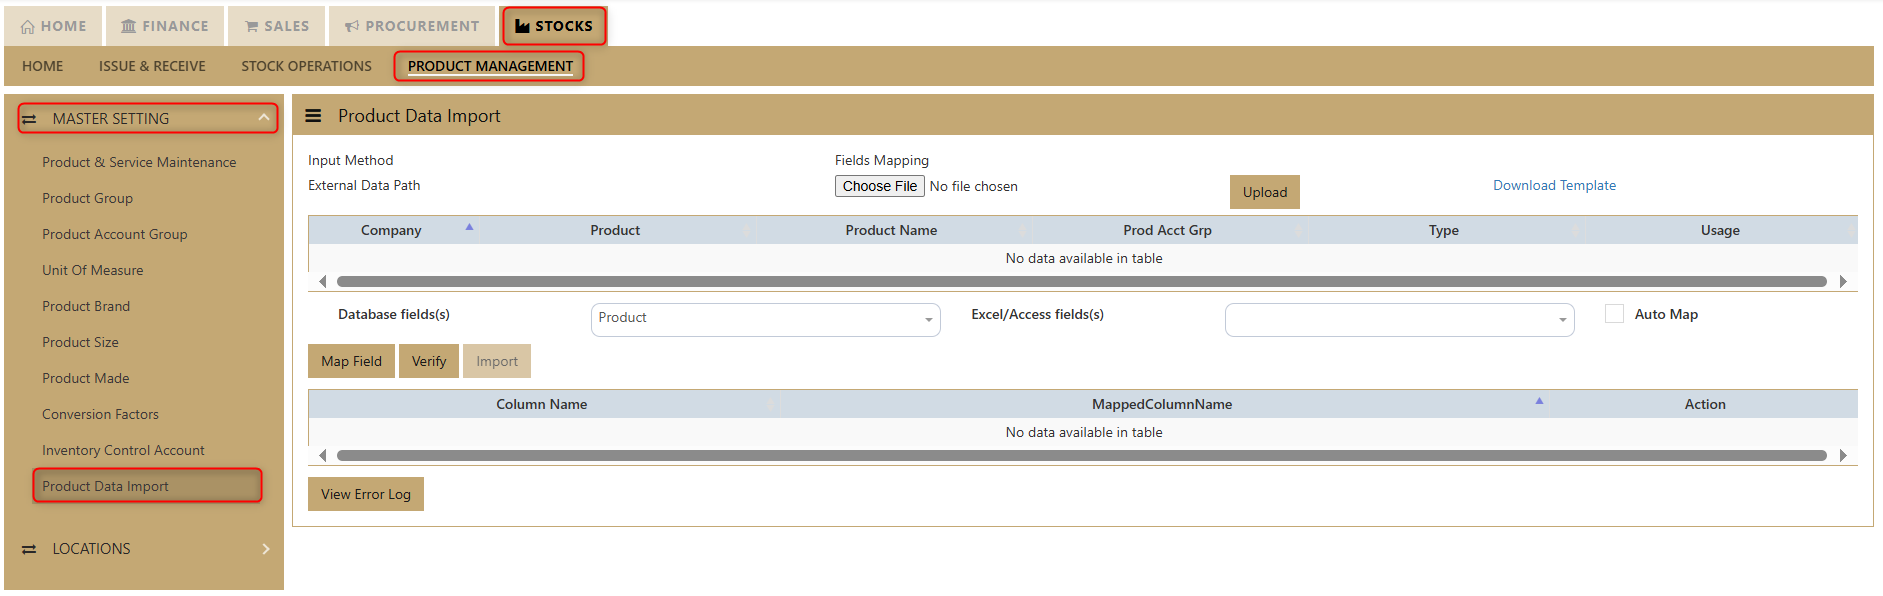](https://doc.uniq365.com/uploads/images/gallery/2025-02/HW1image.png)
##### **Product Data Import Instructions:**
**Download Template**: Access the system option to download the Excel template.
[](https://doc.uniq365.com/uploads/images/gallery/2025-02/q1Mimage.png)
**Encode Data**: Enter the necessary data into the Excel file, ensuring all fields are filled correctly, then save the file.
[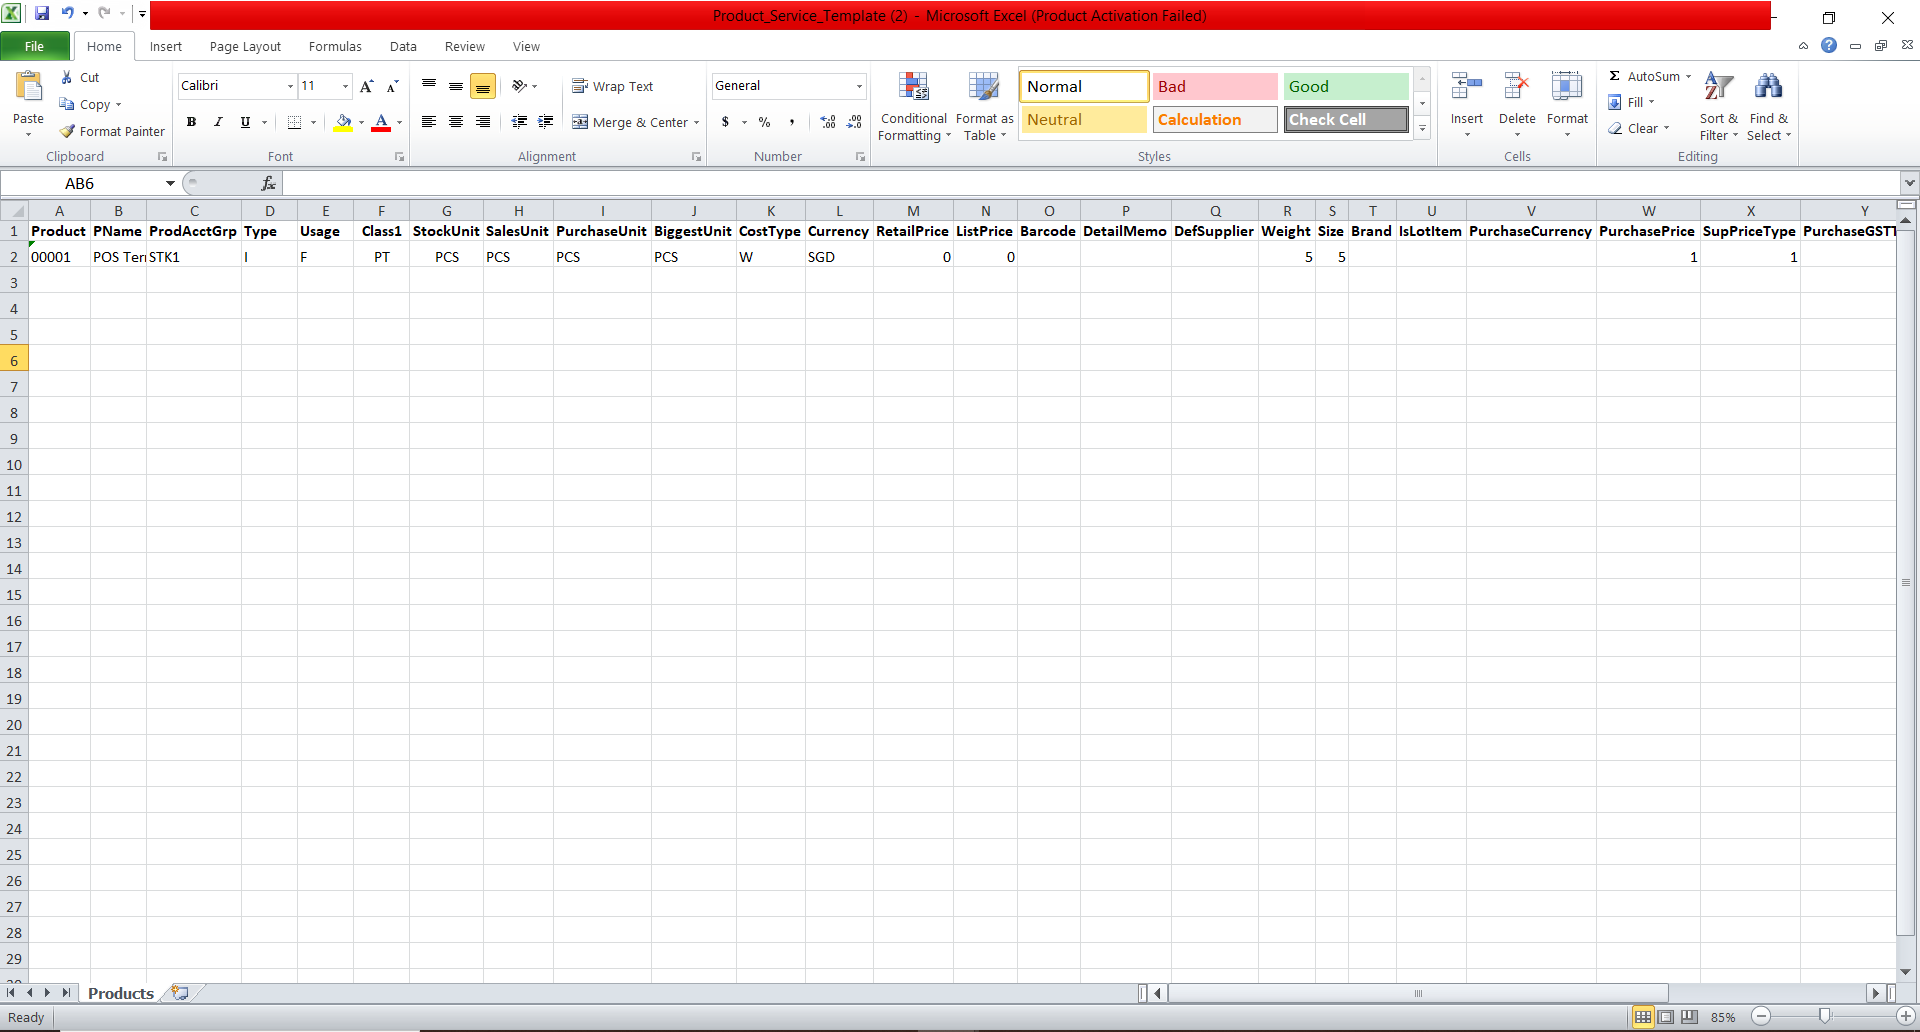](https://doc.uniq365.com/uploads/images/gallery/2025-02/v7Eimage.png)
**Choose File**: Click the "Choose File" button to open the folder where your saved Excel file is located.
[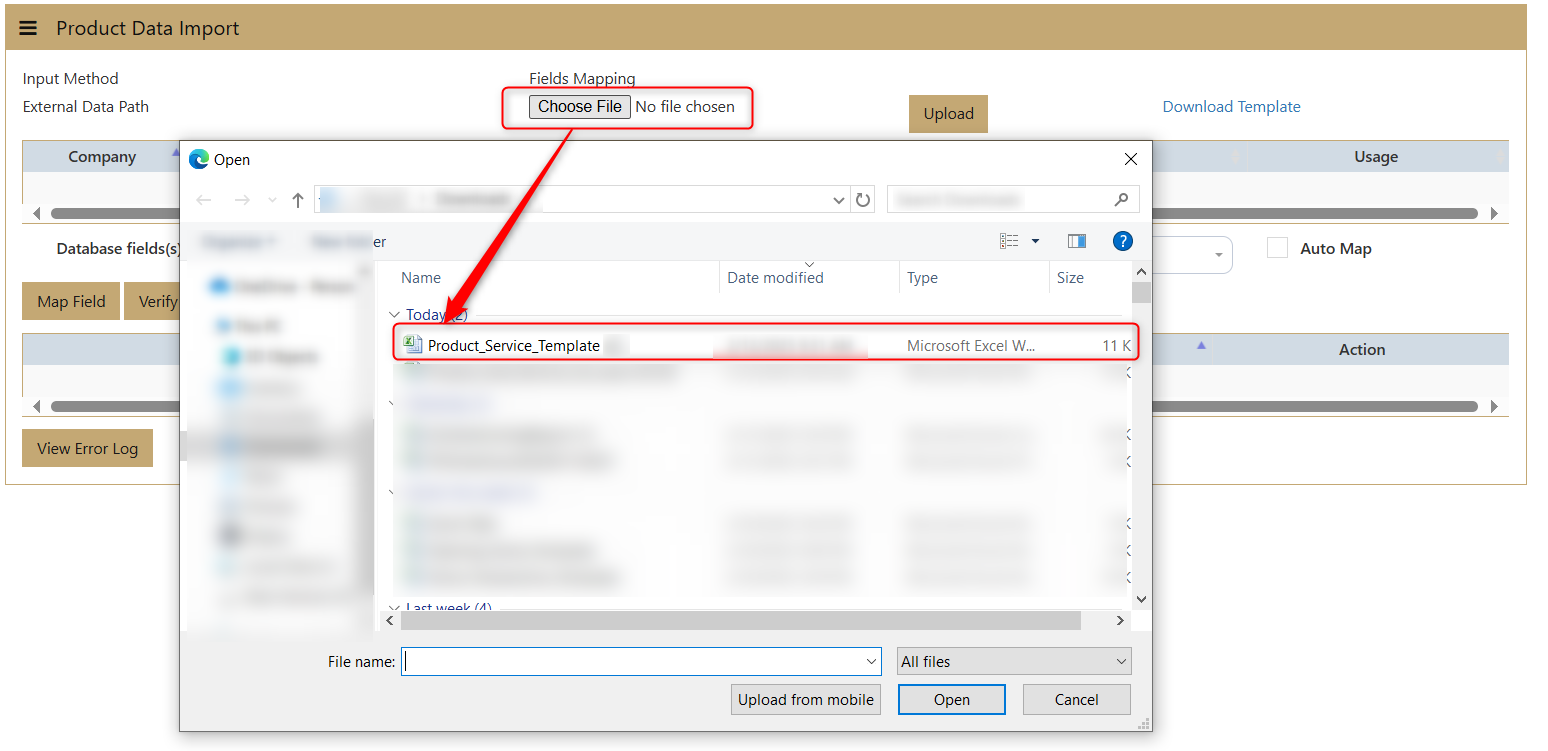](https://doc.uniq365.com/uploads/images/gallery/2025-02/LgYimage.png)
**Upload File**: After selecting the file, click "Upload." The system will extract the data from the Excel file.
[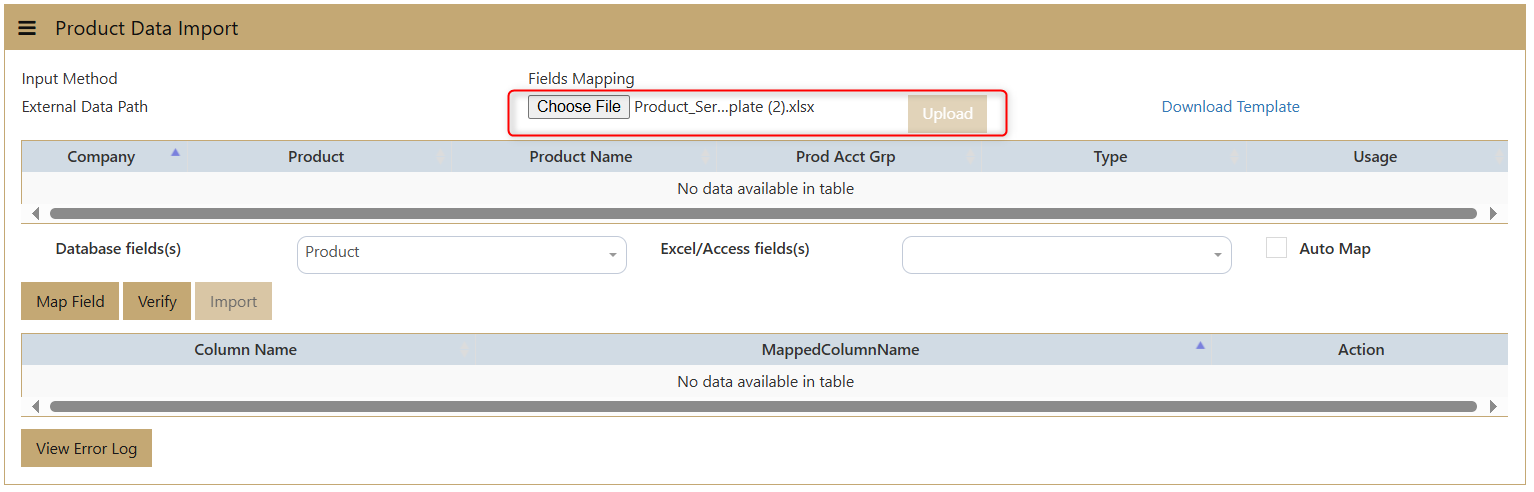](https://doc.uniq365.com/uploads/images/gallery/2025-02/Lajimage.png)
**Data Display**: The system will display the Company, Product, Product Name, Product Acct Group, Type, and Usage on the interface.
[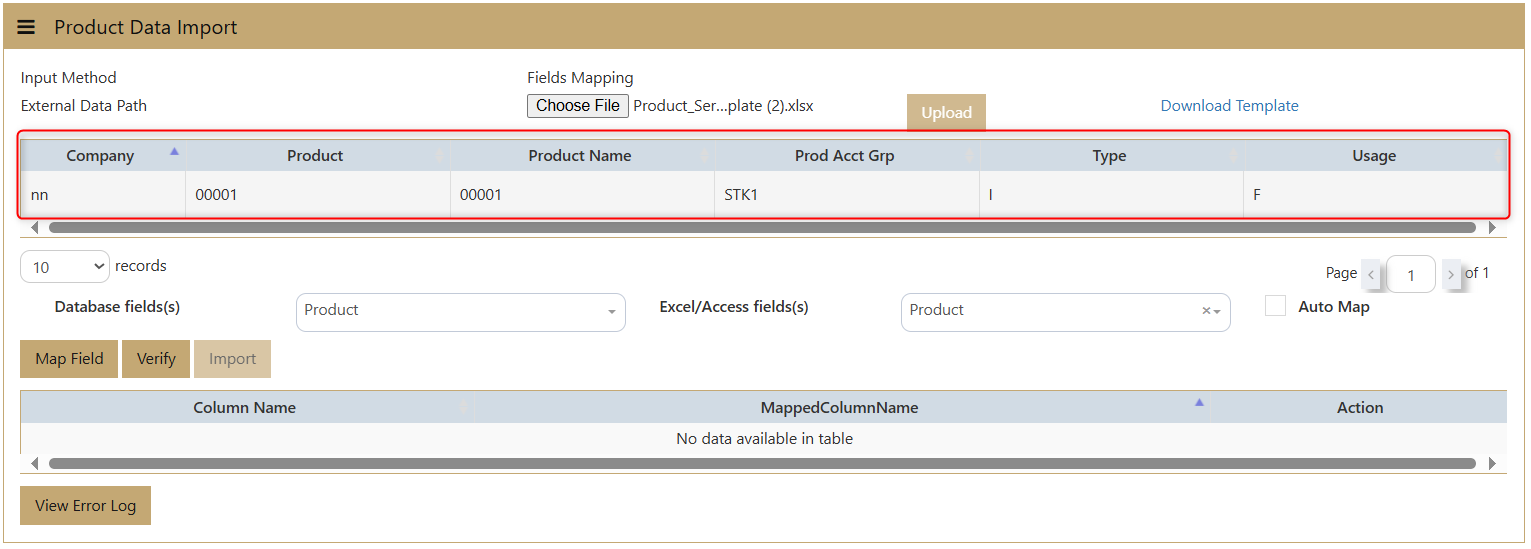](https://doc.uniq365.com/uploads/images/gallery/2025-02/Z4Gimage.png)
**Select Data Fields**: Choose the data fields you want to extract. You can use the **AutoMap** function to automatically map the transactions according to the saved Excel file.
[](https://doc.uniq365.com/uploads/images/gallery/2025-02/4smimage.png)
**Map Fields**: Click **Map Field** to have the system record the data according to the field mappings.
[](https://doc.uniq365.com/uploads/images/gallery/2025-02/GNmimage.png)
**Verify**: Click **Verify** to check for any errors or modifications that may be needed.
[](https://doc.uniq365.com/uploads/images/gallery/2025-02/Qxcimage.png)
**View Error Log**: If there are any issues, the **View Error Log** will display the errors detected by the system. Once these errors are fixed user can proceed to next step
[](https://doc.uniq365.com/uploads/images/gallery/2025-02/mM4image.png)
[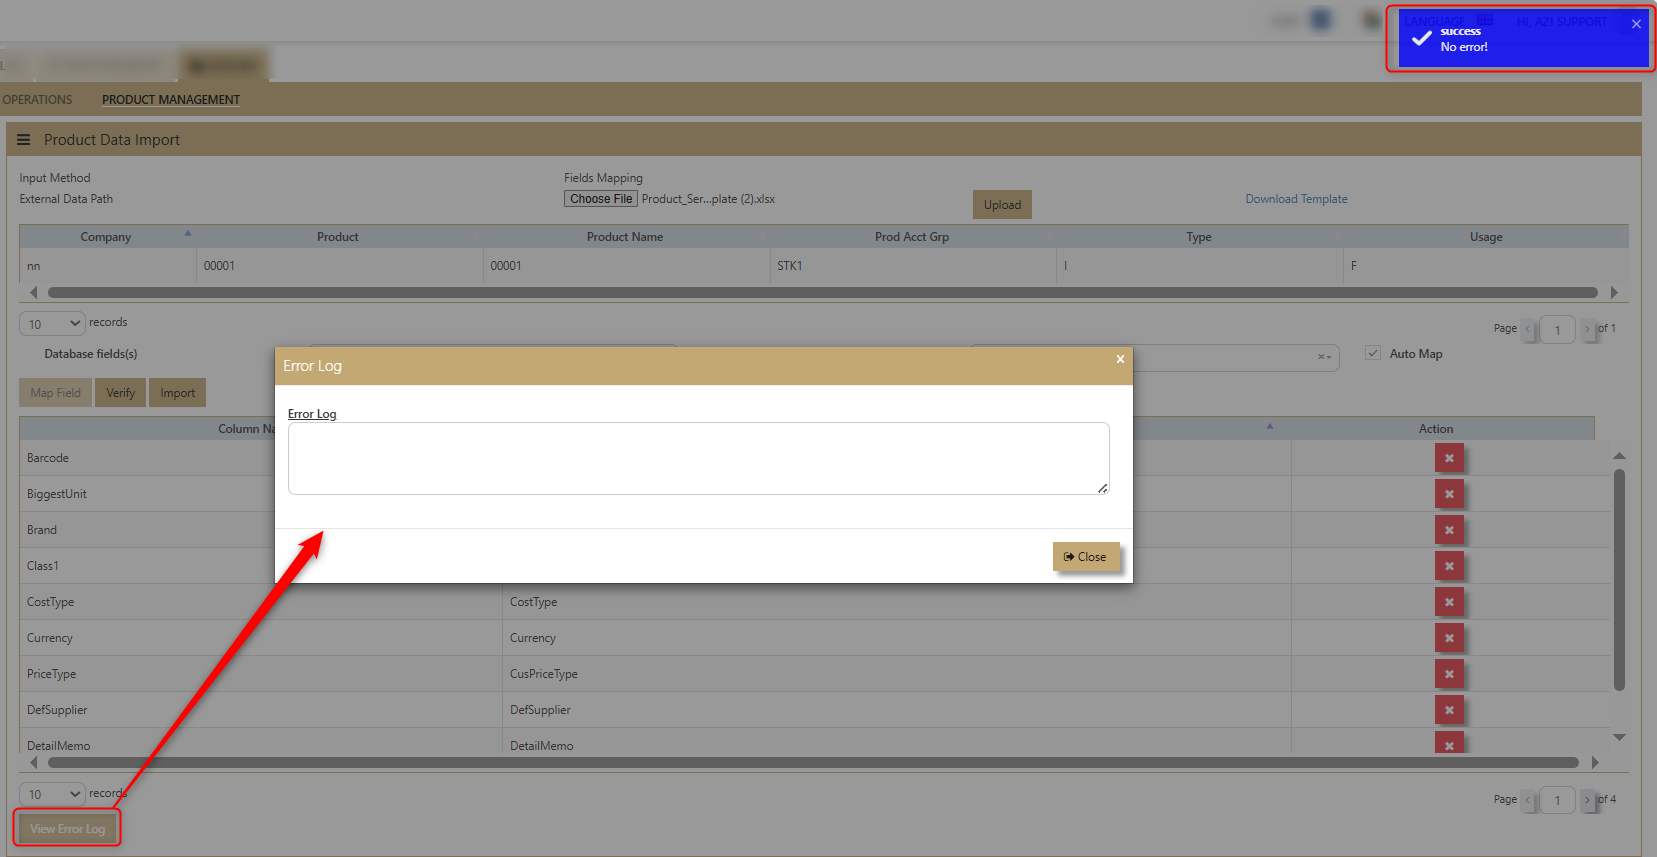](https://doc.uniq365.com/uploads/images/gallery/2025-02/8cKimage.png)
**Import**: Once everything is verified, click **Import** to upload the data into the system without errors.
[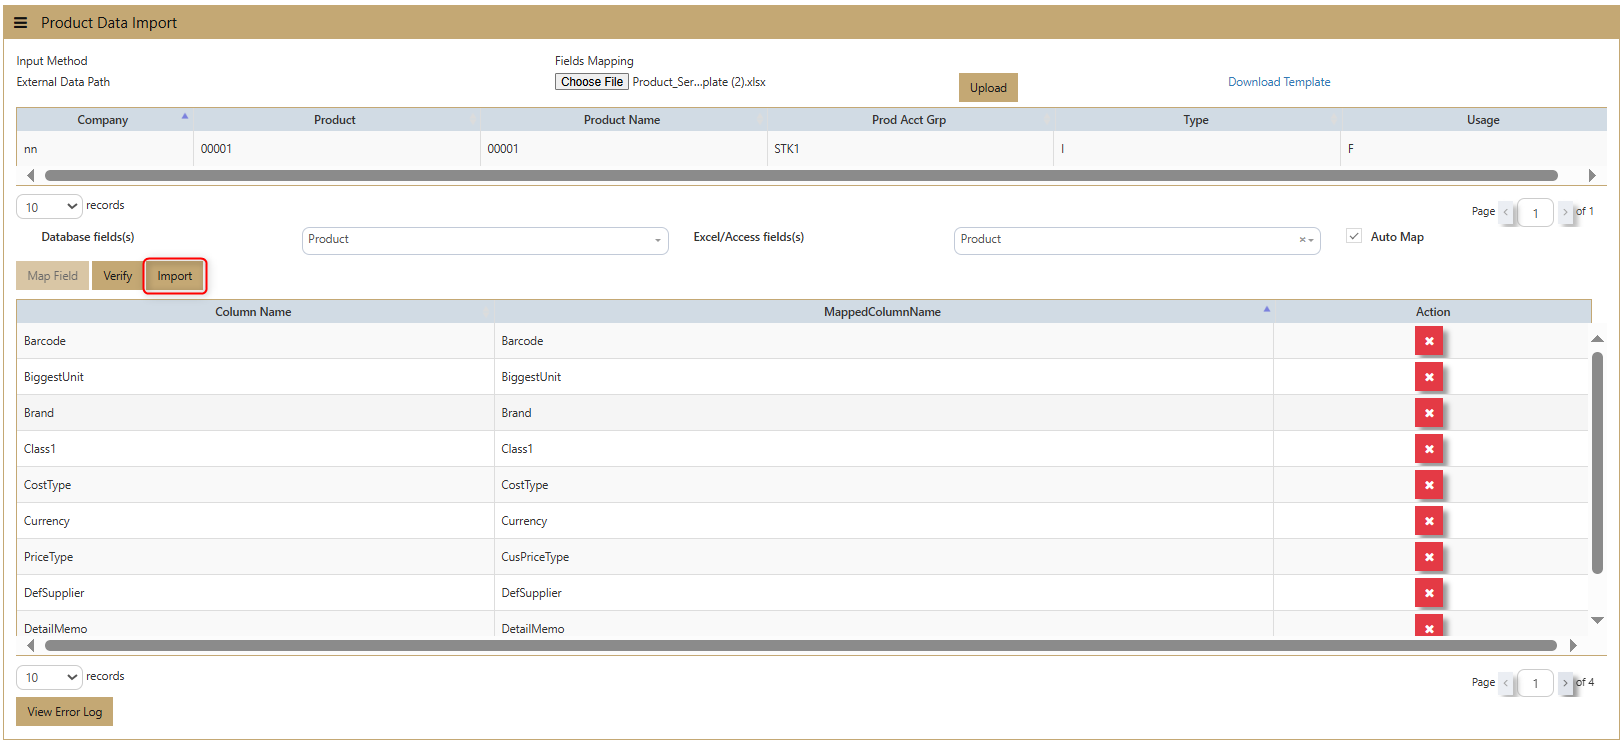](https://doc.uniq365.com/uploads/images/gallery/2025-02/vwPimage.png)
**Review Upload**: After importing, the system will show the column names, mapped column names, and actions of the uploaded Excel file. Users can verify the successful upload of the product data in the **Product & Service Maintenance** section of the system.
[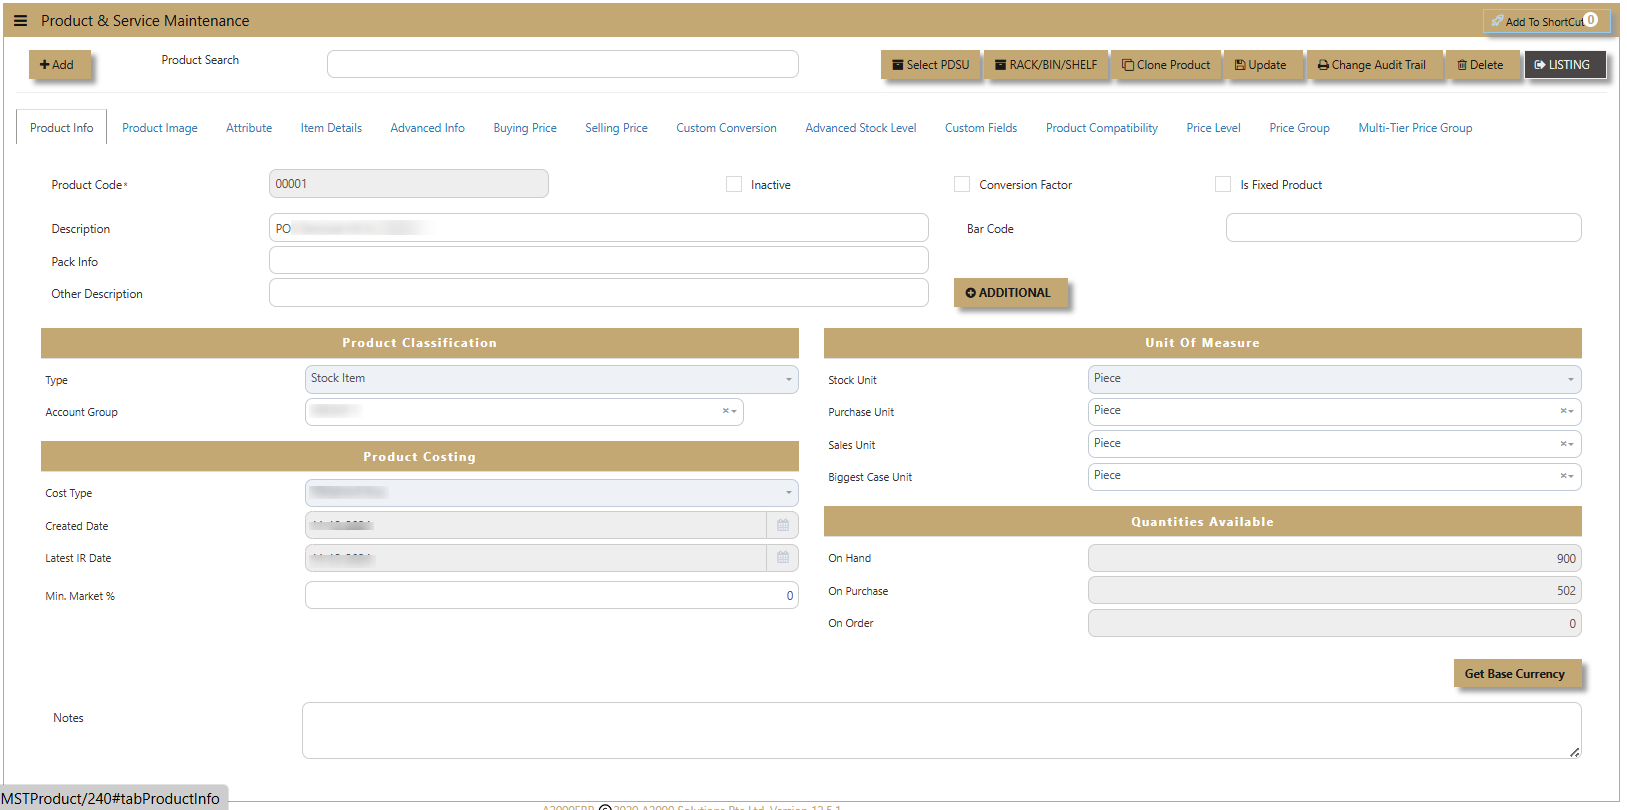](https://doc.uniq365.com/uploads/images/gallery/2025-02/yLRimage.png)
[](https://doc.uniq365.com/uploads/images/gallery/2025-02/ylrimage.png)
Locations - Warehouse Code
##### **What is Warehouse Code?**
##### This is a feature in Uniq365 allows users to manage and classify warehouses, along with their **Zone & Rack** details. Users can create multiple records for different warehouses, making it easier to access and organize warehouse information efficiently.
##### The Warehouse setup comes with full address and contact numbers of the relevant warehouses so that a Stock Transfer Voucher can be printed for a proper dispatch from/to any warehouses.
##### Uniq365 multiple warehouses can be used primarily to segregate the stock positions of a company within various warehouses or locations.
##### Besides that, this warehouse can also be used to track stock issues to certain projects, an example like bathroom fixtures to a condominium project. You can call the warehouse CP01 (Condo #1) and start to issue the products needed to carry out the project via Stock Transfers. Until you bill the customers, the legal title of the product is still yours and therefore needed to be in your valuation.
##### Once the project gets underway, stock at this warehouse is going to build up and by a Warehouse-wise Stock Report, you can track the exact quantity and value you have at stake. When it comes to billing, simply issue the Condo #1 customer all the items out of CP01 warehouse.
##### **How to Create Warehouse Code?**
Click on **Stocks - Product Management - Locations - Warehouse Code** icon for the following screen.
[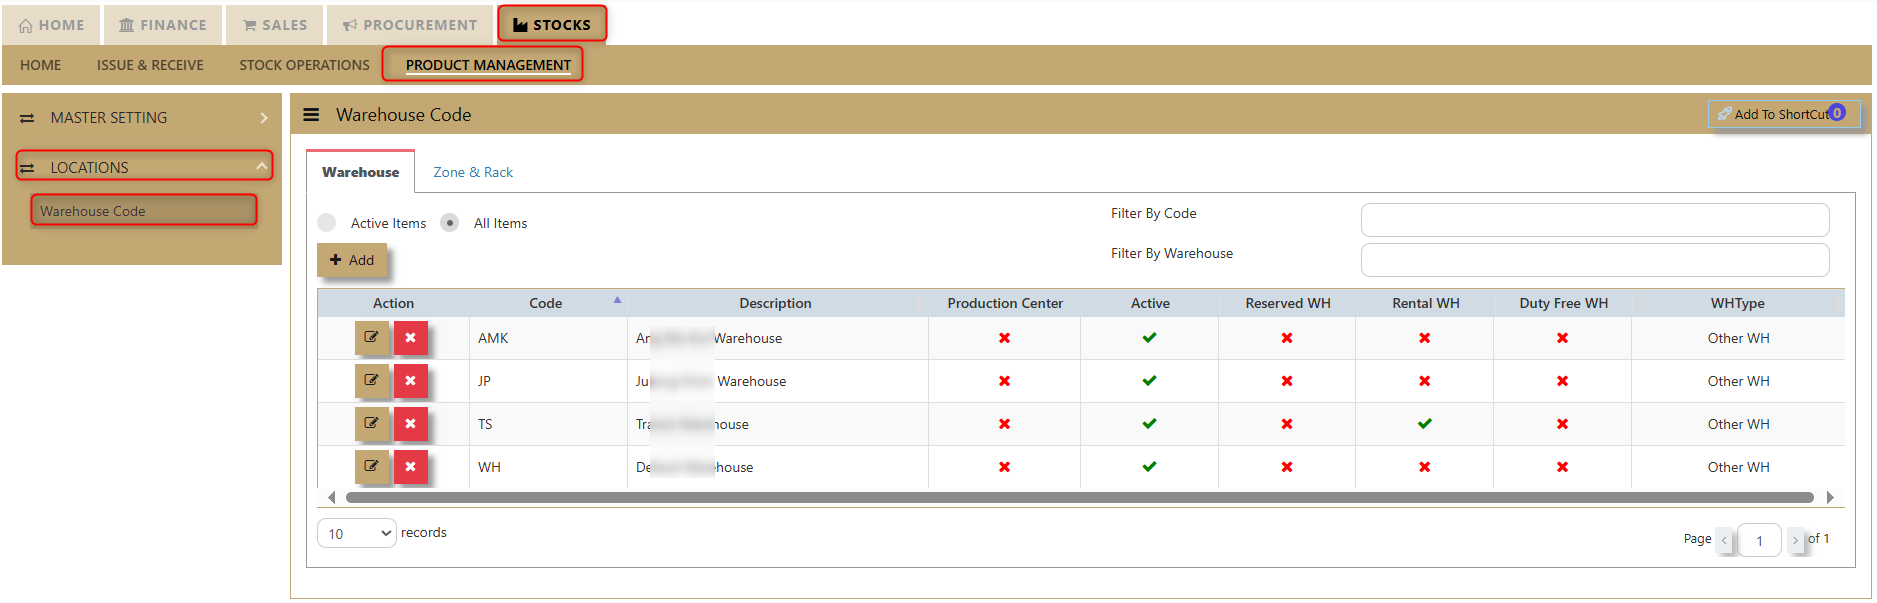](https://doc.uniq365.com/uploads/images/gallery/2025-02/TlGimage.png)
1. Click on the **Add** button to create new Warehouse.
[](https://doc.uniq365.com/uploads/images/gallery/2025-02/4ooimage.png)
2. After that another tab will show and the user must fill out the following information accordingly:
[](https://doc.uniq365.com/uploads/images/gallery/2025-02/HsBimage.png)
**Code** - allows the user to input 9 alphanumeric codes for their new warehouse.
**Description** - for the user to input the warehouse name.
**Address** - this is where the warehouse is located.
**Tel** - telephone number
**Fax -** fax number
**Additional Information** - allows user to add any information for the new warehouse.
[](https://doc.uniq365.com/uploads/images/gallery/2025-02/IC8image.png)
**Warehouse Classification** - allows user to ticked on the kind of warehouse classification is applicable. If it is Rental WH/Transit WH, Reserved WH, Production Center or Duty-Free WH. Users can also click on **inactive** button if the warehouse will no longer be in use.
[](https://doc.uniq365.com/uploads/images/gallery/2025-02/hTvimage.png)
**Warehouse Type** - allows user to choose and tick if the Warehouse is a Cust Warehouse or Other Warehouse.
[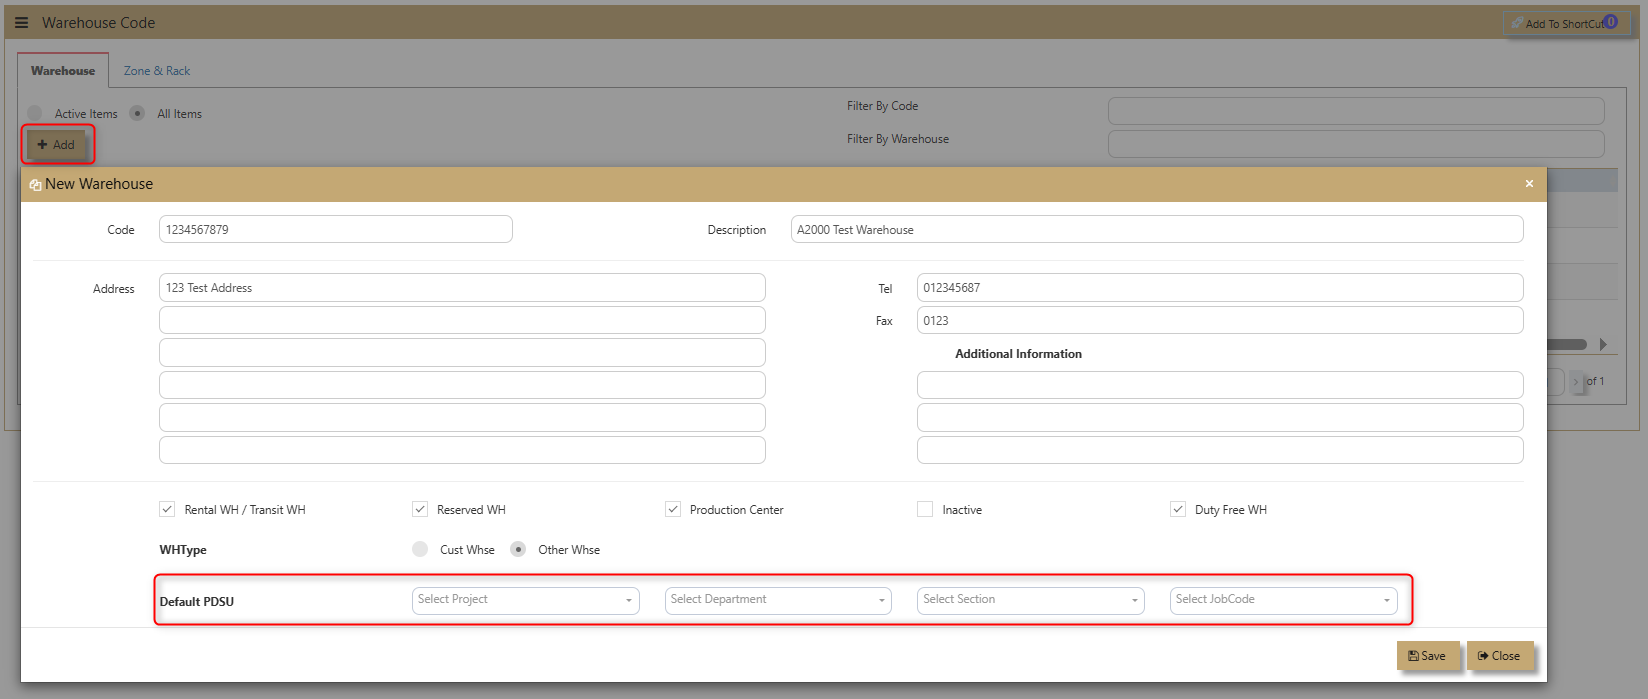](https://doc.uniq365.com/uploads/images/gallery/2025-02/ez8image.png)
**Default PDSU** - enable user to easily add Project, Department, Section and Job Code.
3. Click **Save** then the new warehouse will be added.
[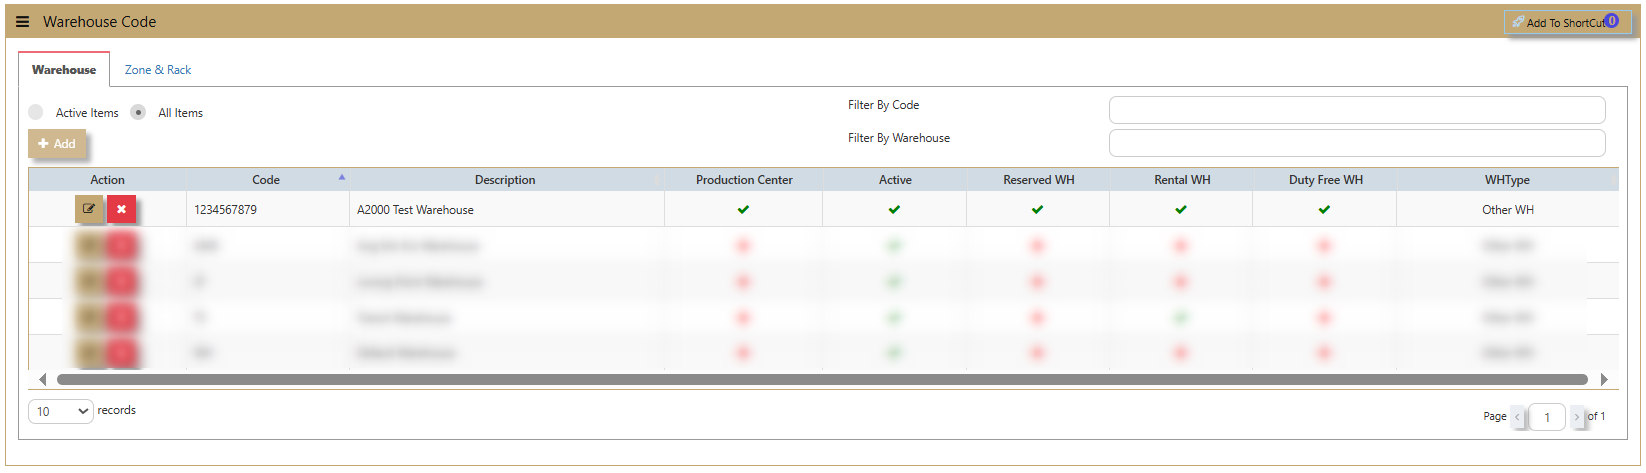](https://doc.uniq365.com/uploads/images/gallery/2025-02/r8fimage.png)
##### **How to use Zone & Rack?**
The **Zone and Rack** function in Uniq 365 Accounting System helps streamline inventory management by organizing products into designated racks and zones within a warehouse or storage facility. This feature enhances stock tracking, reduces search time, and improves overall operational efficiency, making inventory control and order fulfillment faster and more accurate.
[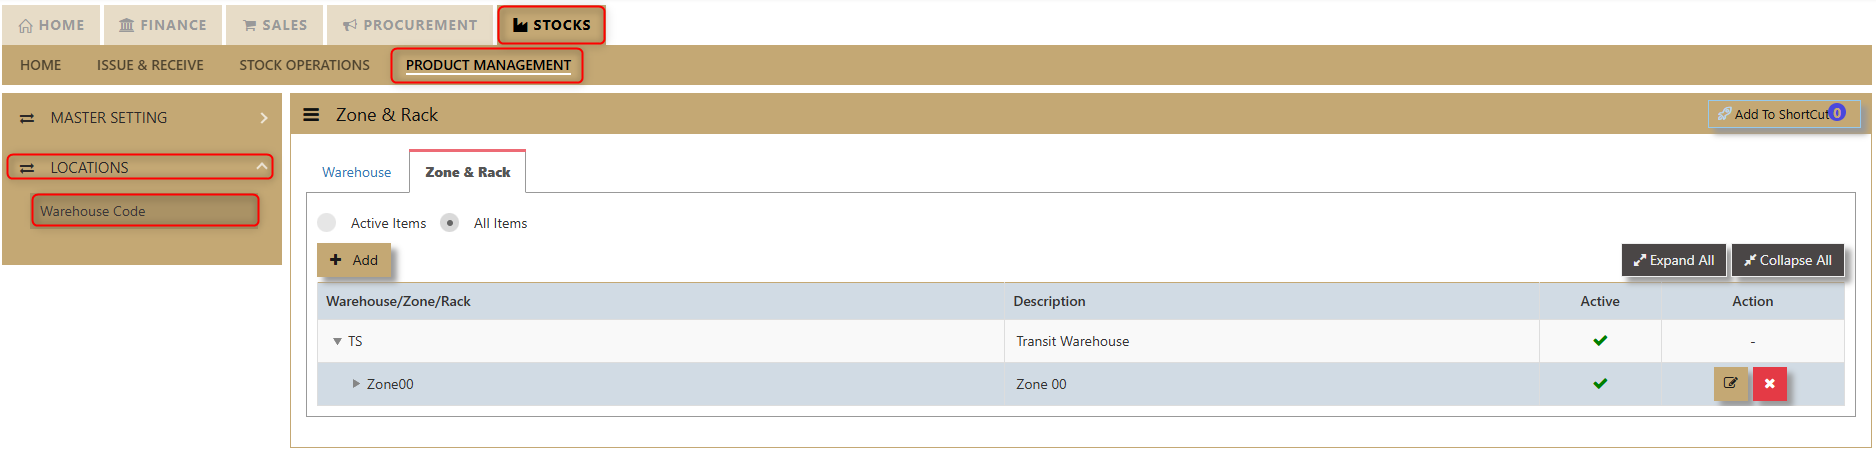](https://doc.uniq365.com/uploads/images/gallery/2025-02/uFvimage.png)
**Flush Details** button allows the user to delete the line detail.
**Download Template** allows the user to have an excel format to simply upload and the system will capture the transaction.
Excel format sample:
[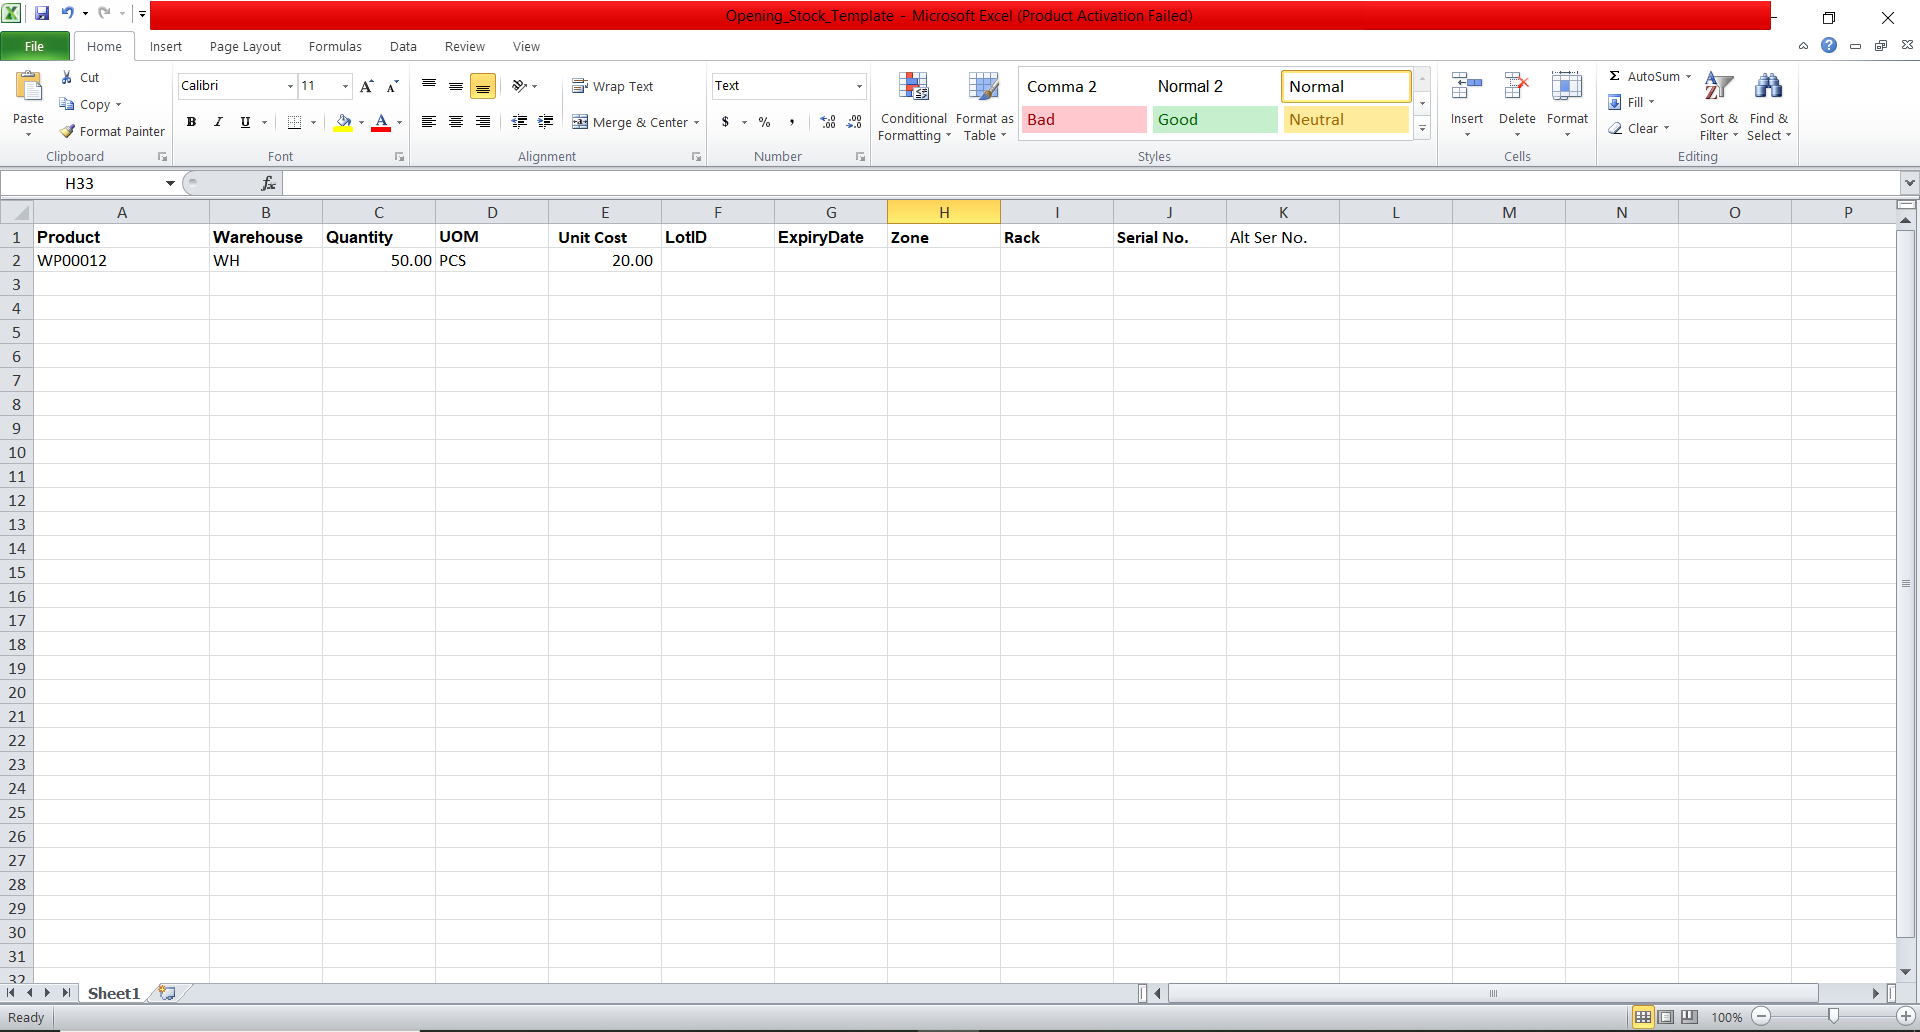](https://doc.uniq365.com/uploads/images/gallery/2025-02/dOaimage.png)
User can made use of the Stock Ledger to check the entries made.
[](https://doc.uniq365.com/uploads/images/gallery/2025-02/Pvwimage.png)
# Stock Transfers
##### Stock Transfer (Direct) for Uniq365 refers to the seamless and efficient process of transferring stocks directly between different locations or warehouses within the Uniq365 system. This feature ensures smooth stock movement, real-time tracking, and better management of inventory across multiple locations, enabling businesses to maintain accurate stock levels, reduce errors, and streamline their operations.
\_\_\_\_\_\_\_\_\_\_\_\_\_\_\_\_\_\_\_\_\_\_\_\_\_\_\_\_\_\_\_\_\_\_\_\_\_\_\_\_\_\_\_\_\_\_\_\_\_\_\_\_\_\_\_\_\_\_\_\_\_\_\_\_\_\_\_\_\_\_\_\_\_\_\_\_\_\_\_\_\_\_\_\_\_\_\_\_\_\_\_\_\_\_\_\_\_\_\_\_\_\_\_\_\_\_\_\_\_\_\_\_\_\_\_\_\_\_\_\_\_\_\_\_\_\_\_\_\_\_\_\_\_\_\_\_\_\_\_\_\_\_\_\_
##### **How to create Stock Transfer Direct?**
1\. In **Stocks - Stock Operation - Operation - Stock Transfer (Direct)** user can see the screen below.
[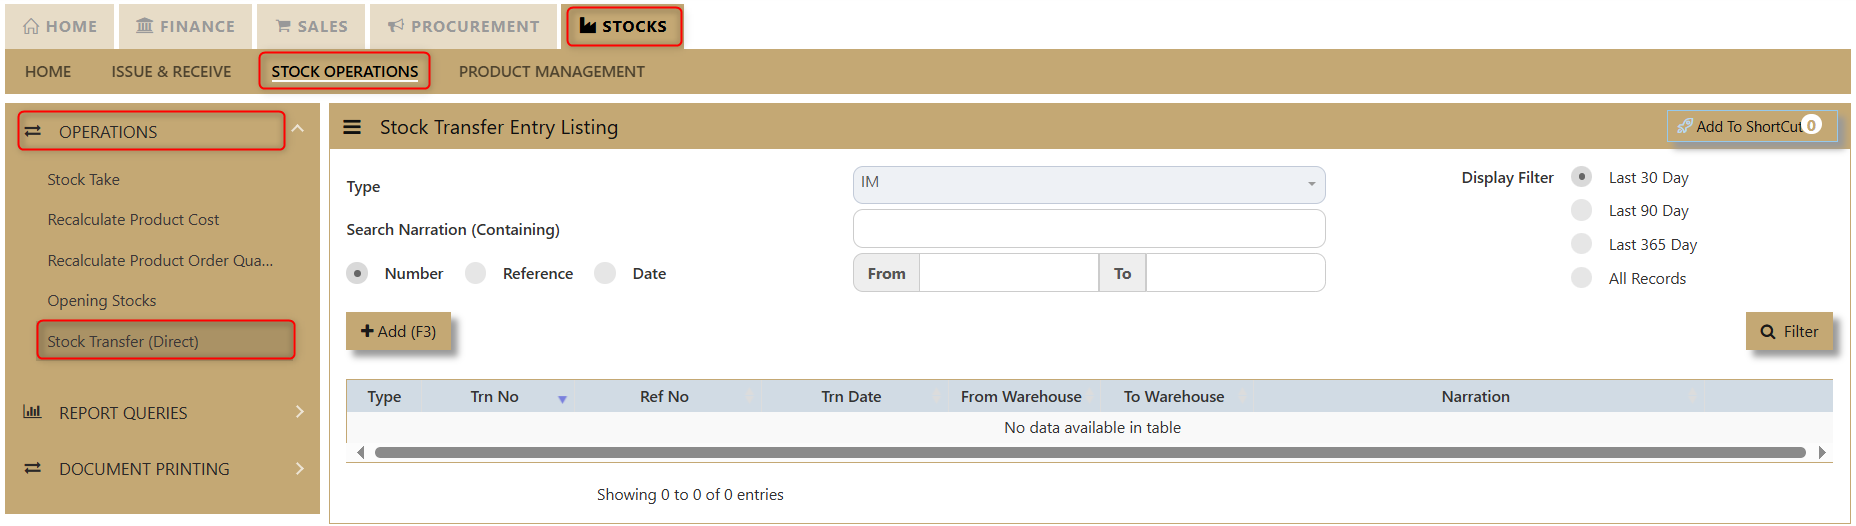](https://doc.uniq365.com/uploads/images/gallery/2025-02/evcimage.png)
2\. Click Add(F3) to create new transaction.
[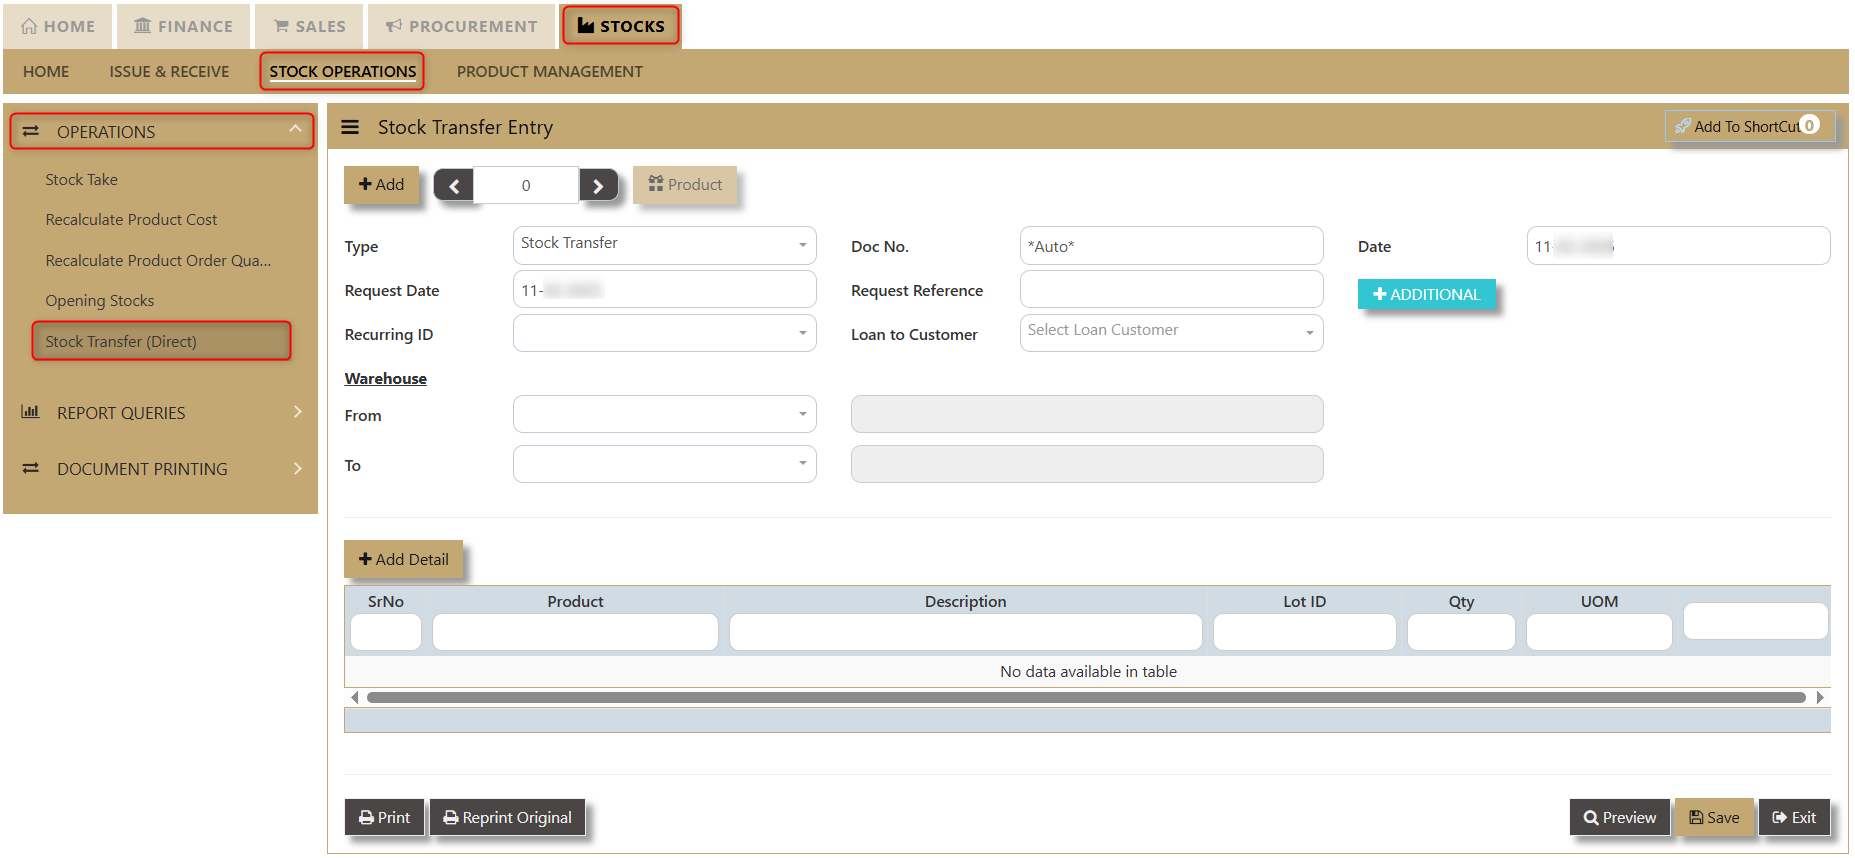](https://doc.uniq365.com/uploads/images/gallery/2025-02/0Wnimage.png)
3\. **Add** button allows user to create new transaction. Number '0' means the transaction number and **Product** is an overview for Product and Service Maintenance.
[](https://doc.uniq365.com/uploads/images/gallery/2025-02/cZBimage.png)
The user must also fill in the following fields:
- **Type** - a dropdown showing which transaction the user is using.
[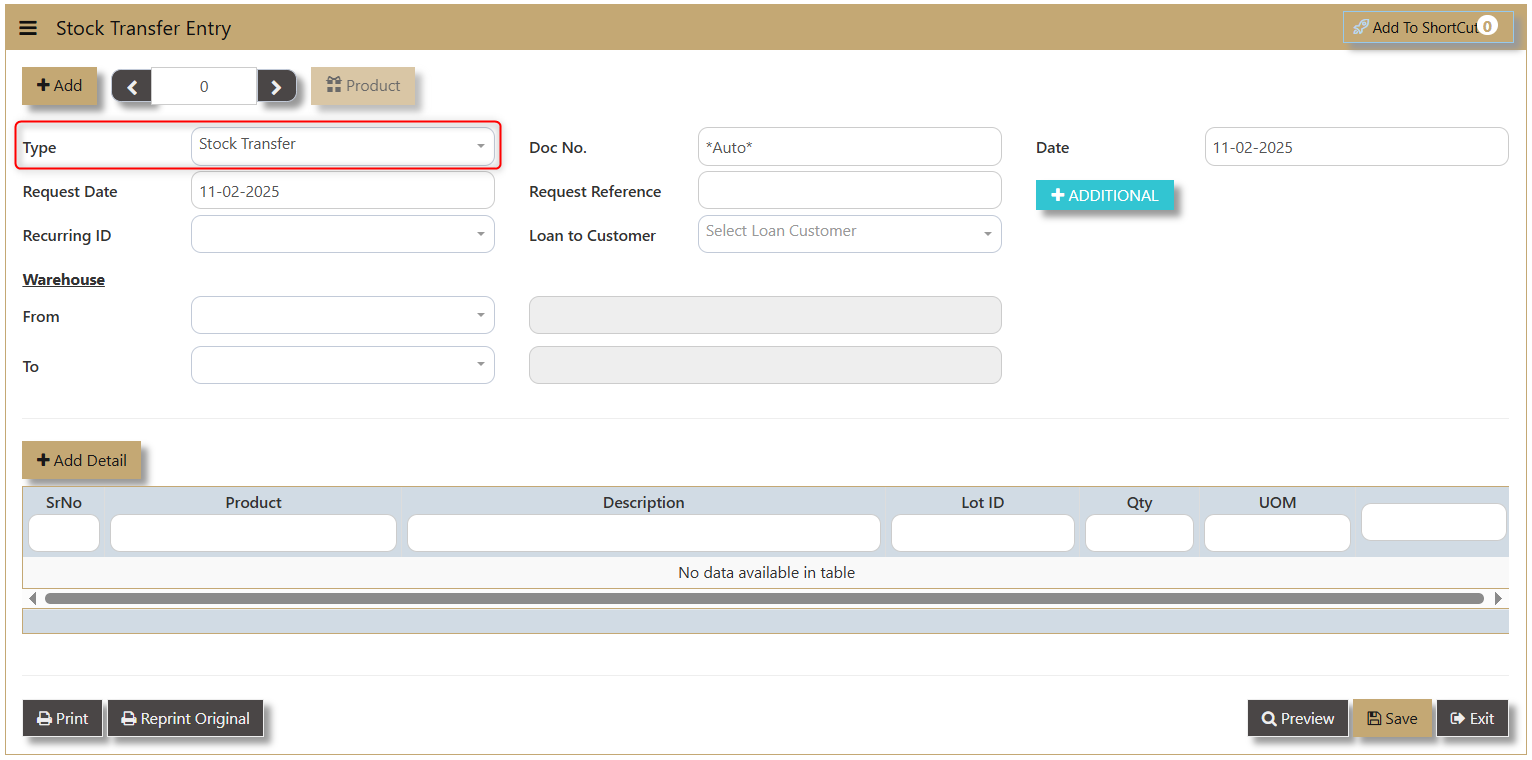](https://doc.uniq365.com/uploads/images/gallery/2025-02/Xogimage.png)
- **Request Date** - this is when the product is requested for transfer.
[](https://doc.uniq365.com/uploads/images/gallery/2025-02/Ci1image.png)
- **Recurring ID** - unique identifier for regular, scheduled stock transfers between locations. A dropdown will show information about the Product ID, PCM Code, Customer Code and Customer Name.
[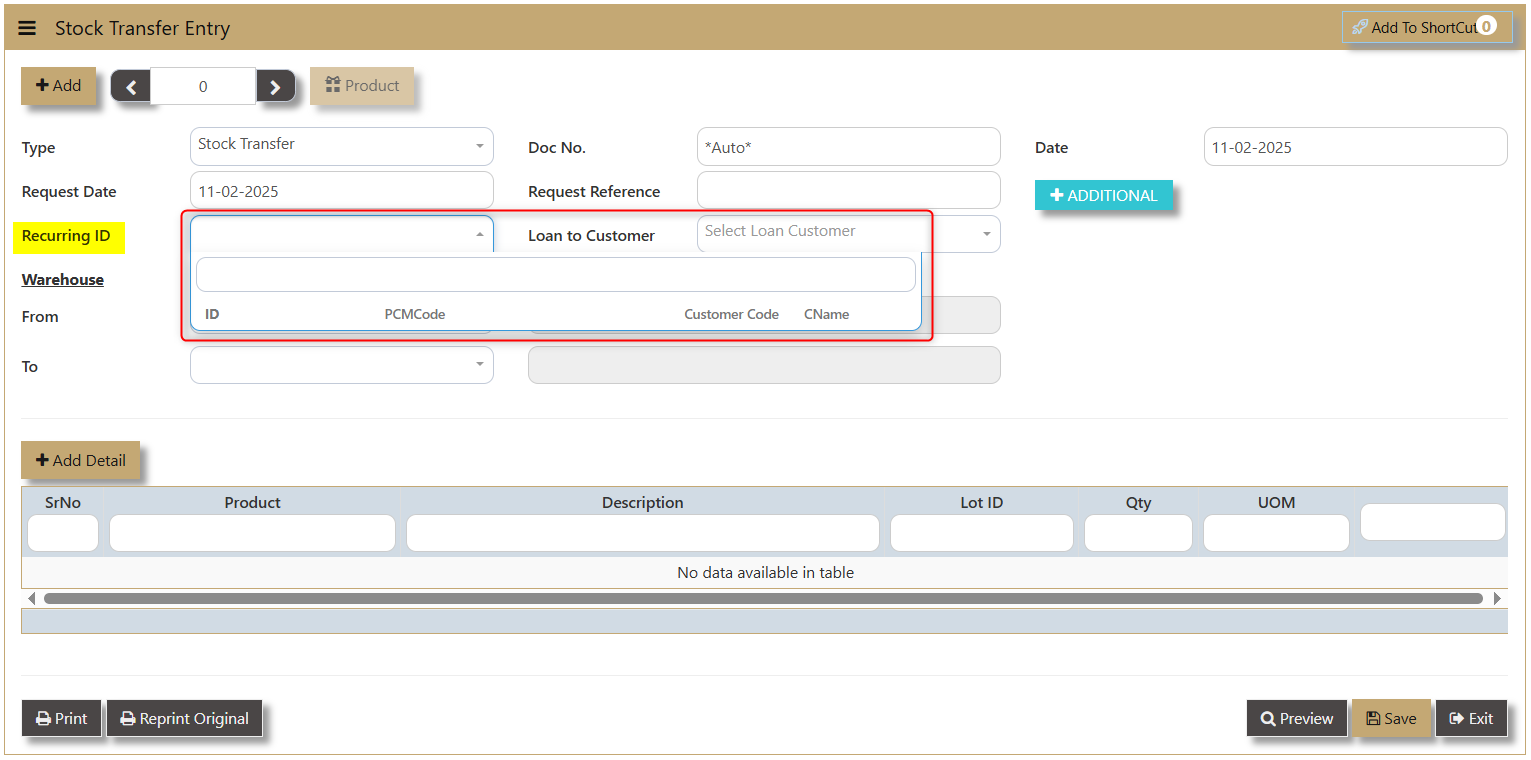](https://doc.uniq365.com/uploads/images/gallery/2025-02/YnPimage.png)
- **Doc No.** - can be automated by the system or manually encoded depending on the setup made.
[](https://doc.uniq365.com/uploads/images/gallery/2025-02/OsYimage.png)
- **Request Reference** - allows user to input any reference connected with their request.
[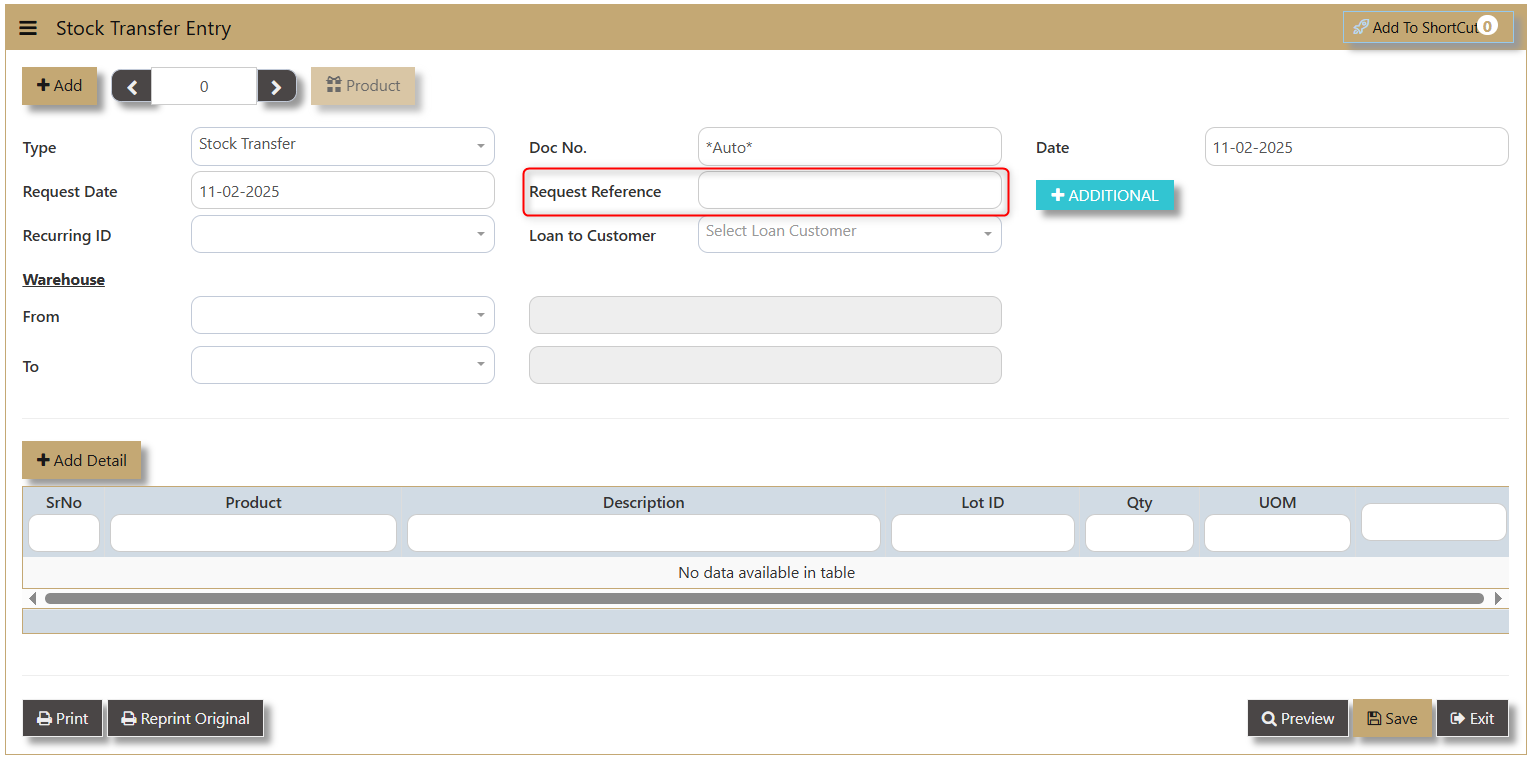](https://doc.uniq365.com/uploads/images/gallery/2025-02/2Guimage.png)
- **Loan to Customer** - allows user to input the customer involved in the transaction. A dropdown will show the information of Customer Code, Name, Credit Limit, Credit Used, Credit Left and Type (C means Customer).
[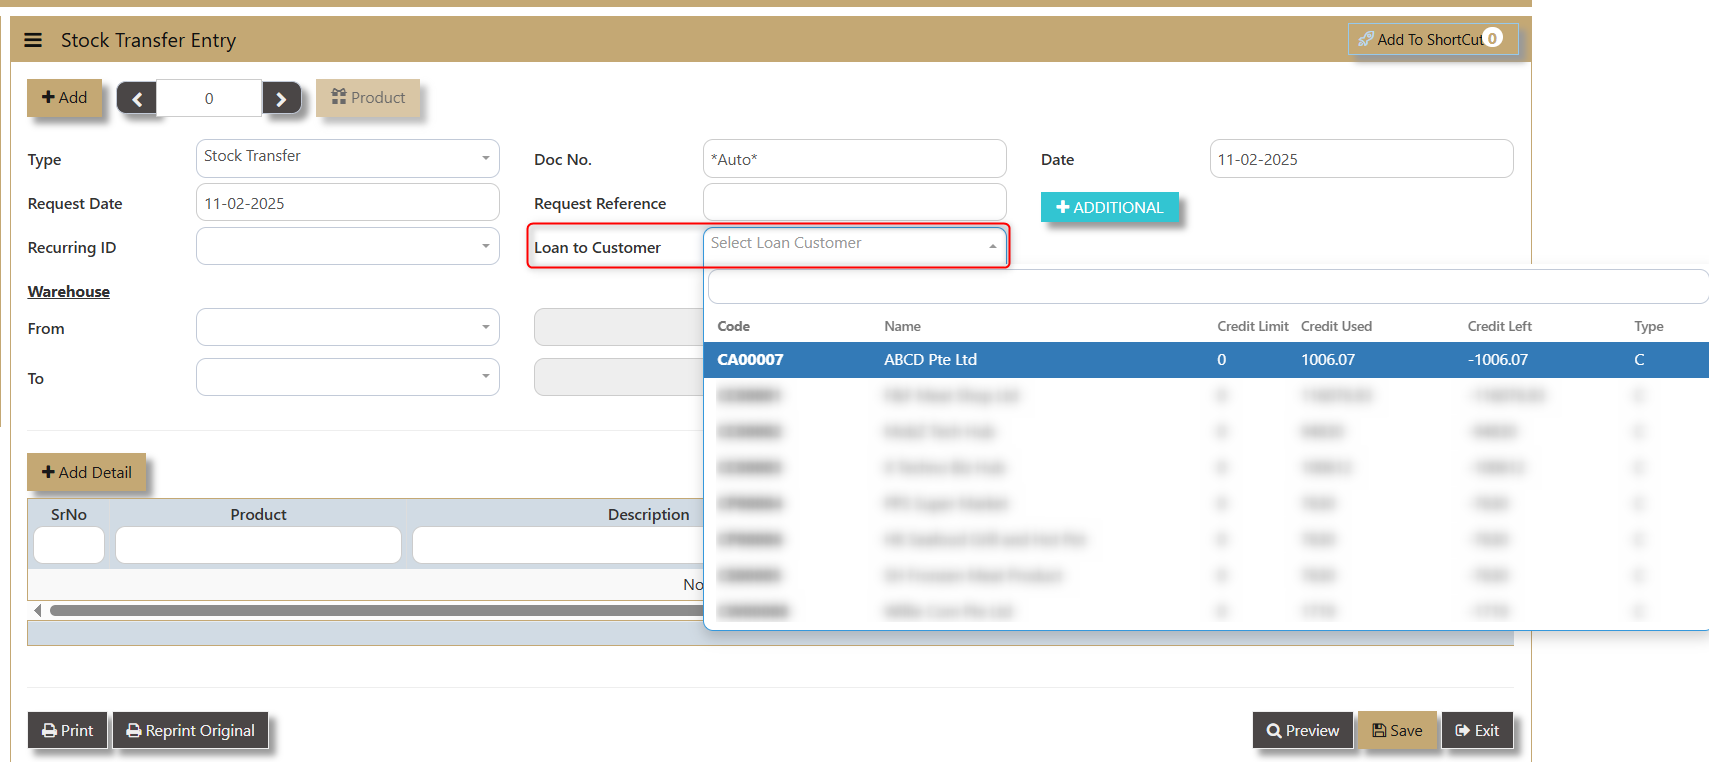](https://doc.uniq365.com/uploads/images/gallery/2025-02/n4aimage.png)
- **Date** - shows when the transaction is made.
[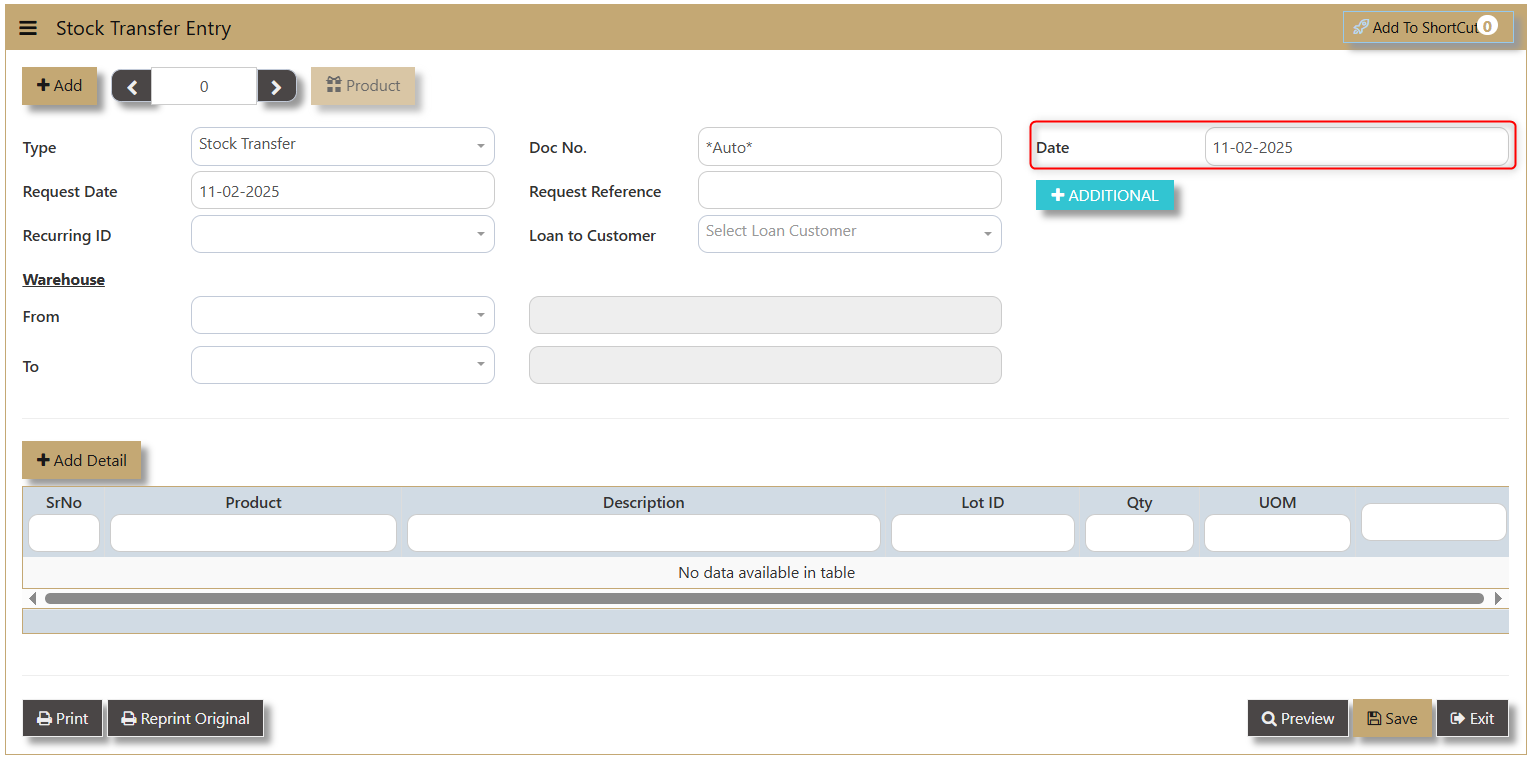](https://doc.uniq365.com/uploads/images/gallery/2025-02/FSSimage.png)
- **Warehouse** - allow user to choose from-and-to what warehouse the transfer will took place.
[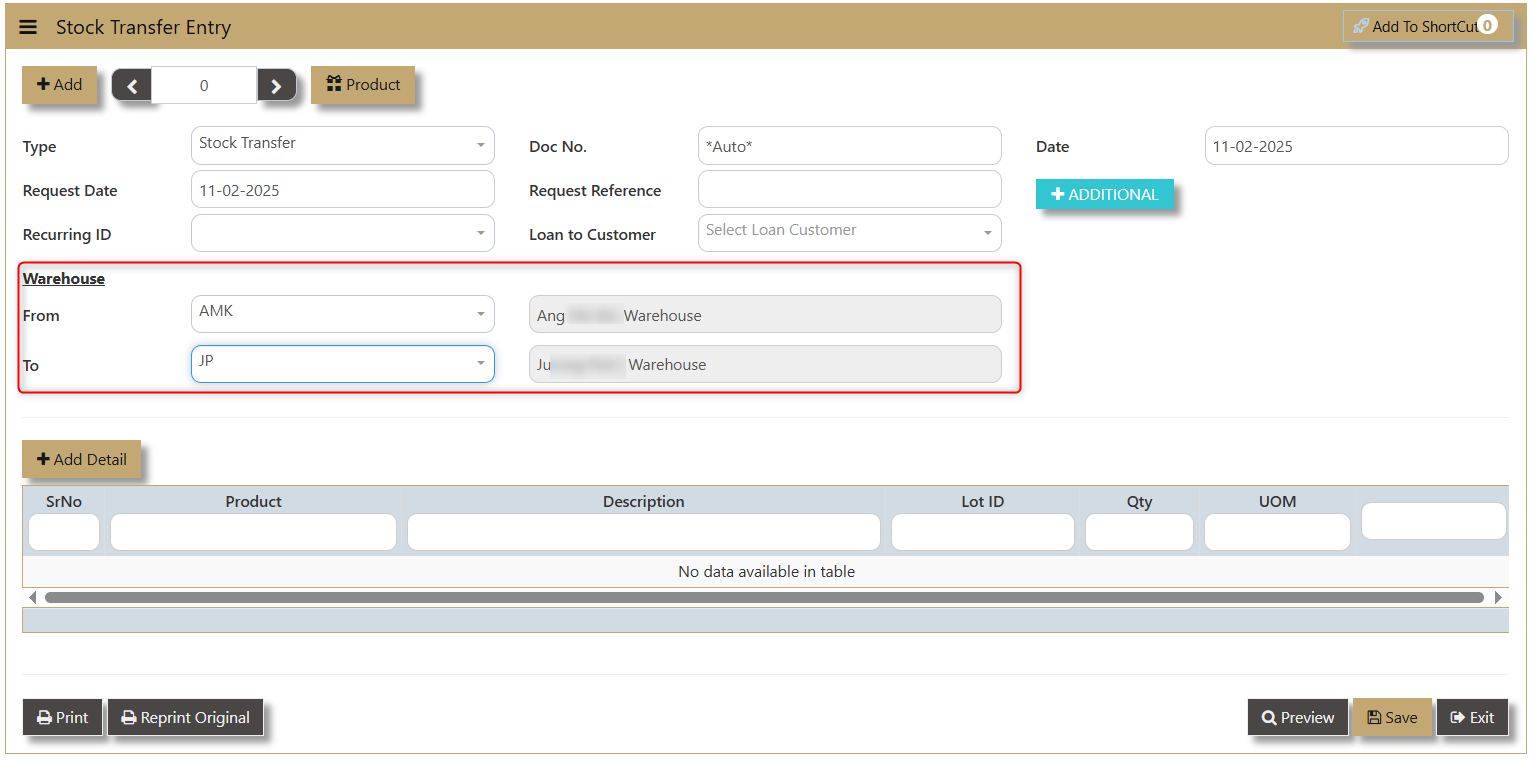](https://doc.uniq365.com/uploads/images/gallery/2025-02/1dkimage.png)
- **Additional** - enable the user to add more information regarding the Stock Transfer where they can input PDSU, Remarks and Reason to Transfer.
[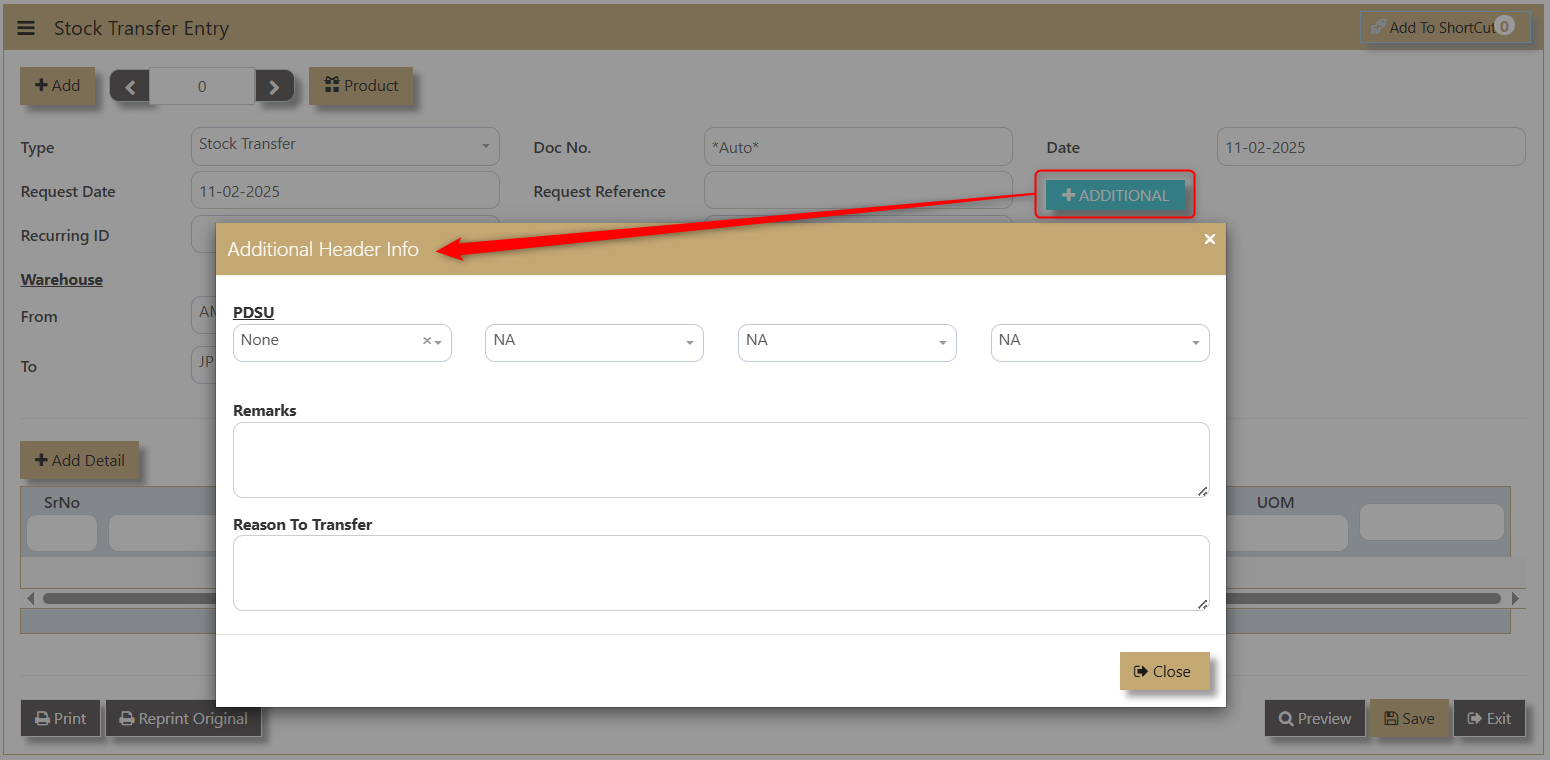](https://doc.uniq365.com/uploads/images/gallery/2025-02/oL1image.png)
4\. Click **Add Detail** to create new line details of the transfer. A dropdown of the products will show the Product, Product Name, On Order, On PO, On Hand, and Available.
[](https://doc.uniq365.com/uploads/images/gallery/2025-02/vA2image.png)
- Once Product Code is selected, the **Description** of the same product will show accordingly.
[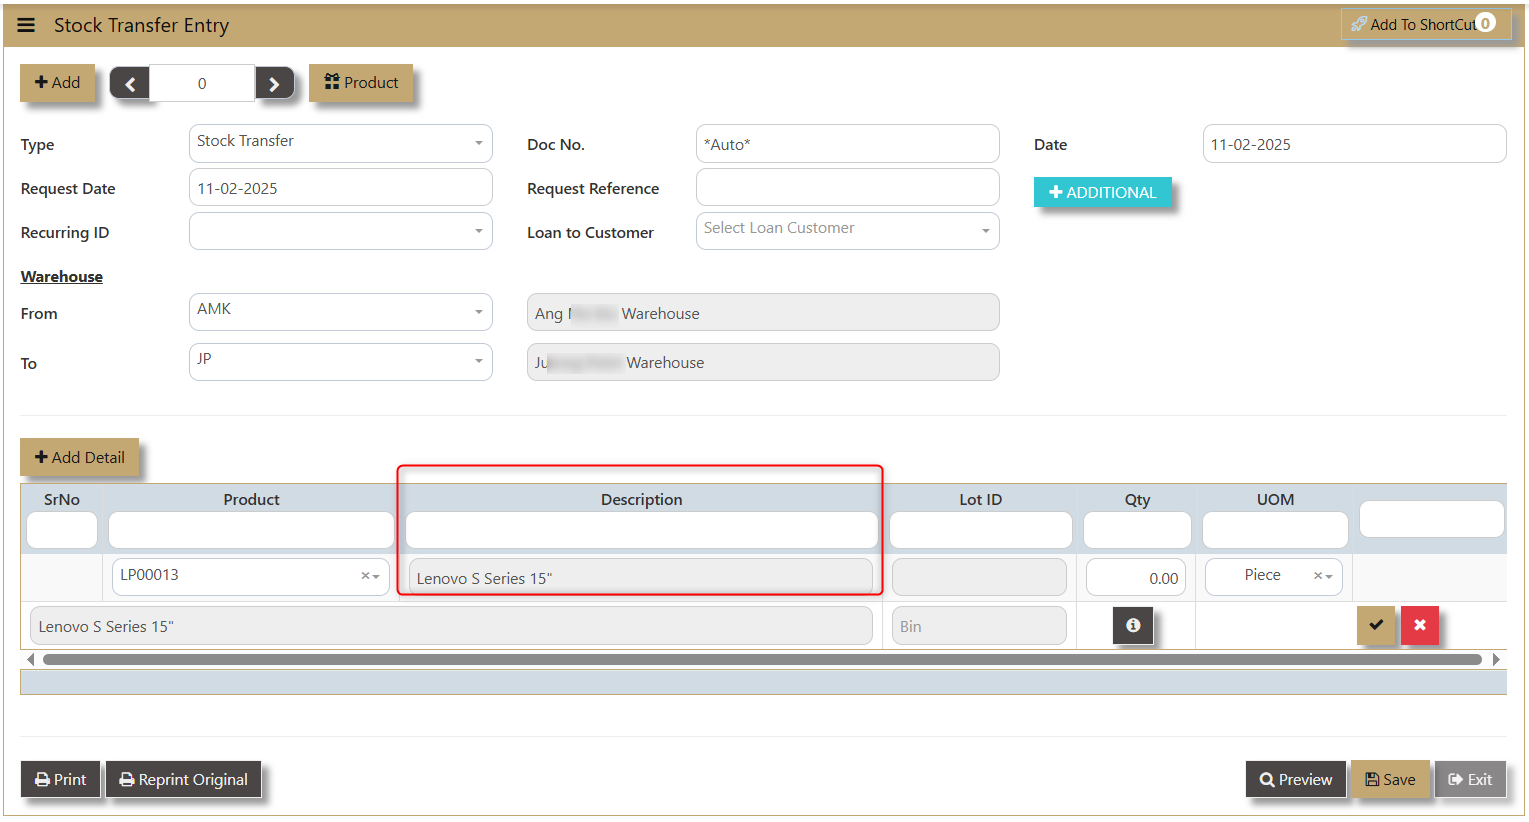](https://doc.uniq365.com/uploads/images/gallery/2025-02/7Rkimage.png)
- **Lot ID** - if product is classified is a lot item, the system will generate.
[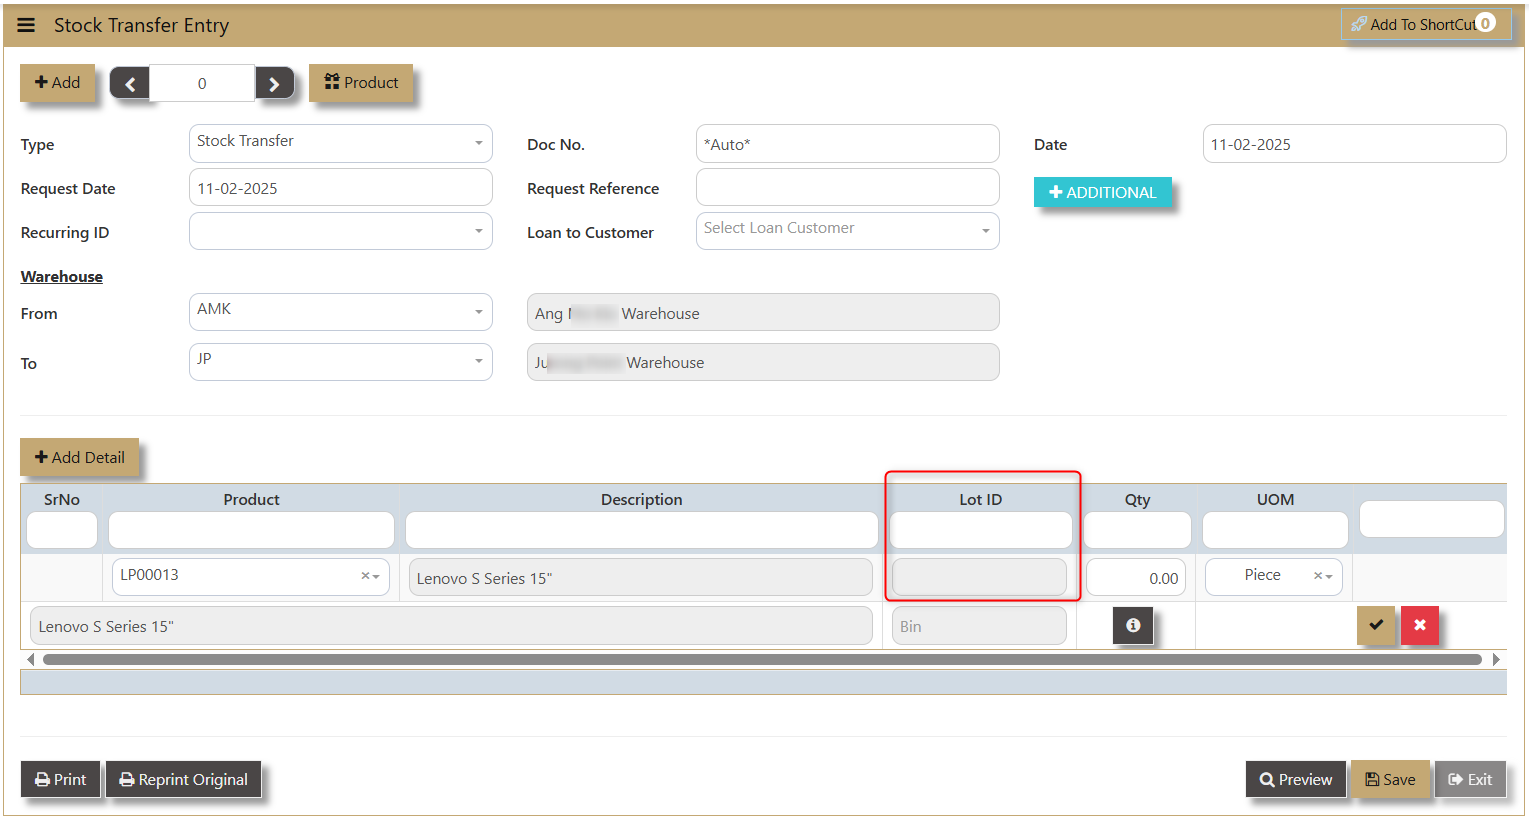](https://doc.uniq365.com/uploads/images/gallery/2025-02/xHRimage.png)
- **Qty** - or Quantity allows the user to manually key in the number of products to be transferred.
[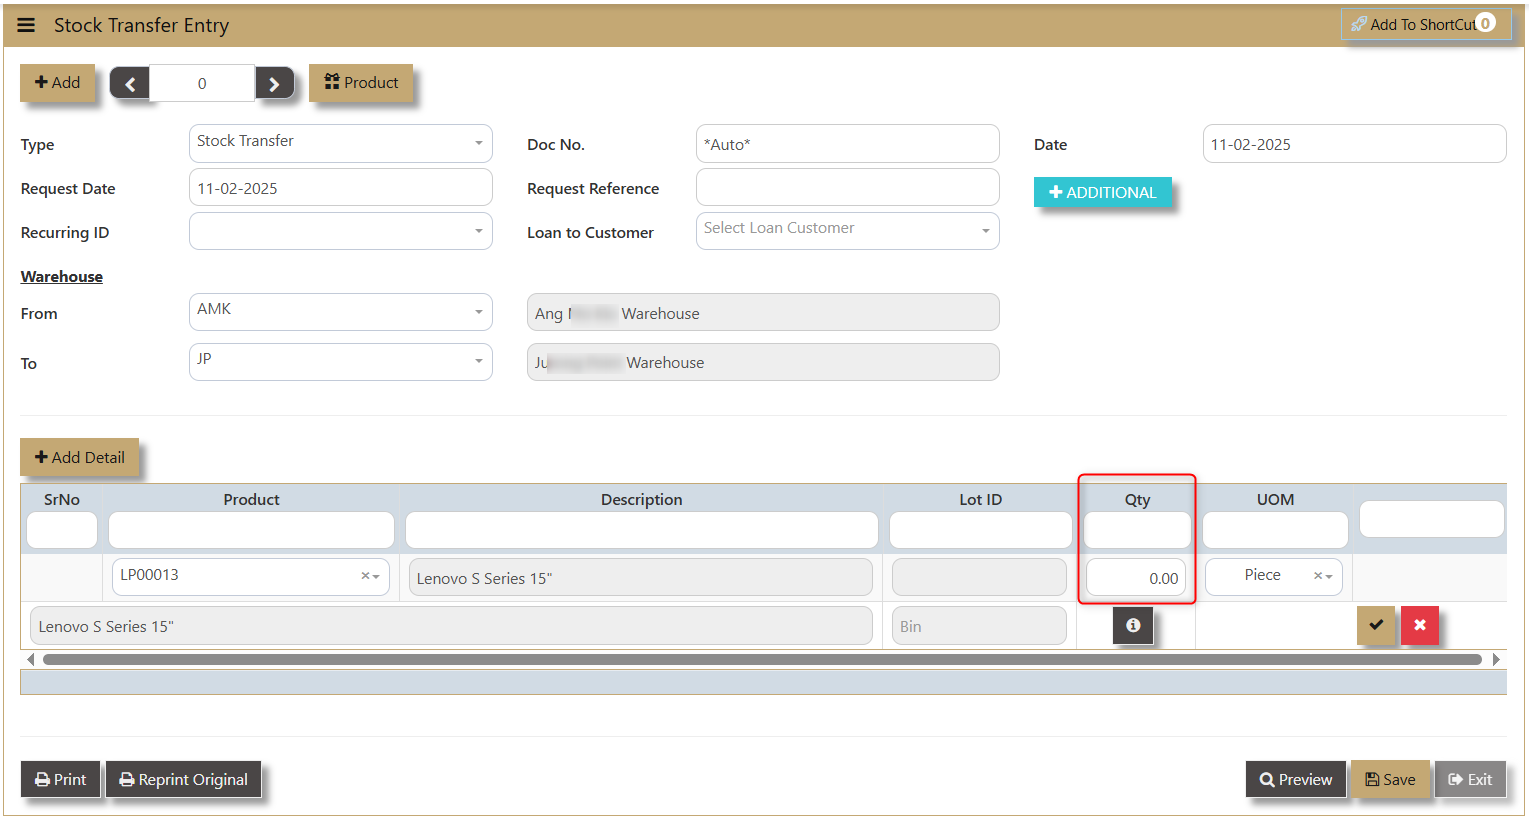](https://doc.uniq365.com/uploads/images/gallery/2025-02/R0timage.png)
- **UOM** - Unit of Measure depends on the maintained information of the product in the Product and Service Maintenance.
[](https://doc.uniq365.com/uploads/images/gallery/2025-02/6fKimage.png)
- **'i' icon** - allows the user to input additional information and access any Serial No and Product Detail.
[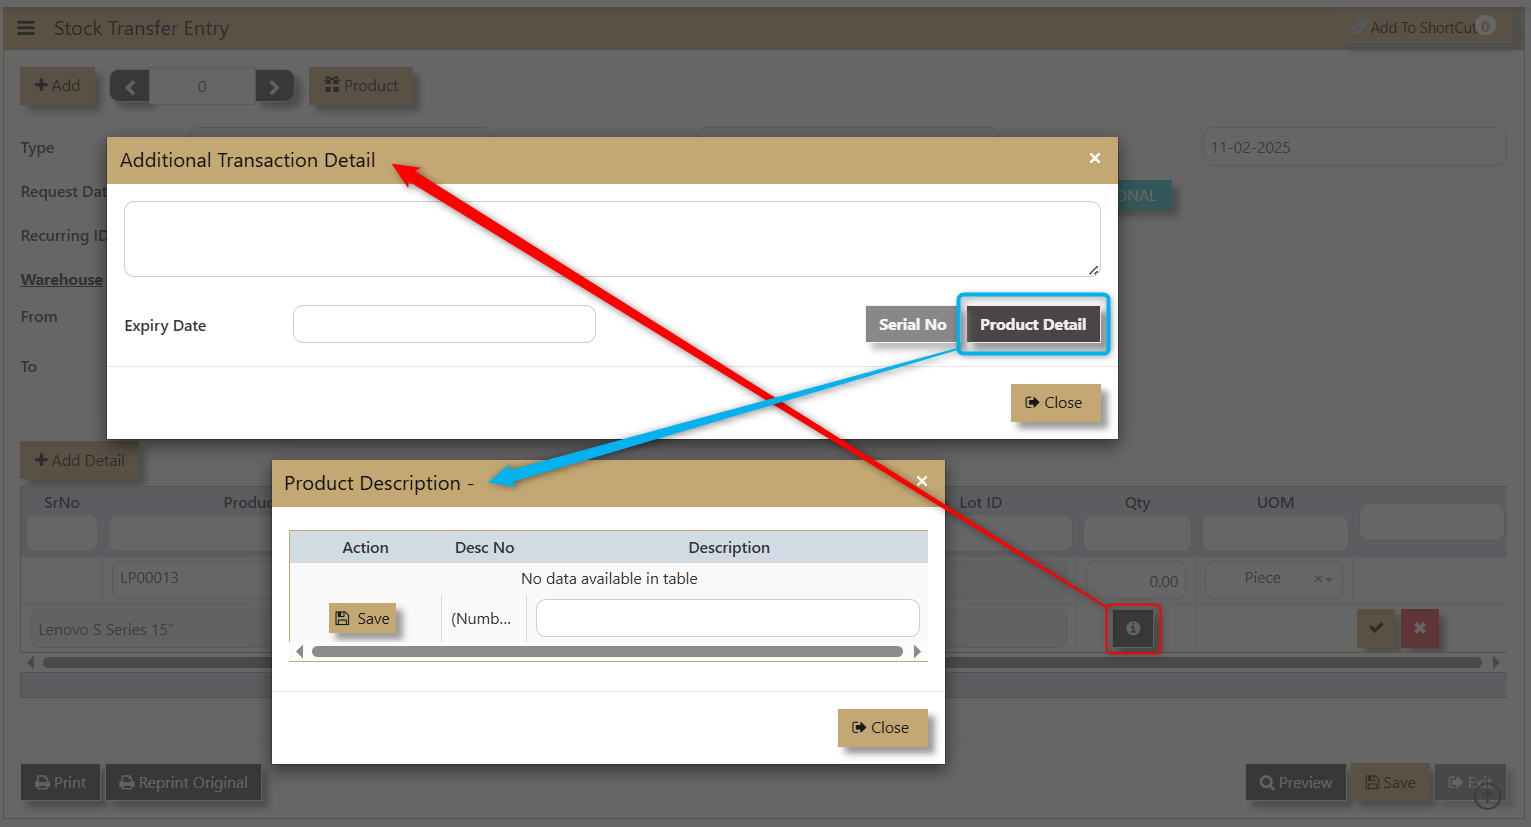](https://doc.uniq365.com/uploads/images/gallery/2025-02/RvDimage.png)
5. Click '**Save'** and '**Preview'** after the transaction.
User can be able to see this transfer between 2 Warehouse in the Stock Ledger Report as shown in this sample:
[](https://doc.uniq365.com/uploads/images/gallery/2025-02/7Y2image.png)
# Stock Take
##### This function is normally done after a physical stock take is done. After affirming the stock quantity, the user can key in the actual count quantity, after which the user can confirm the stock status by clicking on the “Confirm Now” button. Do note that once the confirm button is clicked, there is no way to reverse the action unless another Stock take is created.
##### This is because the action will update the stock status as well as creating a GL transaction to adjust the valuation accordingly.
\_\_\_\_\_\_\_\_\_\_\_\_\_\_\_\_\_\_\_\_\_\_\_\_\_\_\_\_\_\_\_\_\_\_\_\_\_\_\_\_\_\_\_\_\_\_\_\_\_\_\_\_\_\_\_\_\_\_\_\_\_\_\_\_\_\_\_\_\_\_\_\_\_\_\_\_\_\_\_\_\_\_\_\_\_\_\_\_\_\_\_\_\_\_\_\_\_\_\_\_\_\_\_\_\_\_\_\_\_\_\_\_\_\_\_\_\_\_\_\_\_\_\_\_\_\_\_\_\_\_\_\_\_\_\_\_\_\_\_\_\_\_\_\_
##### **What is Stock Take?**
A stock take function in the system is used for inventory count every month or an annual inventory count based from the customer process. Normally a warehouse manager/encoder needed to facilitate inventory count per warehouse and generate the products that are reflected in the inventory.
##### **How to Create Stock Take?**
1\. Click on **Stocks – Stock Operations – Stock Take** icon for following screen.
[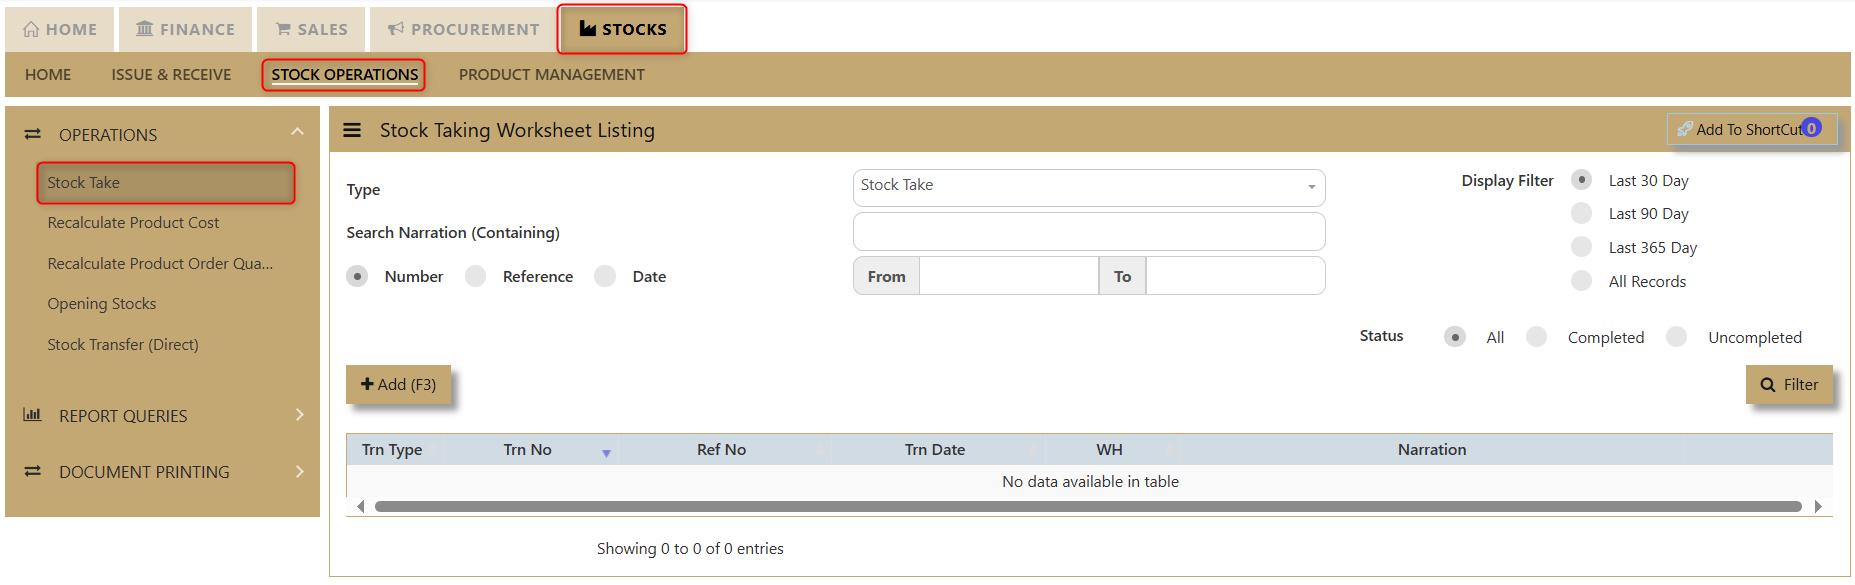](https://doc.uniq365.com/uploads/images/gallery/2025-02/1bMimage.png)
2\. Click on Add (F3) to create new transaction.
[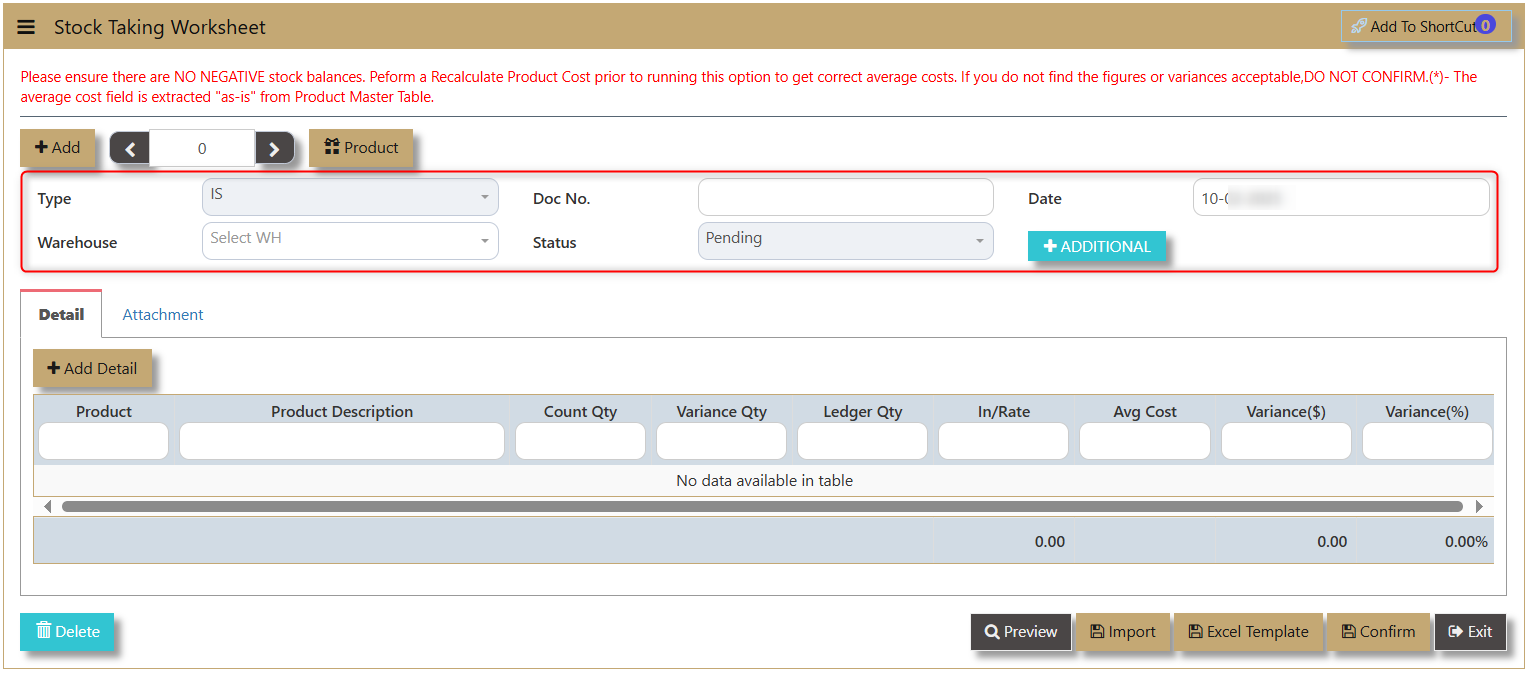](https://doc.uniq365.com/uploads/images/gallery/2025-02/m9pimage.png)
**Type** - IS is the code of Stock Take transaction and this will automatically appear one transaction is added.
**Warehouse** - allows user to select on which Warehouse to record the stock take transaction.
**Doc No.** - enable the user to track the transaction. This can be autogenerated by the system.
**Status** - Determine if the transaction is Confirmed or Pending by the user.
**Date** - Shows when the transaction was made.
**Additional** - button where user can add product information on PDSU and Remarks.
[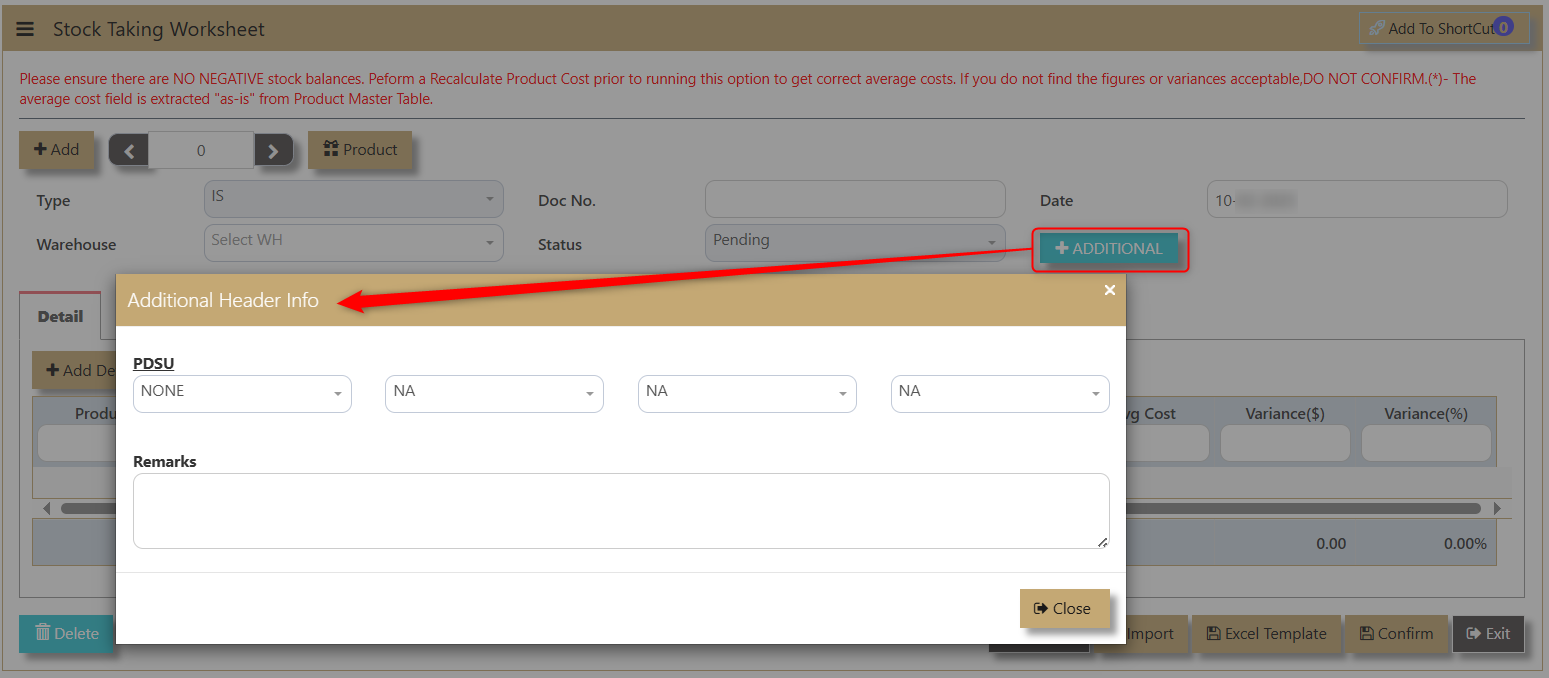](https://doc.uniq365.com/uploads/images/gallery/2025-02/leGimage.png)
3\. After adding the transaction, a line detail for Product will appear. The user must select which product to transact.
[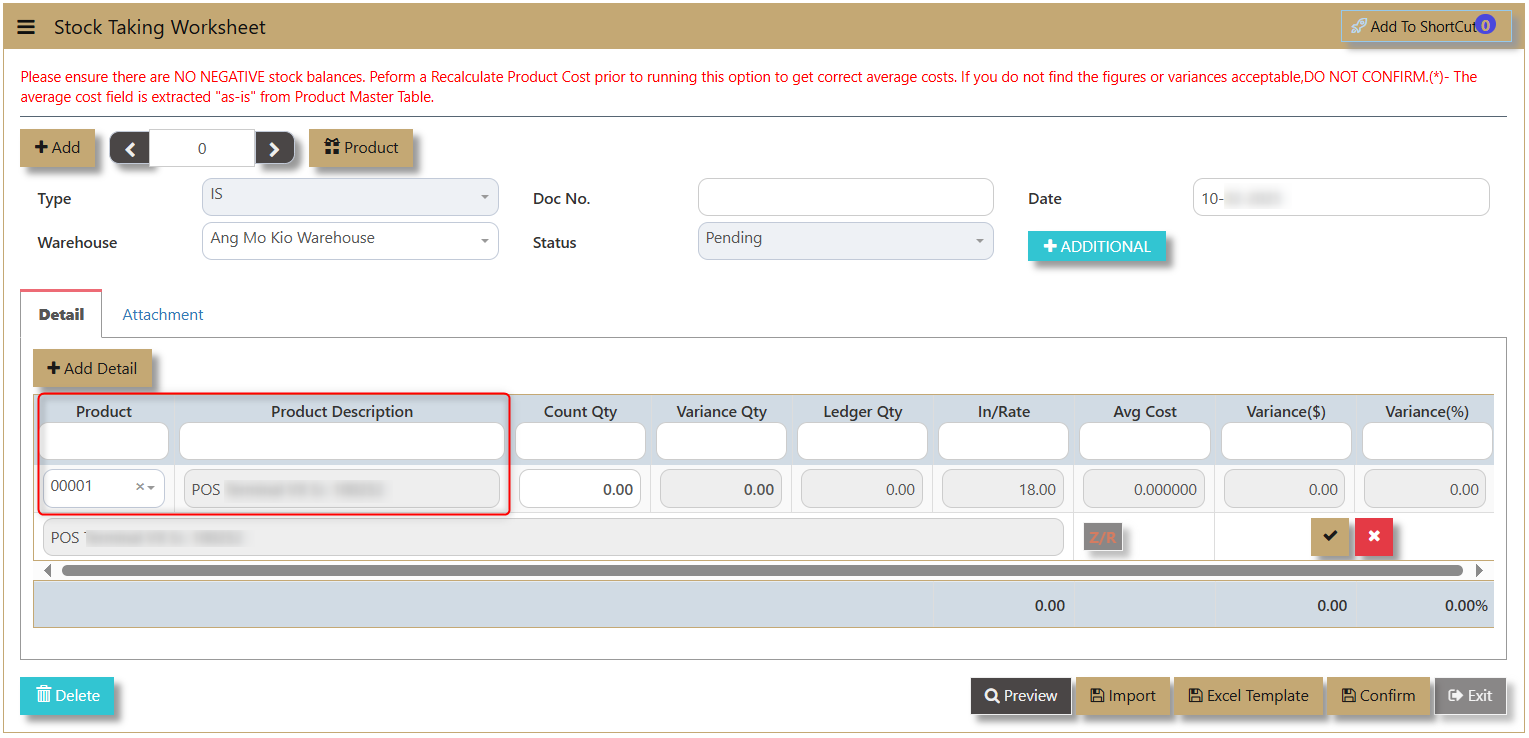](https://doc.uniq365.com/uploads/images/gallery/2025-02/zUUimage.png)
**Product & Product Description** - Once product code is selected the system will automatically populate the product description.
[](https://doc.uniq365.com/uploads/images/gallery/2025-02/MV2image.png)
**Count Qty** - The field where the user will encode the actual count of the product.
[](https://doc.uniq365.com/uploads/images/gallery/2025-02/CLYimage.png)
**Variance Qty** - Difference between Count Qty and Ledger. This is the quantity used to adjust on the system.
[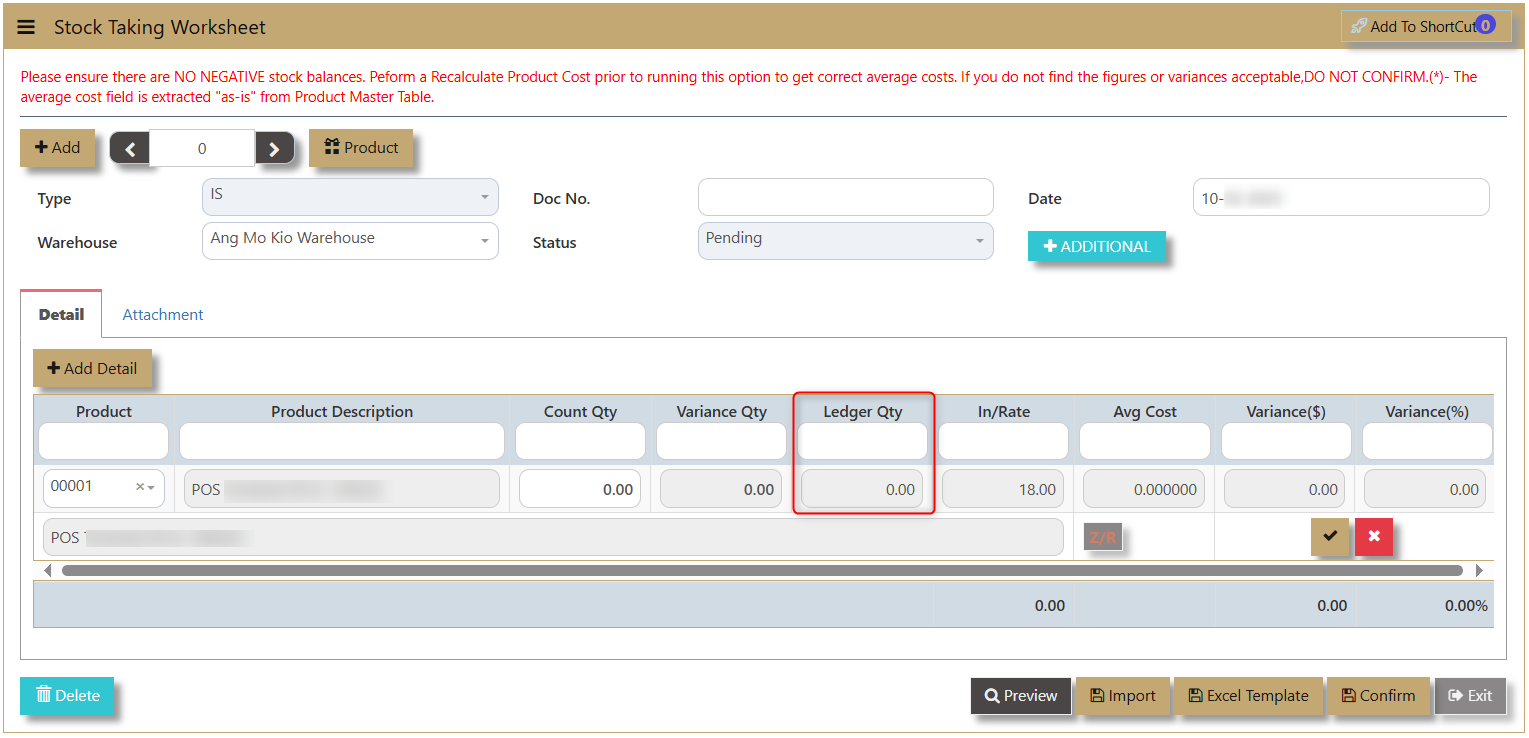](https://doc.uniq365.com/uploads/images/gallery/2025-02/ni3image.png)
**Ledger Qty** - This is the on hand quantity of the product within the system.
[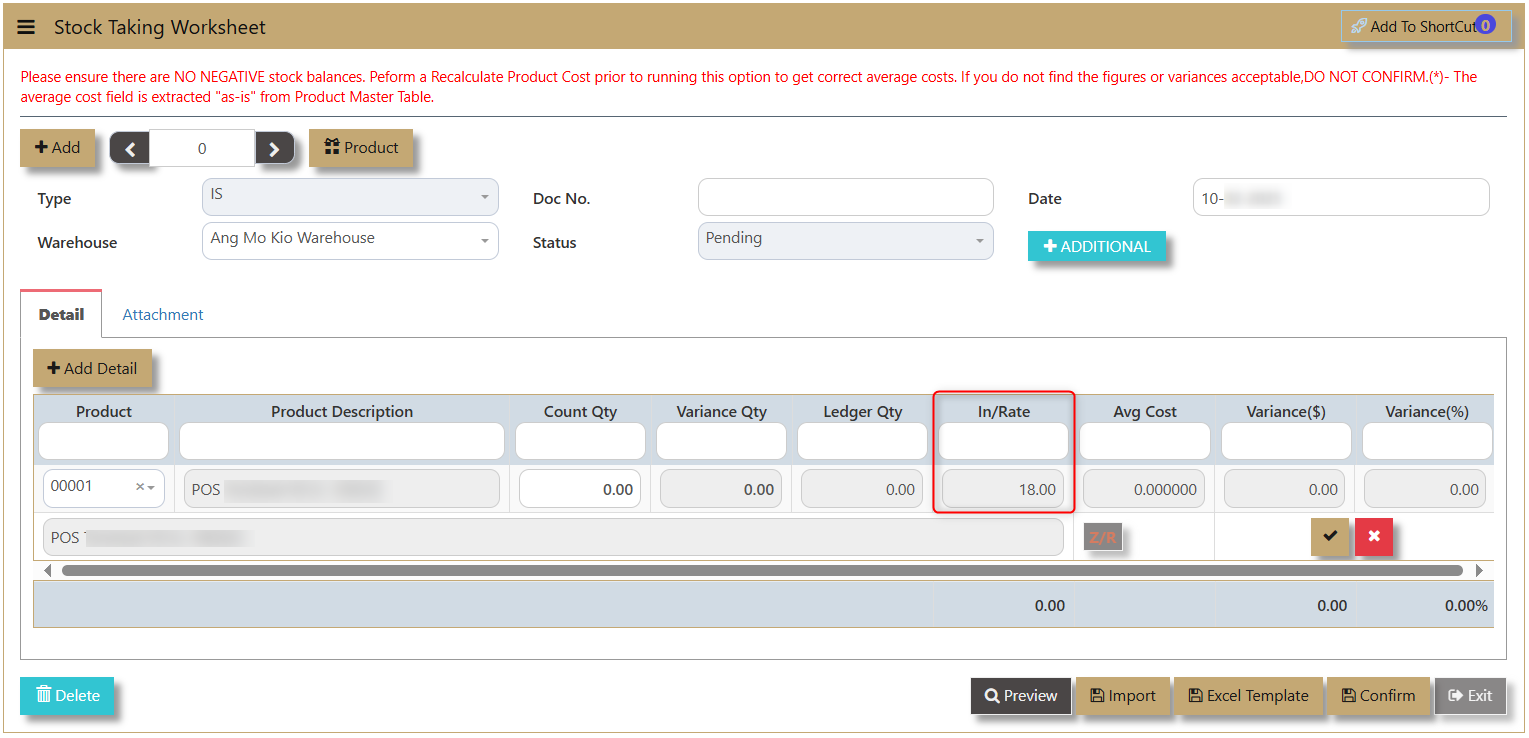](https://doc.uniq365.com/uploads/images/gallery/2025-02/FFTimage.png)
**In/Rate** - the incoming rate based on the last receipt transaction.
[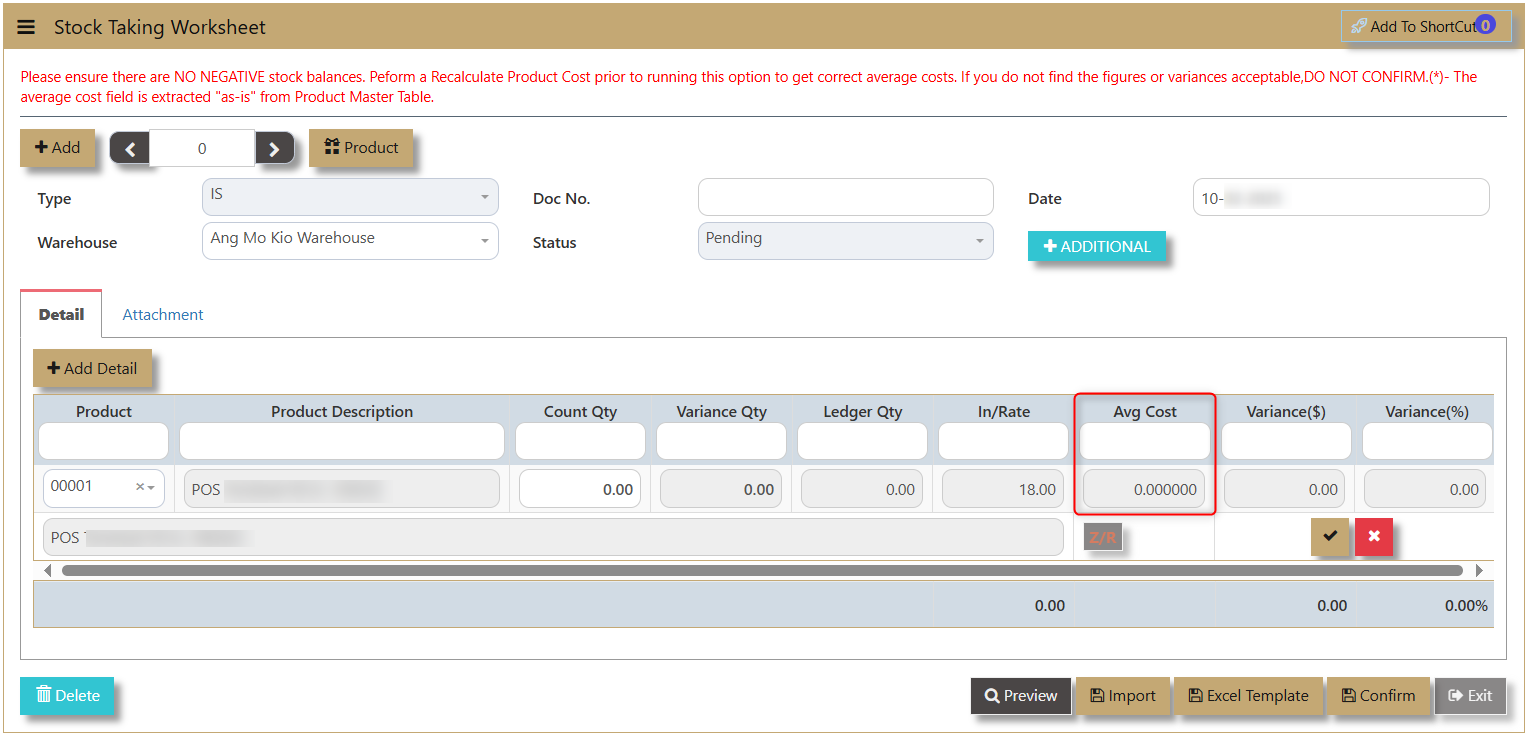](https://doc.uniq365.com/uploads/images/gallery/2025-02/xuMimage.png)
**Avg Cost** - or Average Cost which is usually generated by the system.
[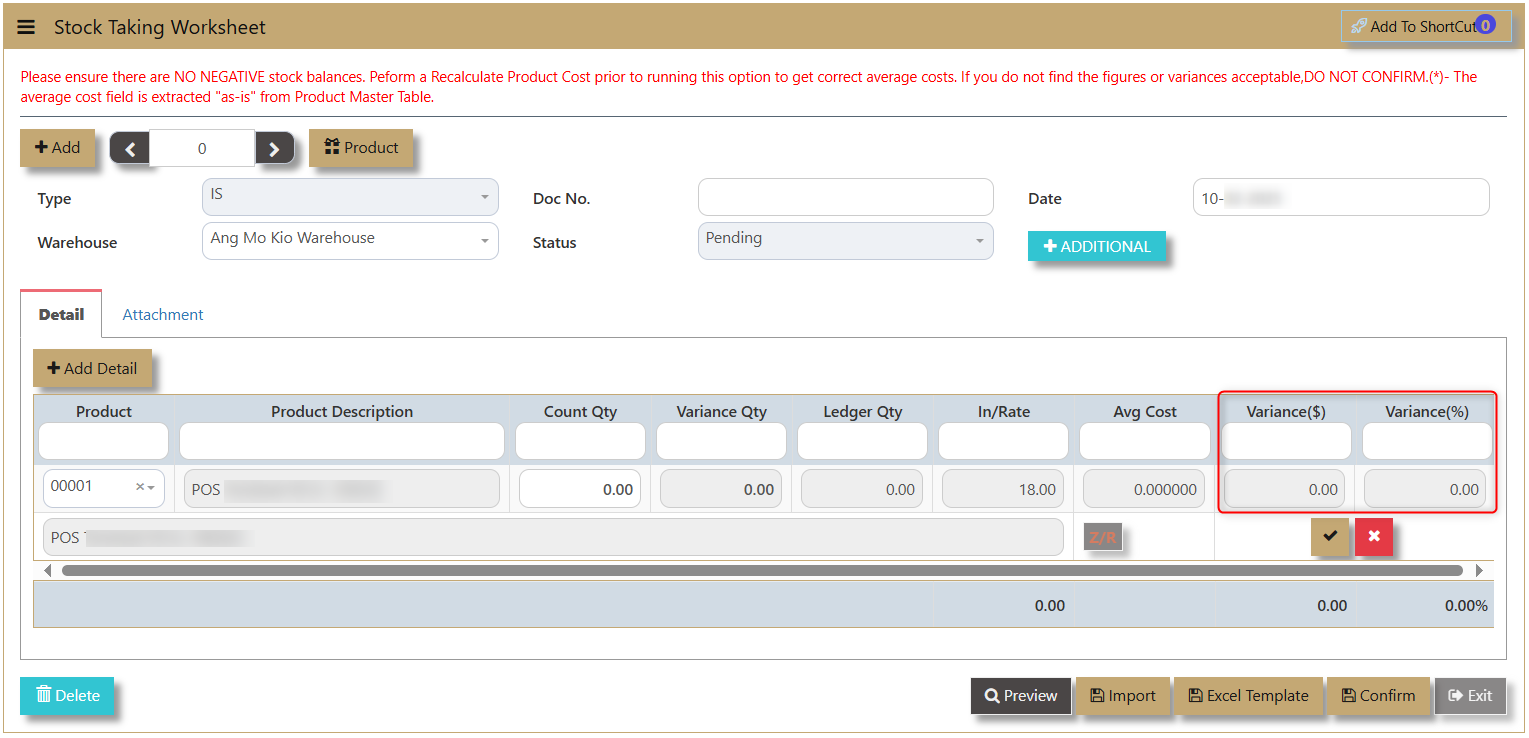](https://doc.uniq365.com/uploads/images/gallery/2025-02/ULjimage.png)
**Variance ($) & Variance (%)** - This is the amount of Variance in Currency and Percentage.
[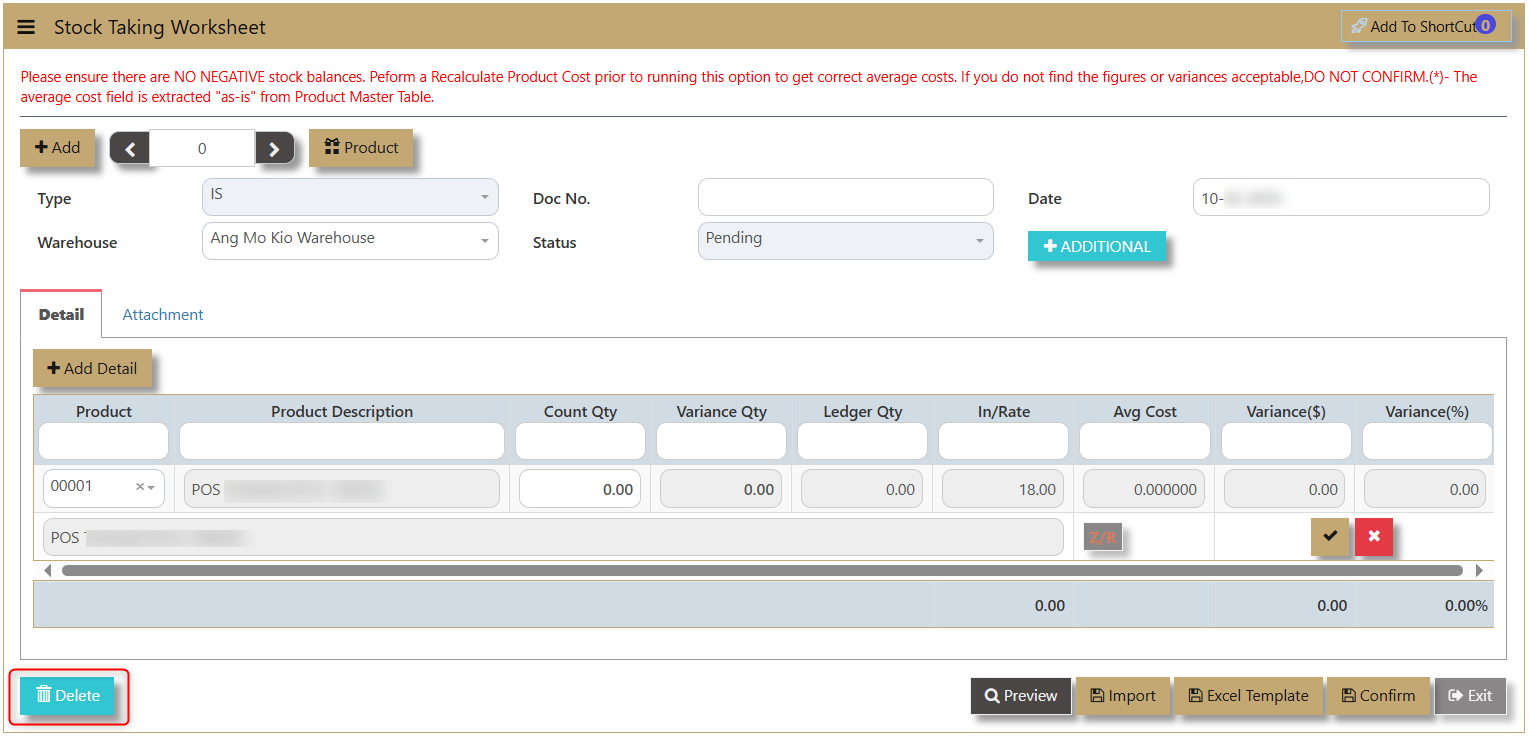](https://doc.uniq365.com/uploads/images/gallery/2025-02/qBpimage.png)
**Delete** - allows user to delete the line details transaction.
[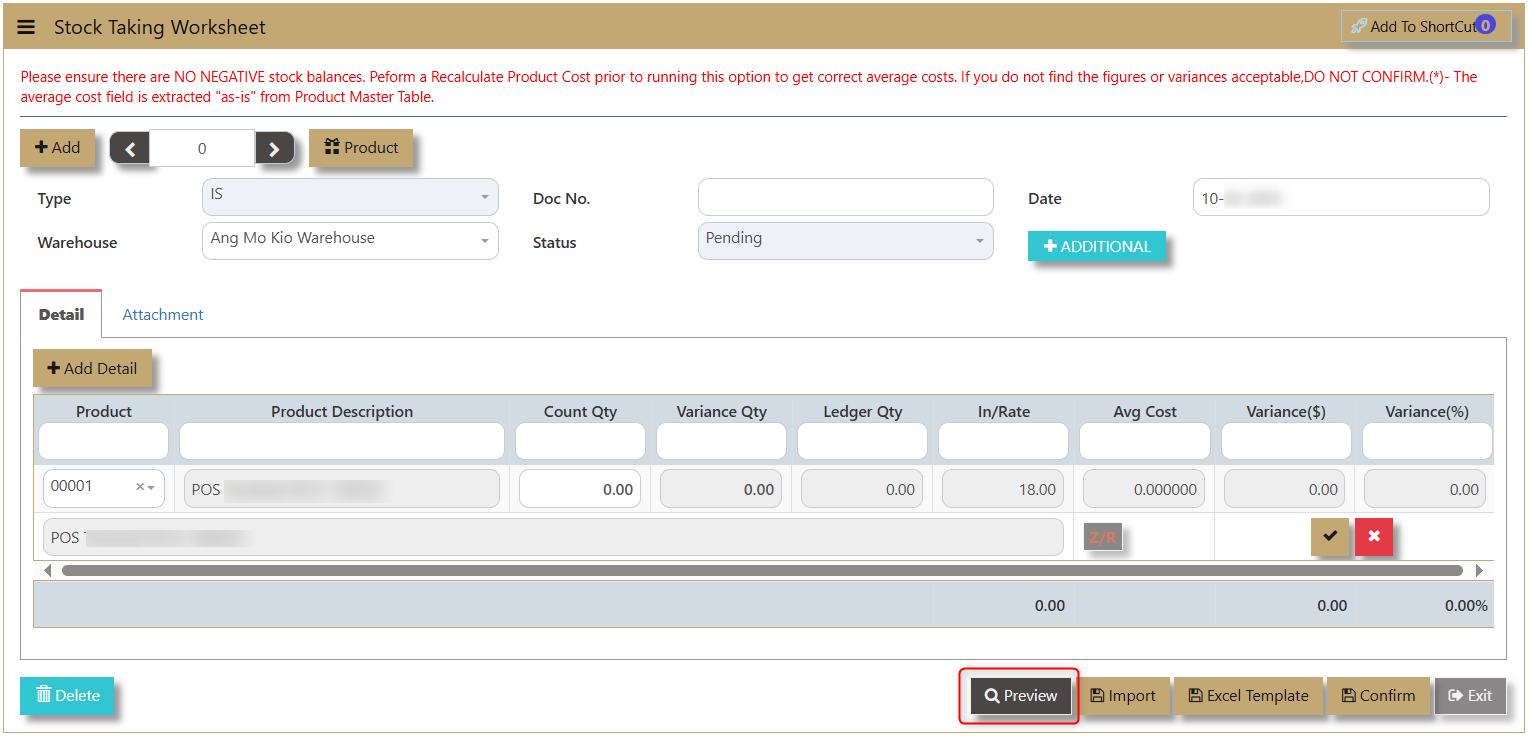](https://doc.uniq365.com/uploads/images/gallery/2025-02/GLeimage.png)
**Preview** **-** allows the user to view the transaction and print.
[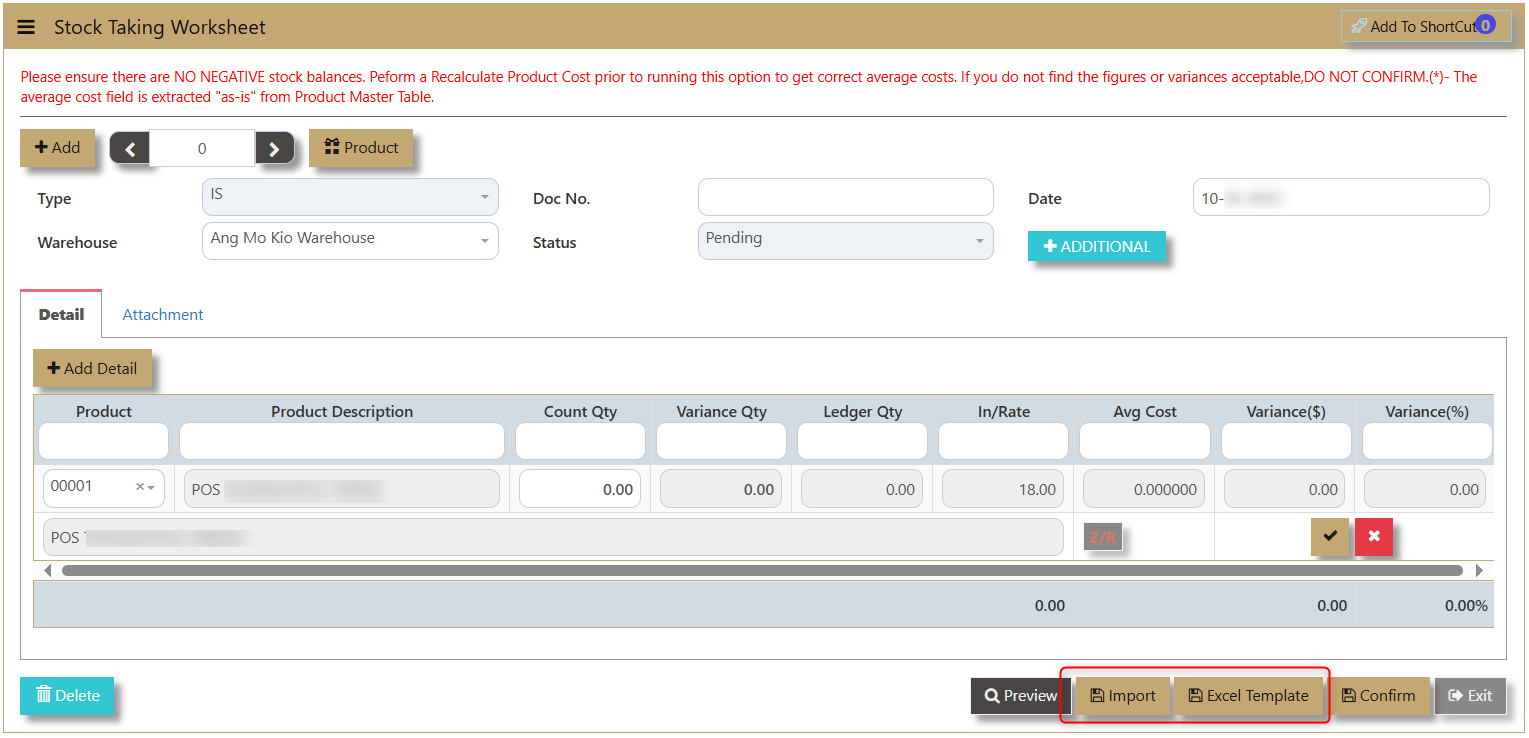](https://doc.uniq365.com/uploads/images/gallery/2025-02/95Yimage.png)
**Excel Template & Import** - allows user to download an excel format that can simultaneously be imported to the system to record the transactions.
Excel Format:
[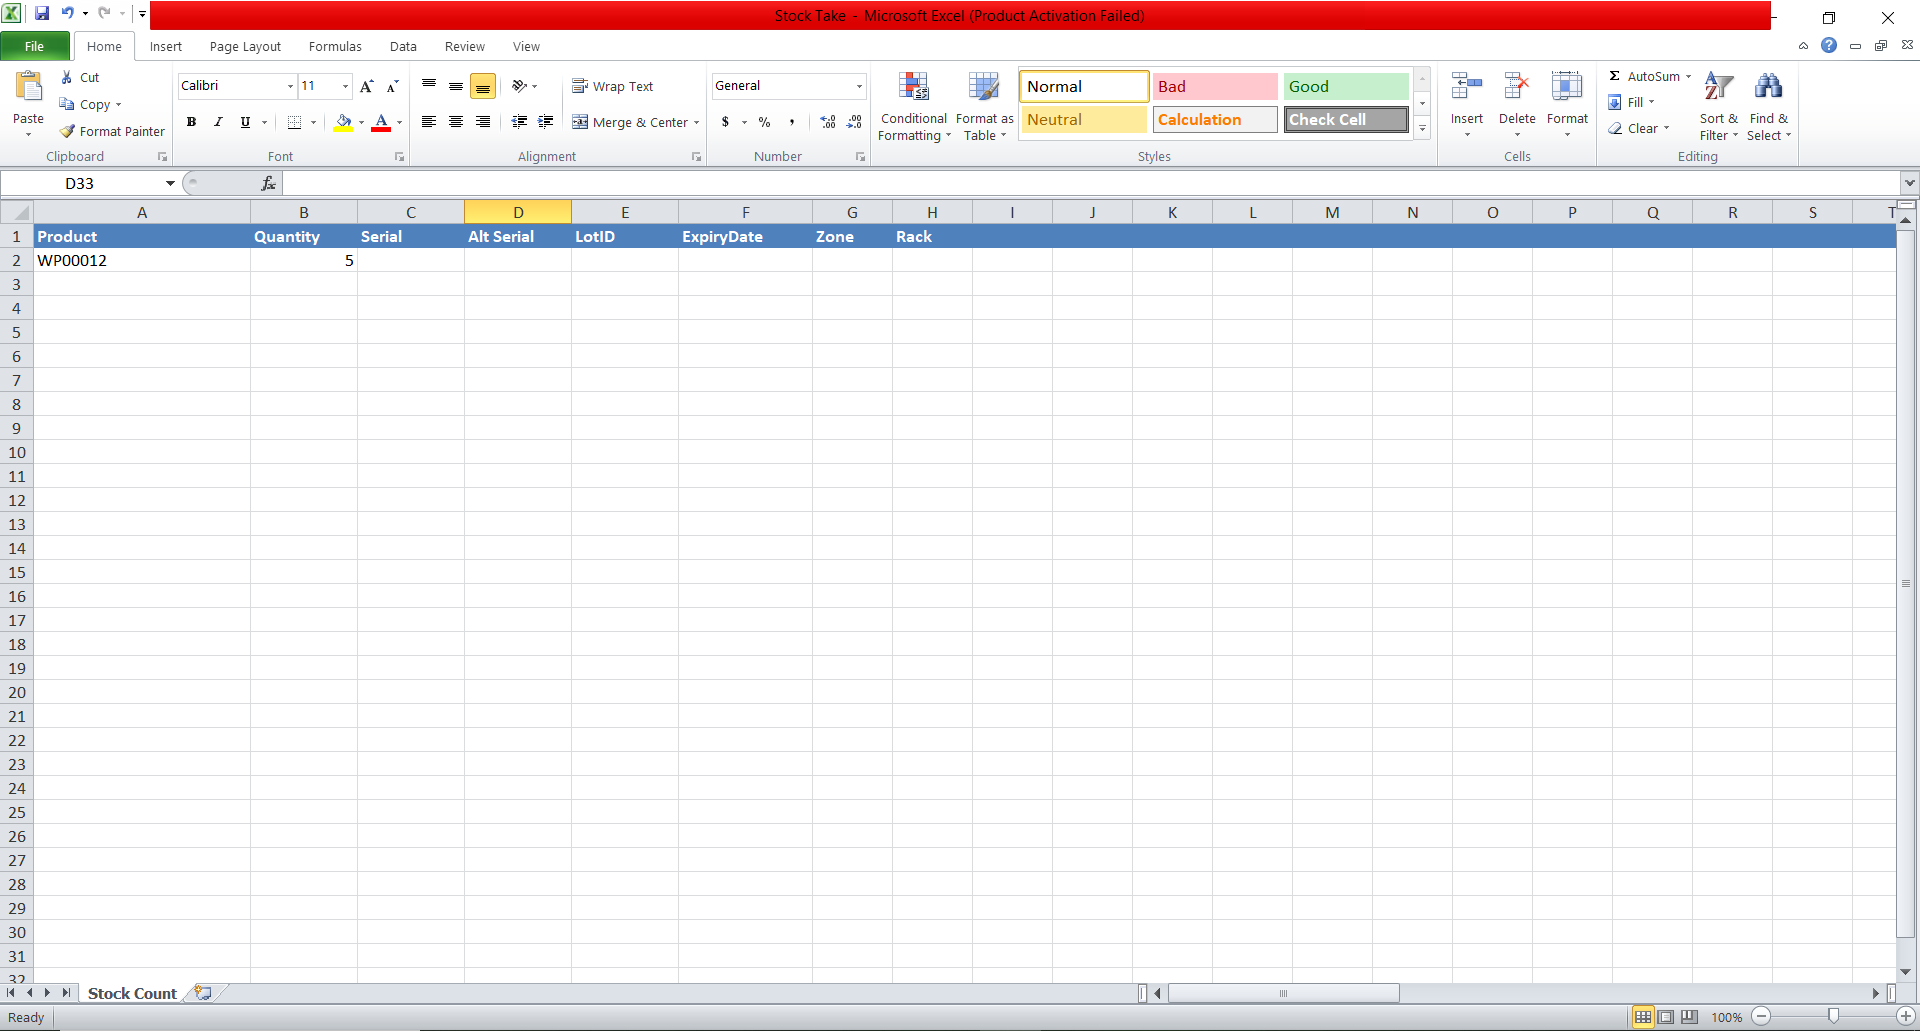](https://doc.uniq365.com/uploads/images/gallery/2025-02/1q6image.png)
Import data:
[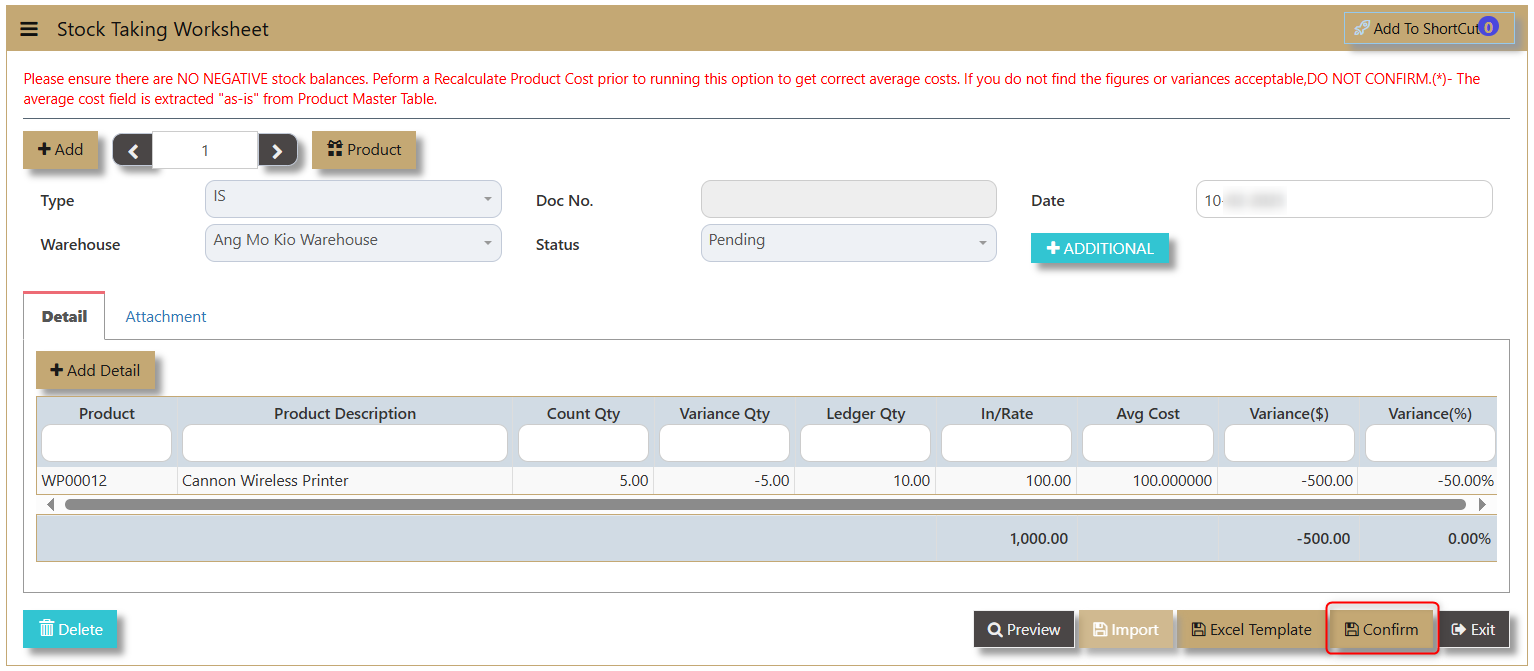](https://doc.uniq365.com/uploads/images/gallery/2025-02/buPimage.png)
4\. After all transaction is made, click on **Confirm**. Do note that once confirmed, it cannot be edited nor deleted.
> ##### **Important:** Before conducting this option, it is important to note the following pre-requisites to the stocktaking.
>
> - No negative stocks are allowed. To check that no negative is happening in between transactions, go and run Electronic Stock Card in the Inventory – Reports & Queries before proceeding.
> - Correct warehouse quantities and costing. To achieve a more indicative warehouse balance and its costs, you should perform a Recalculate Product Cost before this module is activated.
> - A GL transaction will be created when you click the Confirm NOW! Button.
User can be able to check the movement of the stocks in the Stock Ledger as follows:
[](https://doc.uniq365.com/uploads/images/gallery/2025-02/mpXimage.png)
# Recalculation
##### The **Recalculate Product Cost** and **Recalculate Order Quantity** functions in Uniq365 are essential processes designed to ensure the accuracy of product costs and order quantities. By recalculating these values, the system helps maintain correct stock valuations and ensures they align with the corresponding General Ledger (GL) codes. This alignment is crucial for producing reliable financial records and streamlining year-end functions, making it easier to reconcile and close financial periods with confidence. These processes support better inventory management and help businesses maintain operational efficiency and financial accuracy.
\_\_\_\_\_\_\_\_\_\_\_\_\_\_\_\_\_\_\_\_\_\_\_\_\_\_\_\_\_\_\_\_\_\_\_\_\_\_\_\_\_\_\_\_\_\_\_\_\_\_\_\_\_\_\_\_\_\_\_\_\_\_\_\_\_\_\_\_\_\_\_\_\_\_\_\_\_\_\_\_\_\_\_\_\_\_\_\_\_\_\_\_\_\_\_\_\_\_\_\_\_\_\_\_\_\_\_\_\_\_\_\_\_\_\_\_\_\_\_\_\_\_\_\_\_\_\_\_\_\_\_\_\_\_\_\_\_\_\_\_\_\_\_\_
In **Stocks - Stock Operations - Recalculate Product Cost/Recalculate Product Order Quantity.**
[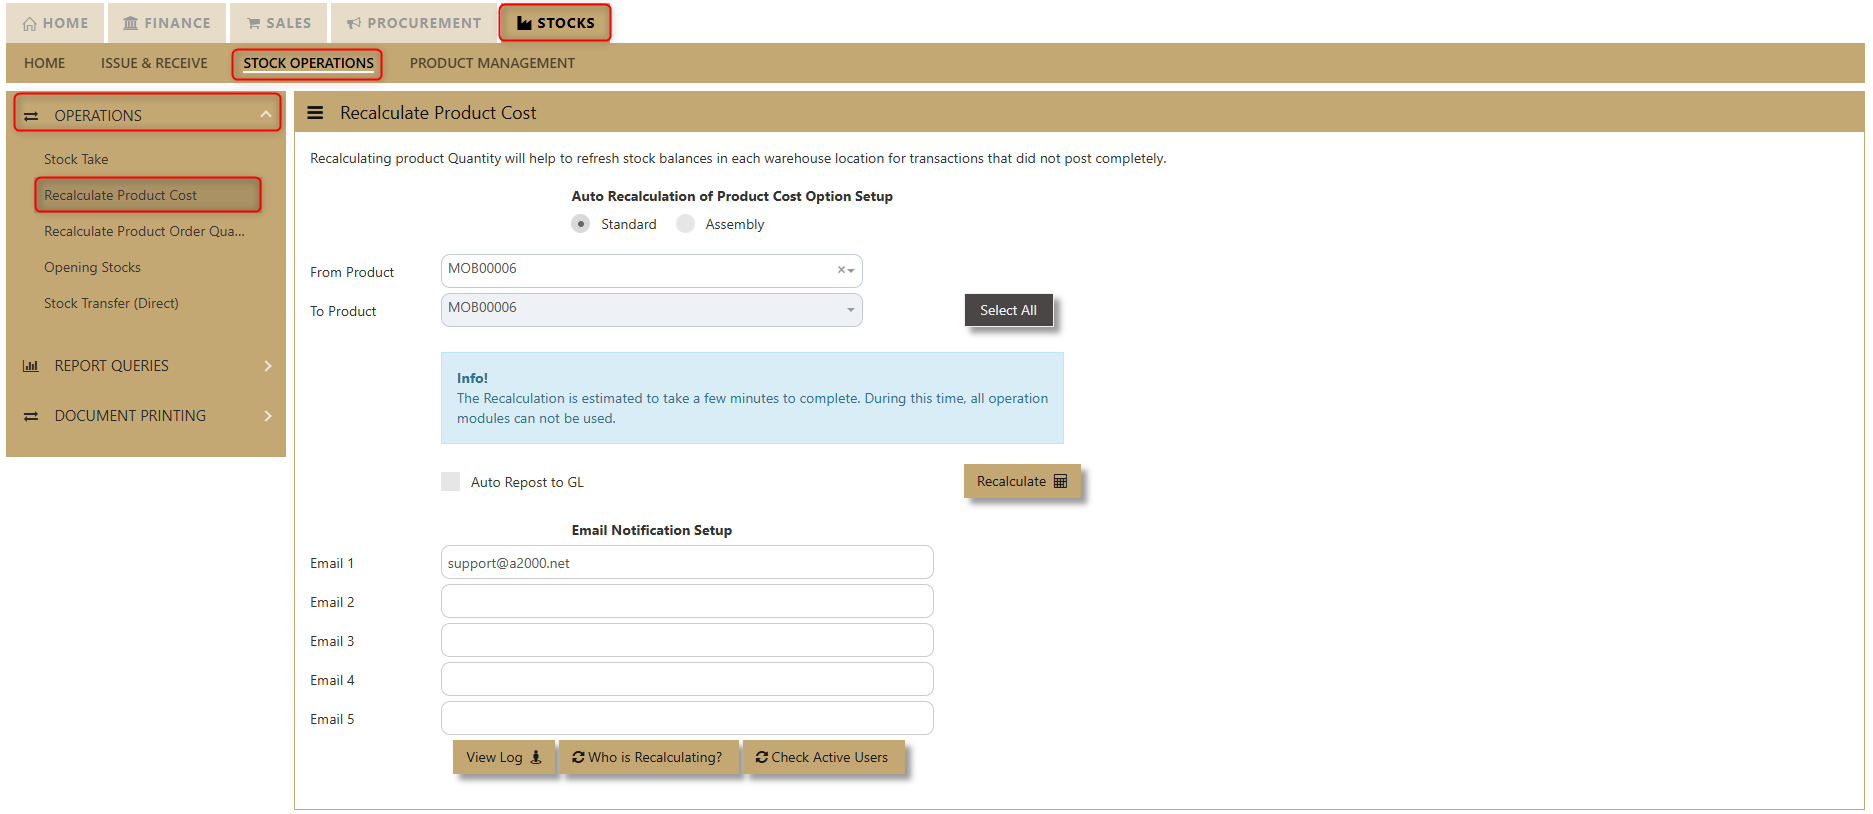](https://doc.uniq365.com/uploads/images/gallery/2025-02/AEvimage.png)
[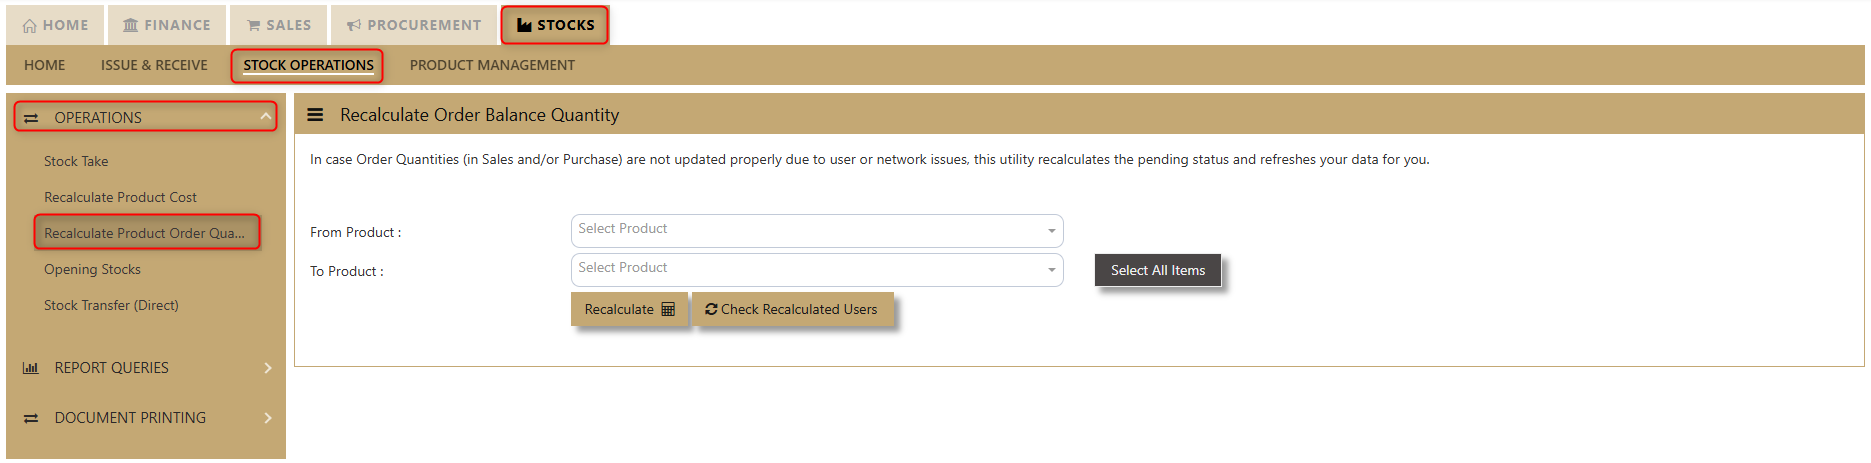](https://doc.uniq365.com/uploads/images/gallery/2025-02/XWrimage.png)
##### **STANDARD & SCHEDULED RECALCULATION**
**1. SYSTEM CHECK NOT TO PROCEED**
a. The system will check if there is an existing Recalculation Process that is on-going. If YES, then the recalculation will not proceed.
b. When the user HIT the Recalculate button, the system will check first if there where users currently login in the system (User Types: OPERATIONS, MOBILE) are prohibited to login if the recalculation is initiated. If there are users currently login for the following user types, a warning prompt will be displayed, and the recalculation will no longer to proceed.
c. The system will check for negative stock, if there is a detection, the system will not proceed for the recal, and then negative stock list will be emailed to the one indicated on the email notification set-up. You can use also the view log button to determine negative stock entries.
**2. SYSTEM CHECK TO PROCEED**
a. If no Users are currently active under the following User Types: OPERATIONS, MOBILE and no ongoing recalculation, then the Product recalculation will proceed. The system will prompt the user an estimated time for the product recalculation to be completed. This will set the user’s expectation as to when the recalculation will be finished.
[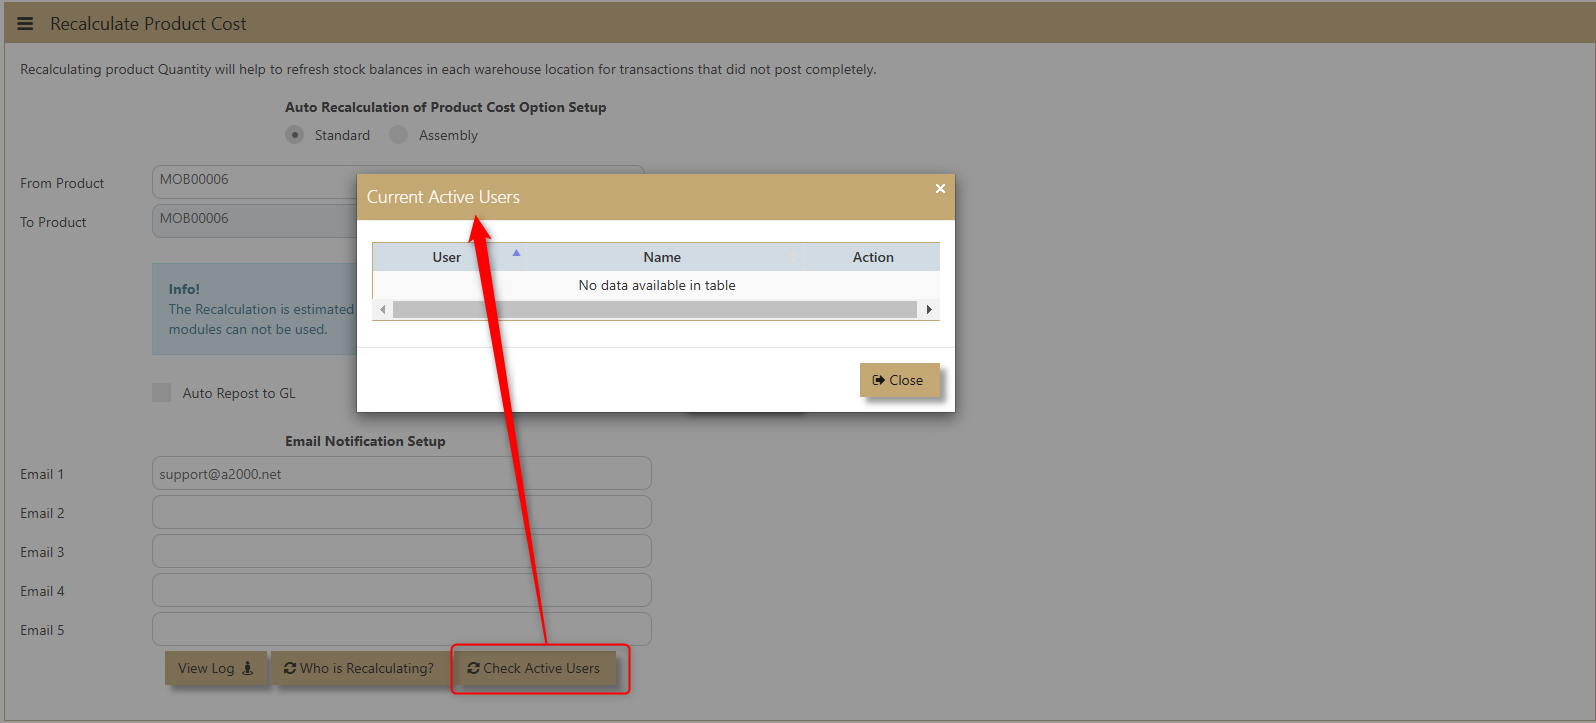](https://doc.uniq365.com/uploads/images/gallery/2025-02/EiXimage.png)
b. The User will then be prompted an option for the following to either perform the Standard Recalculation or Scheduled Recalculation:
[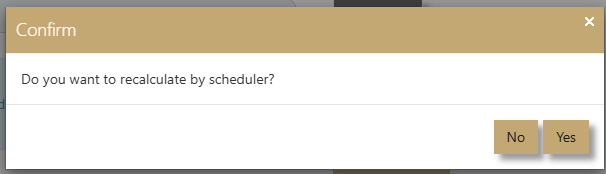](https://doc.uniq365.com/uploads/images/gallery/2025-02/r4himage.png)
**Standard Recalculation** – Upon clicking **NO**, the standard recalculation will be triggered immediately and display estimated time to finished. If it detects negative stock, the system will not proceed with recal process and instead email a negative stock list notification. If no negative stock, the system will proceed accordingly to perform recal.
**Scheduled Recalculation** – Upon Clicking **YES**, it will proceed with the Scheduled Recalculation. However, the user will be prompted with another prompt dialogue box either to detect negative stock or not. If the User Selected YES, then the system will prompt negative stock detection and display these entries, otherwise if selected NO, then it will ignore and proceed the with scheduled recal.
a. When the Scheduled Recalculation is triggered the recalculation process will start by 12 Mid-night automatically.
##### **CHECK NOTES:**
1\. The Recalculate Product Cost have now the option to run the recalculation as scheduled and will auto run (12 AM Midnight).
[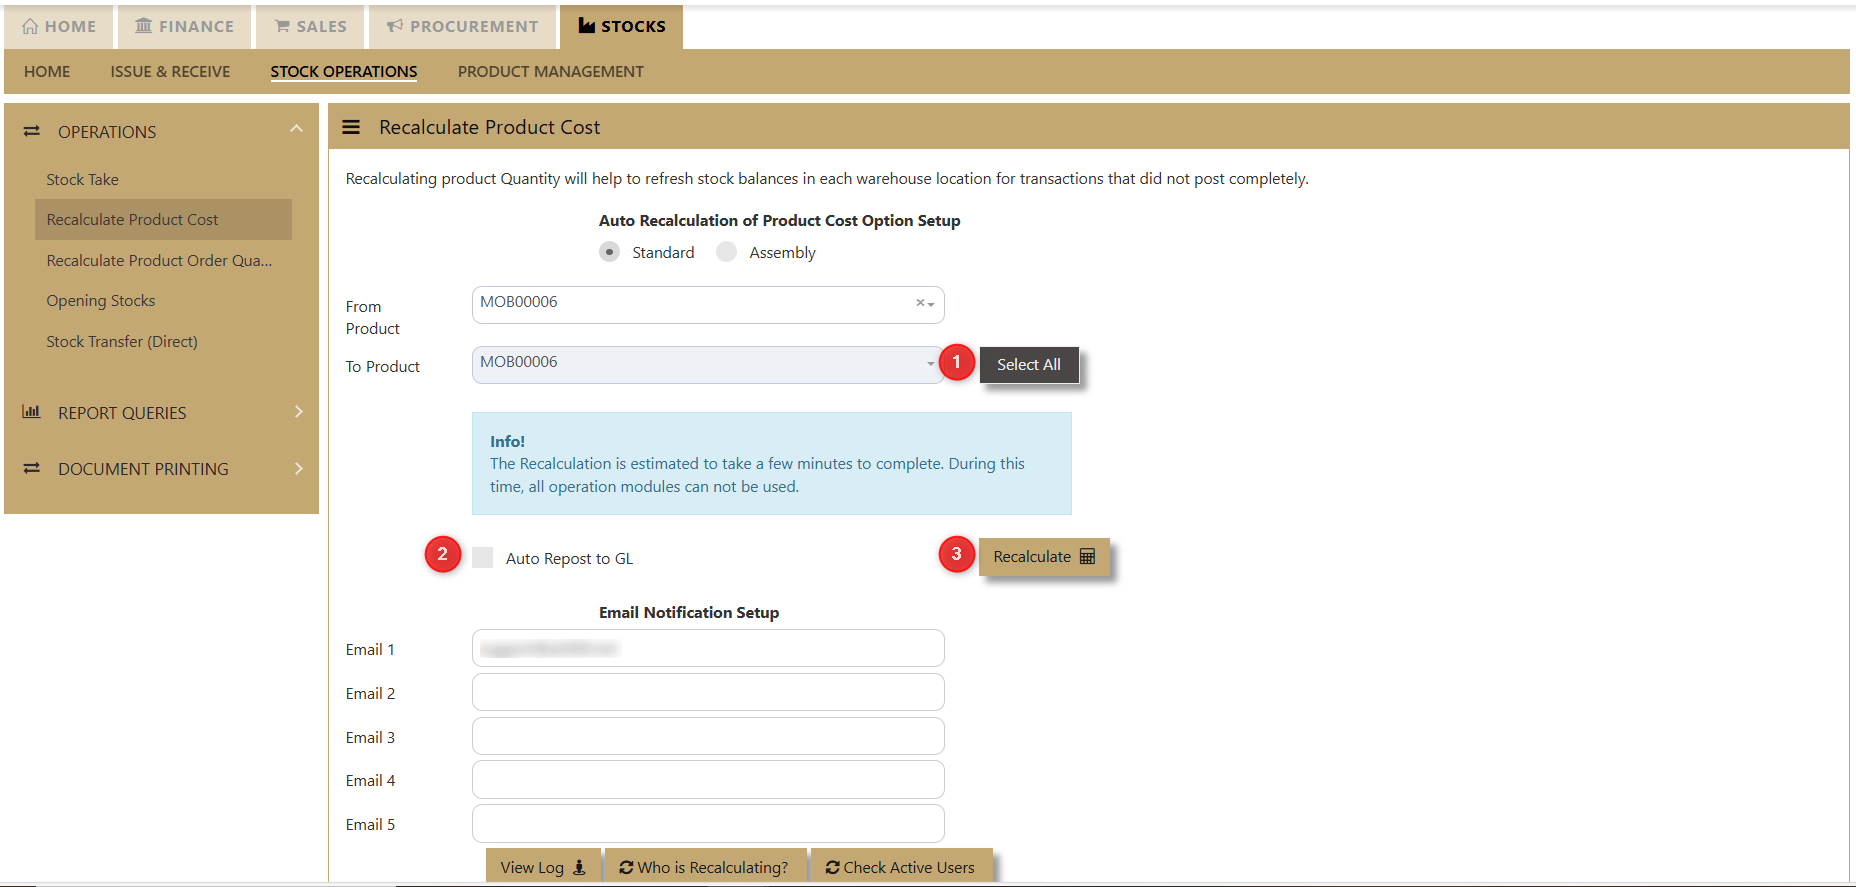](https://doc.uniq365.com/uploads/images/gallery/2025-02/7Ak1HVimage.png)
**PROCEED ACTION: YES** [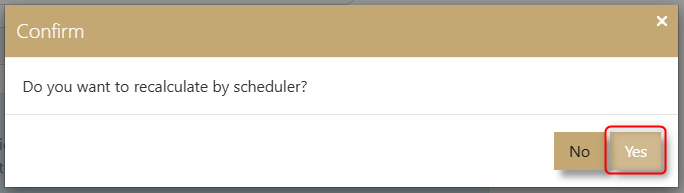](https://doc.uniq365.com/uploads/images/gallery/2025-02/Nhiimage.png)
- Only pre-calculate to check negative stock entries
- Option to cancel the scheduled recalculation process
- Will write a log as for pre-calculate process
If No negative occurrences, then the user can proceed with YES then it will auto perform Recalculate Product cost by 12 Midnight.
[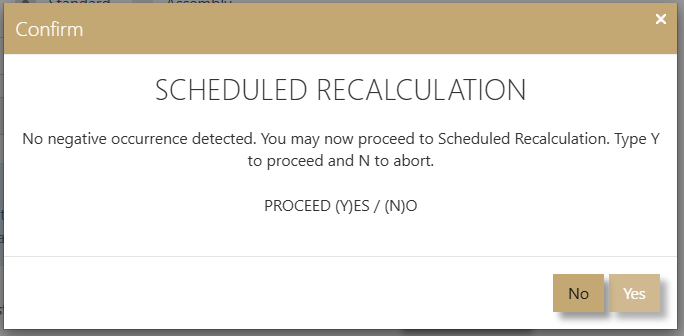](https://doc.uniq365.com/uploads/images/gallery/2025-02/b6cimage.png)
If there are negative occurrences, then the recalculate product cost will not be going to proceed instead there is an option to view negative occurrences.
[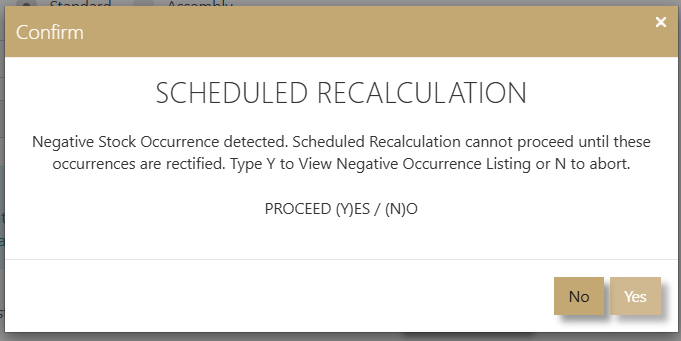](https://doc.uniq365.com/uploads/images/gallery/2025-02/GDximage.png)
**PROCEED ACTION: NO**
[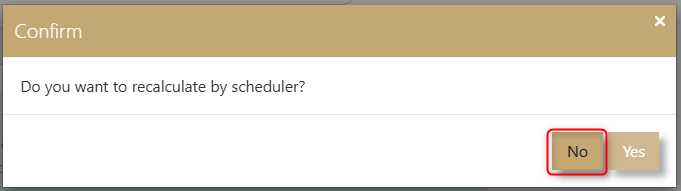](https://doc.uniq365.com/uploads/images/gallery/2025-02/5QHimage.png)
- Will recalculate at mid-night
- Will send email if there are negative stock entries
- Will write all logs as SERVICE and can check after midnight recalculation.
##### **WHAT’S NEW?**
1\. Upon selection of Products, a notification now will be displayed for the estimate time for the Recalculation to finished. This will help the user to keep in mind about the timing and to set the expectation right for the user.
[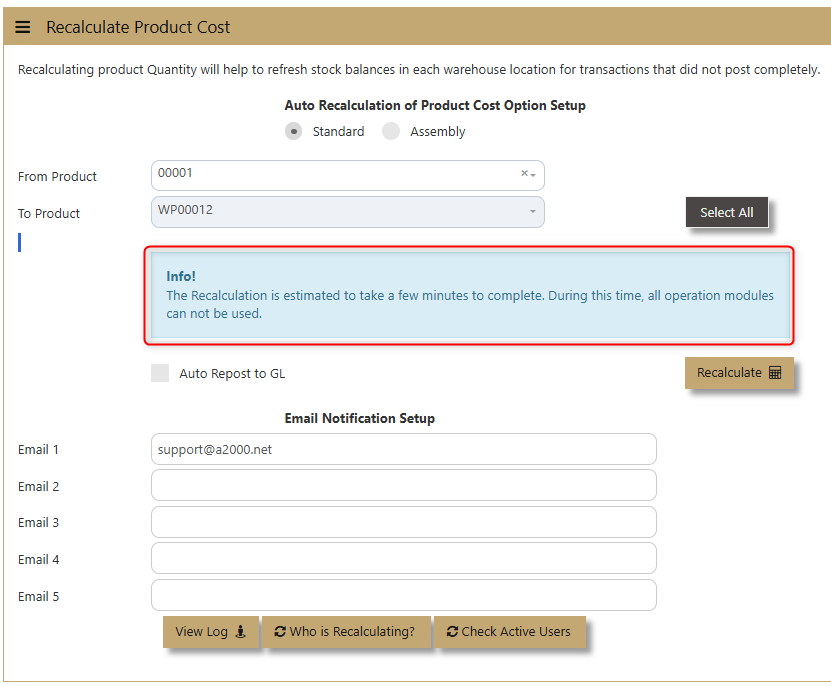](https://doc.uniq365.com/uploads/images/gallery/2025-02/c9Timage.png)
2\. When doing a Standard Product Recalculation, we need to make sure that all users are log out in the system. Otherwise, the recalculation will not be going to proceed. The system will have to check first if there is no OPERATIONS, MOBILE User Type that is log on the system as it will affect inventory. When the system is on the mode to perform a recalculation, these user types need to logout in the system. The Email Notification Setup – this will auto populate and the system will auto get the email of the user who will perform the recalculation.
[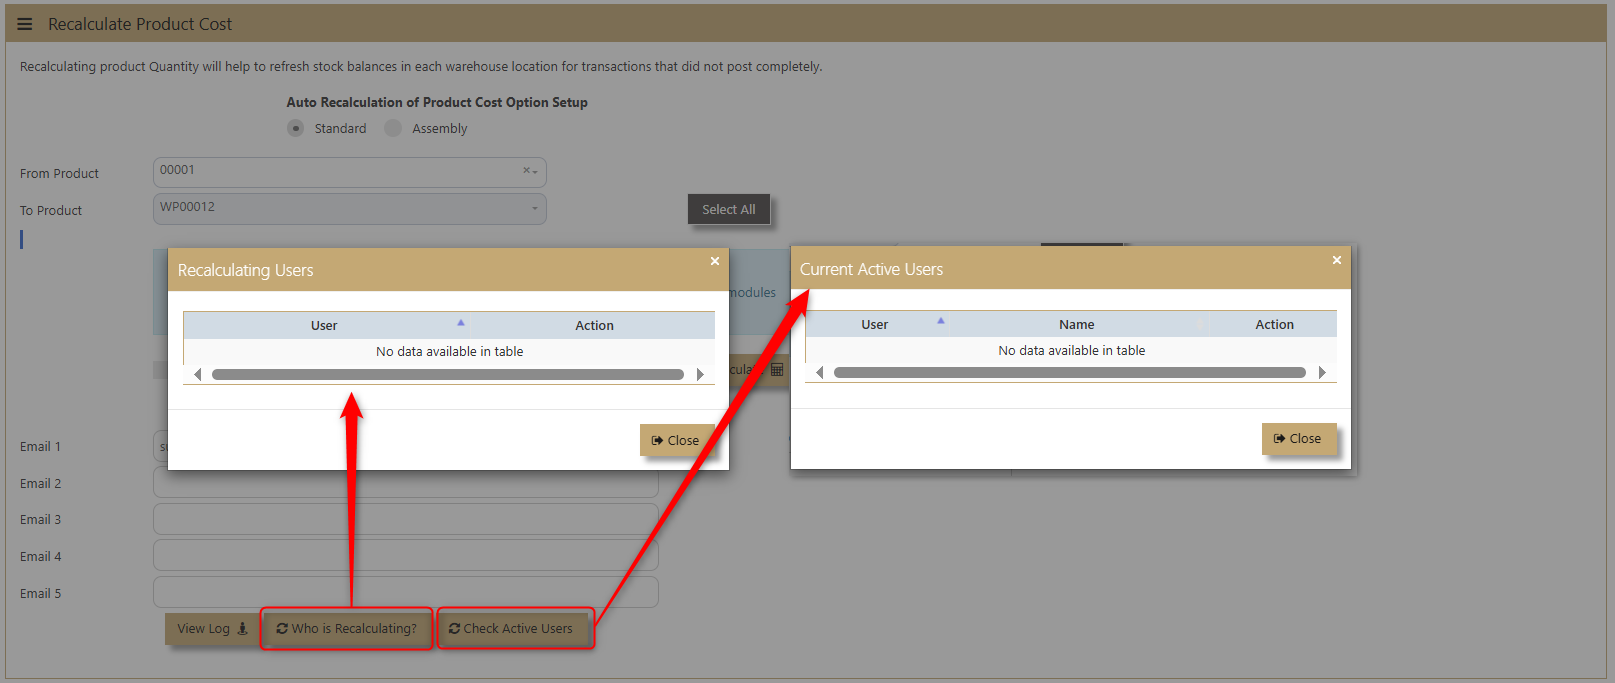](https://doc.uniq365.com/uploads/images/gallery/2025-02/RVkimage.png)
**WHO IS RECALCULATING?**
This button will display the person who is doing the ongoing Product Recalculation Process, regardless of whether it is a standard or scheduled recalculation.
**CHECK ACTIVE USERS**
This button will display CURRENT Active Users on the System. This displays the list of users that is currently logon in the system.
3\. Under System Manager -> User Access Control -> User Maintenance -> Select the user you want to give rights for the following:
[](https://doc.uniq365.com/uploads/images/gallery/2025-02/ukFimage.png)
- Can kick out the login Active User
This access is very critical and should be given only to authorized person only.
NOTE: In the latest Recalculation of Product Cost, if there are active users, the system does not permit user to proceed. Similarly, if users are not fully logged out, Recalculation Product cost cannot proceed. However, some users closed their web browsers without logging out, and the server side recognize their session as still active, even though the web browser is closed at client side.
System now allows the admin user to clear the user from the system or kill the recalculation process if they need to stop halfway.
4\. Negative stock entries can be found in Recalculation log or via email notification if negative stock is detected in the system.
[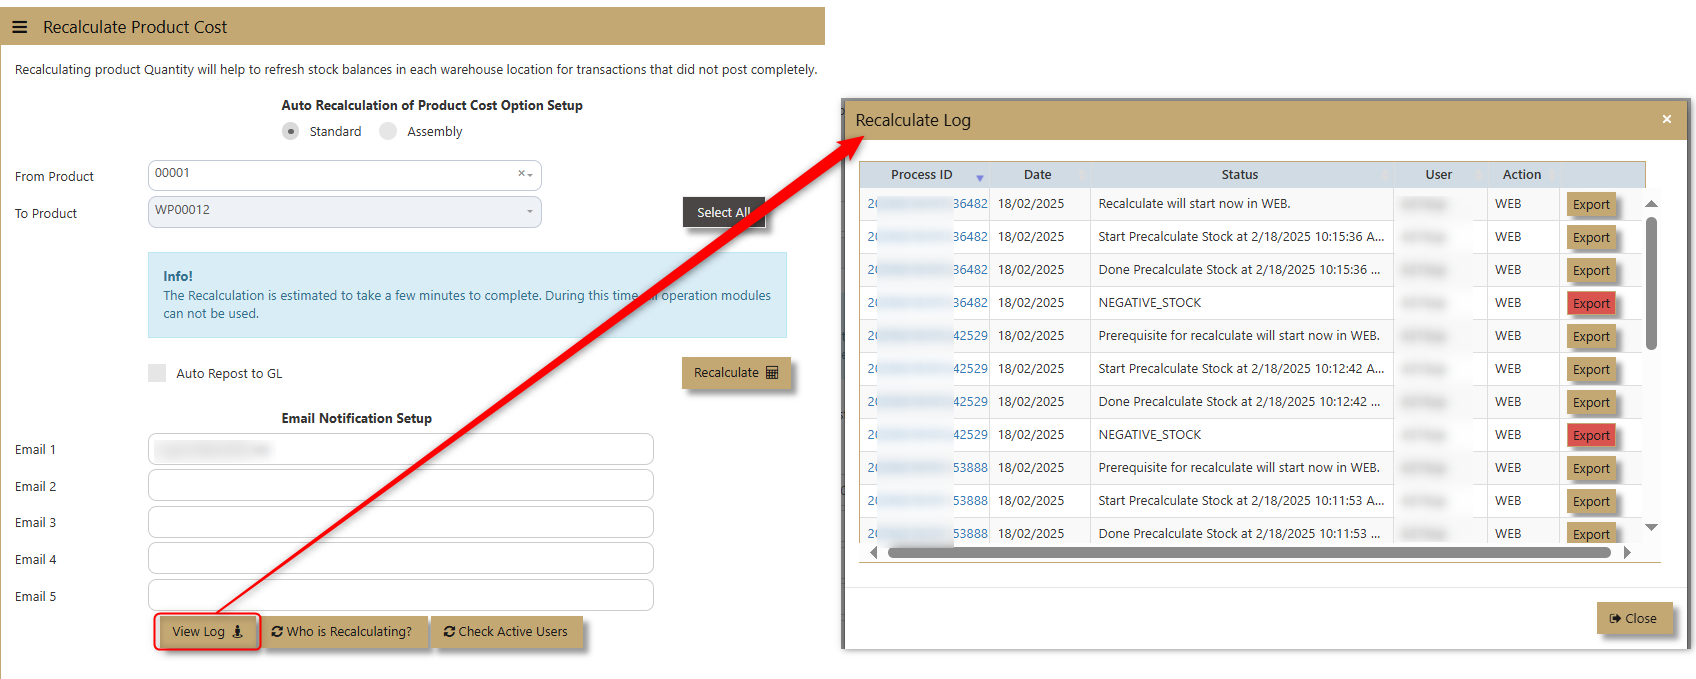](https://doc.uniq365.com/uploads/images/gallery/2025-02/SWUimage.png)
[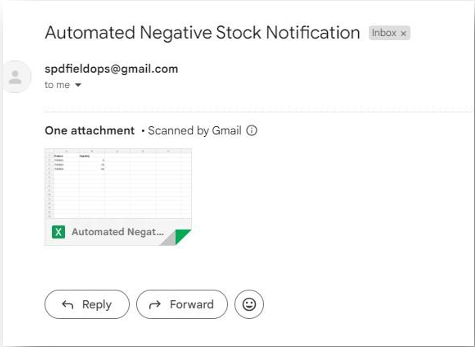](https://doc.uniq365.com/uploads/images/gallery/2025-02/itBimage.png)
5\. Recalculation Termination – The user who currently performing the recalculation process will be the one to have the rights to terminate/abort the process.
[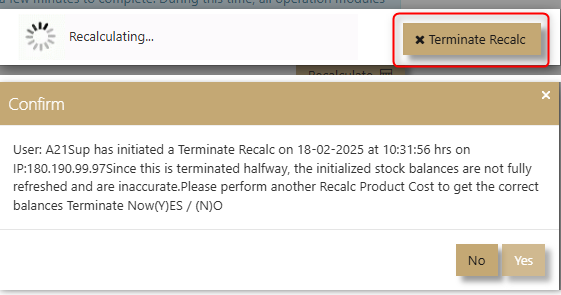](https://doc.uniq365.com/uploads/images/gallery/2025-02/q7Oimage.png)
6\. Negative Stock Occurrence List – If the system detects a negative stock list, the System will display all negative entries, and the user can zoom the details.
[](https://doc.uniq365.com/uploads/images/gallery/2025-02/8g0image.png)
# Reports & Queries
#####
This option enables user to generate reports for Inventory Management.
Reports Can be sent to a Preview Screen or to Printer by clicking the respective printer or preview button.
\_\_\_\_\_\_\_\_\_\_\_\_\_\_\_\_\_\_\_\_\_\_\_\_\_\_\_\_\_\_\_\_\_\_\_\_\_\_\_\_\_\_\_\_\_\_\_\_\_\_\_\_\_\_\_\_\_\_\_\_\_\_\_\_\_\_\_\_\_\_\_\_\_\_\_\_\_\_\_\_\_\_\_\_\_\_\_\_\_\_\_\_\_\_\_\_\_\_\_\_\_\_\_\_\_\_\_\_\_\_\_\_\_\_\_\_\_\_\_\_\_\_\_\_\_\_\_\_\_\_\_\_\_\_\_\_\_\_\_\_\_\_\_\_
STOCK STATUS QUERY
##### **What is Stock Status Query?**
##### If the user requires a screen that will tell in one glance, the stock status, Uniq365 will answer their needs. This report also features a series of “zoom-in” screens that allows you to drill down to the transaction level.
##### **How to use Stock Status Query?**
1\. Click on **Stock – Stock Operations – Reports & Queries - Stock Status Query** icon for following screen.
[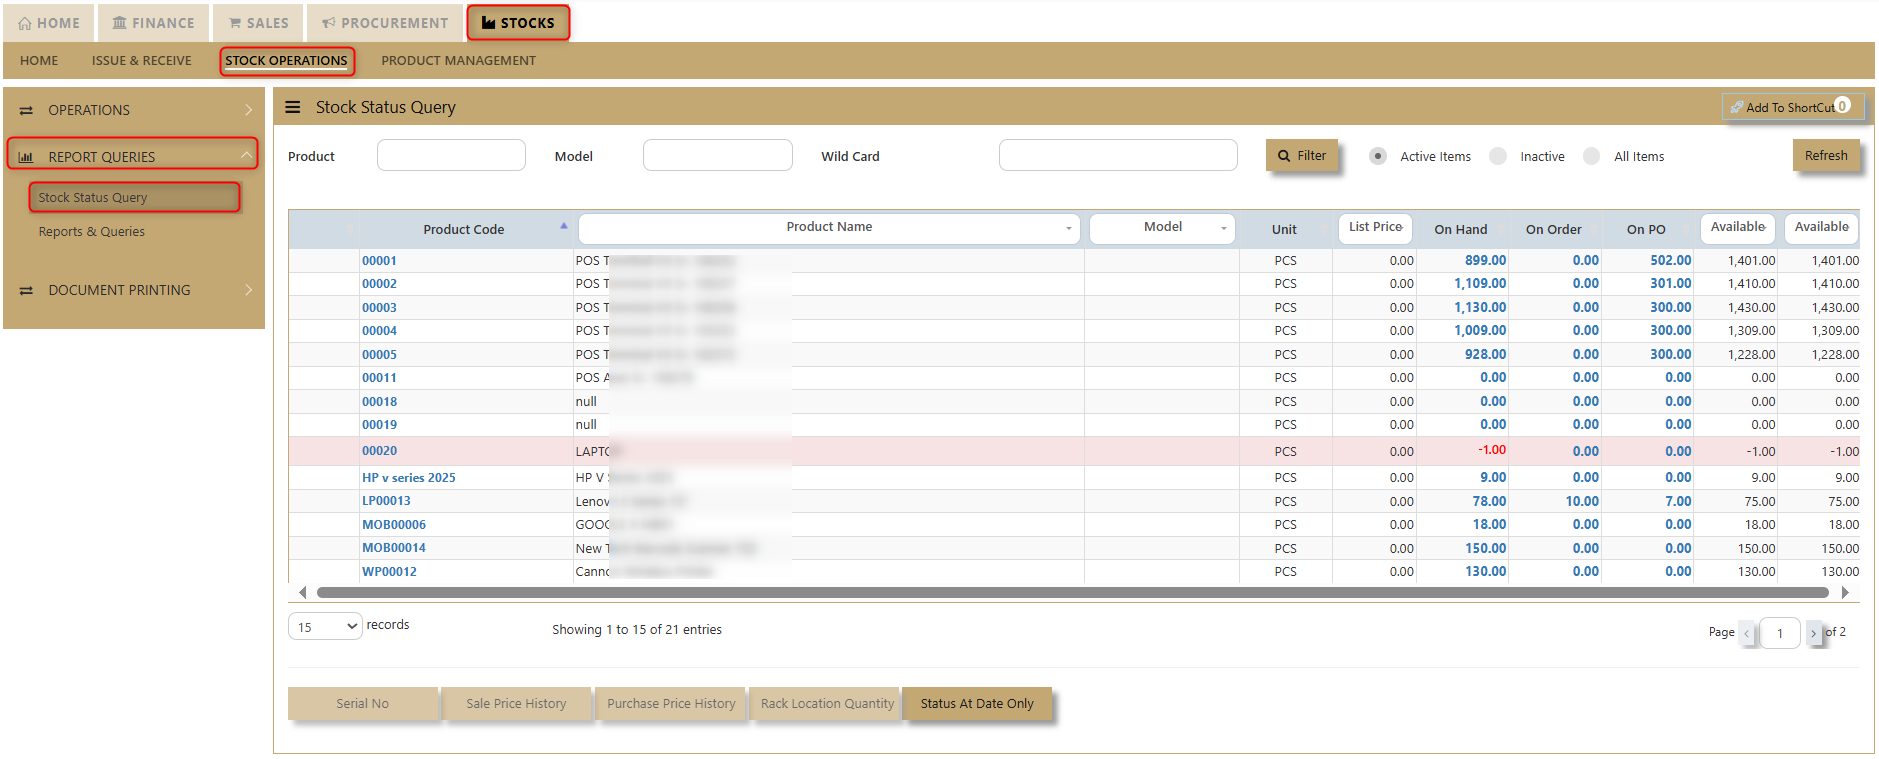](https://doc.uniq365.com/uploads/images/gallery/2025-02/xhZimage.png)
2\. Assuming user want to see the status of say Product Code “00001” that reflect an available balance of 899 PCS. Simply click the side bar (as shown by example in above graphic) to select “00001”. Click on the on hand Qty then select the Warehouse to see the Warehouse Quantity in each warehouse. A pop-up window showing the product balance by warehouse will appear.
[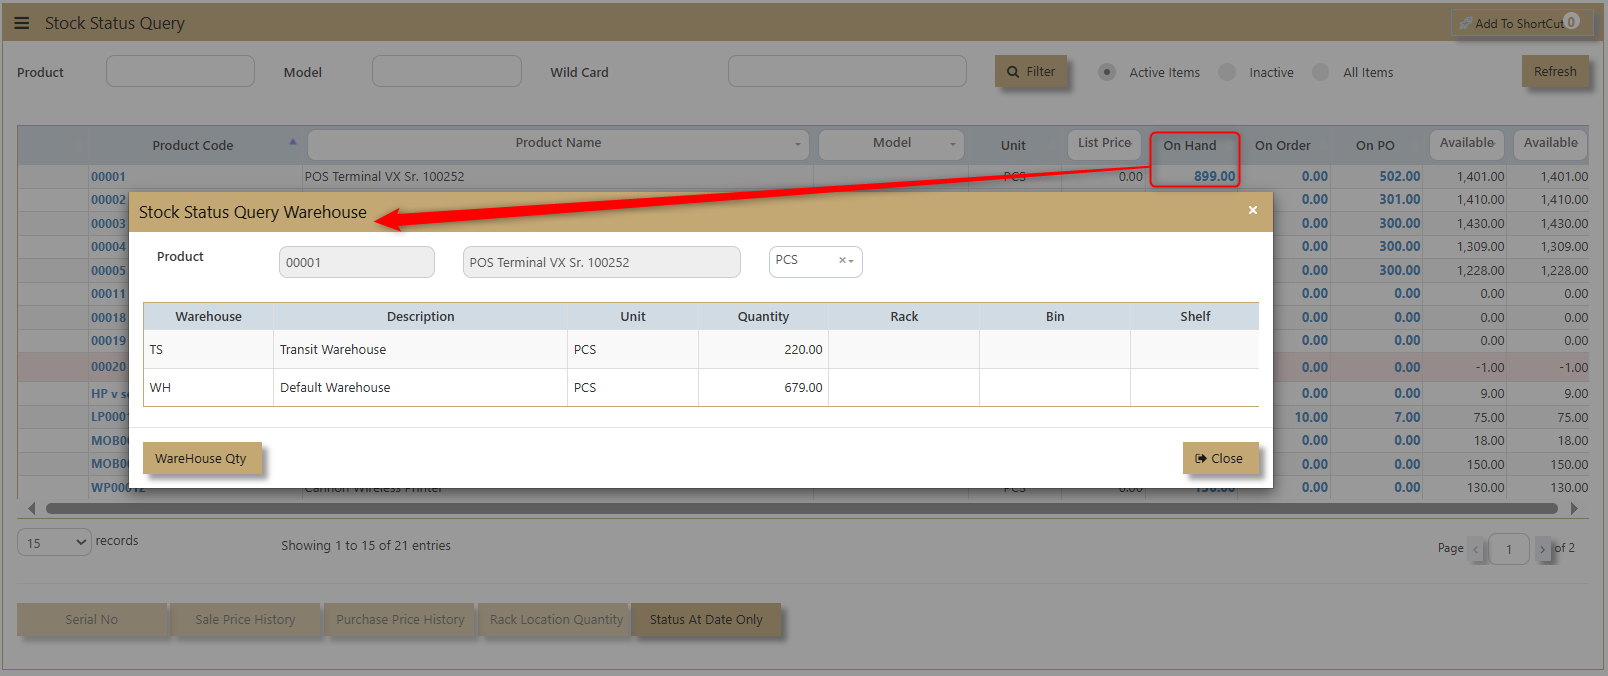](https://doc.uniq365.com/uploads/images/gallery/2025-02/L0Wimage.png)
3\. Users are allowed to zoom in further to see the status of each warehouse. E.g., we can click **WH** to see **Warehouse Qty** now.
[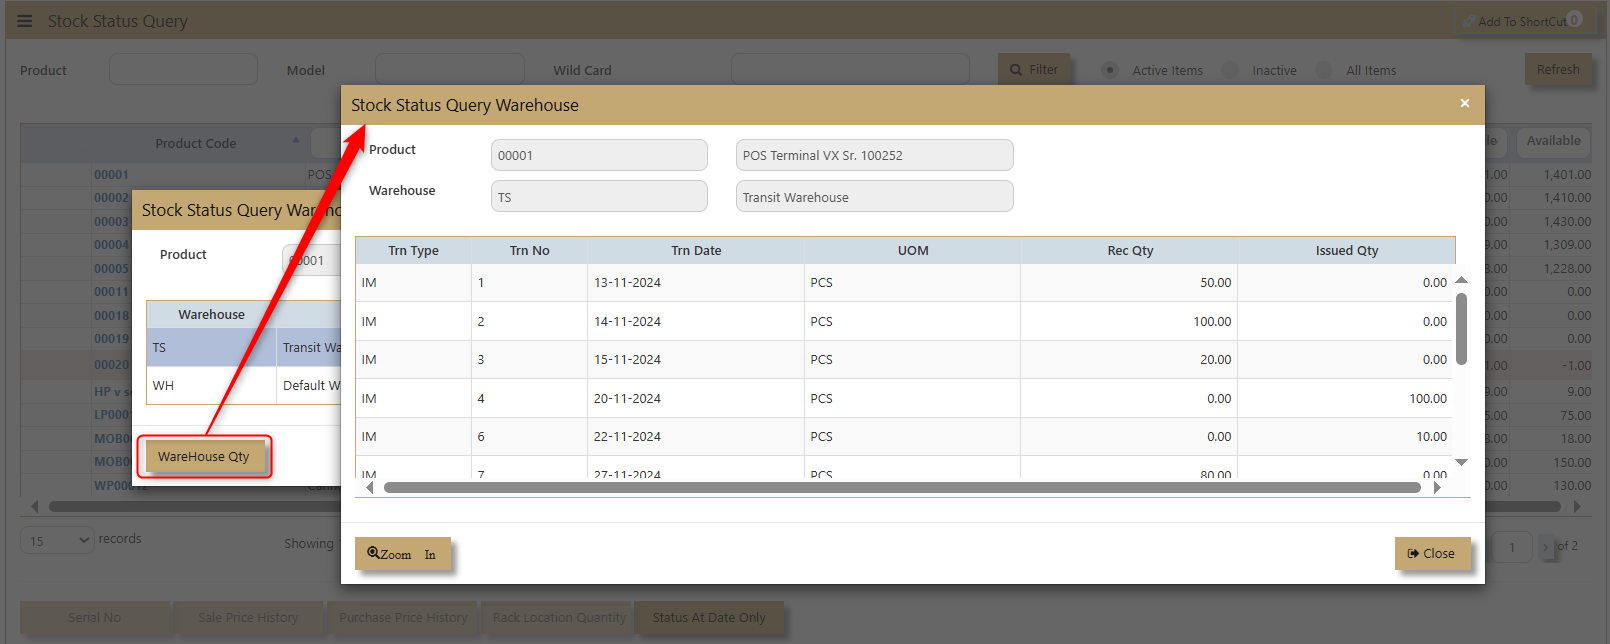](https://doc.uniq365.com/uploads/images/gallery/2025-02/yrYimage.png)
4\. The transaction in the Warehouse is now displayed. If you want to see any transaction details, then select the raw and click the zoom button to check the details.
[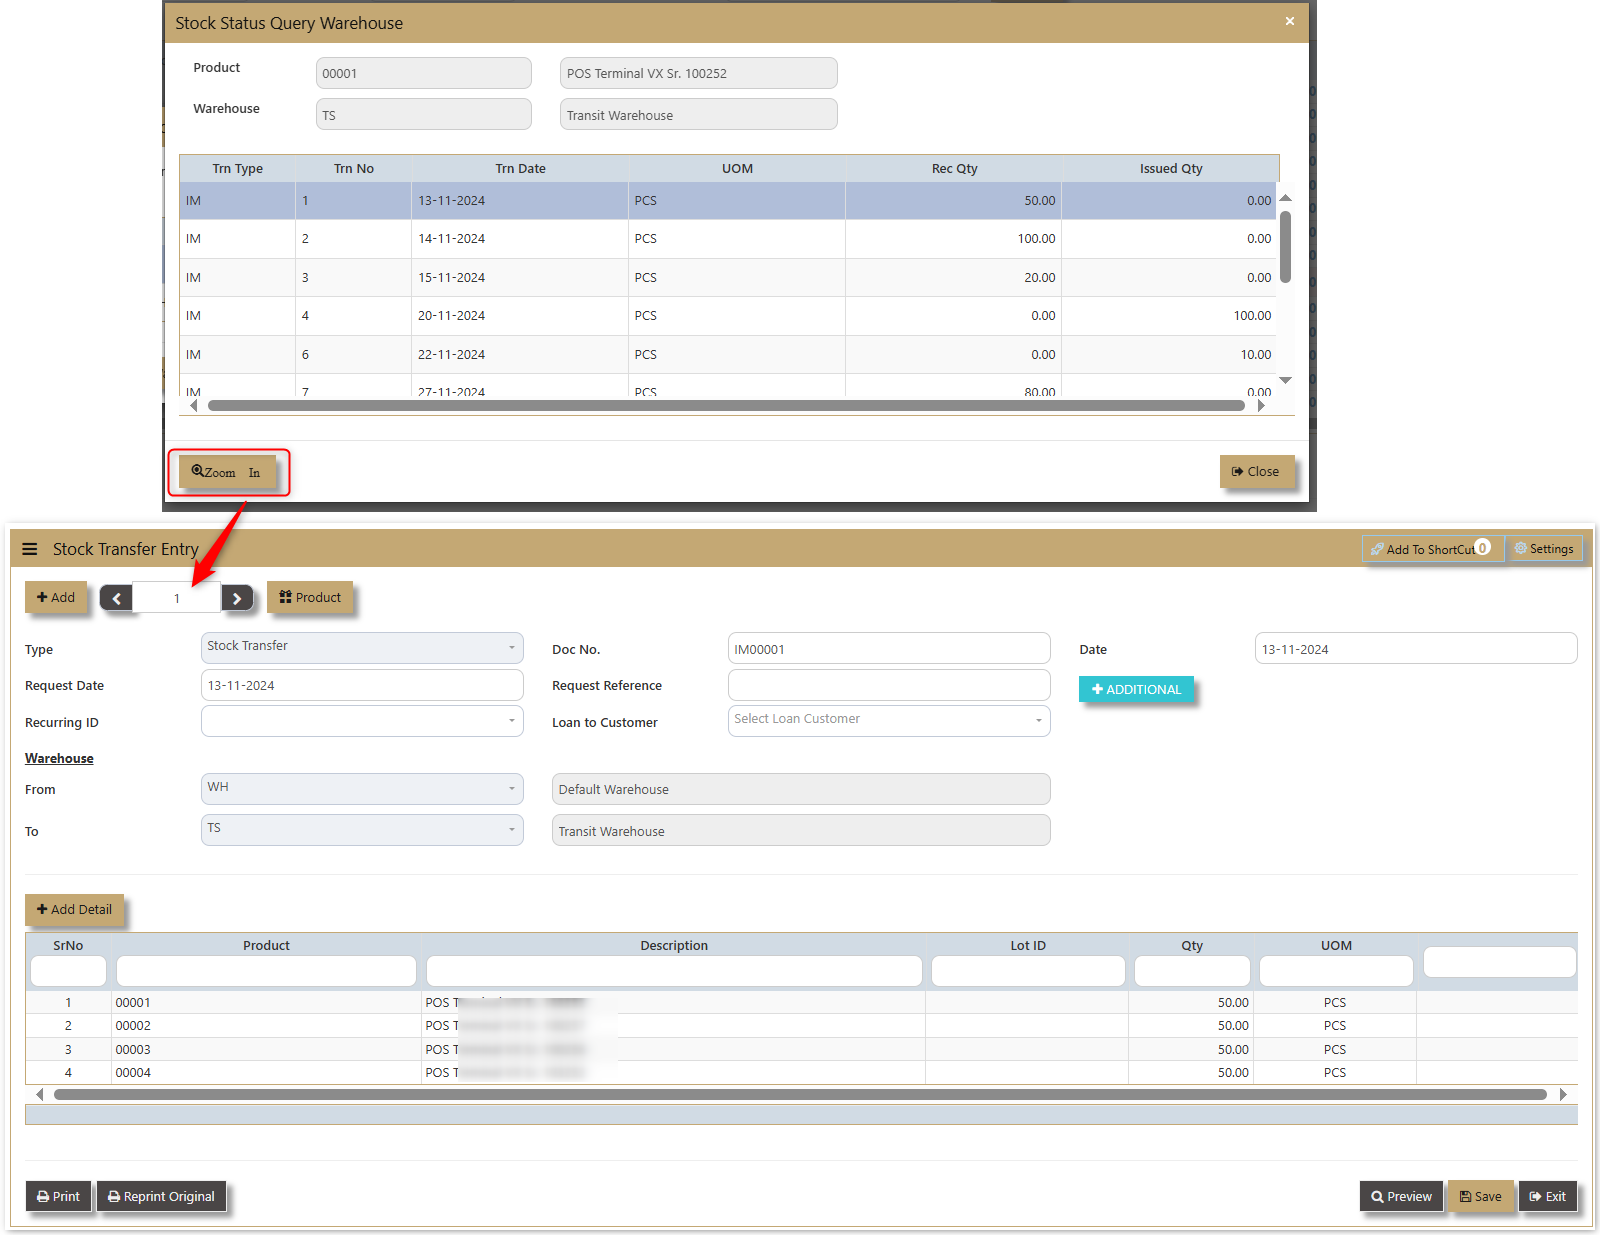](https://doc.uniq365.com/uploads/images/gallery/2025-02/Isximage.png)
5\. User could be able to see the sales price history as indicated below.
[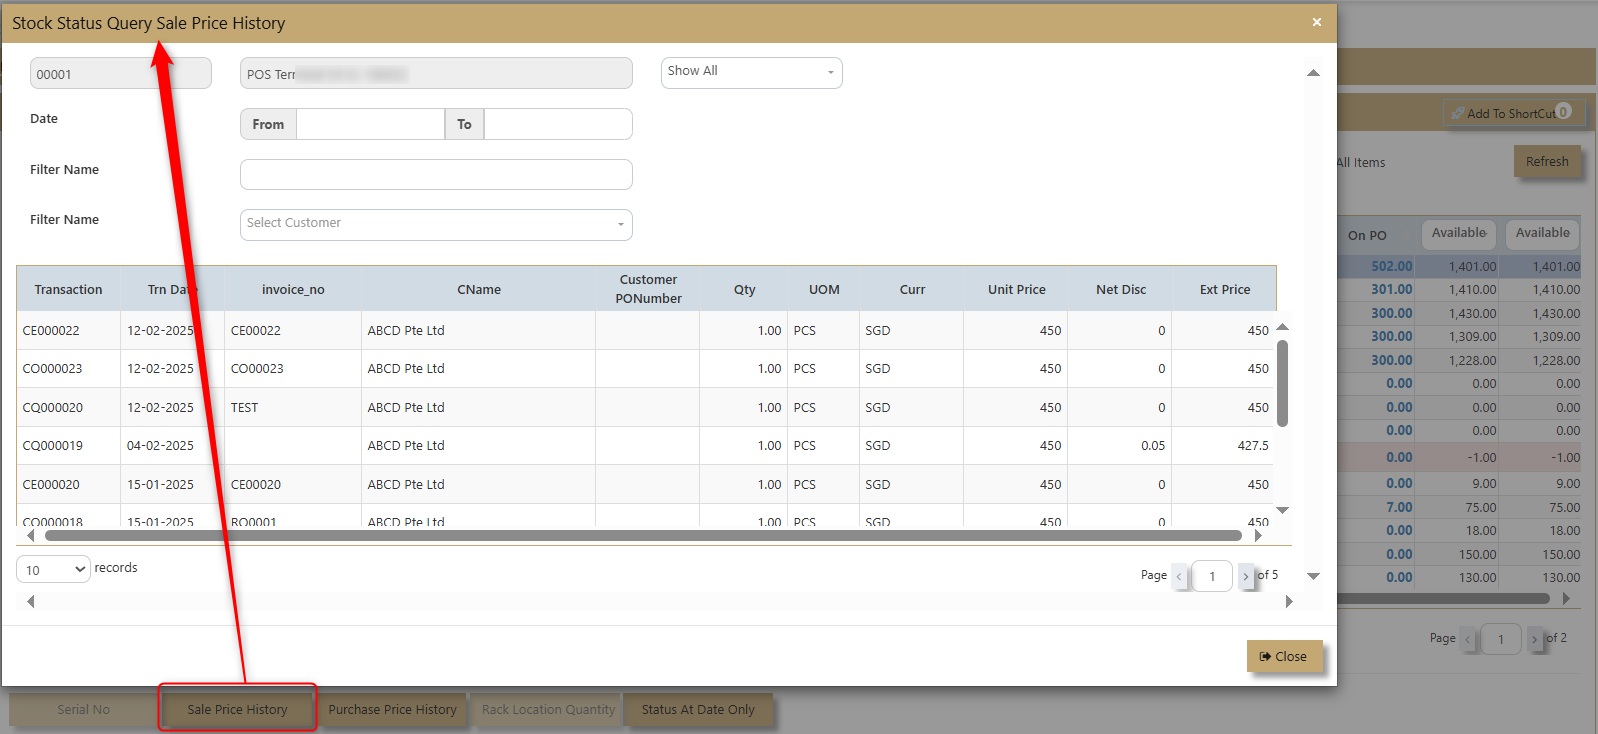](https://doc.uniq365.com/uploads/images/gallery/2025-02/8x7image.png)
6\. User could be able to see the Purchase price history.
[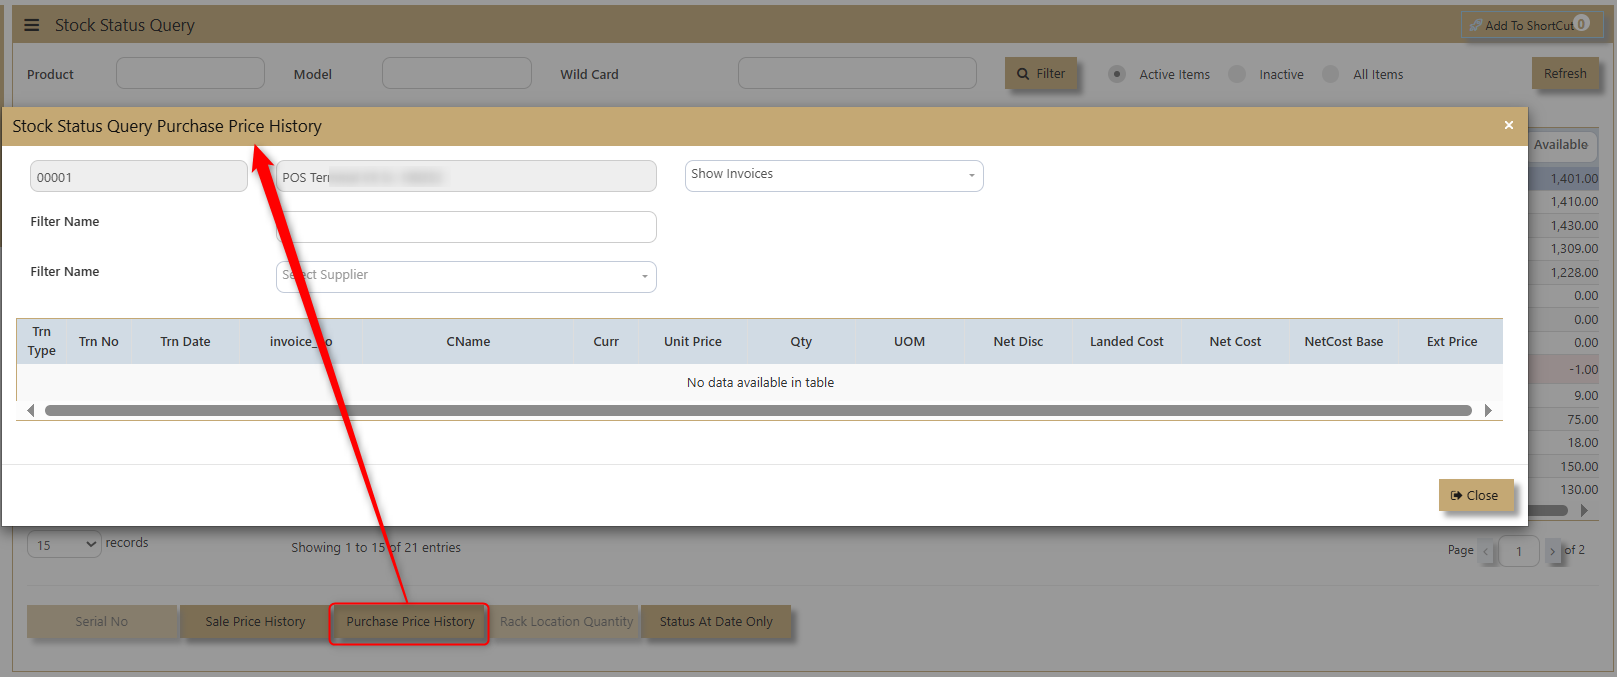](https://doc.uniq365.com/uploads/images/gallery/2025-02/SEDimage.png)
7\. If the product is Serialized. the system will enable the button for Serail to see the serial number pf the certain product.
[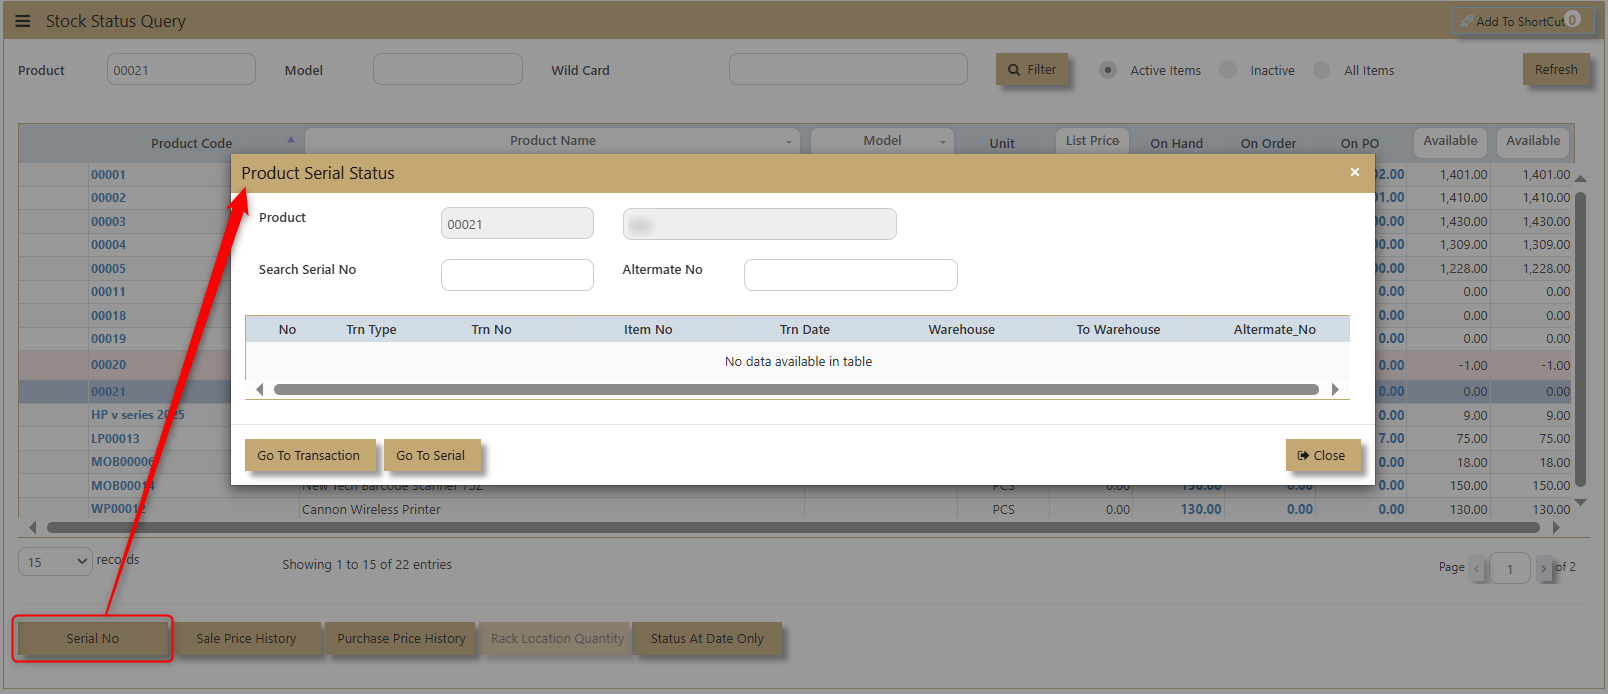](https://doc.uniq365.com/uploads/images/gallery/2025-02/IsVimage.png)
8\. Status at Date only will show the status of the product at the current date when the query is made.
[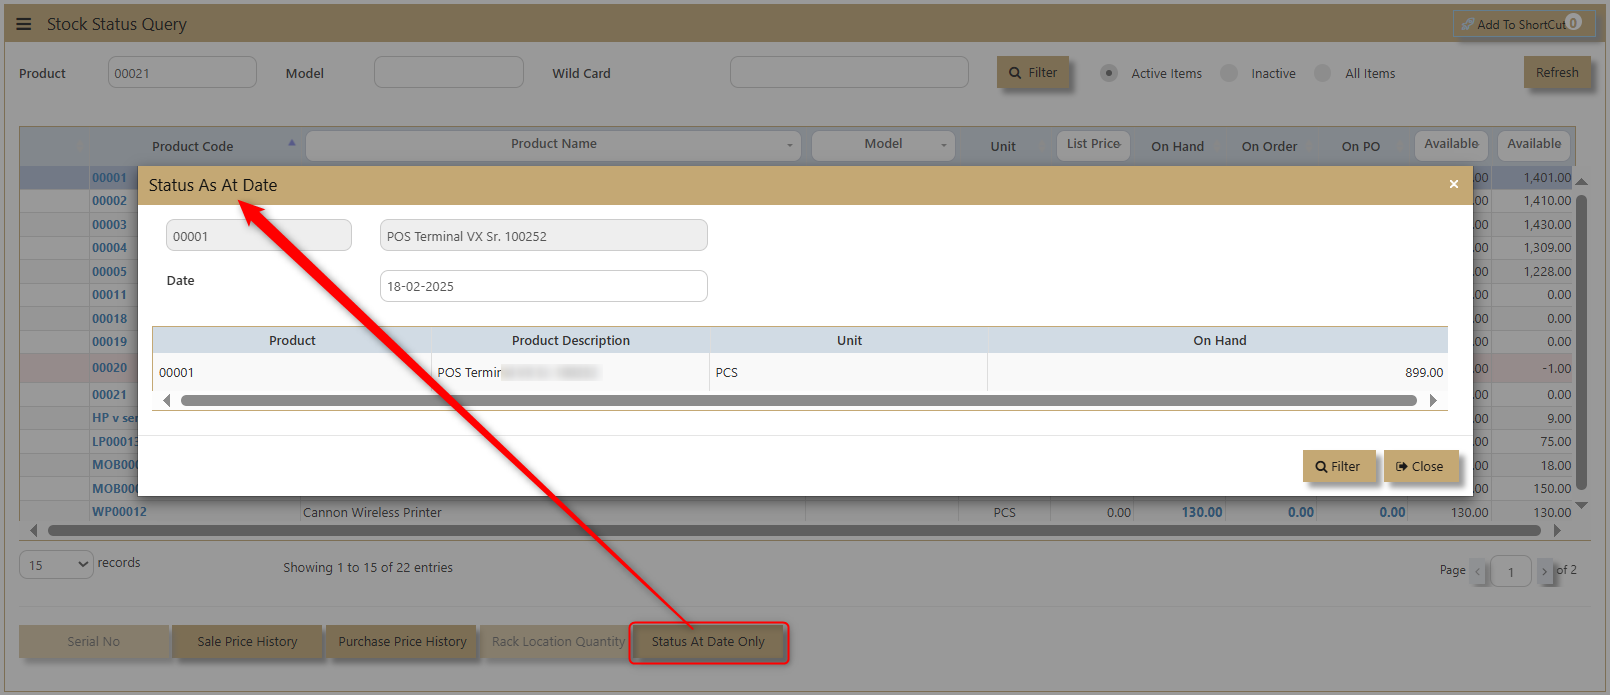](https://doc.uniq365.com/uploads/images/gallery/2025-02/k37image.png)
REPORTS & QUERIES
##### **How to use Report & Queries?**
1\. Click on **Stock – Stock Operations - Reports Queries – Reports & Queries** icon for following screen.
[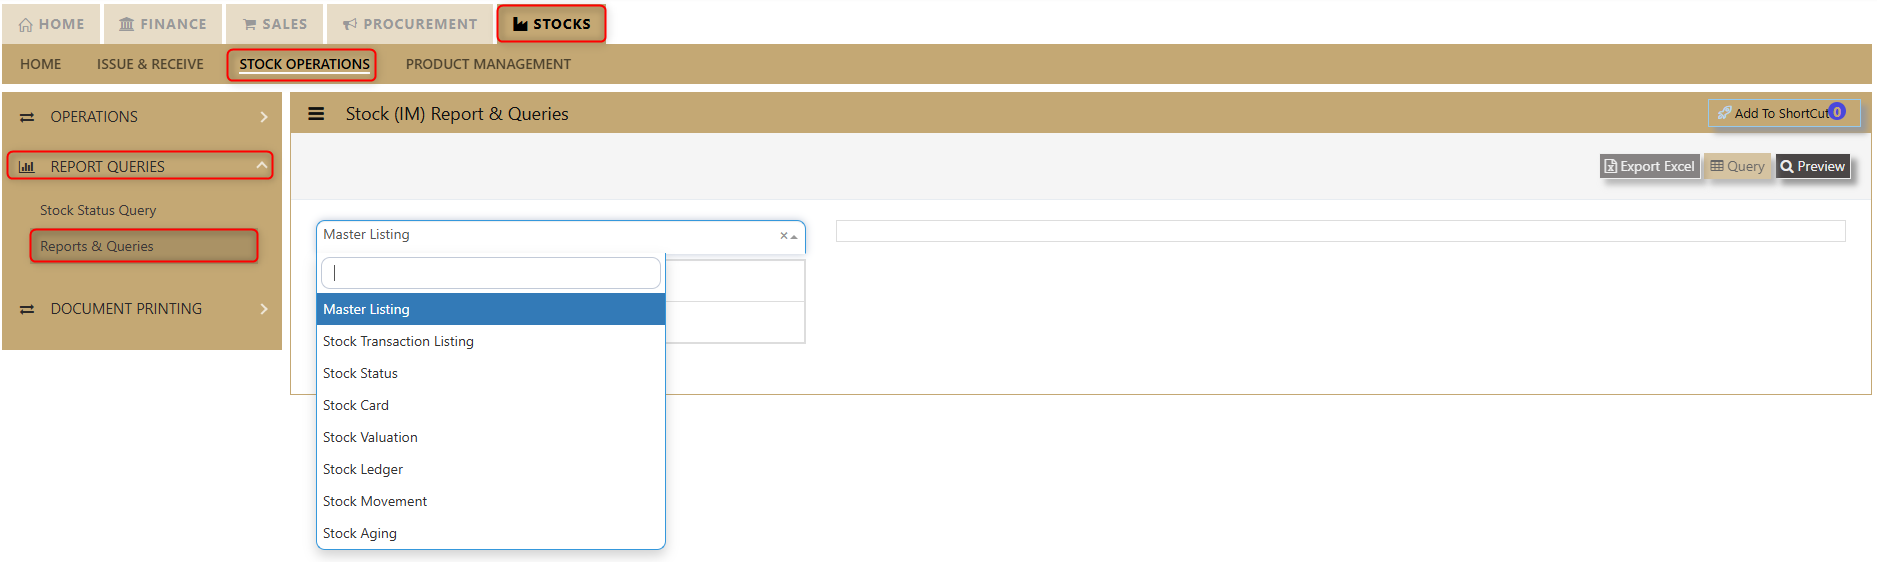](https://doc.uniq365.com/uploads/images/gallery/2025-02/fAMimage.png)
The main reports are Stock Valuation, Stock Ledger and Stock Aging. These reports will enable the users to see the on-hand quantity and valuation, the transactions made as well as the aging report of the stock items.
These reports & queries will also enable the user to see reports for Master Listing, Stock Transaction Listing, Stock Status, Stock Card and Stock Movement.
##### **1. Master Listing**
Users can filter and view products and warehouses by Product and Brand Short. This report provides a clear overview of stock levels and warehouse locations, helping users manage inventory efficiently. By applying the filters, they can quickly access the specific data they need. Click on preview and the user may access the report.
[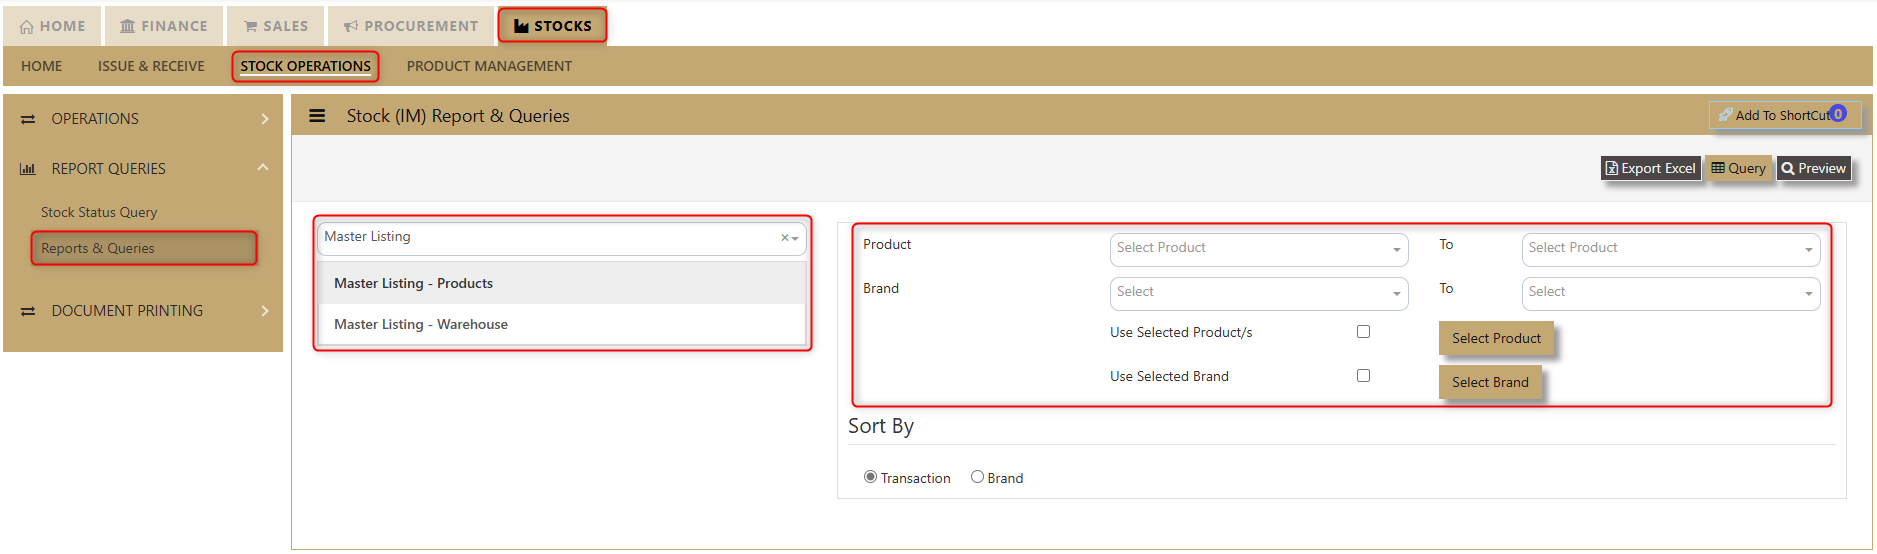](https://doc.uniq365.com/uploads/images/gallery/2025-02/o3kimage.png)
[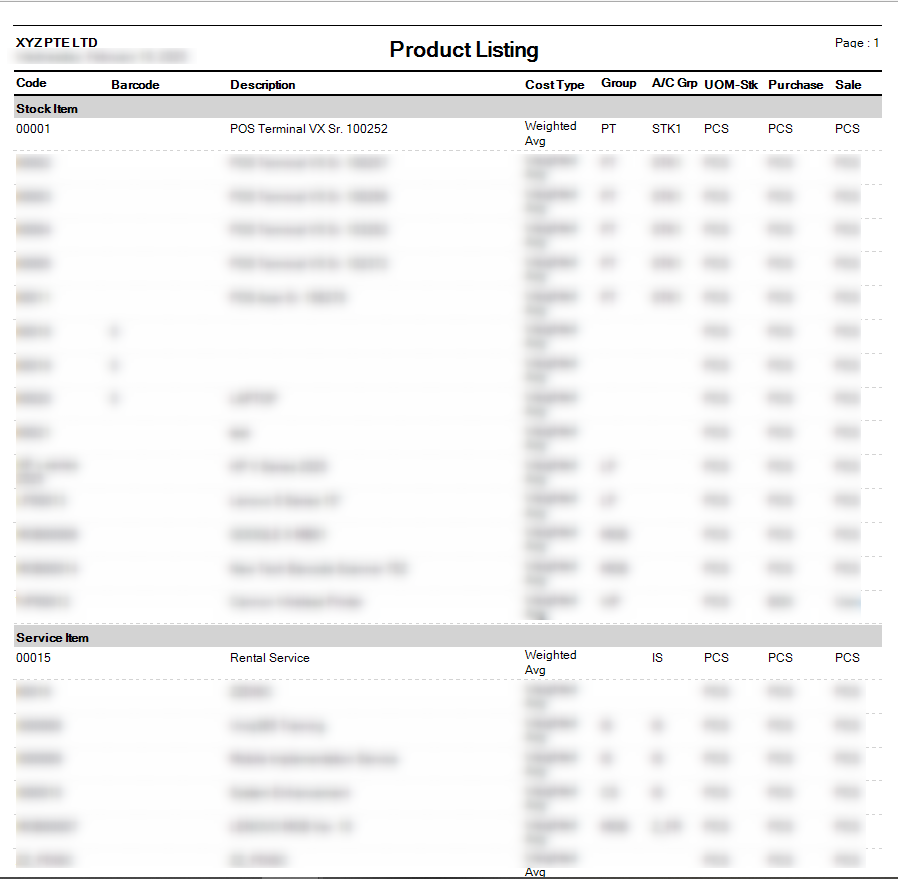](https://doc.uniq365.com/uploads/images/gallery/2025-02/mboimage.png)
##### **2. Stock Transaction Listing**
Stock Transaction Listing Report provides users with a comprehensive overview of stock transactions, allowing them to view details by transaction type and transaction number. The report offers an option to suppress inactive stock, ensuring that only active items are displayed. Users can refine their data by utilizing a range of filters, including Date, Reference, Product, Warehouse, Project, Department, Section, and Unit, enabling easy access to specific information. Additionally, users have the flexibility to sort the report by Transaction, Reference, or Date, offering a streamlined approach for efficient data analysis and decision-making.
[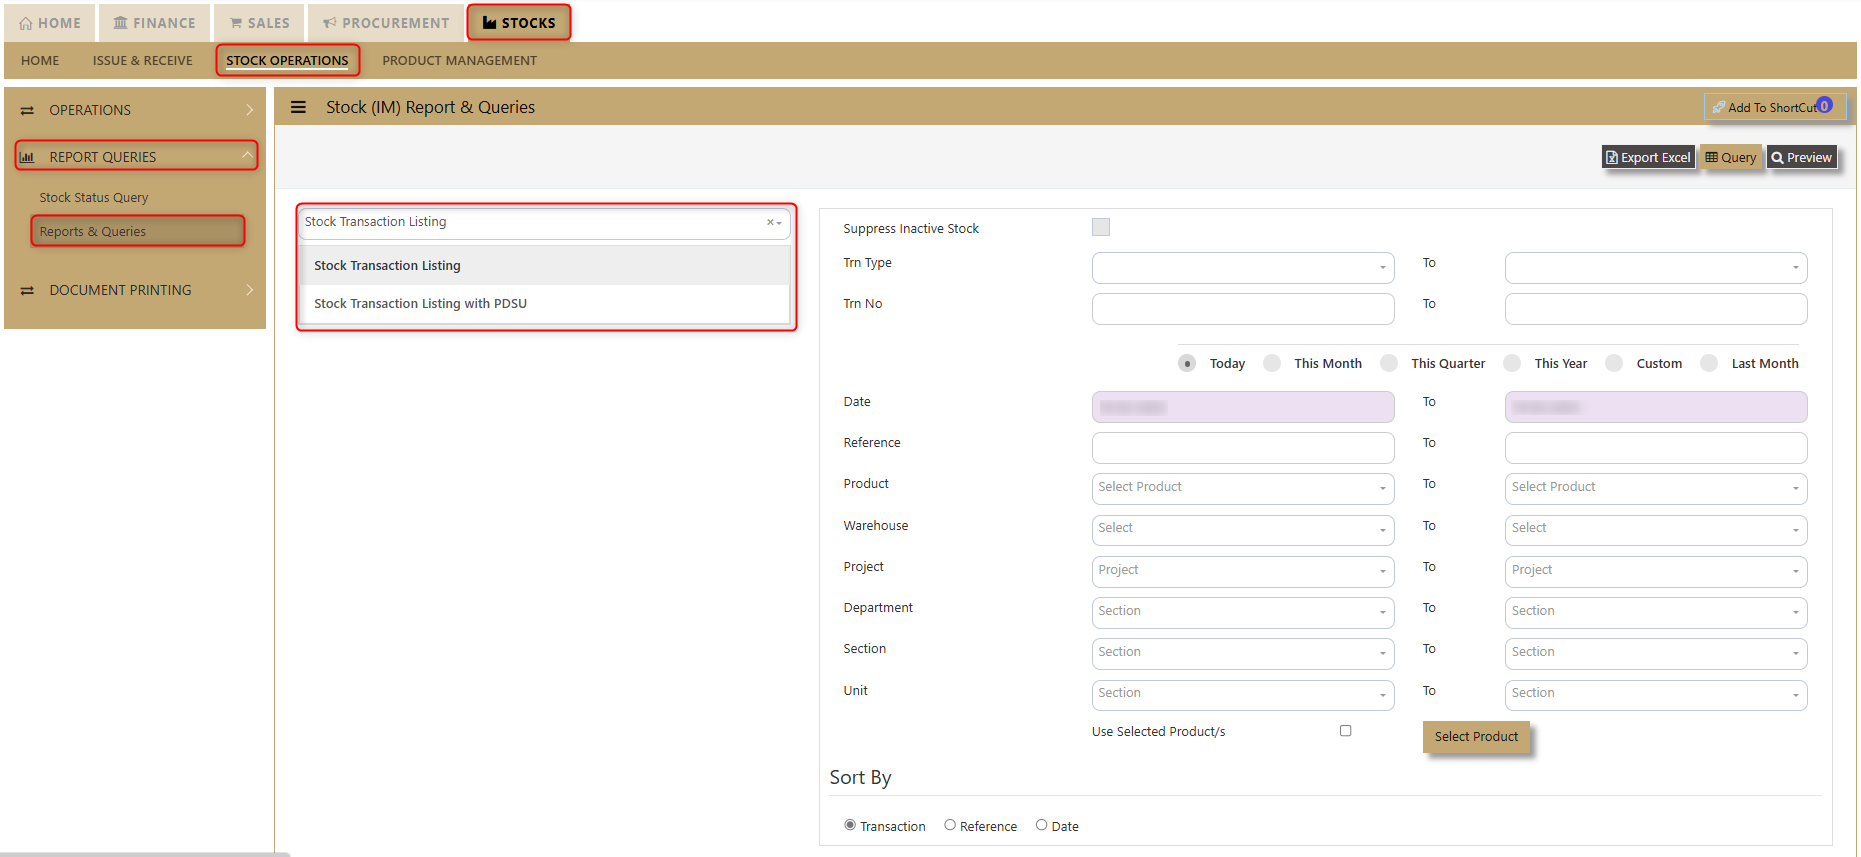](https://doc.uniq365.com/uploads/images/gallery/2025-02/dYiimage.png)
[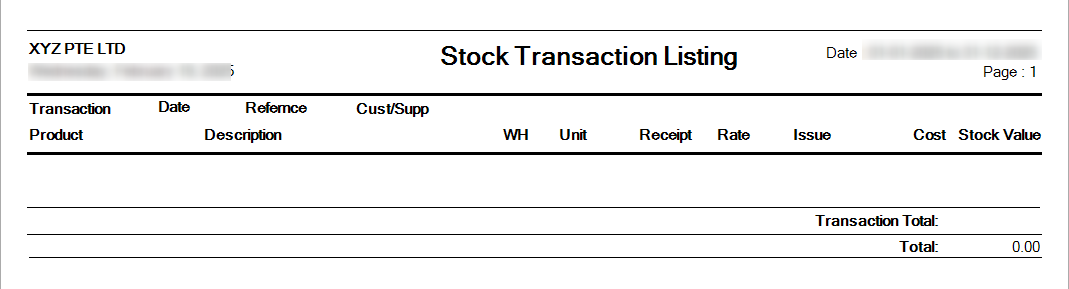](https://doc.uniq365.com/uploads/images/gallery/2025-02/8imimage.png)
##### **3. Stock Status**
Stock Status Report offers users the ability to generate detailed insights into stock levels with two key report options: **Stock Status - Master Stock Plan** and **Stock Status - Product Wise**. This functionality allows users to track and analyze stock data based on their preferred view. The report includes filtering options for **Product** and **Date**, enabling users to narrow down the results to meet specific needs. Whether users are focusing on the overall stock plan or detailed product-level information, the Stock Status Report provides an efficient and flexible tool for managing stock data.
[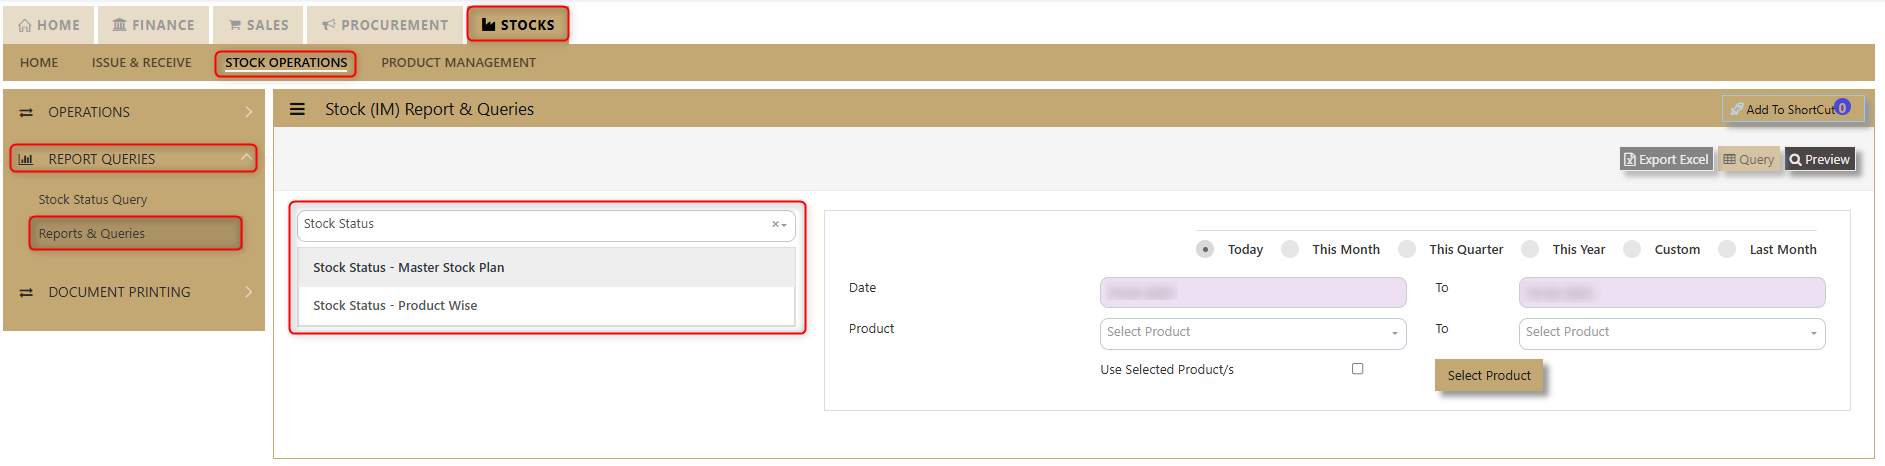](https://doc.uniq365.com/uploads/images/gallery/2025-02/HC4image.png)
##### **4. Stock Card**
Stock Card Report allows users to view detailed records of stock movements for specific products across different warehouses. Users can easily filter the report by **Date**, **Product**, and **Warehouse**, offering a tailored view of stock levels and transactions over time. This flexibility ensures that users can access the precise information they need, whether for tracking stock movements, auditing inventory, or managing warehouse operations efficiently. The Stock Card Report is an essential tool for monitoring stock activity and making informed inventory decisions.
[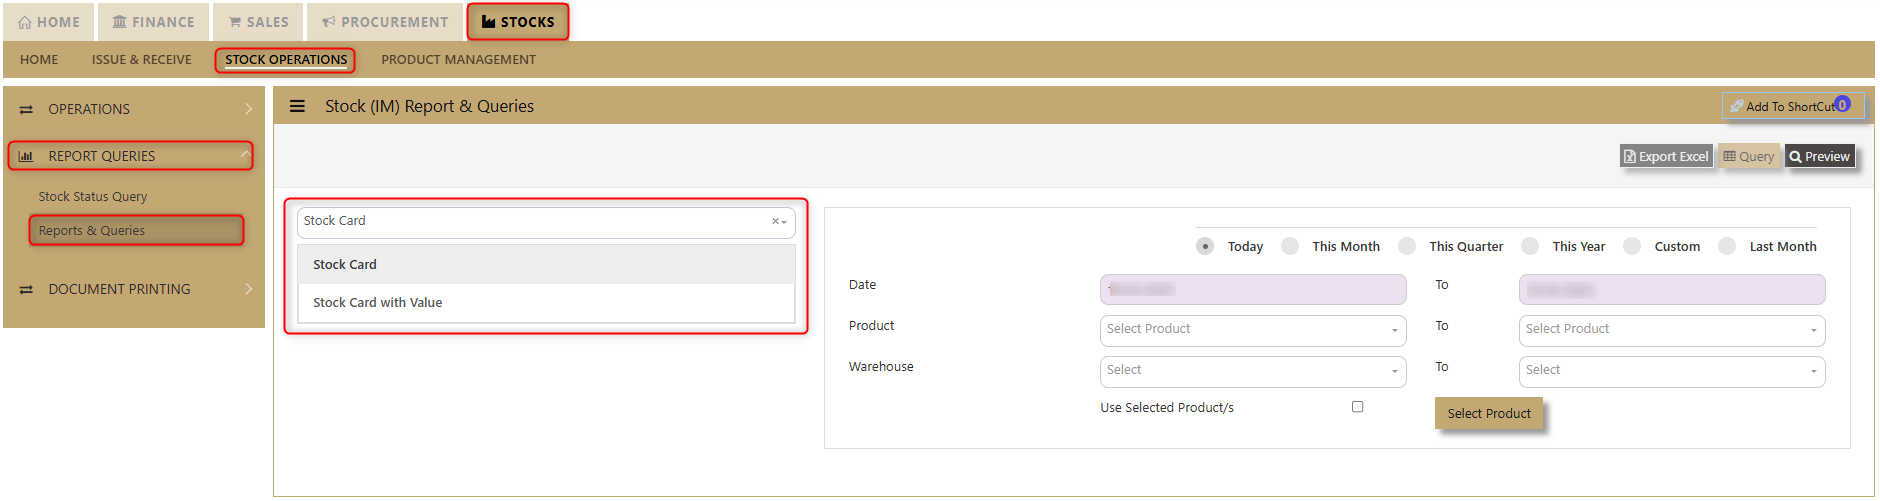](https://doc.uniq365.com/uploads/images/gallery/2025-02/P7Rimage.png)
[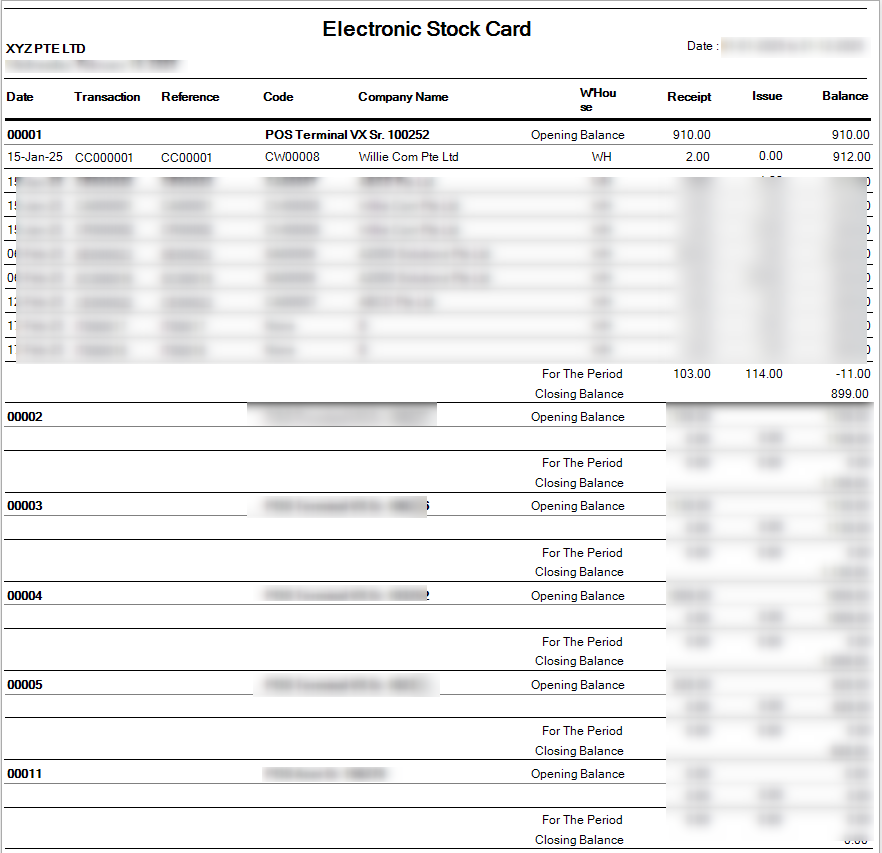](https://doc.uniq365.com/uploads/images/gallery/2025-02/P9Himage.png)
##### **5. Stock Valuation**
Stock Valuation Report provides users with a clear and detailed overview of stock values, offering the flexibility to refine the data according to specific needs. Users can choose to **suppress zero balances**, ensuring that stocks with a zero balance do not appear, or **suppress inactive stocks**, which displays only active items in the report. The report also features a variety of filters, including **Date**, **Product**, **Product Group**, **Brand**, **Model**, and **Warehouse**, allowing users to focus on particular stock categories. Additionally, users can sort the report by **Transaction**, **Brand**, **Warehouse**, **Product Group**, **Model**, and **Make** to streamline their analysis and decision-making. This report is a powerful tool for tracking stock value, inventory status, and product performance across various parameters.
[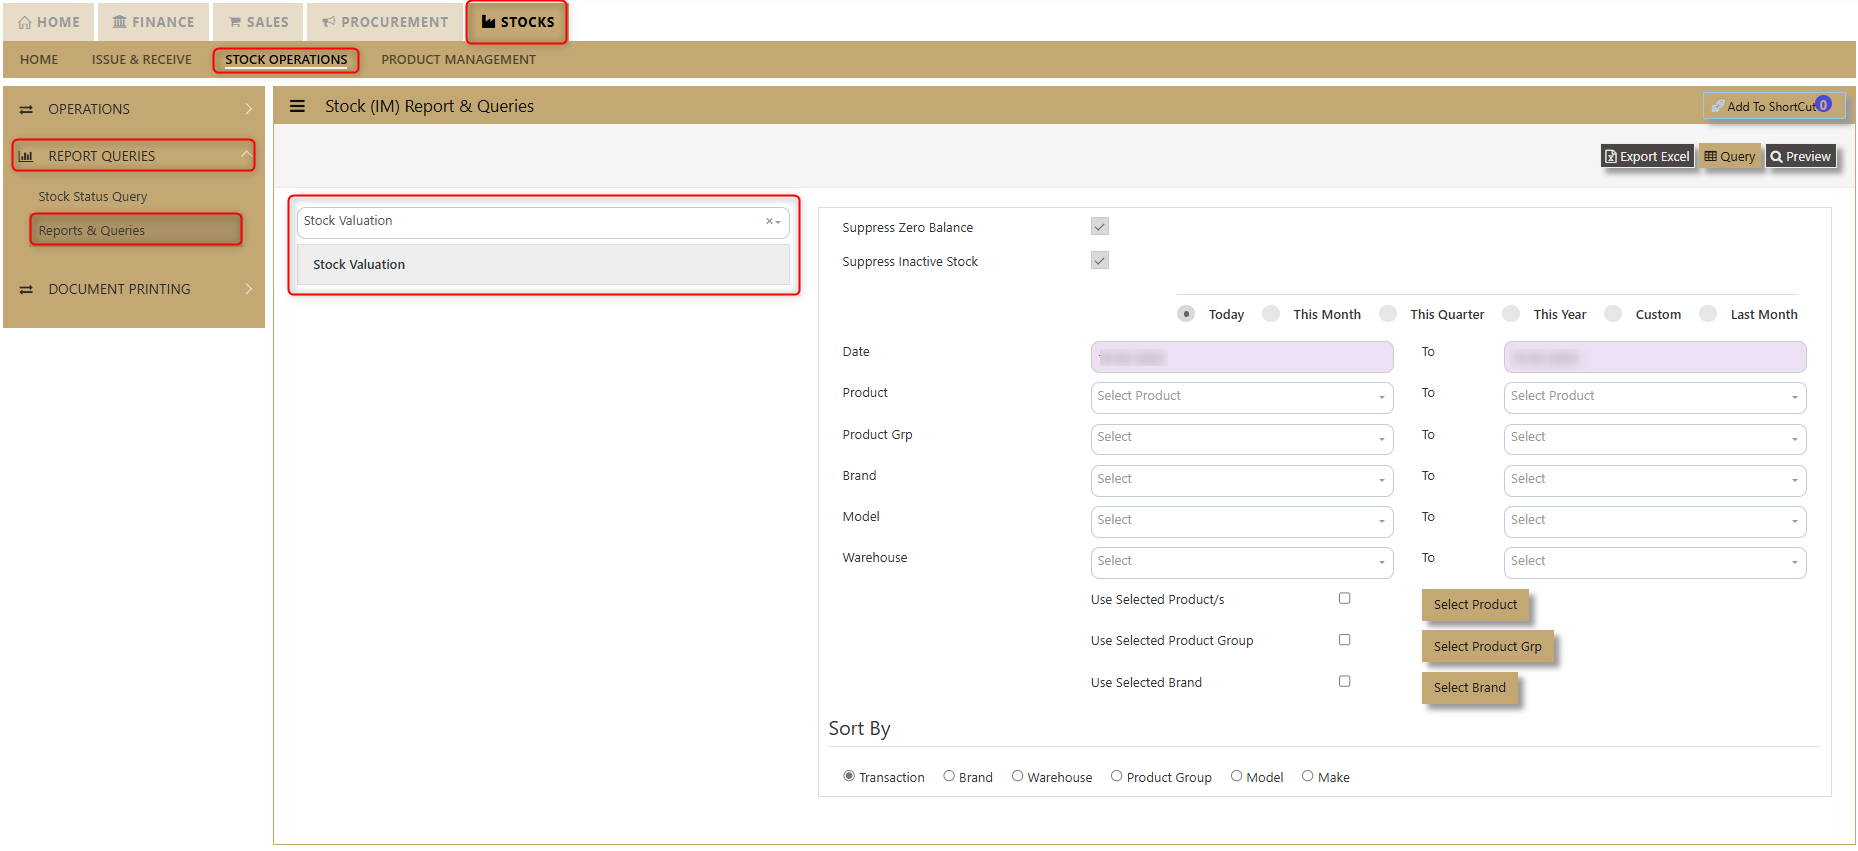](https://doc.uniq365.com/uploads/images/gallery/2025-02/EFfimage.png)
[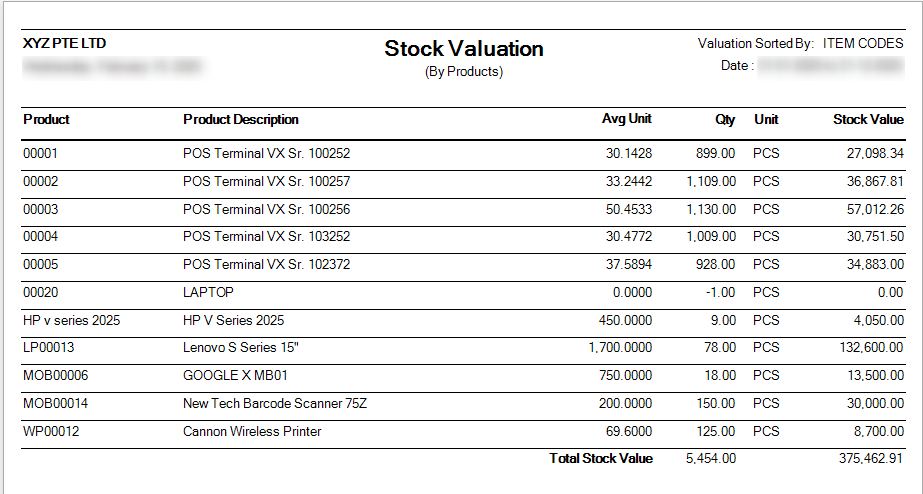](https://doc.uniq365.com/uploads/images/gallery/2025-02/SX4image.png)
#####
##### **6. Stock Ledger**
Stock Ledger Report offers users a detailed record of all stock movements and transactions, providing an essential tool for tracking inventory activity. With the ability to filter by **Date**, **Product**, and **Warehouse**, users can easily access specific information related to their stock transactions. This functionality ensures that users can analyze stock history, monitor changes, and gain insights into inventory trends across various products and locations. The Stock Ledger Report is designed to support efficient inventory management and improve decision-making through accurate, up-to-date transaction data.
[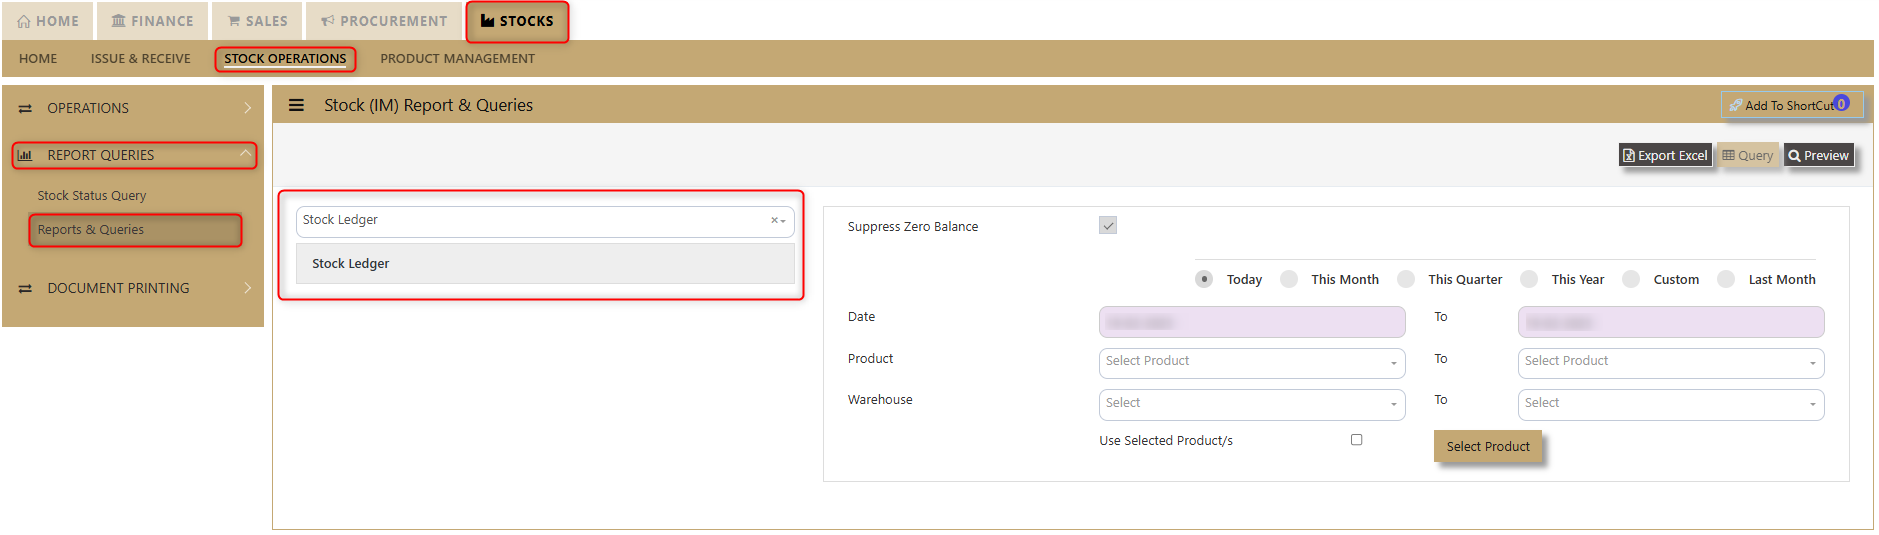](https://doc.uniq365.com/uploads/images/gallery/2025-02/v8Simage.png)
[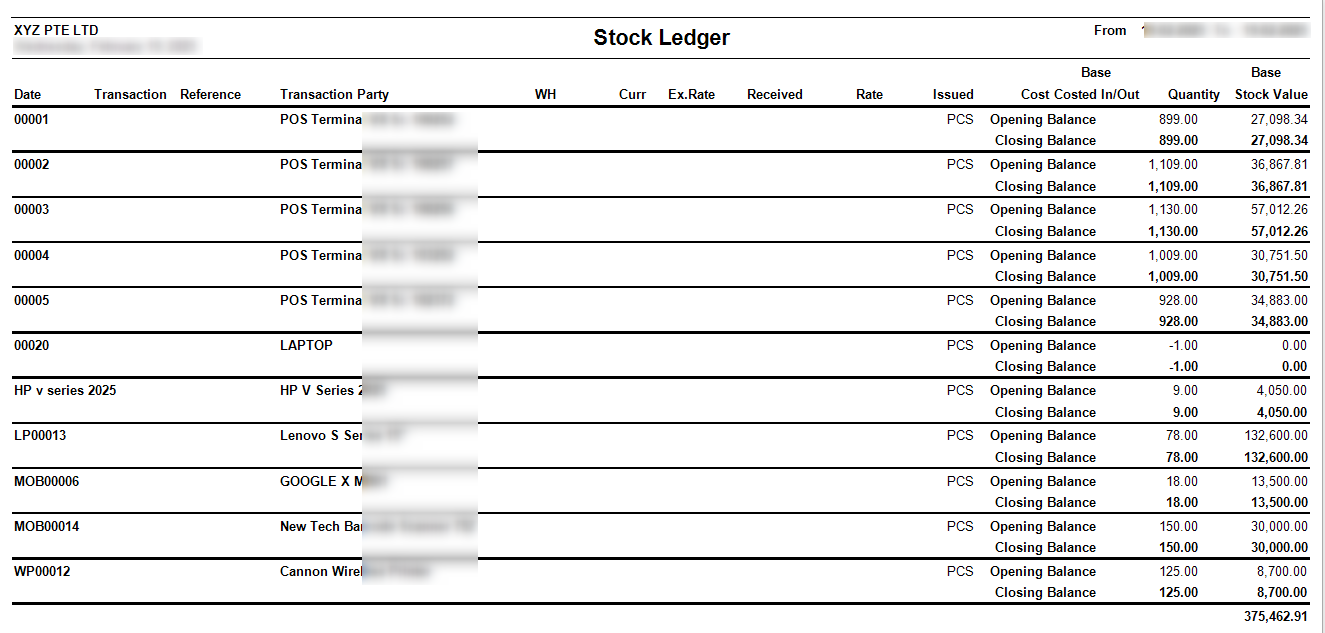](https://doc.uniq365.com/uploads/images/gallery/2025-02/3GXimage.png)
##### **7. Stock Movement**
Stock Movement Report provides users with a comprehensive view of their stock movements, allowing them to track inventory in real-time. Users can filter the report by date, product, product group, and warehouse, with the option to suppress zero balance items for a more streamlined display. Additionally, the report can be sorted by transaction, brand, product group, and model, enabling users to analyze data according to their specific needs. This detailed, customizable report helps users efficiently manage and review their stock movements for better decision-making.
[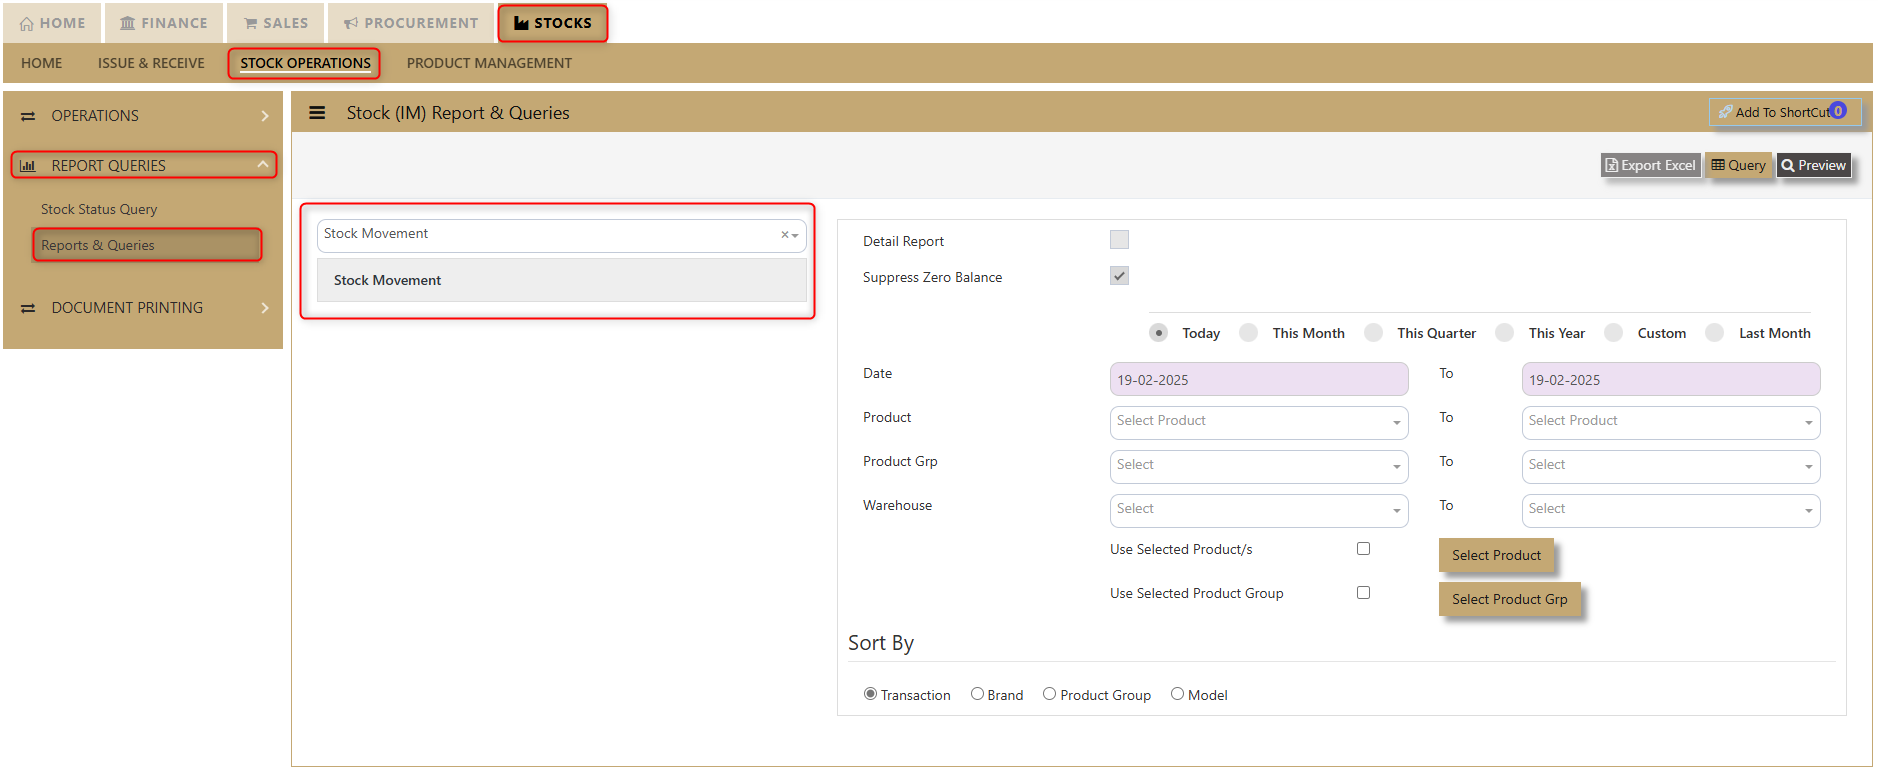](https://doc.uniq365.com/uploads/images/gallery/2025-02/aFRimage.png)
[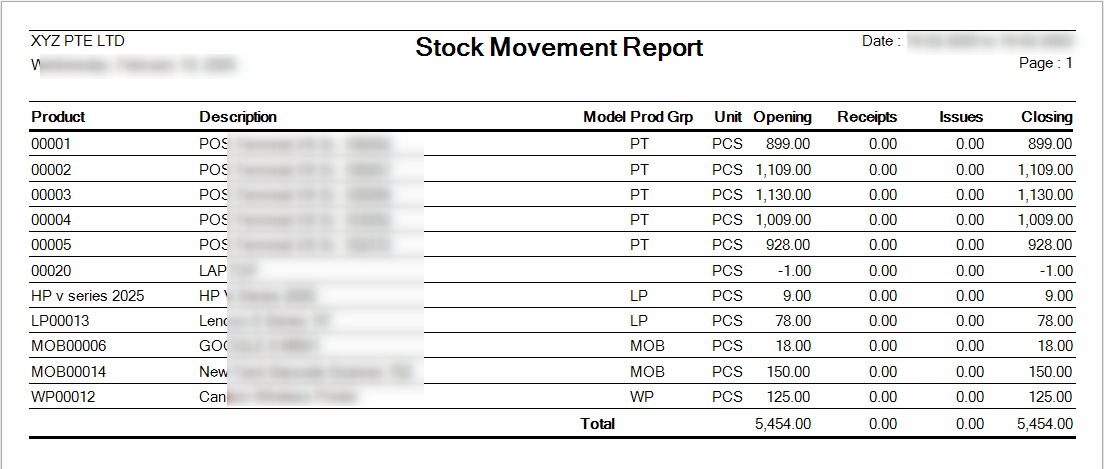](https://doc.uniq365.com/uploads/images/gallery/2025-02/oIdimage.png)
##### **8. Stock Aging**
Stock Aging Report allows users to view stock data for up to 2 years, offering valuable insights into inventory age. Users can filter the report by Product, Product Group, Age on Date, and Age Group to customize the view to their needs. Additionally, the report includes an option to suppress zero balance items for a cleaner presentation. This detailed, customizable report enables users to efficiently track stock aging, pinpoint slow-moving items, and make data-driven inventory decisions.
[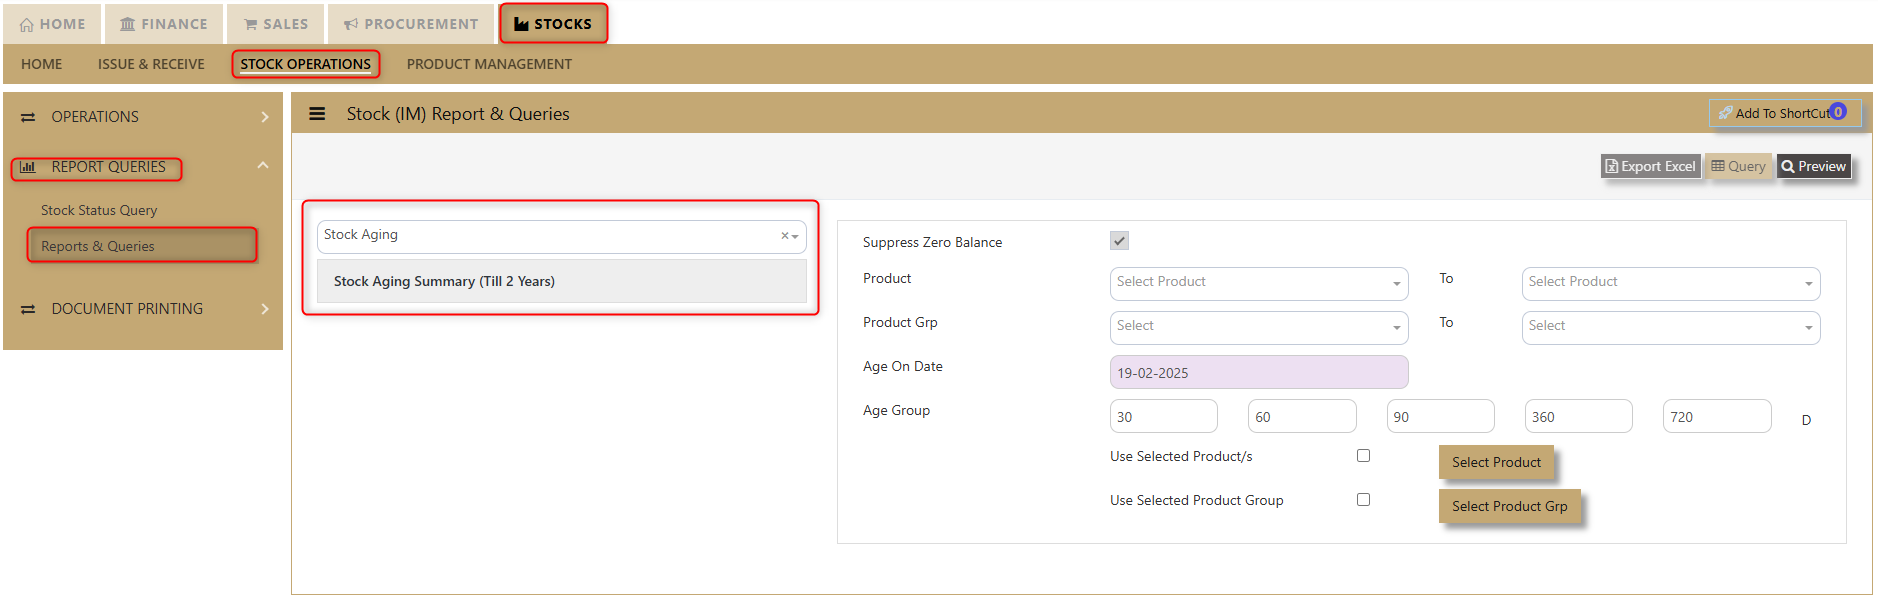](https://doc.uniq365.com/uploads/images/gallery/2025-02/aB8image.png)
[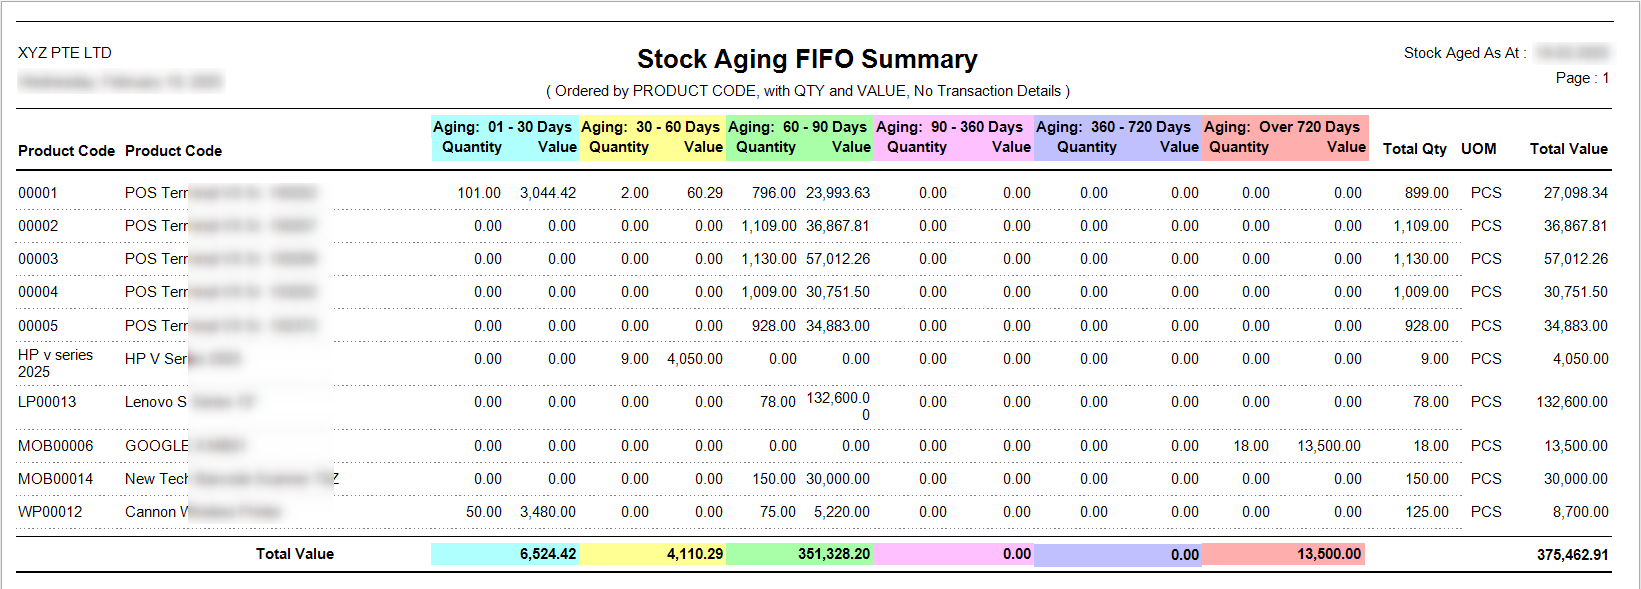](https://doc.uniq365.com/uploads/images/gallery/2025-02/4rCimage.png)
JOURNAL VOUCHER
#### Also known as **JOURNAL VOUCHER**, GL Transaction entry post all transactions directly to General Ledger. No other online posting to other modules are performed. In Uniq365, transaction type is GJ.
#### **General Ledger Journal Voucher:**
[](https://doc.uniq365.com/uploads/images/gallery/2025-01/UKfimage.png)
#### Upon click of the **Journal Voucher**, the General ledger Journal Voucher listing will show from latest entry with the following fields:
- **TYPE** - Transaction Type is GJ
- **SEARCH NARRATION \[containing\]** - Key in searchable text or description
- **NUMBER BUTTON**- Tick this if you opt to filter for the 'Transaction number
- **REFERENCE BUTTON**- Tick this if you opt to filter for the 'Document Number'
- **DATE** **BUTTON**- Tick this if you opt to filter for the date,
- **FROM** - Search FROM for any 'Number, Reference or Date'
- **TO** - Search TO for any ''Number, Reference or Date'
- **FILTER** - To enable the Search
- **ADD -** Upon click, you can KEY IN new GJ transaction
- **EDIT** - Upon click, you can EDIT the transaction
- **PRINT** - Upon click, you may PREVIEW and PRINT
#### THE COLUMN SHOW:
- **TYPE** - Transaction Type GJ
- **TRN NO** -Transaction number which upon tick arrow, can be re-arranged by ascending or descending order
- **REF NO**- Reference number
- **TRN DATE**- Transaction Date (in this format DD-MM-YYYY)
- **CURRENCY**- Header currency
- **NARRATION**- Description
- **AMOUNT**-Zero meaning the debit vs credit is equal
\_\_\_\_\_\_\_\_\_\_\_\_\_\_\_\_\_\_\_\_\_\_\_\_\_\_\_\_\_\_\_\_\_\_\_\_\_\_\_\_\_\_\_\_\_\_\_\_\_\_\_\_\_\_\_\_\_\_\_\_\_\_\_\_\_\_\_\_\_\_\_\_\_\_\_\_\_\_\_\_\_\_\_\_\_\_\_\_\_\_\_\_\_\_\_\_\_\_\_\_\_\_\_\_\_\_\_\_\_\_\_\_\_\_\_\_\_\_\_\_\_\_\_\_\_\_\_
#### **HOW TO ADD GJ?**
- Upon click **ADD** from the Journal Voucher listing, the form will show as below
[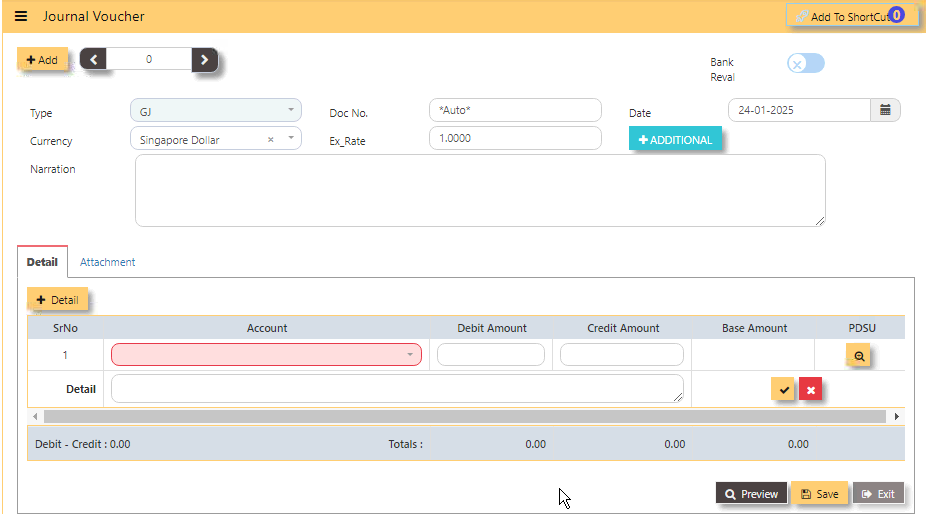](https://doc.uniq365.com/uploads/images/gallery/2025-01/zSmimage.png)
- Select the transaction **TYPE** as GJ (Journal Voucher)
- **TRANSACTION NUMBER** - Beside the add button, the transaction number is auto-numbering and not editable
- **DOC NO** - Can be manually keyed in or 'auto-numbering' base on system setting opted (refer to system setting).
- Enter the **DATE, CURRENCY and EXCHANGE RATE**
- **NARRATION** Field is optional, key in any description
- **BANK REVAL** - Switch on or off
- **+ADDITIONAL** - Header info, to select for Project, Department, Section, Unit and Narration
- **+DETAIL** - For the item details in the lower part of the screen, the first column is for the selection of the Account code, followed by the description, debit amount or credit amount, base amount and PDSU. Upon click +DETAIL, select chart of account code, key in either in debit or credit, then click check will save the first row.
- **PREVIEW** - To preview and print the transaction
- **SAVE** - Calibrate Saving for the Transaction.
- **EXIT**-To go back in listing or menu navigation.
- **CREATE AUTO REVERSE JOURNAL** - if tick, will allow to reverse the Journal entry.
#### [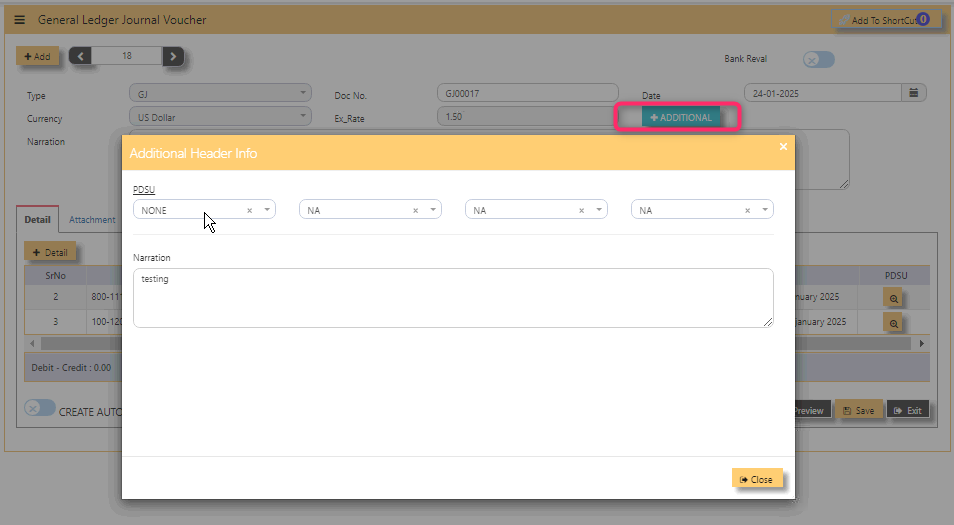](https://doc.uniq365.com/uploads/images/gallery/2025-02/REoimage.png)
**Note:** Please note that the GST or tax is not enable to GJ or GY. If any adjustment is needed for short or over billings, it has to be done in Receivables or Payables Modules.
**Pre-requirements:**
\- Have a complete list of your chart of account before adding Journal Entry.
\_\_\_\_\_\_\_\_\_\_\_\_\_\_\_\_\_\_\_\_\_\_\_\_\_\_\_\_\_\_\_\_\_\_\_\_\_\_\_\_\_\_\_\_\_\_\_\_\_\_\_\_\_\_\_\_\_\_\_\_\_\_\_\_\_\_\_\_\_\_\_\_\_\_\_\_\_\_\_\_\_\_\_\_\_\_\_\_\_\_\_\_\_\_\_\_\_\_\_\_\_\_\_\_\_\_\_\_\_\_\_\_\_\_\_\_\_\_\_\_\_\_\_\_\_
#### **RELATED REPORTS:**
#### **WHERE CAN I GET THE SUMMARY OF GJ REPORT?**
You may find summary of GJ report in the transaction listing report:
GENERAL LEDGER - REPOTS QUERIES - TRANSACTION LISTING
Select the Type 'GJ' and select the date range
Below is a sample screen:
[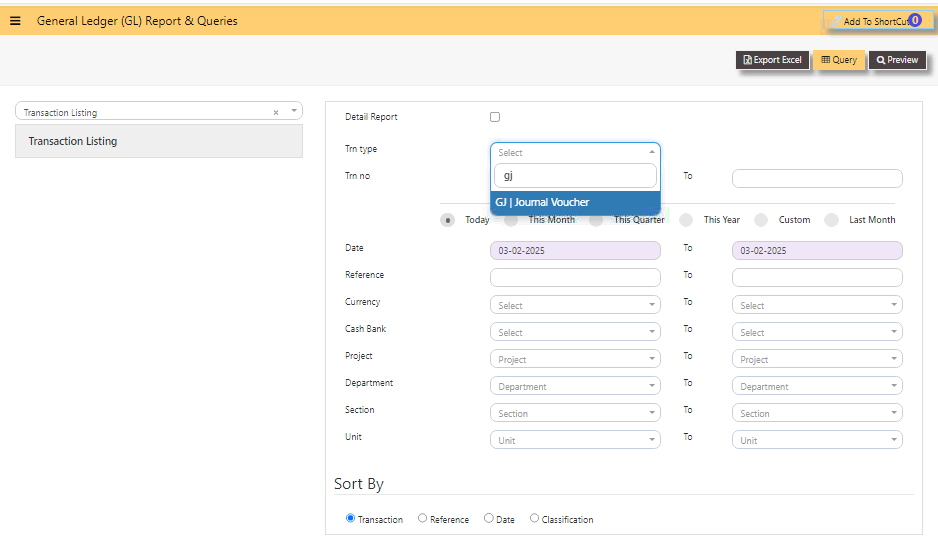](https://doc.uniq365.com/uploads/images/gallery/2025-02/K3jimage.png)
1. **QUERY** - Tick if you opt to export in excel format, with filter capability,
2. **EXPORT EXCEL** - To export the report in excel format.
\_\_\_\_\_\_\_\_\_\_\_\_\_\_\_\_\_\_\_\_\_\_\_\_\_\_\_\_\_\_\_\_\_\_\_\_\_\_\_\_\_\_\_\_\_\_\_\_\_\_\_\_\_\_\_\_\_\_\_\_\_\_\_\_\_\_\_\_\_\_\_\_\_\_\_\_\_\_\_\_\_\_\_\_\_\_\_\_\_\_\_\_\_\_\_\_\_\_\_\_\_\_\_\_\_\_\_\_\_\_\_\_\_\_\_\_\_\_\_\_\_\_\_\_\_\_\_\_\_\_\_
#### **HOW TO CREATE AUTO-REVERSE JOURNAL?**
- In the below example, upon tick create auto-reverse journal, system will prompt and let user select the date to reverse.
[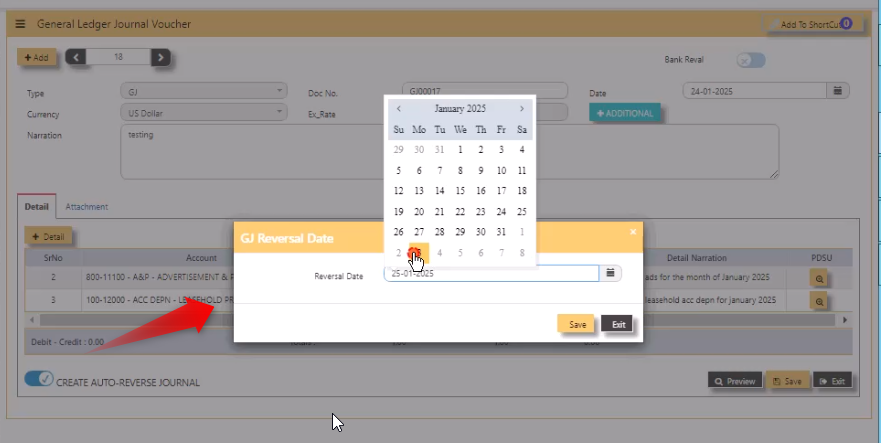](https://doc.uniq365.com/uploads/images/gallery/2025-02/IRaimage.png)
- After selected date, system will auto-post a new GY - GJ20 as prompted.
[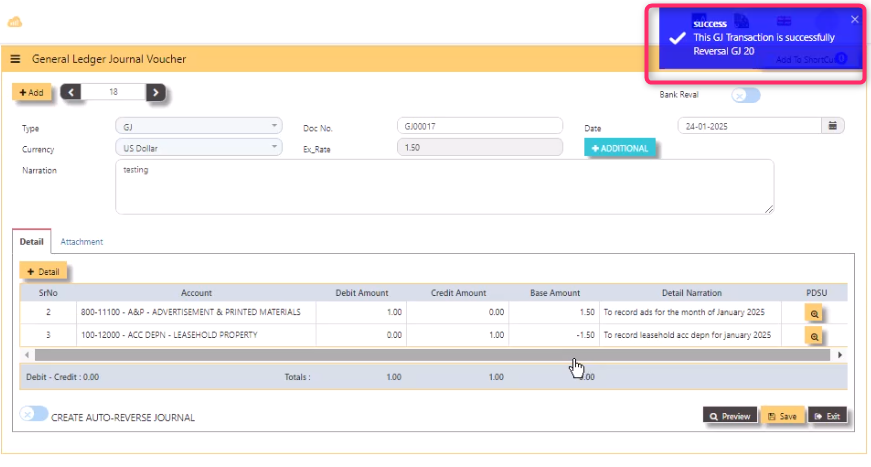](https://doc.uniq365.com/uploads/images/gallery/2025-02/nk6image.png)
YEAR ENDING TRANSACTION
#### In **YEAR END LISTING**,
- click open, you will find the list of year ending transaction listing with the transaction type GY.
[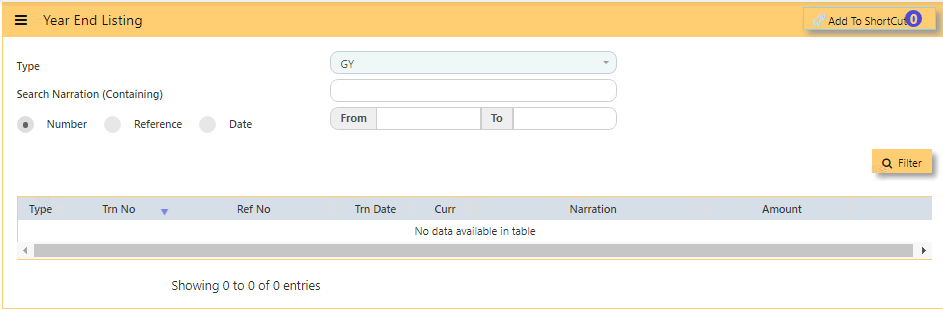](https://doc.uniq365.com/uploads/images/gallery/2025-01/7Mnimage.png)
- **TYPE** - Transaction type as **GY**
- **SEARCH NARRATION (CONTAINING)** - Search function
- **NUMBER BUTTON** - Tick if you opt to filter for the 'Transaction number'
- **REFERENCE BUTTON** - Tick if you opt to filter for the 'DOC number'
- **DATE BUTTON** - Refers to the date of the created transaction (in this format DD-MM-YYYY)
- **FROM** - Use to Search FROM for any 'Number, Reference or Date'
- **TO** - Search TO for any 'Number, Reference or Date'
- **FILTER** - To calibrate the searching mechanism based from the given criteria
\_\_\_\_\_\_\_\_\_\_\_\_\_\_\_\_\_\_\_\_\_\_\_\_\_\_\_\_\_\_\_\_\_\_\_\_\_\_\_\_\_\_\_\_\_\_\_\_\_\_\_\_\_\_\_\_\_\_\_\_\_\_\_\_\_\_\_\_\_\_\_\_\_\_\_\_\_\_\_\_\_\_\_\_\_\_\_\_\_\_\_\_\_\_\_\_\_\_\_\_\_\_\_\_\_\_\_\_\_\_\_\_\_\_\_\_\_\_\_\_\_\_\_\_\_\_\_
#### **WHERE CAN I GET THE SUMMARY OF GY REPORT?**
You may find summary of GY report in the transaction listing report:
1. GENERAL LEDGER - REPORTS QUERIES - TRANSACTION LISTING
2\. Select the Type as 'GY'
3\. Specify the Date Range
4\. Click Preview
####
[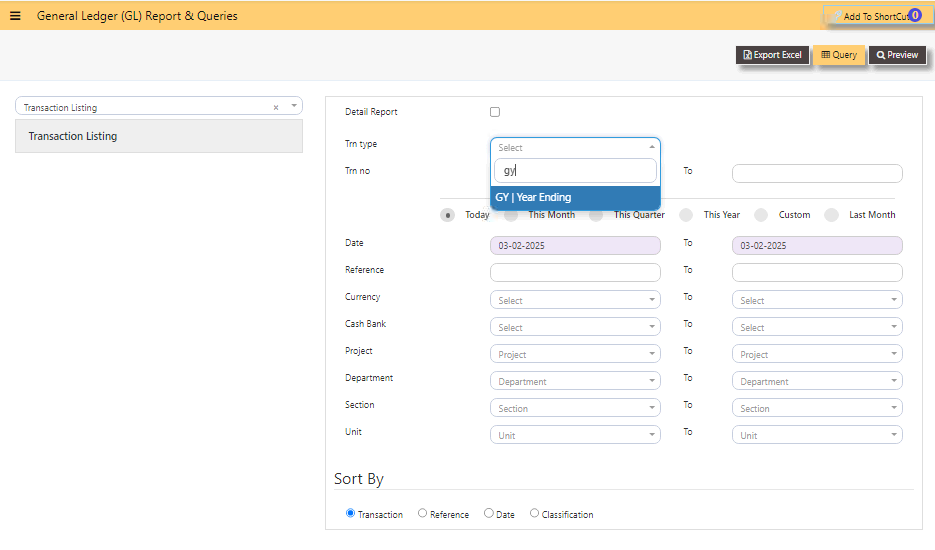](https://doc.uniq365.com/uploads/images/gallery/2025-02/IHximage.png)
1. **QUERY** - Tick if you want to export in excel format, with filter capability
2. **EXPORT EXCEL** - To export the report in excel format
ENTER GL OPENING BALANCE
#### To start the accounting, the **GL OPENING BALANCE** needs to capture all balance sheet items (Assets and Liabilities) balances from the last closing balance. If this is a new company, then this entry is not necessary.
#### **THE GL OPENING BALANCE LISTING:**
[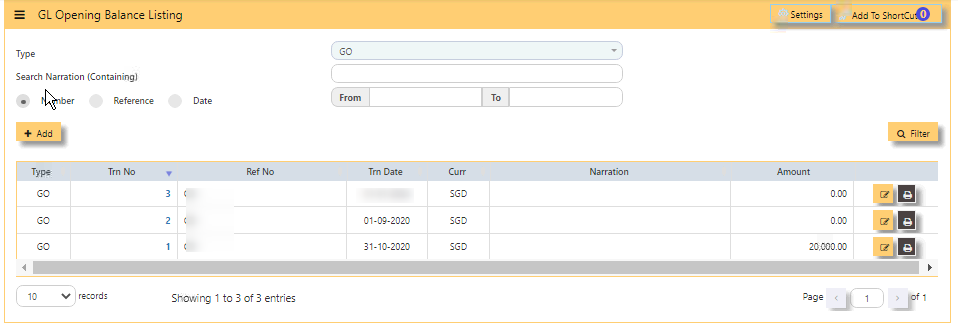](https://doc.uniq365.com/uploads/images/gallery/2025-01/vEyimage.png)
#### \_\_\_\_\_\_\_\_\_\_\_\_\_\_\_\_\_\_\_\_\_\_\_\_\_\_\_\_\_\_\_\_\_\_\_\_\_\_\_\_\_\_\_\_\_\_\_\_\_\_\_\_\_\_\_\_\_\_\_\_\_\_\_\_\_\_\_\_\_\_\_\_\_\_\_\_\_\_\_\_
#### **HOW TO ENTER GL OPENING BALANCE \[PER BASE CURRENCY\]?**
In this sample, the base currency is in SGD Exchange Rate to 1.000
[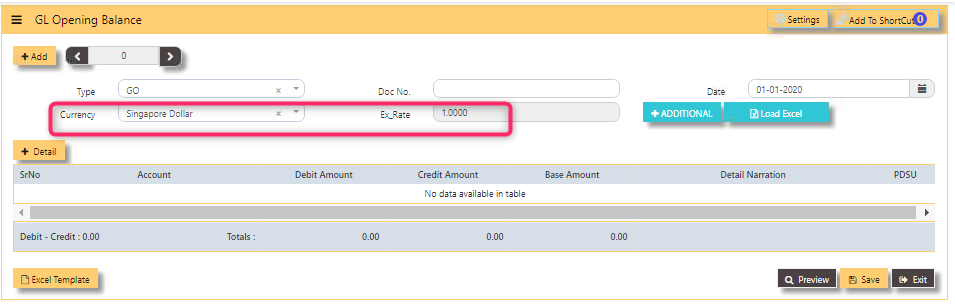](https://doc.uniq365.com/uploads/images/gallery/2025-01/QJ1image.png)
- Click **ADD**
- **TRANSACTION NUMBER** - Beside 'ADD' is auto-numbering and not editable,
- select **TYPE** as **GO**
- **DOC NO** - Key in the Reference Number,
Transaction Date (at least 1 day before the start date of the
accounting period – it must not be in the current accounting
period),
- **DATE** - Default to 'today date' but can be interchangeable (in this format DD-MM-YYYY)
- **CURRENCY** - Select from dropdown
- **EX RATE** - Auto fill or can manually key in values
- **ADDITIONAL** - Is for selecting the PROJECT-DEPARTMENT-SECTION-UNIT or PDSU and
- **NARRATION** - Key in your narration.
- **+DETAIL** - When tick, will open a line detail,
- **ACCOUNT** - Select the chart of account and enter the amount in the debit or credit side. Save
the transaction.
- We highly recommend to enter GL OPENING BALANCE \[of foreign currency\] in a separate GO.
\_\_\_\_\_\_\_\_\_\_\_\_\_\_\_\_\_\_\_\_\_\_\_\_\_\_\_\_\_\_\_\_\_\_\_\_\_\_\_\_\_\_\_\_\_\_\_\_\_\_\_\_\_\_\_\_\_\_\_\_\_\_\_\_\_\_\_\_\_\_\_\_\_\_\_\_\_\_\_\_\_\_\_\_\_\_\_\_\_\_\_\_\_\_\_\_\_\_\_\_\_\_\_\_\_\_\_\_\_\_\_\_\_\_\_\_\_\_\_\_\_\_\_\_\_\_\_\_
#### **ADDITIONAL HEADER INFO**
- **PDSU**
- **Narration**
- [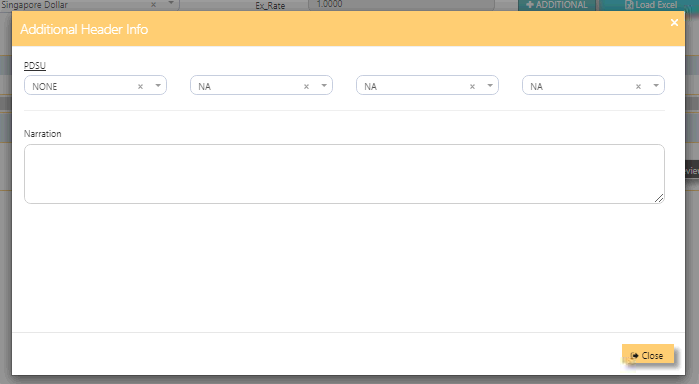](https://doc.uniq365.com/uploads/images/gallery/2025-01/LRlimage.png)
\_\_\_\_\_\_\_\_\_\_\_\_\_\_\_\_\_\_\_\_\_\_\_\_\_\_\_\_\_\_\_\_\_\_\_\_\_\_\_\_\_\_\_\_\_\_\_\_\_\_\_\_\_\_\_\_\_\_\_\_\_\_\_\_\_\_\_\_\_\_\_\_\_\_\_\_\_\_\_\_\_\_\_\_\_\_\_\_\_\_\_\_\_\_\_\_\_\_\_\_\_\_\_\_\_\_\_\_\_\_\_\_\_\_\_\_\_\_\_\_\_\_\_\_\_\_\_
#### **HOW TO ENTER GL OPENING BALANCE (PER FOREIGN CURRENCY)?**
**In this sample, foreign currency is in USD ex rate .74-**
[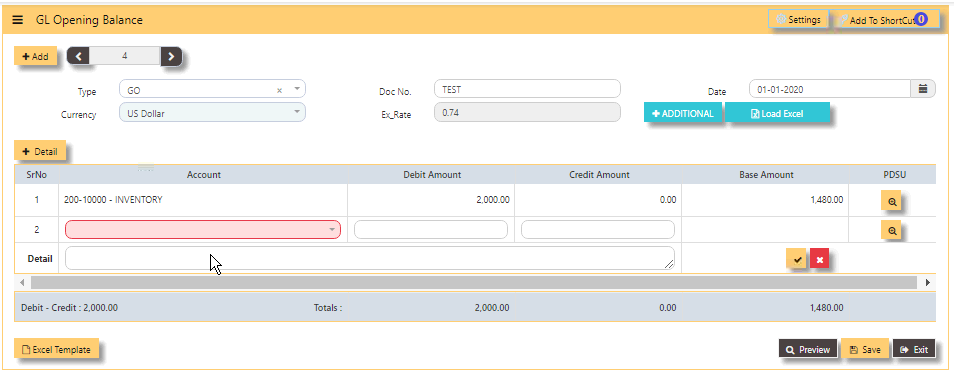](https://doc.uniq365.com/uploads/images/gallery/2025-01/OZEimage.png)
- Same steps as GO above but will vary on '**CURRENCY**' selected. Here a foreign currency is USD.
\_\_\_\_\_\_\_\_\_\_\_\_\_\_\_\_\_\_\_\_\_\_\_\_\_\_\_\_\_\_\_\_\_\_\_\_\_\_\_\_\_\_\_\_\_\_\_\_\_\_\_\_\_\_\_\_\_\_\_\_\_\_\_\_\_\_\_\_\_\_\_\_\_\_\_\_\_\_\_\_\_\_\_\_\_\_\_\_\_\_\_\_\_\_\_\_\_\_\_\_\_\_\_\_\_\_\_\_\_\_\_\_\_\_\_\_\_\_\_\_\_\_\_\_\_\_\_\_\_\_\_\_\_\_\_\_\_
#### **REPORTS:**
#### **WHERE CAN I GET THE SUMMARY OF GO REPORT?**
You may find summary of GO report in the transaction listing report:
1. In GENERAL LEDGER - REPORTS & QUERIES - TRANSACTION LISTING
2. Select type as ‘GO’ and date range
3. Then preview, as on the sample screen:
[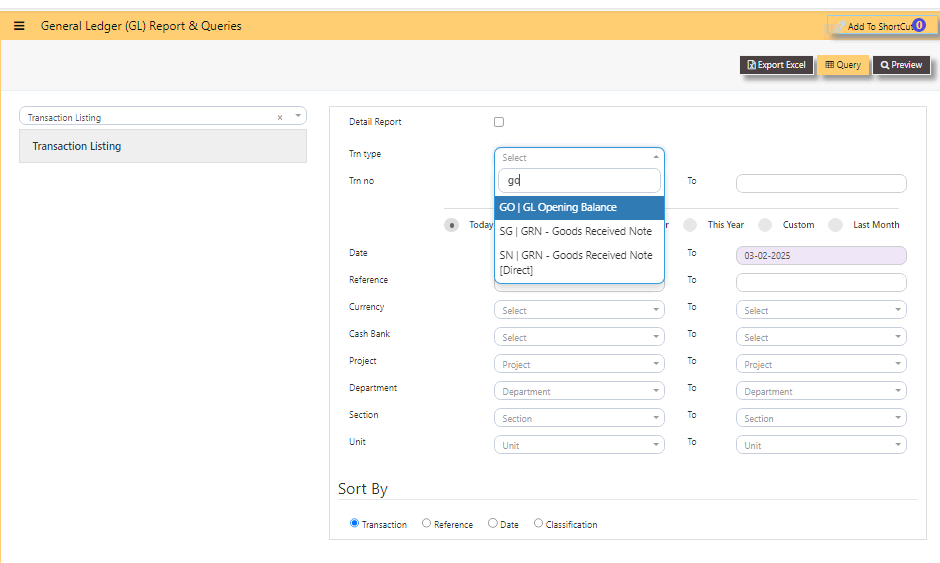](https://doc.uniq365.com/uploads/images/gallery/2025-02/YoIimage.png)
1. **QUERY** - tick if you opt to export in excel format, with filter capability,
2. **EXPORT EXCEL** - to export the report in excel format.
REPOST OF GL TRANSACTION
#### In a perfect situation, all transactions should post properly. However, the office network we operate is imperfect; virus & worms, power outage, network cabling issues, machine hangs, user negligence etc.
Any combination(s) of above can affect transaction. When problem happens, there is a feature for the GL transactions that
are affected to be re-posted. In cases where certain charts of accounts are re-mapped, you may need to re-post the transactions to
GL in a quickly manner.
#### **HOW TO REPOST GL TRANSACTIONS?**
[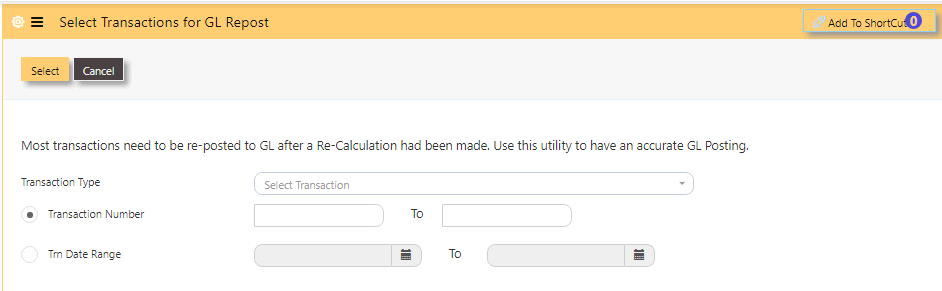](https://doc.uniq365.com/uploads/images/gallery/2025-01/m3oimage.png)
- Click on **FINANCE, GENERAL LEDGER, REPOST OF GL TRANSACTIONS**.
- Select **TRANSACTION TYPE**,
- Select either in **TRANSACTION NUMBER**, key in the number FROM and TO
- or **TRN DATE RANGE**, select date FROM and TO (in this format DD-MM-YYYY)
- then click **SELECT**.
YEAR END POSTING
#### **Uniq365** is a real time accounting system that will have transactions that closed every time it is saved. No year end
procedures are needed at transaction level. However a Year-End Option is required.
The **YEAR ENDING POSTING** serves the purpose of transferring the present year P&L amount into a Retained Earning figure.
\_\_\_\_\_\_\_\_\_\_\_\_\_\_\_\_\_\_\_\_\_\_\_\_\_\_\_\_\_\_\_\_\_\_\_\_\_\_\_\_\_\_\_\_\_\_\_\_\_\_\_\_\_\_\_\_\_\_\_\_\_\_\_\_\_\_\_\_\_\_\_\_\_\_\_\_\_\_\_\_\_\_\_\_\_\_\_\_\_\_\_\_\_\_\_\_\_\_\_\_\_\_\_\_\_\_\_\_\_\_\_\_\_\_\_\_\_\_\_\_\_\_\_\_\_\_\_\_\_\_\_\_\_
#### **HOW TO DO A YEAR-END POSTING?**
1. In General ledger, Operations, **year ending option**,
2. **Enter year to be closed** - key in,
3. You may opt to leave blank these fields- 1.A, 1.B., 2.A., 2.B., 3.A., 3.B.,
4. mandatory tick - confirmation boxes,
5. lastly, tick **'PROCEED YEAR-END'**.
6. **CANCEL** - tick if you do not want to proceed.
[](https://doc.uniq365.com/uploads/images/gallery/2025-02/1XWimage.png)
#### **Pre-requirements:**
- Before carrying out the Year Ending process, check if mappings are correctly done, go to SYSTEM ADMIN – ACCOUNT POSTING SETTING and check that the following accounts are setup.
**A. Year End Trn Type** – select GY, the pre-set transaction type for Year-End posting operation.
**B. P & L Account** – enter the code for Current Year P & L Account.
**C. Balance Sheet A/c** – select the Retained Earning Account, as below.
[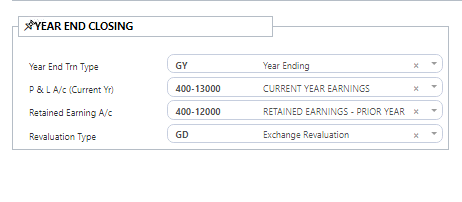](https://doc.uniq365.com/uploads/images/gallery/2025-02/FN3image.png)
- Have a **saved file in pdf or excel** of 4reports- Stock valuation report, Trial balance Report, Customer outstanding report and Supplier outstanding report as mandatory attachments in 1.A., 1.B., 2.A. and 3.A.
- [ ] #### **Year ending checklist to be done annually:**
It is best recommended to do the checklist before the year ending:
\- Stock ledger is tie to your General ledger stock balance,
\- Diagnostics are cleared away,
\- Customer ledgers are correct,
\- Supplier ledgers are correct,
\- and lastly, GST reports are correct.
POSTING RECURRING JOURNAL
#### **HOW TO DO POSTING RECURRING JOURNAL?**
#### **PRE-REQUISITE:**
- You must have an existing recurring journal first before do the posting recurring journal.
#### **POSTING RECURRING JOURNAL:**
- **BILLING CYCLE** - select from the dropdown, 1-Monthly, 2-Bi monthly, 3- Quarterly, 6 - Semi-Annually 12 - Annually
- **POSTING YEAR** - select the year to post
- **POSTING MONTH** - select the month to post
- **SEARCH** - tick, will show the available recurring entries
- **AVAILABLE RECURRING ENTRIES** - show listings of available recurring journal entries
- **ADD ALL** - tick, will transfer all 'AVAILABLE RECURRING ENTRIES' to the right 'RECURRING ENTRIES TO POST'
- **ADD -** select one or selected entries to transfer to right
- **REMOVE** - transfer back one or selected entries from 'RECURRING ENTRIES TO POST' back to 'AVAILABLE RECURRING ENTRIES'
- **REMOVE ALL** - transfer all back from 'RECURRING ENTRIES TO POST' to 'AVAILABLE RECURRING ENTRIES'
- **RECURRING ENTRIES TO POST** - are selected entries to post
- **POST** - tick, will post the entries and will transfer the journal to 'POSTED RECURRING ENTRIES'
- **INVALID RECURRING ENTRIES** - are invalid entries. You must review your template and correct them.
- **POSTED RECURRING ENTRIES** - list of successfully posted entries
- **EDIT** - select from 'POSTED RECURRING ENTRIES', upon tick EDIT, will zoom in recurring journal for edit
- **EXIT** - tick to close the posting.
[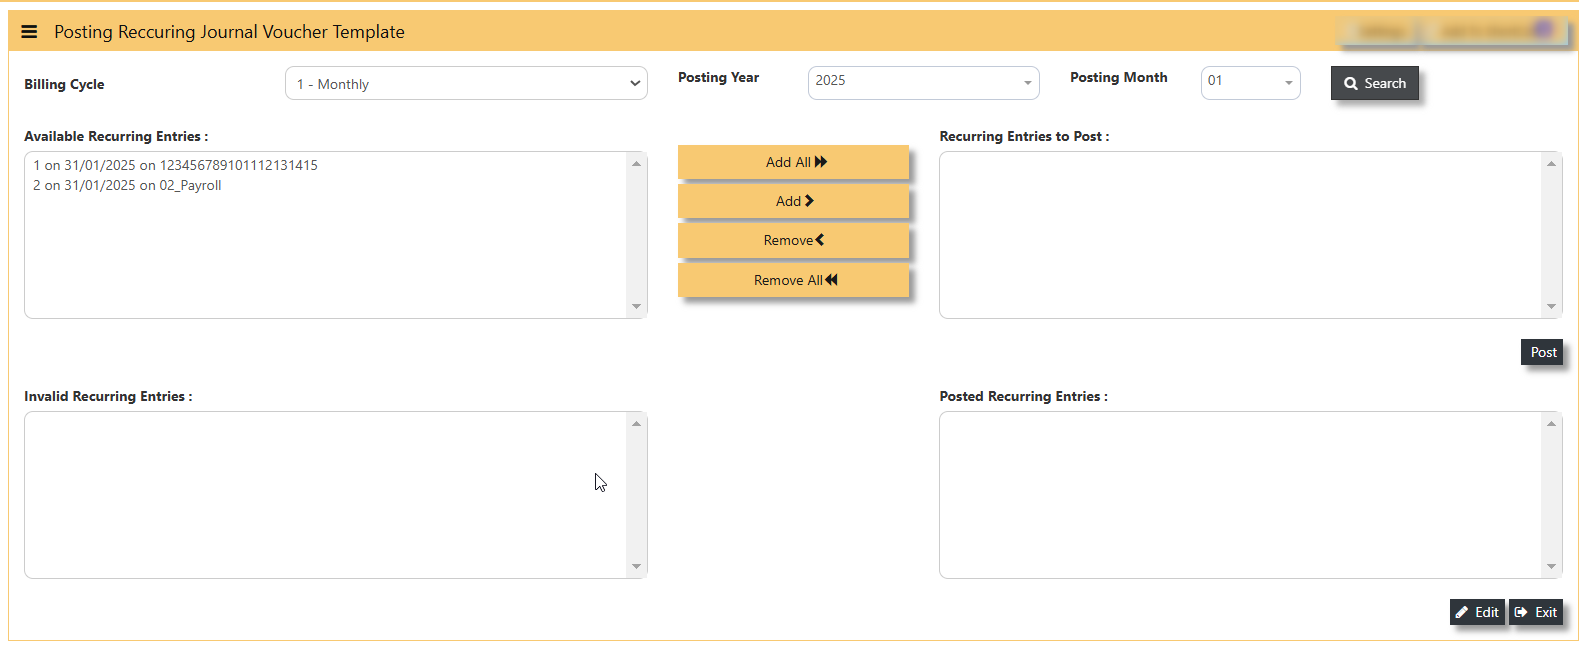](https://doc.uniq365.com/uploads/images/gallery/2025-02/mWMimage.png)
RECURRING JOURNAL VOUCHER TEMPLATE LISTING
#### **PREVIEW THE RECURRING JOURNAL VOUCHER TEMPLATE LISTING**
- **RECURRING ID** - Key in from and to id
- **VOUCHER NAME** - Key in the voucher name
- **BILLING CYCLE -** Select if you opt to preview base on billing cycle
- **CURRENCY** - Select if you opt to preview base on currency
- **PROJECT** - Select if you opt to preview base on project
- **DEPARTMENT**- Select if you opt to preview base on department
- **SECTION** - Select if you opt to preview base on section
- **UNIT** - Select if you opt to preview base on unit
- **ONLY SHOW ACTIVE** - To show active.
[ 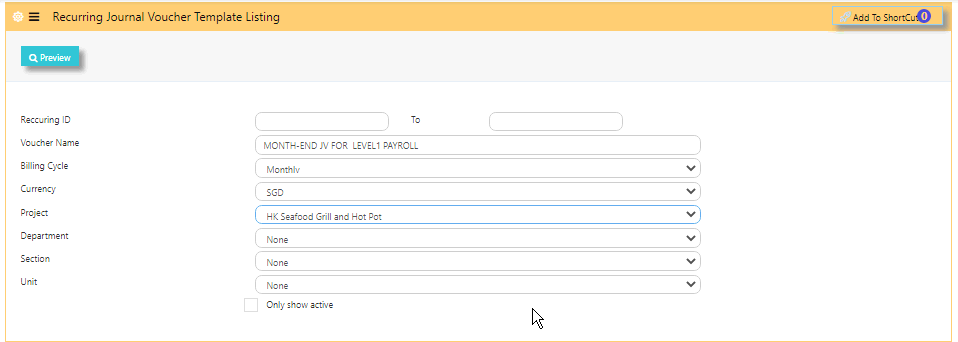](https://doc.uniq365.com/uploads/images/gallery/2025-01/1Gximage.png)
PERIOD LOCKING
#### **PERIOD LOCKING**
#### Availability of this access - **'PERIOD LOCKING'**, vary base on user group. The locking is commonly given to 'ADMINISTRATOR GROUP' who have the highest authority to control the locking.
#### **HOW TO SET PERIOD LOCKING?**
[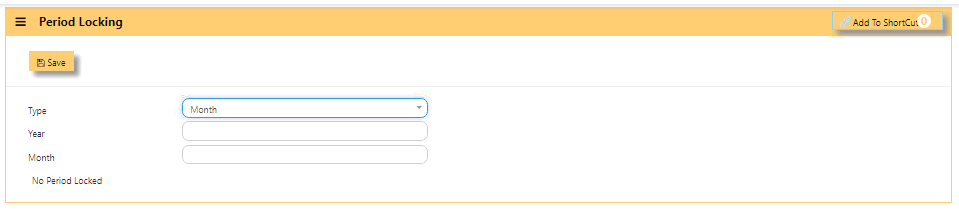](https://doc.uniq365.com/uploads/images/gallery/2025-01/f6vimage.png)
- Select **TYPE** as month, year or no locking,
[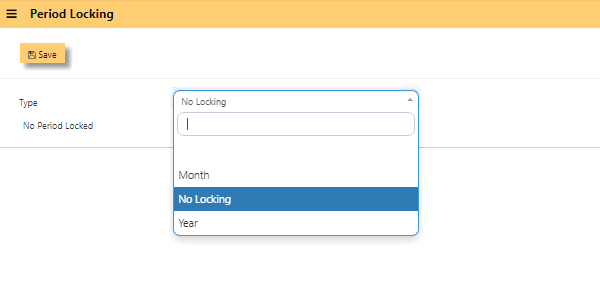](https://doc.uniq365.com/uploads/images/gallery/2025-02/2cnimage.png)
- If selected type is other than **'No Locking'**, select either in **YEAR** - key in the year (this field is editable),
- **MONTH** - key in the month (this field is editable),
- **SAVE**.
- **NOTE** - the year or month is editable depending on the last GY date entered.
- This is the same '**LOCKING'** you can find in SYSTEM ADMIN - SYSTEM SETTINGS.
MONTHLY STOCK ENTRY
#### The **MONTHLY STOCK ENTRY** is used for NO STOCK POSTING \[METHOD\] ONLY:
#### **HOW TO ADD IN OPENING ENTRY TAB?**
- **YEAR -** show year of opening entry
- **CLOSING STOCK BALANCE** - show the value of the opening entry
- **NEW** - tick to add the opening value and this is done once as opening entry
- **EDIT** - upon select, will show edit window, value is editable
- **UPDATE** - tick
- **CLOSE** - to go back to previous window
[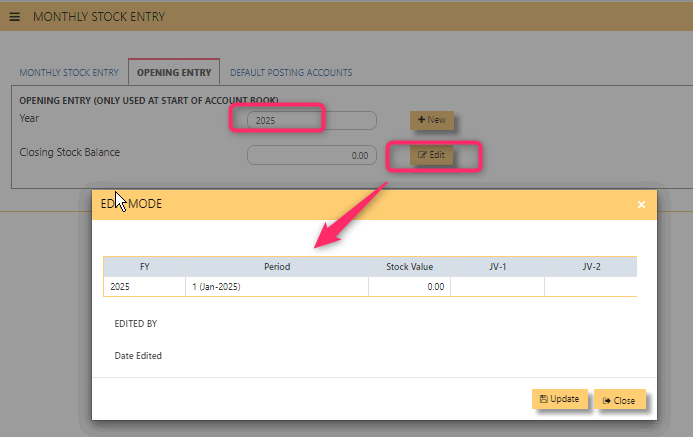](https://doc.uniq365.com/uploads/images/gallery/2025-02/yzSimage.png)
#### **MONTHLY STOCK ENTRY TAB**
[](https://doc.uniq365.com/uploads/images/gallery/2025-02/gjkimage.png)
- **YEAR** - key in year to search, in this sample, is YEAR 2024
- **FYI**- financial year
- **PERIOD** - month and year of the financial
- **CLOSING BALANCE** - key in closing value
- **CREATE** - tick after key in value of closing balance for the given month
- **EDIT** - tick after edit value of closing balance for the given month
- **JV1** - this reference will auto-generate as **CLOSING BALANCE** of the month
- **JV1 DATE** - date of JV1
- **JV2** - this reference will auto-generate as **OPENING BALANCE** of the month
- **JV2 DATE** - date of JV2
- **USER** - refers to user who added the entry
#### **DEFAULT POSTING ACCOUNTS TAB**
**DEFAULT POSTING ACCOUNTS TAB** is the mapping of **STOCK CONTROL BS**, **CLOSING STOCK PNL** and **OPENING STOCK PNL** account that will be necessary in monthly stock entry.
- **ACCOUNT NAME** - mandatory to select stock control account BS, closing stock P&L and opening stock P&L.
- **POSTING TYPE** - mandatory to select posting type 'fixed account', 'product group', etc.
- **FIXED ACCOUNT** - mandatory to select GL account code
[](https://doc.uniq365.com/uploads/images/gallery/2025-02/Diwimage.png)
RECUR JOURNAL TEMPLATE
#### **HOW TO SEARCH RECURRING JOURNAL TEMPLATE?**
- **FROM** - Select from dropdown Transaction Type and voucher name
- **TO** - Select Transaction Type and voucher name
- **FILTER** - Tick to proceed SEARCHING.
- **TYPE** - Transaction type is **VB**
- **TRN NO** - Show number descending order
- **DESCRIPTION** - As name of recurring journal template
- **CREATED DATE** - Display the Date (in this format DD-MM-YYYY)
- **CURR** - Shows the Currency
- **NARRATION** - Shows Transaction Description
- [](https://doc.uniq365.com/uploads/images/gallery/2025-02/41Ximage.png)
\- Tick if opt to edit the recurring journal template.
**NOTE** - If you wish to edit existing recurring journal with historical transactions, it can be edited only in validity date 'TO' only.
[](https://doc.uniq365.com/uploads/images/gallery/2025-02/BUHimage.png)
#### **HOW TO ADD NEW RECURRING JOURNAL TEMPLATE?**
- **+ADD -** Tick to open the recurring journal form
- **VOUCHER NAME** - Key in desired name, can be alphanumeric not more than 20characters.
- **BILLING CYCLE** - Select from dropdown if monthly, quarterly, yearly, etc.
- **FIRST MONTH** - Select month among January to December
- **DAY** - Key in 1 or until 31, or tick **'LAST DAY'**
- **POST MONTH** - Select the months to post the recurring journal
- **VALIDITY FROM and TO** - Select from and to date for the effectivity of the recurring journal (date in this format DD-MM-YYYY)
- **CURRENCY** - Select currency from the dropdown
- **EX RATE** - Defaulted to latest rate or key in new rate
- **NARRATION** - Key in description of narration
- **PDSU** - Select from dropdown the project-department-section-unit, skip if not enabled for your book.
- **PAYMENT DETAILS +ADD NEW** - Tick to add the chart of account.
- **SAVE -** Tick to save template
- **EXIT** - To go back to sub menu.
- **INACTIVE** - To hide or remove the template from active listings.
[](https://doc.uniq365.com/uploads/images/gallery/2025-02/rIHimage.png)
MASTER LISTING
#### **HOW TO GENERATE MASTER LISTING - CHART OF ACCOUNT?**
- **ACCOUNT** - to view specific account or when left blank, will show full list of chart of account or
- **ACCOUNT NAME** - to view specific name
- **USE SELECTED GL ACCOUNT** button - tick, this selection is use when user want to select 2 or more chart of account
- then **SELECT ACCOUNT** - tick 2 or more chart of account
- **PREVIEW** - click will show list of chart of account in either select by '**ACCOUNT**' or by '**USE SELECTED GL ACCOUNT**
#### [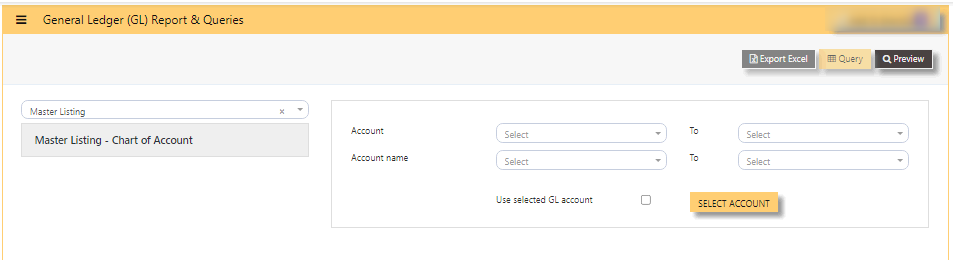](https://doc.uniq365.com/uploads/images/gallery/2025-02/6USimage.png)
TRANSACTION LISTING
#### **TRANSACTION LISTING REPORT or otherwise know GL transaction listing,** can be previewed here.
#### **HOW TO PREVIEW TRANSACTION LISTING?**
Fill up the following filter parameters:
- DETAIL REPORT
- TRN TYPE
- TRN NO
- BUTTON - TODAY, THIS MONTH, THIS QUARTER, THIS YEAR, CUSTOM, LAST MONTH
- DATE
- REFERENCE
- CURRENCY
- CASH BANK
- PROJECT
- DEPARTMENT
- SECTION
- UNIT
- SORT BY - select TRANSACTION, REFERENCE, DATE or CLASSIFICATION
- PREVIEW
- QUERY
- EXPORT EXCEL
#### [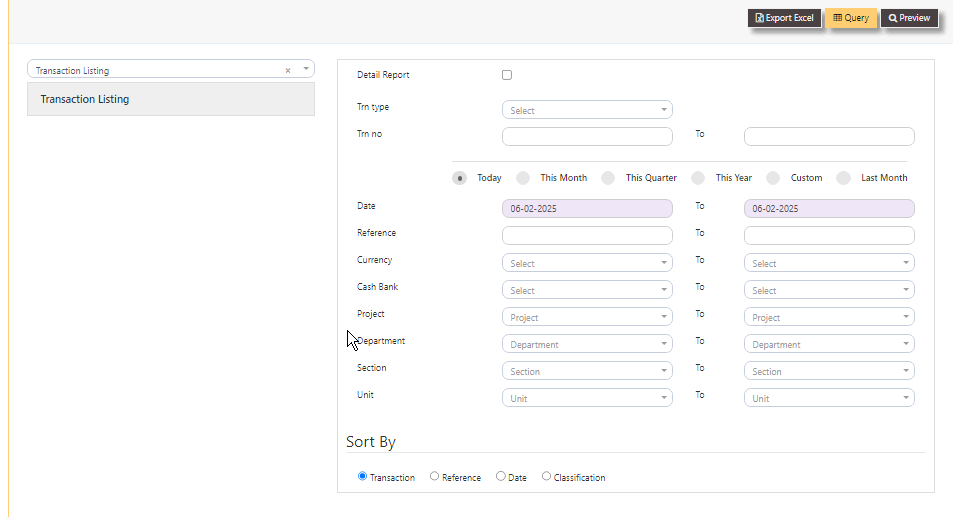](https://doc.uniq365.com/uploads/images/gallery/2025-02/YlPimage.png)
Sample transaction listing if selected a specific TRN TYPE GJ with selected date range 01 January 2025 to 13 February 2025, will show as below:
[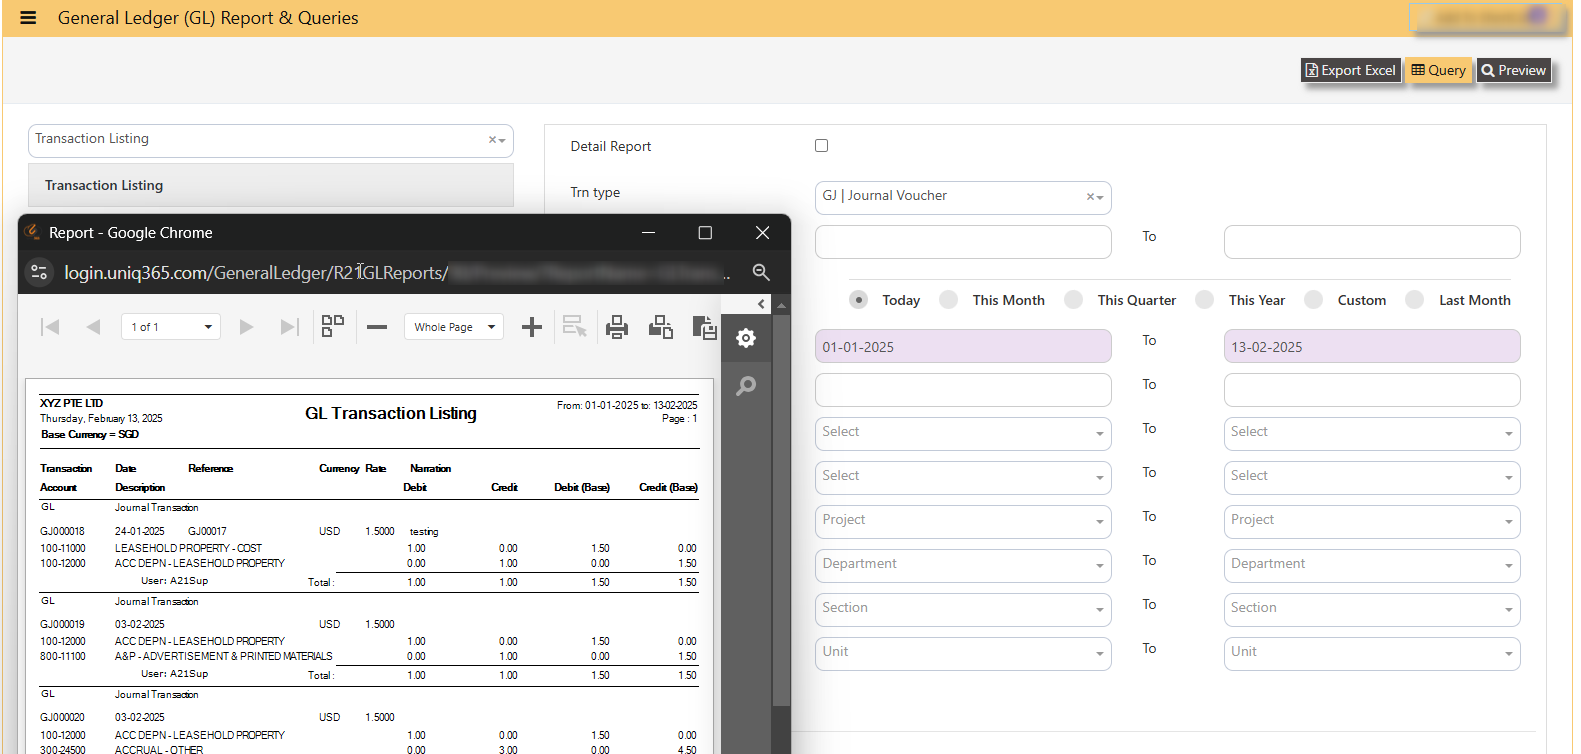](https://doc.uniq365.com/uploads/images/gallery/2025-02/qXqimage.png)
GST REPORT
#### **HOW TO GENERATE GST F5?**
#### **This report is generated for submission to IRAS.**
- **GST Form 5 Statement (By GST TYPE) -** is the most commonly used Form5
- **Date -** select date range
- **PREVIEW -** click to view
- **QUERY -** to export excel with filter capability
- **EXPORT EXCEL -** to export to excel
#### [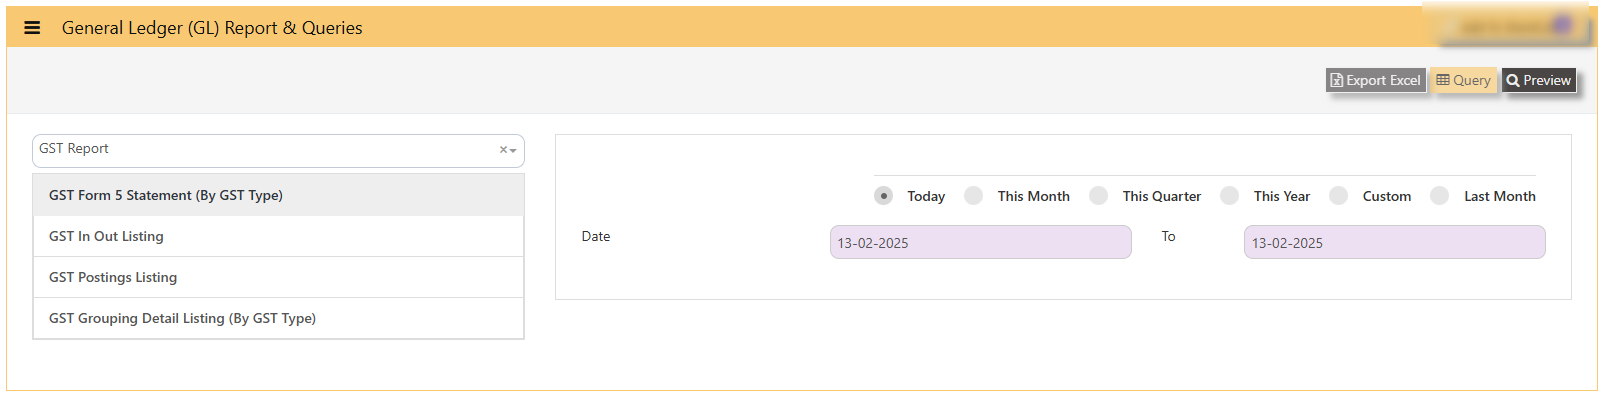](https://doc.uniq365.com/uploads/images/gallery/2025-02/Nwjimage.png)
#### **SAMPLE PREVIEW OF GST FORM5 (BY GST TYPE):**
- **ARROW LEFT OR RIGHT**- select pages \[in sample will show pages 1 of total 1 page\]
- **- or +** - zoom from 1% to 100%
- **PRINT** - select to print
- **DOWNLOAD** - to pdf or excel.
[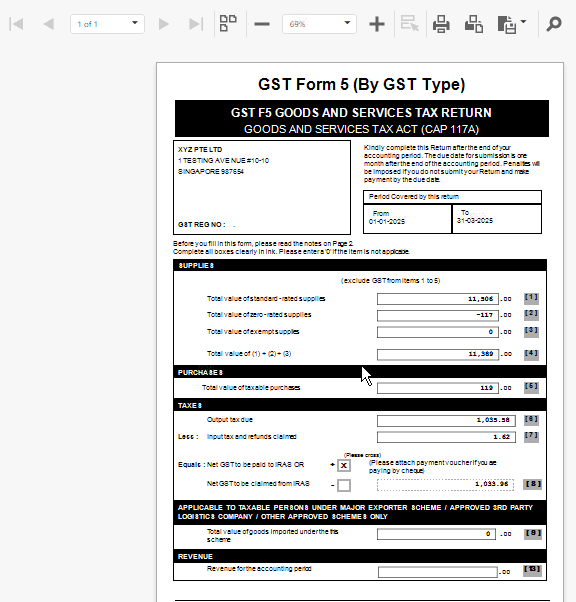](https://doc.uniq365.com/uploads/images/gallery/2025-02/c75image.png)
\_\_\_\_\_\_\_\_\_\_\_\_\_\_\_\_\_\_\_\_\_\_\_\_\_\_\_\_\_\_\_\_\_\_\_\_\_\_\_\_\_\_\_\_\_\_\_\_\_\_\_\_\_\_\_\_\_\_\_\_\_\_\_\_\_\_\_\_\_\_\_\_\_\_\_\_\_\_\_\_\_\_\_\_\_\_\_\_\_\_\_\_\_\_\_\_\_\_\_\_\_\_\_\_\_\_\_\_\_\_\_\_\_\_\_\_\_\_\_\_\_\_
#### **HOW TO GENERATE GST IN OUT LISTING?**
**This report reflects all posted transactions with GST (sorted from payable to receivable).**
- **GST IN OUT LISTING**
- **DATE**
- **PROJECT**
- **DEPARTMENT**
- **SECTION**
- **UNIT**
[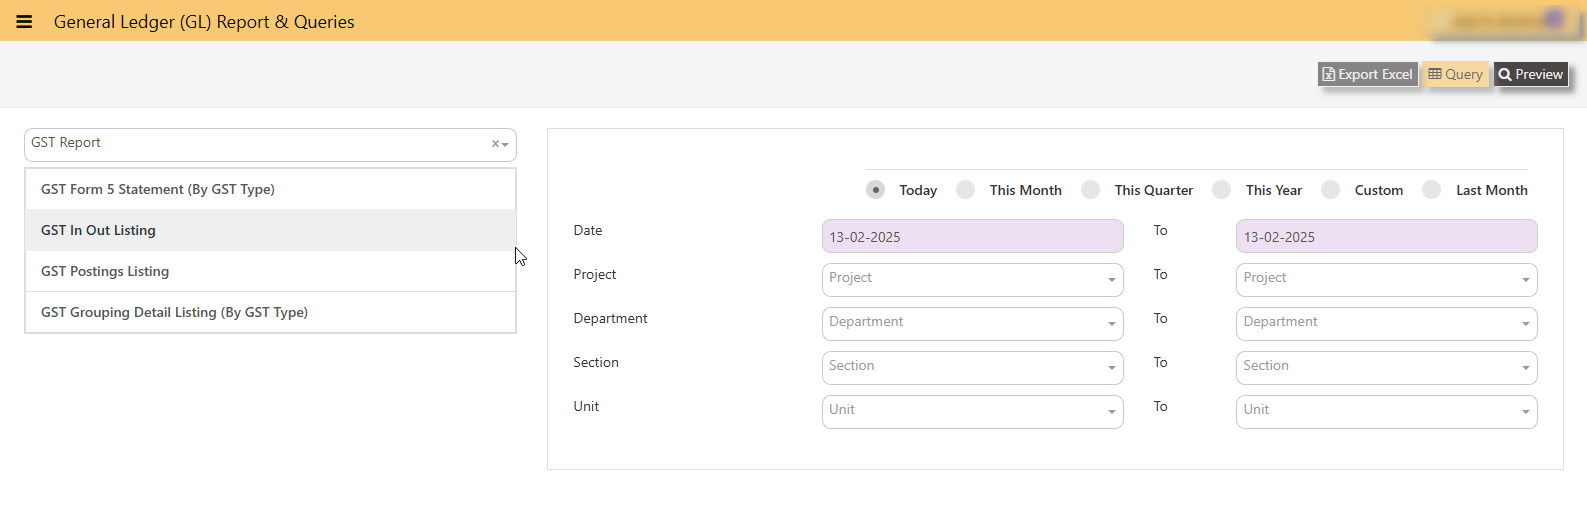](https://doc.uniq365.com/uploads/images/gallery/2025-02/5nVimage.png)
#### **SAMPLE PREVIEW OF GST IN OUT LISTING:**
[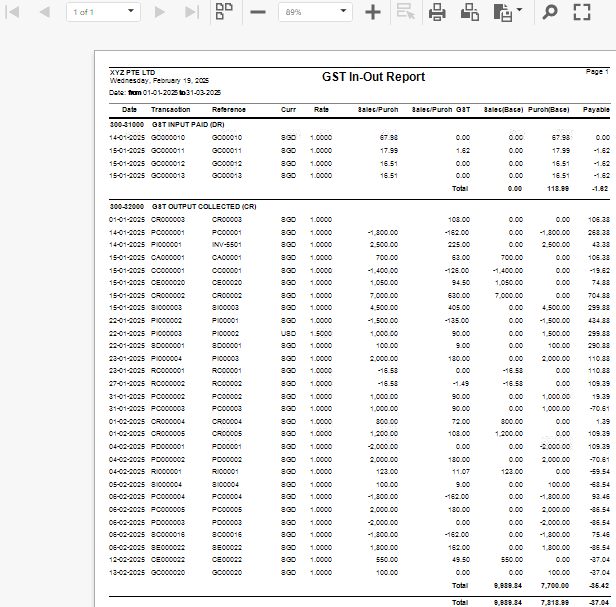](https://doc.uniq365.com/uploads/images/gallery/2025-02/1u6image.png)
\_\_\_\_\_\_\_\_\_\_\_\_\_\_\_\_\_\_\_\_\_\_\_\_\_\_\_\_\_\_\_\_\_\_\_\_\_\_\_\_\_\_\_\_\_\_\_\_\_\_\_\_\_\_\_\_\_\_\_\_\_\_\_\_\_\_\_\_\_\_\_\_\_\_\_\_\_\_\_\_\_\_\_\_\_\_\_\_\_\_\_\_\_\_\_\_\_\_\_\_\_\_\_\_\_\_\_\_\_\_\_\_\_\_\_\_\_\_\_\_\_\_\_\_\_
#### **HOW TO GENERATE GST POSTING LISTING?**
**This report reflects transactions sorted by GST CODE, grouped by GL ACCOUNT CODE.**
Navigate on the GST Posting Listing Report and fill up your required parameters for the report generation.
[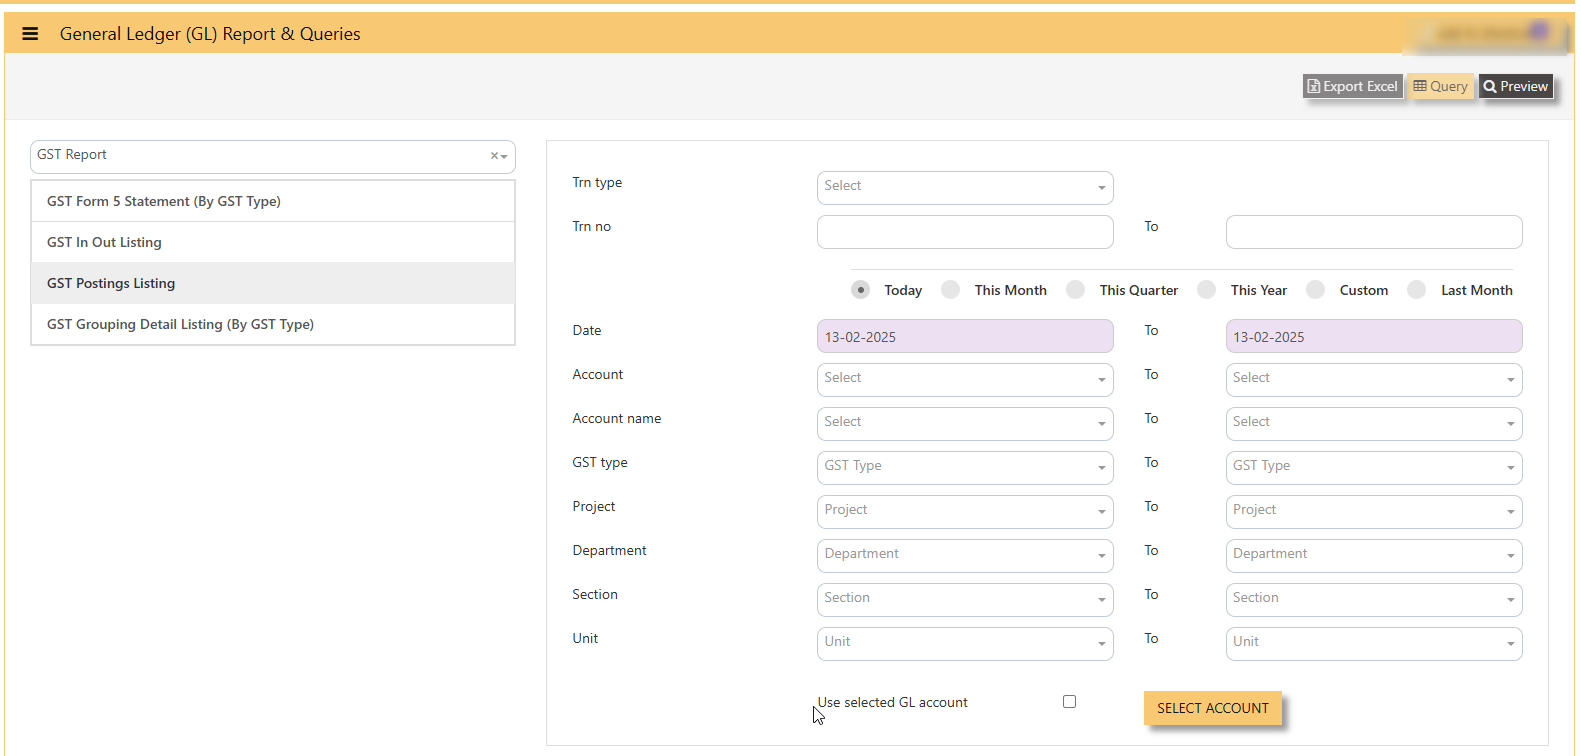](https://doc.uniq365.com/uploads/images/gallery/2025-02/KsFimage.png)
#### **SAMPLE PREVIEW OF GST POSTING LISTING:**
[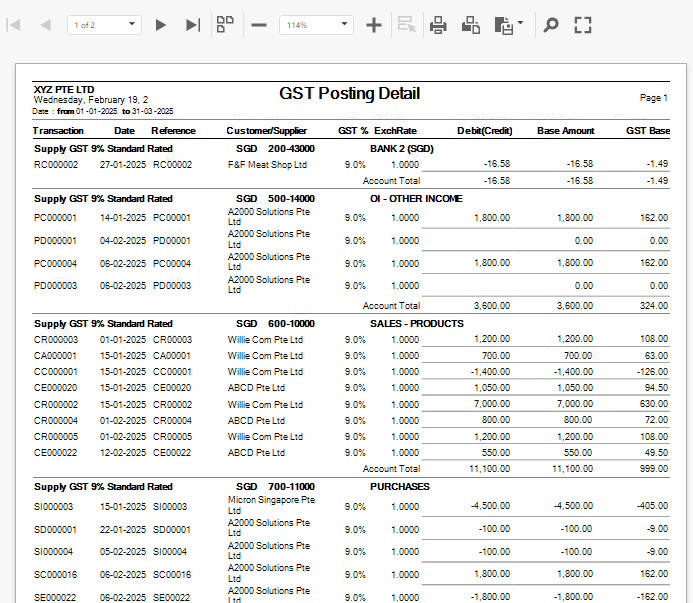](https://doc.uniq365.com/uploads/images/gallery/2025-02/bQYimage.png)
\_\_\_\_\_\_\_\_\_\_\_\_\_\_\_\_\_\_\_\_\_\_\_\_\_\_\_\_\_\_\_\_\_\_\_\_\_\_\_\_\_\_\_\_\_\_\_\_\_\_\_\_\_\_\_\_\_\_\_\_\_\_\_\_\_\_\_\_\_\_\_\_\_\_\_\_\_\_\_\_\_\_\_\_\_\_\_\_\_\_\_\_\_\_\_\_\_\_\_\_\_\_\_\_\_\_\_\_\_\_\_\_\_\_\_\_\_\_\_\_\_\_\_\_\_
#### **HOW TO GENERATE GST GROUPING DETAIL LISTING BY GST TYPE?**
**This report report reflect summary of transaction posted with GST involved, grouped by GST TYPE.**
Navigate on the GST Grouping Detail Listing(By GST Type) and fill up your required parameters for the report generation.
[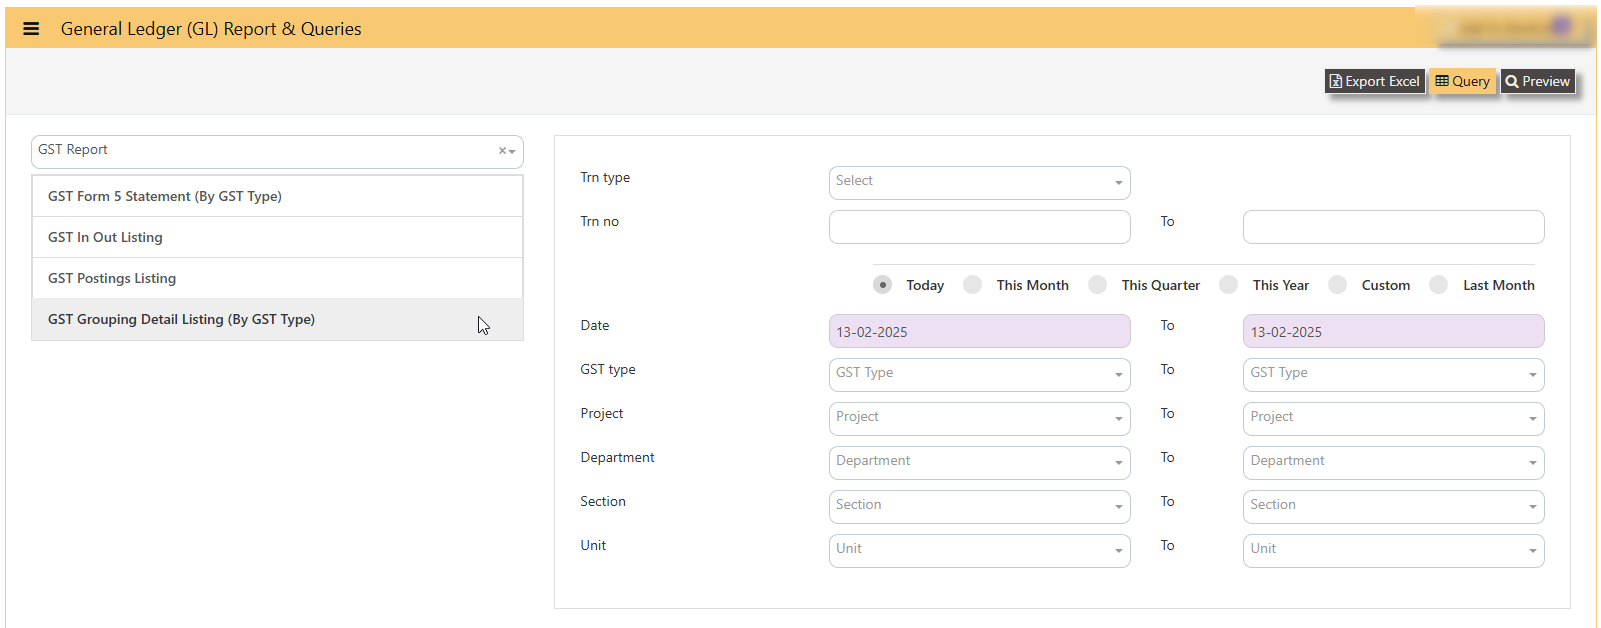](https://doc.uniq365.com/uploads/images/gallery/2025-02/l17image.png)
#### **SAMPLE PREVIEW OF GST GROUPING DETAIL LISTING BY GST TYPE?**
[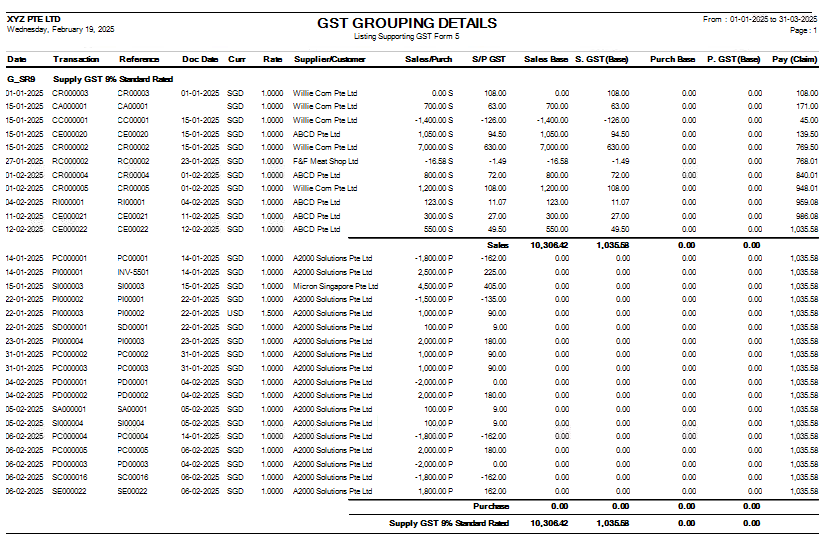](https://doc.uniq365.com/uploads/images/gallery/2025-02/Groimage.png)
TRIAL BALANCE
#### **TRIAL BALANCE** in **Uniq365** can be previewed in 2 ways-
- **Trial balance By Date**
- **Trial balance By Year / Period**
#### **HOW TO GENERATE TRIAL BALANCE BY DATE?**
- select **TRIAL BALANCE BY DATE**
- **YEAR -** key in
- **TODAY** - defaulted but you may select **'THIS MONTH', 'THIS QUARTER', 'THIS YEAR', 'CUSTOM' or 'LAST MONTH'**
- **DATE** - select from and to (in this format DD-MM-YYYY)
- **PROJECT** - filter by project
- **DEPARTMENT** - filter by department
- **SECTION** - filter by section or
- **UNIT** - filter by unit
- **PREVIEW** - tick to preview
- **QUERY** - to export in excel with filter capability
- **EXPORT EXCEL** - to export in excel
[](https://doc.uniq365.com/uploads/images/gallery/2025-02/eg4image.png)
#### **SAMPLE FORMAT OF TRIAL BALANCE BY DATE:**
[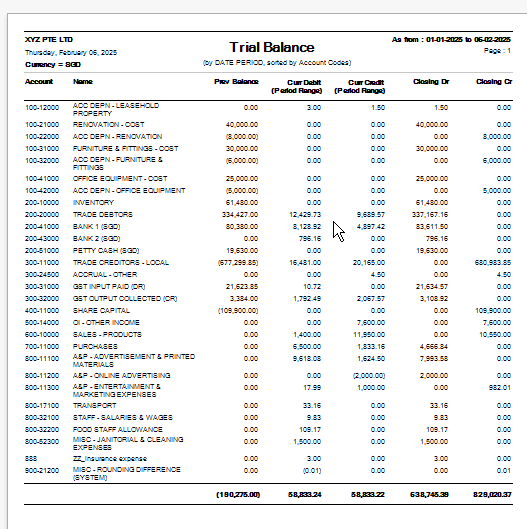](https://doc.uniq365.com/uploads/images/gallery/2025-02/8Osimage.png)
\_\_\_\_\_\_\_\_\_\_\_\_\_\_\_\_\_\_\_\_\_\_\_\_\_\_\_\_\_\_\_\_\_\_\_\_\_\_\_\_\_\_\_\_\_\_\_\_\_\_\_\_\_\_\_\_\_\_\_\_\_\_\_\_\_\_\_\_\_\_\_\_\_\_\_\_\_\_\_\_\_\_\_\_\_\_\_\_\_\_\_\_\_\_\_\_\_\_\_\_\_\_\_\_\_\_\_\_\_\_\_\_\_\_\_\_\_\_\_\_
#### **HOW TO GENERATE TRIAL BALANCE BY YEAR PERIOD?**
- select **TRIAL BALANCE BY YEAR PERIOD**
- **YEAR -** key in
- **PERIOD** - key in from 1 to 12 \[end of month basis\]. Example, if you key period 12, system will take the sum from month 1 to 12. If the start period is January, system will sum up from January 1 to December 31 of the selected year.
- **PROJECT** - filter by project
- **DEPARTMENT** - filter by department
- **SECTION** - filter by section or
- **UNIT** - filter by unit
- **PREVIEW** - tick to preview
- **QUERY** - to export in excel with filter capability
- **EXPORT EXCEL** - to export in excel
[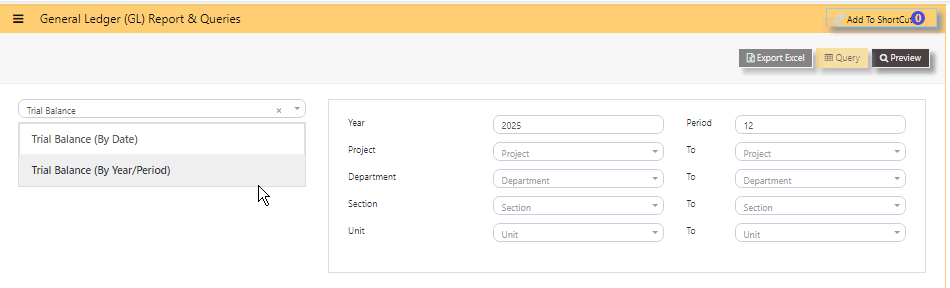](https://doc.uniq365.com/uploads/images/gallery/2025-02/98Ximage.png)
#### **SAMPLE FORMAT OF TRIAL BALANCE BY YEAR PERIOD:**
In this sample, year is 2025, the start month is January as period 1, so key in period 12 \[system will sum up from period 1 to 12\], trial balance will show as of \[last day\] DECEMBER 2025.
#### **HOW TO READ THE COLUMNS OF TRIAL BALANCE?**
- **YEAR -** as keyed in
- **PERIOD - 12** as **DECEMBER**
- **ACCOUNT -** chart of account code
- **NAME** - description of chart of account
- **PREV MONTH BALANCE** - in this sample, balance is from November 30 2025
- **CURR DR MONTH** - sum of transactions from DECEMBER 1 to 31 2025
- **CURR CR MONTH** - sum of transactions from DECEMBER 1 to 31 2025
- **CLOSING DR**-sum of columns previous month bal, Curr Dr and Curr Cr
- **CLOSING CR**-sum of columns previous month bal, Curr Dr and Curr Cr. [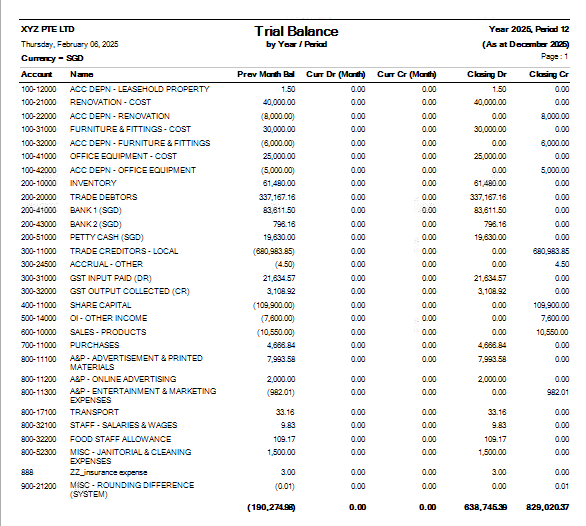](https://doc.uniq365.com/uploads/images/gallery/2025-02/4gWimage.png)
GENERAL LEDGER
#### **GENERAL LEDGER LISTING** can be previewed in many ways
- **GENERAL LEDGER LISTING**
- **GENERAL LEDGER LISTING NO NARRATION**
- **GENERAL LEDGER LISTING SUB LEDGER**
- **GENERAL LEDGER LISTING BASE CURRENCY ONLY**
- **GENERAL LEDGER LISTING DETAILS IN XLS**
#### [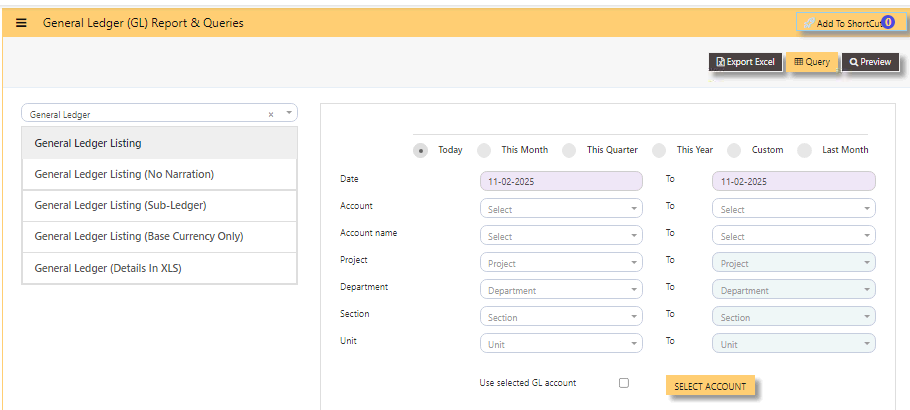](https://doc.uniq365.com/uploads/images/gallery/2025-02/CrRimage.png)
- tick **TODAY**, THIS MONTH, THIS QUARTER, THIS YEAR, CUSTOM or LAST MONTH
- **DATE** - select from and to (in this format DD-MM-YYYY)
- **ACCOUNT** - select either from dropdown chart-of-account code or
- **ACCOUNT NAME** - select from and to
- **PROJECT** - you may leave blank if no project-department-section-unit use or select from and to
- **DEPARTMENT** - you may leave blank if no department-section-unit use
- **SECTION** - you may leave blank if no section-unit use
- **UNIT** - you may leave blank if no unit use.
- **USE SELECTED GL ACCOUNT** - you may use this if you wish to view selected chart of account.
- **SELECT ACCOUNT BUTTON** - upon tick, another page will show, select the chart of account you wish to include in the preview by checking the box.
- **SELECT ALL ACCOUNT** - will help tick all chart of accounts
- **UNSELECT ALL ACCOUNT** - will untick all chart of accounts
- **CANCEL** - will let you return to the previous page
- **ARROW LEFT and RIGHT** on PAGES 1 to last - will let you select and tick chart of account.
- **RECORDS** - 10, 25, 50 100 and 200 lines to show on each page.
[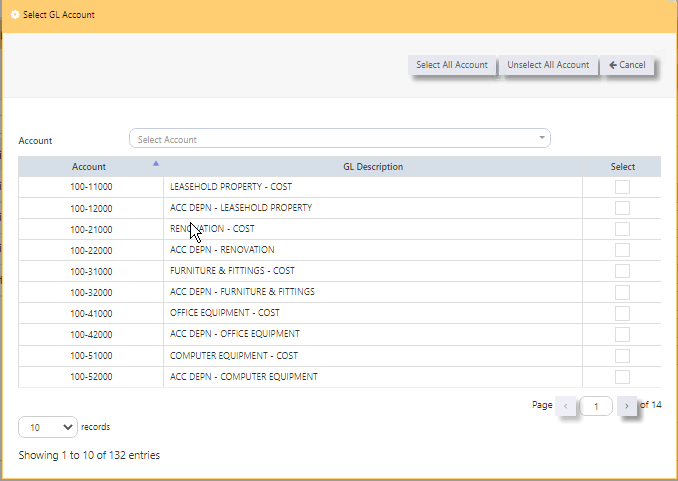](https://doc.uniq365.com/uploads/images/gallery/2025-02/k5Vimage.png)
#### **GENERAL LEDGER LISTING SAMPLE PREVIEW**
[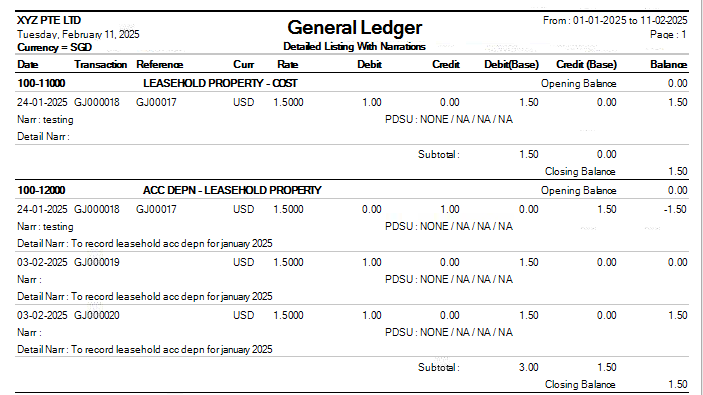](https://doc.uniq365.com/uploads/images/gallery/2025-02/anEimage.png)
#### **GENERAL LEDGER LISTING NO NARRATION SAMPLE PREVIEW**
[](https://doc.uniq365.com/uploads/images/gallery/2025-02/J30image.png)
#### **GENERAL LEDGER LISTING SUBLEDGER SAMPLE PREVIEW**
[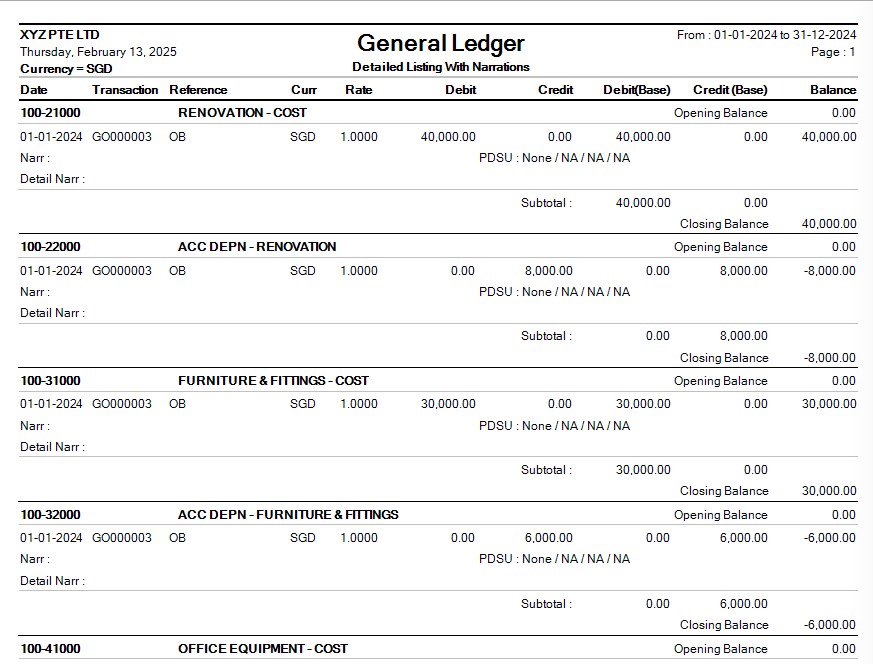](https://doc.uniq365.com/uploads/images/gallery/2025-02/z4Jimage.png)
#### **GENERAL LEDGER LISTING BASE CURRENCY ONLY SAMPLE PREVIEW**
[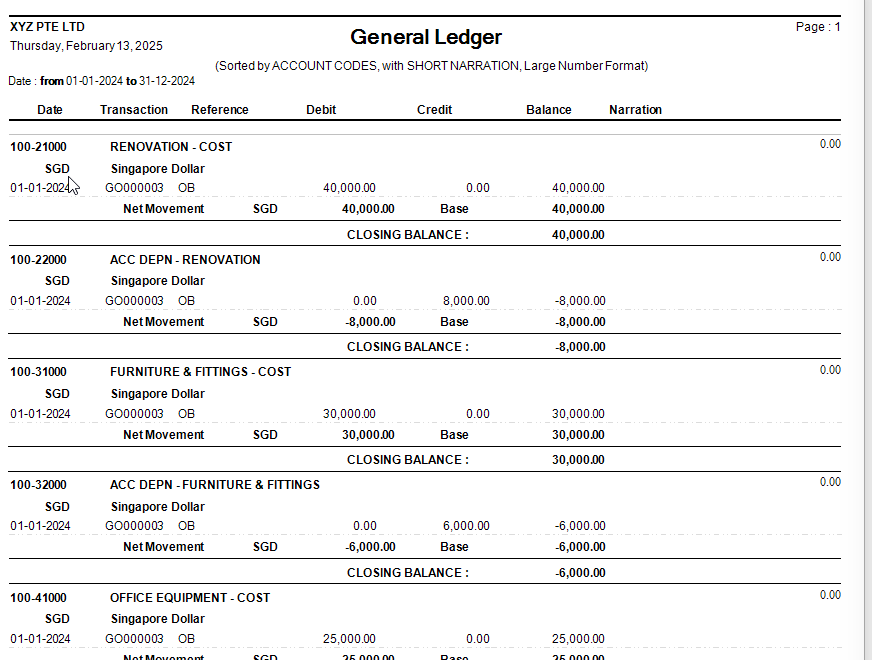](https://doc.uniq365.com/uploads/images/gallery/2025-02/N2limage.png)
#### **GENERAL LEDGER LISTING XLS SAMPLE PREVIEW**
[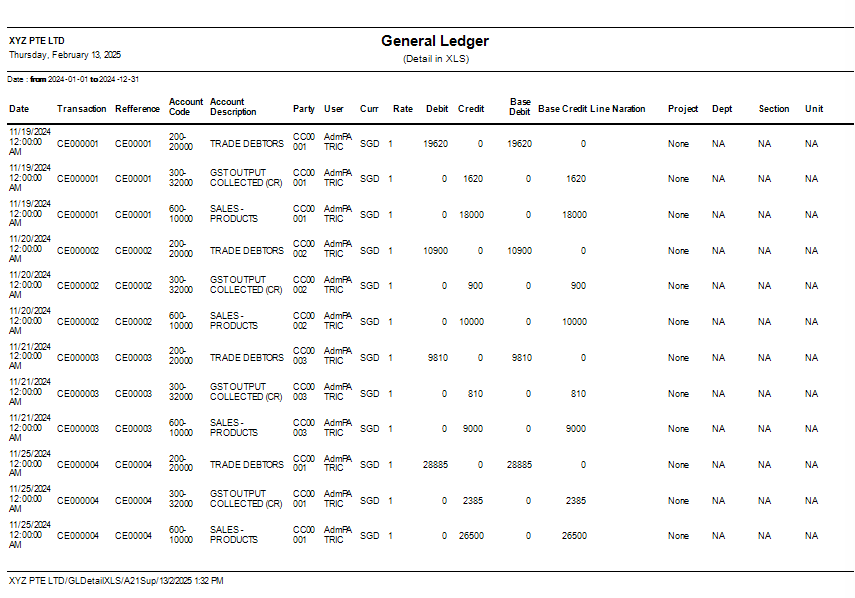](https://doc.uniq365.com/uploads/images/gallery/2025-02/kYBimage.png)
PROFIT AND LOSS
#### **PROFIT AND LOSS can be previewed in many ways**
- **PROFIT AND LOSS**
- **PROFIT AND LOSS CLASSIFICATION IN MONTH**
- **PROFIT AND LOSS CLASSIFICATION**
- **PROFIT AND LOSS SUBACCOUNT TYPE GROUP**
- **PROFIT AND LOSS SUBACCOUNT TYPE**
[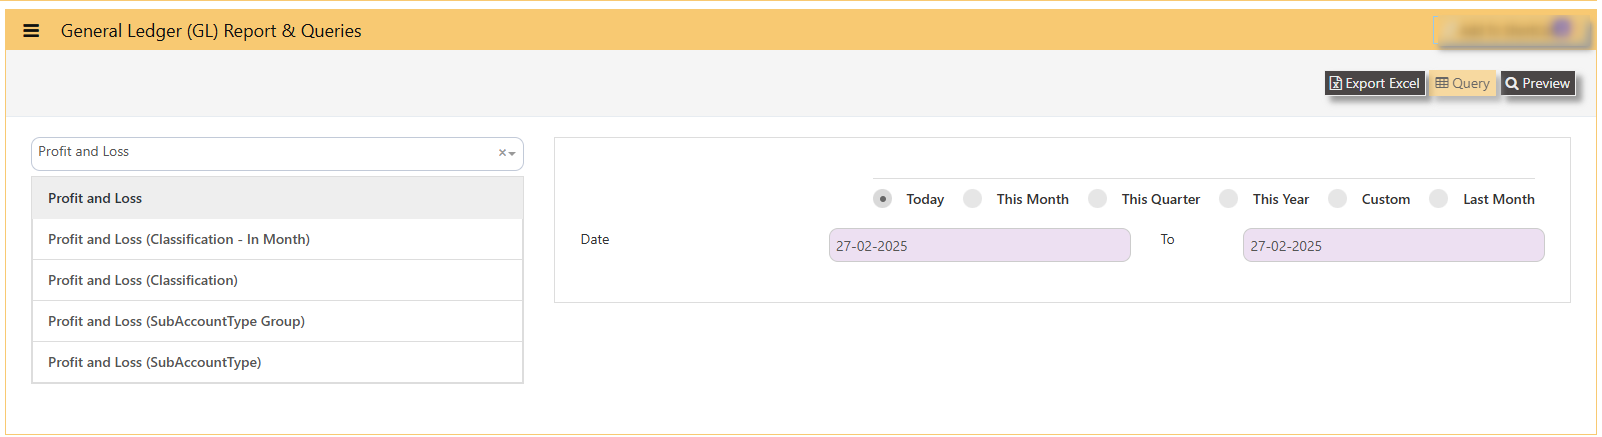](https://doc.uniq365.com/uploads/images/gallery/2025-02/uhPimage.png)
\_\_\_\_\_\_\_\_\_\_\_\_\_\_\_\_\_\_\_\_\_\_\_\_\_\_\_\_\_\_\_\_\_\_\_\_\_\_\_\_\_\_\_\_\_\_\_\_\_\_\_\_\_\_\_\_\_\_\_\_\_\_\_\_\_\_\_\_\_\_\_\_\_\_\_\_\_\_\_\_\_\_\_\_\_\_\_\_\_\_\_\_\_\_\_\_\_\_\_\_\_\_\_\_\_\_\_\_\_\_\_\_\_\_\_\_\_\_\_\_\_
#### **HOW TO PREVIEW PROFIT AND LOSS?**
- **select the report -** PROFIT AND LOSS, PROFIT AND LOSS CLASSIFICATION IN MONTH, PROFIT AND LOSS CLASSIFICATION, PROFIT AND LOSS SUBACCOUNT TYPE GROUP AND PROFIT AND LOSS SUBACCOUNT TYPE
- **DATE -** from and to
- **TODAY -** will auto select date range from 'today' to 'today', this month, this quarter, custom or last month.
#### **SAMPLE PREVIEW PROFIT AND LOSS**
- **HEADER -** company, date generated, date of profit and loss statement
- **PAGE** - number of page
- **TYPE -** income or expense
- **ACCOUNT -** chart of account code
- **DESCRIPTION -** description
- **INCOME -** column of all debit balance
- **EXPENSE -** column of all credit balance
- **PROFIT/LOSS** - auto-indicate loss if 'debit balance' \[this sample is loss\] or profit if 'credit balance'
- **TOTAL** - total debit or income and total credit or expense
#### [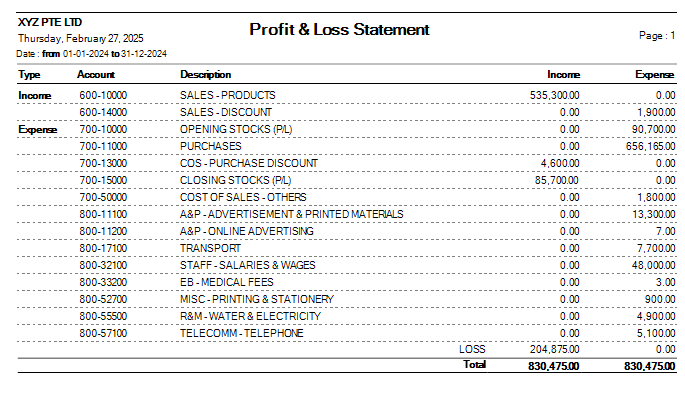](https://doc.uniq365.com/uploads/images/gallery/2025-02/ey9image.png)
\_\_\_\_\_\_\_\_\_\_\_\_\_\_\_\_\_\_\_\_\_\_\_\_\_\_\_\_\_\_\_\_\_\_\_\_\_\_\_\_\_\_\_\_\_\_\_\_\_\_\_\_\_\_\_\_\_\_\_\_\_\_\_\_\_\_\_\_\_\_\_\_\_\_\_\_\_\_\_\_\_\_\_\_\_\_\_\_\_\_\_\_\_\_\_\_\_\_\_\_\_\_\_\_\_\_\_\_\_\_\_\_\_\_\_\_\_\_\_\_\_\_\_\_\_\_\_
#### **HOW TO PREVIEW PROFIT AND LOSS CLASSIFICATION IN MONTH?**
- **select the report -** PROFIT AND LOSS CLASSIFICATION IN MONTH
- **YEAR AND PERIOD -** key in
- **PROJECT -** select from and to
- **DEPARTMENT -** select from and to
- **SECTION -** select from and to
- **UNIT -** select from and to
- **SHOW PERCENTAGE -** tick to show percentage per row
[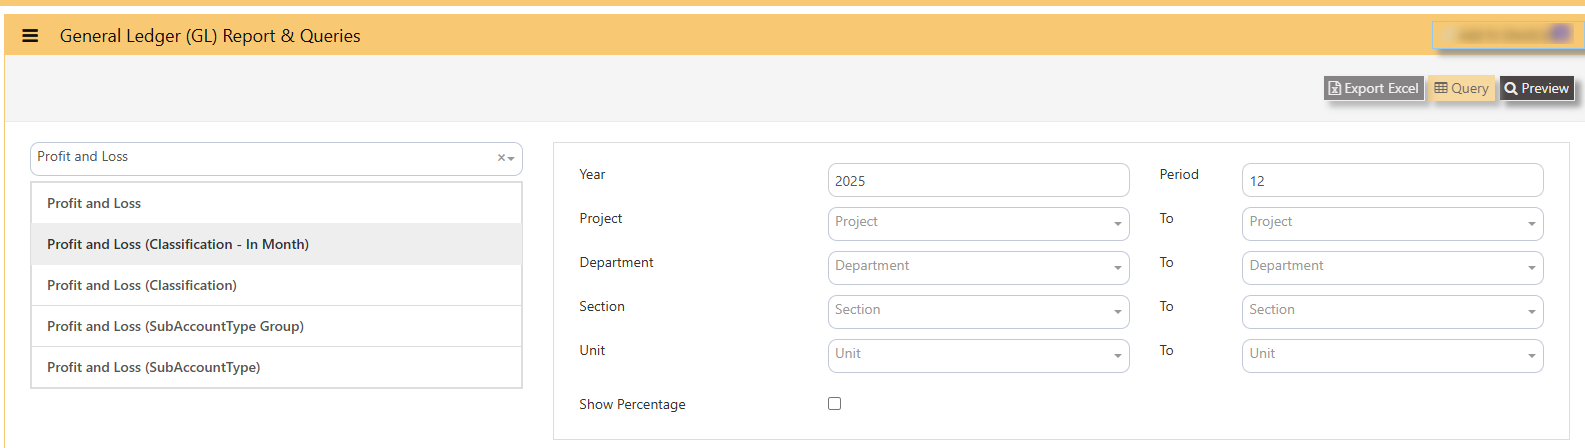](https://doc.uniq365.com/uploads/images/gallery/2025-02/K34image.png)
- **PREVIEW** - click
- **FORMAT SELECTION** - select custom 1, 2 or 3
[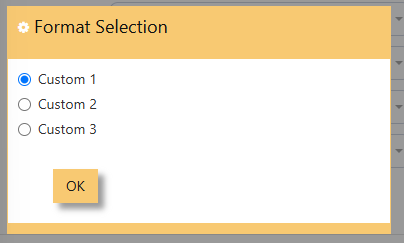](https://doc.uniq365.com/uploads/images/gallery/2025-02/pv7image.png)
#### **SAMPLE PREVIEW PROFIT AND LOSS CLASSIFICATION IN MONTH**
- **report** will show the monthly values in 12 months
- **arrows left or right** - show page 1 to 4
- **- or +** - zoom in report
- **printer icon** - click to print
- **export** - click to pdf or excel
#### [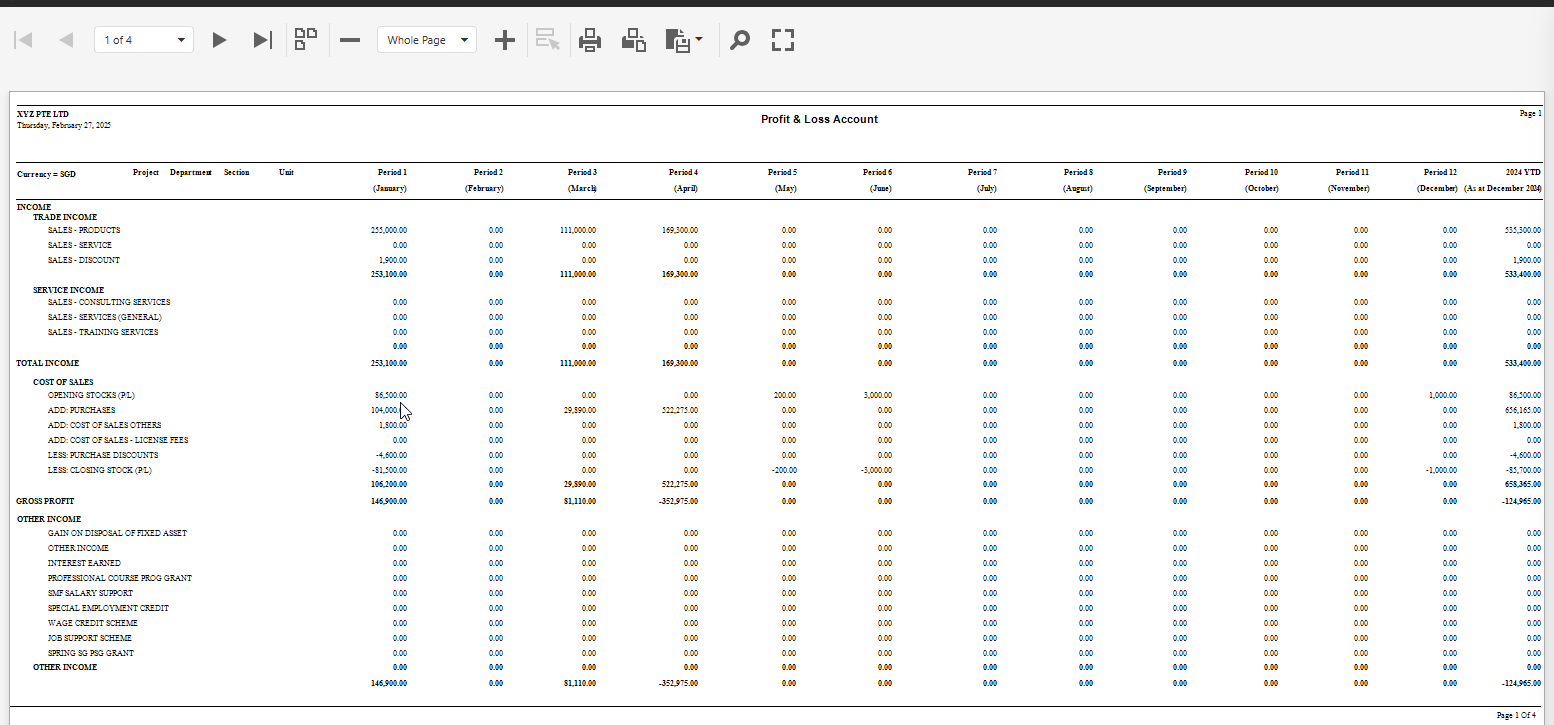](https://doc.uniq365.com/uploads/images/gallery/2025-02/xhKimage.png)
#### **SAMPLE PREVIEW PROFIT AND LOSS CLASSIFICATION**
[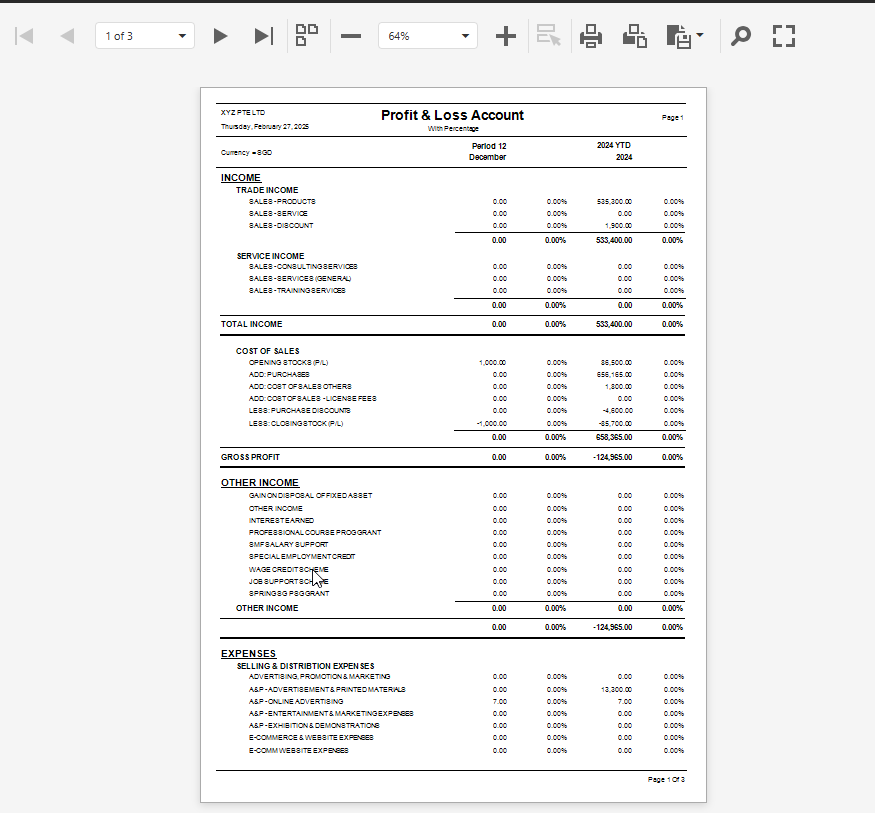](https://doc.uniq365.com/uploads/images/gallery/2025-02/0jSimage.png)
\_\_\_\_\_\_\_\_\_\_\_\_\_\_\_\_\_\_\_\_\_\_\_\_\_\_\_\_\_\_\_\_\_\_\_\_\_\_\_\_\_\_\_\_\_\_\_\_\_\_\_\_\_\_\_\_\_\_\_\_\_\_\_\_\_\_\_\_\_\_\_\_\_\_\_\_\_\_\_\_\_\_\_\_\_\_\_\_\_\_\_\_\_\_\_\_\_\_\_\_\_\_\_\_\_\_\_\_\_\_\_\_\_\_\_\_\_\_\_\_
#### **SAMPLE PREVIEW PROFIT AND LOSS SUBACCOUNT TYPE GROUP**
- **YEAR and PERIOD -** select from dropdown and key in period from 1 until 12
- **PREVIEW -** click to preview
- **EXPORT EXCEL -** to export to excel
- **ALLOW ZERO BALANCE** - tick to allow accounts with zero balances
- [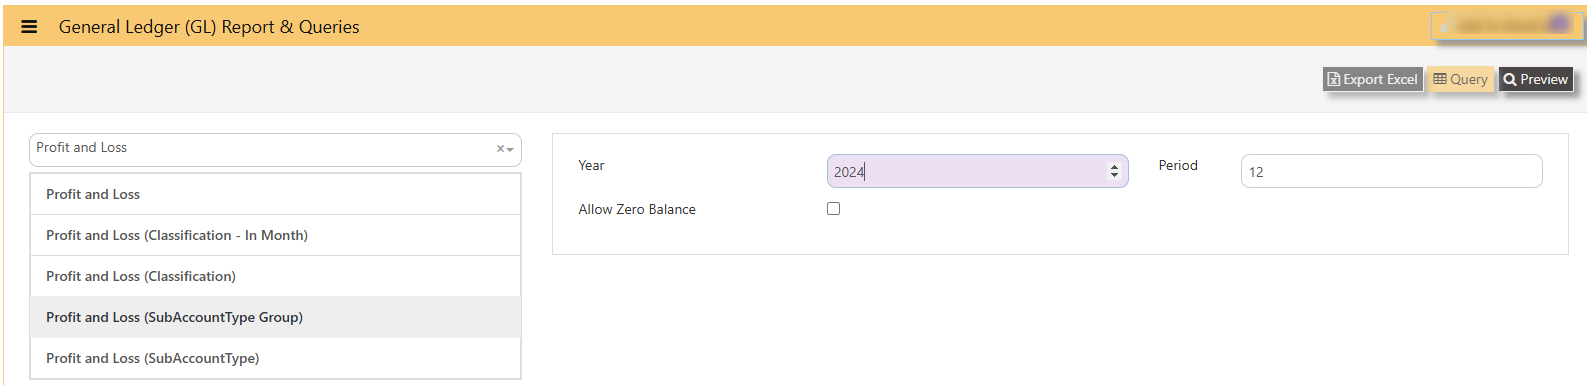](https://doc.uniq365.com/uploads/images/gallery/2025-02/ZdZimage.png)
#### **PROFIT AND LOSS STATEMENT BY SUB ACCOUNT or BY SUB LEVEL**
- **TYPE -** income or expense
- **ACCOUNT -** chart of account code
- **DESCRIPTION -** chart of account
- **MTD -** month to date
- **YTD -** year to date
- **LMTD**
- **LYTD**
[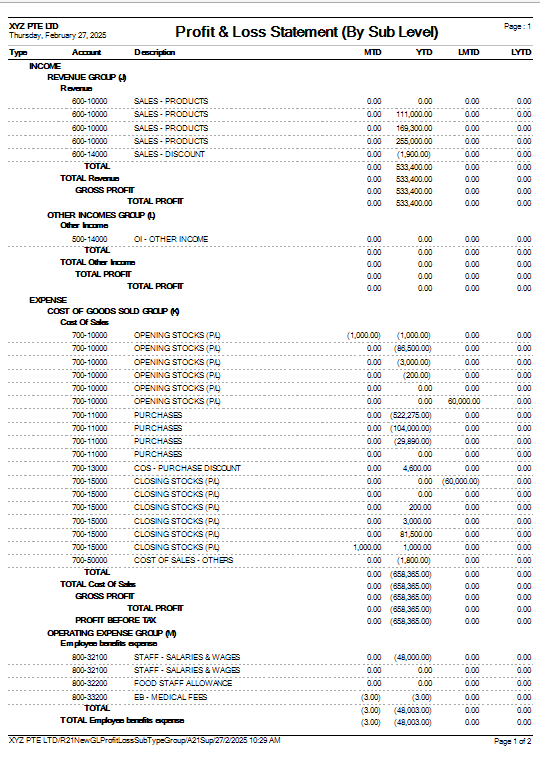](https://doc.uniq365.com/uploads/images/gallery/2025-02/1fTimage.png)
\_\_\_\_\_\_\_\_\_\_\_\_\_\_\_\_\_\_\_\_\_\_\_\_\_\_\_\_\_\_\_\_\_\_\_\_\_\_\_\_\_\_\_\_\_\_\_\_\_\_\_\_\_\_\_\_\_\_\_\_\_\_\_\_\_\_\_\_\_\_\_\_\_\_\_\_\_\_\_\_\_\_\_\_\_\_\_\_\_\_\_\_\_\_\_\_\_\_\_\_\_\_\_\_\_\_\_\_\_
#### **SAMPLE PREVIEW PROFIT AND LOSS SUBACCOUNT TYPE**
- **TYPE -** income or expense
- **ACCOUNT -** chart of account code
- **DESCRIPTION -** chart of account
- **INCOME -** debit balance
- **EXPENSE -** credit balance
- **PAGE** - number of pages
[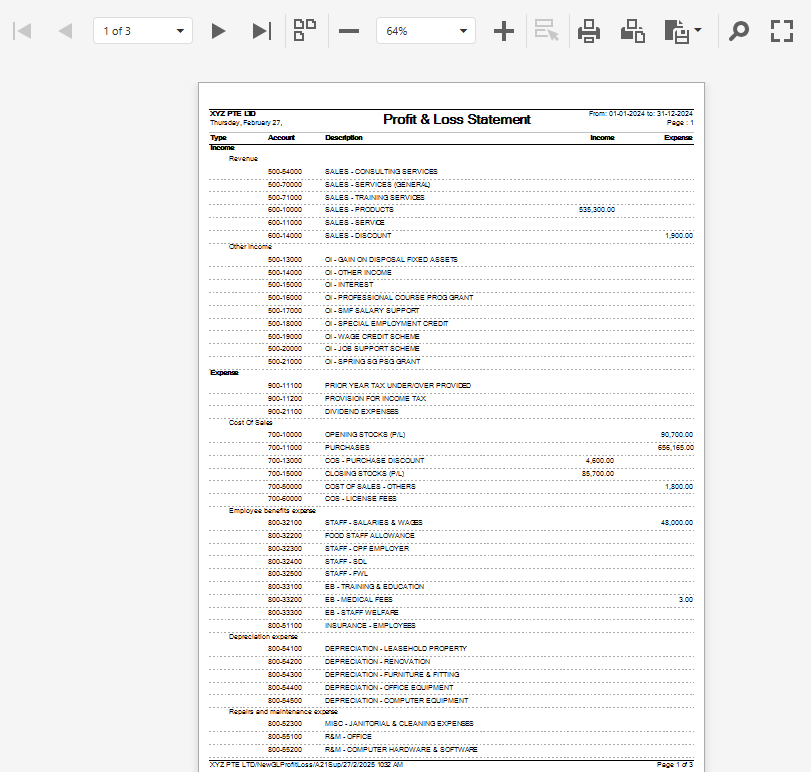](https://doc.uniq365.com/uploads/images/gallery/2025-02/Da8image.png)
BALANCE SHEET
#### **BALANCE SHEET can be previewed in many ways**
- **BALANCE SHEET**
- **BALANCE SHEET SUBACCOUNT TYPE**
- **BALANCE SHEET WITH CLASSIFICATION**
**\_\_\_\_\_\_\_\_\_\_\_\_\_\_\_\_\_\_\_\_\_\_\_\_\_\_\_\_\_\_\_\_\_\_\_\_\_\_\_\_\_\_\_\_\_\_\_\_\_\_\_\_\_\_\_\_\_\_\_\_\_\_\_\_\_\_\_\_\_\_\_\_\_\_\_\_\_\_\_\_\_\_\_\_\_\_\_\_\_\_\_\_\_\_\_\_\_\_\_\_\_\_\_\_\_\_\_\_\_\_\_\_\_\_\_\_\_\_\_\_\_\_\_\_\_\_\_\_\_**
#### **HOW TO PREVIEW BALANCE SHEET?**
- **YEAR -** select
- **DATE -** select date (date is in this format DD-MM-YYYY)
- **PREVIEW** - tick
- **QUERY** - export to excel with filter capability
- **EXPORT EXCEL** - export
[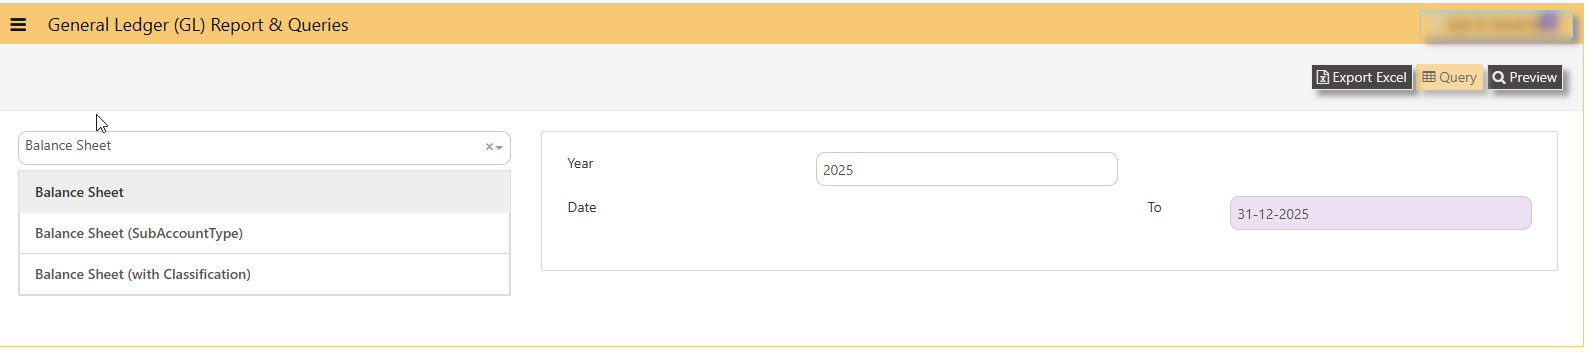](https://doc.uniq365.com/uploads/images/gallery/2025-02/yGPimage.png)
#### **BALANCE SHEET SAMPLE PREVIEW**
- **Type -** Assets or Liabilities \[wherein, in system, Equity is under Liabilities type\]
- **Account -** chart of account code
- **Description -** chart of account description
- **Assets -** column of account with debit closing values
- **Liabilities -** column of account with credit closing values
[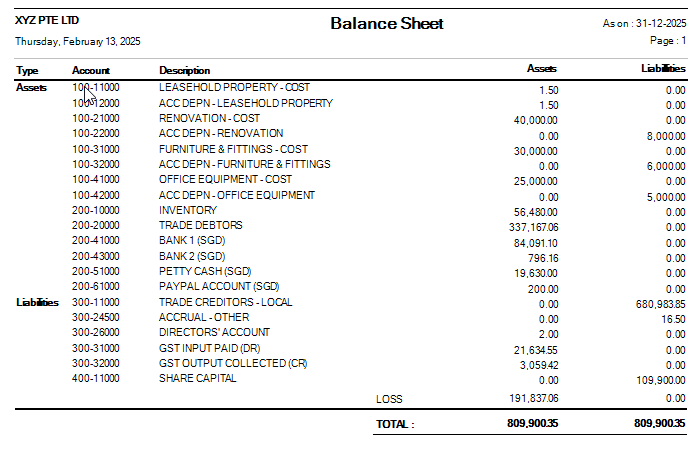](https://doc.uniq365.com/uploads/images/gallery/2025-02/z18image.png)
#### **BALANCE SHEET SUBACCOUNT TYPE SAMPLE PREVIEW**
[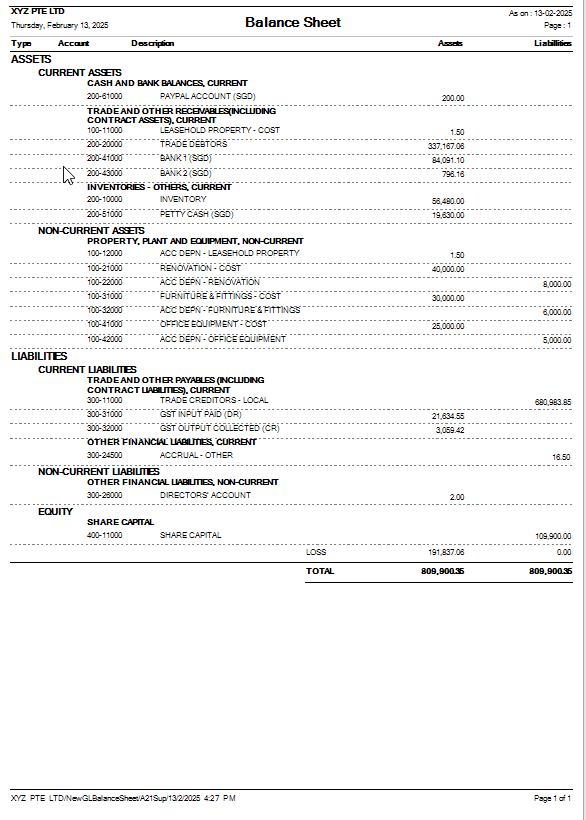](https://doc.uniq365.com/uploads/images/gallery/2025-02/4g3image.png)
#### **BALANCE SHEET CLASSIFICATION SAMPLE PREVIEW**
[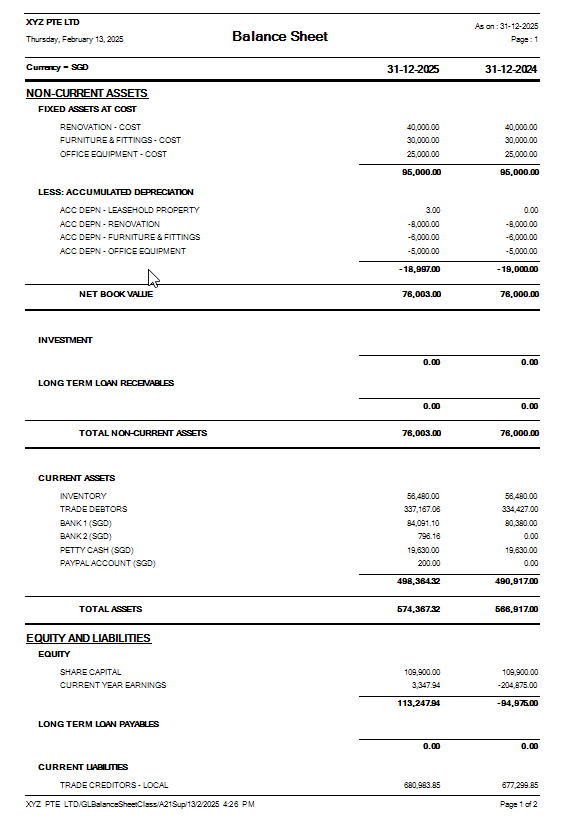](https://doc.uniq365.com/uploads/images/gallery/2025-02/tY0image.png)
CASH FLOW STATEMENT
**Question : How to set and generate Cash Flow Statement?**
**Answer:**
The cash flow statement format indirect method typically consists of three main cashflows from Operating activities, Investing activities and Financing activities, in sample below:
[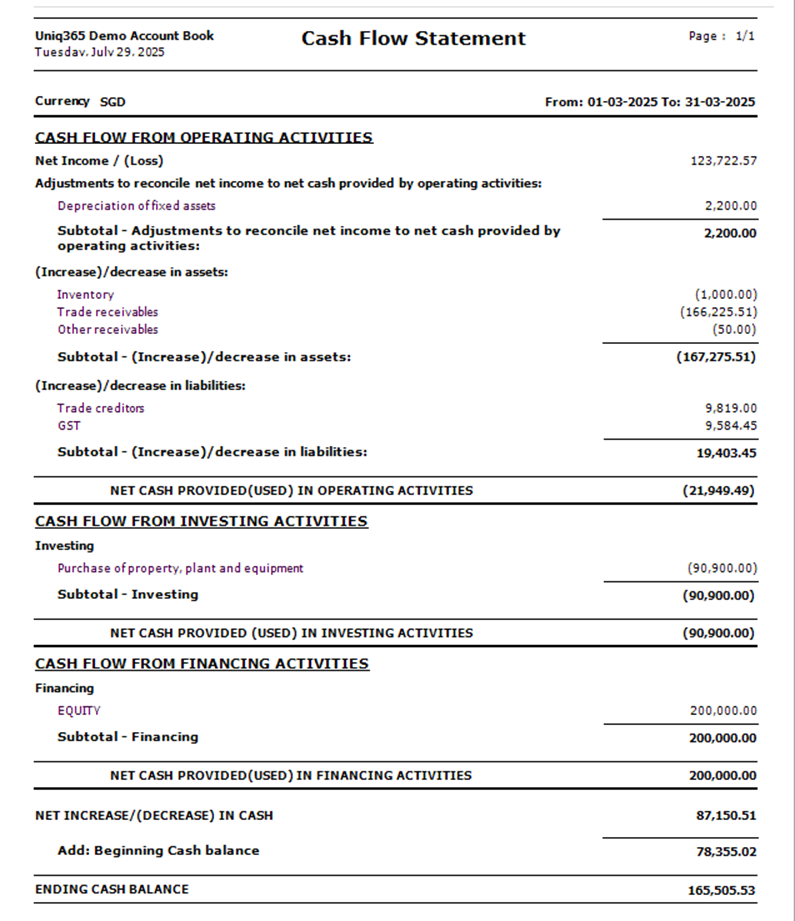](https://doc.uniq365.com/uploads/images/gallery/2025-07/image.png)
**SETTING:**
In UNIQ365, To generate the CASH FLOW STATEMENT, setting must be done properly.
**STEP 1** – **CREATE SUB-TITLES**, in the CASH FLOW ACTIVITIES, fill the details of SECTION, ORDER and CASH FLOW ACTIVITES.
Note that the CASH FLOW ACTIVITIES and CASH FLOW DESCRIPTION may vary ‘name’ base on your creation and for purpose of this guide, we name cash flow activities as follows:
· **SECTION** – Operating, Investing and Financing as standard ‘terms’, nothing else.
· **ORDER**- Note that the report will be presented base on ORDER you set, in ascending from 10 to 50.
· **CASH FLOW ACTIVITIES** – in order ‘10’, it is advisable to assign the first SUB-TITLE name as ‘Adjustment to reconcile net income to net cash provided by operating activities’.
[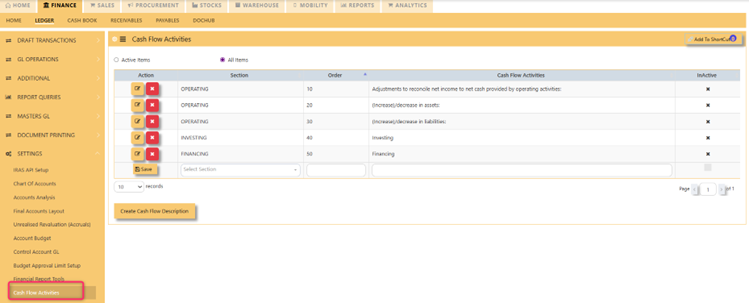](https://doc.uniq365.com/uploads/images/gallery/2025-07/Wu0image.png)
**STEP 2** – **CREATE CASH FLOW DESCRIPTION**, list CASH FLOW DESCRIPTION by add ORDER, CASH FLOW ACTIVITIES dropdown and SUB-SECTION.
[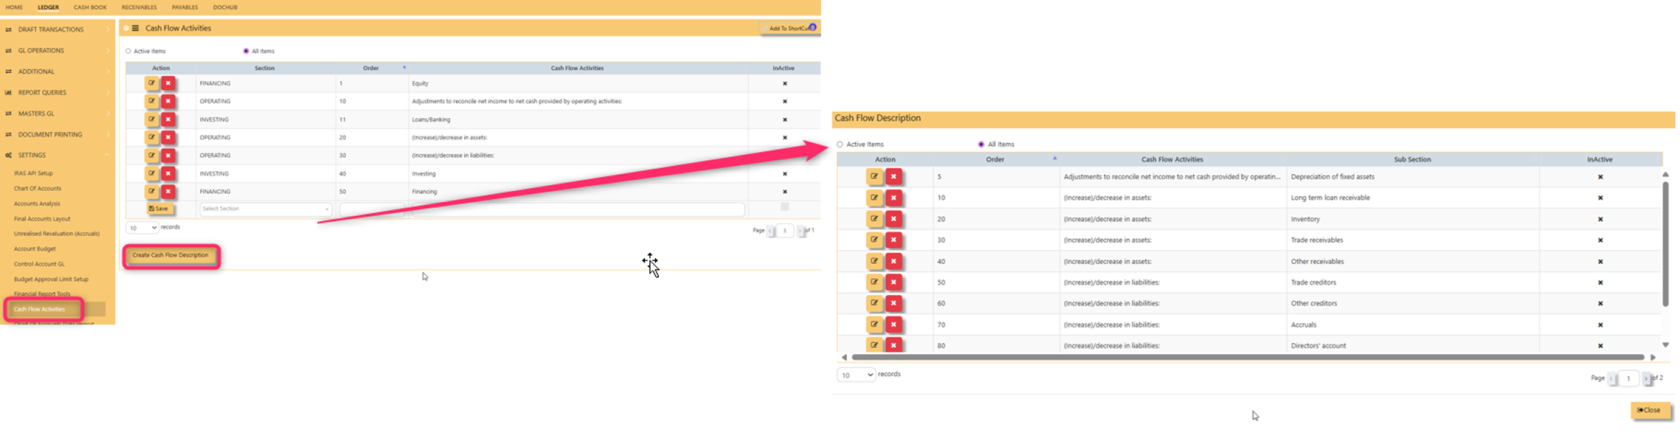](https://doc.uniq365.com/uploads/images/gallery/2025-08/jc9image.png)
In **CASH FLOW ACTIVITIES** select from dropdown list, fill sub-section then save.
[](https://doc.uniq365.com/uploads/images/gallery/2025-08/zKtimage.png)
**STEP 3 **– **OPERATING, INVESTING AND FINANCING**, Identify the CHART OF ACCOUNT that belongs to OPERATING, INVESTING and FINANCING
3.1 **OPERATING AND** **ACCUMULATED DEPRECIATION** – To list ‘accumulated depreciation’ under subtitle ‘operating activities’, select accumulated depreciation in CHART OF ACCOUNT>FINANCE GROUP>select 2 LEVELS:
· **SUBTITLE** as ‘Adjustment to reconcile net income..’
· **CASH FLOW DESCRIPTION** as ‘Depreciation of fixed assets’
[](https://doc.uniq365.com/uploads/images/gallery/2025-07/Uuqimage.png)
3.2 Trade receivables, inventory, other current assets, trade payables and othercurrent liabilities, same step on 3.1.
3.3 **INVESTING** To list ‘computer’ under subtitle ‘investing activities’, select ‘computer’ in CHART OF ACCOUNT>FINANCE GROUP>select 2 LEVELS:
- ** SUBTITLE** as ‘Investing’
- **CASH FLOW DESCRIPTION** as ‘Purchase of property plant and equipment’
- [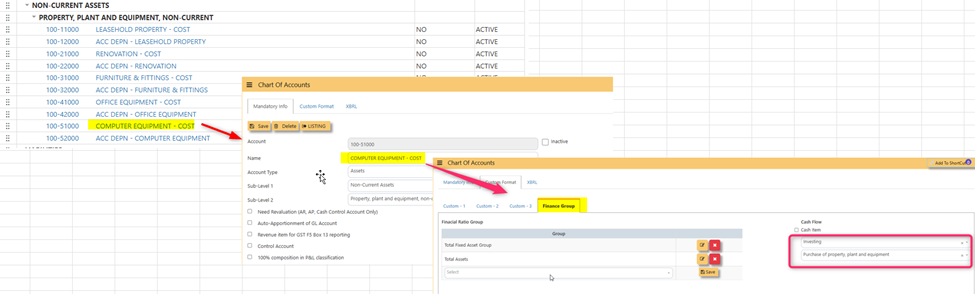](https://doc.uniq365.com/uploads/images/gallery/2025-07/JVSimage.png)3.4 **FINANCING** To list ‘share capital’ under subtitle ‘financing activities’, select ‘share capital’ in CHART OF ACCOUNT>FINANCE GROUP>select 2 LEVELS:
- **SUBTITLE** as ‘Investing'
- **CASH FLOW DESCRIPTION** as ‘Equity’
[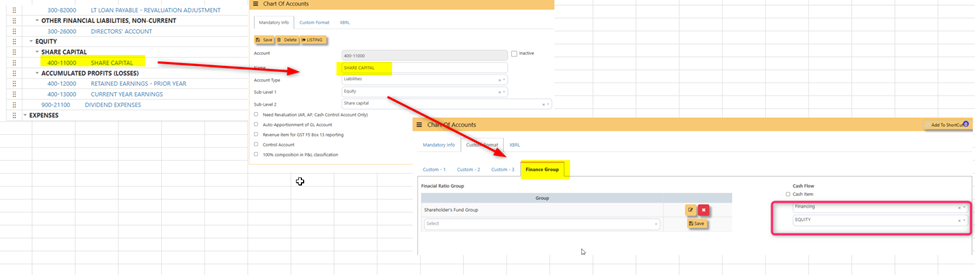](https://doc.uniq365.com/uploads/images/gallery/2025-07/Axiimage.png)
**STEP 4** – **BEGINNING CASH BALANCE**, Identify the CASH AND CASH EQUIVALENT beginning cash balance by going to chart of account – in this example, in CHART OF ACCOUNT, select DBS BANK, in FINANCE GROUP, tick ‘CASH ITEM’ then SAVE.
[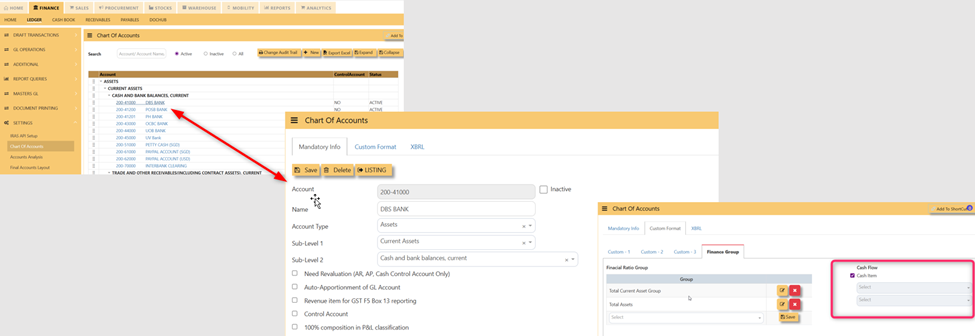](https://doc.uniq365.com/uploads/images/gallery/2025-07/8Wbimage.png)
In this preview:
[](https://doc.uniq365.com/uploads/images/gallery/2025-07/MXmimage.png)
**STEP 5 –** **GENERATE THE REPORT**, in ledger, reports queries, generate the report by selecting
- CASH FLOW STATEMENT
- date range
- Preview
- [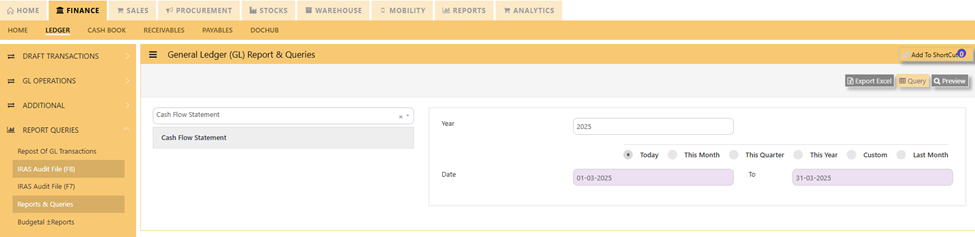](https://doc.uniq365.com/uploads/images/gallery/2025-07/mpwimage.png)
**OTHER RELATED REPORTS OF CASH FLOW:**
· **CHART OF ACCOUNT MASTERLISTING CASH FLOW- **in LEDGER> REPORTS QUERIES>MASTER LISTING CHART OF ACCOUNT CASH FLOW>PREVIEW.
[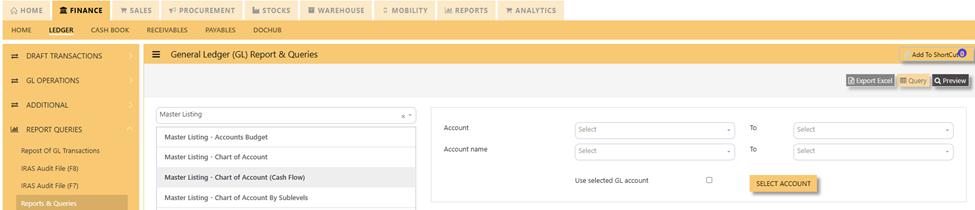](https://doc.uniq365.com/uploads/images/gallery/2025-07/1gyimage.png)
GST TYPE
#### **GST TYPE or SALES TAX / GST MASTER** in **Uniq365** are pre-set codes and not interchangeable.
- Note that the pre-set codes are based on the prevailing IRAS codes.
- If there is any new rates advised by IRAS, it will be added accordingly and you should not manually add it.
- What to do when GST Rates Change? The **Uniq365** is able to cope with the changes of rate and is readily available. If you are not able to find the GST code, contact **Uniq365** support team.
[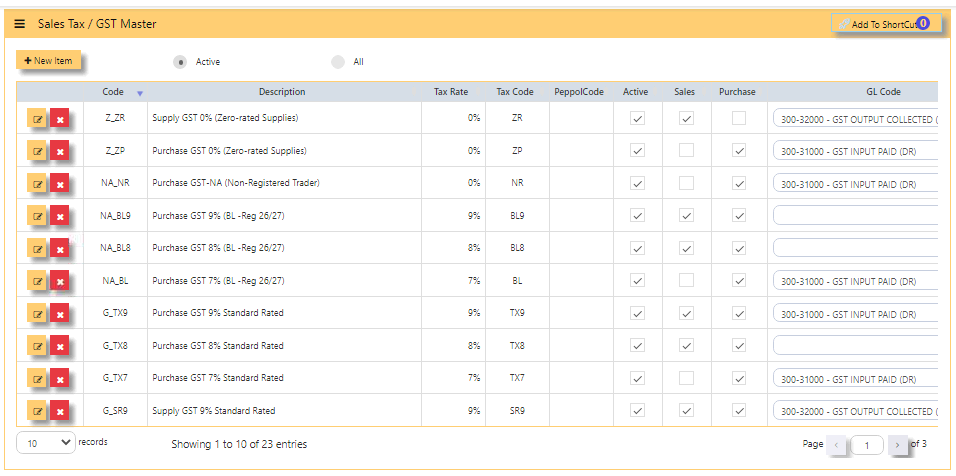](https://doc.uniq365.com/uploads/images/gallery/2025-01/fVIimage.png)
- **CODE** is pre-set code and cannot be interchangeable
- **DESCRIPTION** is also pre-set code but can be changed
- **TAX RATE** is pre-set rate
- **TAX CODE** is pre-set code base on prevailing IRAS codes
- **PEPPOL CODE** is for peppol use
- **ACTIVE** is ticked if actively use
- **SALES** is ticked if the code is used for sales only
- **PURCHASE** is ticked if the code is used for purchases only
- **GL CODE** is chart of account mapped for the specific GST code
PROJECT
> (\*) - This is an optional module. If you have not sign up for it, you will not see this on your menu.
>
> **Project Accounting** in **Uniq365** is achieved by the use of PDSU Codes, available throughout the entire package. Understanding what the PDSU codes will enable you to set it up most appropriately.
> **Project Code**
> **“P”** refers to Project Code; an 8-character field, that can be used to signify different projects, different offices or even different business units.
>
> #### **HOW TO ADD PROJECT?**
>
> #### [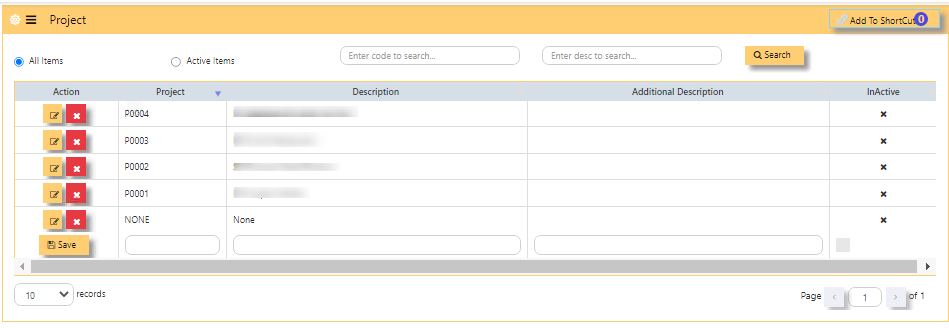](https://doc.uniq365.com/uploads/images/gallery/2025-01/8TFimage.png)
>
> - Beside 'SAVE' button, **PROJECT** - Key in unique code
> - key in **DESCRIPTION** - This field is interchangeable
> - optional **ADDITIONAL DESCRIPTION** \[also interchangeable\]
> - column **'INACTIVE' COLUMN** Shows inactivated projects
> - after filling, tick **SAVE**.
> - **EDIT BUTTON** - Note that if the project is already used in transactions, system will not allow you to change anymore.
> - **NOTE** - It is advisable to always keep 'NONE' department.
DEPARTMENT
**Department Code**
**“D”** refers to Department Code; an 8-character field, that can be used to signify sub-group under defined 'P' such as branches or the like.
#### **HOW TO ADD DEPARTMENT?**
[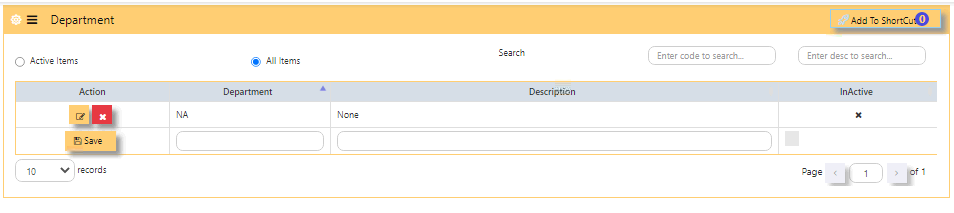](https://doc.uniq365.com/uploads/images/gallery/2025-01/KYqimage.png)
- Beside 'SAVE' button, **DEPARTMENT** - Key in unique code
- key in **DESCRIPTION** - This field is interchangeable
- column **'INACTIVE' COLUMN** Shows inactivated DEPARTMENT
- after filling, tick **SAVE**
- **EDIT BUTTON** - Note that if the project is already used in transactions, system will not allow you to change anymore
- **ACTIVE ITEMS** - When ticked, will show active
- **ALL ITEMS** - When ticked, will show both active and inactive
- **SEARCH** - You may use this to search a specific DEPARTMENT
- **NOTE** - It is advisable to always keep 'NONE' DEPARTMENT
SECTION
**Section Code**
**“S”** refers to Section Code; an 8-character field, that can be used
to signify sub-group under 'D'.
#### **HOW TO ADD SECTION?**
[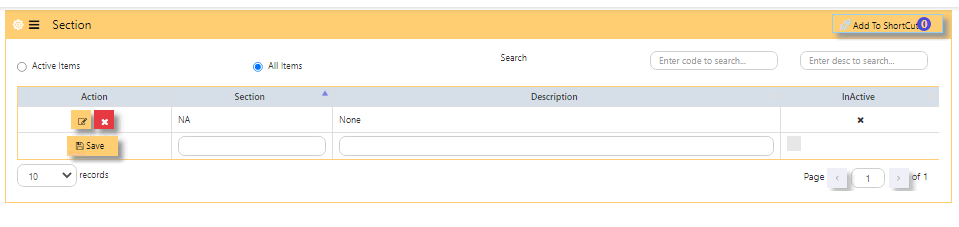](https://doc.uniq365.com/uploads/images/gallery/2025-01/ewQimage.png)
- Beside 'SAVE' button, **SECTION -** Key in unique code
- key in **DESCRIPTION** - This field is interchangeable
- column **'INACTIVE' COLUMN** Shows inactivated SECTION
- after filling, tick **SAVE**
- **EDIT BUTTON** - Note that if the section is already used in transactions, system will not allow you to change anymore
- **ACTIVE ITEMS** - When ticked, will show active
- **ALL ITEMS** - When ticked, will show both active and inactive
- **SEARCH** - You may use this to search a specific SECTION
- **NOTE** - It is advisable to always keep 'NONE' SECTION.
UNIT
**Unit Code**
**“U”** refers to Section Code; an 8-character field, that can be used
to signify sub-group under 'S'.
#### **HOW TO ADD UNIT?**
#### [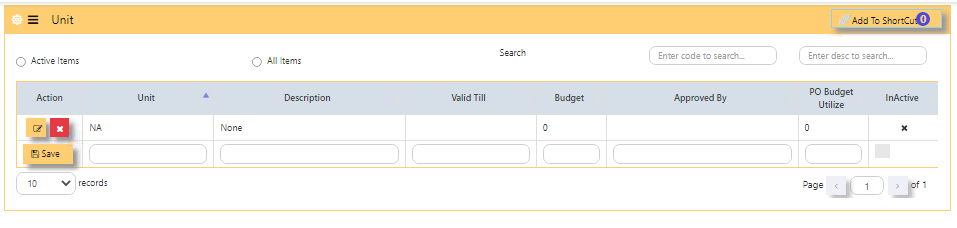](https://doc.uniq365.com/uploads/images/gallery/2025-01/BQoimage.png)
- Beside 'SAVE' button, **UNIT** - Key in unique code
- key in **DESCRIPTION** - This field is interchangeable
- column **'INACTIVE' COLUMN** shows inactivated UNIT
- after filling, tick **SAVE**.
- **EDIT BUTTON** - note that if the unit is already used in transactions, system will not allow you to change anymore.
- **ACTIVE ITEMS** - when ticked, will show active
- **ALL ITEMS**-when ticked, will show both active and inactive
- **SEARCH** - you may use this to search a specific UNIT
- **NOTE** - it is advisable to always keep 'NONE' UNIT.
\_\_\_\_\_\_\_\_\_\_\_\_\_\_\_\_\_\_\_\_\_\_\_\_\_\_\_\_\_\_\_\_\_\_\_\_\_\_\_\_\_\_\_\_\_\_\_\_\_\_\_\_\_\_\_\_\_\_\_\_\_\_\_\_\_\_\_\_\_\_\_\_\_\_\_\_\_\_\_\_\_\_\_\_\_\_\_\_\_\_\_\_\_\_\_\_\_\_\_\_\_\_\_\_\_\_\_\_\_\_\_\_\_\_\_\_\_\_\_\_\_\_\_\_\_\_\_\_\_
#### **How does PDSU Works?**
Every transaction can carry the PDSU at entry. The reports in General Ledger – Reports & Queries allow you to filter by PDSU
It also allows a combination of PDSU codes to work, thus narrowing the reporting band.
\_\_\_\_\_\_\_\_\_\_\_\_\_\_\_\_\_\_\_\_\_\_\_\_\_\_\_\_\_\_\_\_\_\_\_\_\_\_\_\_\_\_\_\_\_\_\_\_\_\_\_\_\_\_\_\_\_\_\_\_\_\_\_\_\_\_\_\_\_\_\_\_\_\_\_\_\_\_\_\_\_\_\_\_\_\_\_\_\_\_\_\_\_\_\_\_\_\_\_\_\_\_\_\_\_\_\_\_\_\_\_\_\_\_\_\_\_\_\_\_\_\_\_\_\_\_\_\_\_
#### **How to Use PDSU for Budgeting?**
#### Accounts budgeting in **Uniq365** requires the use of PDSU. To set budgets, go to Maintenance – Account Budget to start
entering the budgets.
- Select the GL Account to set budget.
- Enter the Year. If the financial year is from 1st Jan 2027 -
31st Dec 2027, enter the year as 2027 and January will be
Month 1, February is Month 2 and so on
- At the first line (Month 1), click on “Details” to get into
entry mode as follow.
- Select an appropriate Project, Department, Section and Unit Code to
start the budgeting process.
- When this budget detail box is closed, the totals of all the
individual budgets auto-updates into the Month 1 balance.
Move on into Month 2 and so on until all the 12 months’
budgets are set. Move on to the next GL code.
CURRENCY
#### **Currencies** needed for transactions are created in this table.
#### **Note:** If you did not buy the multi-currency option in **Uniq365**, you can only create a single currency.
#### **HOW TO ADD NEW CURRENCY?**
**[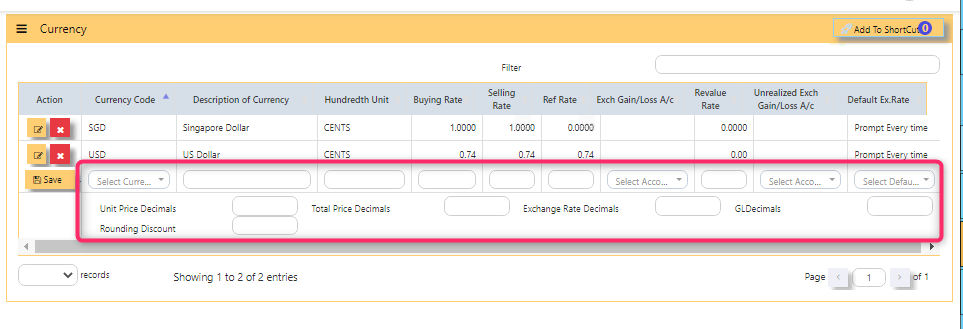](https://doc.uniq365.com/uploads/images/gallery/2025-01/Il9image.png)**
- In the open field, **SELECT CURRENCY**, you can only pick up the **CURRENCY CODE** and you are not
allowed to create new ones. Any currency selected here is used for all transactions in **Uniq36**5.
- As you select the 'CURRENCY', **DESCRIPTION OF CURRENCY** will auto-fill,
- Same on **HUNDREDTH UNIT**, will auto-fill. The hundredth-unit description is for **Uniq365** to print amount in words. For example, it is “Cents” for Singapore Dollars, “Sen” for Malaysian Ringgit, “Satang” and “Centavos” for Thai and Filipino currencies respectively.
- Manually key in **BUYING RATE**
- Manually key in **SELLING RATE**
- Manually key in **REF RATE**
- The **EXCHANGE GAIN/LOSS, REVALUE RATE** and **UNREALIZED EXCH GAIN/LOSS AC**, will be skipped for now as it will be covered under Multi-Currency Handling
- Fill **UNIT PRICE DECIMALS** as 2 depending on your preference, maximum 9 decimals.
- Fill **TOTAL PRICE DECIMALS** as 2 depending on your preference, maximum 2 decimals
- Fill **EXCH RATE DECIMALS** as 2 depending on your preference, maximum 8 decimals
- Fill **GL DECIMALS** as 2 depending on your preference, maximum 2 decimals
- Fill **ROUNDING DISCOUNT** as 2 depending on your preference, maximum 2 decimals.
\_\_\_\_\_\_\_\_\_\_\_\_\_\_\_\_\_\_\_\_\_\_\_\_\_\_\_\_\_\_\_\_\_\_\_\_\_\_\_\_\_\_\_\_\_\_\_\_\_\_\_\_\_\_\_\_\_\_\_\_\_\_\_\_\_\_\_\_\_\_\_\_\_\_\_\_\_\_\_\_\_\_\_\_\_\_\_\_\_\_\_\_\_\_\_\_\_\_\_\_\_\_\_\_\_\_\_\_\_\_\_\_\_\_\_\_\_\_\_\_\_\_\_\_\_\_\_\_\_\_\_
#### **HOW TO EDIT THE RATE \[SIMPLE TABLE\]?**
#### Once added, you can only edit for the exchange **rates** and **decimals.** Changes can be set at first day of accounting year.
[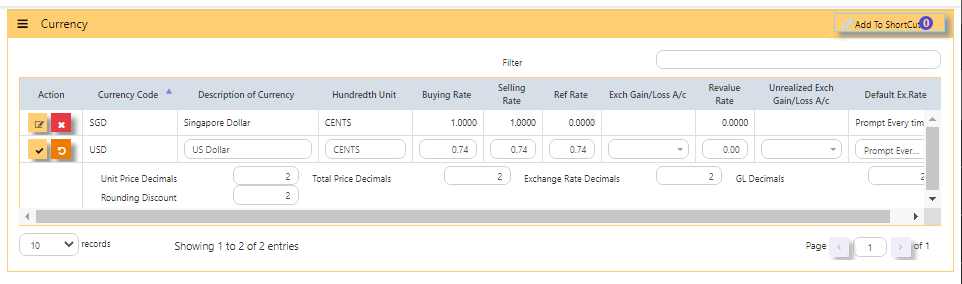](https://doc.uniq365.com/uploads/images/gallery/2025-01/5ijimage.png).
- Note: If you did not buy the Foreign Currency option, ignore the Exchange Gain/Loss options.
VIEW DAILY CURRENCY (BY CURRENCY)
#### **IN DAILY CURRENCY BY CURRENCY TABLE,** you will be able to view the daily rates by currency.
#### **HOW TO VIEW THE DAILY CURRENCY RATE?**
- **In DAILY CURRENCY BY CURRENCY -** View by currency, each table is presented by currency, rows by date
- **PREVIOUS** - Scroll left to show previous currency
- **NEXT** - Scroll right to show the next currency
- **RECORDS** - Select base on 10s, 25s, 50s, 100s and 200s per page
- **PAGE** - 1 of total pages, click arrow right to reach last page
#### **SAMPLE BELOW:**
[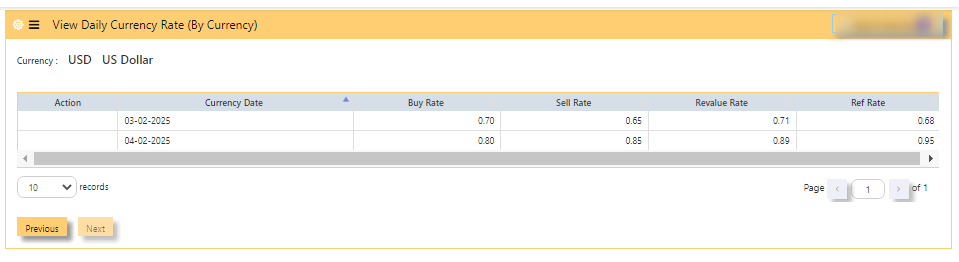](https://doc.uniq365.com/uploads/images/gallery/2025-02/lr9image.png)
ADD DAILY CURRENCY (BY DATE)
#### **DAILY CURRENCY BY DATE table,** in this table, KEY IN the daily rates by currency.
#### **HOW TO ADD DAILY CURRENCY RATE?**
- In GL operations, click open **DAILY CURRENCY BY DATE**
- **DATE** -is defaulted today
- **+NEW ITEM** - click to add daily rate
#### [](https://doc.uniq365.com/uploads/images/gallery/2025-02/tACimage.png)
- in new item, select the **DATE** of rate
- select **CODE** of currency - select from dropdown list the currency
- **DESCRIPTION** - auto fill after selected CODE of currency
- **BUY RATE** - key in buying rate of foreign currency
- **SELL RATE** - key in selling rate of foreign currency
- **REVALUE RATE** - key in revalue rate of foreign currency
- **REF RATE** - key in , optional, fill this if the base is other than SGD currency (Singapore dollar currency). This rate relates to GST reporting
- **SAVE**-click to save the filled details then
- **CLOSE**.
#### [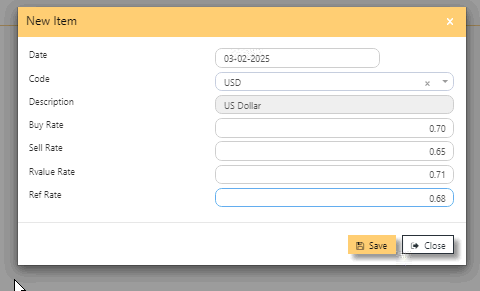](https://doc.uniq365.com/uploads/images/gallery/2025-02/NGFimage.png)
CHART OF ACCOUNTS
#### The **Chart of Account** is where the user can create account codes to be used in the system. The account codes can be classified into Assets, Liabilities, Income or Expense, as well as be grouped into various levels when designing layout of financial reports such as Balance Sheet.
In order to start using **Uniq365**, some basic Chart of Accounts such as the GST and Currency Codes must be created.
[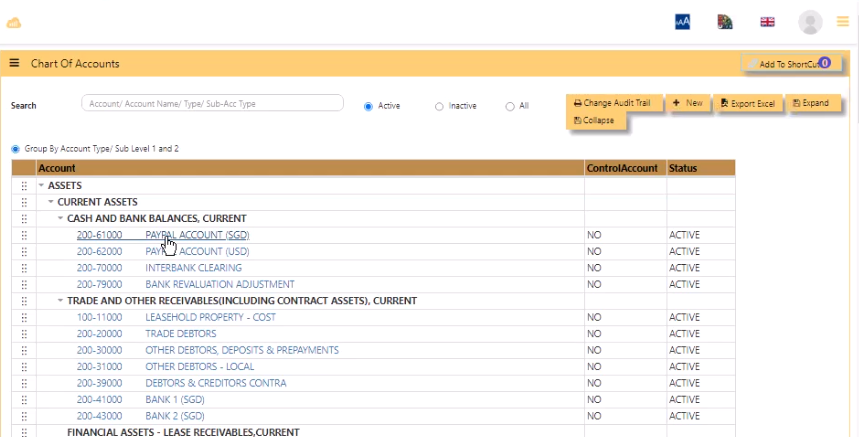](https://doc.uniq365.com/uploads/images/gallery/2025-02/2QPimage.png)
- **SEARCH** - to search code by keying in 'description' for purpose of edit
- **ACTIVE** - click to show only active codes, '**INACTIVE**' to show all inactive codes or '**ALL**' to show both active and inactive
- **CHANGE AUDIT TRAIL** - to generate report of changes done in chart of account
- **NEW** - click to add new code,
- **EXPORT EXCEL** - to generate the listing in excel format
- **EXPAND** - to expand
- **COLLAPSE** - to collapse
\_\_\_\_\_\_\_\_\_\_\_\_\_\_\_\_\_\_\_\_\_\_\_\_\_\_\_\_\_\_\_\_\_\_\_\_\_\_\_\_\_\_\_\_\_\_\_\_\_\_\_\_\_\_\_\_\_\_\_\_\_\_\_\_\_\_\_\_\_\_\_\_\_\_\_\_\_\_\_\_\_\_\_\_\_\_\_\_\_\_\_\_\_\_\_\_\_\_\_\_\_\_\_\_\_\_\_\_\_\_\_\_\_\_\_\_\_\_\_\_\_\_\_\_\_\_\_\_\_
#### **HOW TO ADD NEW CHART OF ACCOUNT CODE?**
[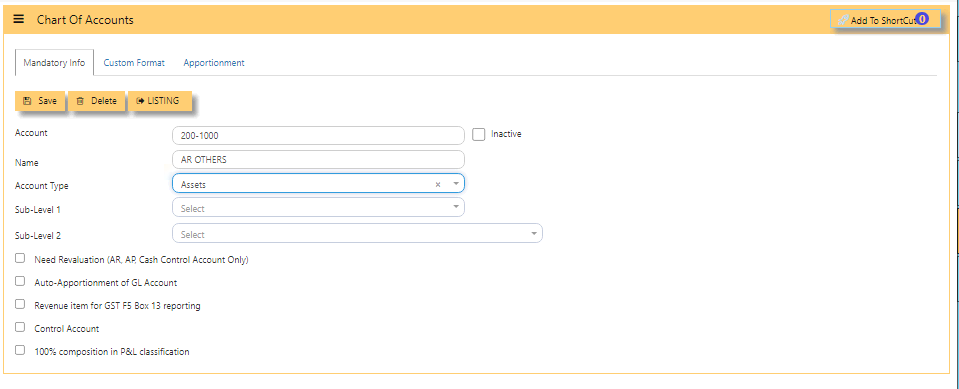](https://doc.uniq365.com/uploads/images/gallery/2025-01/d1Nimage.png)
- **ACCOUNT -** Enter a code for this Chart of Account. The maximum is 12 alpha-numeric characters.
- **NAME -** Enter the description for this Chart of Account e.g. Sales Revenue Account. The maximum length allowed is 40 characters.
- **ACCOUNT TYPE -** Click to select account type. The 4 choices are Income, Expense, Asset and Liability
- **SUB-LEVEL 1** - used in P&L presentation
- **SUB-LEVEL 2** - used in P&L presentation
- **NEED REVALUATION \[AR, AP, CASH CONTROL ACCOUNT ONLY** - when ticked, the specific coa will be included in the revaluation of AR or AP.
- **AUTO-APPORTIONMENT OF GL ACCOUNT** -
- **REVENUE ITEM FOR GST F5 BOX13 REPORTING** - when ticked, will include in BOX 13, applied to income Chart Of Account or COA,
- **CONTROL ACCOUNT**-applies to AR and AP main chart of account,
- **100% COMPOSITION IN P&L CLASSIFICATION**- applied to main income chart of account.
- **SAVE** - click save and **confirmation** 'to store the data entered', select either **'cancel'** or **'ok'**.
[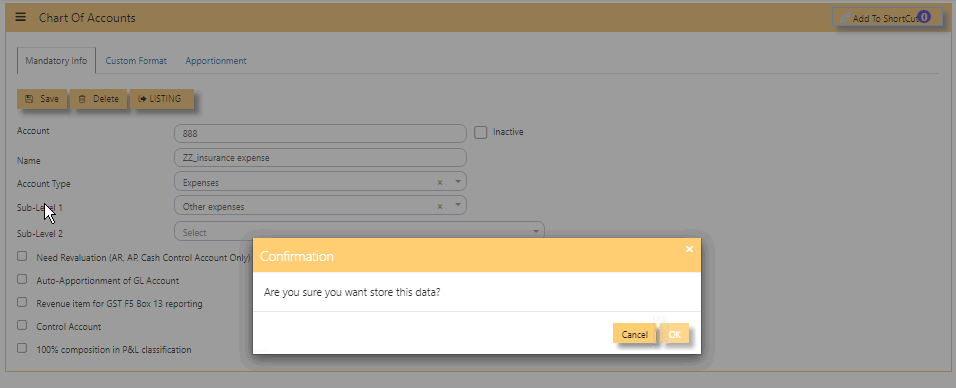](https://doc.uniq365.com/uploads/images/gallery/2025-02/gFrimage.png)
- **DELETE** - to delete a specific chart-of-account code
- **LISTING** - click to go back to the listing with 'search'
- **CUSTOM FORMAT** - relates to the final accounts layout, to select the related level 1, level 2 and level 3 [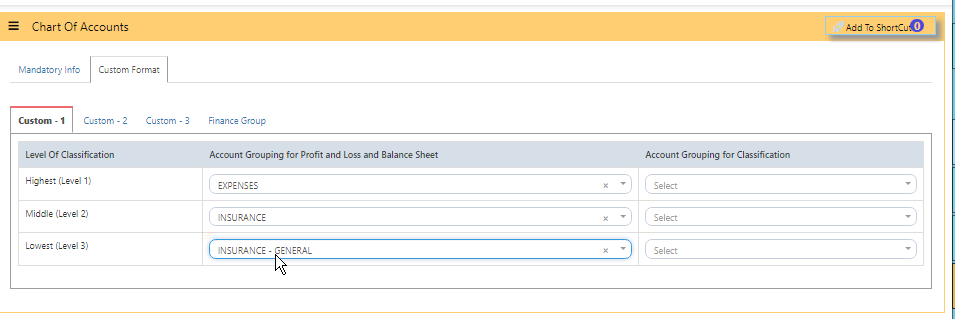](https://doc.uniq365.com/uploads/images/gallery/2025-02/eEGimage.png)
\_\_\_\_\_\_\_\_\_\_\_\_\_\_\_\_\_\_\_\_\_\_\_\_\_\_\_\_\_\_\_\_\_\_\_\_\_\_\_\_\_\_\_\_\_\_\_\_\_\_\_\_\_\_\_\_\_\_\_\_\_\_\_\_\_\_\_\_\_\_\_\_\_\_\_\_\_\_\_\_\_\_\_\_\_\_\_\_\_\_\_\_\_\_\_\_\_\_\_\_\_\_\_\_\_\_\_\_\_\_\_\_\_\_\_\_\_\_\_\_\_\_\_\_\_\_\_\_\_\_\_\_\_
#### **HOW TO EDIT CHART OF ACCOUNT CODE?**
- Note that existing **CHART OF ACCOUNT CODE** after having historical transaction cannot be deleted but can be edited in limited fields such as on name, account type, custom format.
- In chart of account listing, search 'code' to edit or,
- Point cursor then double click from the existing list then you can edit,
.[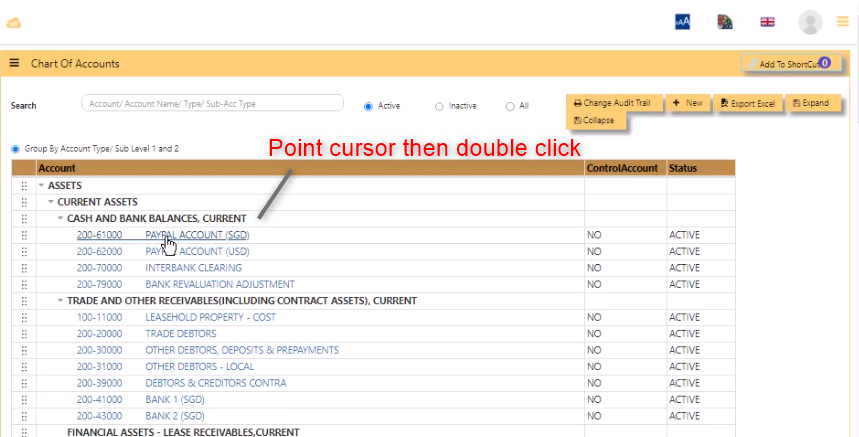](https://doc.uniq365.com/uploads/images/gallery/2025-02/dIgimage.png)
FINAL ACCOUNTS LAYOUT
#### **Uniq365** allows almost unlimited ways to display your Profit & Loss Statement and Balance Sheet layout through **FINAL** **ACCOUNTS LAYOUT**. This module will help to manage the Profit and Loss classification and Balance sheet classification.
- There are 3 custom format available for user to customize reports - **custom 1, 2 and 3**.
- **LEVEL 1**- as main level**, LEVEL 2** - are branches of Level 1 account, while **LEVEL 3** - are branches of Level 2 account, key in your preferred description,
- **SORT 1** \_ **FOOTER** - key in the description of SUBTOTAL,
- **SHOW LINE** - will provide underline, can be **none**, **single** line or **double** lines.
- **PROFIT** - to show if the account is in normal credit balance or debit balance.
- **RUNNING TOTAL** under LEVEL 1 - sums up the total of Level 1, key in the description 'TOTAL'.
- **+ADD** - to add each account code corresponding chart of account.
- **LEVEL 3\_ SORT 3** - key in **description**, select **print**, select **profit,** select **non stock** and category **trading**.
- **SAVE** - tick will save any new addition or changes.
- **DOWNLOAD TEMPLATE** - to get template in excel format for filling up,
- **IMPORT TEMPLATE** - to forward to system the prepared template,
- **EXPORT** - to export in excel format.
- **CHANGE AUDIT TRAIL**-provide report of latest change done by user.
[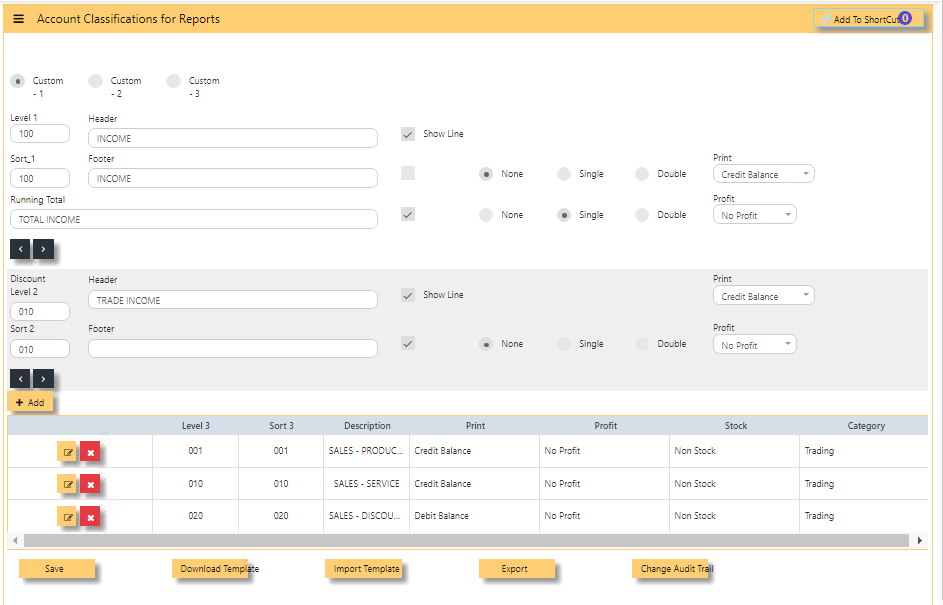](https://doc.uniq365.com/uploads/images/gallery/2025-01/hBzimage.png)
\_\_\_\_\_\_\_\_\_\_\_\_\_\_\_\_\_\_\_\_\_\_\_\_\_\_\_\_\_\_\_\_\_\_\_\_\_\_\_\_\_\_\_\_\_\_\_\_\_\_\_\_\_\_\_\_\_\_\_\_\_\_\_\_\_\_\_\_\_\_\_\_\_\_\_\_\_\_\_\_\_\_\_\_\_\_\_\_\_\_\_\_\_\_\_\_\_\_\_\_\_\_\_\_\_\_\_\_\_\_\_\_\_\_\_\_\_\_\_\_\_\_\_\_\_\_\_\_\_\_\_\_\_\_\_\_
#### **HOW TO GET PROFIT AND LOSS CLASSIFICATION REPORT?**
- In General ledger -> Reports Queries -> Profit and Loss (Classification)
- In General ledger -> Reports Queries -> Balance Sheet (Classification)
[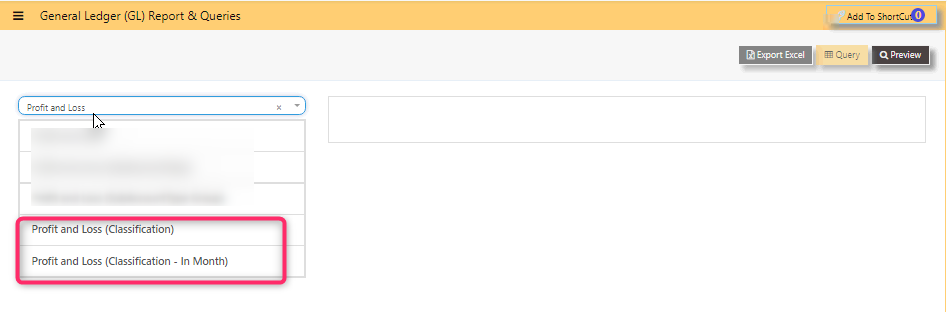](https://doc.uniq365.com/uploads/images/gallery/2025-02/Dtcimage.png)
[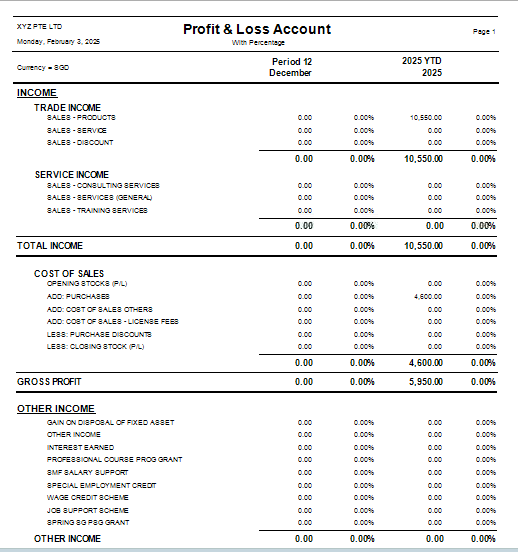](https://doc.uniq365.com/uploads/images/gallery/2025-02/Ct3image.png)
CONTROL ACCOUNT GL
#### **In Uniq365**, this option determines how the GL is updated when posting transactions, in **GL ACCOUNT POSTING SETTING**.
User is reminded that **SETTINGS** should be set permanently at the start of use of new account book and not to be accessed other than by the ADMIN user.
- **ACCOUNT NAME** -control accounts of exchange gain or loss realized and unrealized
- **POSTING TYPE** - select from dropdown '**FIXED**' or '**CURRENCY**'
- **FIXED ACCOUNT** - if posting type selected is FIXED, select the chart of account that corresponds to the exchange gain/loss account code
- **YEAR ENDING CLOSING** - settings for the year ending
- **OTHER CONTROL ACCOUNTS** - setting for the **GST SALES, GST PURCHASES, GST FIXED ASSETS, GST CLEARING and ROUNDING DIFFERENCE ACCOUNT**.
For example, the Chart of Account to be posted for Exchange Gain/Loss or GST tax depends on what has been selected for the respective account as shown below example.
[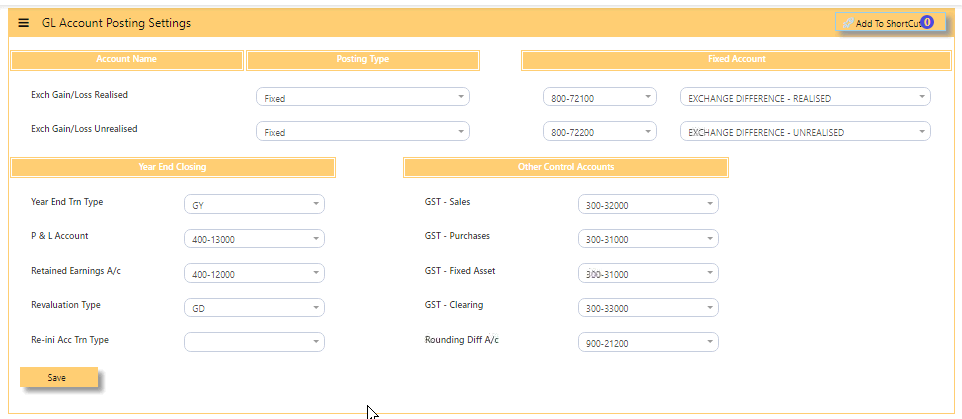](https://doc.uniq365.com/uploads/images/gallery/2025-01/5Bcimage.png)
#### **CONTROL ACCOUNT** such as TRADE DEBTORS AND TRADE CREDITORS are also ticked in CHART OF ACCOUNT, as in below sample.
[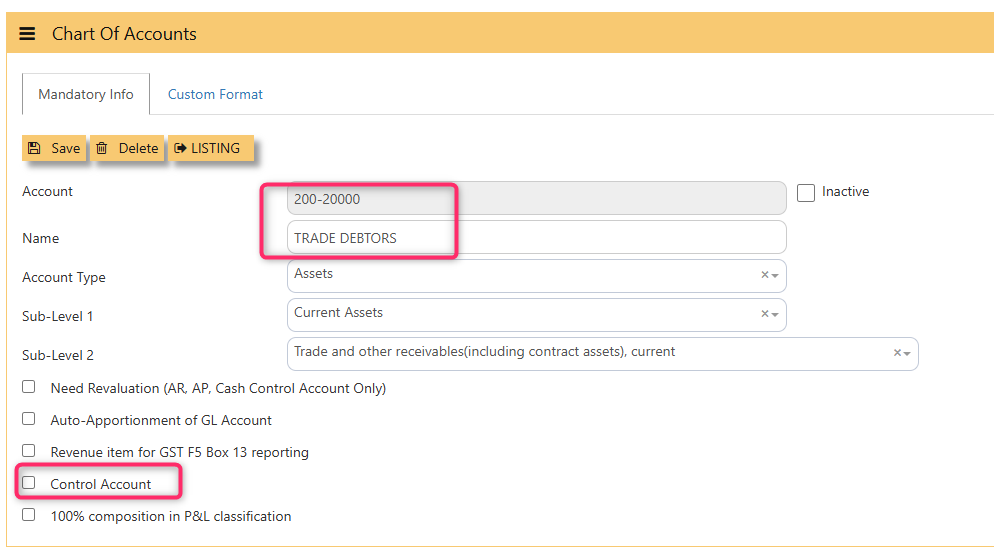](https://doc.uniq365.com/uploads/images/gallery/2025-02/PZHimage.png)
CHART OF ACCOUNTS DATA IMPORT
#### In **Uniq365,** **CHART OF ACCOUNTS DATA IMPORT** will help first-time user to import new CHART OF ACCOUNTS list.
\_\_\_\_\_\_\_\_\_\_\_\_\_\_\_\_\_\_\_\_\_\_\_\_\_\_\_\_\_\_\_\_\_\_\_\_\_\_\_\_\_\_\_\_\_\_\_\_\_\_\_\_\_\_\_\_\_\_\_\_\_\_\_\_\_\_\_\_\_\_\_\_\_\_\_\_\_\_\_\_\_\_\_\_\_\_\_\_\_\_\_\_\_\_\_\_\_\_\_\_\_\_\_\_\_\_\_\_\_\_\_\_\_\_\_\_\_\_\_\_\_\_\_\_\_\_\_\_\_\_\_\_\_\_\_\_\_\_
#### **HOW TO IMPORT CHART OF ACCOUNTS?**
- **DOWNLOAD TEMPLATE** - before import, download template for filling up of CHART OF ACCOUNTS
- **FIELDS MAPPING** - choose file should be in excel format
- **UPLOAD** button - after choose file
- **DATABASE FIELDS** - select 'account' should match 'excel/access fields' or
- **AUTO MAP** - tick to auto map
- **VERIFY** - tick then system will verify if fields are correctly mapped
- **IMPORT** - import every field accordingly
- **VIEW ERROR LOG** - will list the error log, pay attention to the mentioned fields and try to correct them. If anything else, contact UNIQ365 support for assistance
- **VIEW IMPORT LIST** - will list imported fields
[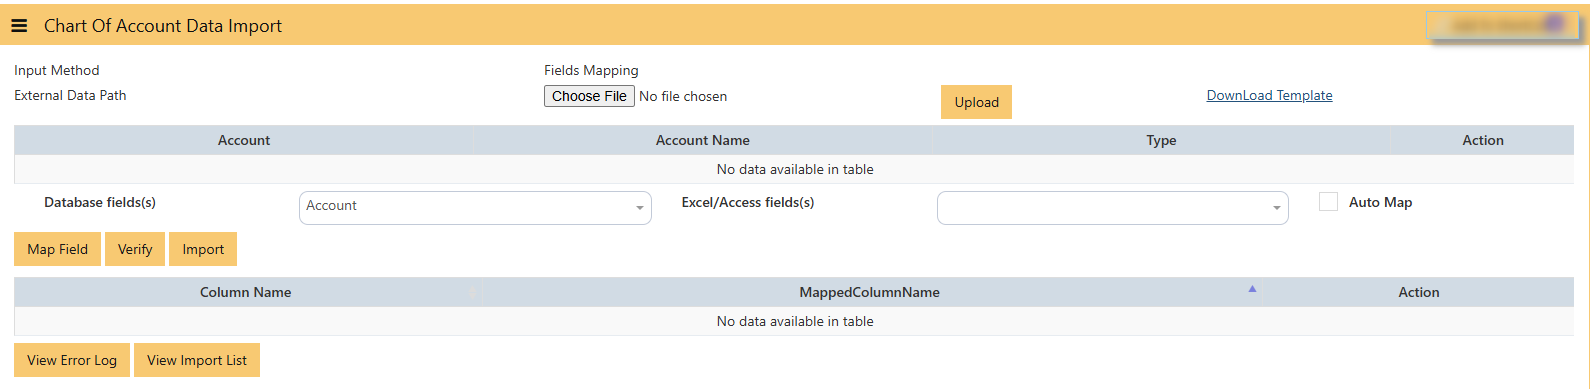](https://doc.uniq365.com/uploads/images/gallery/2025-02/Bnnimage.png)
\_\_\_\_\_\_\_\_\_\_\_\_\_\_\_\_\_\_\_\_\_\_\_\_\_\_\_\_\_\_\_\_\_\_\_\_\_\_\_\_\_\_\_\_\_\_\_\_\_\_\_\_\_\_\_\_\_\_\_\_\_\_\_\_\_\_\_\_\_\_\_\_\_\_\_\_\_\_\_\_\_\_\_\_\_\_\_\_\_\_\_\_\_\_\_\_\_\_\_\_\_\_\_\_\_\_\_\_\_\_\_\_\_\_\_\_\_\_\_\_\_\_\_\_\_\_\_\_\_\_\_\_\_\_
#### **DOWNLOAD TEMPLATE SAMPLE**
- **check download folder -** open COA\_template and fill
[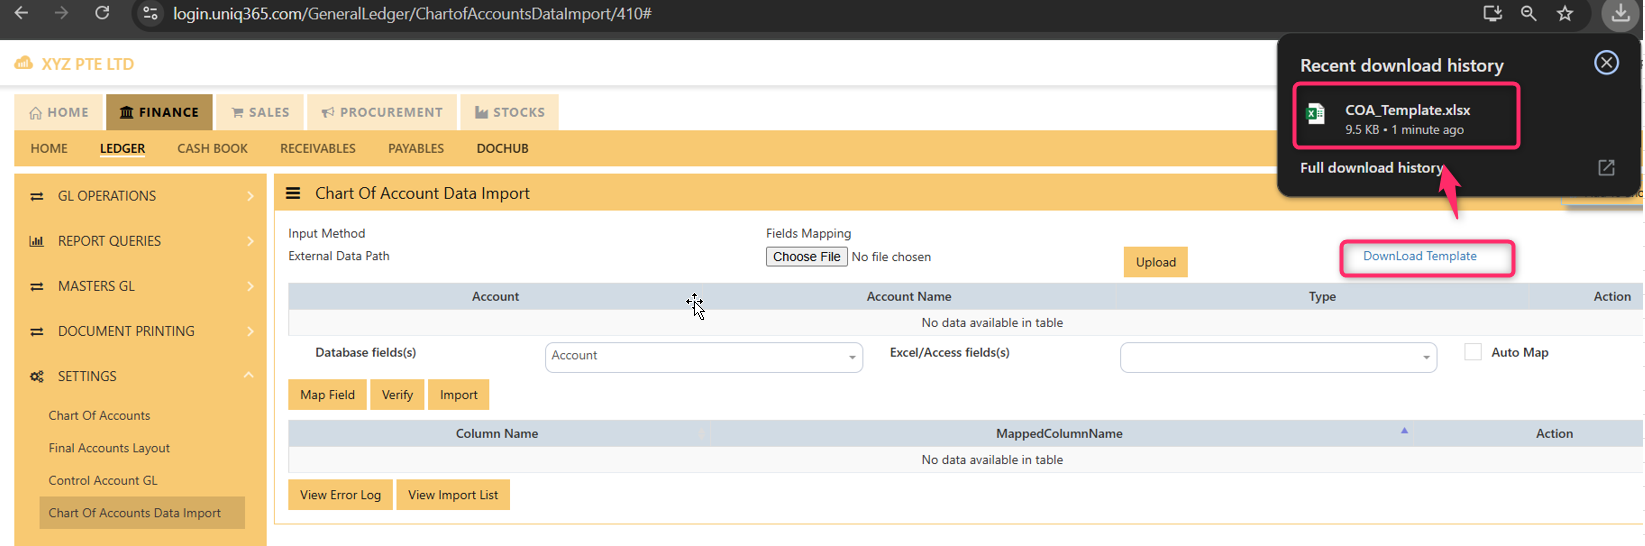](https://doc.uniq365.com/uploads/images/gallery/2025-02/qwLimage.png)
Cash Bank Contra
##### **HOW TO CREATE CASH BANK CONTRA TRANSACTIONS?**
##### A **contra transaction** in the cash book of UNIQ365 refers to a transaction that involves the movement of money between two cash or bank accounts within the organization, without affecting the overall cash balance. For example, when cash is transferred from the petty cash account to the main cash account, or when funds are moved between different bank accounts, it is recorded as a contra transaction. These transactions are typically non-revenue or non-expense related but still need to be documented for accurate financial tracking. The ERP system records the debit and credit entries for both accounts, ensuring proper internal cash flow management and accurate accounting, while the overall cash position remains unchanged.
##### Go to **Finance> Cash Book> Cash book operations > Cash Book Contra**
[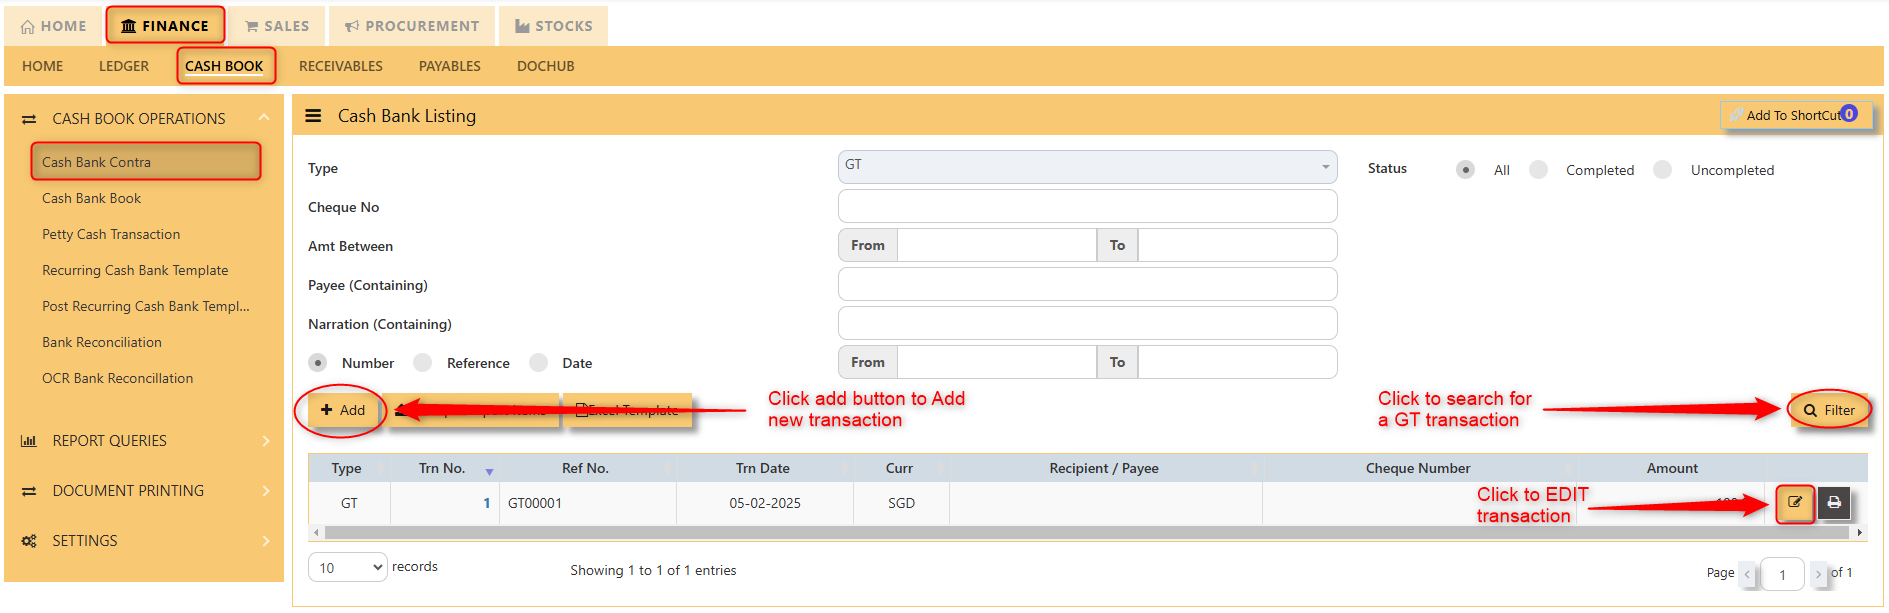](https://doc.uniq365.com/uploads/images/gallery/2025-02/60oimage.png)
[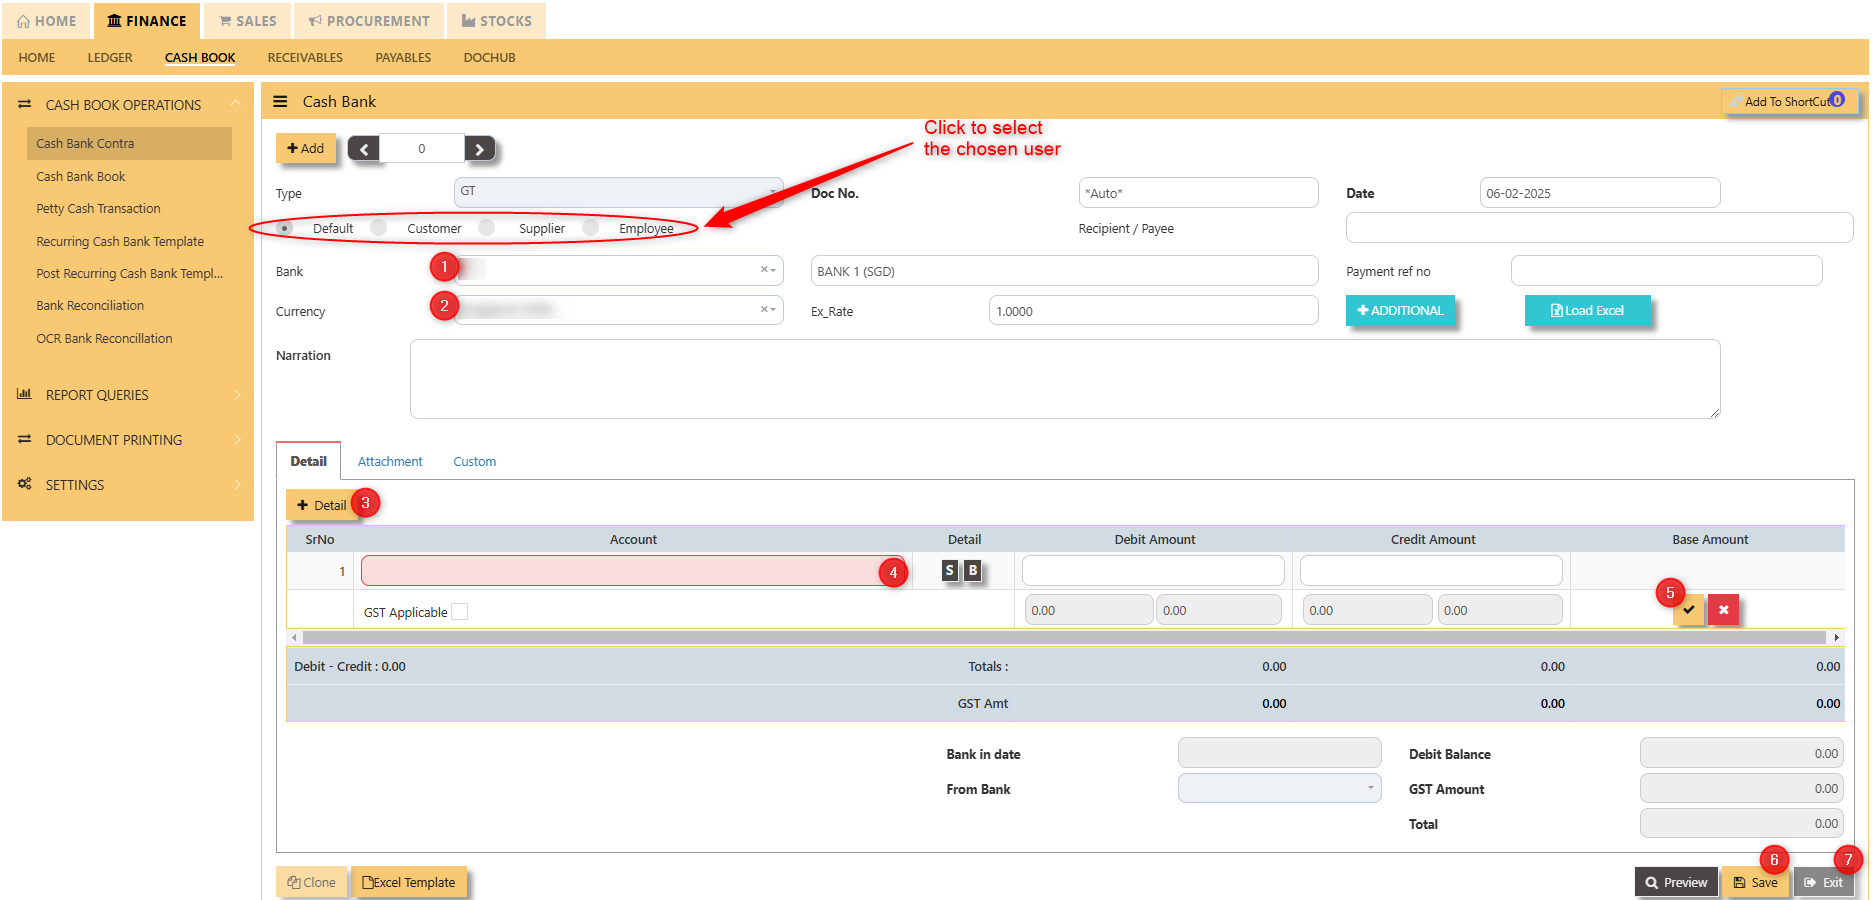](https://doc.uniq365.com/uploads/images/gallery/2025-02/cVQimage.png)
1. Click to select chosen bank
2. Click to select chosen currency
3. Click to add new details
4. Click the select new account
5. Click to “check” to save the new details
6. Click ‘’save’’ to save the transaction
7. Click “exit” to exit the transaction
Petty Cash Transaction
##### **HOW TO CREATE PETTY CASH TRANSACTIONS?**
##### **Petty Cash Transaction** involves recording small, day-to-day cash expenditures that are made for minor expenses, such as office supplies, employee reimbursements, or incidental costs. These transactions are typically managed through a dedicated petty cash account. When a petty cash transaction occurs, the ERP system records the expenditure, adjusting the petty cash balance and categorizing the expense under the appropriate account (e.g., office supplies, travel expenses). As petty cash is replenished, the ERP updates the balance and ensures proper documentation for reconciliation with the general ledger. This helps maintain accurate financial records for small cash outflows while ensuring control and accountability over the use of petty cash.
##### Go to **Finance> Cash Book> Petty Cash Transaction.**
##### [](https://doc.uniq365.com/uploads/images/gallery/2025-02/7Z3image.png)
[](https://doc.uniq365.com/uploads/images/gallery/2025-02/DW7image.png)
1. Click to select chosen bank
2. Click to select chosen currency
3. Click to add new details
4. Click the select new account
5. Click to “check” to save the new details
6. Click ‘’save’’ to save the transaction
7. Click “exit” to exit the transaction
Recurring Cash Bank Template
##### **HOW TO CREATE RECURRING CASH BANK TEMPLATE?**
##### **Recurring Cash Bank Template** in a web ERP system is a feature that automates and manages repetitive cash or bank transactions that occur on a regular basis, such as monthly rent payments, loan installments, or subscription fees. The template allows users to set up these transactions once, specifying the frequency (e.g., weekly, monthly, quarterly) and the relevant amounts, accounts, and categories. The ERP system then automatically generates and records these transactions on the specified dates without manual intervention. This automation streamlines cash flow management, ensures timely payments or receipts, and reduces the risk of errors or missed entries, all while maintaining consistency and improving the accuracy of financial reporting. This can also be done with petty cash transactions.
[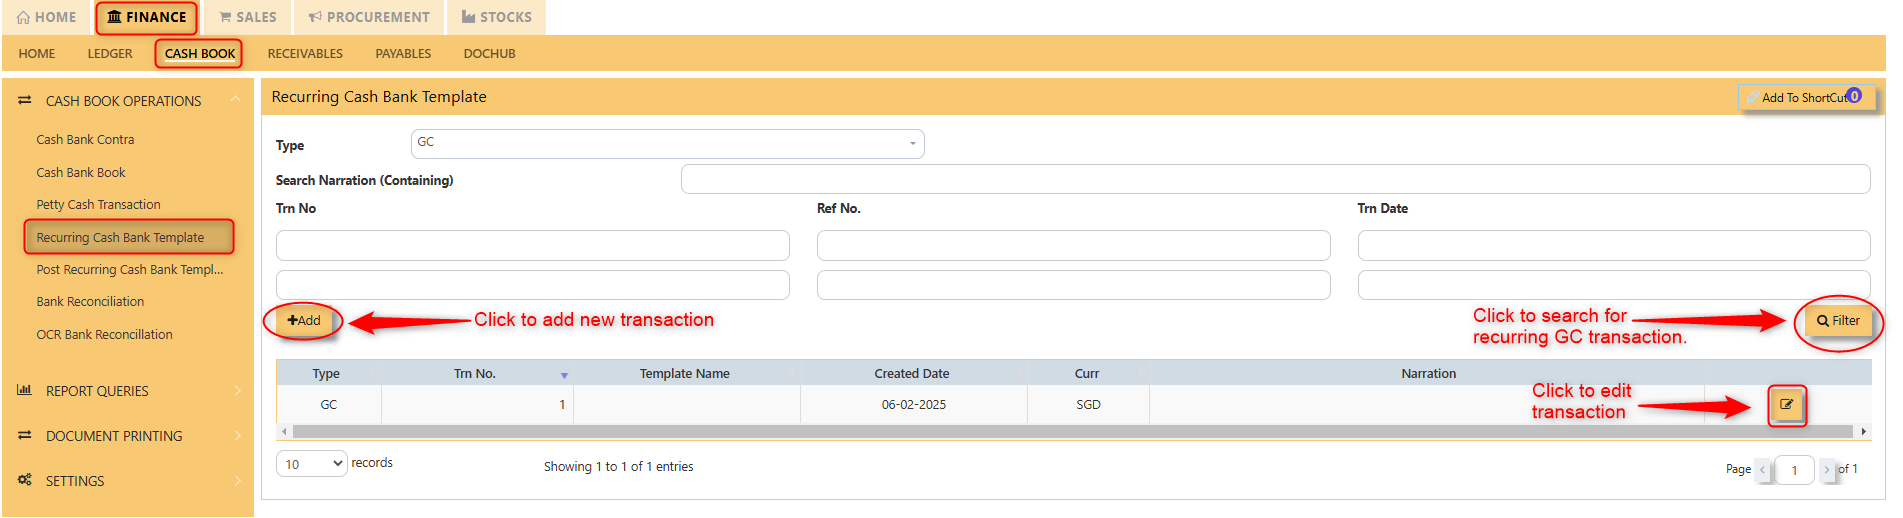](https://doc.uniq365.com/uploads/images/gallery/2025-02/uNmimage.png)
[](https://doc.uniq365.com/uploads/images/gallery/2025-02/GU5image.png)
1. Click to select chosen bank.
2. Click to select chosen currency.
3. Choose how frequent the transaction will reoccur.
4. Click "add new" to add line details.
5. Select new account.
6. Click to “check” to save the new details.
7. Click ‘’save’’ to save the transaction.
8. Click “exit” to exit the transaction.
Post Recurring Cash Bank Template
##### **HOW TO POST RECURRING CASH BANK TEMPLATE?**
##### To **Post Recurring Cash Bank Template** in a web ERP system, you first set up a template for a transaction that occurs regularly, such as monthly rent or utility payments, by specifying details like the transaction amount, frequency, involved bank accounts, and associated categories.
##### Once the template is configured, the system automatically posts the transaction on the scheduled date, generating the necessary journal entries to debit and credit the relevant accounts, such as cash or bank and the expense accounts. This automation ensures timely, accurate recording of recurring transactions without the need for manual entry each time, streamlining cash flow management and maintaining consistent financial records.
[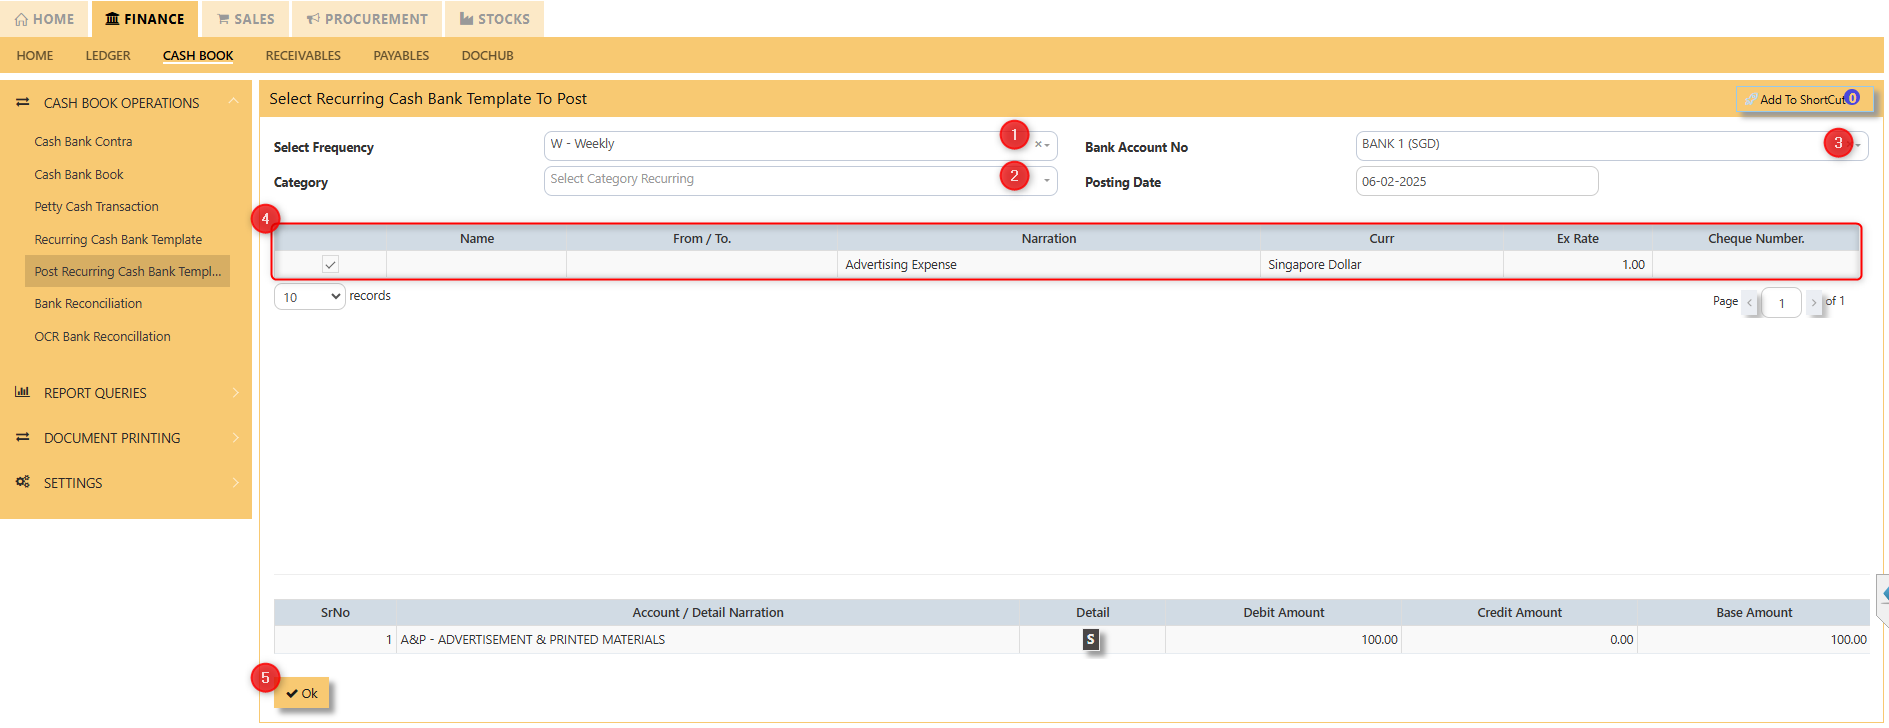](https://doc.uniq365.com/uploads/images/gallery/2025-02/A0Ximage.png)
[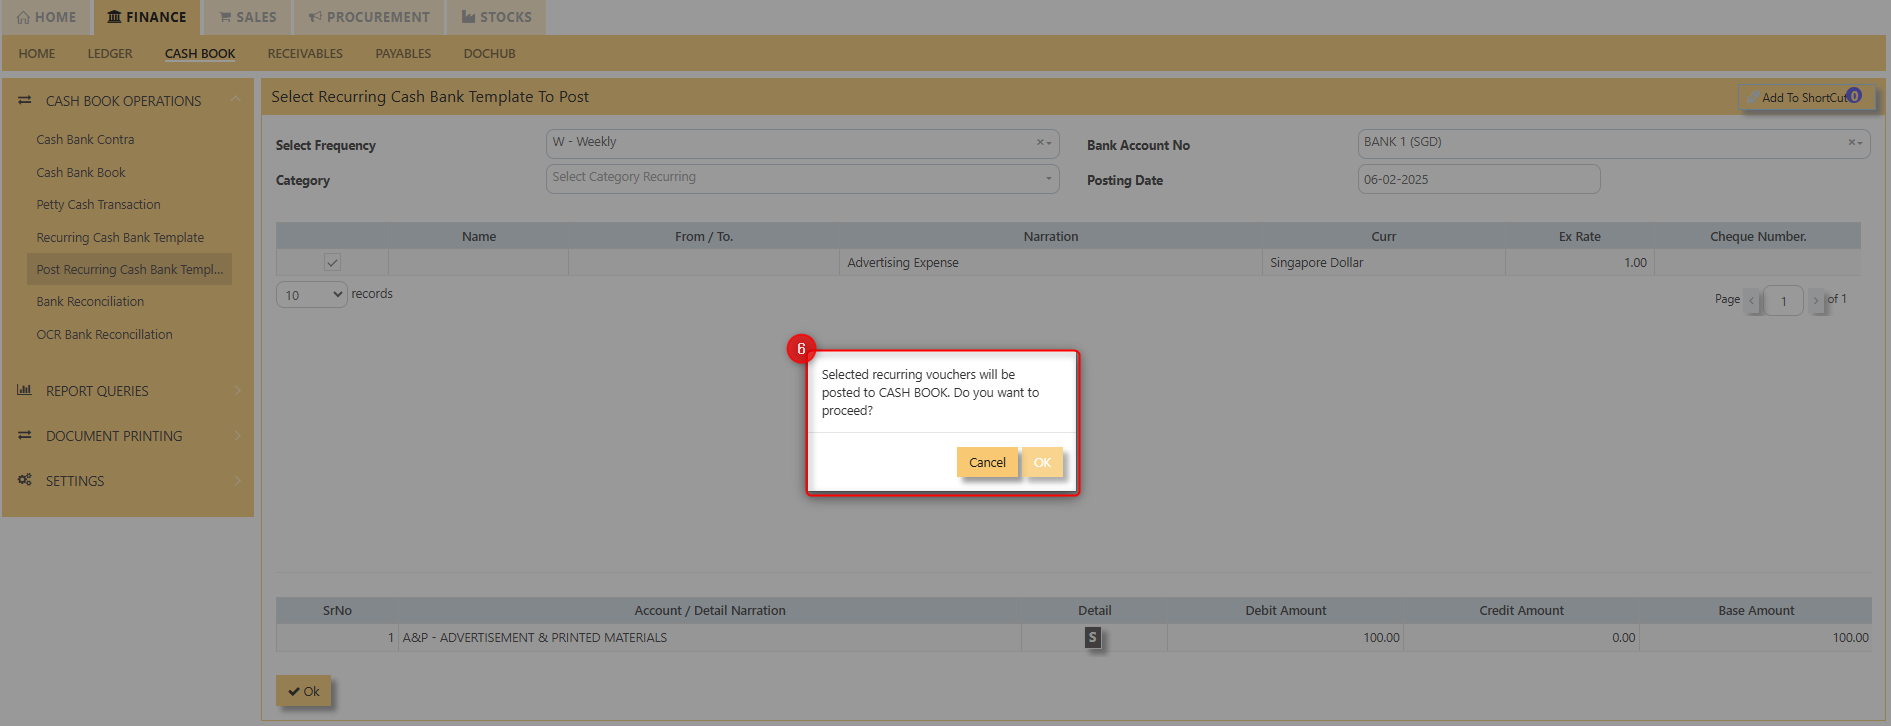](https://doc.uniq365.com/uploads/images/gallery/2025-02/uRrimage.png)
1. Select the frequency of the recurring transaction.
2. Select the category recurring.
3. Select Bank Account No.
4. Tick the recurring transaction that you want to post.
5. Click "Okay" once finalized.
6. Prompt will occur confirming the transaction to posted. Click ok to post [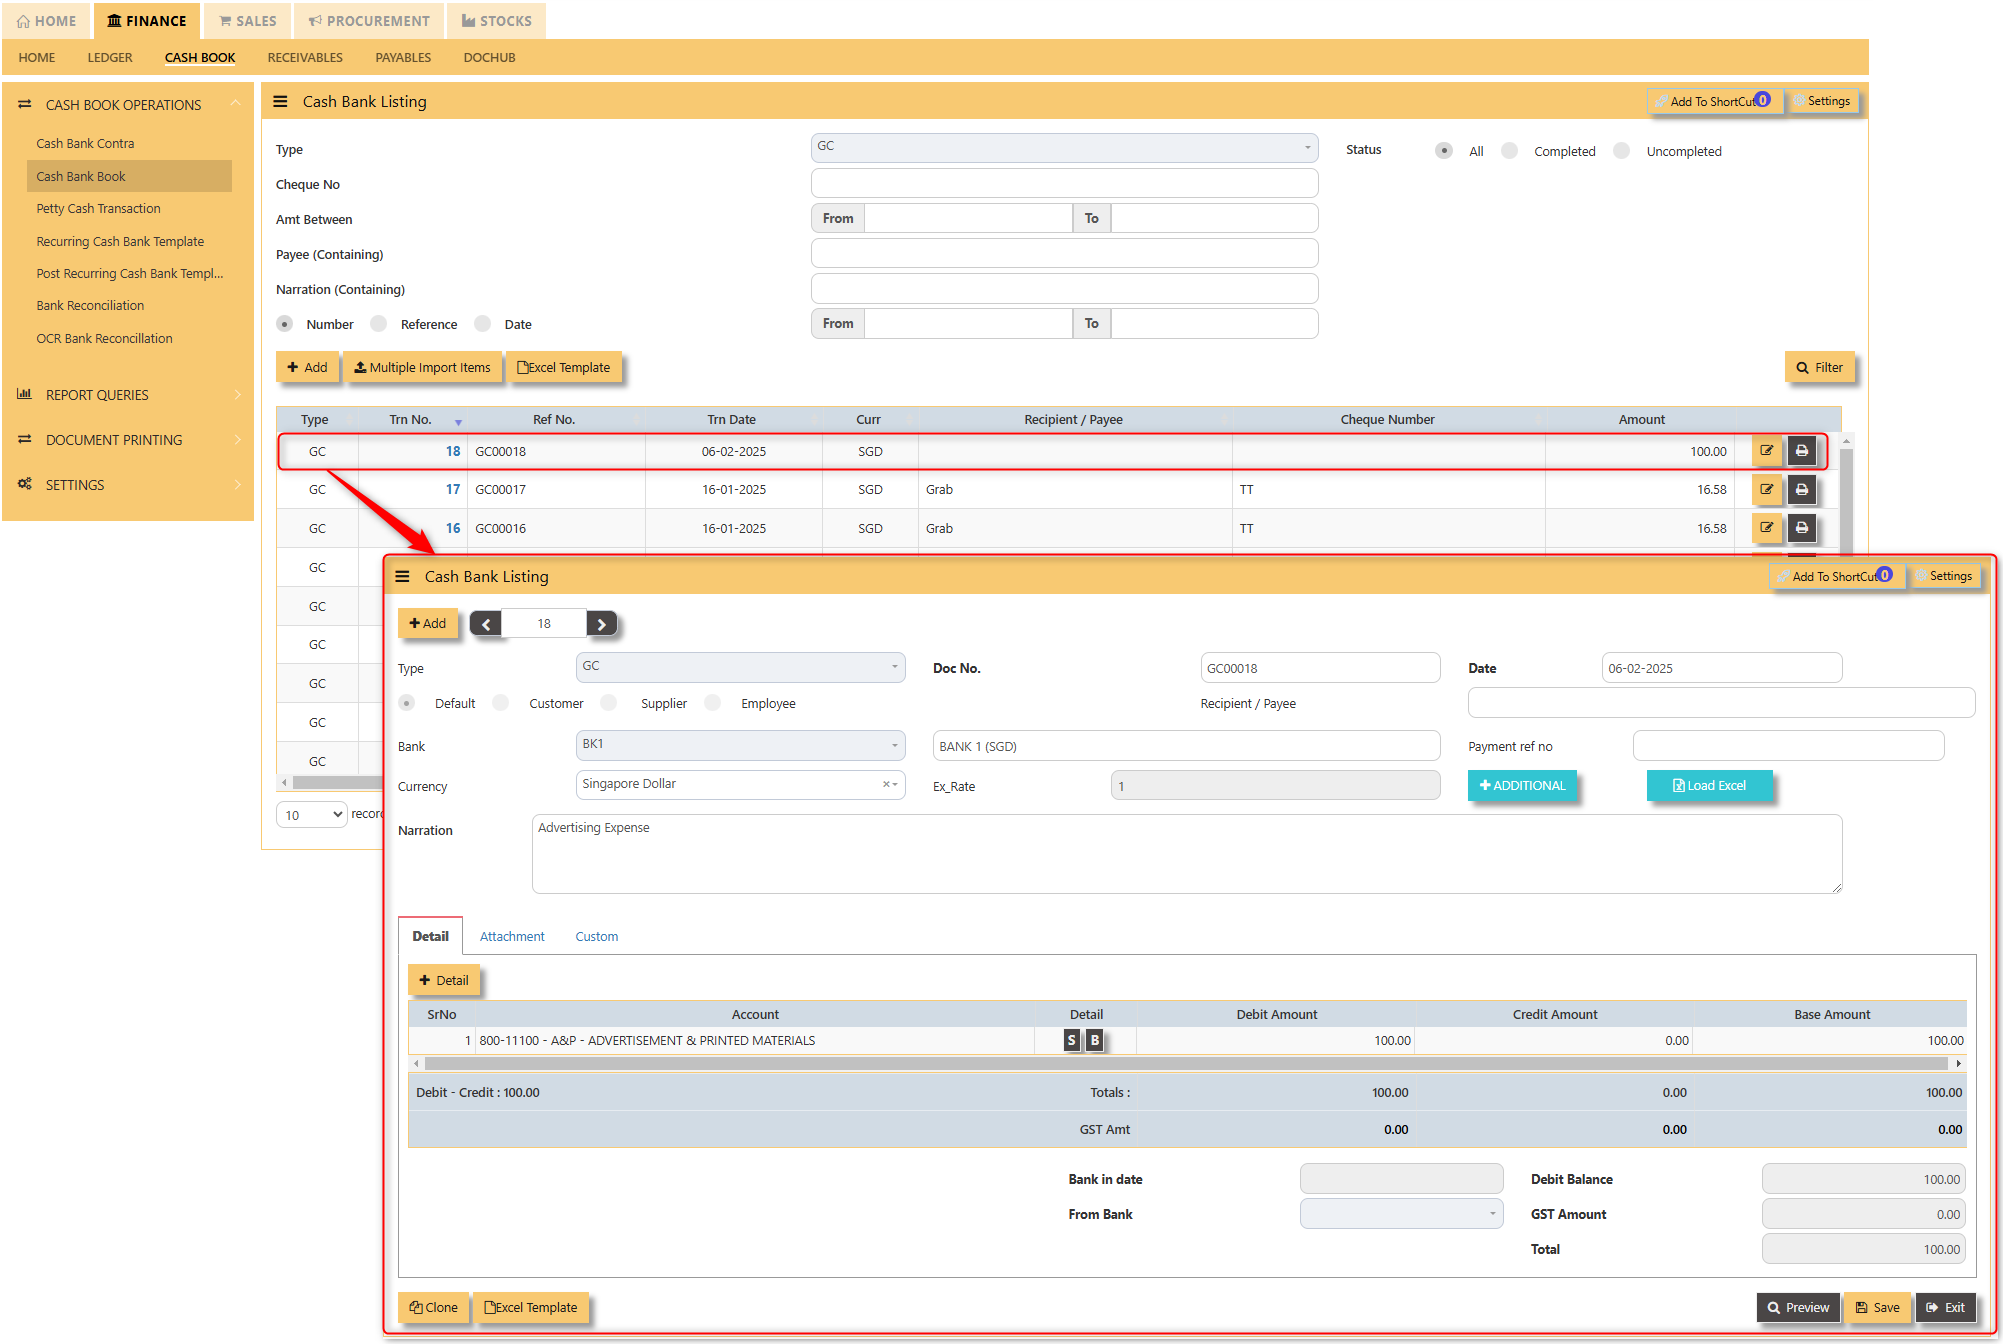](https://doc.uniq365.com/uploads/images/gallery/2025-02/O1Nimage.png)
After posting the recurring GC transaction, it will be visible in the Cash Bank Book screen.
Cash Bank Status Query
Click on **Cash Bank Book – Report & Queries – Cash Bank Status Query** icon for the following screen.
[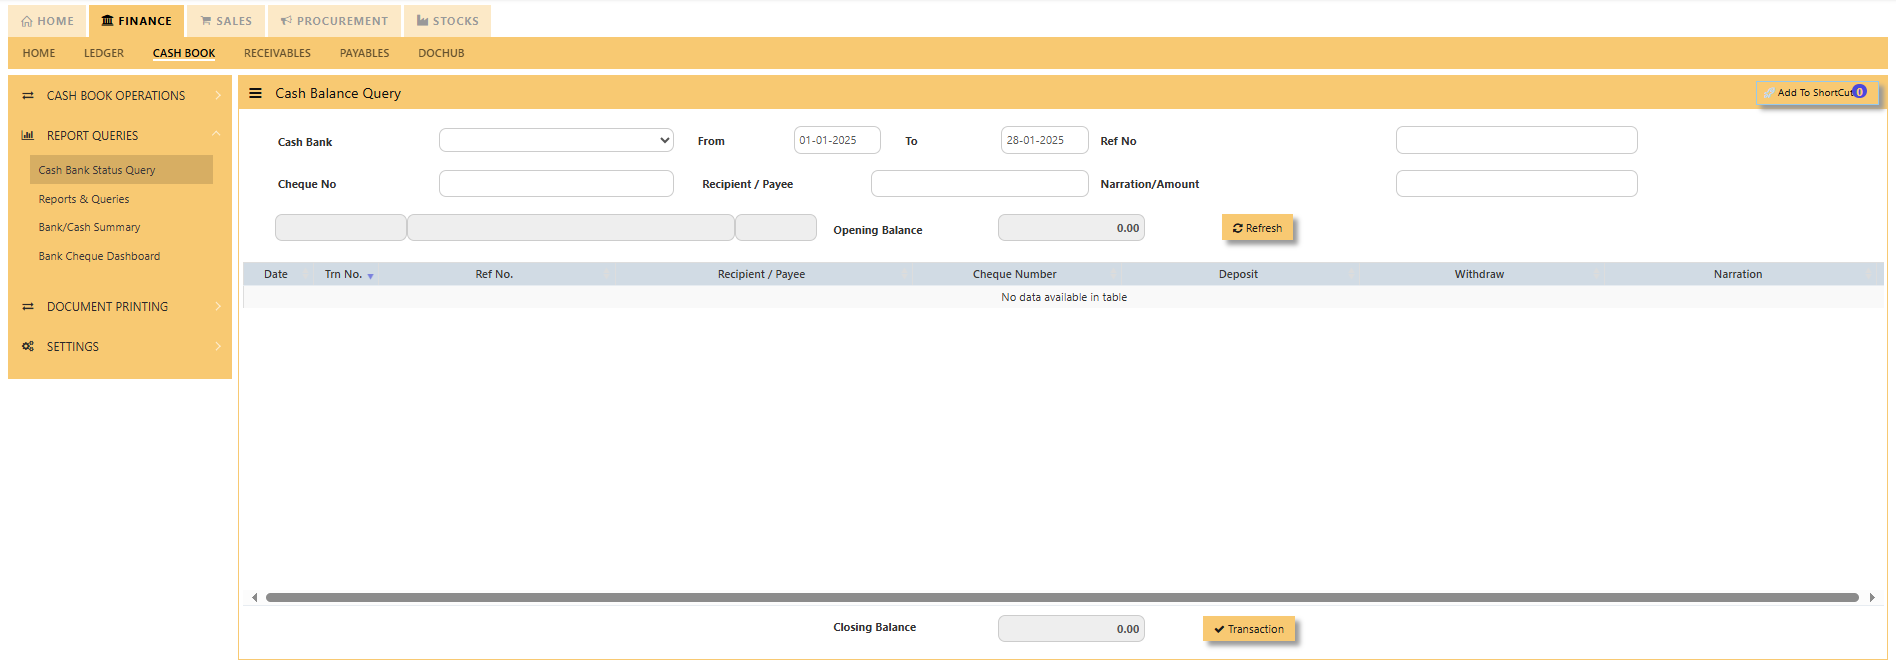](https://doc.uniq365.com/uploads/images/gallery/2025-01/lPnimage.png)
To use the bank status query:
1. Choose the respective Cash Bank Code from the dropdown.
2. Select the inclusive dates of transactions.
3\. Once you hit "**REFRESH**", the transaction for the cash bank code will appear. This dashboard will show you all the individual cash or bank code, from the dates inclusive in the from and to dates as well as the opening balance as shown below.
[](https://doc.uniq365.com/uploads/images/gallery/2025-02/R4mimage.png)
Reports & Queries
Click on **Cash Bank Book – Reports & Queries – Reports & Queries** icon for the following screen.
[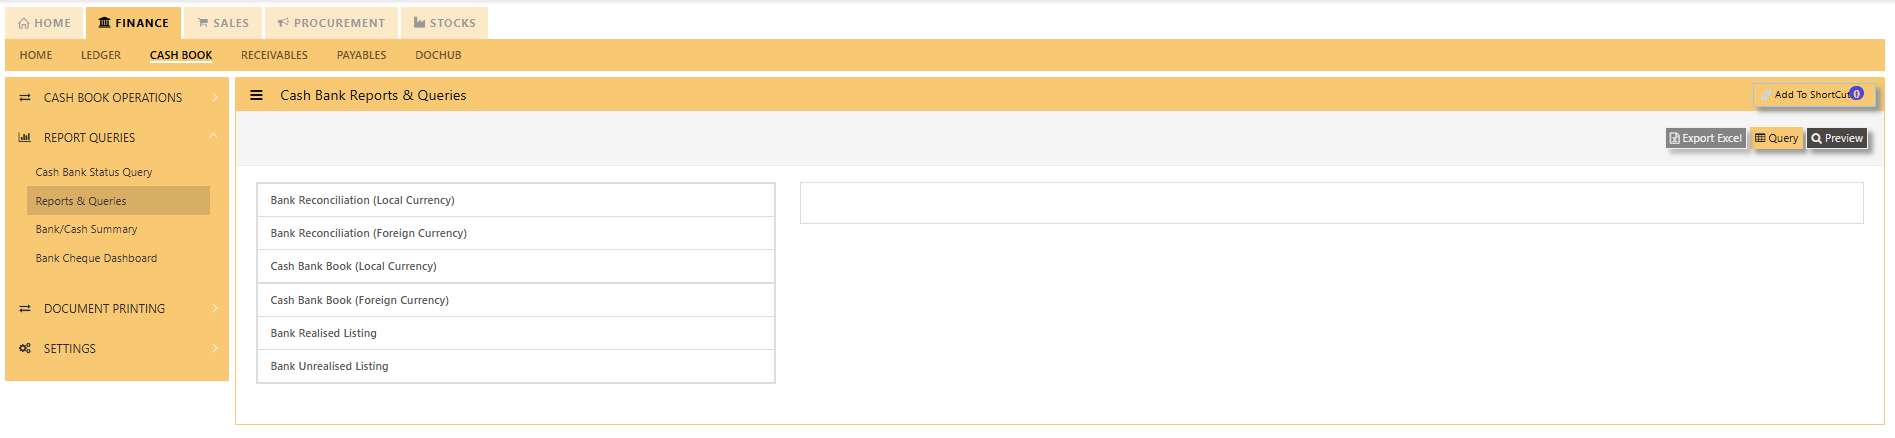](https://doc.uniq365.com/uploads/images/gallery/2025-01/XN2image.png)
These reports may be sent to a previewed to print, click on to Preview. You may seek an individual report, and the following data can in turn be drilled down to transaction level.
- Mater Listing – Currency Rates
- Bank Reconciliation (Local Currency)
- Bank Reconciliation (Foreign Currency)
- Cash Bank Book (Local Currency)
- Cash Bank Book (Foreign Currency)
- Bank Realized Listing
- Bank Unrealized listing
- Cheque Deposit listing
Bank/Cash Summary
Click on **Cash Bank Book – Reports & Queries – Bank/Cash Summary **for the following screen.
[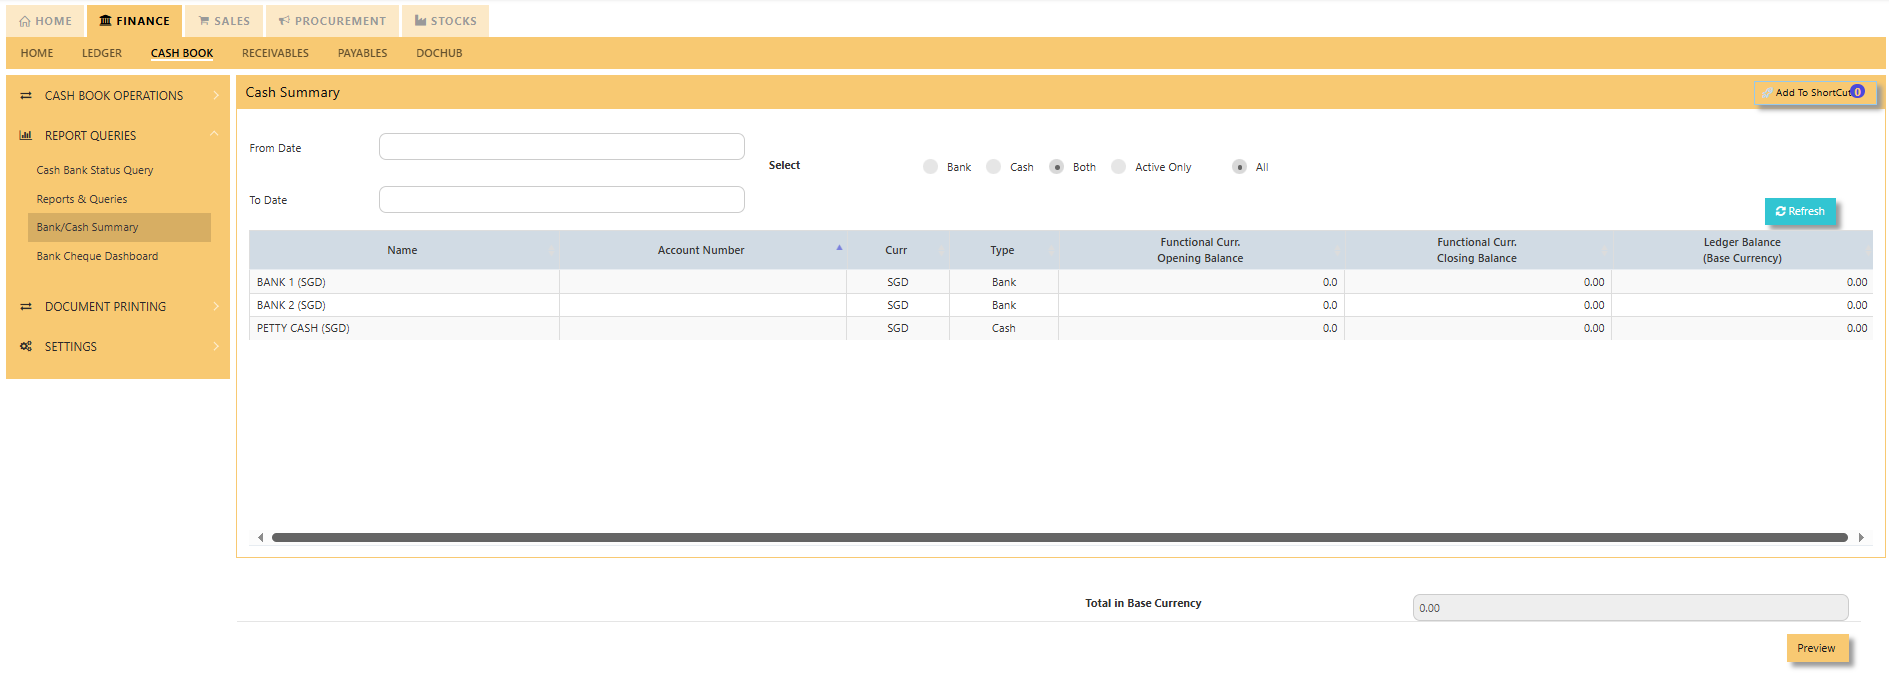](https://doc.uniq365.com/uploads/images/gallery/2025-01/QuMimage.png)
A Bank/Cash Summary provides an overview of a company's cash opening, closing and ledger balance during a specific period. It helps track the movement of funds and provides a clear snapshot of liquidity and available cash. This summary is essential for ensuring that a company can meet its financial obligations, manage working capital effectively, and reconcile its records with bank statements to ensure accuracy and avoid discrepancies.
[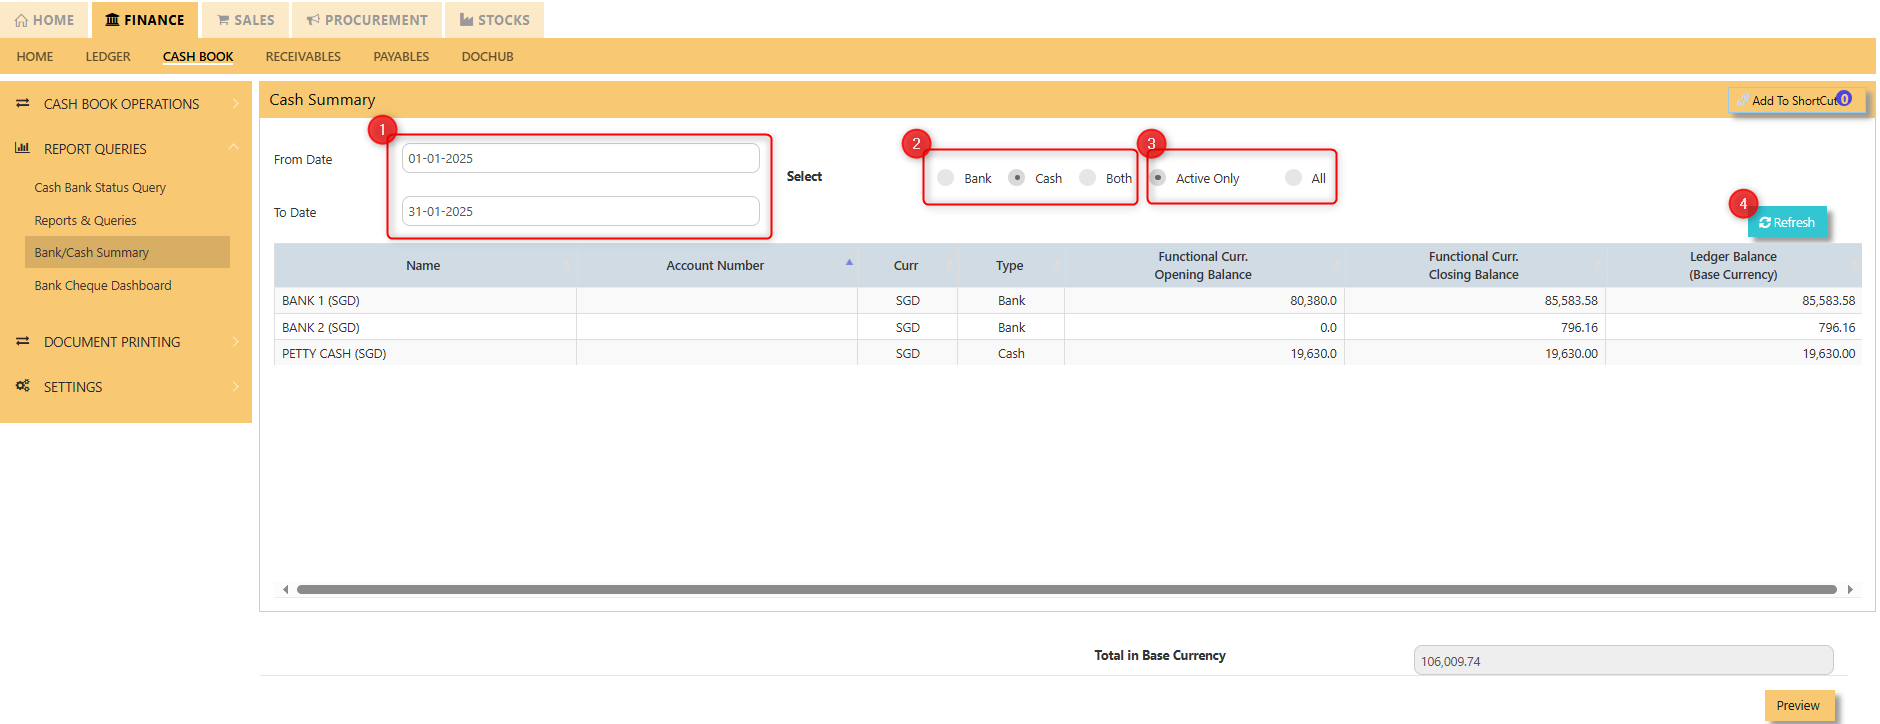](https://doc.uniq365.com/uploads/images/gallery/2025-02/B23image.png)
1. Select the "**FROM**" and "**TO**" dates.
2. Select the type whether it is **bank**, **cash** and/or **both.**
3. Select the status whether "**ACTIVE ONLY**" or "**ALL**"
4. Hit "**REFRESH**" for all transactions to appear in the dashboard.
[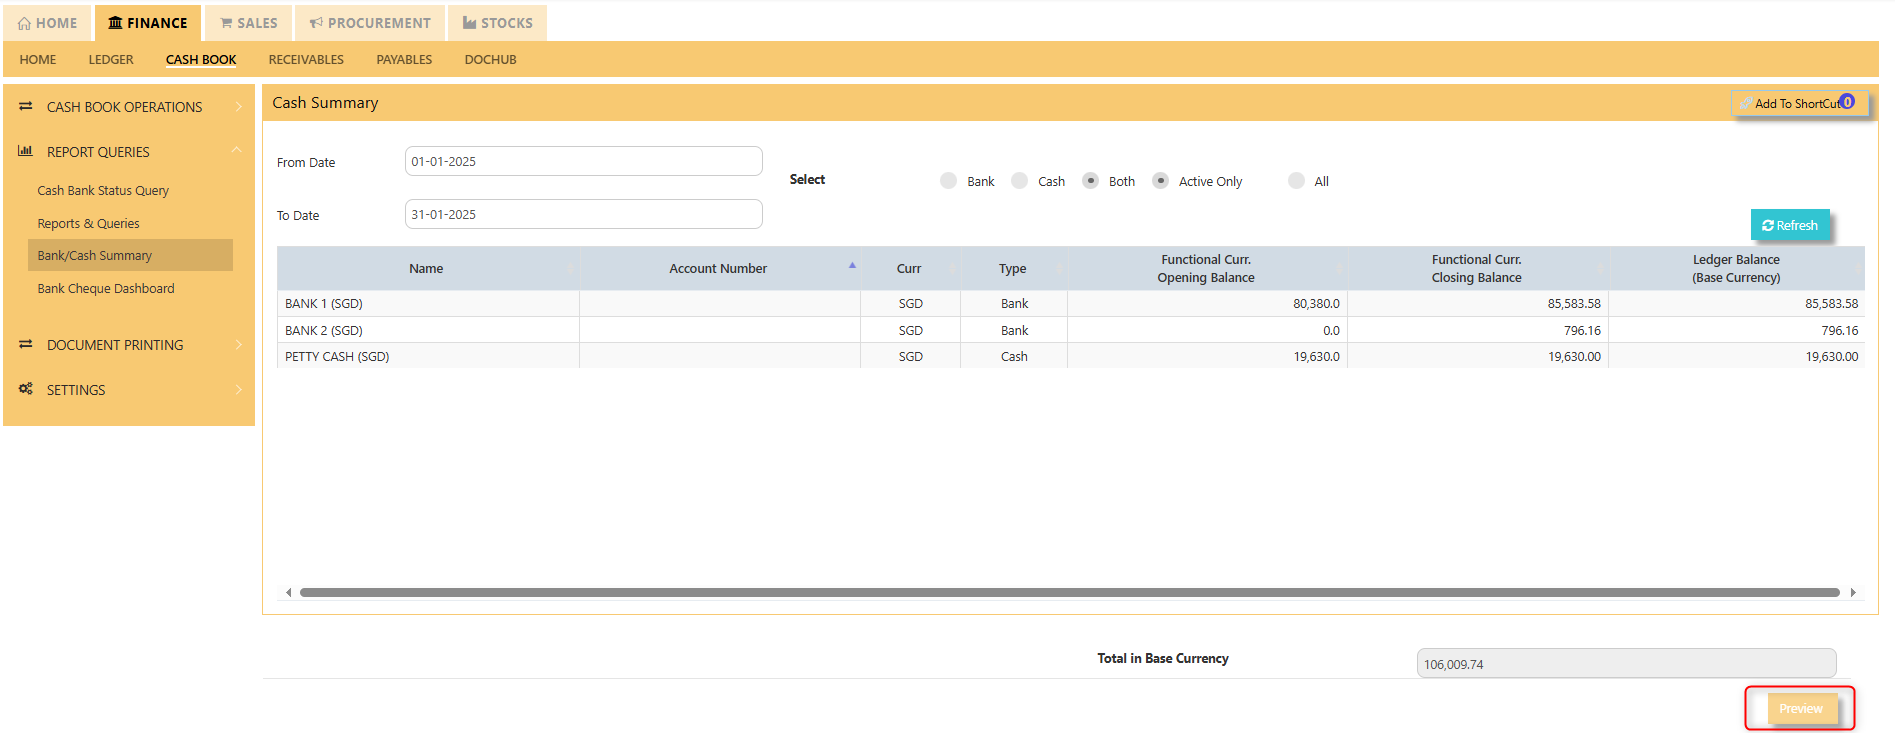](https://doc.uniq365.com/uploads/images/gallery/2025-02/DcAimage.png)
Click "**PREVIEW**" in the lower right portion of your screen to export Bank/Cash Summary in printable format.
[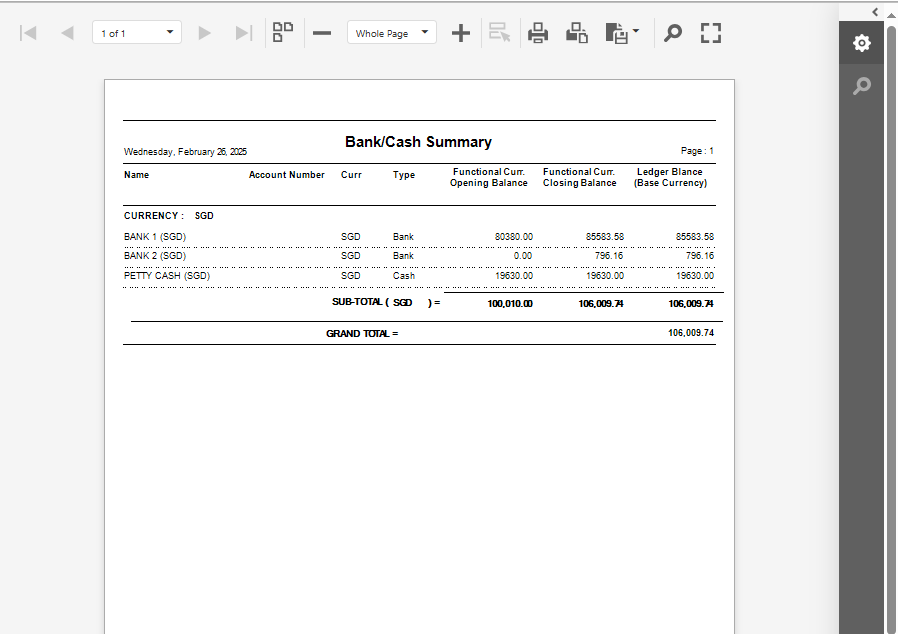](https://doc.uniq365.com/uploads/images/gallery/2025-02/1rCimage.png)
Bank Cheque Dashboard
Click on **Cash Bank Book – Report & Queries – Cash Bank Status Query**
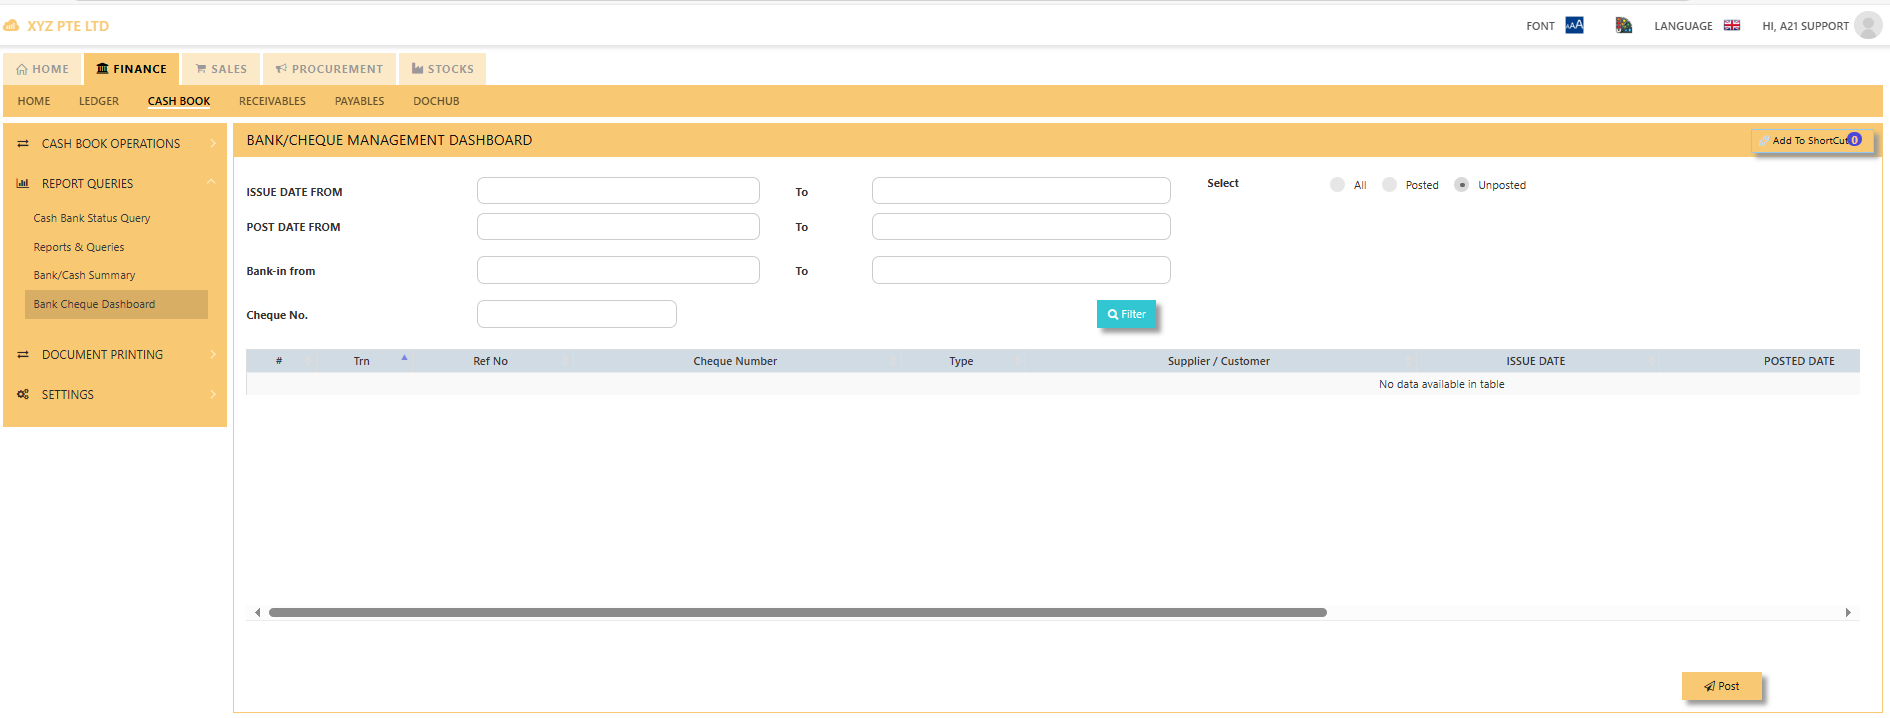A Bank/Cheque Management Dashboard shows bank/cheque-related transactions for a business or organization. It consolidates essential data such as Trn, Ref No, Cheque Number, Type, Supplier/Customer, issue date, posted date, bank in/collected date. The dashboard can filter the status of cheque to posted, unposted or both. Filter is also applicable to the issue date, post date, Bank-in from and Cheque No to pull up a transaction.
CREDIT NOTE
#### **CREDIT NOTE**
A credit note usually issued when clients return goods or services. To record a receivable credit note in Uniq365, you have to go in receivables module and look for credit note tab. Attached photo in reference where you can find it.
\_\_\_\_\_\_\_\_\_\_\_\_\_\_\_\_\_\_\_\_\_\_\_\_\_\_\_\_\_\_\_\_\_\_\_\_\_\_\_\_\_\_\_\_\_\_\_\_\_\_\_\_\_\_\_\_\_\_\_\_\_\_\_\_\_\_\_\_\_\_\_\_\_\_\_\_\_\_\_\_\_\_\_\_\_\_\_\_\_\_\_\_\_\_\_\_\_\_\_\_\_\_\_\_\_\_\_\_\_\_\_\_\_\_\_\_\_\_\_\_\_\_\_\_\_\_\_\_\_\_\_\_\_\_
[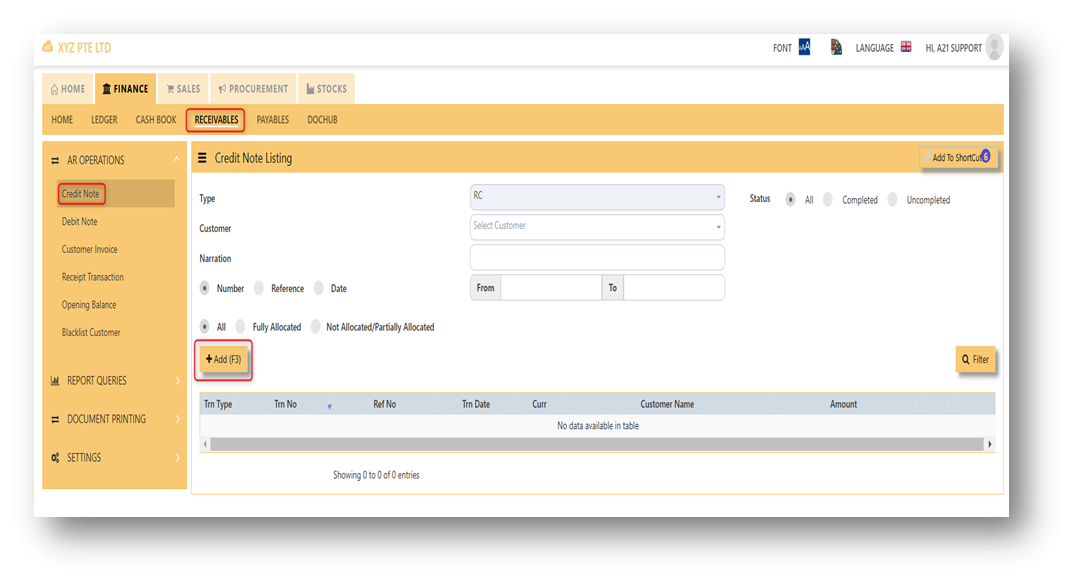](https://doc.uniq365.com/uploads/images/gallery/2025-01/6CKimage.png)
##### **Steps on how to enter new transaction in Credit Note:**
1. Click on **Receivables – AR Operations – Credit Note (RC)** and the following screen will appear.
[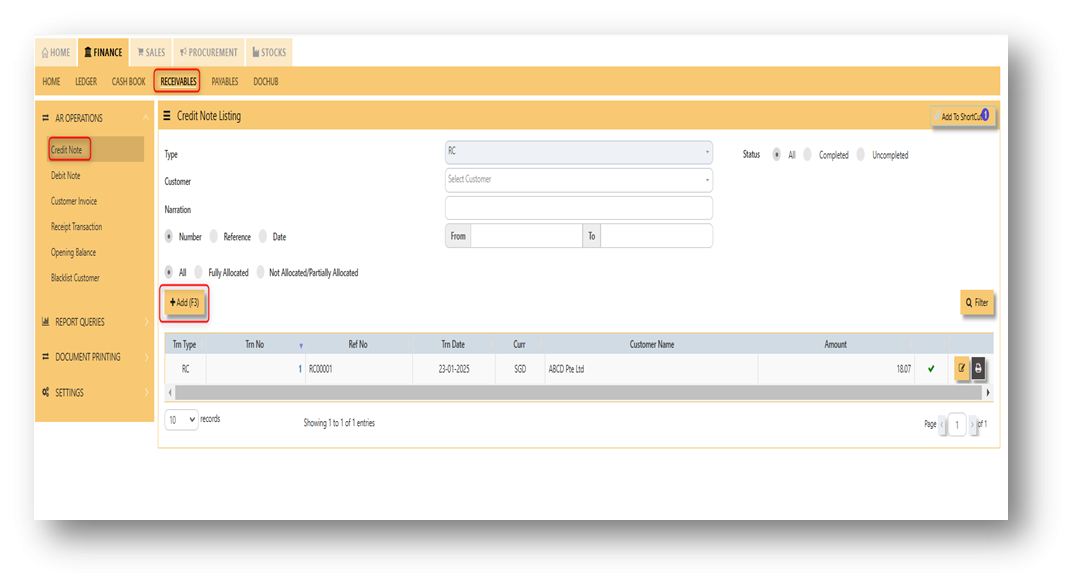](https://doc.uniq365.com/uploads/images/gallery/2025-01/blmimage.png)
2. Click on Add button to create a new transaction.
[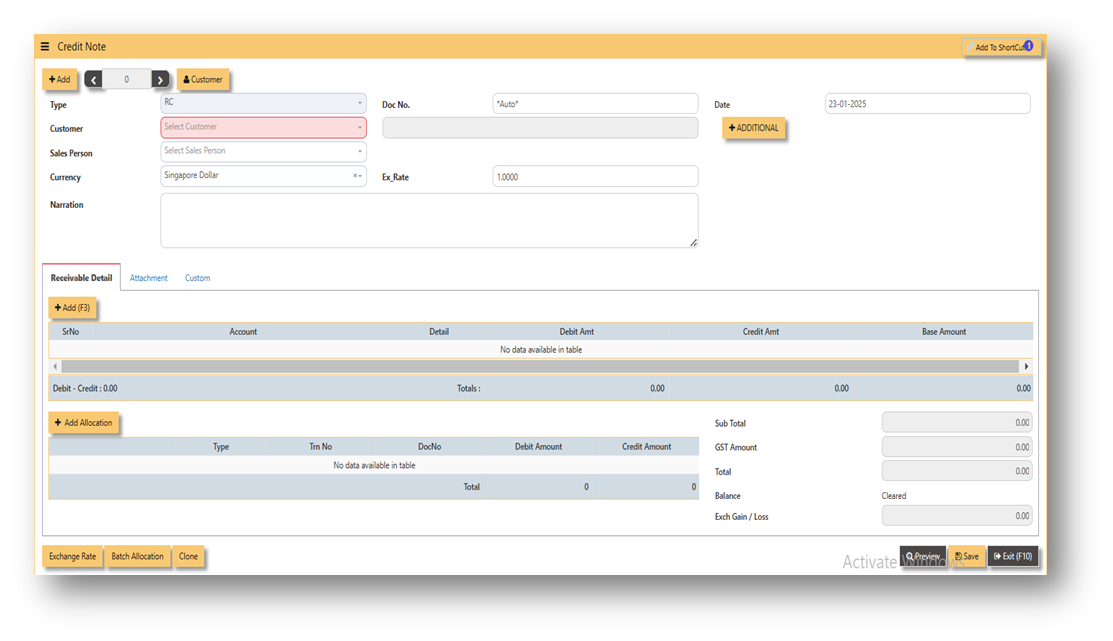](https://doc.uniq365.com/uploads/images/gallery/2025-01/ulnimage.png)
- Fill up the fields in the header section such as **Ref No, Date, Supplier, Contact Person, Currency and Exchange Rate**.
- Then select the account concerned at the detail section.
- Click for **Additional Info** for necessary details to add
[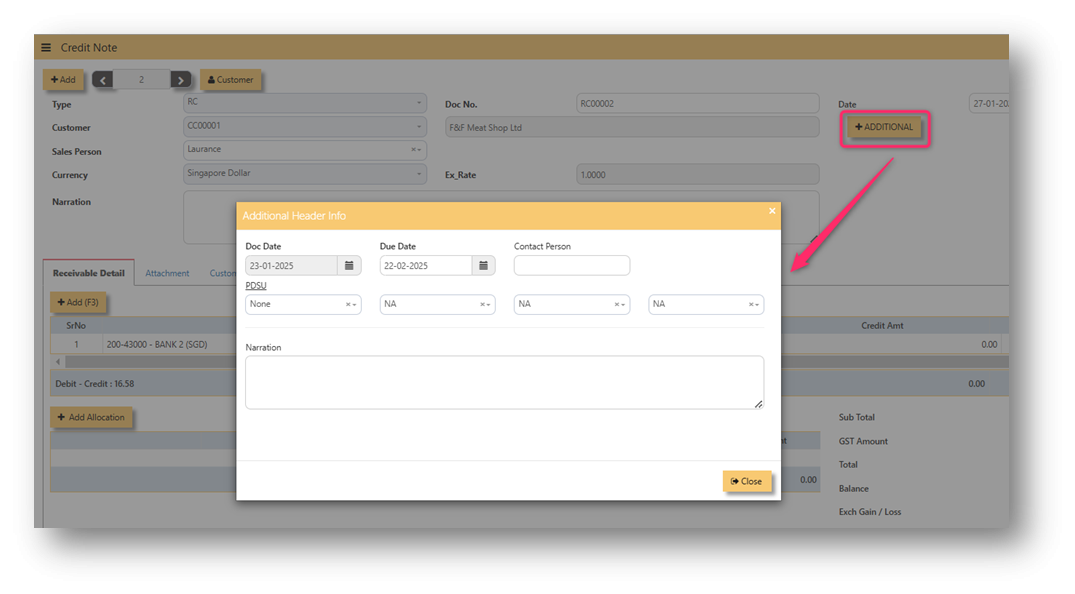](https://doc.uniq365.com/uploads/images/gallery/2025-02/l8Timage.png)
- Click on **SAVE** button to complete the entry.
[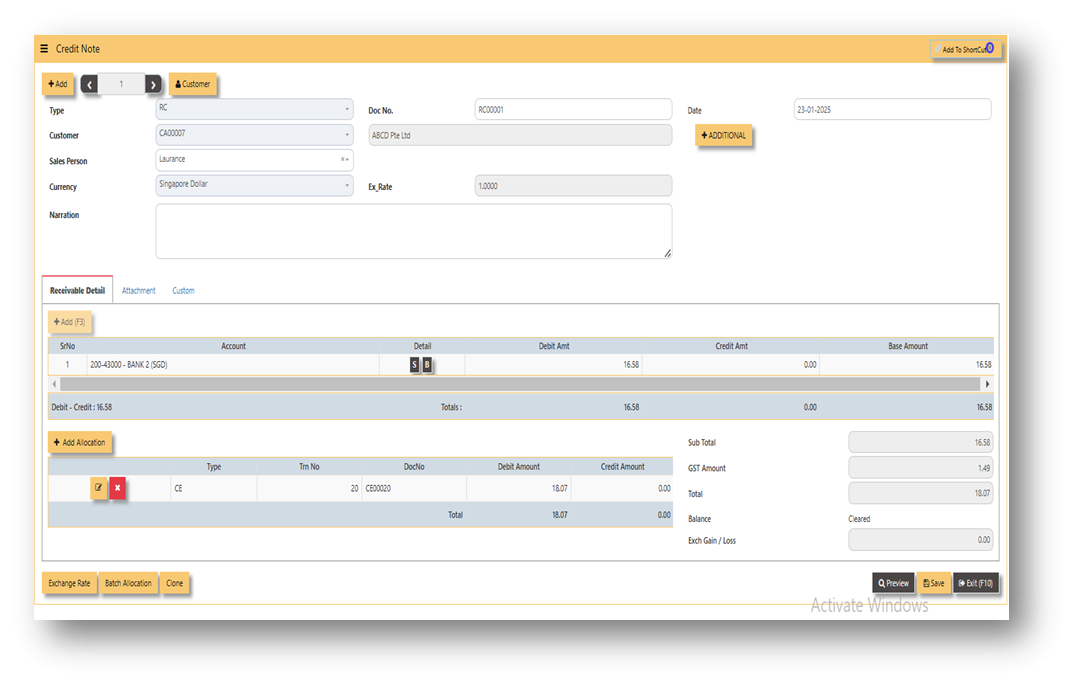](https://doc.uniq365.com/uploads/images/gallery/2025-01/xKWimage.png)
**\_\_\_\_\_\_\_\_\_\_\_\_\_\_\_\_\_\_\_\_\_\_\_\_\_\_\_\_\_\_\_\_\_\_\_\_\_\_\_\_\_\_\_\_\_\_\_\_\_\_\_\_\_\_\_\_\_\_\_\_\_\_\_\_\_\_\_\_\_\_\_\_\_\_\_\_\_\_\_\_\_\_\_\_\_\_\_\_\_\_\_\_\_\_\_\_\_\_\_\_\_\_\_\_\_\_\_\_\_\_\_\_\_\_\_\_\_\_\_\_\_\_\_\_\_\_\_\_\_\_\_\_\_\_
ADDITIONAL INFORMATION:**
2.1 Batch Allocation
If user has a lot of transactions needed to allocate, they may use the batch allocation button to allocate more transactions in convenient way. Refer to attached photo on how batch allocation works.
[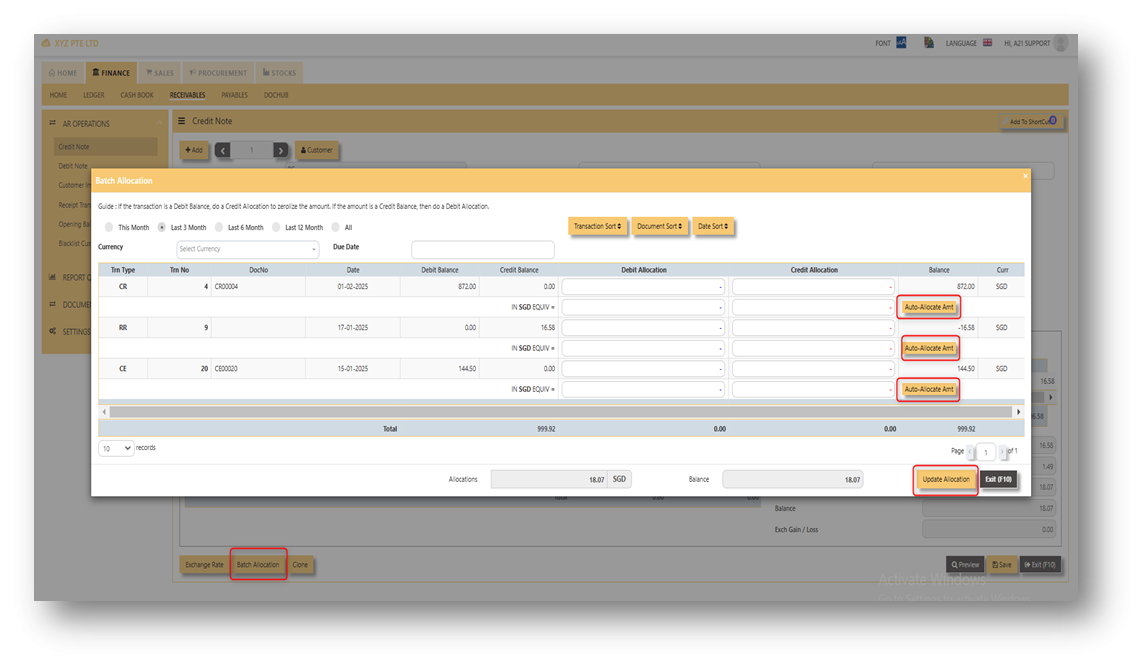](https://doc.uniq365.com/uploads/images/gallery/2025-01/tB0image.png)
2.2 Clone
If user wanted to create new RC transaction with same details from previous transaction, user can click the button of "clone" in order to create new RC transaction with same details from previous transaction. In this way, no need to key-in manually all the details, hence will just choose which customer should it be clone.
[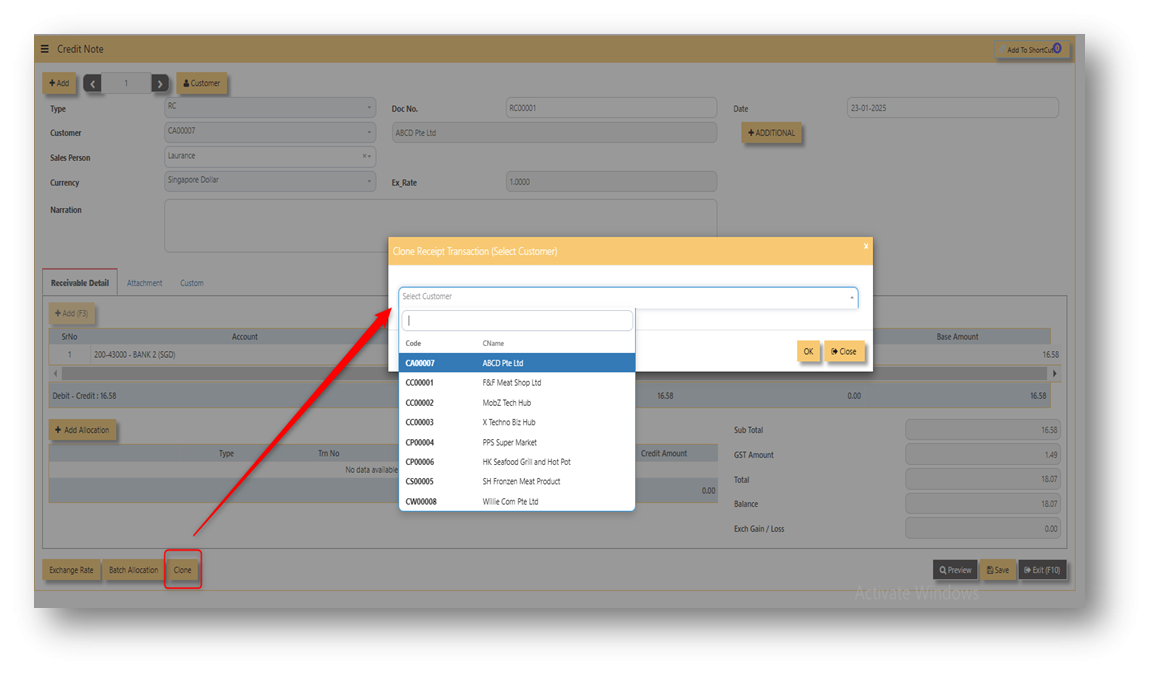](https://doc.uniq365.com/uploads/images/gallery/2025-01/zAPimage.png)
Attached photo is an example of transaction newly created from clone button.
[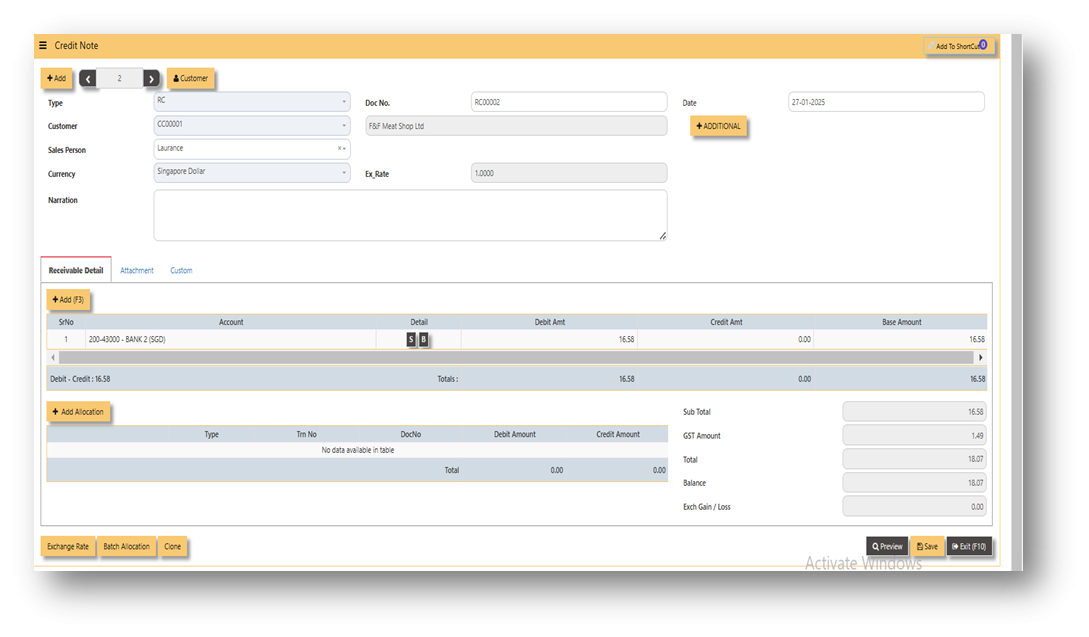](https://doc.uniq365.com/uploads/images/gallery/2025-01/zoqimage.png)
2.3 Exchange Rate
It will redirect you to Finance Tab. Attached link for further information. [MASTERS GL | Support Doc](https://doc.uniq365.com/books/online-user-guide-10-1224/page/masters-gl)
[](https://doc.uniq365.com/uploads/images/gallery/2025-02/ubLimage.png)
2.4 Attachment
This function use to upload supporting documents related to your transaction. Kindly also note that system only allow this format (gif, jpg, jpeg, png, pdf, doc, docx, xls, xlsx, csv, msg, html and htm) file type and with max file size 25 mb.
[](https://doc.uniq365.com/uploads/images/gallery/2025-02/8Ikimage.png)
3\. Report and Queries
For the double entries of the said RC transaction above, it can verify to check under AR transaction listing.
[](https://doc.uniq365.com/uploads/images/gallery/2025-02/tIEimage.png)
DEBIT NOTE
##### **DEBIT NOTE**
Debit note is the form issued for any additional amount of goods or services rendered to customers wherein no product code and quantity involved. Shortly known as Receivable debit note or RD. In UNIQ365, the receivable debit note can be found receivable module under operations. Please refer attached photo for reference where could it be found.
\_\_\_\_\_\_\_\_\_\_\_\_\_\_\_\_\_\_\_\_\_\_\_\_\_\_\_\_\_\_\_\_\_\_\_\_\_\_\_\_\_\_\_\_\_\_\_\_\_\_\_\_\_\_\_\_\_\_\_\_\_\_\_\_\_\_\_\_\_\_\_\_\_\_\_\_\_\_\_\_\_\_\_\_\_\_\_\_\_\_\_\_\_\_\_\_\_\_\_\_\_\_\_\_\_\_\_\_\_\_\_\_\_\_\_\_\_\_\_\_\_\_\_\_\_\_\_\_\_\_\_\_\_\_
[](https://doc.uniq365.com/uploads/images/gallery/2025-02/1apimage.png)
##### **Steps on how to enter new transaction in Credit Note:**
1. Click on **Receivables – AR Operations – Debit Note (RD)** and the following screen will appear.
[](https://doc.uniq365.com/uploads/images/gallery/2025-02/GoKimage.png)
2. Click on Add button to create a new transaction.
[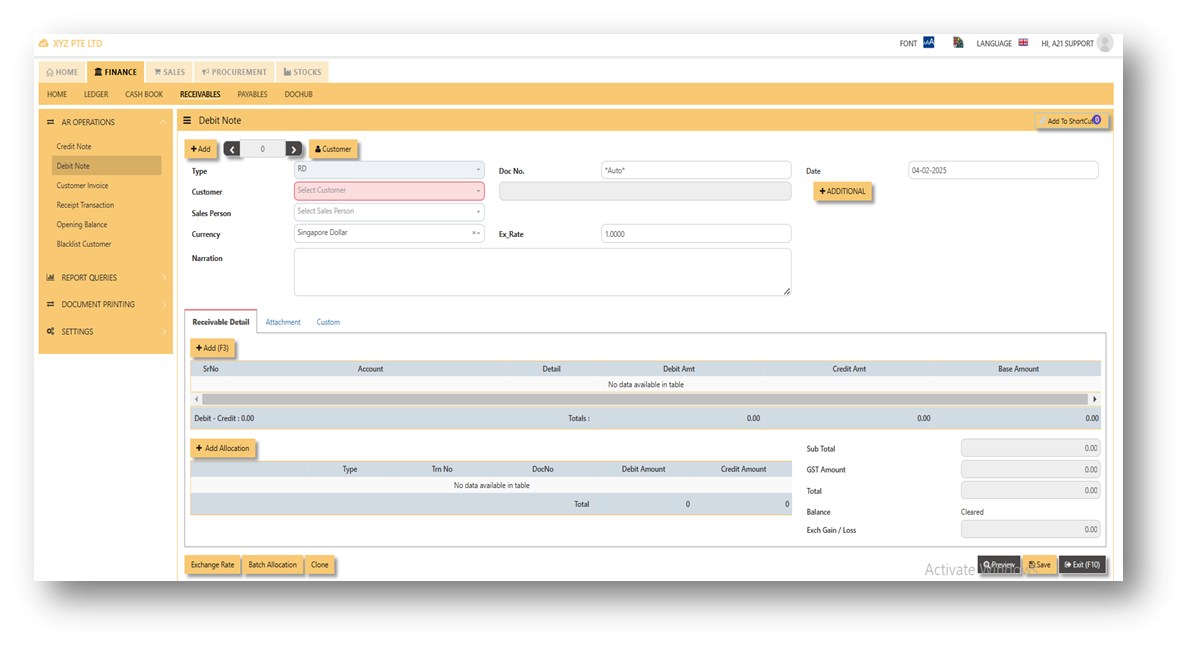](https://doc.uniq365.com/uploads/images/gallery/2025-02/mv2image.png)
- Fill up the fields in the header section such as **Ref No, Date, Supplier, Contact Person, Currency and Exchange Rate**.
- Then select the account concerned at the detail section.
- Click on **SAVE** button to complete the entry.
3\. Attached photo is a sample transaction of Debit Note (RD).
[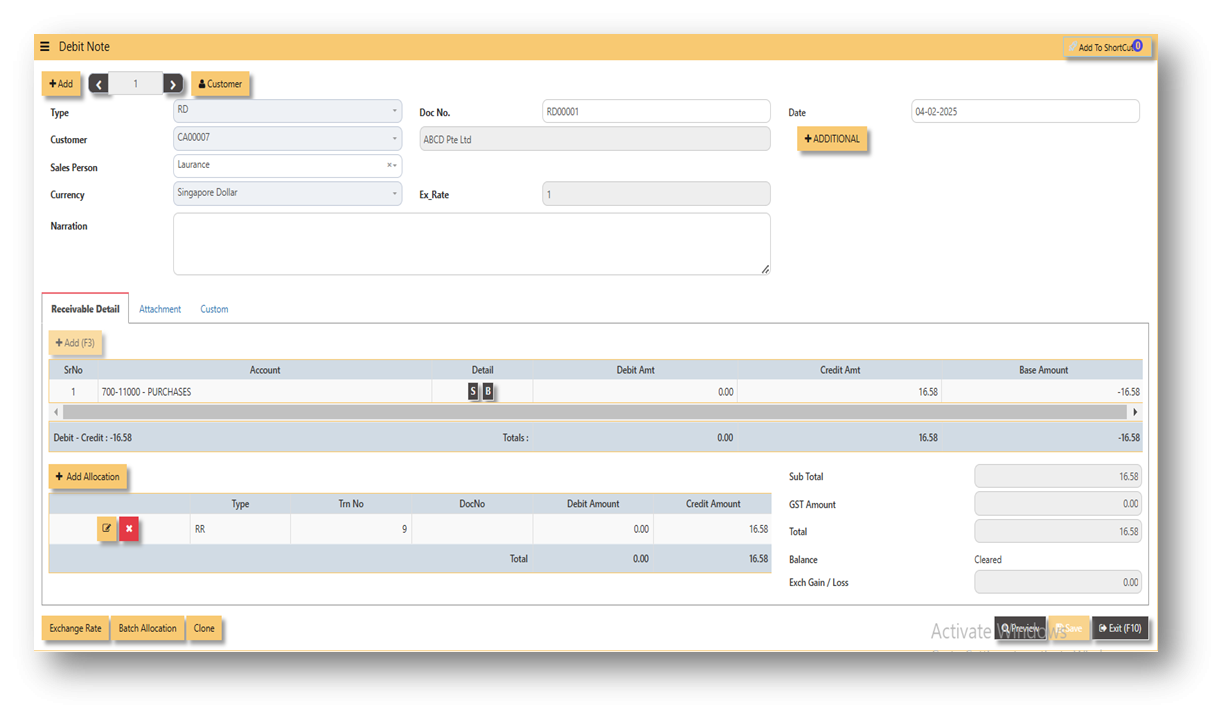](https://doc.uniq365.com/uploads/images/gallery/2025-02/9Vyimage.png)
\_\_\_\_\_\_\_\_\_\_\_\_\_\_\_\_\_\_\_\_\_\_\_\_\_\_\_\_\_\_\_\_\_\_\_\_\_\_\_\_\_\_\_\_\_\_\_\_\_\_\_\_\_\_\_\_\_\_\_\_\_\_\_\_\_\_\_\_\_\_\_\_\_\_\_\_\_\_\_\_\_\_\_\_\_\_\_\_\_\_\_\_\_\_\_\_\_\_\_\_\_\_\_\_\_\_\_\_\_\_\_\_\_\_\_\_\_\_\_\_\_\_\_\_\_\_\_\_\_\_\_\_\_\_
ADDITIONAL INFORMATION:
2.1 Batch Allocation
If user has a lot of transactions needed to allocate, they may use the batch allocation button to allocate more transactions in convenient way. Refer to attached photo on how batch allocation works.
[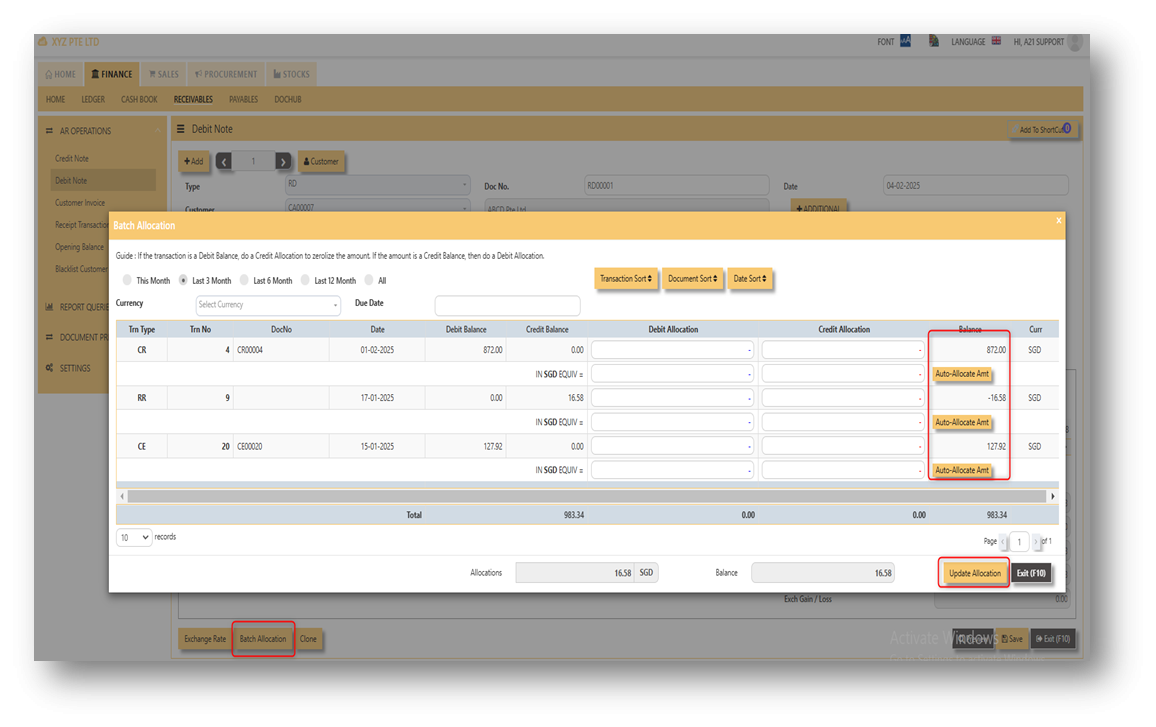](https://doc.uniq365.com/uploads/images/gallery/2025-02/vpZimage.png)
2.2 Clone
If user wanted to create new RD transaction with same details from previous transaction, user can click the button of "clone" in order to create new RD transaction with same details from previous transaction. In this way, no need to key-in manually all the details, hence will just choose which customer should it be clone.
[](https://doc.uniq365.com/uploads/images/gallery/2025-02/oT7image.png)
Attached photo is an example of transaction newly created from clone button.
[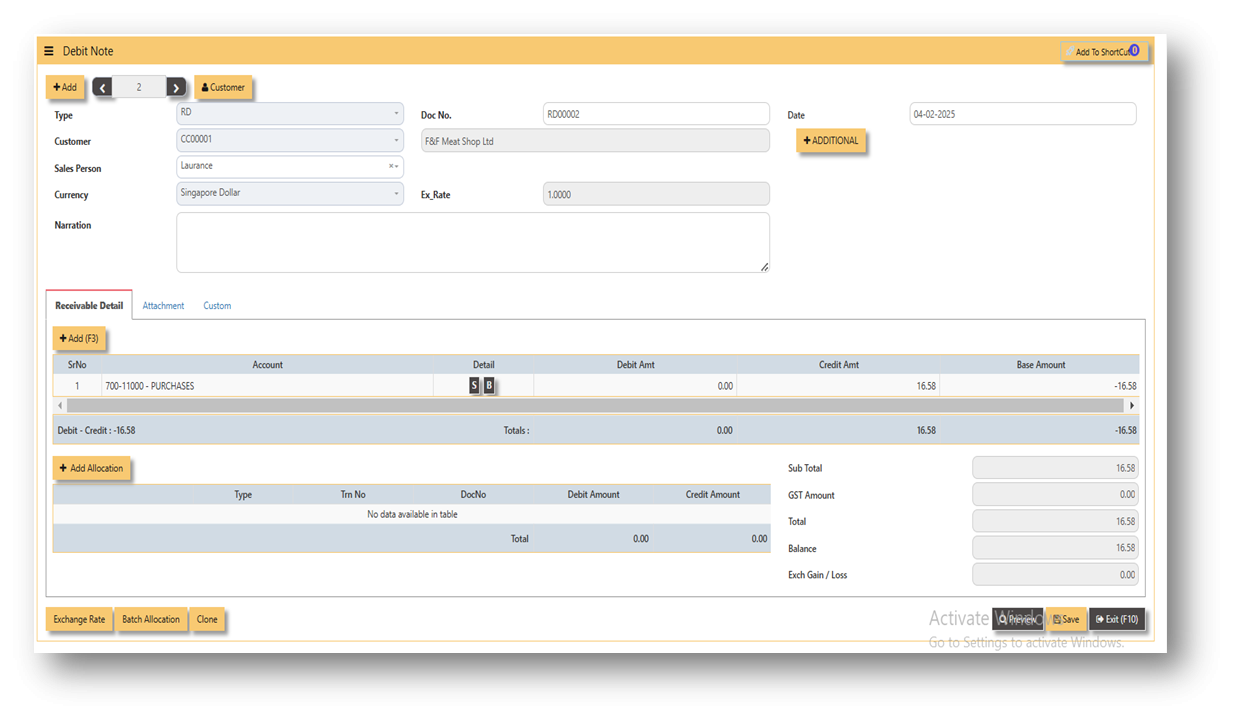](https://doc.uniq365.com/uploads/images/gallery/2025-02/ZsVimage.png)
2.3 Exchange Rate
It will redirect you to Finance Tab. Attached link for further information. [MASTERS GL | Support Doc](https://doc.uniq365.com/books/online-user-guide-10-1224/page/masters-gl)
[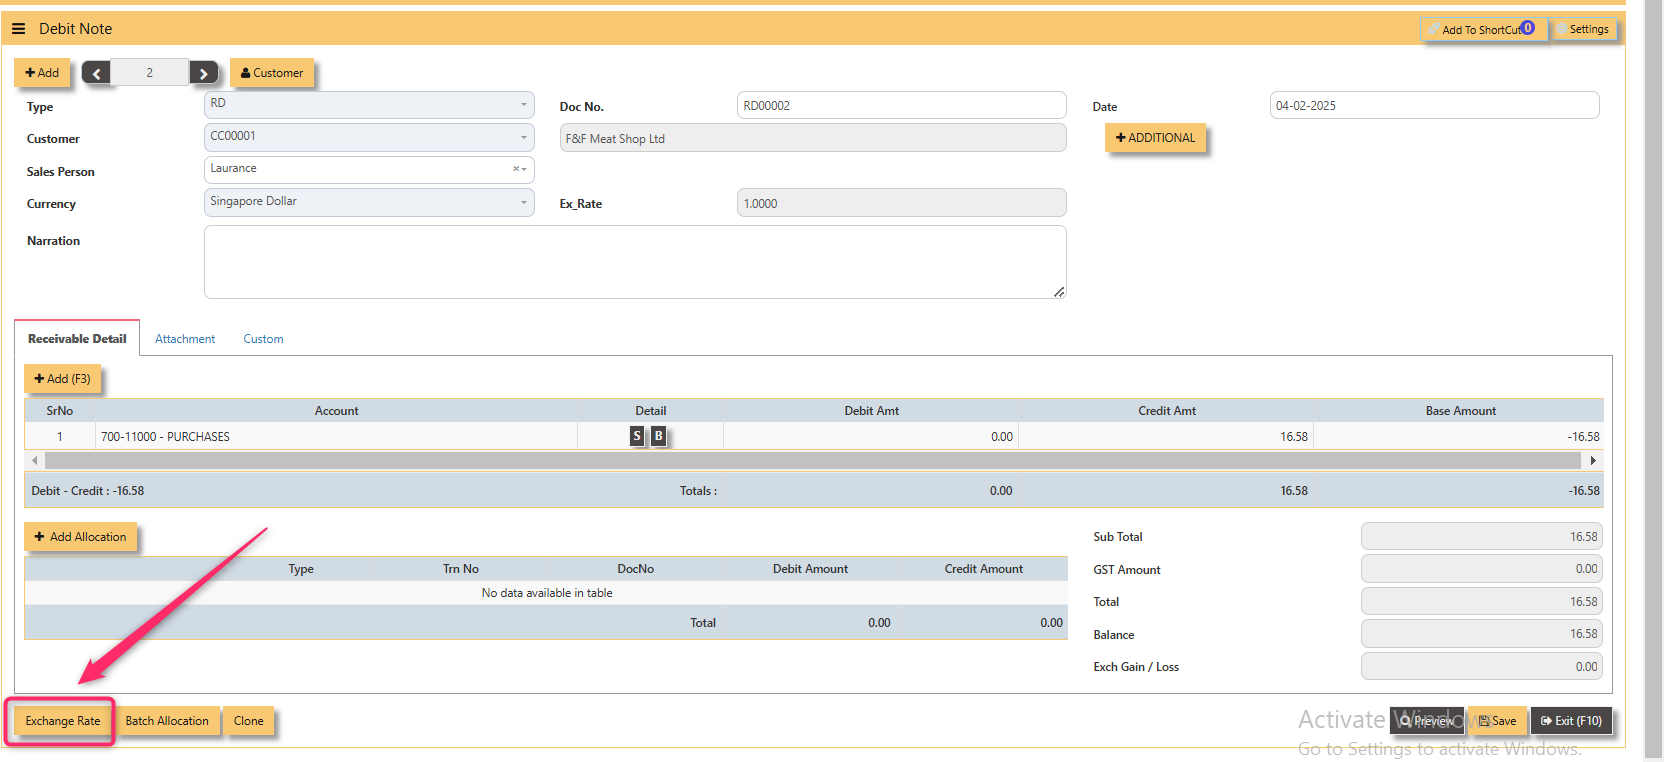](https://doc.uniq365.com/uploads/images/gallery/2025-02/pi6image.png)
2.4 Attachment
This function use to upload supporting documents related to your transaction. Kindly also note that system only allow this format (gif, jpg, jpeg, png, pdf, doc, docx, xls, xlsx, csv, msg, html and htm) file type and with max file size 25 mb.
[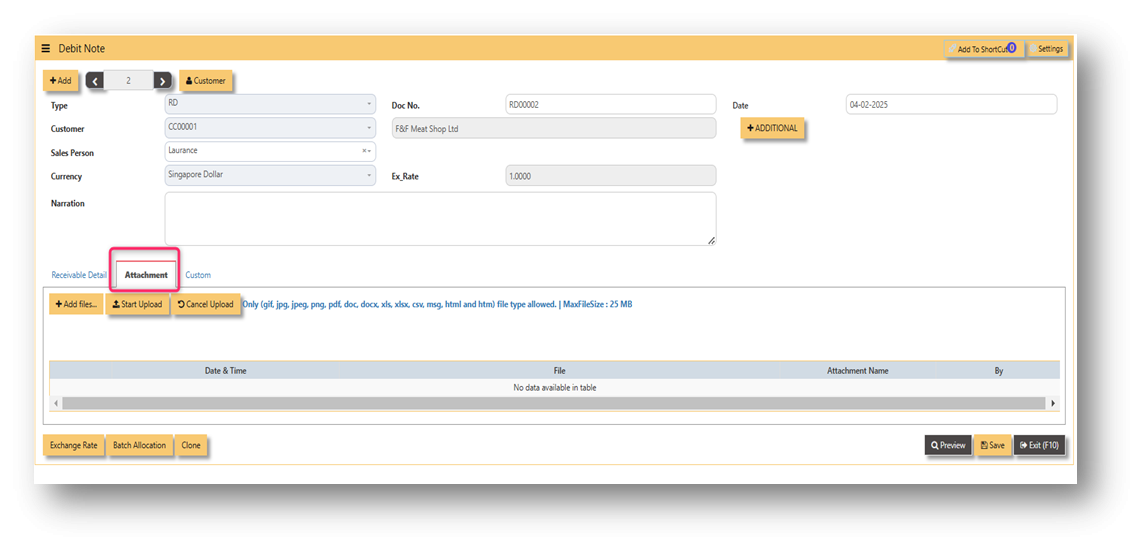](https://doc.uniq365.com/uploads/images/gallery/2025-02/5biimage.png)
3\. Report and Queries
For the double entries of the said RD transaction above, it can verify to check under AR transaction listing.
[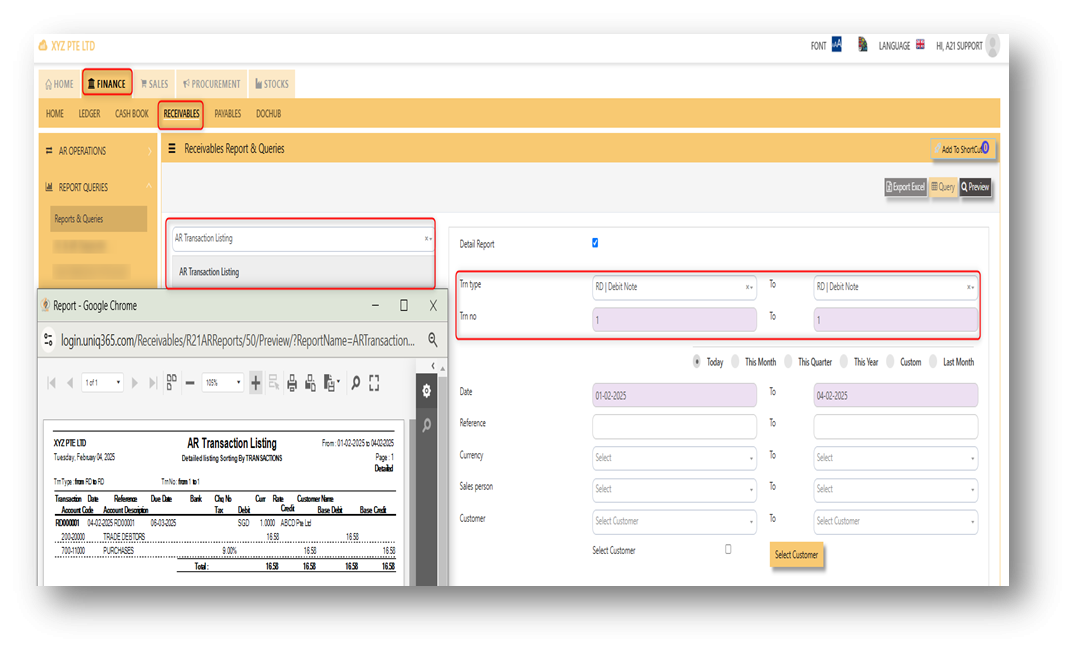](https://doc.uniq365.com/uploads/images/gallery/2025-02/MPbimage.png)
CUSTOMER INVOICE
##### **CUSTOMER INVOICE**
There may be times where there is a SALES of non-stock item. User may use Customer Invoice (RI) transaction to effect such a transaction. The customer invoice or RI can be found under receivable module. Please refer to attached photo where to find the customer invoice.
\_\_\_\_\_\_\_\_\_\_\_\_\_\_\_\_\_\_\_\_\_\_\_\_\_\_\_\_\_\_\_\_\_\_\_\_\_\_\_\_\_\_\_\_\_\_\_\_\_\_\_\_\_\_\_\_\_\_\_\_\_\_\_\_\_\_\_\_\_\_\_\_\_\_\_\_\_\_\_\_\_\_\_\_\_\_\_\_\_\_\_\_\_\_\_\_\_\_\_\_\_\_\_\_\_\_\_\_\_\_\_\_\_\_\_\_\_\_\_\_\_\_\_\_\_\_\_\_\_\_\_\_\_\_
[](https://doc.uniq365.com/uploads/images/gallery/2025-02/NqVimage.png)
##### **Steps on how to enter new transaction in Credit Note:**
1. Click on **Receivables – AR Operations – Customer Invoice (RI)** and the following screen will appear.
[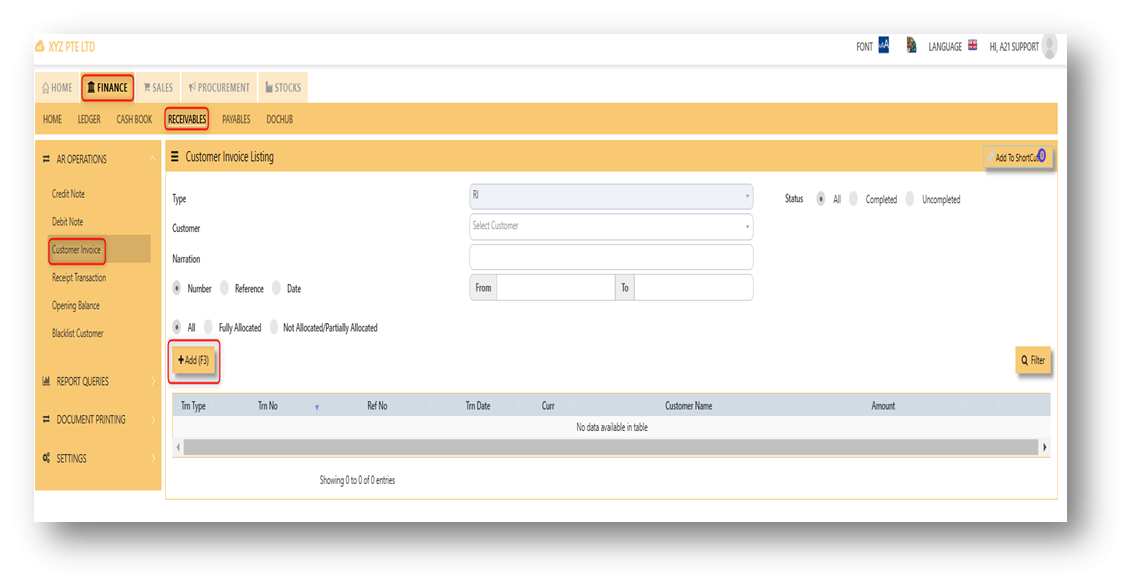](https://doc.uniq365.com/uploads/images/gallery/2025-02/sKQimage.png)
2\. Click on Add button to create a new transaction.
[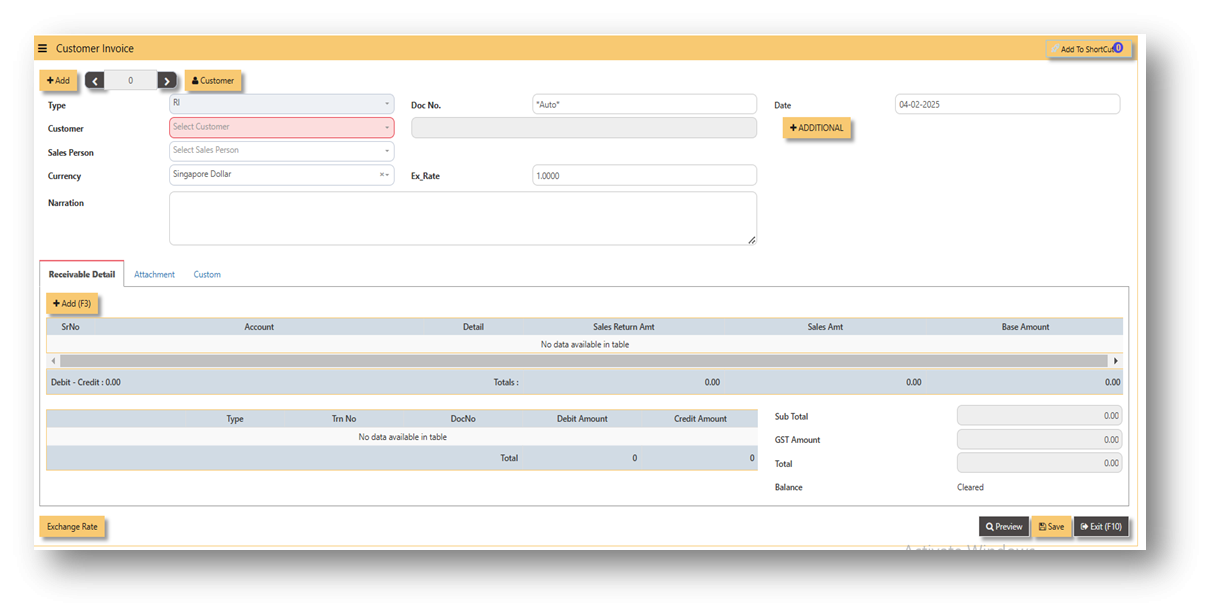](https://doc.uniq365.com/uploads/images/gallery/2025-02/OR3image.png)
- Fill up the fields in the header section such as **Ref No, Date, Supplier, Contact Person, Currency and Exchange Rate**.
- Then select the account concerned at the detail section.
- Click on **SAVE** button to complete the entry.
3\. Attached photo is a sample transaction of Customer Invoice (RI).
[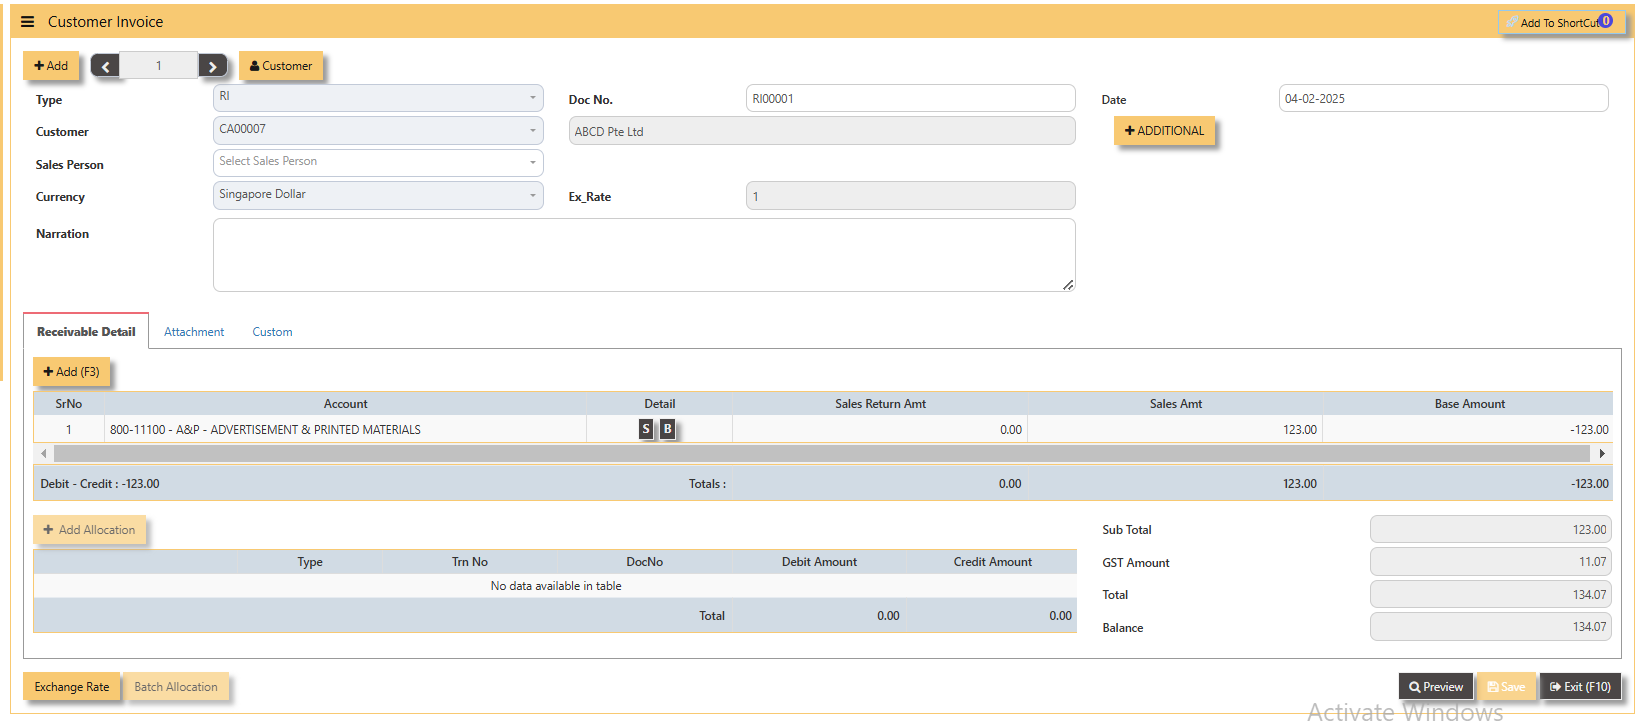](https://doc.uniq365.com/uploads/images/gallery/2025-02/iGNimage.png)
4\. Report and Queries
For the double entries of the said RI transaction above, it can verify to check under AR transaction listing.
[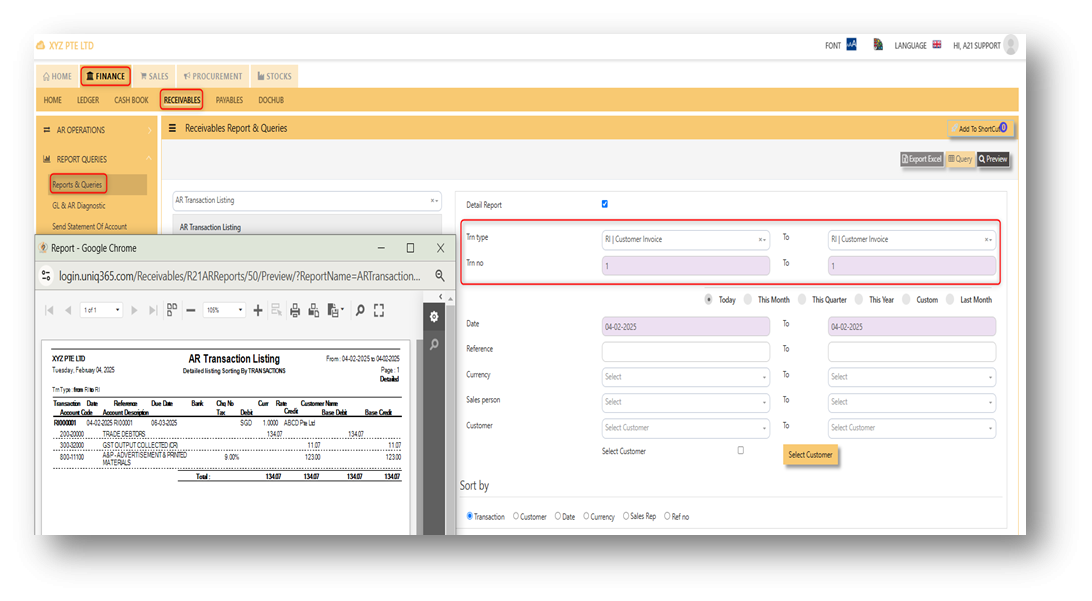](https://doc.uniq365.com/uploads/images/gallery/2025-02/EIeimage.png)
RECEIPT TRANSACTION
##### **Receipt Transaction**
A receipt transaction menu is where you can record of a payment received from a customer. In UNIQ 365, the receipt transaction can be found in receivable module.
[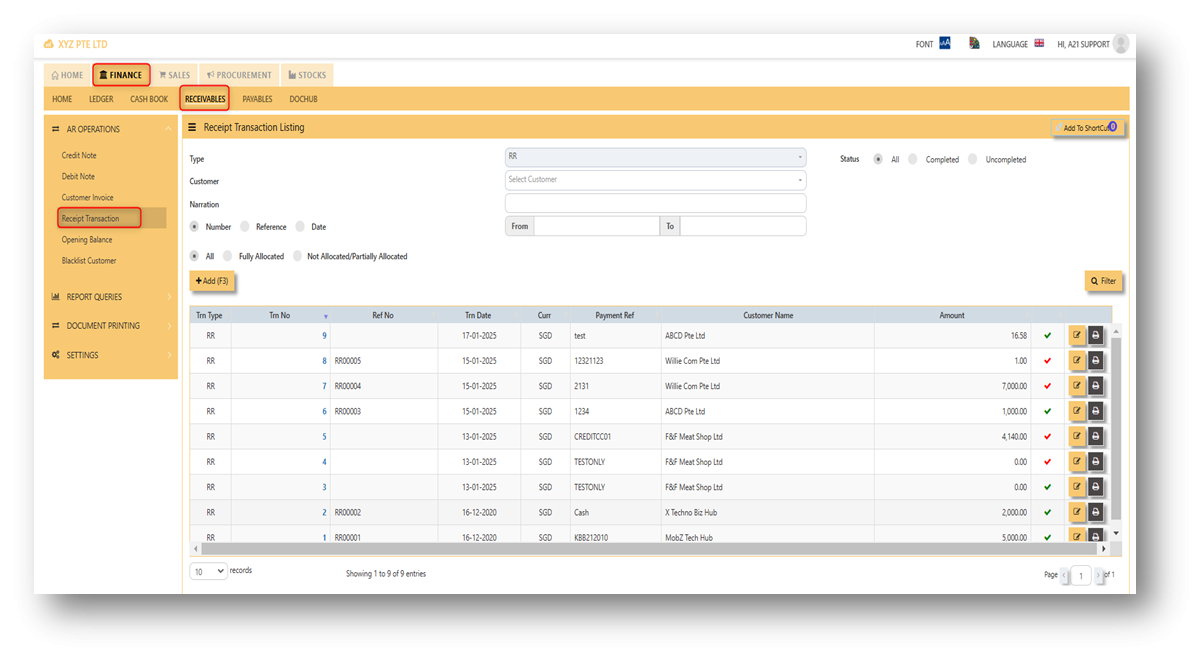](https://doc.uniq365.com/uploads/images/gallery/2025-02/wVUimage.png)
\_\_\_\_\_\_\_\_\_\_\_\_\_\_\_\_\_\_\_\_\_\_\_\_\_\_\_\_\_\_\_\_\_\_\_\_\_\_\_\_\_\_\_\_\_\_\_\_\_\_\_\_\_\_\_\_\_\_\_\_\_\_\_\_\_\_\_\_\_\_\_\_\_\_\_\_\_\_\_\_\_\_\_\_\_\_\_\_\_\_\_\_\_\_\_\_\_\_\_\_\_\_\_\_\_\_\_\_\_\_\_\_\_\_\_\_\_\_\_\_\_\_\_\_\_\_\_\_\_\_\_\_\_\_
##### **Steps on how to enter new transaction in Receipt Transaction:**
1. Click on Receivables – AR Operations – Receipt Transaction (RI) and the following screen will appear.
[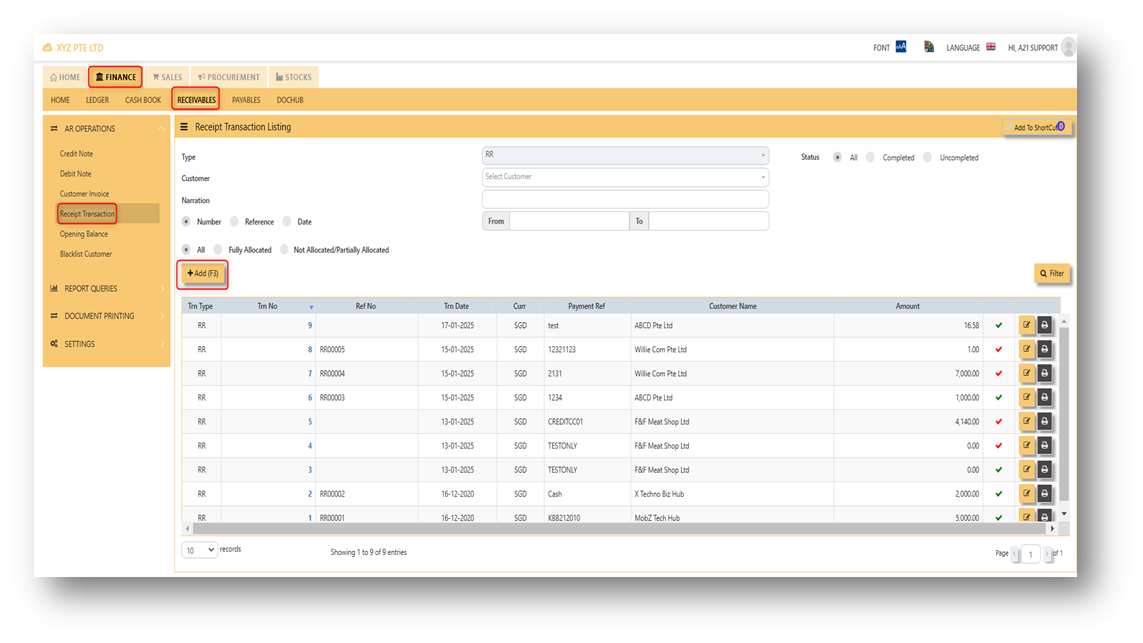](https://doc.uniq365.com/uploads/images/gallery/2025-02/nz8image.png)
2. Click on Add button to create a new transaction.
[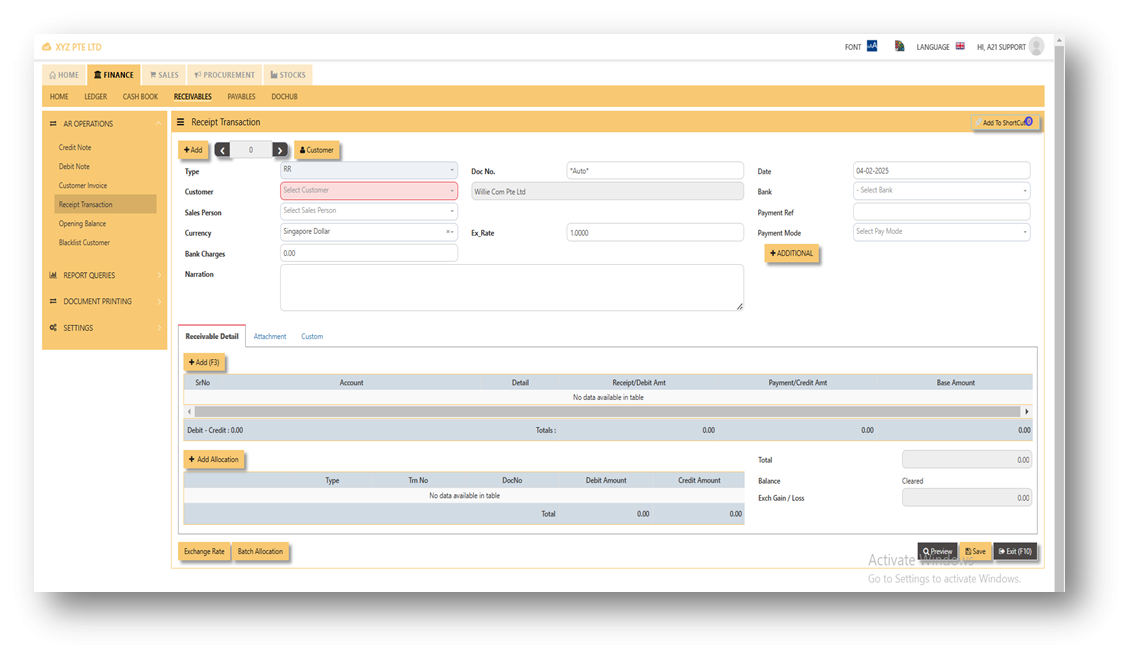](https://doc.uniq365.com/uploads/images/gallery/2025-02/Phmimage.png)
- Fill up the fields in the header section such as **Ref No, Date, Supplier, Contact Person, Currency, Payment Ref, Payment mode and Exchange Rate.**
- Fill up the Select a bank code and click on detail line, The system will automatically populate the detail line with account code that is being set to the cash bank.
- Then select the account concerned at the detail section.
- Click on **SAVE** button to complete the entry.
Attached is an example of new receipt transaction.
[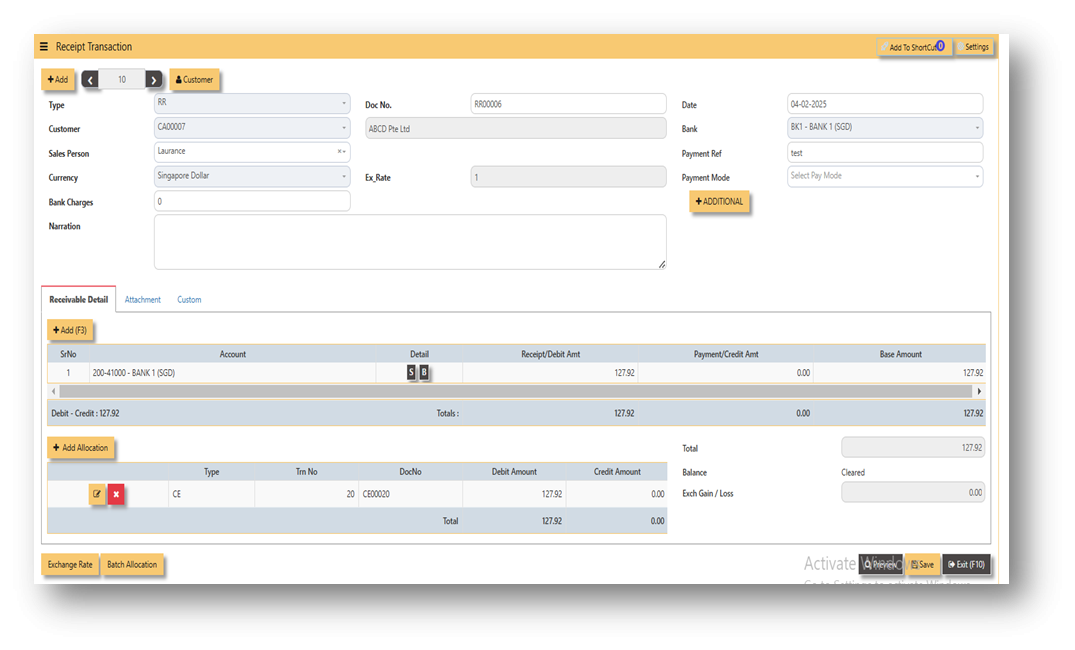](https://doc.uniq365.com/uploads/images/gallery/2025-02/rSJimage.png)
**ADDITIONAL INFORMATION:**
2.1 Batch Allocation
If user has a lot of transactions needed to allocate, they may use the batch allocation button to allocate more transactions in convenient way. Refer to attached photo on how batch allocation works.
[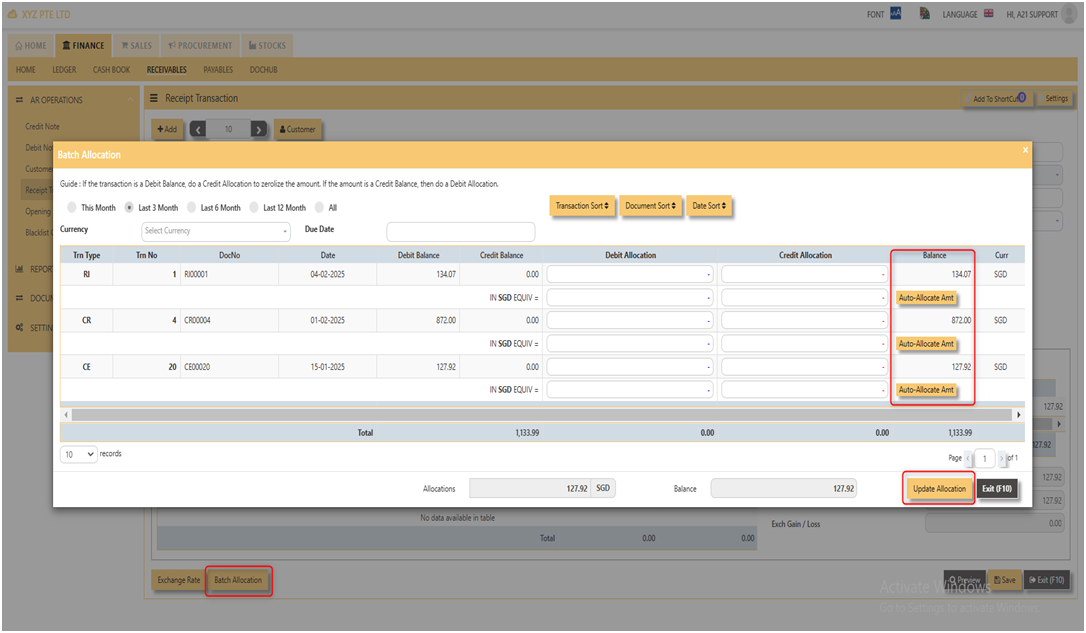](https://doc.uniq365.com/uploads/images/gallery/2025-02/0ylimage.png)
2.3 Exchange Rate
It will redirect you to Finance Tab. Attached link for further information. [MASTERS GL | Support Doc](https://doc.uniq365.com/books/online-user-guide-10-1224/page/masters-gl)
[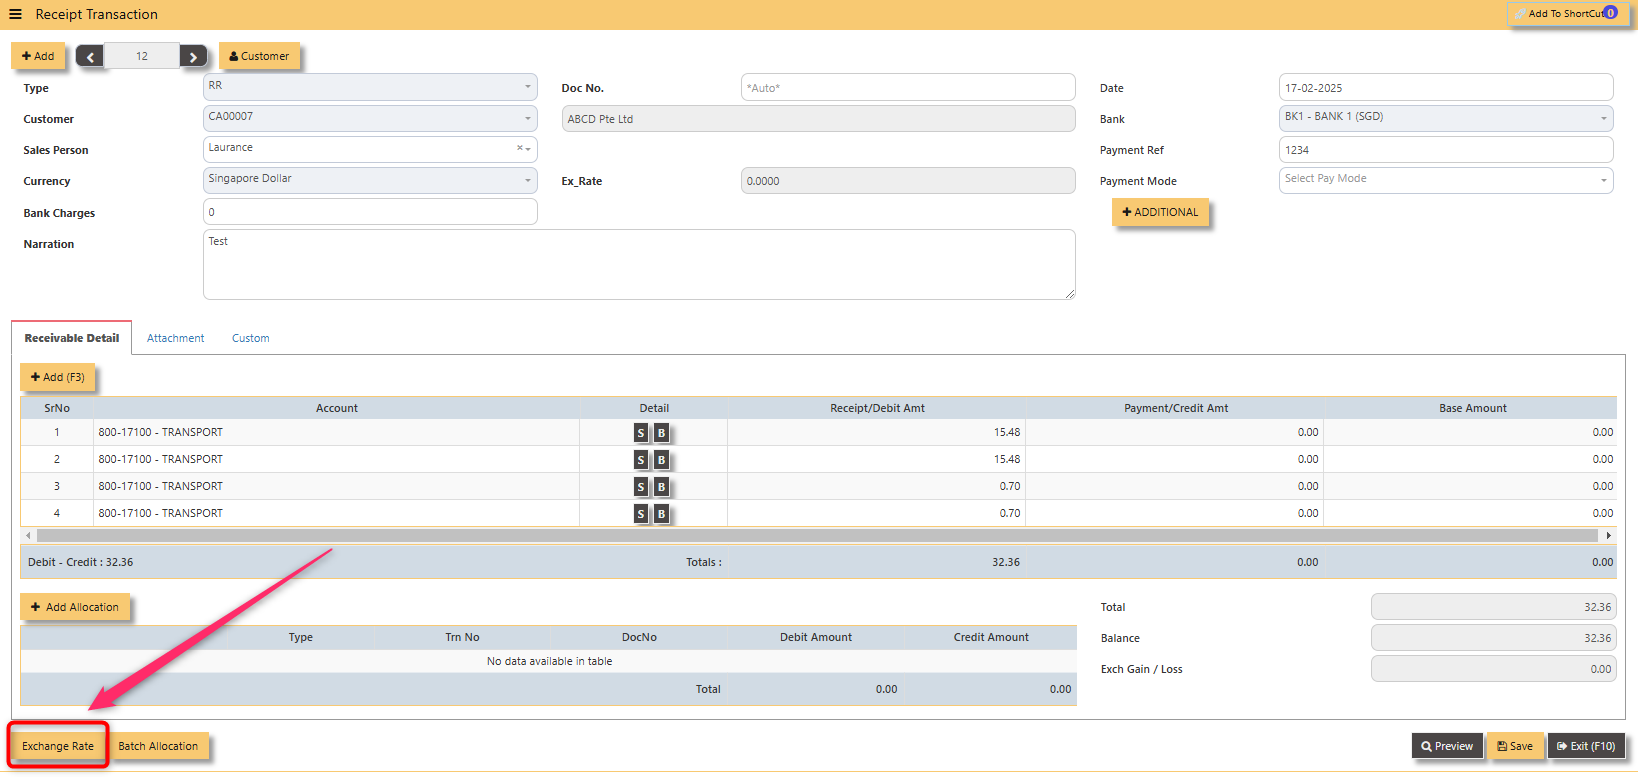](https://doc.uniq365.com/uploads/images/gallery/2025-02/PQPimage.png)
2.4 Attachment
This function use to upload supporting documents related to your transaction. Kindly also note that system only allow this format (gif, jpg, jpeg, png, pdf, doc, docx, xls, xlsx, csv, msg, html and htm) file type and with max file size 25 mb.
[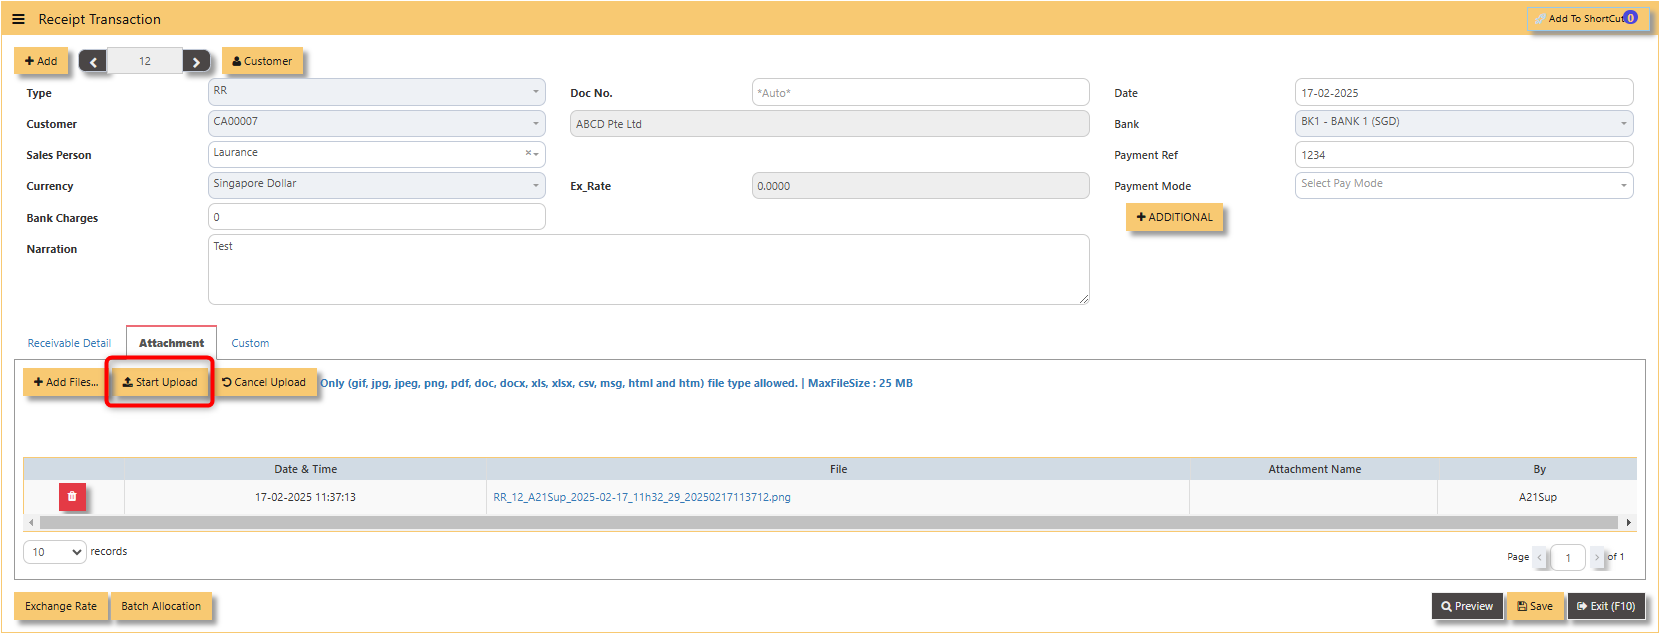](https://doc.uniq365.com/uploads/images/gallery/2025-02/qO1image.png)
3\. Report and Queries
For the double entries of the said RI transaction above, it can verify to check under AR transaction listing.
[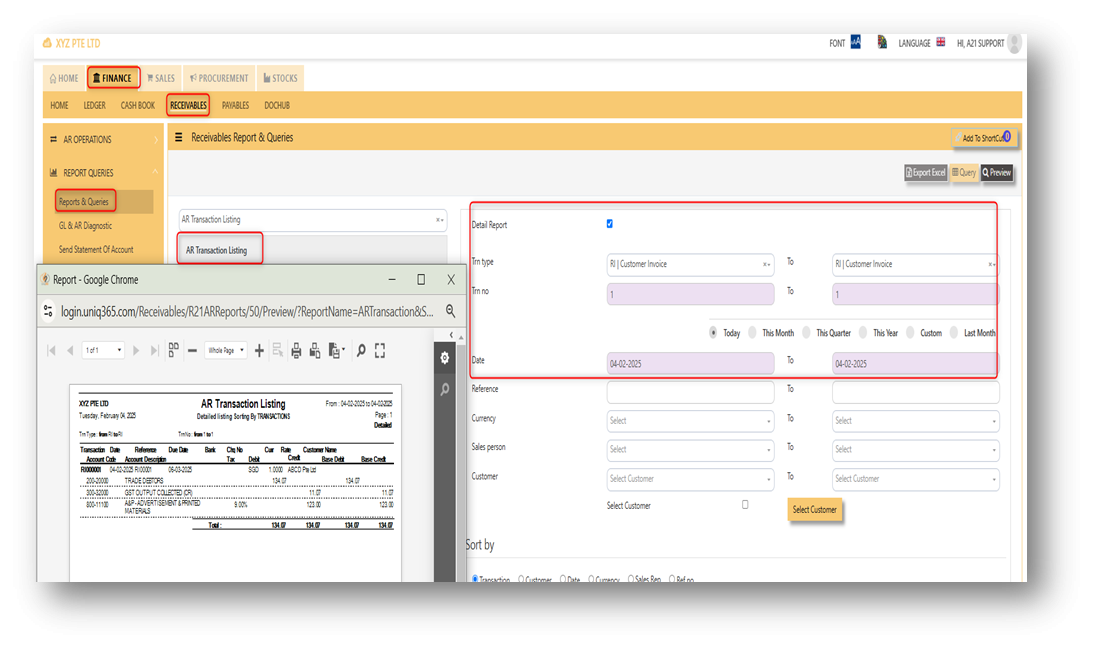](https://doc.uniq365.com/uploads/images/gallery/2025-02/elWimage.png)
OPENING BALANCE
To start on a new database, AR Opening Balances must be updated in order for user to trace all the customer outstanding invoices at the start of the 1st financial year.
**Important: The total amount entered under AR Open Item must tie with the opening amount in the General Ledger Opening for Trade Debtor Control Account/(s) if the Posting Type selected in Receivable Control Account is customer.**
You may use the report under **Receivables – Reports & Queries – AR Open Item Listings** for reference to check your figures.
[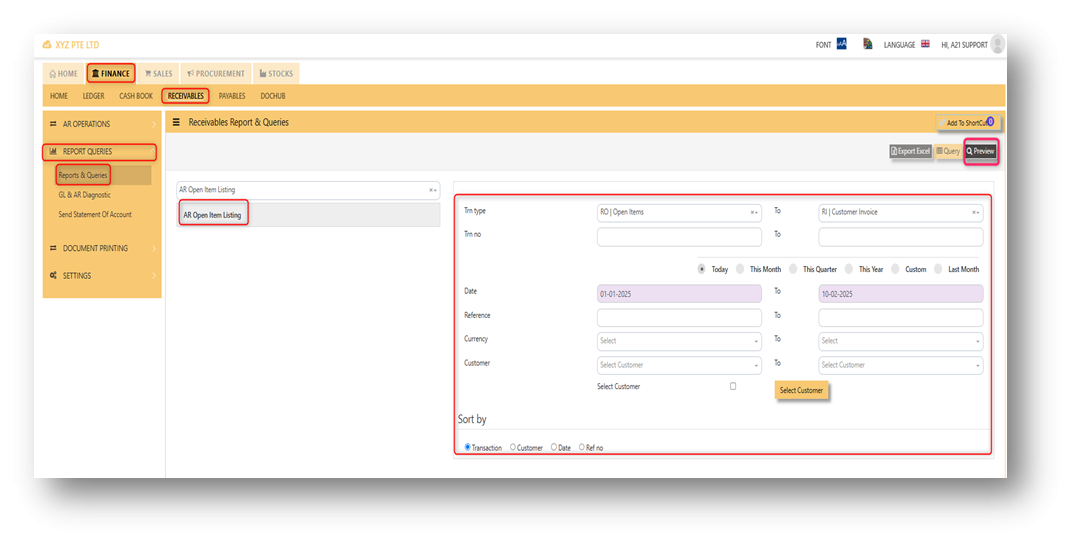](https://doc.uniq365.com/uploads/images/gallery/2025-02/G8Kimage.png)
\_\_\_\_\_\_\_\_\_\_\_\_\_\_\_\_\_\_\_\_\_\_\_\_\_\_\_\_\_\_\_\_\_\_\_\_\_\_\_\_\_\_\_\_\_\_\_\_\_\_\_\_\_\_\_\_\_\_\_\_\_\_\_\_\_\_\_\_\_\_\_\_\_\_\_\_\_\_\_\_\_\_\_\_\_\_\_\_\_\_\_\_\_\_\_\_\_\_\_\_\_\_\_\_\_\_\_\_\_\_\_\_\_\_\_\_\_\_\_\_\_\_\_\_\_\_\_\_\_\_\_\_\_\_
Below is the Account Receivable – Opening Items screen. There is **NO** double entry posting for this option. The records entered will be retained for current year usage like allocations, verification of outstanding invoices etc.
1\. Click on **Receivables – AR Operations – Opening Balance** and the following screen will appear.
[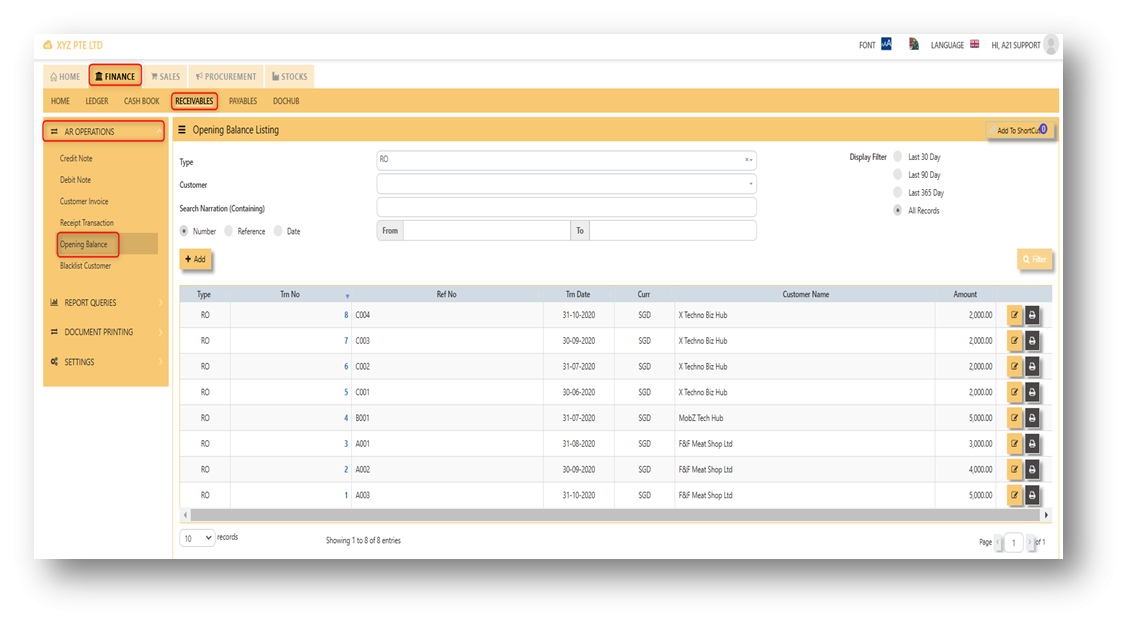](https://doc.uniq365.com/uploads/images/gallery/2025-02/WRZimage.png)
2\. Click on **Add** button for new transaction
[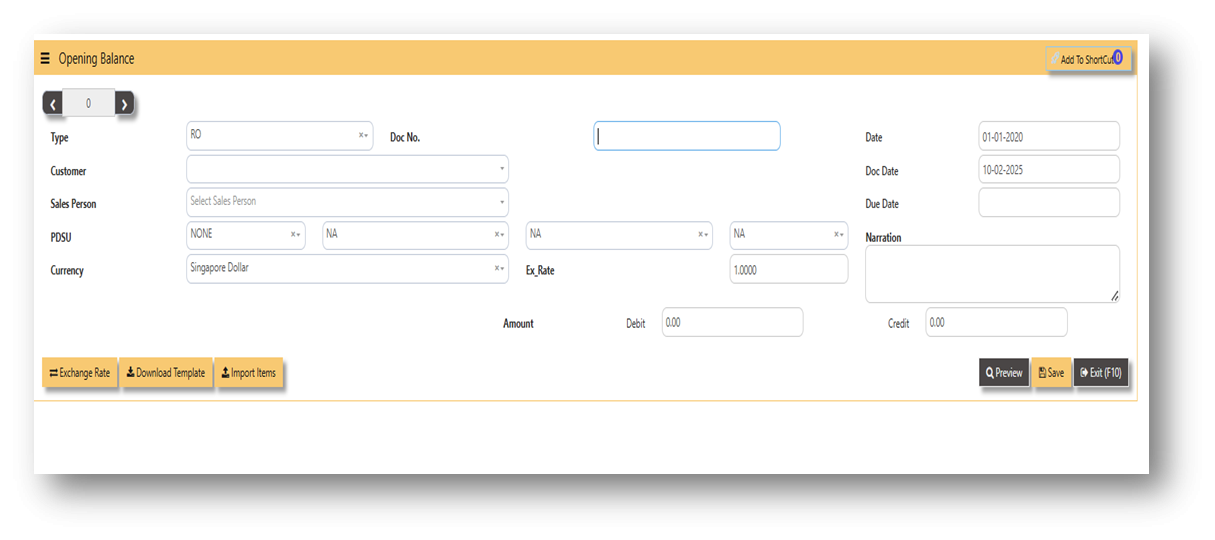](https://doc.uniq365.com/uploads/images/gallery/2025-02/TX3image.png)
- Fill up the fields such as **Ref No, Date, Dock Date, Due Date, Customer, Buyer, PDSU, Currency, Exchange Rate, Narration, and amount.**
[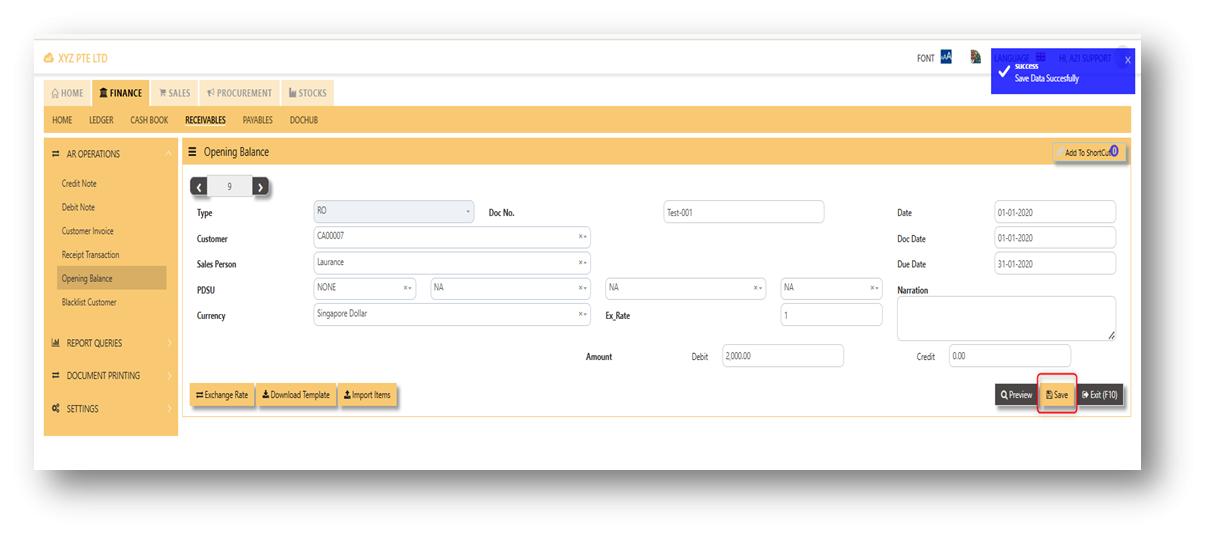](https://doc.uniq365.com/uploads/images/gallery/2025-02/XpLimage.png)
\_\_\_\_\_\_\_\_\_\_\_\_\_\_\_\_\_\_\_\_\_\_\_\_\_\_\_\_\_\_\_\_\_\_\_\_\_\_\_\_\_\_\_\_\_\_\_\_\_\_\_\_\_\_\_\_\_\_\_\_\_\_\_\_\_\_\_\_\_\_\_\_\_\_\_\_\_\_\_\_\_\_\_\_\_\_\_\_\_\_\_\_\_\_\_\_\_\_\_\_\_\_\_\_\_\_\_\_\_\_\_\_\_\_\_\_\_\_\_\_\_\_\_\_\_\_\_\_\_\_\_\_\_\_
**Additional Information:**
- **Ex Rate** It will redirect you to Finance Tab. Attached link for further information. [MASTERS GL | Support Doc](https://doc.uniq365.com/books/online-user-guide-10-1224/page/masters-gl)
[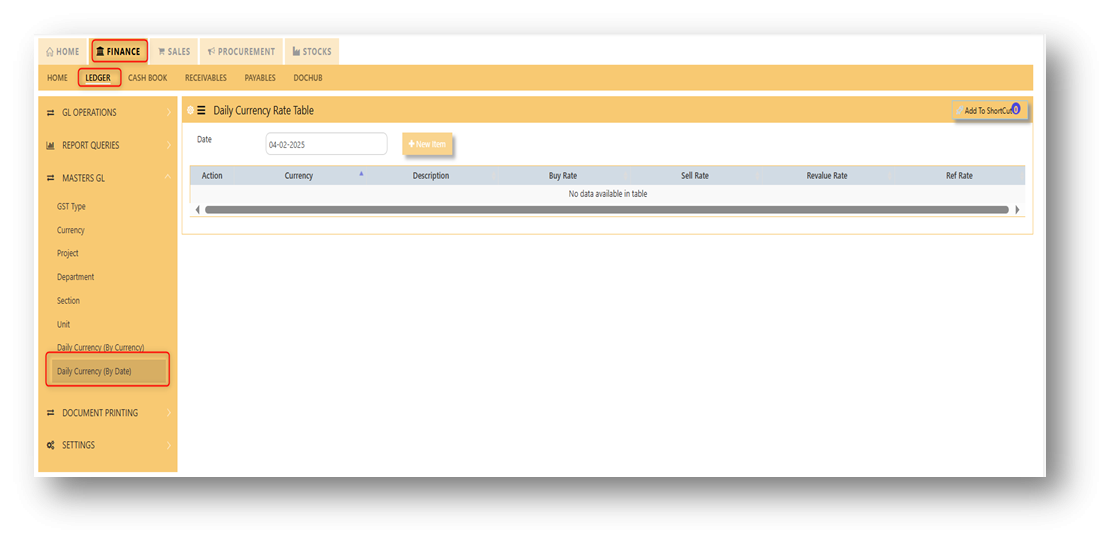](https://doc.uniq365.com/uploads/images/gallery/2025-02/176image.png)
- **Download Template** Once you click for the Download Template , it will auto download the Excel File.
[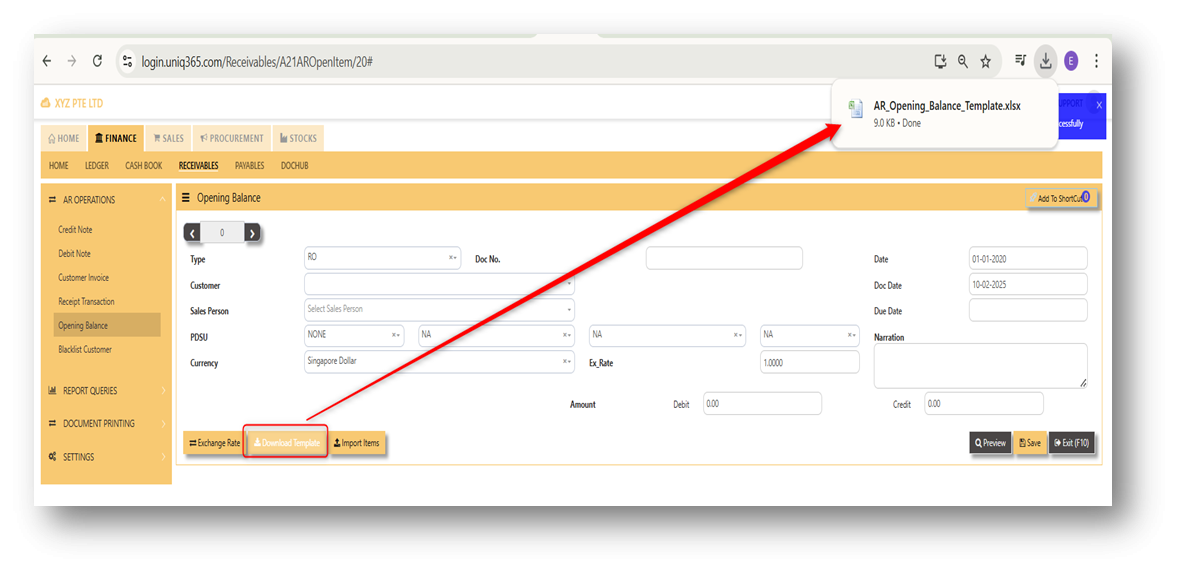](https://doc.uniq365.com/uploads/images/gallery/2025-02/JUAimage.png)
Ensure the Excel file you plan to upload is formatted correctly. It should contain all the necessary fields required such as:
- Customer Code
- Inv Date
- Inv Number
- Doc Date
- Due Date
- Sales Person
- Narration
- Project
- Department
- Section
- Unit
- Currency
- Exchange Rate
- Debit Amount
- Credit Amount
[](https://doc.uniq365.com/uploads/images/gallery/2025-02/suximage.png)
- **Import Items** This open a file browser or prompt you to select the Excel file you want to upload.
[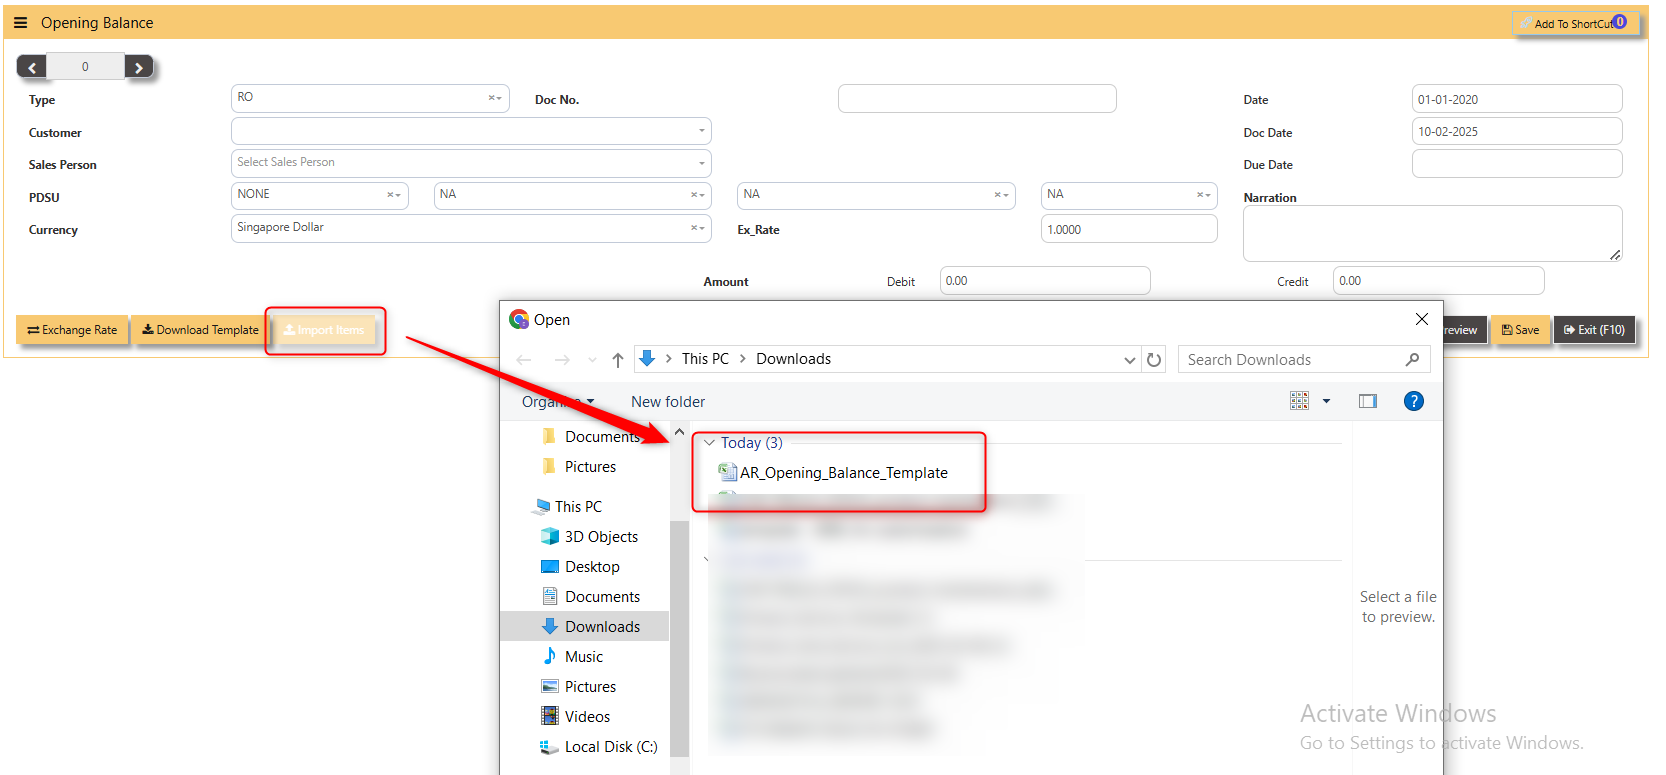](https://doc.uniq365.com/uploads/images/gallery/2025-02/wzZimage.png)
BLACKLIST CUSTOMER
This option enables user to blacklist customers and suppliers. Once a customer is black-listed, user will be blocked from entering any receivable transactions for the customer concerned.
\_\_\_\_\_\_\_\_\_\_\_\_\_\_\_\_\_\_\_\_\_\_\_\_\_\_\_\_\_\_\_\_\_\_\_\_\_\_\_\_\_\_\_\_\_\_\_\_\_\_\_\_\_\_\_\_\_\_\_\_\_\_\_\_\_\_\_\_\_\_\_\_\_\_\_\_\_\_\_\_\_\_\_\_\_\_\_\_\_\_\_\_\_\_\_\_\_\_\_\_\_\_\_\_\_\_\_\_\_\_\_\_\_\_\_\_\_\_\_\_\_\_\_\_\_\_\_\_\_\_\_\_\_\_
**How to enter Blacklist Customer?**
Steps to enter Blacklist Customer are as follow:
1. Click on **Receivables – AR Operations – Blacklist** customer for the entry screen.
[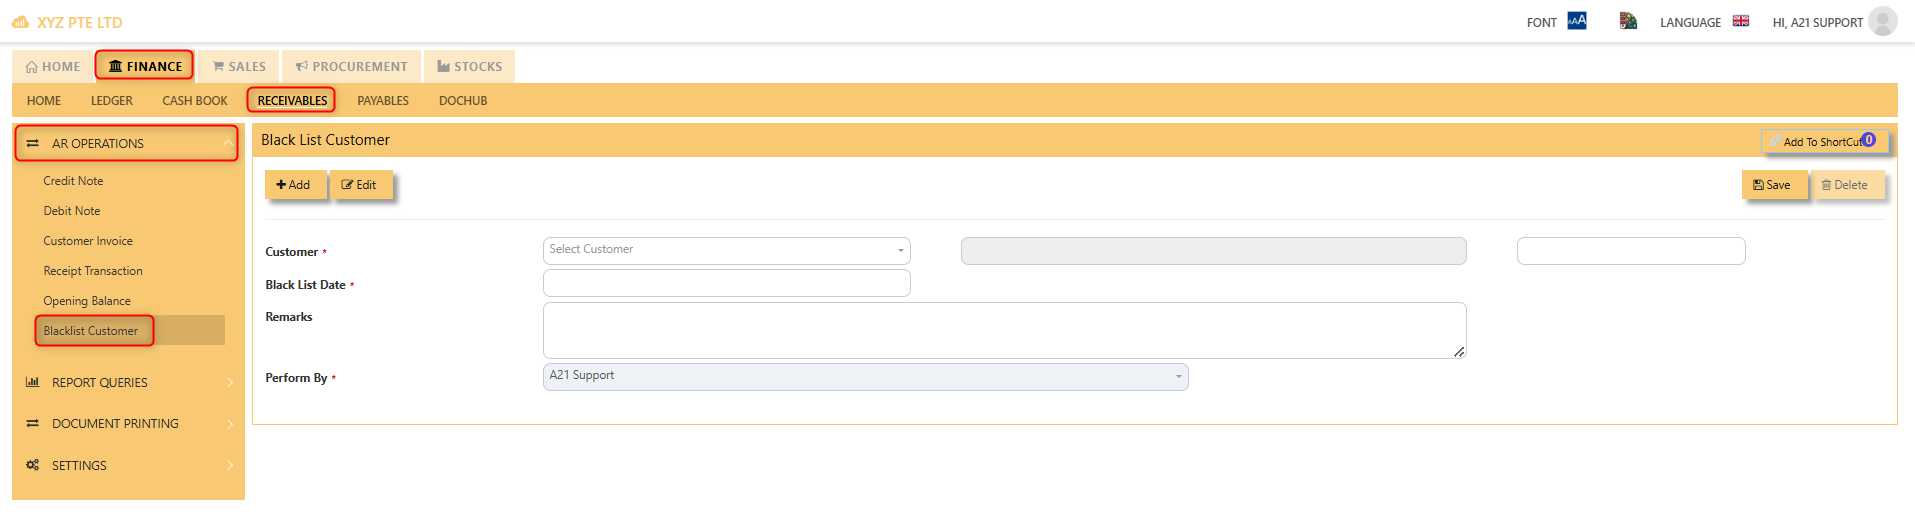](https://doc.uniq365.com/uploads/images/gallery/2025-02/ODEimage.png)
2\. Click on **Add button**. Select the customer from the drop-down list, enter the Blacklist date, key in the Remarks.
Screen below is an example of the entry.
[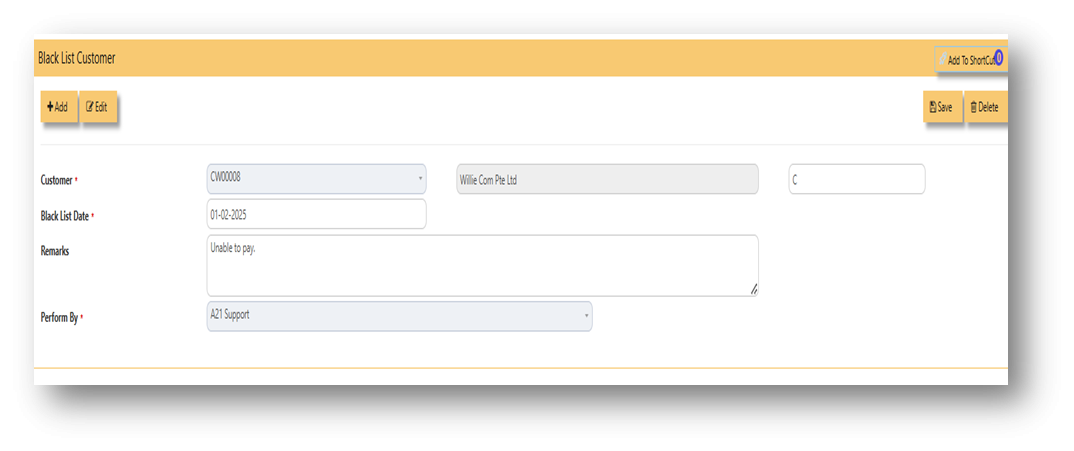](https://doc.uniq365.com/uploads/images/gallery/2025-02/9qfimage.png)
- To delete a customer from the blacklist record, user must click on edit button, select the customer concerned, and then click on delete button to clear the record.
- User may print the report of all the Blacklisted Customers for reference via **Receivables – Reports & Queries – Blacklisted Customer Listing.**
REPORT QUERIES
In report and queries menu you can generate a reports related to receivable transactions. Mainly use reports are AR transaction Listing, AR statement of account, AR aging analysis, customer ledger, AR outstanding and many more. The report and queries menu can be found in receivables > report and queries > report and queries.
[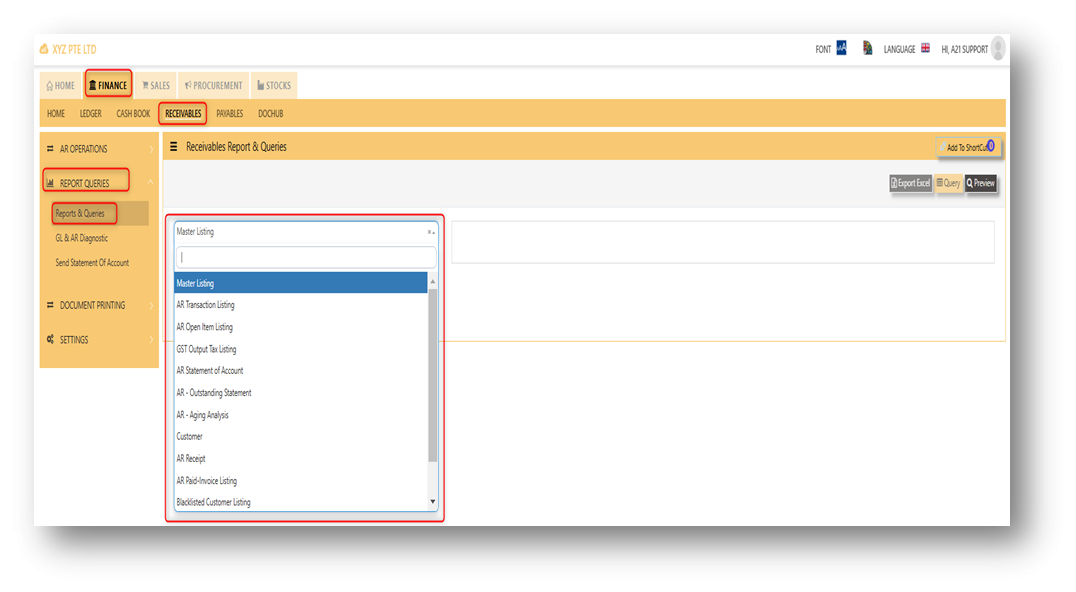](https://doc.uniq365.com/uploads/images/gallery/2025-02/Cgdimage.png)
Example on how to generate a report.
1\. Select a report you wanted to generate.
2\. Fill up necessary field, in order to capture the filtering of report correctly.
3\. Click ''preview'' button to generate the report.
[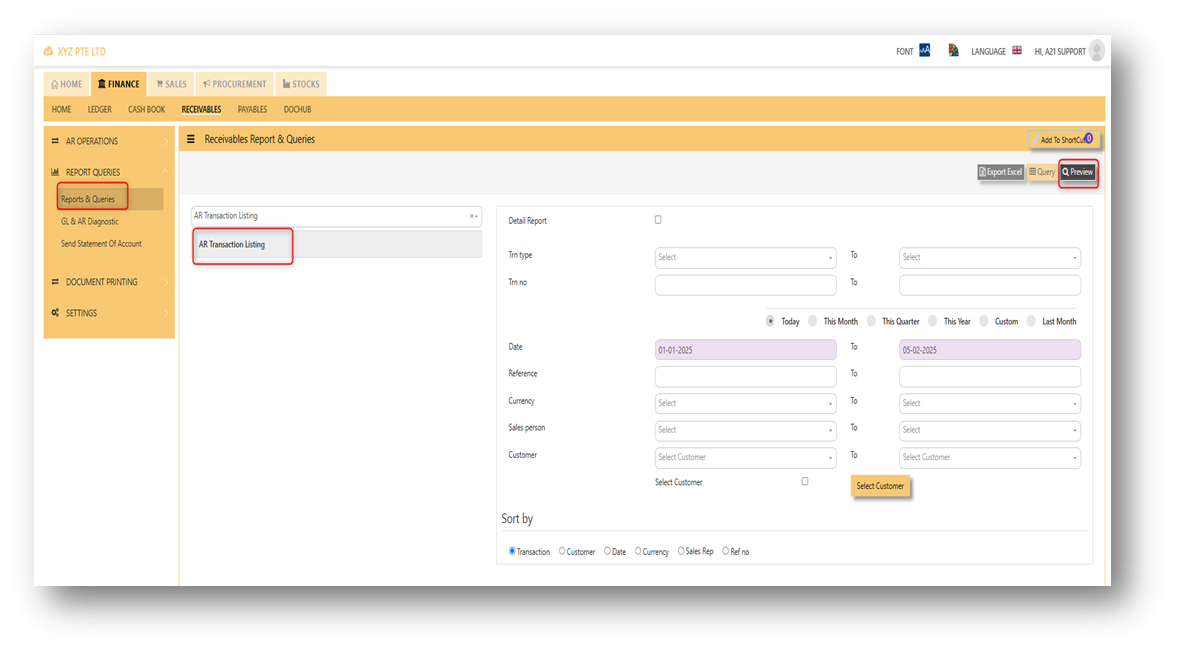](https://doc.uniq365.com/uploads/images/gallery/2025-02/p2uimage.png)
4\. Also, there is an option to download the report in pdf, xlsx, csv, and etc. Please refer to attached photo on how to download on it.
[](https://doc.uniq365.com/uploads/images/gallery/2025-02/nMDimage.png)
GL AND AR DIAGNOSTICS
The GL and AR Diagnostic menu can be used to find transactions that are causing of unbalance from AR vs. GL. This menu can be found in receivables > report and queries > GL and AR diagnostics.
[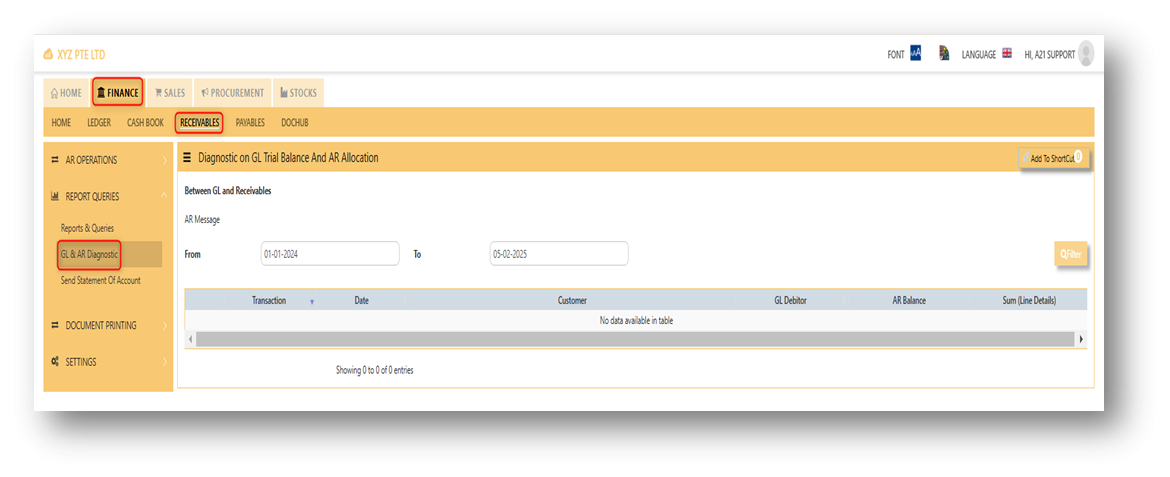](https://doc.uniq365.com/uploads/images/gallery/2025-02/JiRimage.png)
In order to generate if there is any transactions in the diagnostics, user must fill up the fields of from date and to date correctly, and after filling it up, need to click the filter button.
[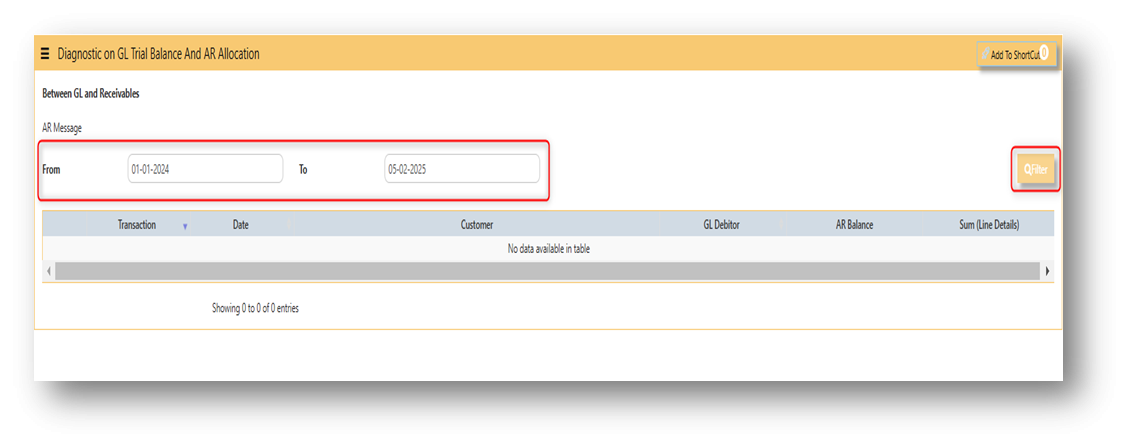](https://doc.uniq365.com/uploads/images/gallery/2025-02/wWsimage.png)
*NOTE: If in case the transactions were not able to clear automatically, Please contact customer care support.*
SEND STATEMENT OF ACCOUNT
In Uniq365, The ''send statement of account'' menu is used to send statement of account in your specific customers. This menu can be found in receivables > report and queries > send statement of account.
[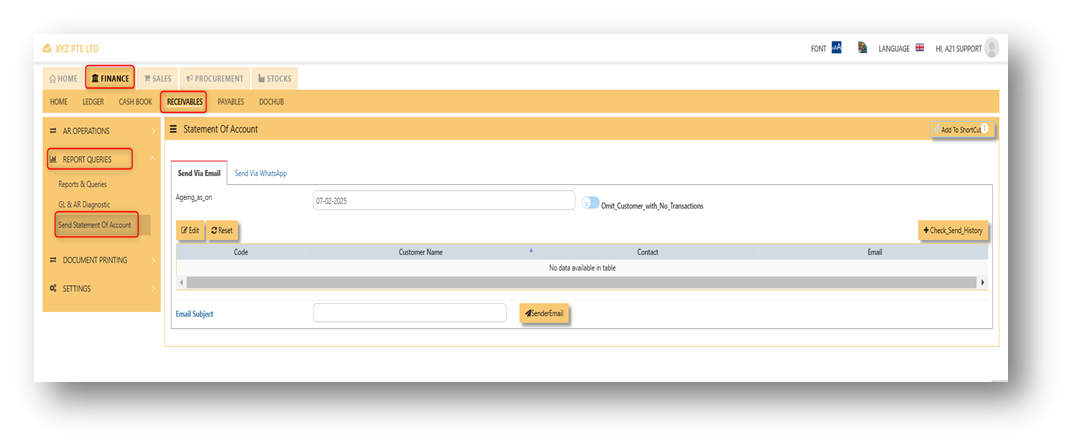](https://doc.uniq365.com/uploads/images/gallery/2025-02/aNqimage.png)
**STEPS ON HOW TO SEND A STATEMENT OF ACCOUNT:
Note: Before you can able to send a SOA to a customer, the user must set up first email setting. Email setting can be found in system admin - company - email setting. The email set up usually done during implementation.**
[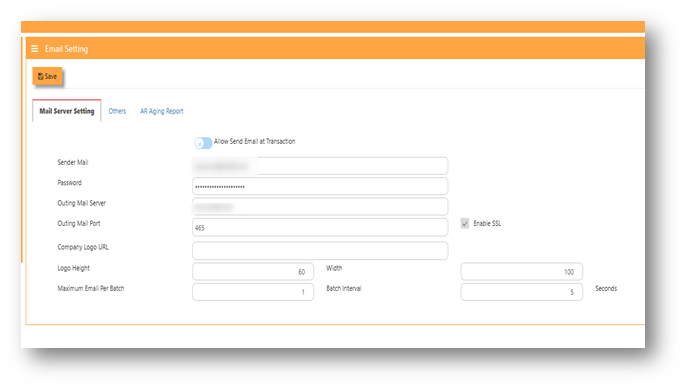](https://doc.uniq365.com/uploads/images/gallery/2025-03/3B8image.png)
1. Filter first the date you wanted to generate first.
2. Click ''edit'' to select customer, after that, tick which customer you will send the SOA and clicked for the ''insert button'' [](https://doc.uniq365.com/uploads/images/gallery/2025-02/daTimage.png)
3. After clicked ''insert'' button, all the customers you have ticked will show in the list, if already confirmed. User may clicked the ''sendemail'' to send the SOA into the following customers. [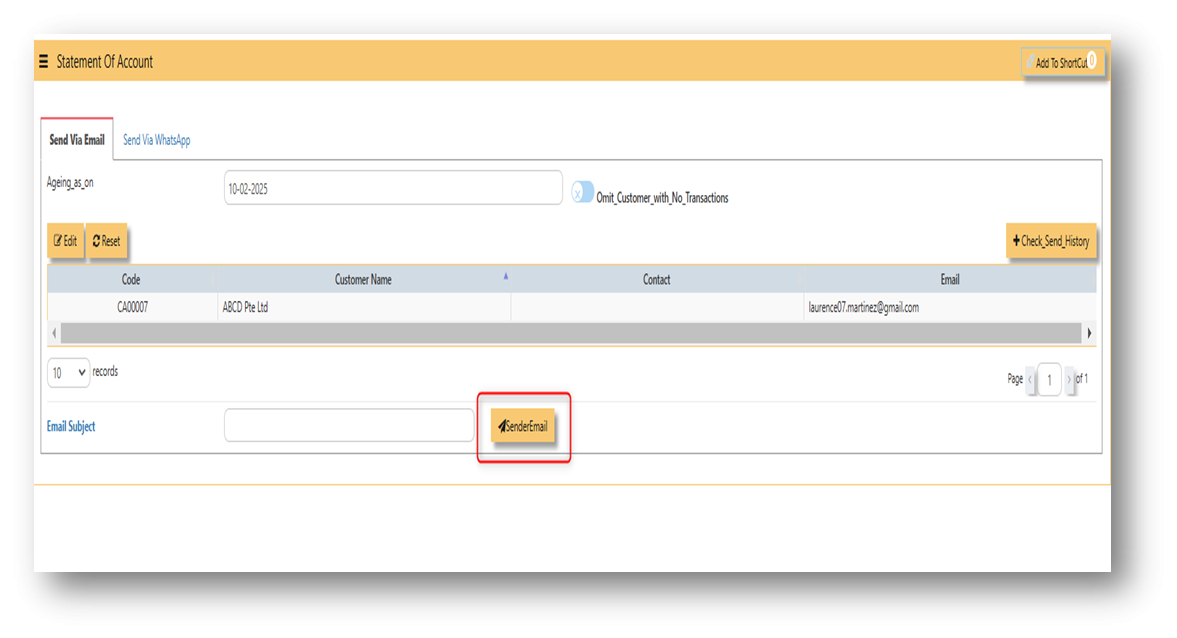](https://doc.uniq365.com/uploads/images/gallery/2025-02/54Pimage.png)
**Attached photo is an example of E-SOA.**
[](https://doc.uniq365.com/uploads/images/gallery/2025-03/MU2image.png)
[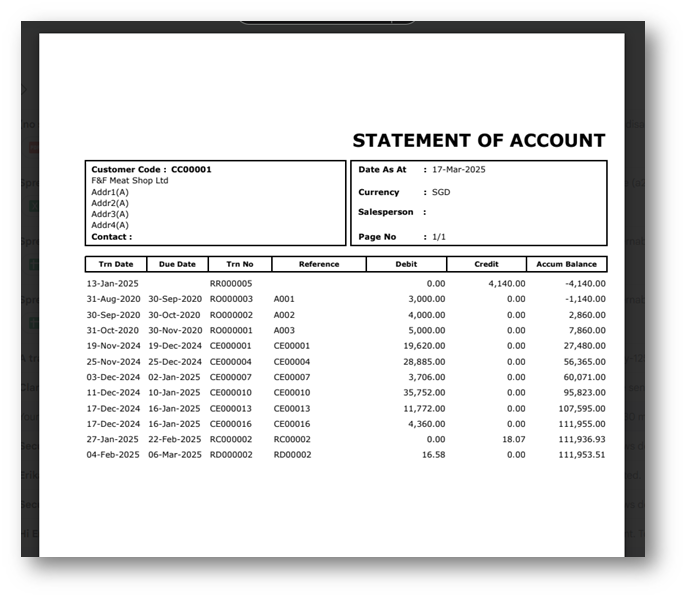](https://doc.uniq365.com/uploads/images/gallery/2025-03/TAfimage.png)
Customer Maintenance
##### The **Customer Maintenance** is used to enter master records of customers. The information and properties of a customer such as customer code, customer name, billing address, credit limit, pricing information, shipping address, the account posting details etc are entered here.
[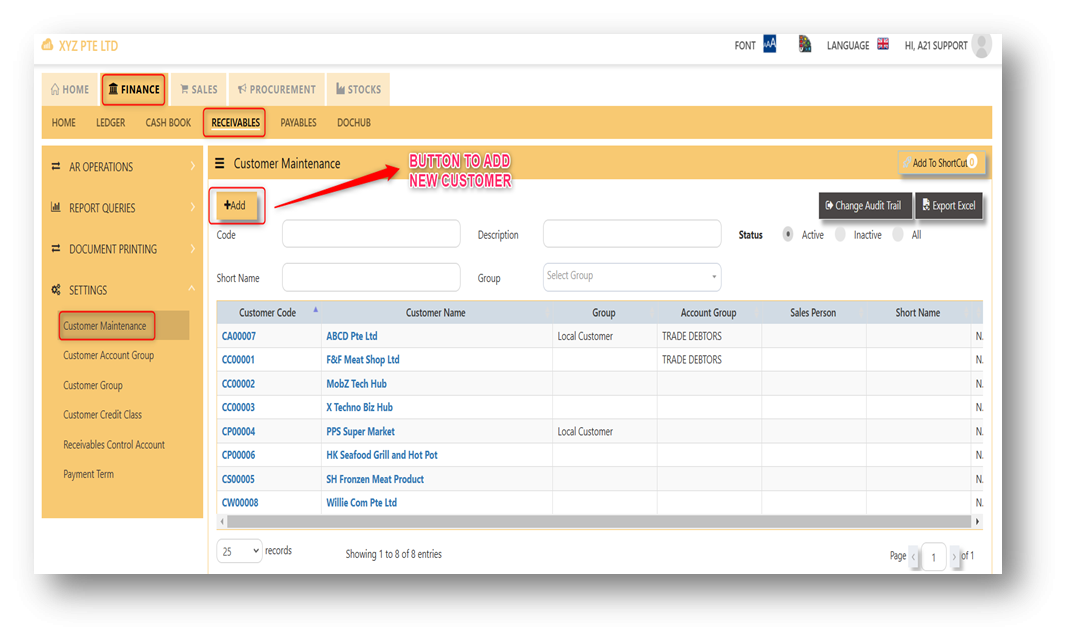](https://doc.uniq365.com/uploads/images/gallery/2025-01/8awimage.png)
[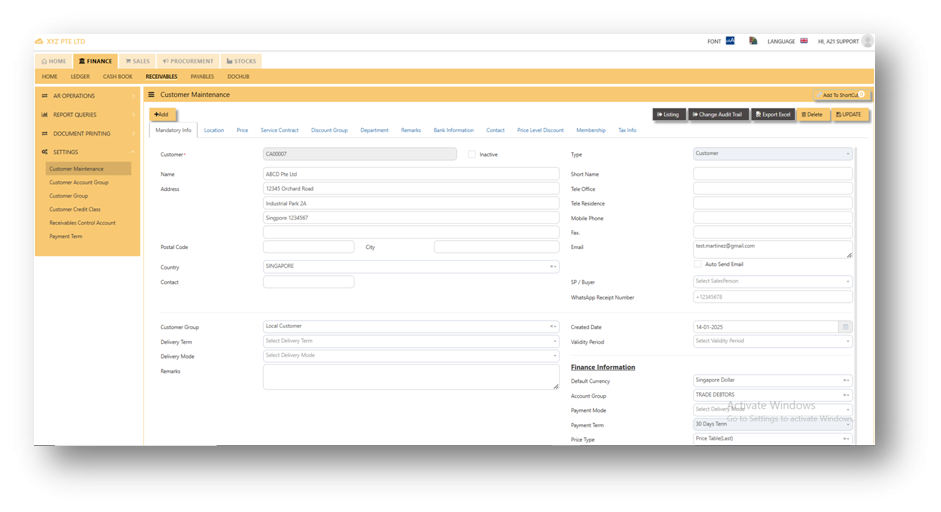](https://doc.uniq365.com/uploads/images/gallery/2025-01/etDimage.png)
This is the place where you add new Customer or edit existing Customer. Some of the fields are mandatory, such
as the following :
- **Customer** - Enter the code for the new Customer. The maximum is 10 alphanumeric characters.
- **Name** - Enter the name of Customer. The maximum is 50 characters
- Key in the necessary Information, such as Address, Telephone, Fax, E-mail & etc.
- **Type** - Select C for Customer or B for both Customer & Supplier
- **SP** - Click to select the Salesperson defined under System Manager – System Utilities - Employee
- **Credit Class** - Click to select the credit class defined under Sales – Maintenance – Credit Class. This setting is for the reports under Receivable \\ Aging Analysis by credit class (Transaction date / due Date)
- **User** - Click to select the user defined under System Manager – System Utilities - User Maintenance
This setting is to prevent a user from accessing customers and their information which belong to other users.
- **Territory** - Click to select the credit class defined under Sales – Customer Management – Customer Territory
This setting is for the reports under Sales Module \\ Sales Analysis Report \\ Customer Territory Sales Analysis.
- **Price Type** - You may decide on a pricing method for each and every Customer
**A. Price Table (Sales/Last)** - Every time a transaction is created for this Customer, the system will call out the selling price from the Customer Maintenance Price Table
**B. Last Price** - If Last Price is selected, the price billed for a particular product will be saved in the Last Price column of the Price table. The next time the same product is entered in an invoice for that customer, the Last Price will be automatically picked up.
**C. Product Setting** - Every time an invoice is created for this customer, the system will show the selling price from the Product & Service Maintenance (Depends on the Price Type selected)
**D. Price Table (Sales)** - Every time an invoice is created for this customer, the system will call out the selling price from the Customer Maintenance Price Table
**E. Price Book -** If the user select Price book as their price type, the configuration set-up can be found in Sales > Customer Management > Price Settings > Price Book. If price book is selected as price type, the price that will call out in transaction based from the price book that users been set up.
- **Deliver Term** - Click to select the Delivery Term defined under Sales – Customer Management – Delivery Term
Example: *FOB - Free On Board*
*CIF - Carriage, Insurance & Freight*
- **Delivery Mode** - Click to select the Delivery Mode defined under Sales – Customer Management – Delivery Mode
Example: *Truck, Flight, Self Collection*
- **Payment Term** - Click to select the Payment Mode defined under Sales – Customer Management – Payment Terms
Example: *30 Days, 60Days, COD (Cash on delivery)*
- **Group** - Click to select the Group defined under Sales – Customer Management – Customer Type Group
The group here is for the reports under Sales\\Sales Analysis Reports\\Customer Group wise Sales Analy*sis*
- **Account Group** - If the auto account posting is by Customer, then click to select the relevant Account Group defined under Sales – Customer Management – Customer Account Group
- **Default Currency** - Select the currency that this Customer normally transacts in.
*Location - Create different delivery locations for this Customer*
*Price - Records the history of selling prices for this Customer if the price type (price table) is selected*
***Important: Our system does not allow duplicate customer codes in Customer Maintenance, so before creating the coding for Customer Maintenance, please double check and make sure that there are no duplicates. As guidance for creating Customer codes, one example is “CA0001” for A2000 Pte Ltd.; “C” stands for Customer and “A” is the starting alphabet for the Customer name.***
Customer Groups
##### This option lets you indicate the Customer Group if you intend to use reports that sort or filter by Customer Group (Optional).
##### **How to Setup Customer Type Group?**
- Click on Receivables – Settings – Customer Group icon for the following screen.
[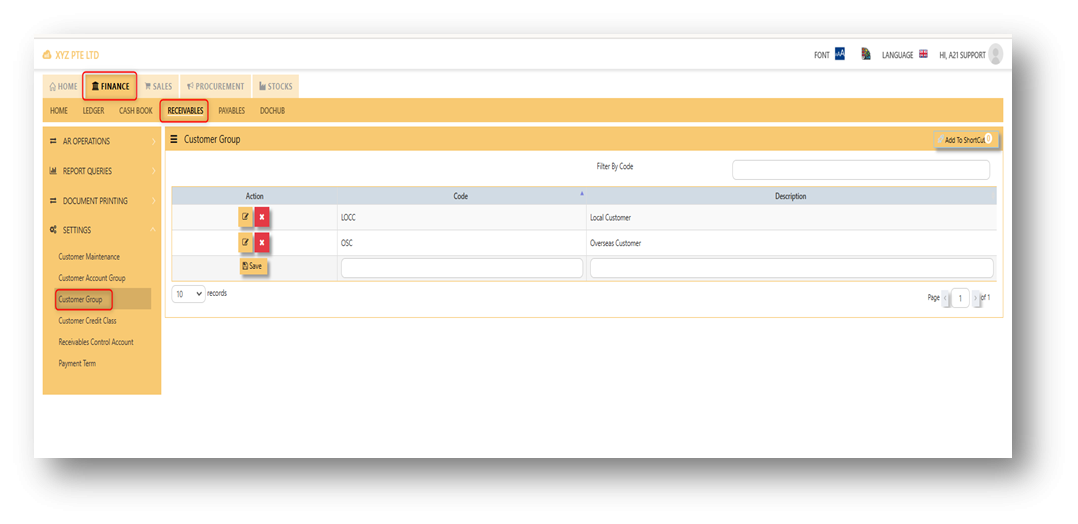](https://doc.uniq365.com/uploads/images/gallery/2025-02/limimage.png)
- Enter Customer Groups as shown in above example.
***Note: If you did not use this grouping method for reporting, please ignore the options.***
Customer Account Groups
##### The Customer Account Group is used for auto posting function when the user creates Sales Transaction. Unlike other systems that are hard-coded, A2000 WEB ERP allows the accounts posting to be organized according to the users’ requirements through their own Customer Account Groups.
You can create different groups and set the account posting to be by
“**Customer Group**” if you need:
Exp: Trade Debtor A/C by Customer
Sales A/C by Customer
Discount A/C by Customer
Cost of Sales A/C by Customer
[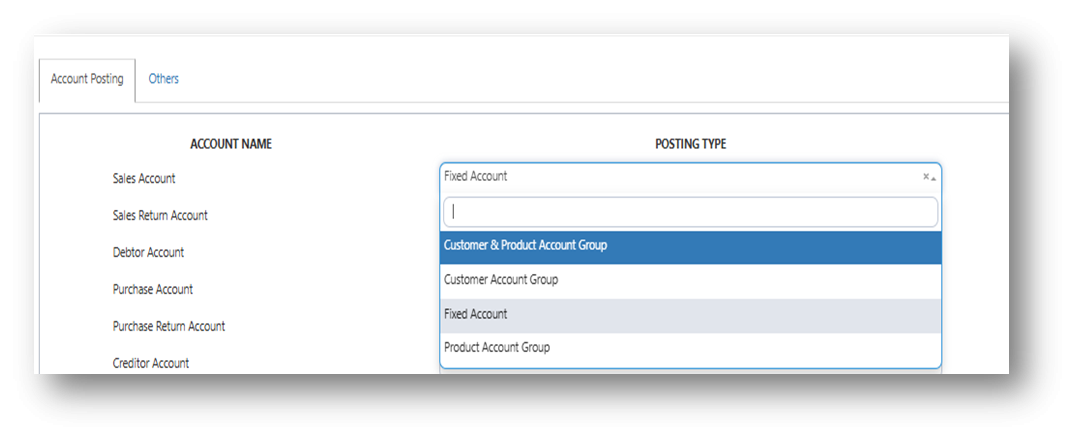](https://doc.uniq365.com/uploads/images/gallery/2025-02/ST1image.png)
#### **How to Setup Customer A/C Group?**
- Click on Receivable – Settings – Customer Account Group icon for the following screen.
[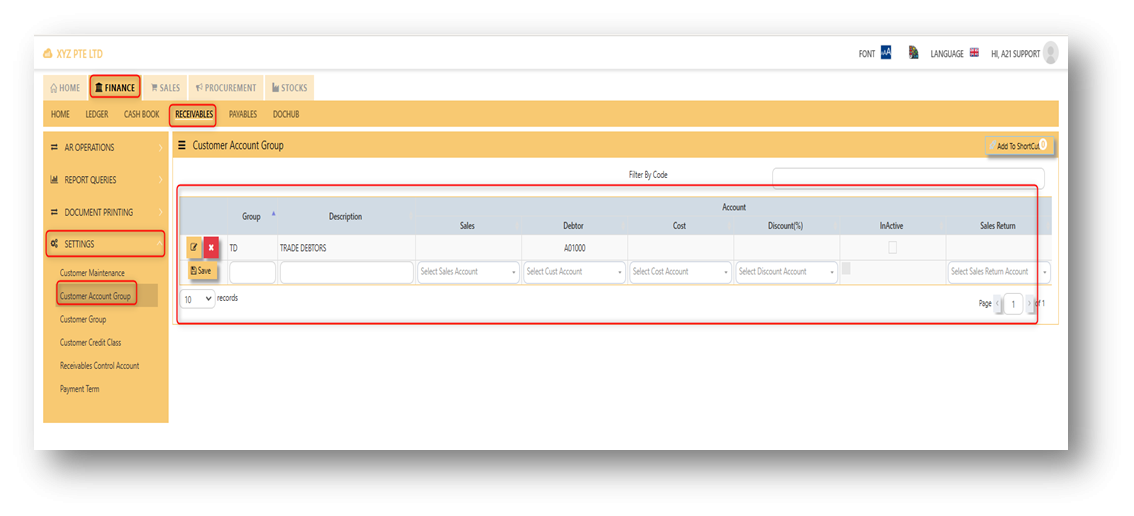](https://doc.uniq365.com/uploads/images/gallery/2025-02/Wxtimage.png)
- Enter the Code & Description Name for Customer Account Group. After setting the codes and names, the user can map the GL Chart of Account code for “Trade Debtor A/C”, “Sales A/C”, “Discount A/C” & “Cost A/C”.
***Note: If you did not use for this posting method, please ignore the options.***
Payment Terms
This is where you indicate the Customer Payment Terms for Customers and Suppliers. The payment terms set for individual customers and suppliers are for the buckets in the Statement of Account & Aging reports.
##### **How to add Payment Terms?**
- Click on Receivables – Settings– Payment Terms icon for the following screen.
[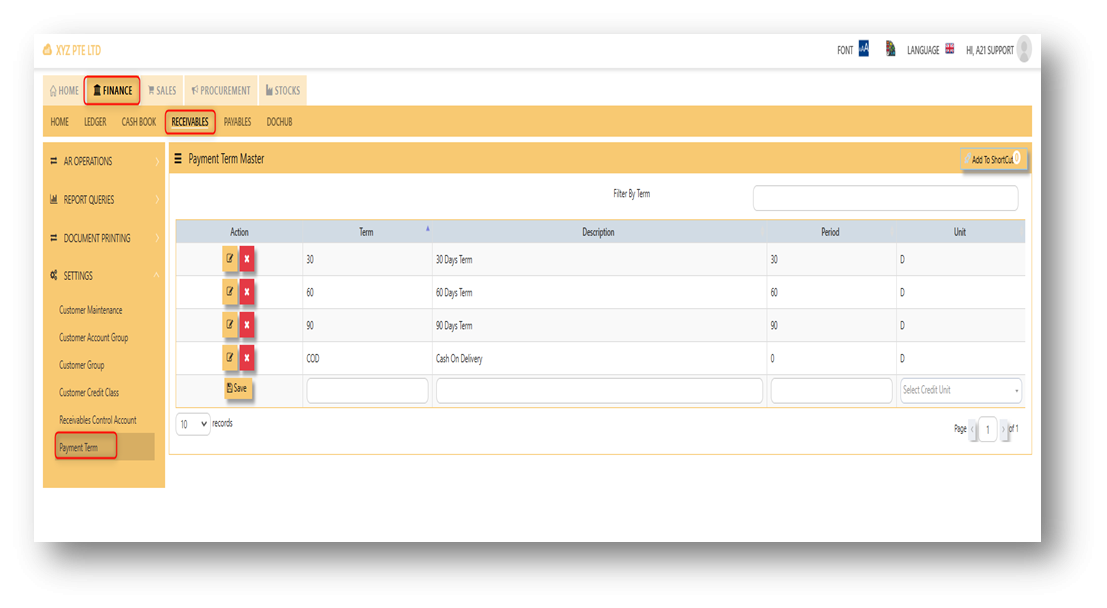](https://doc.uniq365.com/uploads/images/gallery/2025-02/nuUimage.png)
- Enter the above Terms of Payment as shown above. For more flexible settings, user can indicate the Payment Terms according to the report needed.
Exp: Add 7 Days, 45 days or 120 days…etc.
***Note: If you did not set the payment terms, you can not select the terms for individual customers and the system***
***will be unable to generate accurate Statement of Account & Aging reports.***
AP OPERATIONS
## **Payable Transaction**
##### Transactions for **Supplier Invoice (PI),** **Credit Note (PC)**, **Debit Note (PD)** and **Payment transaction (PV)** can be done at this option. Allocation of outstanding invoices can be made via PI, PC, PD and PV transactions.
##### This option posts on-line to Supplier/Creditors account and GST account if applicable. Upon allocation of foreign currency transactions, realized exchange gain/loss will be captured and its amount posted to the account concerned.
[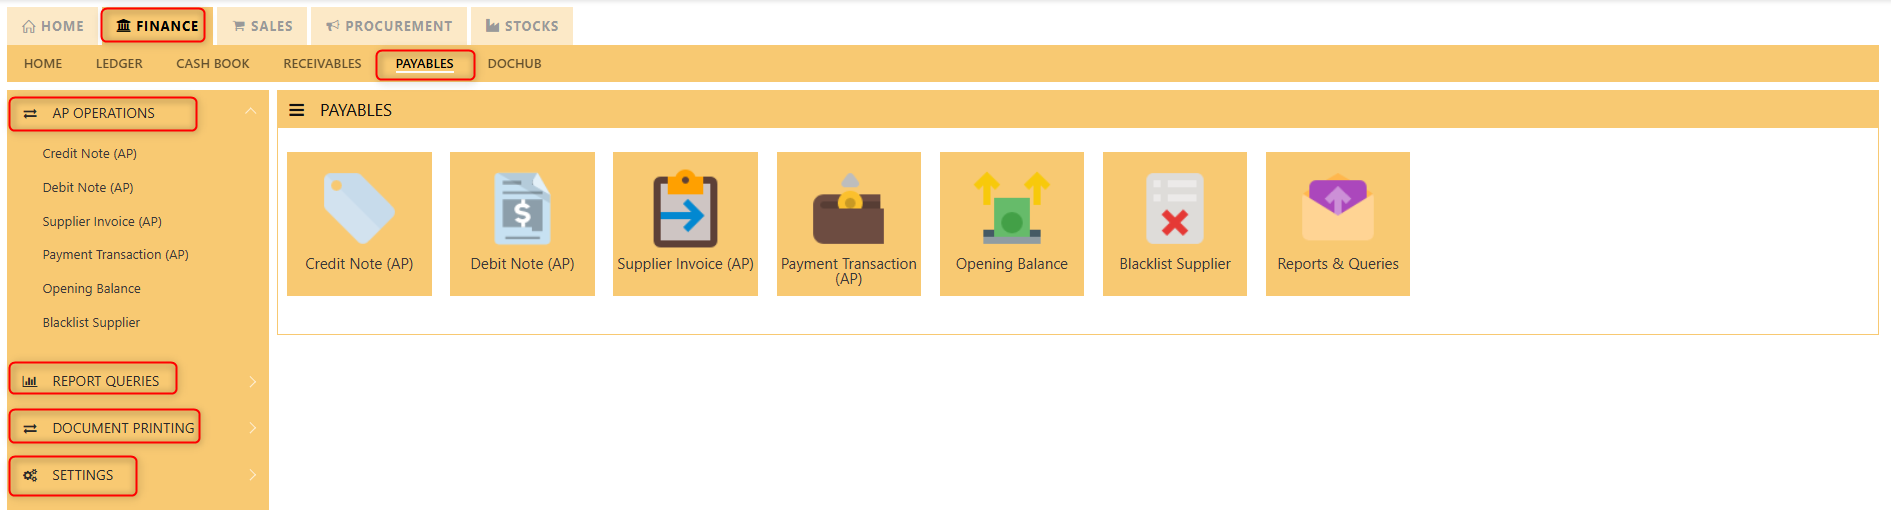](https://doc.uniq365.com/uploads/images/gallery/2025-02/cBPimage.png)
Credit Note (AP)
## **How to enter Credit Note (PC)?**
##### A credit note is a document issued by a seller to a buyer, acknowledging that a certain amount of money is being credited to the buyer's account. It typically occurs when there has been a return of goods, overpayment, or an error in the original invoice. The credit note can be used by the buyer as a credit for future purchases or to request a refund.
##### **\_\_\_\_\_\_\_\_\_\_\_\_\_\_\_\_\_\_\_\_\_\_\_\_\_\_\_\_\_\_\_\_\_\_\_\_\_\_\_\_\_\_\_\_\_\_\_\_\_\_\_\_\_\_\_\_\_\_\_\_\_\_\_\_\_\_\_\_\_\_\_\_\_\_\_\_\_\_\_\_\_\_\_\_\_\_\_\_\_\_\_\_\_\_\_\_\_\_\_**
**Steps to enter PC are as follow:**
1\. Click on **Payables – AP Operations – Credit Note (AP)** and the following screen will appear.
[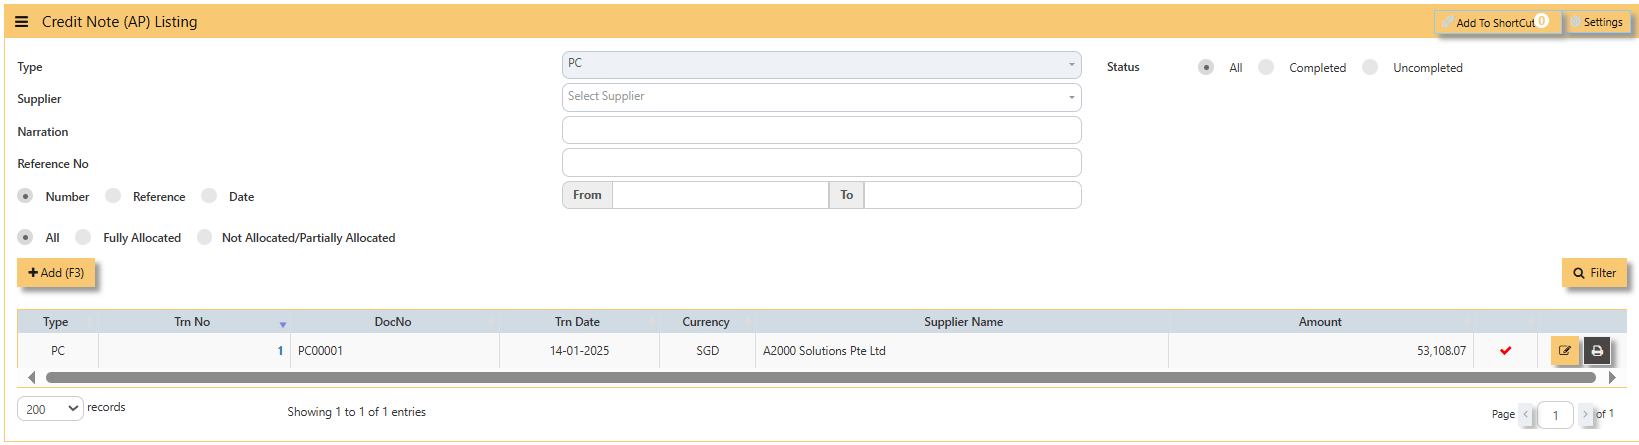](https://doc.uniq365.com/uploads/images/gallery/2025-01/xXfimage.png)
2\. Click on **Add** button to create a new transaction.
[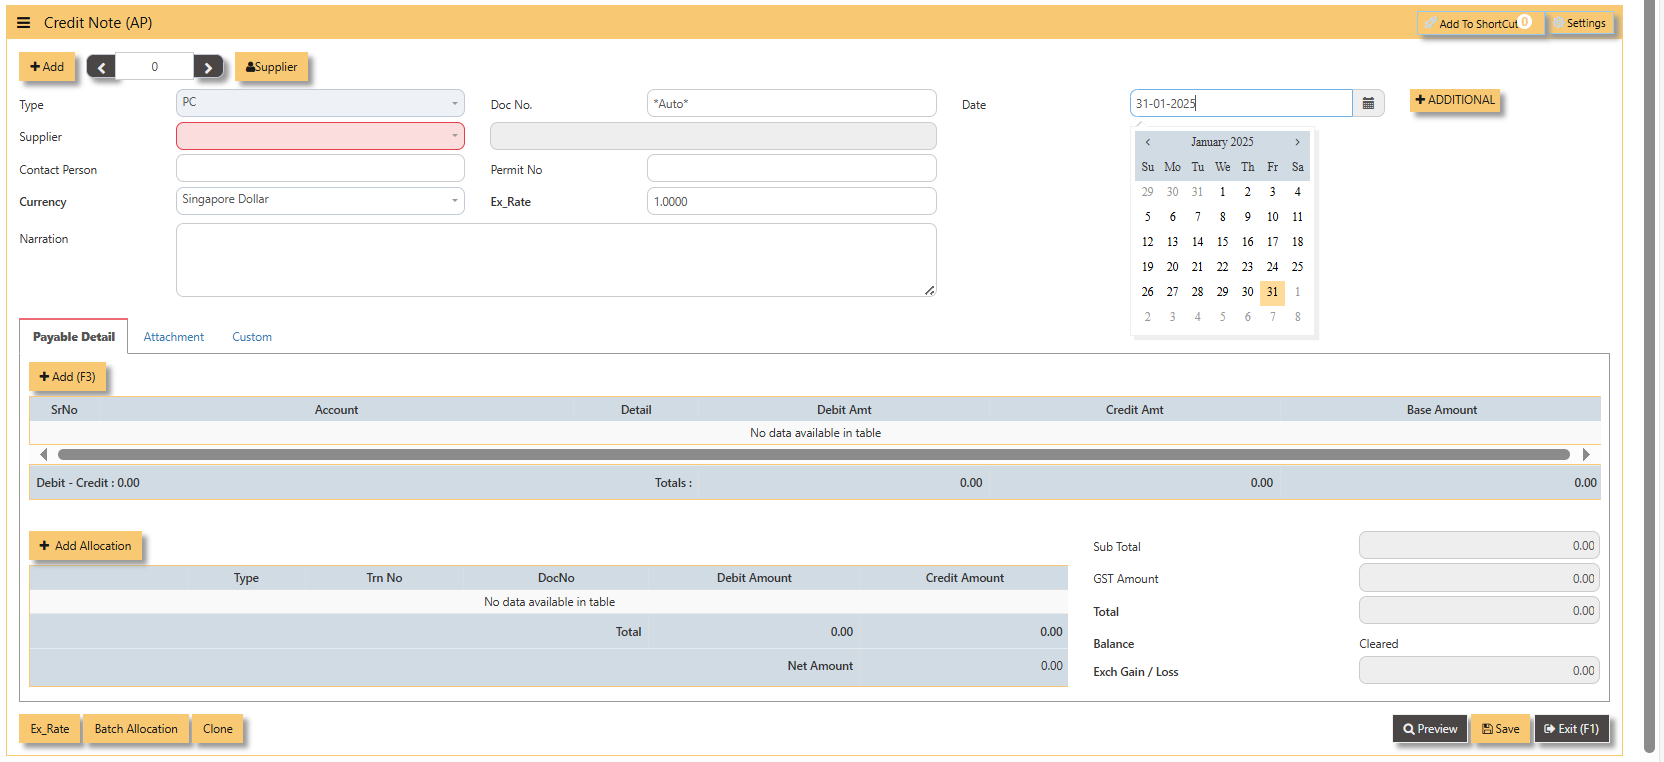](https://doc.uniq365.com/uploads/images/gallery/2025-01/Dmoimage.png)
- Fill up the fields in the header section such as **Date, Supplier, Contact Person, Currency and Exchange Rate**.
- Then select the account concerned at the detail section.
- Click for **Additional Info** for necessary details to add
[](https://doc.uniq365.com/uploads/images/gallery/2025-02/FHkimage.png)
- Click on **save** button to complete the entry.
3\. Below is a sample PC transaction screen.
[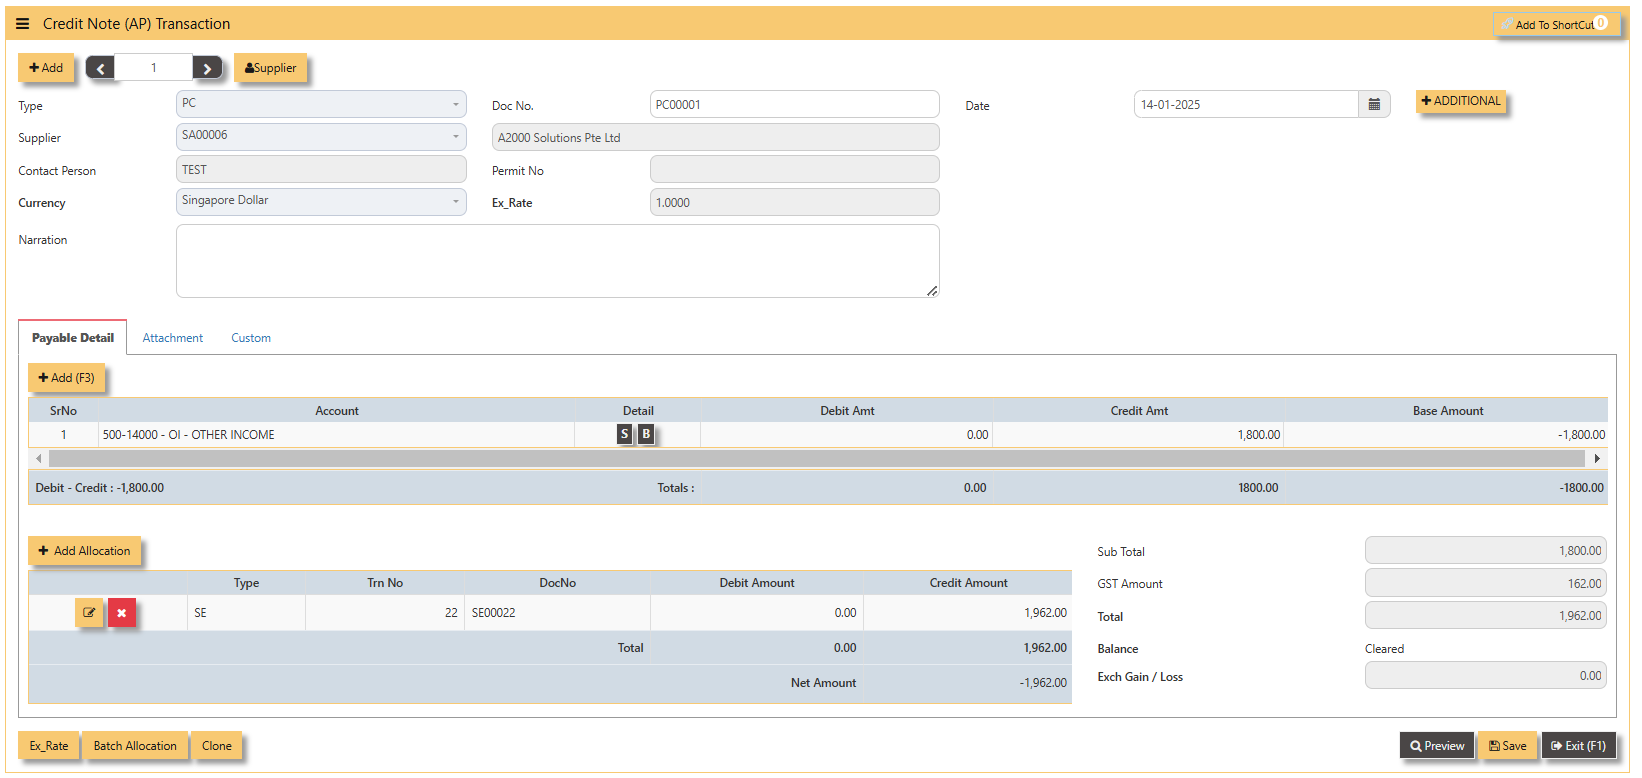](https://doc.uniq365.com/uploads/images/gallery/2025-02/CJBimage.png)
**Additional Information:**
- **Add Allocation** This is where you can manually add allocation.
[](https://doc.uniq365.com/uploads/images/gallery/2025-02/8c2image.png)
- **Ex Rate** It will redirect you to Finance Tab. Attached link for further information. [MASTERS GL | Support Doc](https://doc.uniq365.com/books/online-user-guide-10-1224/page/masters-gl)
[](https://doc.uniq365.com/uploads/images/gallery/2025-02/gBTimage.png)
- **Batch Allocation** If you have a lot of transactions needed to allocate, you may use the batch allocation button to allocate transactions in a convenient way. Sample below.
[](https://doc.uniq365.com/uploads/images/gallery/2025-02/Ppbimage.png)
- **CLONE** It will allow you to copy the exact transaction created; where it will be creating another transaction copying the transaction you have clone.
[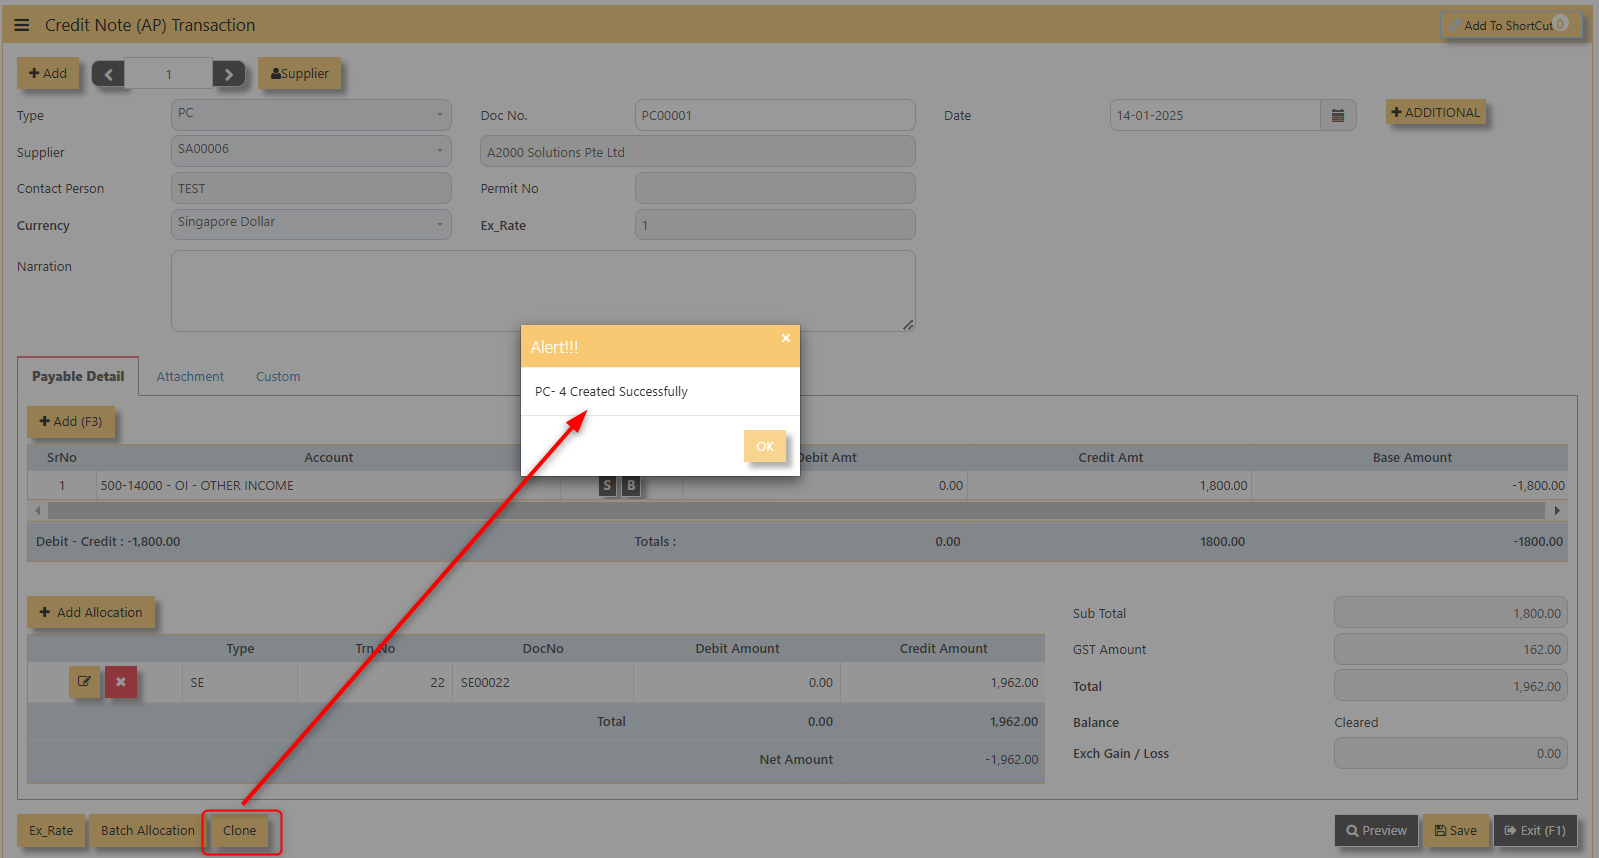](https://doc.uniq365.com/uploads/images/gallery/2025-02/JNQimage.png)
4\. For the double entries of the PC transaction created, it can be verify under **AP Transaction Listing.**
[](https://doc.uniq365.com/uploads/images/gallery/2025-02/4v1image.png)
**Note: The steps to enter Credit Note (PC) & Debit Note (PD) are identical to PI. User will need to select transaction type PC or PD respectively to enter the record.**
Debit Note (AP)
## **How to enter Debit Note (PD)?**
##### A debit note is a document issued by a buyer to a seller, indicating that the seller owes a credit for goods or services that were returned, damaged, or invoiced incorrectly. It serves as a formal request for an adjustment in the payment, reducing the amount owed to the seller. Debit notes are commonly used in transactions to correct billing errors or return goods after delivery.
##### **\_\_\_\_\_\_\_\_\_\_\_\_\_\_\_\_\_\_\_\_\_\_\_\_\_\_\_\_\_\_\_\_\_\_\_\_\_\_\_\_\_\_\_\_\_\_\_\_\_\_\_\_\_\_\_\_\_\_\_\_\_\_\_\_\_\_\_\_\_\_\_\_\_\_\_\_\_\_\_\_\_\_\_\_\_\_\_\_\_\_\_\_\_\_\_\_\_\_\_**
**Steps to enter PD are as follow:**
1\. Click on **Payables – AP Operations – Debit Note (AP)** and the following screen will appear.
[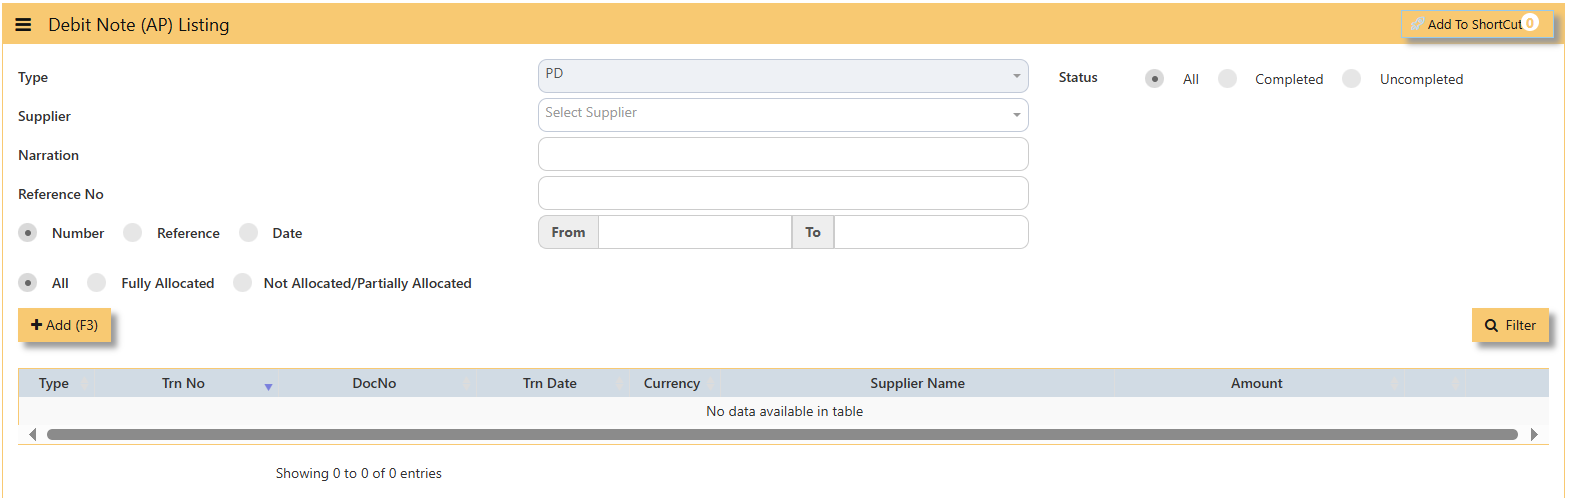](https://doc.uniq365.com/uploads/images/gallery/2025-02/zOKimage.png)
2\. Click on **Add** button to create a new transaction.
[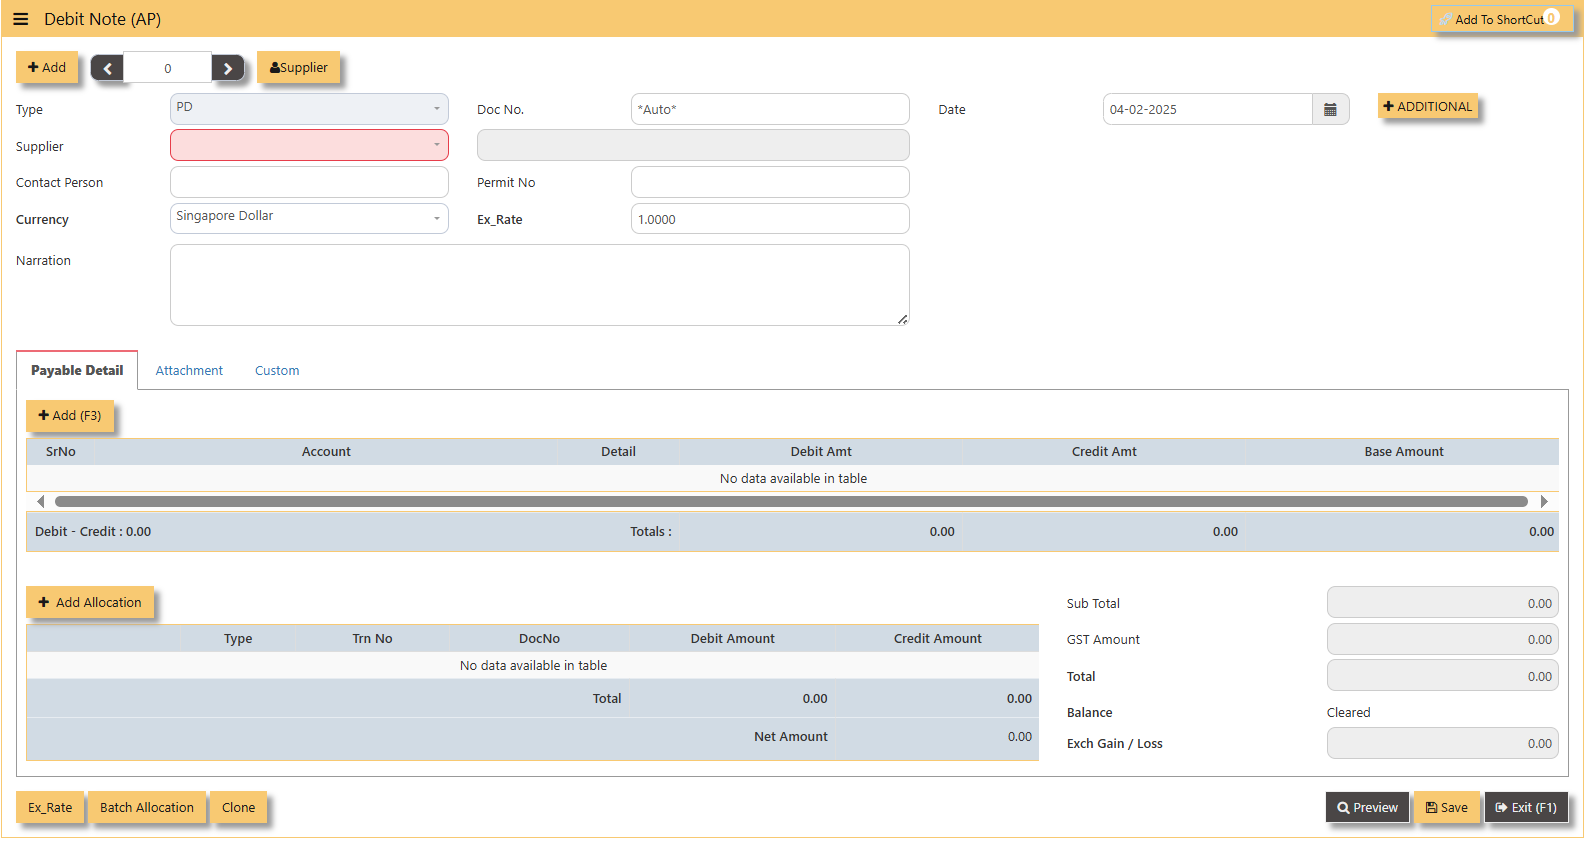](https://doc.uniq365.com/uploads/images/gallery/2025-02/OSHimage.png)
- Fill up the fields in the header section such as **Date, Supplier, Contact Person, Currency and Exchange Rate.**
- Then select the account concerned at the detail section.
- Click for **Additional Info** for necessary details to add.
[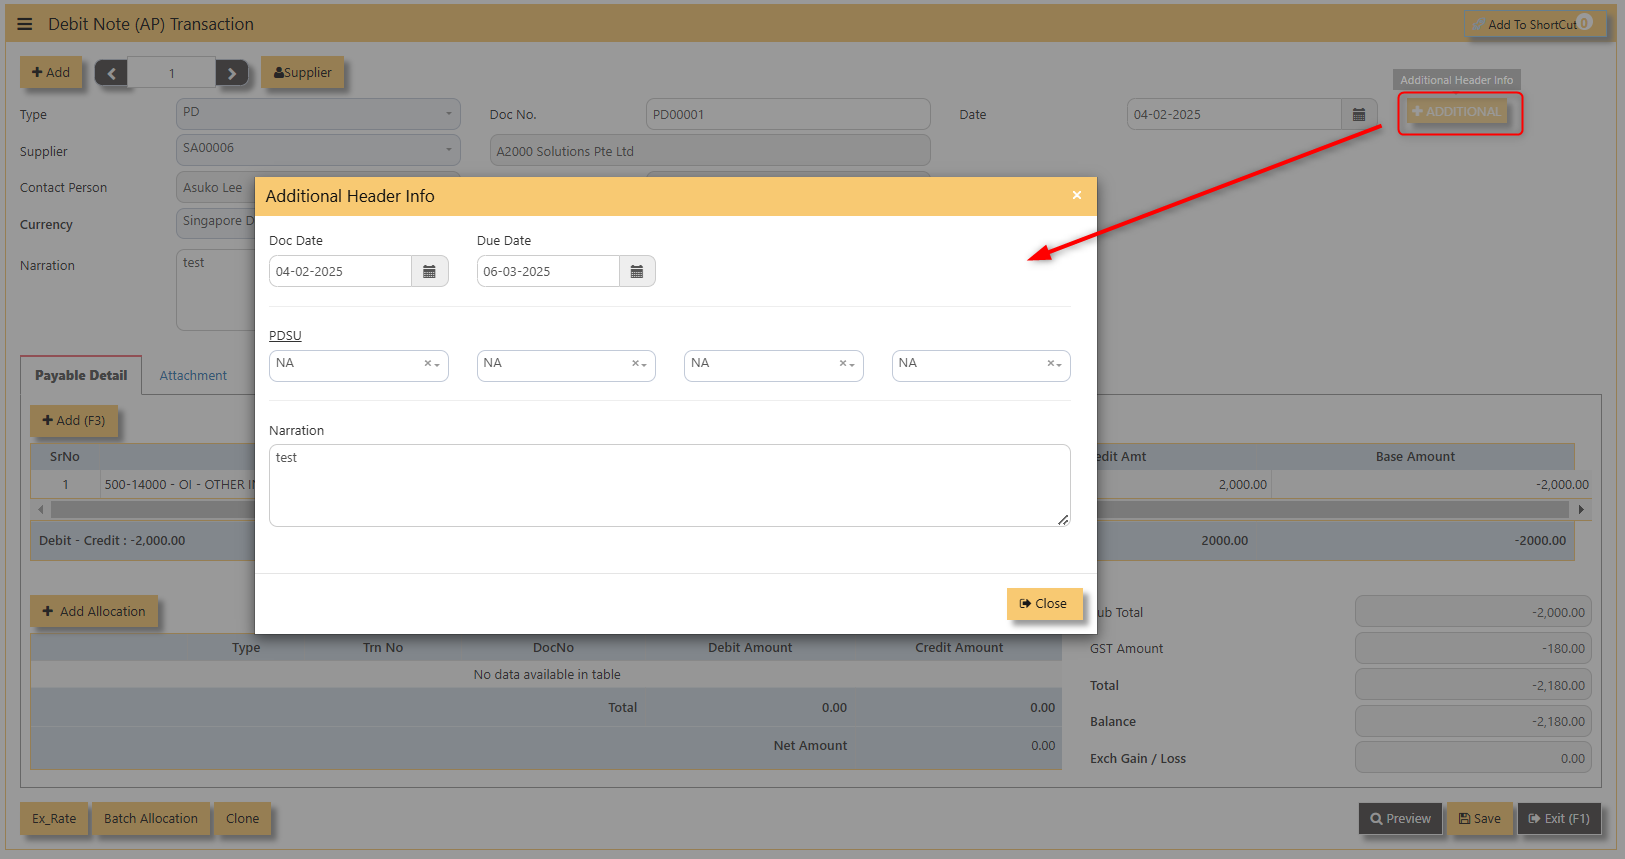](https://doc.uniq365.com/uploads/images/gallery/2025-02/o3zimage.png)
- Click on **save** button to complete the entry.
3\. Below is a sample PD transaction screen.
[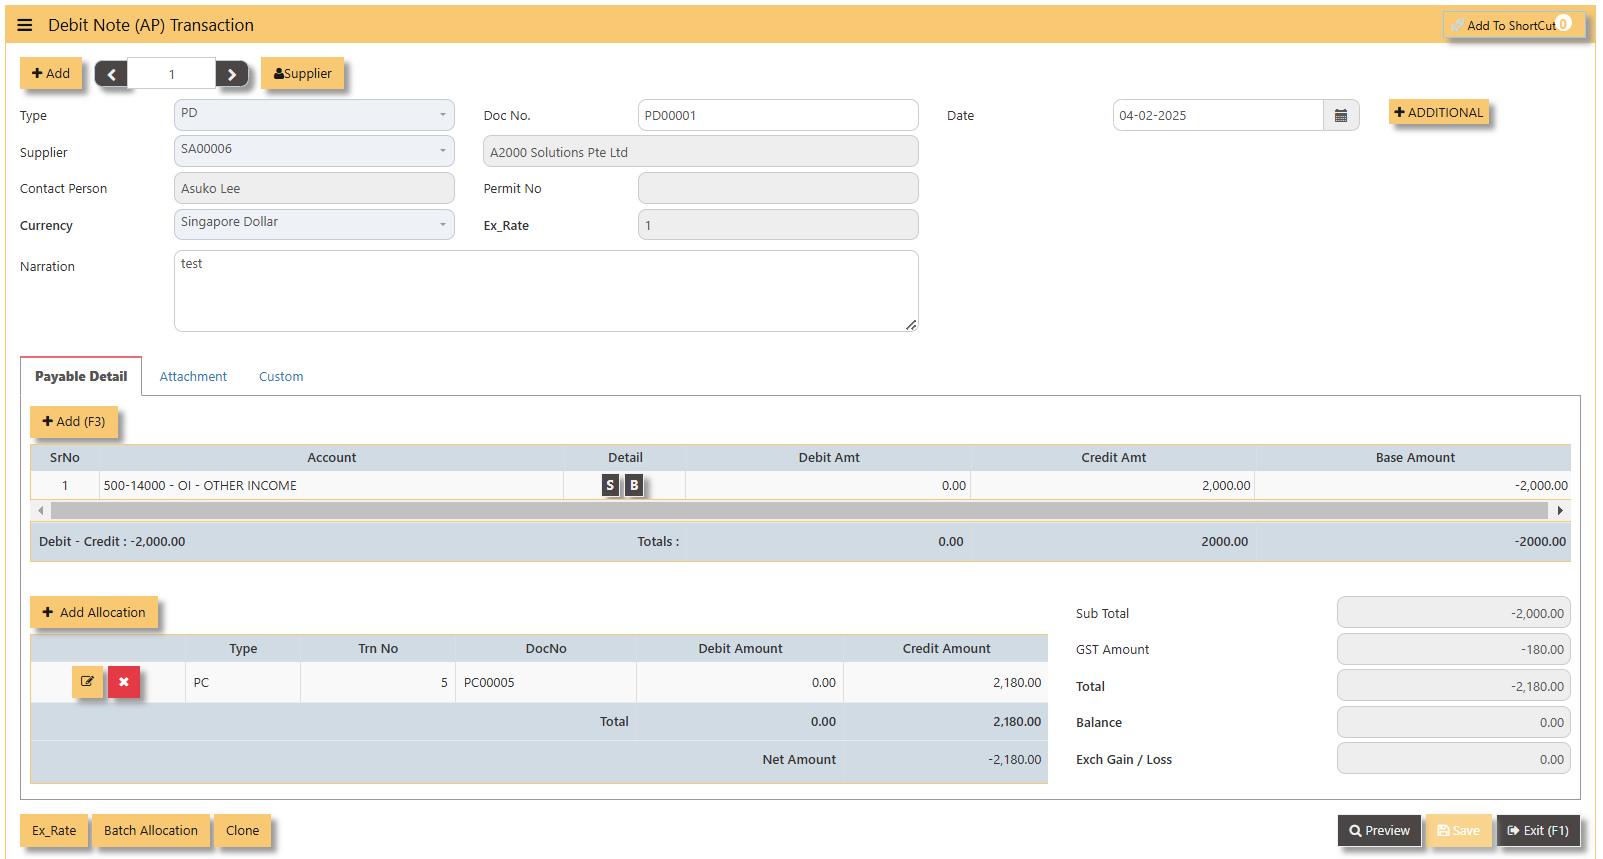](https://doc.uniq365.com/uploads/images/gallery/2025-02/yUQimage.png)
**Additional Information: **
- **Add Allocation **This is where you can manually add the transaction.
[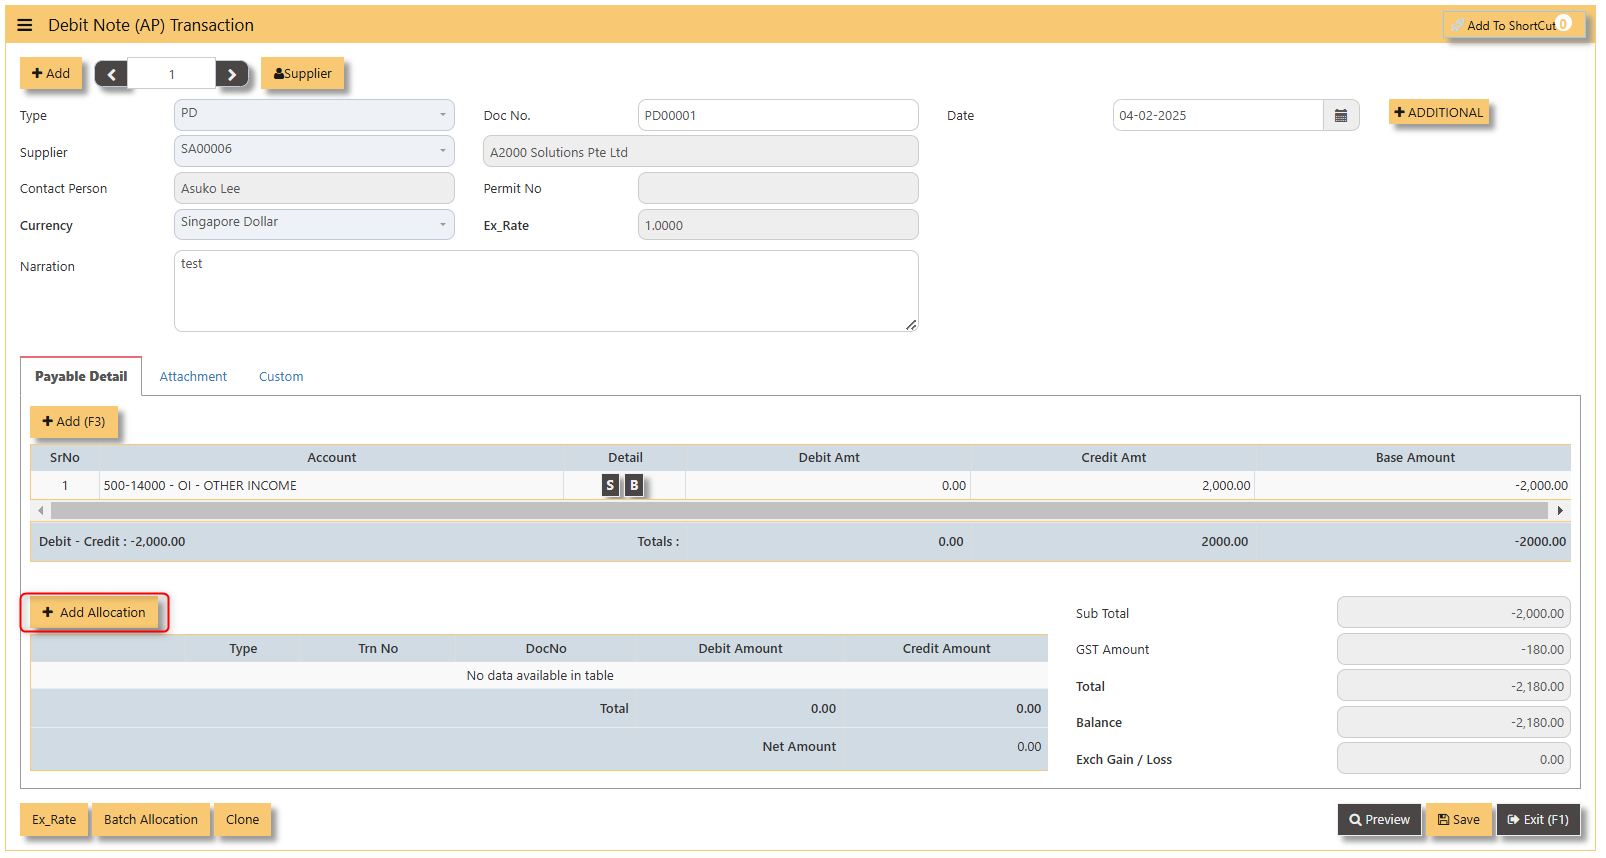](https://doc.uniq365.com/uploads/images/gallery/2025-02/Iguimage.png)
- **Ex Rate** It will redirect you to Finance Tab. Attached link for further information. [MASTERS GL | Support Doc ](https://doc.uniq365.com/books/online-user-guide-10-1224/page/masters-gl)
[](https://doc.uniq365.com/uploads/images/gallery/2025-02/gBTimage.png)
- **Batch Allocation** If you have a lot of transactions needed to allocate, you may use the batch allocation button to allocate transactions in a convenient way. Sample below.
[](https://doc.uniq365.com/uploads/images/gallery/2025-02/wA3image.png)
- **Clone** It will allow you to copy the exact transaction created; where it will be creating another transaction copying the transaction you have clone.
[](https://doc.uniq365.com/uploads/images/gallery/2025-02/CVoimage.png)
4\. For the double entries of the PD transaction created, it can be verified under **AP Transaction Listing.**
[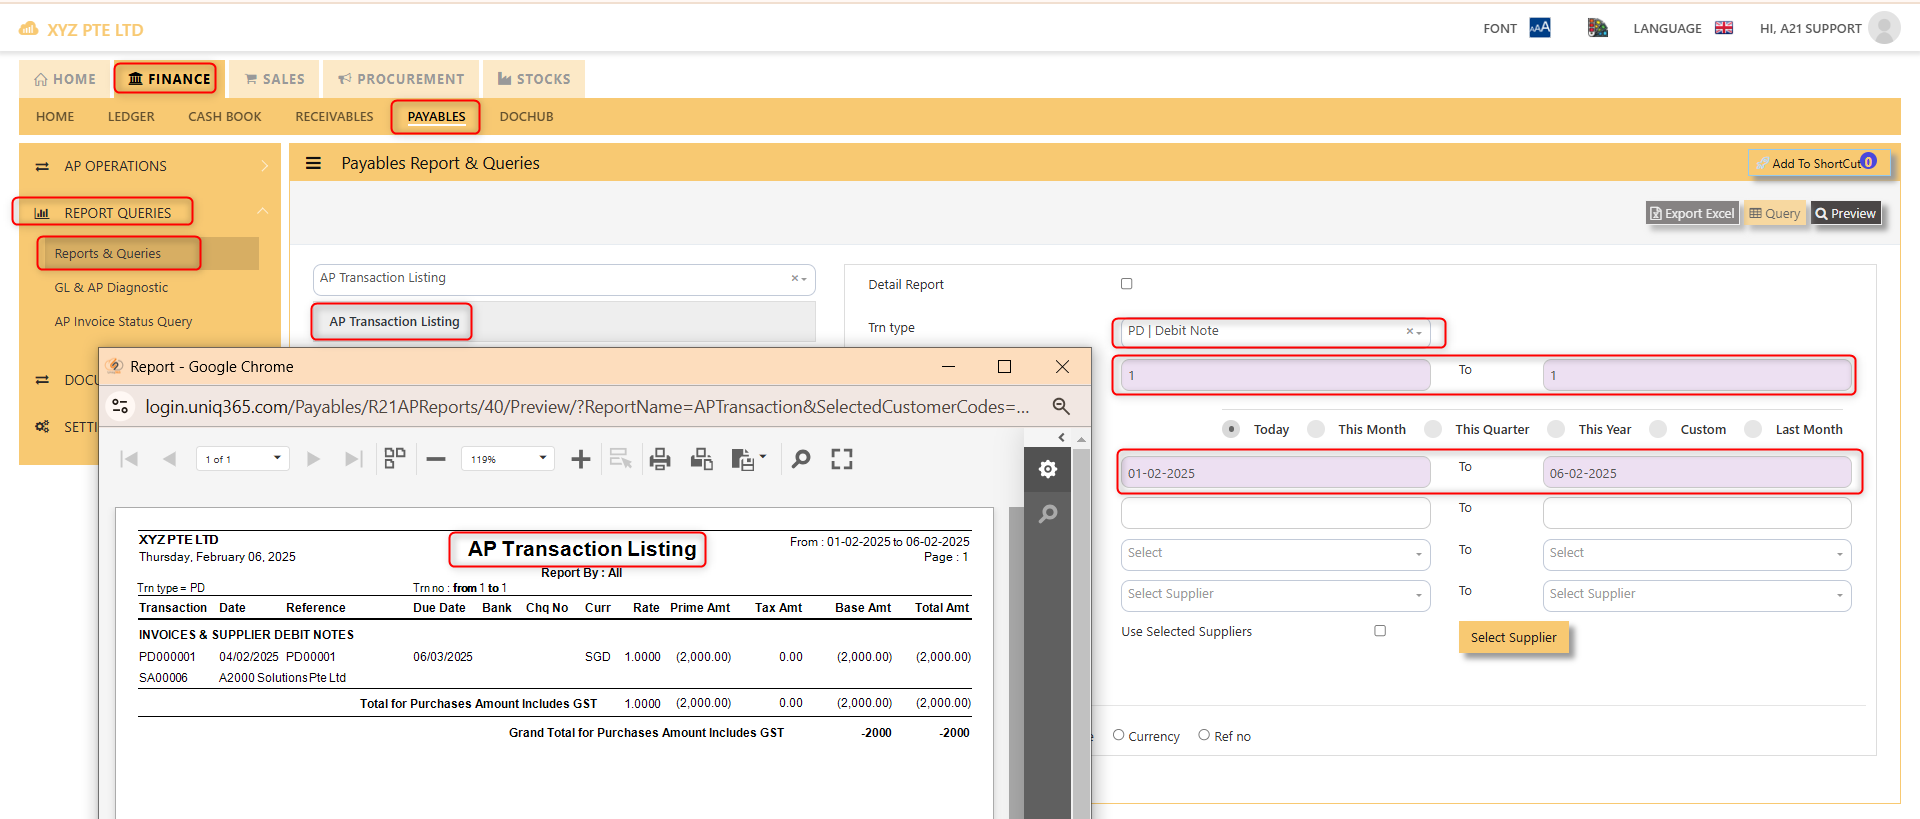](https://doc.uniq365.com/uploads/images/gallery/2025-02/xvfimage.png)
> **Note: The steps to enter Credit Note (PC) & Debit Note (PD) are identical to PI. User will need to select transaction type PC or PD respectively to enter the record.**
Supplier Invoice (AP)
## **How to enter Supplier Invoice (PI)?**
##### A supplier invoice is a document issued by a supplier to a buyer requesting payment for goods or services provided. It typically includes details such as the quantity, price, and description of the items, along with payment terms and due dates. The invoice serves as a formal record of the transaction and is used for accounting and financial purposes.
##### There may be times where there is a purchase of non-stock item. User may use PI transaction to affect such transaction.
##### **\_\_\_\_\_\_\_\_\_\_\_\_\_\_\_\_\_\_\_\_\_\_\_\_\_\_\_\_\_\_\_\_\_\_\_\_\_\_\_\_\_\_\_\_\_\_\_\_\_\_\_\_\_\_\_\_\_\_\_\_\_\_\_\_\_\_\_\_\_\_\_\_\_\_\_\_\_\_\_\_\_\_\_\_\_\_\_\_\_\_\_\_\_\_\_\_\_\_\_**
**Steps to enter PI are as follow:**
1. Click on **Payables – AP Operations – Supplier Invoice (AP)** and the following screen will appear. [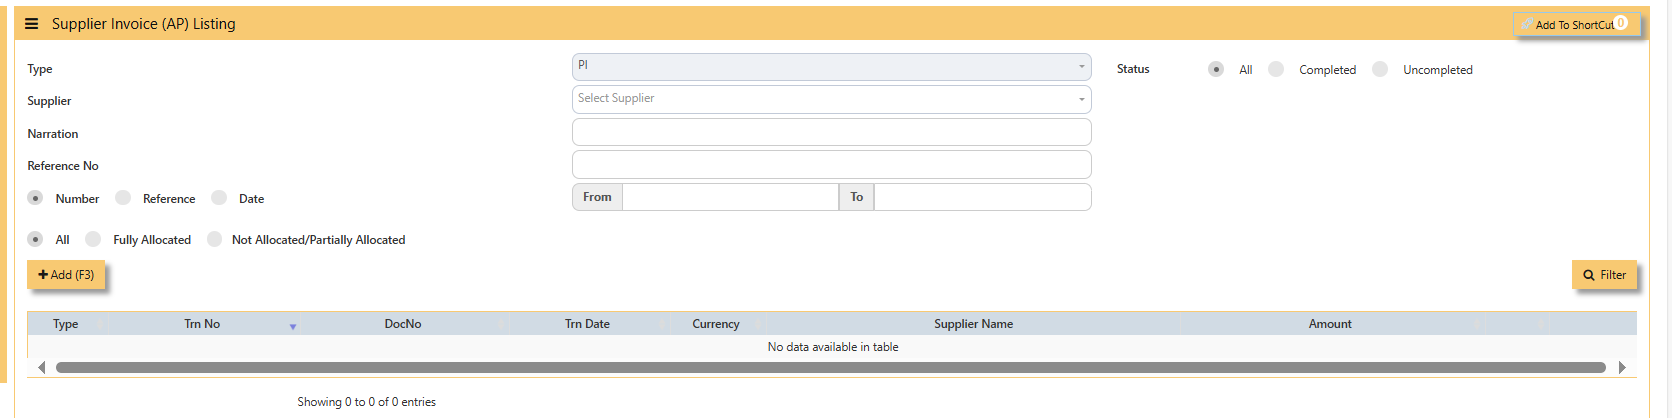](https://doc.uniq365.com/uploads/images/gallery/2025-01/V7Wimage.png)
2. Click on **Add** button to create a new transaction
[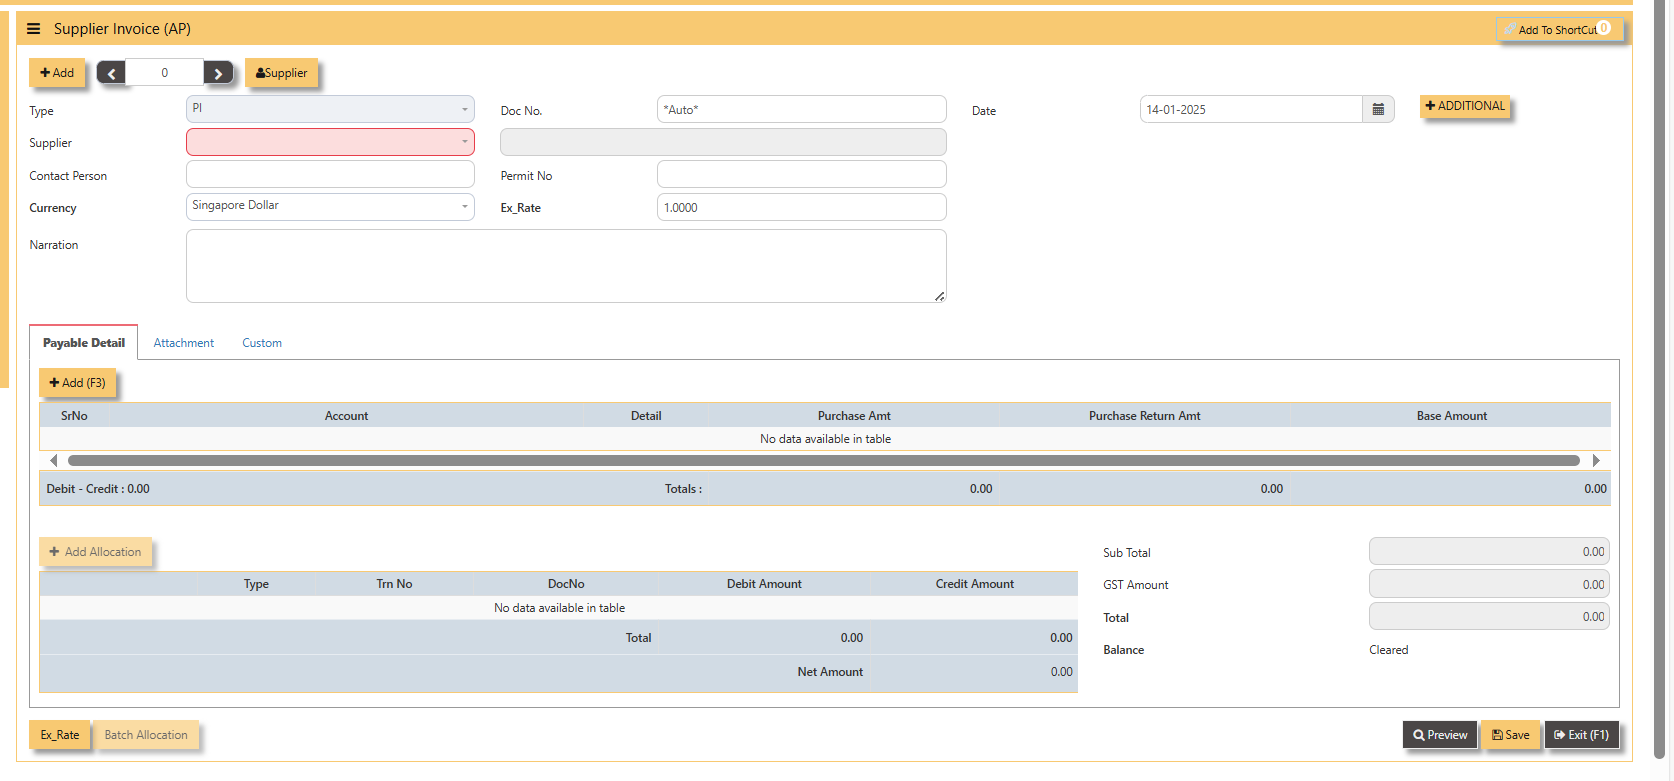](https://doc.uniq365.com/uploads/images/gallery/2025-01/NzHimage.png)
- Fill up the fields in the header section such as **Ref No, Date, Supplier, Contact Person, Currency and Exchange Rate**.
- Then select the account concerned at the detail section.
- Click for **Additional Info** for necessary details to add.
[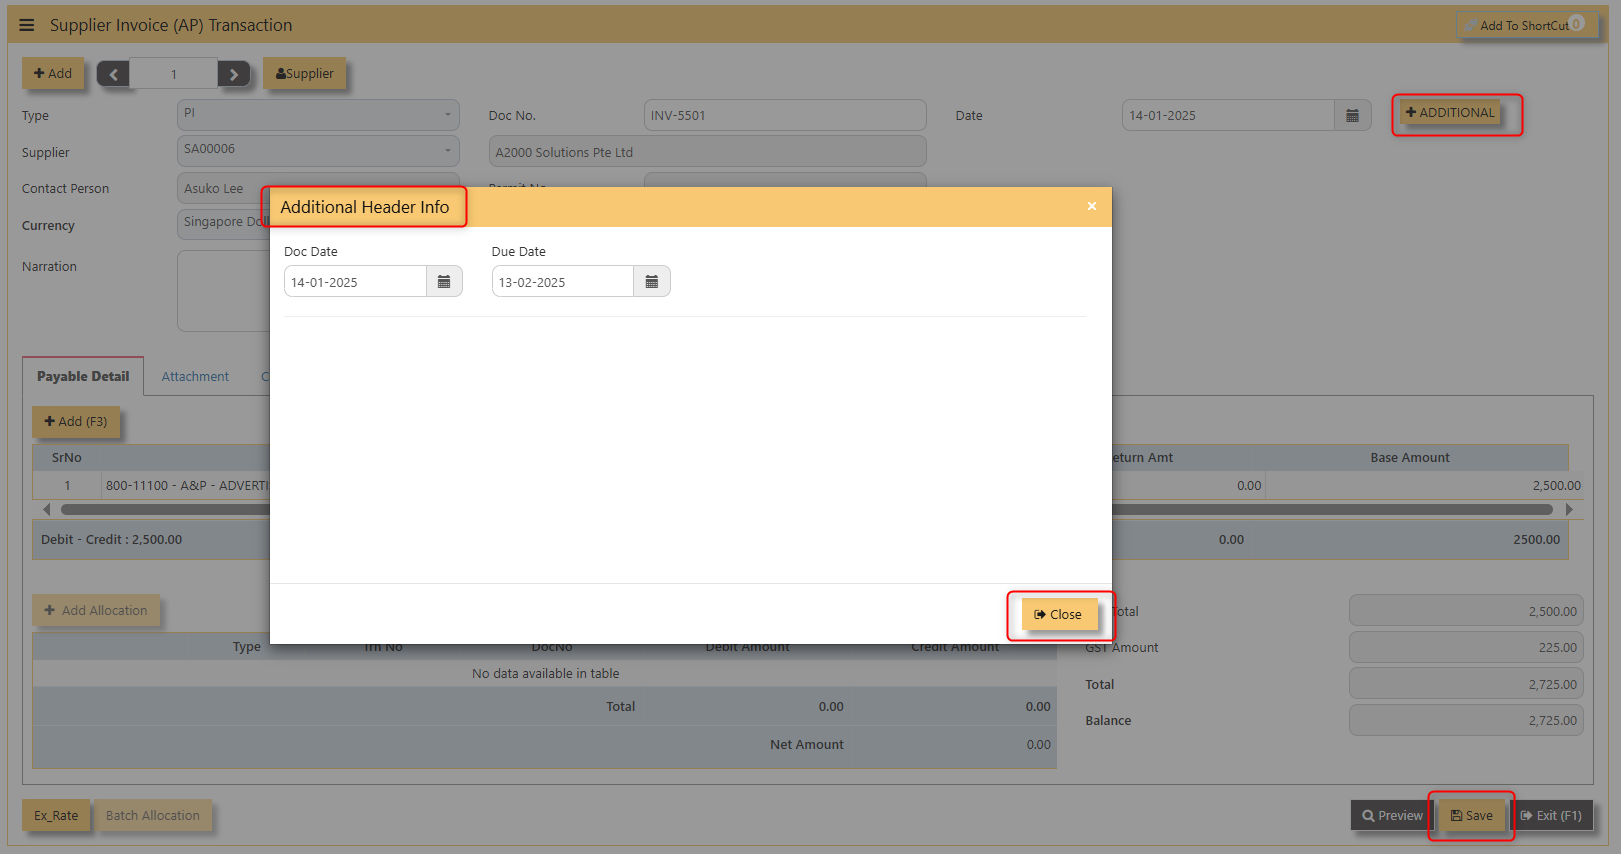](https://doc.uniq365.com/uploads/images/gallery/2025-02/s1Pimage.png)
- Click on **save** button to complete the entry.
3\. Below is a sample PI transaction screen.
[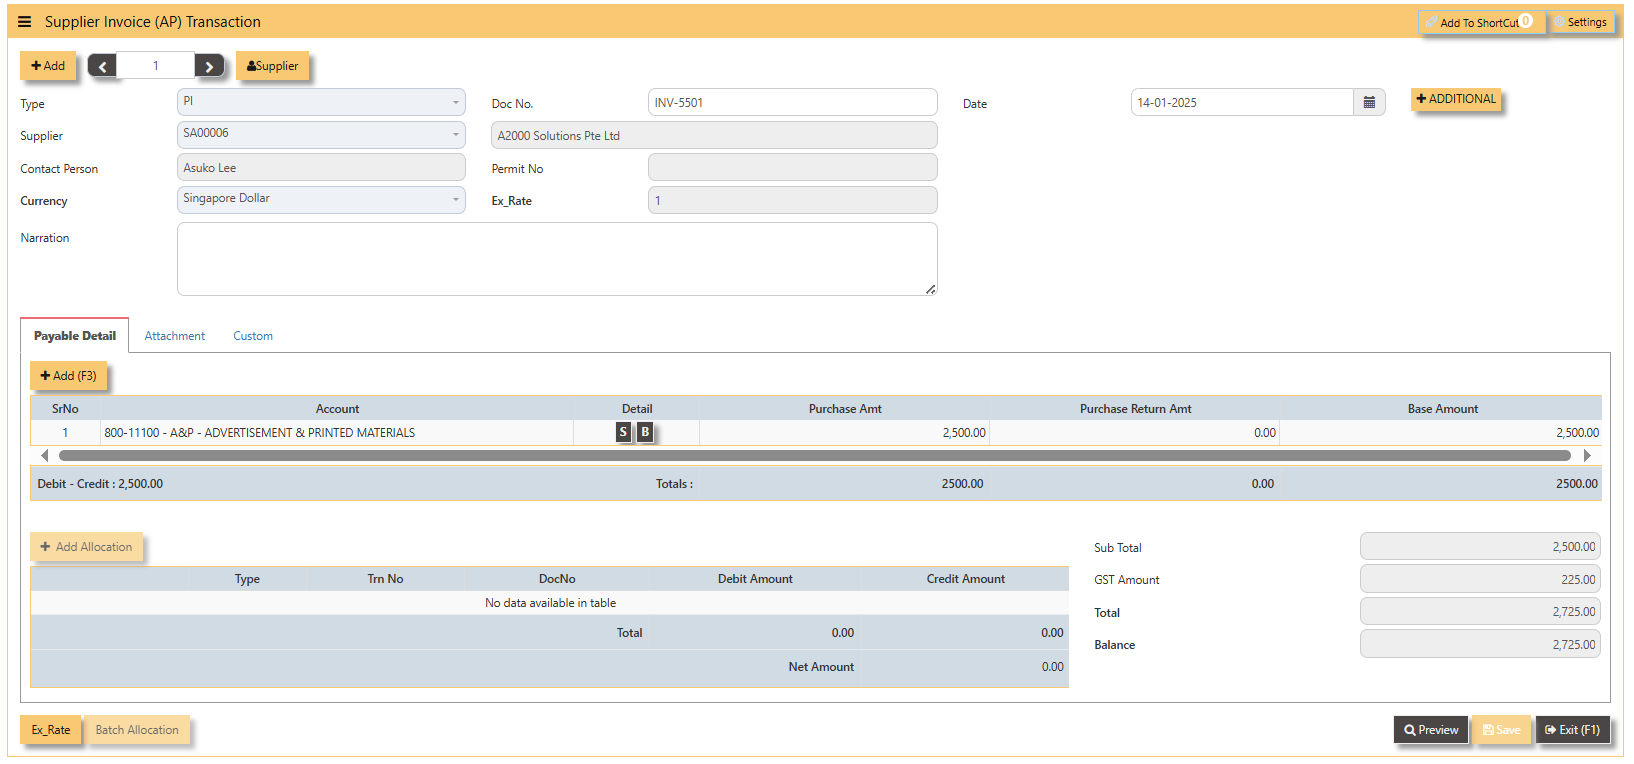](https://doc.uniq365.com/uploads/images/gallery/2025-01/udaimage.png)
**Additional Information:**
- **Ex Rate** It will redirect you to Finance Tab. Attached link for further information. [MASTERS GL | Support Doc](https://doc.uniq365.com/books/online-user-guide-10-1224/page/masters-gl)
[](https://doc.uniq365.com/uploads/images/gallery/2025-02/gBTimage.png)
3. For the entries of the PI transaction created, it can be verify under **AP Transaction Listing.**
[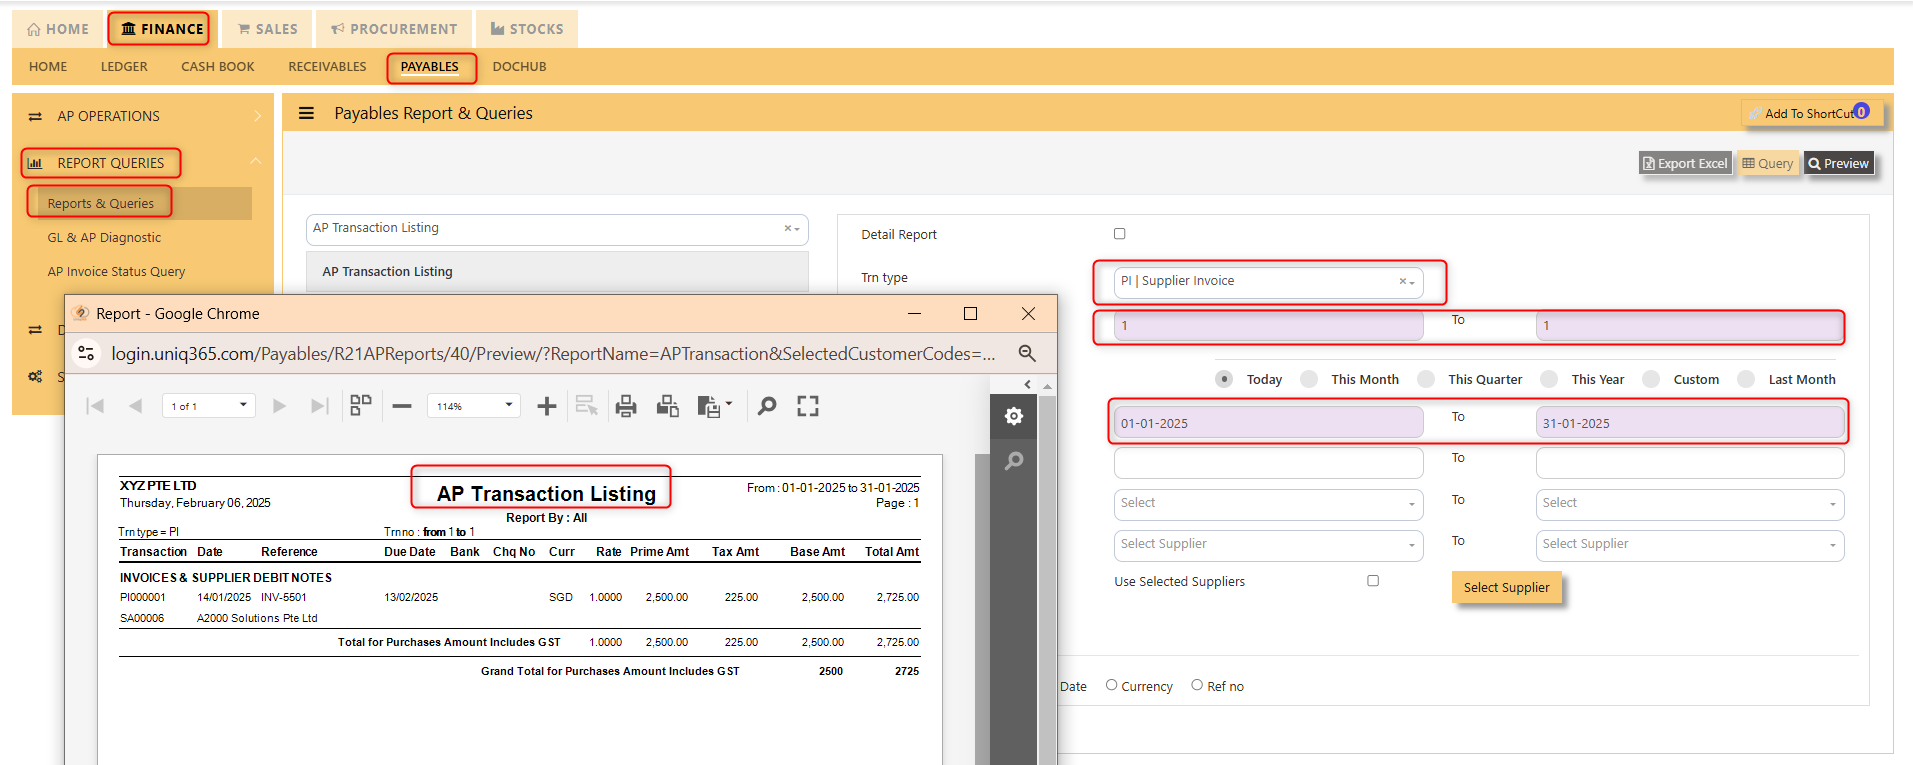](https://doc.uniq365.com/uploads/images/gallery/2025-02/6Ntimage.png)
> **Note: The steps to enter Credit Note (PC) & Debit Note (PD) are identical to PI. User will nee****d to select transaction type PC or PD respectively to enter the record.**
##### **\_\_\_\_\_\_\_\_\_\_\_\_\_\_\_\_\_\_\_\_\_\_\_\_\_\_\_\_\_\_\_\_\_\_\_\_\_\_\_\_\_\_\_\_\_\_\_\_\_\_\_\_\_\_\_\_\_\_\_\_\_\_\_\_\_\_\_\_\_\_\_\_\_\_\_\_\_\_\_\_\_\_\_\_\_\_\_\_\_\_\_\_\_\_\_\_\_\_\_**
##### **How to allocate Foreign Currency Invoice with Base Currency Payment?**
Let's use the following example to do this type of allocation:
1. Create a foreign currency invoice as follow:
[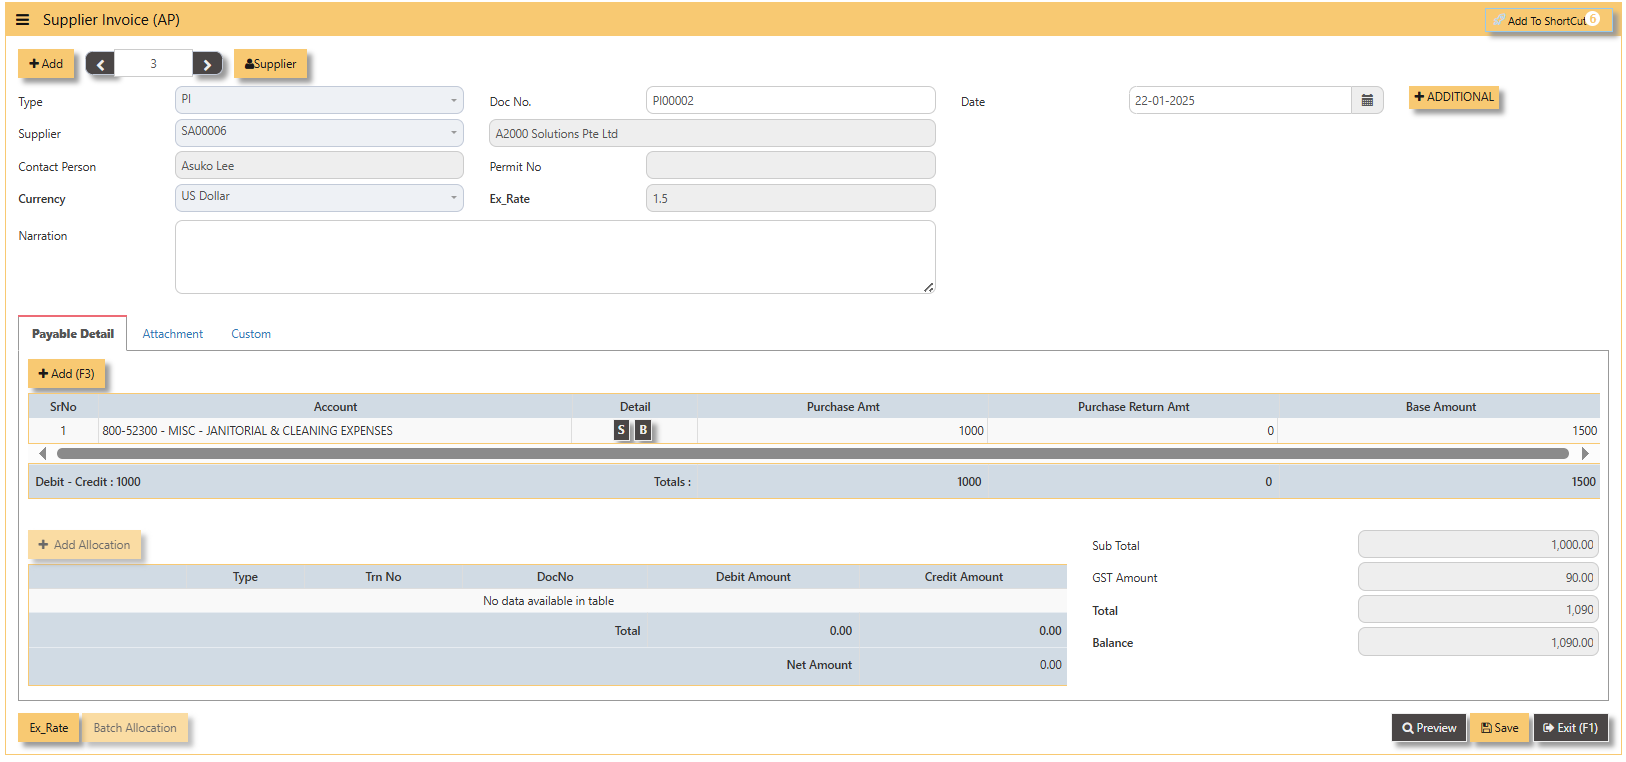](https://doc.uniq365.com/uploads/images/gallery/2025-01/Gtsimage.png)
2. Payment is made in base currency and in this example, it is SGD. The payment voucher should be entered as follow:
[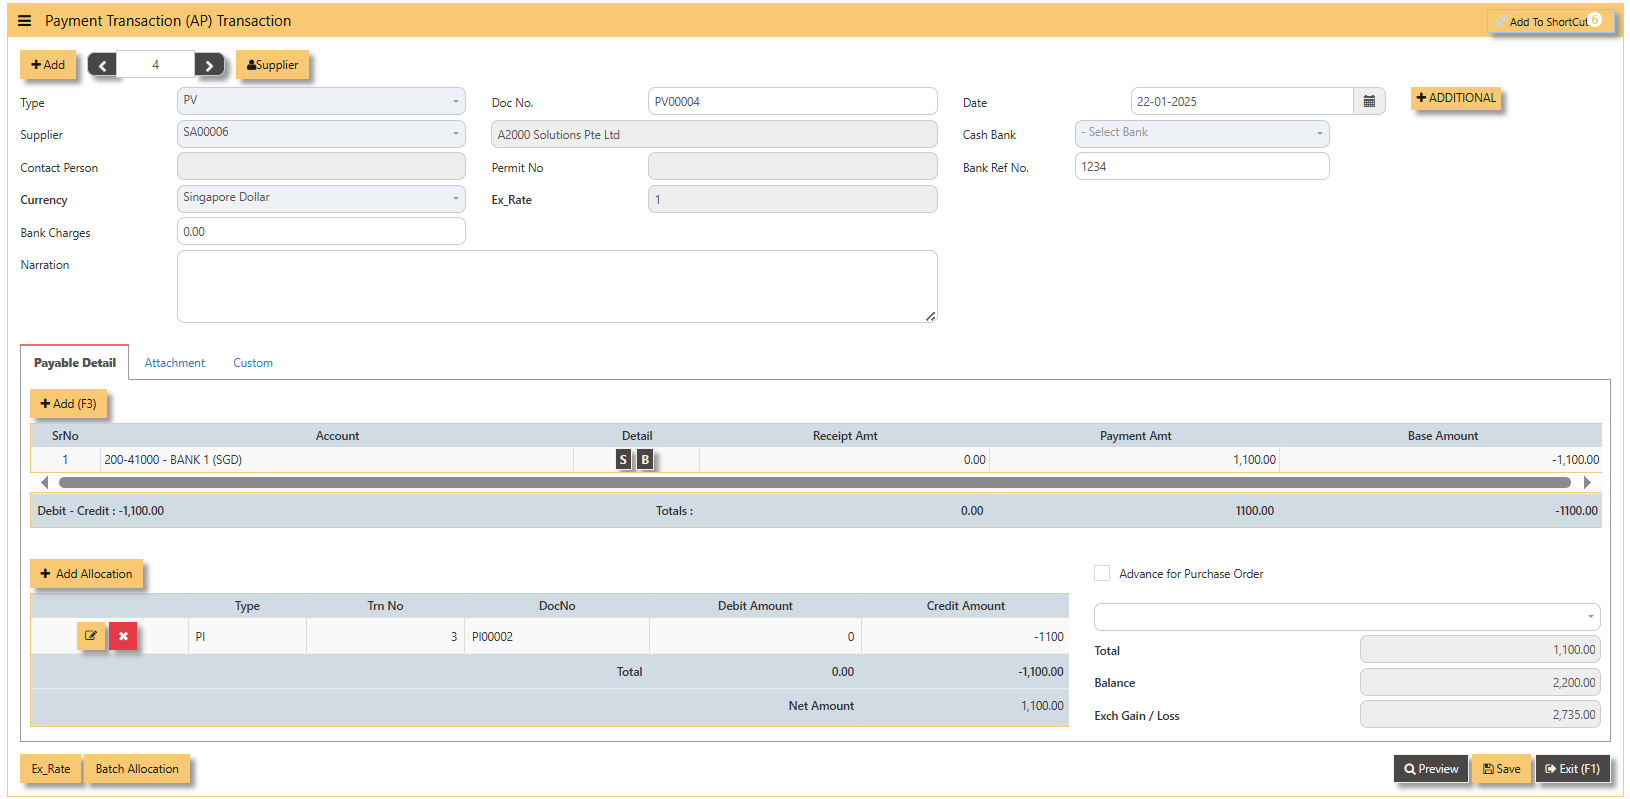](https://doc.uniq365.com/uploads/images/gallery/2025-01/k30image.png)
- Click on **Batch Allocation** button for the screen below:
[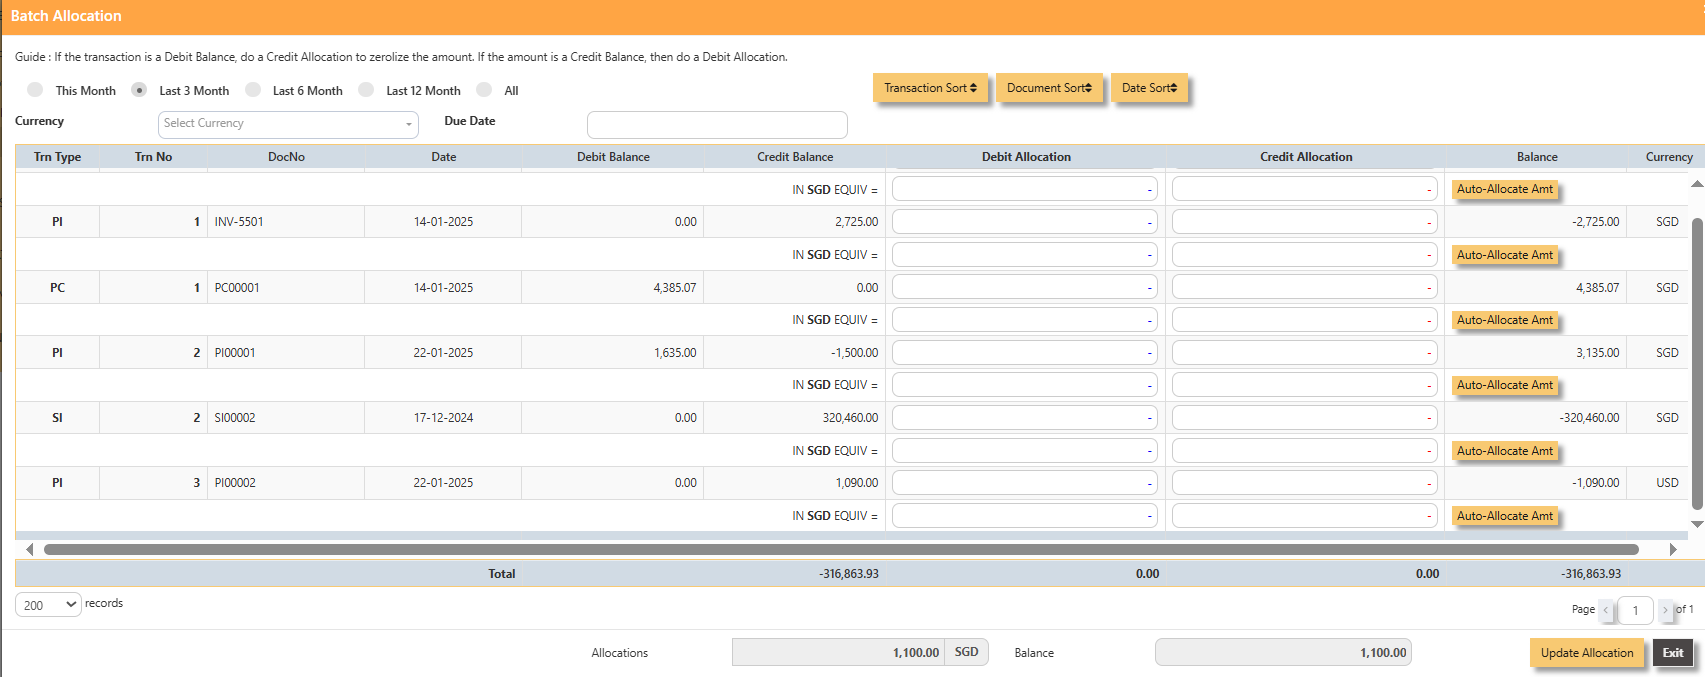](https://doc.uniq365.com/uploads/images/gallery/2025-01/89Cimage.png)
- For PI00002, click on **Auto-Allocate Amt** button, you will notice that the full amount of the invoice will be populated at
the 1st line.
[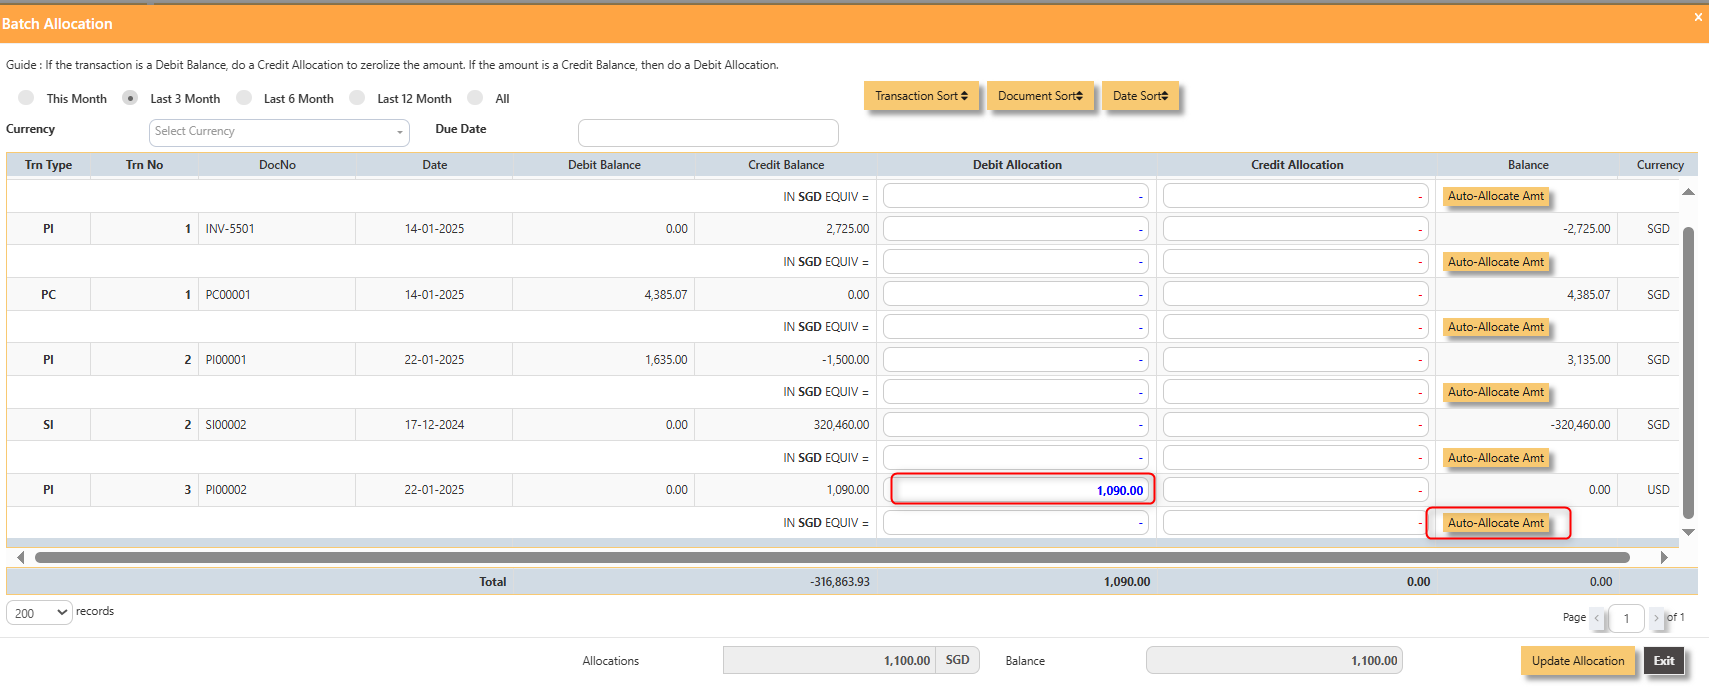](https://doc.uniq365.com/uploads/images/gallery/2025-01/jj9image.png)
- You should manually type in the base currency amount in SGD field as shown below. Click on **Update Allocation** to complete the allocation and **save** the PV transaction.
[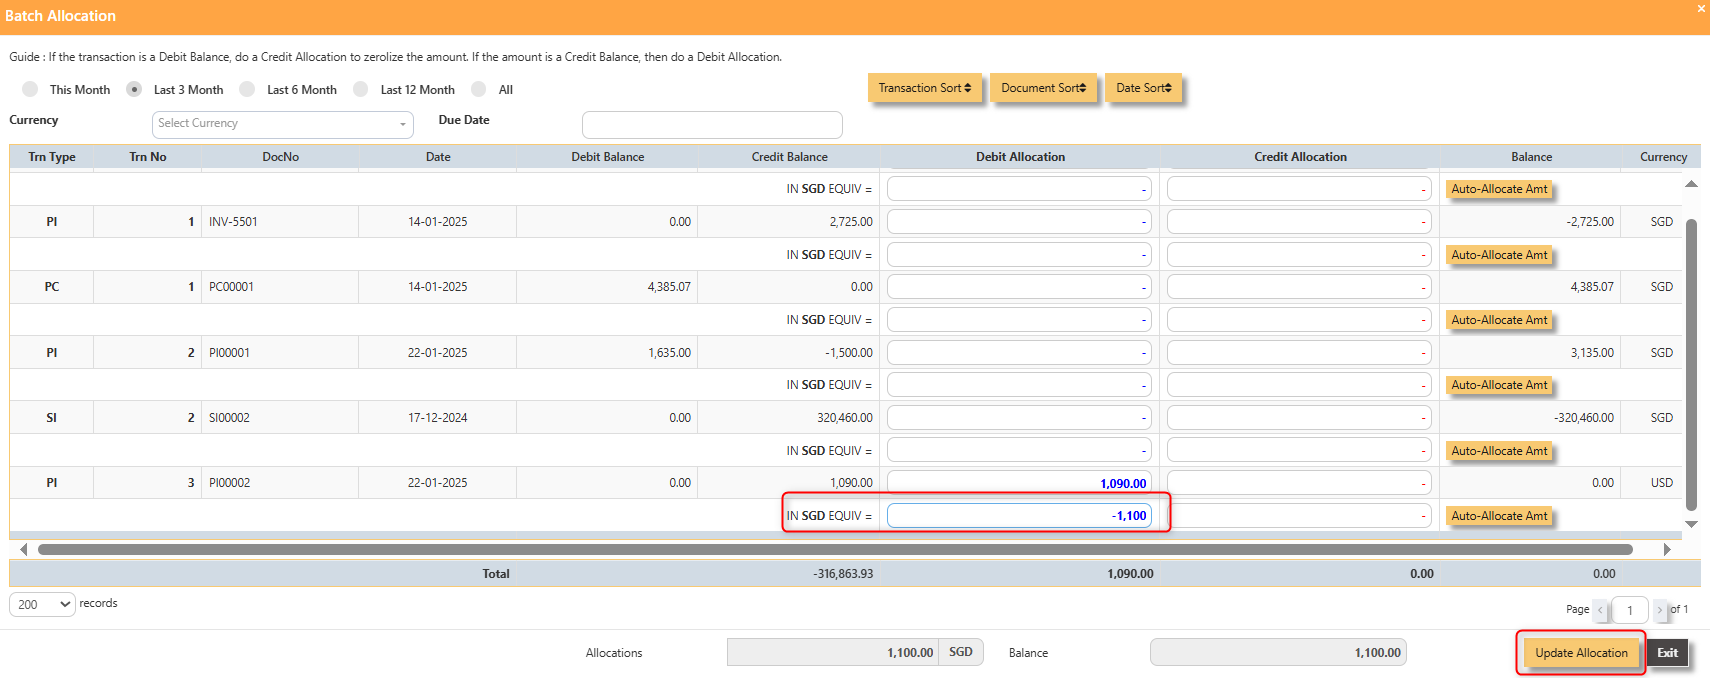](https://doc.uniq365.com/uploads/images/gallery/2025-01/3zTimage.png)
3. The completed payment transaction is as follow:
[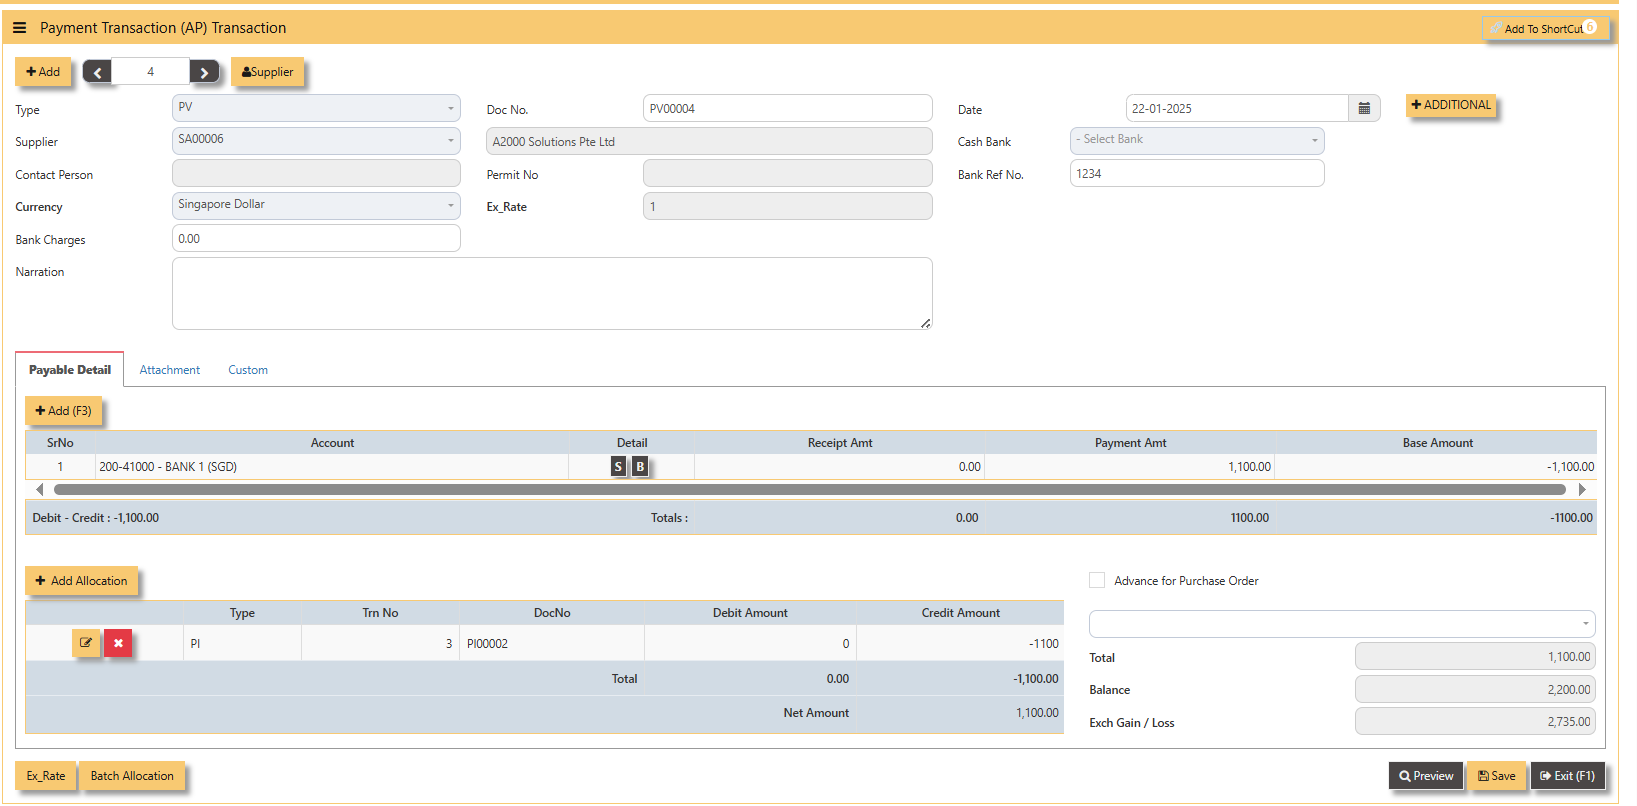](https://doc.uniq365.com/uploads/images/gallery/2025-01/ZCoimage.png)
4. UNIQ365 will capture the Realized Exchange Gain/Loss automatically upon allocation. The double entry of the above
transaction is shown below:
[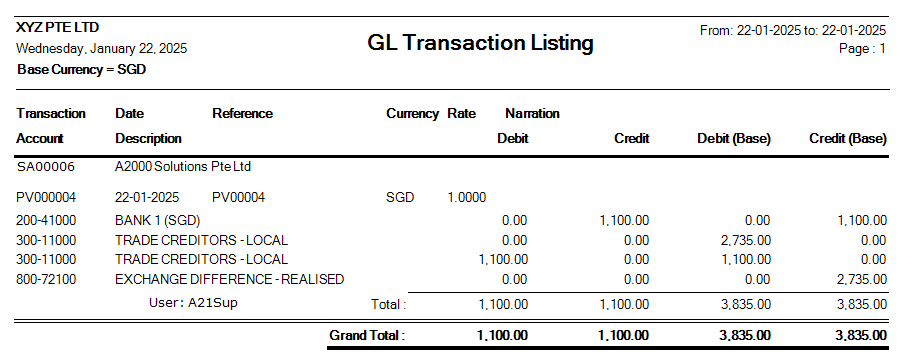](https://doc.uniq365.com/uploads/images/gallery/2025-01/YYSimage.png)
Payment Transaction (AP)
## **How to enter Payment Transaction (PV)?**
##### A payment transaction is the process where funds are transferred from one party to another in exchange for goods, services, or obligations. It typically involves the payer providing payment information, which is then processed by a payment system or intermediary. Once the transaction is authorized, the funds are transferred to the payee, completing the exchange.
##### **\_\_\_\_\_\_\_\_\_\_\_\_\_\_\_\_\_\_\_\_\_\_\_\_\_\_\_\_\_\_\_\_\_\_\_\_\_\_\_\_\_\_\_\_\_\_\_\_\_\_\_\_\_\_\_\_\_\_\_\_\_\_\_\_\_\_\_\_\_\_\_\_\_\_\_\_\_\_\_\_\_\_\_\_\_\_\_\_\_\_\_\_\_\_\_\_\_\_\_**
**Steps to enter PV are as follow:**
1. Click on **Payables** – **AP Operations** – **Payment Transaction** (AP) and the following screen will appear.
[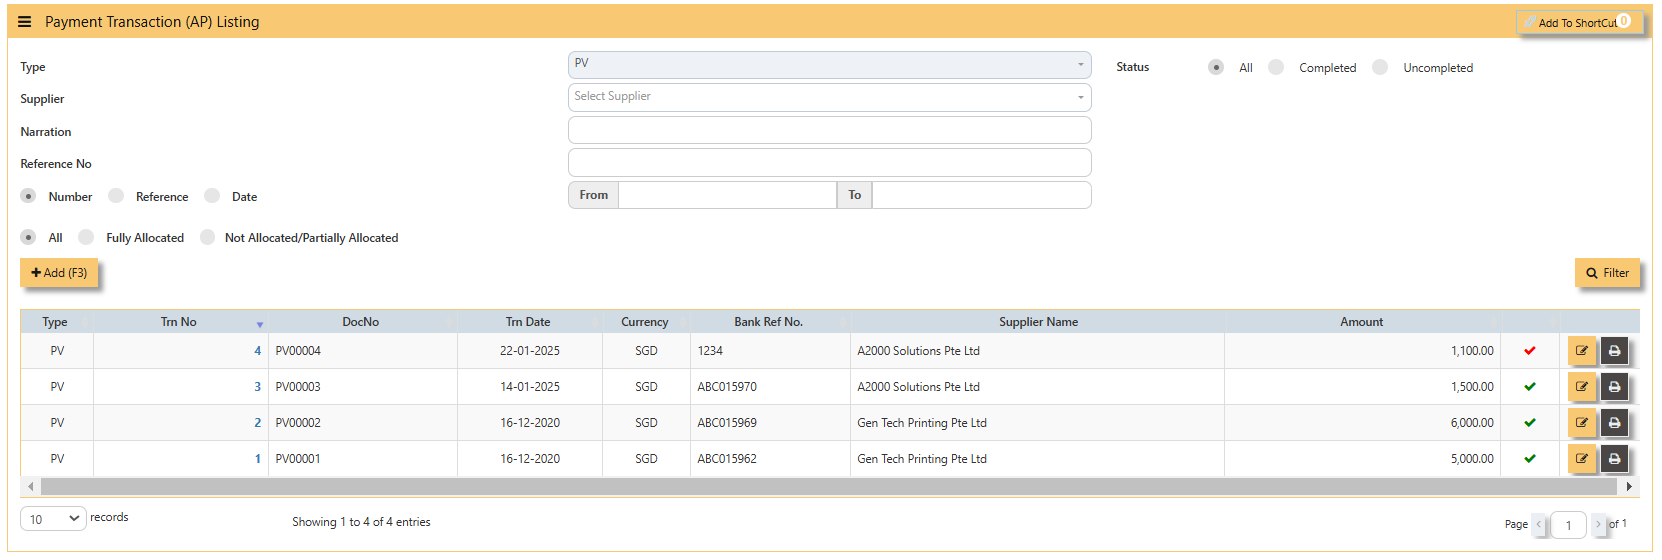](https://doc.uniq365.com/uploads/images/gallery/2025-02/NUHimage.png)
2\. Click on **Add** button to create a new transaction.
[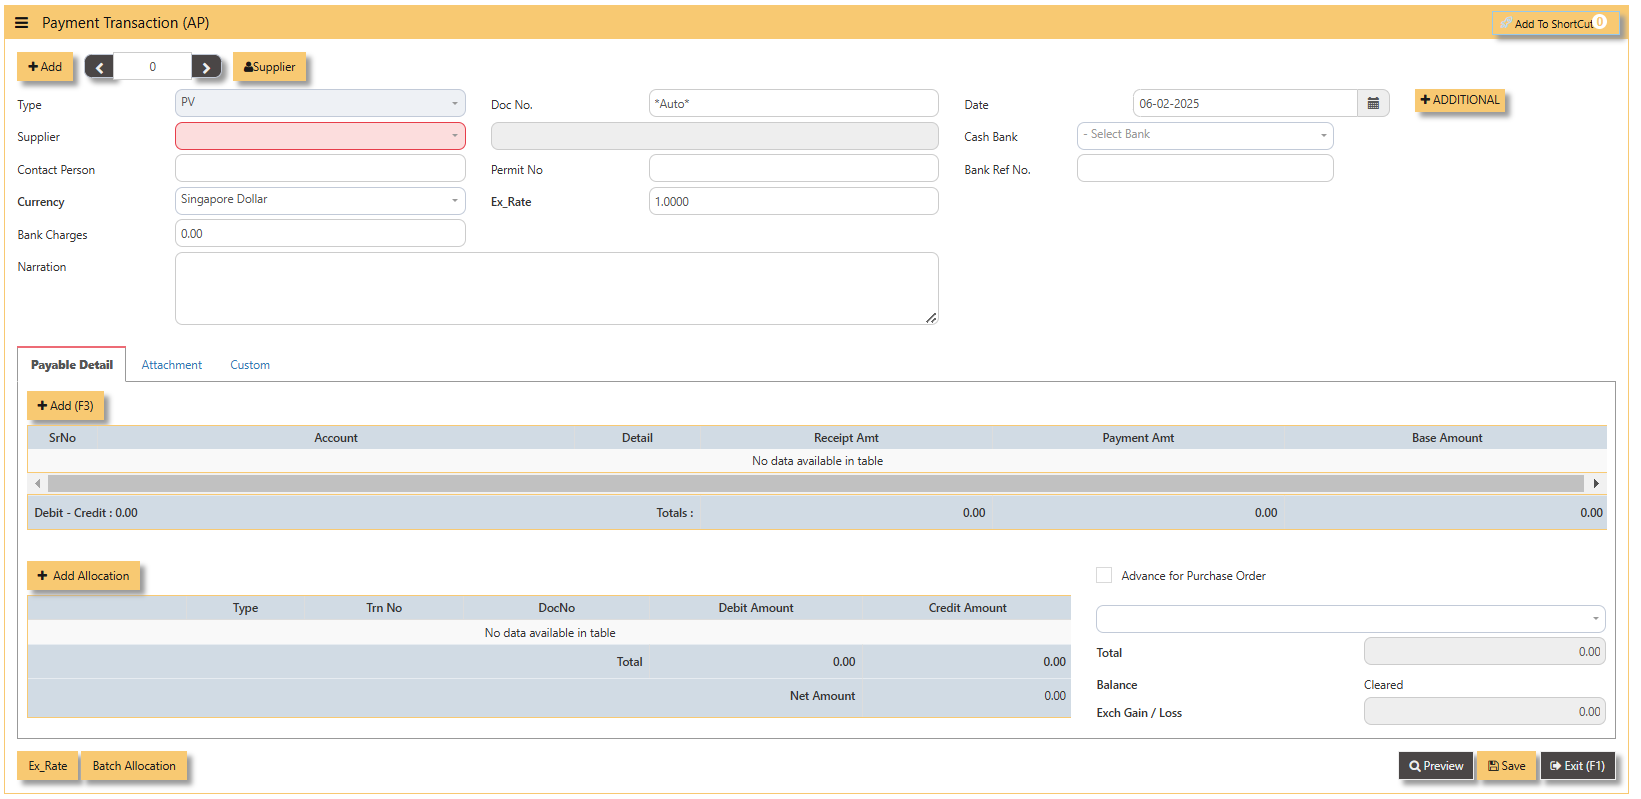](https://doc.uniq365.com/uploads/images/gallery/2025-02/exZimage.png)
- Fill up the fields in the header section such as **Date, Supplier, Contact Person, Currency, Exchange Rate, Cash Bank and Bank Ref No.**
- Then select the account concerned at the detail section.
- Click for **Additional Info** for necessary details to add.
[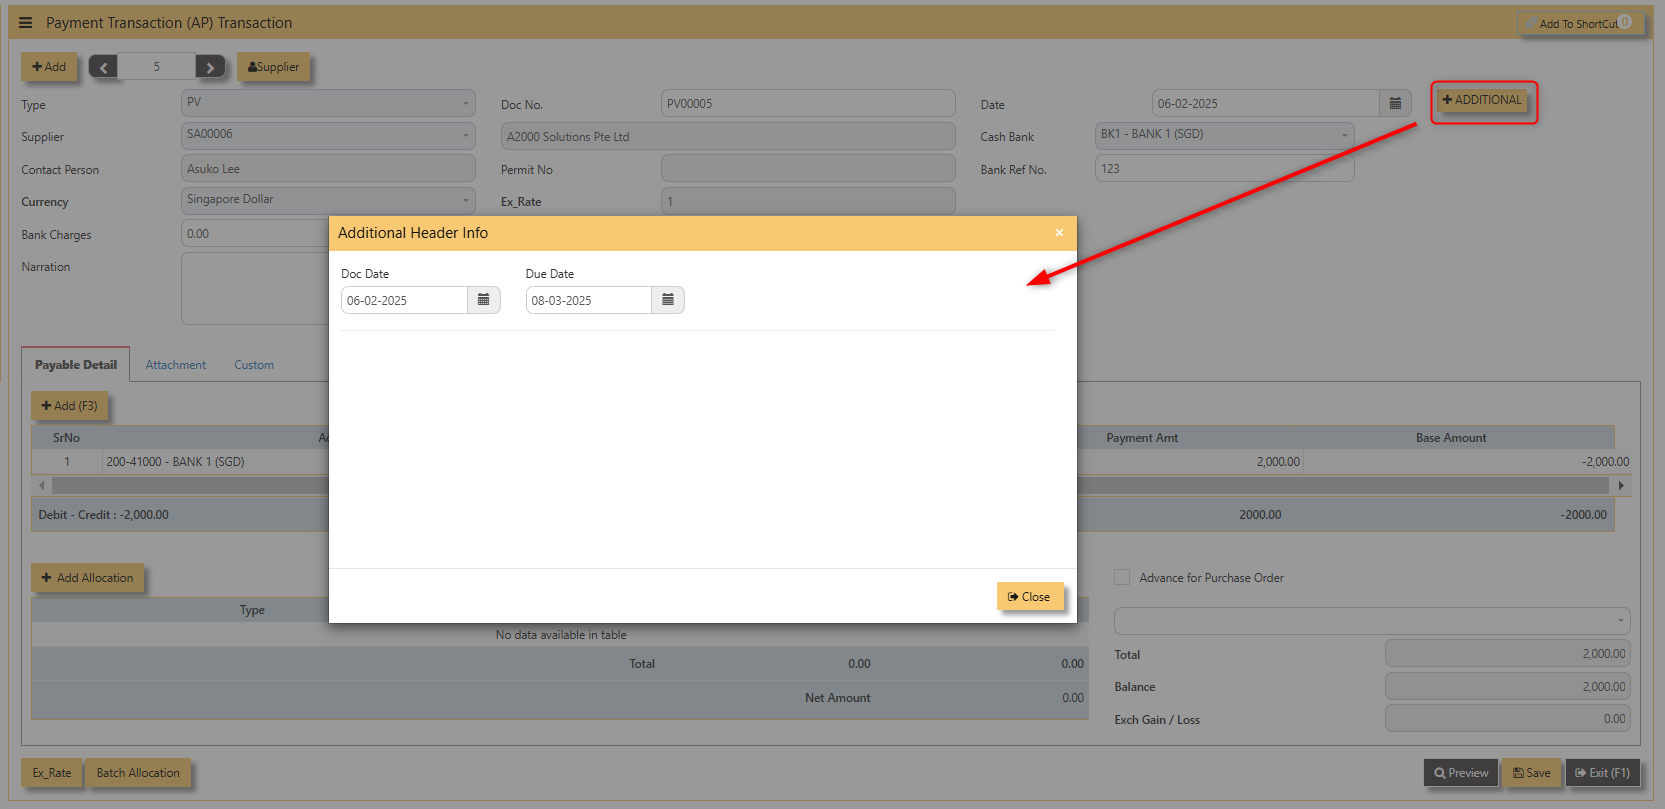](https://doc.uniq365.com/uploads/images/gallery/2025-02/rNpimage.png)
- Click on **save** button to complete the entry.
3\. Below is a sample PV transaction screen.
[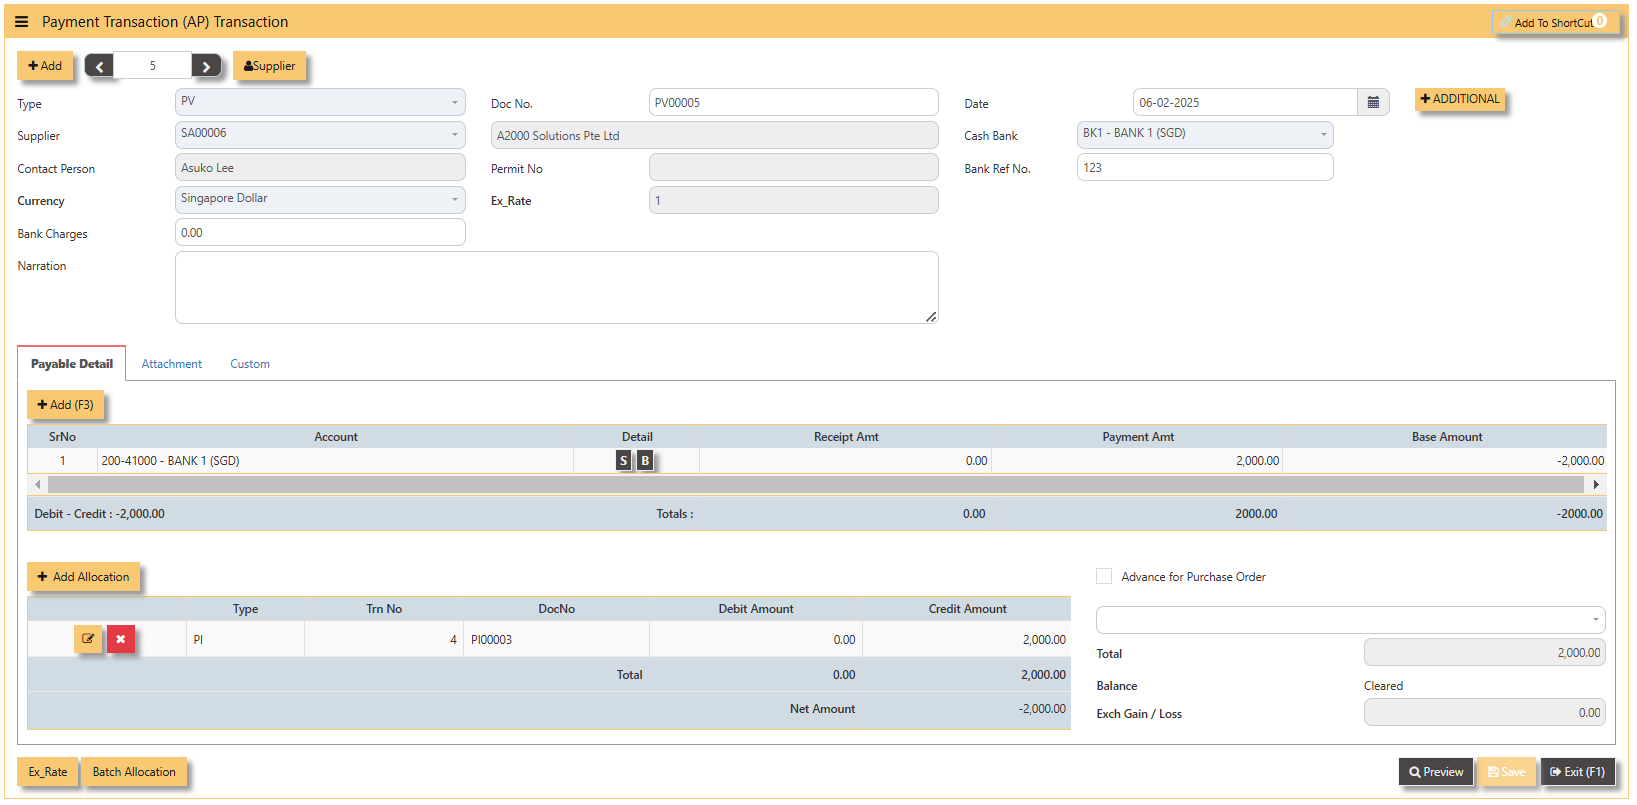](https://doc.uniq365.com/uploads/images/gallery/2025-02/9gXimage.png)
**Additional Information: **
- **Ex Rate** It will redirect you to Finance Tab. Attached link for further information. [MASTERS GL | Support Doc ](https://doc.uniq365.com/books/online-user-guide-10-1224/page/masters-gl)
[](https://doc.uniq365.com/uploads/images/gallery/2025-02/gBTimage.png)
- **Batch Allocation** If you have a lot of transactions needed to allocate, you may use the batch allocation button to allocate transactions in a convenient way. Sample below.
[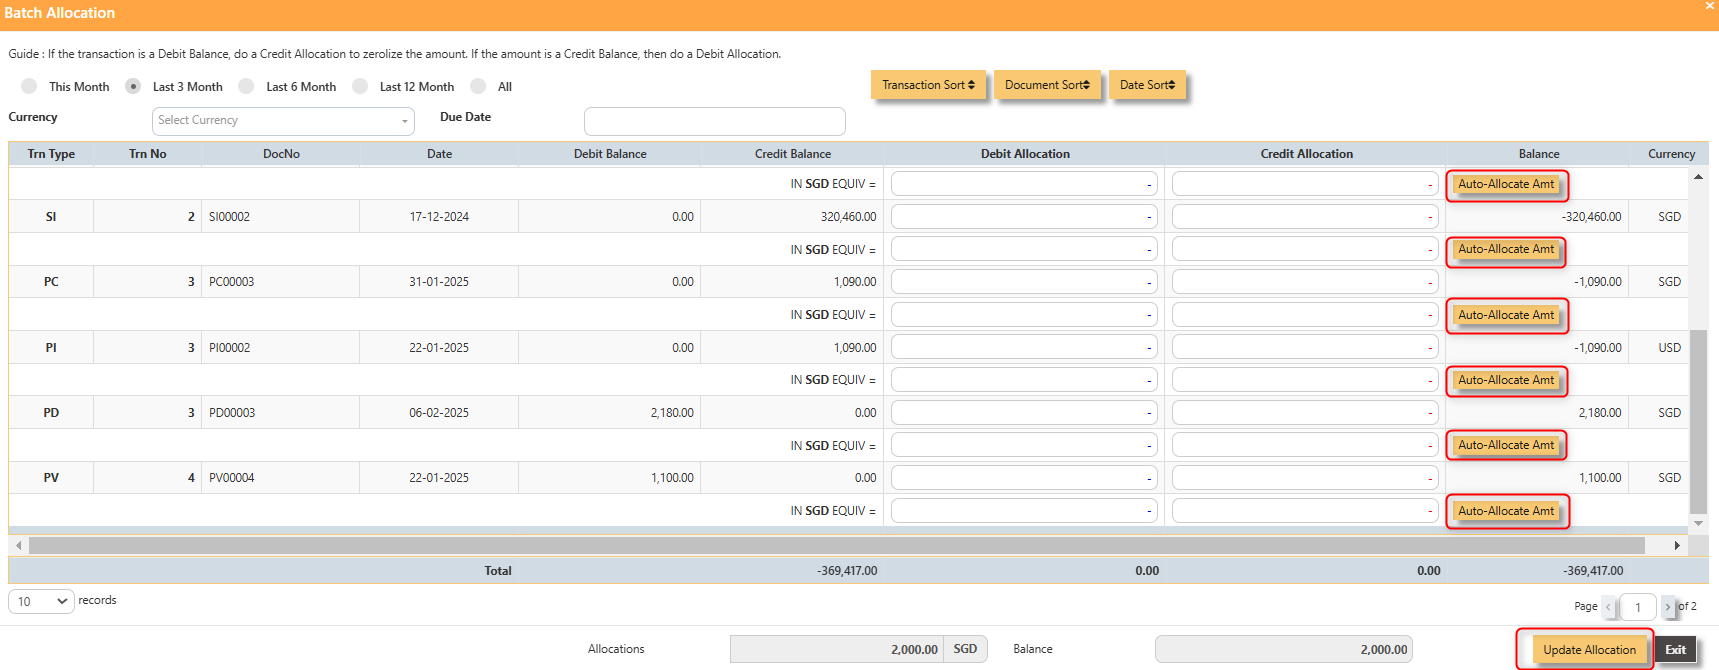](https://doc.uniq365.com/uploads/images/gallery/2025-02/crNimage.png)
4\. For the double entries of the PV transaction created, it can be verify under **AP Transaction Listing.**
[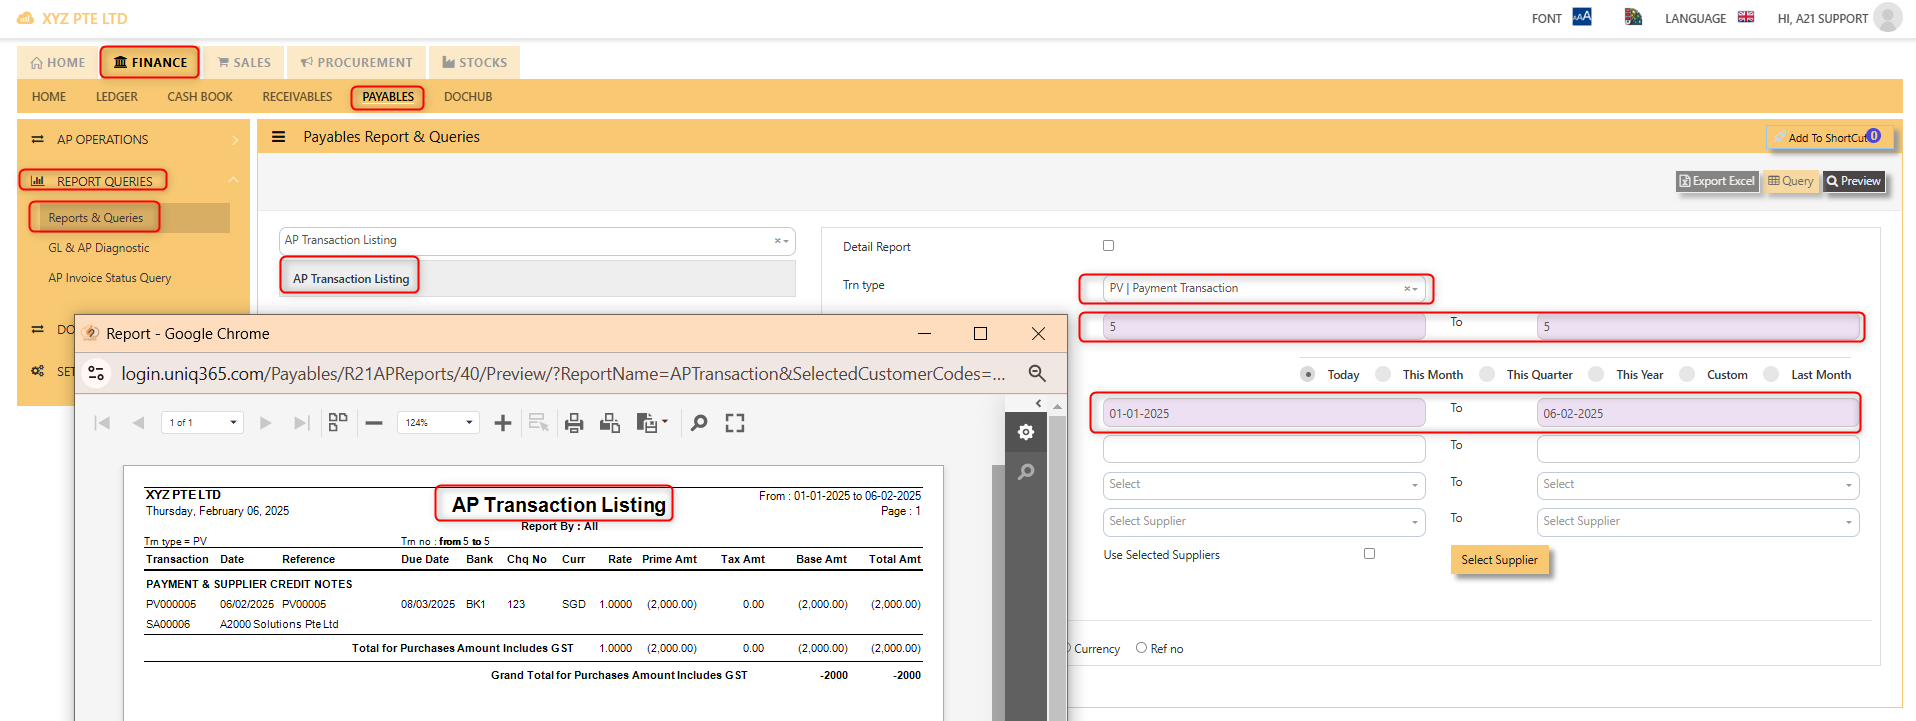](https://doc.uniq365.com/uploads/images/gallery/2025-02/19nimage.png)
Opening Balance
##### To start on a new database, AP Opening Balances must be updated in order for user to trace all the outstanding supplier invoices at the start of the 1st financial year.
> **Important: The total amount entered under AP Open Item must tie with the opening amount in the General Ledger Opening for Trade Creditor Control Account/(s) if the Posting Type selected in Payable Control Account is Supplier. **
You may use the report under **Payables – Reports & Queries – AP Open Item Listings** to tie the figures.
[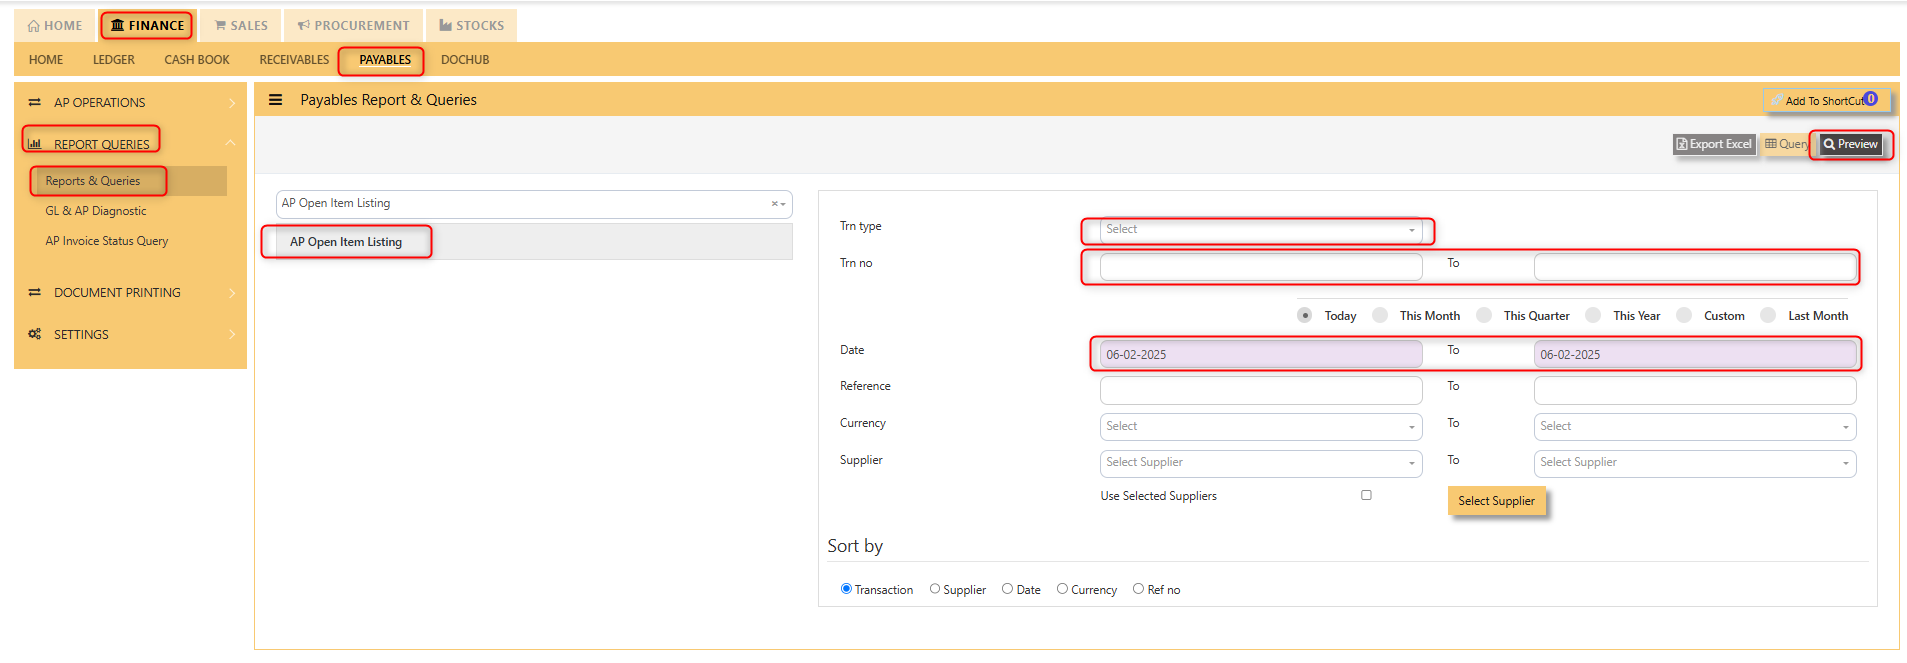](https://doc.uniq365.com/uploads/images/gallery/2025-02/oe7image.png)
##### Below is the Account Payable – Opening Items screen. There is **NO** double entry posting for this option. The records entered will be retained for current year usage like allocations, verification of outstanding invoices etc.
1. Click on **Payables – AP Operations – Opening Balance** and the following screen will appear.
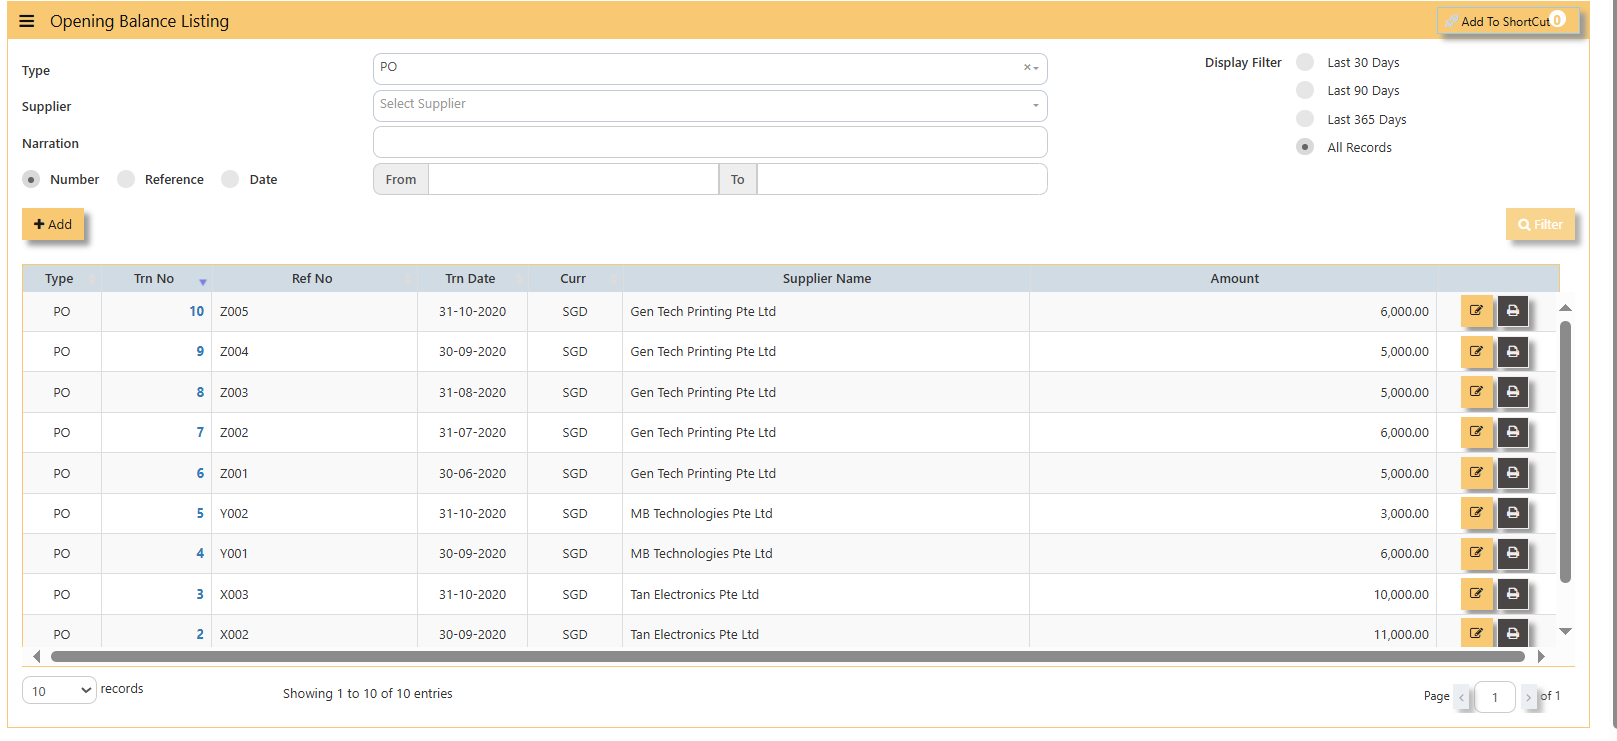
2\. Click on **Add** button for new transaction
[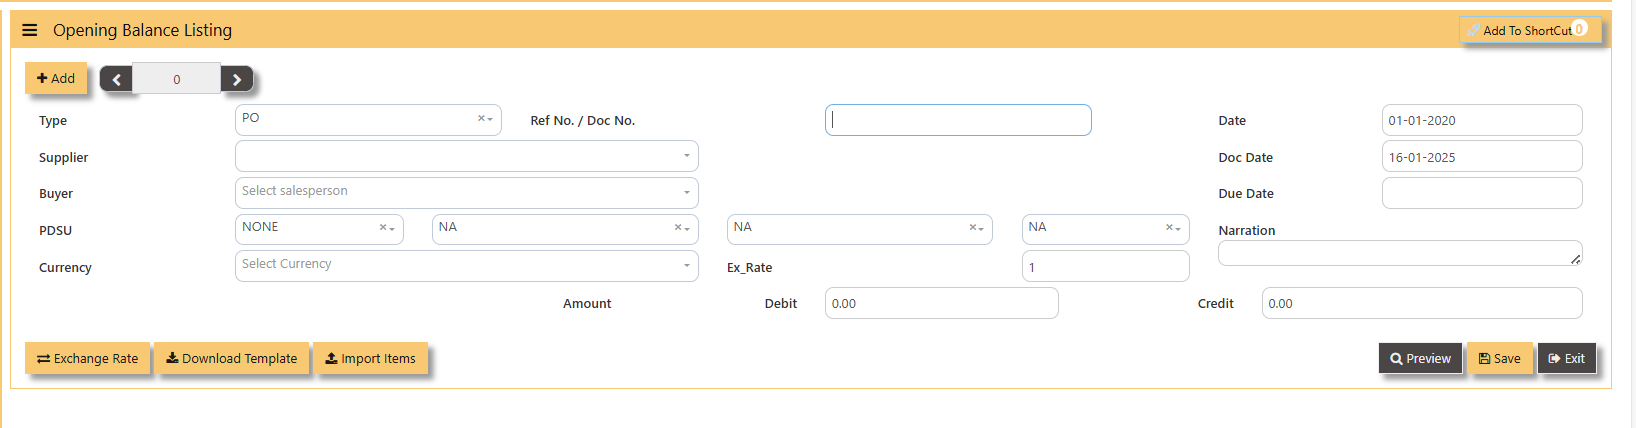](https://doc.uniq365.com/uploads/images/gallery/2025-01/ri5image.png)
- Fill up the fields such as **Ref No, Date, Dock Date, Due Date, Supplier, Buyer, PDSU, Currency, Exchange Rate, Narration, and amount.**
[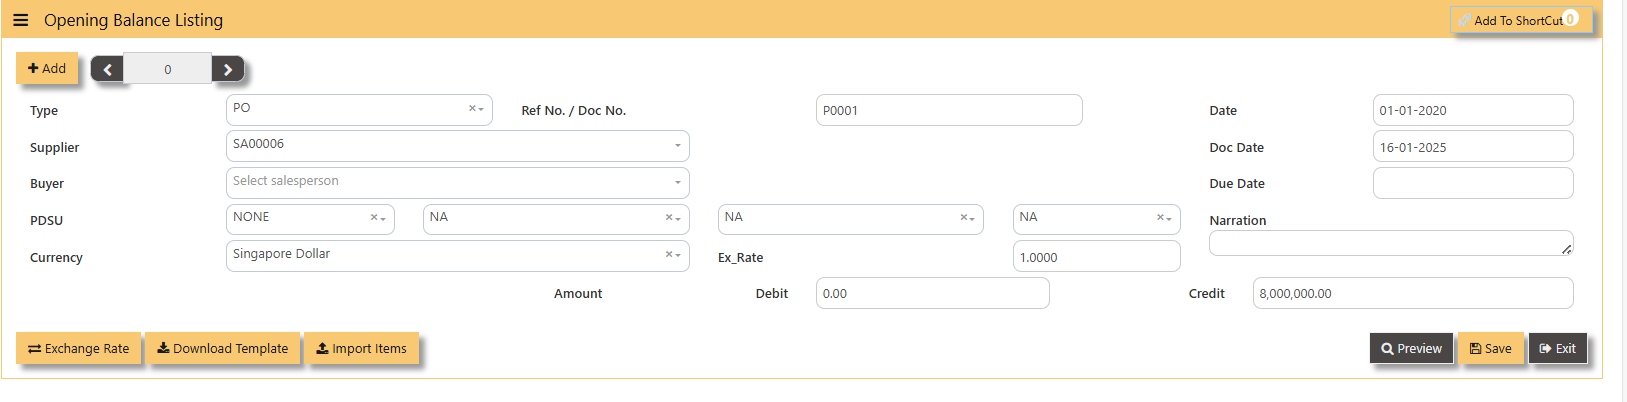](https://doc.uniq365.com/uploads/images/gallery/2025-01/yMQimage.png)
> **Note: The date must be the actual date of invoices concerned in order for the system to capture the correct supplier aging. If supplier invoice the amount is credit side and if is a supplier credit note is a debit side. **
**Additional Information:**
- **Ex Rate** It will redirect you to Finance Tab. Attached link for further information. [MASTERS GL | Support Doc ](https://doc.uniq365.com/books/online-user-guide-10-1224/page/masters-gl)
[](https://doc.uniq365.com/uploads/images/gallery/2025-02/gBTimage.png)
- **Download Template** Once you click for the Download Template, it will auto download the Excel File.
[](https://doc.uniq365.com/uploads/images/gallery/2025-02/jFZimage.png)
Ensure the Excel file you plan to upload is formatted correctly. It should contain all these fields:
- Supplier Code
- Inv Date
- Inv Number
- Doc Date
- Due Date
- Buyer
- Narration
- Project
- Department
- Section
- Unit
- Currency
- Exchange Rate
- Debit Amount
- Credit Amount
[](https://doc.uniq365.com/uploads/images/gallery/2025-02/OQpimage.png)
##### **\_\_\_\_\_\_\_\_\_\_\_\_\_\_\_\_\_\_\_\_\_\_\_\_\_\_\_\_\_\_\_\_\_\_\_\_\_\_\_\_\_\_\_\_\_\_\_\_\_\_\_\_\_\_\_\_\_\_\_\_\_\_\_\_\_\_\_\_\_\_\_\_\_\_\_\_\_\_\_\_\_\_\_\_\_\_\_\_\_\_\_\_\_\_\_\_\_\_\_**
##### **How to Import Items?**
1\. Click Import Items, this opens a file browser or prompt you to select the Excel file you want to upload.
[](https://doc.uniq365.com/uploads/images/gallery/2025-02/9wkimage.png)
- Sample excel file below generated from the system,
[](https://doc.uniq365.com/uploads/images/gallery/2025-02/uocimage.png)
2\. After successfully import of the excel file above, you may verify the entry in **AP Open Item Listing,**
[](https://doc.uniq365.com/uploads/images/gallery/2025-02/vrCimage.png)
Blacklist Supplier
##### This option enables user to blacklist customers and suppliers. Once a supplier is black-listed, user will be blocked from entering any purchase transactions for the supplier concerned.
##### **\_\_\_\_\_\_\_\_\_\_\_\_\_\_\_\_\_\_\_\_\_\_\_\_\_\_\_\_\_\_\_\_\_\_\_\_\_\_\_\_\_\_\_\_\_\_\_\_\_\_\_\_\_\_\_\_\_\_\_\_\_\_\_\_\_\_\_\_\_\_\_\_\_\_\_\_\_\_\_\_\_\_\_\_\_\_\_\_\_\_\_\_\_\_\_\_\_\_\_**
#### **How to enter Blacklist Supplier?**
Steps to enter Blacklist Supplier are as follow:
1. Click on **Payables – AP Operations – Blacklist** Supplier for the entry screen.
[](https://doc.uniq365.com/uploads/images/gallery/2025-01/lZRimage.png)
2. Click on **Add button**. Select the supplier from the drop-down list, enter the Blacklist date, key in the Remarks and select the A2000ERP user who performed the entry.
Screen below is an example of the entry,
[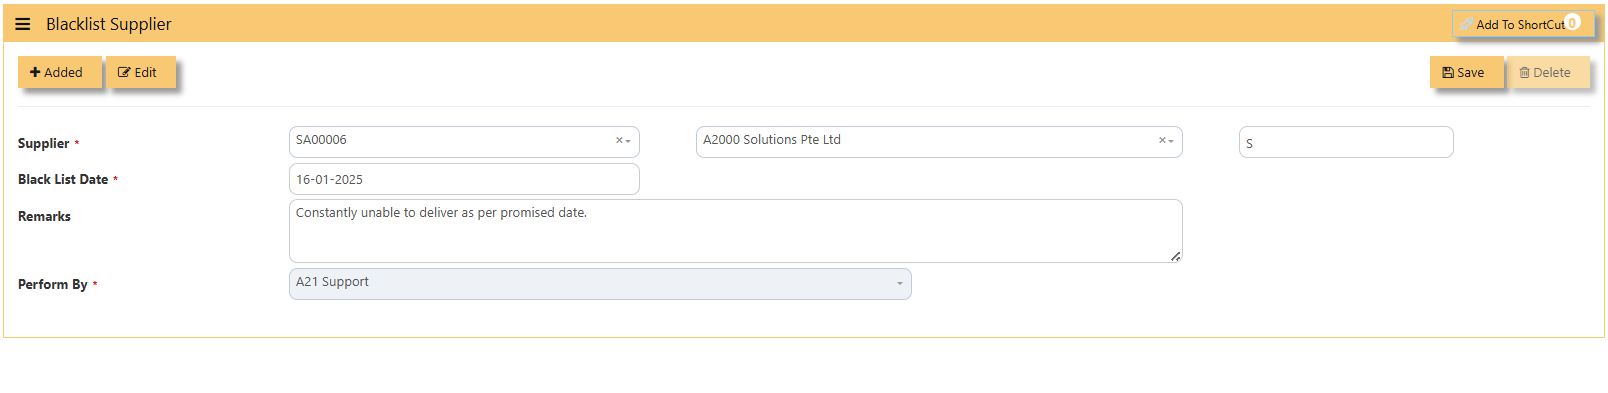](https://doc.uniq365.com/uploads/images/gallery/2025-01/1Osimage.png)
- To delete a supplier from the blacklist record, user must click on Edit button, select the supplier concerned, and then click on **Delete button** to clear the record.
Report Queries
##### The reports & query screen shown here opens the options for the users to print important reports related to the payables/purchase modules.
[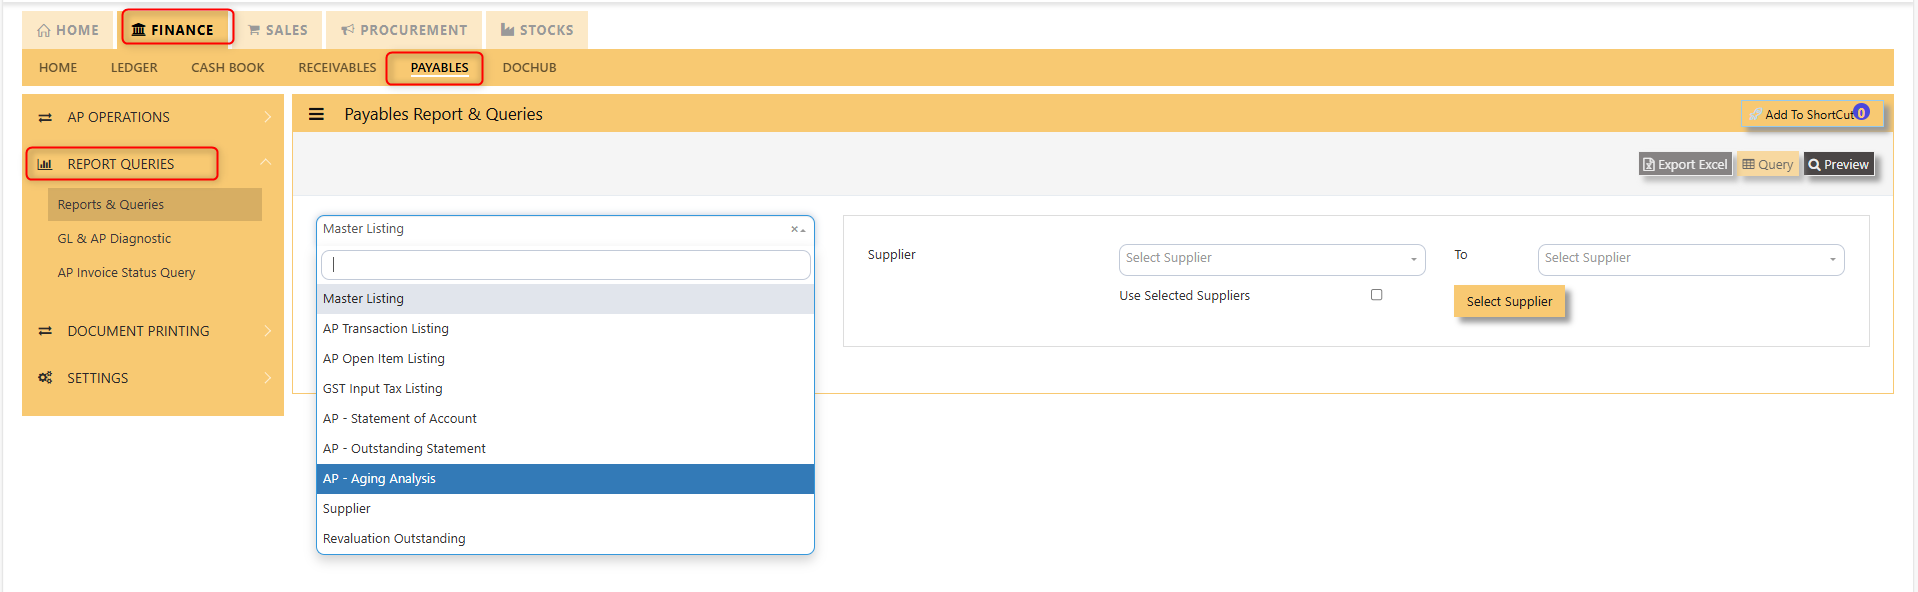](https://doc.uniq365.com/uploads/images/gallery/2025-01/QYvimage.png)
The main documents are the Statement of Account, Outstanding Statement and the Aging Analysis. These reports will enable the users to see the outstanding amount due to the suppliers, the transactions made as well as the aging report of outstanding transactions.
GL & AP Diagnostic
##### This screen will help you identify transactions that causes unbalanced of your GL Code and AP Accounts.
- Click on **Payables – AP Operations – Report Queries - GL & AP Diagnostic** and the following screen will appear.
[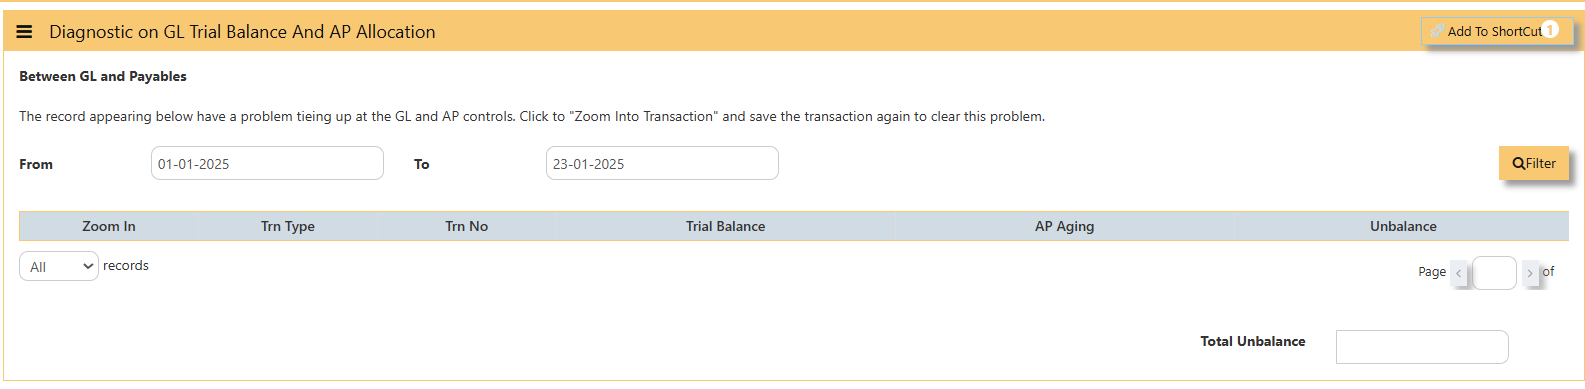](https://doc.uniq365.com/uploads/images/gallery/2025-01/iZ2image.png)
- Must filter the **From To** Date accordingly when was the unbalanced started and click **filter** so system will show you transactions that causes your unbalance if any.
AP Invoice Status Query
This screen will show AP Invoices such as how many were **invoiced**, **paid** and its remaining **balance.**
- Click on **Payables – AP Operations – Report Queries - AP Invoice Status Query** and the following screen will appear.
[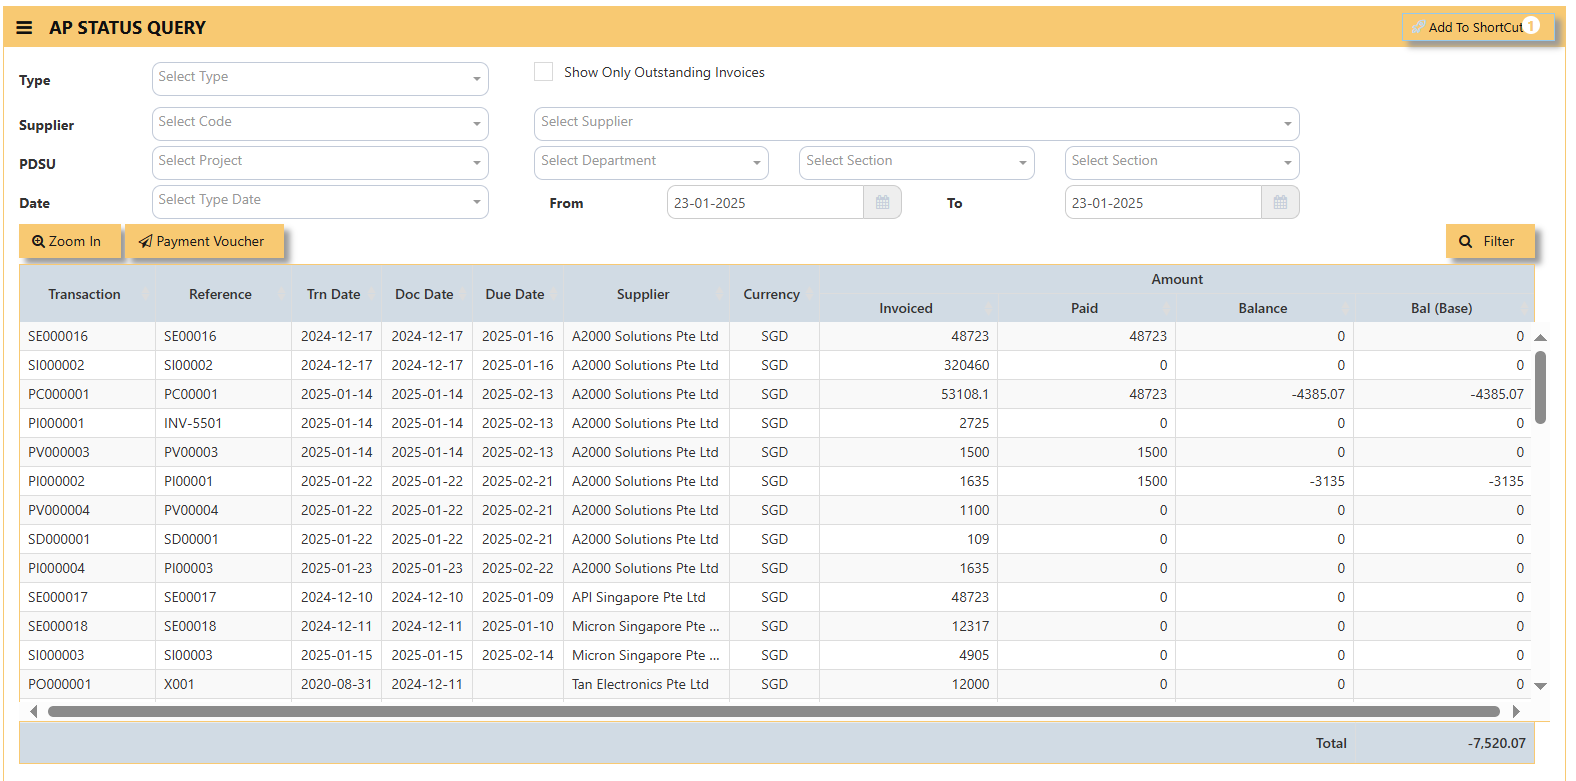](https://doc.uniq365.com/uploads/images/gallery/2025-01/Sw6image.png)
- Filter accordingly the necessaries such as **Type of transaction,** tick **show only outstanding invoices** if you want to, **Supplier, PDSU if any, Type Date and Filter.**
Below photo as a sample,
[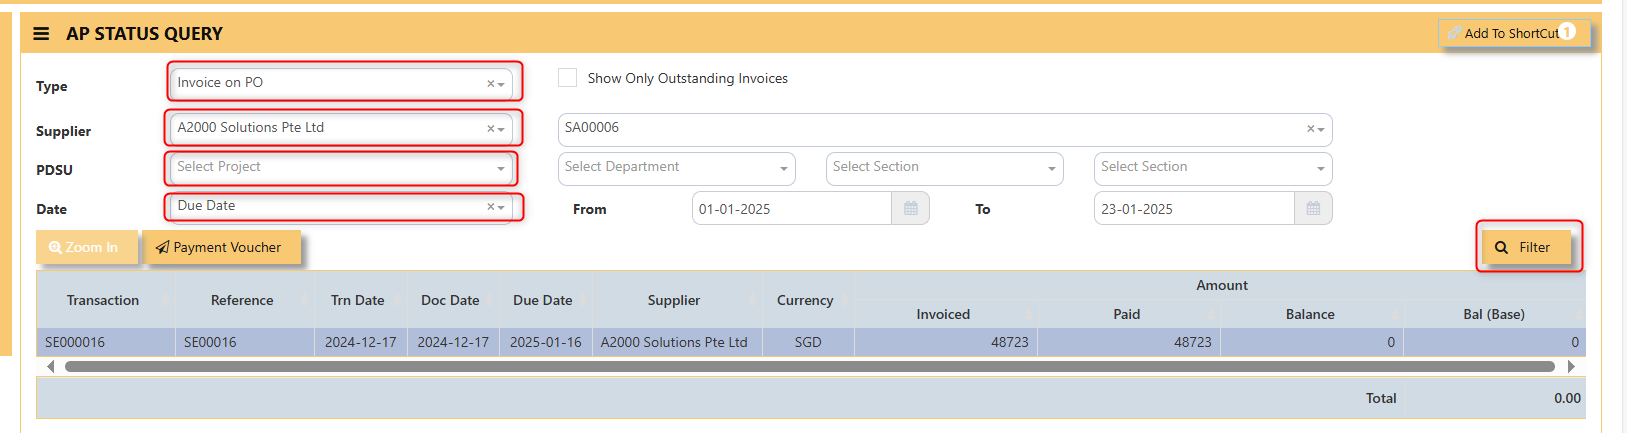](https://doc.uniq365.com/uploads/images/gallery/2025-01/MrVHcFimage.png)
- You may click **ZOOM IN** and it will redirect you to the transaction itself.
[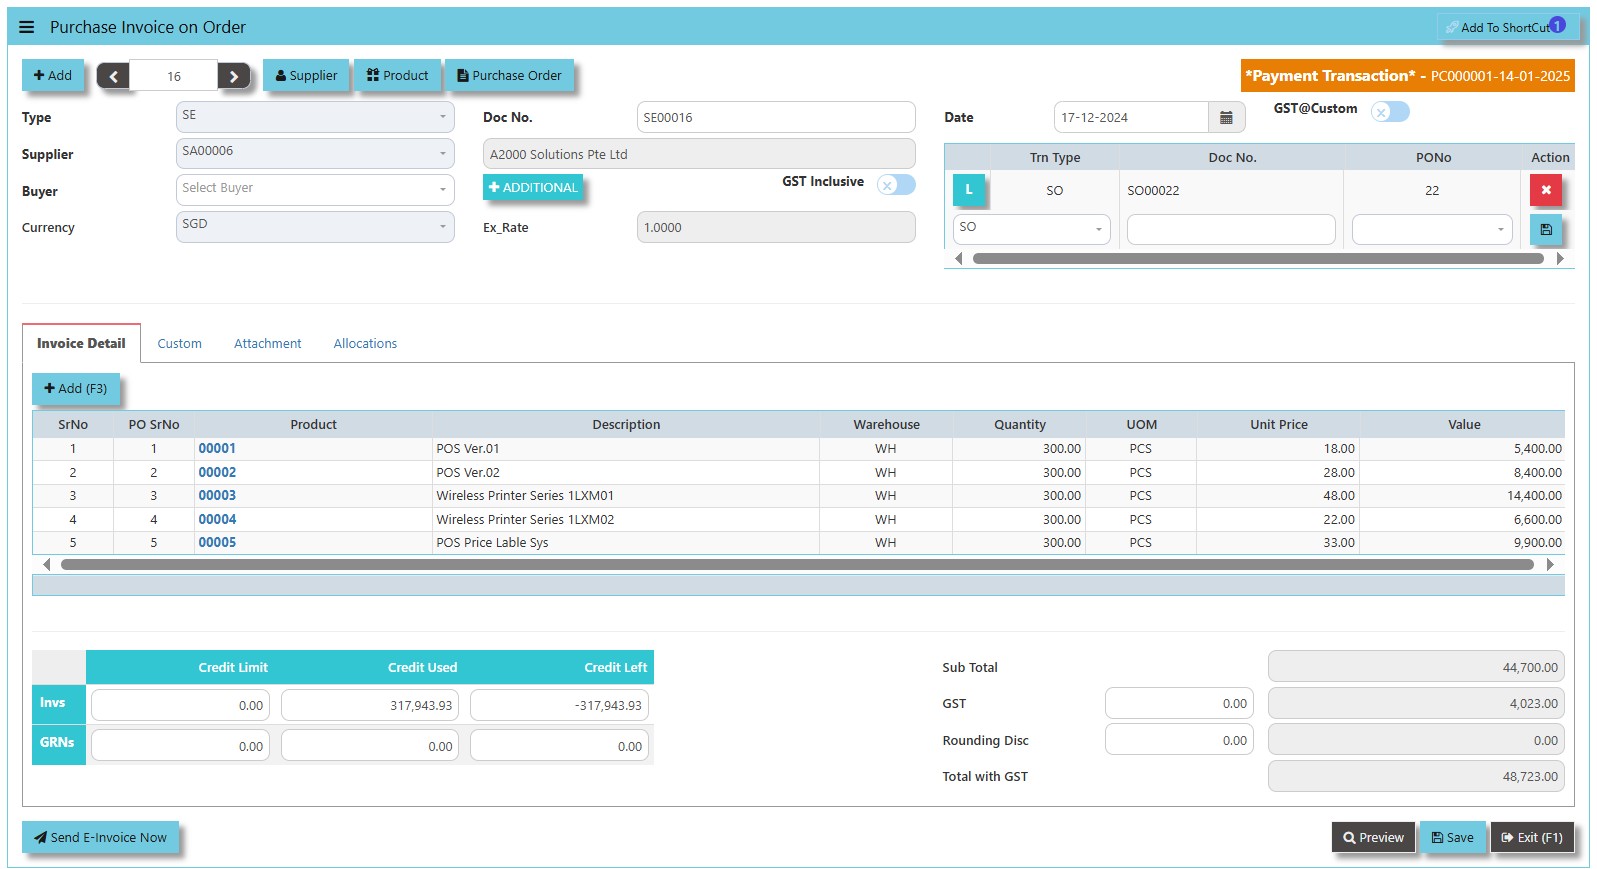](https://doc.uniq365.com/uploads/images/gallery/2025-01/HWQimage.png)
- Meanwhile, when **Payment Voucher** is click, following screen will appear.
[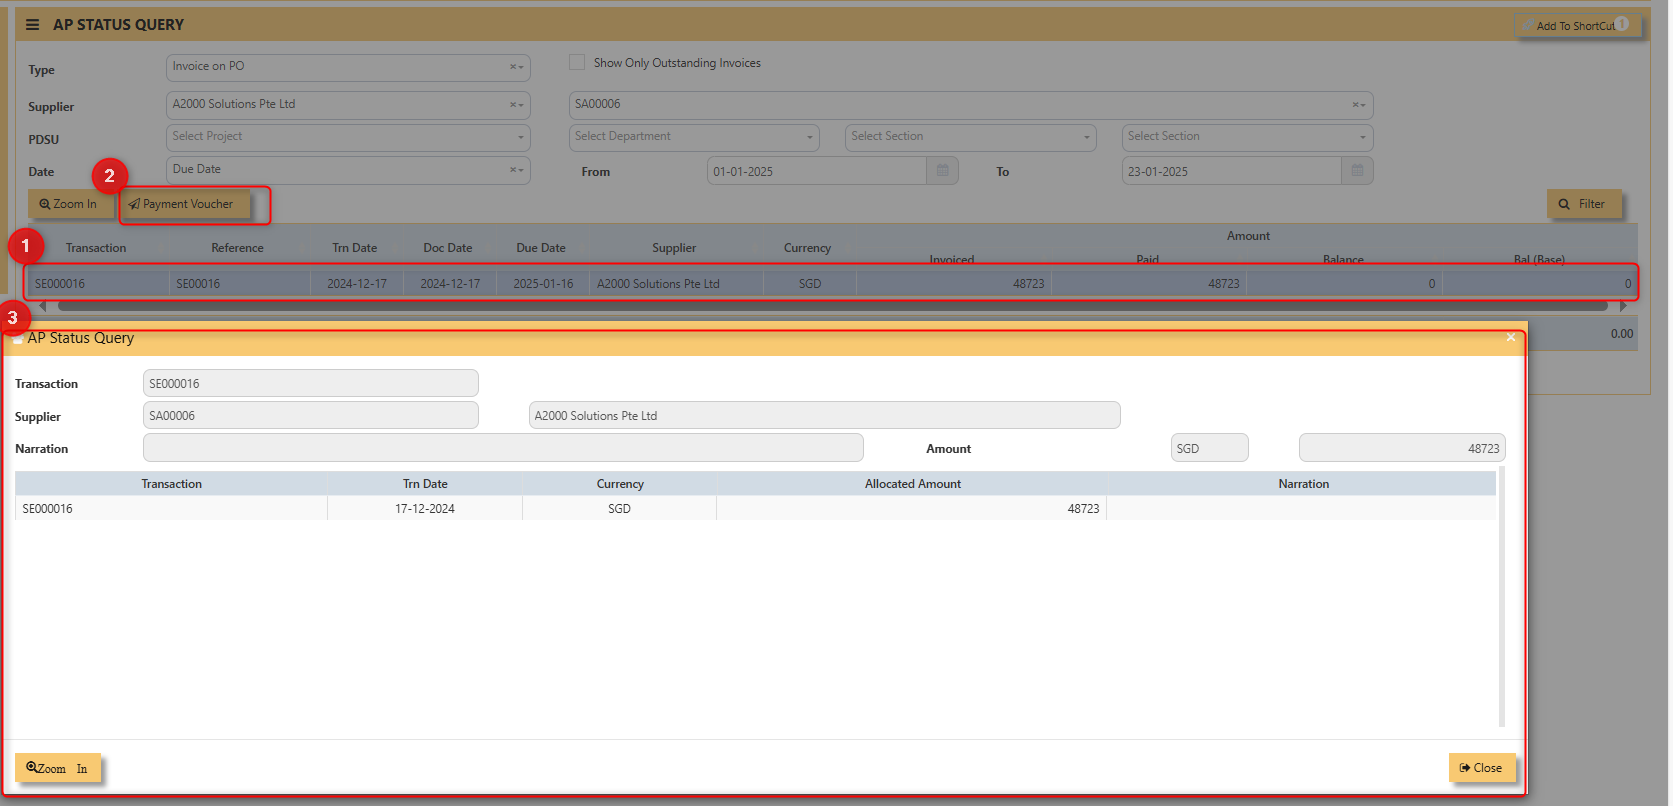](https://doc.uniq365.com/uploads/images/gallery/2025-01/obfimage.png)
Supplier Maintenance
##### The Supplier Maintenance is used to enter master records of suppliers. The information regarding a supplier such as Supplier Code, Name, billing address, credit limit, pricing information, shipping addresses and the account posting details are entered here.
##### **\_\_\_\_\_\_\_\_\_\_\_\_\_\_\_\_\_\_\_\_\_\_\_\_\_\_\_\_\_\_\_\_\_\_\_\_\_\_\_\_\_\_\_\_\_\_\_\_\_\_\_\_\_\_\_\_\_\_\_\_\_\_\_\_\_\_\_\_\_\_\_\_\_\_\_\_\_\_\_\_\_\_\_\_\_\_\_\_\_\_\_\_\_\_\_\_\_\_\_**
**How to create Supplier records?**
**Details:**
Click on **Finance - Payables – Settings – Supplier** **Maintenance** for the following screen.
[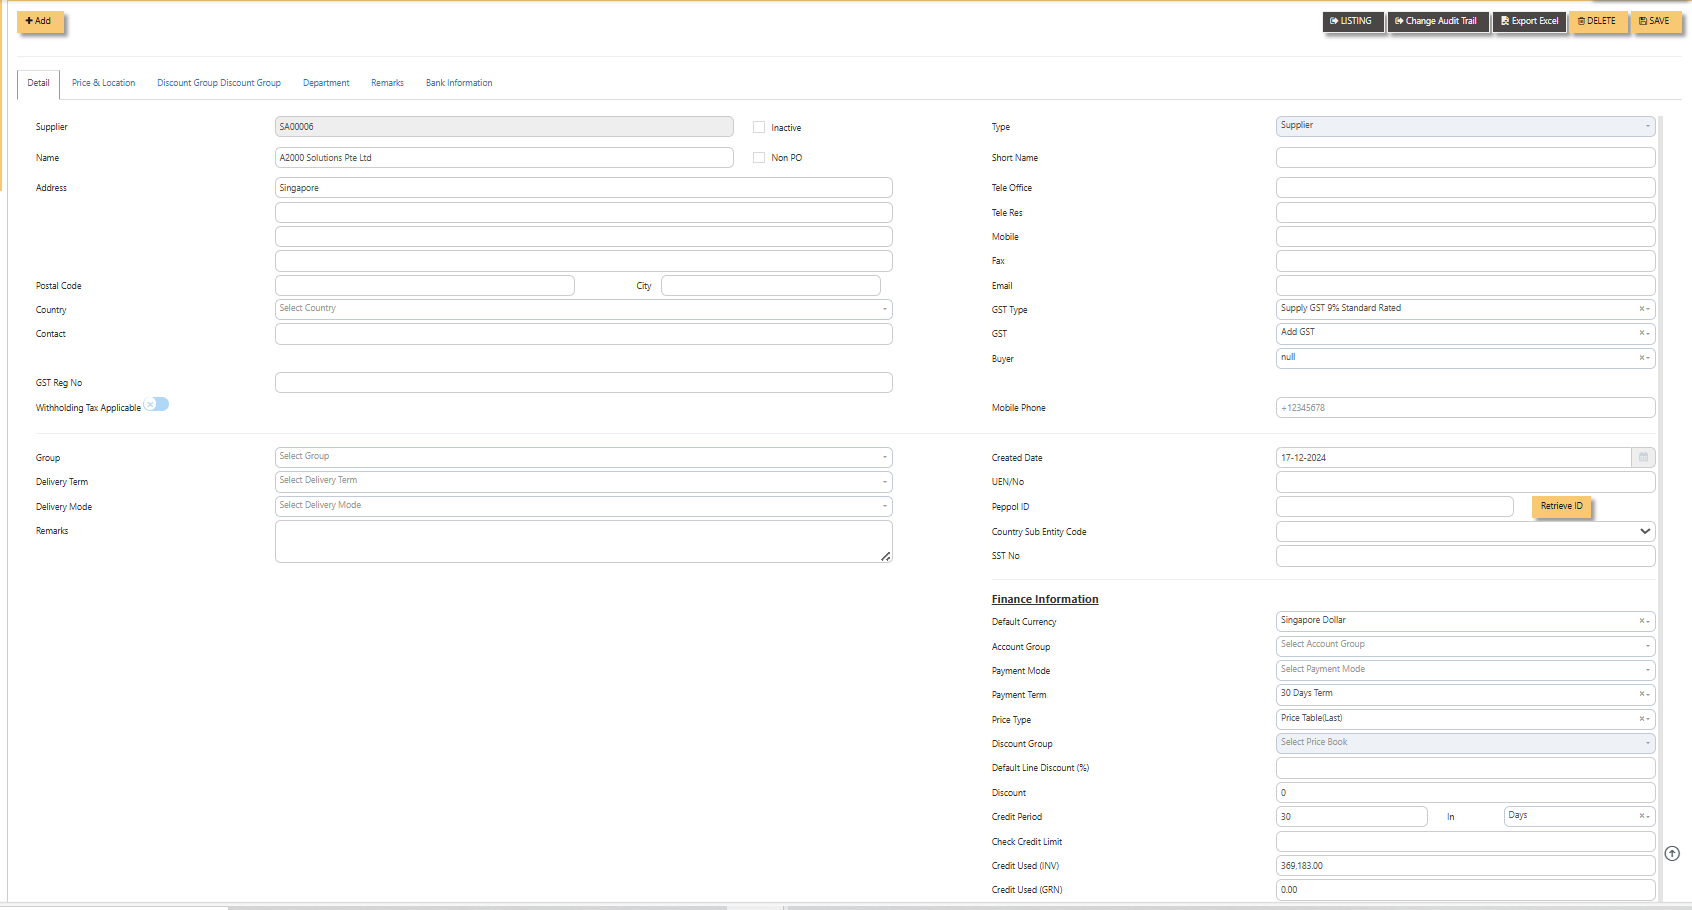](https://doc.uniq365.com/uploads/images/gallery/2025-01/X89image.png)
- **Supplier (mandatory)** Enter the code for new supplier. This is a 10-character alphanumeric field.
- **Type** Select S for Supplier or B for Both Customer & Supplier.
- **Name (mandatory)** Enter the name of the supplier.
- **Address (mandatory)** Enter the billing address of this supplier.
- **Postal Code** Enter the postal code of the supplier's address.
- **Contact** Enter the contact person's name.
- **Account Group (mandatory)** If the Account Posting Setting is set based on Supplier‟ Posting Type, then click to select the relevant Account Group that is defined under Payables - Maintenance.
- **Group** Click to select the reporting group.
- **Delivery Term** Click to select the Delivery Term.
- **Delivery Mode** Click to select the Delivery Mode.
- **Payment Term** Click to select the Payment Term.
- **Payment Mode** Click to select the Payment Mode.
- **Sales Tax Type** Select the Sales Tax type that will apply for this supplier. For example, if this is an Export supplier in USA, then the GST for this purchase will normally be zero-rated. Once Zero-GST is selected here, the next time this supplier's invoice is entered, the GST type will be captured automatically.
- **Default Currency** Select the currency that this supplier normally transacts in. For a USA based supplier, the default currency is in US Dollars. In the case of Japanese suppliers, it will be Yen.
- **Price Type** Please refer to procurement module for further information with Price Type
- **Discount** Enter the discount in percentage given by this supplier. For example, a particular supplier normally gives 10% off List Price for all the items supplied. User could then enter 10% in this field. The system will capture the discount
every time an invoice is raised for this supplier. Hence, you need not remember each and every of your supplier's discount rate.
- **Credit Period** Enter the number of days, weeks or months that this supplier gives as credit period.
- **Credit Limit** Enter the Credit Limit of supplier. This is a numerical field that will enable the system to check and block
payable/purchase entries once the figure reaches the limit, provided the required setting is done in System Manager – System Utilities – System Settings.
- **Credit Used** This is a non-editable field. It is updated automatically by the system every time the credit is used up.
- **SP/Buyer** Click to select the Buyer assigned to this supplier.
> **Note: Tab sheets for Prices & Location, Discount Group and Supplier Product Code are applicable for Purchase Module only**
Supplier Account Group
##### If the Posting Type for Creditor Account is set to Supplier in Payable Control Accounts, the system will locate the creditor account code from Supplier Account Group maintenance screen as shown below:
[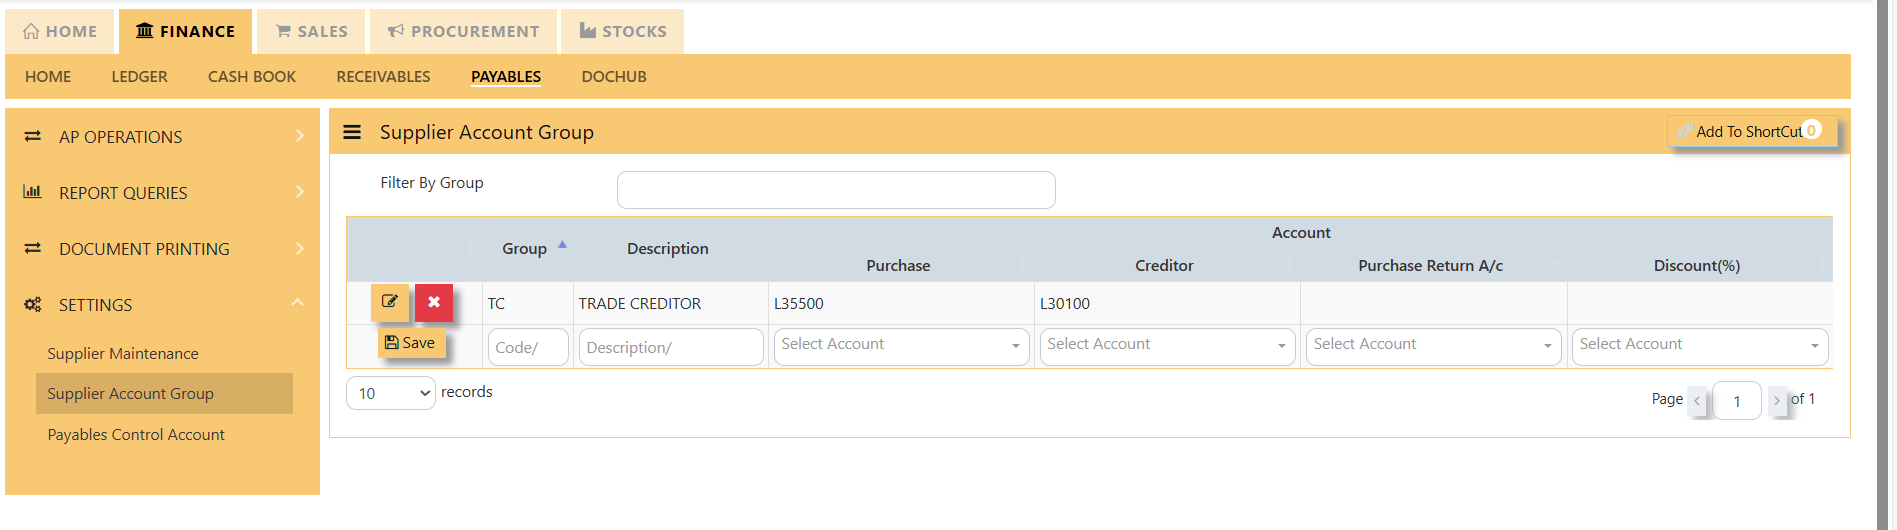](https://doc.uniq365.com/uploads/images/gallery/2025-01/MSKimage.png)With reference to setting done as per screen above, if supplier TC is being mapped to TC Account Group in Supplier Maintenance, and user enter a Supplier Invoice (PI) transaction in AP module, the system will automatically credit the amount of transaction concerned to account name Other Creditors & Accrual.
Likewise, these creditor accounts will be automatically posted during creation of Invoices, Credit Notes and Debit Notes in Purchase Module and any AP Transaction in AP Module.
##### **\_\_\_\_\_\_\_\_\_\_\_\_\_\_\_\_\_\_\_\_\_\_\_\_\_\_\_\_\_\_\_\_\_\_\_\_\_\_\_\_\_\_\_\_\_\_\_\_\_\_\_\_\_\_\_\_\_\_\_\_\_\_\_\_\_\_\_\_\_\_\_\_\_\_\_\_\_\_\_\_\_\_\_\_\_\_\_\_\_\_\_\_\_\_\_\_\_\_\_**
##### **How to create Supplier Account Group?**
1. Click on **Finance - Payables – Setting – Supplier Account** icon for following screen. [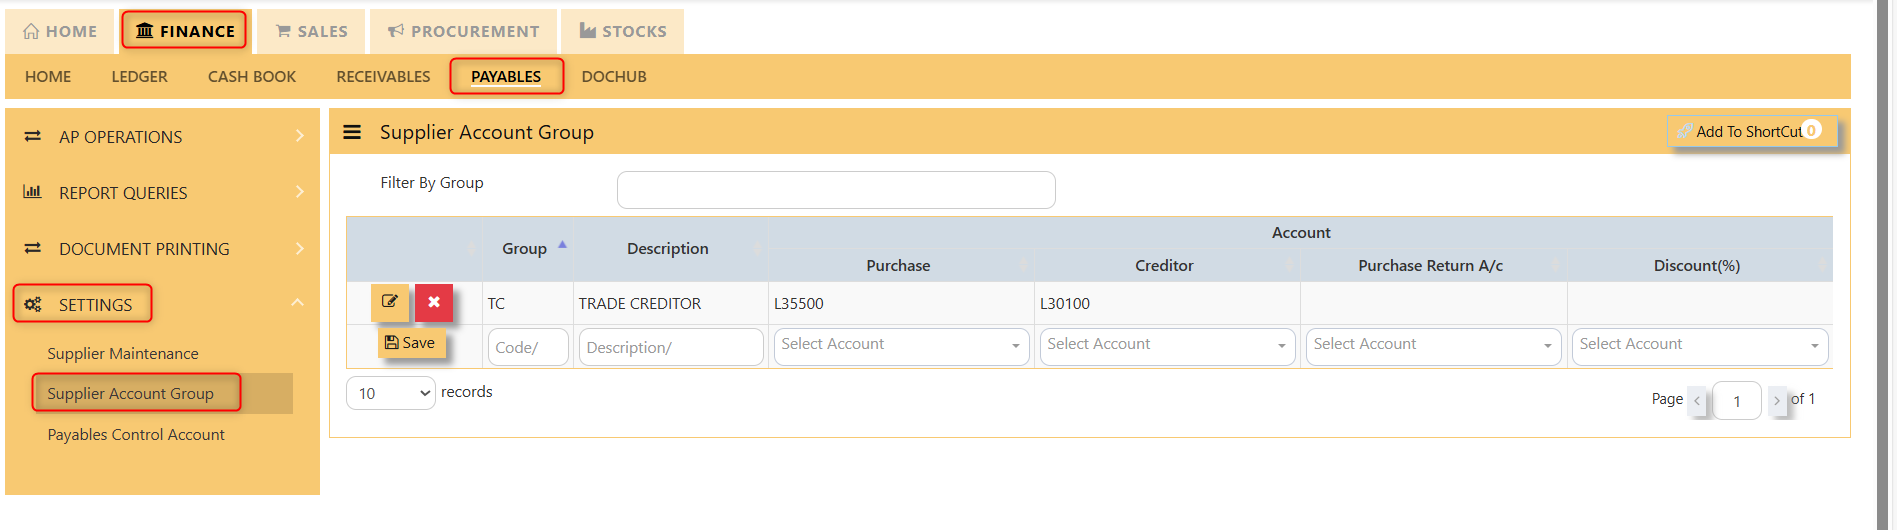](https://doc.uniq365.com/uploads/images/gallery/2025-01/VVhimage.png)
2. At the new line, enter the Supplier Account Group code under the Group column. This field can cater up to 4 alpha-numeric characters.
3. Key in the account code description at the Description field. This field can cater up to 50 alpha-numeric characters.
4. Select the Creditor A/c via the drop-down list.
Payable Control Account
##### UNIQ365 will automatically post Invoices, Credit Notes and Debit Notes in Purchase Module and AP Transactions in AP Module according to the setting done at Payable Control Accounts option.
Click on **Payables – Settings – Payable Control Accounts** icon for following screen.
[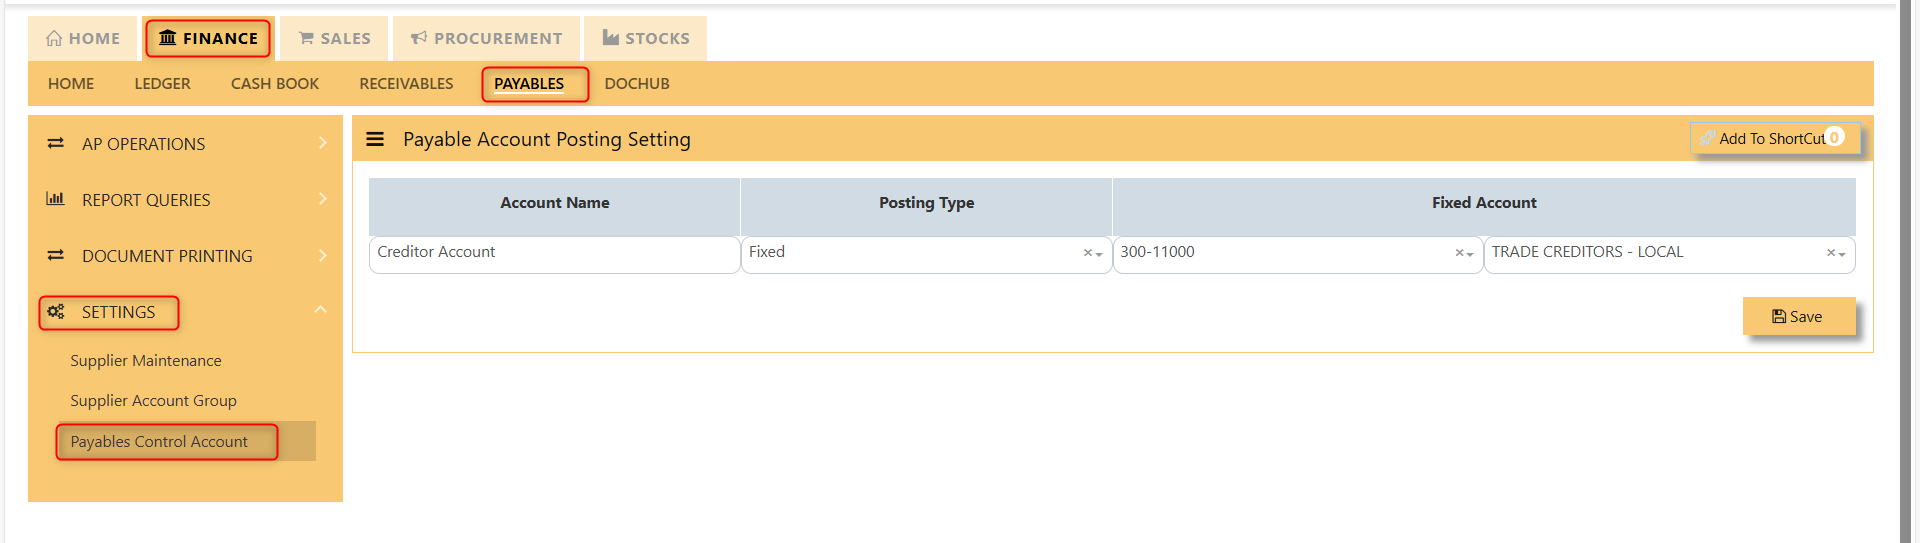](https://doc.uniq365.com/uploads/images/gallery/2025-01/zvVimage.png)
The Posting Types available are:
**Fixed**
If this option is selected, user must select the Creditor control account from the account code drop-down list at Fixed Account section.
For example, when a payment transaction is done at Payable module, assuming DBS Bank Account is used to make payment, the double entry under this setting will be as follow:
Dr Cr
Trade Creditor A/C XXX
DBS Bank A/C XXX
**Supplier**
User must ensure that the setting for Supplier Account Group is done. UNIQ365 will post to the Creditor Control Accounts accordingly for transactions done in Purchase and Payables modules.
Customer Maintenance
POS Terminal
POS Payment Modes
DOC HUB TO CASH BANK BOOK \[CREATE GC\]
#### **HOW TO ADD FROM DOC HUB TO CASH BANK?**
- **OCR SCAN** – click or
- **PROCESS** – click
- **CASH BANK BOOK** - select
- SELECT **DEFAULT, CUSTOMER, SUPPLIER or EMPLOYER**
- **RECIPIENT/PAYEE** - key in
- **BANK** – select
- **PAYMENT REF** – key in
- **DATE** – default today
- **CURRENCY **– default to sgd and key in exchange rate
- **ACCOUNT CODE** – select account code
- **AMOUNT** – key in
- **GST INCLUSIVE **– click
- **TAX APP**-click and select gst type
- **CREATE GC - **click
[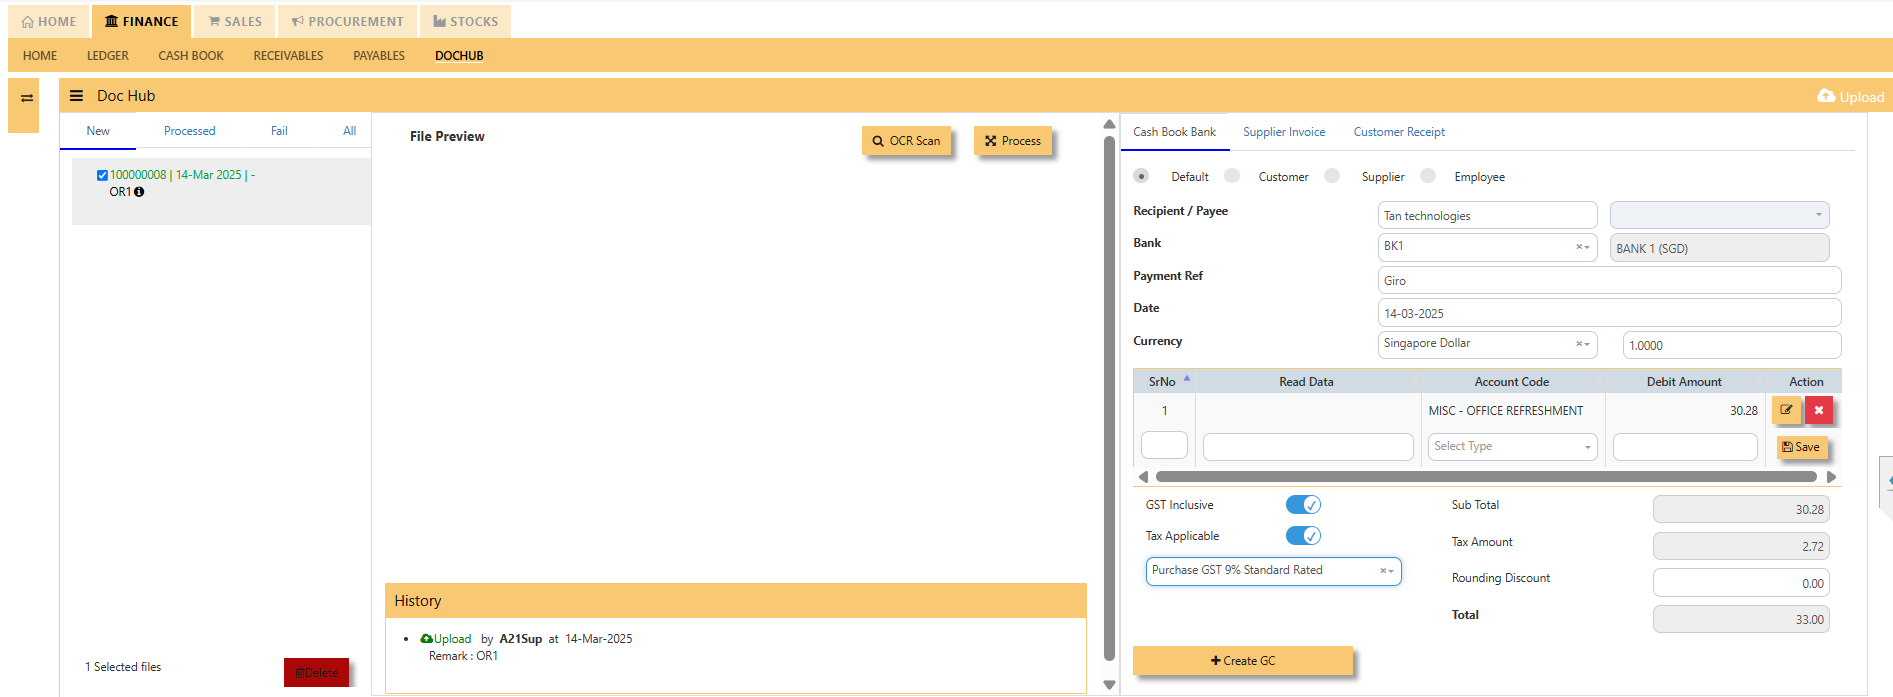](https://doc.uniq365.com/uploads/images/gallery/2025-03/zIiimage.png)
**CASH BOOK ENTRY or GC** **ENTRY** will be auto-created, in HEADER and DETAIL tab will reflect according to the doc hub as entered:
[](https://doc.uniq365.com/uploads/images/gallery/2025-03/AKqimage.png)
Then, **ATTACHMENT** tab, will list the saved doc-
- **DATE AND TIME**– date and time of upload
- **FILE** – filename of document
- **BY** – user login
- [](https://doc.uniq365.com/uploads/images/gallery/2025-03/wgnimage.png)
DOC HUB TO SUPPLIER INVOICE \[CREATE PI\]
#### **HOW TO ADD FROM DOC HUB TO PAYABLE INVOICE OR PI?**
- **OCR SCAN** – click or
- **PROCESS** – click
- **SUPPLIER INVOICE TAB** - select
- **SUPPLIER CODE** - select
- **CONTACT PERSON - **key in
- **REF** – key in
- **CURRENCY** – default to SGD
- **DATE **– default today
- **ACCOUNT CODE** – select account code
- **AMOUNT** – key in
- **GST INCLUSIVE **– click
- **TAX APP**-click and select gst type
- **CREATE PI - **click to save
[](https://doc.uniq365.com/uploads/images/gallery/2025-03/bfuimage.png)
**PI ENTRY** will be auto-created, in HEADER and DETAIL tab will reflect according to the doc hub as entered:
[](https://doc.uniq365.com/uploads/images/gallery/2025-03/iL3image.png)
Then, **ATTACHMENT** tab, will list the saved doc-
- **DATE AND TIME**– date and time of upload
- **FILE** – filename of document
- **BY** – user login
[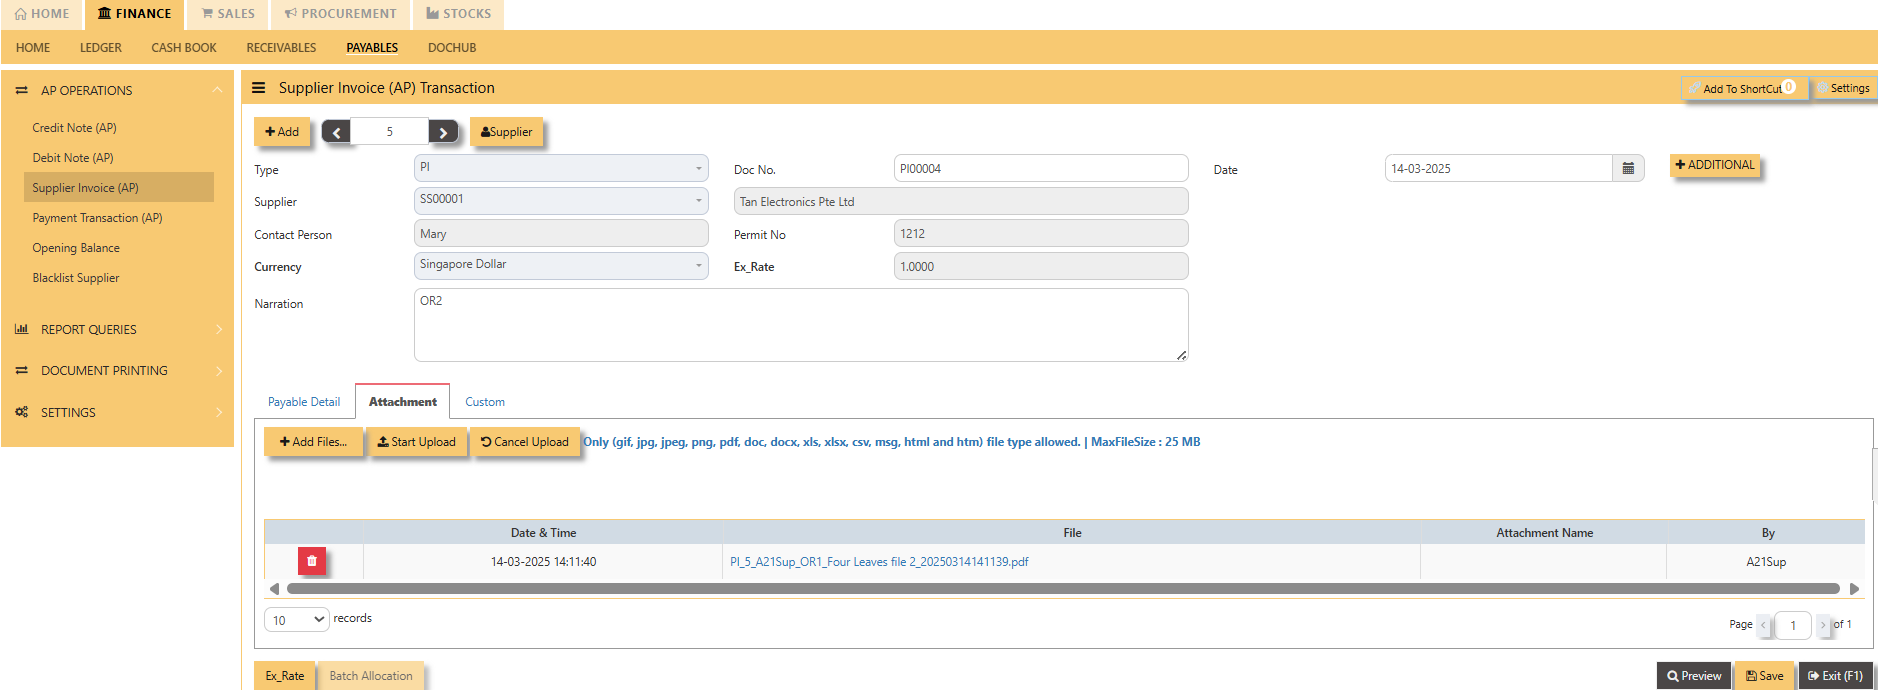](https://doc.uniq365.com/uploads/images/gallery/2025-03/1Yjimage.png)
DOC HUB TO CUSTOMER RECEIPT \[CREATE RR\]
#### **HOW TO ADD FROM DOC HUB TO CUSTOMER RECEIPT OR RR?**
- **OCR SCAN** – click or
- **PROCESS** – click
- **CUSTOMER RECEIPT TAB** - select
- **CUSTOMER CODE** - select
- **SALESPERSON - **select
- **BANK** – select
- **CURRENCY** **and EX RATE**– default to SGD and 1.0
- **DATE **– default today
- **ACCOUNT CODE** – select account code
- **AMOUNT** – key in
- **GST INCLUSIVE **– click
- **GST APPLICABLE**-click and select gst type
- **CREATE RR - **click to save
[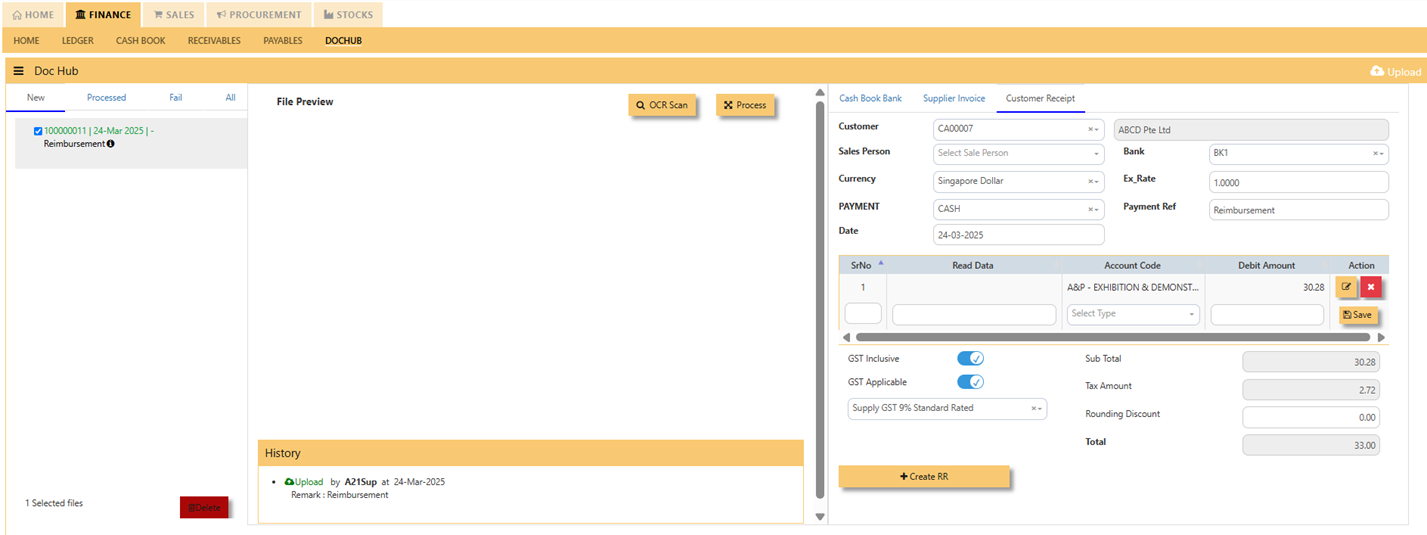](https://doc.uniq365.com/uploads/images/gallery/2025-03/wOSimage.png)
**RR ENTRY** will be auto-created, in HEADER and DETAIL tab will reflect according to the doc hub as entered:
[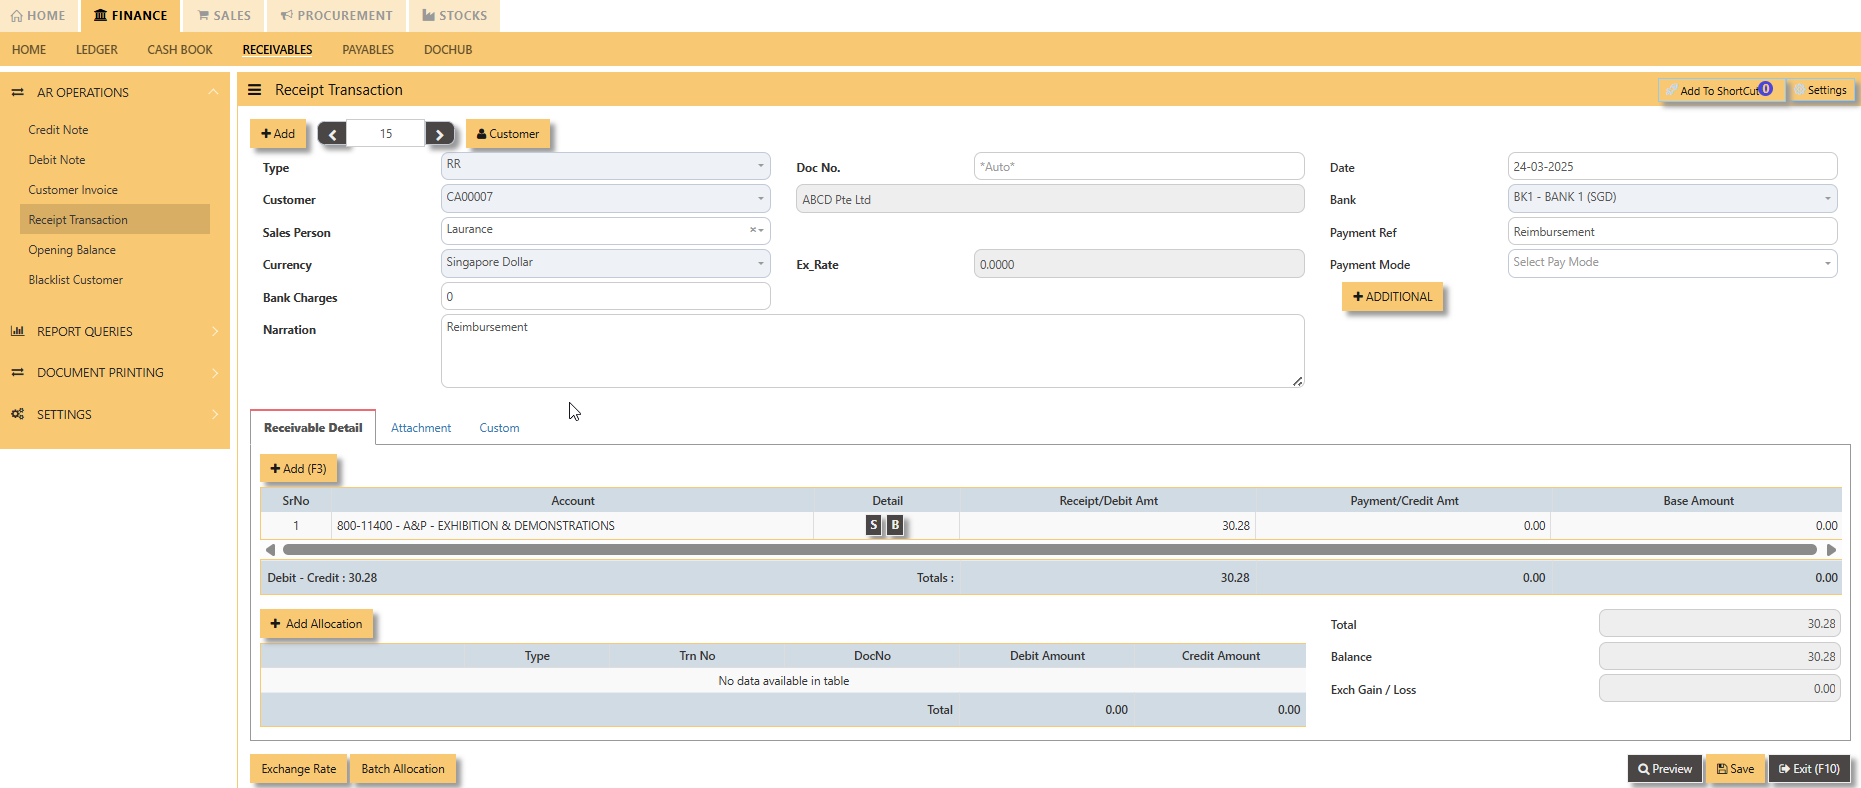](https://doc.uniq365.com/uploads/images/gallery/2025-03/YG3image.png)
Then, **ATTACHMENT** tab, will list the saved doc-
- **DATE AND TIME**– date and time of upload
- **FILE** – filename of document
- **BY** – user login
[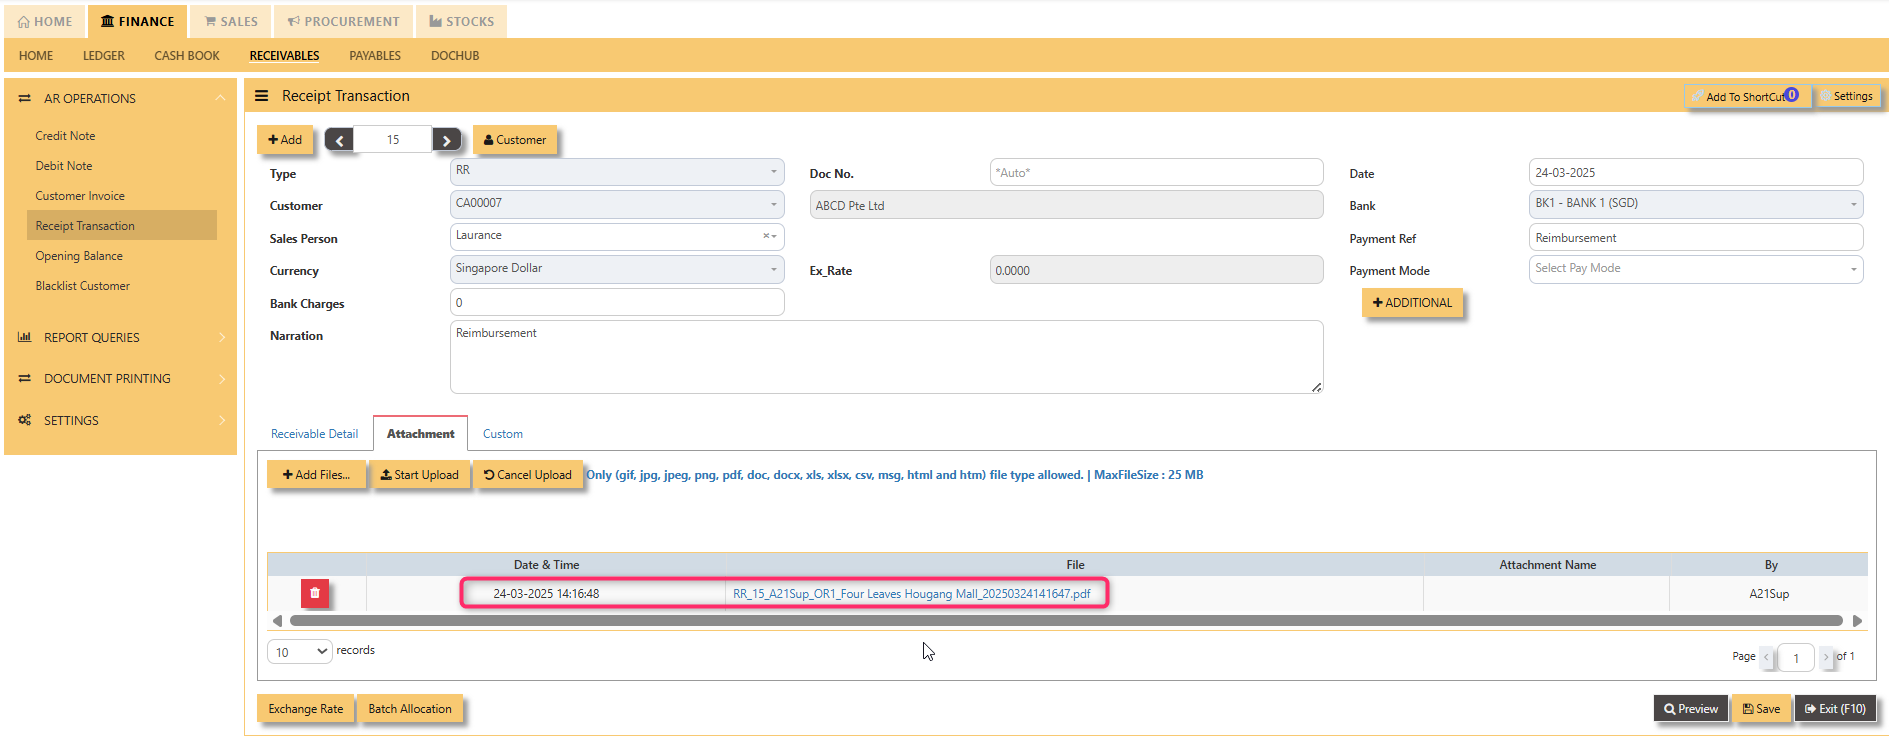](https://doc.uniq365.com/uploads/images/gallery/2025-03/0Onimage.png)