Purchase Module
Overview - Purchase Module
PROCUREMENT MODULE
The Procurement Module in Uniq365 is where all the Purchase transactions take place. Uniq365 is able to handle the various Purchases methods to cater to the different needs of different organizations. In this section, we will explore the different types of entries made and how these entries affect the ledger as well as the inventory status.
________________________________________________________________________________________________________________________________________________
MENU NAVIGATION
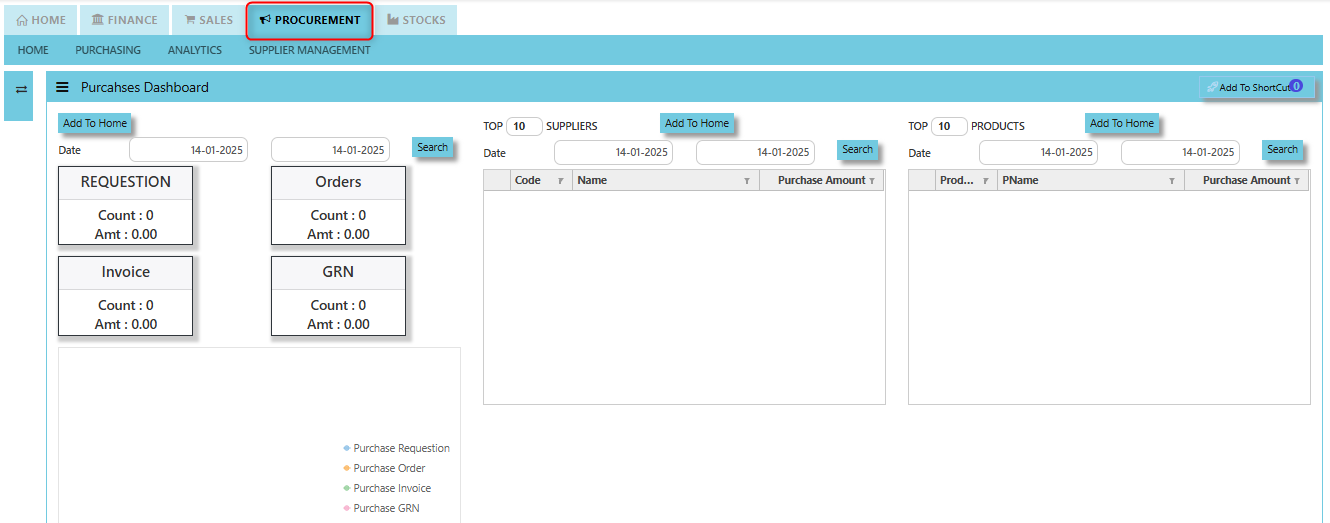
Purchase Dashboard a visual interface that aggregates and presents key metrics, trends, and insights related to procurement activities.
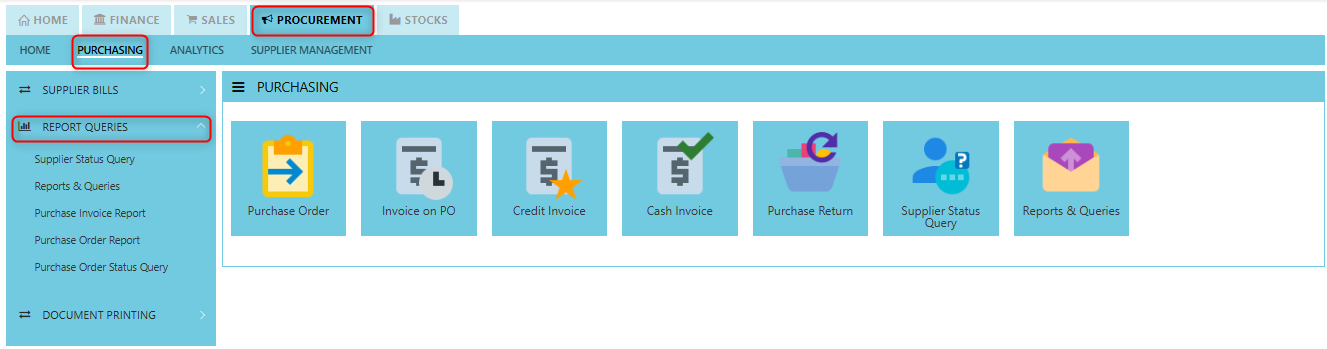
The Procurement Module has 3 Sub tabs, as shown above, which are Purchasing, Analytics, and Supplier Management.
Purchasing is where transactions are entered, such as Supplier Purchase Order, Supplier GRN (Goods Receive Note), Supplier Invoice, Goods Return Credit and Debit Notes.
Analytics refers to the tools, techniques, and reports used to analyze and derive insights from the data related to procurement activities.
Supplier Management is where all supplier masters are created and the main settings for Purchase module are set.
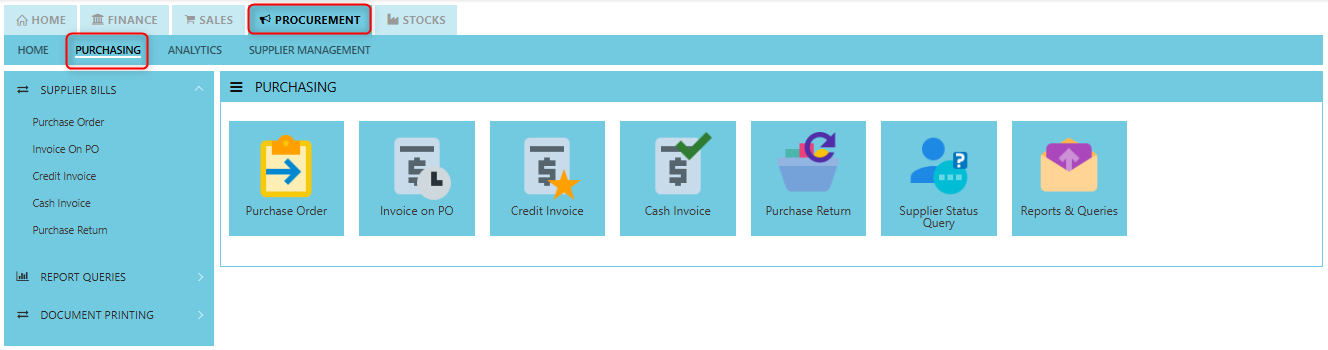
Purchasing
In a typical setup, the user may put up a Typical Purchase Requisition (note the difference between a Purchase Requisition & a Sales Quotation. A Purchase Requisition allows you to indicate which supplier you are sending the order to). Once the requisition is confirmed, a Purchase Order can be created. Upon confirmation of all the Purchase Orders, the goods will then be delivered by the stated suppliers. You may record a Goods Received Note (GRN – Optional) for your reference and then send the supplier’s invoice to the Accounts Department. Alternatively, you can just record the Invoice straight upon receiving it from supplier.
Another scenario is that no Purchase Order is created, only a verbal order is placed to the suppliers. You received goods from suppliers and the invoice is sent to you later. The final scenario is where the Purchase is done simply by placing an order and you just receive the goods and invoice from suppliers, in which case the Credit/Cash Invoice will be created directly. Some Purchase transactions can be done by placing a deposit first.
_______________________________________________________________________________________________________
How to locate Purchasing?
- Click on PROCUREMENT – PURCHASING for the screen below.
Supplier Purchase Order (SO)
In Uniq365, you can indicate the Supplier Delivery Mode in the Supplier Maintenance or Transactions. You can also sort or filter reports by Delivery Mode. The Purchase Order in the Purchase Module serves as a document to update the system that goods are on order. No ledger postings take place at this point. Purchase Order is denoted by the transaction type “SO”.
___________________________________________________________________________________________________
How to create Supplier Purchase Order?
1. Click on PROCUREMENT – PURCHASING – SUPPLIER BILLS - PURCHASE ORDER for the screen below.
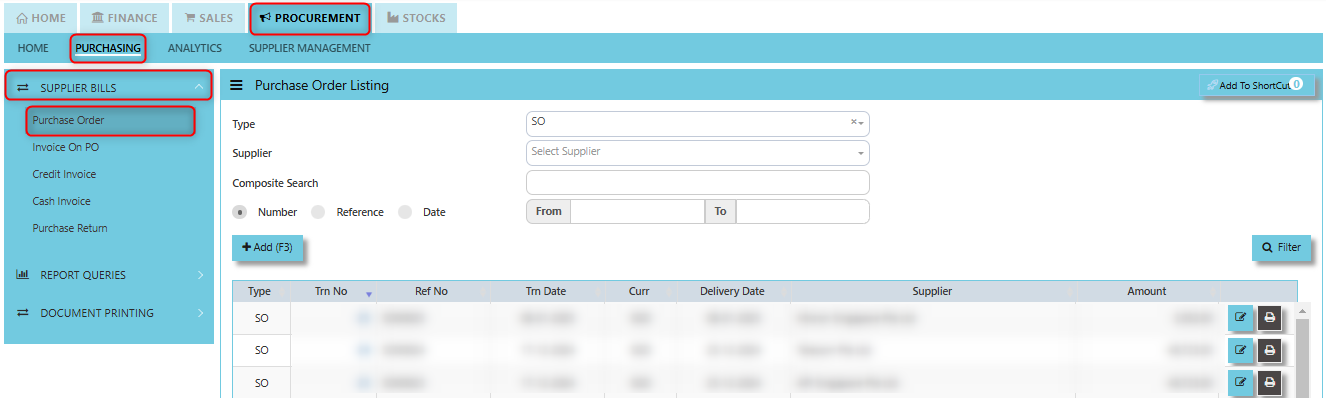
2. Click Add (F3) to create new record.
3. Click Type - drop-down to select transaction type – SO (Purchases Order).
4. After transaction type selection, use the tab button to go to the Ref No., Date, and other fields.
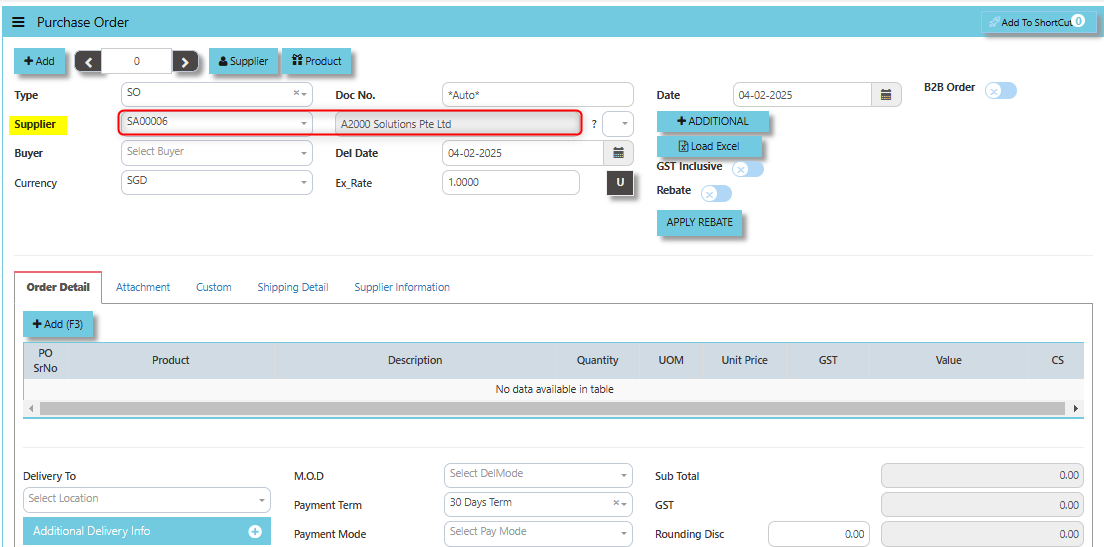
5. Click the Supplier - drop-down list to select Supplier Name, followed by the Buyer, PDS, Currency, Rate, Narration, Delivery Date & Lead Time if applicable.
6. After all the header information has been entered, go to the Details section to select the Product Code and Name for that Purchase Order. Save the transaction after this is done.
___________________________________________________________________________________________________________________________________________
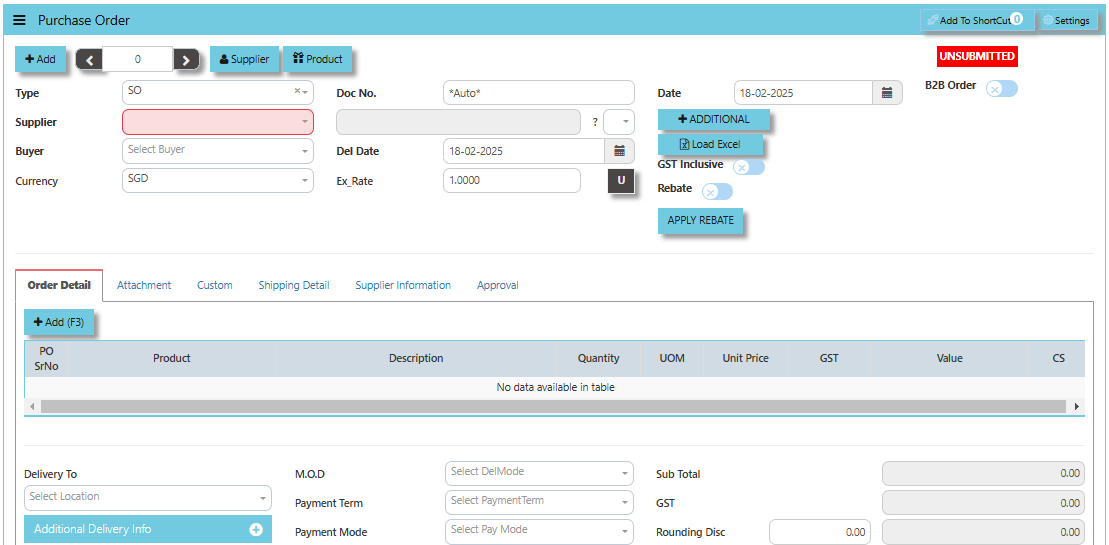
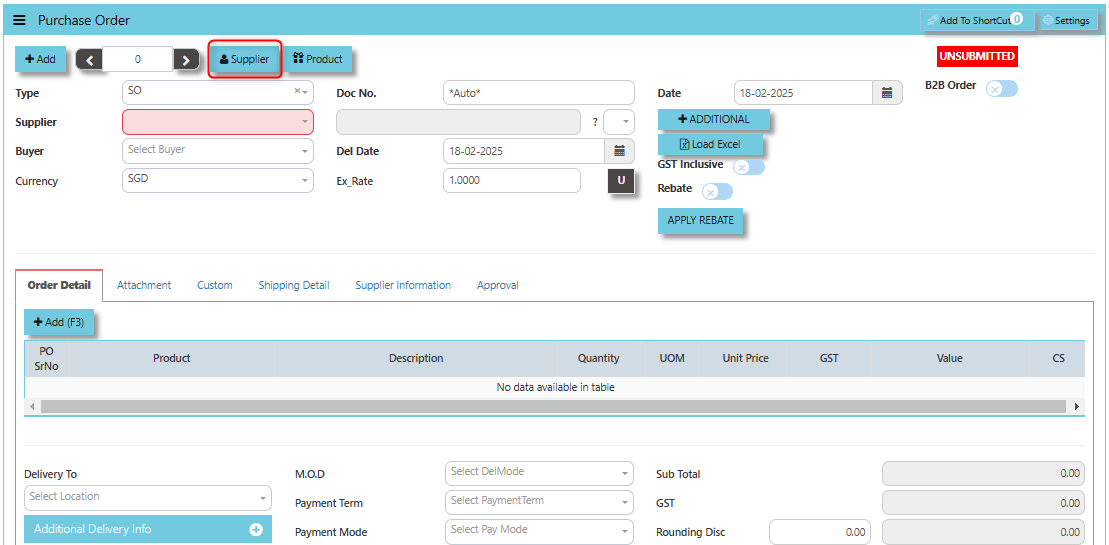
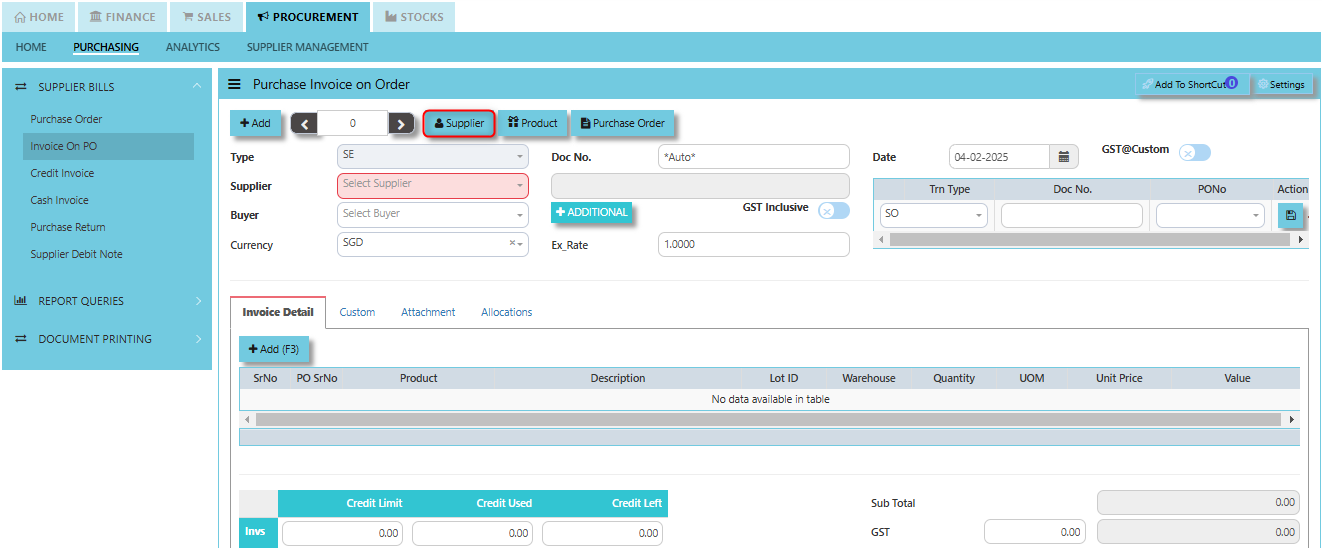
The Supplier button provides quick access to detailed supplier profiles under supplier maintenance.
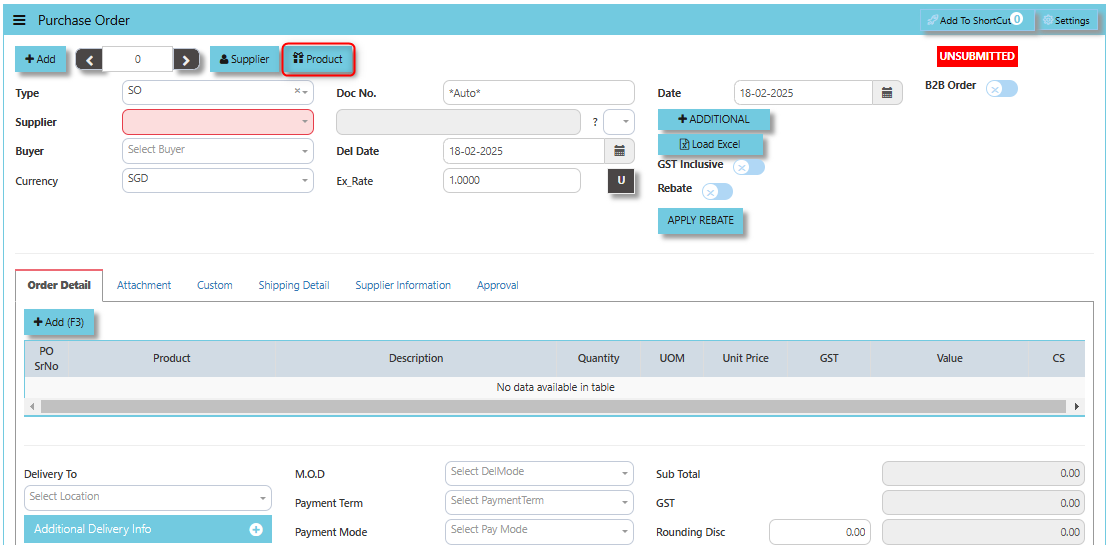
The Product button provides quick access to product and service maintenance.
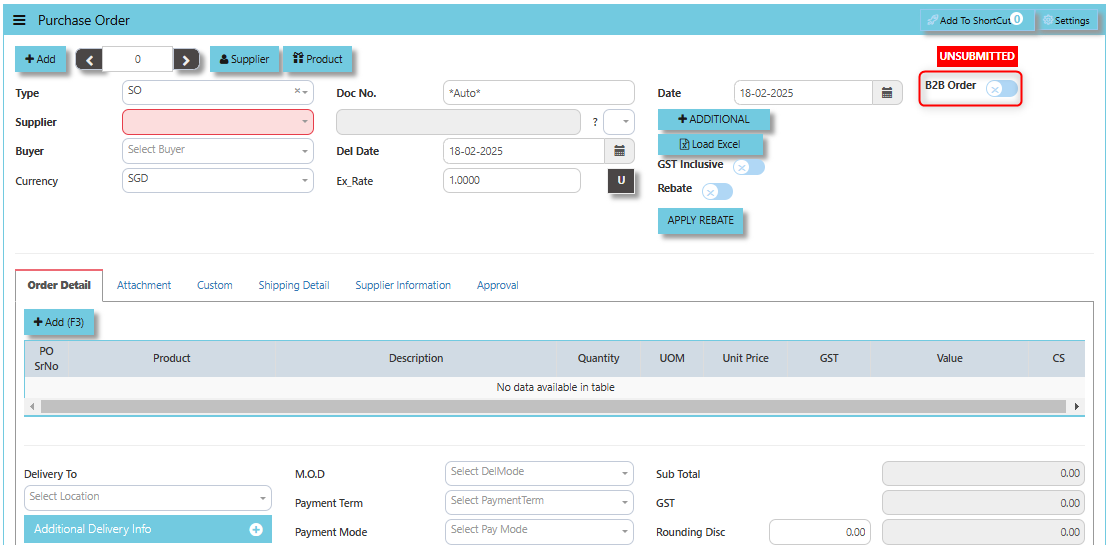
"B2B Order" checkbox typically indicates a special setting or status related to Business-to-Business (B2B) transactions. When this option is ticked or checked, it often triggers specific functionalities or workflows that pertain to B2B purchasing. When the "B2B Order" option is ticked, it likely signifies that the purchase order is being placed as part of a B2B transaction, meaning the order is between two businesses rather than a business and a consumer.
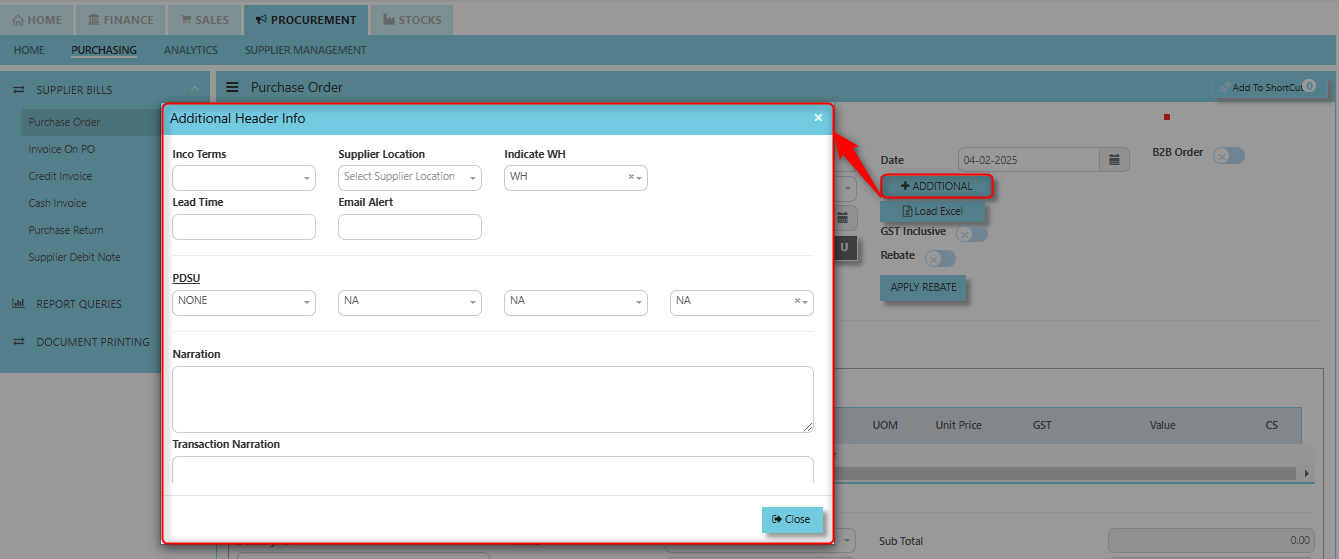
"Additional Header Info" button is typically used to capture and manage additional information related to the purchase order at the header level (i.e., Inco Terms, Supplier Location, Indicate WH, Lead Time, Email Alert, PDSU, Narration and Transaction Narration). This feature allows users to add extra data or notes that are relevant to the entire purchase order.
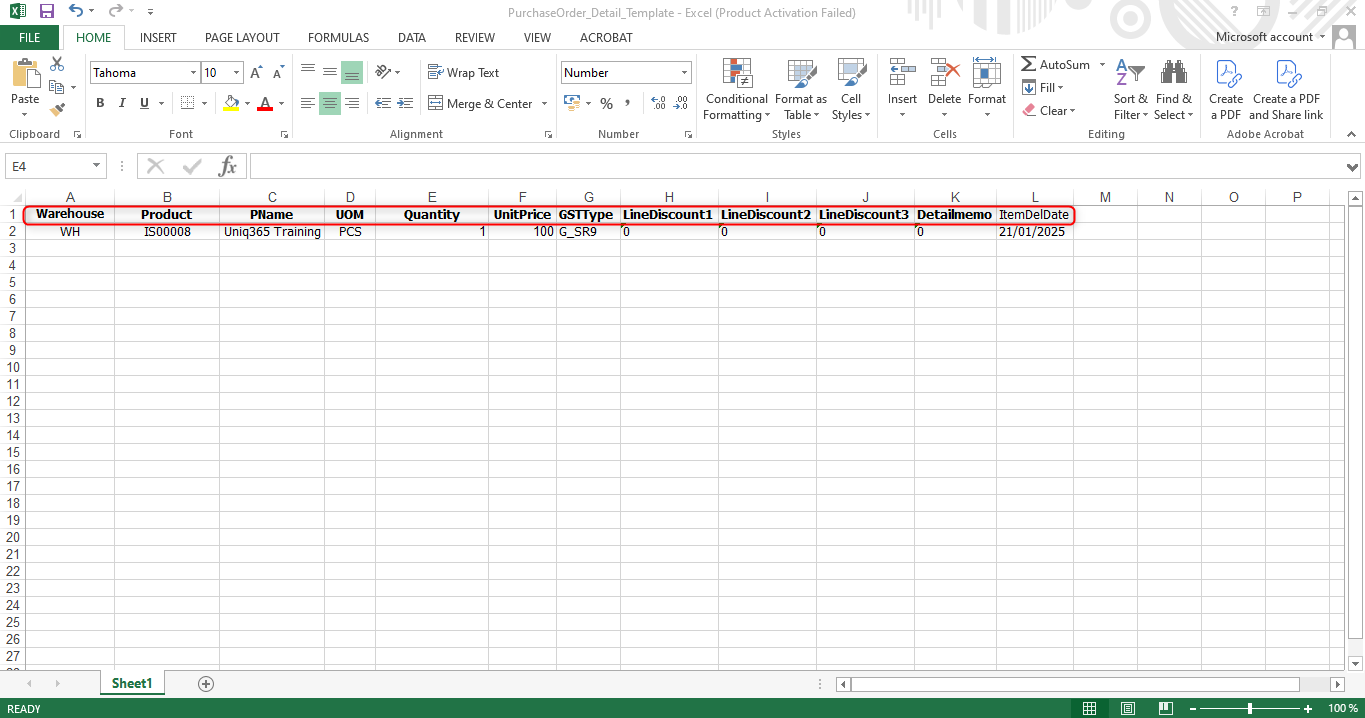
Excel Template - The button allows users to download a pre-configured Excel template for entering or importing data related to the purchase order. The template is usually formatted to match the system's required structure for purchase orders, ensuring consistency and data accuracy.
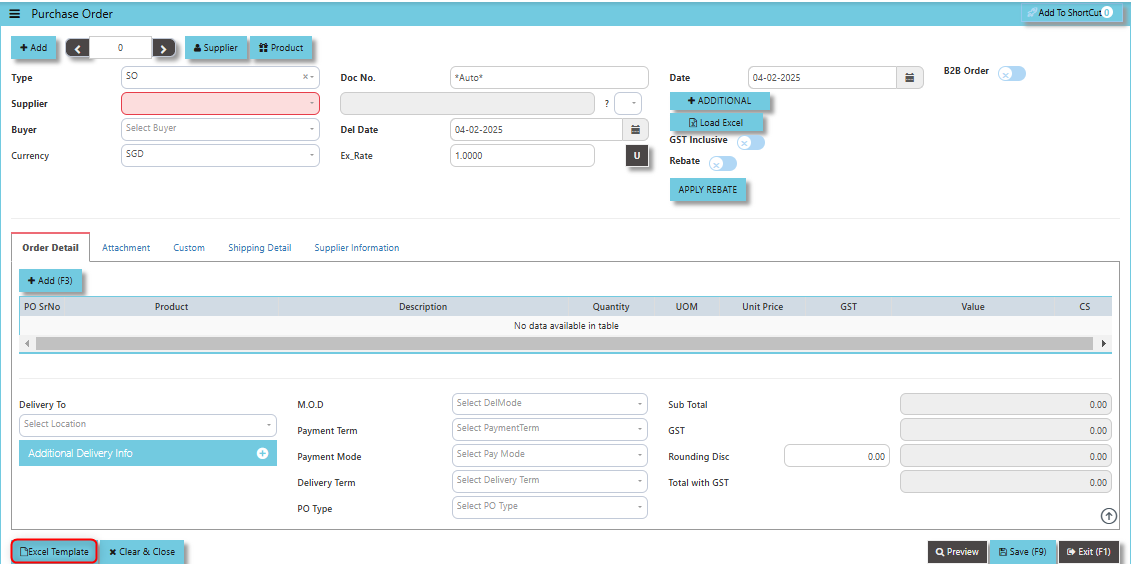
Load Excel - When users have an Excel file with purchase order information (such as item names, quantities, prices, supplier details, etc.), the "Load Excel" button allows them to upload and import this data directly into the system. This eliminates the need for manual entry of the data into the system's purchase order fields.

___________________________________________________________________________________________________________________________________________
How to use Load Excel?
- Click the Supplier - drop-down list to select Supplier Name.
2. Download the Excel Template and ensure the Excel file you plan to upload is formatted correctly. It should contain all the necessary fields required for a purchase order, such as:
- Warehouse
- Product Code
- Product Name
- UOM
- Quantity
- Unit Price
- GST Type
- Line Discount 1, 2 & 3
- Detail Memo
- Item Delivery Date
3. Click the "Load Excel" button to open the file upload interface. This may open a file browser or prompt you to select the Excel file you want to upload.
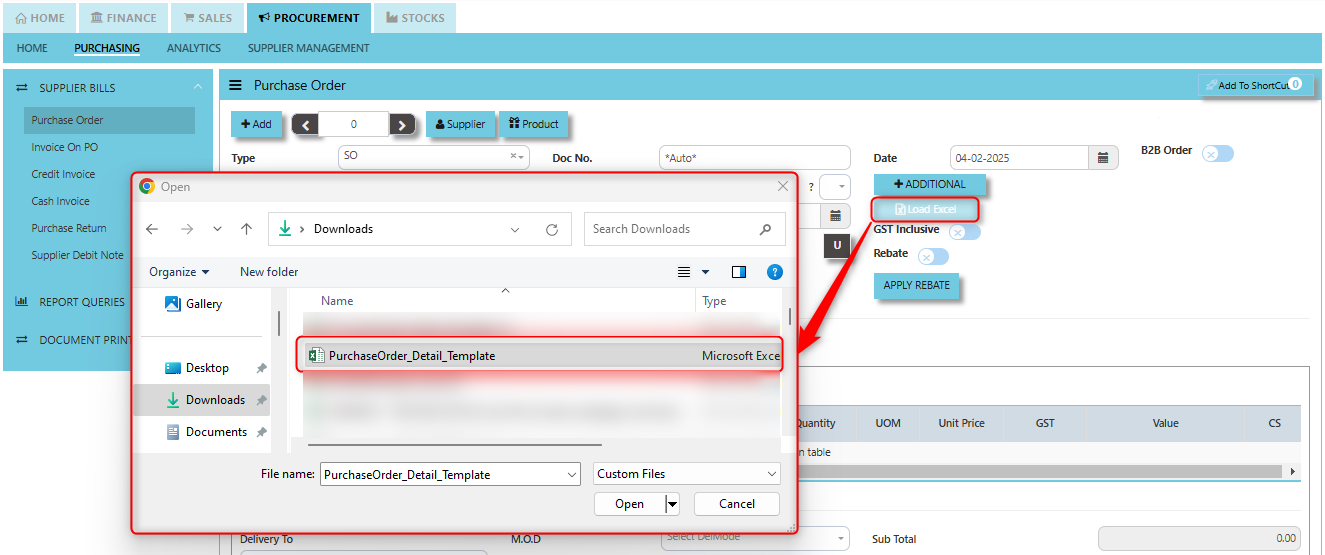
4. Once the filed uploaded, system will prompt a message that record has been imported successfully.
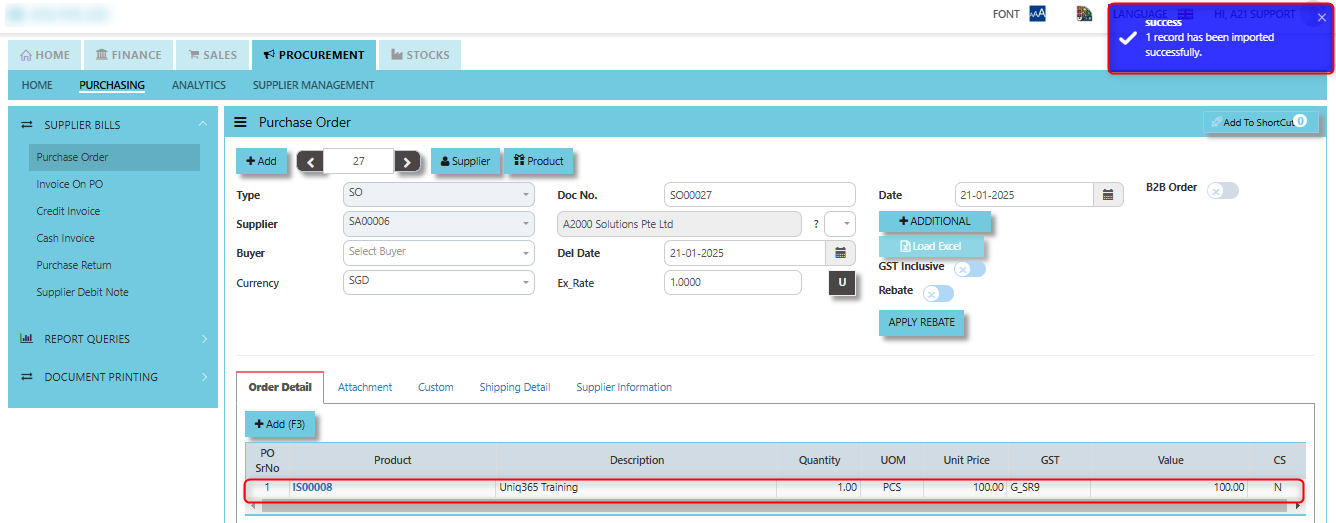
5. After the import is complete, review the imported purchase orders in the system to ensure everything has been transferred correctly. This might include checking that the order details, such as item descriptions, quantities, prices, and suppliers, are accurate.
6. Once the data is imported successfully and checking is done, you can proceed to save the purchase order as required by your workflow. This may involve further approvals or other processes depending on the organization's procedures.
___________________________________________________________________________________________________________________________________________
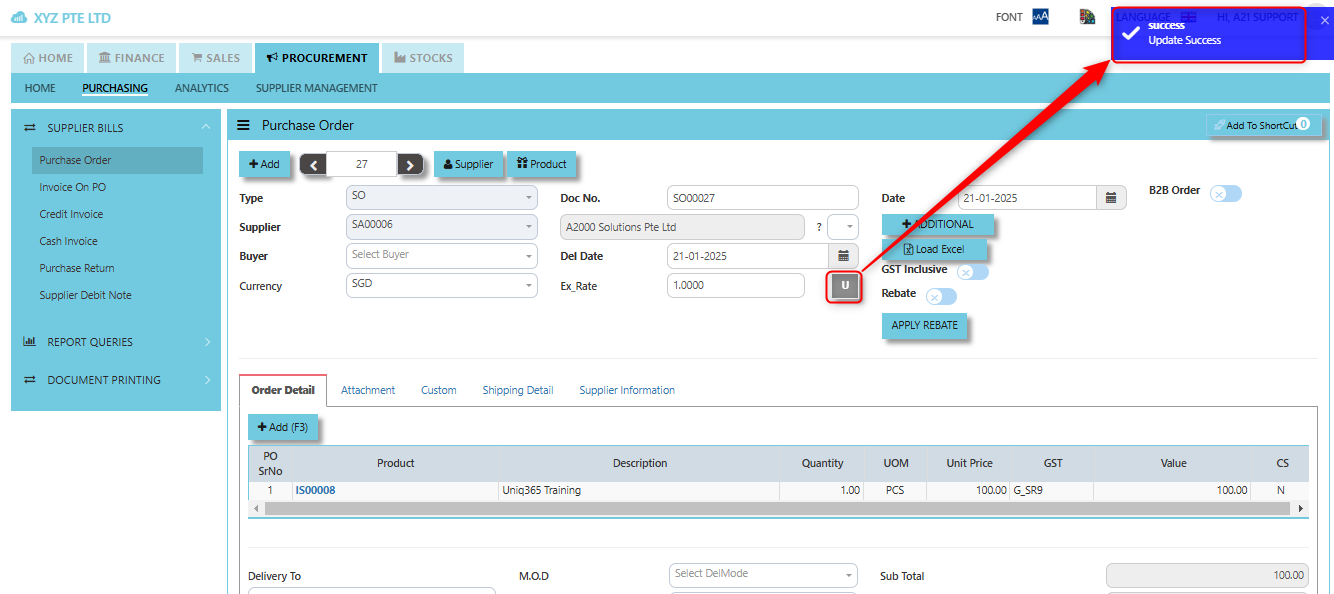
Update (U Button): When you click the U button, It may be used to update the status of the purchase order after changes have been made.
The GST Inclusive checkbox indicates whether the prices quoted by the supplier in the PO include Goods and Services Tax (GST) or not.

- When ticked (GST Inclusive): provided in the PO already includes the applicable GST amount. The GST amount will not be calculated or displayed separately, as it's already accounted for in the quoted price.
- When not ticked (GST Exclusive): The purchase price is considered exclusive of GST. The system will calculate and add the GST based on the applicable tax rate, and the final total will be the sum of the base price plus the GST amount.
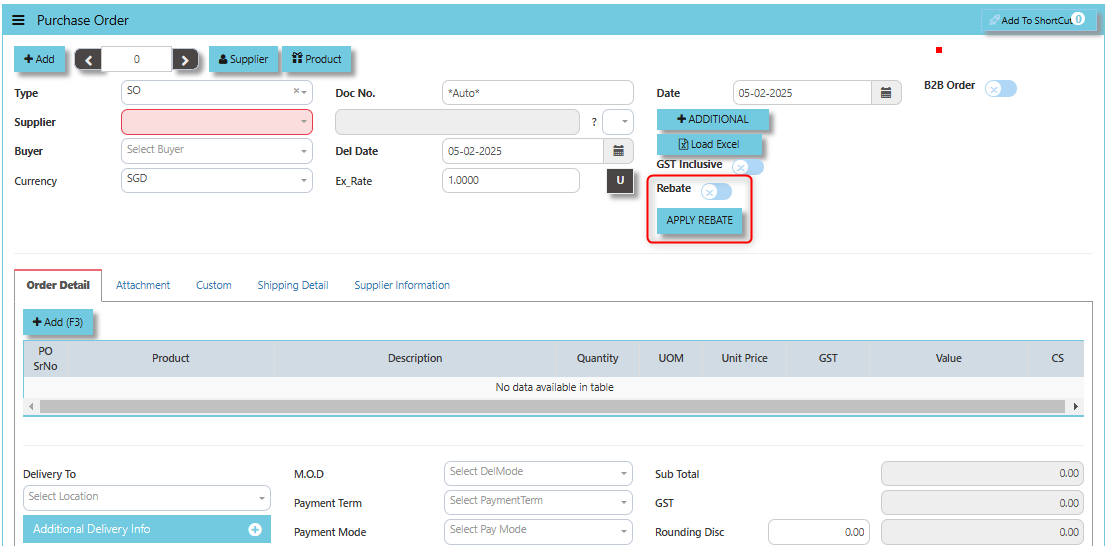
The "Apply Rebate" is typically used to apply any available rebates or discounts to the total order value. This button allows users to apply that rebate to reduce the overall cost of the purchase order.
___________________________________________________________________________________________________________________________________________
How to Apply Rebate?
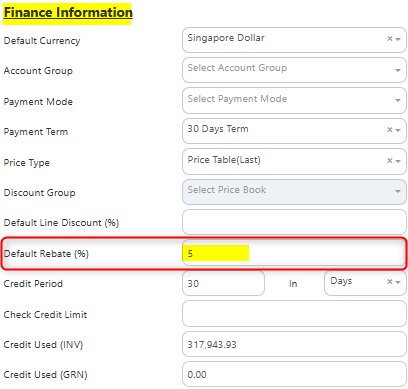
1. Under the Supplier Maintenance - Finance Information enable the Rebate Percentage Type in the percentage you want to include.
2. Enable the Rebate Item under Product Maintenance. Click on STOCKS - PRODUCT MANAGEMENT - MASTER SETTING - PRODUCT & SERVICE MAINTENANCE - ATTRIBUTE TAB
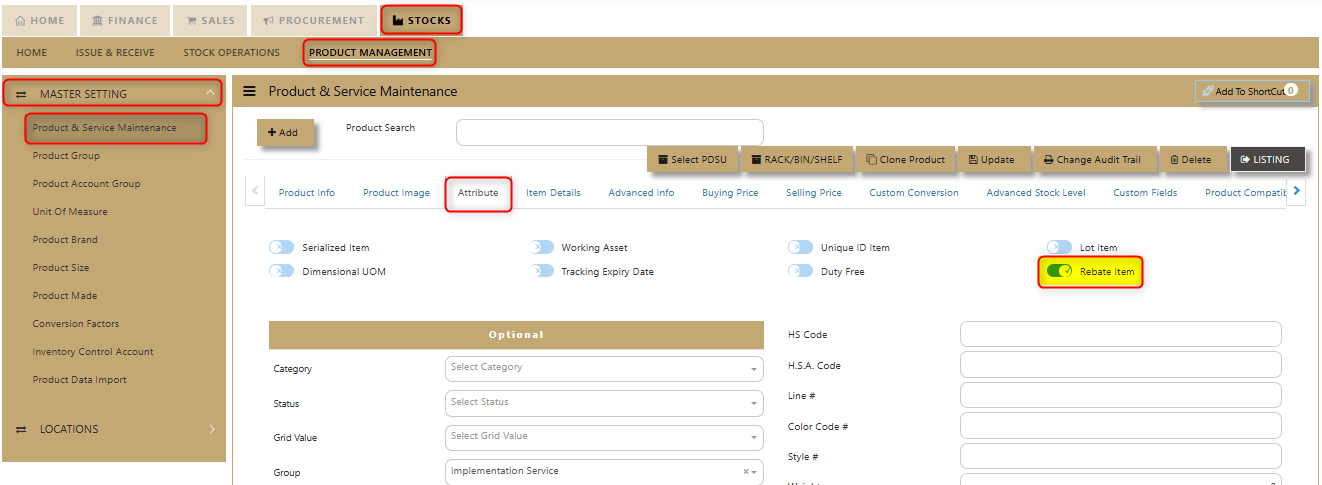
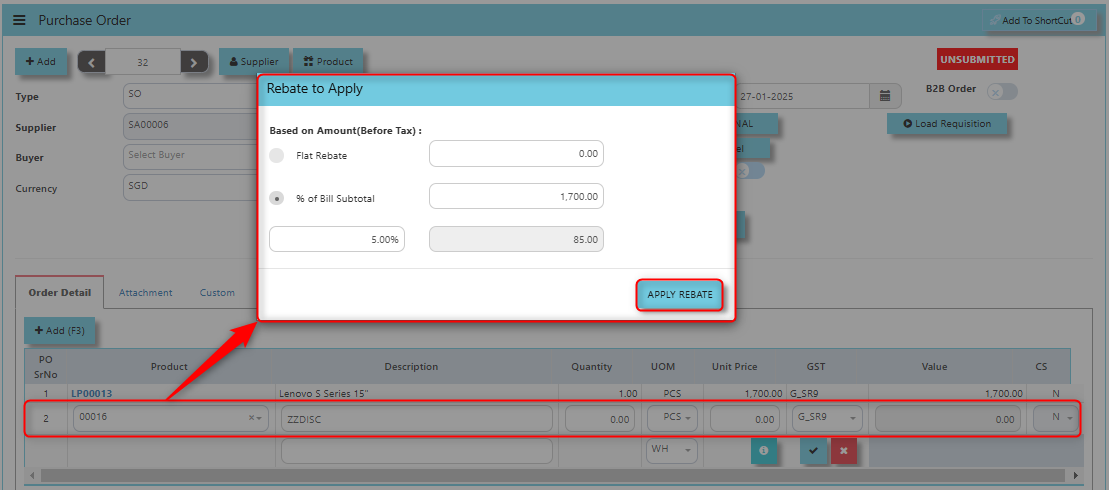
3. Encode the rebate Product/Service to calibrate the percentage discount. A dialogue box will prompt to verify the Rebate to be applied. Configure accordingly on your desired rebate percentage and Click “Apply Rebate” once done.
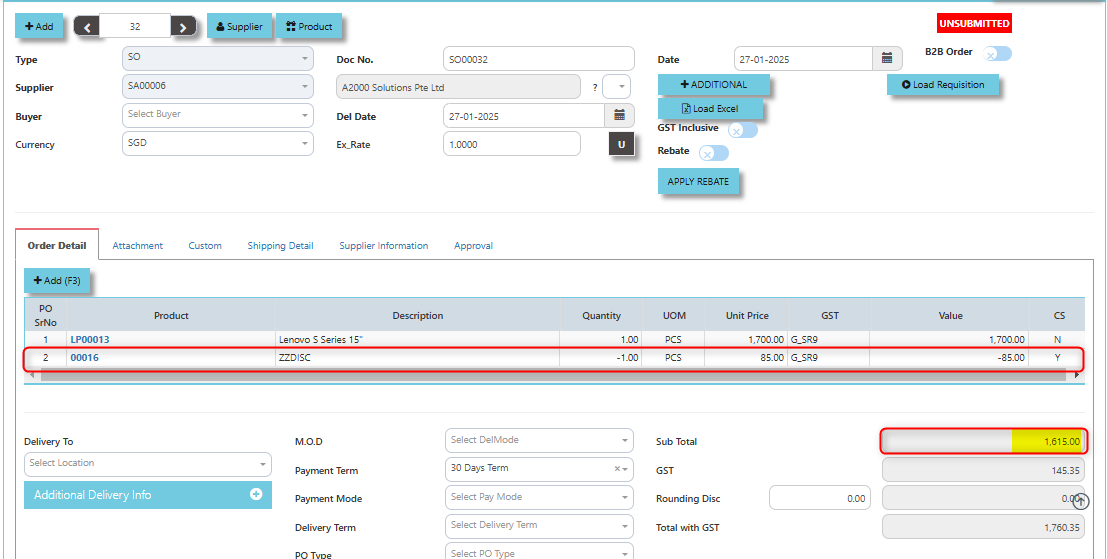
4. Upon encoding the output will go as like the below image for the computed Sub Total.
___________________________________________________________________________________________________________________________________________
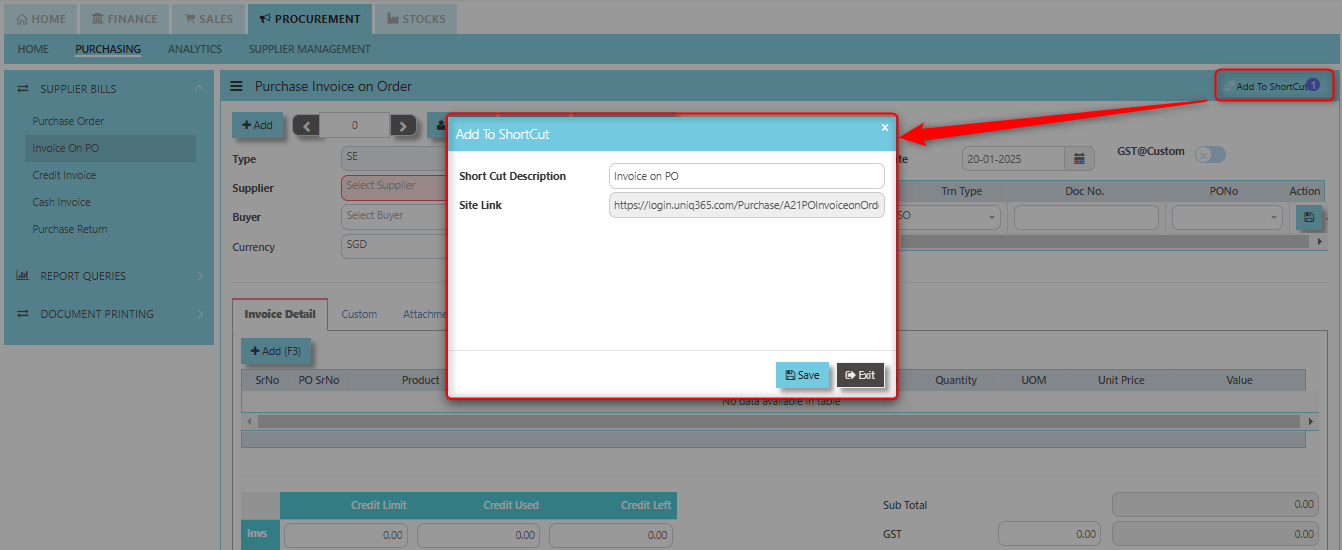
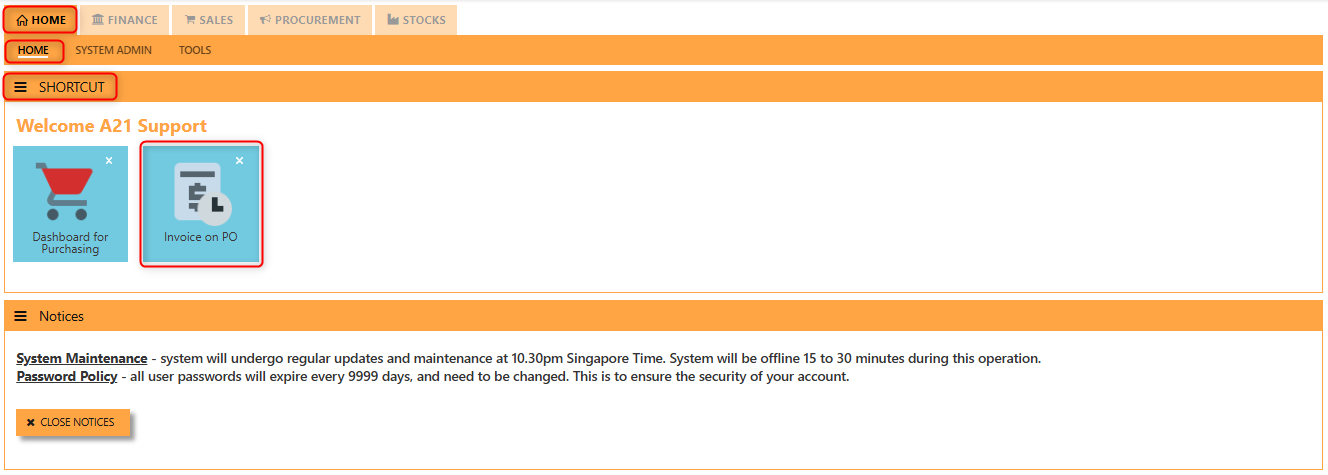
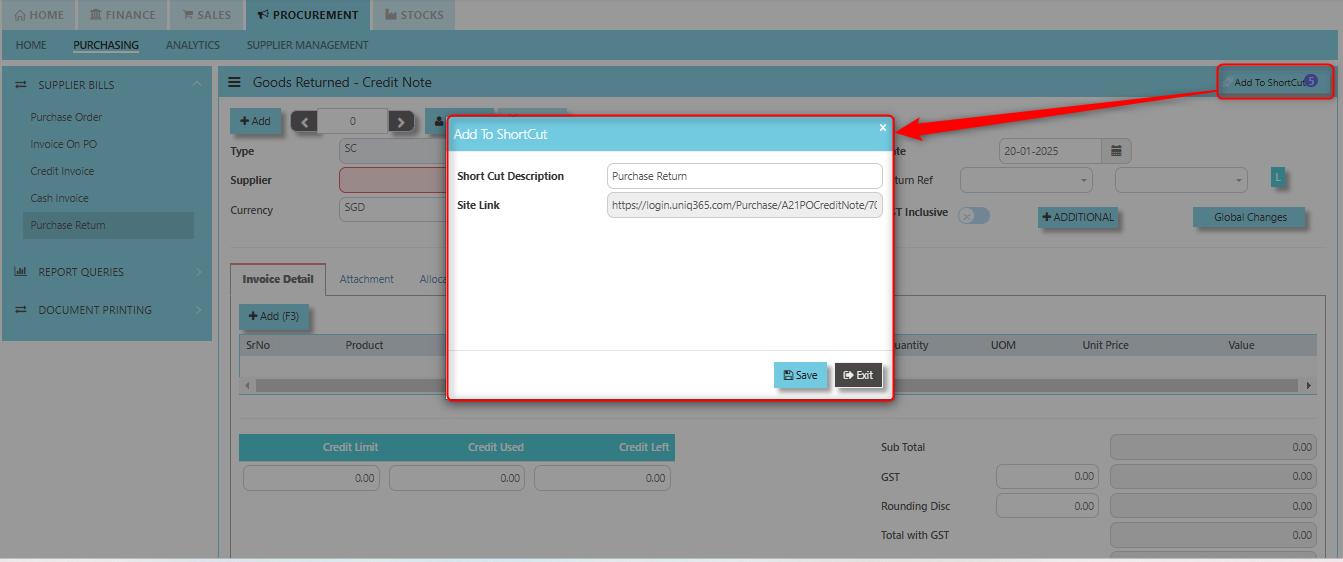
Add to ShortCut - Used to create a shortcut for quick access to a specific purchase order or purchase-related functionality within the ERP system. When you click this button, the selected purchase order or screen can be added to a personalized list of shortcuts, which allows users to quickly navigate to that specific purchase order or function without having to search for it every time.
How to use Add to ShortCut?
1. Click "Add to ShortCut" and system will open below windows:
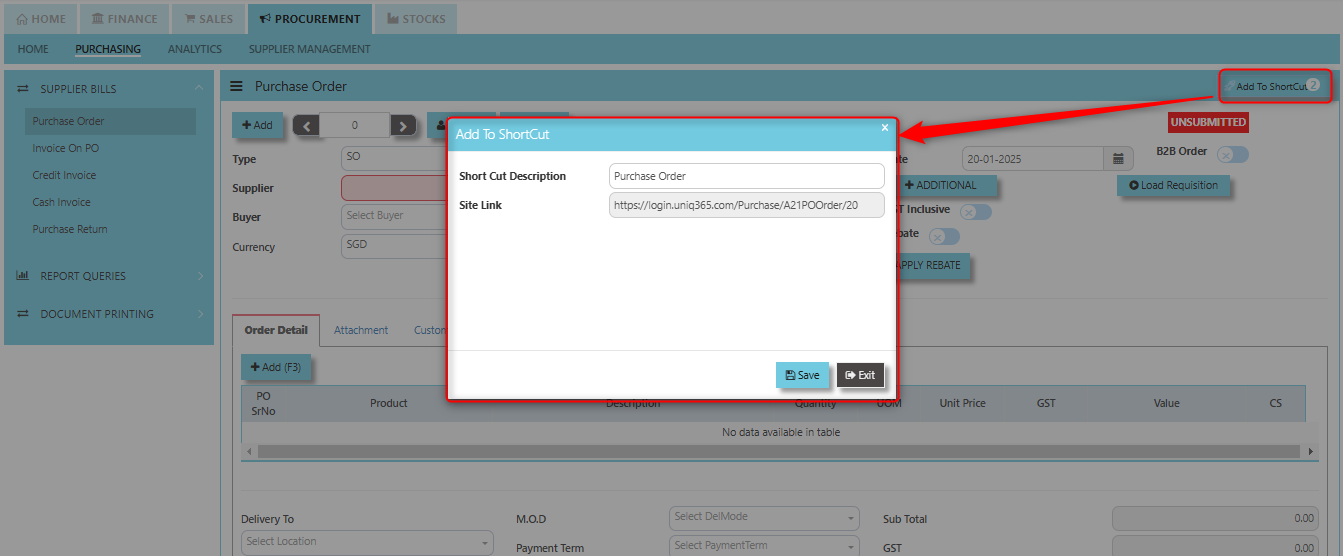
2. Enter Short Cut Description
3. Click SAVE then click OK.
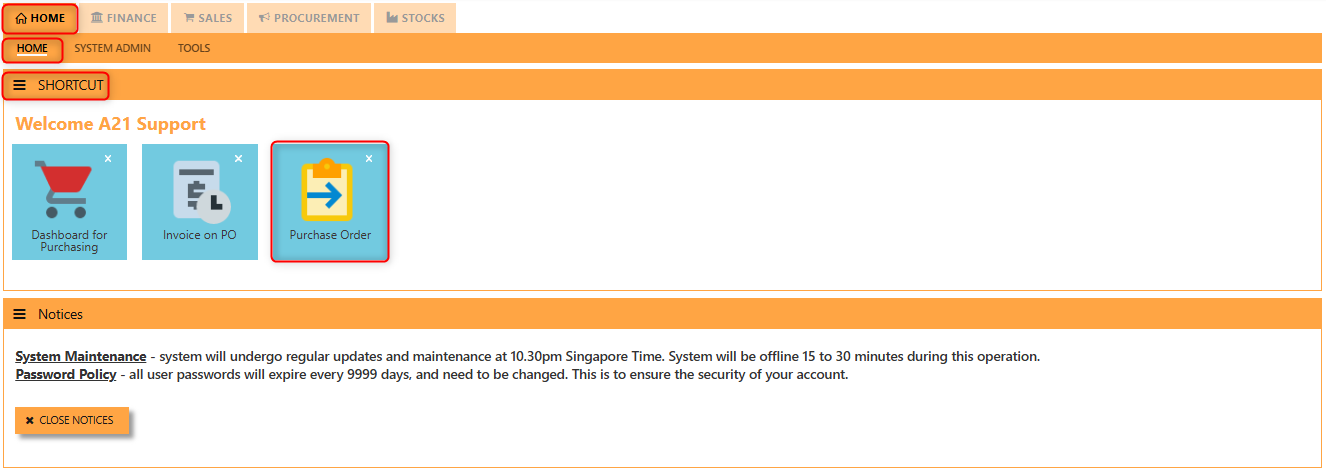
4. User may look to the Homepage for the added function or page. Click on HOME - HOME - SHORTCUT for the screen below.
___________________________________________________________________________________________________________________________________________
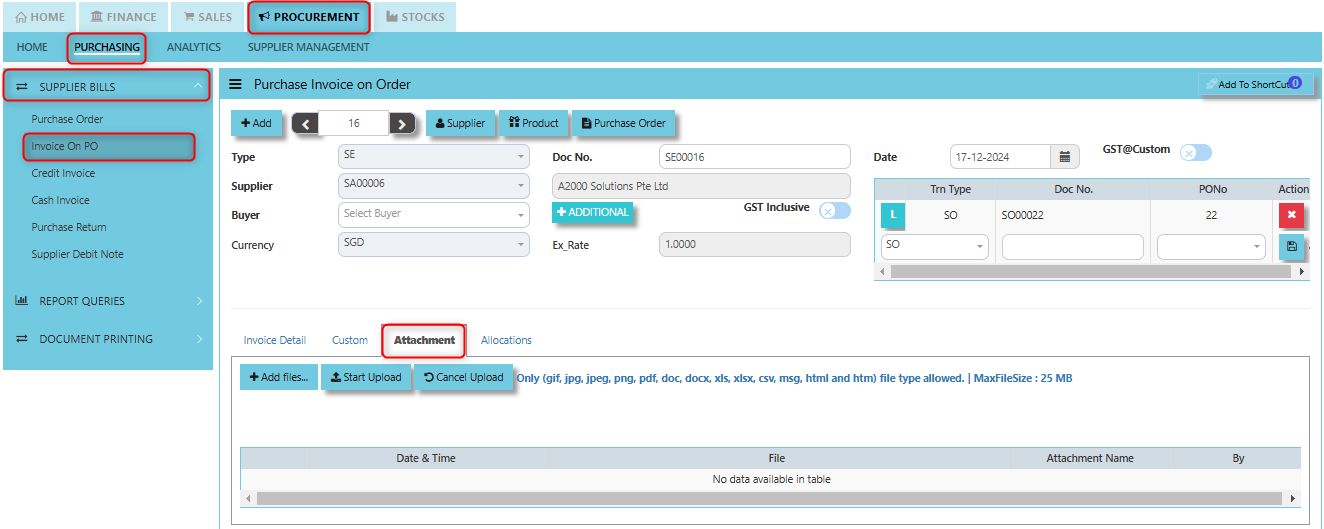
"Attachment Tab" allows users to attach various files and documents related to the purchase order. By attaching relevant files, users ensure that all purchase-related information is kept in one place, making the procurement process smoother, more transparent, and easier to track.
How to use Attachment Tab?
1. Click on PROCUREMENT - PURCHASING - SUPER BILLS - PURCHASE ORDER - ATTACHMENT TAB for the screen below.
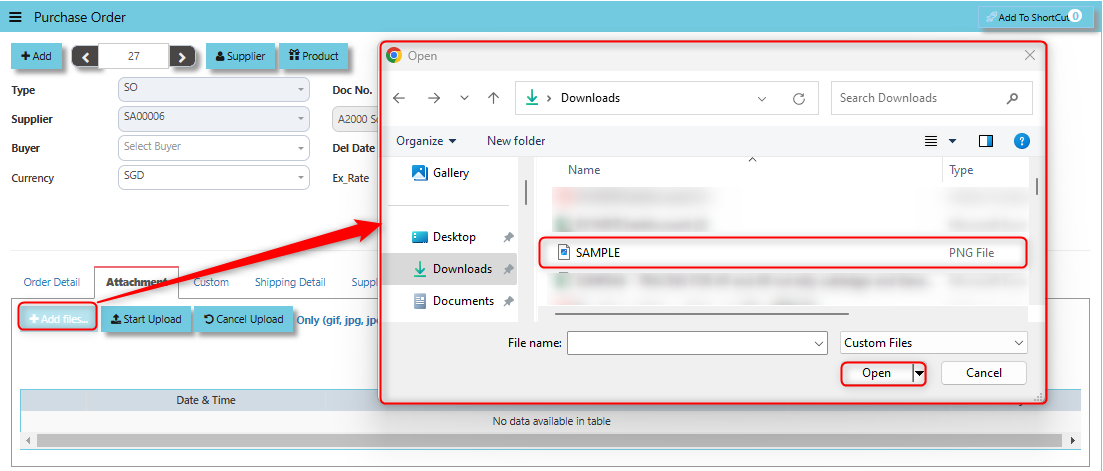
2. Click +Add files and windows will prompt then choose the file you want to upload by clicking open. Kindly take note the file types and maximum size requirements in uploading: Only (gif, jpg, jpeg, png, pdf, doc, docx, xls, xlsx, csv, msg, html and htm) file type allowed. | MaxFileSize : 25 MB
3. Key in the Attachment Name then click start to upload.
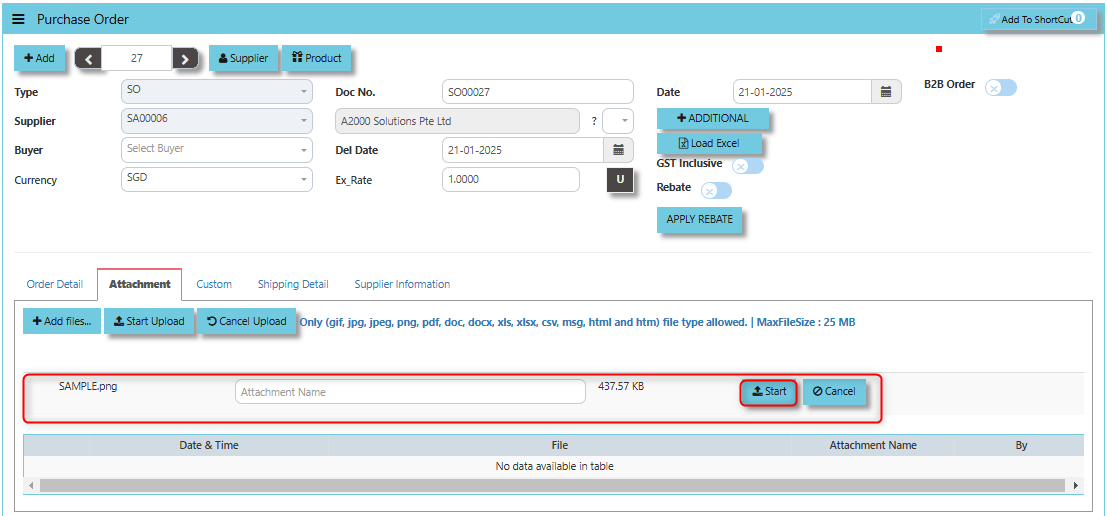
4. Once the file attached, click "SAVE" button
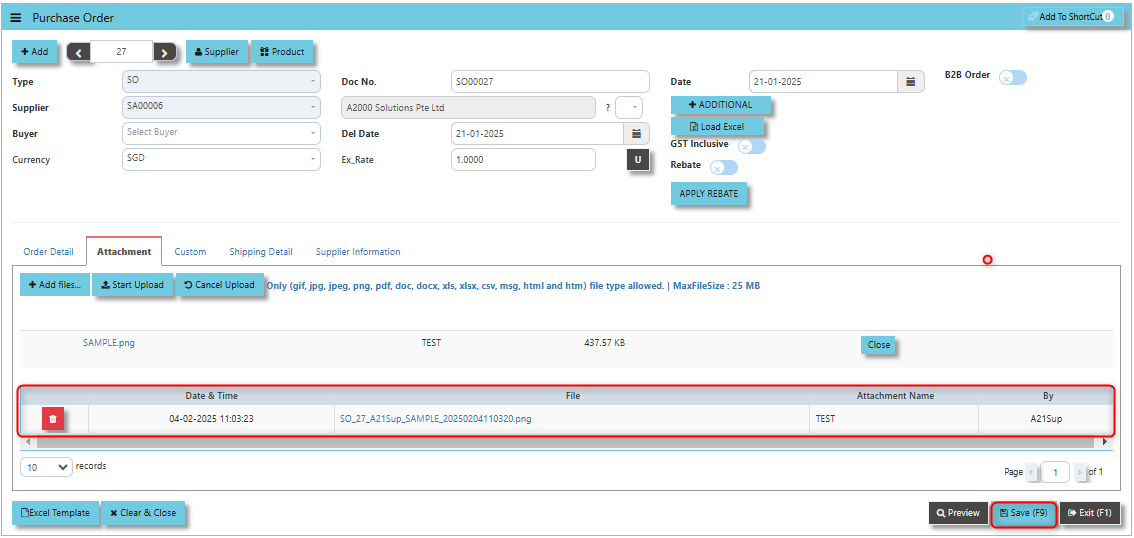
User may opt to cancel the uploading by clicking the "Cancel Upload" button and delete the file uploaded by clicking the "Bin icon" at the line detail.
___________________________________________________________________________________________________________________________________________
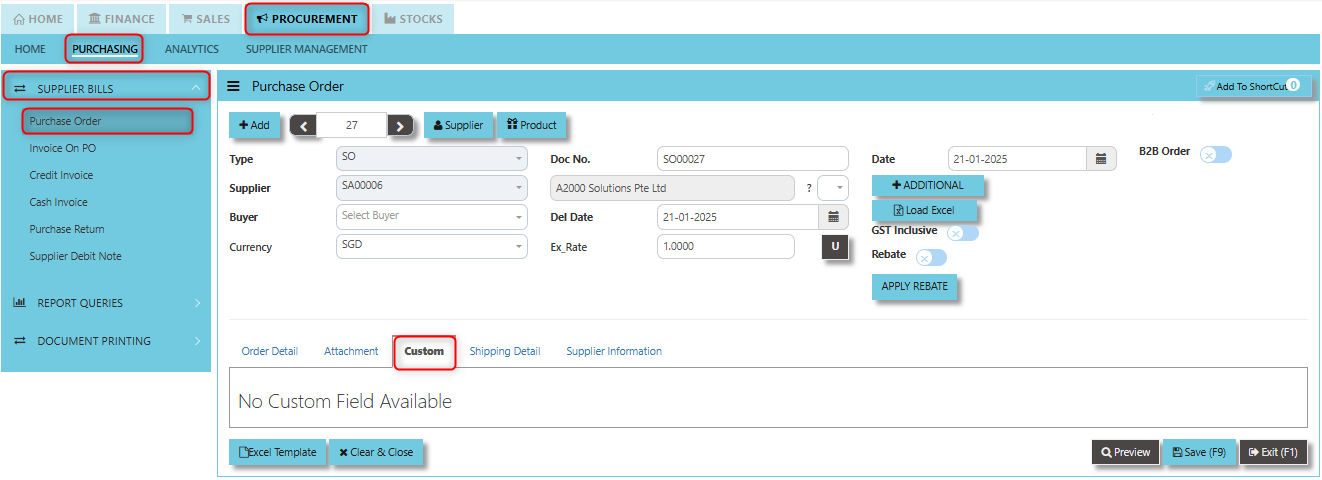
"Custom Tab" allows user to add custom fields or sections to a purchase order form. This feature is intended to accommodate specific business requirements or processes that are not covered by the standard fields in the system.
___________________________________________________________________________________________________________________________________________
"Shipping Detail Tab" a section where specific shipping-related information is entered and managed for the purchased goods or services. This tab ensures that all relevant details regarding the shipment, delivery location, and delivery expectations are captured in the system to facilitate smooth and accurate order fulfillment.
How to set Shipping Detail?
1. Click on PROCUREMENT - PURCHASING - SUPPLIER BILLS -PURCHASE ORDER - SHIPPING DETAIL for the screen below.
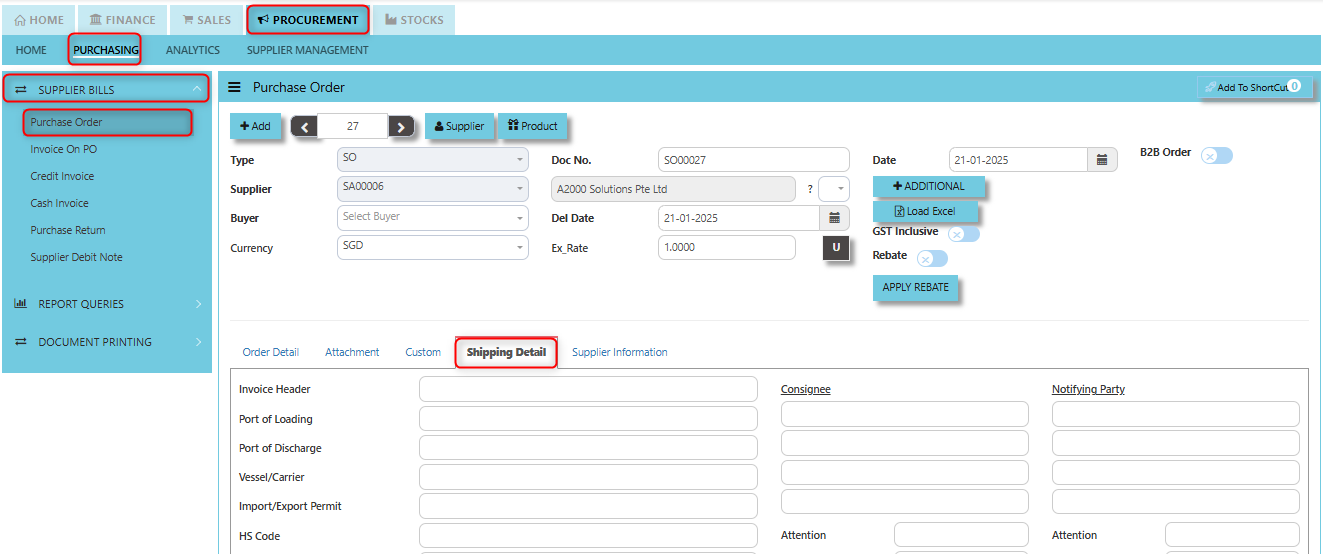
2. Input the details for the below fields:
- Invoice Header
- Port of Loading
- Port of Discharge
- Vessel/Carrier
- Import/Export Permit
- HS Code
- Container/Seal No
- Other Information
- Consignee
- Attention
- Tel
- Fax
- Notifying Party
- Attention
- Tel
- Fax
- Est. Date of Delivery (ETD)
- Est. Date Sailing (ETS)
- Est. Date Arrival (ETA)
3. Once keyed in the necessary details, click the next tab and will automatically save all the information then system will prompt you a message.
___________________________________________________________________________________________________________________________________________
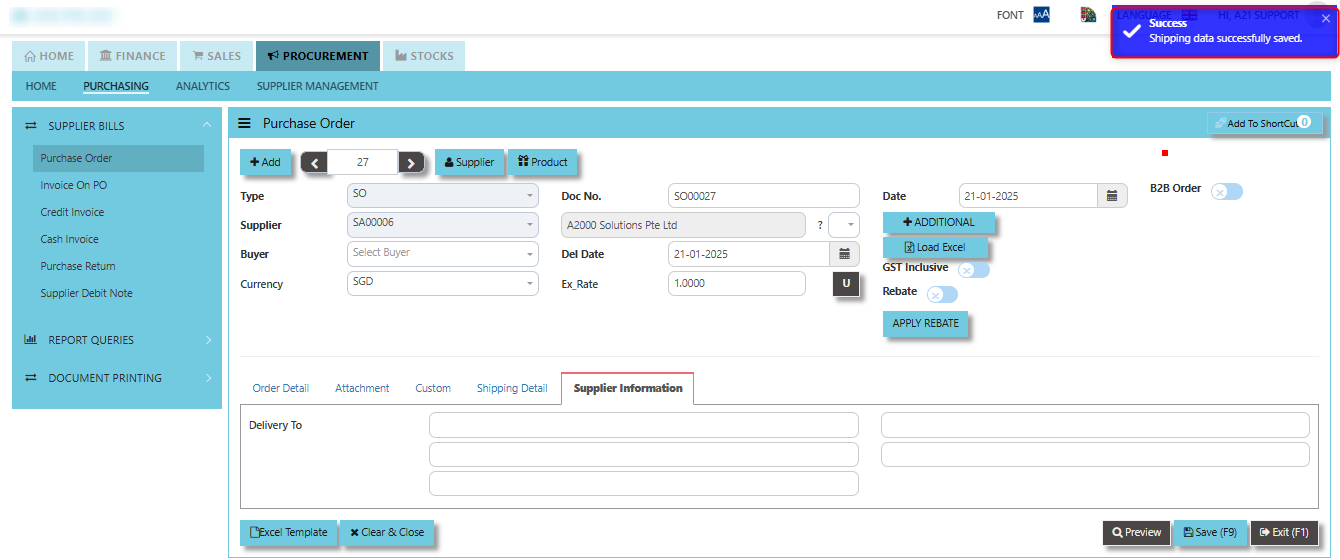
"Supplier Information Tab" provides essential details about the supplier or vendor responsible for fulfilling the purchase order.
How to set Supplier Information?
1. Click on PROCUREMENT - PURCHASING - SUPPLIER BILLS - PURCHASE ORDER - SUPPLIER INFORMATION for the screen below.
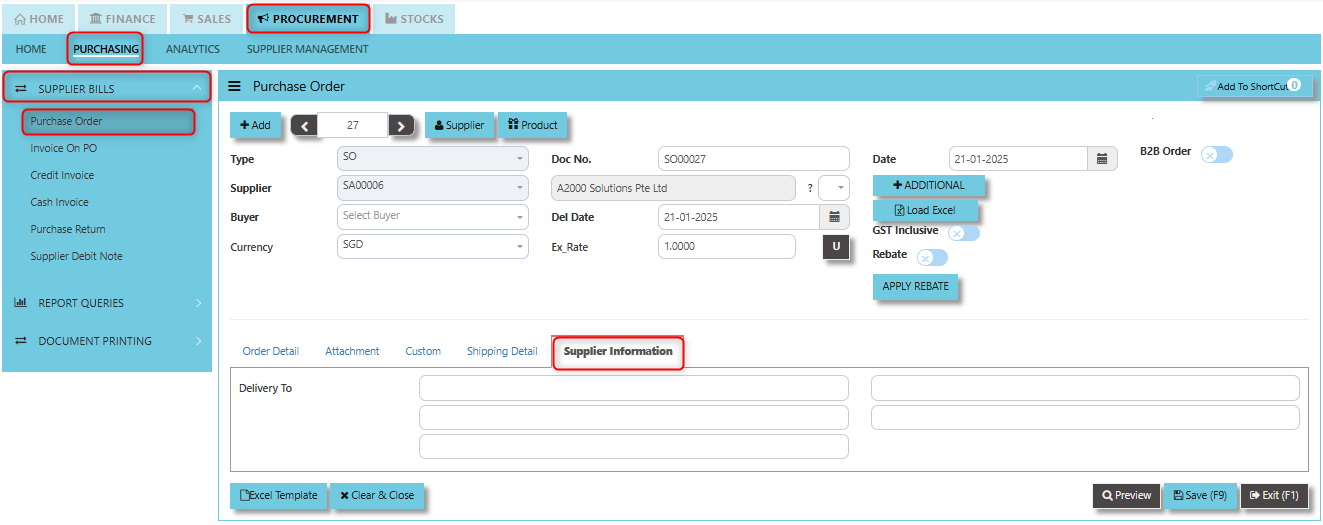
2. Key in the details of "Delivery To"
3. Once keyed in the necessary details, click "SAVE"
___________________________________________________________________________________________________________________________________________
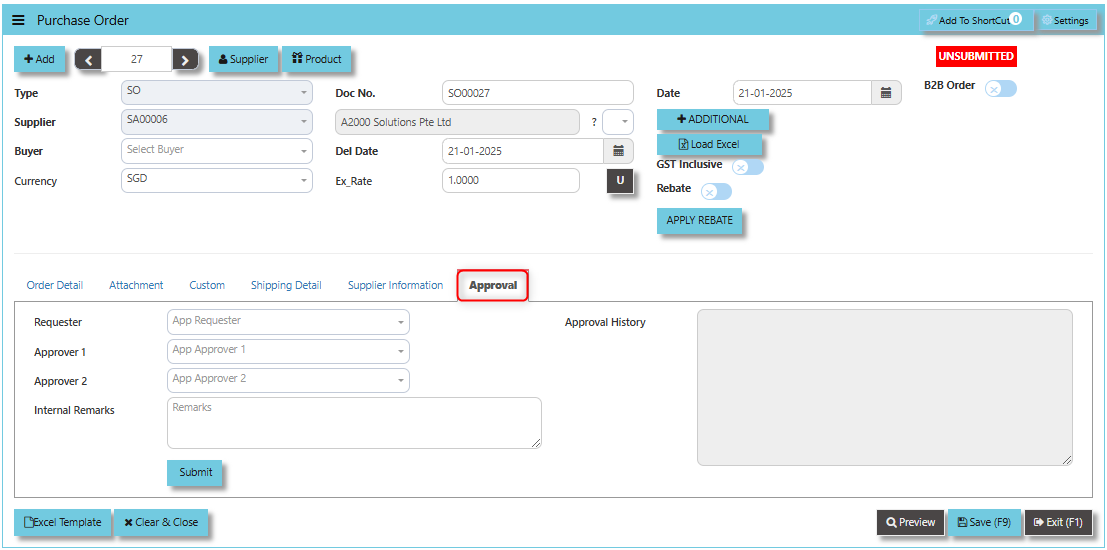
The Approval tab ensures that purchase orders are thoroughly reviewed and authorized in compliance with the company's purchasing policies and procedures before any procurement activity is carried out.
How to use Approval Tab?
1. Click PROCUREMENT - PURCHASING - SUPPLIER BILLS - PURCHASE ORDER - APPROVAL TAB for the screen below.
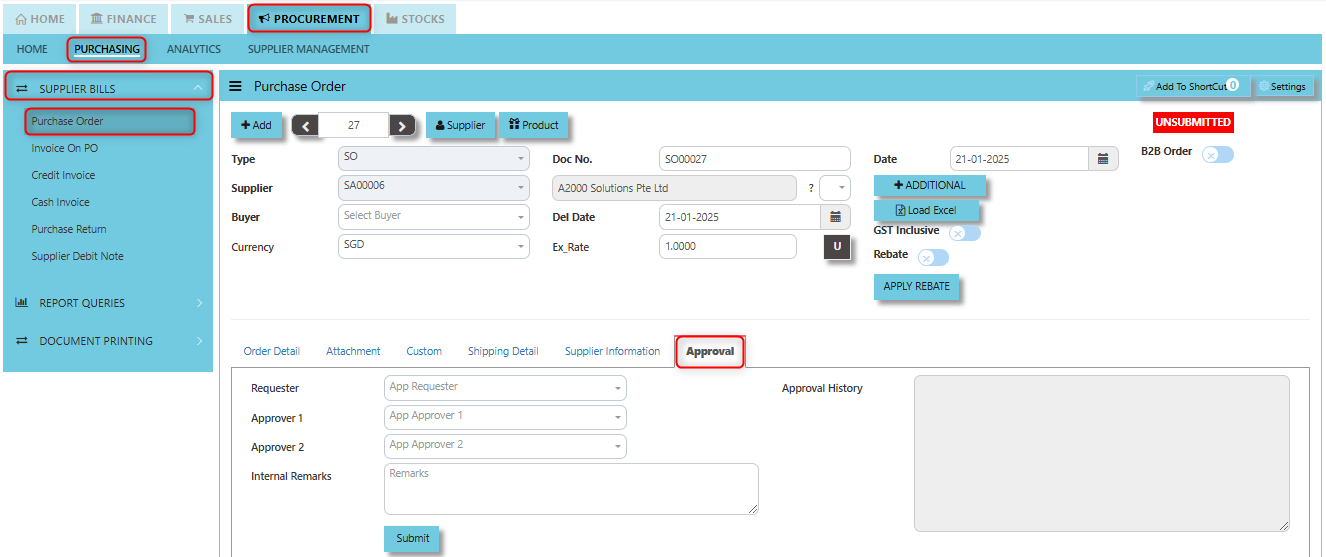
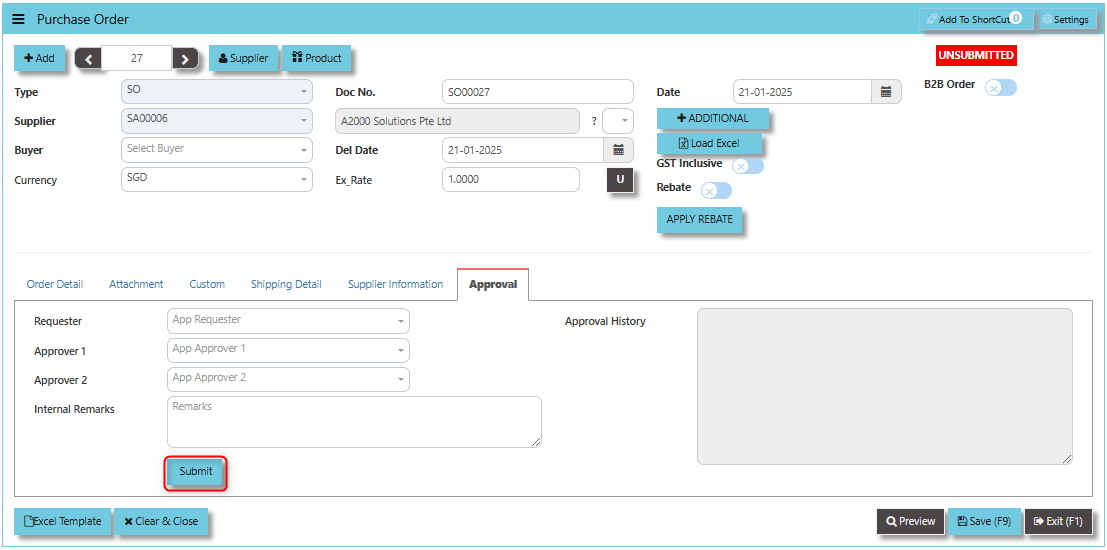
2. Select requester for the said created purchase order
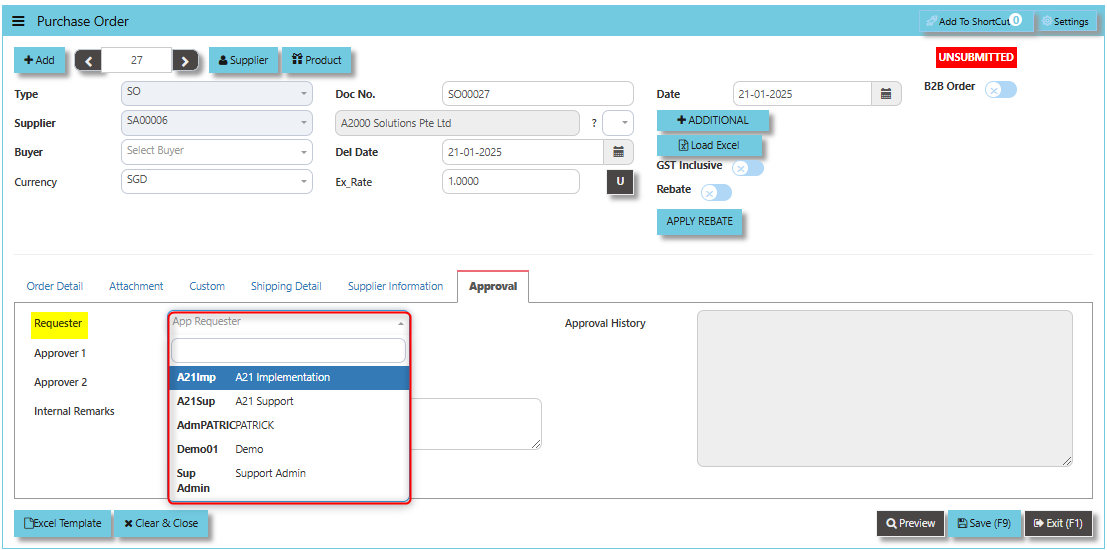
3. Select for Approval 1. If the process requires an Approval 2 user may select but should not be same approver under Approval 1.

4. Input any remarks associated to the purchase order.

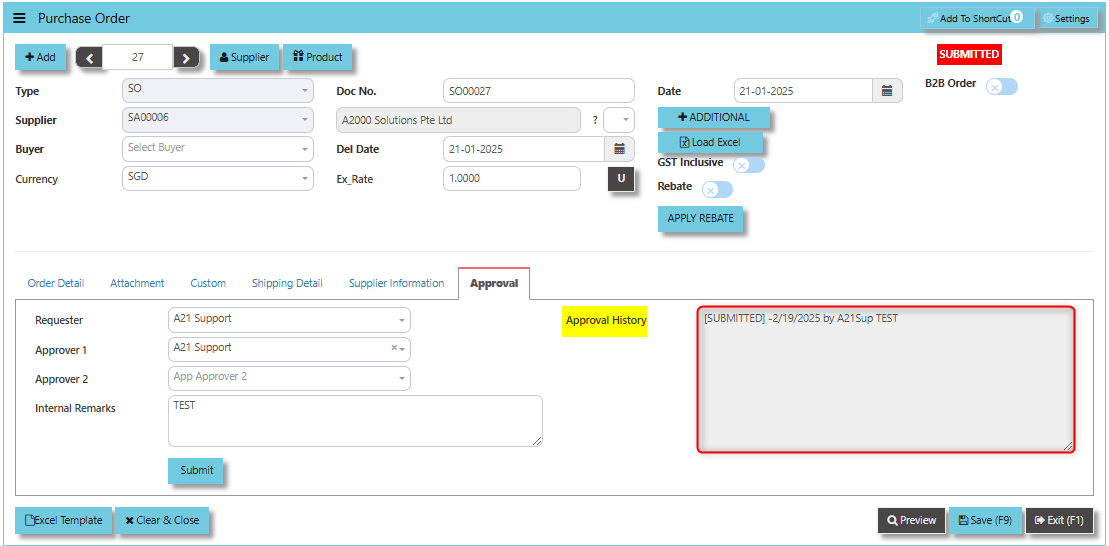
5. Click "SUBMIT" then OK and system will prompt that data has been submitted for approval.
6. Transaction screen will show you the historical record under Approval History field.
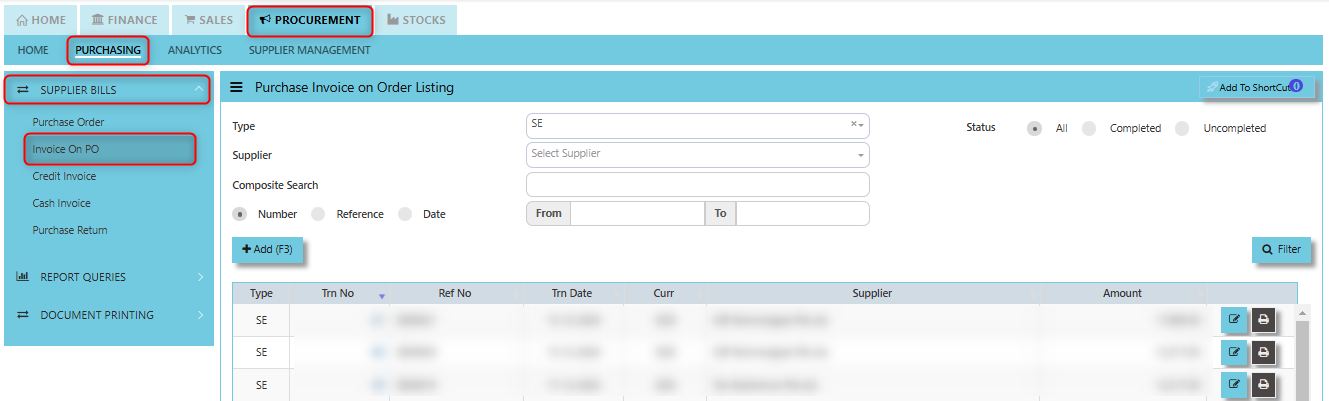
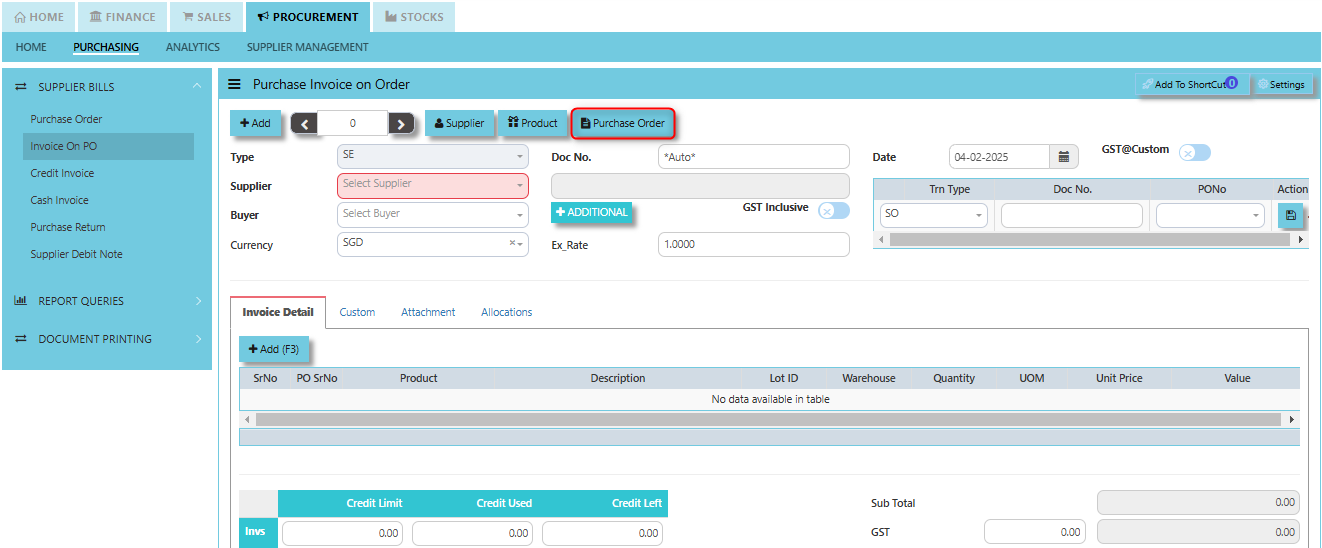
Invoice on PO (SE)
Following the Purchase Operation, you will create the Supplier Invoice on Order. Enter the required fields before selecting the Purchase Order at the top right hand corner of the screen. The product line items must be verified and entered one by one. After entering all the item details, click on the Save button. The GL and Inventory will be updated.
___________________________________________________________________________________________________
How to create Invoice on Order?
1. Click on PROCUREMENT – PURCHASING – SUPPLIER BILLS - INVOICE ON PO for the screen below.
2. Click Add (F3) to create new record.
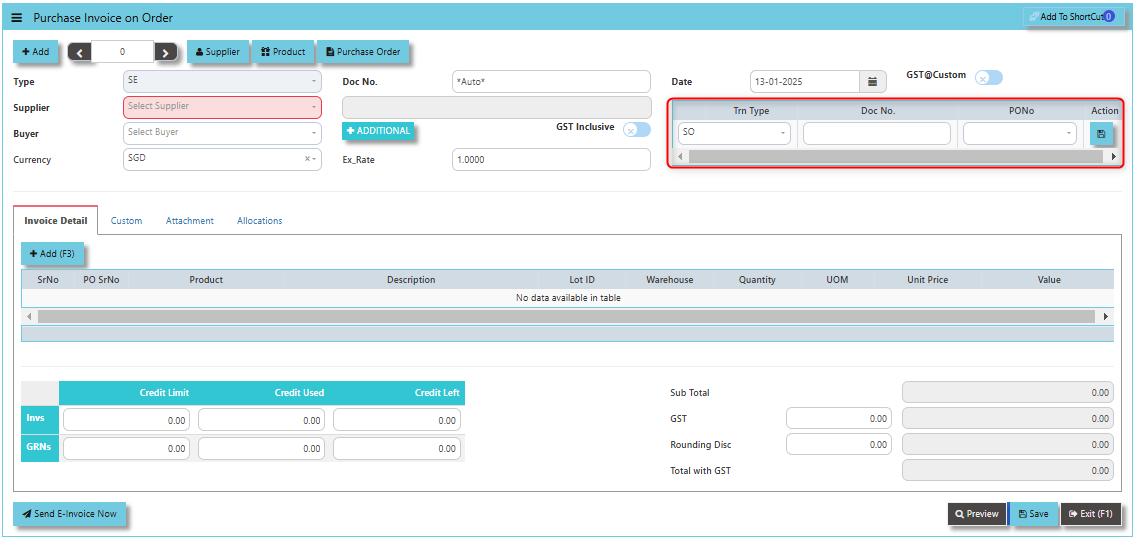
3. Click Type - drop-down to select transaction type – SE (Invoice on Order).
4. After transaction type selection, use the tab button to go to the Ref No., Date and other fields.
5. Click the Supplier - drop-down list to select Supplier Name, followed by the Buyer, PDS, Currency and Exchange Rate.
6. After the above steps are done, click on the Order No. drop- down list to select a Purchase Order (SO) (refer to the highlighted screen).
7. After selecting the SO transaction from the Order No. column, user can use the “L” button beside the Order No. to load all the product items at one go. Alternatively, you can use the Ref column which appears at product line details, to enter the items from the Purchase Order one by one. After all the items are called out, save the transaction.
___________________________________________________________________________________________________________________________________________
Add to ShortCut - Used to create a shortcut for quick access to a specific purchase invoice or purchase invoice-related functionality. By clicking this button, users can add the current purchase invoice to a list of shortcuts, allowing them to access the invoice or related functionality quickly and efficiently, without needing to search for it each time.

How to use Add to ShortCut?
1. Click "Add to ShortCut" and system will open below windows:
2. Enter Short Cut Description
3. Click SAVE then click OK.
4. User may look to the Homepage for the added function or page. Click on HOME - HOME - SHORTCUT for the screen below.
___________________________________________________________________________________________________________________________________________
"Supplier Button" enables users to add specific supplier data under Supplier Maintenance.
"Product Button" enables users to add specific products under Product & Service Maintenance.

"Purchase Order" Button serves as a mechanism to link or reference the related purchase order to the invoice being processed.
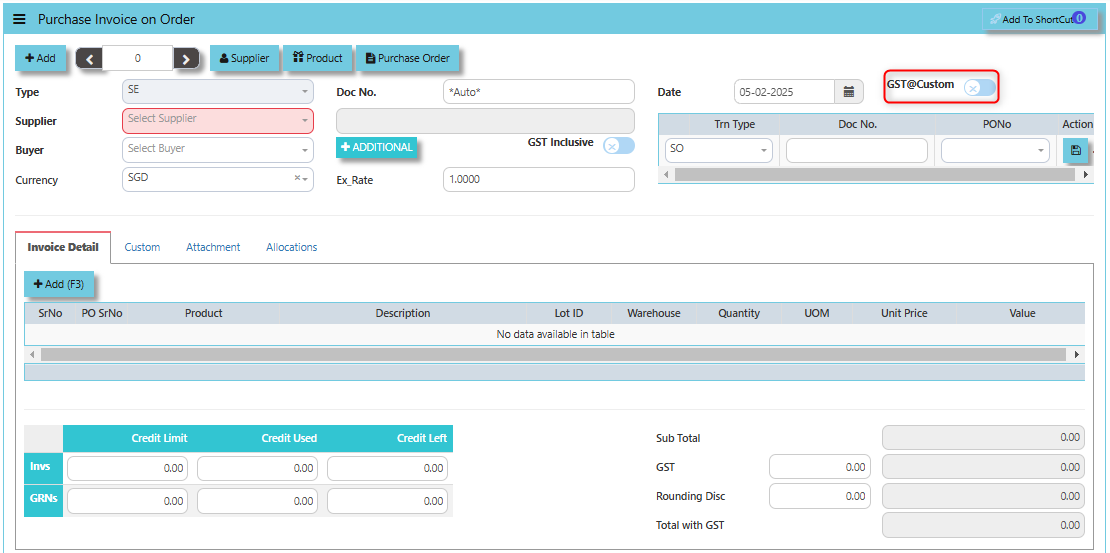
The GST @Custom checkbox typically used to enable custom GST rates for a specific transaction, rather than applying a standard or predefined GST rate.
- When ticked (GST @Custom enabled): It allows the user to manually input a custom GST rate for the goods or services listed on the purchase invoice. Modify the tax calculation for the invoice as required, based on the custom rate.
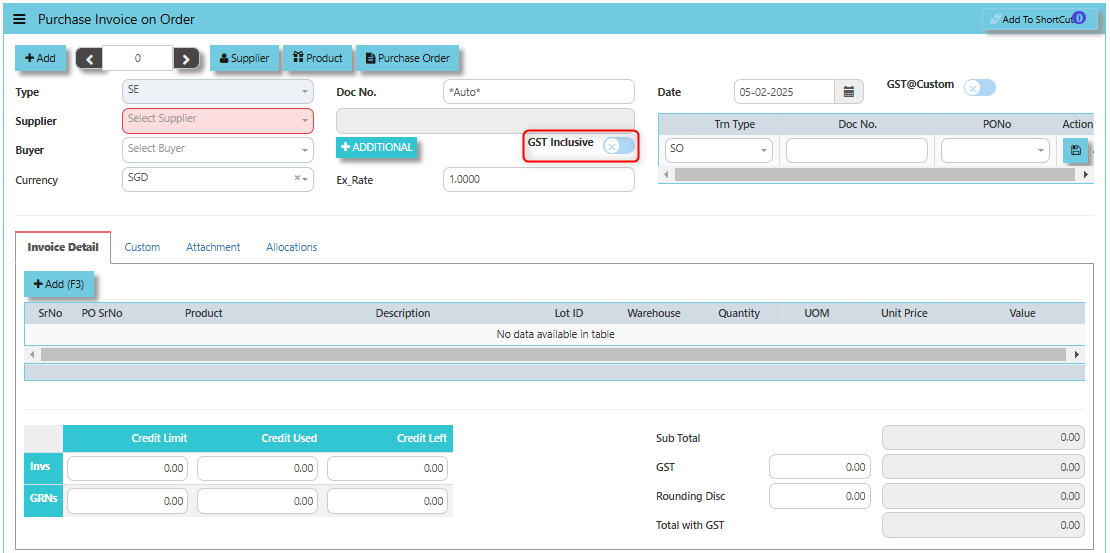
The GST Inclusive checkbox determines whether the GST amount is included within the total amount of the goods or services on the invoice or if it is calculated separately.
- GST Inclusive Checkbox (When ticked): If the GST is included in the price, the system will automatically calculate the base price (the price excluding GST) and the GST amount based on the total value.
- When not ticked (GST Exclusive): The system will calculate the GST separately based on the base price of the items and add it to the total amount of the invoice.
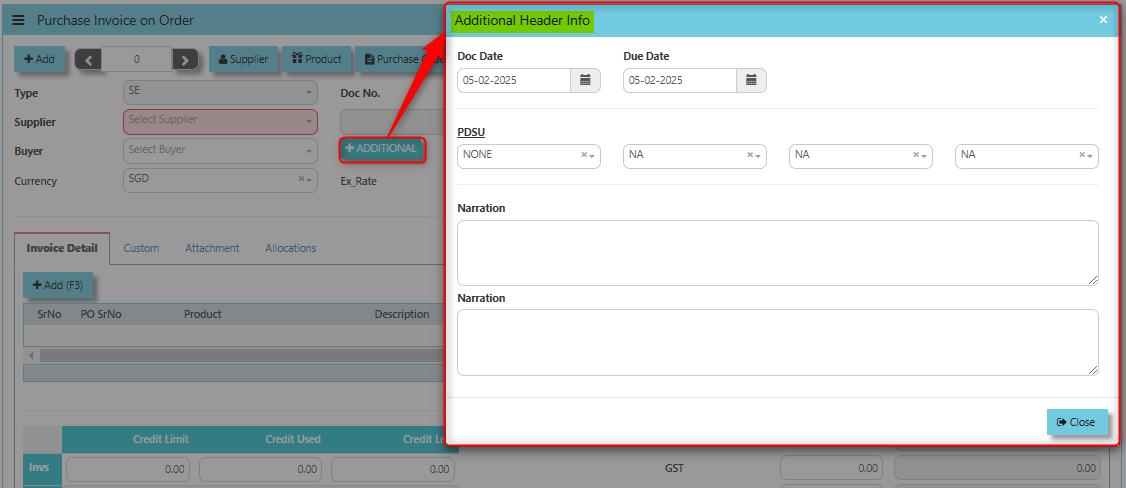
The Additional Header Info button allows users to enter and view additional details or supplementary information at the header level of the purchase invoice.
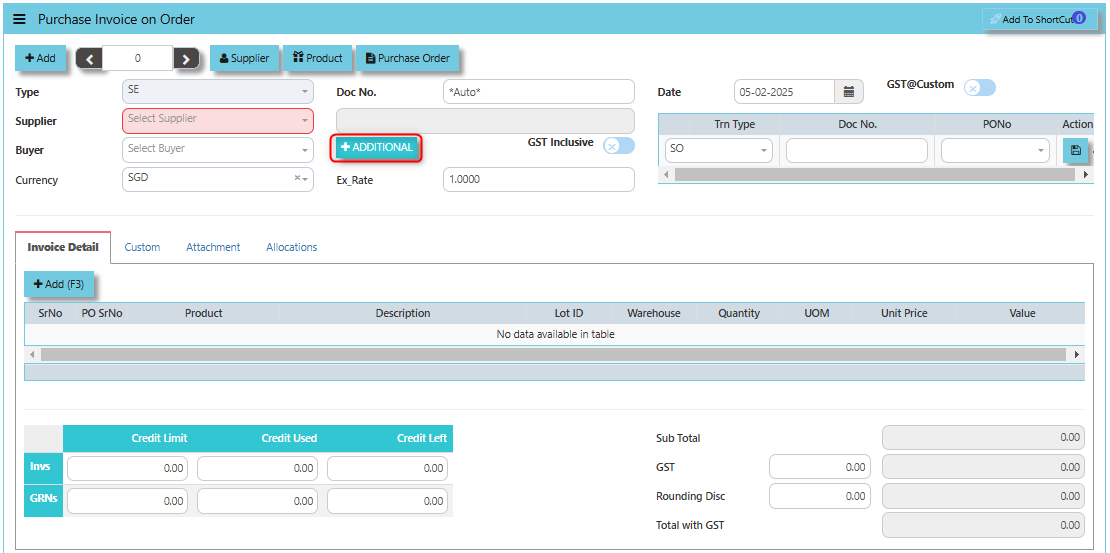
Once clicked the said button, user may input the below additional information:
- Doc Date
- Due Date
- PDSU
- Narrations
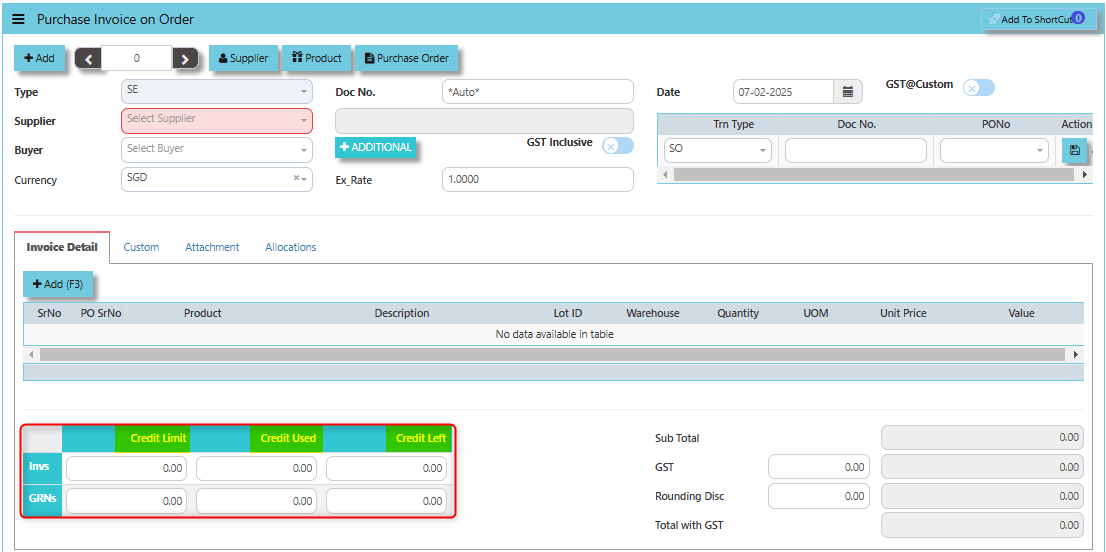
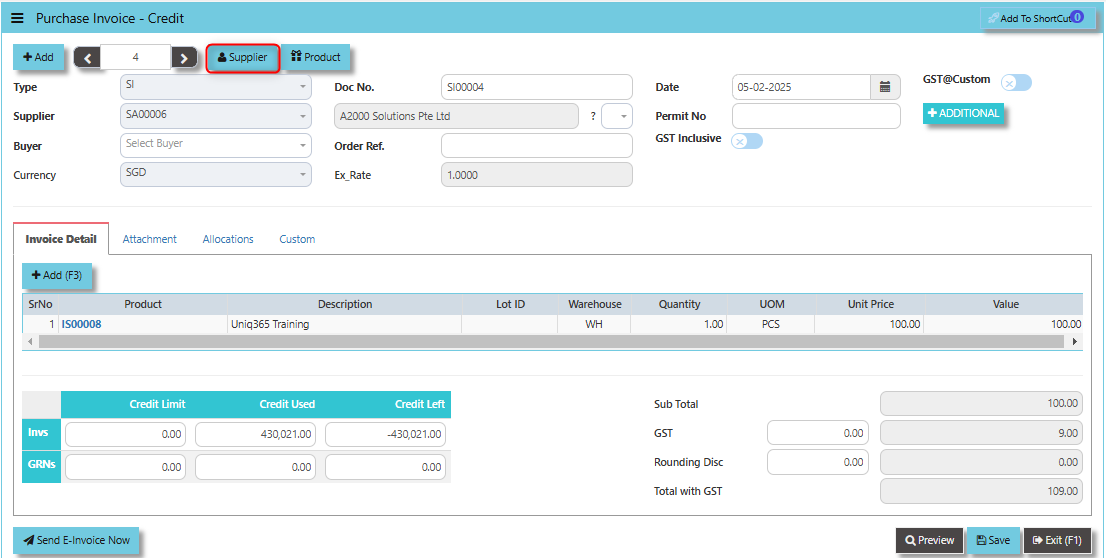
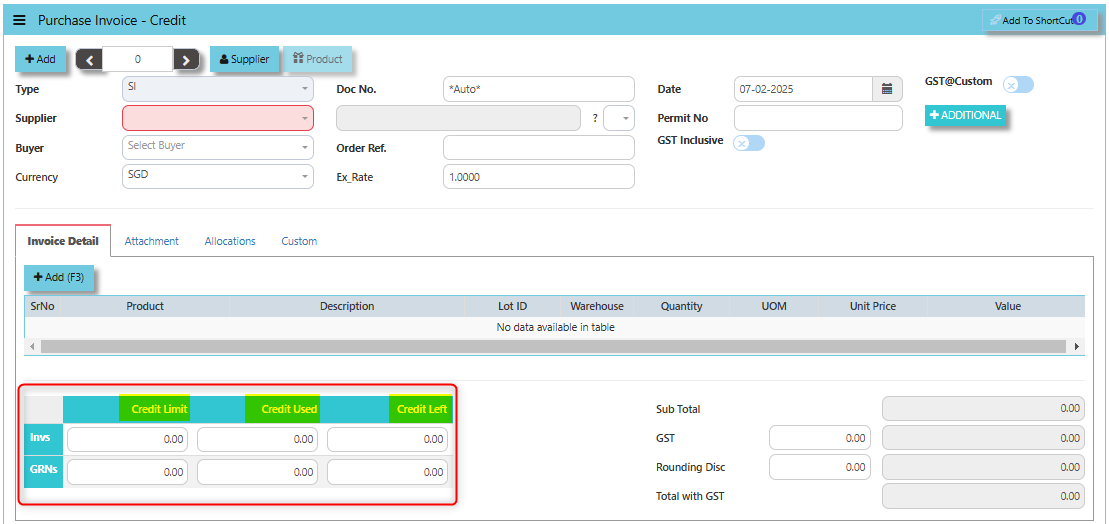
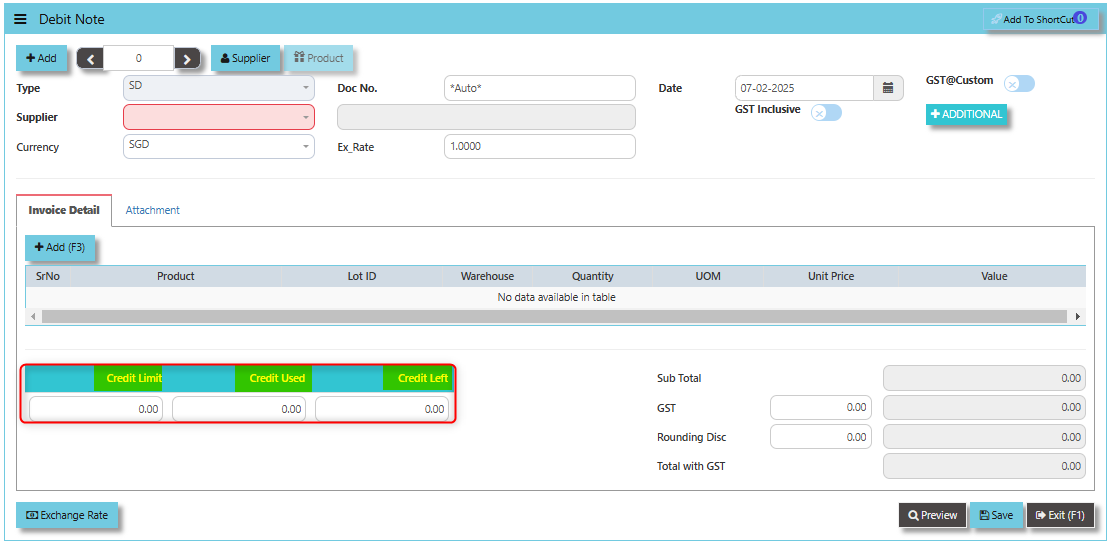
The terms Credit Limit, Credit Used, and Credit Left typically relate to the management of financial transactions and the control of purchasing activities. These are usually associated with the vendor or supplier accounts, and each of them plays a role in controlling and monitoring the financial aspects of procurement.
- Credit Limit -This is the maximum amount of credit that a vendor or supplier is willing to extend to your organization.
- Credit Used - This refers to the amount of credit that has already been used by the company on purchases from a specific vendor or supplier.
- Credit Left - This is the remaining amount of credit that is still available to be used with the vendor after subtracting the credit used from the total credit limit.
"Send E-Invoice Now" Button: serves the purpose of immediately sending an electronic invoice (e-invoice) to the relevant party, typically the supplier or vendor, once the purchase invoice has been generated.
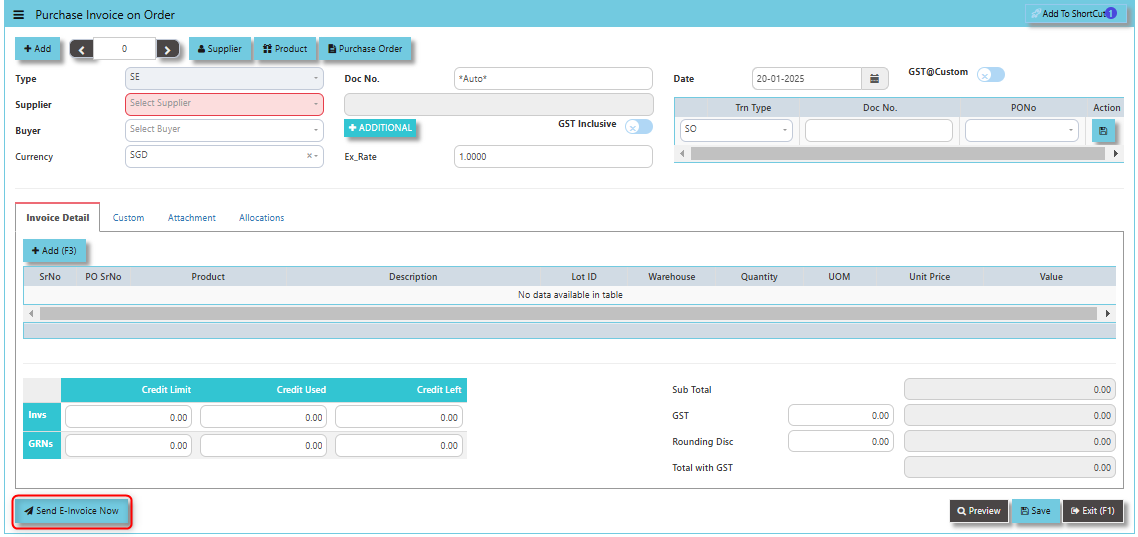
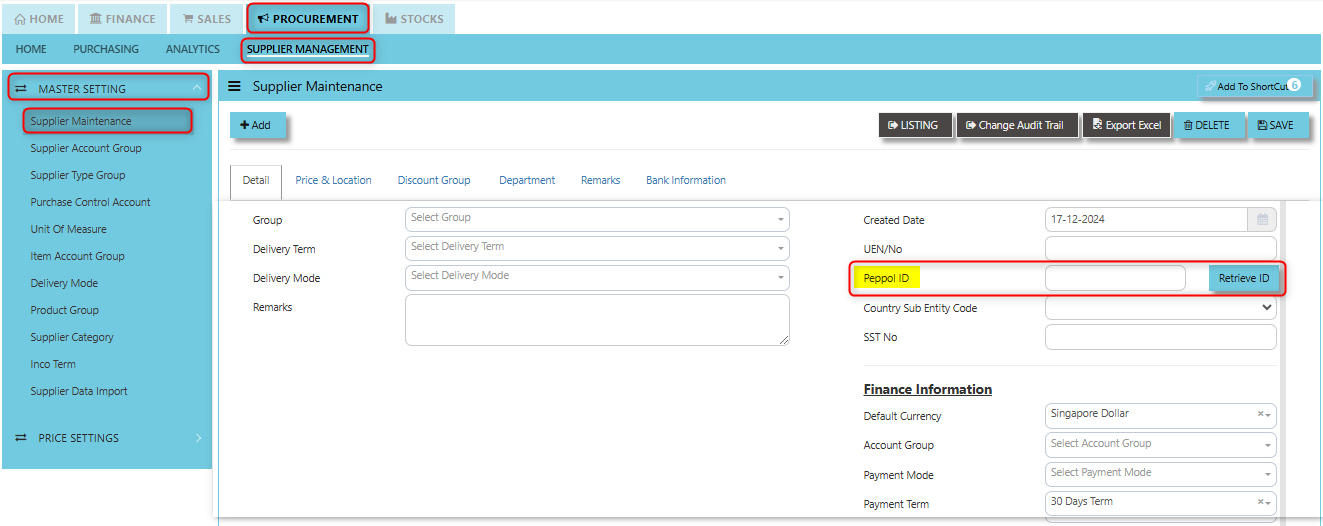
Supplier company should get "Peppol ID" as a pre-requisite for this function and user can maintain under supplier maintenance of the specific supplier. click on PROCUREMENT - SUPPLIER MANAGEMENT - MASTER SETTING - SUPPLIER MAINTENANCE - PEPPOL ID
___________________________________________________________________________________________________________________________________________
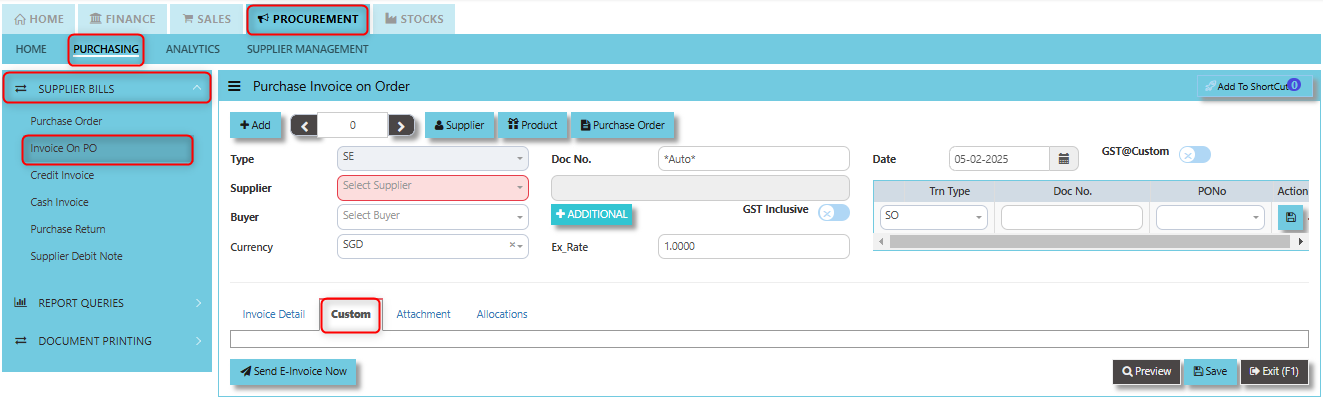
Custom Tab provides a space for users to input customized data or additional fields that are specific to their business processes and requirements.
- Click on PROCUREMENT - PURCHASING - SUPPLIER BILLS - INVOICE ON PO - CUSTOM TAB
___________________________________________________________________________________________________________________________________________
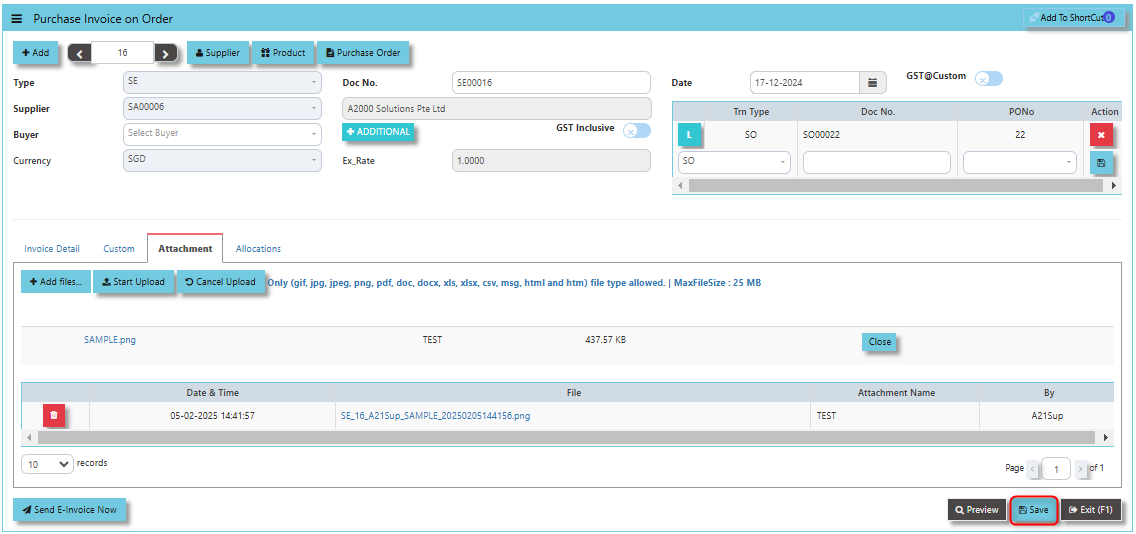
Attachment Tab allows users to attach and manage relevant documents or files related to a specific purchase invoice. This feature helps streamline the process by ensuring that all supporting documentation is easily accessible and linked directly to the invoice within the system.
How to attach file?
1. Click on PROCUREMENT - PURCHASING - SUPPLIER BILLS - INVOICE ON PO - ATTACHMENT TAB for the screen below.

2. Click +Add files and windows will prompt then choose the file you want to upload by clicking open. Kindly take note the file types and maximum size requirements in uploading: Only (gif, jpg, jpeg, png, pdf, doc, docx, xls, xlsx, csv, msg, html and htm) file type allowed. | MaxFileSize : 25 MB
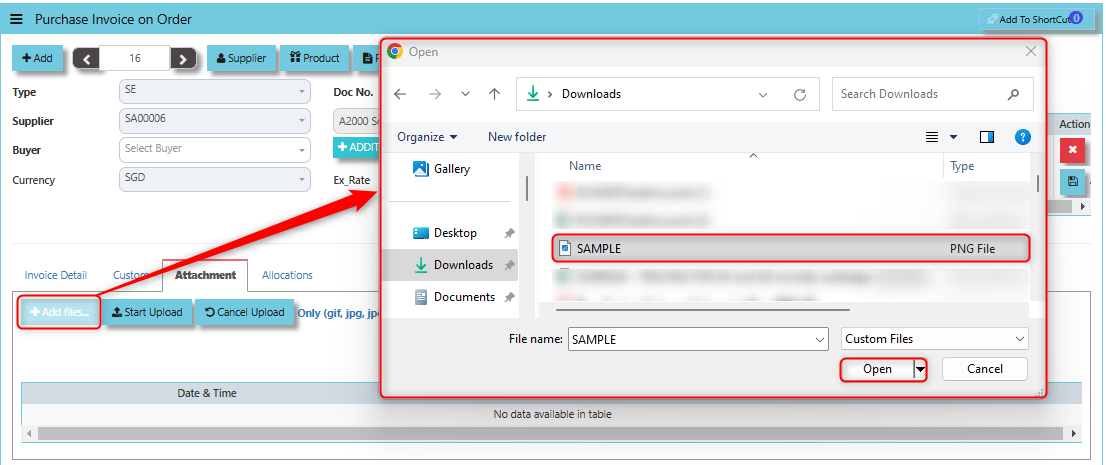
3. Key in the Attachment Name then click start to upload.
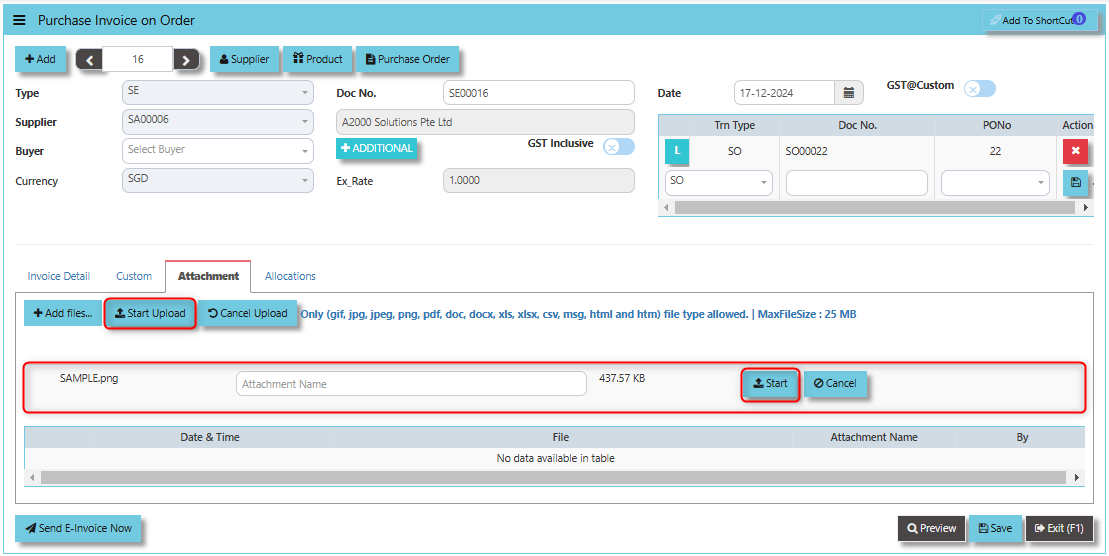
4. Once the file attached, click "SAVE" button
___________________________________________________________________________________________________________________________________________
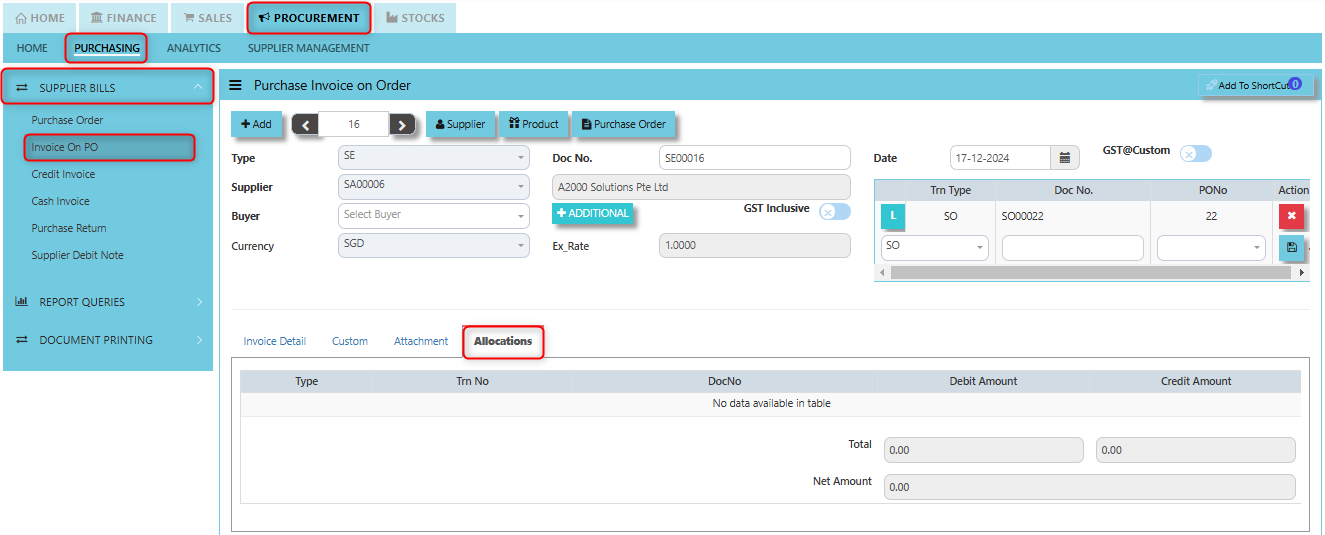
The Allocations Tab is used to manage and allocate the amounts or costs associated with the purchase invoice. Click on PROCUREMENT - PURCHASING - SUPPLIER BILLS - INVOICE ON PO - ATTACHMENT TAB for the screen below.
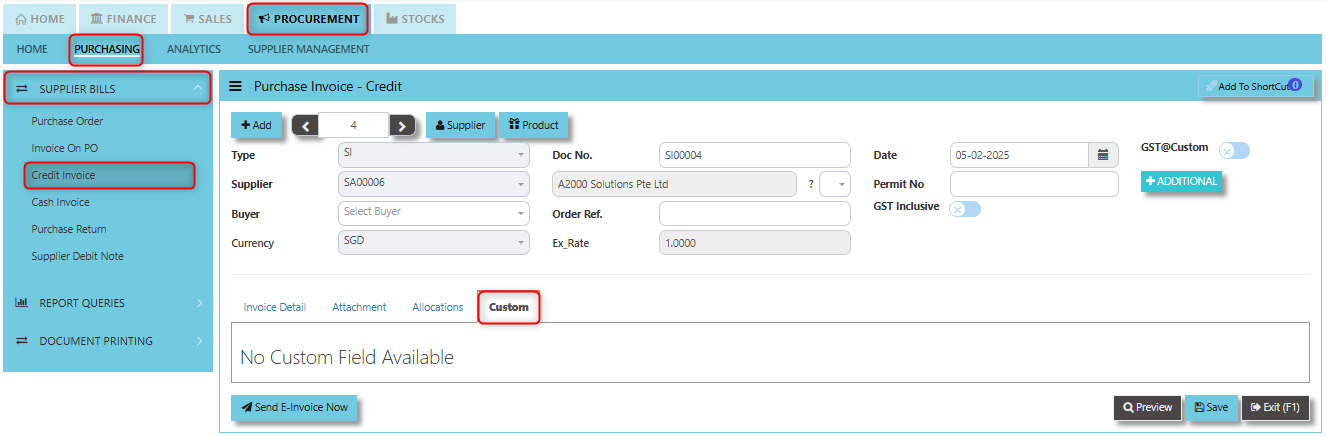
Credit Invoice (SI)
A Supplier Credit Invoice directly updates the inventory status and post a direct transaction for invoicing. It will also update the Accounts Payable at the same time.
___________________________________________________________________________________________________
How to set create Credit Invoice?
1. Click on PROCUREMENT – PURCHASING – SUPPLIER BILLS - CREDIT INVOICE for the screen below.
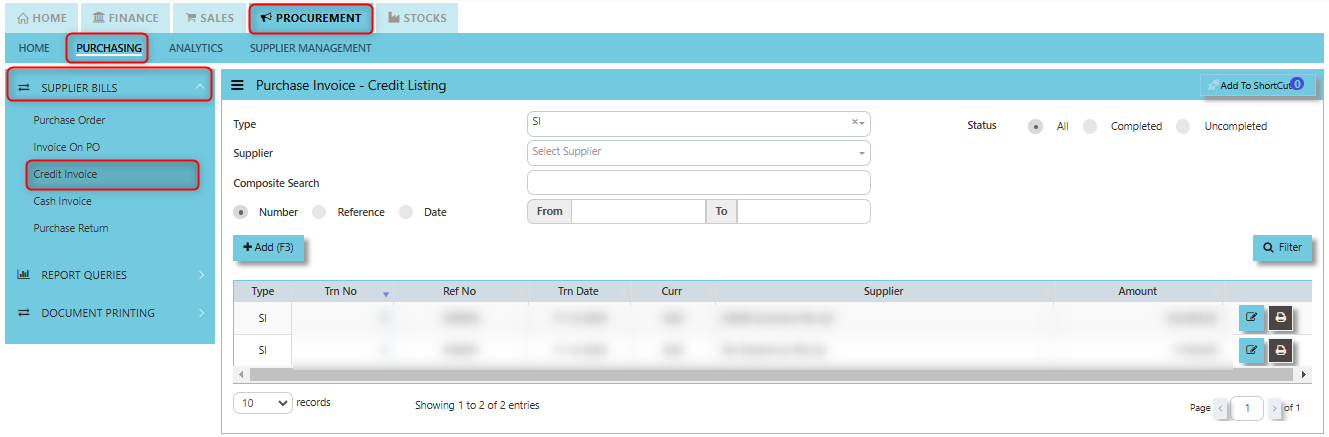
2. Click Add (F3) to create new record.
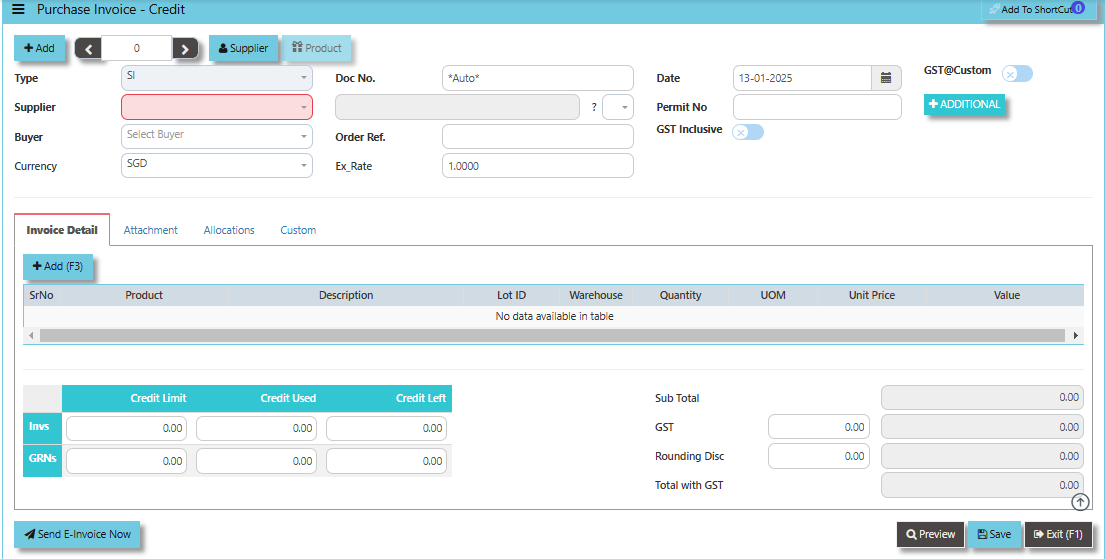
3. Click the Type - drop-down to select transaction type – SI (Credit Invoice).
4. After selecting the transaction type, use the tab button to go to the Ref No., Date and other fields.
5. Click the Supplier - drop-down list to select Supplier Name, followed by the Buyer, PDS, Currency, Exchange Rate, Our D/O, Order Ref No. and Narration if applicable.
6. After completing the above steps, go to Invoice Details to enter the product code, name, quantity, and unit price. Save the transaction.
___________________________________________________________________________________________________________________________________________
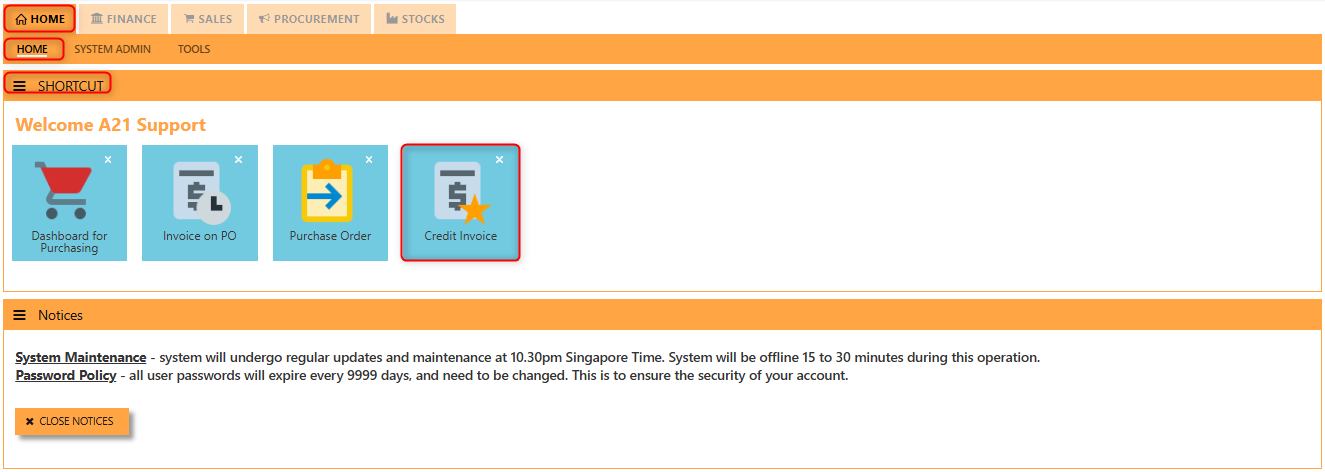
Add to ShortCut - Serves the purpose of creating a shortcut for quick access to a specific credit note or purchase invoice credit transaction. By clicking this button, users can add the current credit note or credit invoice related to a purchase to their personalized shortcut list, allowing them to access it instantly without having to search for it repeatedly.

How to use Add to ShortCut?
1. Click "Add to ShortCut" and system will open below windows:

2. Enter Short Cut Description
3. Click SAVE then click OK.
4. User may look to the Homepage for the added function or page. Click on HOME - HOME - SHORTCUT for the screen below.
___________________________________________________________________________________________________________________________________________
By clicking the Supplier Button, users can view or select the supplier's details (e.g., name, contact information, and payment terms) from the system's supplier database.
The Product Button It helps link and easy access to the Product and Service Maintenance for new creation of Items/Services.

The GST@Custom checkbox used to manage and apply customized GST (Goods and Services Tax) rates or rules to the credit invoice, which may differ from the standard GST rates. When the GST@Custom checkbox is ticked, the system will calculate the GST based on the custom rate entered or configured for that specific transaction, rather than using the default GST rate.

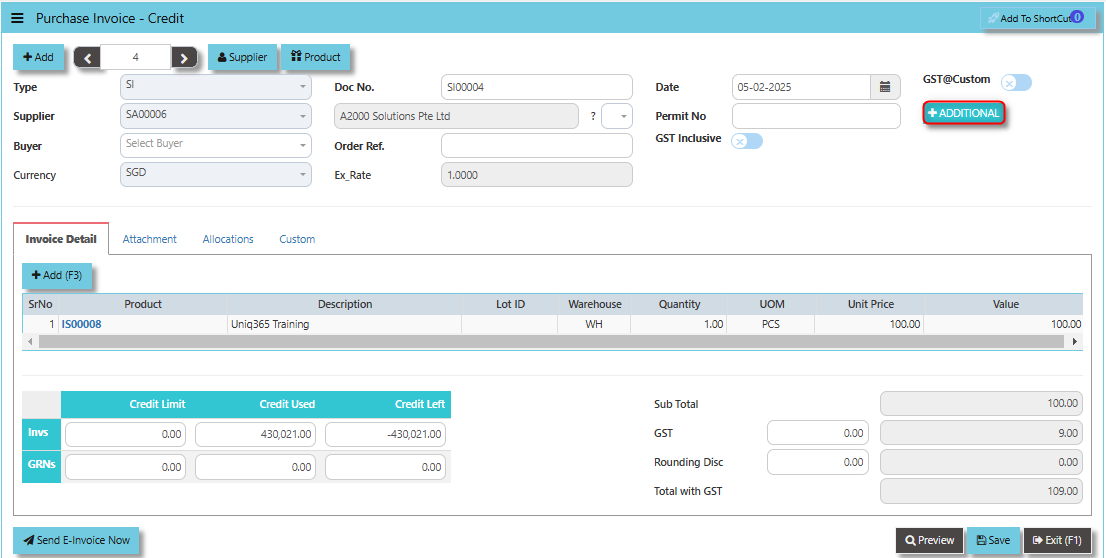
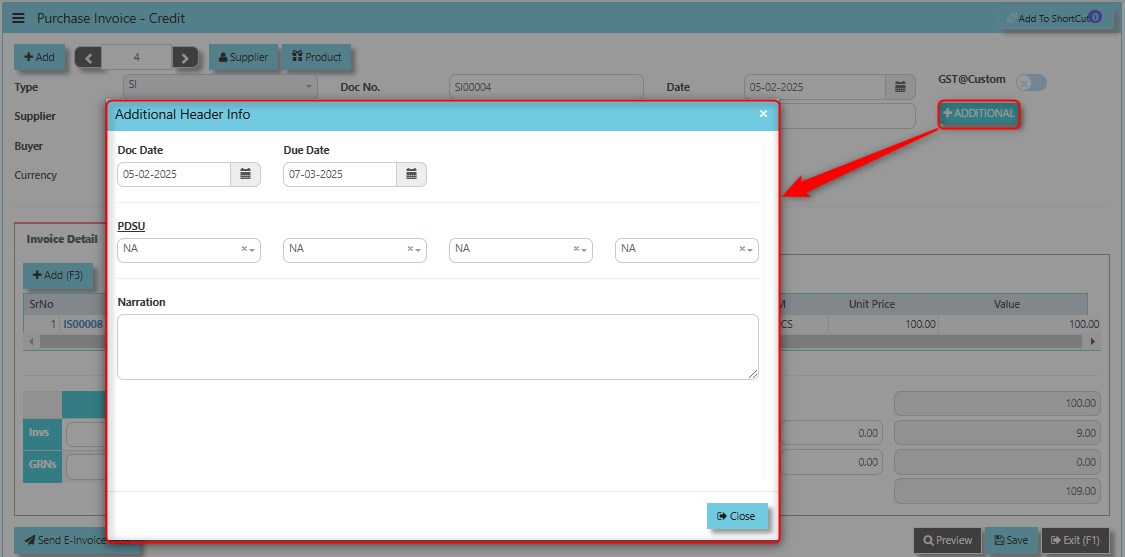
The Additional Header Info button allows users to enter or view extra, customizable details at the header level of the credit invoice. This button is designed to capture supplementary information that may not be included in the standard fields of the credit invoice but is important for the transaction or for internal tracking.
Once clicked the said button, user may input the necessary details for the below fields:
- Doc Date
- Due Date
- PDSU
- Narration
When the GST Inclusive checkbox is ticked, it means that the GST amount is already included in the total amount on the credit invoice. This informs the system that the value provided is the final amount including both the product or service cost and the GST.

The terms Credit Limit, Credit Used and Credit Left play a key role in managing financials and transactions, particularly when there are adjustments or returns to be made to suppliers.
- The Credit Limit in the context of a credit invoice refers to the maximum amount of credit a supplier is willing to extend to the organization for refunds, adjustments, or returns.
- Credit Used refers to the amount of credit that has already been applied or used in credit invoices to reduce the organization's outstanding obligations to the supplier.
- The Credit Left refers to the remaining amount of credit available to the organization after the application of credit invoices, which can be used in future adjustments, returns, or refunds.
"Send E-Invoice Now" Button: Used to immediately send the credit note or purchase invoice credit to the supplier or vendor in an electronic format. This functionality automates the process of transmitting the credit note, making it quicker, more efficient, and ensuring compliance with e-invoicing regulations in regions where applicable.
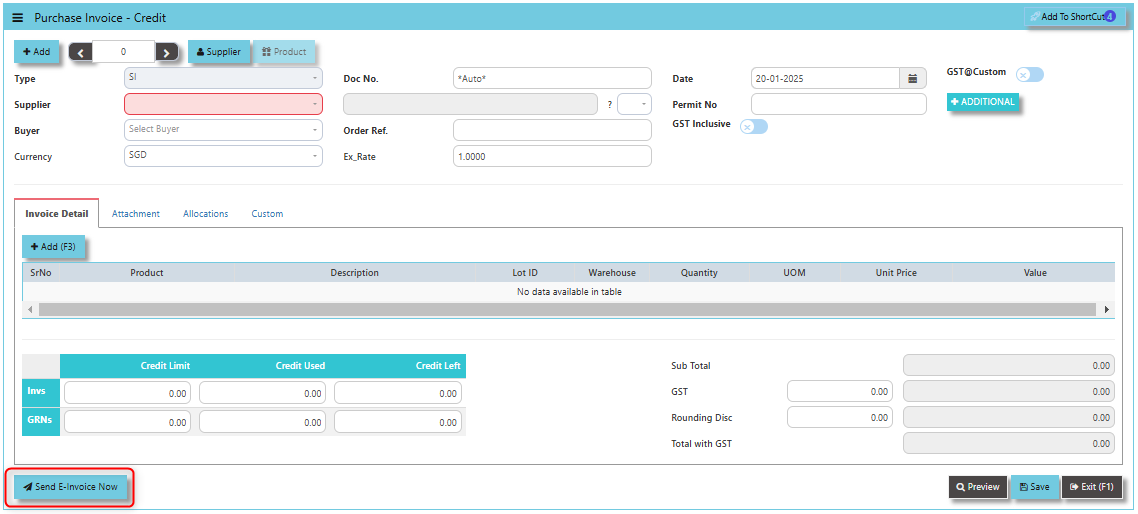
Supplier company should get "Peppol ID" as a pre-requisite for this function and user can maintain under supplier maintenance of the specific supplier. Click on PROCUREMENT - SUPPLIER MANAGEMENT - MASTER SETTING - SUPPLIER MAINTENANCE - PEPPOL ID

___________________________________________________________________________________________________________________________________________
The Attachment Tab allows users to attach supporting documents or files related to the credit invoice. This feature helps in storing, organizing, and referencing any relevant documents associated with the credit transaction, making the entire process more efficient and transparent.
How to use Attachment Tab?
1. Click on PROCUREMENT - PURCHASING - SUPPLIER BILLS - CREDIT INVOICE - ATTACHMENT TAB for the screen below.
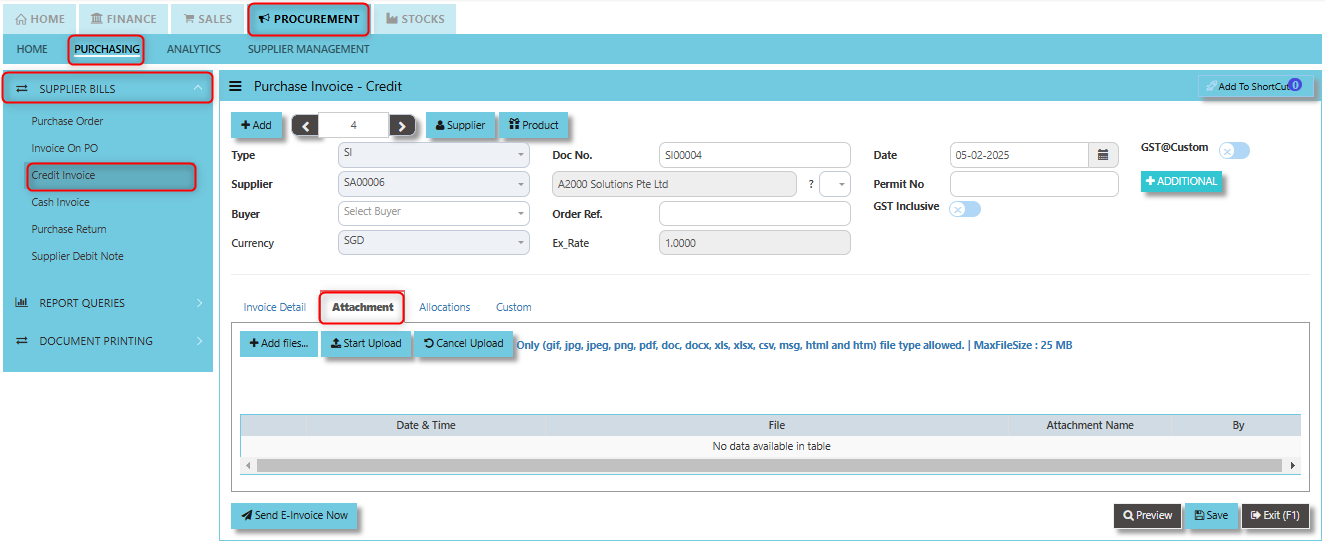
2. Click +Add files and windows will prompt then choose the file you want to upload by clicking open. Kindly take note the file types and maximum size requirements in uploading: Only (gif, jpg, jpeg, png, pdf, doc, docx, xls, xlsx, csv, msg, html and htm) file type allowed. | MaxFileSize : 25 MB

3. Key in the Attachment Name then click start to upload.
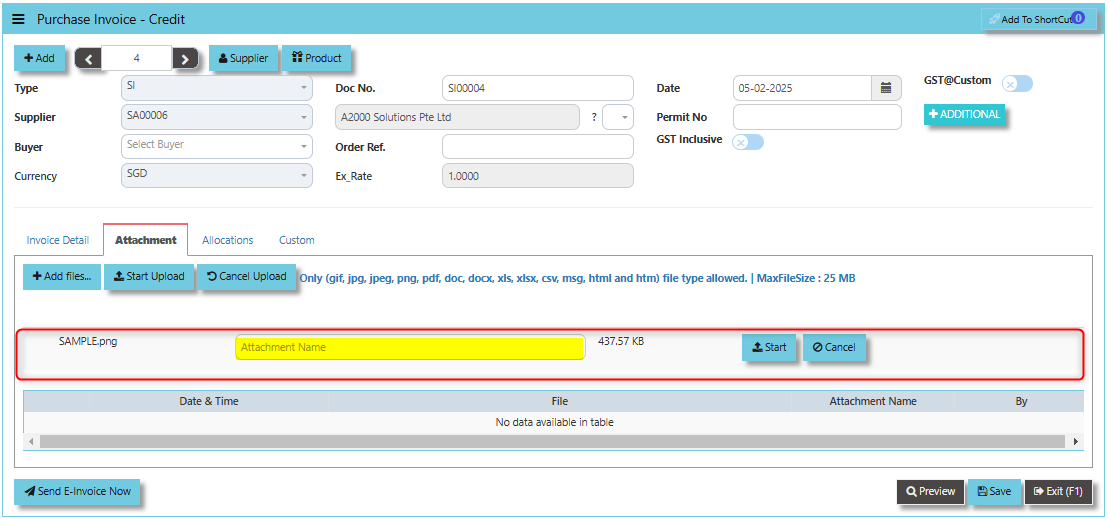
4. Once the file attached, click "SAVE" button
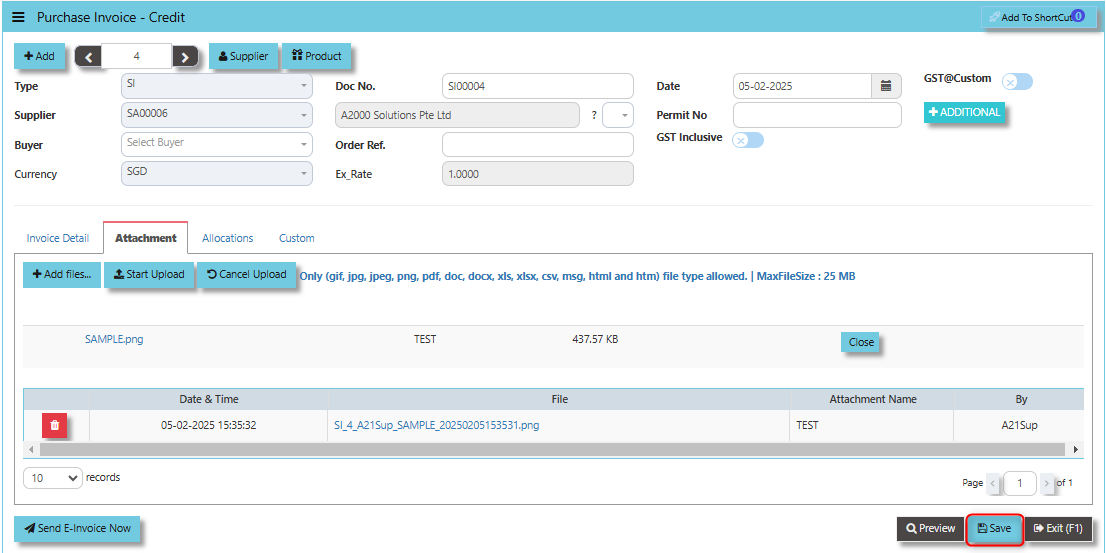
User may opt to cancel the uploading by clicking the "Cancel Upload" and delete the uploaded file by utilizing the "Bin Icon" at the left corner of line detail.
___________________________________________________________________________________________________________________________________________
The Allocations Tab allows users to allocate or apply the credit amount to specific purchase orders (POs) or purchase invoices. This helps in linking the credit invoice to the correct purchase transaction, ensuring that the financial records are adjusted accurately.
- Click on PROCUREMENT - PUCHASING - SUPPLIER BILLS - CREDIT INVOICE - AALLOCATIONS TAB for the screen below.

___________________________________________________________________________________________________________________________________________
Custom Tab provides flexibility for users to enter additional data or modify the layout and structure of the credit invoice to accommodate special business processes, reporting, or compliance needs.
- Click on PROCUREMENT - PURCHASING - SUPPLIER BILLS - CREDIT INVOICE - CUSTOM TAB for the screen below.
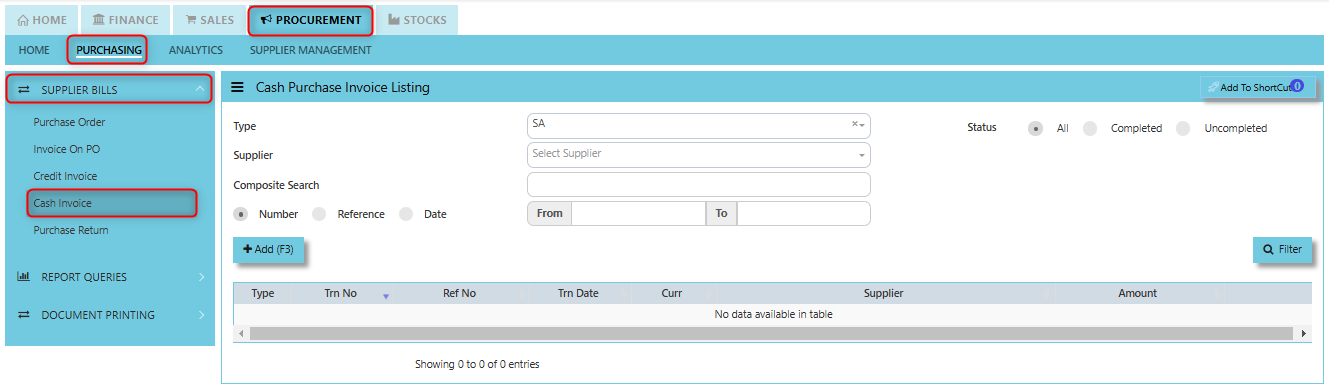
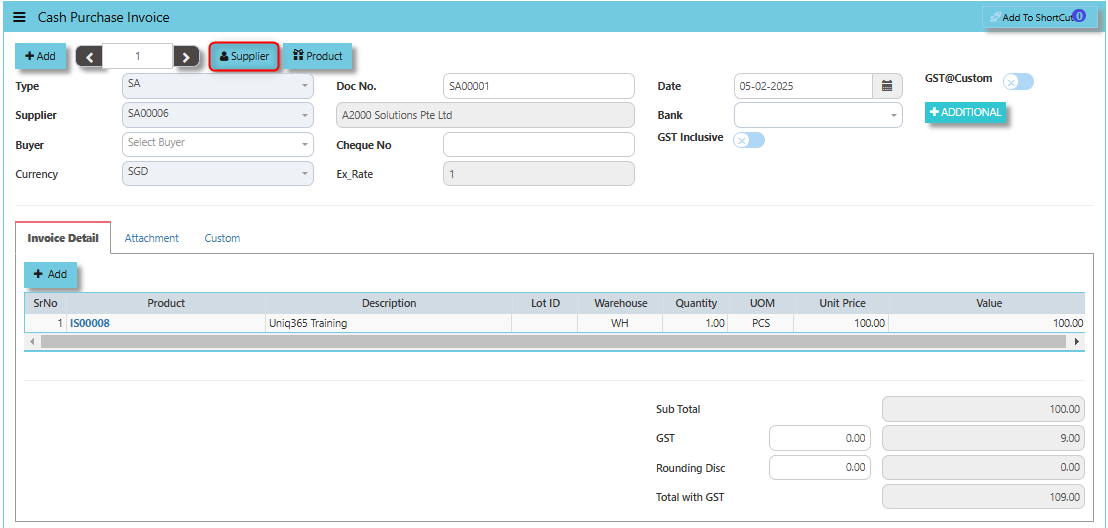
Cash Invoice (SA)
Unlike the Purchase Credit Invoice, the Supplier Invoice – Cash directly credit the bank as it is a direct cash transaction. This transaction updates the inventory as well as the GL. The Bank code is mandatory and must be specified before saving the transaction.
___________________________________________________________________________________________________
How to set create Cash Invoice?
1. Click on PROCUREMENT – PURCHASING – SUPPLIER BILLS - CASH INVOICE for the screen below.
2. Click Add (F3) to create new record.
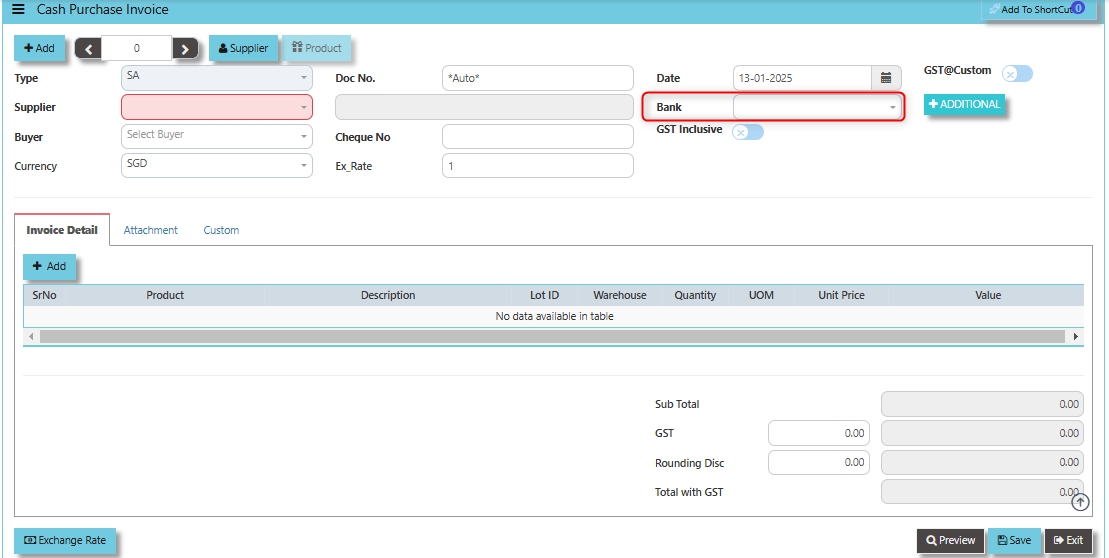
3. Click the Type - drop-down to select transaction type – SA (Cash Invoice).
4. After the transaction type selection, use the tab button to go to the Ref No., Date and other fields.
5. Click the Supplier - drop-down list to select Supplier Name, followed by the Buyer, PDS, Currency and Exchange Rate.
6. The “Bank Code” is an important field and must be entered, followed by the Cheque Number (refer the highlighted screen).
7. Once all the header information has been entered, go to the Details section to select the product code and name from the drop-down list. Save the transaction after this is done.
___________________________________________________________________________________________________________________________________________
Add to ShortCut - By clicking the "Add to Shortcut" button, the cash purchase invoice or related feature (such as the specific purchase transaction or screen) is saved to the user's personalized shortcut list. This allows for faster navigation in the future, eliminating the need to go through multiple menus to access the same page or function.

How to use Add to ShortCut?
1. Click "Add to ShortCut" and system will open below windows:
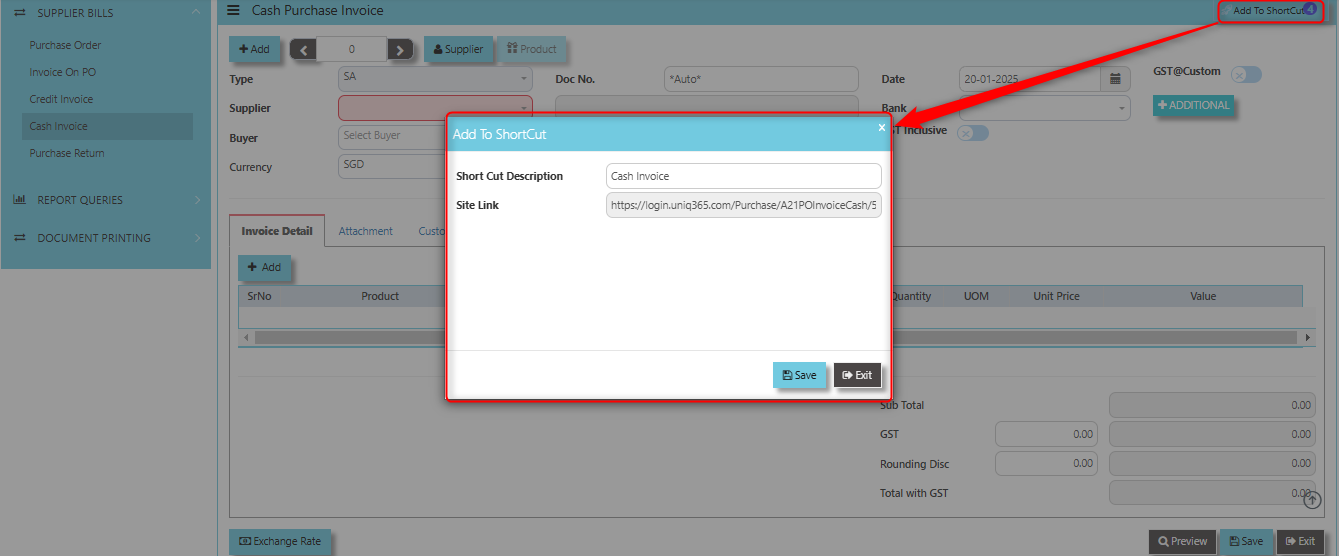
2. Enter Short Cut Description
3. Click SAVE then click OK.
4. User may look to the Homepage for the added function or page. Click on HOME - HOME - SHORTCUT for the screen below.
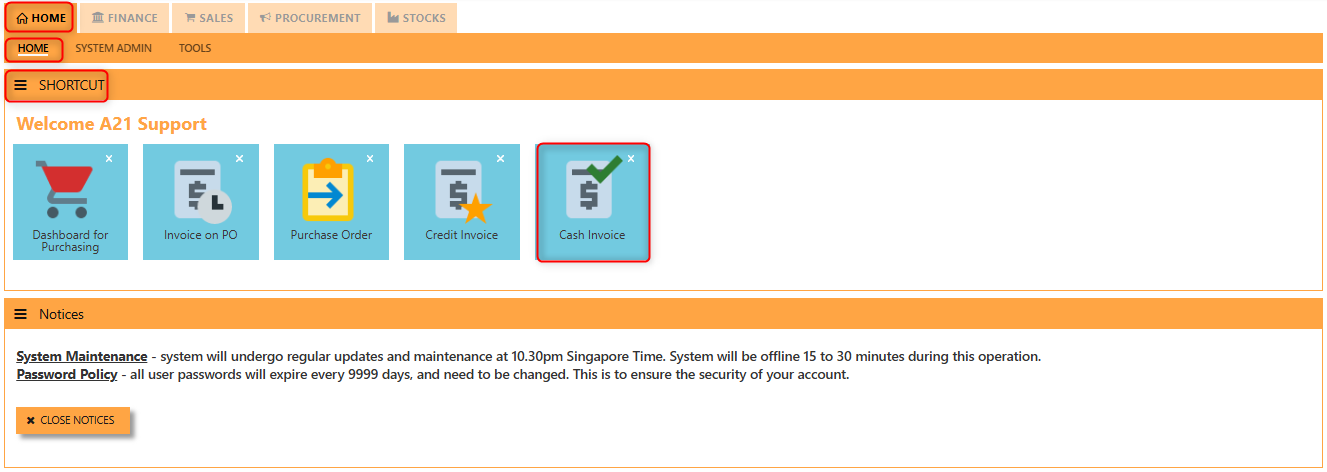
___________________________________________________________________________________________________________________________________________
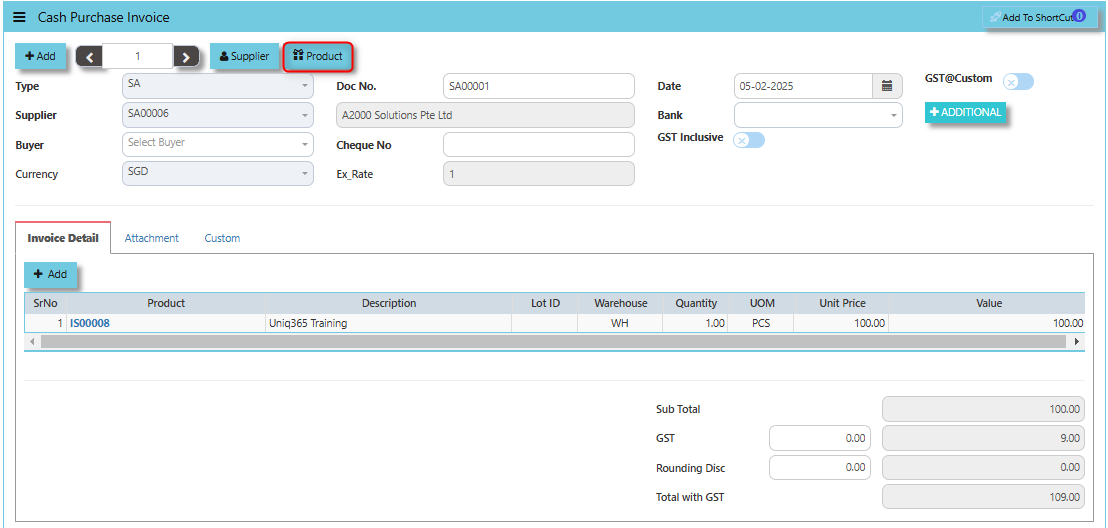
By clicking the Supplier Button, users can view or select the supplier's details (e.g., name, contact information, and payment terms) from the system's supplier database.
The Product Button It helps link and easy access to the Product and Service Maintenance for new creation of Items/Services.
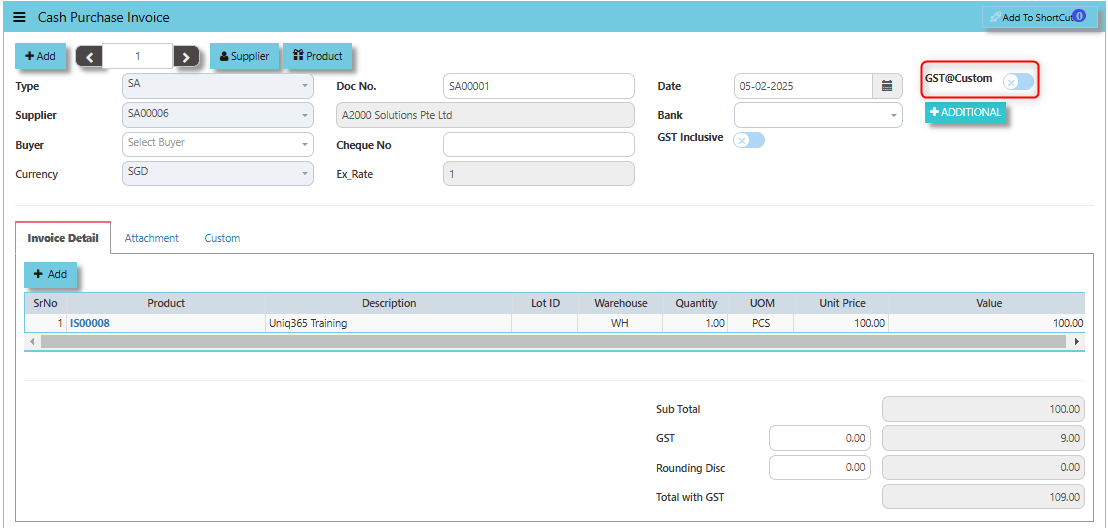
The GST@Custom checkbox typically used to manage the application of custom GST rates or tax treatment for specific purchases made with cash. This feature allows users to handle scenarios where the standard GST rates do not apply, or where there is a need to apply a special GST rate for a particular transaction.
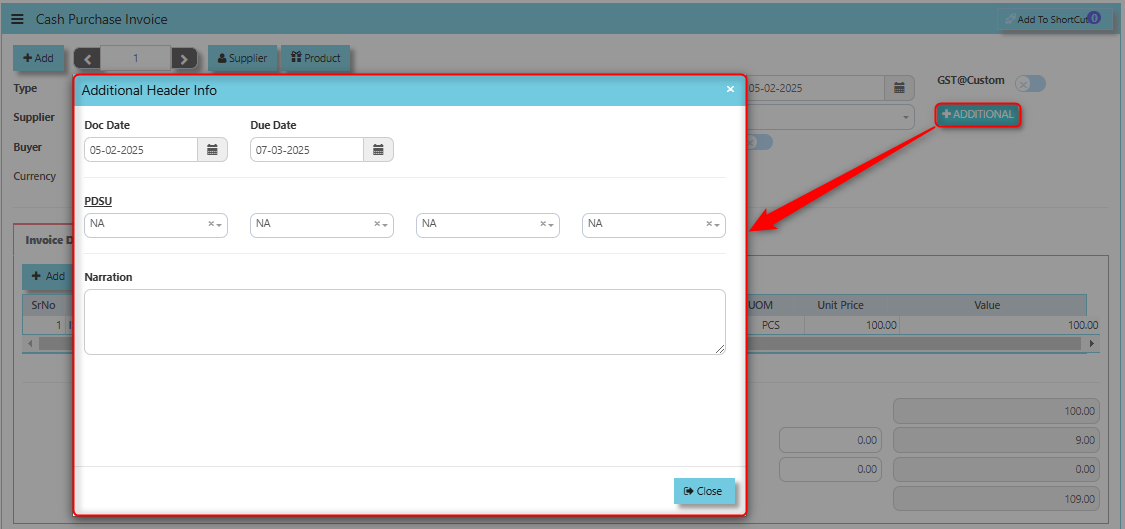
The Additional Header Info button allows users to add or view additional information or custom fields related to the purchase invoice at the header level. This button typically provides a way to capture supplementary details that are relevant to the overall transaction, which may not be included in the standard fields of the invoice.
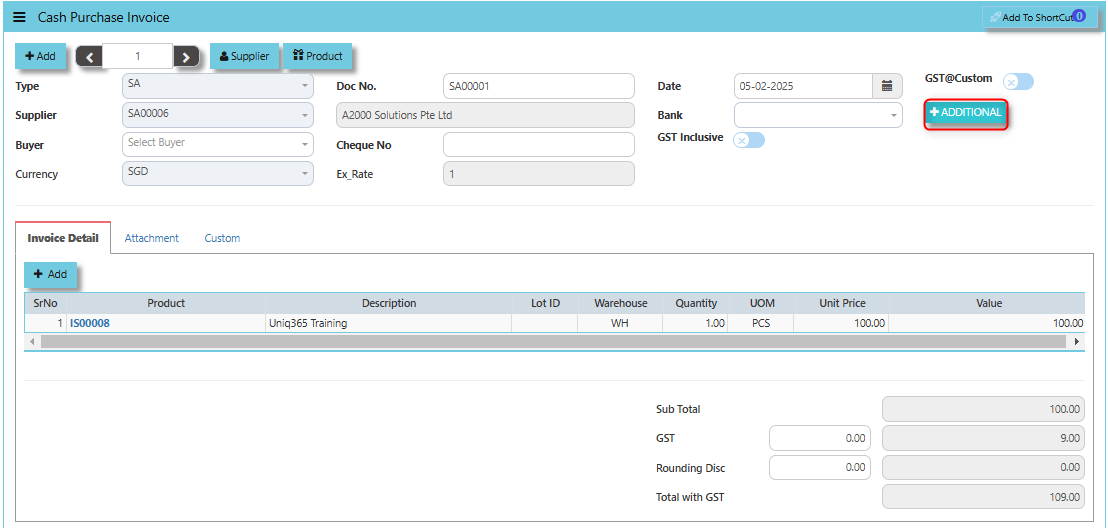
Once clicked the Additional Button, user may input the necessary details for the below fields:
- Doc Date
- Due Date
- PDSU
- Narration
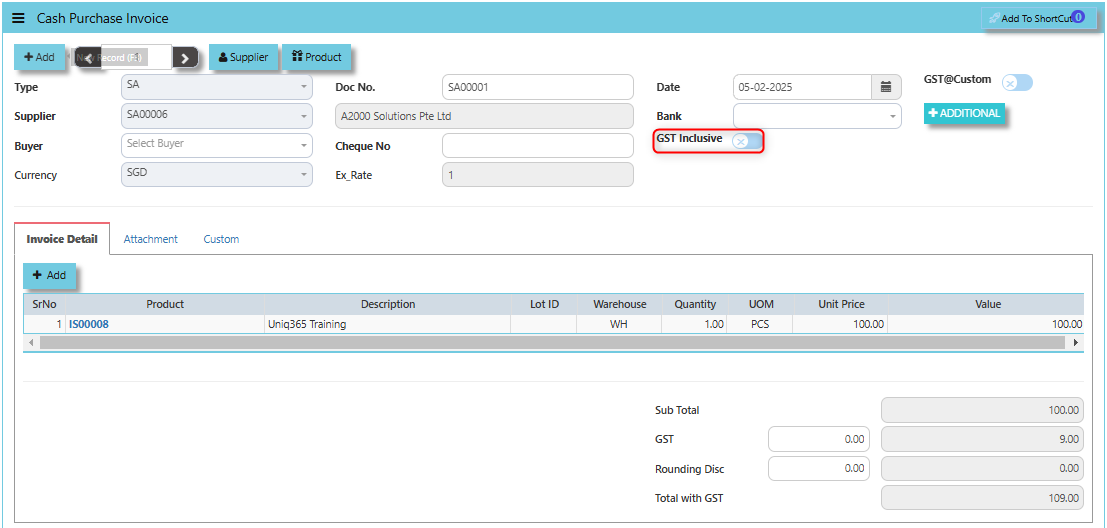
When the GST Inclusive checkbox is ticked, it means that the purchase price provided by the supplier already includes GST. In other words, the GST amount has already been factored into the total price of the items or services being purchased.
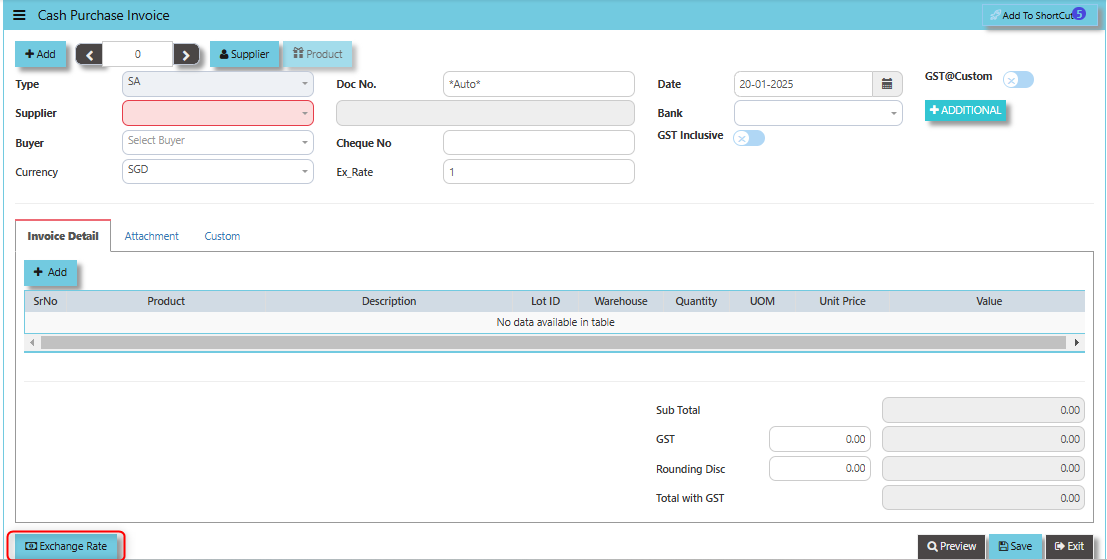
"Exchange Rate" button - Used to define or update the exchange rate when the invoice involves foreign currency transactions. This feature allows users to accurately convert the purchase invoice amount from the foreign currency into the company’s base currency, based on the prevailing exchange rate at the time of the transaction.
___________________________________________________________________________________________________________________________________________
The Attachment Tab is used to manage and store digital attachments related to the purchase invoice. This feature allows users to link and upload various types of files, documents, or supporting materials that are associated with a particular cash purchase transaction.
How to use Attachment Tab?
1. Click on PROCUREMENT - PURCHASING - SUPPLIER BILLS - CASH INVOICE - ATTACHMENT TAB for the screen below.

2. Click +Add files and windows will prompt then choose the file you want to upload by clicking open. Kindly take note the file types and maximum size requirements in uploading: Only (gif, jpg, jpeg, png, pdf, doc, docx, xls, xlsx, csv, msg, html and htm) file type allowed. | MaxFileSize : 25 MB

3. Key in the Attachment Name then click start to upload.

4. Once the file attached, click "SAVE" button
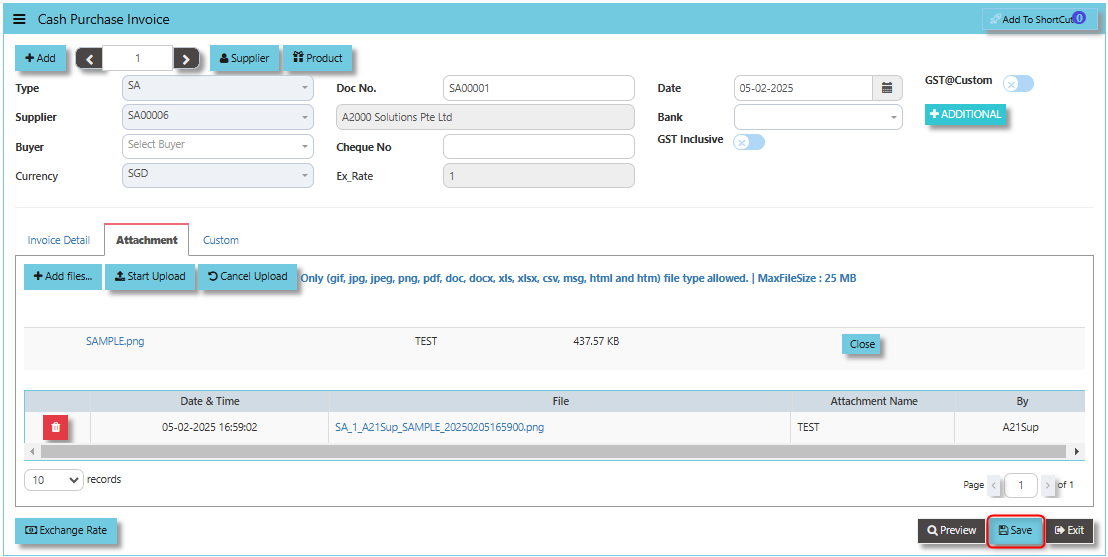
User may opt to cancel the uploading by clicking the "Cancel Upload" and delete the uploaded file by utilizing the "Bin Icon" at the left corner of line detail.
___________________________________________________________________________________________________________________________________________
"Custom Tab" typically used for customizable fields that allow businesses to capture specific information relevant to their unique processes. This tab provides flexibility for users to add or store additional data or custom attributes that are not part of the default structure of the cash purchase invoice.
- Click on PROCUREMENT - PURCHASING - SUPPLIER BILLS - CASH INVOICE - CUSTOM TAB for the screen below.

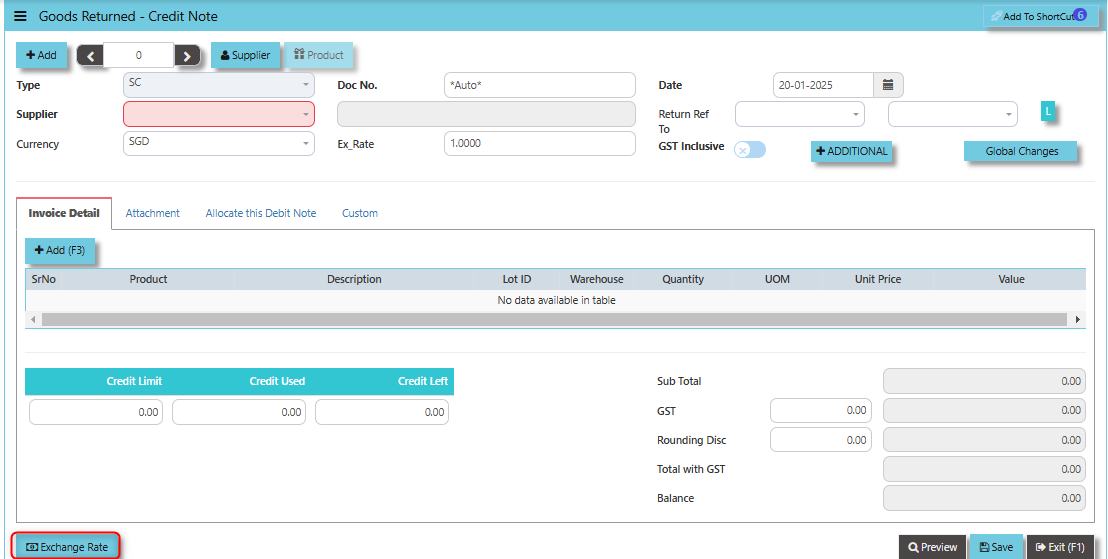
Purchase Return (SC)
This is used to create a Credit Note to suppliers when Goods are returned. This will update the GL and the stock status.
___________________________________________________________________________________________________
How to set create Purchase Return?
1. Click on PROCUREMENT – PURCHASING – SUPPLIER BILLS - PURCHASE RETURN for the screen below.
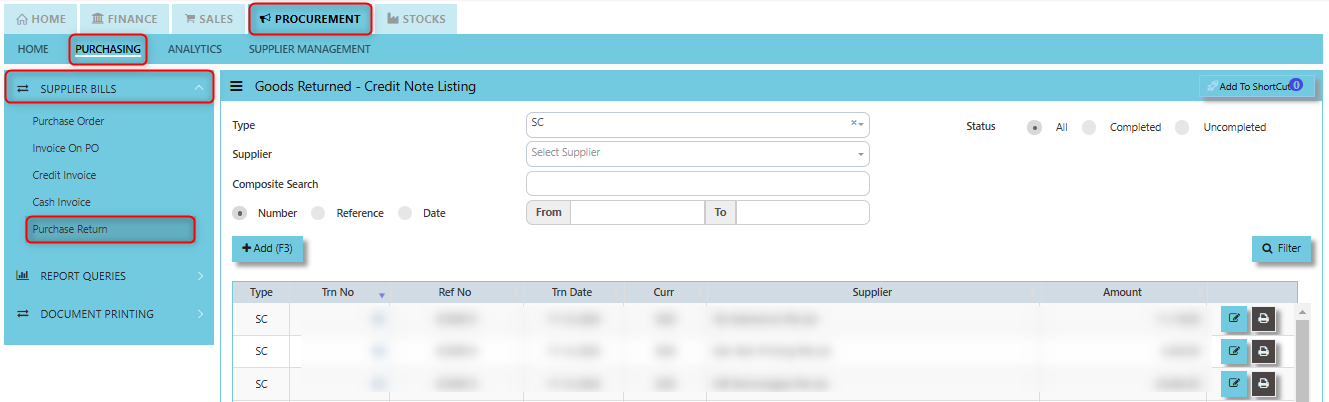
2. Click Add (F3) to create new record.
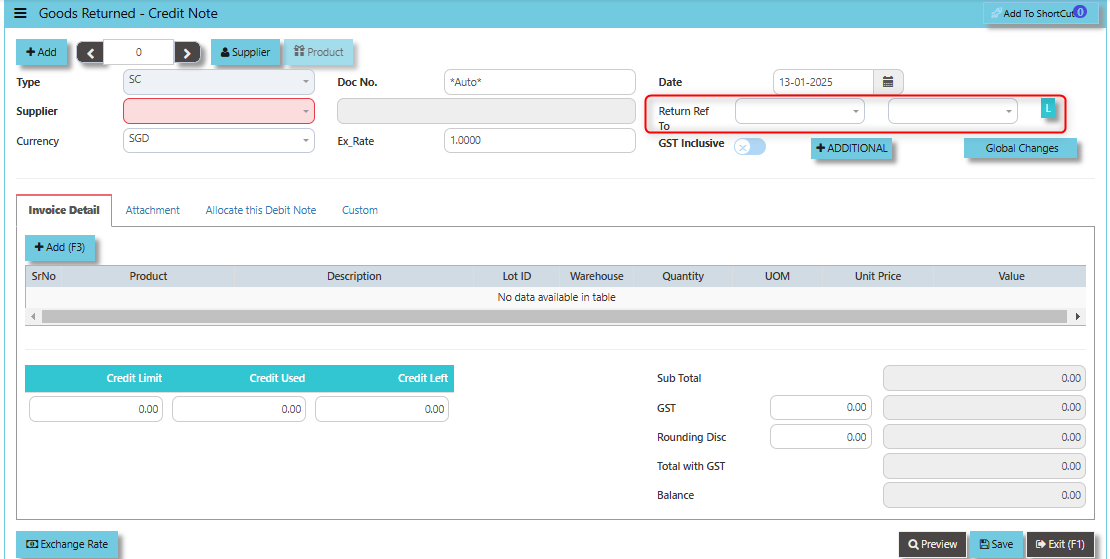
3. Click Type - drop-down to select transaction type – SC (Goods Returned – Credit Note).
4. After transaction type selection, use the tab button to go to the Ref No., Date, and other fields.
5. Click the Supplier - drop-down list to select Supplier Name, followed by the Buyer, PDS, Currency, Exchange Rate, RMA Ref and Narration if applicable.
___________________________________________________________________________________________________________________________________________
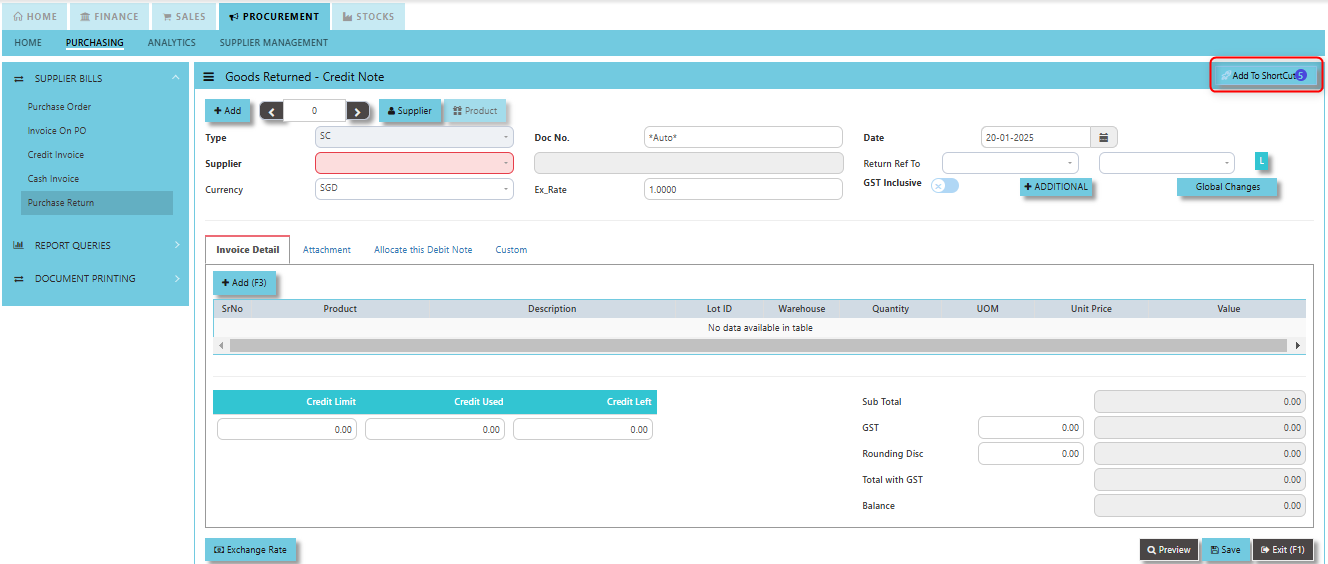
Add to ShortCut - Clicking this button allows users to add a specific supplier's profile or page to a shortcut list. Once added, this shortcut enables the user to quickly navigate to the supplier’s details directly from a dashboard or main menu, without having to search for the supplier each time.
How to use Add to ShortCut?
1. Click "Add to ShortCut" and system will open below windows:
2. Enter Short Cut Description
3. Click SAVE then click OK.
4. User may look to the Homepage for the added function or page. Click on HOME - HOME - SHORTCUT for the screen below.

___________________________________________________________________________________________________________________________________________
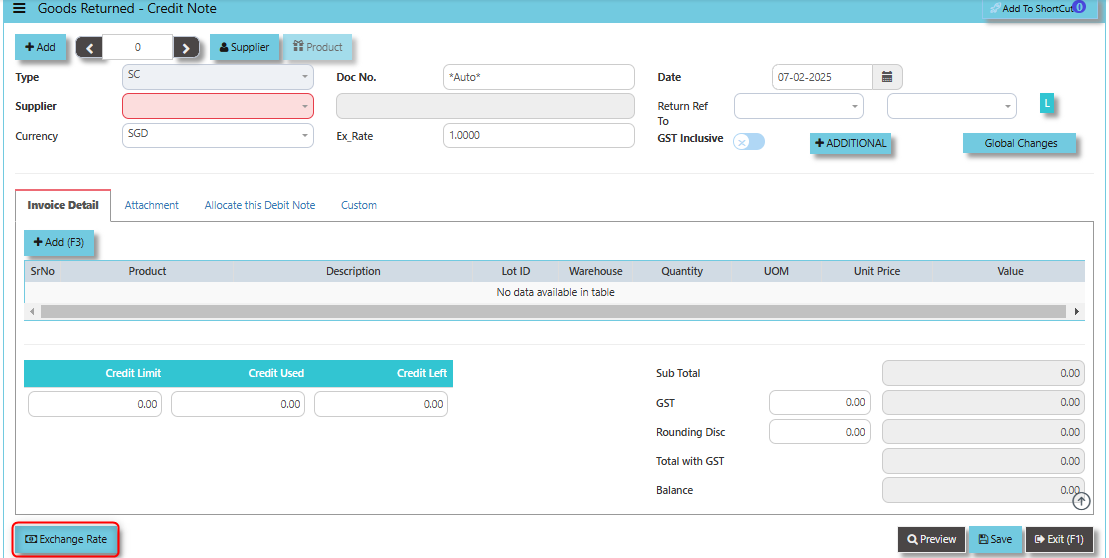
"Exchange Rate" Button - used to define or update the exchange rate when a goods return or credit note transaction involves foreign currency. This allows users to convert the value of the returned goods or the credit amount from the supplier’s currency into the company’s base or local currency based on the applicable exchange rate.
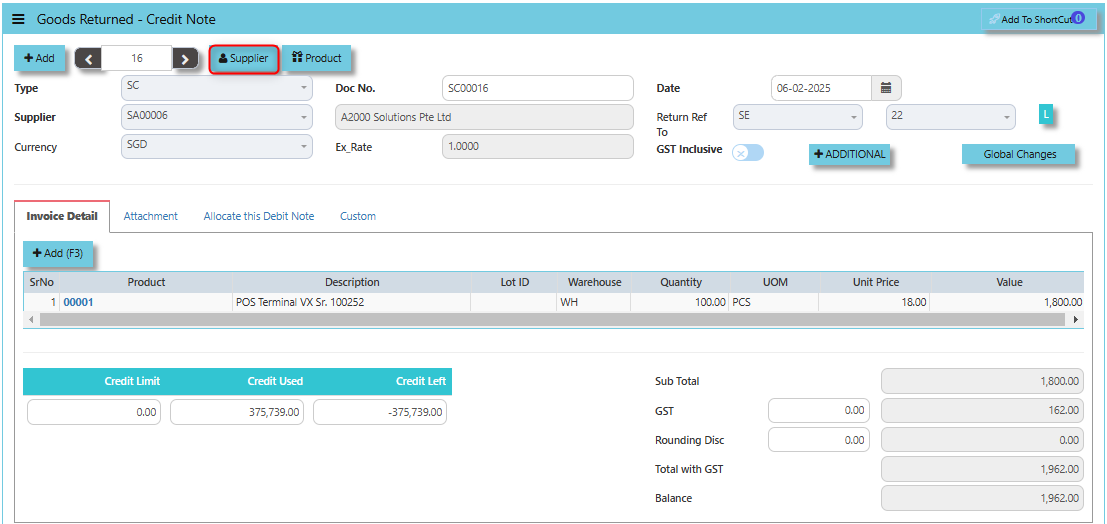
"Supplier Button" provides users with a quick and efficient way to manage and update supplier information when processing goods returns and credit notes. Clicking the Supplier button allows users to directly access the Supplier Maintenance screen or module.
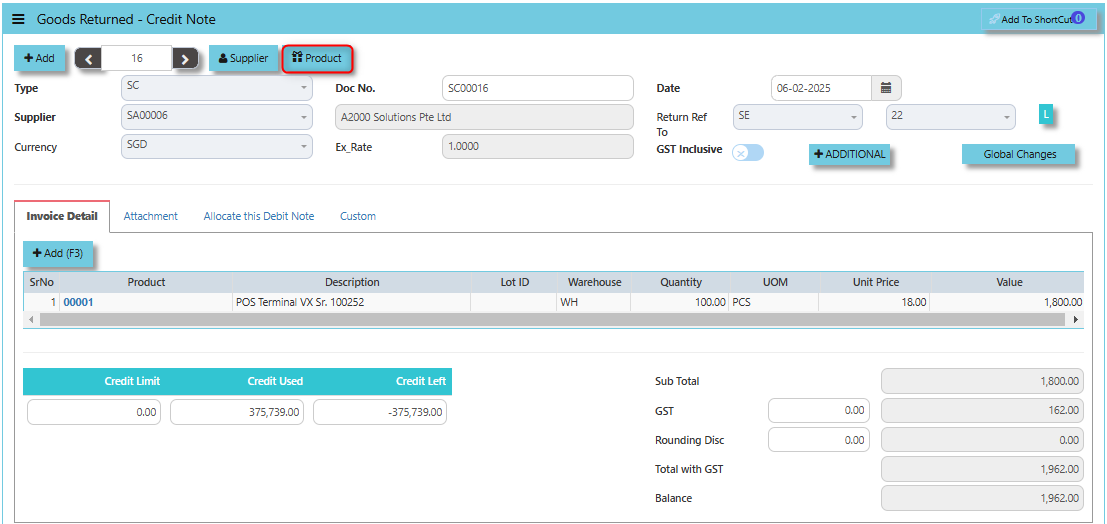
By clicking the Product button, users can quickly access the Product & Service Maintenance module. This allows them to add new item, review and manage product details related to the returned items, such as product descriptions, quantities, and pricing. This is especially useful when dealing with returns for specific products.
When the GST Inclusive checkbox is ticked, the system assumes that the GST is already included in the original price of the goods being returned. This means the total amount for the returned goods (including GST) is treated as a single value, and there is no separate GST calculation for the return. The system will consider the entire amount (including GST) when processing the credit note.
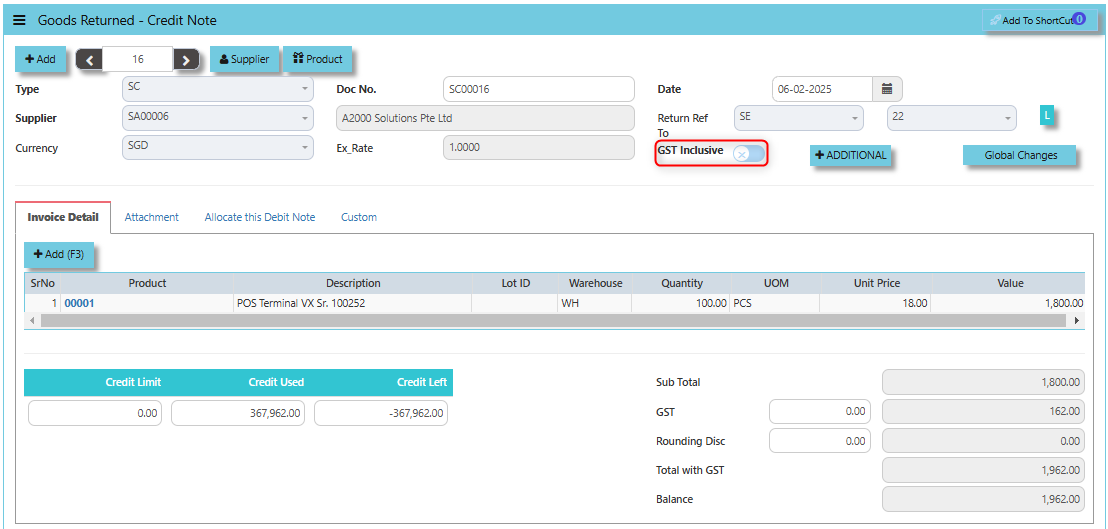
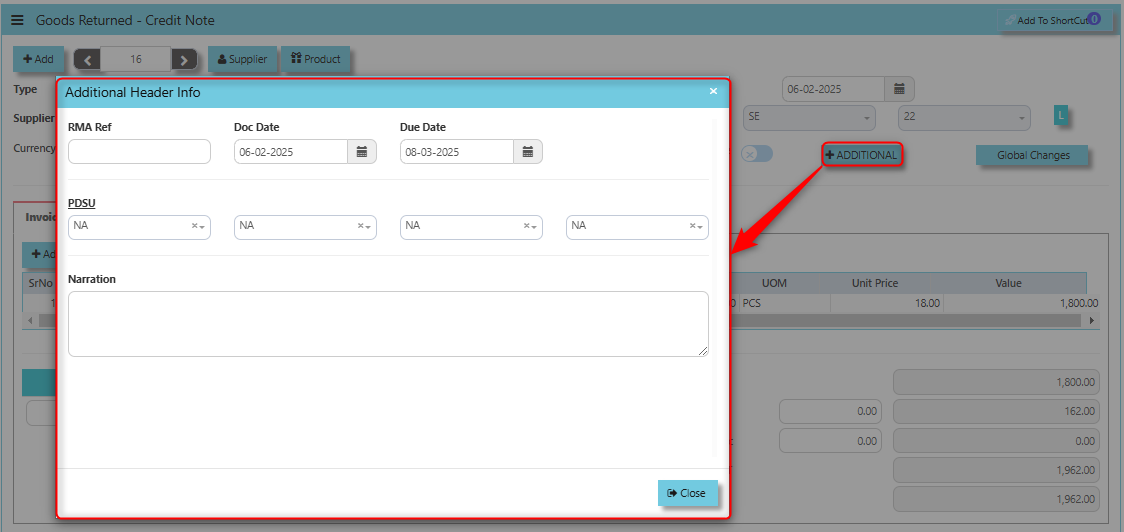
The Additional Header Info button provides users with the ability to add extra, customizable information to the header of the credit note document. This feature enhances the flexibility and detail of the credit note process.
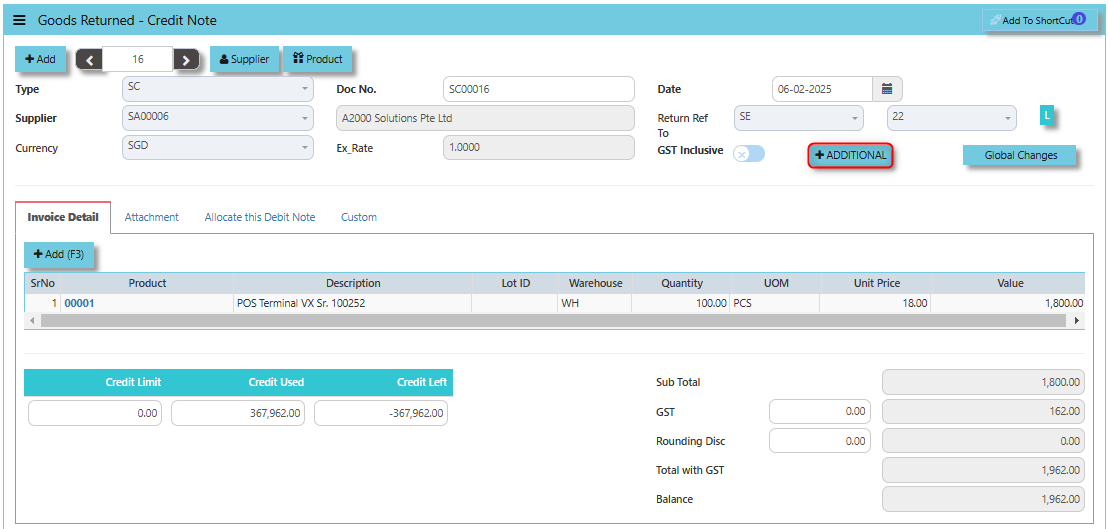
Once clicked, there is a window will prompt and user may input the necessary details for the below fields.
- RMA Ref
- Doc Date
- Due Date
- PDSU
- Narration
___________________________________________________________________________________________________________________________________________
Global Changes Button allows users to efficiently apply or modify discounts across multiple returned items in a credit note.
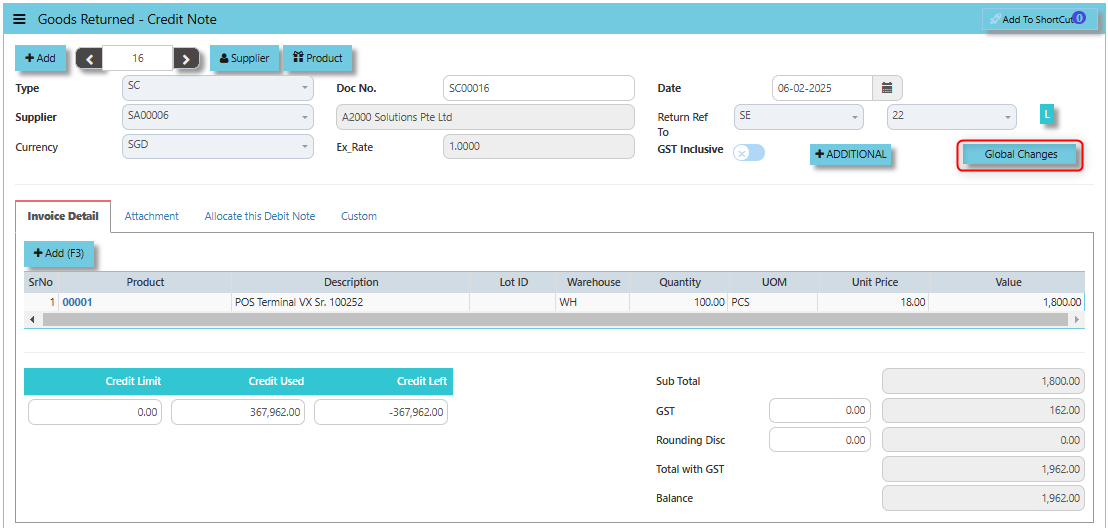
How to use Global Changes Button?
1. Click Global Changes button and a dialogue box will prompt to verify the Global Discount to be applied. Configure accordingly on your desired discount amount then click "Apply" and will auto fill the percentage discount level field. User may opt to add Global Tax change to be applied then click "Confirm" once done.
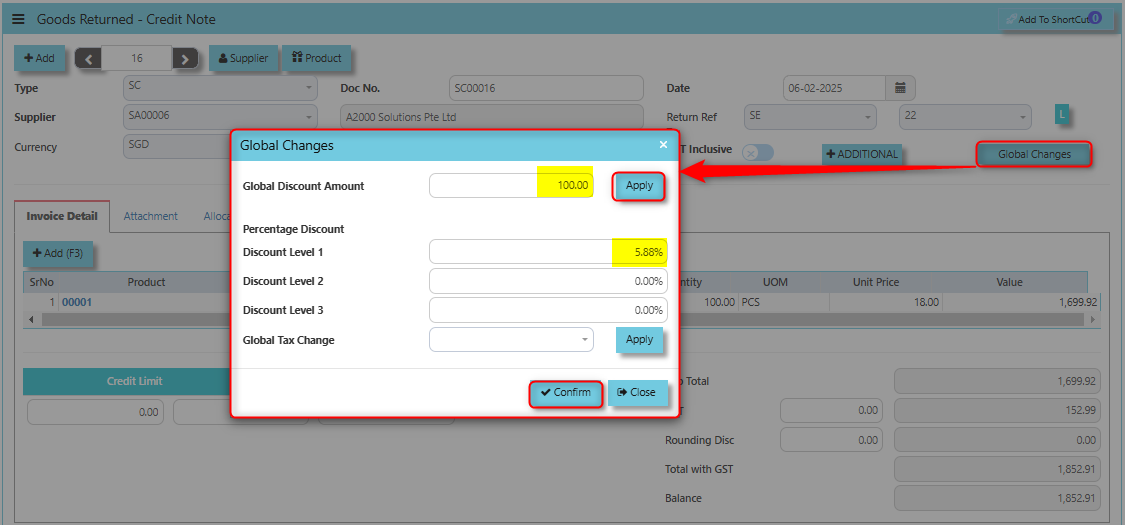
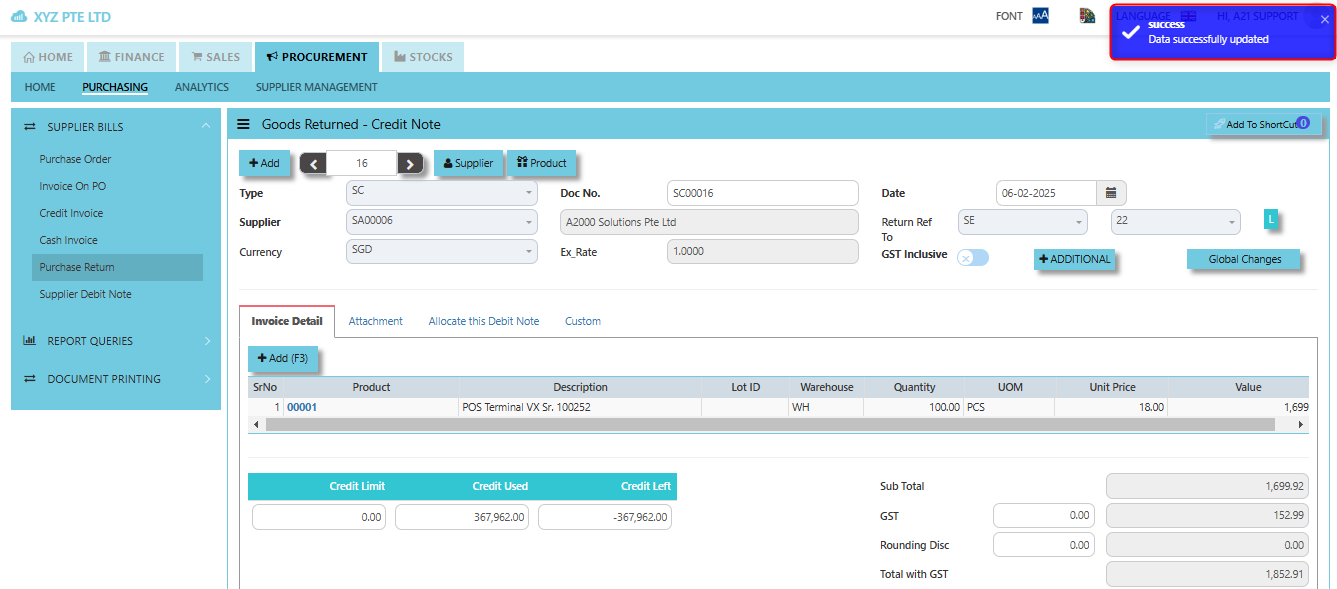
2. Once clicked "Confirm", system will prompt a message that data has been successfully saved.
___________________________________________________________________________________________________________________________________________
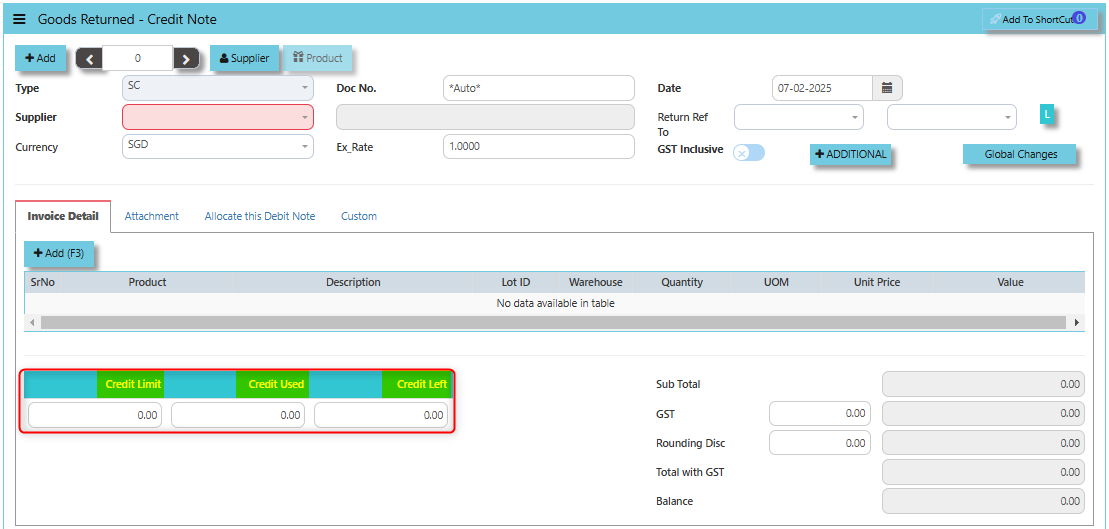
The Credit Limit, Credit Used, and Credit Left in the context of a Purchase Return (when goods are returned to the supplier) are important for managing financial adjustments and maintaining control over supplier accounts.
- The Credit Limit refers to the maximum amount of credit that a supplier is willing to extend to the organization for returns or exchanges of purchased goods.
- The Credit Used refers to the total value of returns (or credits) that have already been processed and applied to the organization's account with the supplier.
- The Credit Left is the amount of credit that remains available to be used for future purchase returns or exchanges. It is calculated by subtracting the Credit Used from the Credit Limit.
The Exchange Rate button allows users to manage the currency exchange rates for transactions when returning goods purchased from international suppliers. Its main function is to ensure that the return is properly accounted for when the original purchase and the return are in different currencies or the exchange rate has changed between the purchase date and the return date.
___________________________________________________________________________________________________________________________________________
The Attachment Tab allows users to attach and store relevant documents or files that are associated with the credit note for returned goods. This function helps in maintaining a comprehensive and organized record of all supporting materials related to the return process.
How to use Attachment Tab?
1. Click on PROCUREMENT - PURCHASING - SUPPLIER BILLS - PURCHASE RETURN - ATTACHMENT TAB for the screen below.
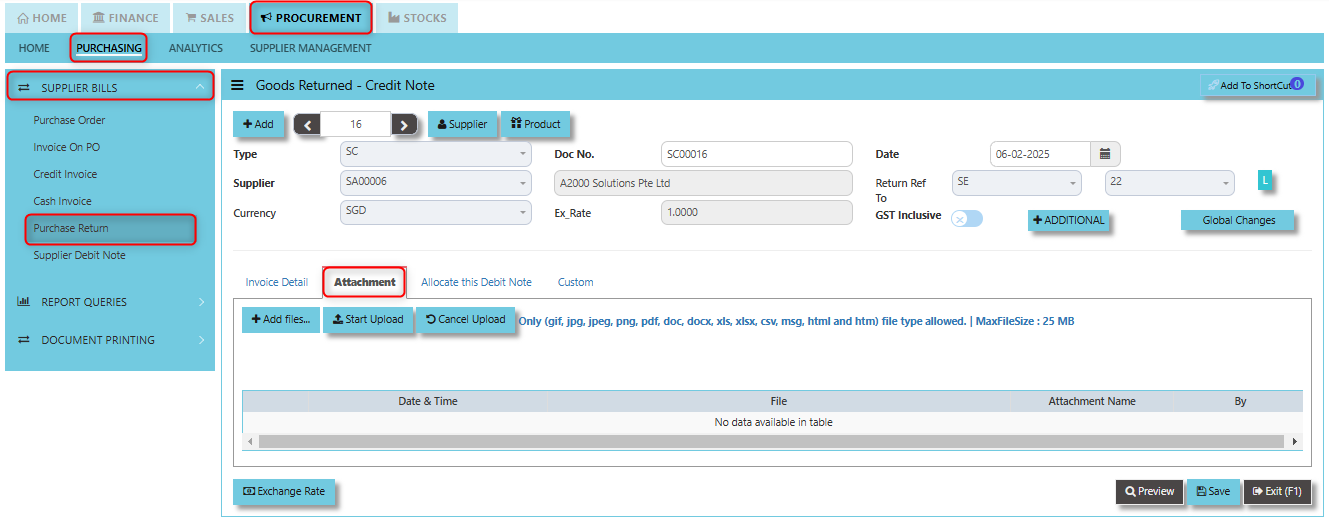
2. Click +Add files and windows will prompt then choose the file you want to upload by clicking open. Kindly take note the file types and maximum size requirements in uploading: Only (gif, jpg, jpeg, png, pdf, doc, docx, xls, xlsx, csv, msg, html and htm) file type allowed. | MaxFileSize : 25 MB
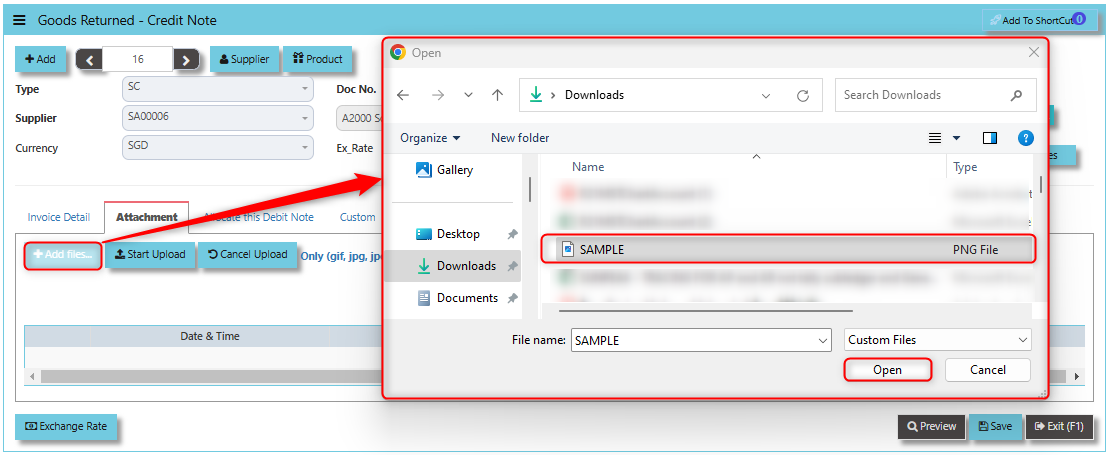
3. Key in the Attachment Name then click start to upload.
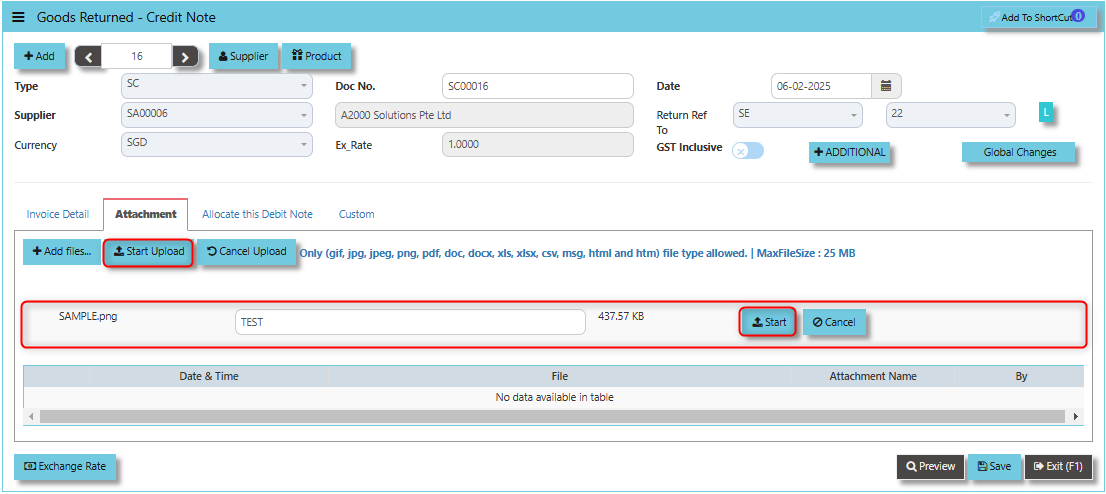
4. Once the file attached, click "SAVE" button
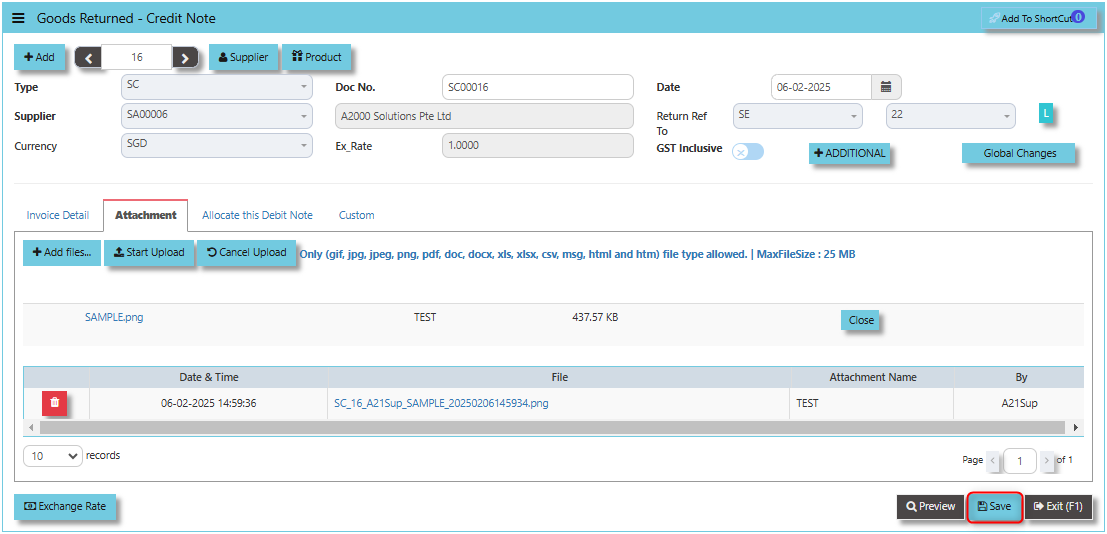
User may opt to cancel the uploading by clicking the "Cancel Upload" and delete the uploaded file by utilizing the "Bin Icon" at the left corner of line detail.
___________________________________________________________________________________________________________________________________________
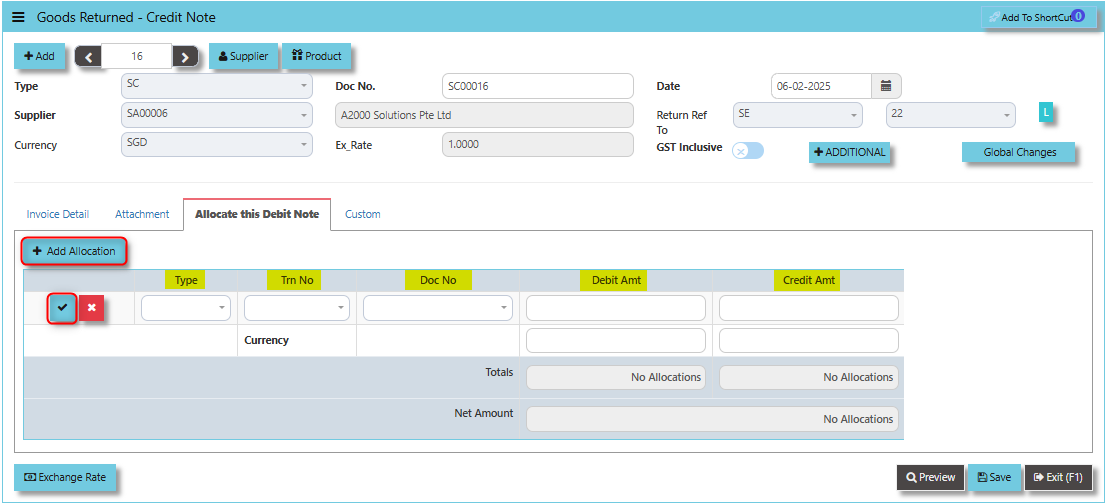
Allocation Tab used to manage and allocate the financial impact of the goods return and the associated credit note. It helps users properly match and allocate the returned goods to the correct transaction types like PC, PD, PI, PV, SD, SE and SI.
How to use Allocation Tab?
1. Click on PROCUREMENT - PURCHASING - SUPPLIER BILLS - PURCHASE RETURN - ALLOCATION TAB for the screen below.

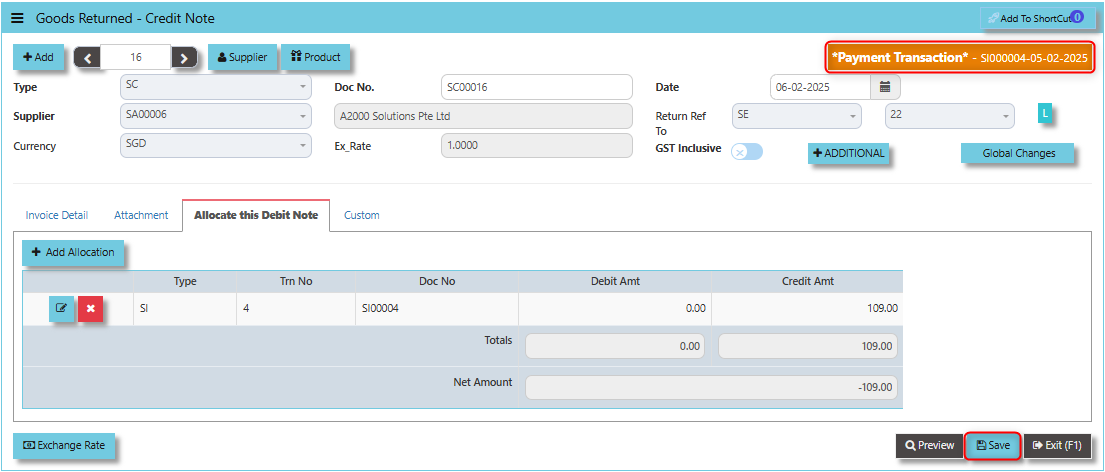
2. Click +Add Allocation button. Select the Trn Type, Trn Number, Doc Number associated to the Credit Note input the Debit and Credit Amount then click the "Check" button to save the line detail.
3. Click "SAVE" and user may look into the upper right note of trn screen where specific transaction that credit note is associated.
___________________________________________________________________________________________________________________________________________
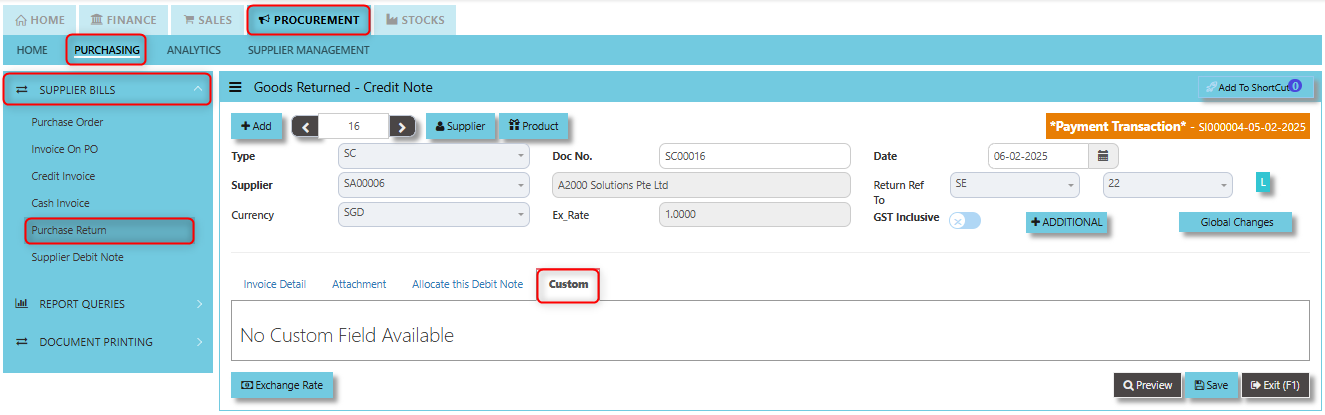
The Custom Tab provides users with the ability to add custom fields or personalized data related to the goods return and credit note transaction. Click on PROCUREMENT - PURCHASING - SUPPLIER BILLS - PURCHASE RETURN - CUSTOM TAB for the screen below.
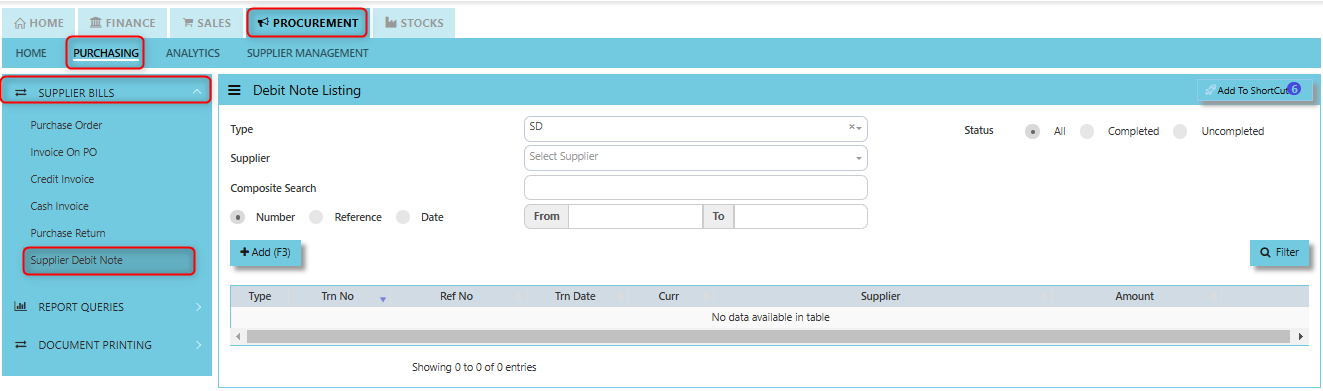
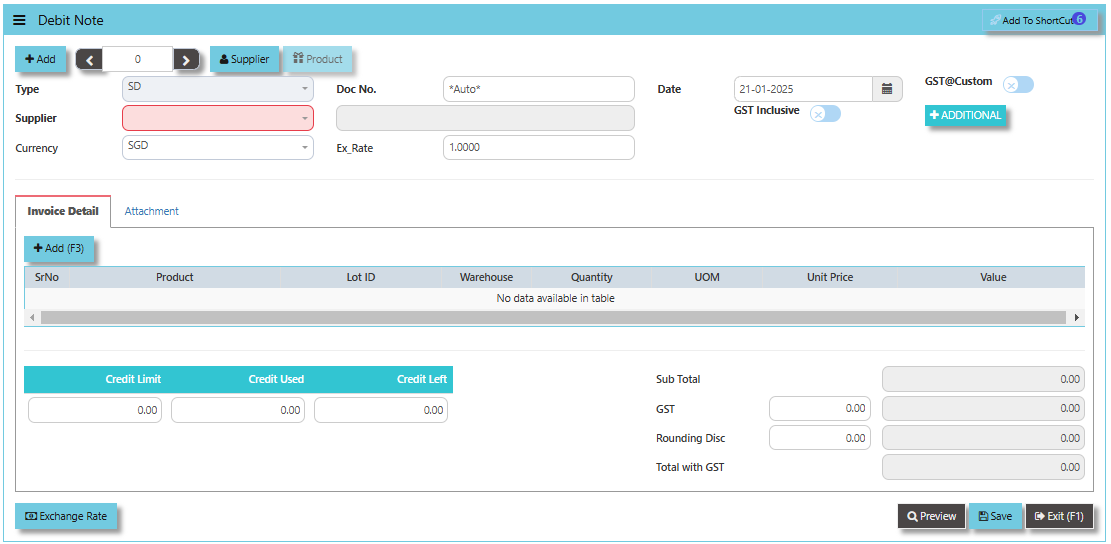
Supplier Debit Note (SD)
This is a direct Debit Note which sells product directly to suppliers. Its updates the GL and Inventory status.
___________________________________________________________________________________________________
How to set create Supplier Debit Note?
1. Click on PROCUREMENT – PURCHASING – SUPPLIER BILLS - SUPPLIER DEBIT NOTE for the screen below.
2. Click Add (F3) to create new record.
3. Click Type - drop-down to select transaction type – SD (Debit Note).
4. After transaction type selection, use the tab button to go to the Ref No., Date, and other fields.
5. Click the Supplier drop-down list to select Supplier Name, followed by the Buyer, PDS, Currency, Exchange Rate and Narration if applicable.
6. After updating the header information, go to Details section to enter the product items. Save the transaction after this is done.
___________________________________________________________________________________________________________________________________________
The Add to Shortcut functionality provides a personalized experience, allowing users to tailor their Uniq365 dashboard or menu system to their specific roles and tasks. For users who regularly process or review Supplier Debit Notes, having a shortcut can save time by enabling direct access to the document or screen. This can speed up repetitive tasks, such as updating or adjusting debit notes, reviewing supplier credits, or verifying supplier transactions.
How to use Add to ShortCut?
1. Click "Add to ShortCut" and system will open below windows:
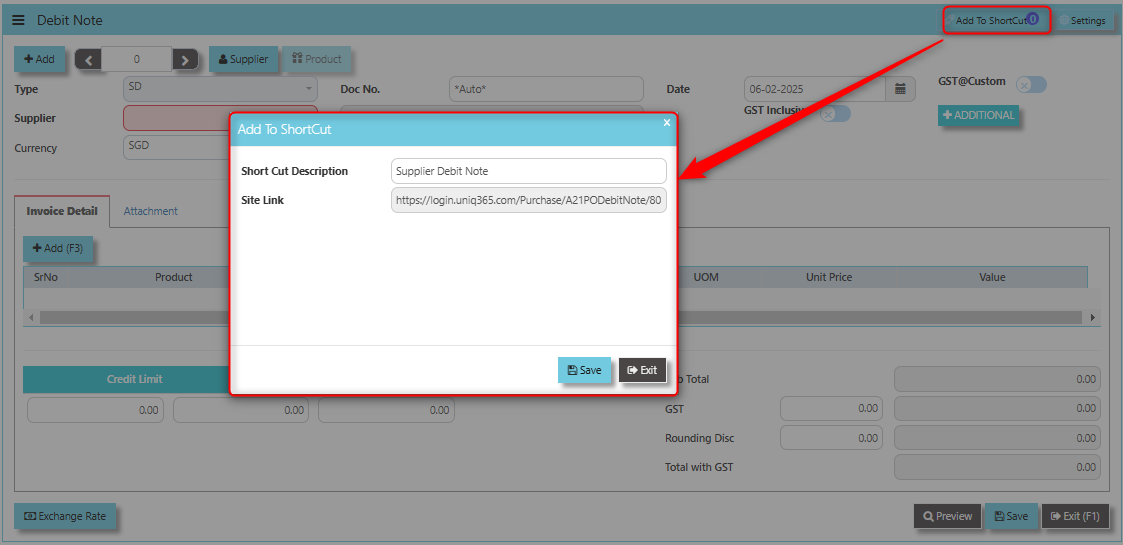
2. Enter Short Cut Description
3. Click SAVE then click OK.
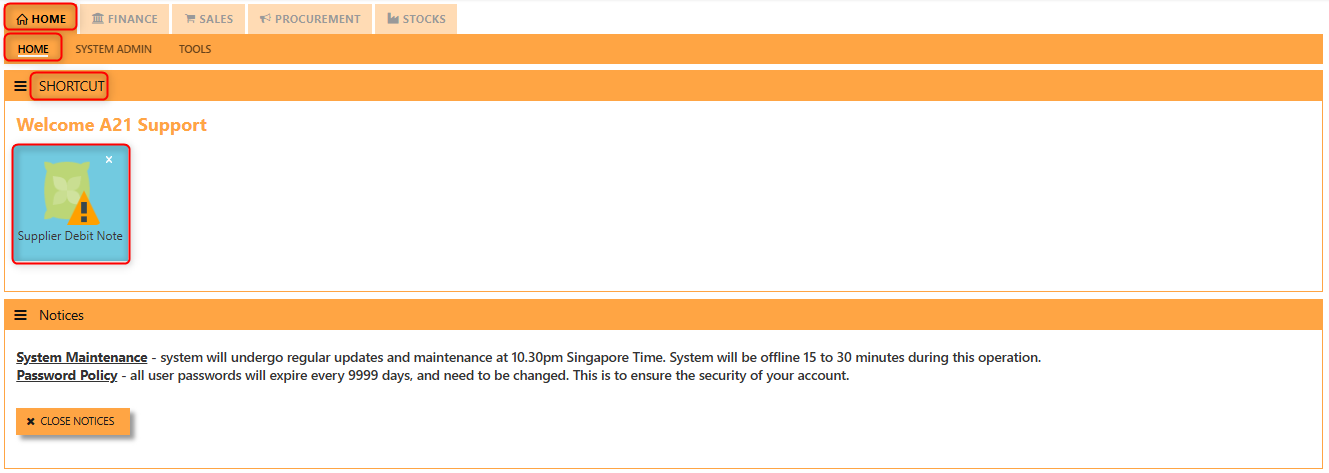
4. User may look to the Homepage for the added function or page. Click on HOME - HOME - SHORTCUT for the screen below.
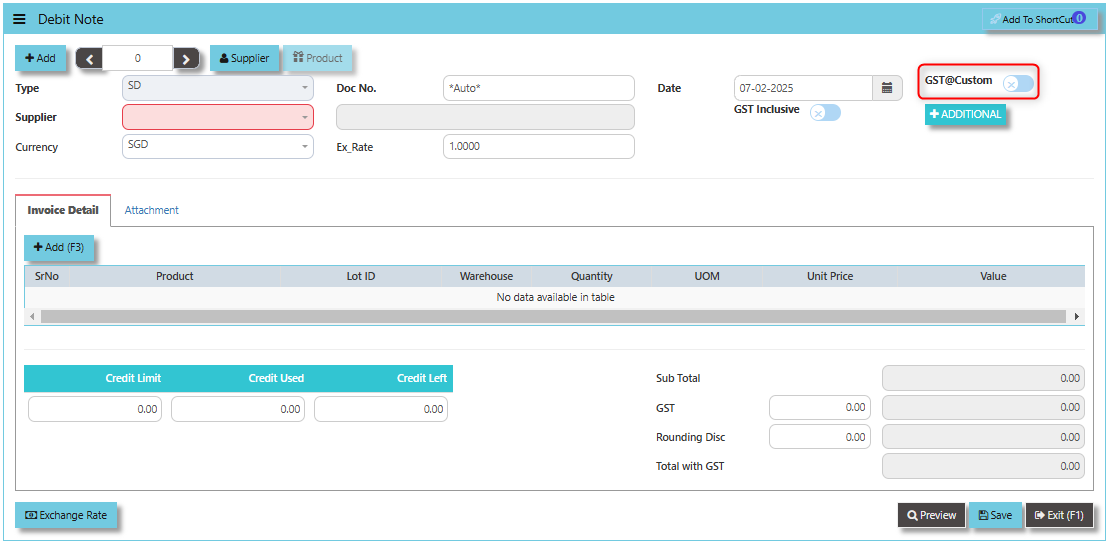
The GST@Custom checkbox allows users to apply a custom GST rate for the debit note transaction, which might differ from the standard GST rate.
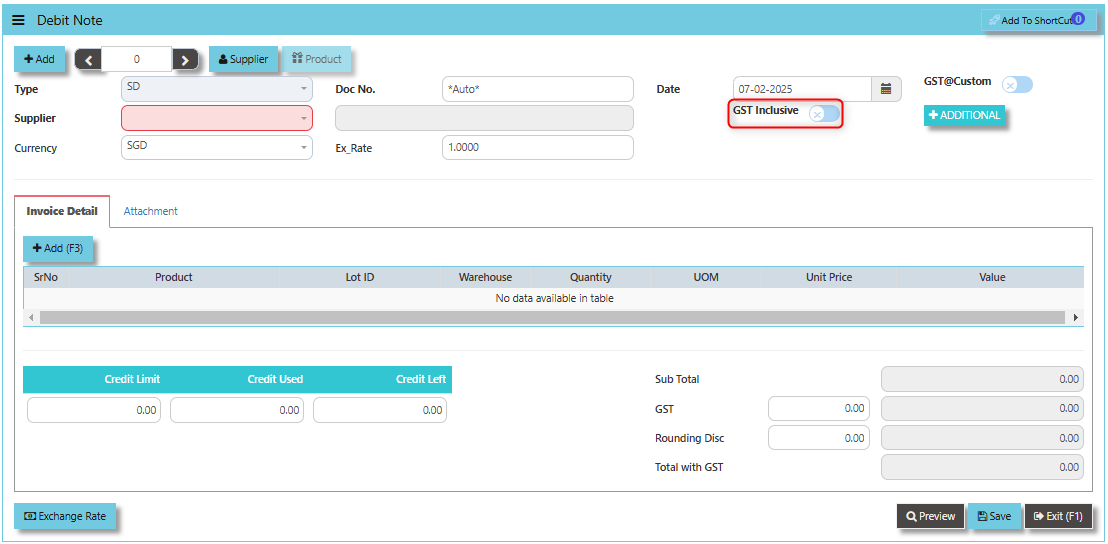
The GST Inclusive checkbox plays a crucial role in determining how GST is handled in the debit note process:
- When ticked, it indicates that the GST is already included in the amount, and the system will decompose the total value to calculate the net amount and GST portion.
- When not ticked, the system treats the provided amount as exclusive of GST and will calculate and add the GST separately on the net value.
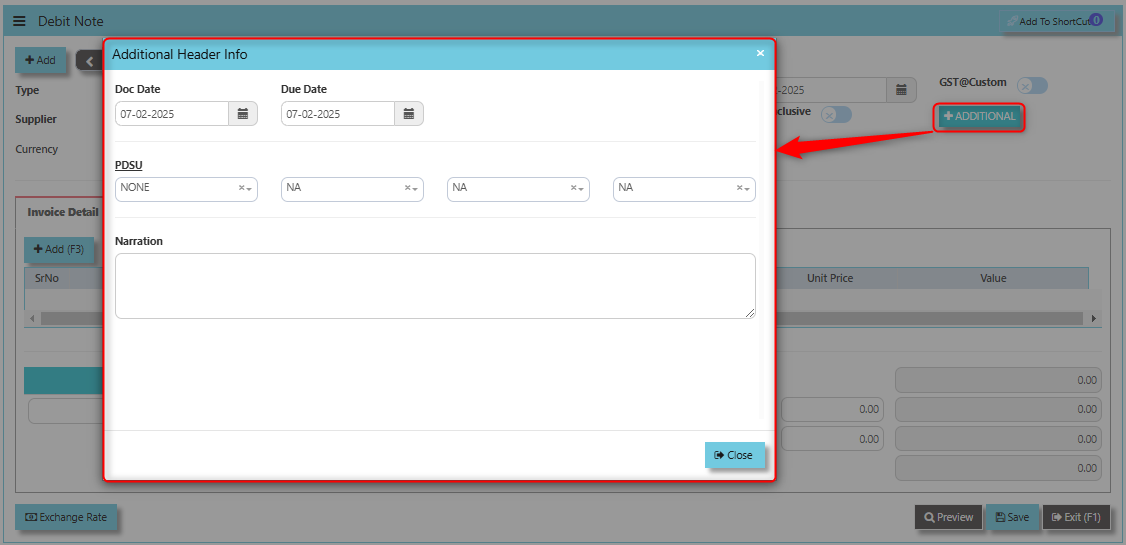
The Additional Header Info Button typically serves to provide users with the ability to add or view additional information that is relevant to the debit note transaction.
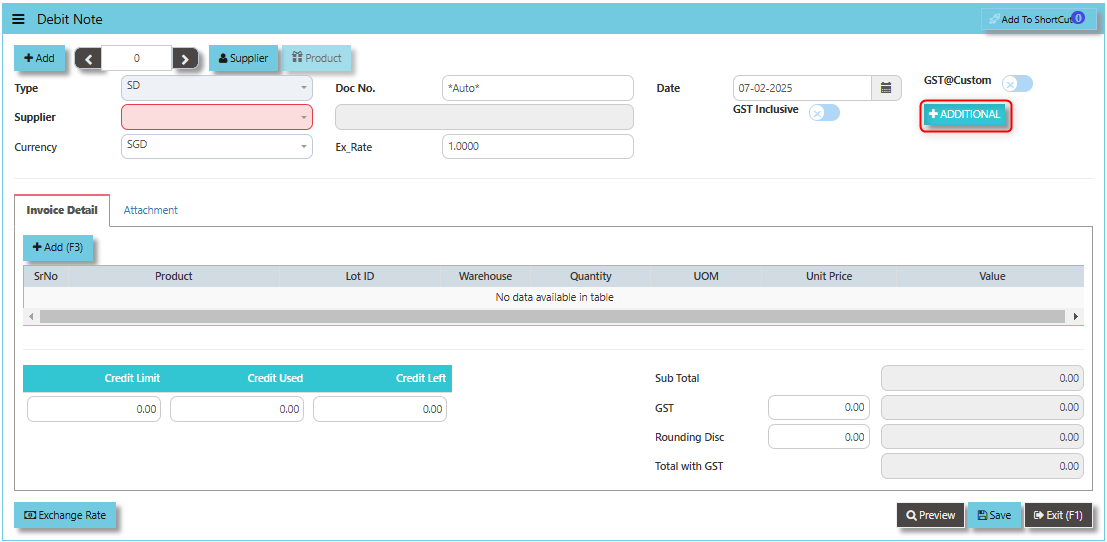
Once clicked, a dialogue box will prompt and user may fille the details as follows:
The Credit Limit, Credit Used, and Credit Left fields play a critical role in managing the credit terms between the company and its suppliers.
- Credit Limit: The maximum amount of credit extended by the supplier to the company.
- Credit Used: The total amount of credit the company has consumed from the supplier, including purchases and adjustments like debit notes.
- Credit Left: The remaining available credit, calculated by subtracting the Credit Used from the Credit Limit.
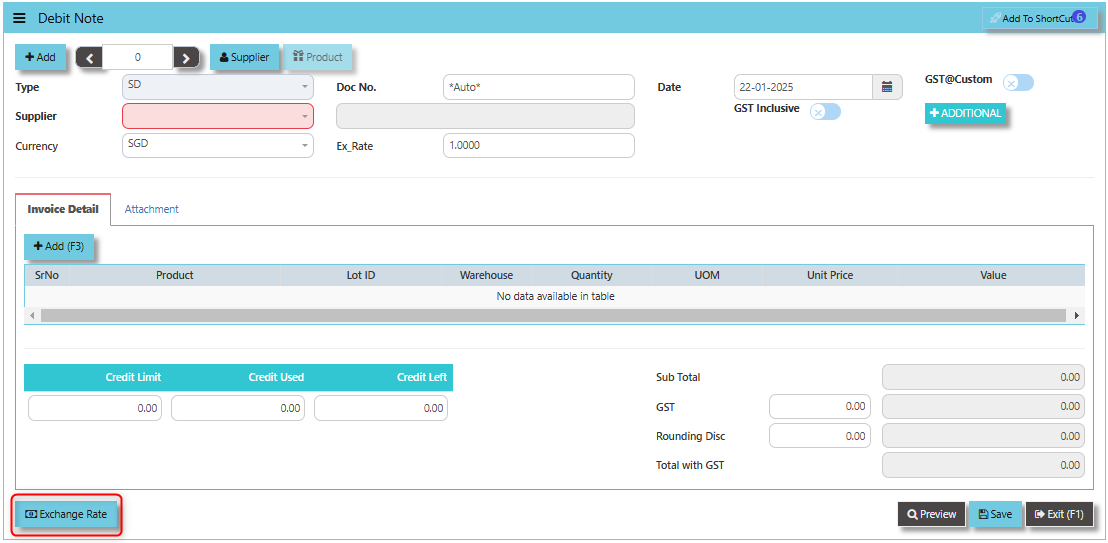
The Exchange Rate button allows for the conversion of the Debit Note value from the supplier's currency to your company's base currency. It ensures that the debit is accurately recorded in your accounts payable or other financial records.
___________________________________________________________________________________________________________________________________________
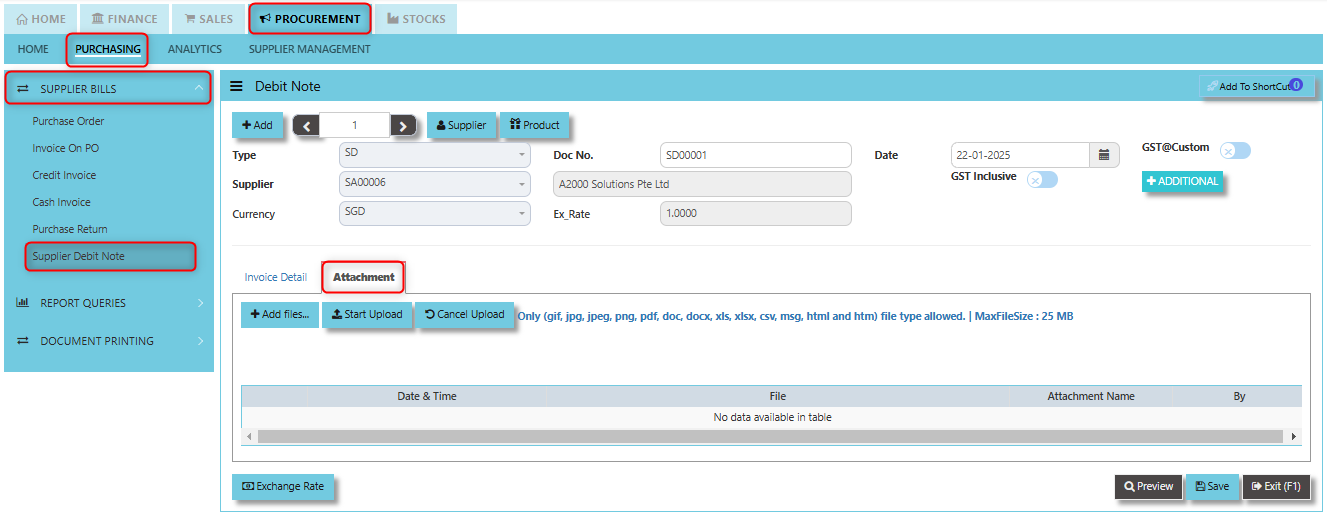
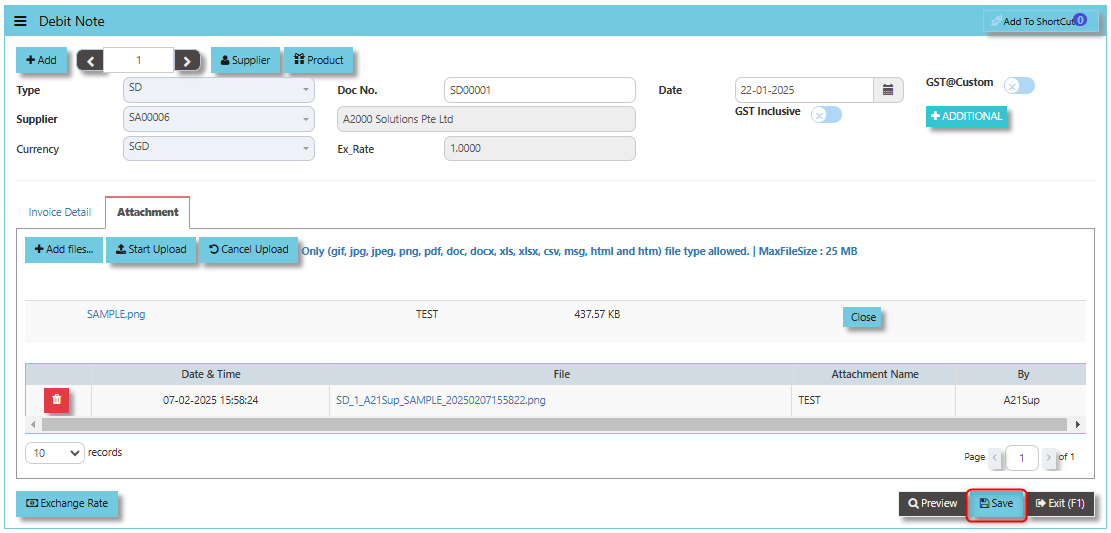
The Attachment Tab designed to store and manage relevant documents and files associated with the Supplier Debit Note transaction.
How to use Attachment Tab?
1. Click on PROCUREMENT - PURCHASING - SUPPLIER BILLS - SUPPLIER DEBIT NOTE - ATTACHMENT TAB for the screen below.
2. Click +Add files and windows will prompt then choose the file you want to upload by clicking open. Kindly take note the file types and maximum size requirements in uploading: Only (gif, jpg, jpeg, png, pdf, doc, docx, xls, xlsx, csv, msg, html and htm) file type allowed. | MaxFileSize : 25 MB
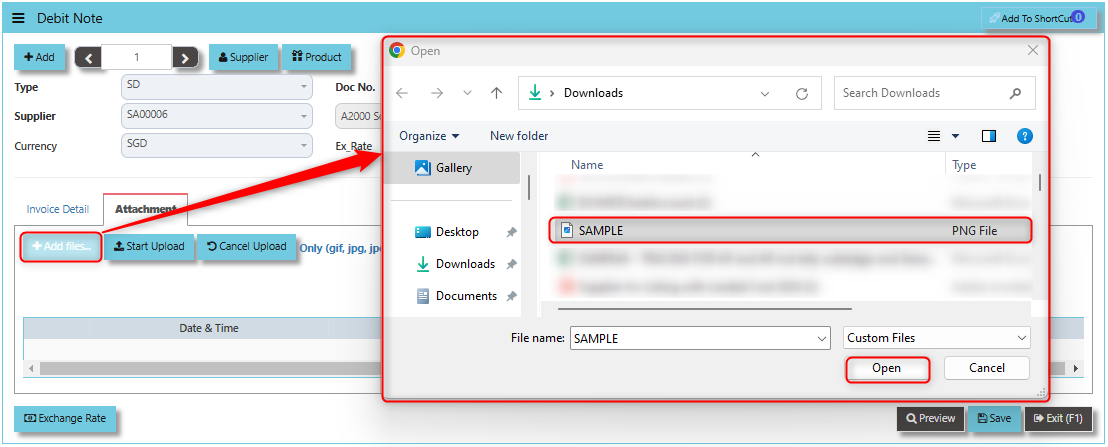
3. Key in the Attachment Name then click start to upload.
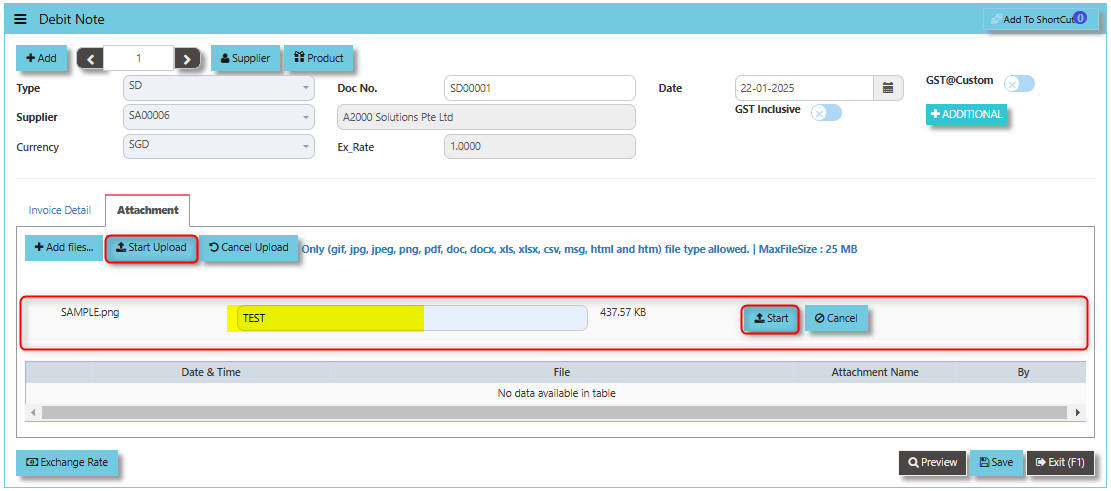
4. Once the file attached, click "SAVE" button
Analytics
In Uniq365, Analytics refers to the use of data analysis and reporting tools to evaluate and optimize the procurement process. It involves gathering, processing, and presenting data related to procurement activities, such as purchasing, supplier performance, inventory management, and cost control.
_______________________________________________________________________________________________________
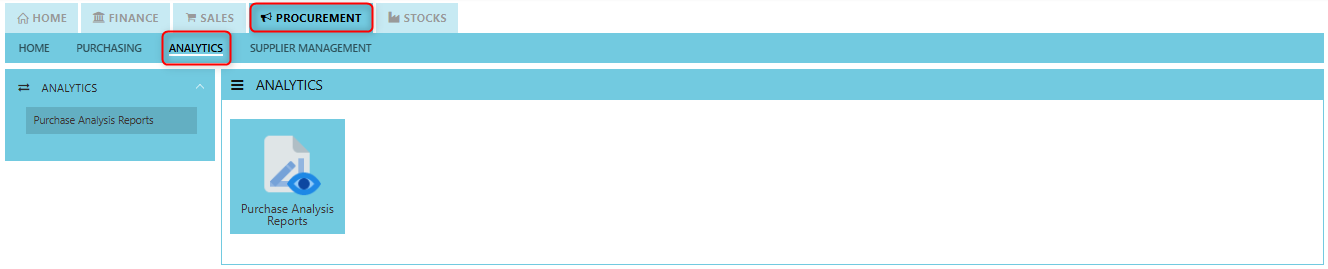
How to locate Analytics?
- Click on PROCUREMENT – ANALYTICS for the screen below.
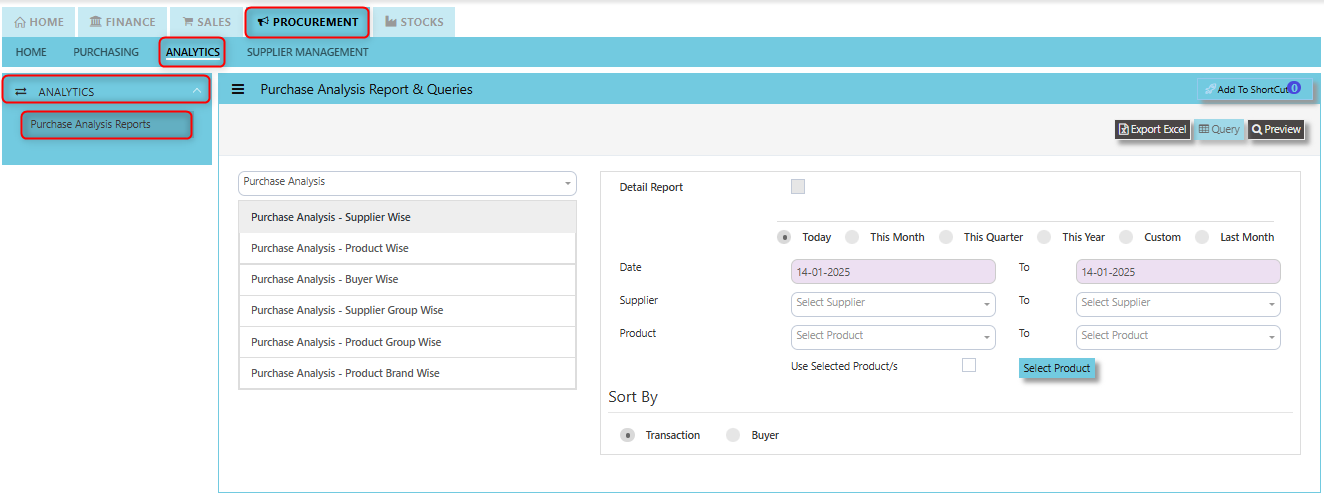
Purchase Analysis Report
The available reports in this section also have the capability to export to Microsoft Word, Excel and PDF. Users can filter the reports according to date, supplier, product, buyer. Detailed reports are available, and the reports can also be sorted by Supplier and Buyer.
___________________________________________________________________________________________________
How to view Purchase Analysis Report?
- Click on PROCUREMENT – ANALYTICS – ANALYTICS - PURCHASE ANALYSIS REPORTS for the screen below.
Supplier Management
The Supplier Management tab comprises the following options that are crucial to setting up and using the Procurement Module:

- Supplier Maintenance
- Supplier Account Group
- Supplier Type Group
- Purchases Control Account
- Unit of Measure
- Item Account Group
- Delivery Mode
- Product Group
- Supplier Category
- Inco Terms
Supplier Maintenance
The Supplier Maintenance stores all the supplier information such as the supplier code, name, and addresses. The supplier code created in the Supplier Maintenance is used to present all the transactions entered for that supplier.
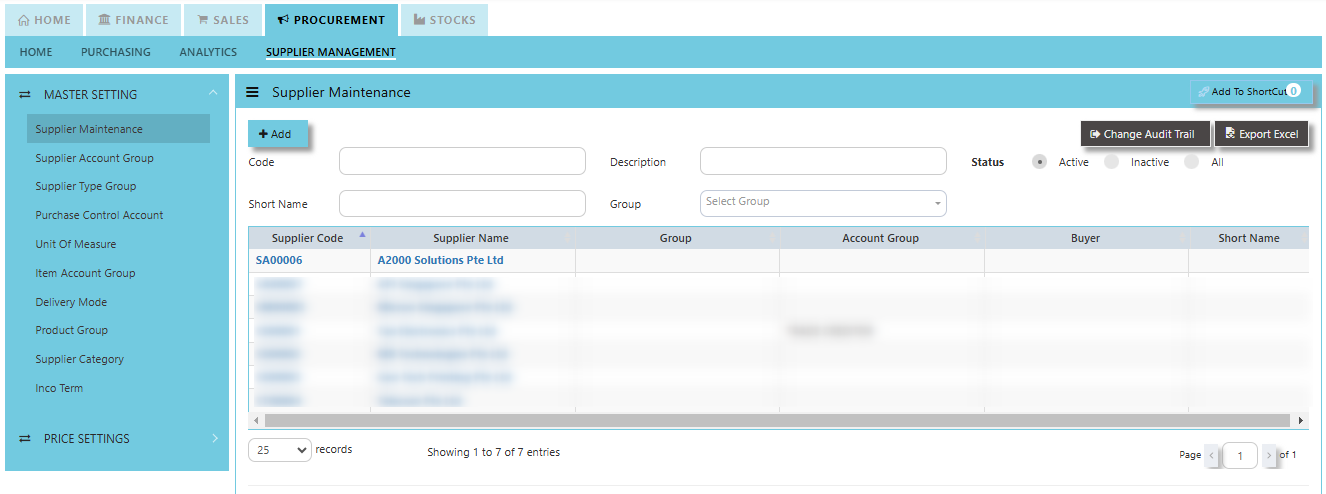
How to create Supplier Maintenance?
- Click on Procurement – Supplier Management – Supplier Maintenance icon for the following screen:
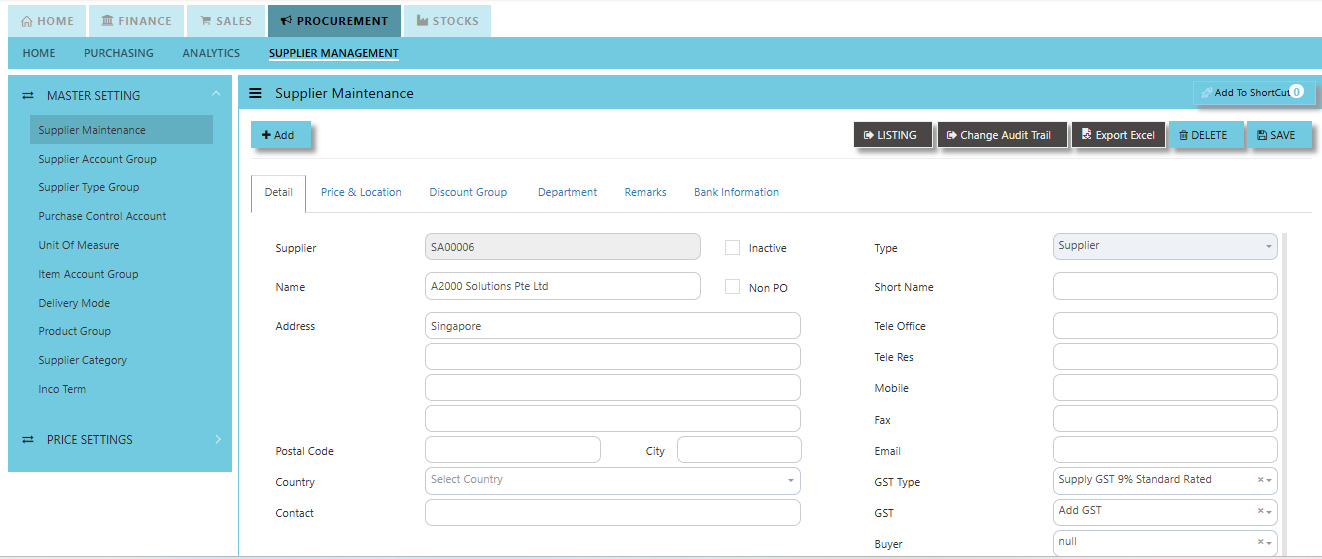
- This is where you add new suppliers or edit existing ones. Some of the fields are mandatory, such as the following:
Mandatory Information:
Supplier - Enter the code for the new supplier. The maximum is 10 alphanumeric characters.
Name - Enter the name of supplier. The maximum is 50 alphanumeric characters.
Key in the necessary information, such as addresses, telephone, fax and e-mail.
Type - Select S for supplier or B for both supplier and customer.
Account Group - If the account posting is set based on supplier, then select the relevant Account Group here which has been defined under Procurement – Supplier Management – Account Group.
Group - This is to select the Group defined under Procurement – Supplier Management – Supplier Type Group. This grouping is for the reports under Purchases\Purchases Analysis Reports\Supplier Group wise Purchases Analysis.
Delivery Term – This is to select the Delivery Term defined under Procurement – Supplier Management – Delivery Term
Example: FOB - Free on Board
CIF - Carriage, Insurance & Freight
Delivery Mode - Click to select the Delivery Mode defined under Procurement – Supplier Management – Delivery Mode
Example: Truck, Flight, Self-Collection
Payment Term - Click to select the Payment Term defined under Procurement – Supplier Management – Payment Terms
Example: 30 Days, 60Days, COD (Cash on delivery)
Payment Mode - Click to select the Payment Mode defined under Procurement – Supplier Management – Payment mode
Example: Cash Payment, Cheque Payment and TT
Default Currency - Select the currency that this supplier normally transacts in.
Discount - Enter the discount in percentage this supplier is enjoying. For example, if a wholesale supplier gets 30% off List Price, enter “30” in this field for that supplier. With this feature, you need not remember each and every of your supplier’s discount rate.
Credit Period - Enter the number of days, weeks, or months that this supplier enjoys as credit period.
Credit Limit - Enter the Credit Limit of supplier. The system will block the purchase transaction once the figure reaches the limit.
Credit Used - This is a non-editable field. It is updated automatically by the system every time the credit is used up.
SP/Buyer - Click to select the Purchaser defined under System Manager – System Utilities – Employee
Price Type - You may decide on pricing method for each and every supplier.
Price Table (Purchases/Last) - Every time an invoice is created for this supplier, the system will call out the selling price from the Supplier Maintenance Price Table.
Group Table (Purchases/Last) - Every time an invoice is created for this supplier, the system will call out the selling price from the Supplier Maintenance Group Table (defined under Purchase – Maintenance – Supplier Type Group). This group assumes that all items in the group carry the same purchase price.
Product Setting - Every time an invoice is created for this supplier, the system will show the selling price from the Product & Service Maintenance (Depends on the Price Type selected).
Purchases - Every time an invoice is created for this supplier, the system will call out the Purchase Price from the Product & Service Maintenance. The user will have to manually set and update the Purchase Price field there.
Last Price - If Last Price is selected, the price billed for a particular product will be saved in the Last Price column of the Price table. The next time the same product is entered in an invoice for that supplier, the Last Price will be automatically picked up.
Location - Create different delivery locations for this supplier.
Price - Records the history of selling price for this supplier if Price Table is selected for the Price Type.
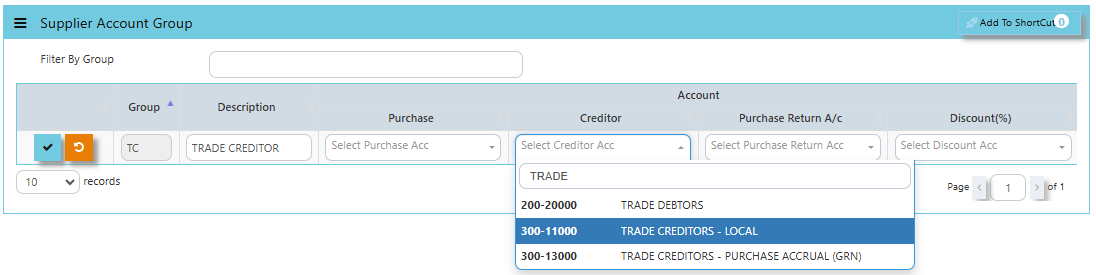
Supplier Account Group
This feature is used for auto accounts posting when saving Purchase Transactions. Unlike other systems that are hard-coded, Uniq365 allows the user to set their own Supplier Accounts postings. The Supplier Account Group needs to be set if the account posting is by Supplier.
How to Setup Supplier Account Group?
- Click on Procurement – Supplier Management – Supplier Account Group icon for the following screen.
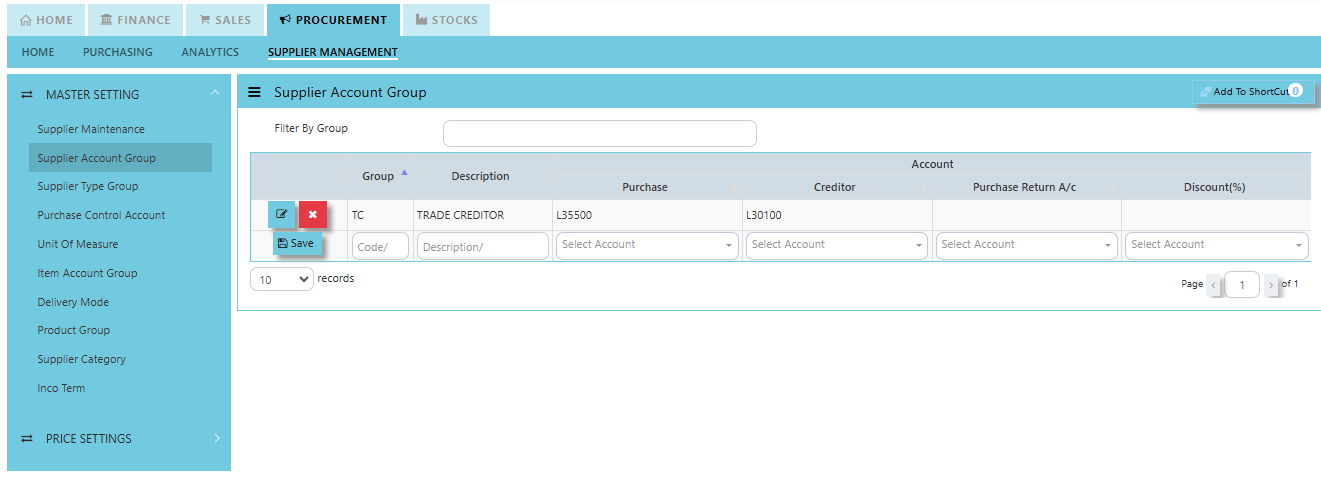
- Enter the Code and Description to create the Supplier Account Group. After this is done, set the GL Chart of Account code for “Creditor A/C”, “Purchases A/C” & “Discount A/C”.
Supplier Type Group
In Uniq365, this is where you create the Supplier Group which will be used to sort or filter reports (Optional).
How to Setup Supplier Type Group?
- Click on Procurement – Supplier Management - Supplier Type Group for the screen below.

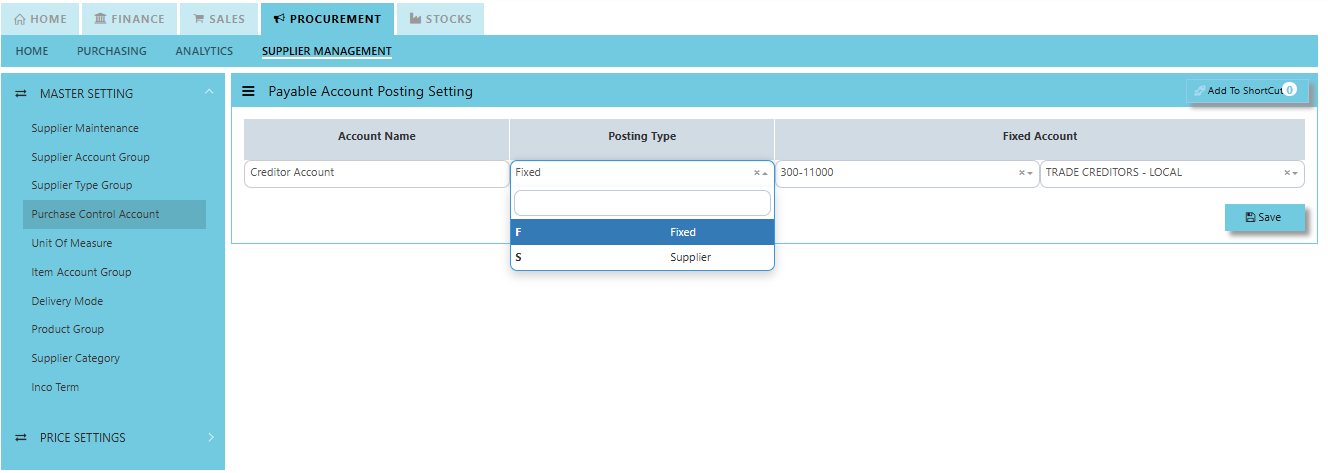
Purchase Control Account
In Uniq365, this is where you can set the Purchase Control Accounts for the GL Auto Account Posting.
How to set Purchase Control Account?
- Click on Procurement – Supplier Management – Purchase Control Account for the screen below.
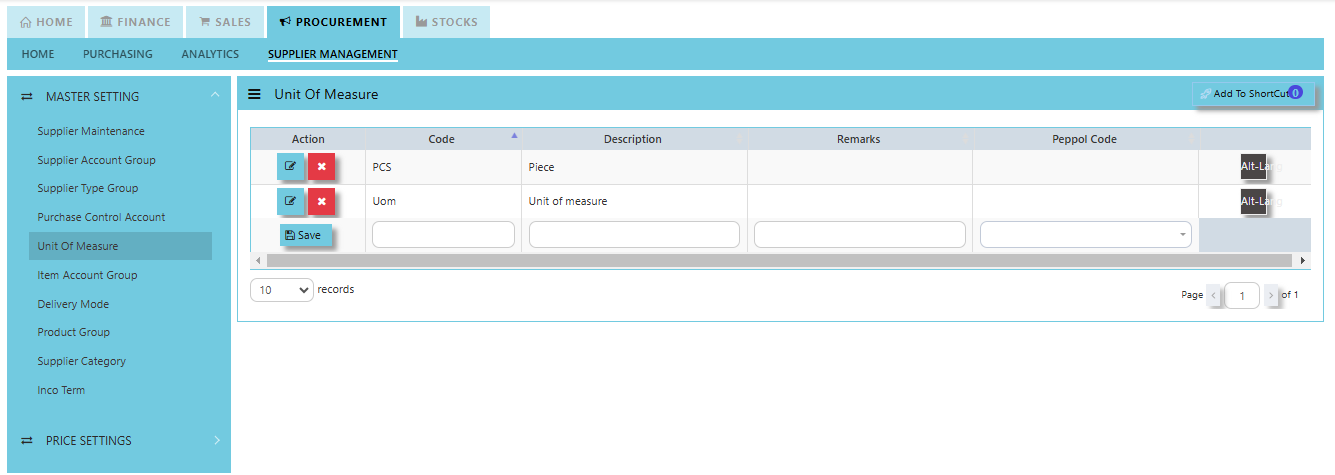
Unit of Measure
In Uniq365, this is where you indicate the Unit of Measure for the product in Procurement Module.
How to create Unit of Measure?
- Click on Procurement – Supplier Management – Unit of Measure for the screen below.
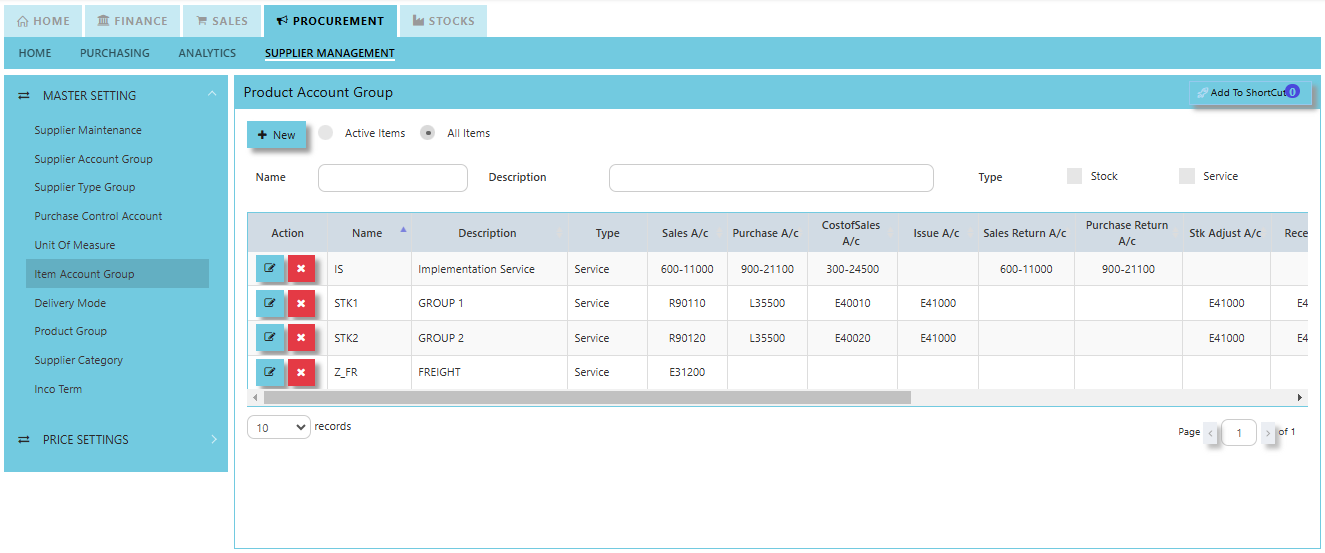
Item Account Group
The Product Account Group is used to categorize products into different accounting groups to manage the financial posting and treatment of transactions related to those products.
How to create Product Account Group?
- Click on Procurement – Supplier Management – Item Account Group for the screen below.
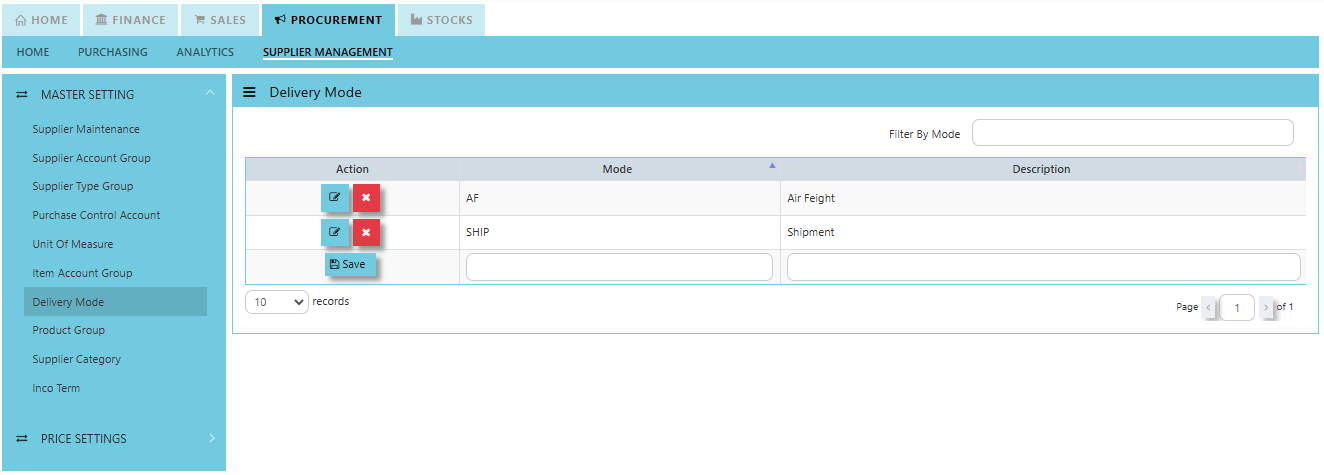
Delivery Mode
In Uniq365, you can indicate the Supplier Delivery Mode in the Supplier Maintenance or Transactions. You can also sort or filter reports by Delivery Mode.
How to create Delivery Mode?
- Click on Procurement – Supplier Management – Delivery Mode for the screen below.
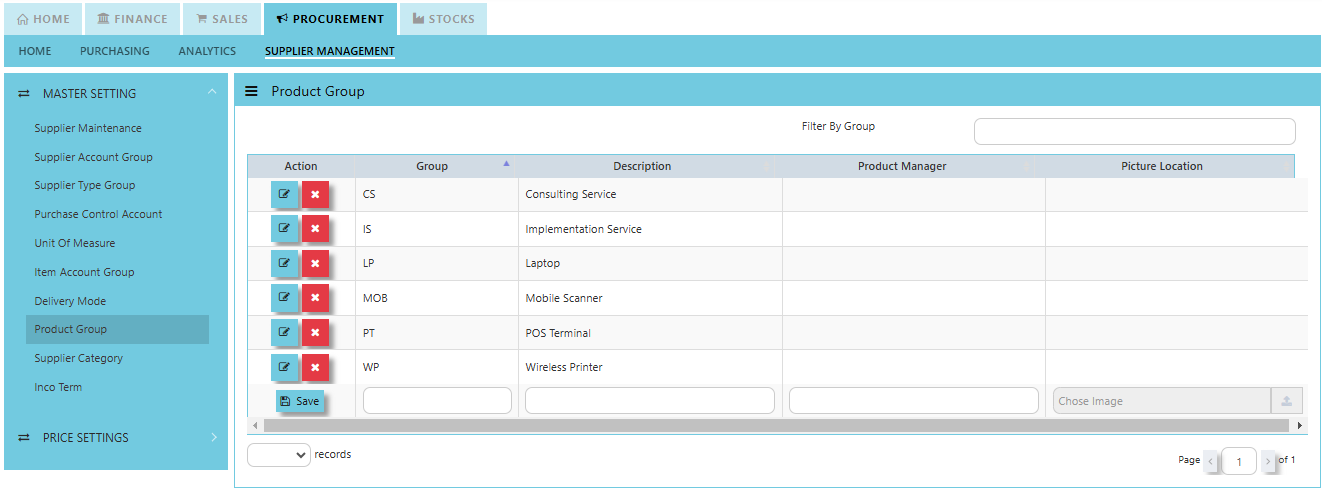
Product Group
In Uniq365, this is where you can set the Product Group for the classification or categorization of products based on shared characteristics and usage.
How to set Product Group?
- Click on Procurement – Supplier Management – Product Group for the screen below.
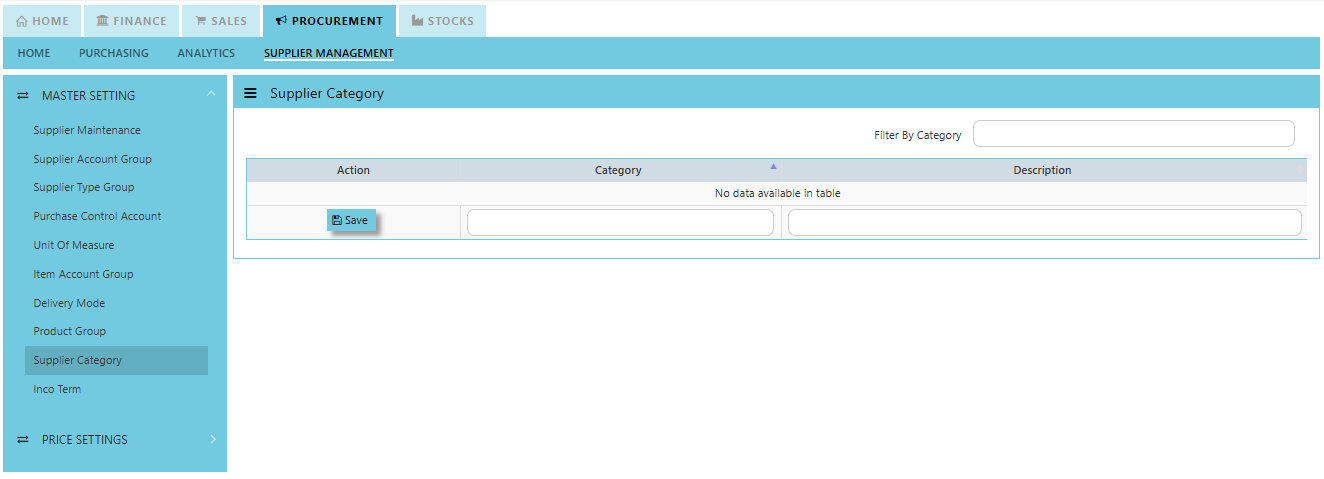
Supplier Category
In Uniq365, this is where you can set the Supplier Category for the classification used to group suppliers based on specific characteristics, such as the types of products or services they provide.
How to set Product Group?
- Click on Procurement – Supplier Management – Product Group for the screen below.
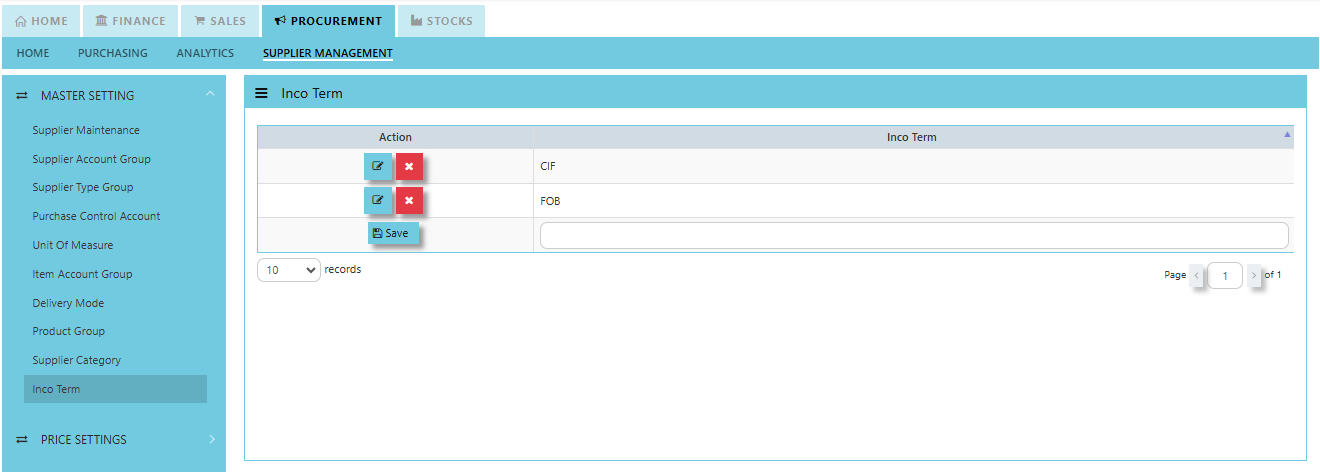
Inco Term
In Uniq365, you can specify the Inco Terms in Supplier Quotation and Purchase Order Transactions. The Inco Terms will first need to be created in the Maintenance first before it can be used at the transaction level.
How to create Inco Term?
- Click on Procurement – Supplier Management – Inco Term for the screen below.
Supplier Price Book
In Uniq365, you may maintain a Supplier Price Book which is a record or catalog that contains the agreed-upon prices for products or services provided by a specific supplier. The price book typically includes a list of items or services, their associated prices, and any other terms or conditions related to the purchase, such as buying price, UOM and discounts.
How to create Supplier Price Book?
1. Click on Procurement – Supplier Management – Price Settings - Supplier Price Book for the screen below.
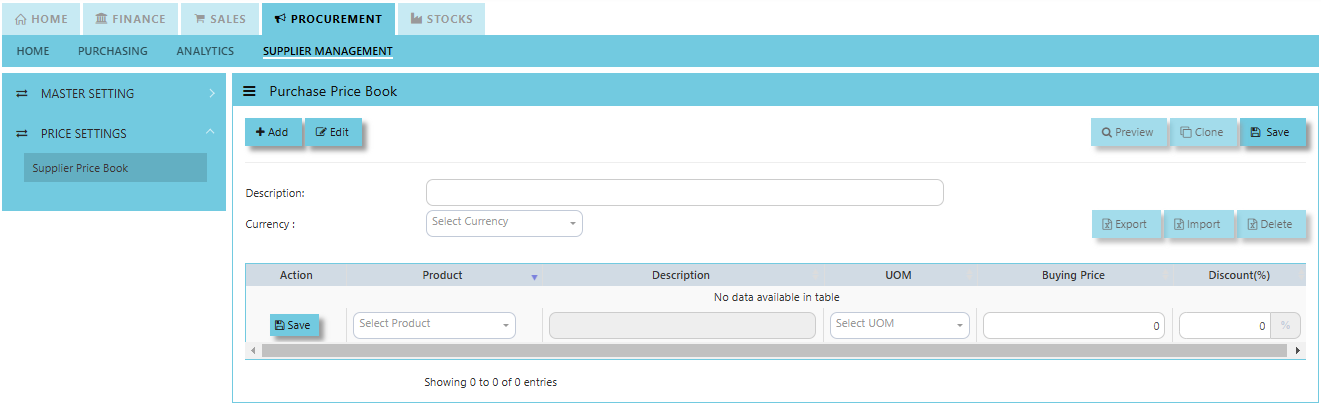
2. Key in Description and Select Currency
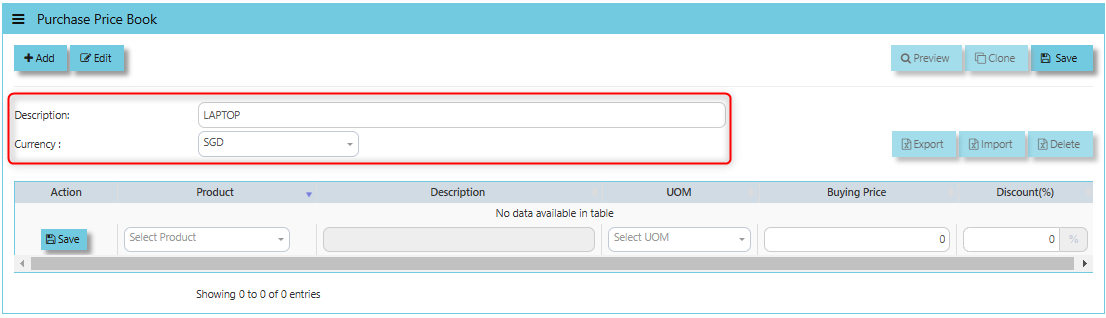
3. Select for the product then description and UOM will automatically appear and key in the price and discount if any.
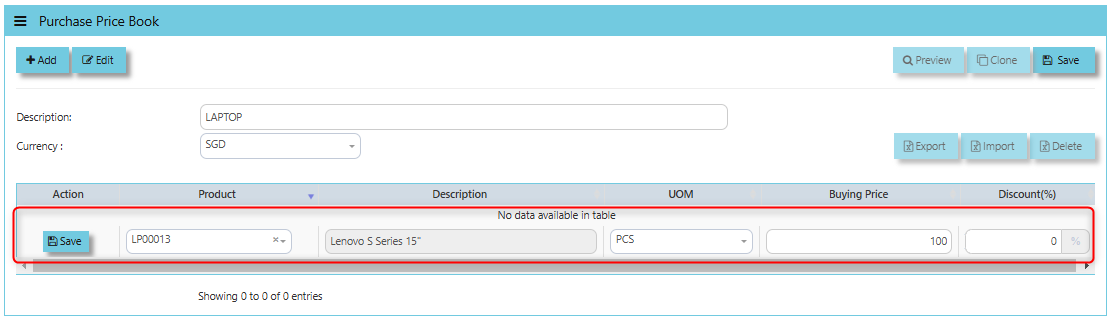
4. Click SAVE to maintain.

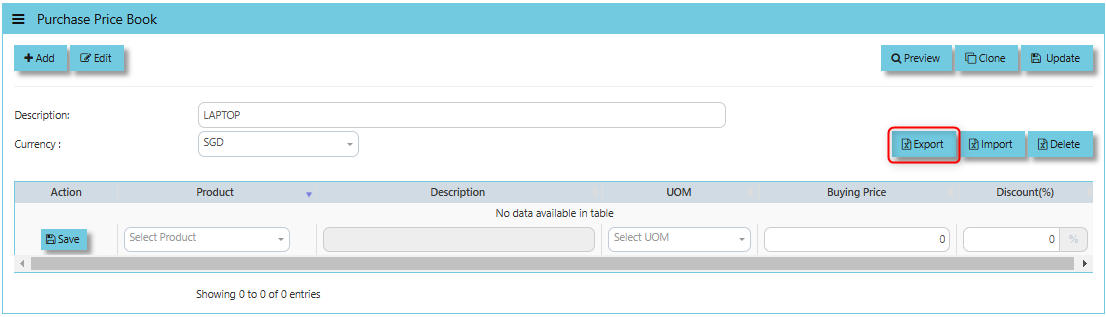
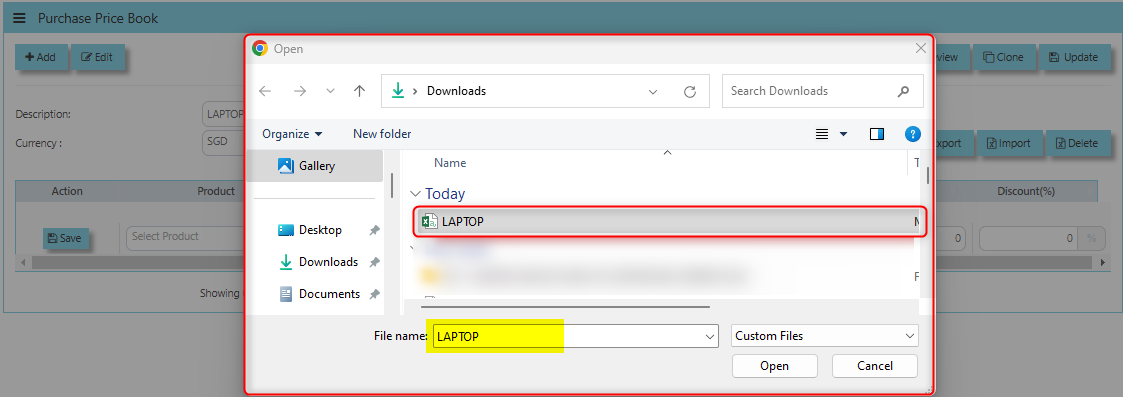
How to use Import Function?
"Import" button is typically used to upload or import price lists from suppliers in bulk.
1. Export the excel format by clicking the "Export Button"
2. Fill the necessary details base on excel format provided then save properly the file.

3. Click the Import button to upload then click the browse.
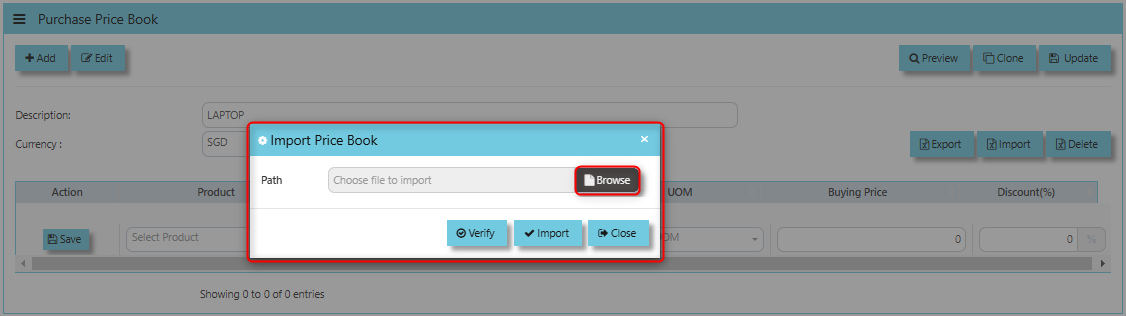
4. Once clicked the Browse then there will be windows prompt and select excel file to upload.
5. Click Verify once done verified the file, click import button to process uploading
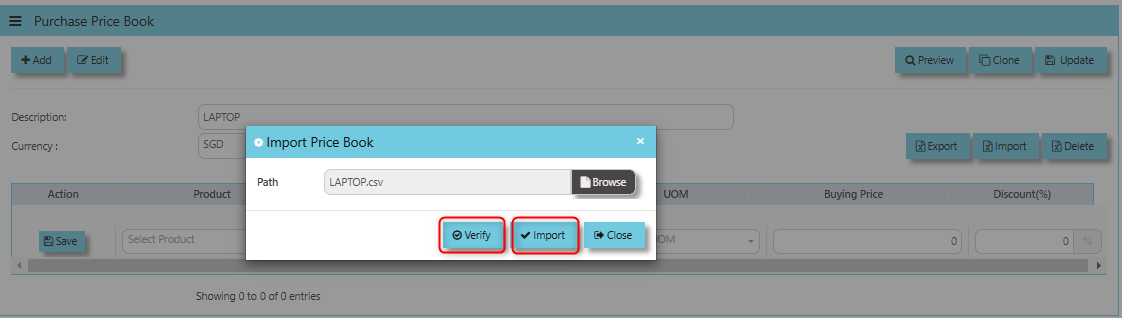
6. Once file imported below are the screen
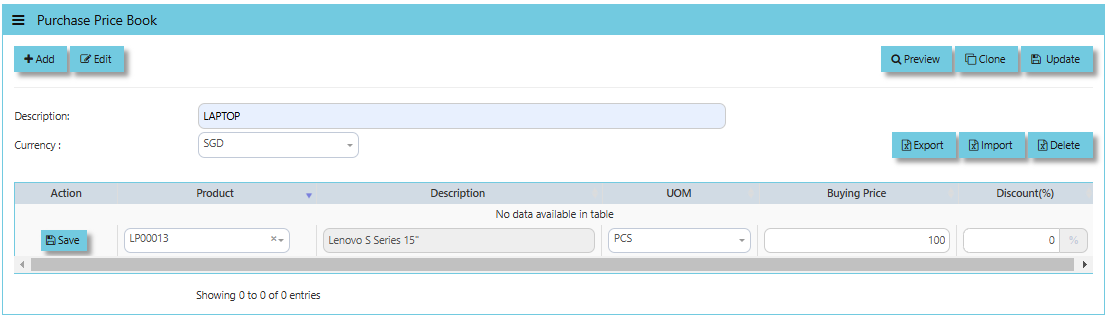
Below are the buttons that users may utilize:
- The Preview button allows you to view the contents of the imported file to ensure everything appears as expected before saving or applying it.
- The Clone button allows users to quickly create a new price book entry by duplicating an existing one.
- If user made any modifications to the supplier price book), clicking the Update button will save those changes to the system.
- The Delete button allows users to permanently remove a supplier’s price book or a specific price list entry from the system.
Report Queries
This is where all the Purchase reports such as Pending Purchase Orders, Purchase Invoice and GRN Listing, as well as Purchase Order Listing are located. The available reports in the Reports/Queries also have the capability to export to Microsoft Word, Excel and PDF. Users can filter the reports according to transaction type, date, reference number, transaction number and supplier. Detailed reports are available, and the reports can also be sorted by Default, Supplier, Product, Reference No and Delivery Date.
_______________________________________________________________________________________________________
How to locate Report Queries?
- Click on PROCUREMENT – PURCHASING – REPORT QUERIES for the screen below.
Supplier Status Query
Uniq365 accounting provides a very convenient interface which allows the user to drill down to the detailed transactions.
___________________________________________________________________________________________________
How to view Supplier Status Query?
1. Click on PROCUREMENT – PURCHASING – REPORT QUERIES – SUPPLIER STATUS QUERY for the screen below.
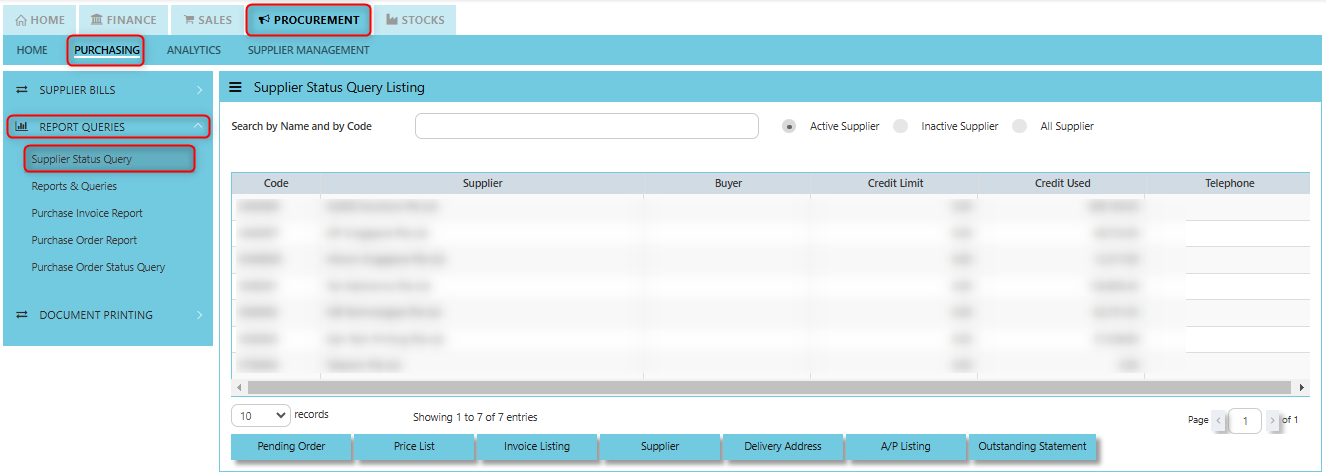
3. You may filter by Active Supplier, Inactive Supplier and All Supplier by ticking it.
4. You may filter by individual suppliers. The following data can be drilled down to transaction level:
- Pending Orders
- Delivery Addresses
- Price List
- AR Listing
- Invoice Listing
- Outstanding Statement
5. Instead of listing all invoices, you may choose to display only those that are outstanding. From this report, you may also drill down to the document level by clicking Go To Transaction.
___________________________________________________________________________________________________________________________________________
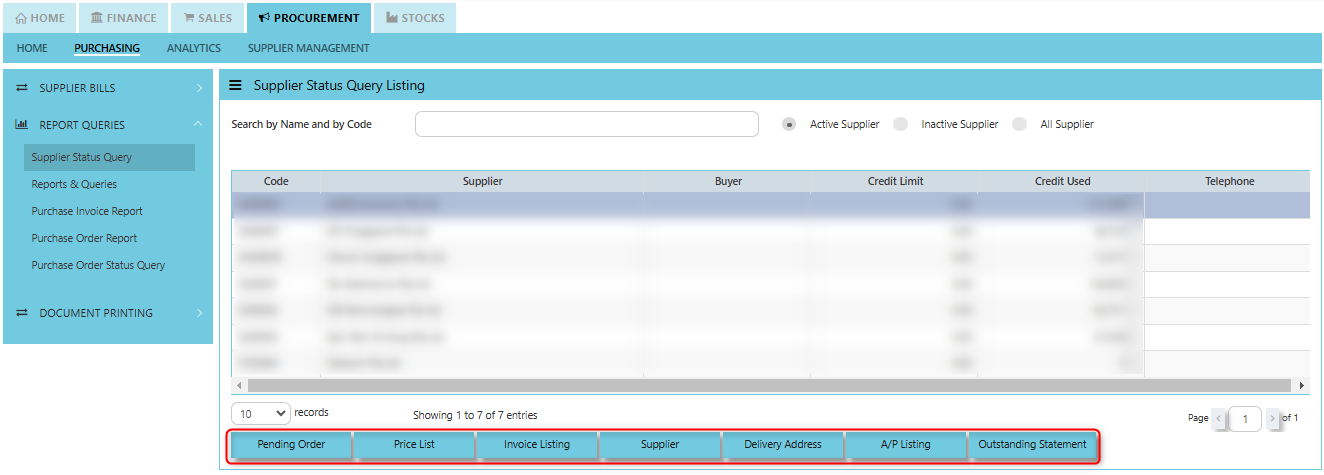
Pending Orders Button shows the orders that have been placed with suppliers but have not yet been fulfilled or processed. You may drill down or visit the transactions by clicking "Zoom In" button inside of this function.
Price List Button displays the price list provided by the supplier for various products or services.
Invoice Listing Button will show a list of invoices from suppliers. These invoices might be in various stages such as unpaid, paid, or pending.
Supplier Button allows the user to view or can be used to quickly access supplier maintenance of selected supplier. You may drill down or visit the transactions by clicking "Zoom In" button inside of this function.
Delivery Address Button displays the code, pending D/O and delivery addresses associated with the supplier.
A/P Listing Button displays a list of accounts payable transactions. These are amounts owed to suppliers for goods or services received. You may drill down or visit the transactions by clicking "Zoom In" button inside of this function.
Outstanding Statement Button provides an outstanding statement of the supplier’s account. It will summarize any unpaid balances or overdue amounts and can be used to review what is still owed to the supplier, including details such as Trn No., Reference, Currency, Double Entry, Balance, Balance Base and Total Amount. You may drill down or visit the transactions by clicking "Zoom In" button inside of this function.
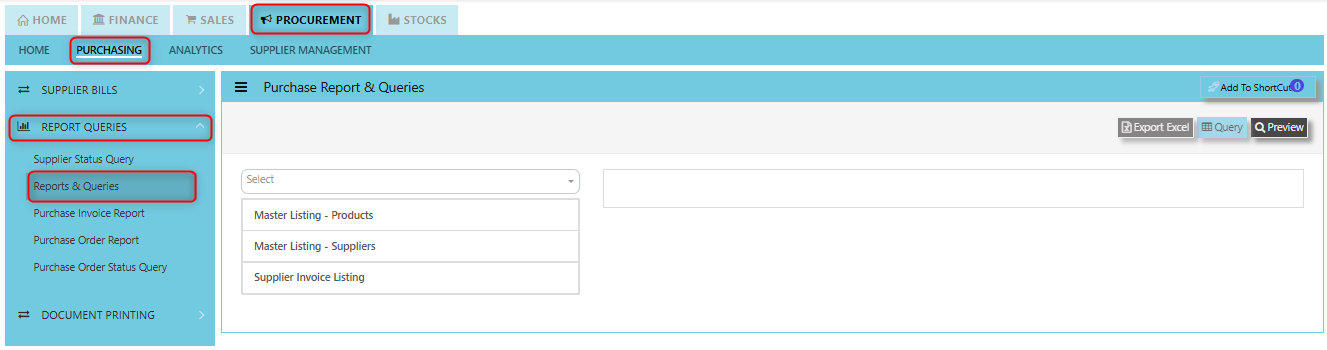
Reports and Queries
Uniq365 Reports & Queries interface make it extremely easy for you to take a report in any way you need, whether it is by date, or PDS.
___________________________________________________________________________________________________
How to view Report and Queries?
- Click on PROCUREMENT – PURCHASING – REPORT QUERIES – REPORT & QUERIES for the screen below.
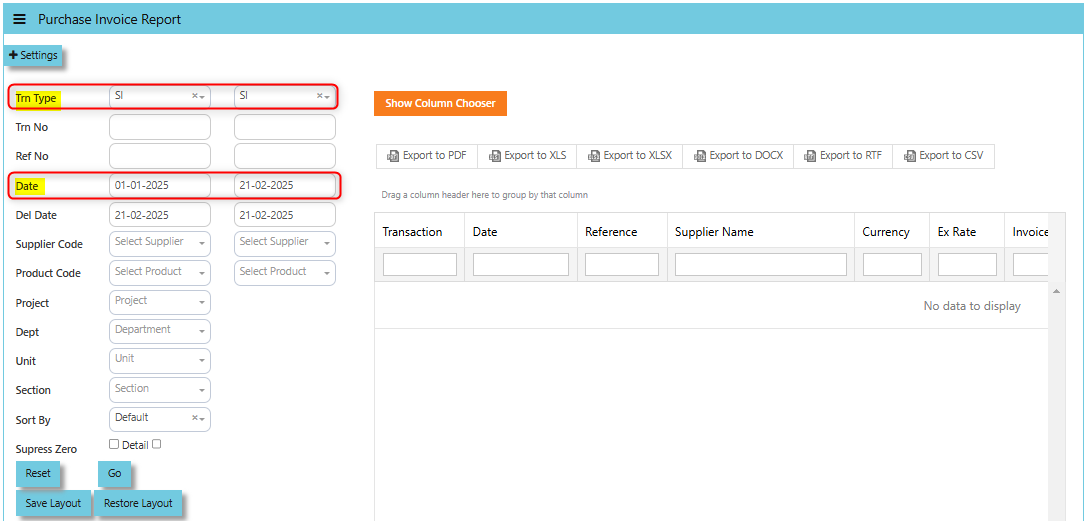
Purchase Invoice Report
In Uniq365, this report provides a detailed summary of all purchase invoices that have been generated within a specific time period or for a particular set of criteria and verify purchase transactions, manage supplier payments, and ensure the accuracy of financial records related to procurement activities.
This report provides a very convenient interface which allows user to drill down to the detailed transaction and user can create their own report format to generate by filtering information base on their own preferences. The available reports in the section also have the capability to export to Microsoft Word, Excel and PDF.
___________________________________________________________________________________________________
How to view Purchase Invoice Report?
Click on PROCUREMENT – PURCHASING – REPORT QUERIES – PURCHASE INVOICE REPORT for the screen below.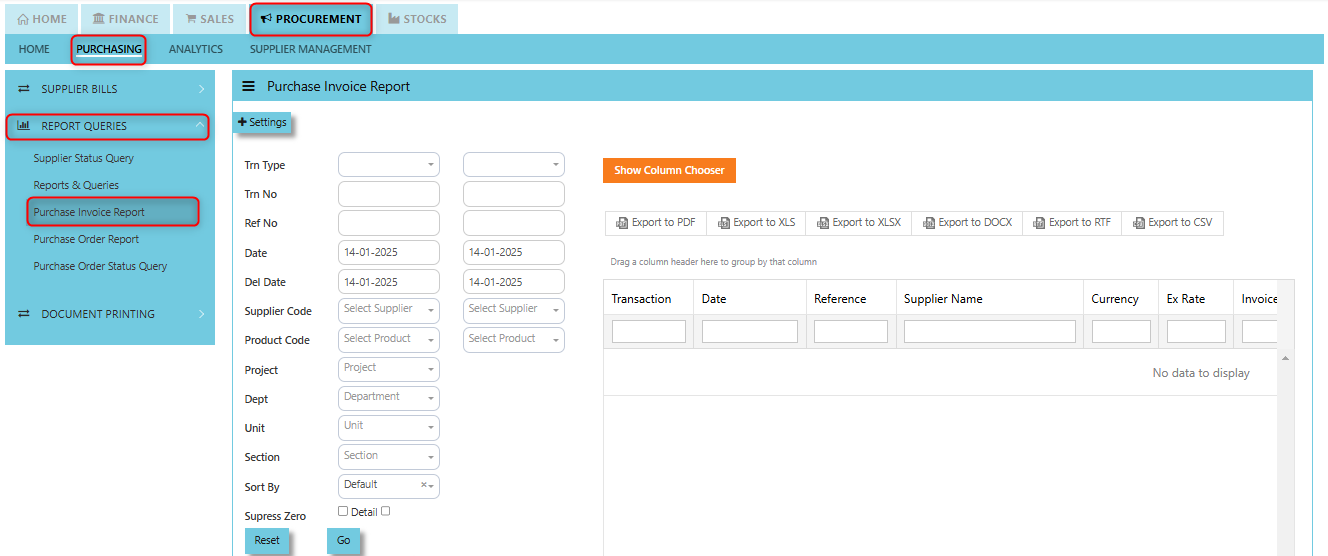
___________________________________________________________________________________________________________________________________________
How to use Purchase Invoice Report?
1. Filter base on your preferences. You can filter it by below fields:
- Trn Type
- Trn No
- Ref No
- Date
- Delivery Date
- Supplier Code
- Product Code
- Project
- Dept
- Section
You can sort by Default or by Product. User may opt to tick Suppress Zero or Detail.
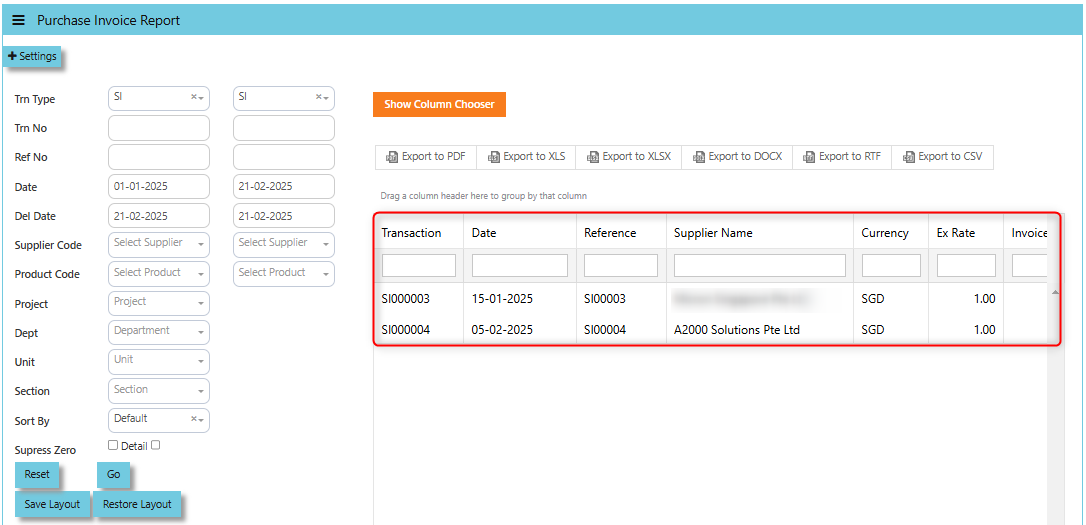
2. Click "GO" button to show the data to display
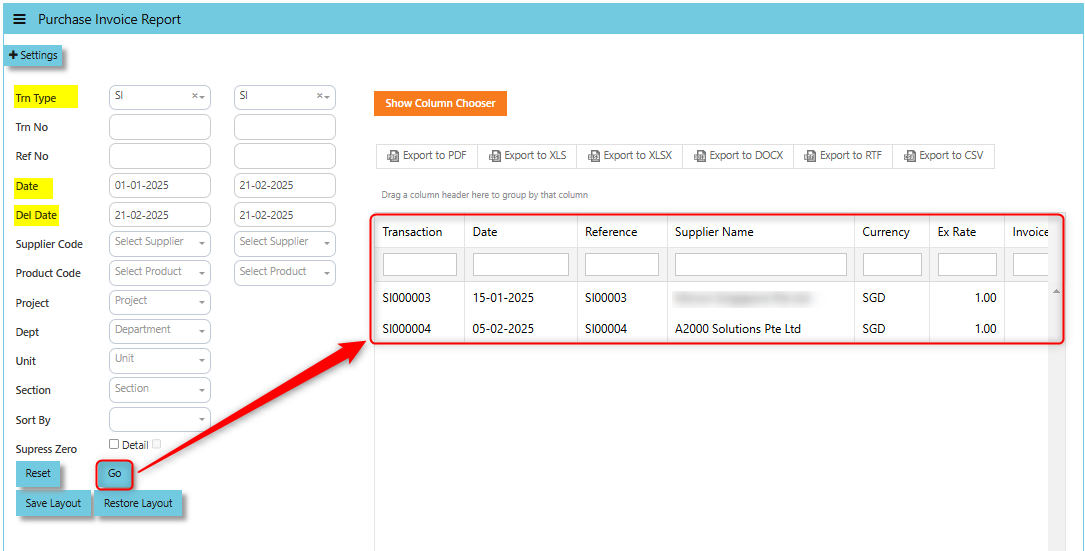
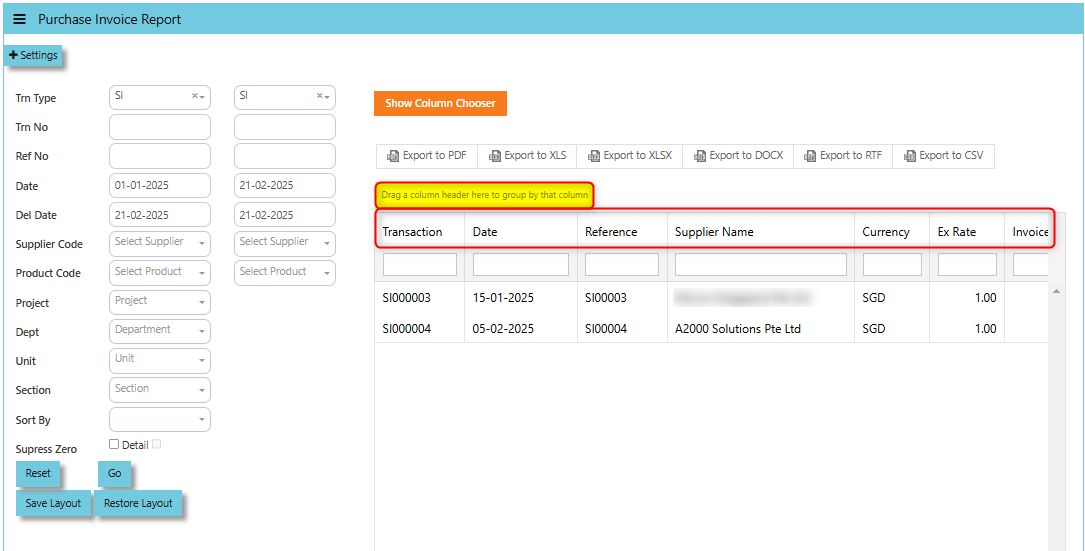
3. You can drag the column header to group by that column base on your report format preferences.
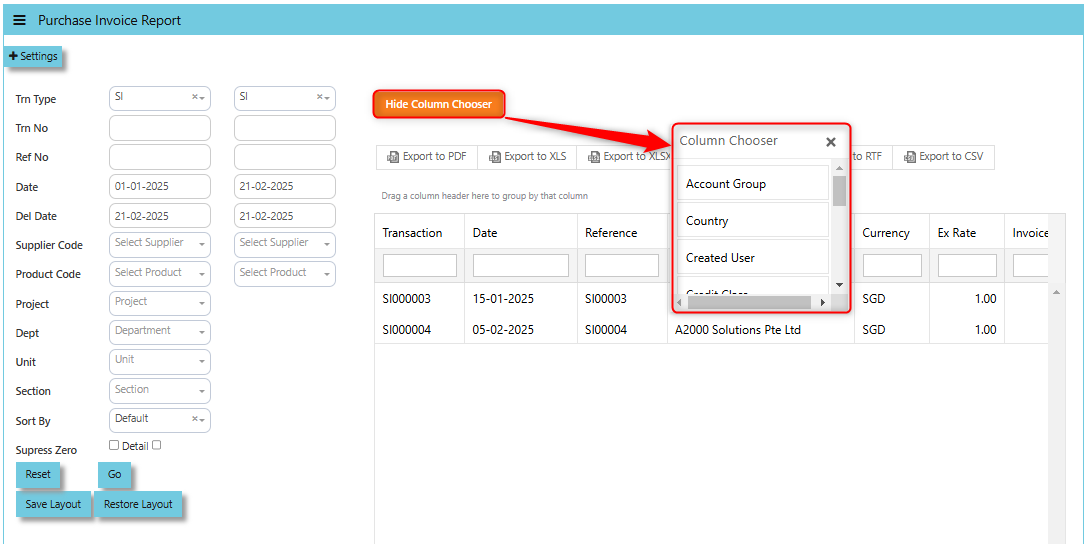
User may use the "Column Chooser", once clicked system prompt drop down-list of header columns and you can choose you want to reflect on your report format and click the "Hide Column Chooser" to close the Column Chooser.
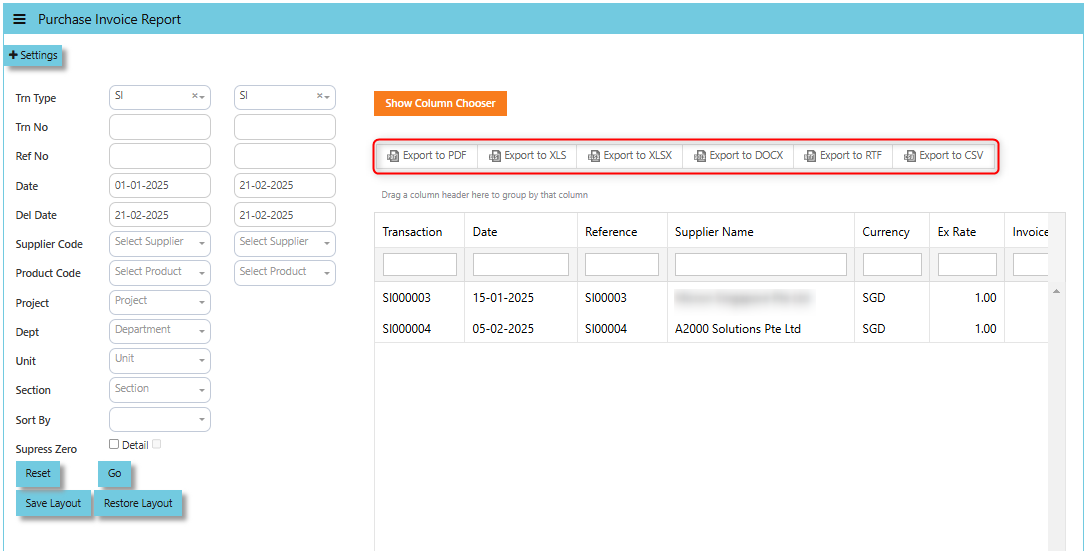
4. Once all set, you can download and export the report in PDF, XLS, XLSX, DOCX, RTF, and CSV
User may click the "Reset" button to back the standard report format generated.
Save Layout this function allows you to save in "Text Document" any customizations or changes made to the report's layout.
The "Restore Layout" button allows you to upload the "Text Document" of customizations you've made to the report's layout back to the default or original settings.
How to use the Restore Layout Button?
1. Select the Trn Type and Date or any details corresponding to text document file you will be uploaded.
2. Click "Restore Layout" and there will windows open then select the file and click "Open" to upload.
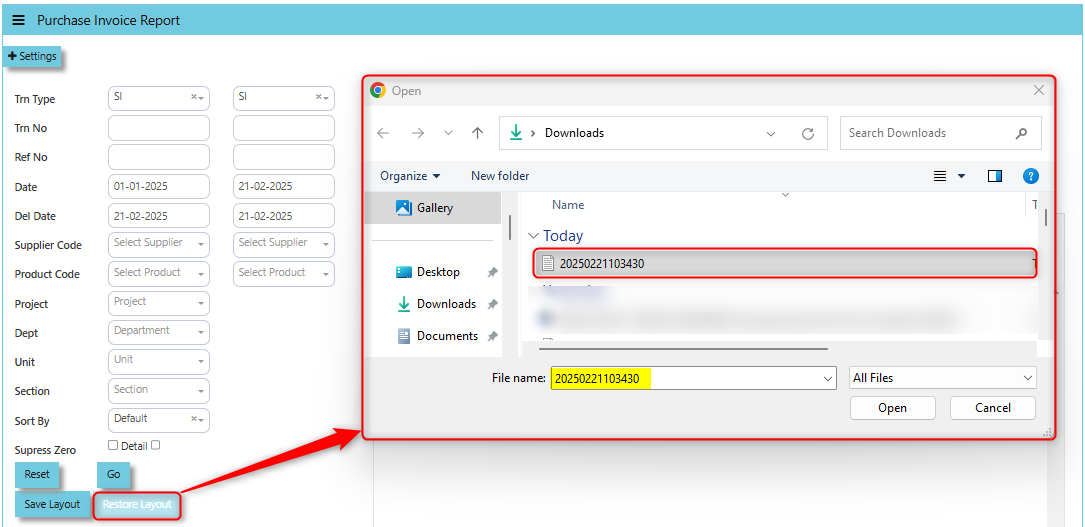
3. Once the file uploaded, data will be displayed.
The User Access Settings function refers to the ability to control who can view, modify, or access the report based on user roles and permissions within a system.
Purchase Order Report
This is a standard report that provides detailed information about purchase orders (POs) created, processed, or pending within the system. It is typically part of the report queries and is used to track and analyze purchasing activities.
The user can dig down to the specific transaction using this report's very user-friendly layout, and they can even customize the report structure by filtering data according to their own preferences. Additionally, the section's accessible reports can be exported to PDF, Excel, and Microsoft Word.
___________________________________________________________________________________________________
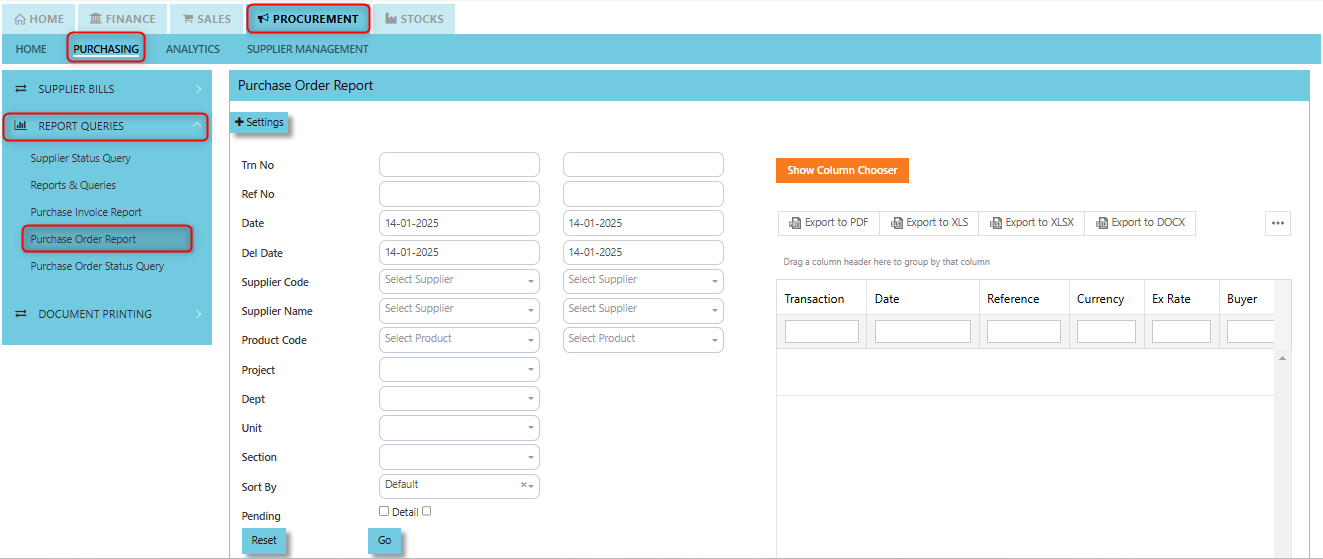
How to view Purchase Order Report?
- Click on PROCUREMENT – PURCHASING – REPORT QUERIES – PURCHASE ORDER REPORT for the screen below.
___________________________________________________________________________________________________________________________________________
How to use Purchase Order Report?
1. Filter base on your preferences. You can filter it by below fields:
- Trn No
- Ref No
- Date
- Delivery Date
- Supplier Code
- Supplier Name
- Product Code
- Project
- Department
- Unit
- Section
You can sort by Default or by Product. User may opt to tick Pending or Detail.
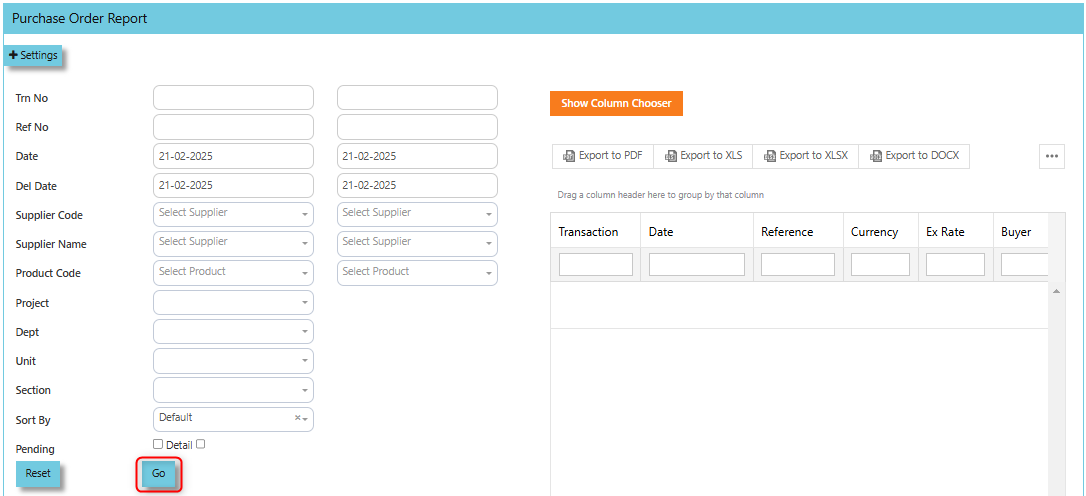
2. Click "GO" button to show the data to display
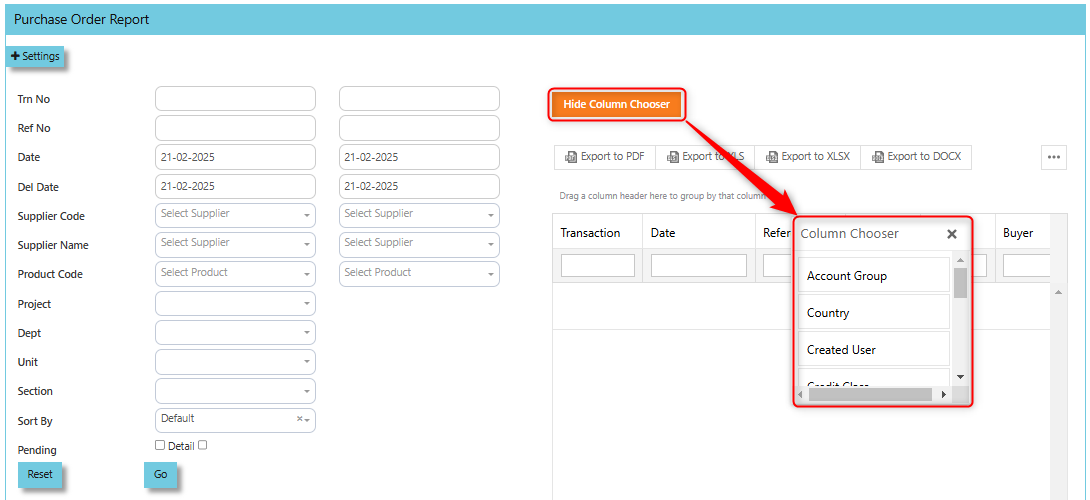
3. You can drag the column header to group by that column base on your report format preferences.
User may use the "Column Chooser", once clicked system prompt drop down-list of header columns and you can choose you want to reflect on your report format and click the "Hide Column Chooser" to close the Column Chooser.
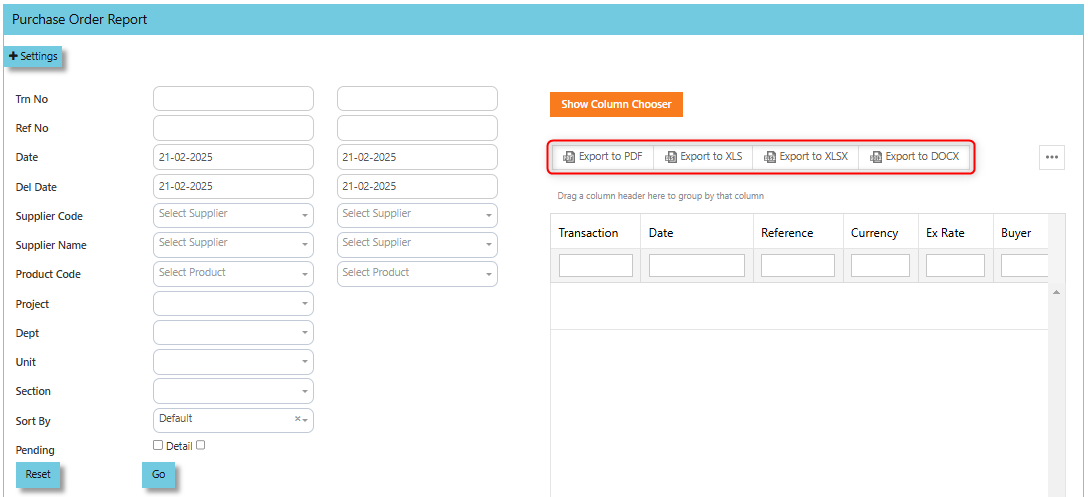
4. Once all set, you can download and export the report in PDF, XLS, XLSX, DOCX, RTF, and CSV
User may click the "Reset" button to back the standard report format generated.
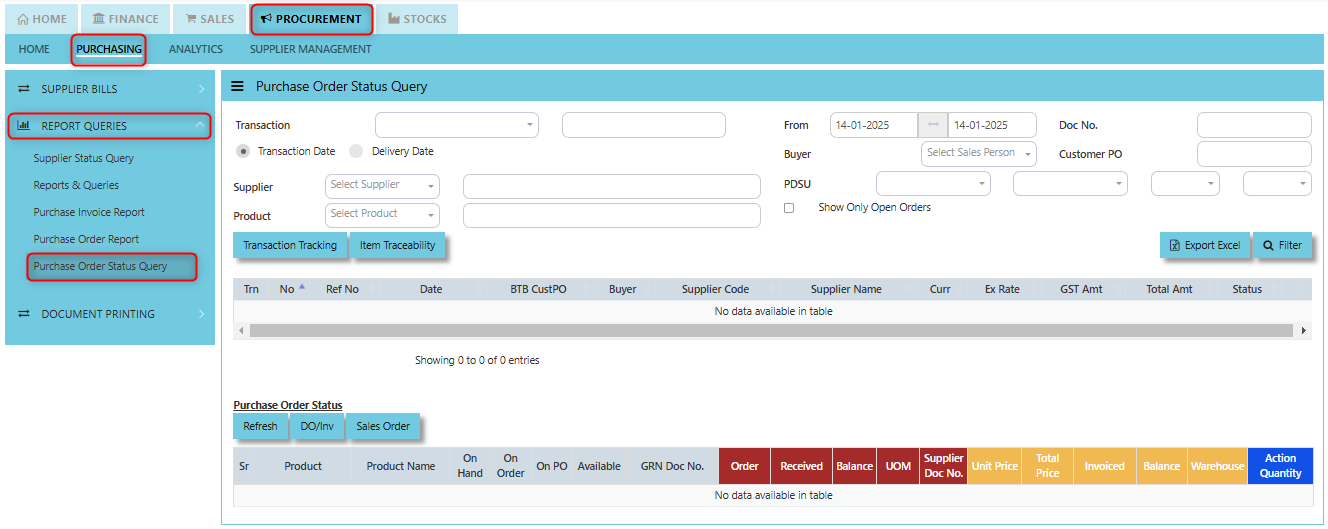
Purchase Order Status Query
In Uniq365, Purchase Order Status Query is a specialized report or query that allows users to view and analyze the status of purchase orders (POs) in real-time. This report helps track the progress of POs and provides insights into whether an order is open, completed, partially received, canceled, or pending approval, among other statuses.
This feature offers a very user-friendly interface that lets the user dive down to the specific transactions and export to Microsoft Excel to generate a tracking report.
___________________________________________________________________________________________________
How to view Purchase Order Status Query?
- Click on PROCUREMENT – PURCHASING – REPORT QUERIES – PURCHASE ORDER STATUS QUERY for the screen below.
___________________________________________________________________________________________________________________________________________
How to use Purchase Order Status Query?
1. Choose transaction type, Transaction Date or Delivery Date then set the date range, select Supplier and Product then click "Filter" button to reflect the data. User may have an option to add filtration by entering Doc. No., Buyer, Customer PO, PDSU and tick "Show Only Open Orders".
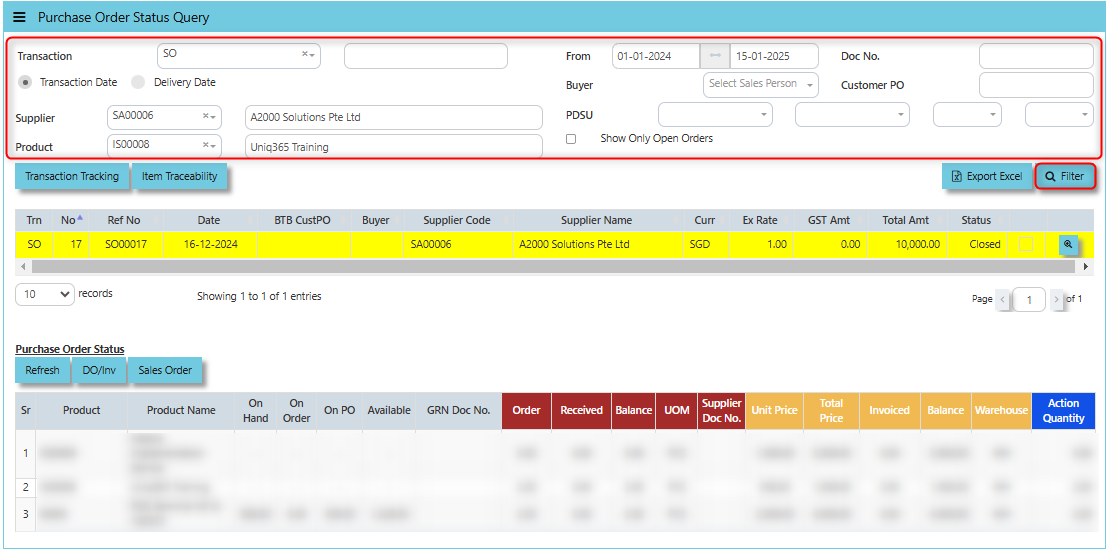
2. By selecting the filtered line transaction, details will show under Purchase Order Status for user references.
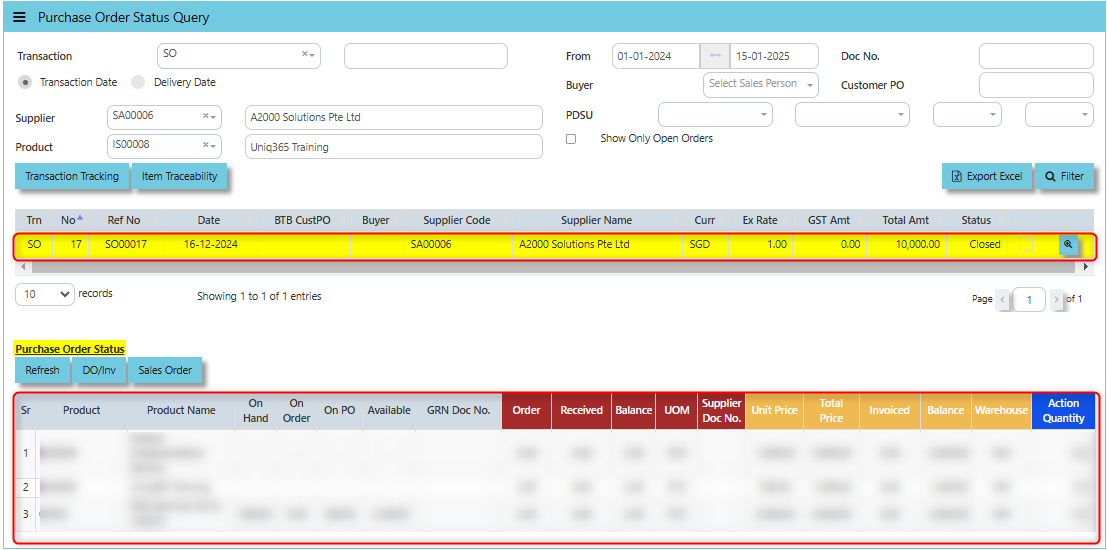
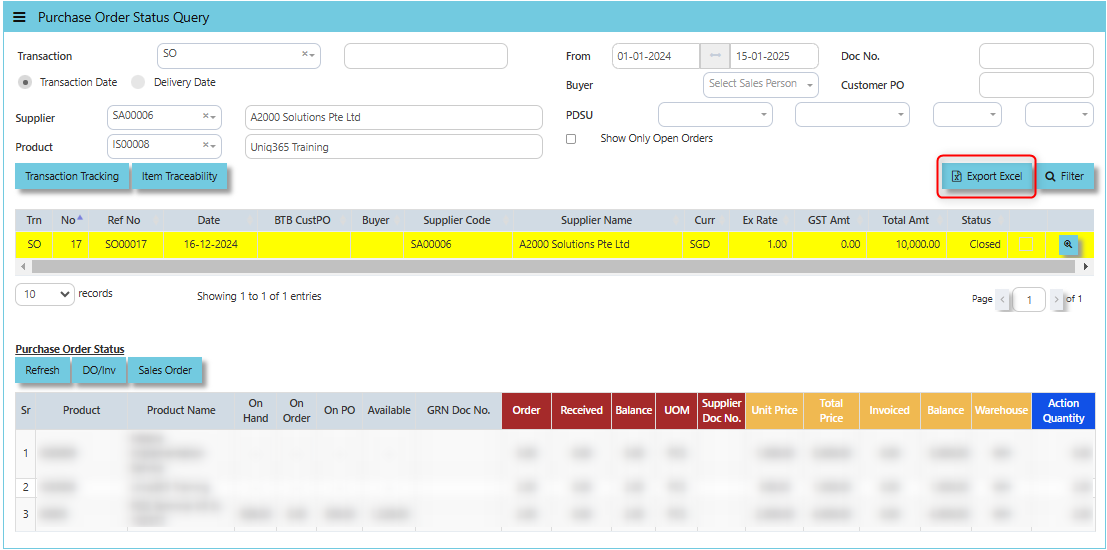
3. Users allow to export the data displayed in the query or report into an Excel spreadsheet.
Under "Purchase Order Status" below are the buttons that users can utilize:
Refresh Button is used to update or reload the data displayed in the Purchase Order Status Query.
DO/Inv Button provides access to the List of Delivery Orders (DO) and Invoices (Inv) associated with the purchase orders.
Sales Order Button provides a quick link to the Sales Order connected to a purchase order, helping users track the fulfillment of customer orders from procurement to delivery.
Document Printing
Finally, the document printing option opens the menu for document printing.
___________________________________________________________________________________________________
How to use Document Printing?
- Click on PROCUREMENT – PURCHASING – DOCUMENT PRINTING - DOCUMENT PRINTING for the screen below.
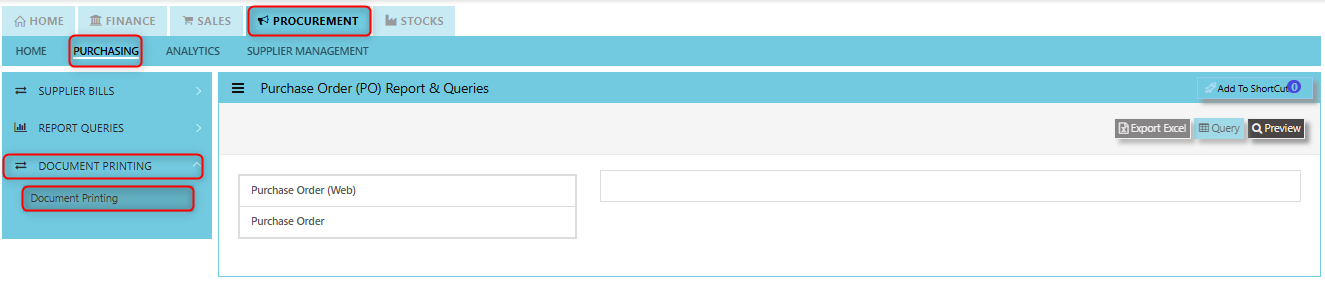
- This option allows user to select the printing of documents a range of document numbers. By previewing the selected report, users can able to download the detailed report into a PDF, XLS, XLSX, DOCX, CSV file, for further analysis, sharing, or record-keeping.