Inventory Module
- Overview - Inventory
- Create New Product
- Stock Transactions
- Opening Stocks
- Stock Transfers
- Stock Take
- Recalculation
- Reports & Queries
Overview - Inventory
STOCKS MODULE
The Inventory module maintains the stock status and allows the user to enter the various stock transactions which updates the GL posting for stocks and cost of sales.
The Inventory Module in UNIQ365 allows the costing methods to be done in the following ways:
-
FIFO - First In First Out
-
Weighted Avg - Weighted Average
-
LIFO - Last In First Out
-
Standard Cost - Standard Costing
These choices are set in the Product Costing field at the Maintenance tab for Product & Service Maintenance.
Important: The most commonly used costing methods are FIFO and Weighted Average. If you need to allow for negative stocks, do not use FIFO. This costing method does not permit negative stocks. You may choose to use Weighted Average instead. It is advisable to use only one costing method for all the products in order to have a smooth and accurate cost recalculation process.
_______________________________________________________________________________________________________
MENU NAVIGATION
The INVENTORY Module has 4 tabs, which are Home, Issue & Receive, Stock Operations, and Product Management.
Home where all the items in other three tabs will be listed down.
Issues & Receive is where transactions such as Stock Transactions, GRN Direct (SN), GRN ON order (SG), Sales Return (CC) as well as Purchase Return (SC) Stock Transfer are entered. It includes all the Reports and queries related to the Issues& receive transactions.
Stock Operations is where transactions such as Stock Take, Opening Stocks, Stock transfer Direct, and Assembly items such as Stock Kit Assembly, Stock kit Disassembly and Bill of Materials are entered. It includes the Recalculate function, Barcode printing, Multiple Barcode Import and all the Reports and queries related to the Stock operation transactions.
Product Management is where master records for product are created.
Create New Product
The Product Management tab comprises the following options that are crucial in setting up and using the STOCKS Module:
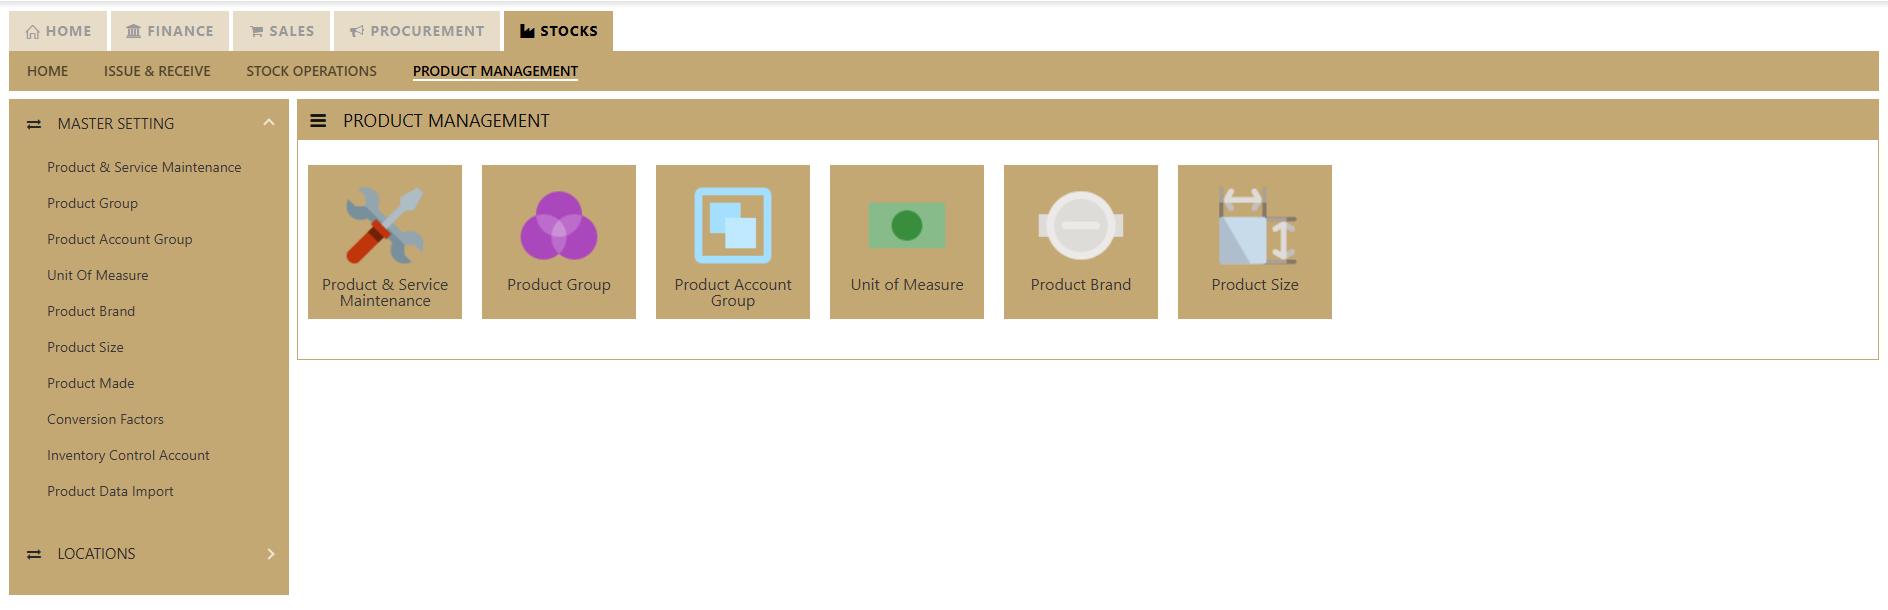
- Product & Service Maintenance
- Product Group
- Product Account Group
- Unit of Measure
- Product Brand
- Product Size
- Product Made
- Conversion Factors
- Inventory Control Account
- Product Data Import
Important: Before proceeding to create a new product or service code, we need to setup some Optional fields (such as Product Group, Size, Model, and Made, Discount Group, Customer/Supplier IM Group and Product Price Group), as well as some Mandatory fields (such as Product Account Group, Inventory Control Account, Units of Measures and Conversion Factors).
Product & Service Maintenance
How to Set-up Product Maintenance?
In Uniq365, product and service maintenance are essential for effective inventory and financial management. By accurately adding and managing product and service details, users can ensure seamless tracking, reporting, and accounting within the system. This functionality helps maintain up-to-date records, streamline operations, and support decision-making for inventory and sales.
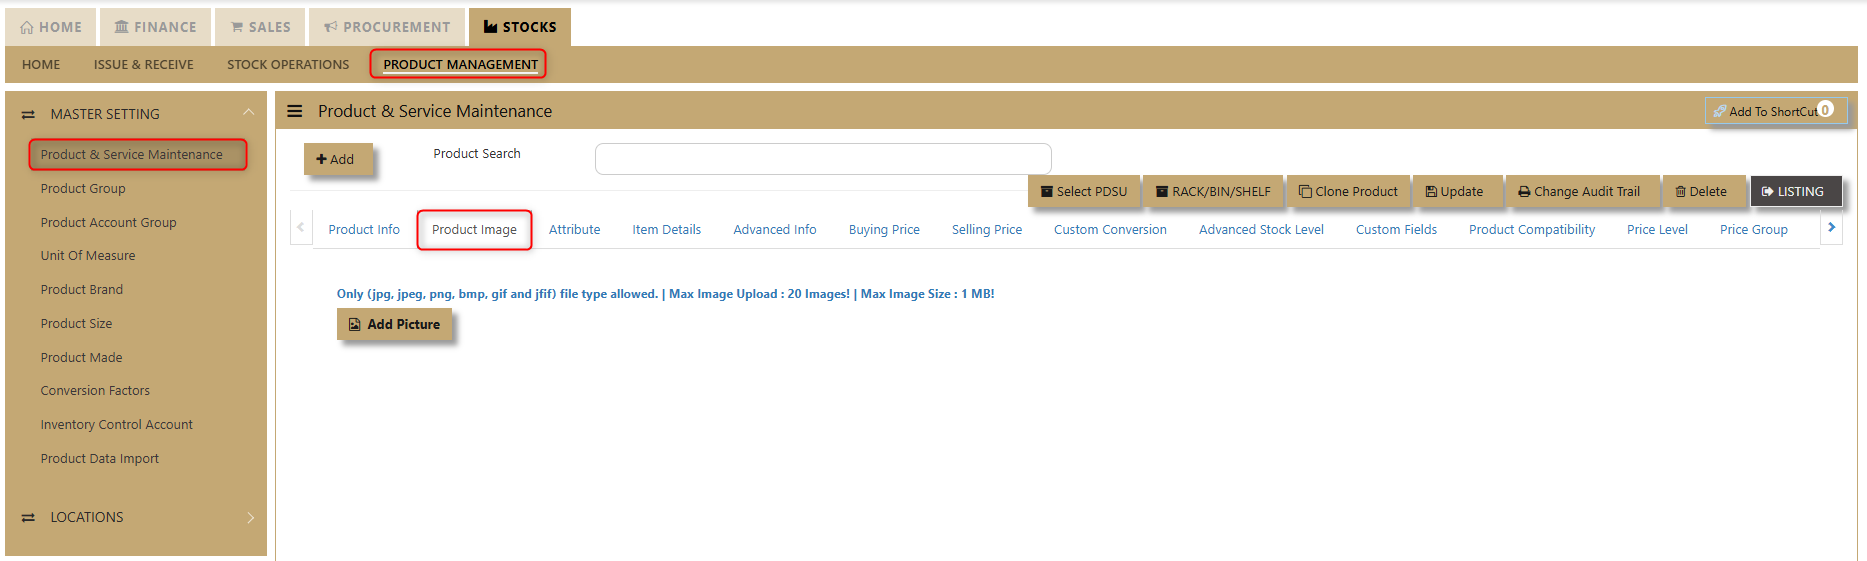
1. Click on Stock– Product Management – Product & Service Maintenance icon for following Inventory listing screen.
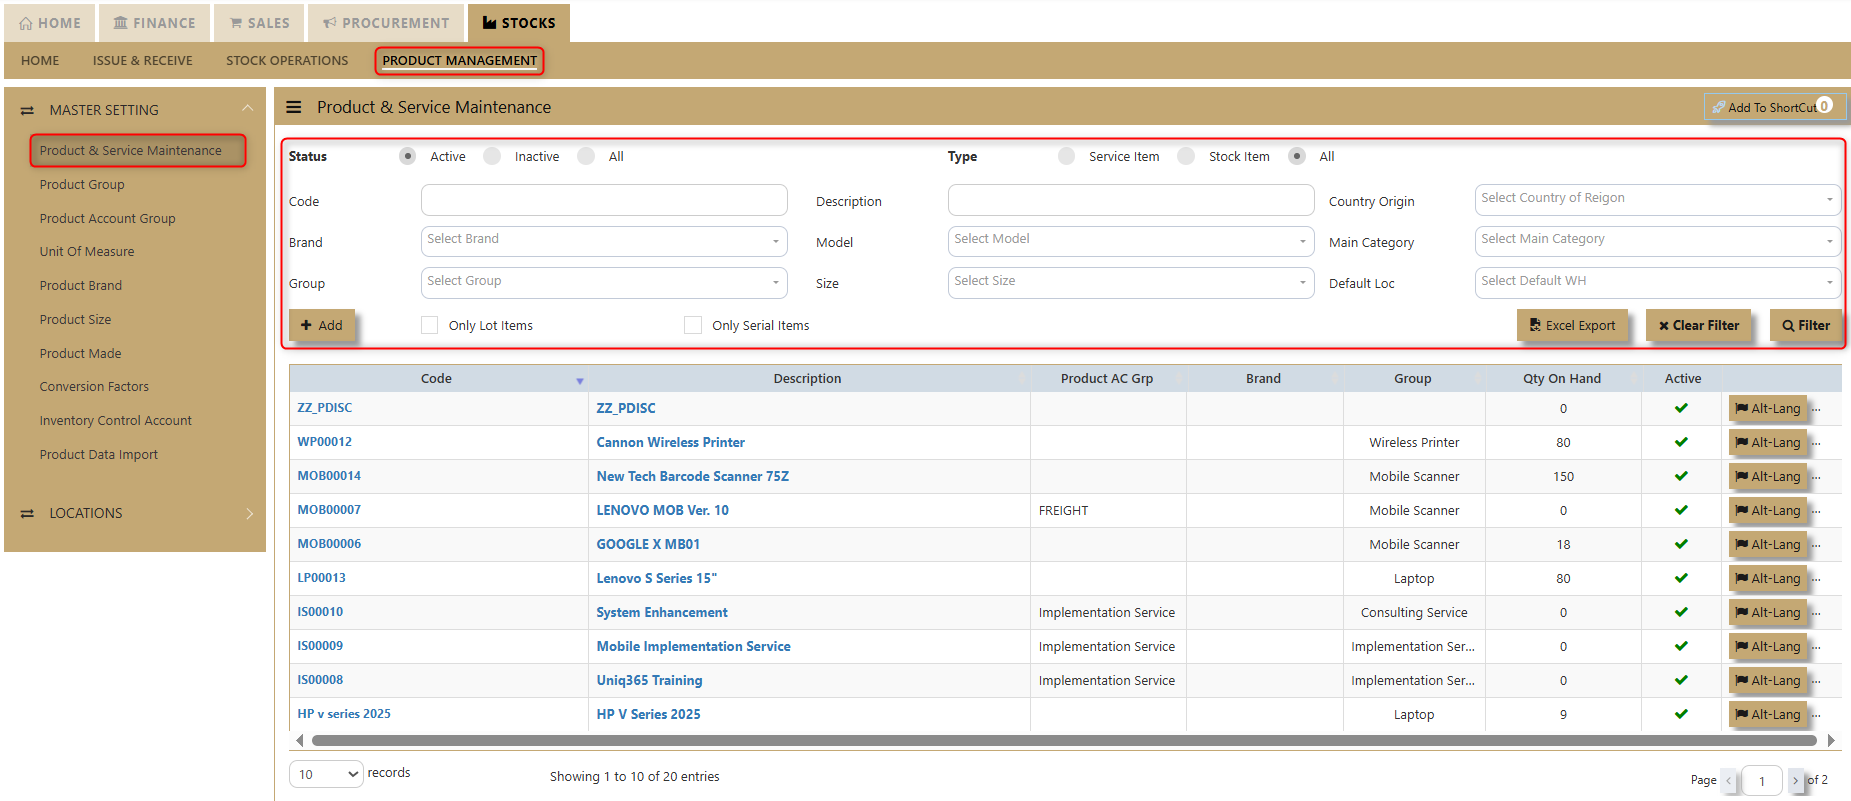
Status Filter -Allows users to choose what status to display in the system interface. Options typically include Active, Inactive, or All.
Type Filter - Used to filter items based on their category, such as stock, service, or all items.
Code, Brand, and Group Filters - Users can input specific product codes, brands, and groups to filter results.
Description, Model, and Size Filters - Allows filtering based on the product description, model, or size.
Country of Origin, Main Category, and Default Location Filters - Users can use these filters to further refine the search by country of origin, main category, or default location.
Excel Export Button - This will let user download all the products and services added within the System and convert into excel format.
How to add new Products and Services in Product & Service Maintenance?

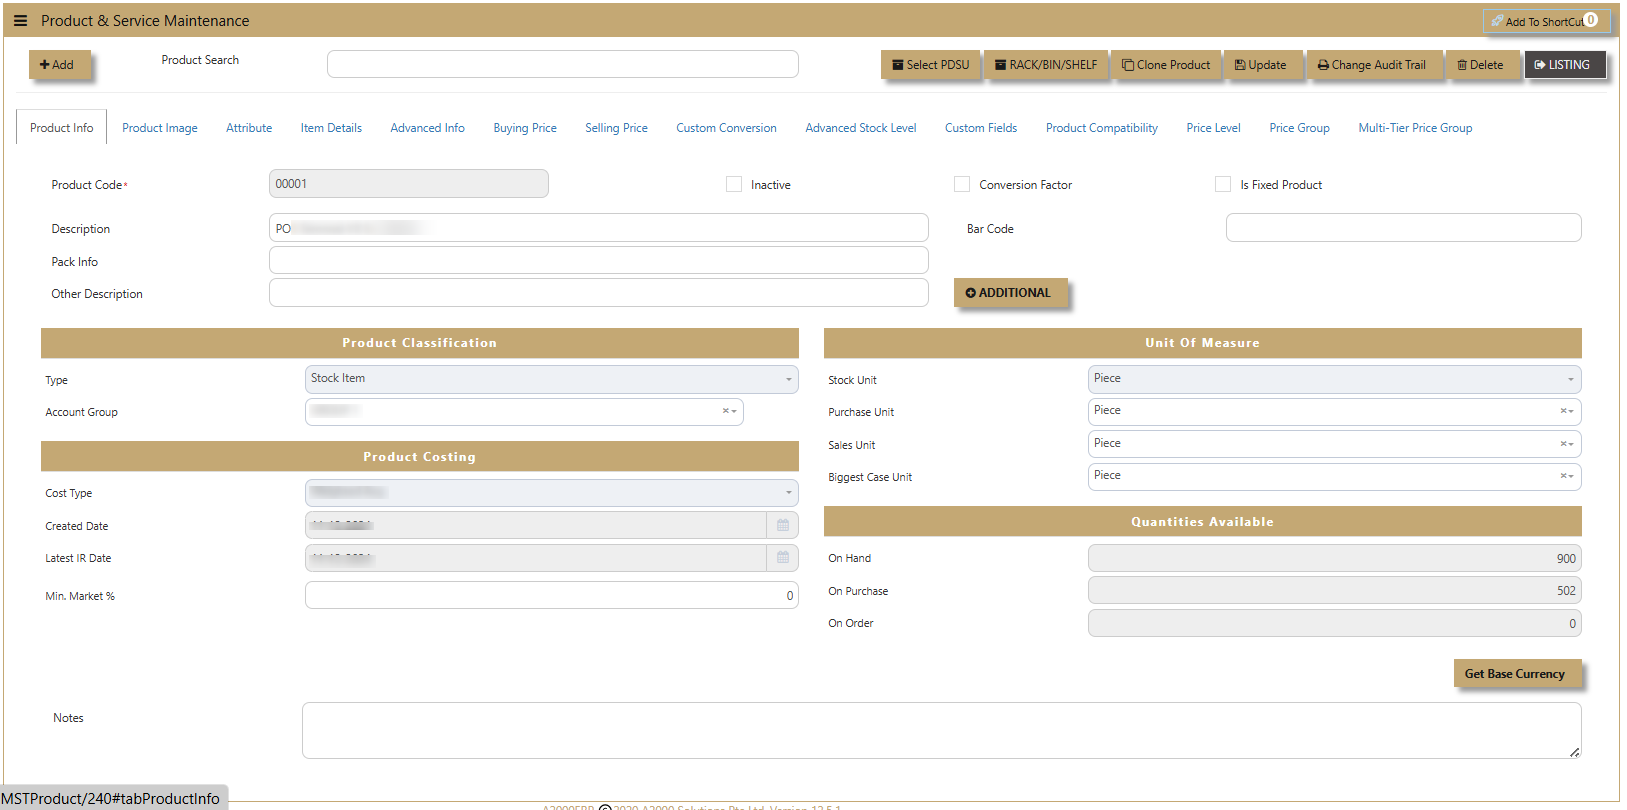
1. Product Info. Click the Add button for new inventory. The user will be redirected to the Product Info page.
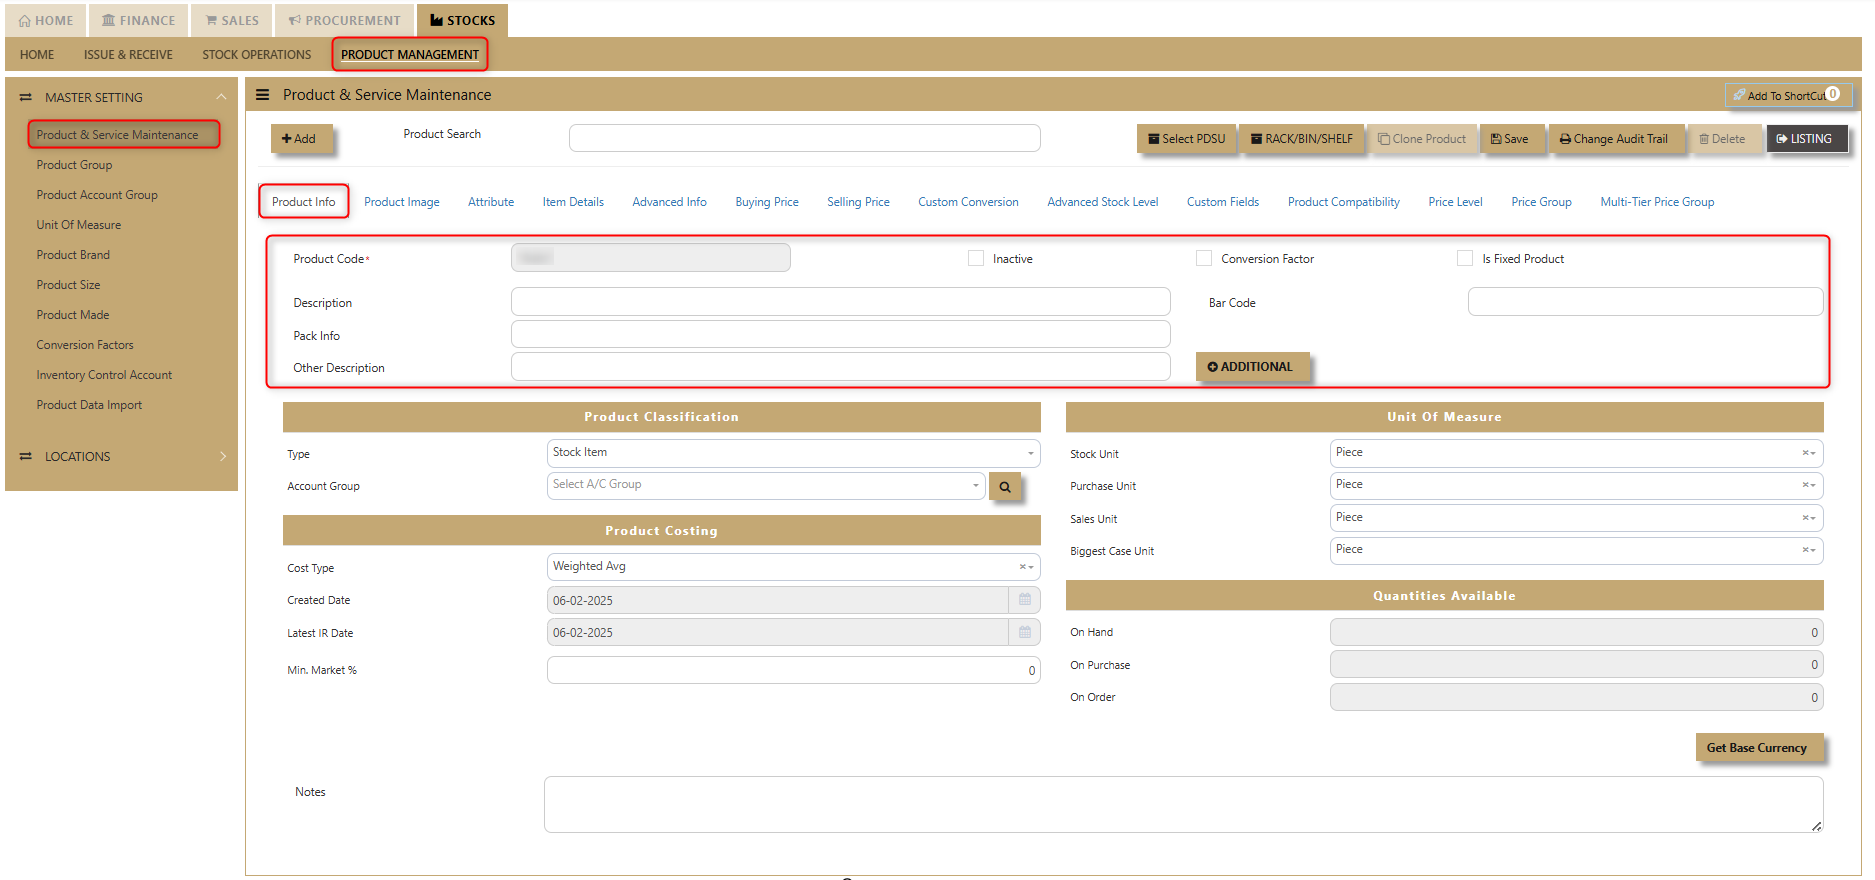
i. Fill in the following components:
Product Code - The code for the new product is autogenerated by the system.
Description - Enter the product name (maximum 50 alphanumeric characters).
Pack Info - Enter any relevant pack information.
Other Description - Enter additional details (unlimited lines, maximum of 40 alphanumeric characters per line).
Barcode - Enter the product barcode
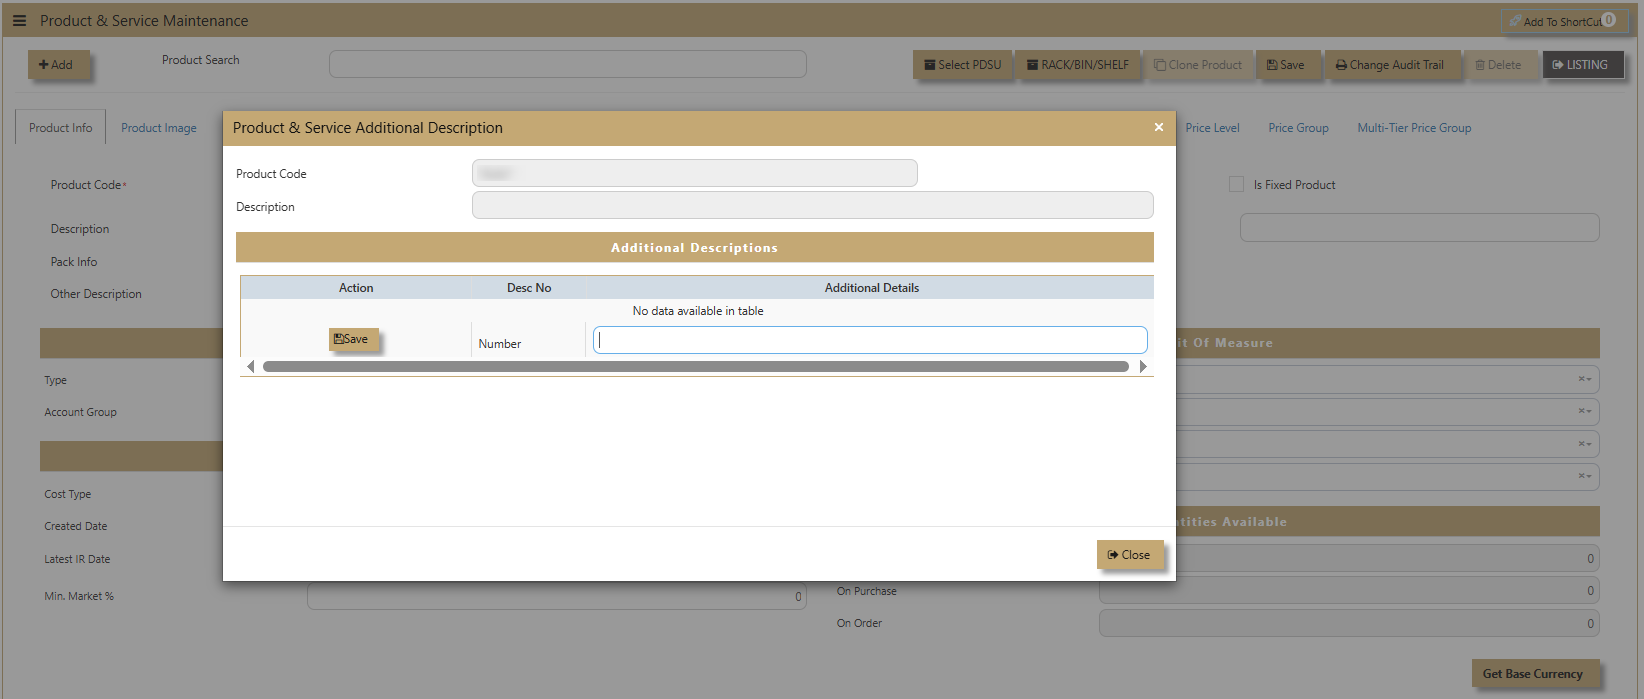
ii. Click the Additional button if there is extra information to link with the new product.
2. Product Info - Product Classification. UNIQ365 helps organize and categorize products for better inventory and financial management. It consists of two key components:
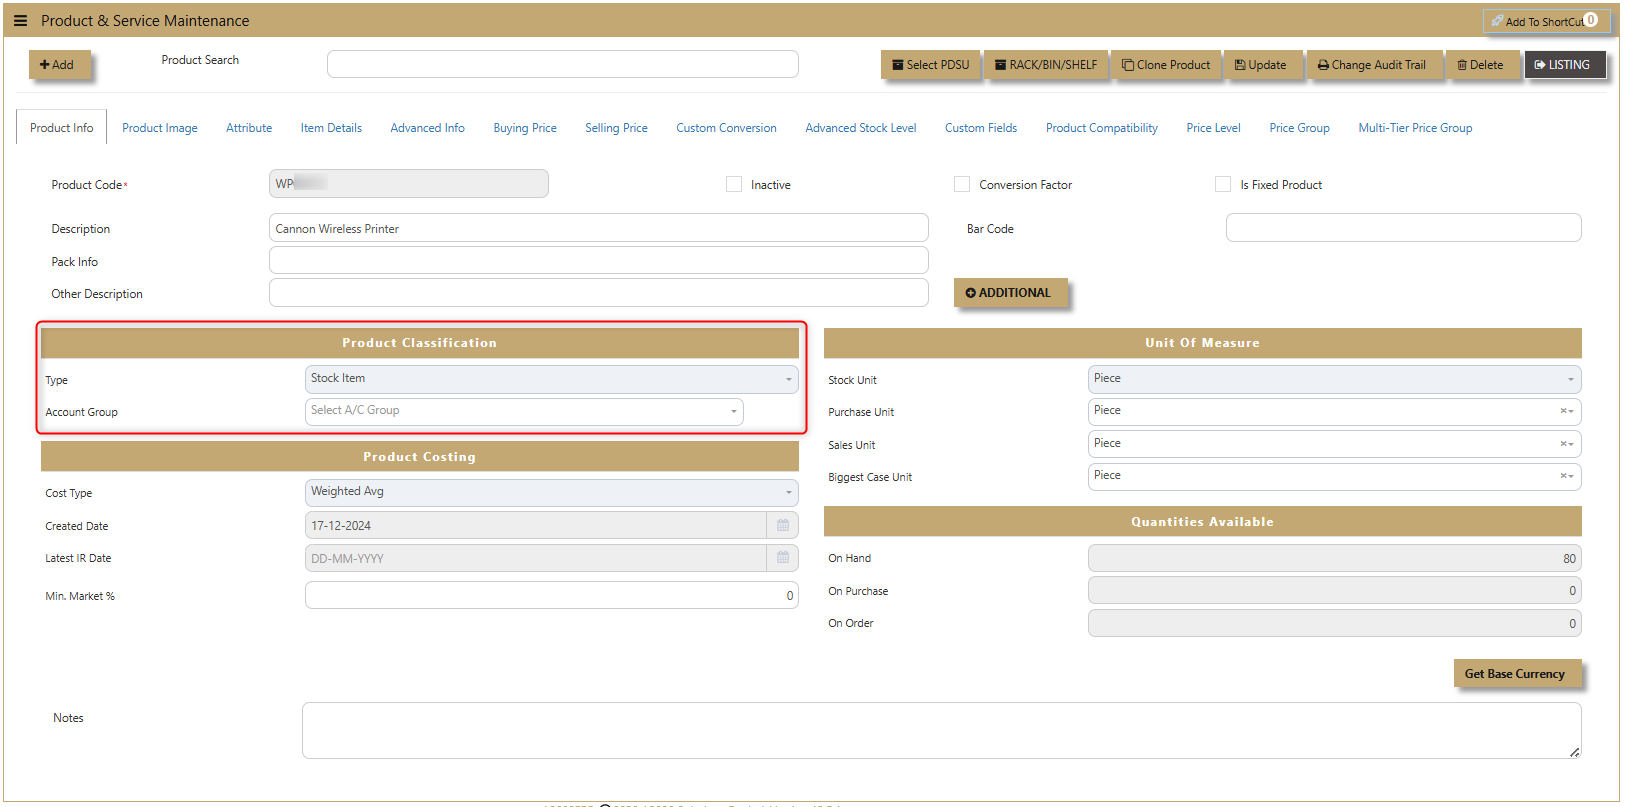
Product Type - Specifies whether the product is a Stock Item or a Service.
Account Group - If any auto account posting depends on Product, then click to select the relevant Accounts Group defined under Inventory/Maintenance/Product Account Group.
Example: Stock-Computer Hardwares, Stock-Softwares, Stock Accessories, Stock-Others.
3. Product Info - Product Costing. UNIQ365 accurately determine and manage the cost of their products, ensuring effective pricing and profitability. This feature plays a key role in cost control, helping to track expenses and set competitive prices.
Note: Please ensure that only one costing type is needed to be attached to all the products.
- Standard Costing. The cost entered in the product master as Standard cost is taken for updating cost of sales.
- Weighted Average. The cost for each product is maintained and the current weighted average cost is used for updating cost of sales.
- FIFO. First In First Out method of costing uses the cost for the first set of available item for updating cost of sales.
- LIFO. Last In First Out method of costing uses the cost for the last set of available item for updating cost of sales.
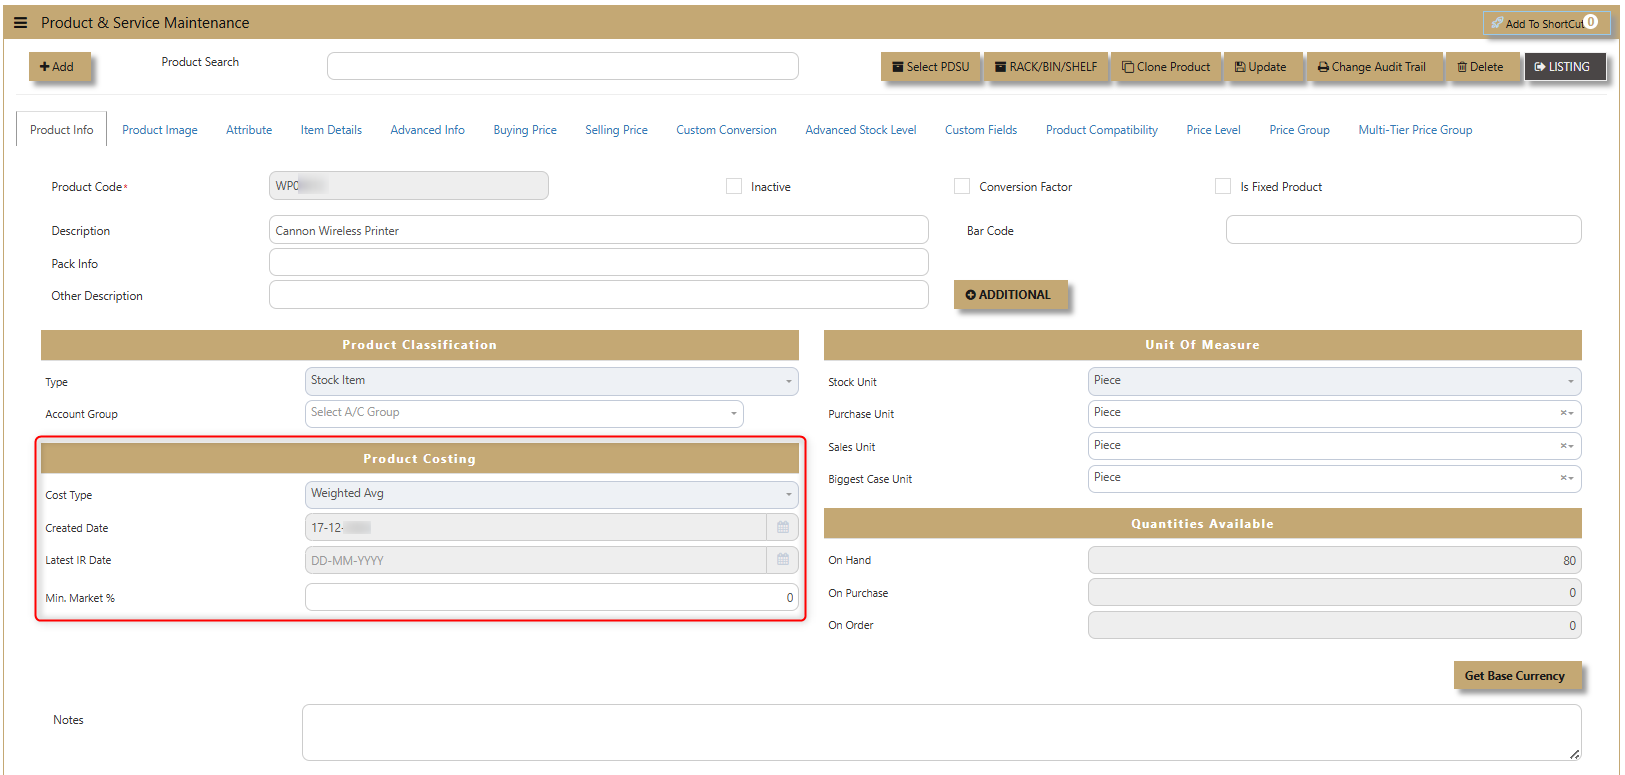
Cost Type - Used by the business process (FIFO, Weighted Average, LIFO & Standard Cost).
Standard - This field is where we set up the Standard cost of the product if Costing type is set to Standard Cost.
Weighted Average - A non-entry field. Displays the Weighted Average cost of the product.'
Created Date - The date the product was added to the system.
Latest IR Date - The most recent Inventory Receipt date.
Min Market % - The minimum market percentage for pricing.
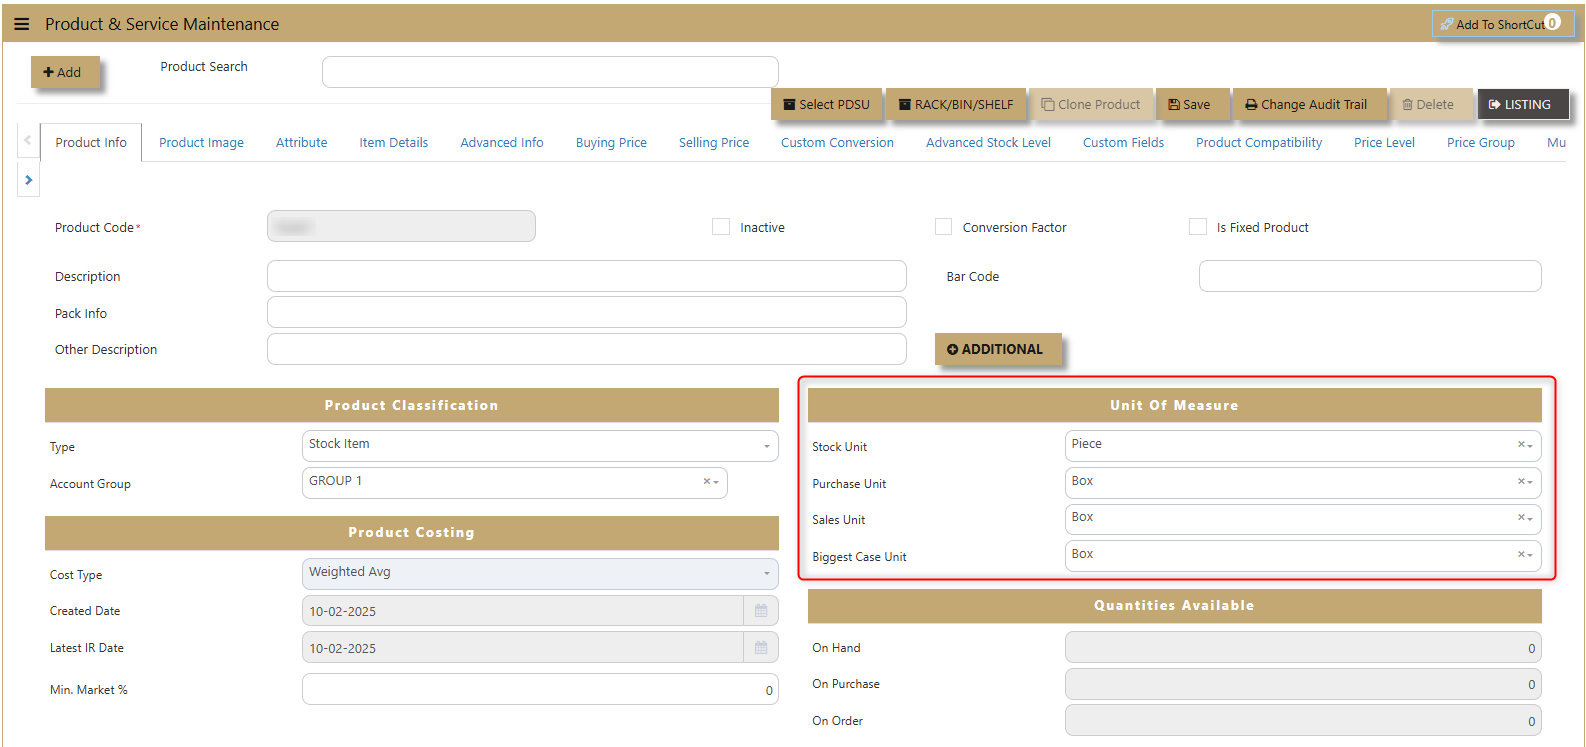
4. Product Info - Unit of Measure (UOM) UNIQ365 used to quantify and track products, such as pieces, boxes, or kilograms. It ensures consistency in inventory management, allowing seamless conversion between units for accurate tracking, pricing, and reporting. This also has its own maintenance tab.
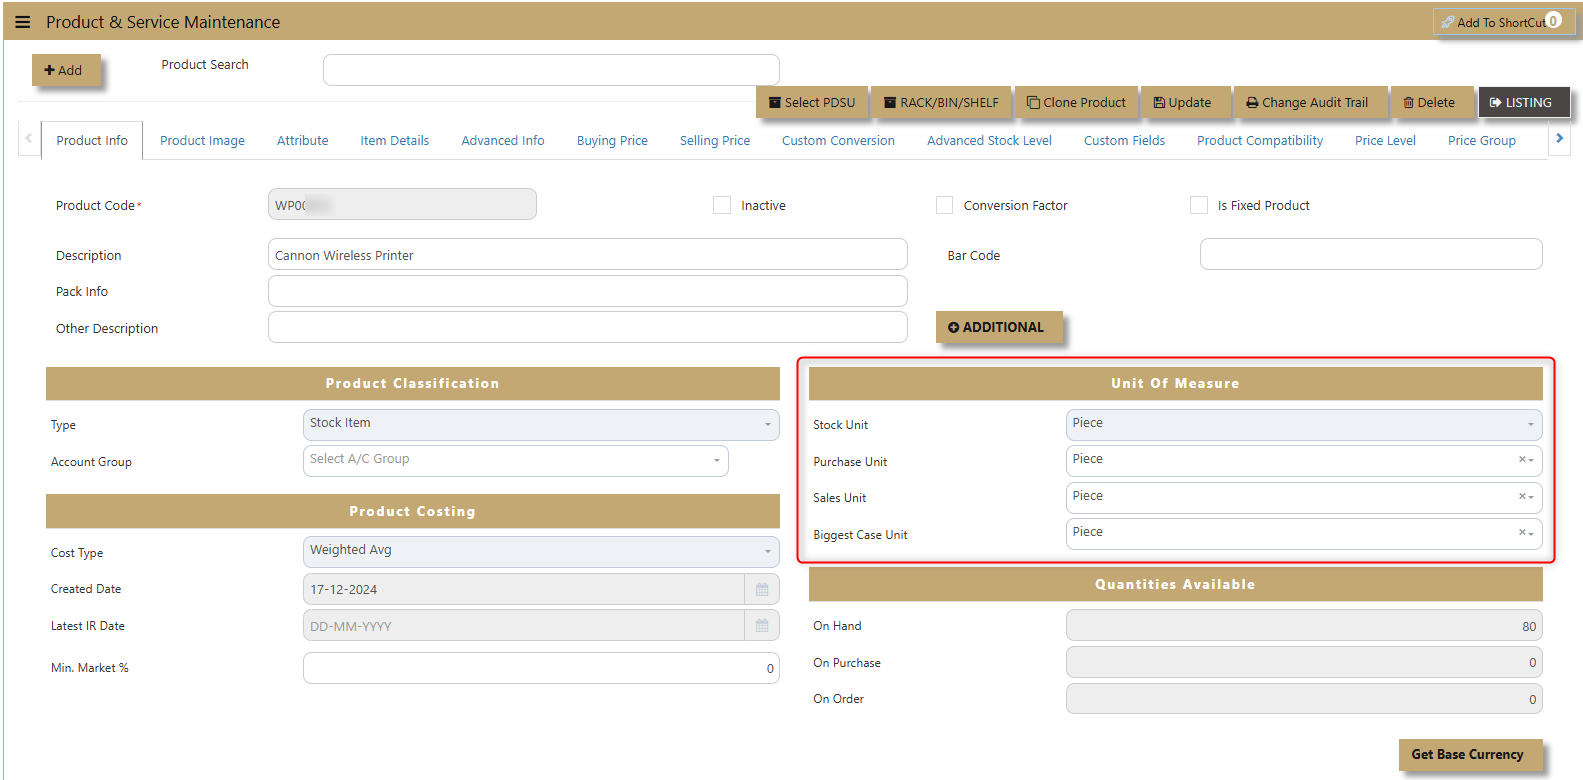
Stock Unit - Enter desired unit of measure for Stock unit. This is the unit that will be used in calculations for quantities in subsequent inventory related reports.
Purchase Unit - If different from Stock Unit a Stock Conversion Factor record must exist.
Sales Unit - If different from Stock Unit a Stock Conversion Factor record must exist.
Biggest Case Unit -The largest packaging unit, used for bulk inventory management and converting stock quantities into larger cases or cartons.
5. Product Info - Quantities Available. In UNIQ365 the total quantity of a product that is available for use, sale, or inventory tracking, taking into account various stages of the product lifecycle. It helps businesses monitor and manage stock levels efficiently. Its 3 components have non-entry field.
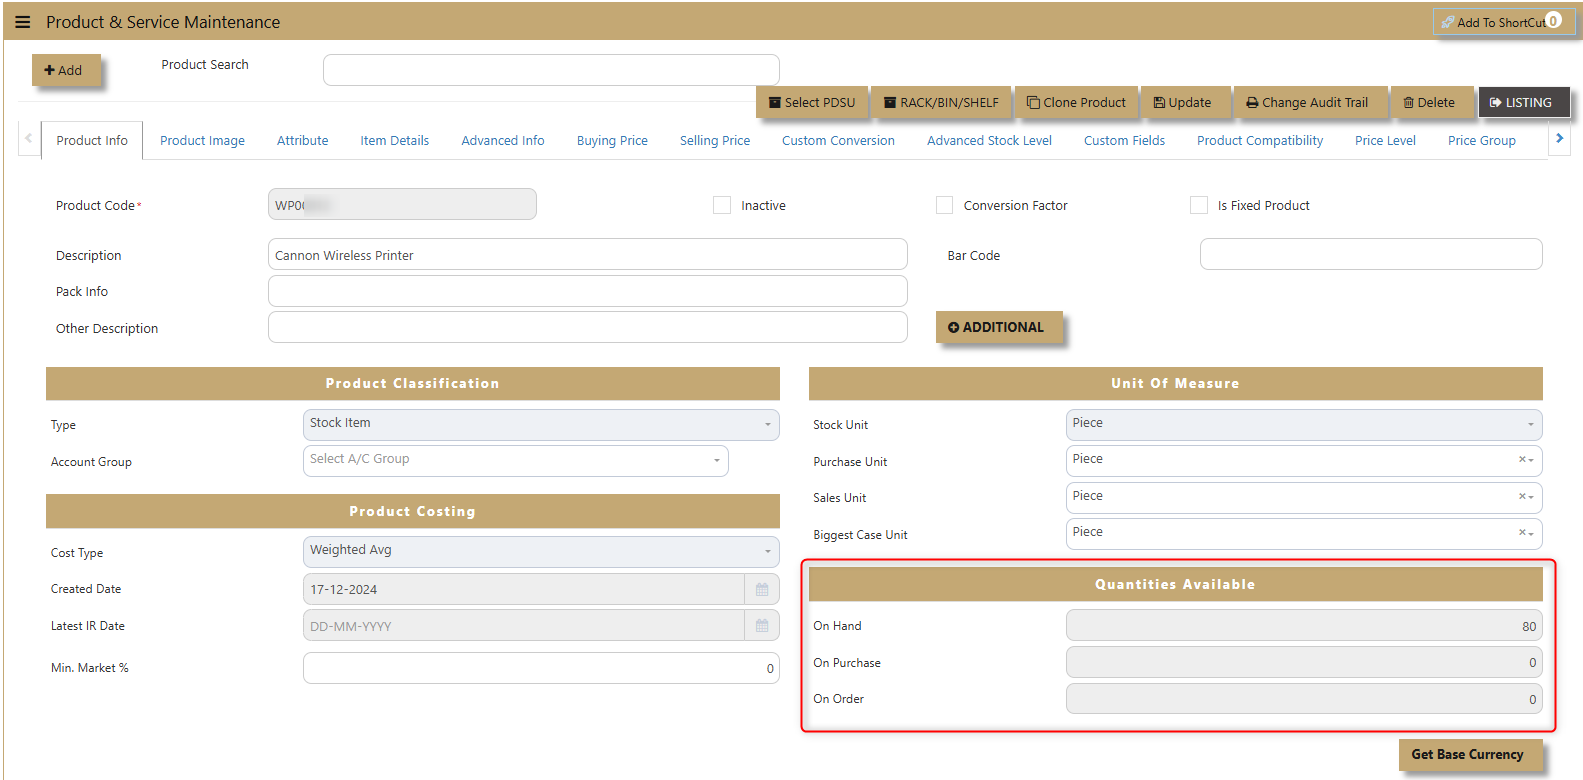
On Hand - The quantity of the product currently in stock and physically available in the warehouse or storage.
On Purchase -The quantity of the product that has been ordered from suppliers but has not yet been received.
On Order -The quantity of the product that is pending or backordered and is expected to be delivered in the future.
How to use Product Image?
Product Image. allows users to upload a picture for each product, helping with visual identification and inventory management.
How to setup Attribute?
1. Attribute. Allows businesses to define specific product variations with specialized attributes for better management and tracking. When dealing with products such as serialized items, dimensional UOM (Units of Measure), working assets, and items with expiry dates, businesses can configure these attributes to ensure accurate tracking and control.

Serialized Item – Tick for products that need to track serial numbers.
Dimensional UOM – Products can be managed based on dimensions (e.g., weight, volume).
Working Assets – Items that are part of the company's assets can be tracked for maintenance or depreciation.
Tracking Expiry Date – Useful for goods with expiry, ensuring items are sold or used before they expire.
Unique ID Items – Every item can be assigned a unique identifier for precise tracking.
Duty-Free – For products exempt from duties or taxes, helping with proper classification.
Lot Item – Tick for products that need lot tracking.
Rebate Items – Items that come with discount/rebate options, facilitating financial tracking and reporting.
How to use Serial Item Tracking?
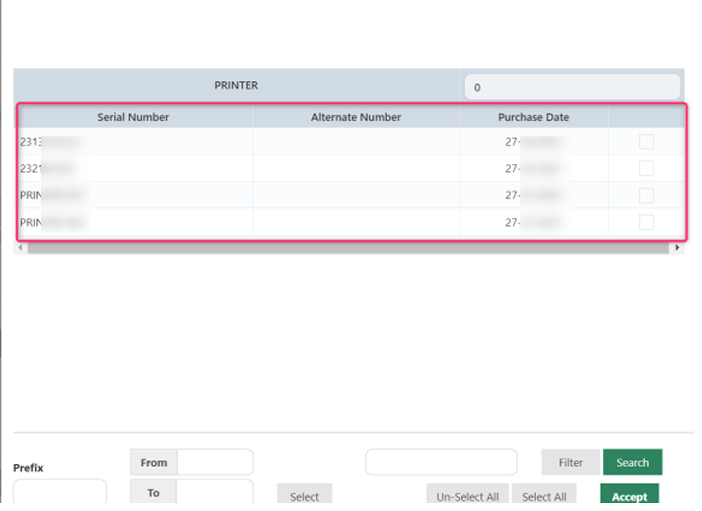
If the product is to be attached with a serialized number, click the box as shown in below screen.

An example of using this feature is the tracking of expensive product, which user may want to monitor for warranty purposes. Many companies maintain the unique serial numbers of Hard Disk Drives, Laser Printers etc and use them for control of movements.
Once a product is designated as Serial Type, every time a transaction involving this product is invoked, the serial number list will appear. Under stock-in transaction like a Purchase Invoice entered below, a list of serial numbers needs to be entered.
Serial numbers may also be entered using a range of serial numbers too. These must be numerical numbers so that a running sequence is possible. Clicking the check-box for “Range of Serial No” will enable the entry of a number range. Once the correct number of serial numbers is inputted, the button “Accept” will be enabled so that user can proceed on the transaction.
Conversely under a stock-out like sales invoice D/O, the system will prompt you to pick an available serial number to perform the stock out. An example below is a sales invoice picking out serial numbers: -
The option for serialized item is based on the following assumptions: -
- The Stock Unit is the same as Sale & Purchase Units. If any of the units are different in the product master,
the tick box for Serial Type will be disabled. - The item must be a Stock Item. If a Service Item is selected, the Serial Type box will also be disabled.
- No negative stock is permitted for serialized item
2. Attribute - Optional. This provides users with the flexibility to fill out additional details about products based on their specific needs. These fields allow for more granular product information, enabling businesses to customize their product records.
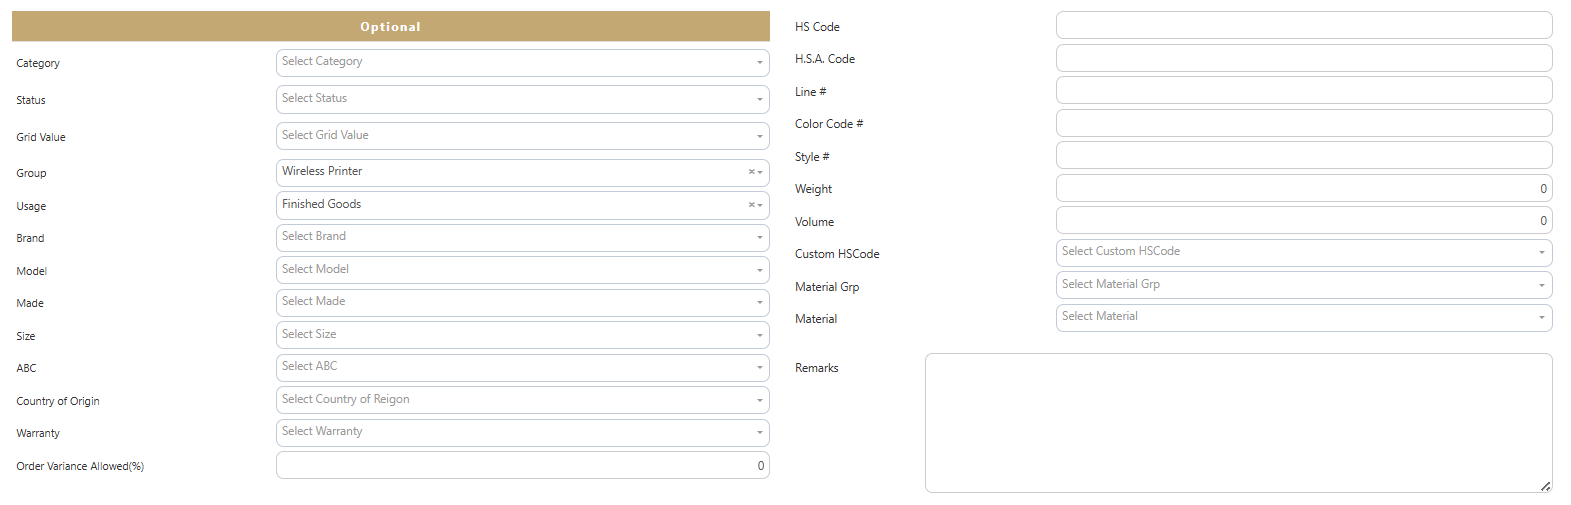
Category - classifies the product under a specific group
Status - indicates the current state of the product (e.g., active, inactive)
Grid Value - a specific reference or pricing value for the product.
Group - product classification based on groups usually maintained on its own tab.
Usage - describes how the product is intended to be used (e.g., Raw Material, Assembly, Finished Goods & Others)
Brand, Model, Made, Size - specifies the brand, model number, manufacturing details, and size of the product defined in its own tabs in Products & Service Maintenance.
ABC - represents the product's classification.
Country of Origin - specifies the product's country of manufacture or origin.
Warranty - provides details about the product’s warranty.
Order Variance Allowed - indicates if variations in orders are permitted.
Color Code #, Style # - refers to the color code and style identification of the product.
Line # - refers to the specific line in a product order.
HS Code, HSA Code, Custom HS Code - a classification code used for customs and international trade.
Weight, Volume - the physical weight & volume of the product.
Material Group - details the material grouping for the product.
Material - specifies the material composition of the product.
Remarks - allows for additional notes or comments.
How to use Item Details?
Item Details. Allows users to add additional information about products, providing a more comprehensive product record.
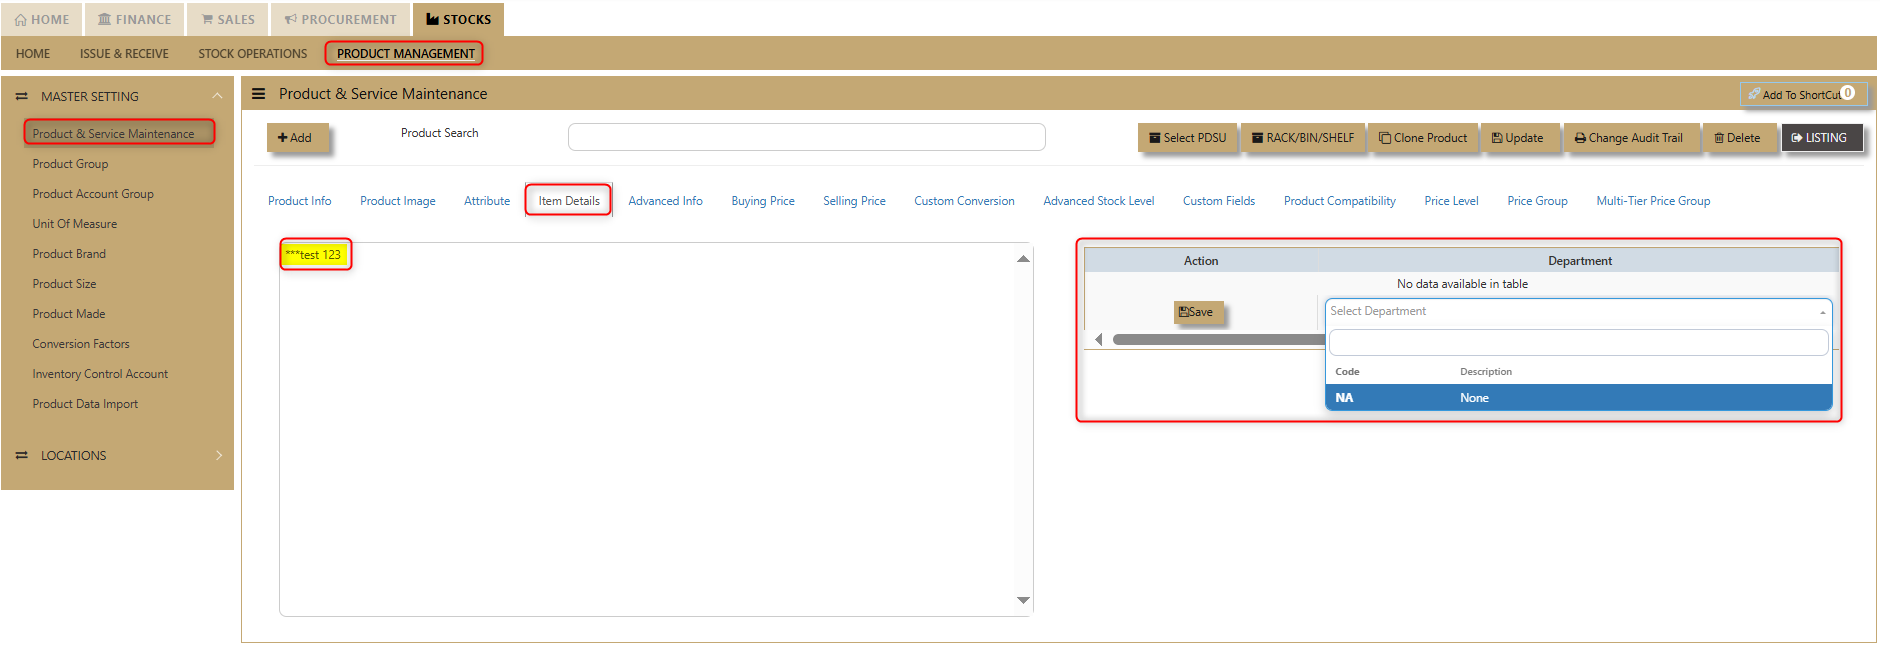
This feature enables businesses to capture key details such as the department responsible for managing the product, along with any other relevant data. By using this tab, users can ensure that all necessary product information is organized and easily accessible for efficient inventory management and reporting.
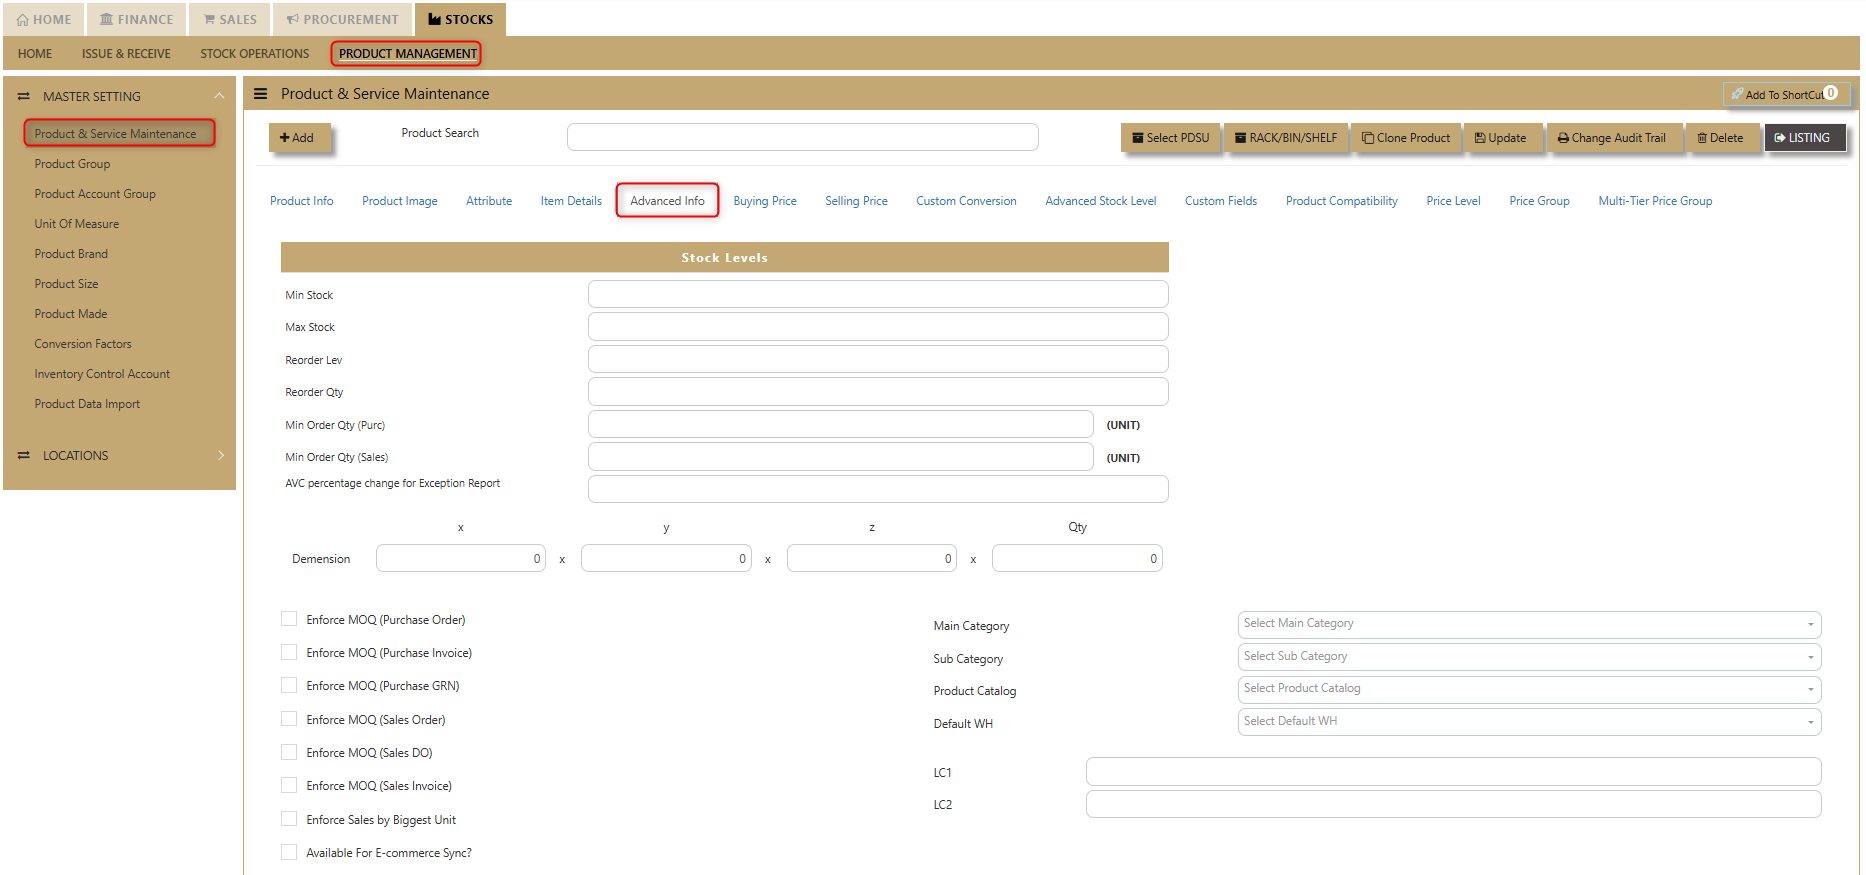
How to use Advanced Info?
To enter Stock Levels. This section allows users to define critical stock parameters, including the Min Stock, Max Stock, Reorder Level, Reorder Qty, Min Order Qty (Purchase), Min Order Qty (Sales), and AVC Percentage Change for the Exception Report. These values help track inventory thresholds, ensuring timely restocking, monitoring stock performance, and identifying exceptions that may require attention.
How to use Buying Price?
This feature allows users to manage essential product and service details, including Def Supplier, Price Type, Currency, Purchase Price, Last Purchase, IMG Group, and Purchase GST Type. It ensures seamless updates of purchasing information, helping businesses track supplier details, pricing, taxes, and inventory with accuracy for optimized procurement and service management.
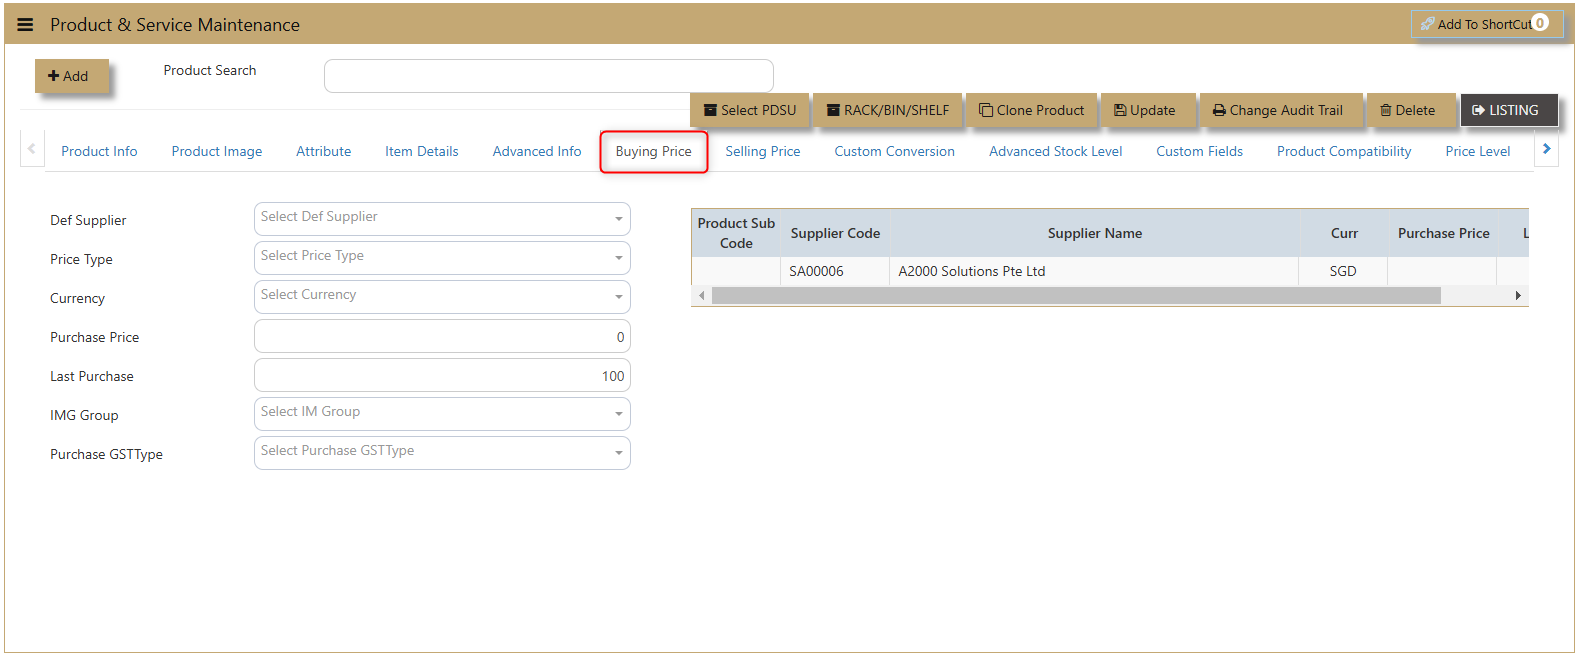
Def Supplier – Select the Supplier that this product is normally purchased from.
Price Type – Select any of the following: - Purchase Price, Last Purchase Price. (Note: Under Supplier Maintenance, if the Price Type selected is “Product Setting”, then the Price Type listed here will take effect when a Purchase transaction is made.)
Currency – Select the currency that this product is normally priced.
Purchase Price – Enter the appropriate price for this product.
Last Purchase – This field is automatically updated by the system, capturing the last Purchase price that this product was billed out.
IM Group – Select the Group defined in Inventory/Maintenance/Product IM Group.
How to use Selling Price?
This feature enables users to set and manage detailed selling price information, including Price Type, Currency, List Price, Discount (%), Retail Price, Dealer Price, Promotion/POS, Last Selling Price, Min Price Exclusive, Min Price Inclusive, IMG Group, MSP, and Sales GST Type. It provides a comprehensive approach to pricing strategies, allowing businesses to define and update pricing structures, discounts, and taxes efficiently for optimized sales and promotions.
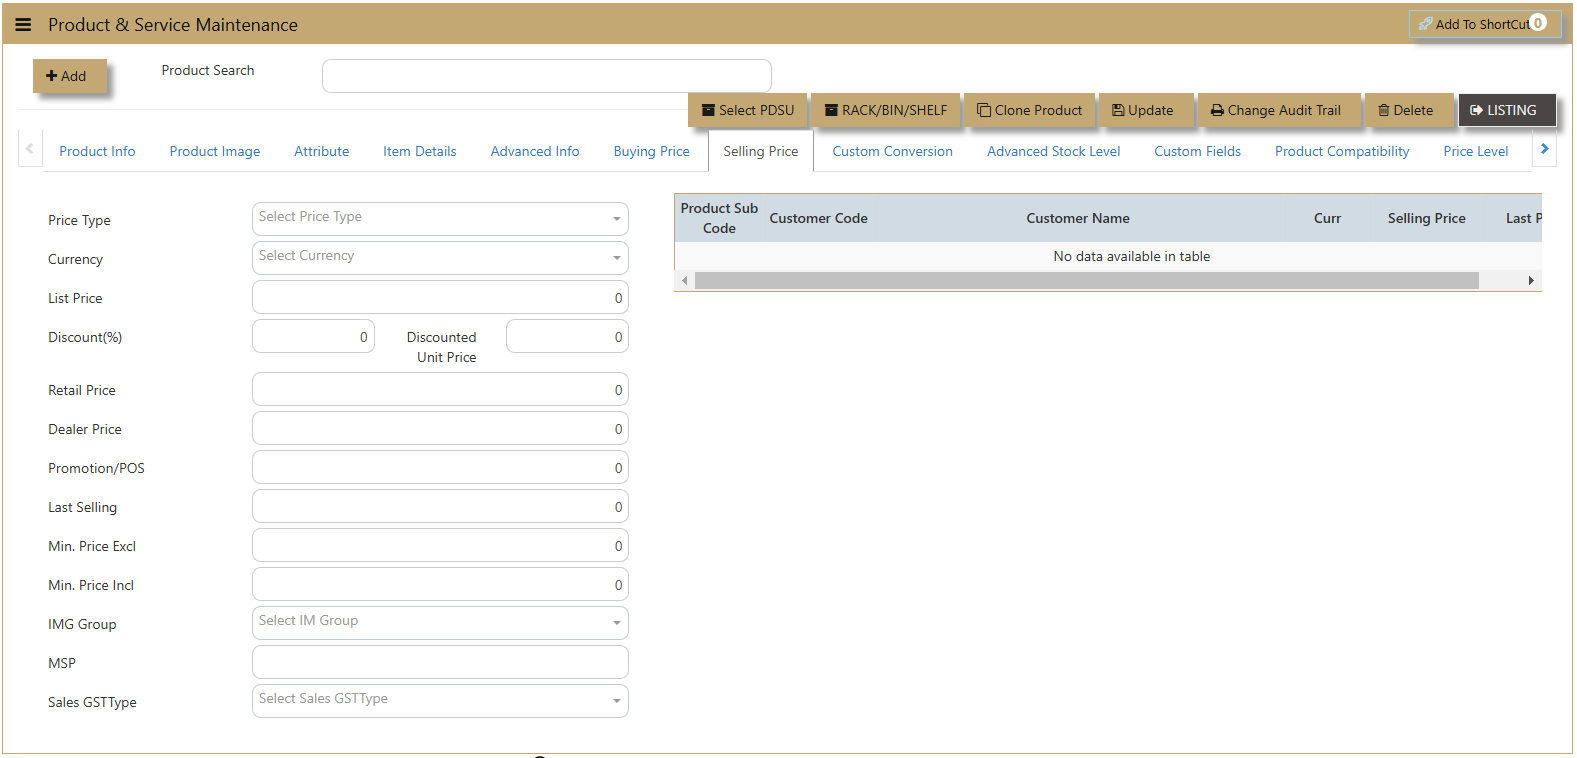
Price Type – Select any of the following: - List Price, Retail Price, Dealer Price, Promotion Price, Last Selling Price or Minimum Price. (Note: Under Customer Maintenance, if the Price Type selected is “Product Setting”, then the Price Type listed here will take effect when a Sales transaction is made.)
Currency – Select the currency that this product is normally priced.
List Price / Retail Price / Dealer Price / Promotion / Min. Selling – Enter the appropriate prices for this product under different pricing scales here.
Last Selling – This field is automatically updated by the system, capturing the last Selling price that this product was billed out.
IM Group – Select the Group defined in Inventory/Maintenance/Customer Supplier IM Group.
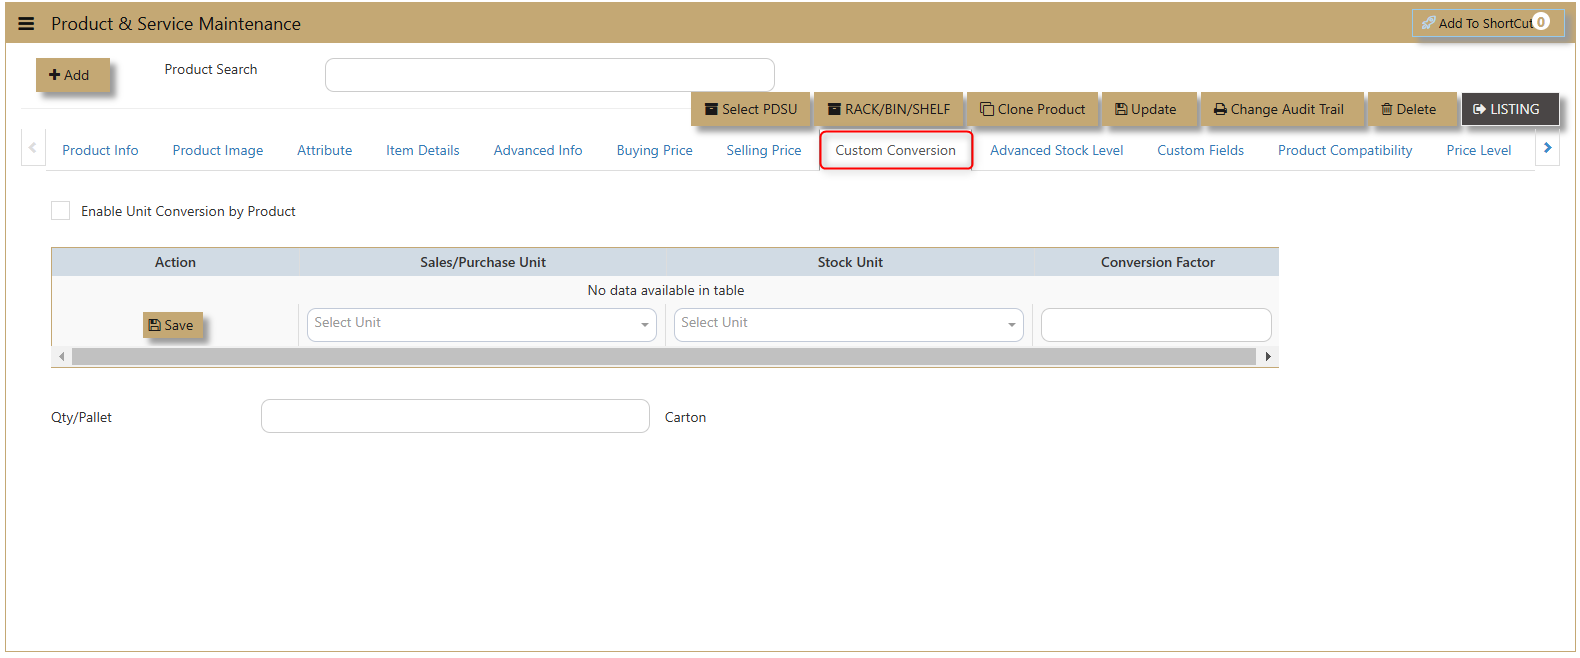
What is Custom Conversion?
Custom Conversion Tab allows users to configure and manage custom conversion settings tailored to their business needs. This feature is demonstrated on its dedicated tab, providing an intuitive interface for easy access and application of custom conversion rules to enhance workflows and data accuracy.
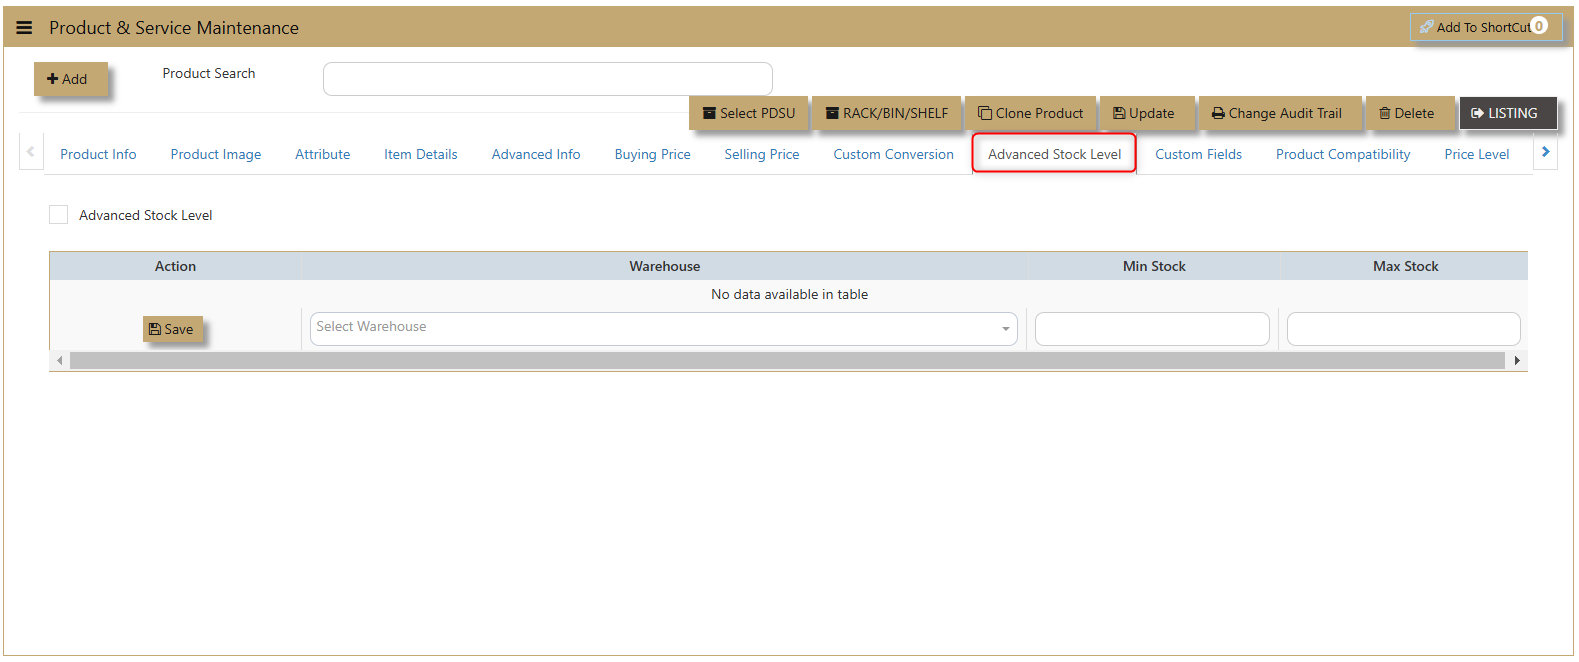
What is Advanced Stock Level?
The Advance Stock Level feature allows users to set and manage stock levels by warehouse. Users can define the Minimum and Maximum stock for each warehouse, ensuring optimal inventory control across multiple locations for efficient stock management and timely replenishment.
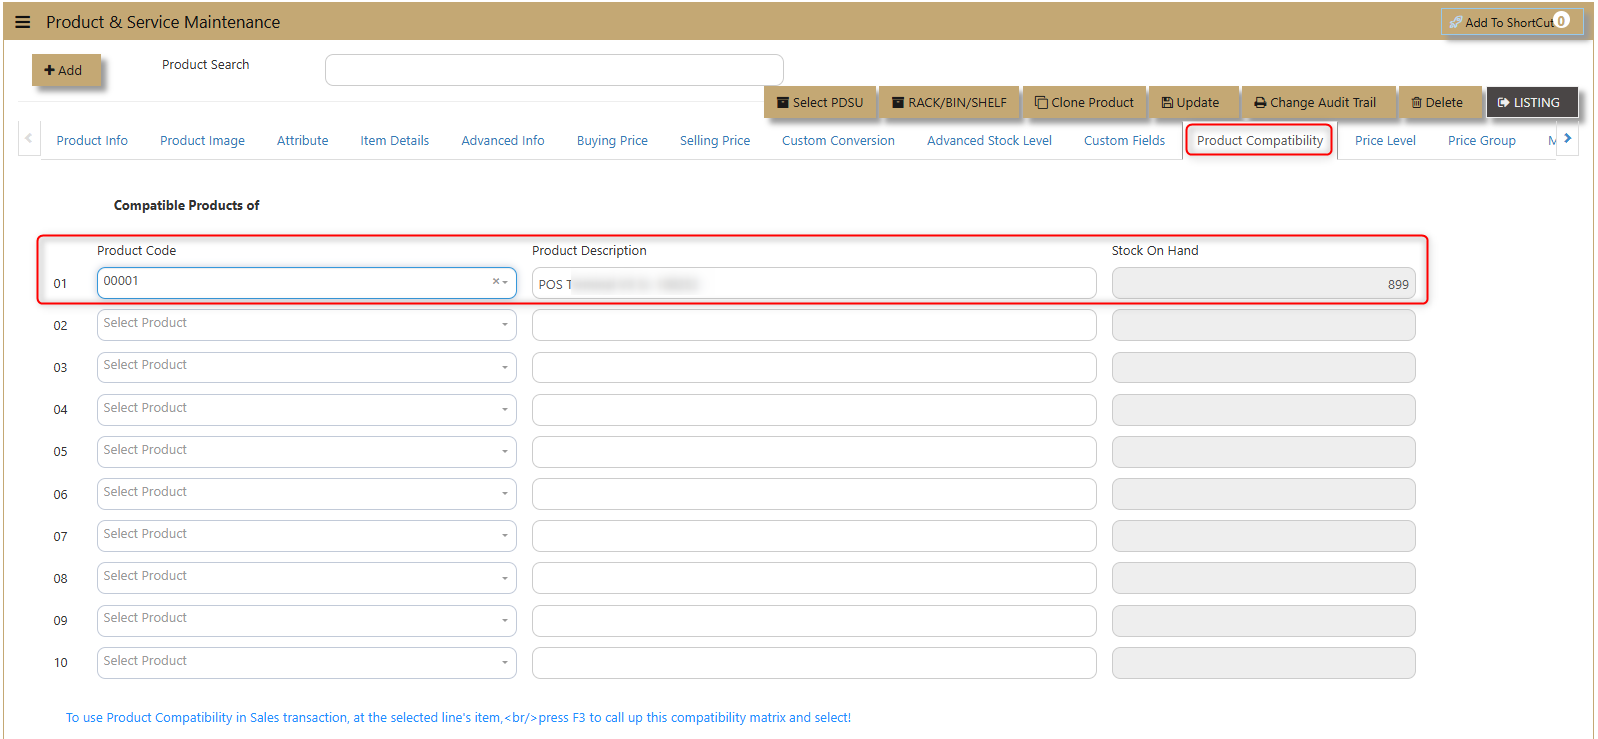
How to use Product Compatibility?
This feature lets users enter a Product Code, and the system will automatically retrieve the corresponding Product Description and display the available Stock on Hand. This simplifies inventory management and ensures accurate product details for smooth operations.
How to use Price Level?
This pricing technique is commonly used in Distribution and Consignment business.
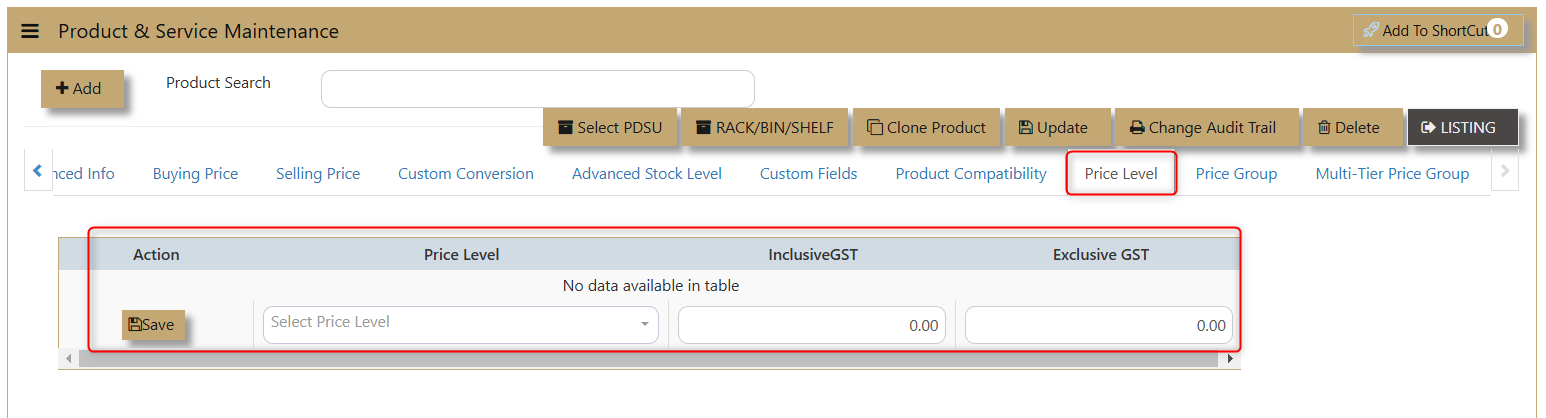
1. Setup.
- The ID plays an important role in both customer and product setup.
- The system will auto-get the Unit price from Product maintenance and a subsequent Line discount will be auto-get from Customer maintenance.
- The system will auto-get the Unit price from Product maintenance and a subsequent Line discount will be auto-get from Customer maintenance.
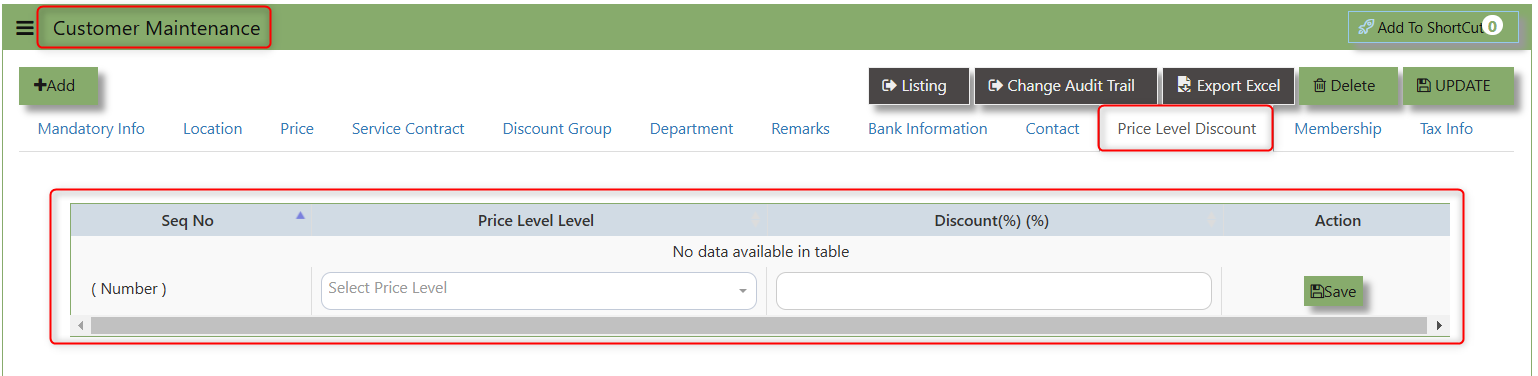
2. Matching of Price Level.
To set the price level in both customer and product maintenance.
- Go to Price Level Discount tab of the customer maintenance to set. then, go back to Price Level Discount tab of the product maintenance to set.
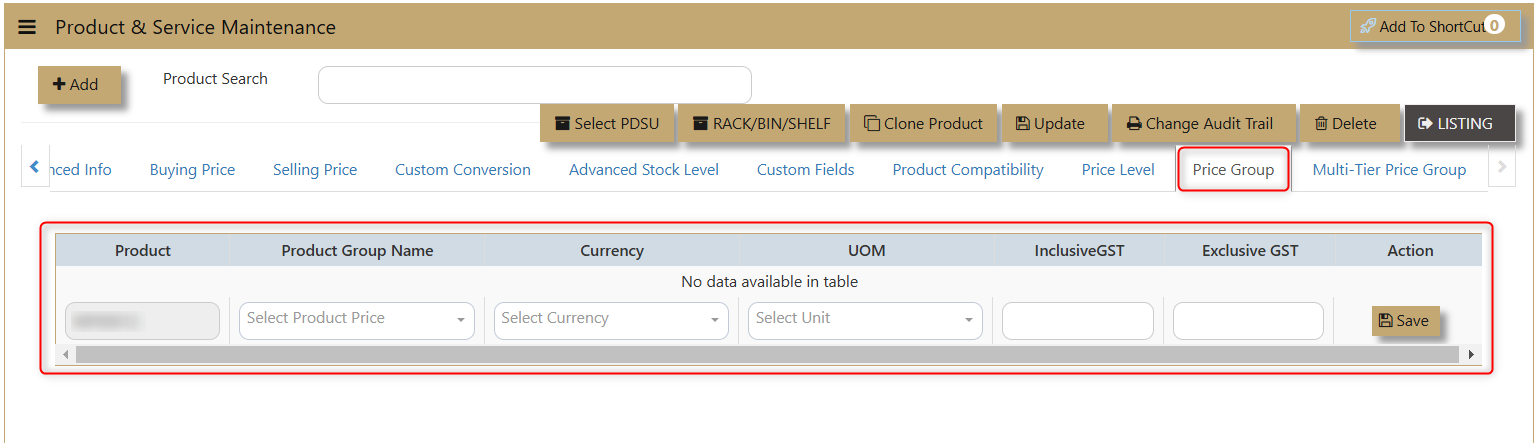
How to use Price Group?
The Price Group feature allows users to view and manage product details, including Group Name, Currency, UOM (Unit of Measure), and both Inclusive GST and Exclusive GST pricing. Users can easily update and save these details for accurate and streamlined pricing management.
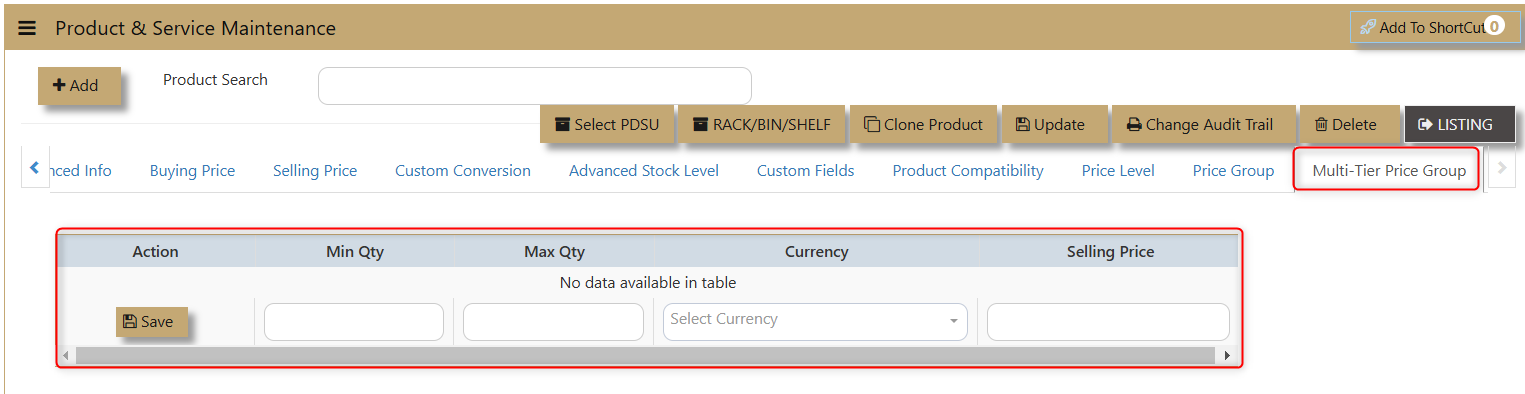
How to use Multi-Tier Price Group?
To set the minimum and maximum quantity for the default price and currency within the bracket. The process on this feature will be discussed further on Customer Maintenance since it is connected to it.
Product Group
How to Create Product Group?
- Click on Stock – Product Management – Product Group icon for the following screen.

2. Enter the Product Groups as per the above example.
Important: Product groups are mainly used as additional analysis tool for various reports in the system. Some of the most commonly used reports are Sales Analysis-Product Group Wise and Inventory reports that can be sorted by Product groups.
Product Account Group
How to Set-up Product Account Group?
a. Click on Stock – Product Management – Product Account Group icon for following screen.
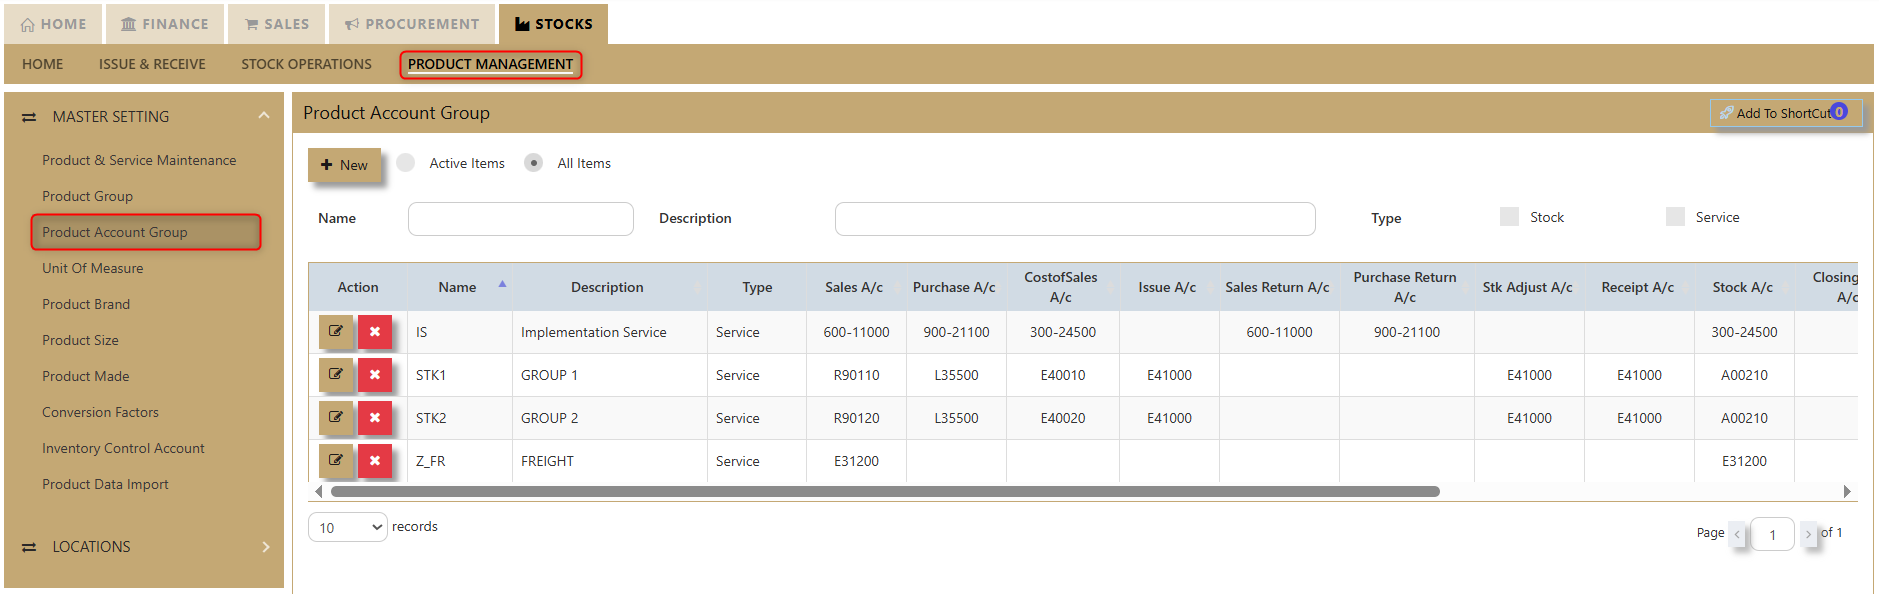
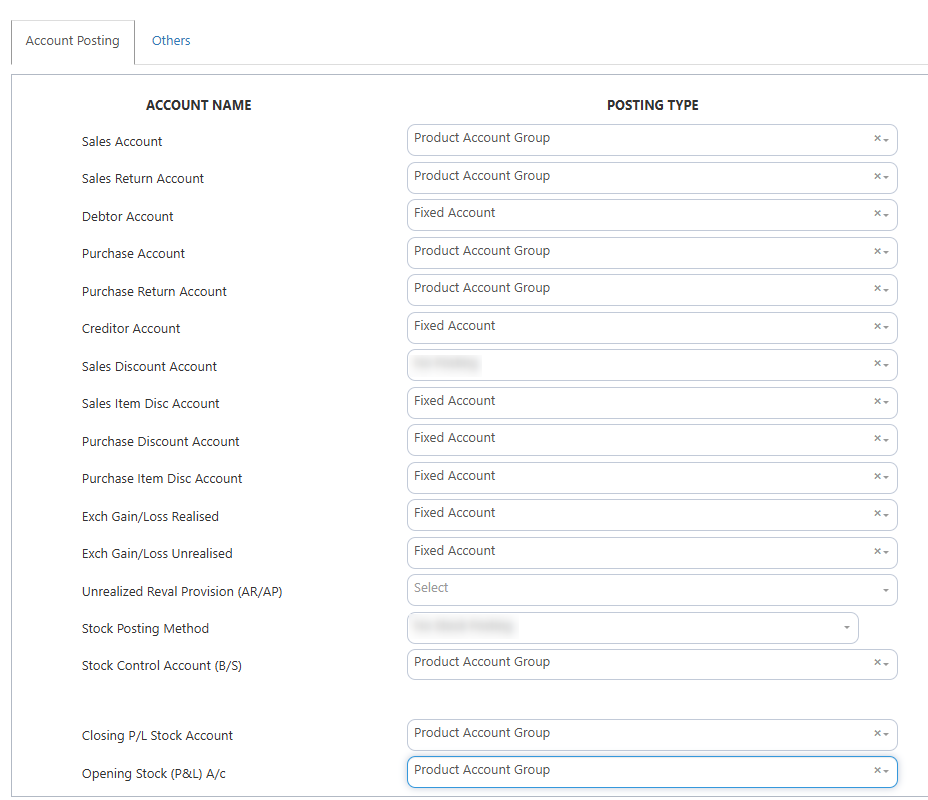
This setup is mandatory when the posting type selected in the Inventory Account Posting Settings is configured as by Product Account Group. To verify or configure this setting, users should navigate to their system settings and access Account Posting Settings.
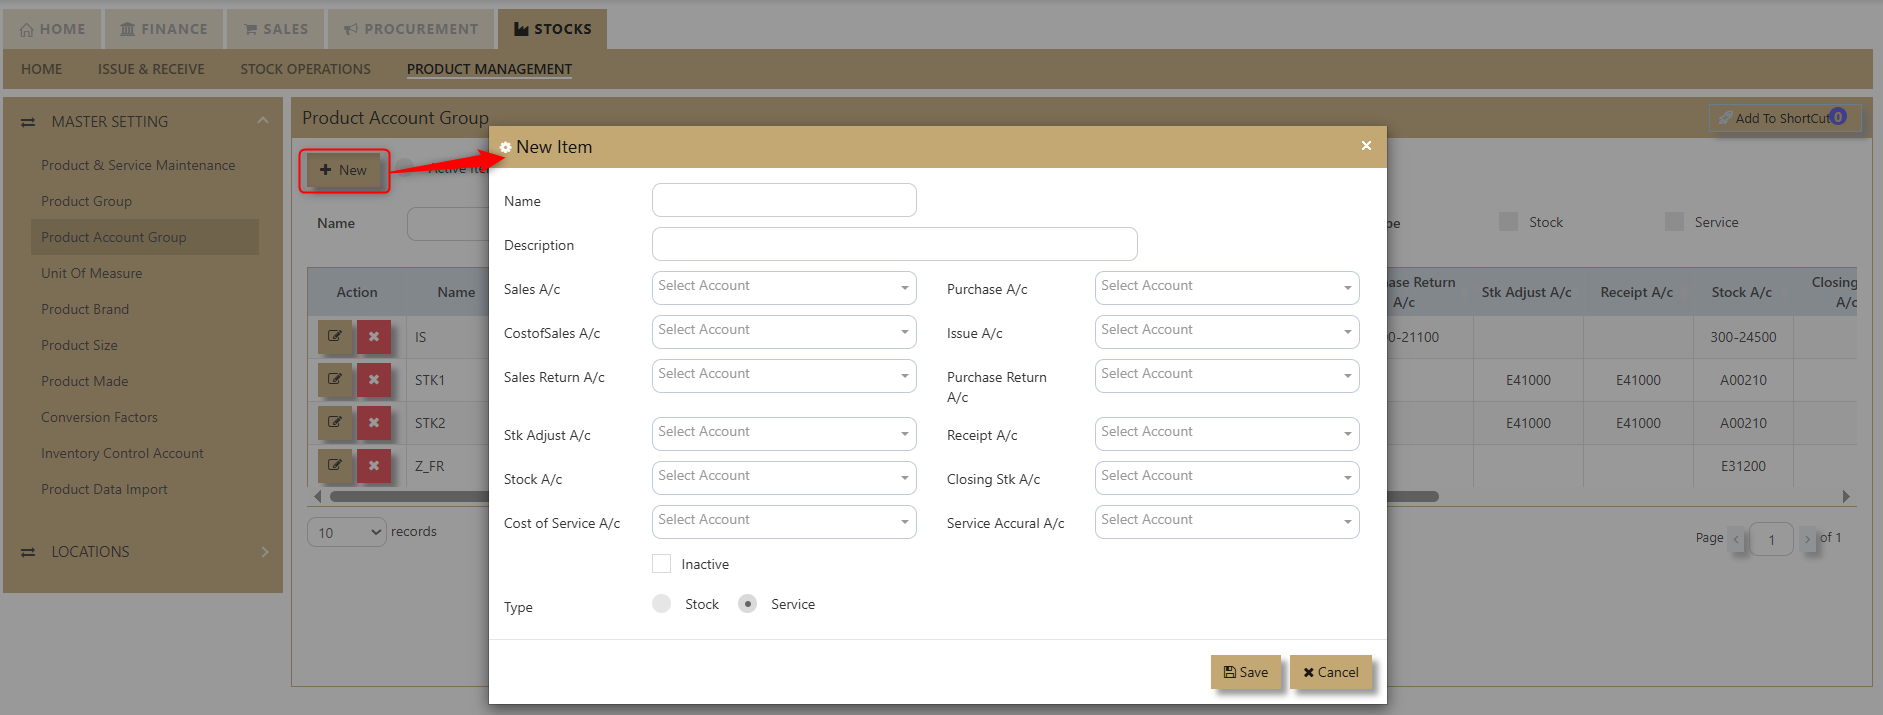
b. How to Add a New Item to Your Product Account Group
-
Click the New Icon:
In the upper-left portion of the screen, click the New icon to begin. -
Fill in the Item Information:
A table will appear where you need to enter the following details:- New Item Name
- Description
- Sales Account
- Cost of Sales Account
- Sales Return Account
- Stock Adjustment Account
- Stock Surcharge Account
- Cost of Service Account
- Purchase Account
- Issue Account
- Purchase Return Account
- Receipt Account
- Closing Stock Account
- Service Accrual Account
-
Select Corresponding Accounts:
For each category, choose the appropriate account based on your business processes. -
Select Item Type:
In the 'Type' section, tick the boxes for Service and/or Stock, depending on the nature of your item. -
Mark as Inactive (if applicable):
If the item is no longer in use, you can check the Inactive option. -
Save the Information:
After filling in all the necessary fields, click Save. Your new item will now be added to your product account group.
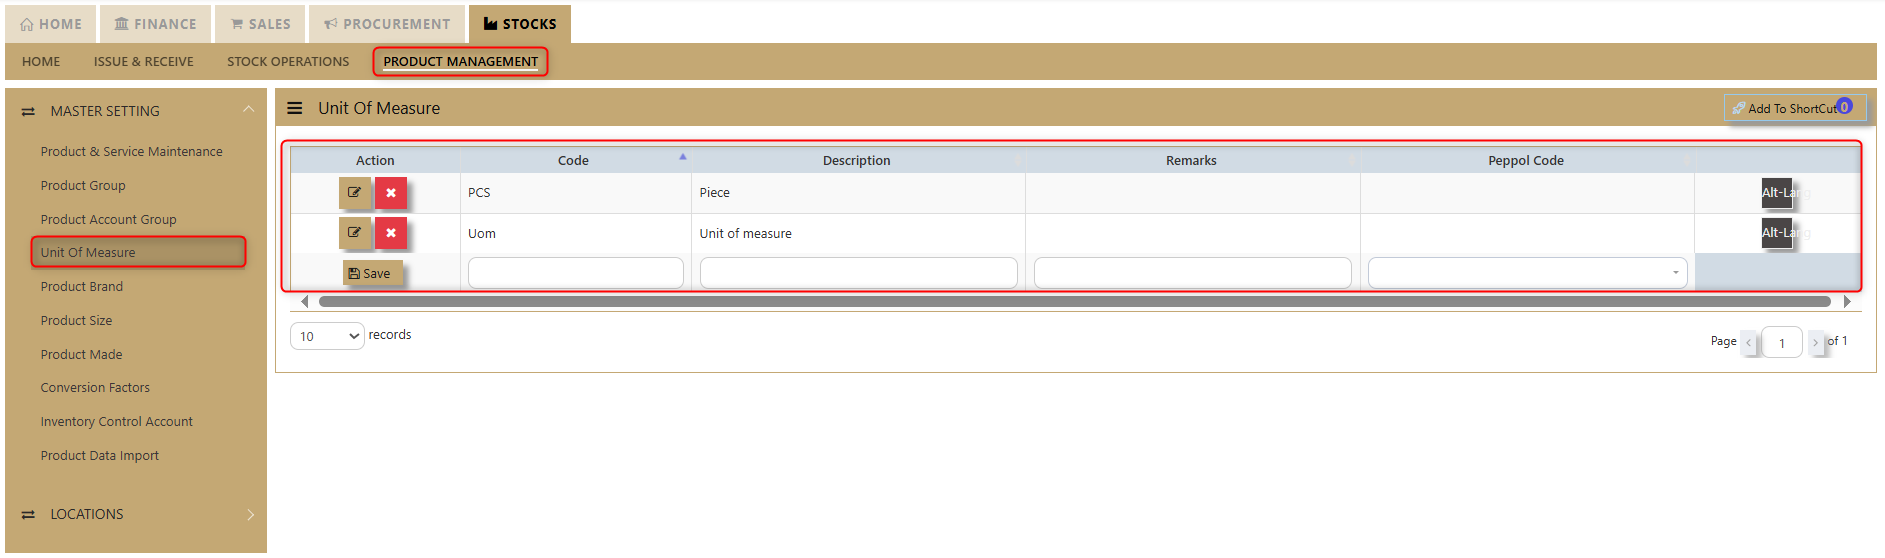
Unit of Measure
How to setup Units of Measure?
The most important product UOM that need to maintain integrity is the STOCK UOM. It is the basis of this UOM that the system calculates costing and conversion factors etc. All Sales and Purchase UOMs in the system can be changed, but depending on the situation, the user may or may not change the STOCK UOMs in the system.
1.1 Product has no transaction yet
If there are no prior transactions, you may change the UOM for this product freely. Simply go to Product Maintenance and click on the Stock UOM and change at will.
1.2 Product already have existing transaction
If there are already transaction(s), you are not allowed to change the STOCK UOM. Example, if this is already cost in system at $5 per bottle, and the UOM is changed to carton of 24, the system will start to have wrong cost à $5 per carton of 24.
Managing UOMs
2.1 Create new UOM
- Go to Stocks – Product Management – Unit of Measure
- Create the UOM code and the UOM Description – and user have a new UOM now
2.2 Products with different UOM
- Go to Stocks – Product Management – Unit of Measure
- Select (or create) a product and click on the UOM tab
- Select the Stock UOM and alternative UOMs and enter the Conversion Factor. (This tab is discussed below)
- You may enter unlimited number of conversions here.
- After this is set, you may transact in any of the UOM that is specified here
Changing UOM if transaction(s) exist
- User can only create new product code with the new UOM. Perform an IT transaction; issue of the items in bottles and receive the item (in new code) in carton. After that is completed, and the old code is zeroized, simply inactivate the old code.
Product Brand, Size, Made
How to Create Product Brand/Size/Made?
Product Brand
Click on Stocks – Product Management – Product Brand icon for the following screen.
Product Size
Click on Stocks – Product Management – Product Size icon for the following screen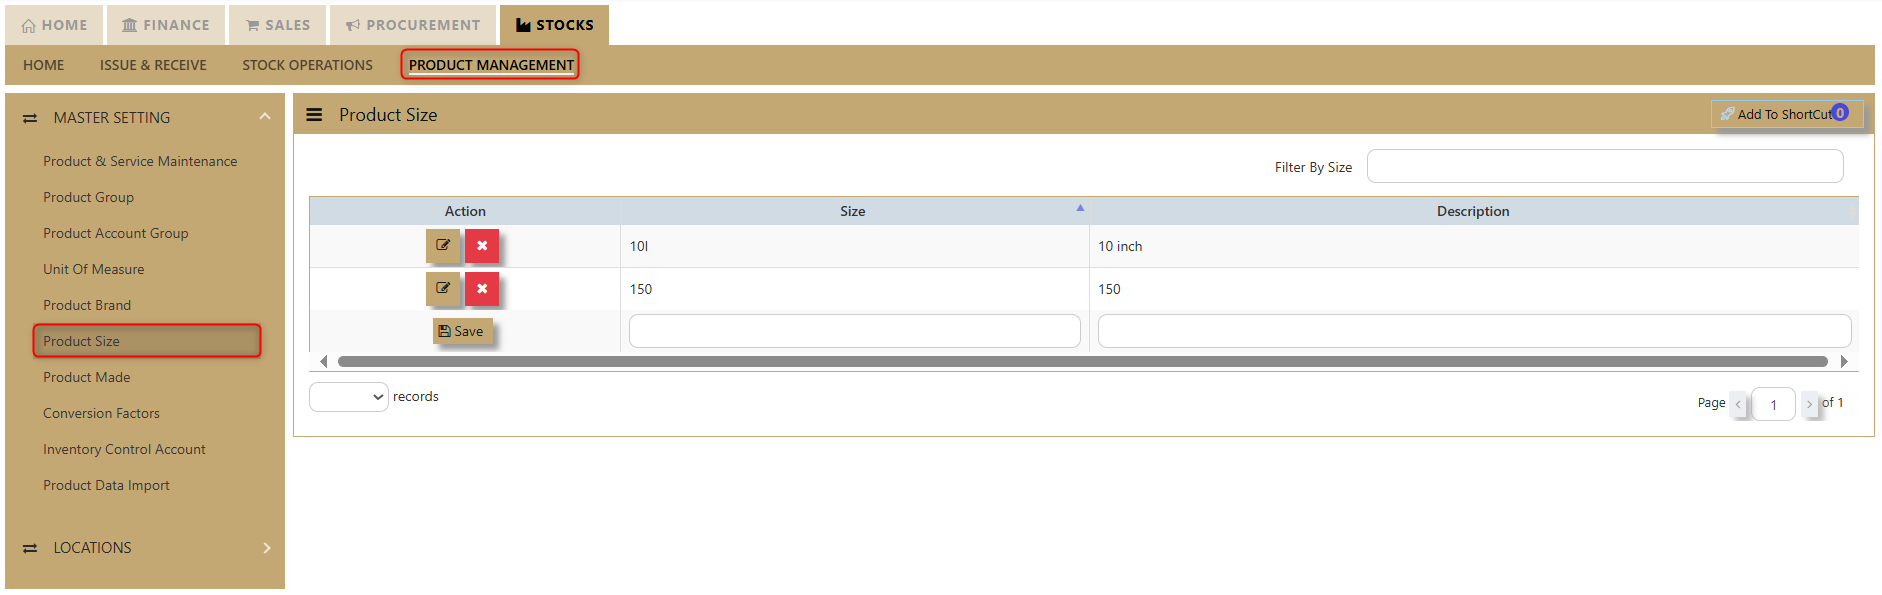
Product Made
Click on Stocks – Product Management – Product Made icon for the following screen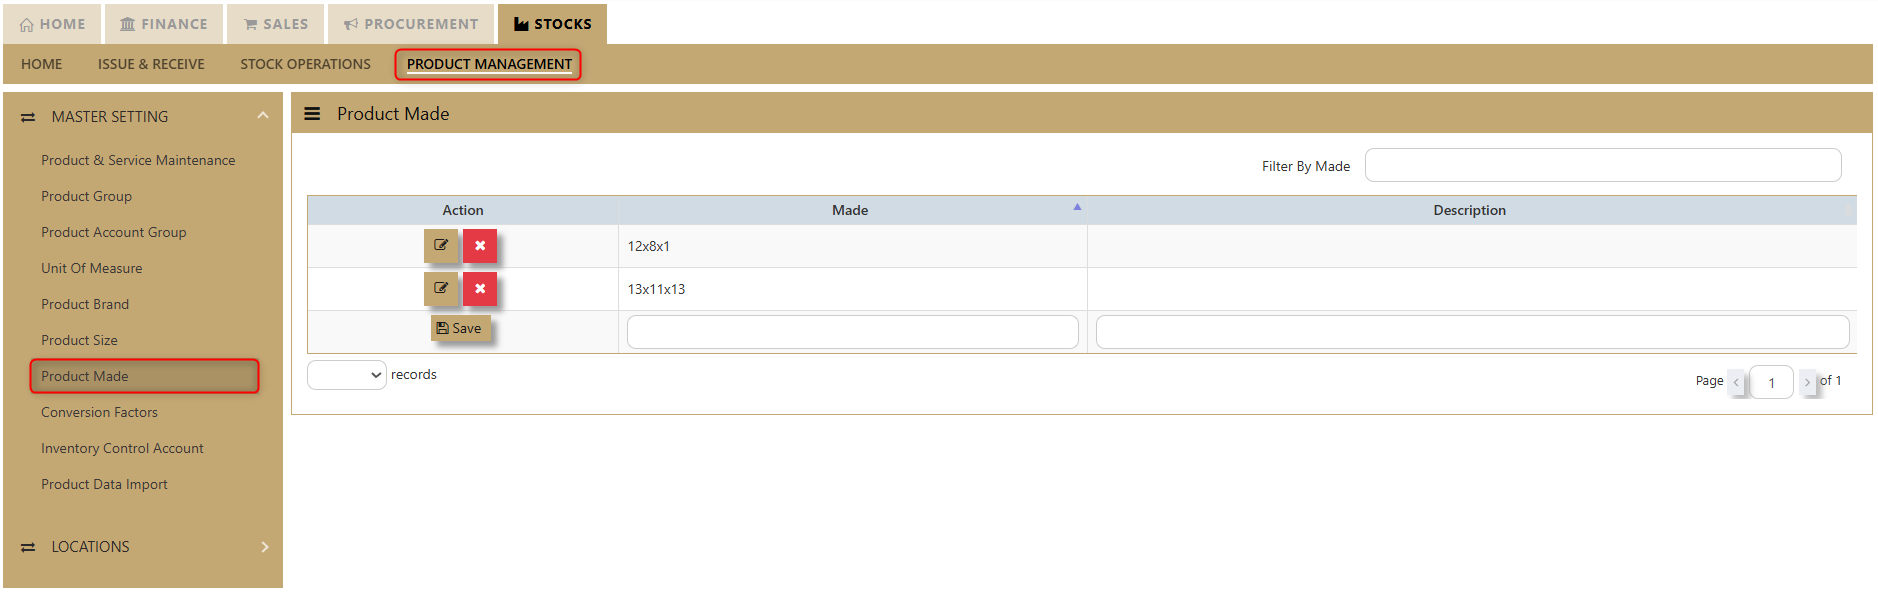
- Enter the Size, Brand, Model, and Made options as shown in the examples above.
- The codes are limited to 4 alphanumeric characters.
- The descriptions are limited to 40 alphanumeric characters.
Important: Size, Model, Brand and Made are mainly used as additional analysis tools for various reports in the system. Some of the most commonly used reports are Sales Analysis-Product Size Model Wise and Inventory reports that can be sorted by Model and Brand.
Conversion Factors
How to Set-up Stock Conversion Factors?
Conversion Factor
Click on Stock– Product Management – Conversion Factors icon for following screen. Take note that this setting is for general conversion which will apply to all the products.
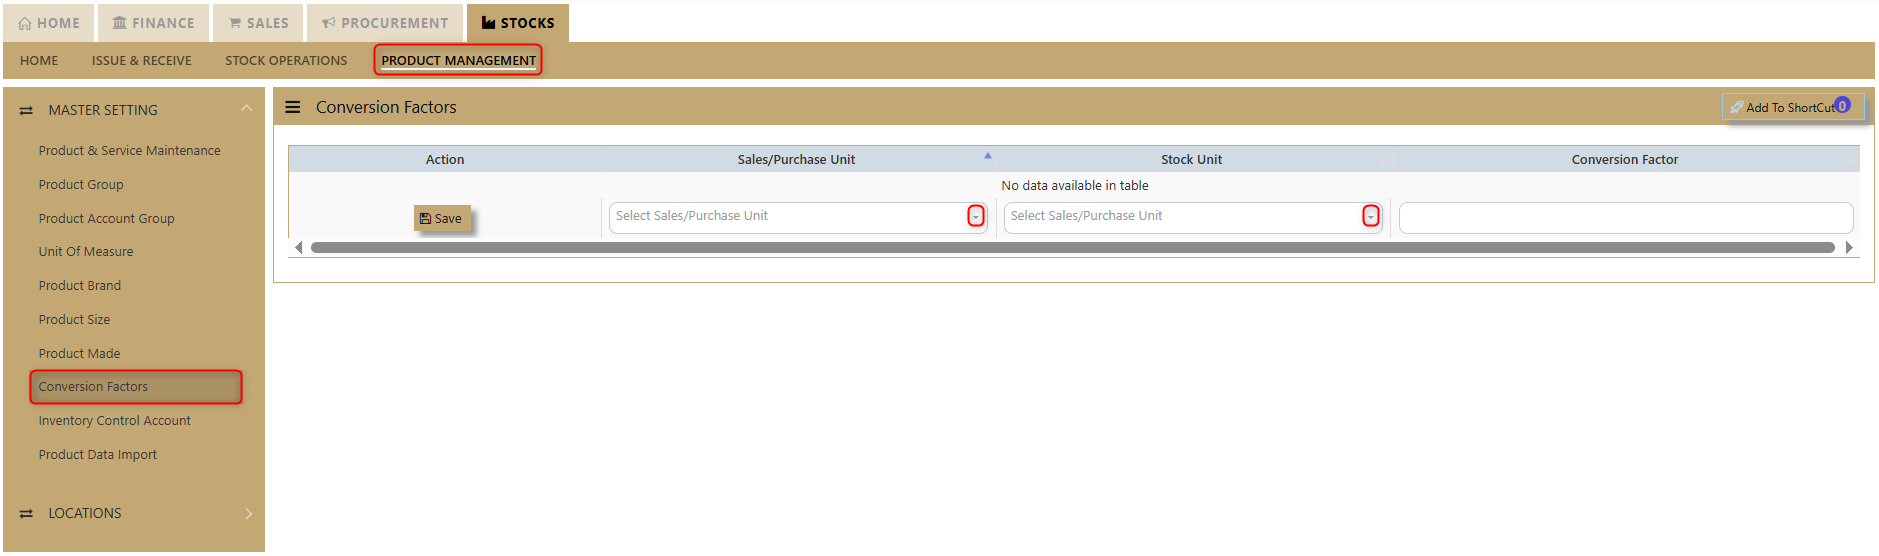
Custom Conversion Factor
If conversion is specific to each product, the setting is done in Custom Conversion Factor tab of each product in Stock – Product Management – Products & Service Maintenance.
Situational: For instance, user wants to buy stock ‘ballpen’ in box then sell in piece. There are 2 units of measurement [otherwise known as UOM] which are box and piece.
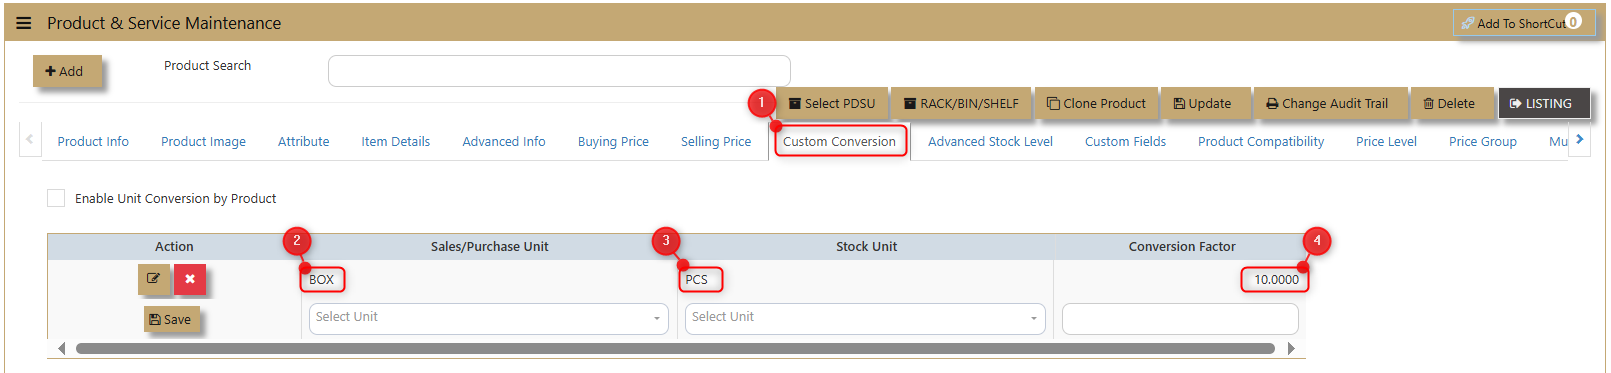
In your custom conversion tab, you will see “stock unit’’, note that stock unit in conversion tab should be same what is your maintained stock unit for that product.
Inventory Control Account
How to Set-up Inventory Control Account?
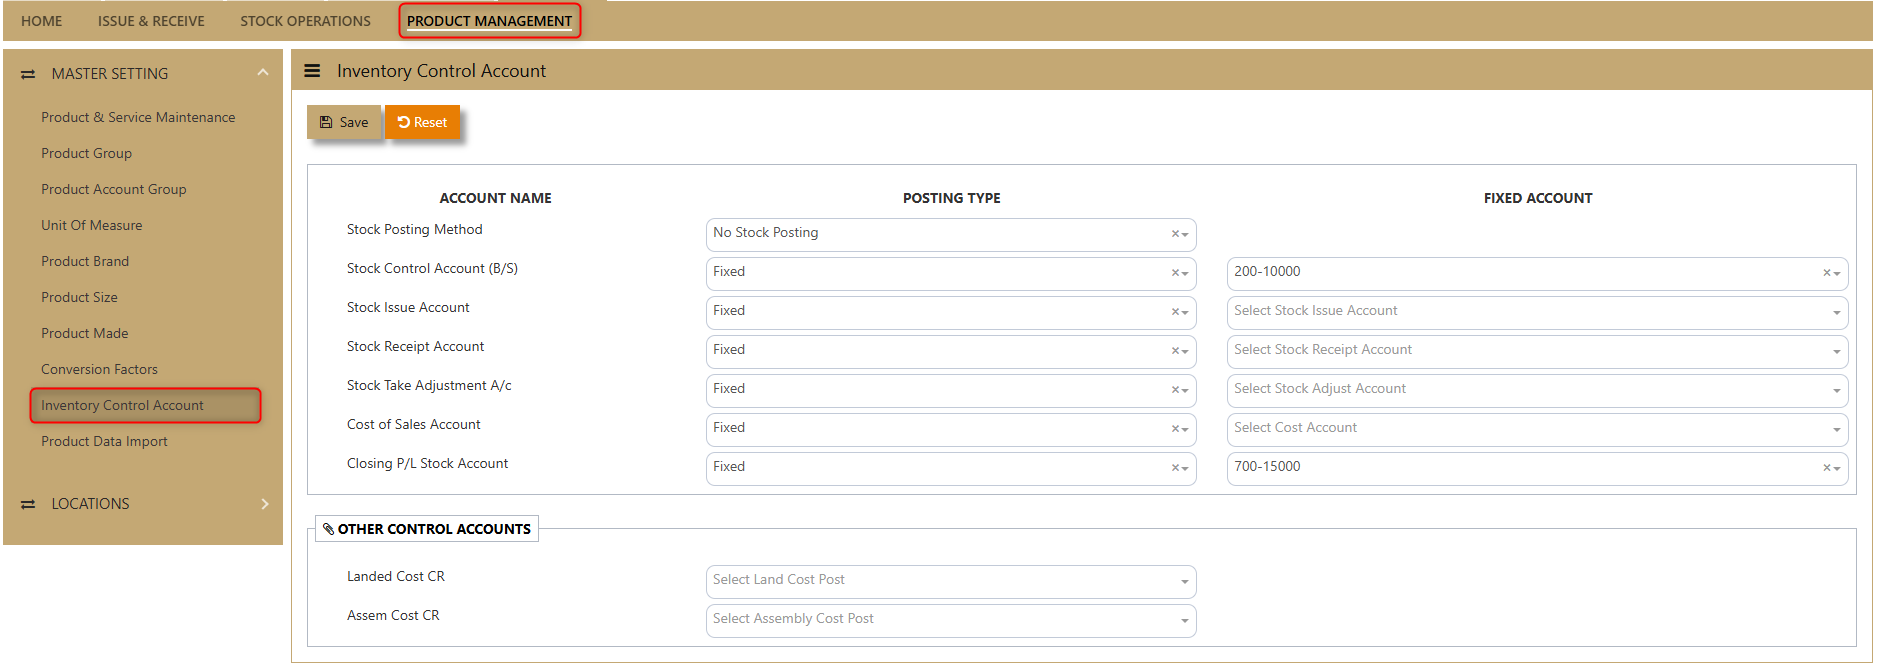
Click on Stock – Maintenance – Inventory Control Account for following screen.
In UNIQ365, this option determines how the GL is to be updated when saving transactions. You need to specify the chart of account codes for Sales, Purchase and Inventory transactions.
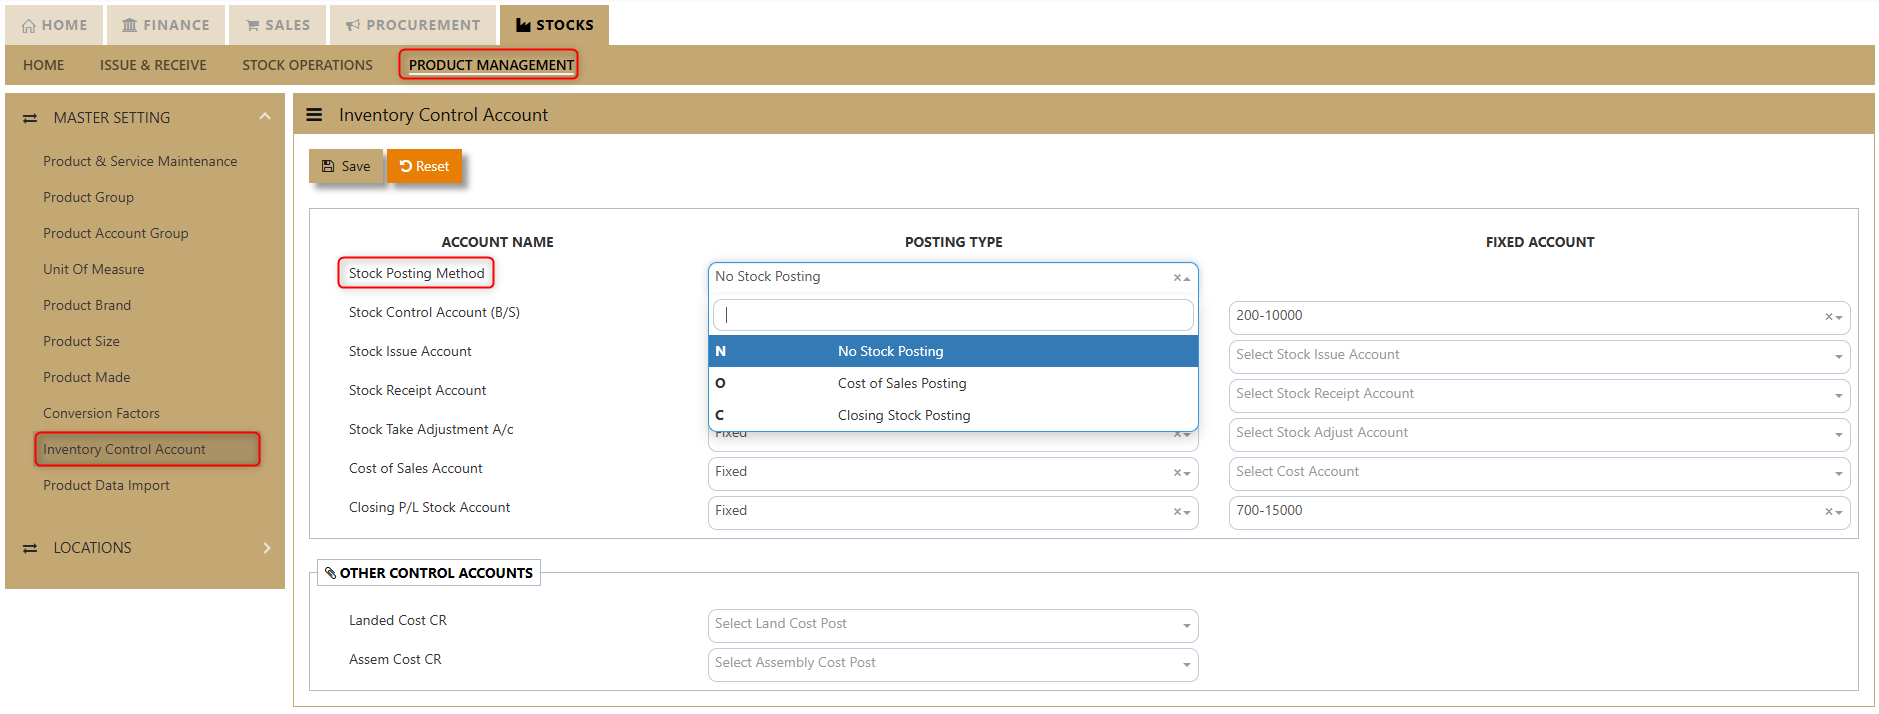
Important: Being a packaged solution, UNIQ365 caters for almost any type of industries with 3 types of stock posting options.
1. No Stock Posting
2. Cost of Sales Posting
3. Closing Stock Posting
Stock Posting Methods
1. No Stock Posting
- Inventory module is not linked to GL.
- All the movement of the stock could still be captured in inventory module.
- User needs to post a journal entry manually to Closing stock & Opening stock accounts for month end closing or year-end closing.
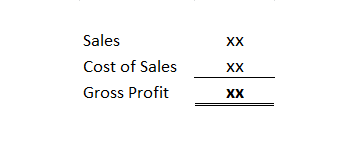
- Normally, Profit and Loss Account will be presented as follows:
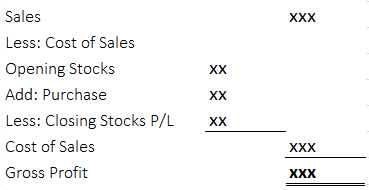
In this case, Purchase Account will be categorized under Expense account.
Below is an example of a double entry for: -
a. Purchase Invoice amounted to $500.00
| Debit | Credit | |
| Purchase Account | S$500 | |
| Trade Creditor Control | S$500 |
b. Sales Invoice amounted to $1,000.00
| Debit | Credit | |
| Trade Debtor Control | S$1000 | |
| Sales Account | S$1000 |
2. Cost of Sales Posting
- Inventory module is linked to GL.
- Closing stock will be automatically updated when Sales,
- Purchase or Inventory transactions are performed.
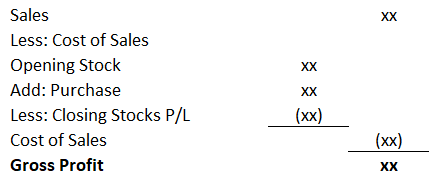
Profit and Loss Account will be presented as follows:
- In this case, Purchase Account will be categorized under Liabilities account.
Below is an example of a double entry for:-
a. Purchase Invoice amounted to $109.00
| Debit | Credit | |
| Purchase Account | S$100 | |
| Trade Creditor Control | S$109 | |
| GST/VAT Tax | S$9 |
b. Sales Invoice amount of $1000.00
| Debit | Credit | |
| Stock A/C (BS) | S$1000 | |
| Purchase A/C | S$1000 |
3. Closing Stock Posting
- Inventory module is linked to GL.
- Closing stock will be automatically updated when Sales, Purchase or Inventory transactions are performed.
- Normally, Profit and Loss Account will be presented as follows:
- In this case, Purchase Account will be categorized under Expense account.
- Below is an example of a double entry for: -
a. Purchase Invoice amounted to $500.00
| Debit | Credit | |
| Purchase Account | S$500.00 | |
| Trade Creditor Control | S$500.00 | |
| Stock B/S | S$500.00 | |
| Closing Stock A/C (P&L) | S$500.00 |
b. Sales Invoice amount of $1000
| Debit | Credit | |
| Trade Debtor Control | S$1000 | |
| Sales Account | S$1000 | |
| Stock B/S | S$500.00 | |
| Closing Stock A/C (P&L) | S$500.00 |
You need to fix the relevant GL Account for Stock Control A/c (B/S), Stock Issue Account, Stock Receipt Account and Closing Stock Account.
Important: After you have decided on the Stock Posting Method, you can now set up the auto posting for the Stock Control Account (B/S), Stock Issue Account, Stock Receipt Account, Stock Take Adjustment A/c, Cost of Sales A/c &
Closing P/L Stock Account based on the guidelines set above.Guide: The setting is Fixed if you only have one account but should be set as Product if you have multiple accounts. For example, if you have multiple Stock accounts (i.e. Stock-Computer Hardwares, Stock Software, Stock-Accessories, Stock-Others).
Product Data Import
What is Product Data Import?
Product Data Import allows users to easily upload product information. By simply uploading a file, the system automatically extracts and integrates all the necessary data. It’s a quick and hassle-free way for users to import everything they need in one go.
How to use Product Data Import?
Look for Stocks - Product Management - Master Billing - Product Data Import as shown:
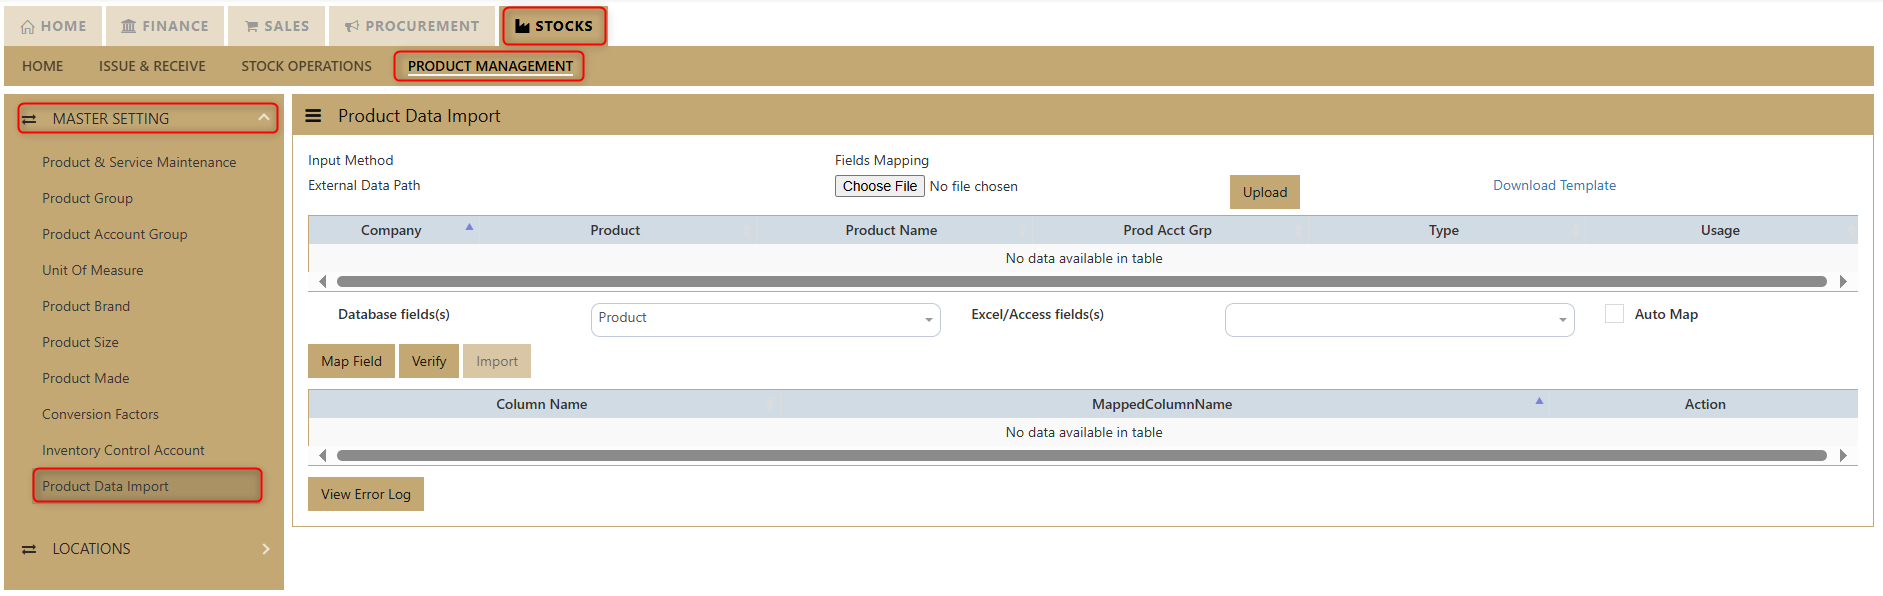
Product Data Import Instructions:
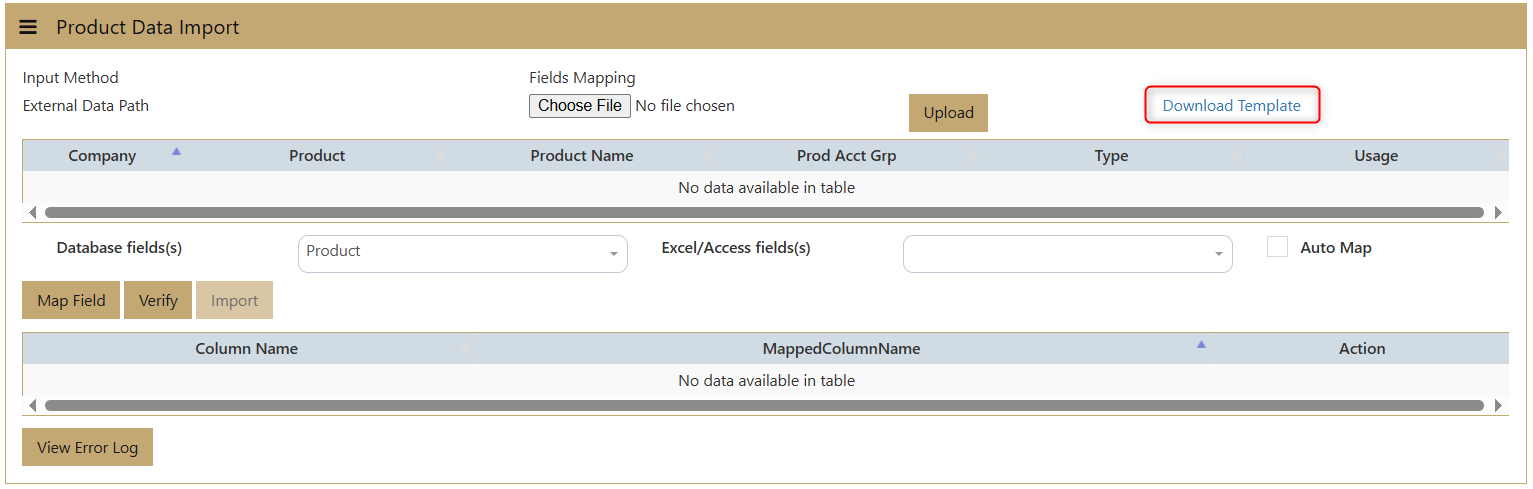
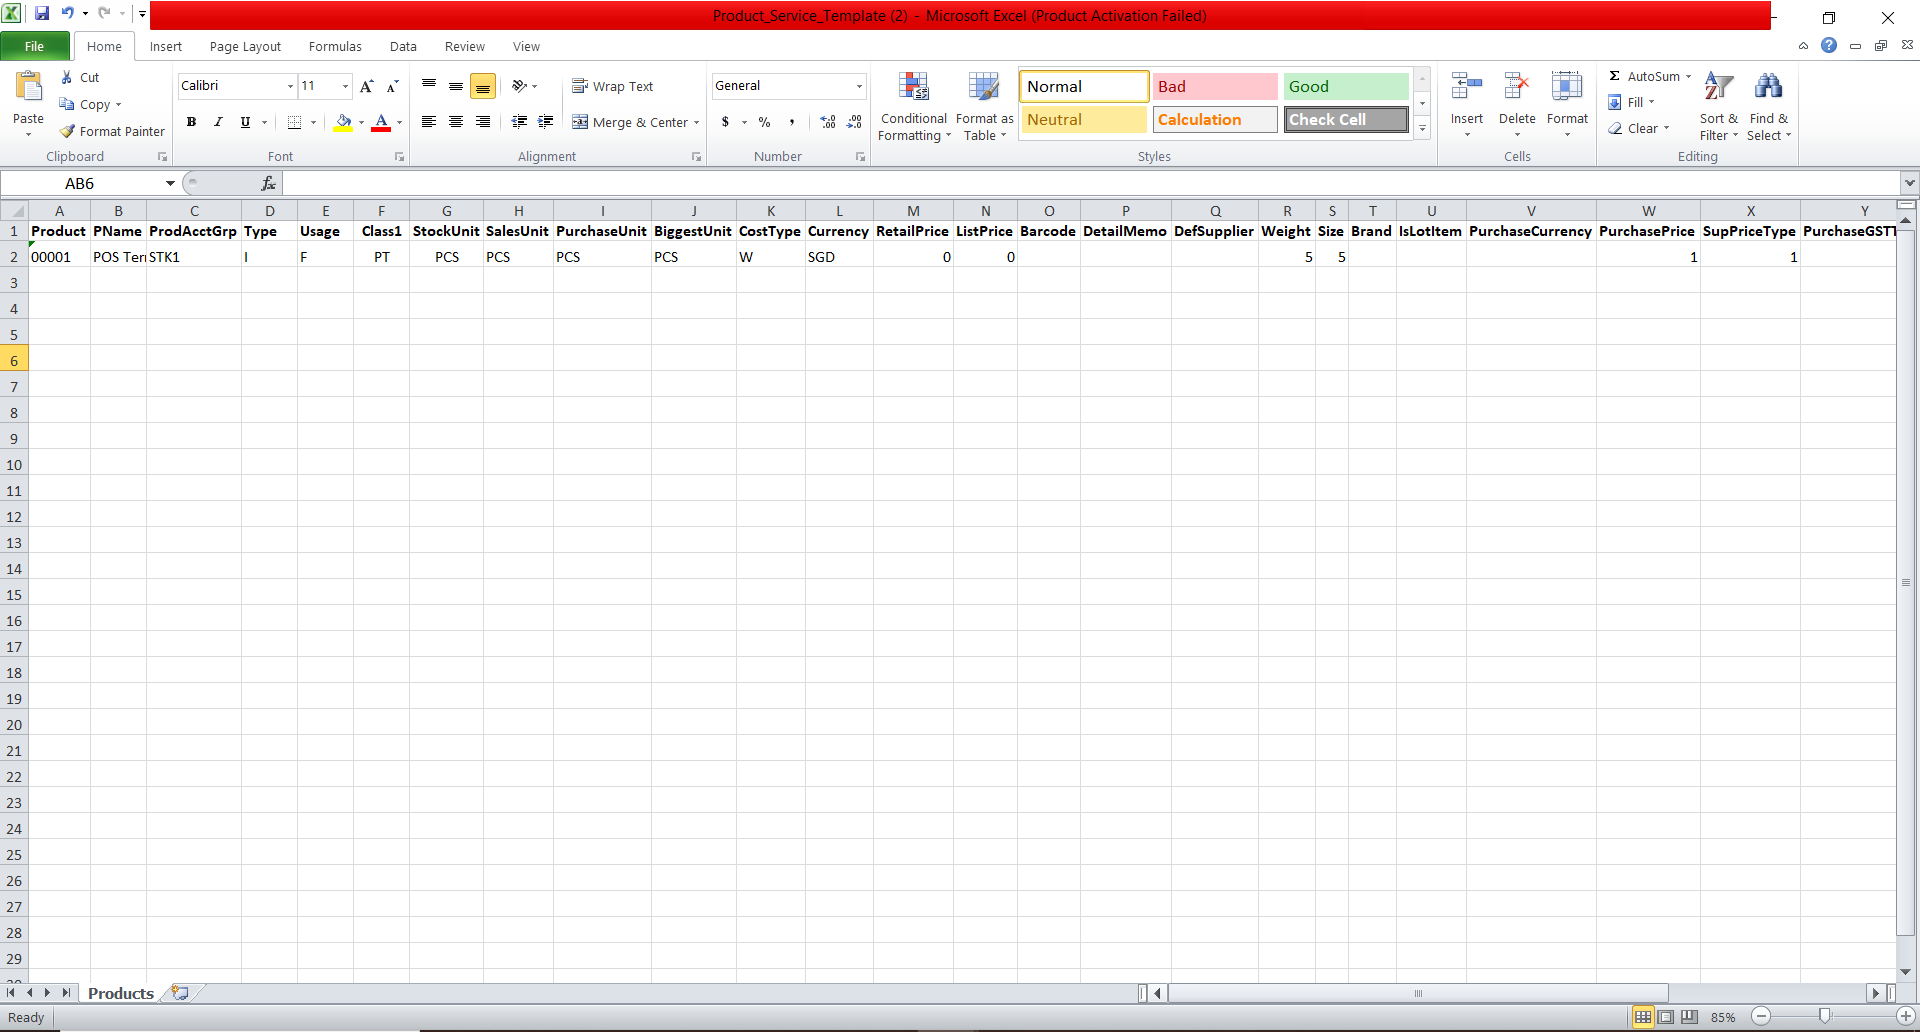
Download Template: Access the system option to download the Excel template.
Encode Data: Enter the necessary data into the Excel file, ensuring all fields are filled correctly, then save the file.
Choose File: Click the "Choose File" button to open the folder where your saved Excel file is located.
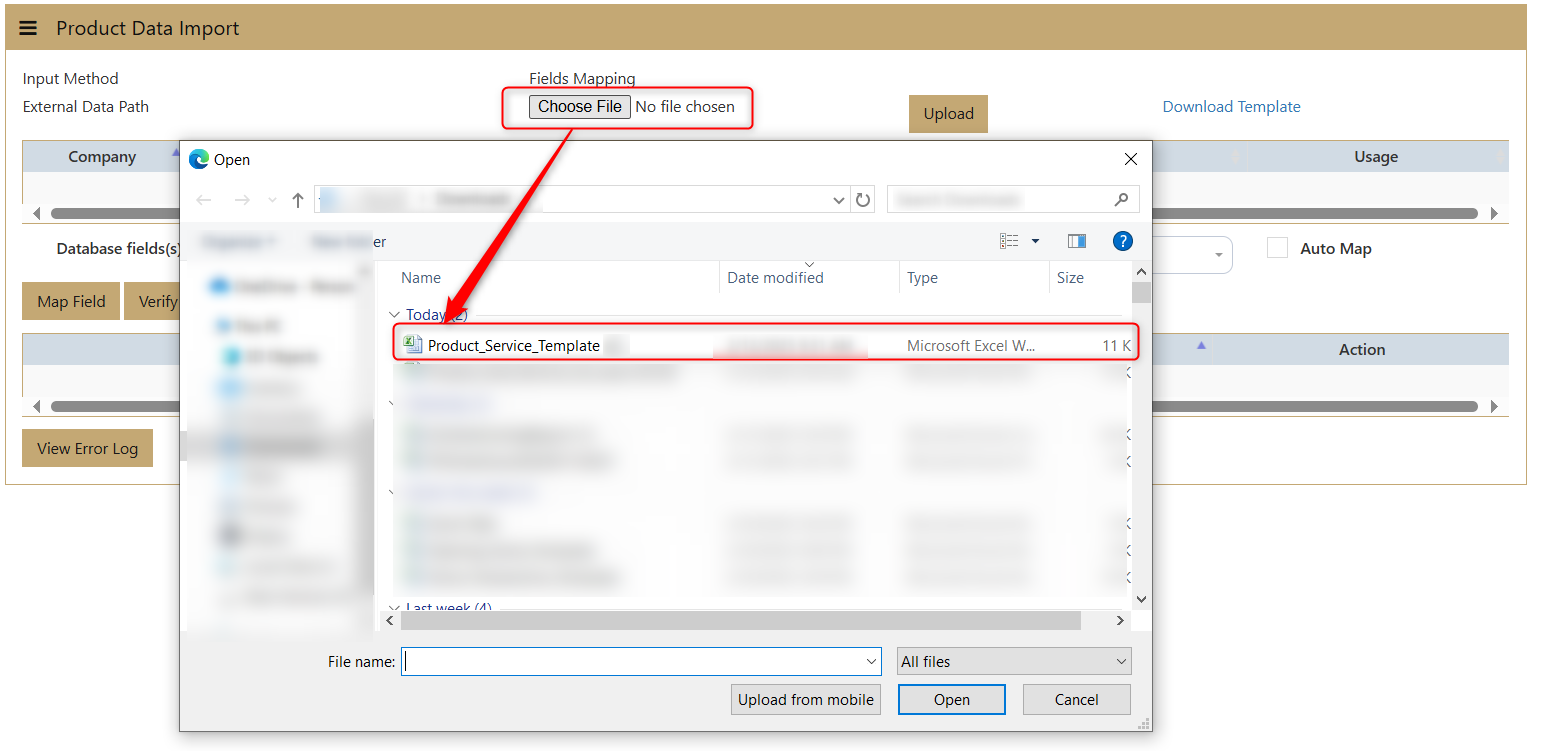
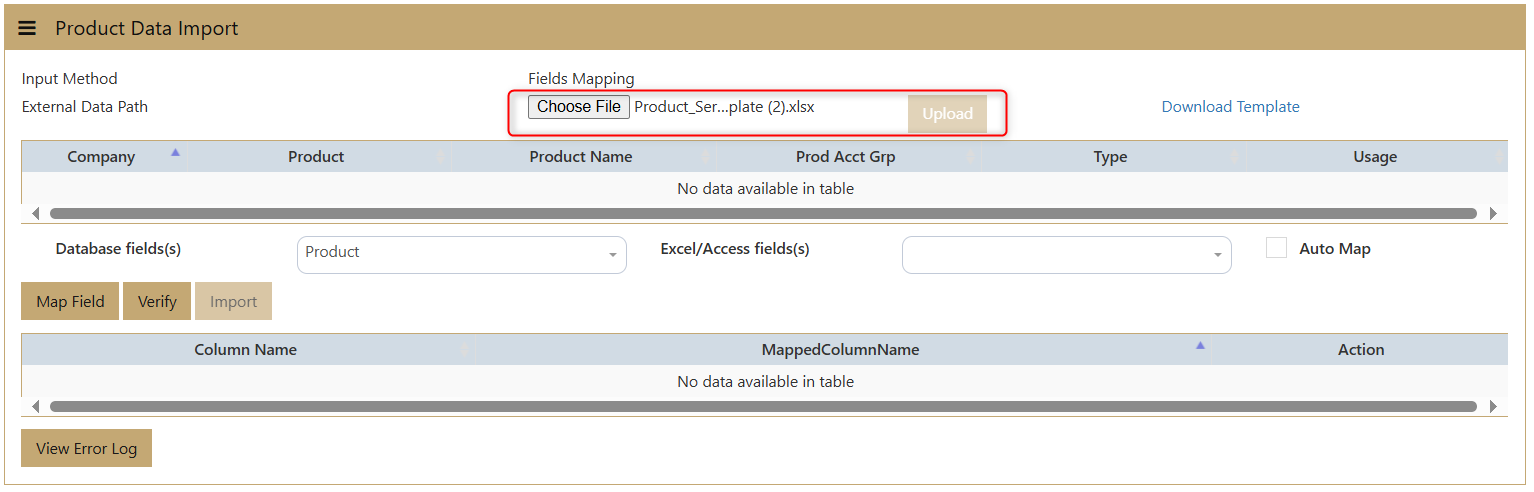
Upload File: After selecting the file, click "Upload." The system will extract the data from the Excel file.
Data Display: The system will display the Company, Product, Product Name, Product Acct Group, Type, and Usage on the interface.
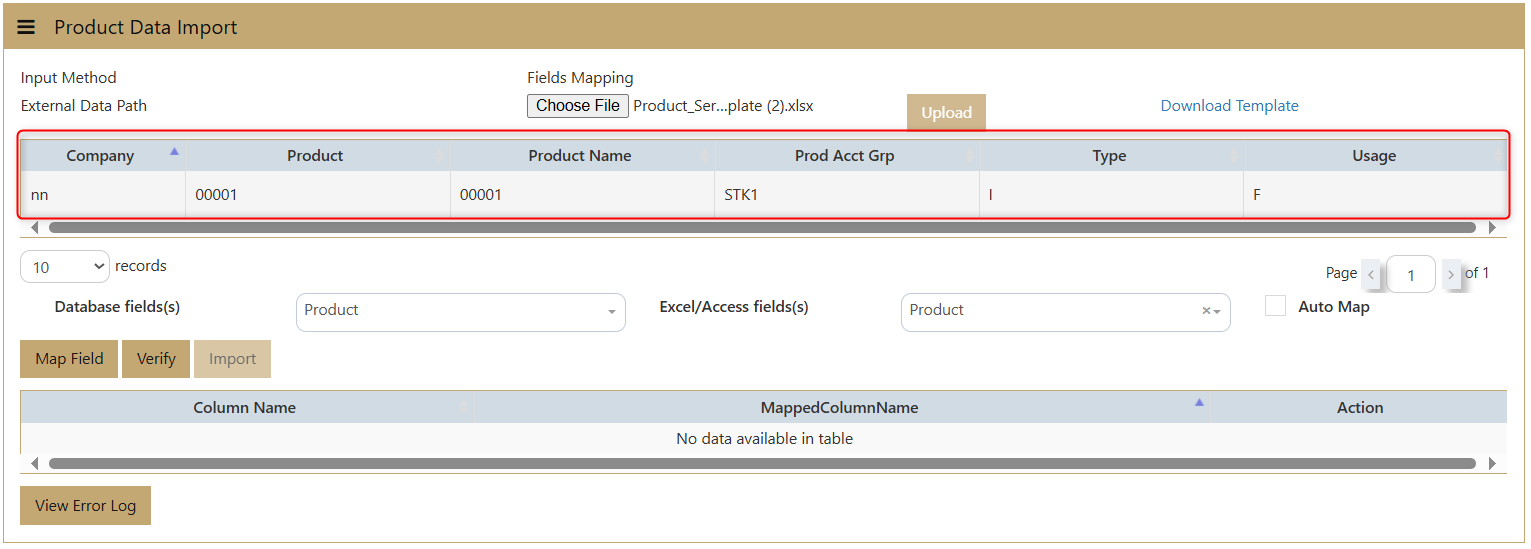
Select Data Fields: Choose the data fields you want to extract. You can use the AutoMap function to automatically map the transactions according to the saved Excel file.
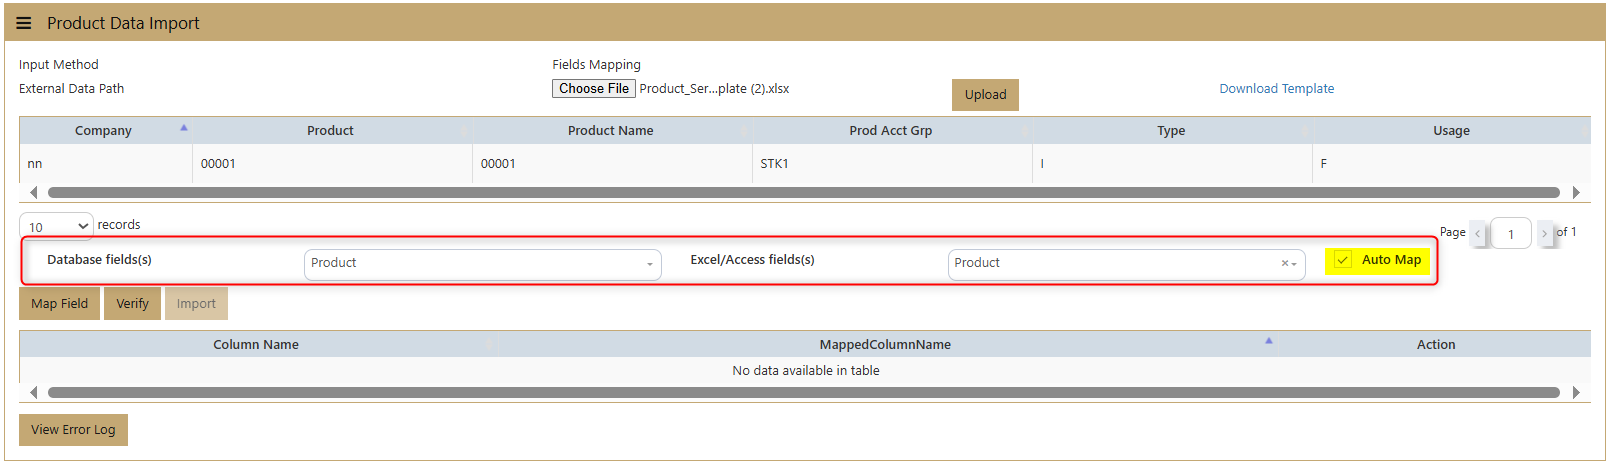
Map Fields: Click Map Field to have the system record the data according to the field mappings.

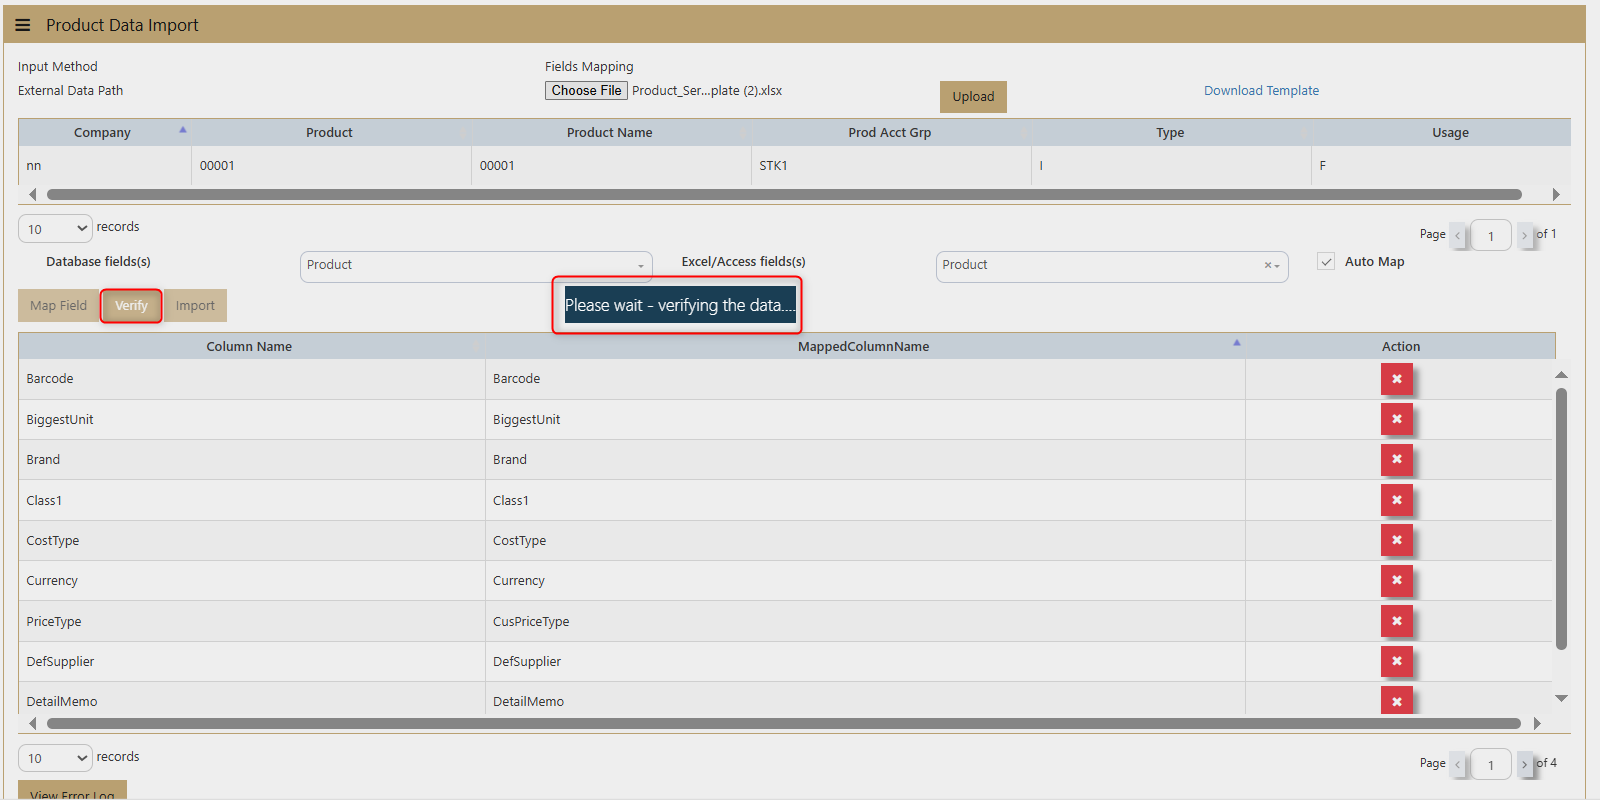
Verify: Click Verify to check for any errors or modifications that may be needed.
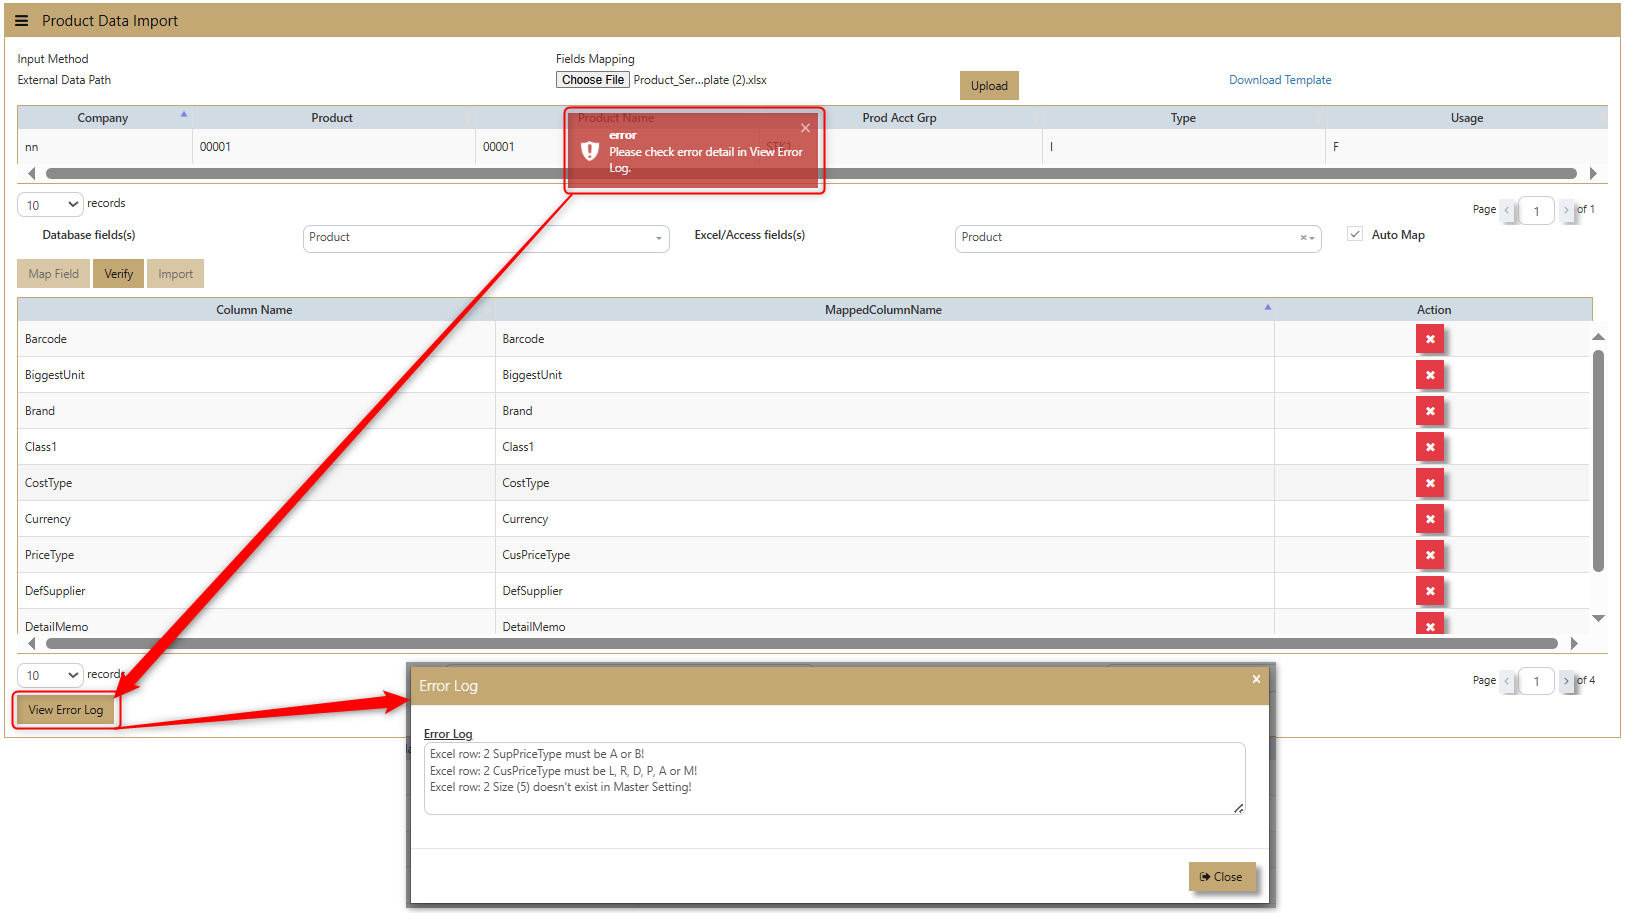
View Error Log: If there are any issues, the View Error Log will display the errors detected by the system. Once these errors are fixed user can proceed to next step
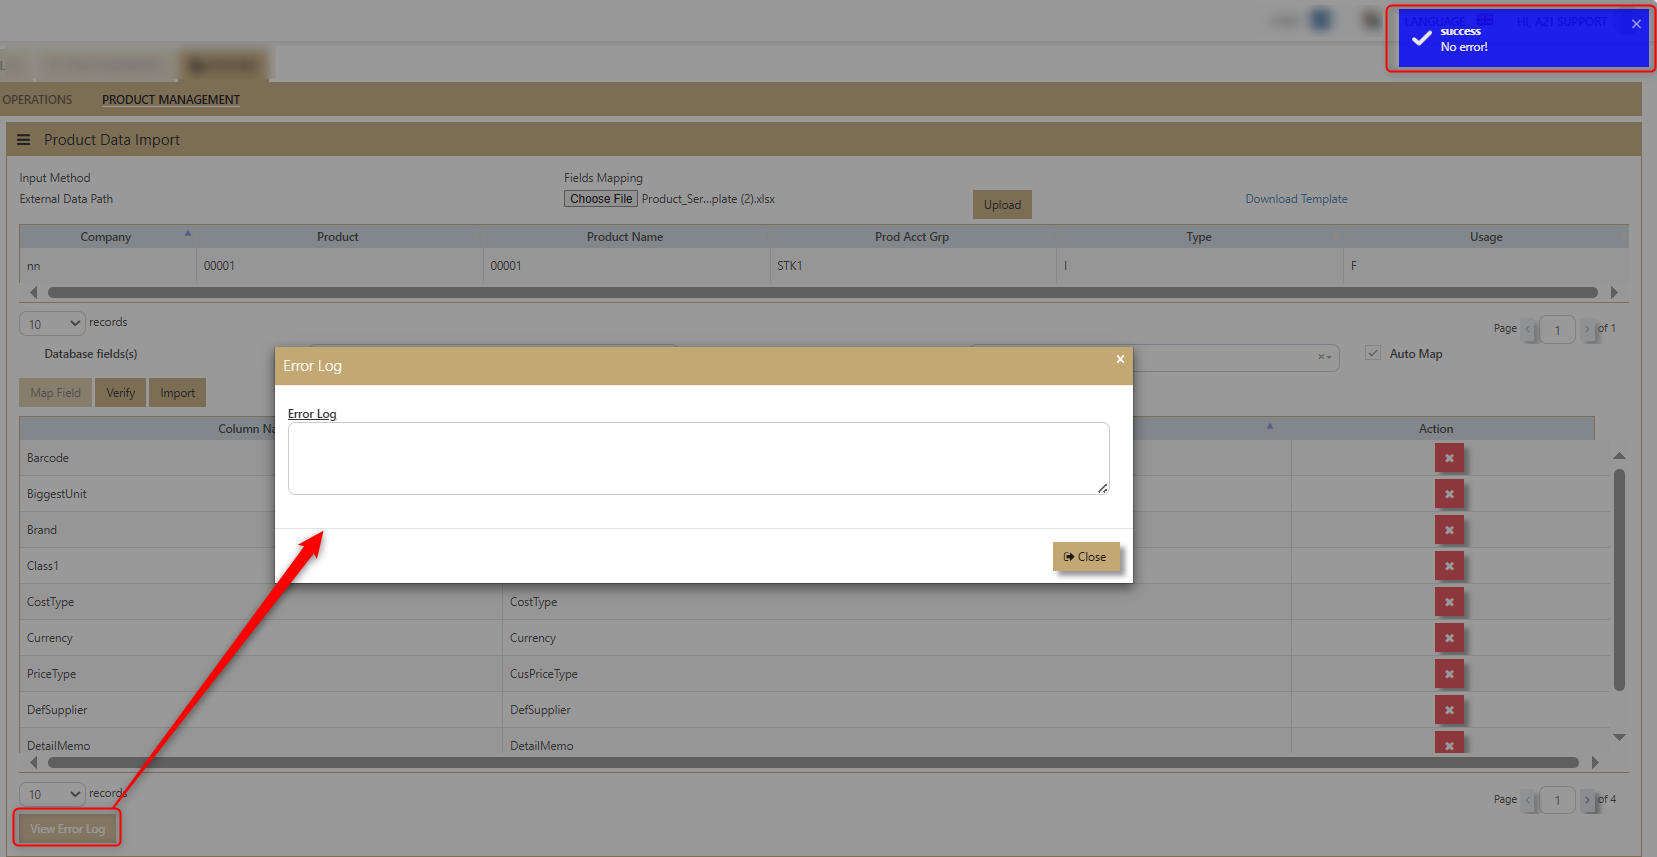
Import: Once everything is verified, click Import to upload the data into the system without errors.
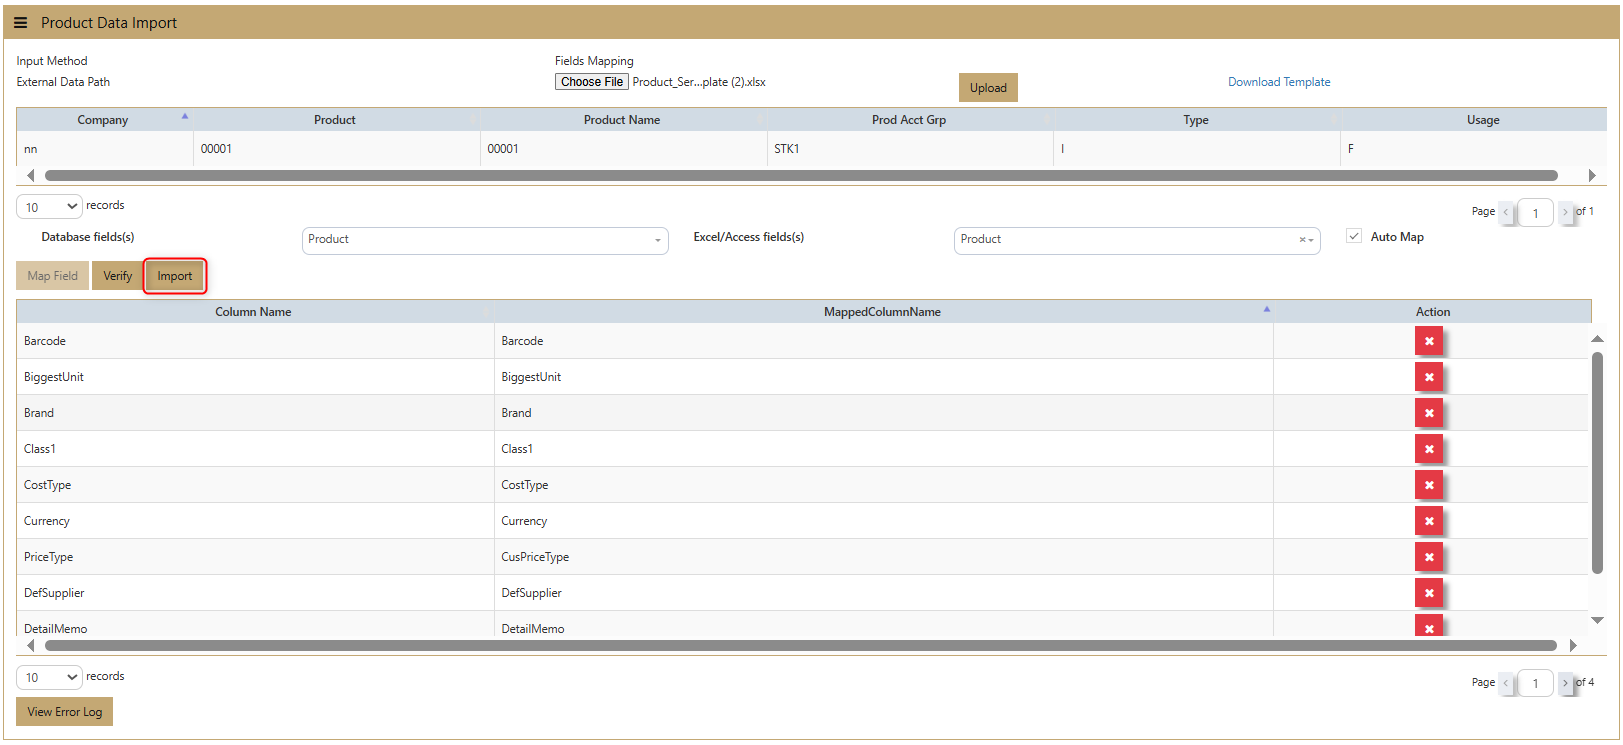
Review Upload: After importing, the system will show the column names, mapped column names, and actions of the uploaded Excel file. Users can verify the successful upload of the product data in the Product & Service Maintenance section of the system.

Locations - Warehouse Code
What is Warehouse Code?
This is a feature in Uniq365 allows users to manage and classify warehouses, along with their Zone & Rack details. Users can create multiple records for different warehouses, making it easier to access and organize warehouse information efficiently.
The Warehouse setup comes with full address and contact numbers of the relevant warehouses so that a Stock Transfer Voucher can be printed for a proper dispatch from/to any warehouses.
Uniq365 multiple warehouses can be used primarily to segregate the stock positions of a company within various warehouses or locations.
Besides that, this warehouse can also be used to track stock issues to certain projects, an example like bathroom fixtures to a condominium project. You can call the warehouse CP01 (Condo #1) and start to issue the products needed to carry out the project via Stock Transfers. Until you bill the customers, the legal title of the product is still yours and therefore needed to be in your valuation.
Once the project gets underway, stock at this warehouse is going to build up and by a Warehouse-wise Stock Report, you can track the exact quantity and value you have at stake. When it comes to billing, simply issue the Condo #1 customer all the items out of CP01 warehouse.
How to Create Warehouse Code?
Click on Stocks - Product Management - Locations - Warehouse Code icon for the following screen.
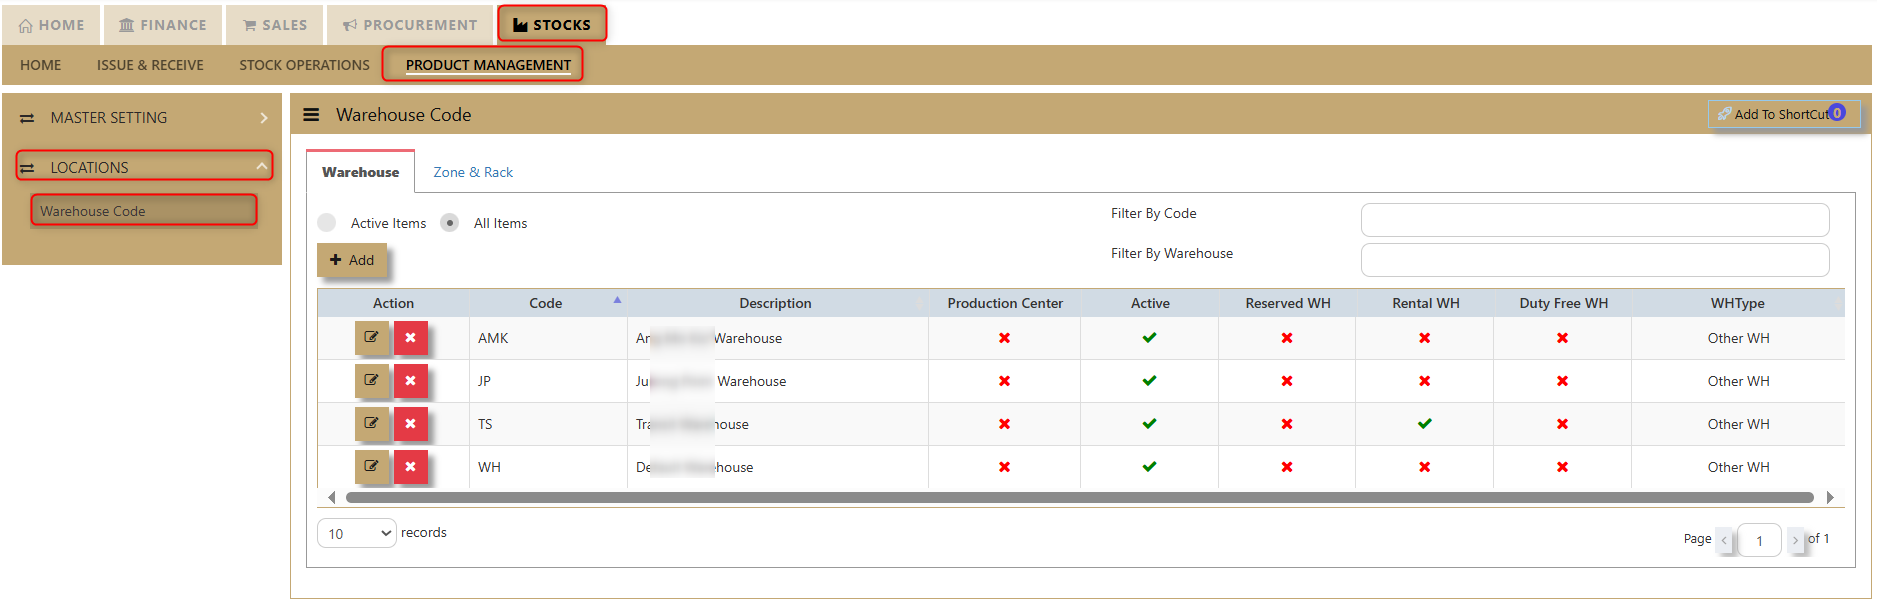
- Click on the Add button to create new Warehouse.
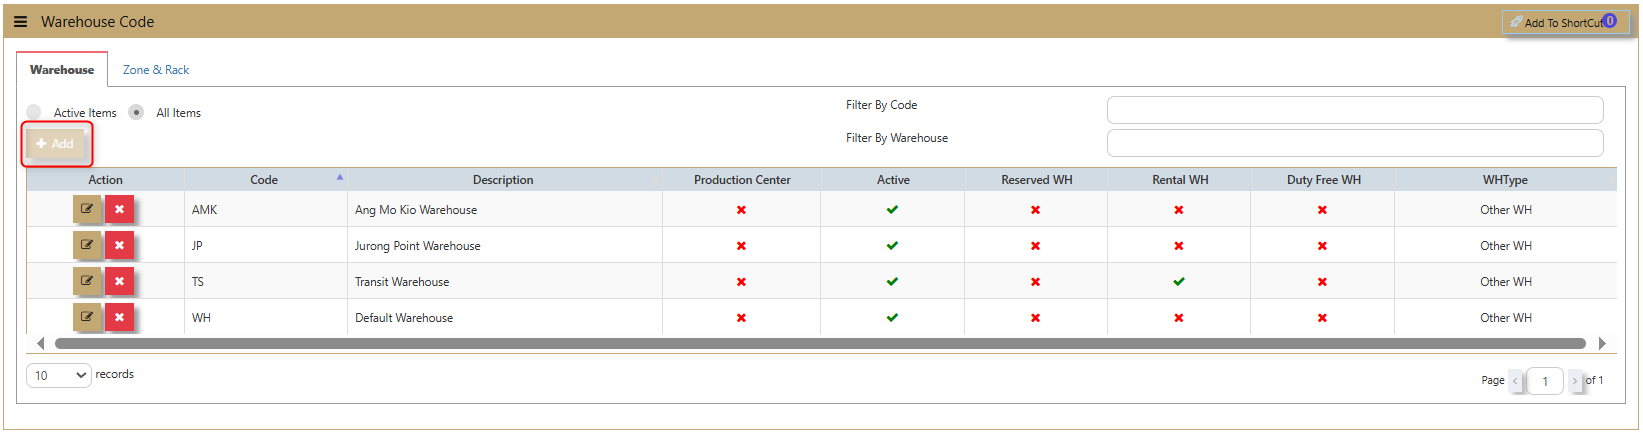
2. After that another tab will show and the user must fill out the following information accordingly:
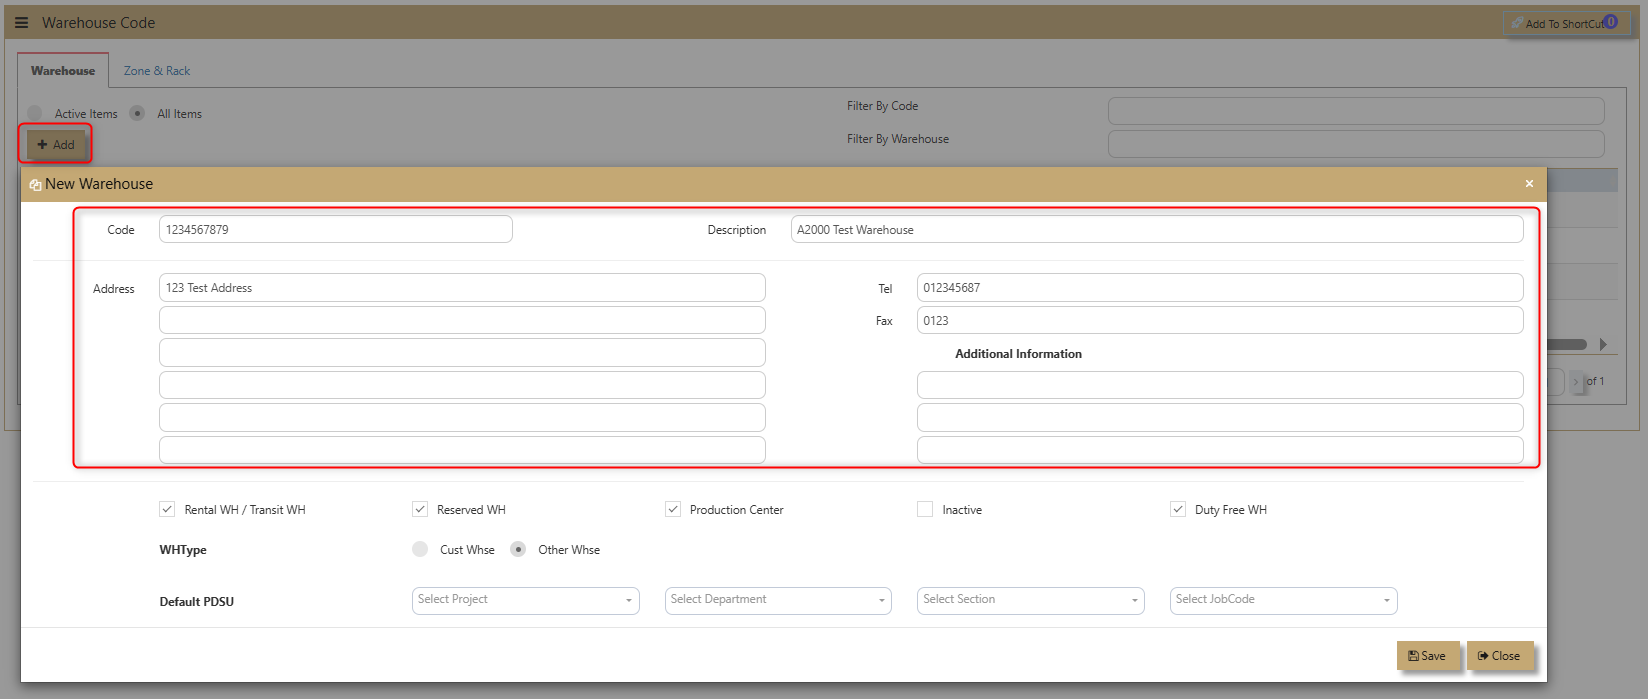
Code - allows the user to input 9 alphanumeric codes for their new warehouse.
Description - for the user to input the warehouse name.
Address - this is where the warehouse is located.
Tel - telephone number
Fax - fax number
Additional Information - allows user to add any information for the new warehouse.
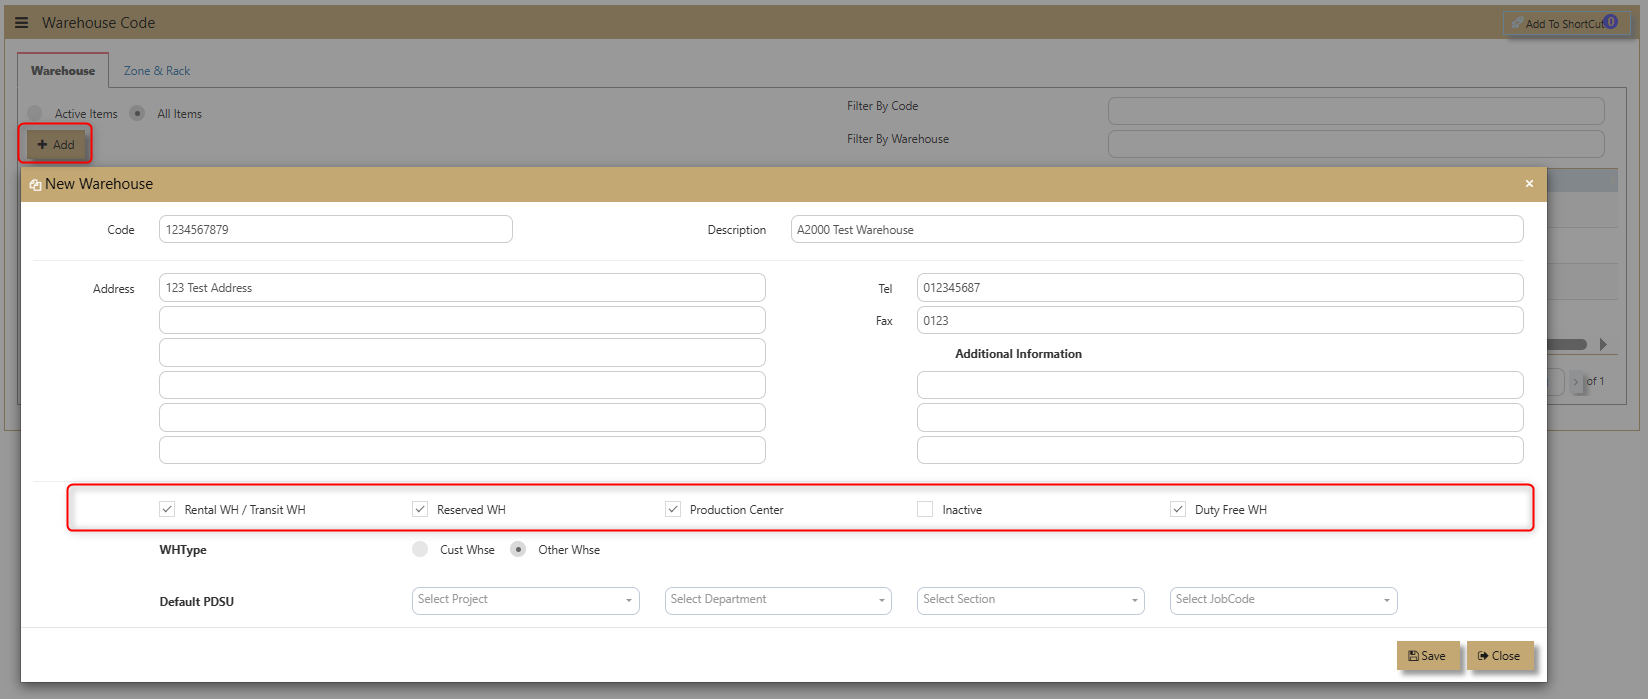
Warehouse Classification - allows user to ticked on the kind of warehouse classification is applicable. If it is Rental WH/Transit WH, Reserved WH, Production Center or Duty-Free WH. Users can also click on inactive button if the warehouse will no longer be in use.
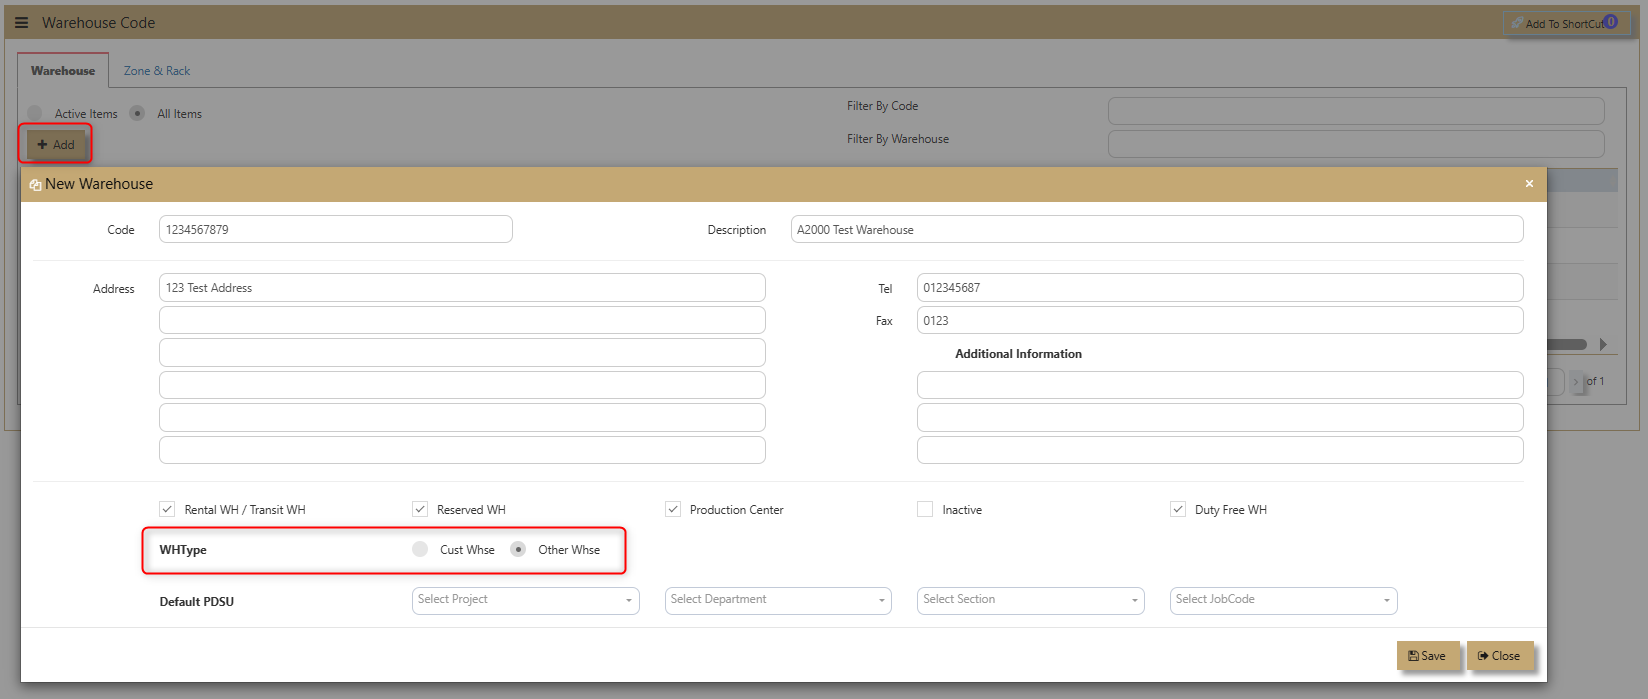
Warehouse Type - allows user to choose and tick if the Warehouse is a Cust Warehouse or Other Warehouse.
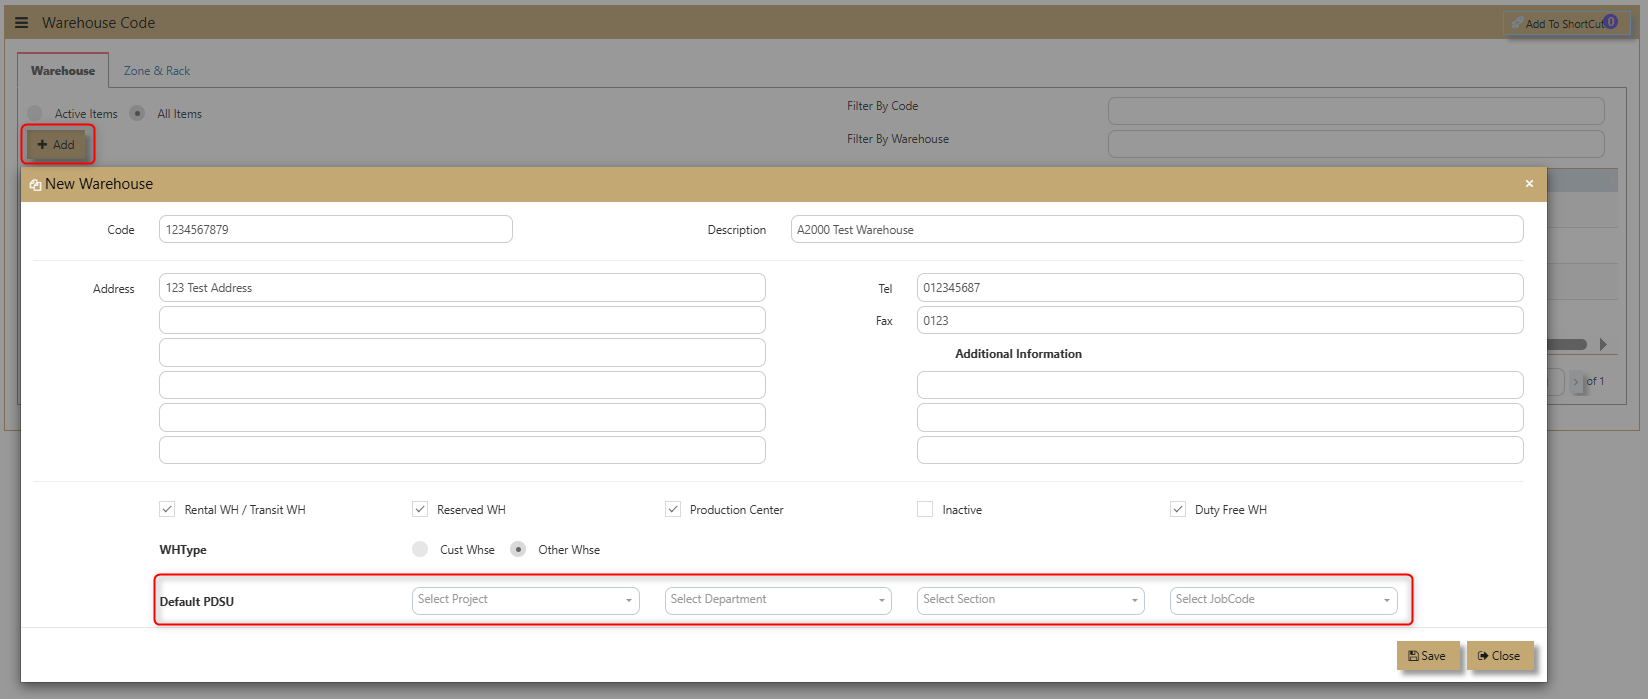
Default PDSU - enable user to easily add Project, Department, Section and Job Code.
3. Click Save then the new warehouse will be added.

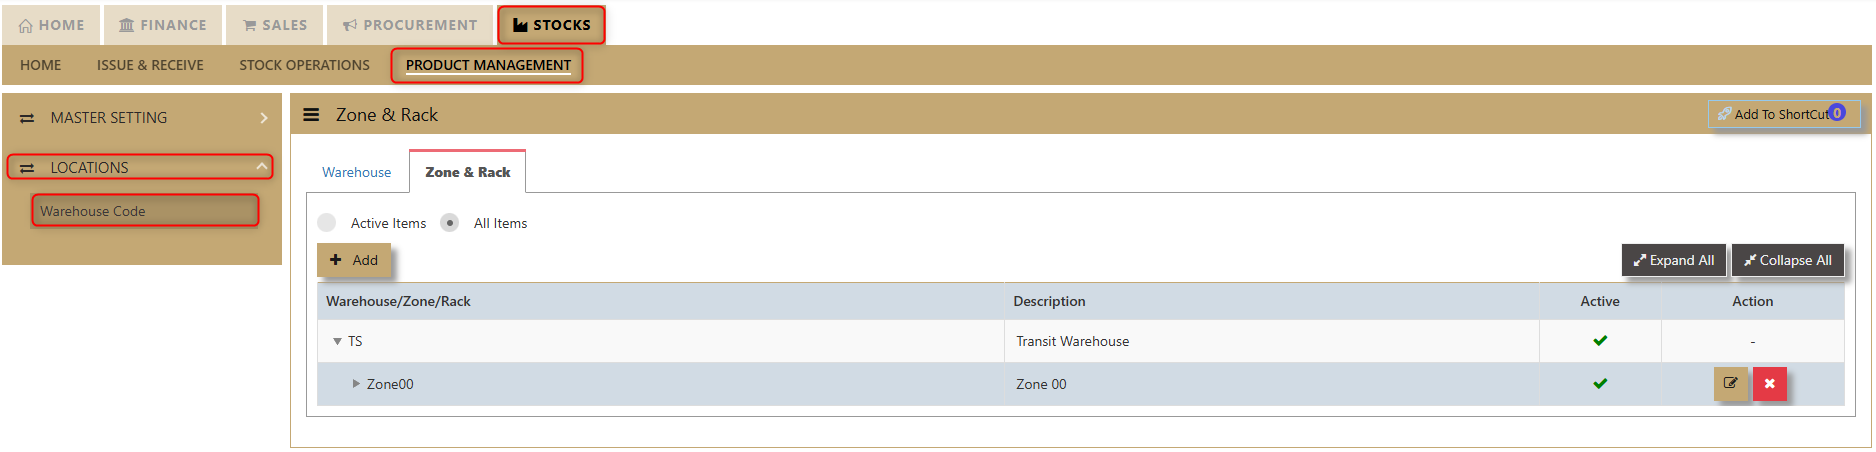
How to use Zone & Rack?
The Zone and Rack function in Uniq 365 Accounting System helps streamline inventory management by organizing products into designated racks and zones within a warehouse or storage facility. This feature enhances stock tracking, reduces search time, and improves overall operational efficiency, making inventory control and order fulfillment faster and more accurate.
Stock Transactions
In Uniq365 stock transaction is the other option that handles the movement of inventories beside creation of sales or purchase transactions. The issue and receipt of stocks are not related to sales and purchases.
________________________________________________________________________________________________________________________________________________
How to Create Stock Transactions?
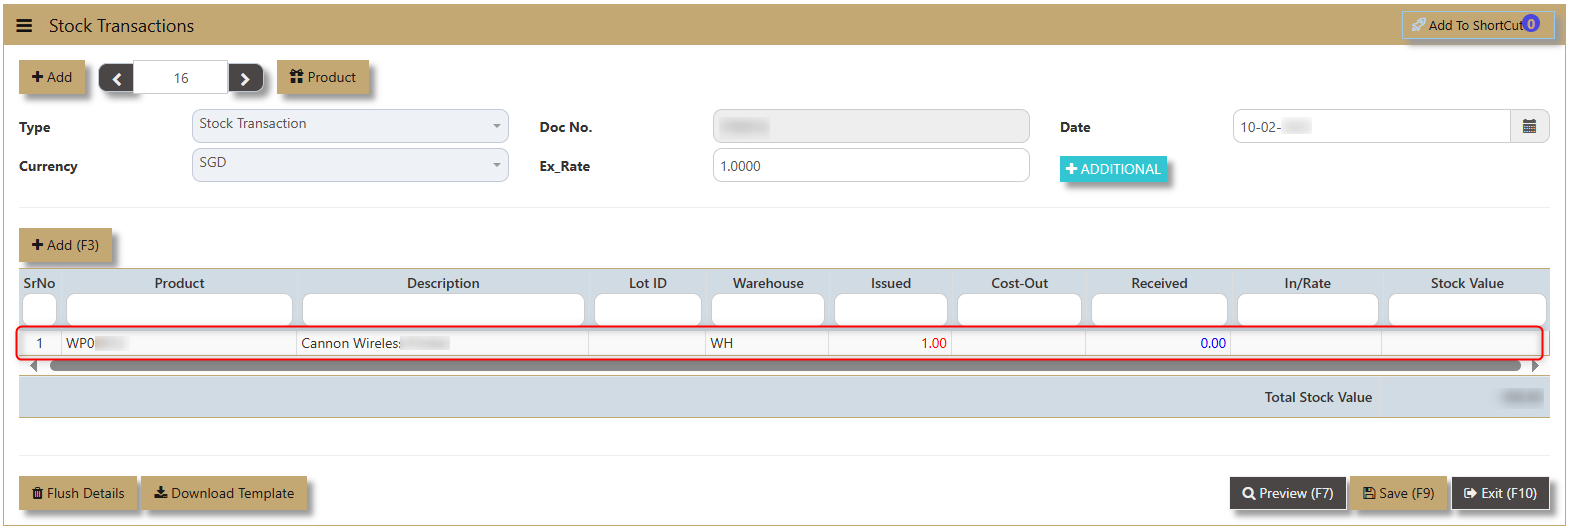
1. Click on Stocks – Issue & Receive – Stock Transactions icon for following screen.
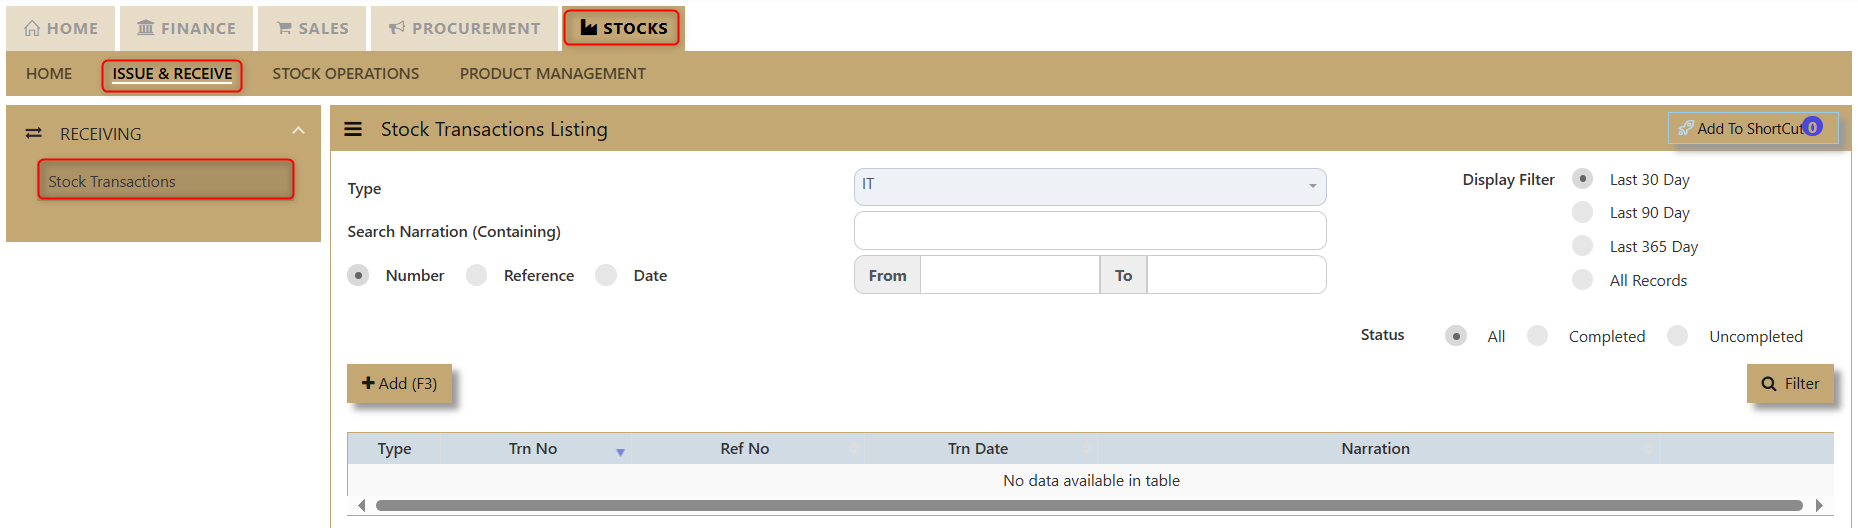
2. Click Add (F3) to create new record.
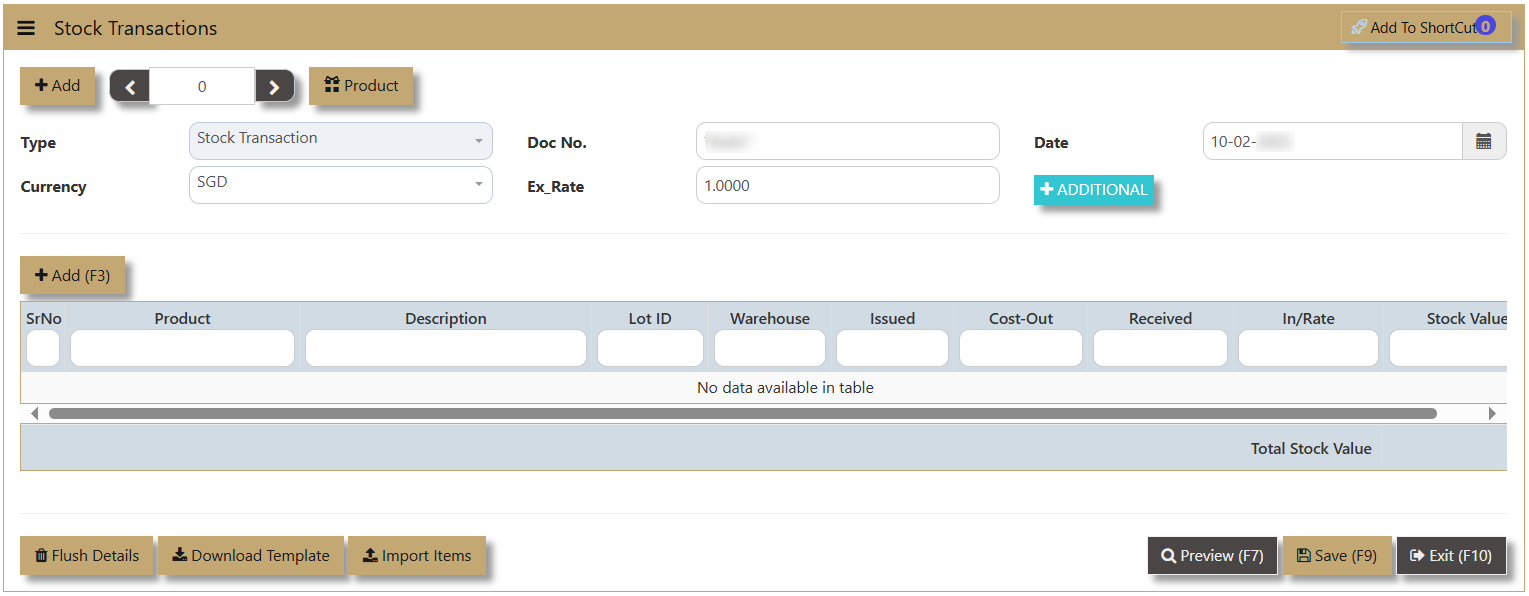
3. Type option is a autogenerated by the system which means user is under Stock Transaction type.
4. Select which Currency applies with the transaction (e.g., SGD, USD, EUR).
5. Doc No depends on the setting the user has set within their account books. It can be auto generated or manually encoded.
6. Ex_Rate is the exchange rate applicable to the certain stock transaction.
7. Date when the stock transaction was made..

The Product provides an overview of the maintained information that user made in the Product & Service Maintenance.

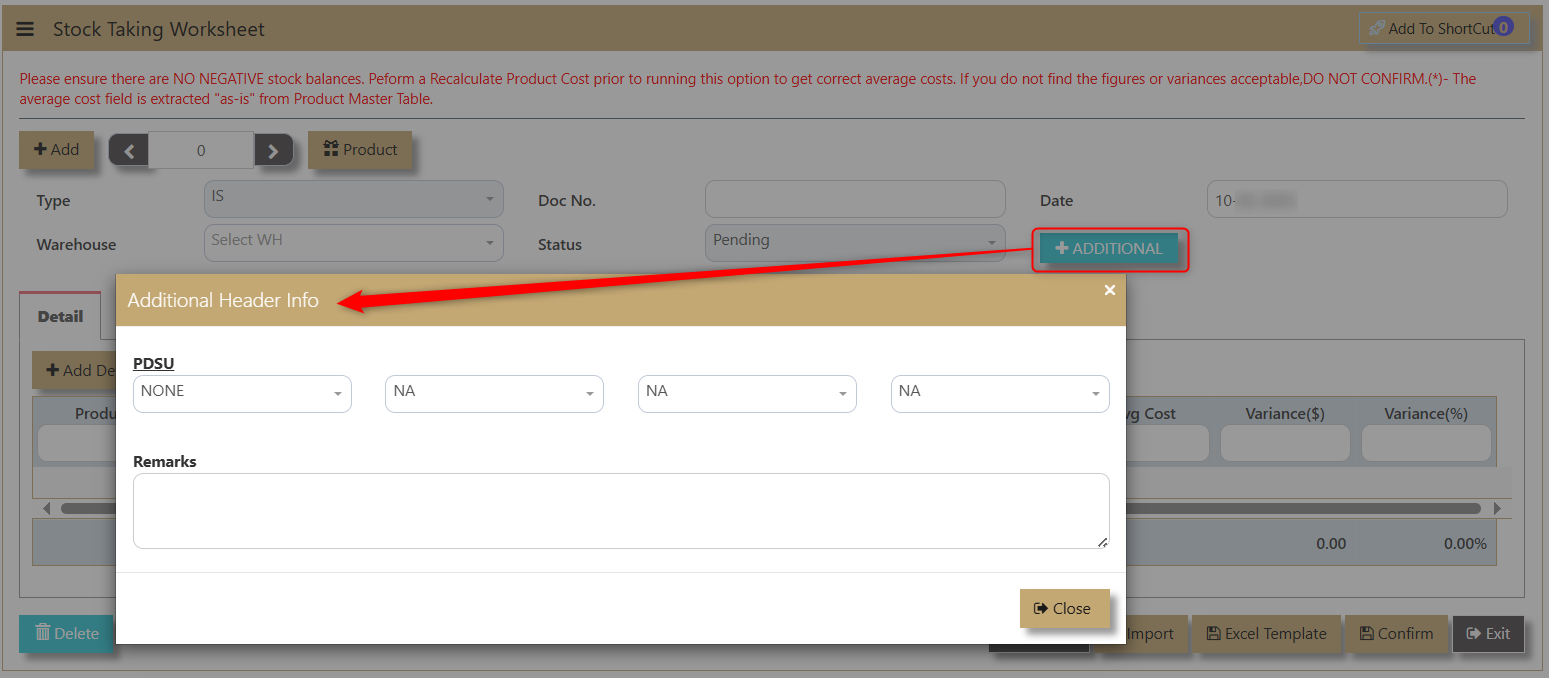
The Additional button is an additional header info for the transaction if the user wants to indicate PDSU (Project, Department, Section, Unit) and Narration for the transaction.
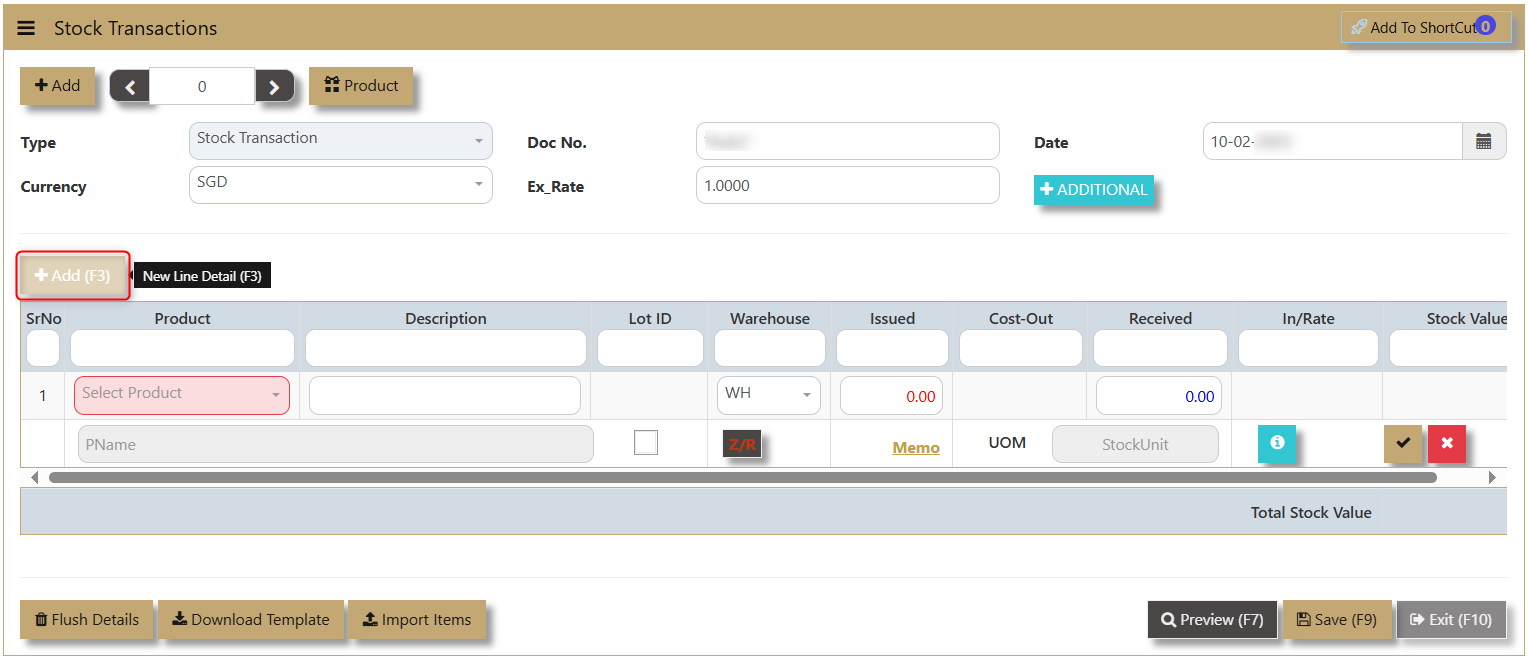
8. If user clicks the Add button, a new line detail will appear with a dropdown that includes fields for Product Code, Description, Lot ID, Warehouse, Issued, Cost Out, Received, In Rate, and Stock Value. These fields allow users to input or select the necessary details for managing the product efficiently.
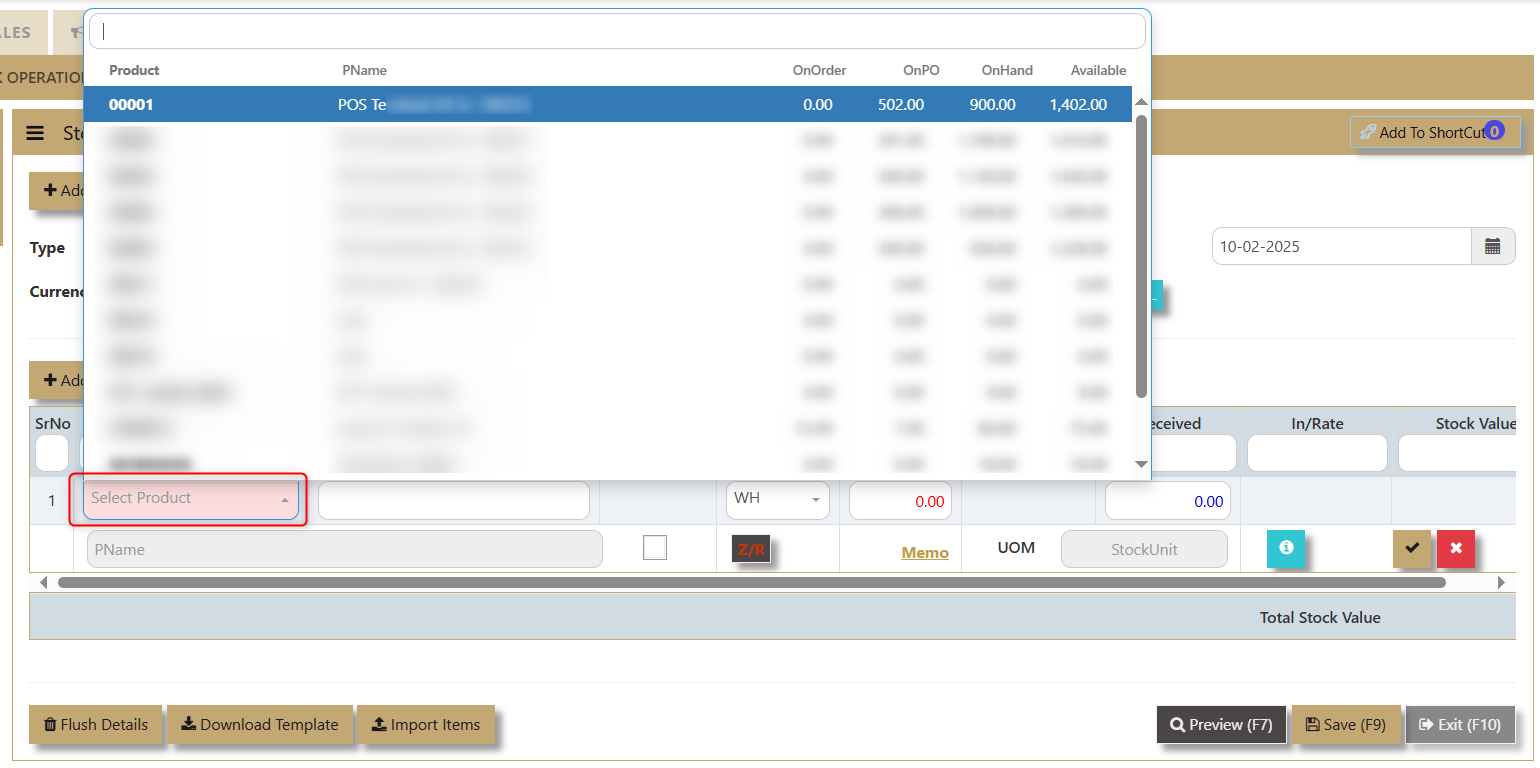
The Select Product dropdown, a list of products involved will appear. The list will display the Product Code, PName (Product Name), and details such as Number of Stock on Order, On Purchase, On Hand, and Available. This allows users to easily select the relevant product and view its current inventory status before proceeding with further actions.
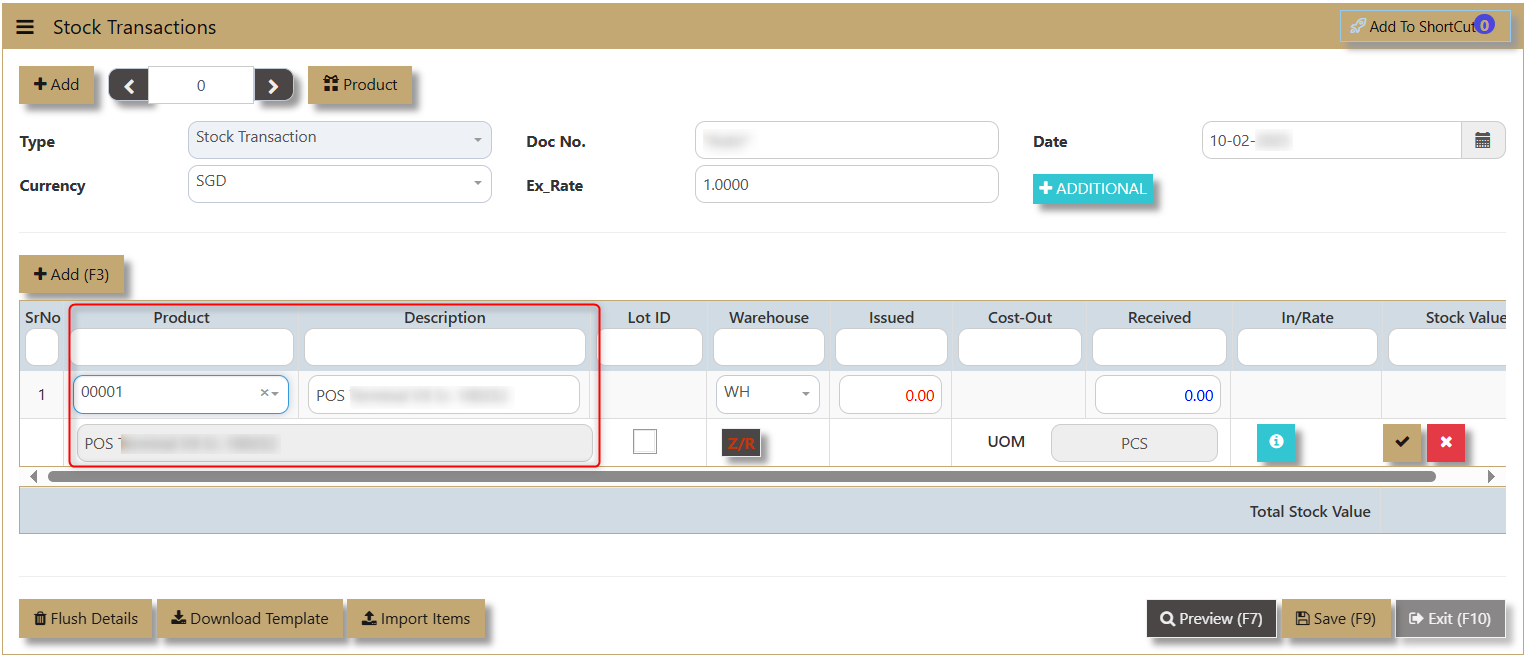
Uniq365 will automatically populate the Product and Description Field once the user choose the product to transact.

If the product has an attribute or categorize as Lot Item, a Lot ID will be reflected in this line detail.
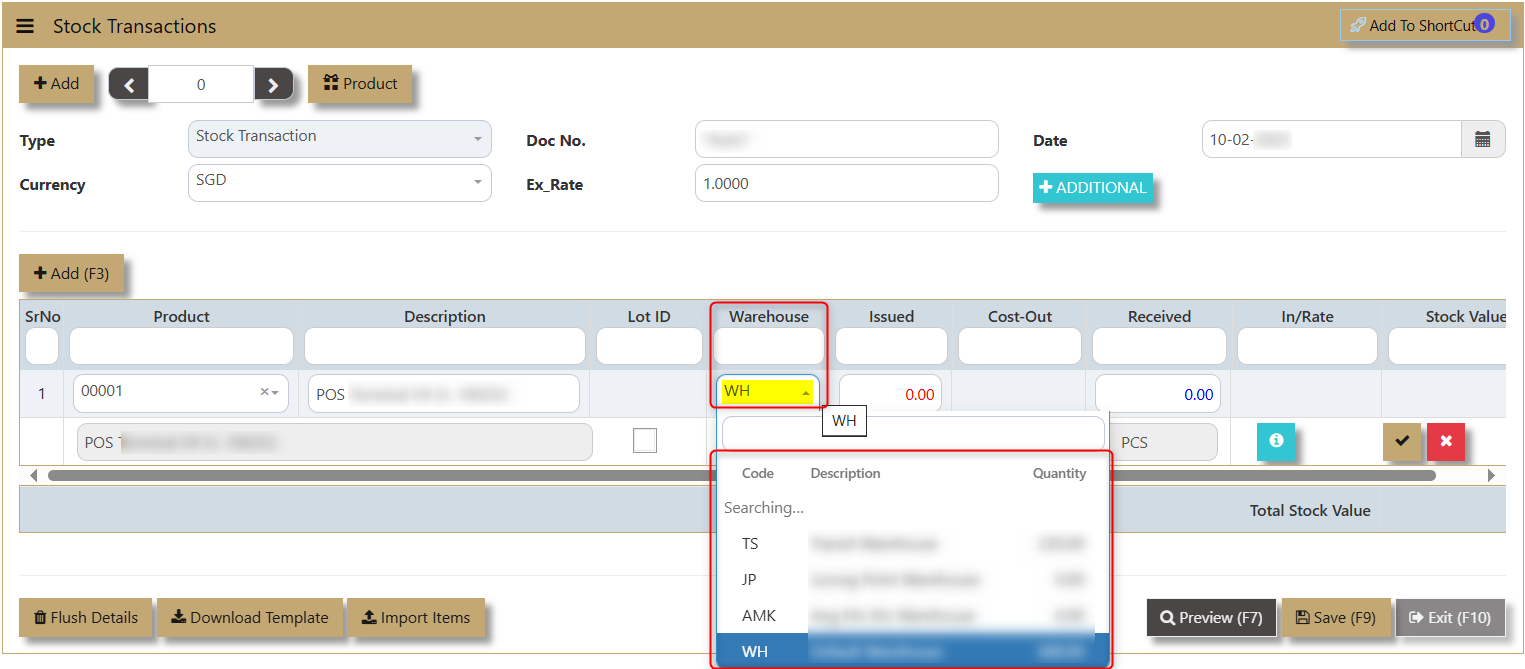
Warehouse (WH) dropdown shows available warehouses for issuing or receiving stocks, displaying the Warehouse Code, Description, and Quantity for each product.
Issued and Received Transaction and its Cost

1. If the user needs to issue out stock, the Issued-Out field must be filled in with the quantity the user intends to issue.
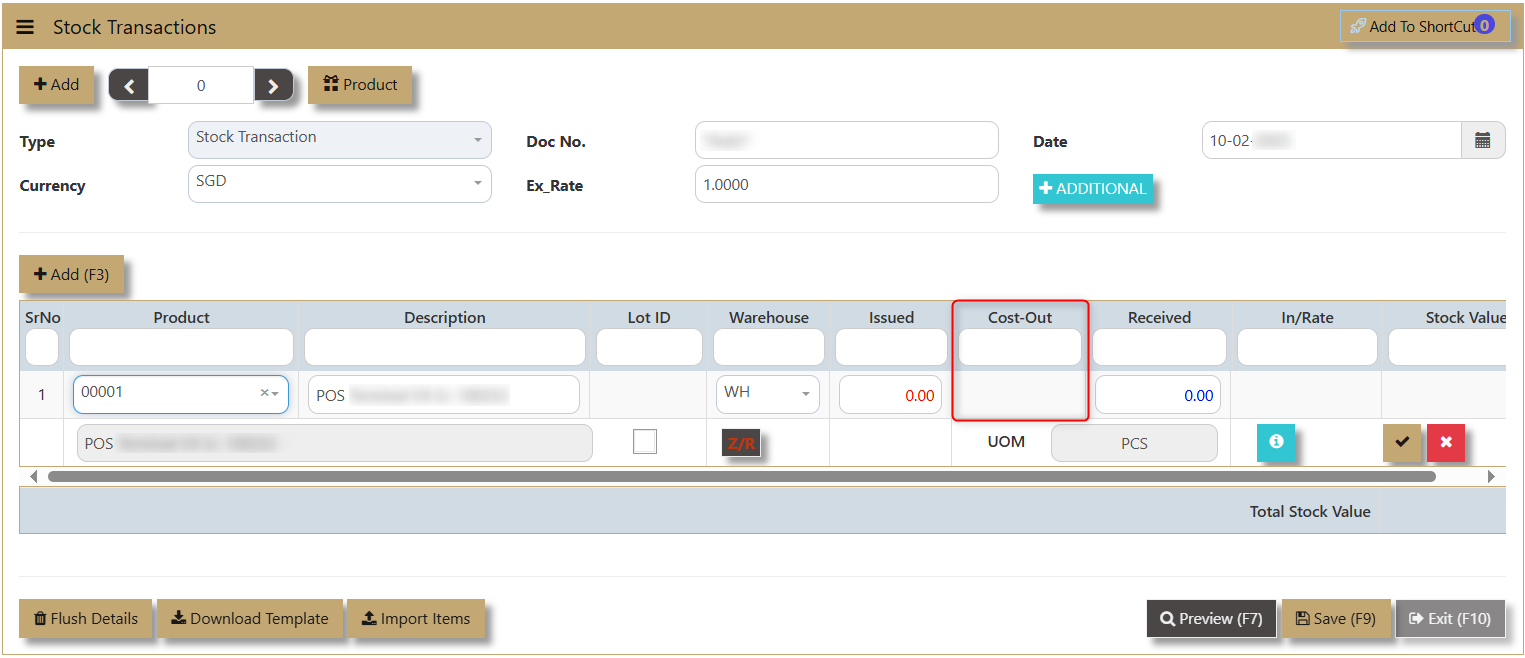
Cost-Out field is auto updated by the system. The user will not have control over what the value being costed out since it is controlled by the valuation technique set up on the product maintenance.
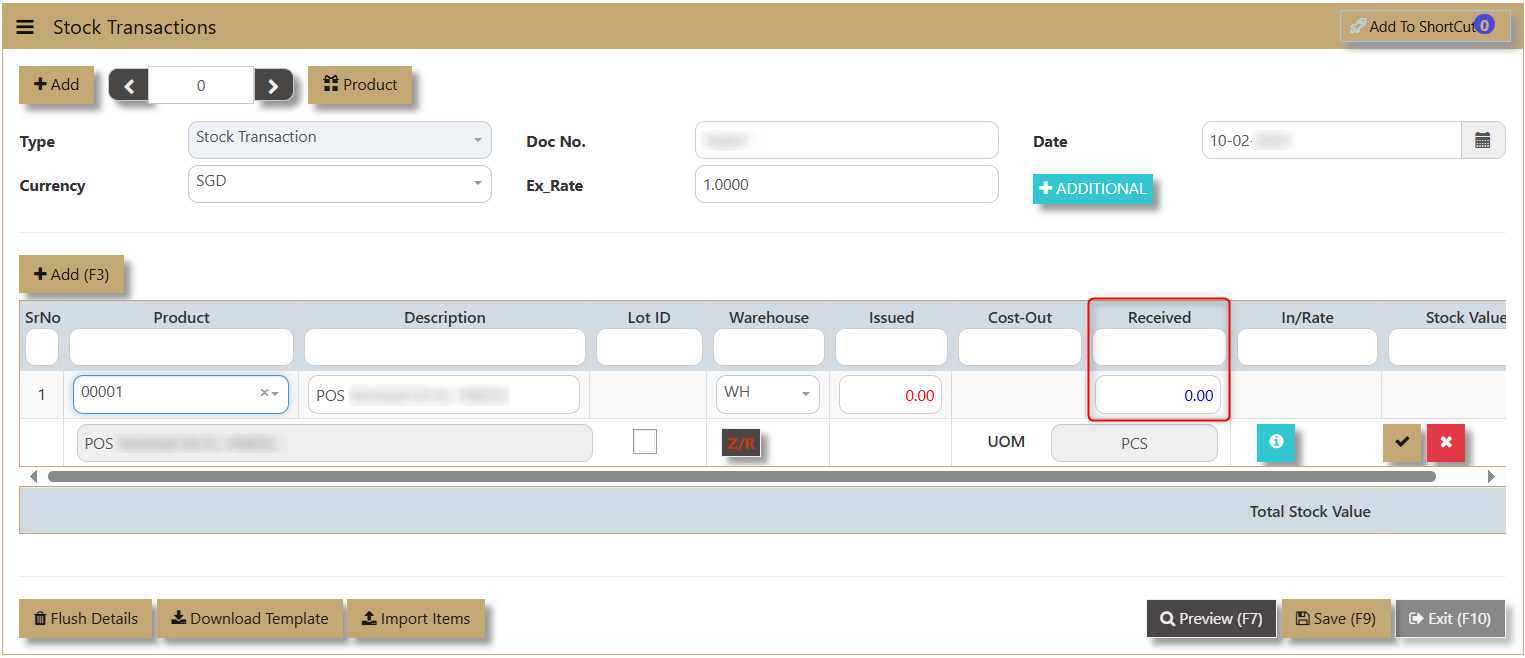
2. The Received field is filled with the corresponding quantity if the user is receiving or issuing in a product.
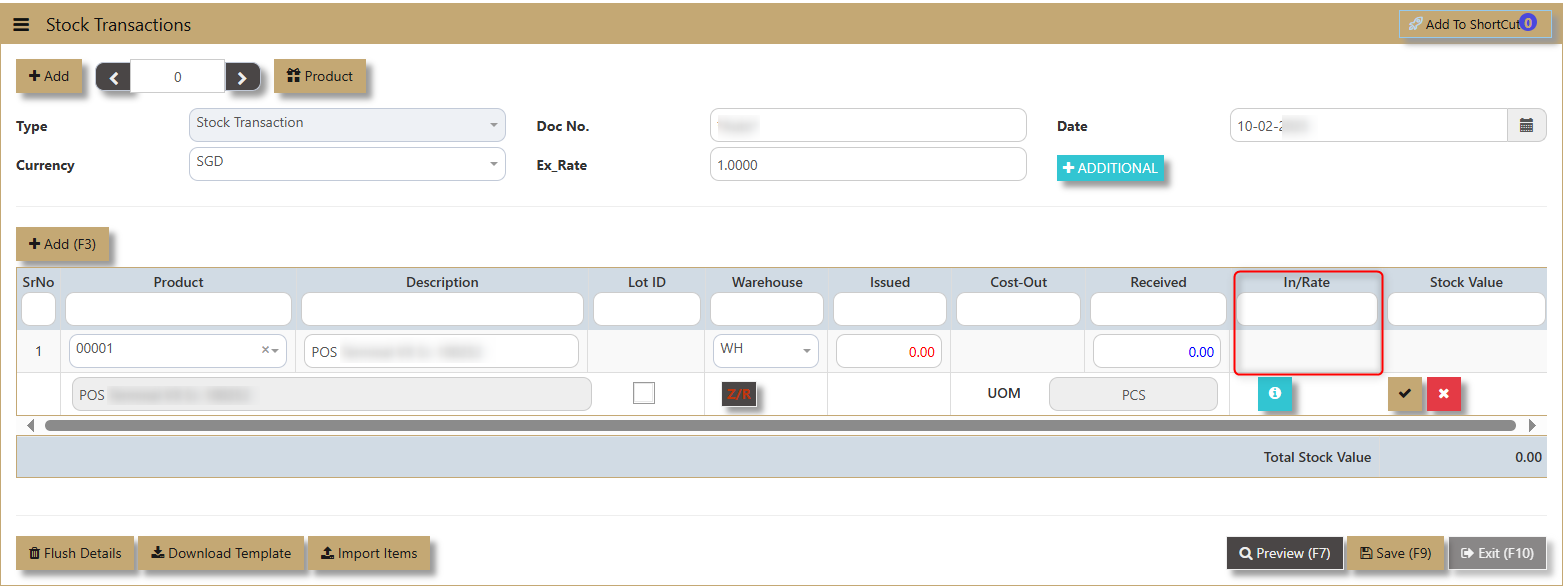
In-Rate field allows user to specify a cost to the item being taken in.
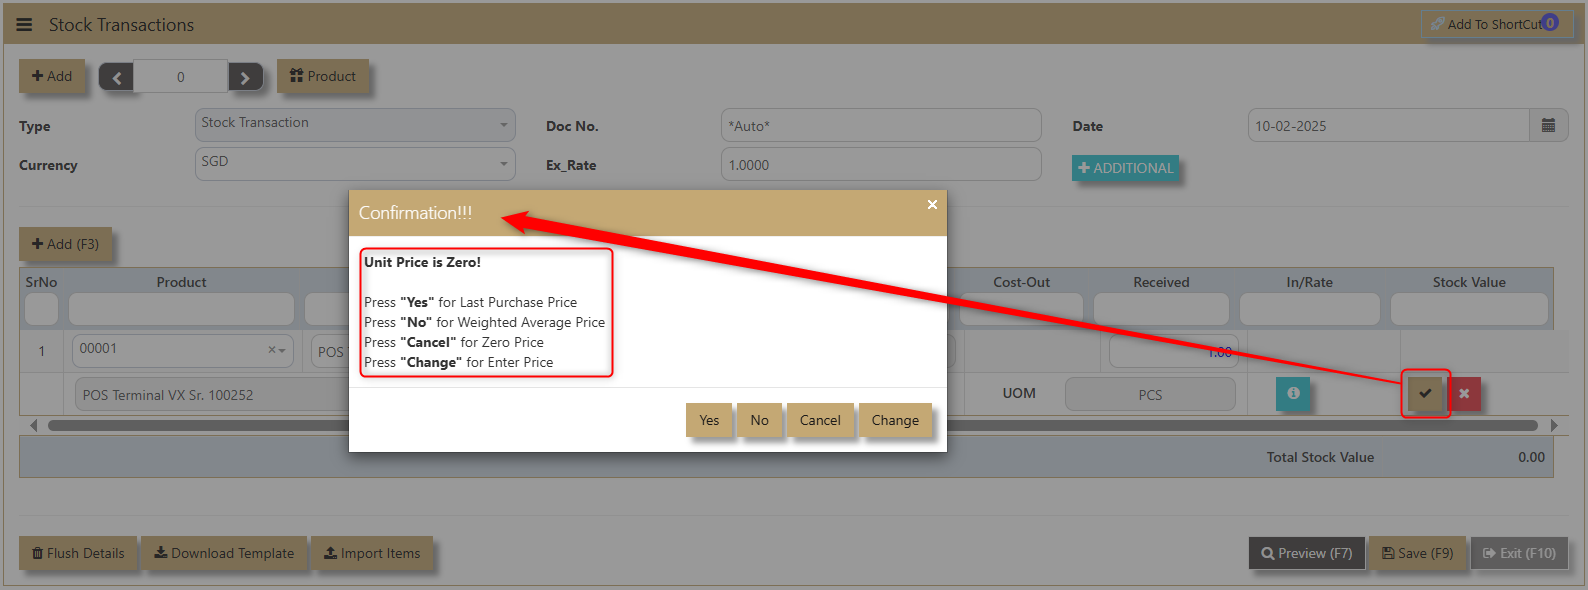
3. Once the user fills in the quantity for Issue or Received, a confirmation will appear asking which Unit Price to apply for the transaction. The options are:
- Yes for Last Purchase Price
- No for Weighted Average Price
- Cancel for Zero Price
- Change to Enter Price manually.
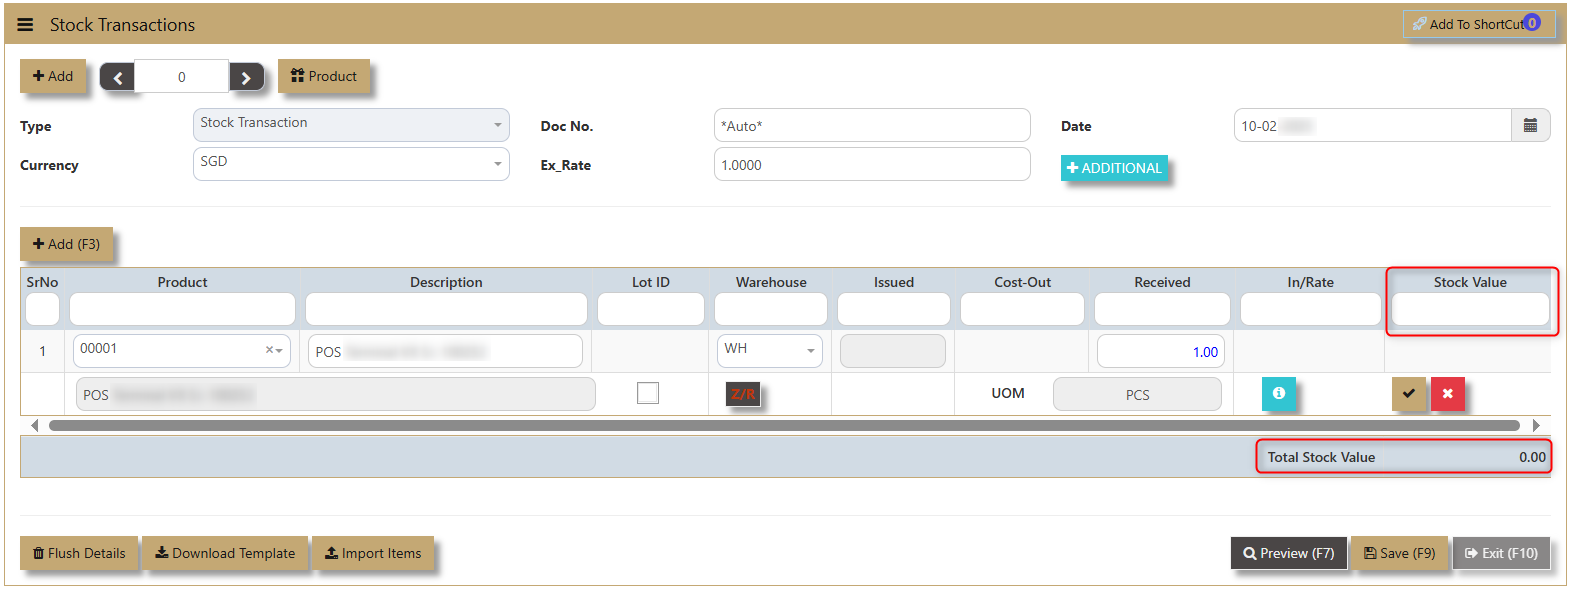
4. After the confirming the Price applicable to the transaction, the system will compute the Stock Value accordingly.
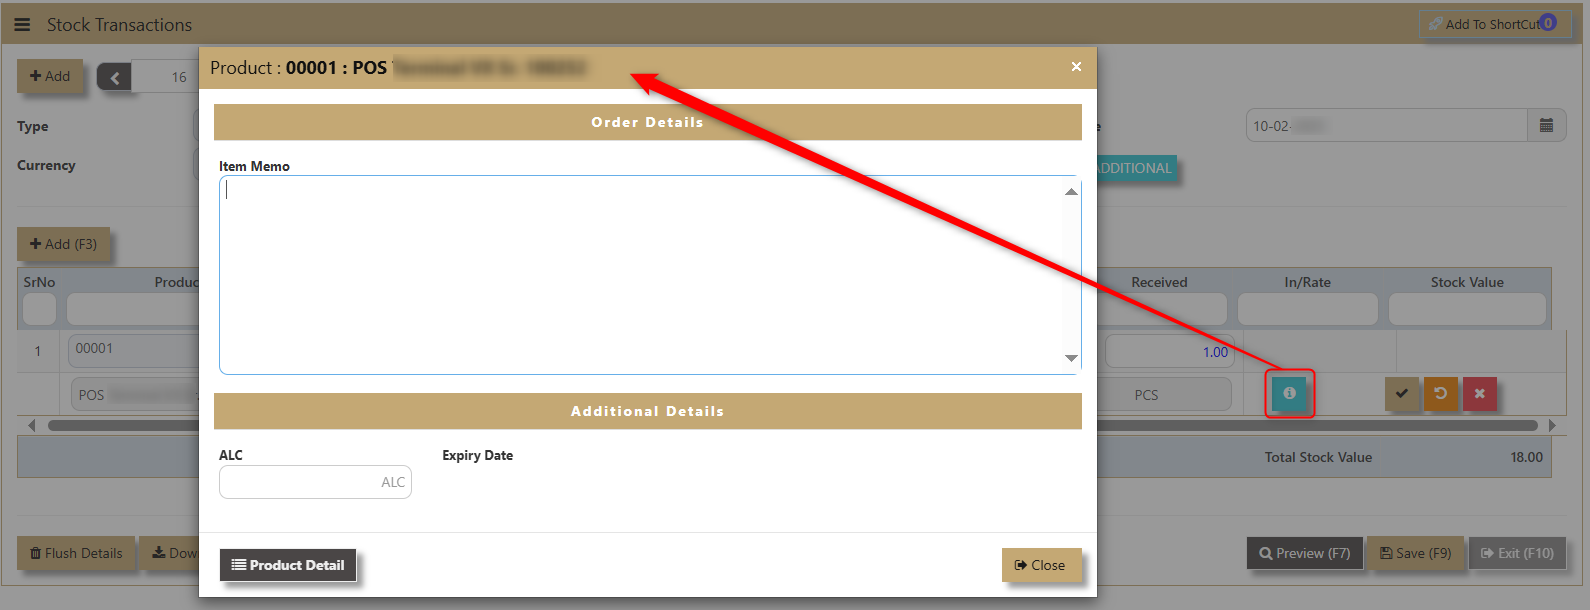
In the line details, user can click on 'i' icon to indicate information for the order detail such as Item Memo and additional details for ALC and its Expiry Date.
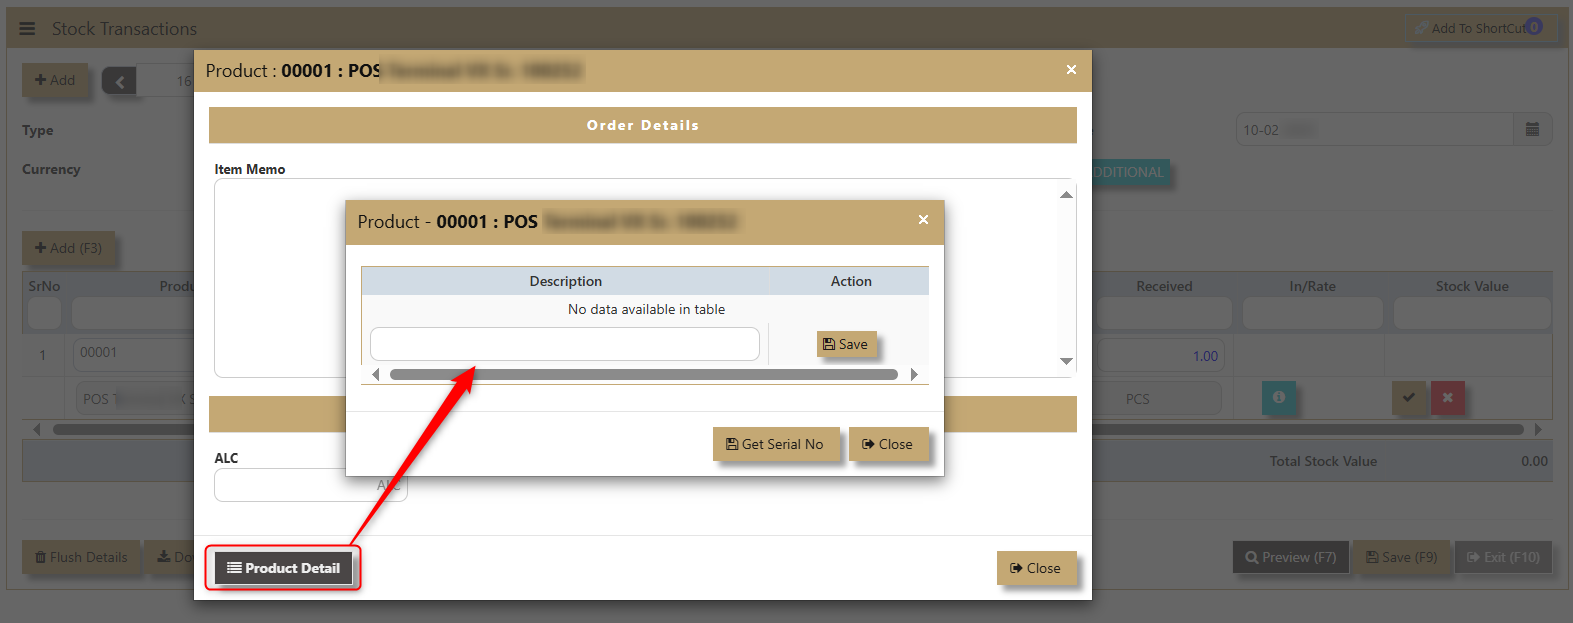
Product Detail button can be used to add any additional description and Get Serial No if the product is classified as Serialized Items in its attributes.
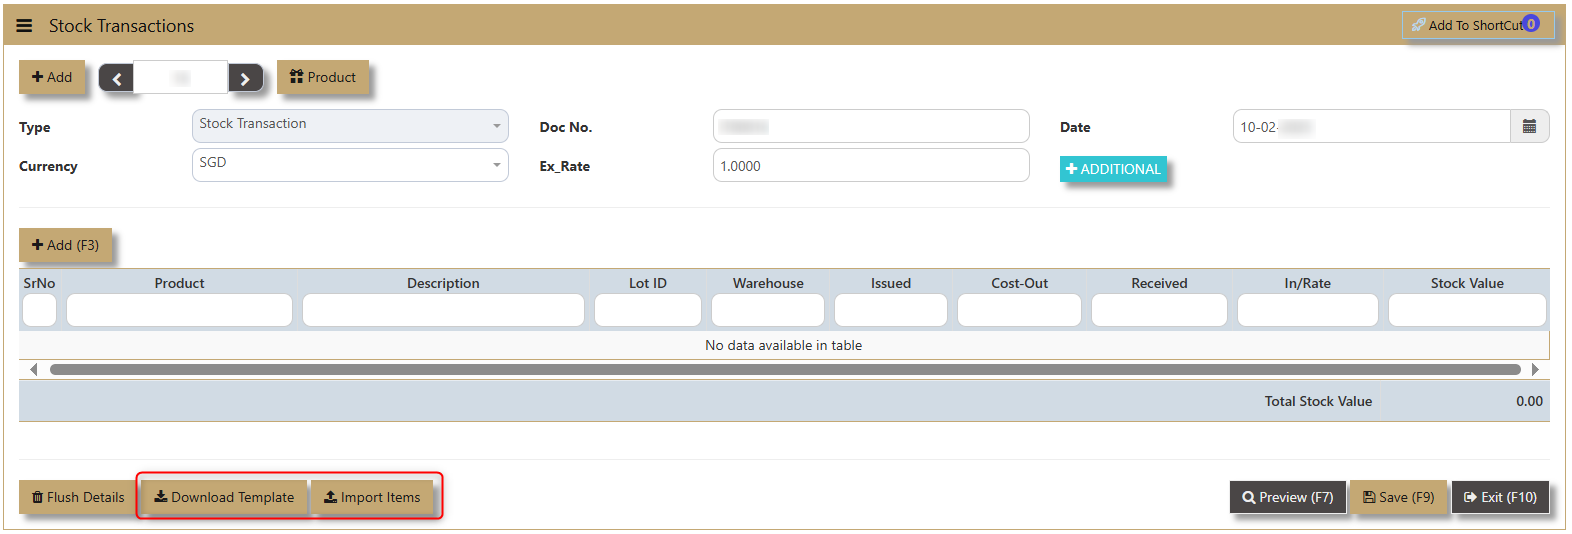
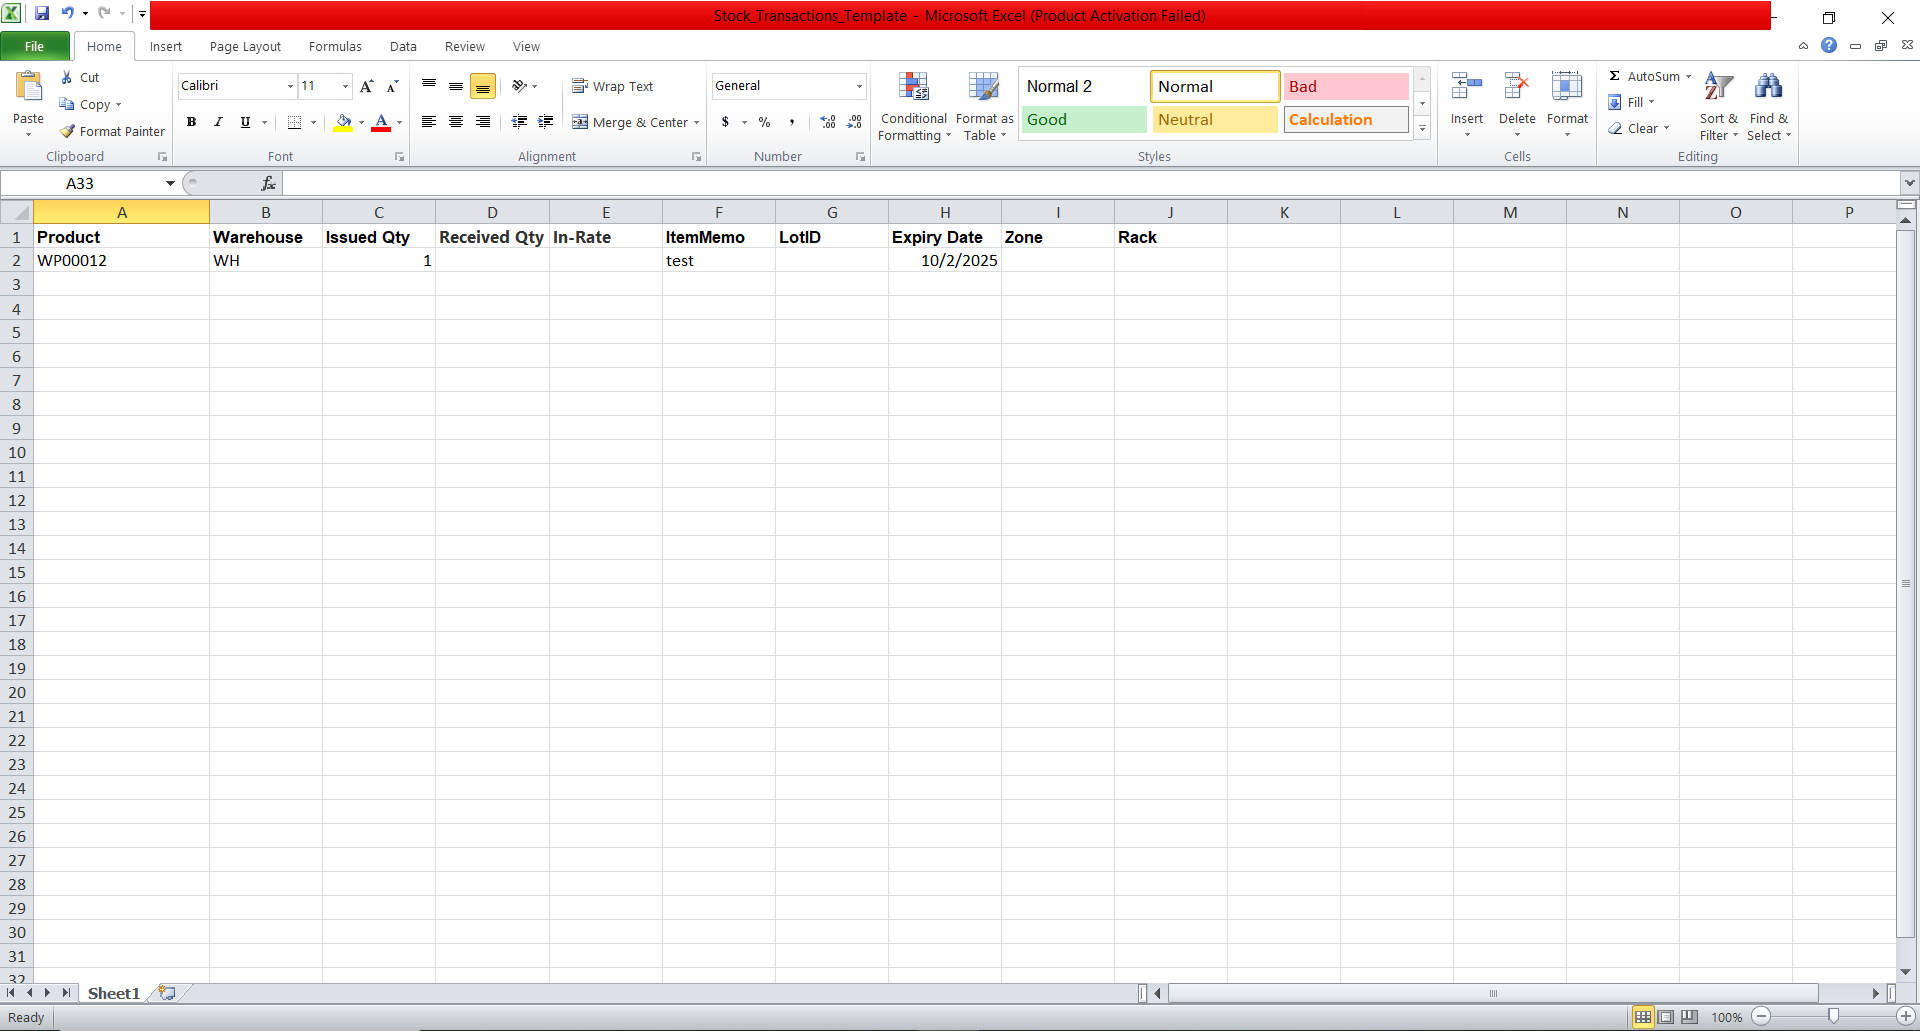
Download Template is the excel format that can be used to simplify the adding of transactions. Just fill out the necessary infomation and click on Import Items and the system will reflect the line details.
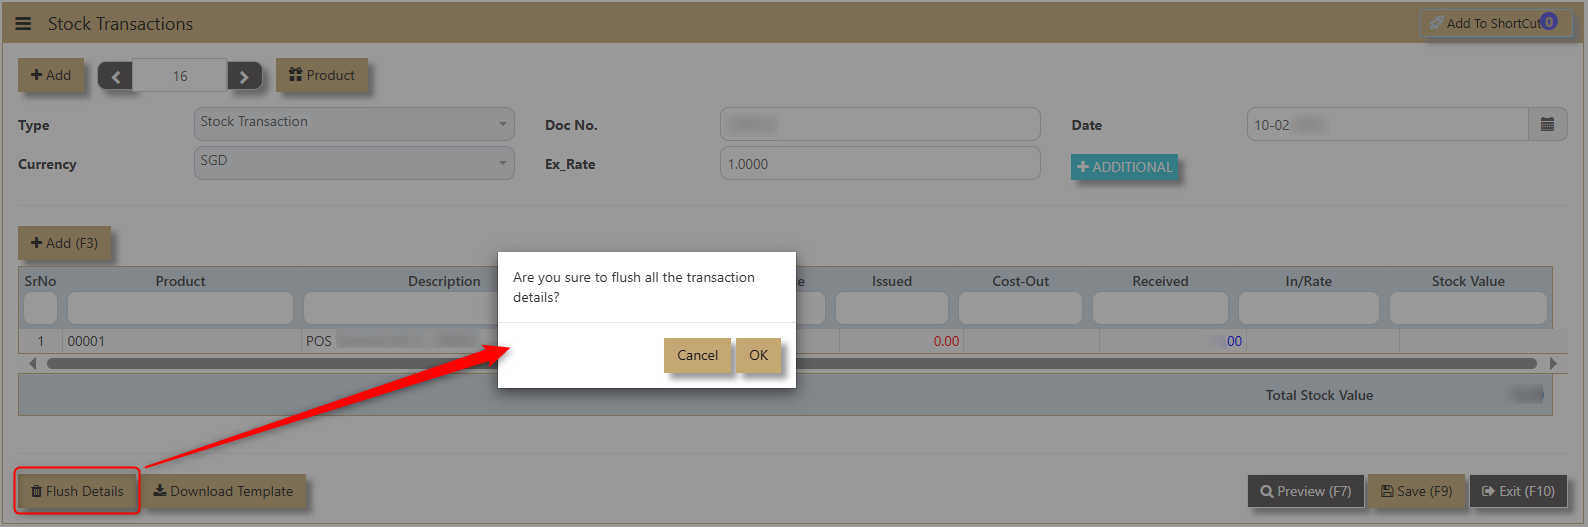
5. Make sure to click on 'Save' after the transaction is made.
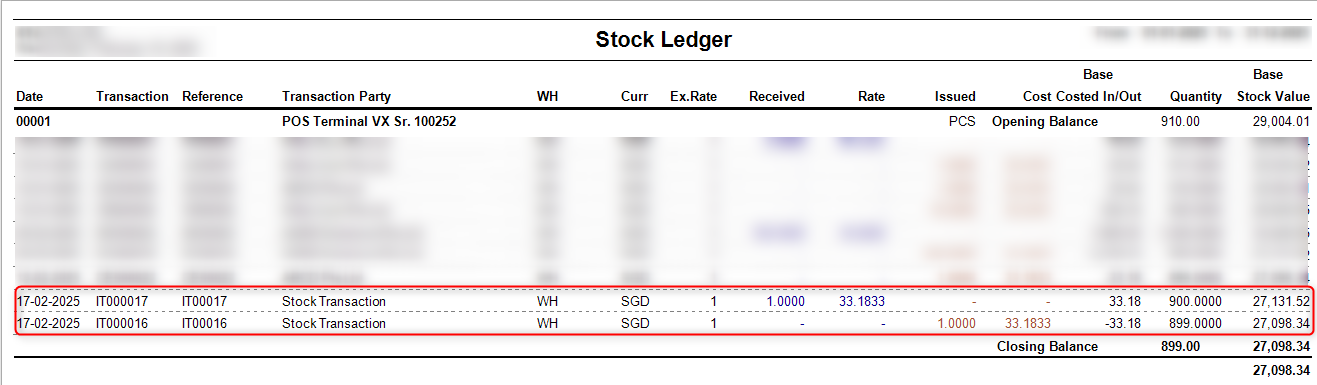
User can be able to see this transaction in the Stock Ledger as shown below: (Given that the user transacts an IT in and IT out)
Opening Stocks
Uniq365 represent Opening Stocks as the value of stock at the beginning of the financial year. This value is automatically reflected based on the account posting settings configured in the account book, ensuring accurate alignment with the company’s financial records and inventory management at the start of the period.
This is the screen to enter or edit the stock balances as on the starting date of actual implementation of UNIQ365 Accounting. This does not perform on-line posting.
________________________________________________________________________________________________________________________________________________
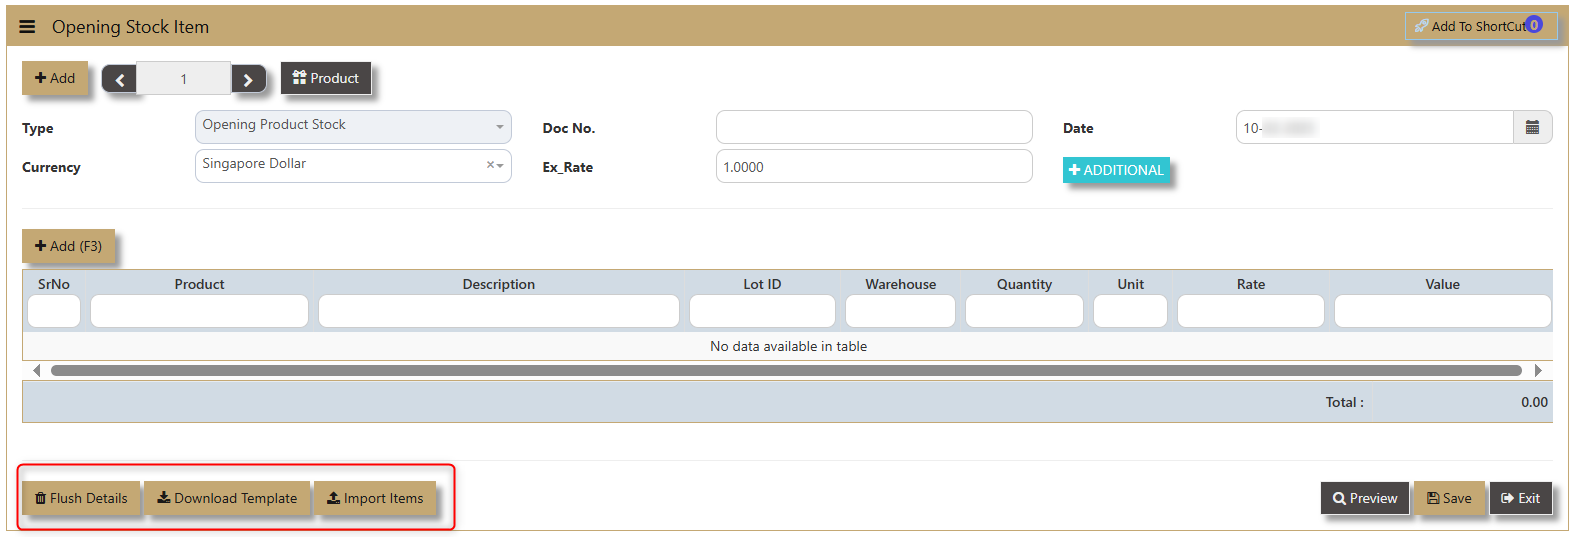
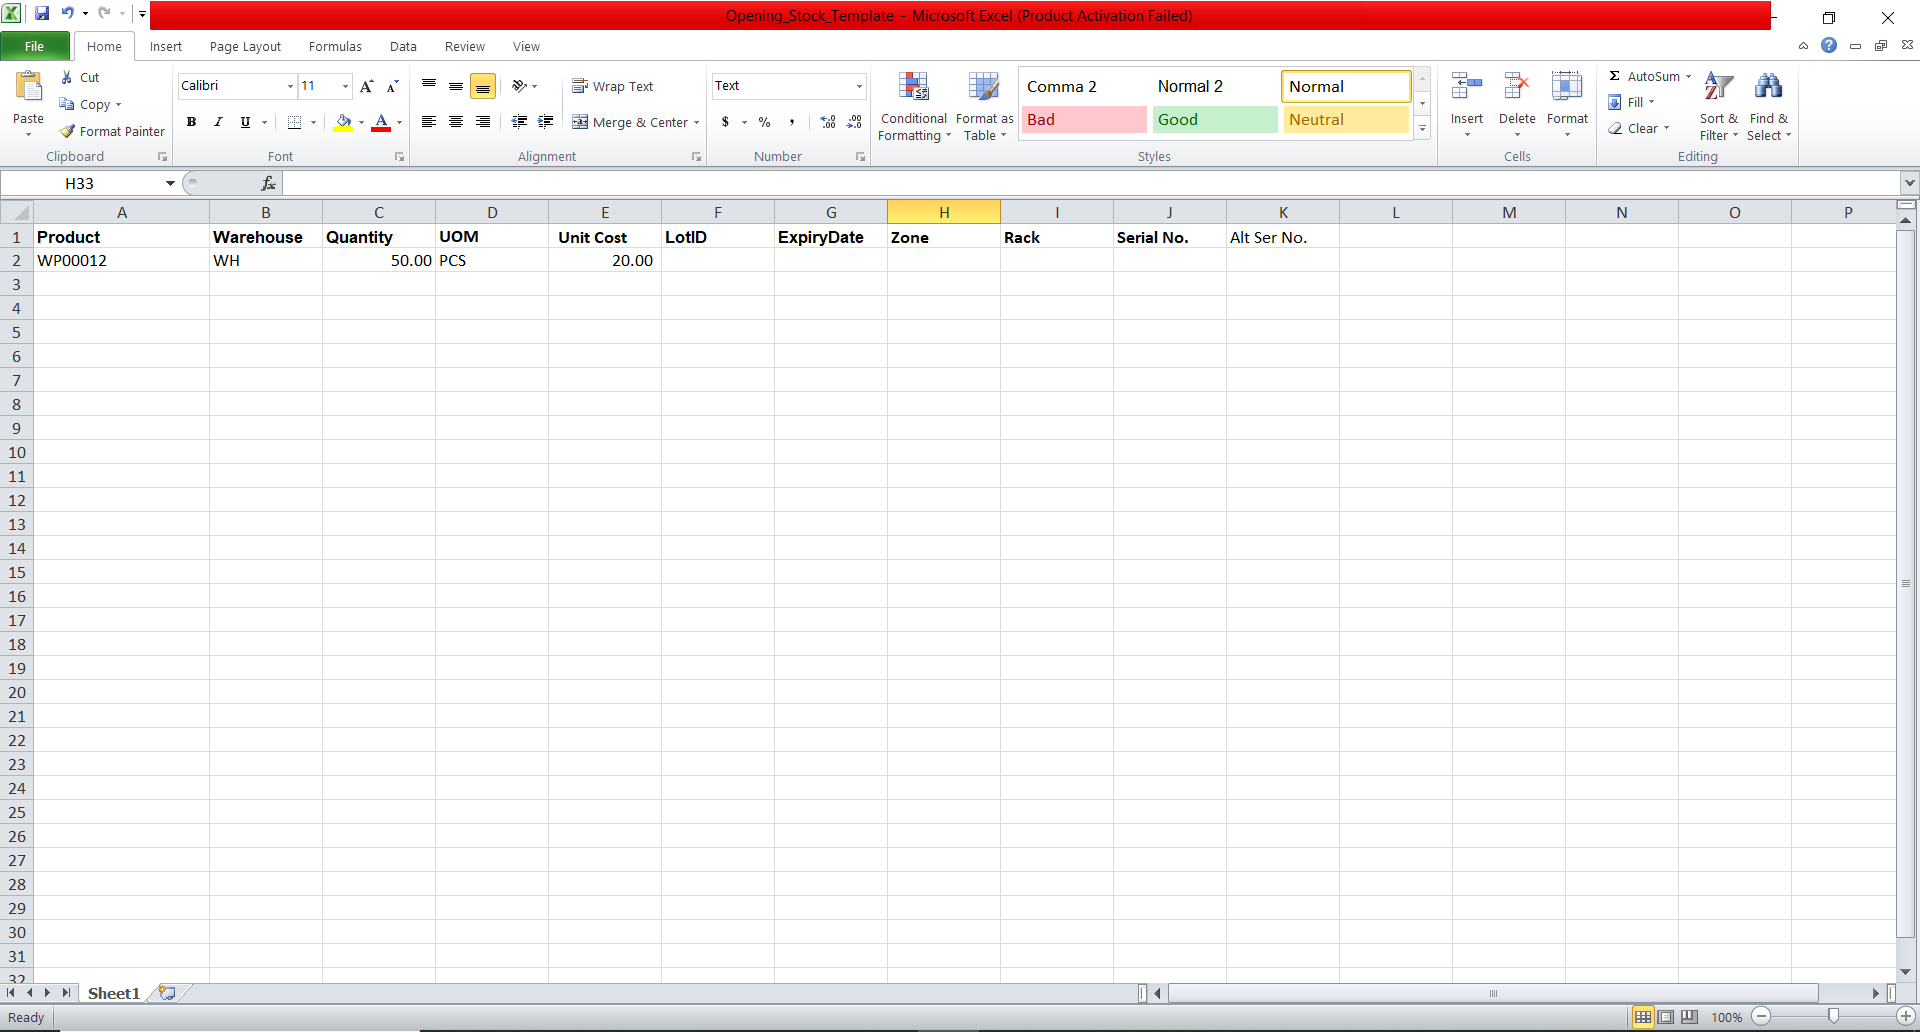
How to create Opening Stocks?
1. Click on Stocks – Stock Operations – Opening Stocks icon for following screen.
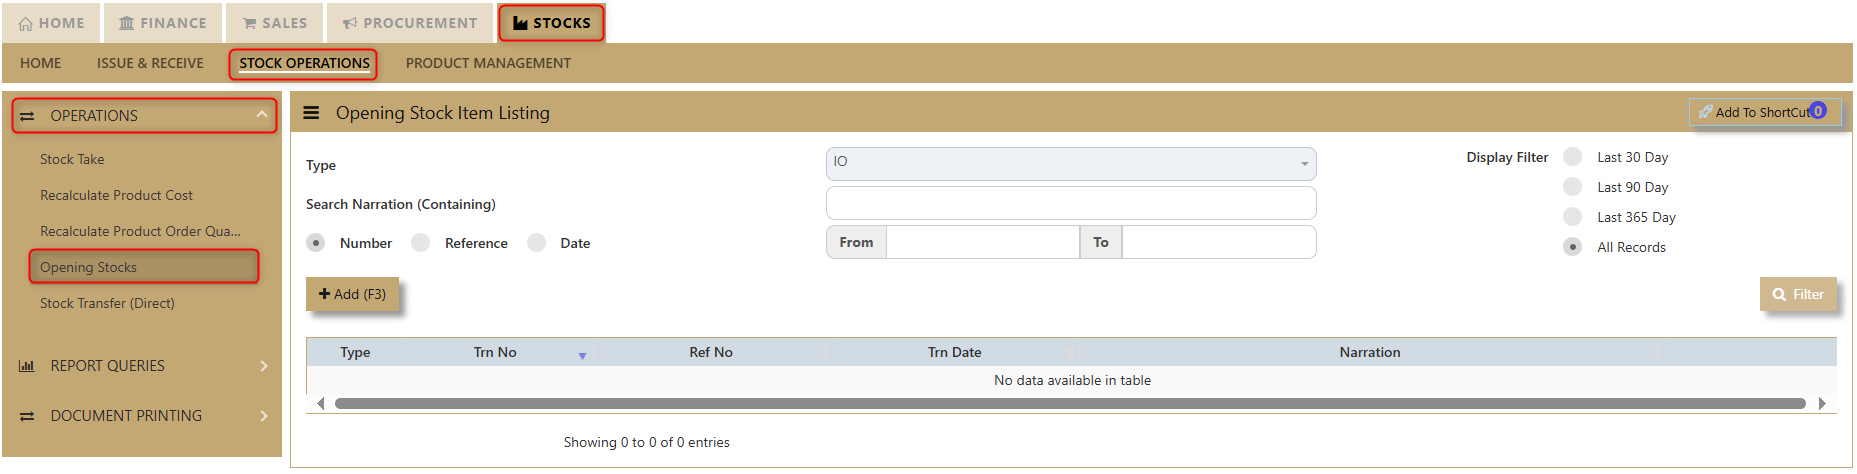
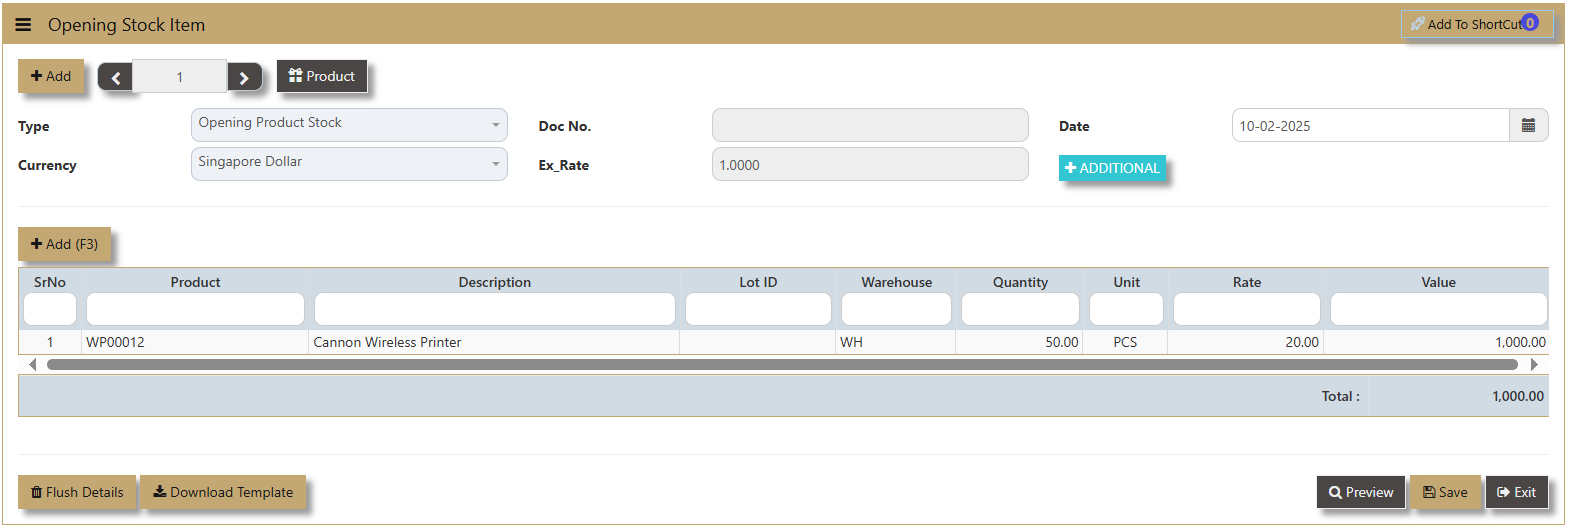
2. Click on Add (F3) button to create new transaction.
3. Add the line details of the product that the user needs to open balance with.
- In each Opening Stock transaction, only 1 line is allowed per stock item per warehouse. You may enter as many lines as you like so long as the product codes and/or warehouses are different.
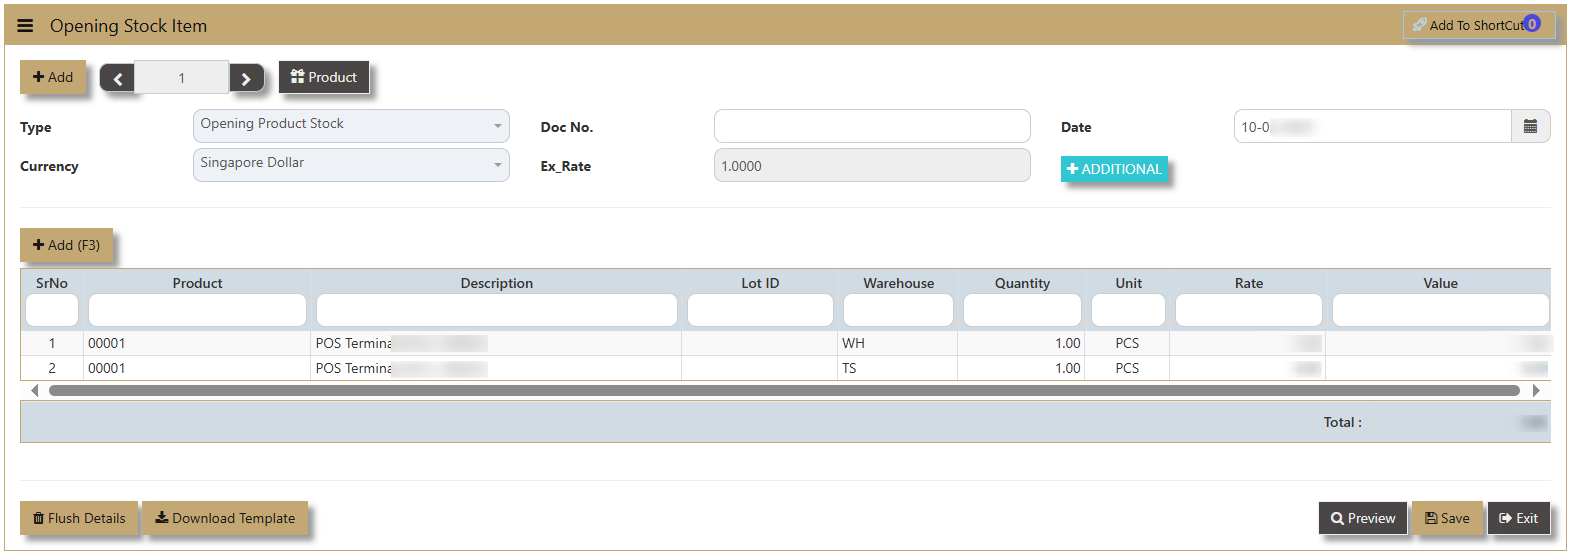
- If there are a few prices for a single item (like different costing for a product under FIFO pricing) to be keyed in, use multiple voucher numbers to effect these entries.
- The total amount of stocks entered in the Opening Stock screen must be equal to the Balance Sheet stock that was entered in the GL – Opening Balances. This is to ensure that the stock ledger ties to the GL stock control account.

Stock Transfers
Stock Transfer (Direct) for Uniq365 refers to the seamless and efficient process of transferring stocks directly between different locations or warehouses within the Uniq365 system. This feature ensures smooth stock movement, real-time tracking, and better management of inventory across multiple locations, enabling businesses to maintain accurate stock levels, reduce errors, and streamline their operations.
________________________________________________________________________________________________________________________________________________
How to create Stock Transfer Direct?
1. In Stocks - Stock Operation - Operation - Stock Transfer (Direct) user can see the screen below.
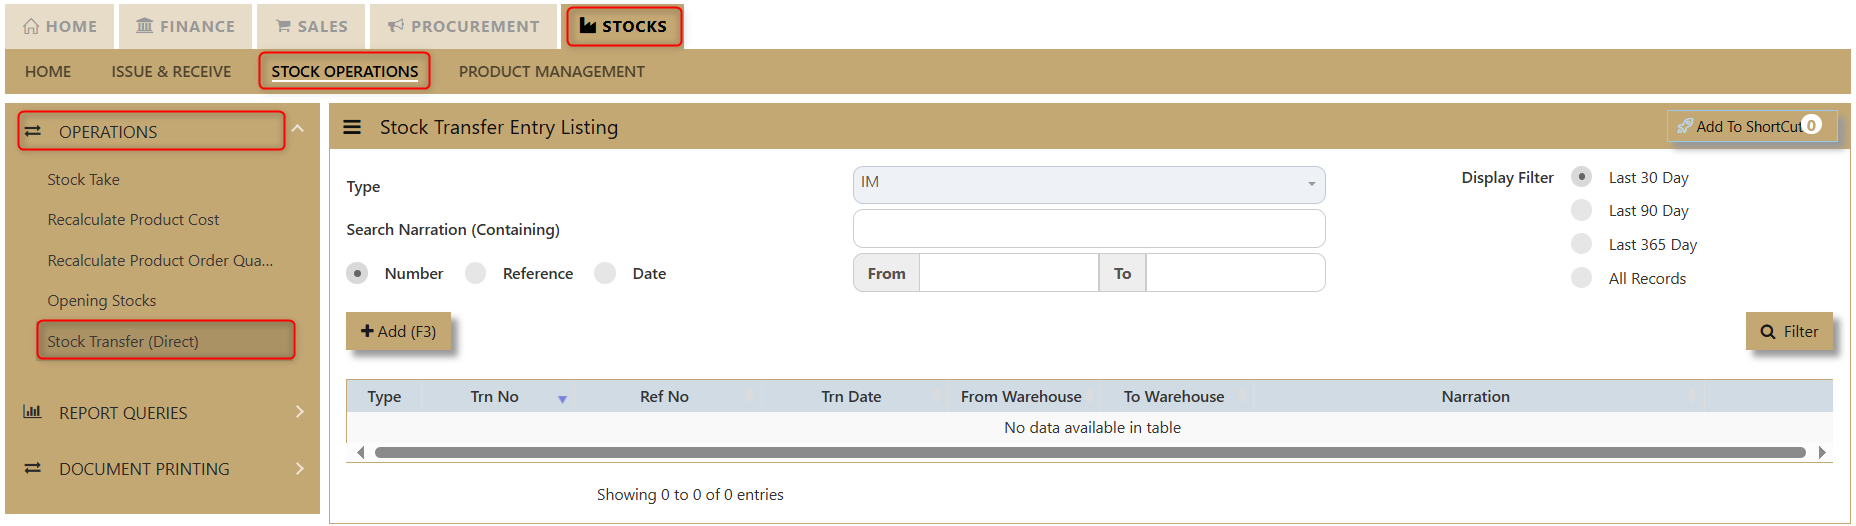
2. Click Add(F3) to create new transaction.
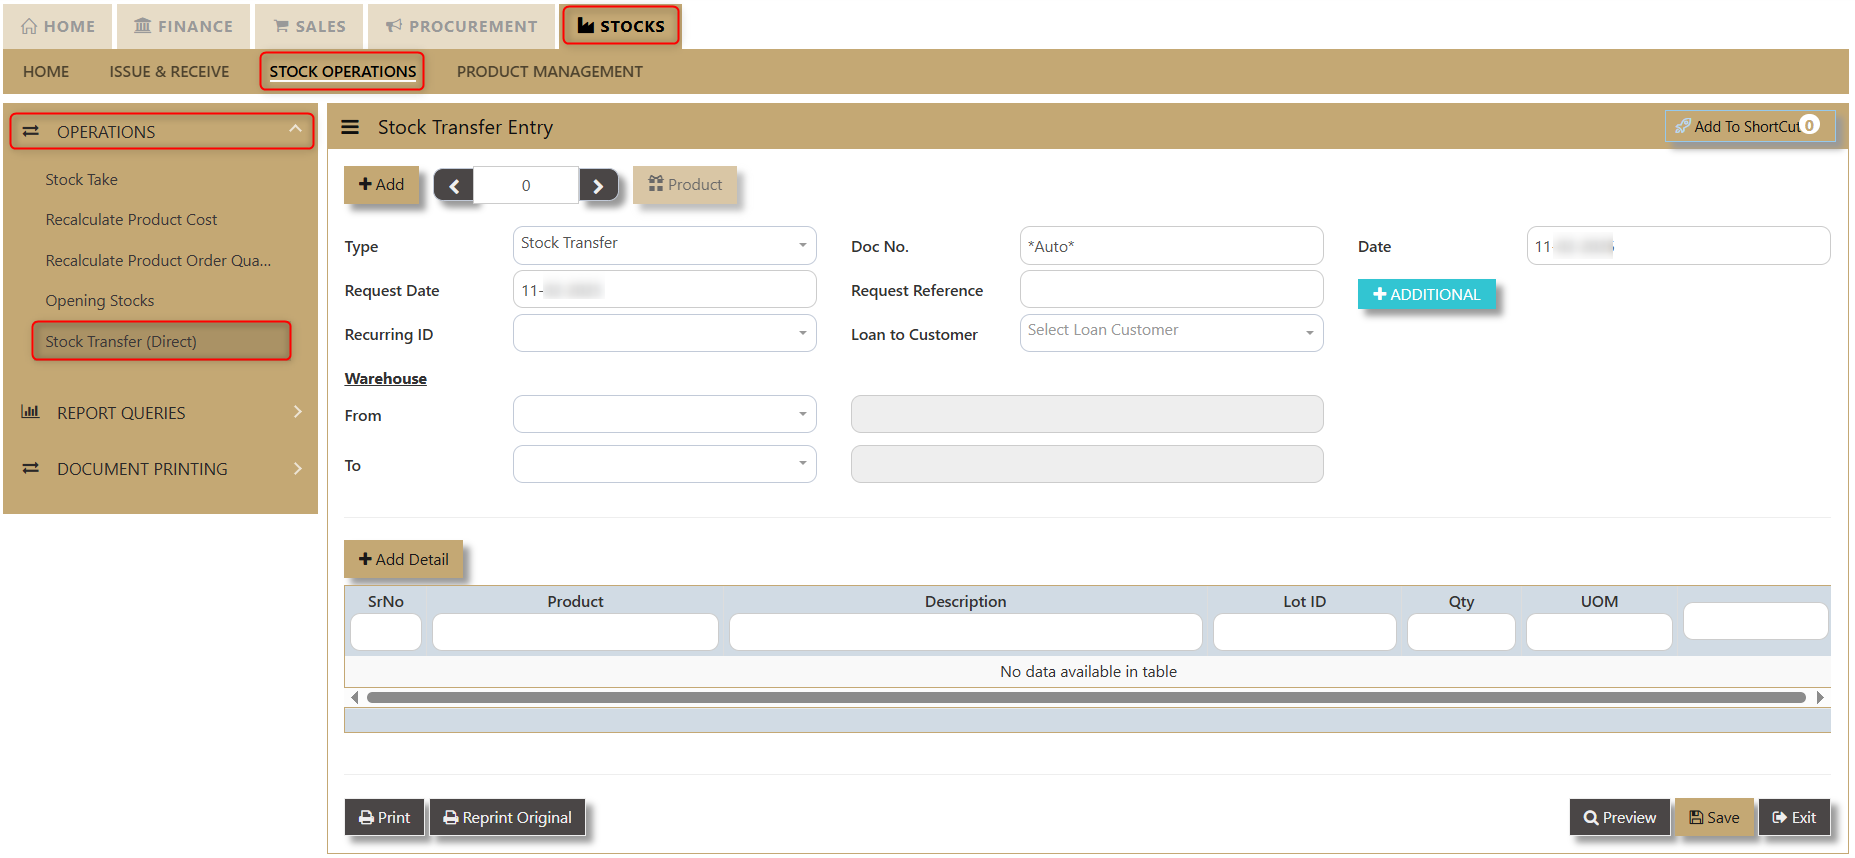
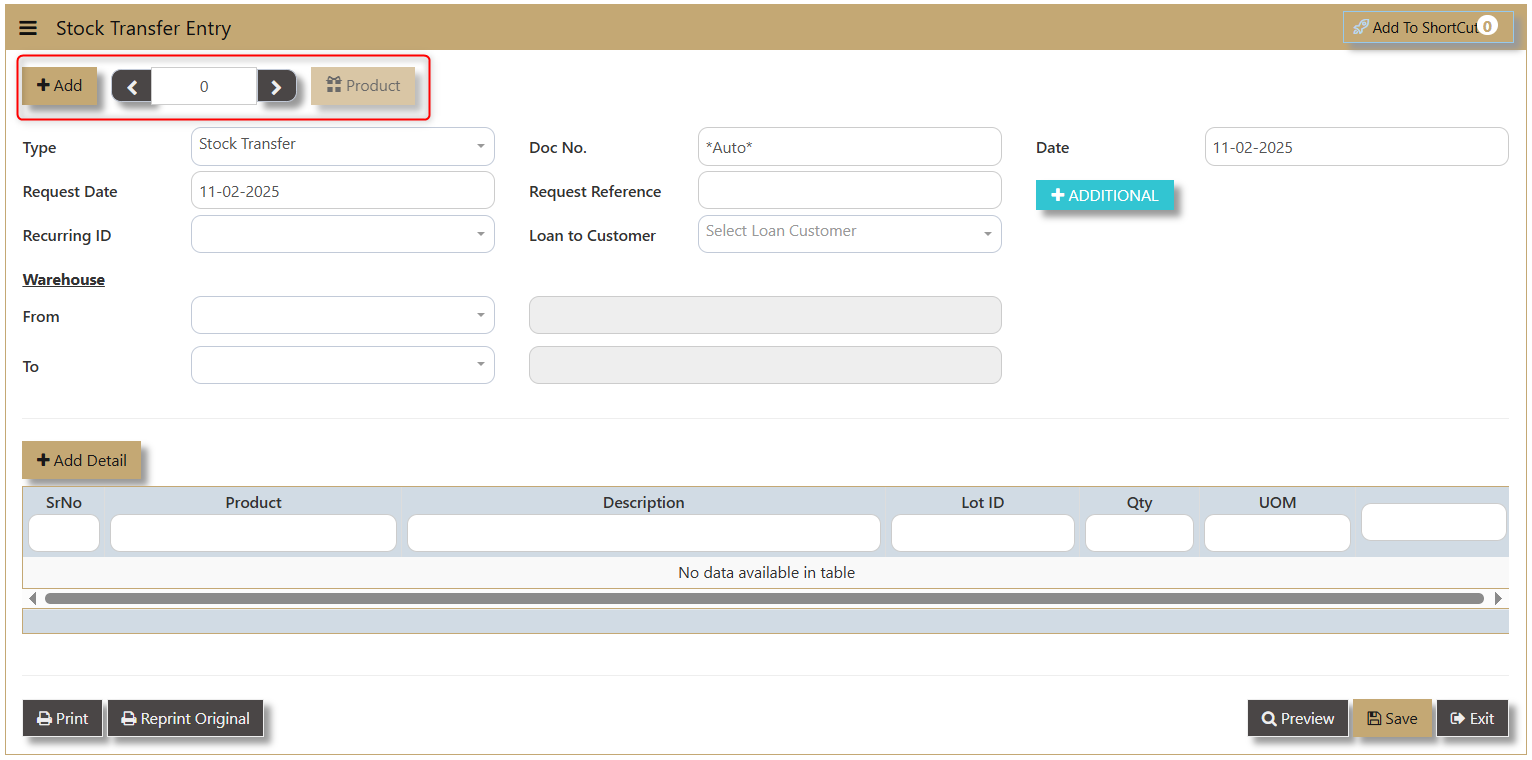
The user must also fill in the following fields:
- Type - a dropdown showing which transaction the user is using.

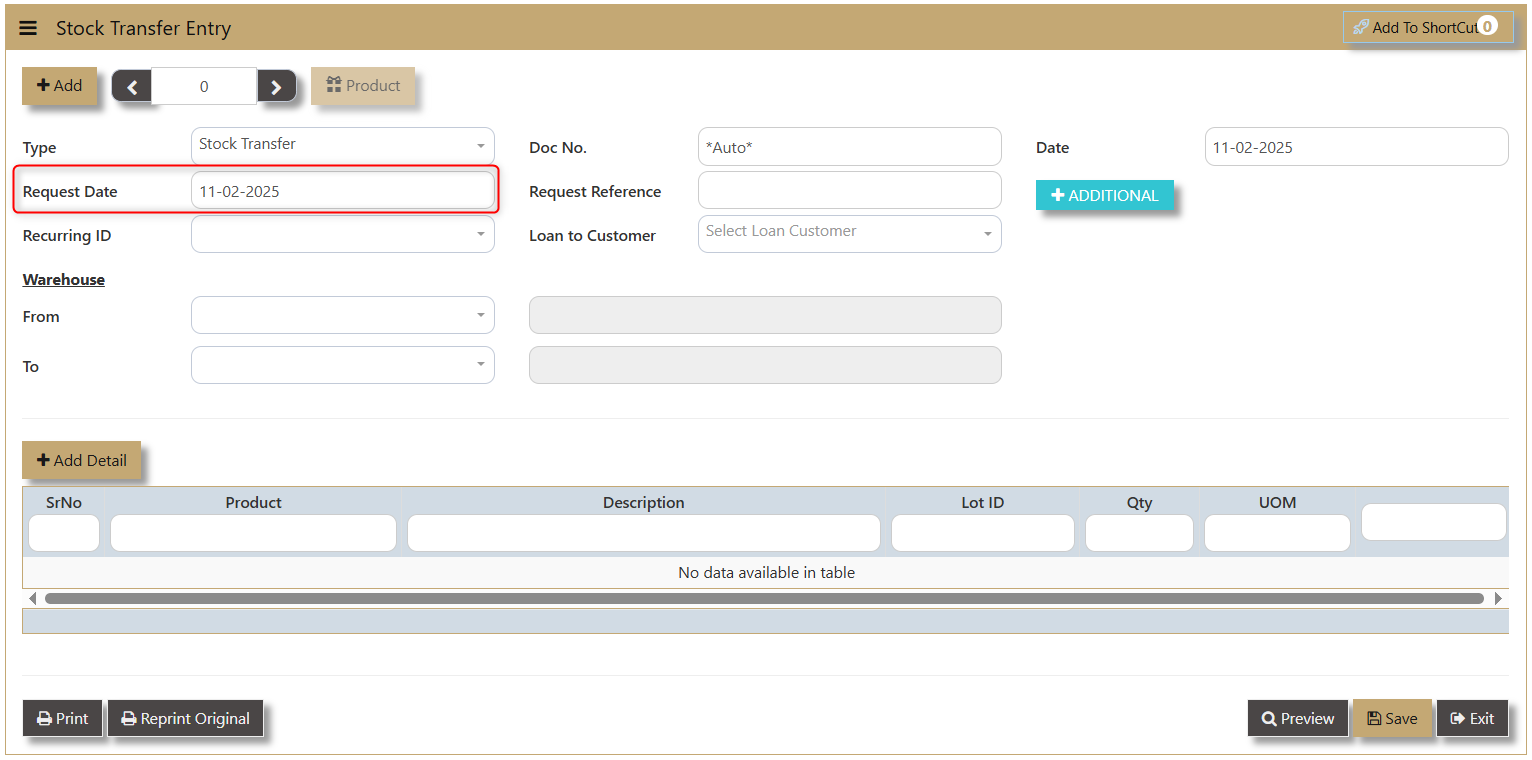
- Request Date - this is when the product is requested for transfer.
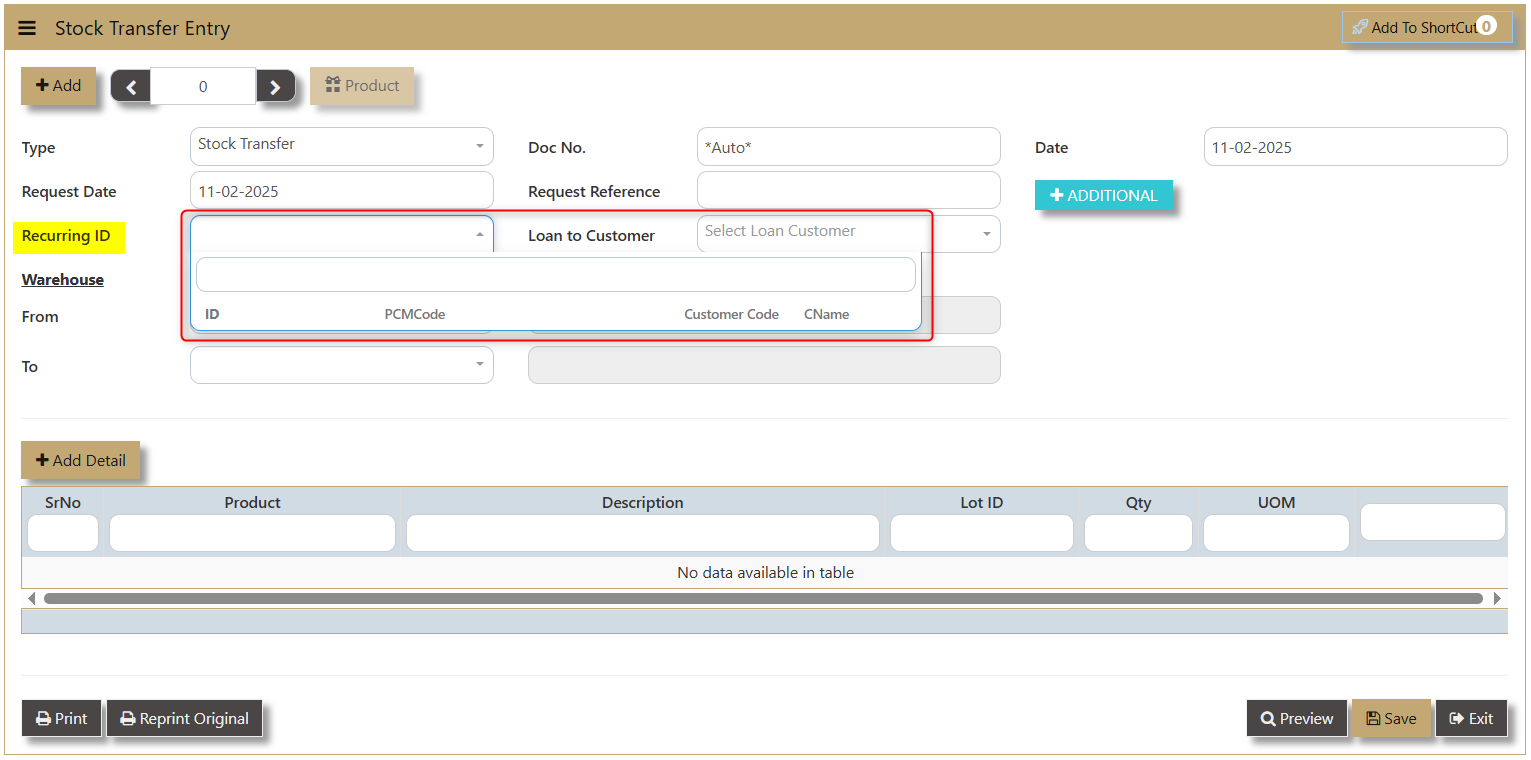
- Recurring ID - unique identifier for regular, scheduled stock transfers between locations. A dropdown will show information about the Product ID, PCM Code, Customer Code and Customer Name.
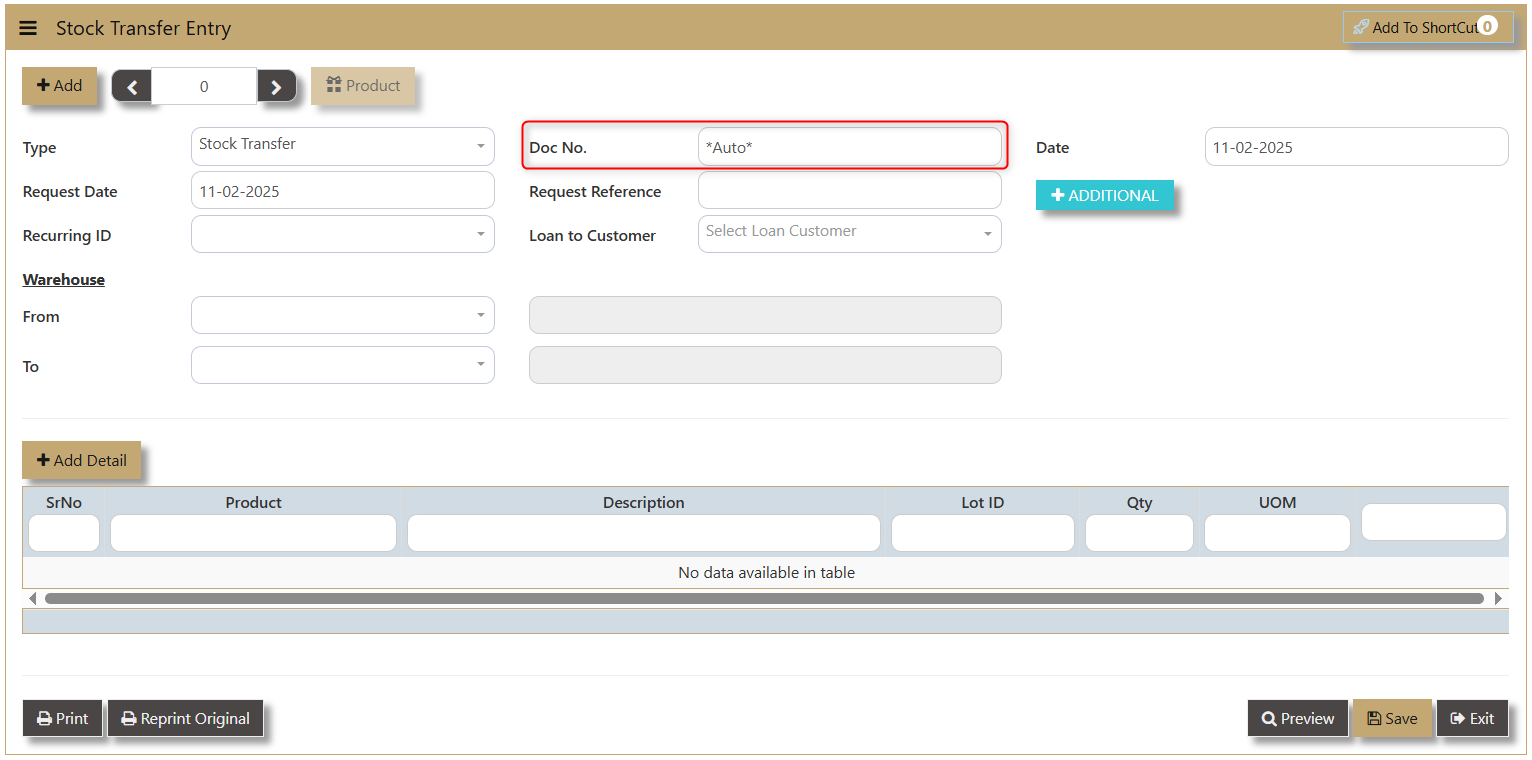
- Doc No. - can be automated by the system or manually encoded depending on the setup made.
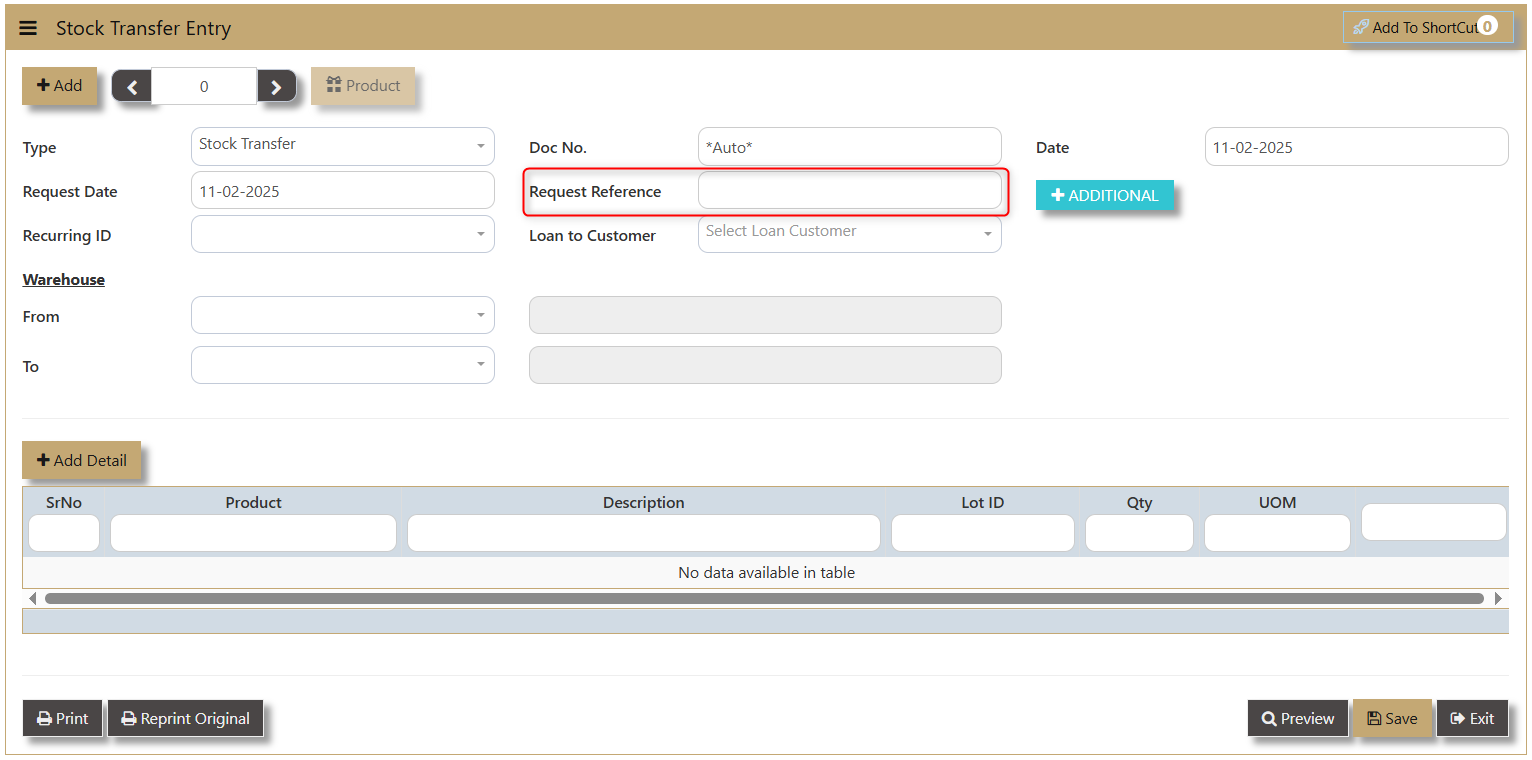
- Request Reference - allows user to input any reference connected with their request.
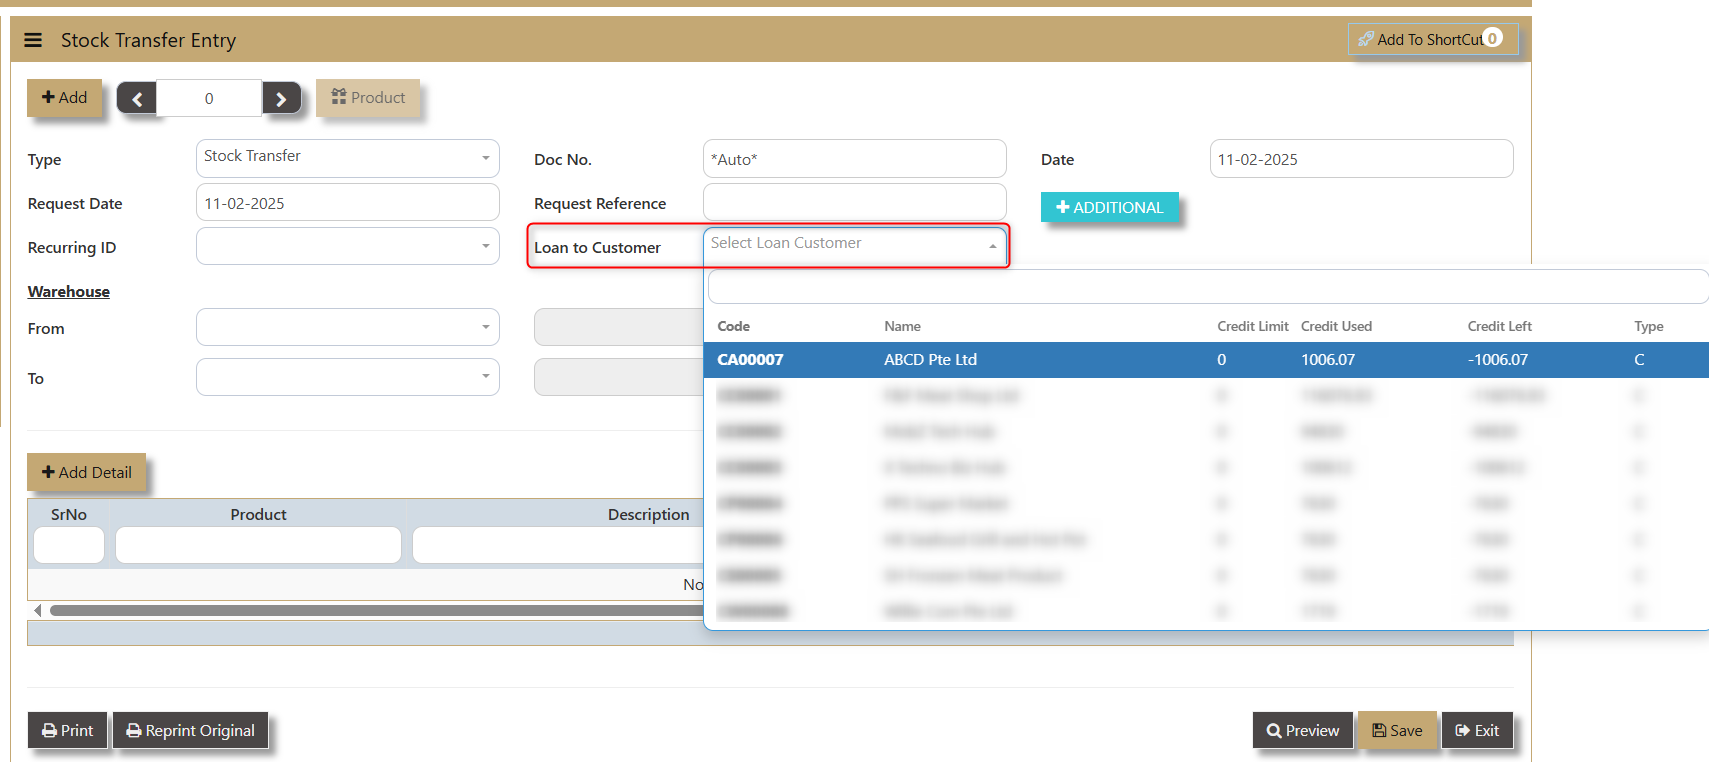
- Loan to Customer - allows user to input the customer involved in the transaction. A dropdown will show the information of Customer Code, Name, Credit Limit, Credit Used, Credit Left and Type (C means Customer).
- Date - shows when the transaction is made.
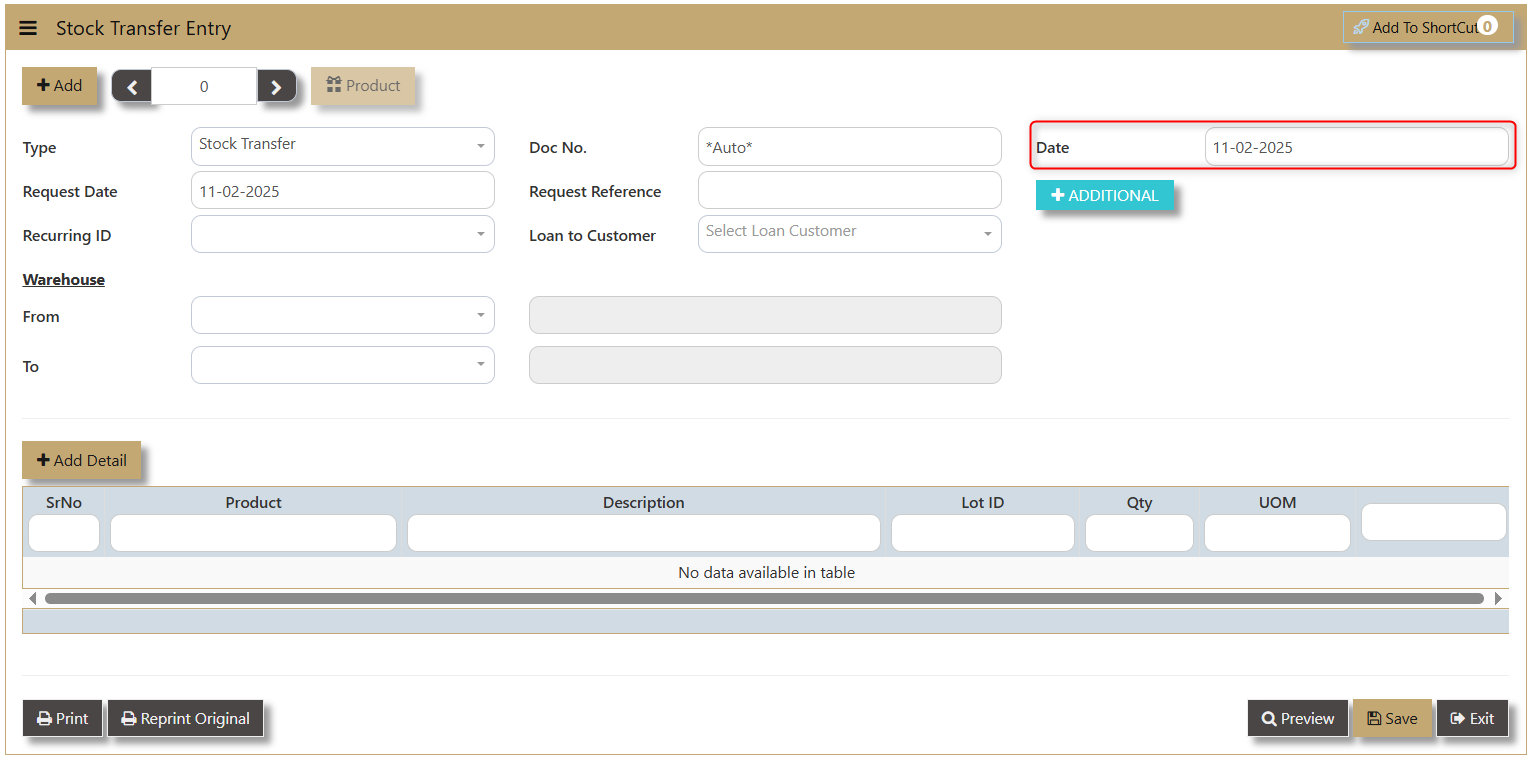
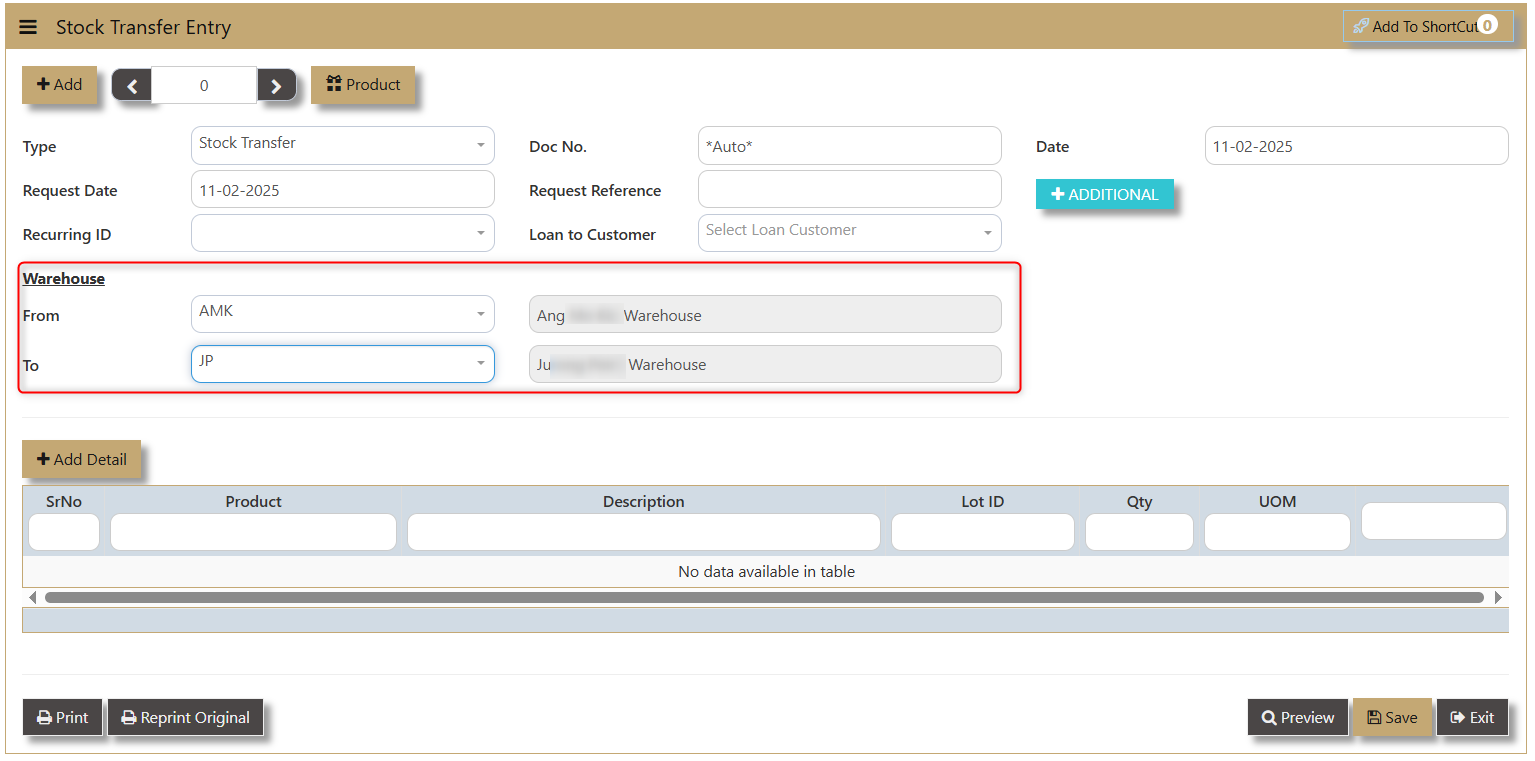
- Warehouse - allow user to choose from-and-to what warehouse the transfer will took place.
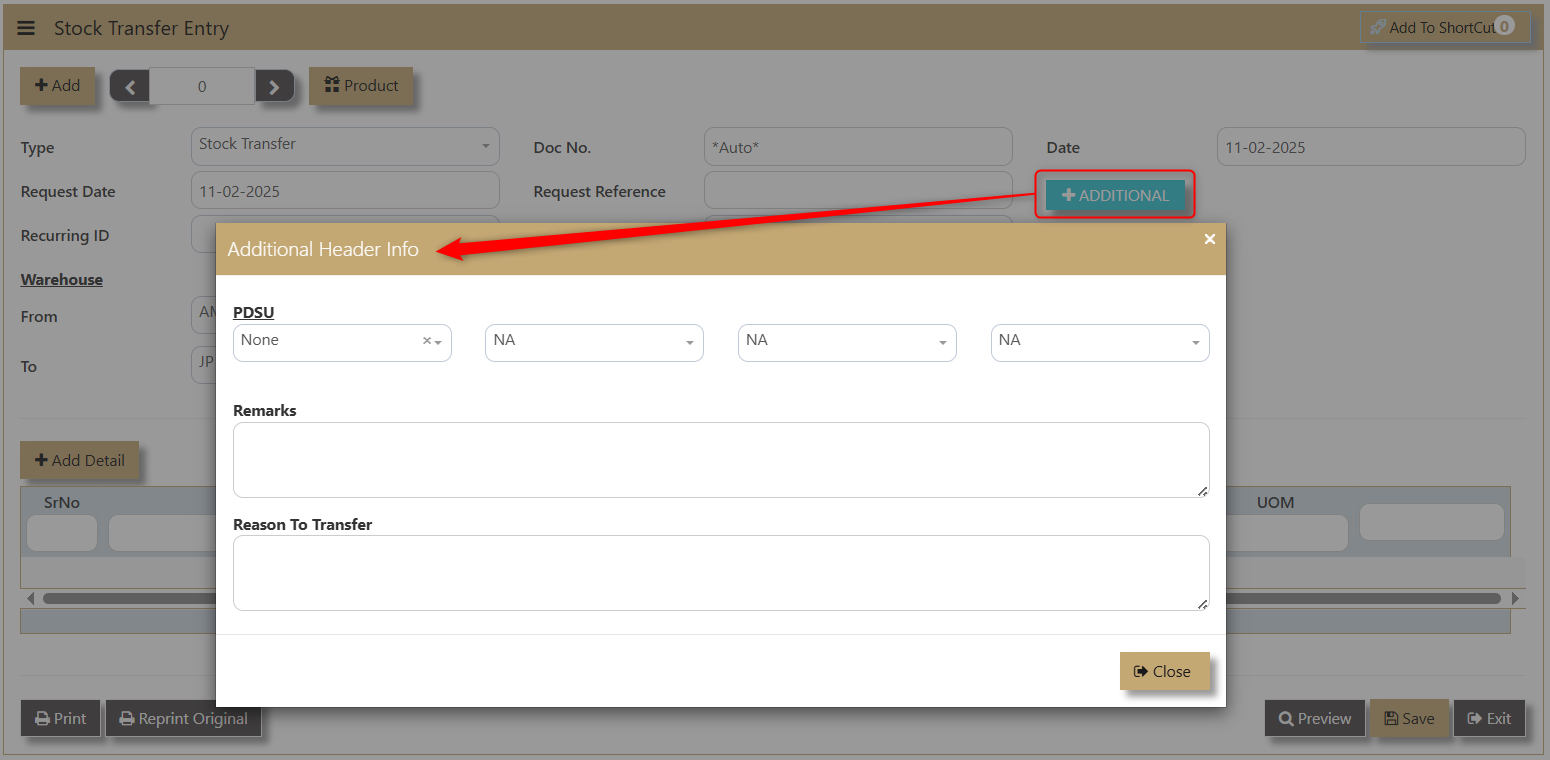
- Additional - enable the user to add more information regarding the Stock Transfer where they can input PDSU, Remarks and Reason to Transfer.
4. Click Add Detail to create new line details of the transfer. A dropdown of the products will show the Product, Product Name, On Order, On PO, On Hand, and Available.

- Once Product Code is selected, the Description of the same product will show accordingly.
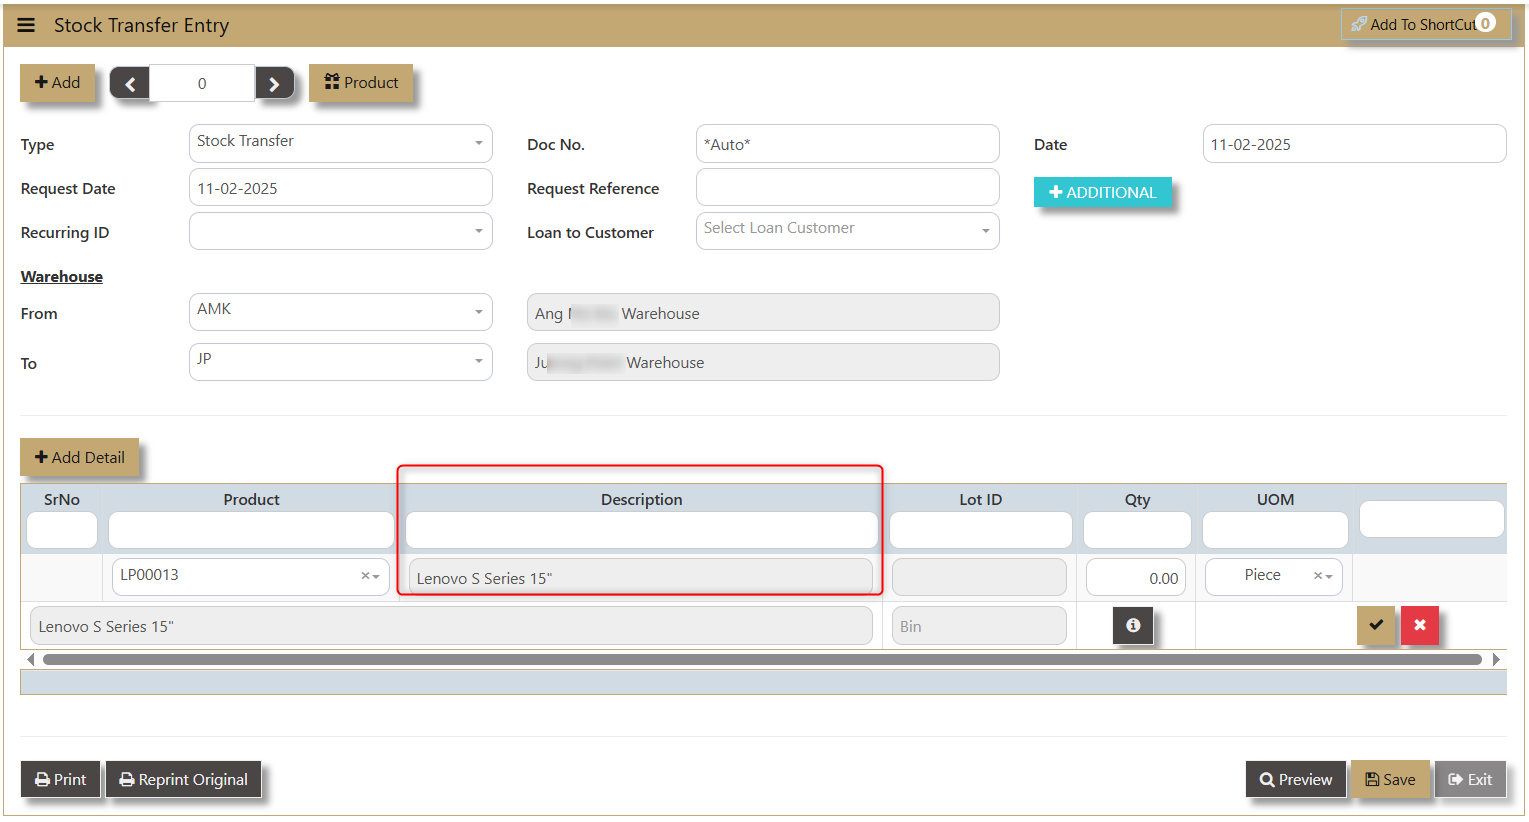
- Lot ID - if product is classified is a lot item, the system will generate.
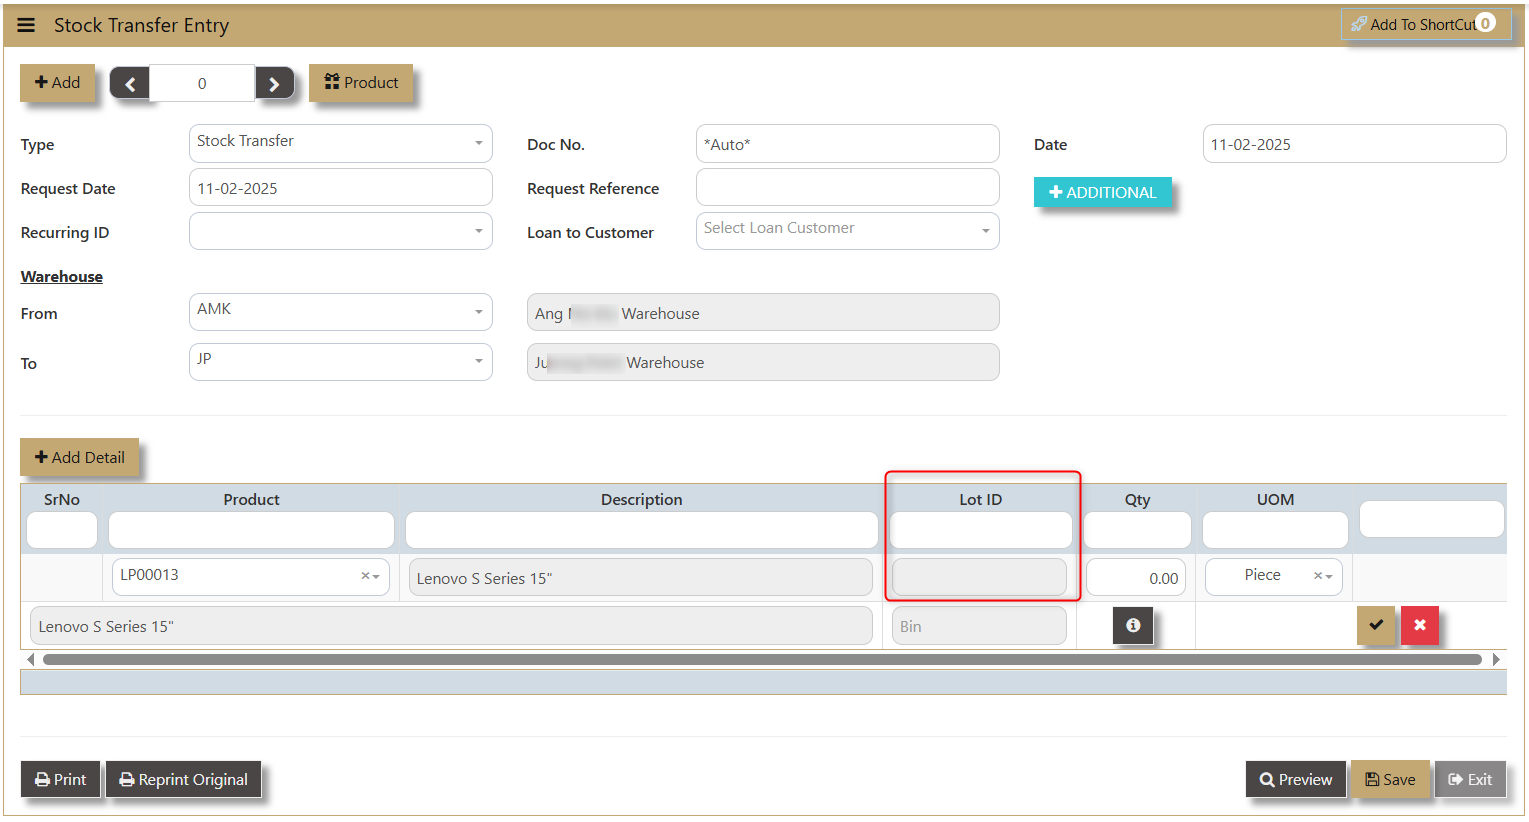
- Qty - or Quantity allows the user to manually key in the number of products to be transferred.
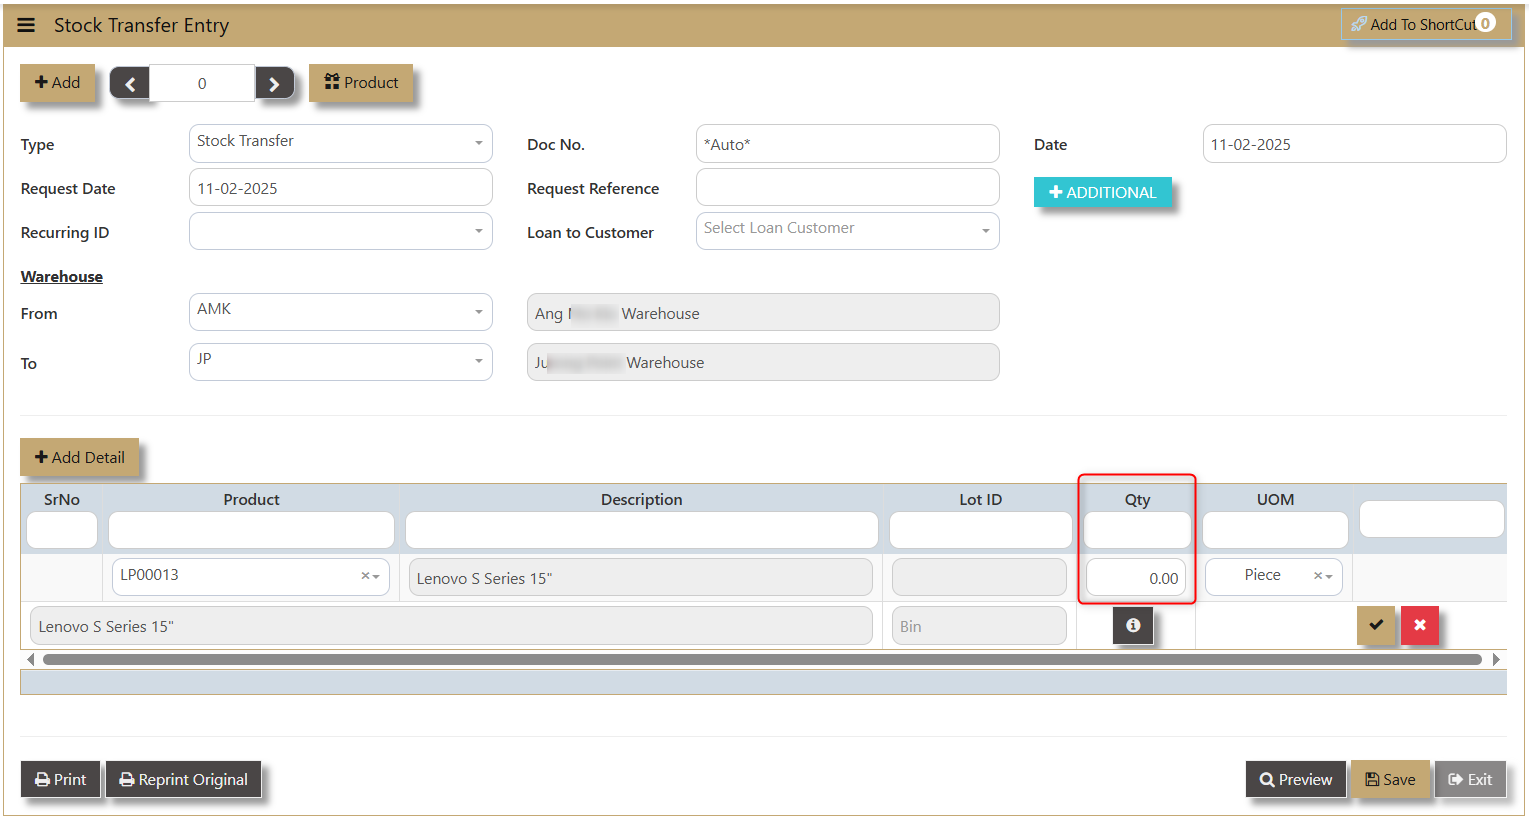
- UOM - Unit of Measure depends on the maintained information of the product in the Product and Service Maintenance.

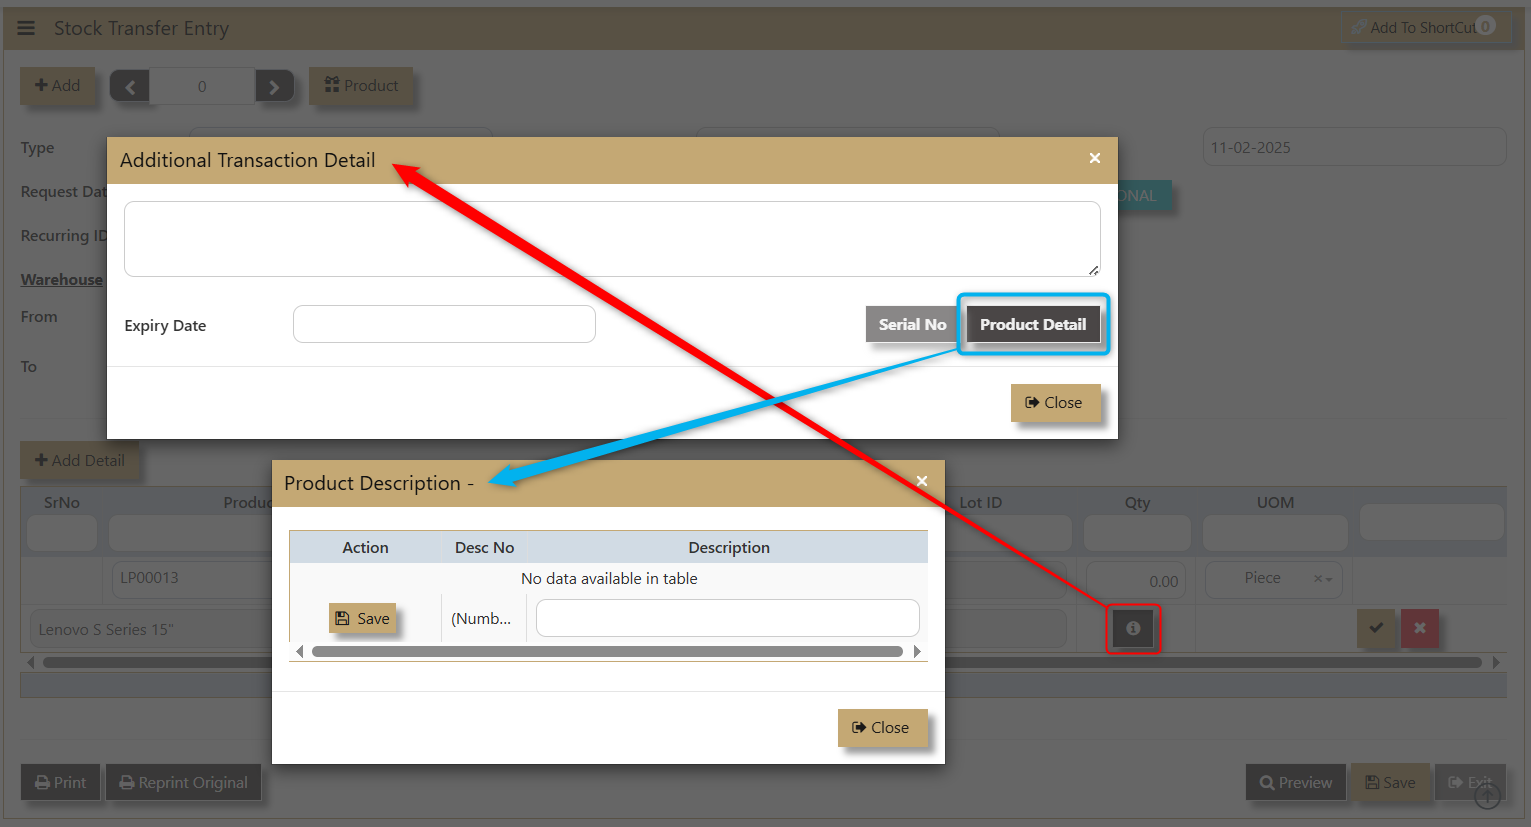
- 'i' icon - allows the user to input additional information and access any Serial No and Product Detail.
5. Click 'Save' and 'Preview' after the transaction.
User can be able to see this transfer between 2 Warehouse in the Stock Ledger Report as shown in this sample:

Stock Take
This function is normally done after a physical stock take is done. After affirming the stock quantity, the user can key in the actual count quantity, after which the user can confirm the stock status by clicking on the “Confirm Now” button. Do note that once the confirm button is clicked, there is no way to reverse the action unless another Stock take is created.
This is because the action will update the stock status as well as creating a GL transaction to adjust the valuation accordingly.
________________________________________________________________________________________________________________________________________________
What is Stock Take?
A stock take function in the system is used for inventory count every month or an annual inventory count based from the customer process. Normally a warehouse manager/encoder needed to facilitate inventory count per warehouse and generate the products that are reflected in the inventory.
How to Create Stock Take?
1. Click on Stocks – Stock Operations – Stock Take icon for following screen.
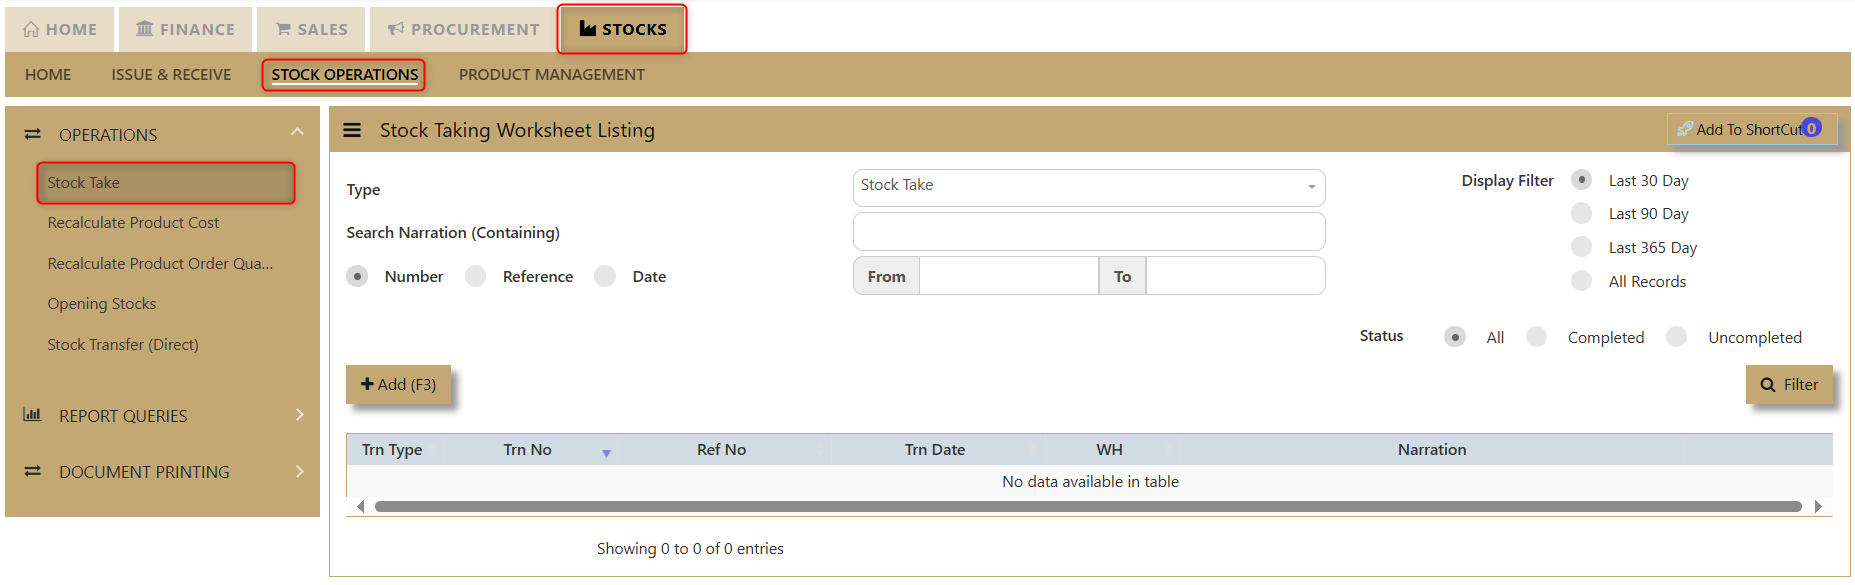
2. Click on Add (F3) to create new transaction.
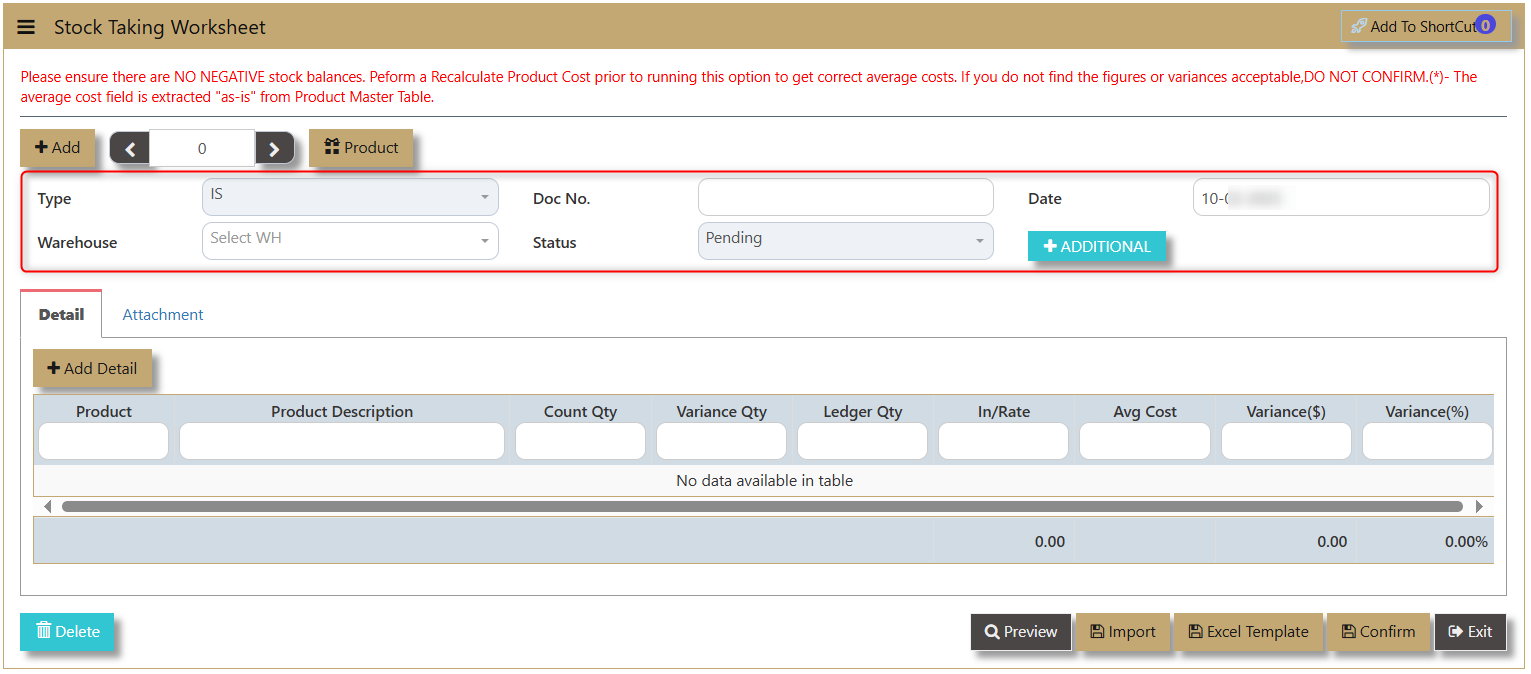
Type - IS is the code of Stock Take transaction and this will automatically appear one transaction is added.
Warehouse - allows user to select on which Warehouse to record the stock take transaction.
Doc No. - enable the user to track the transaction. This can be autogenerated by the system.
Status - Determine if the transaction is Confirmed or Pending by the user.
Date - Shows when the transaction was made.
3. After adding the transaction, a line detail for Product will appear. The user must select which product to transact.
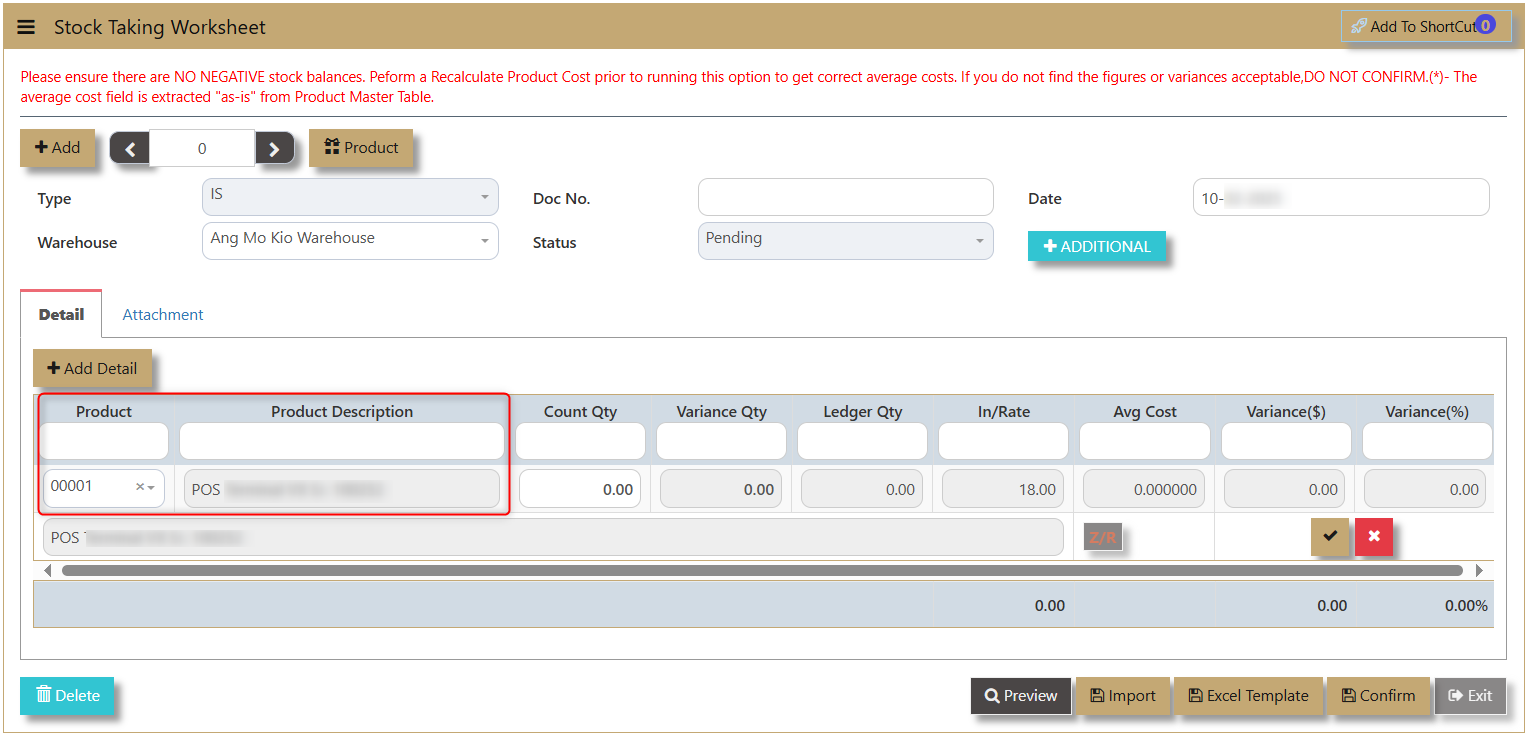
Product & Product Description - Once product code is selected the system will automatically populate the product description.
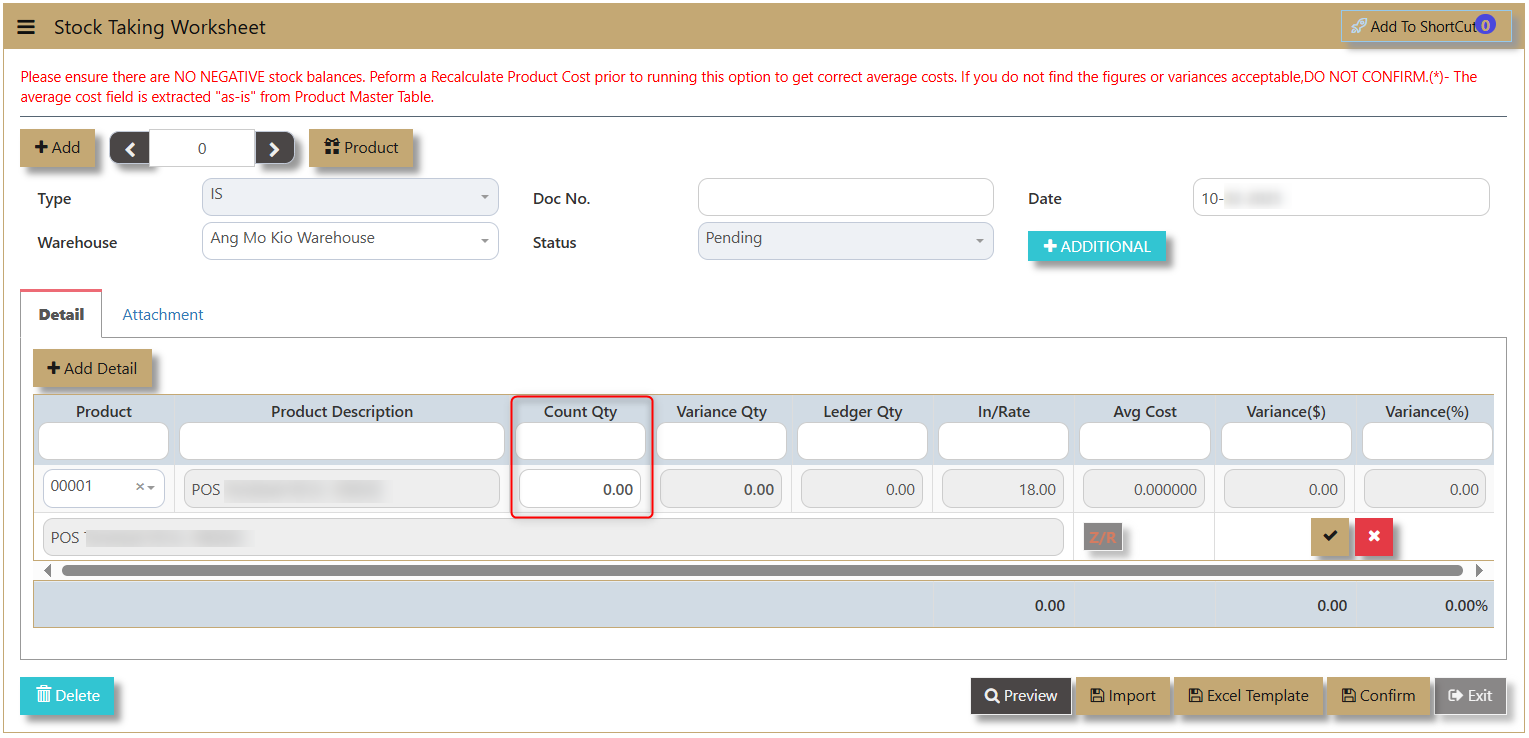
Count Qty - The field where the user will encode the actual count of the product.

Variance Qty - Difference between Count Qty and Ledger. This is the quantity used to adjust on the system.
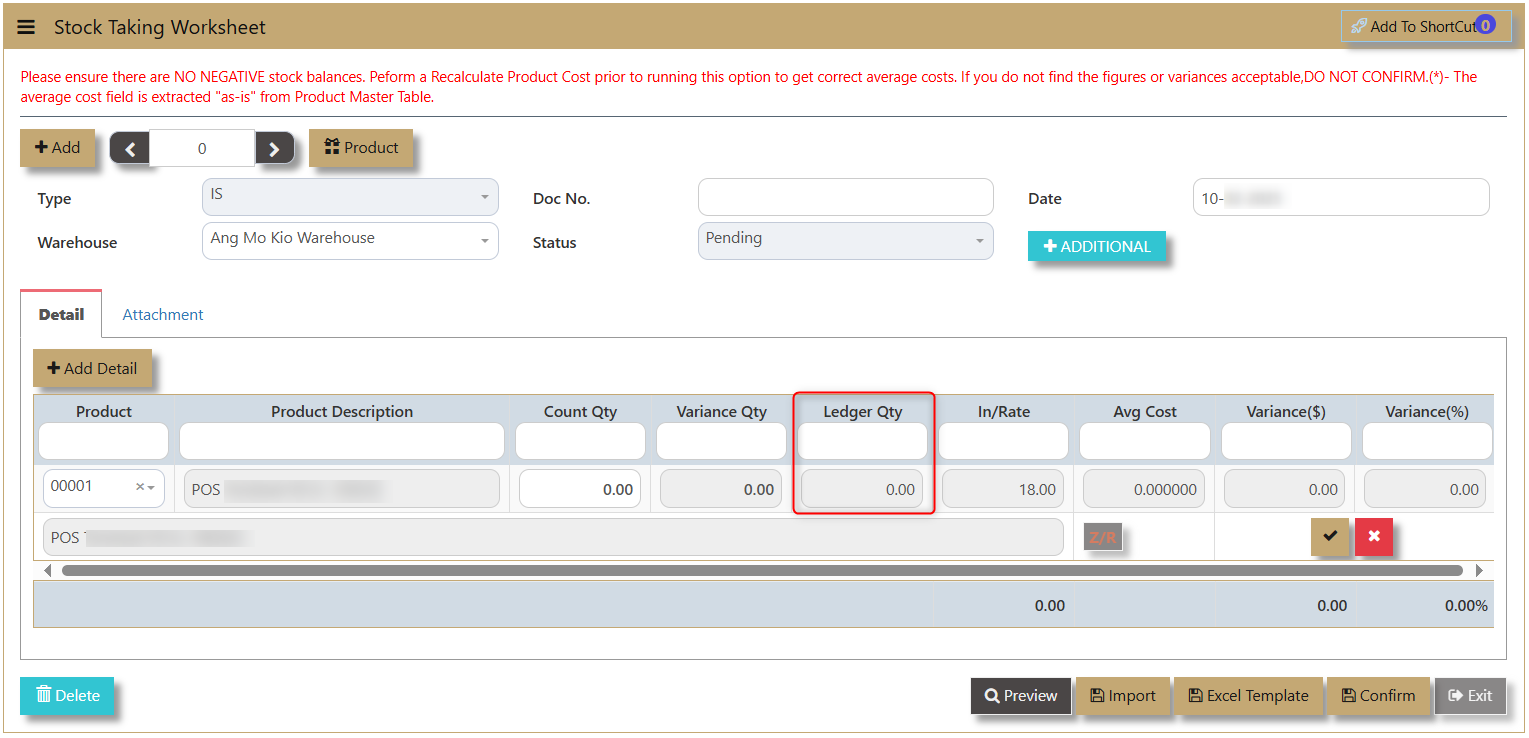
Ledger Qty - This is the on hand quantity of the product within the system.
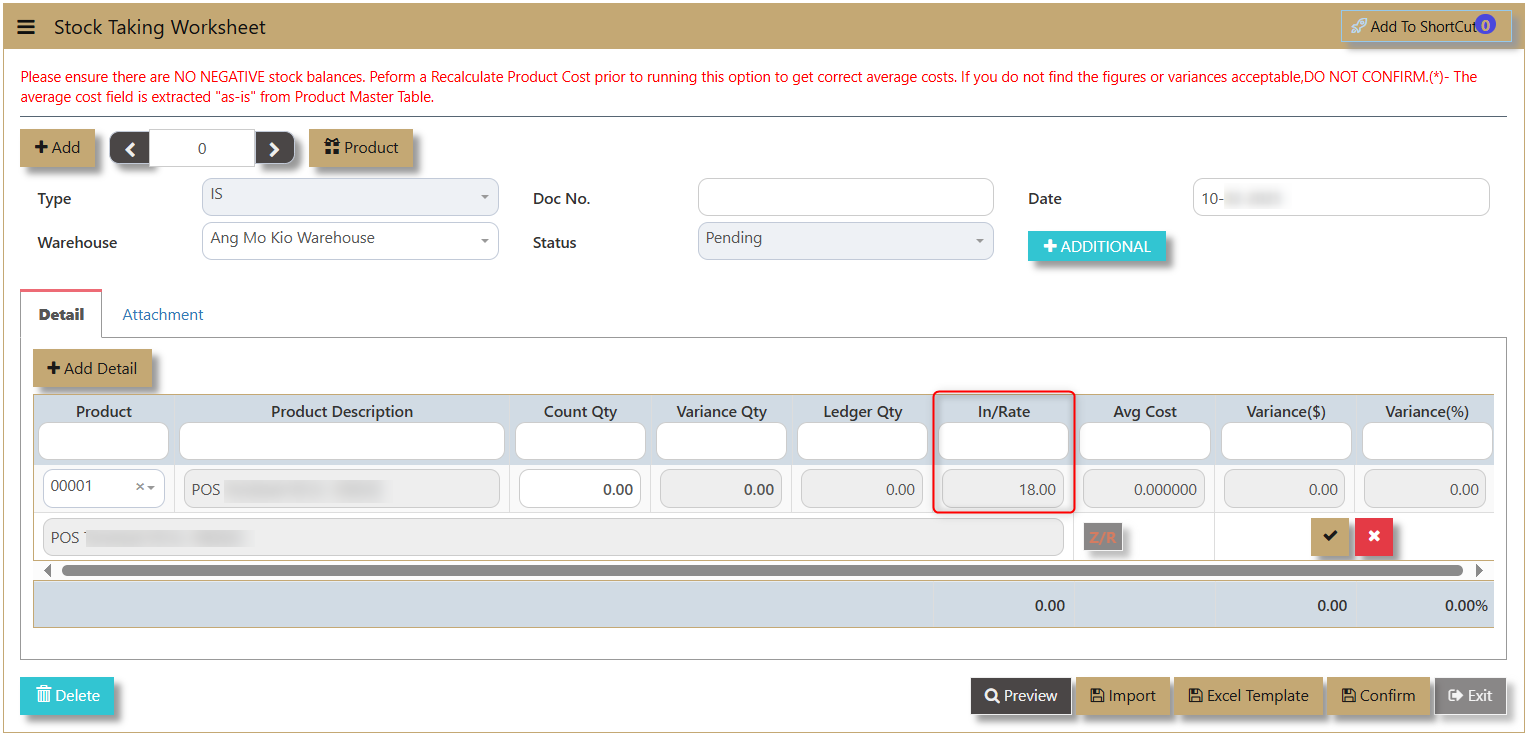
In/Rate - the incoming rate based on the last receipt transaction.
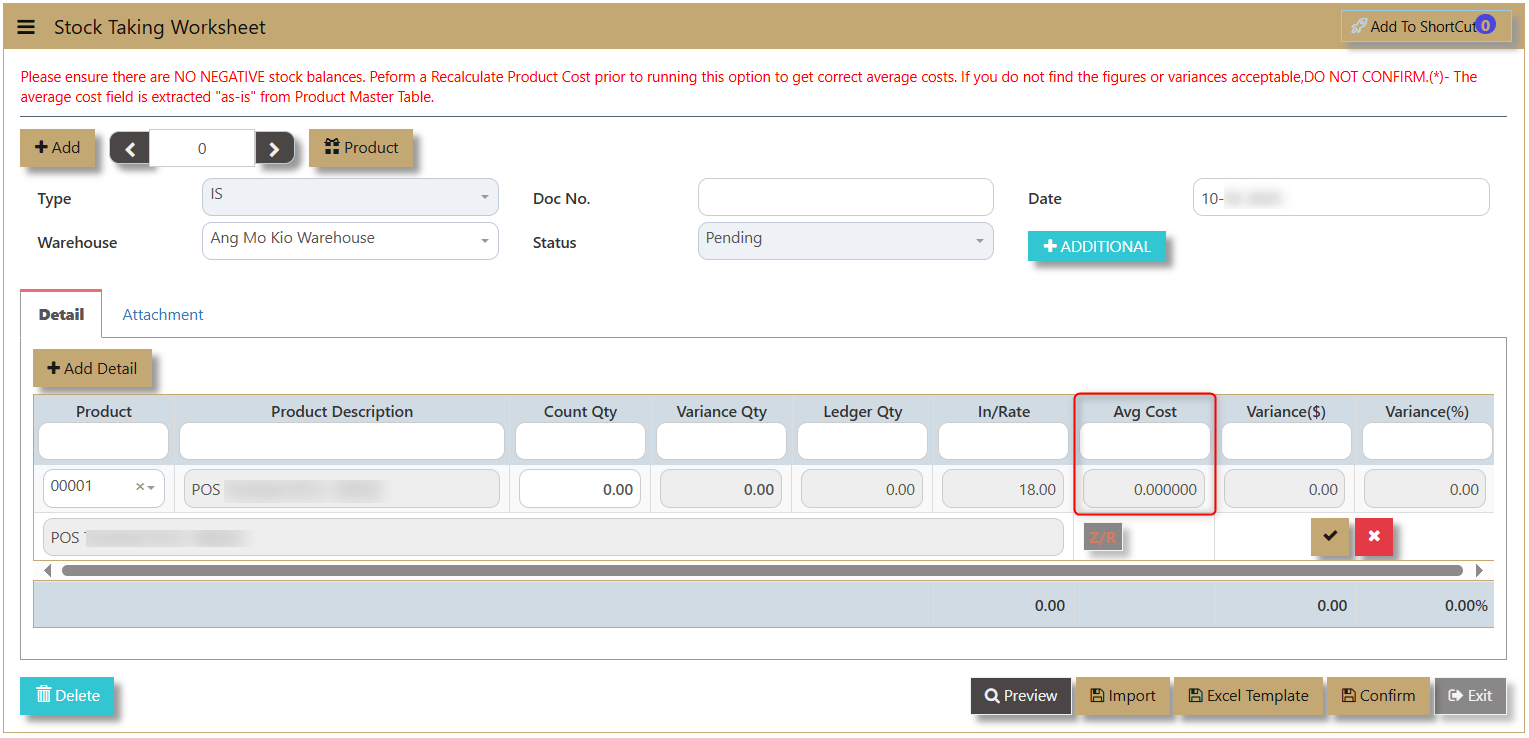
Avg Cost - or Average Cost which is usually generated by the system.

Variance ($) & Variance (%) - This is the amount of Variance in Currency and Percentage.
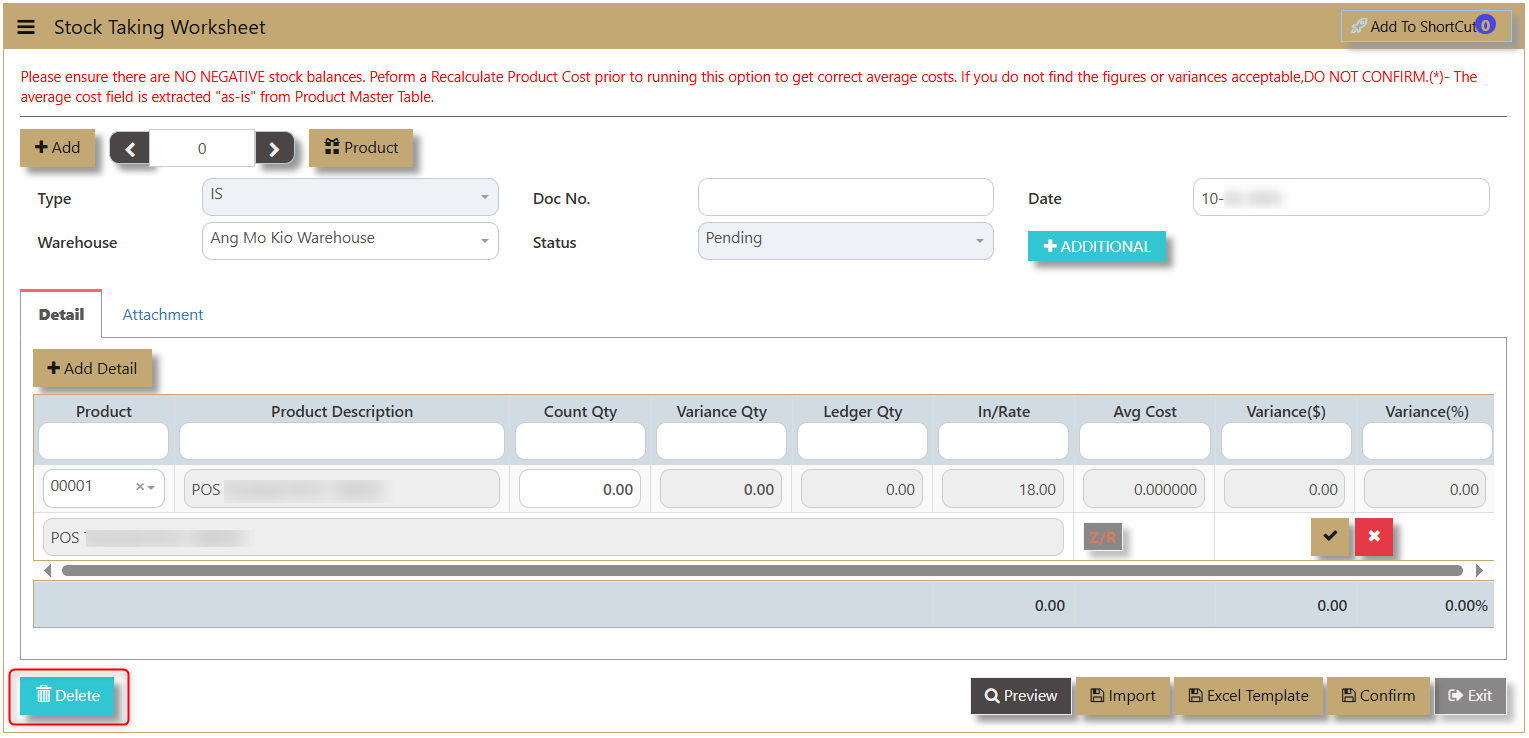
Delete - allows user to delete the line details transaction.

Preview - allows the user to view the transaction and print.

Excel Template & Import - allows user to download an excel format that can simultaneously be imported to the system to record the transactions.
Excel Format:
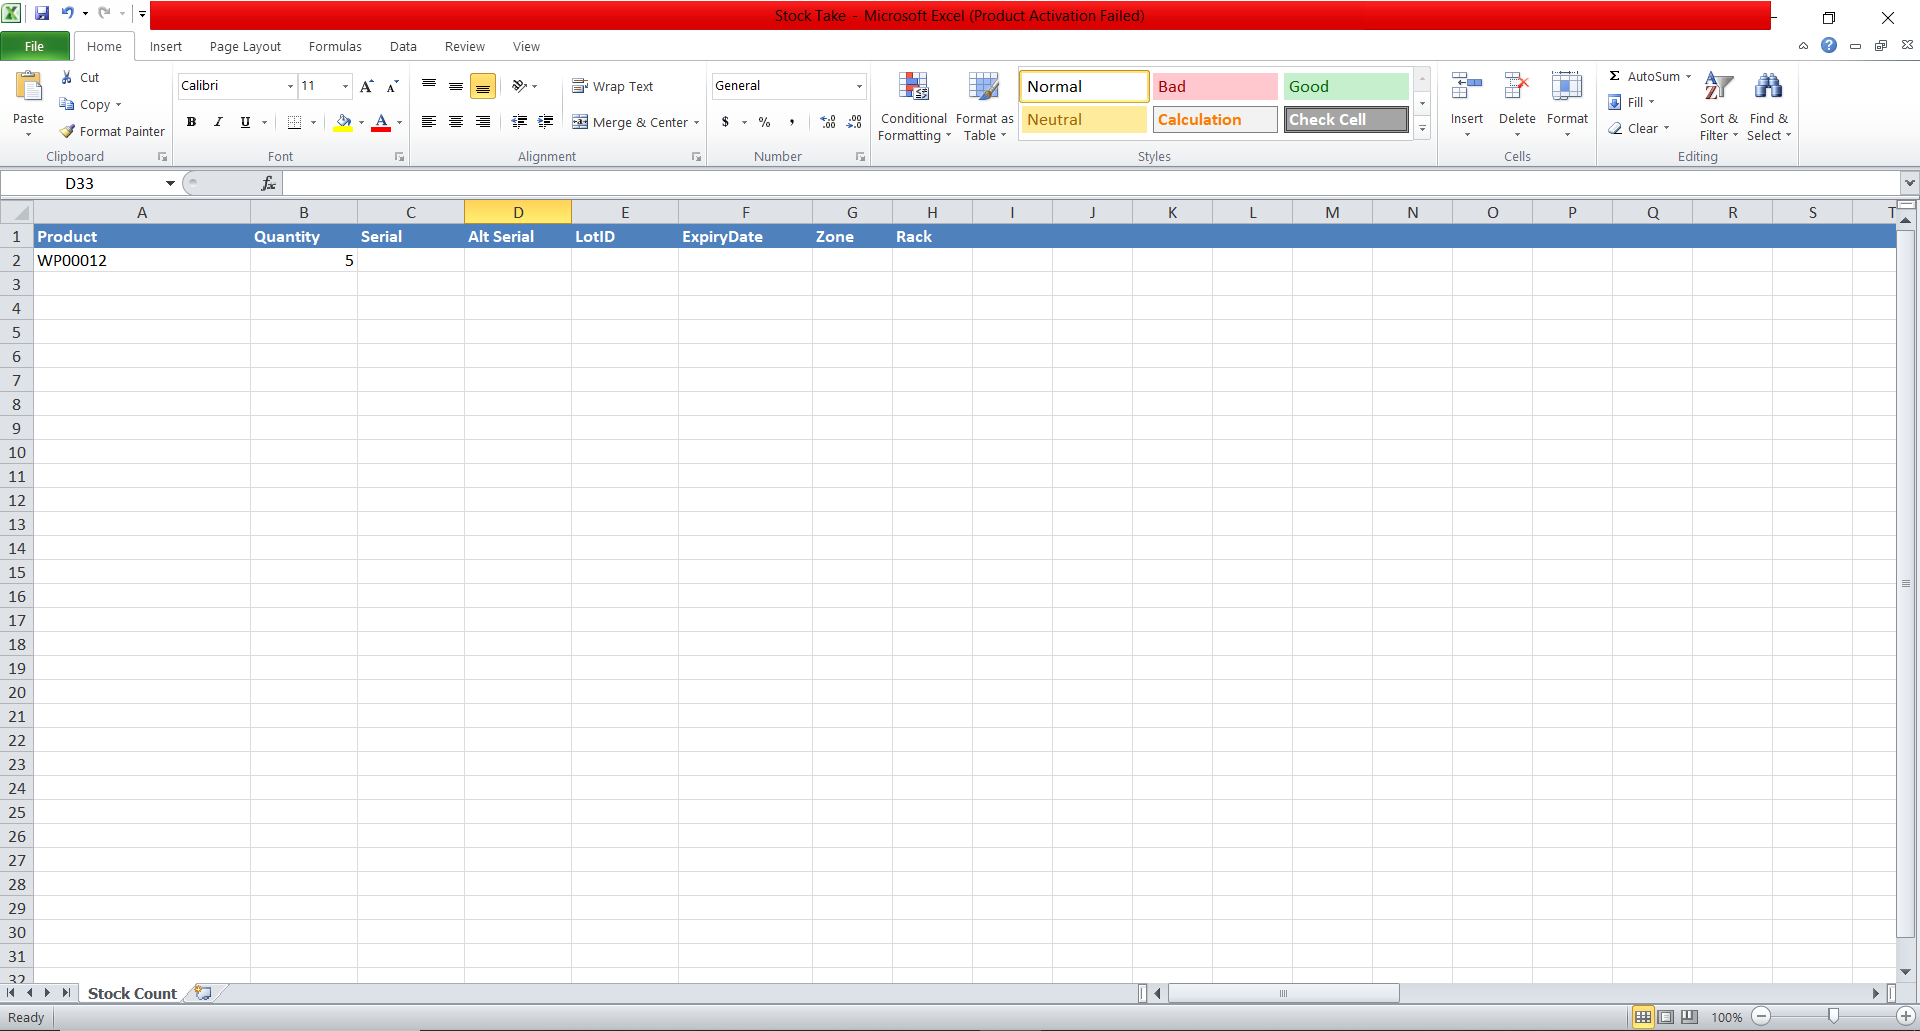
Import data:
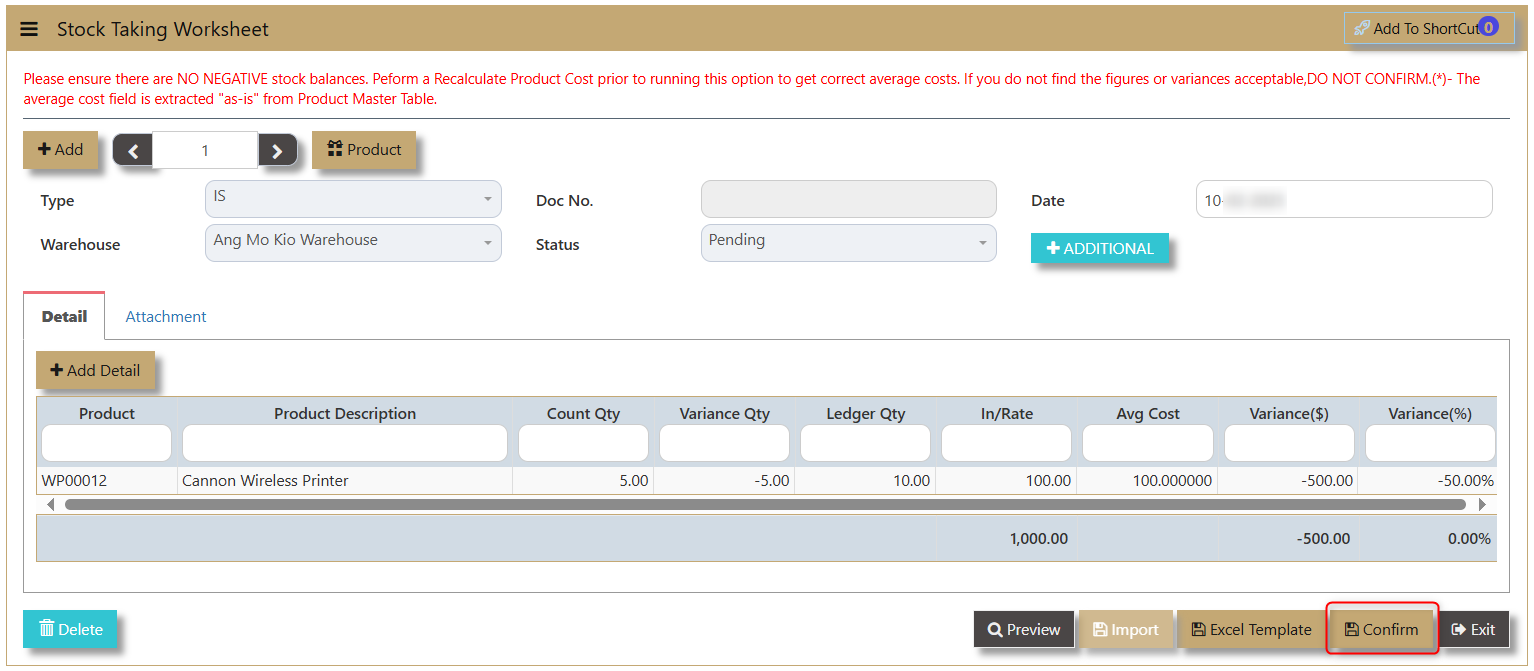
4. After all transaction is made, click on Confirm. Do note that once confirmed, it cannot be edited nor deleted.
Important: Before conducting this option, it is important to note the following pre-requisites to the stocktaking.
- No negative stocks are allowed. To check that no negative is happening in between transactions, go and run Electronic Stock Card in the Inventory – Reports & Queries before proceeding.
- Correct warehouse quantities and costing. To achieve a more indicative warehouse balance and its costs, you should perform a Recalculate Product Cost before this module is activated.
- A GL transaction will be created when you click the Confirm NOW! Button.
User can be able to check the movement of the stocks in the Stock Ledger as follows:

Recalculation
The Recalculate Product Cost and Recalculate Order Quantity functions in Uniq365 are essential processes designed to ensure the accuracy of product costs and order quantities. By recalculating these values, the system helps maintain correct stock valuations and ensures they align with the corresponding General Ledger (GL) codes. This alignment is crucial for producing reliable financial records and streamlining year-end functions, making it easier to reconcile and close financial periods with confidence. These processes support better inventory management and help businesses maintain operational efficiency and financial accuracy.
________________________________________________________________________________________________________________________________________________
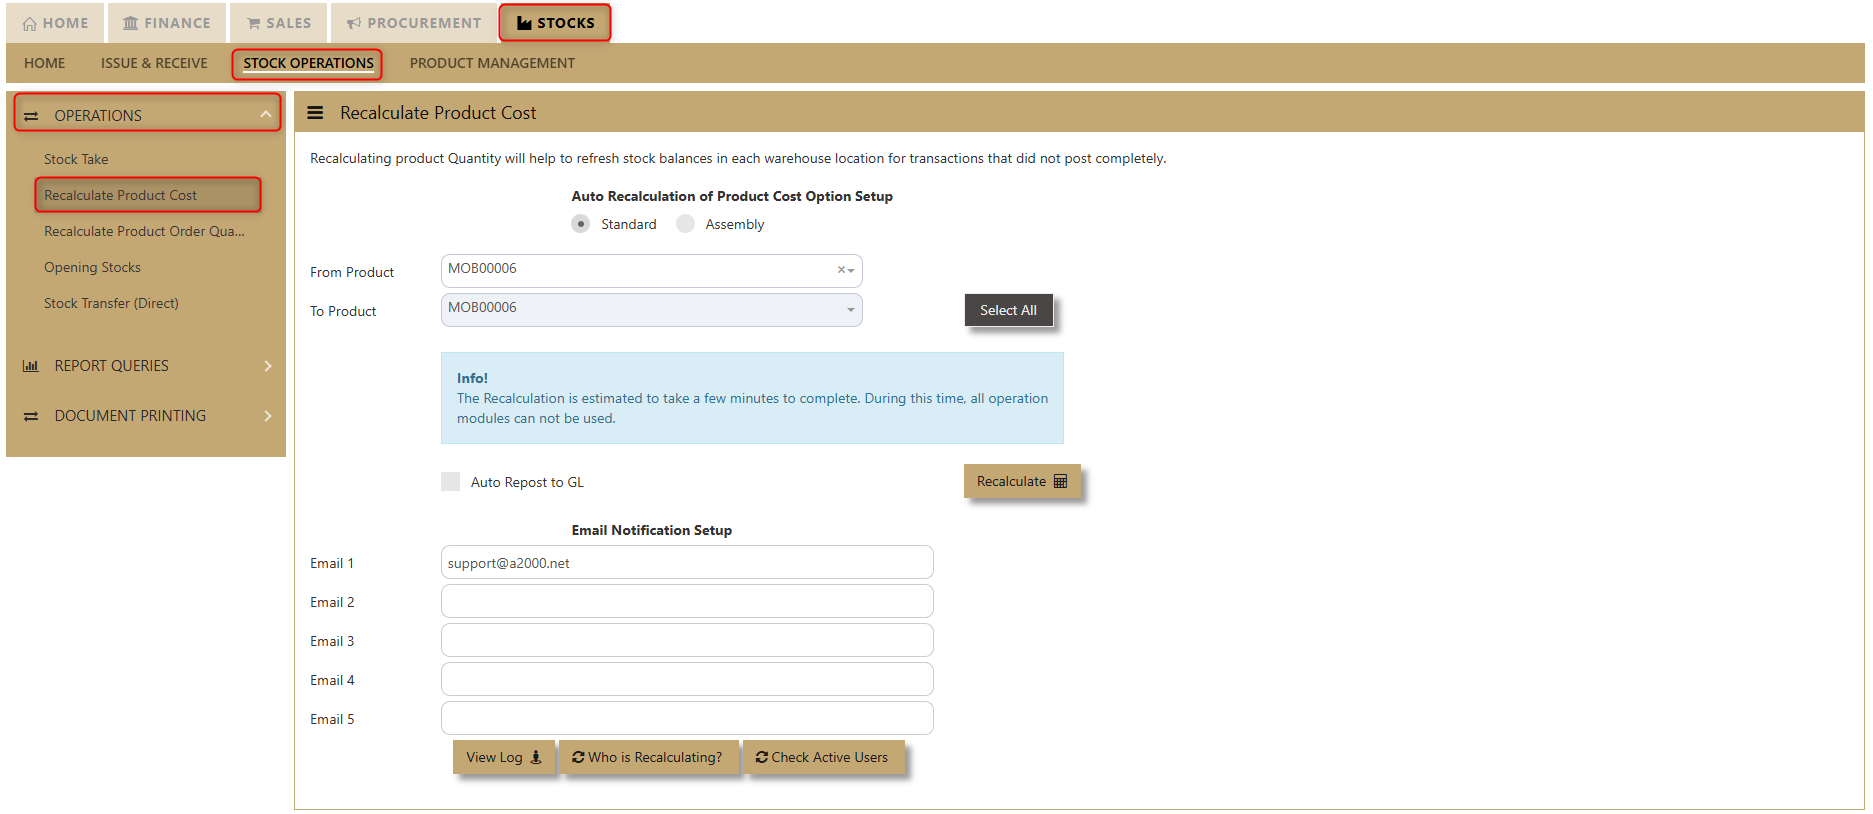
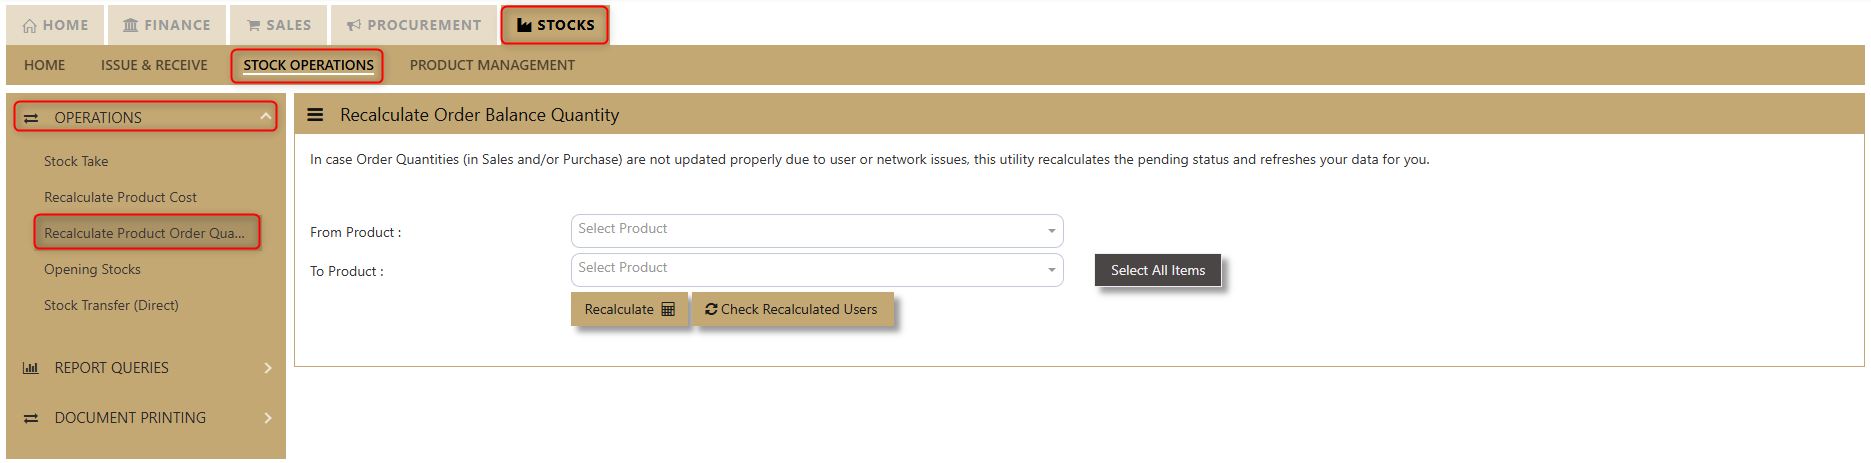
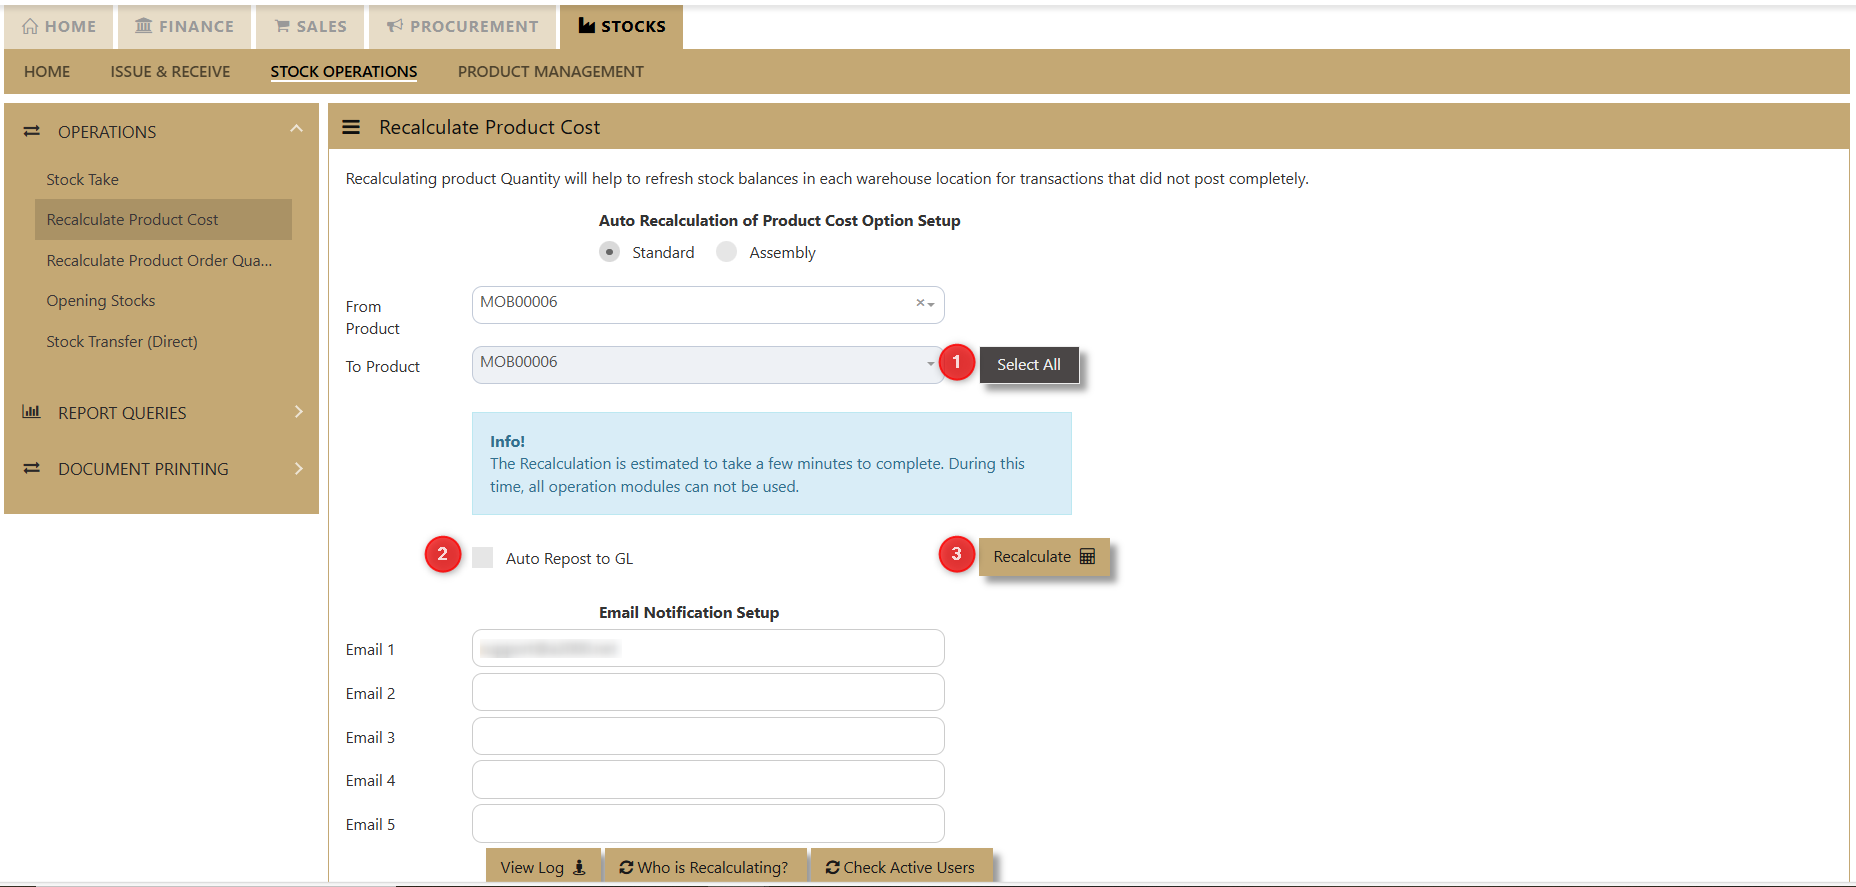
In Stocks - Stock Operations - Recalculate Product Cost/Recalculate Product Order Quantity.
STANDARD & SCHEDULED RECALCULATION
1. SYSTEM CHECK NOT TO PROCEED
a. The system will check if there is an existing Recalculation Process that is on-going. If YES, then the recalculation will not proceed.
b. When the user HIT the Recalculate button, the system will check first if there where users currently login in the system (User Types: OPERATIONS, MOBILE) are prohibited to login if the recalculation is initiated. If there are users currently login for the following user types, a warning prompt will be displayed, and the recalculation will no longer to proceed.
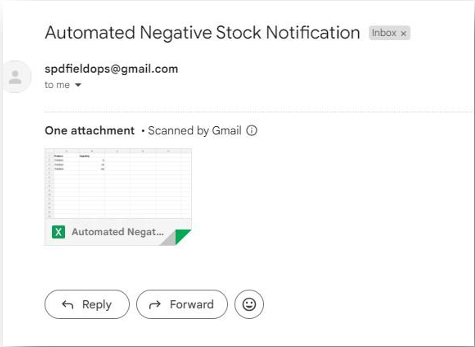
c. The system will check for negative stock, if there is a detection, the system will not proceed for the recal, and then negative stock list will be emailed to the one indicated on the email notification set-up. You can use also the view log button to determine negative stock entries.
2. SYSTEM CHECK TO PROCEED
a. If no Users are currently active under the following User Types: OPERATIONS, MOBILE and no ongoing recalculation, then the Product recalculation will proceed. The system will prompt the user an estimated time for the product recalculation to be completed. This will set the user’s expectation as to when the recalculation will be finished.
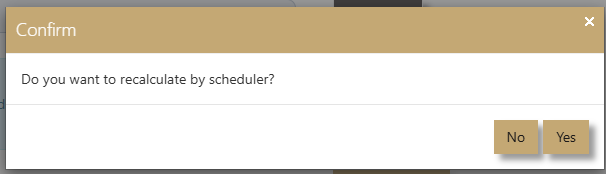
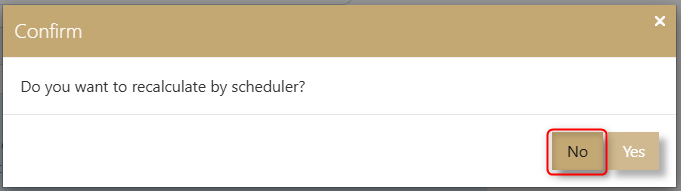
b. The User will then be prompted an option for the following to either perform the Standard Recalculation or Scheduled Recalculation:
Standard Recalculation – Upon clicking NO, the standard recalculation will be triggered immediately and display estimated time to finished. If it detects negative stock, the system will not proceed with recal process and instead email a negative stock list notification. If no negative stock, the system will proceed accordingly to perform recal.
Scheduled Recalculation – Upon Clicking YES, it will proceed with the Scheduled Recalculation. However, the user will be prompted with another prompt dialogue box either to detect negative stock or not. If the User Selected YES, then the system will prompt negative stock detection and display these entries, otherwise if selected NO, then it will ignore and proceed the with scheduled recal.
a. When the Scheduled Recalculation is triggered the recalculation process will start by 12 Mid-night automatically.
CHECK NOTES:
1. The Recalculate Product Cost have now the option to run the recalculation as scheduled and will auto run (12 AM Midnight).
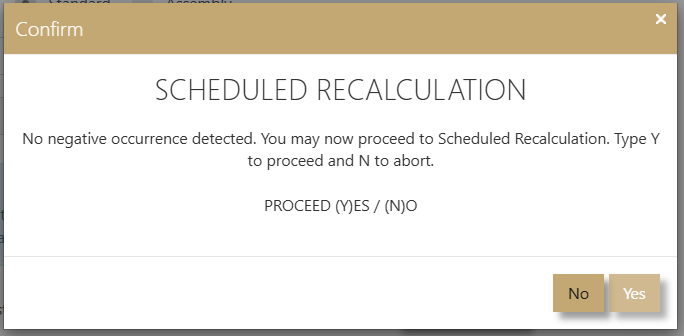
PROCEED ACTION: YES 
- Only pre-calculate to check negative stock entries
- Option to cancel the scheduled recalculation process
- Will write a log as for pre-calculate process
If No negative occurrences, then the user can proceed with YES then it will auto perform Recalculate Product cost by 12 Midnight.
If there are negative occurrences, then the recalculate product cost will not be going to proceed instead there is an option to view negative occurrences.

PROCEED ACTION: NO
- Will recalculate at mid-night
- Will send email if there are negative stock entries
- Will write all logs as SERVICE and can check after midnight recalculation.
WHAT’S NEW?
1. Upon selection of Products, a notification now will be displayed for the estimate time for the Recalculation to finished. This will help the user to keep in mind about the timing and to set the expectation right for the user.
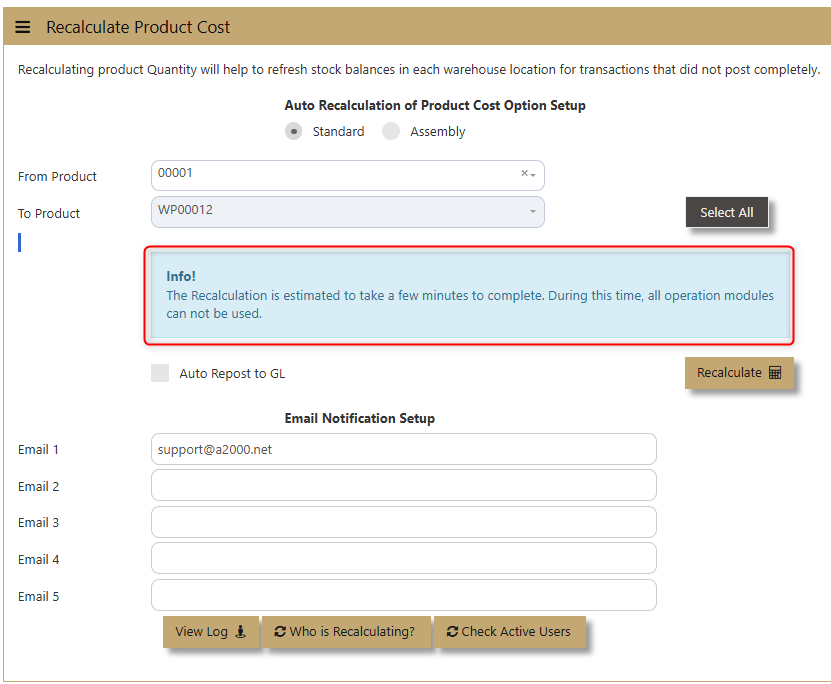
2. When doing a Standard Product Recalculation, we need to make sure that all users are log out in the system. Otherwise, the recalculation will not be going to proceed. The system will have to check first if there is no OPERATIONS, MOBILE User Type that is log on the system as it will affect inventory. When the system is on the mode to perform a recalculation, these user types need to logout in the system. The Email Notification Setup – this will auto populate and the system will auto get the email of the user who will perform the recalculation.
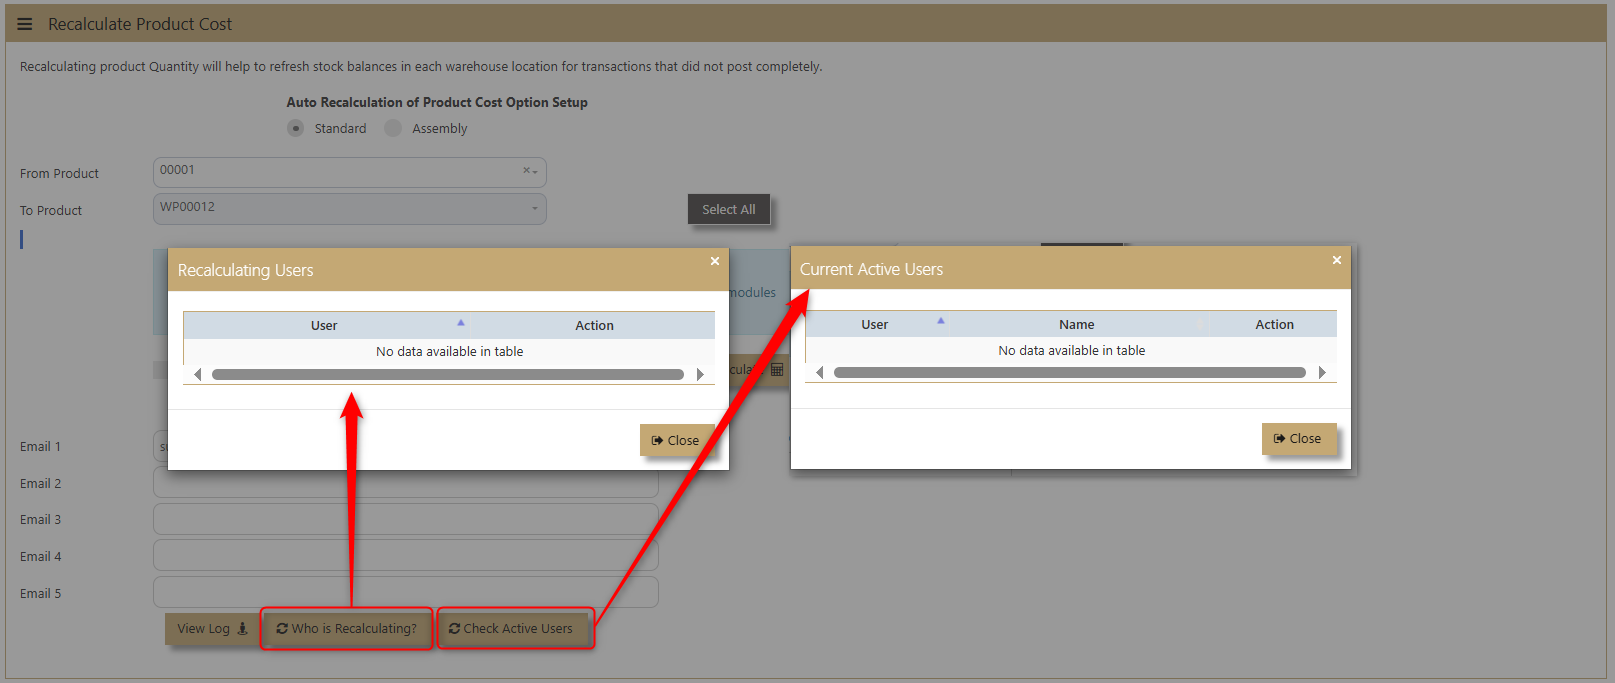
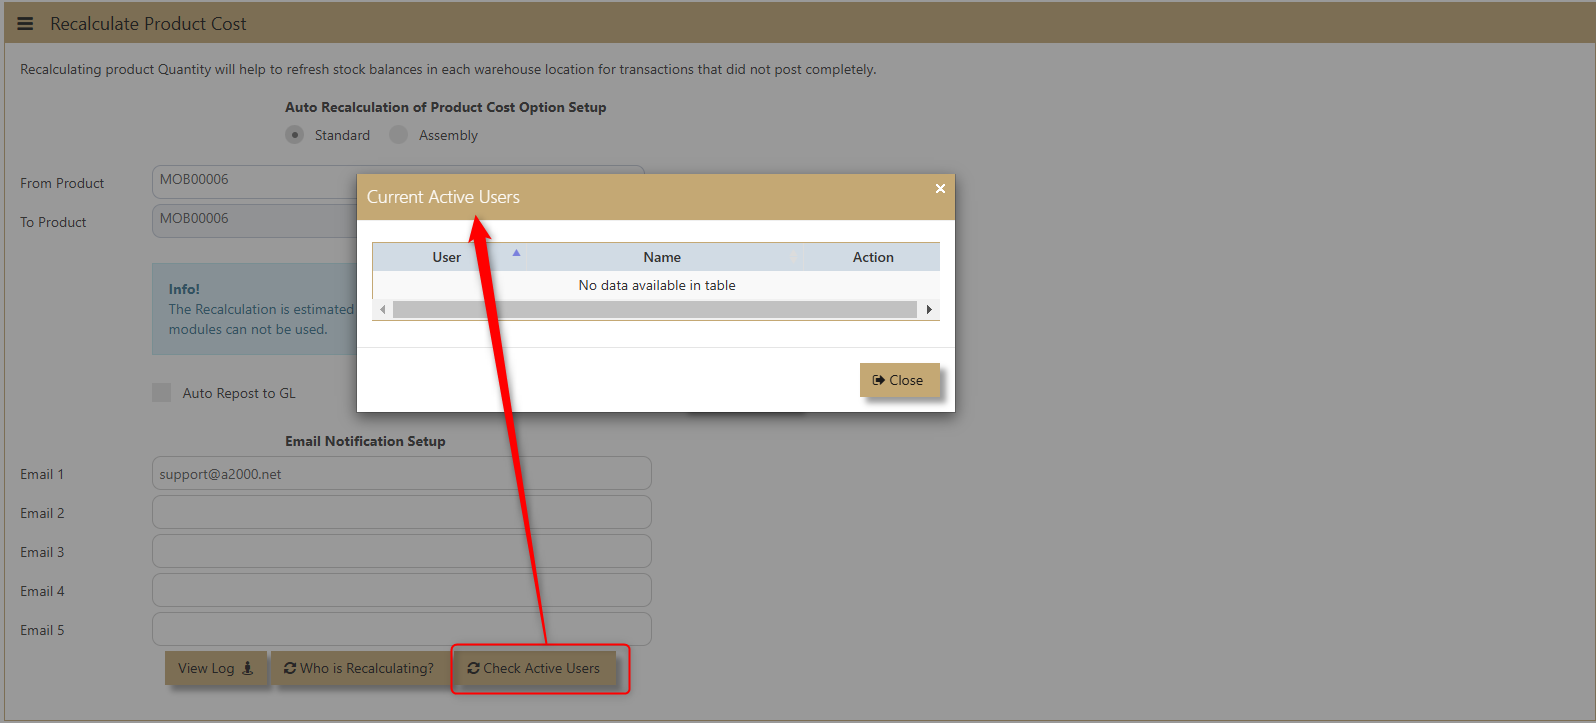
WHO IS RECALCULATING?
CHECK ACTIVE USERS
3. Under System Manager -> User Access Control -> User Maintenance -> Select the user you want to give rights for the following:
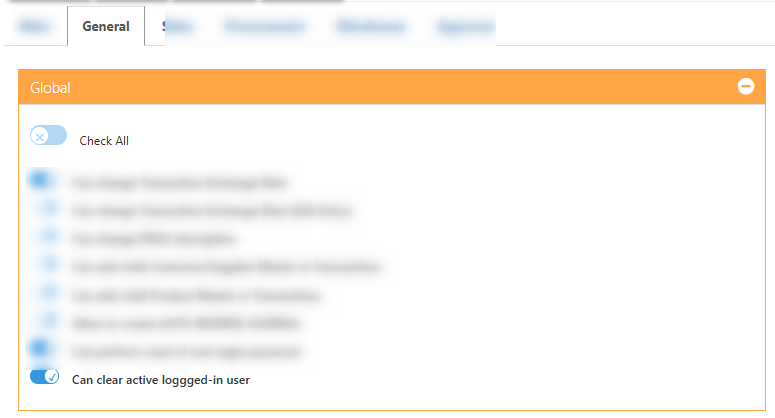
- Can kick out the login Active User
This access is very critical and should be given only to authorized person only.
NOTE: In the latest Recalculation of Product Cost, if there are active users, the system does not permit user to proceed. Similarly, if users are not fully logged out, Recalculation Product cost cannot proceed. However, some users closed their web browsers without logging out, and the server side recognize their session as still active, even though the web browser is closed at client side.
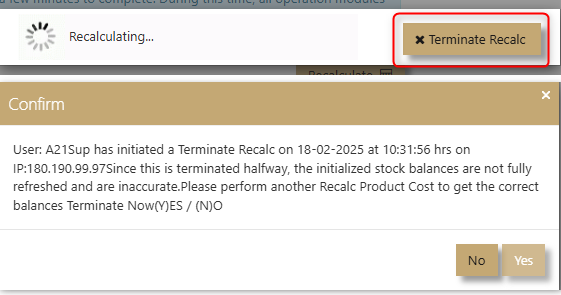
System now allows the admin user to clear the user from the system or kill the recalculation process if they need to stop halfway.
4. Negative stock entries can be found in Recalculation log or via email notification if negative stock is detected in the system.

5. Recalculation Termination – The user who currently performing the recalculation process will be the one to have the rights to terminate/abort the process.
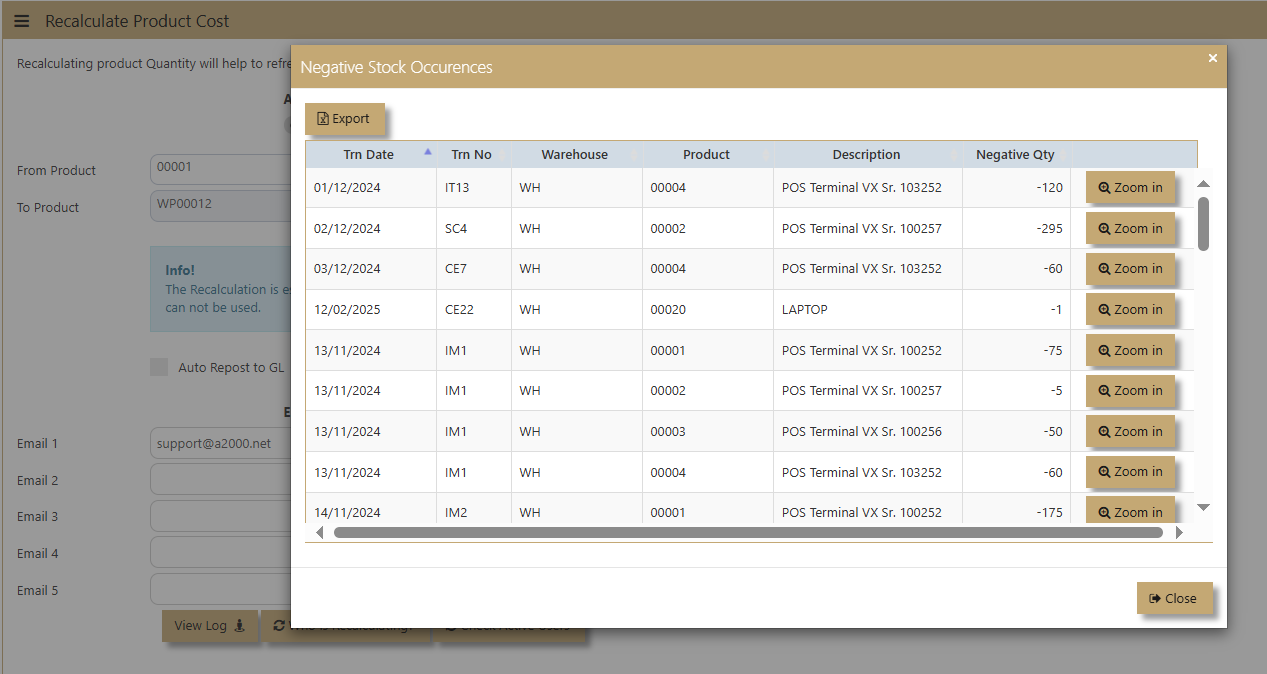
6. Negative Stock Occurrence List – If the system detects a negative stock list, the System will display all negative entries, and the user can zoom the details.
Reports & Queries
This option enables user to generate reports for Inventory Management.
Reports Can be sent to a Preview Screen or to Printer by clicking the respective printer or preview button.
________________________________________________________________________________________________________________________________________________
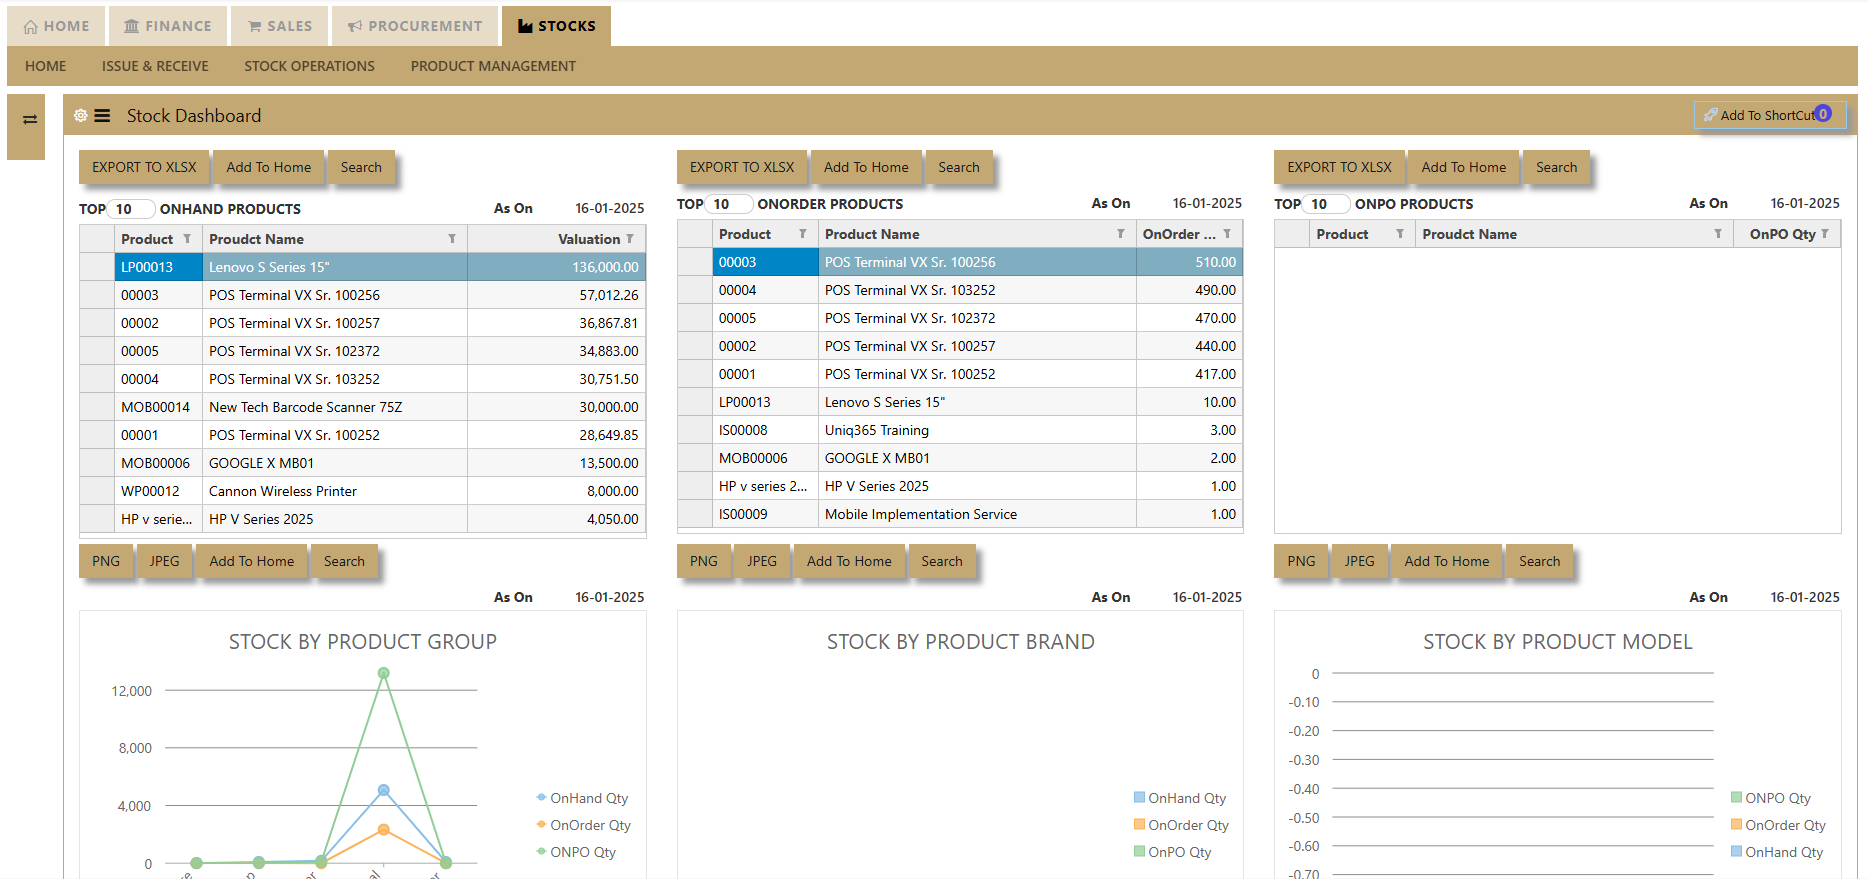
STOCK STATUS QUERY
What is Stock Status Query?
If the user requires a screen that will tell in one glance, the stock status, Uniq365 will answer their needs. This report also features a series of “zoom-in” screens that allows you to drill down to the transaction level.
How to use Stock Status Query?
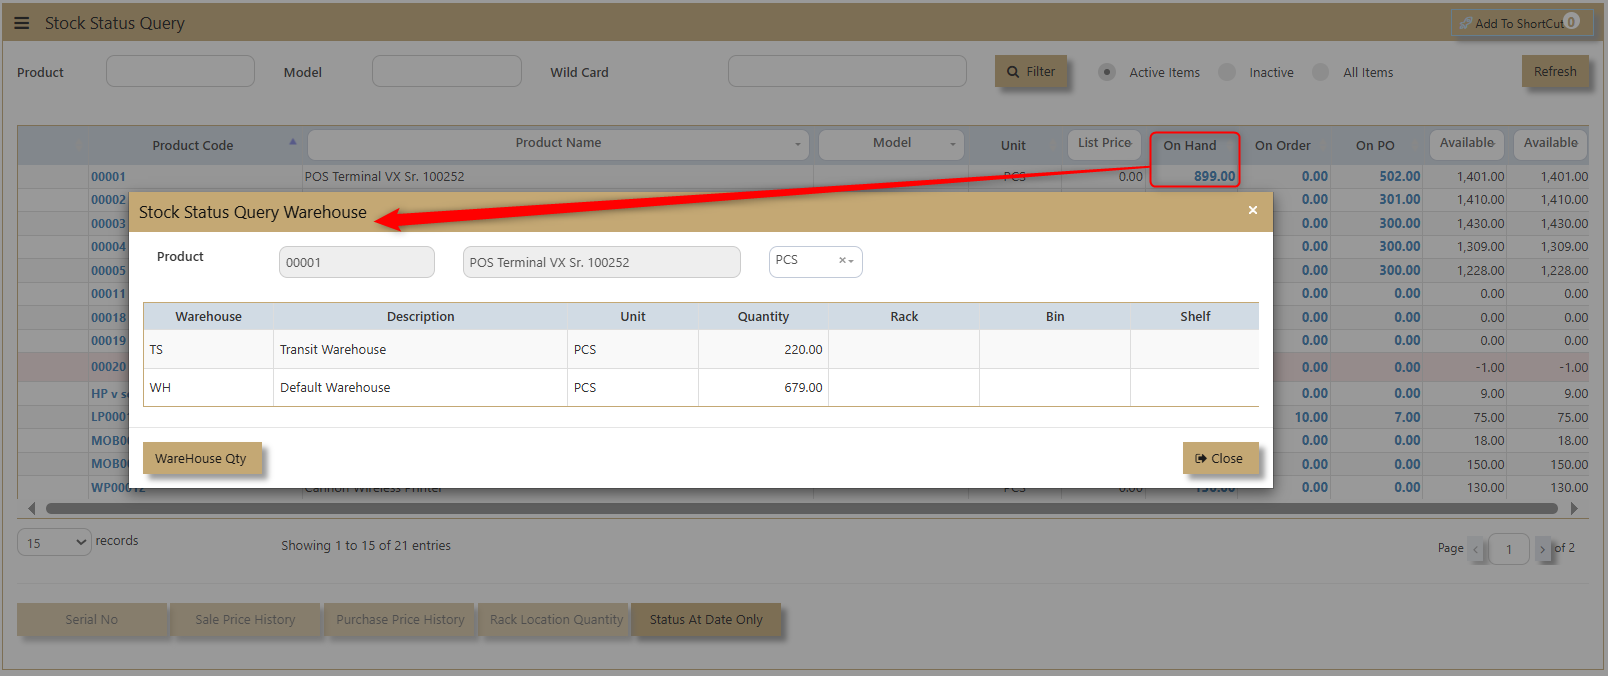
1. Click on Stock – Stock Operations – Reports & Queries - Stock Status Query icon for following screen.
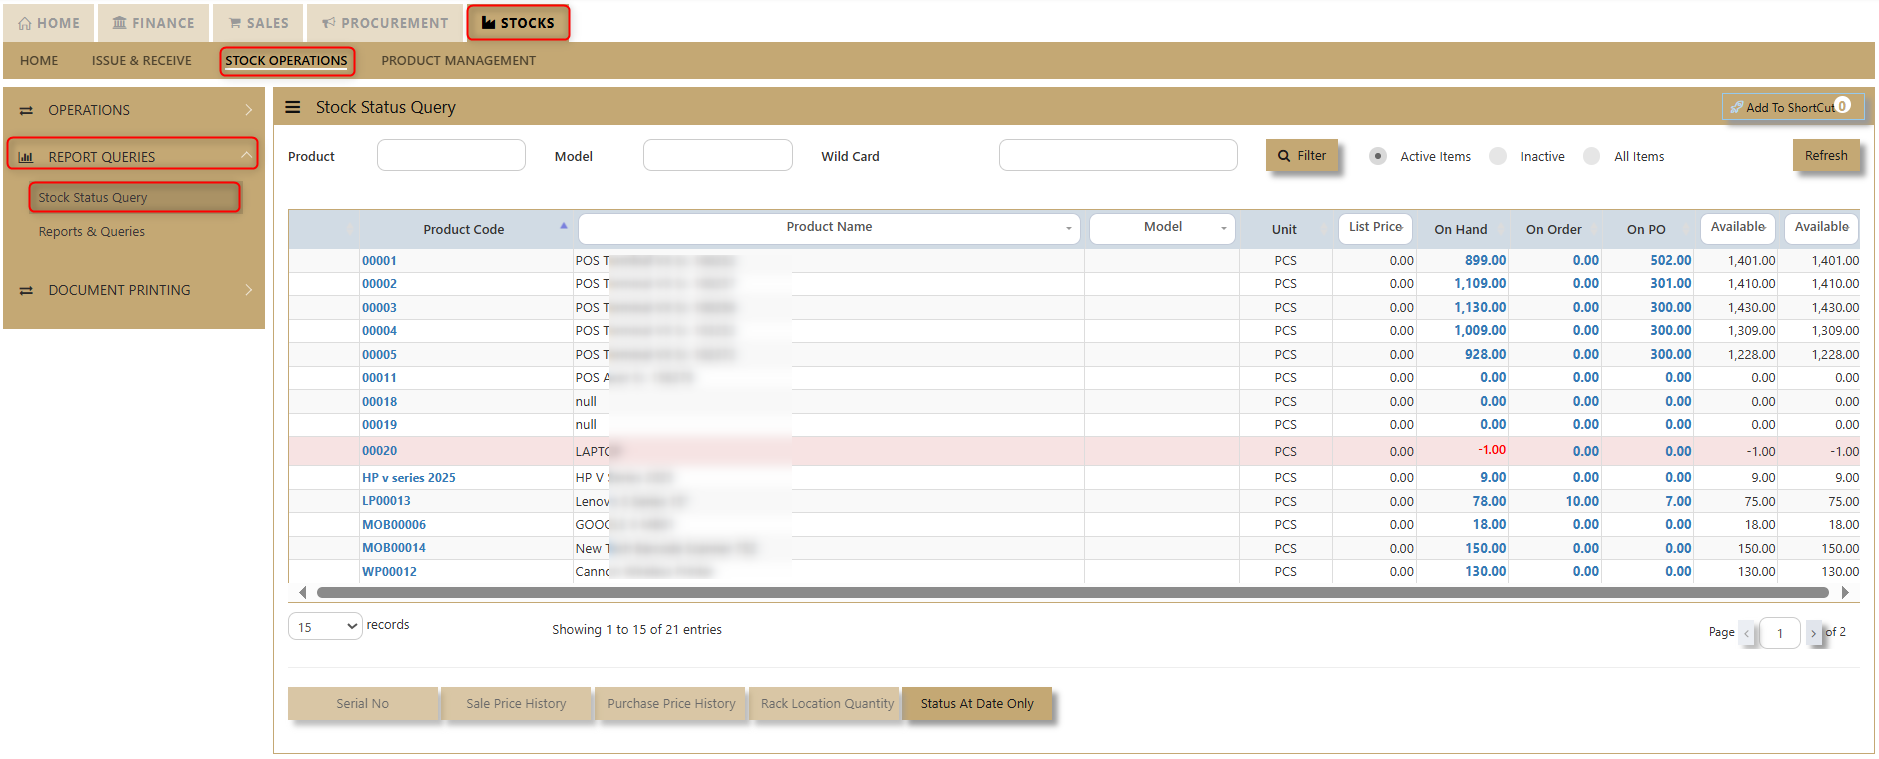
2. Assuming user want to see the status of say Product Code “00001” that reflect an available balance of 899 PCS. Simply click the side bar (as shown by example in above graphic) to select “00001”. Click on the on hand Qty then select the Warehouse to see the Warehouse Quantity in each warehouse. A pop-up window showing the product balance by warehouse will appear.
3. Users are allowed to zoom in further to see the status of each warehouse. E.g., we can click WH to see Warehouse Qty now.
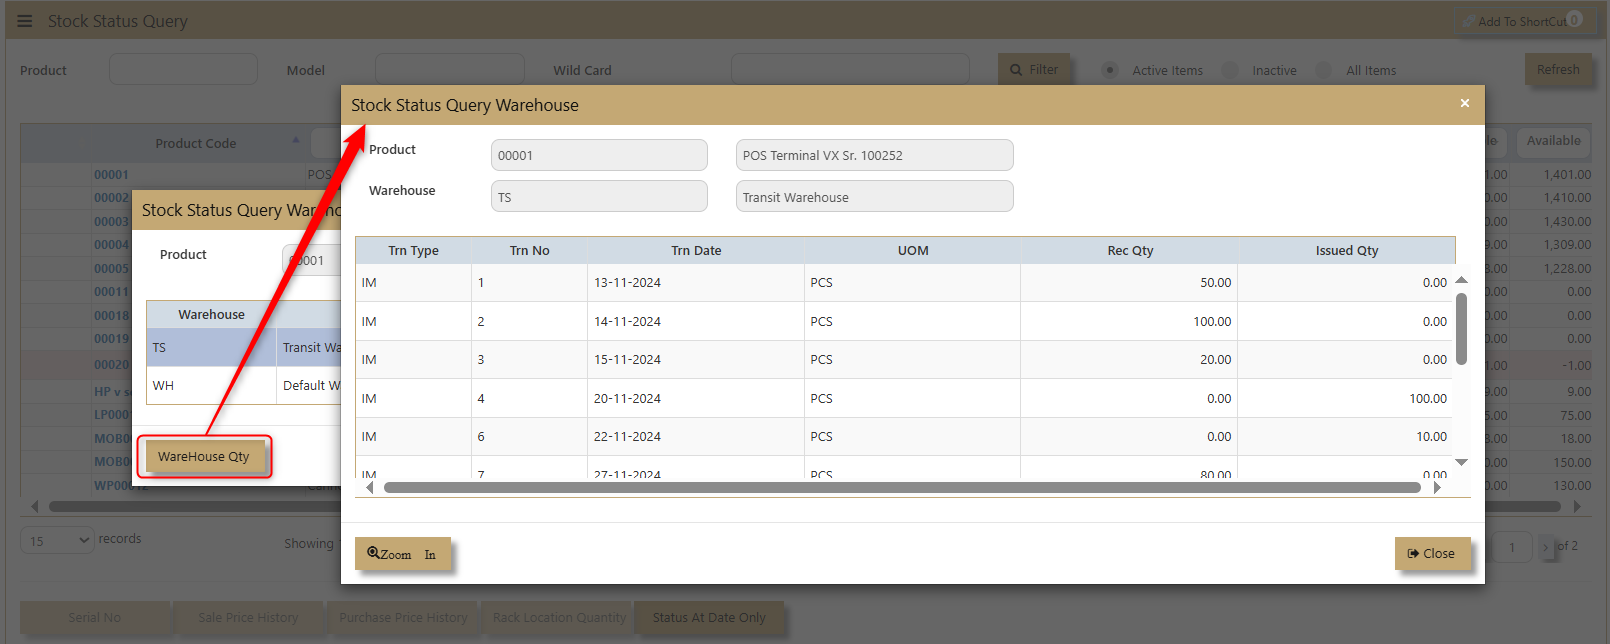
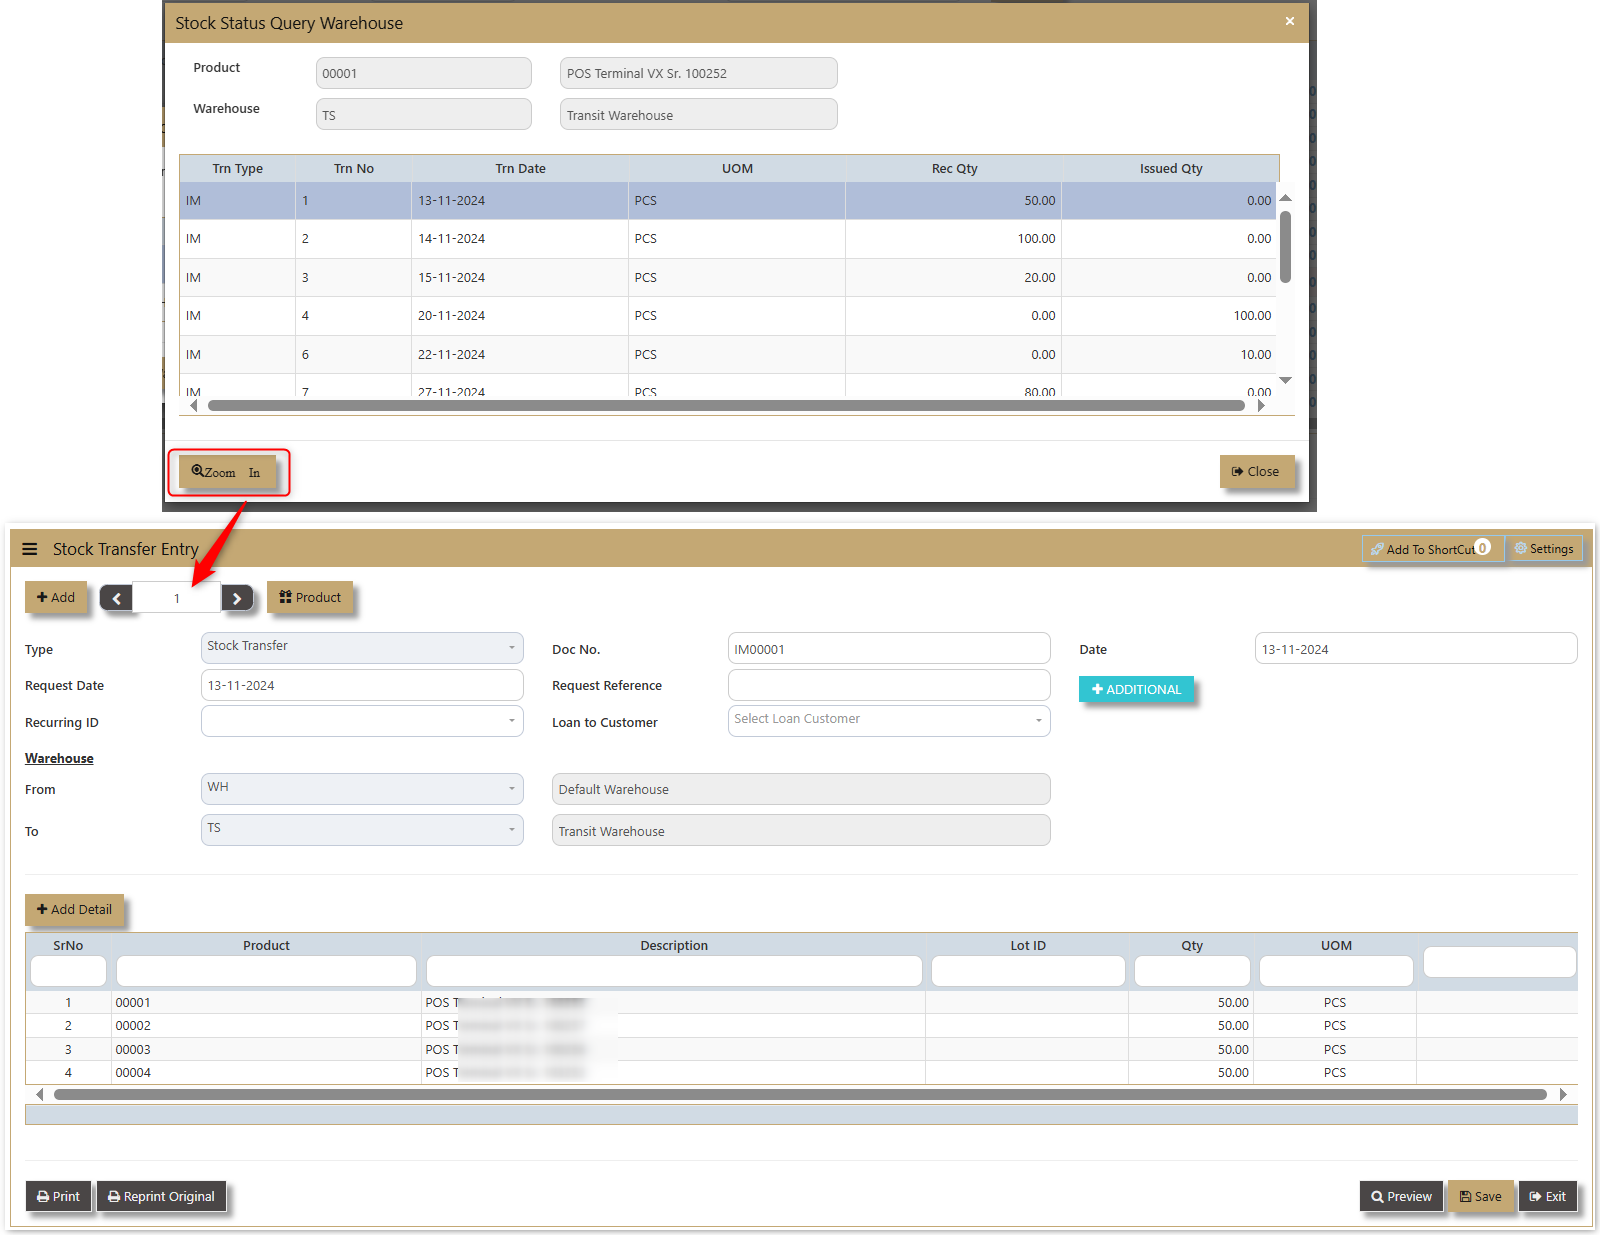
4. The transaction in the Warehouse is now displayed. If you want to see any transaction details, then select the raw and click the zoom button to check the details.
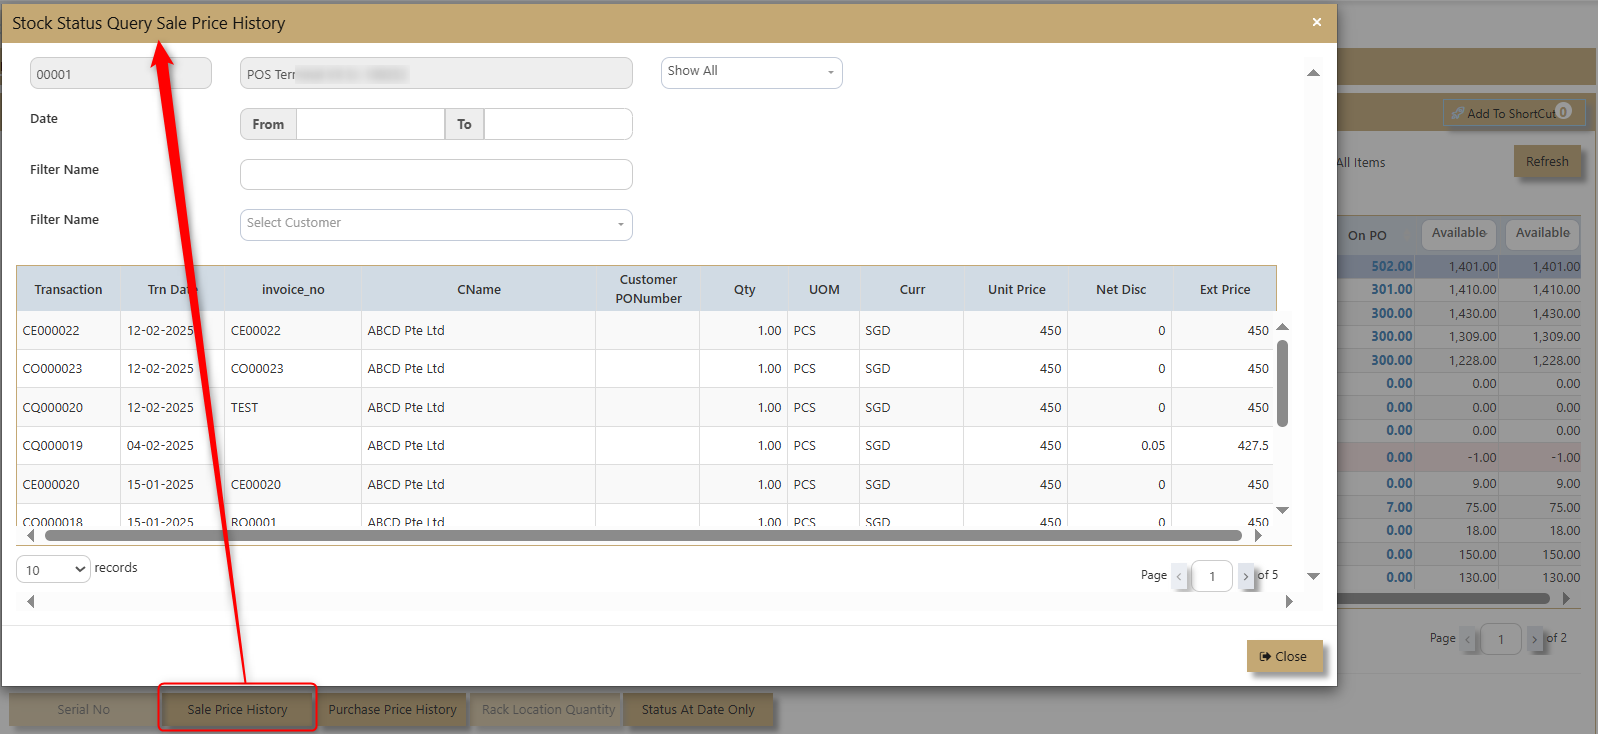
5. User could be able to see the sales price history as indicated below.
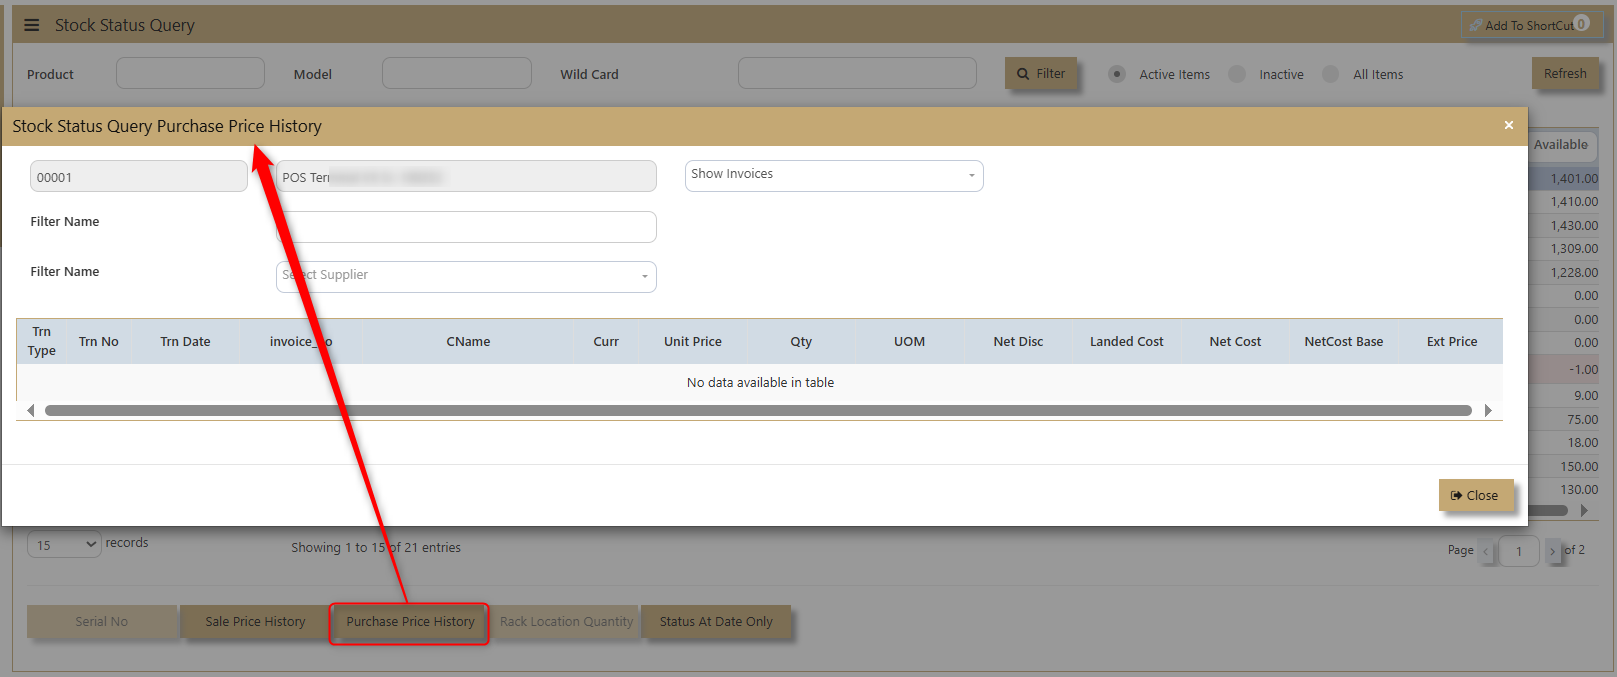
6. User could be able to see the Purchase price history.
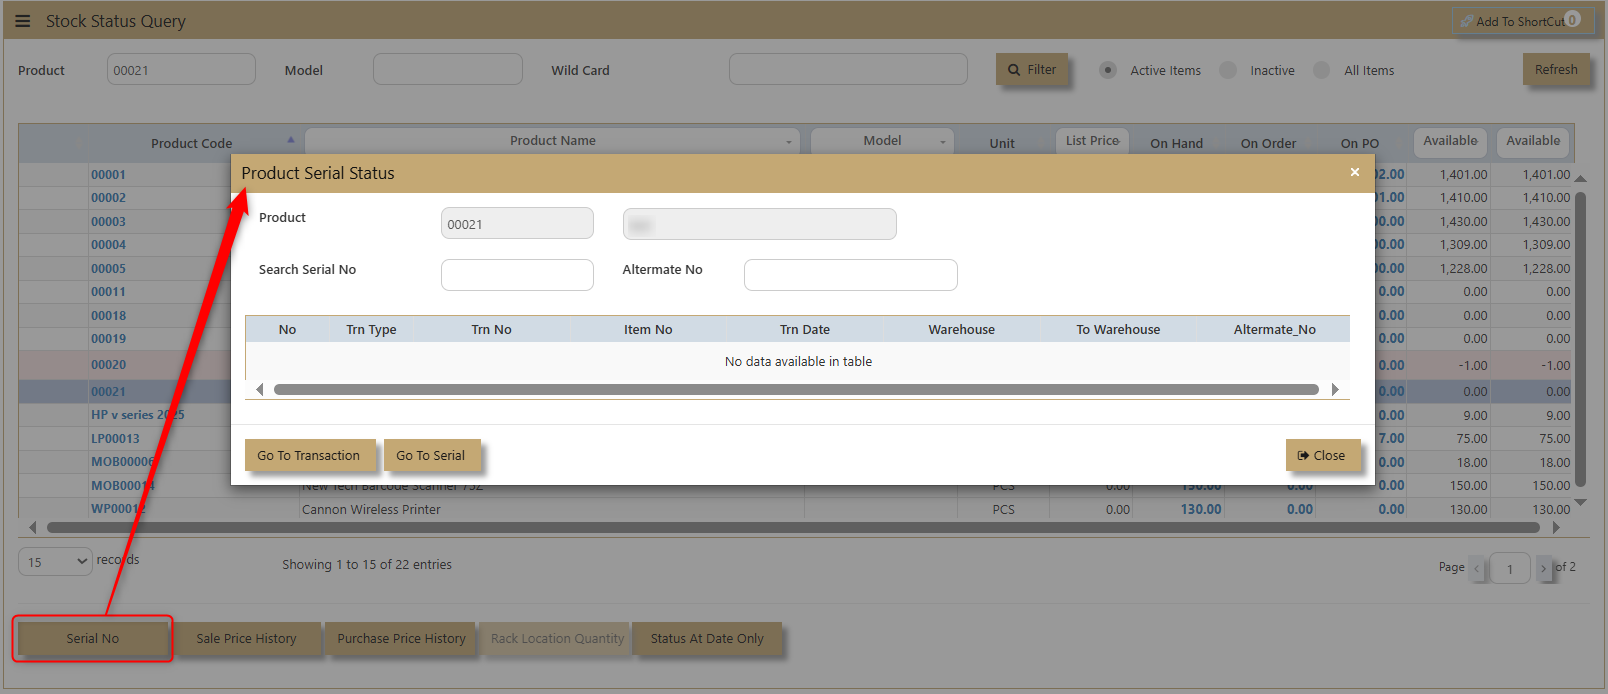
7. If the product is Serialized. the system will enable the button for Serail to see the serial number pf the certain product.
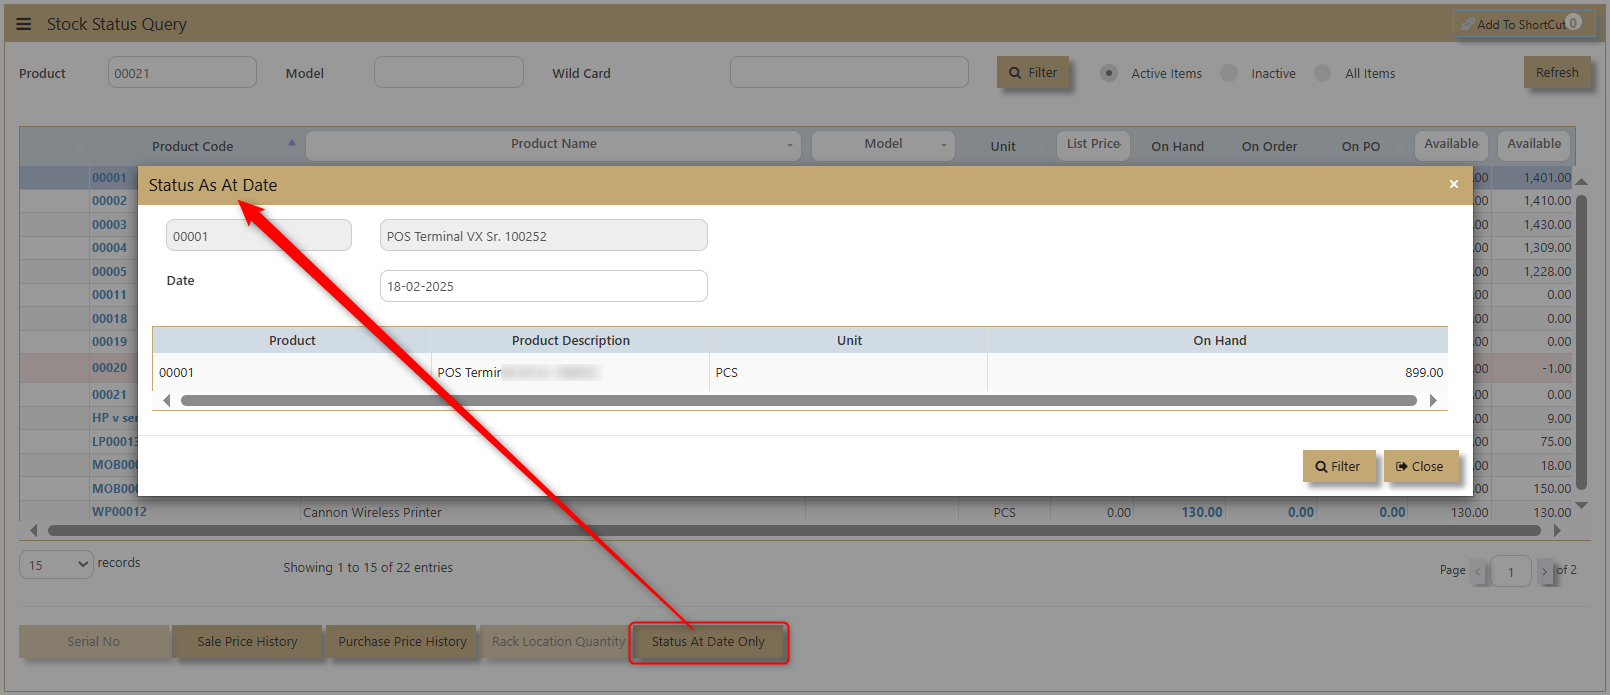
8. Status at Date only will show the status of the product at the current date when the query is made.
REPORTS & QUERIES
How to use Report & Queries?
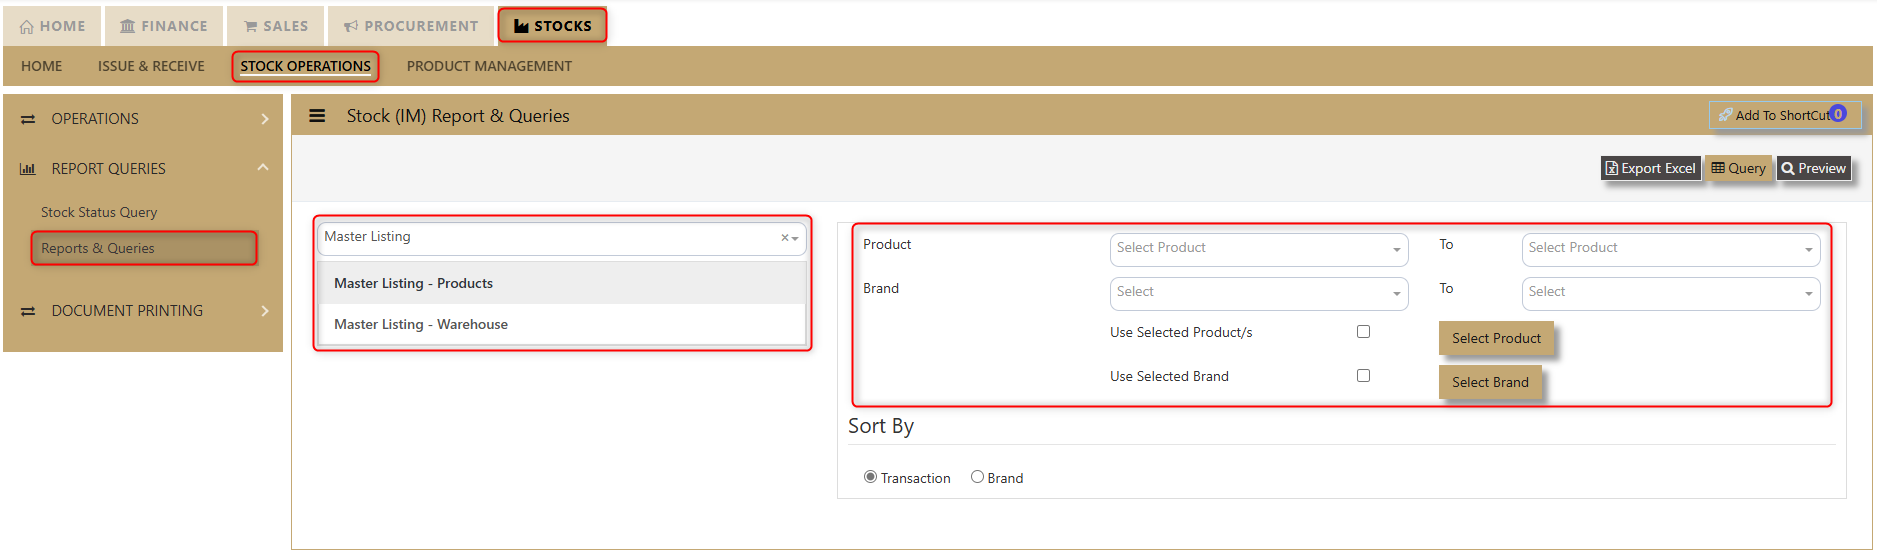
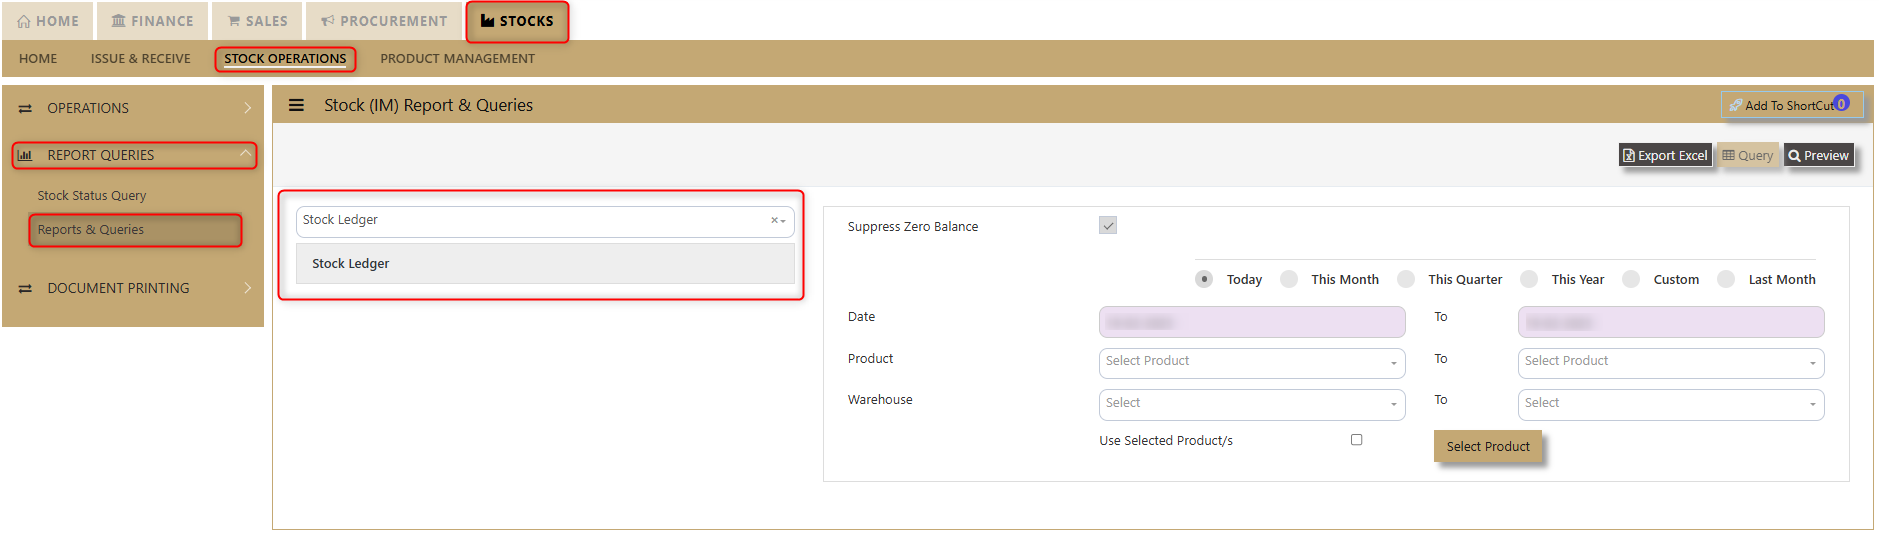
1. Click on Stock – Stock Operations - Reports Queries – Reports & Queries icon for following screen.
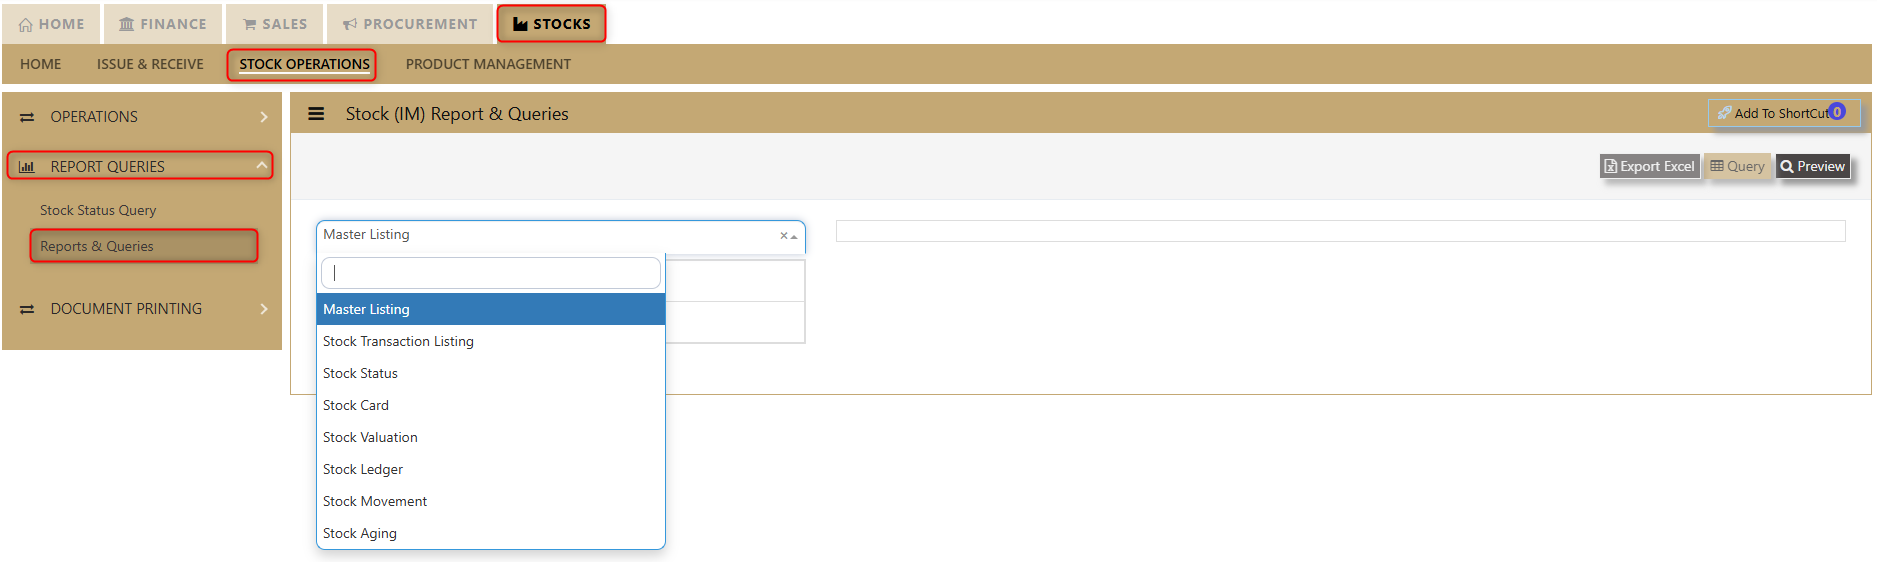
The main reports are Stock Valuation, Stock Ledger and Stock Aging. These reports will enable the users to see the on-hand quantity and valuation, the transactions made as well as the aging report of the stock items.
These reports & queries will also enable the user to see reports for Master Listing, Stock Transaction Listing, Stock Status, Stock Card and Stock Movement.
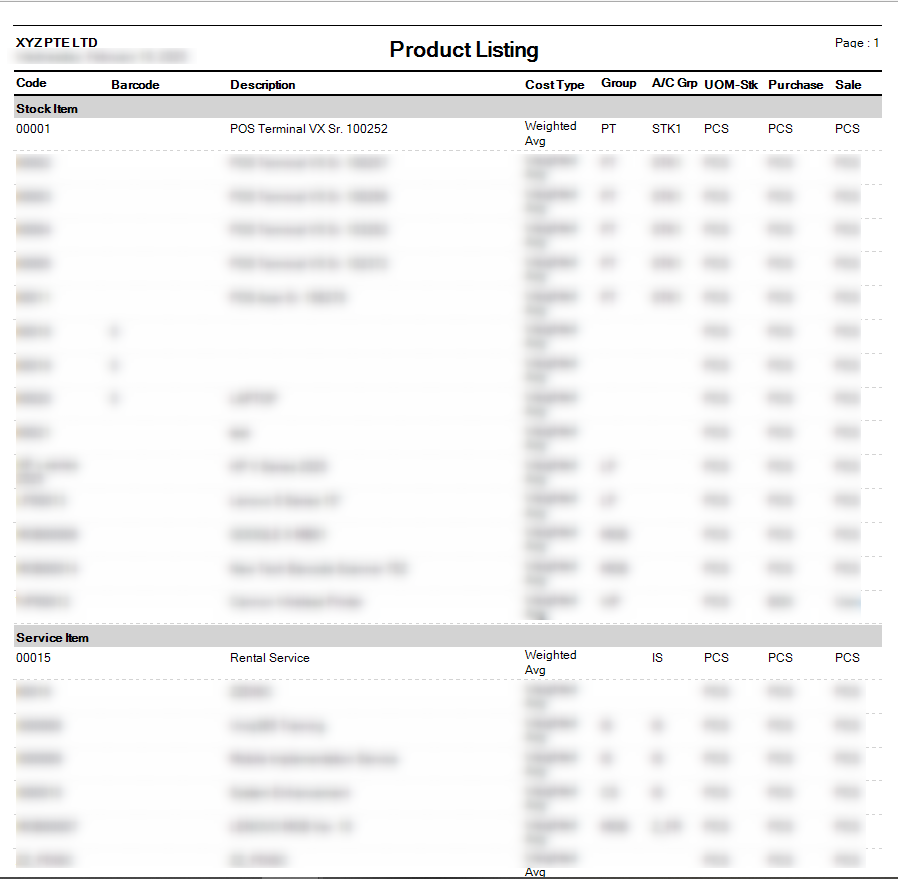
1. Master Listing
Users can filter and view products and warehouses by Product and Brand Short. This report provides a clear overview of stock levels and warehouse locations, helping users manage inventory efficiently. By applying the filters, they can quickly access the specific data they need. Click on preview and the user may access the report.
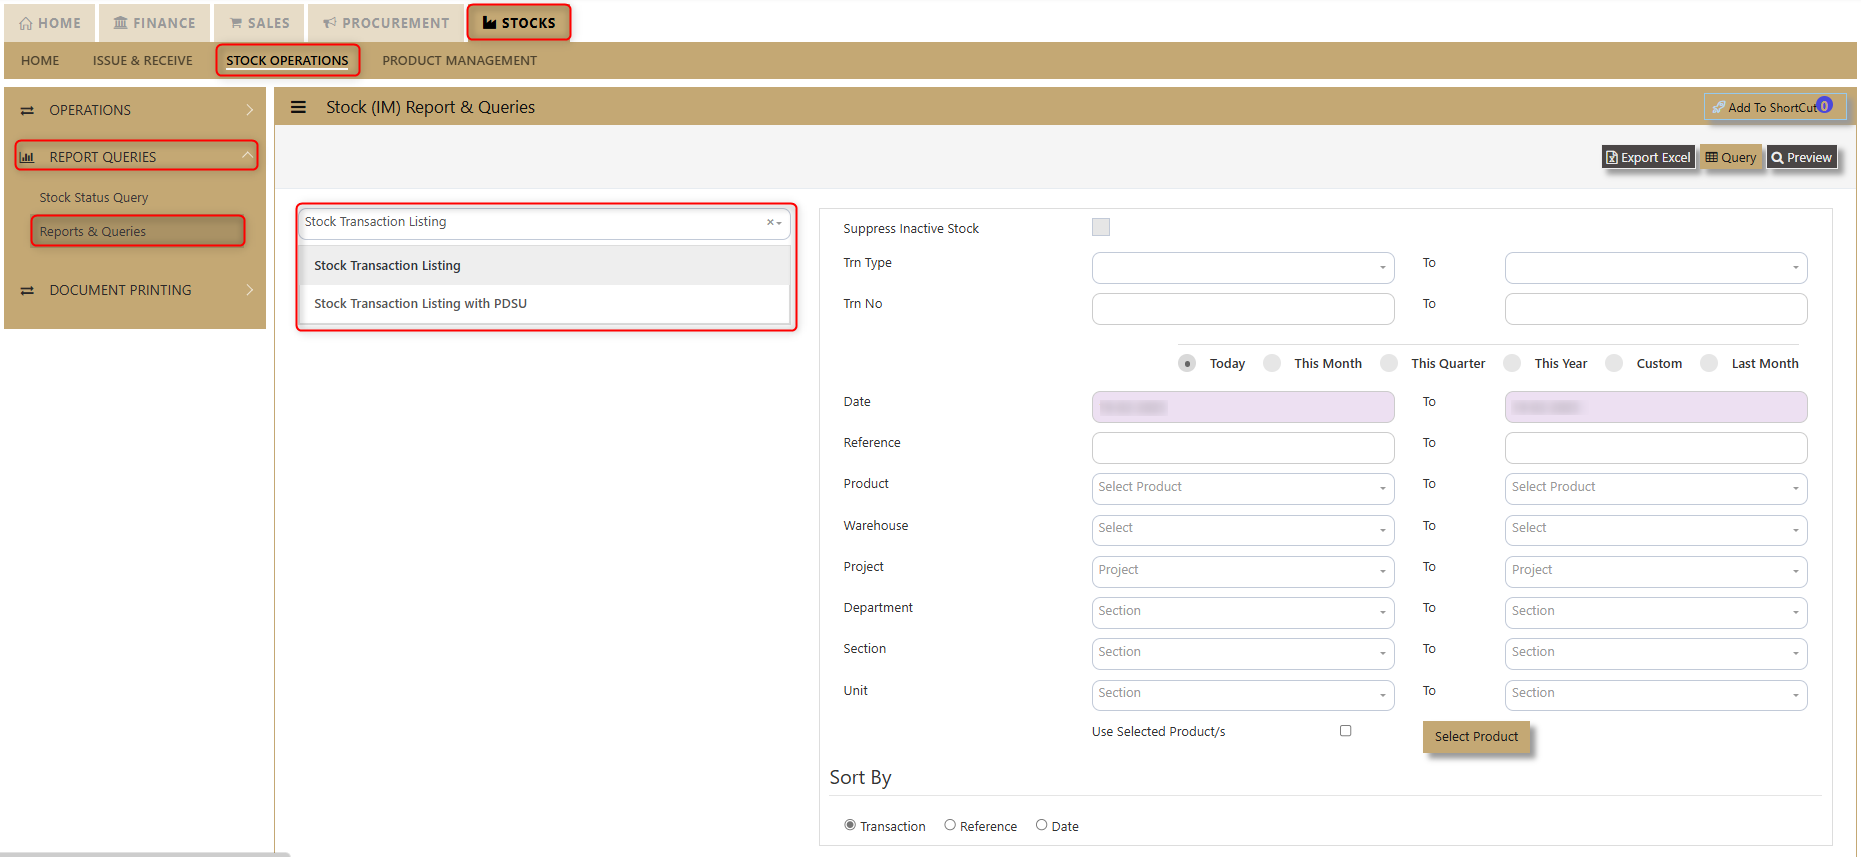
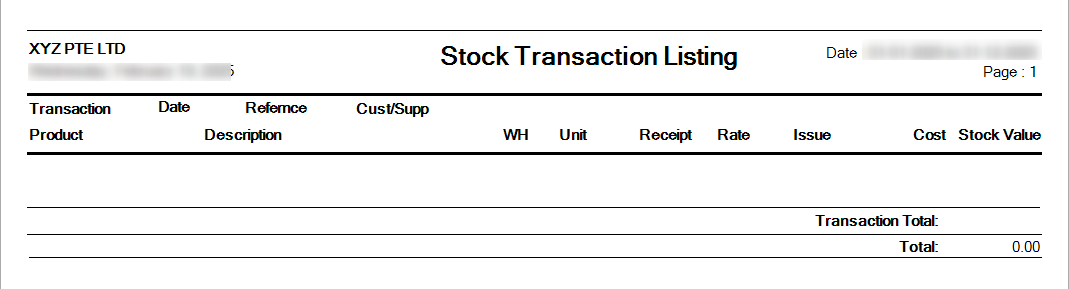
2. Stock Transaction Listing
Stock Transaction Listing Report provides users with a comprehensive overview of stock transactions, allowing them to view details by transaction type and transaction number. The report offers an option to suppress inactive stock, ensuring that only active items are displayed. Users can refine their data by utilizing a range of filters, including Date, Reference, Product, Warehouse, Project, Department, Section, and Unit, enabling easy access to specific information. Additionally, users have the flexibility to sort the report by Transaction, Reference, or Date, offering a streamlined approach for efficient data analysis and decision-making.
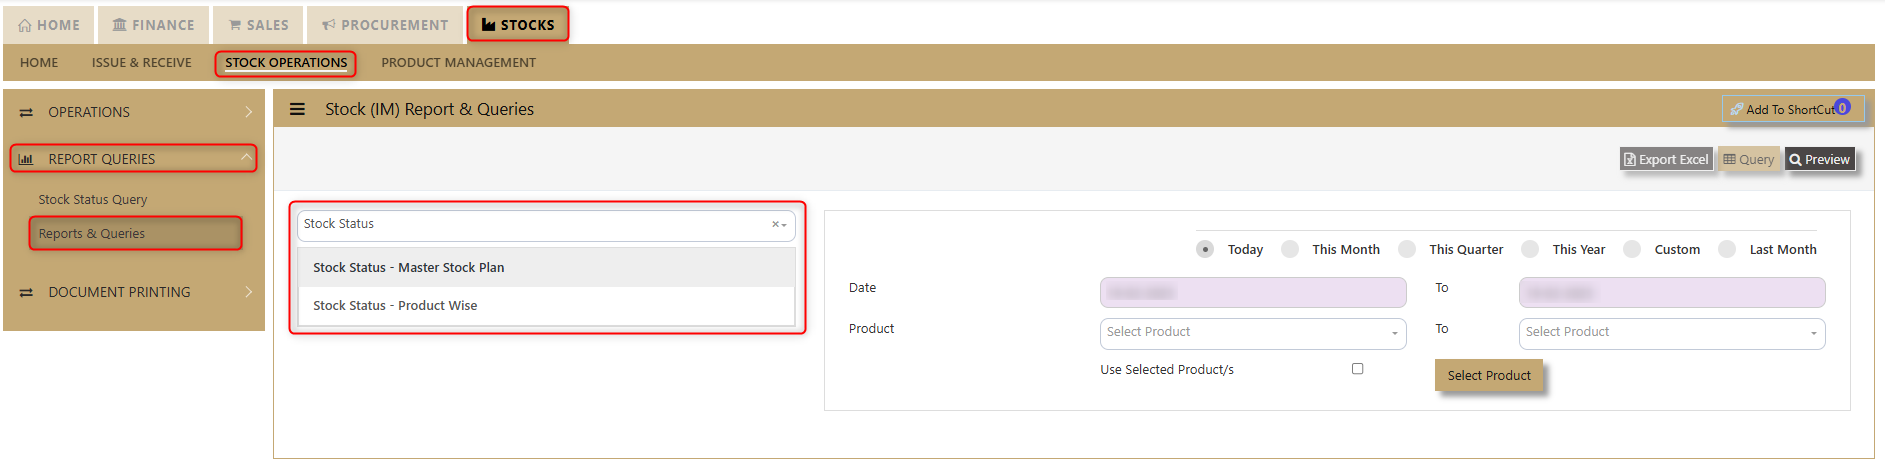
3. Stock Status
Stock Status Report offers users the ability to generate detailed insights into stock levels with two key report options: Stock Status - Master Stock Plan and Stock Status - Product Wise. This functionality allows users to track and analyze stock data based on their preferred view. The report includes filtering options for Product and Date, enabling users to narrow down the results to meet specific needs. Whether users are focusing on the overall stock plan or detailed product-level information, the Stock Status Report provides an efficient and flexible tool for managing stock data.
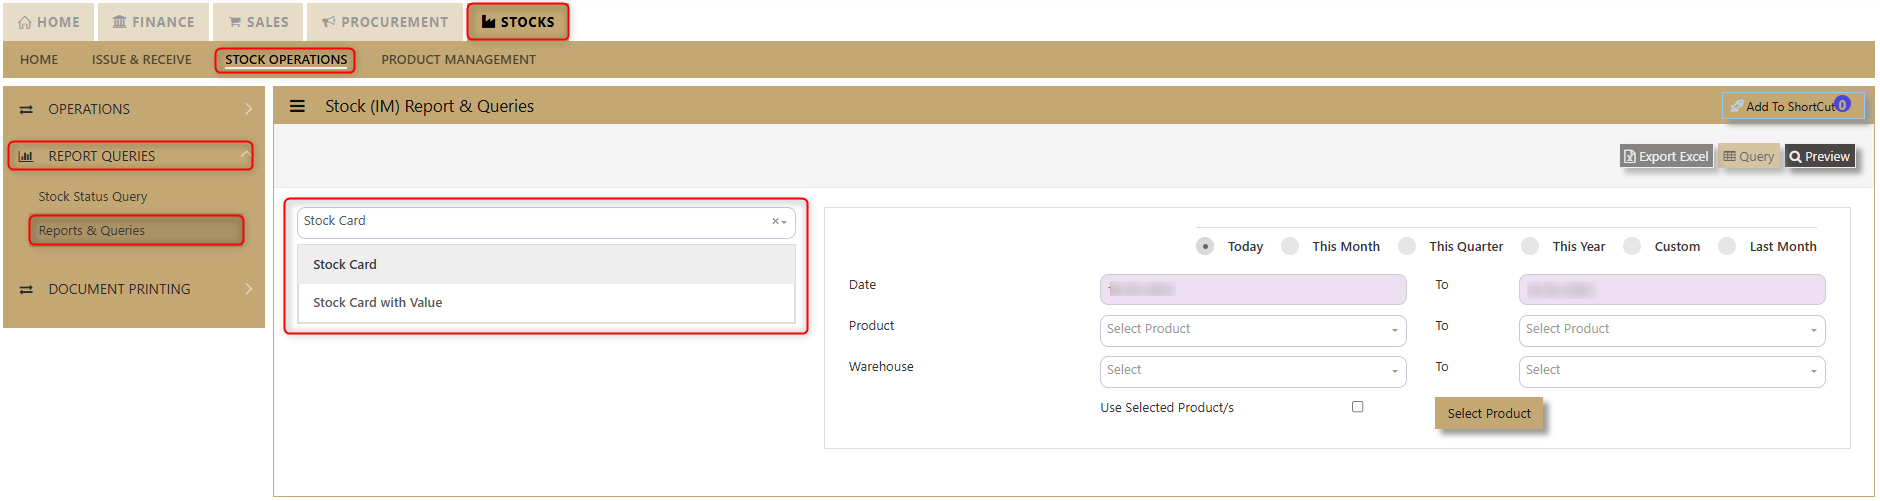
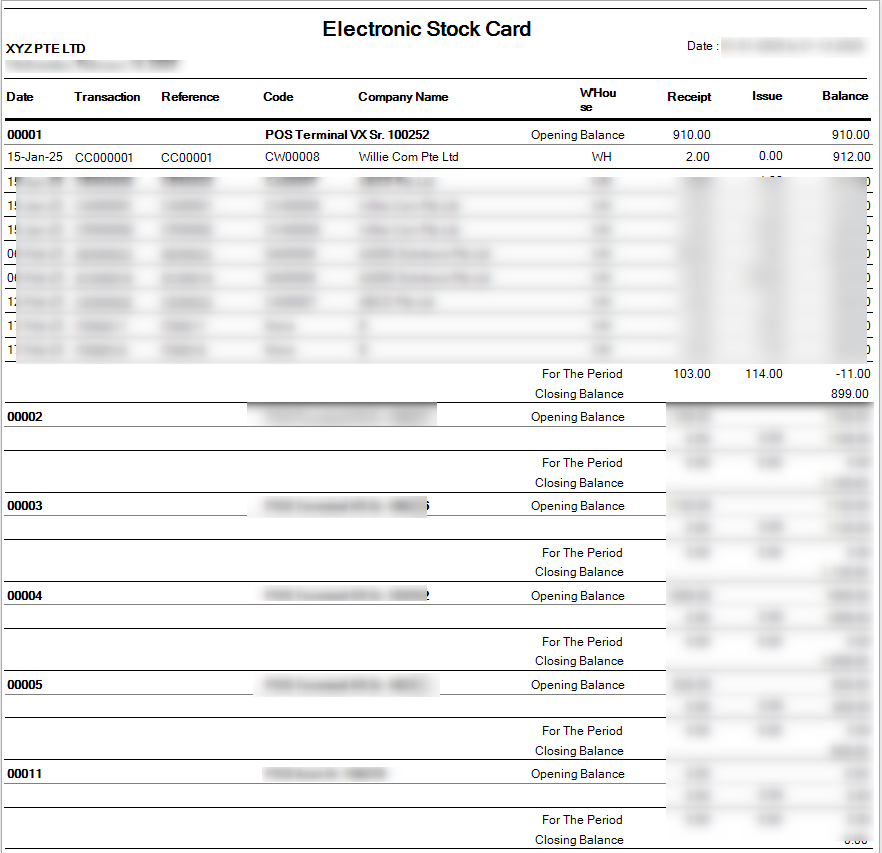
4. Stock Card
Stock Card Report allows users to view detailed records of stock movements for specific products across different warehouses. Users can easily filter the report by Date, Product, and Warehouse, offering a tailored view of stock levels and transactions over time. This flexibility ensures that users can access the precise information they need, whether for tracking stock movements, auditing inventory, or managing warehouse operations efficiently. The Stock Card Report is an essential tool for monitoring stock activity and making informed inventory decisions.
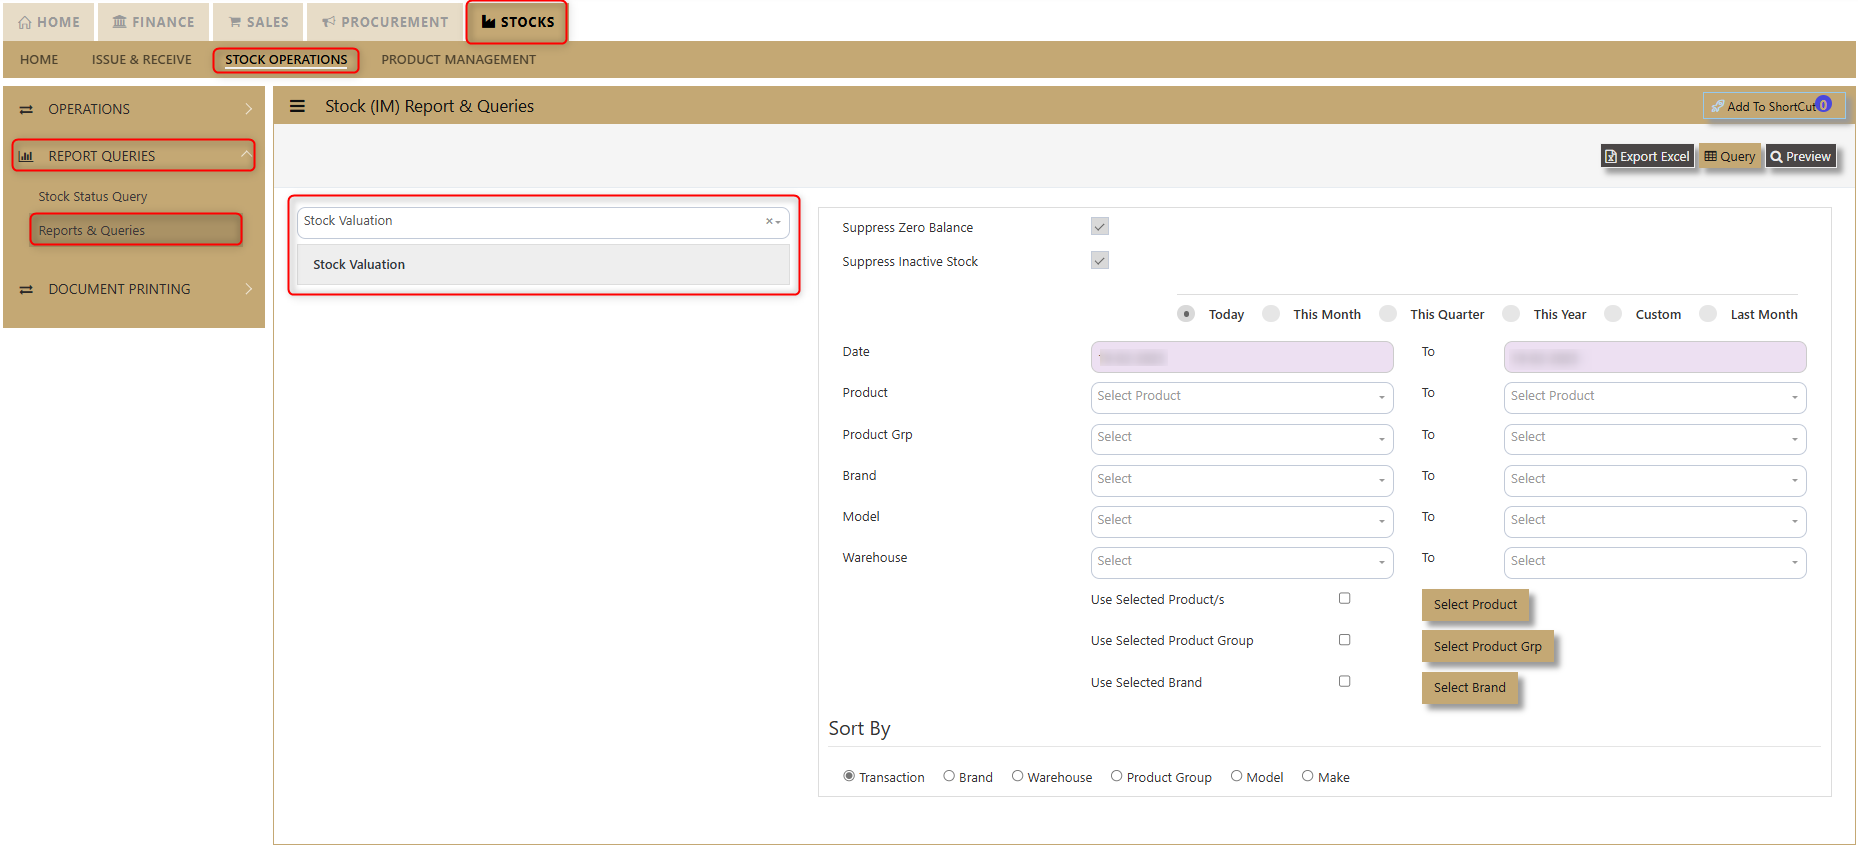
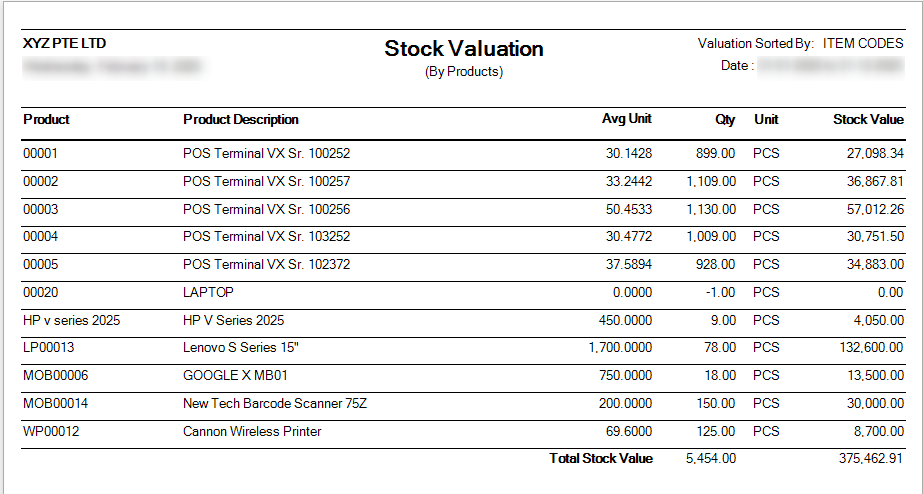
5. Stock Valuation
Stock Valuation Report provides users with a clear and detailed overview of stock values, offering the flexibility to refine the data according to specific needs. Users can choose to suppress zero balances, ensuring that stocks with a zero balance do not appear, or suppress inactive stocks, which displays only active items in the report. The report also features a variety of filters, including Date, Product, Product Group, Brand, Model, and Warehouse, allowing users to focus on particular stock categories. Additionally, users can sort the report by Transaction, Brand, Warehouse, Product Group, Model, and Make to streamline their analysis and decision-making. This report is a powerful tool for tracking stock value, inventory status, and product performance across various parameters.
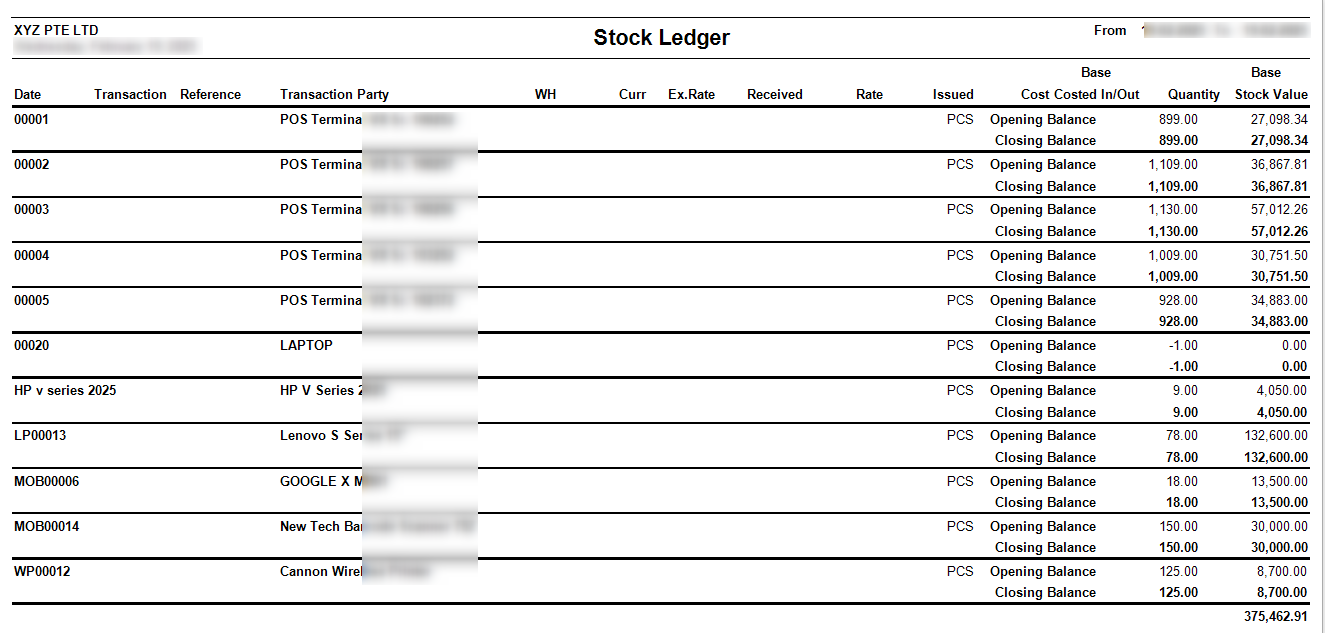
6. Stock Ledger
Stock Ledger Report offers users a detailed record of all stock movements and transactions, providing an essential tool for tracking inventory activity. With the ability to filter by Date, Product, and Warehouse, users can easily access specific information related to their stock transactions. This functionality ensures that users can analyze stock history, monitor changes, and gain insights into inventory trends across various products and locations. The Stock Ledger Report is designed to support efficient inventory management and improve decision-making through accurate, up-to-date transaction data.
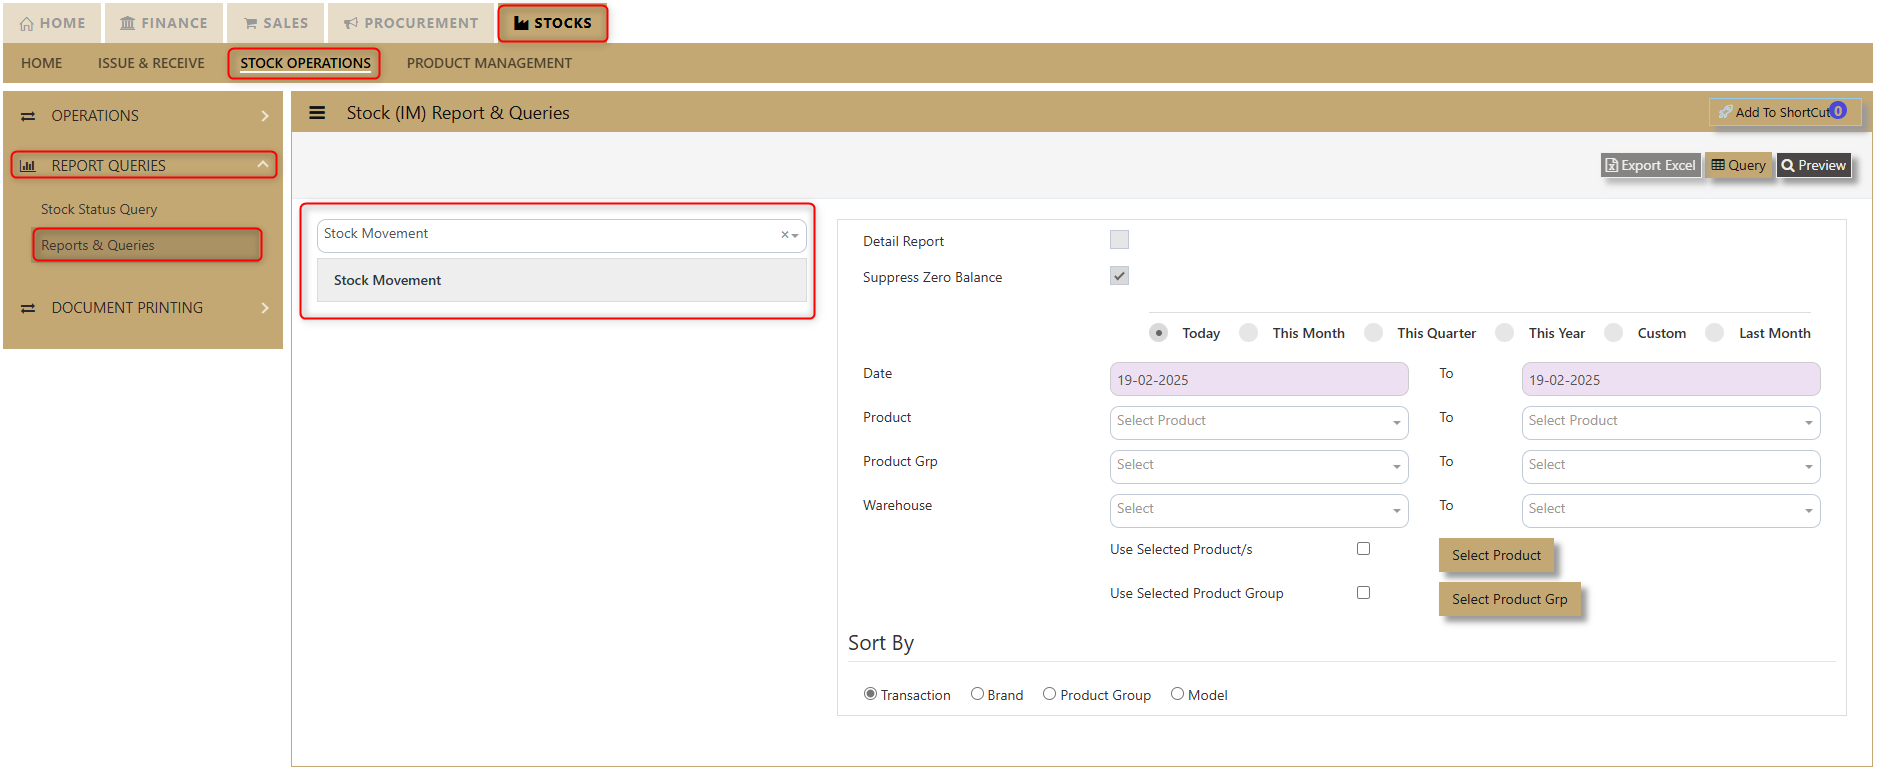
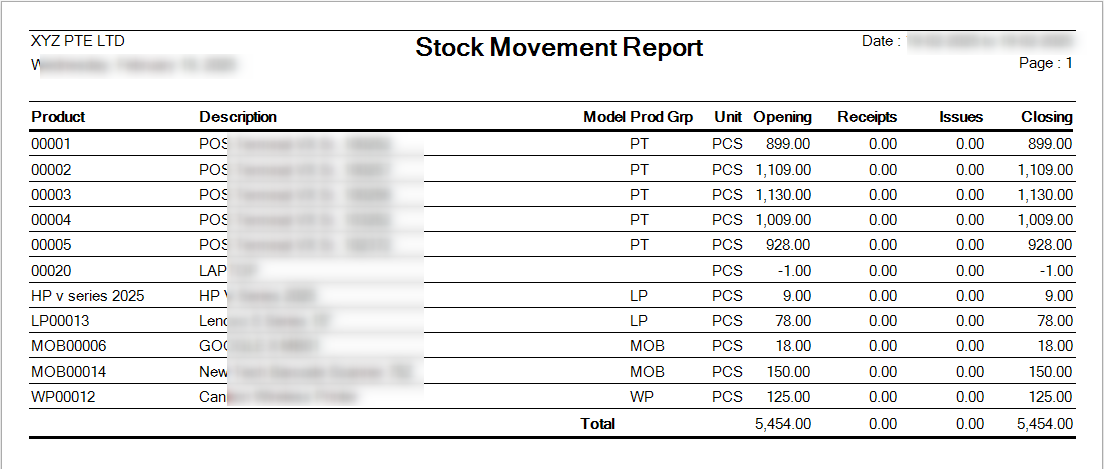
7. Stock Movement
Stock Movement Report provides users with a comprehensive view of their stock movements, allowing them to track inventory in real-time. Users can filter the report by date, product, product group, and warehouse, with the option to suppress zero balance items for a more streamlined display. Additionally, the report can be sorted by transaction, brand, product group, and model, enabling users to analyze data according to their specific needs. This detailed, customizable report helps users efficiently manage and review their stock movements for better decision-making.
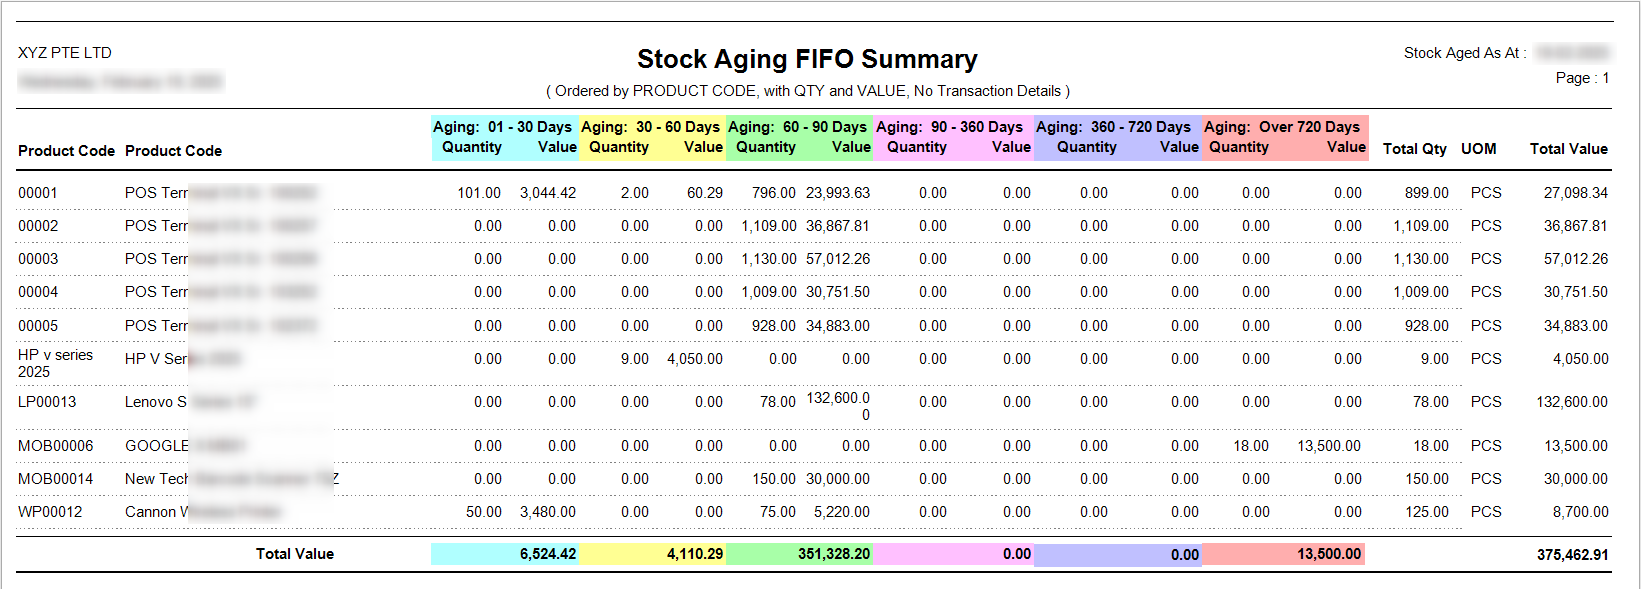
8. Stock Aging
Stock Aging Report allows users to view stock data for up to 2 years, offering valuable insights into inventory age. Users can filter the report by Product, Product Group, Age on Date, and Age Group to customize the view to their needs. Additionally, the report includes an option to suppress zero balance items for a cleaner presentation. This detailed, customizable report enables users to efficiently track stock aging, pinpoint slow-moving items, and make data-driven inventory decisions.