Finance (Receivables)
Overview - Receivables
RECEIVABLE MODULE
This module contains the Accounts Receivable (AR) entry options for various receivables transactions such as receipts and real-time GL posting.
______________________________________________________________________________________________________________________________________
MENU NAVIGATION
Sub-menu items of RECEIVABLE MODULE are listed below:
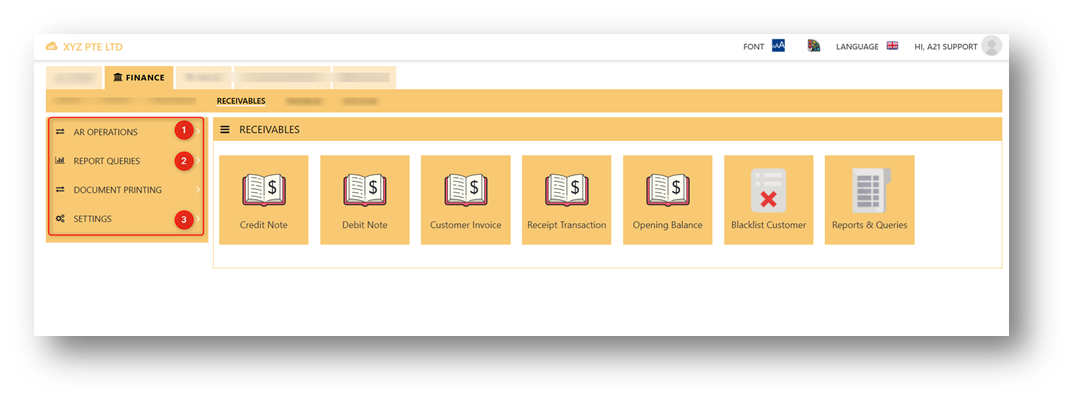
The RECEIVABLE MODULE has 3 tabs, as shown above, namely, Operations, Report Queries, and Settings.
AR OPERATIONS is where transactions are entered, like receivable transactions and opening balances.
REPORT QUERIES contains all the account receivable reports.
SETTINGS is where the master records are created.
AR - Operations
CREDIT NOTE
CREDIT NOTE
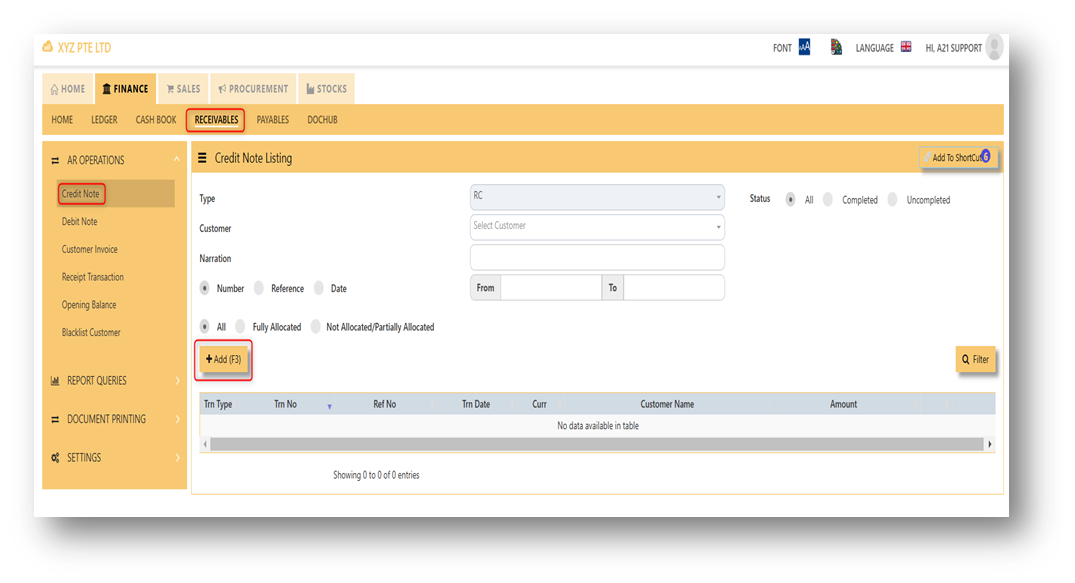
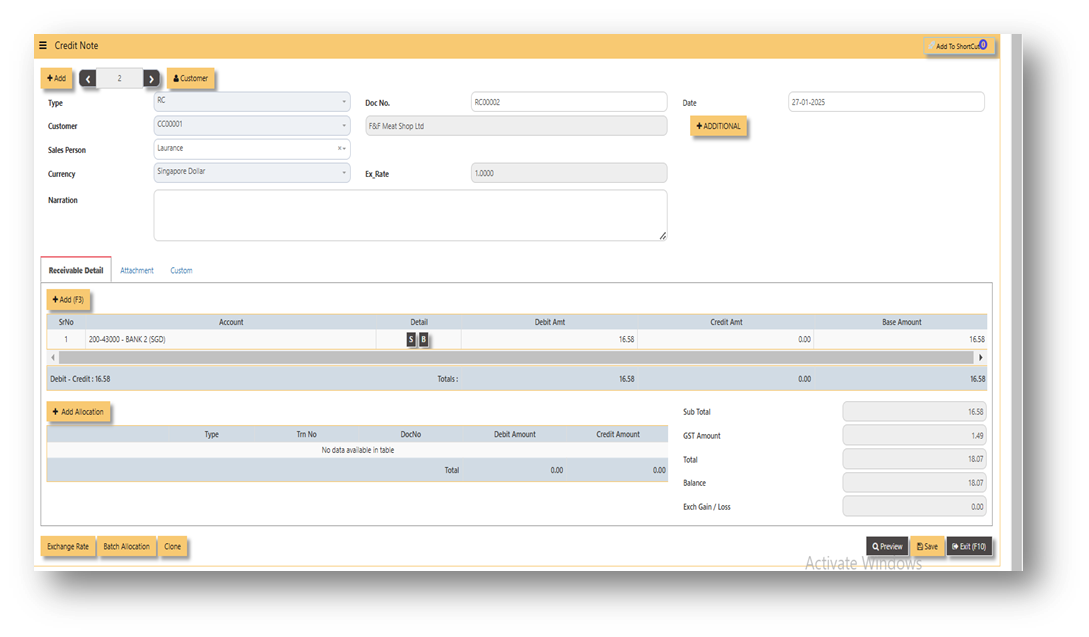
A credit note usually issued when clients return goods or services. To record a receivable credit note in Uniq365, you have to go in receivables module and look for credit note tab. Attached photo in reference where you can find it.
______________________________________________________________________________________________________________________________________
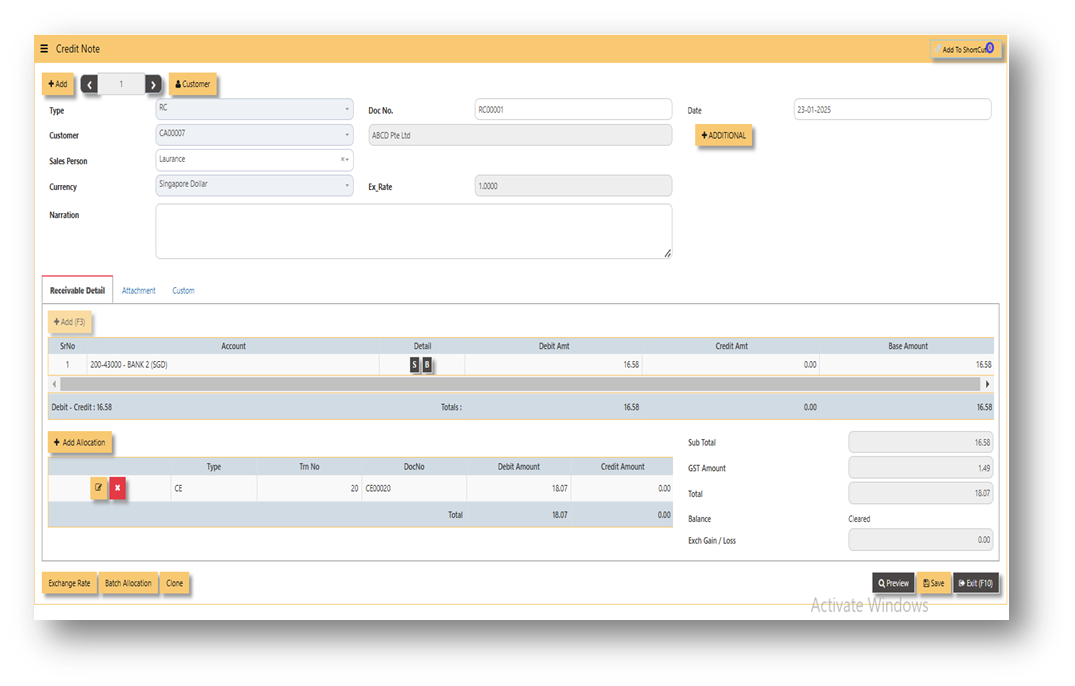
Steps on how to enter new transaction in Credit Note:
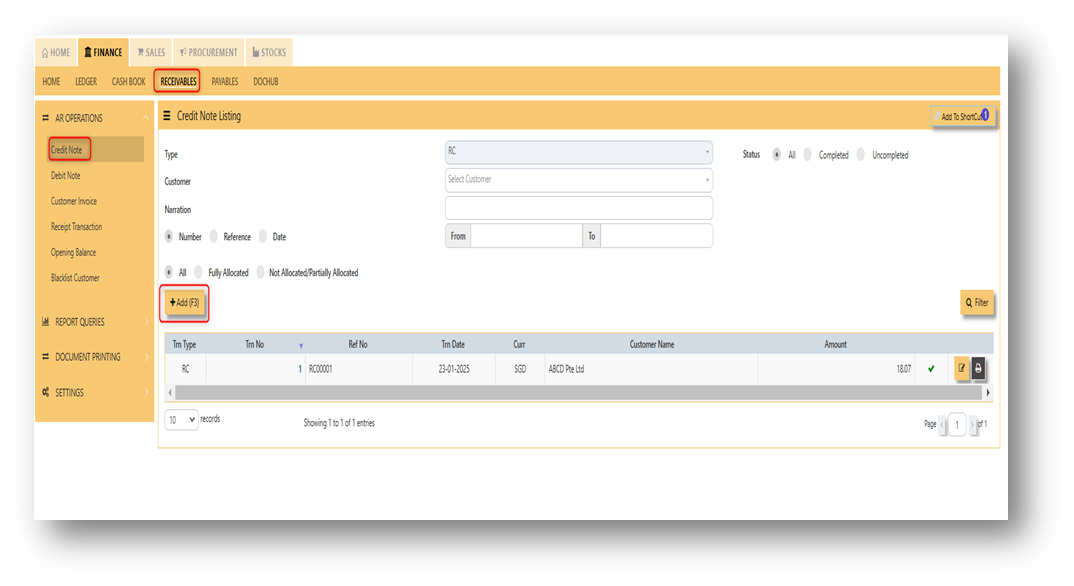
- Click on Receivables – AR Operations – Credit Note (RC) and the following screen will appear.

- Click on Add button to create a new transaction.

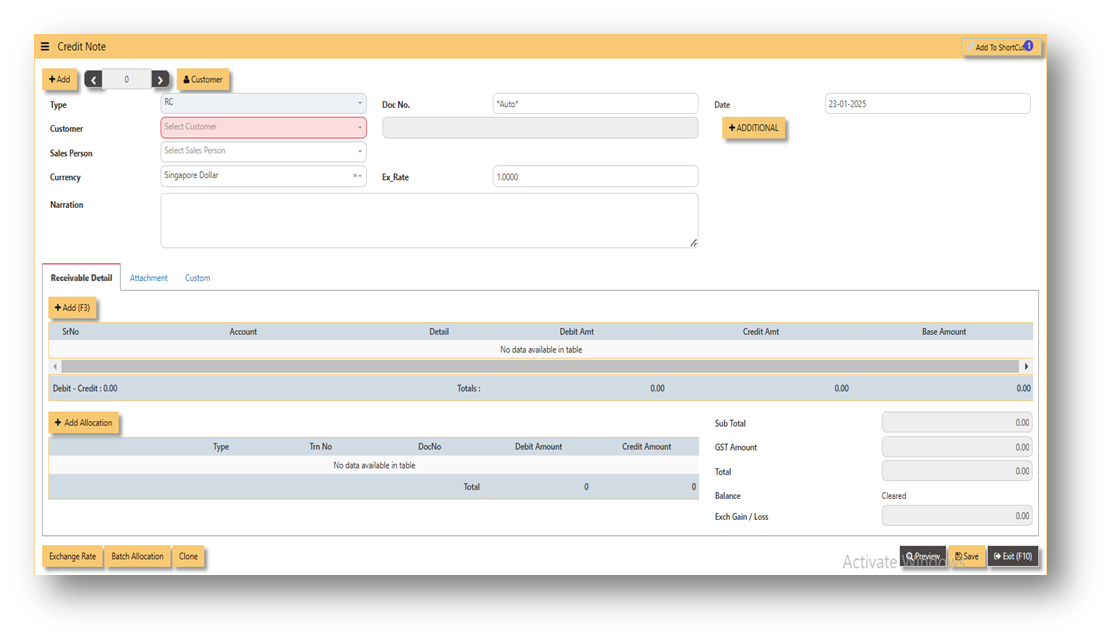
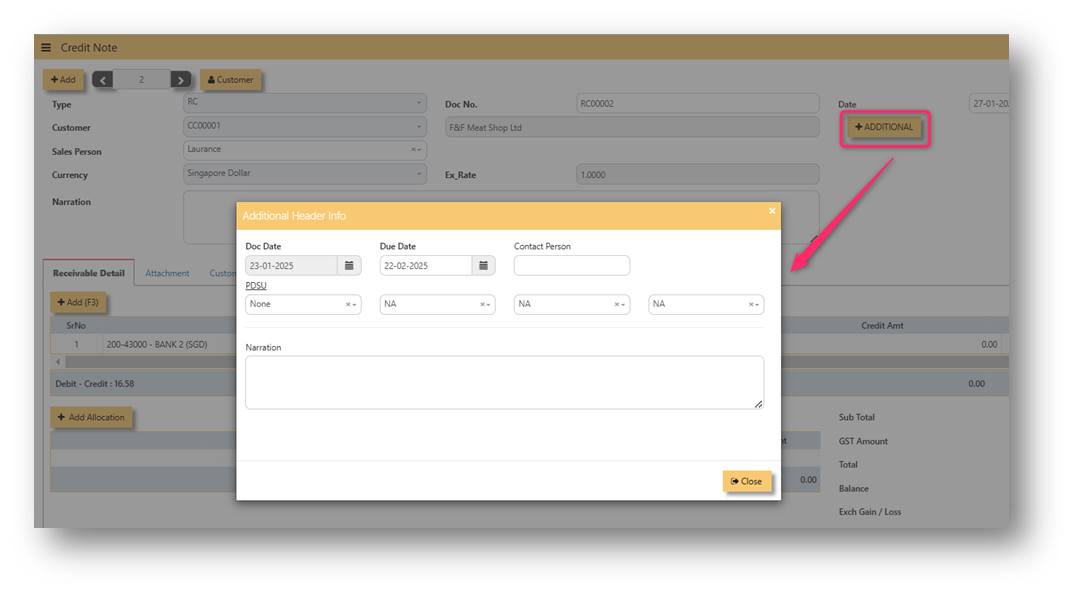
- Fill up the fields in the header section such as Ref No, Date, Supplier, Contact Person, Currency and Exchange Rate.
- Then select the account concerned at the detail section.
- Click for Additional Info for necessary details to add

- Click on SAVE button to complete the entry.
______________________________________________________________________________________________________________________________________
ADDITIONAL INFORMATION:
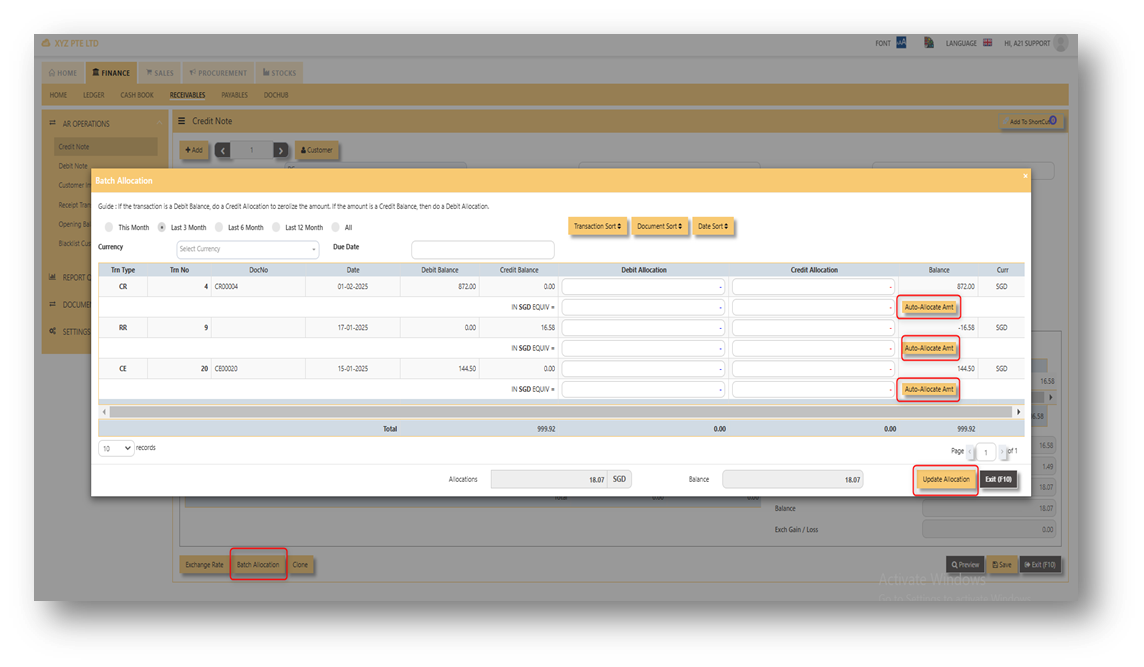
2.1 Batch Allocation
If user has a lot of transactions needed to allocate, they may use the batch allocation button to allocate more transactions in convenient way. Refer to attached photo on how batch allocation works.
2.2 Clone
If user wanted to create new RC transaction with same details from previous transaction, user can click the button of "clone" in order to create new RC transaction with same details from previous transaction. In this way, no need to key-in manually all the details, hence will just choose which customer should it be clone.
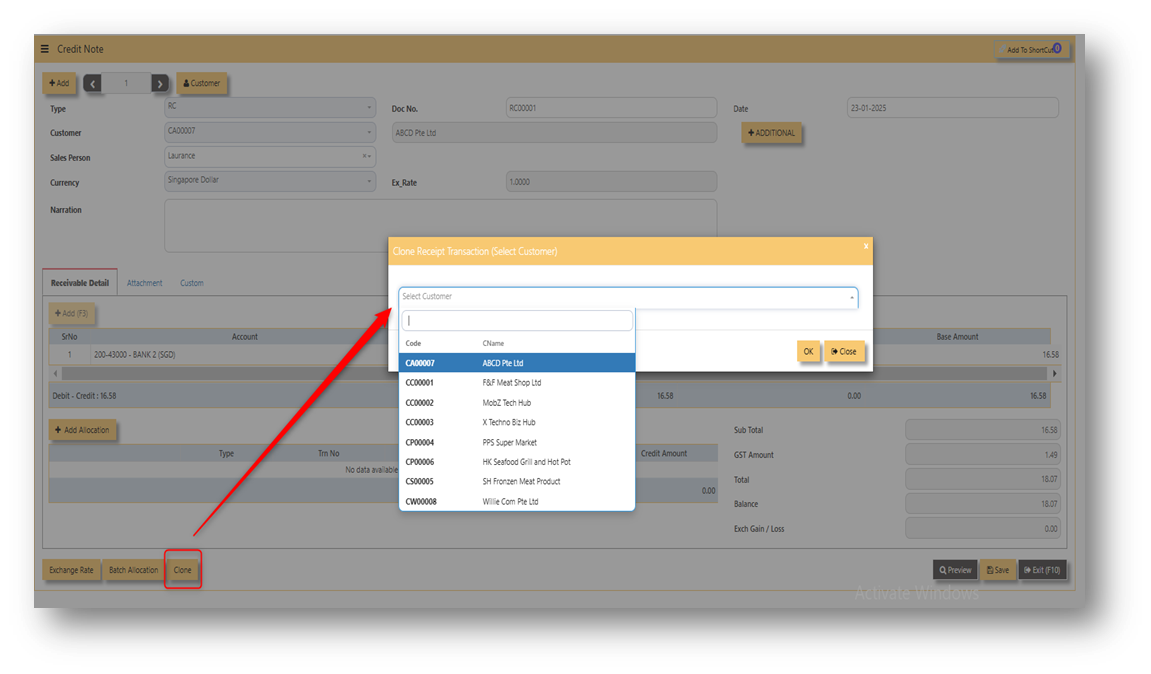
Attached photo is an example of transaction newly created from clone button.
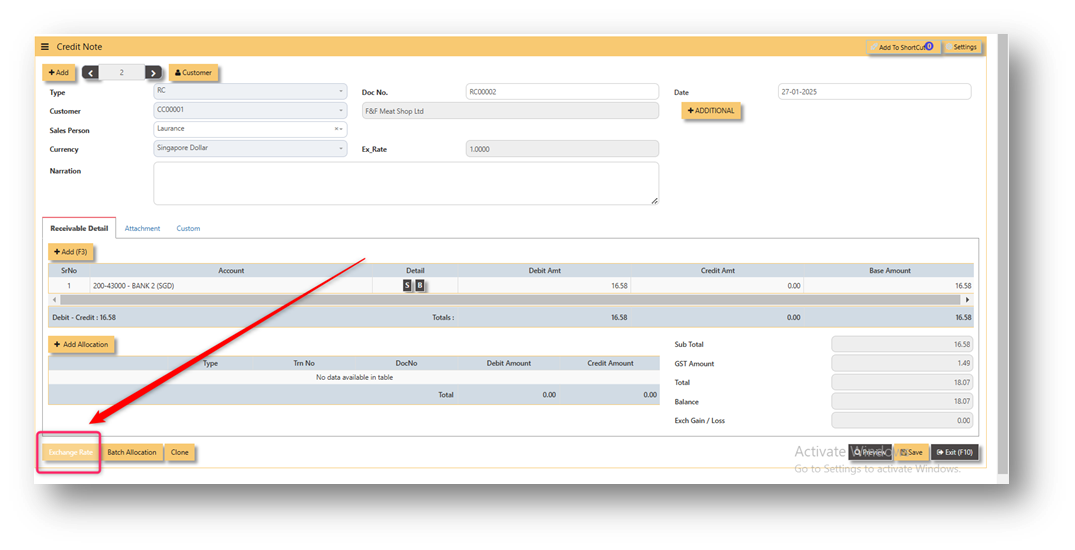
2.3 Exchange Rate
It will redirect you to Finance Tab. Attached link for further information. MASTERS GL | Support Doc
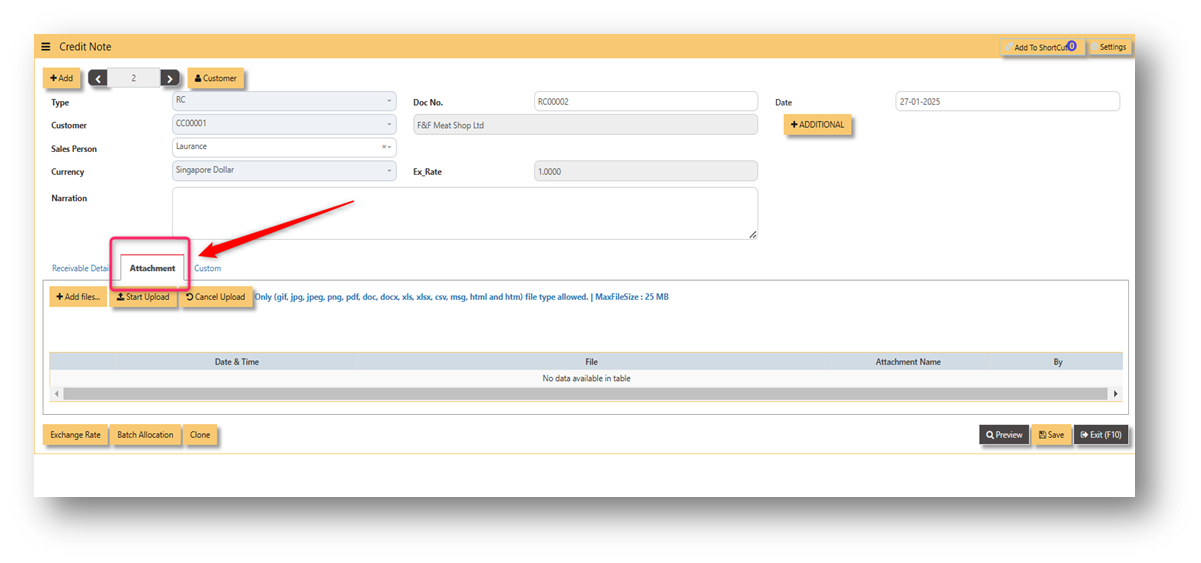
2.4 Attachment
This function use to upload supporting documents related to your transaction. Kindly also note that system only allow this format (gif, jpg, jpeg, png, pdf, doc, docx, xls, xlsx, csv, msg, html and htm) file type and with max file size 25 mb.
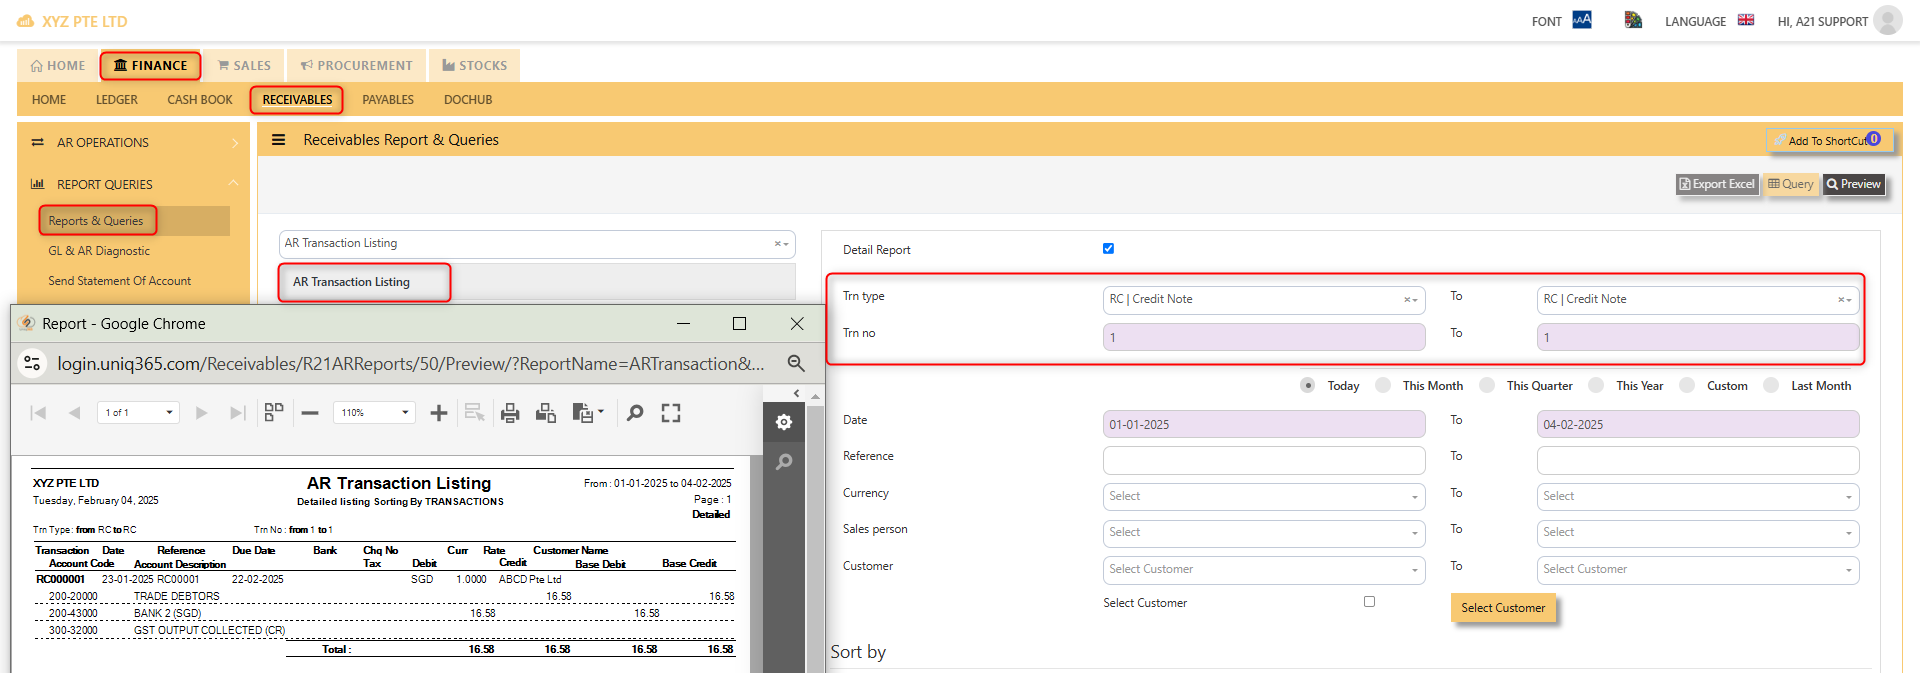
3. Report and Queries
For the double entries of the said RC transaction above, it can verify to check under AR transaction listing.
DEBIT NOTE
DEBIT NOTE
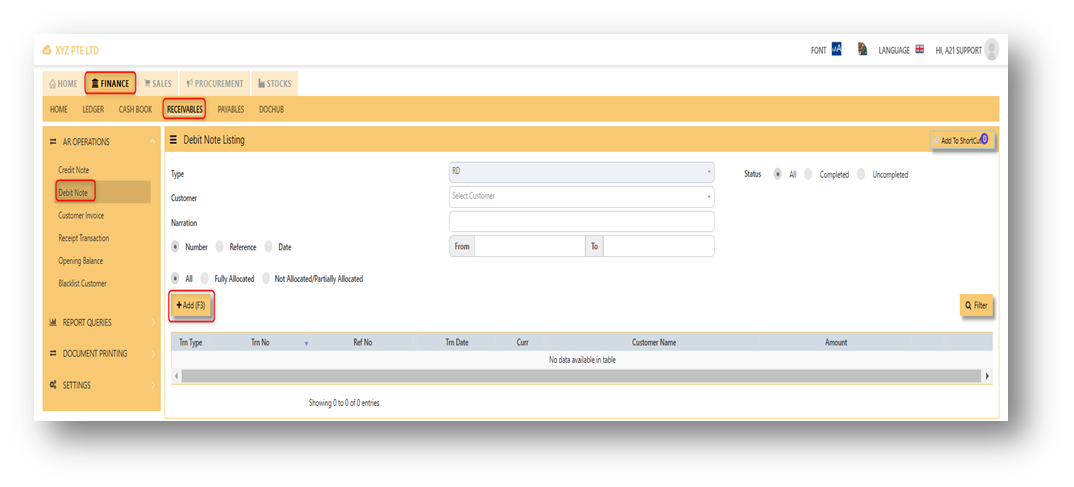
Debit note is the form issued for any additional amount of goods or services rendered to customers wherein no product code and quantity involved. Shortly known as Receivable debit note or RD. In UNIQ365, the receivable debit note can be found receivable module under operations. Please refer attached photo for reference where could it be found.
______________________________________________________________________________________________________________________________________
Steps on how to enter new transaction in Credit Note:
- Click on Receivables – AR Operations – Debit Note (RD) and the following screen will appear.

2. Click on Add button to create a new transaction.
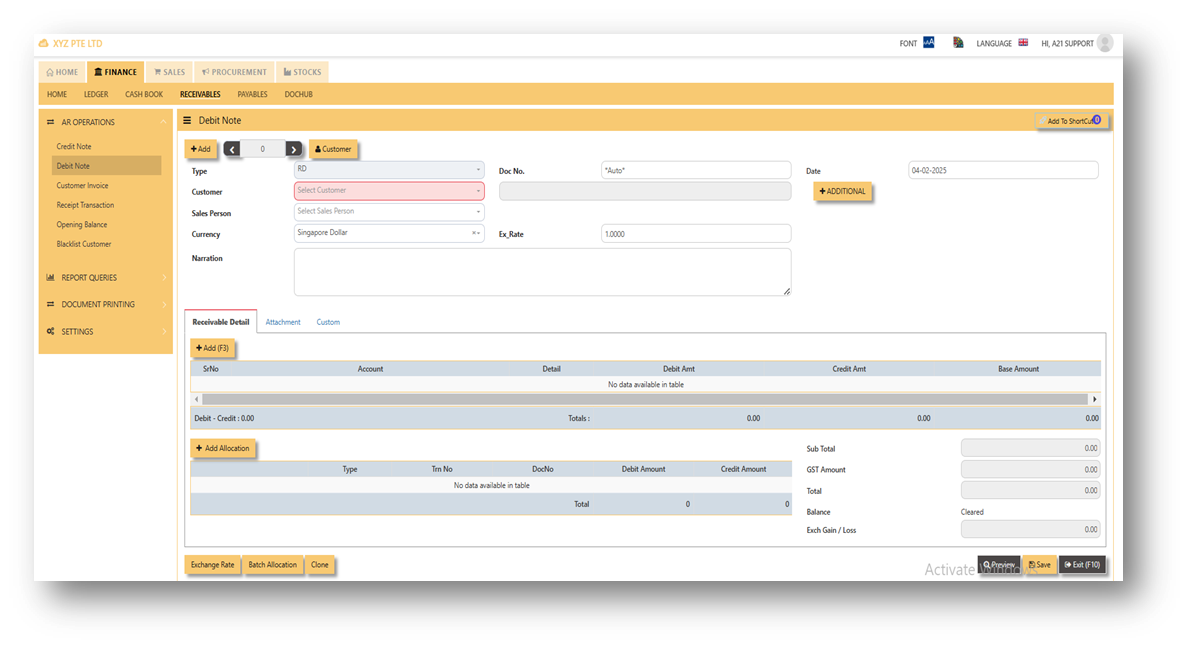
- Fill up the fields in the header section such as Ref No, Date, Supplier, Contact Person, Currency and Exchange Rate.
- Then select the account concerned at the detail section.
- Click on SAVE button to complete the entry.
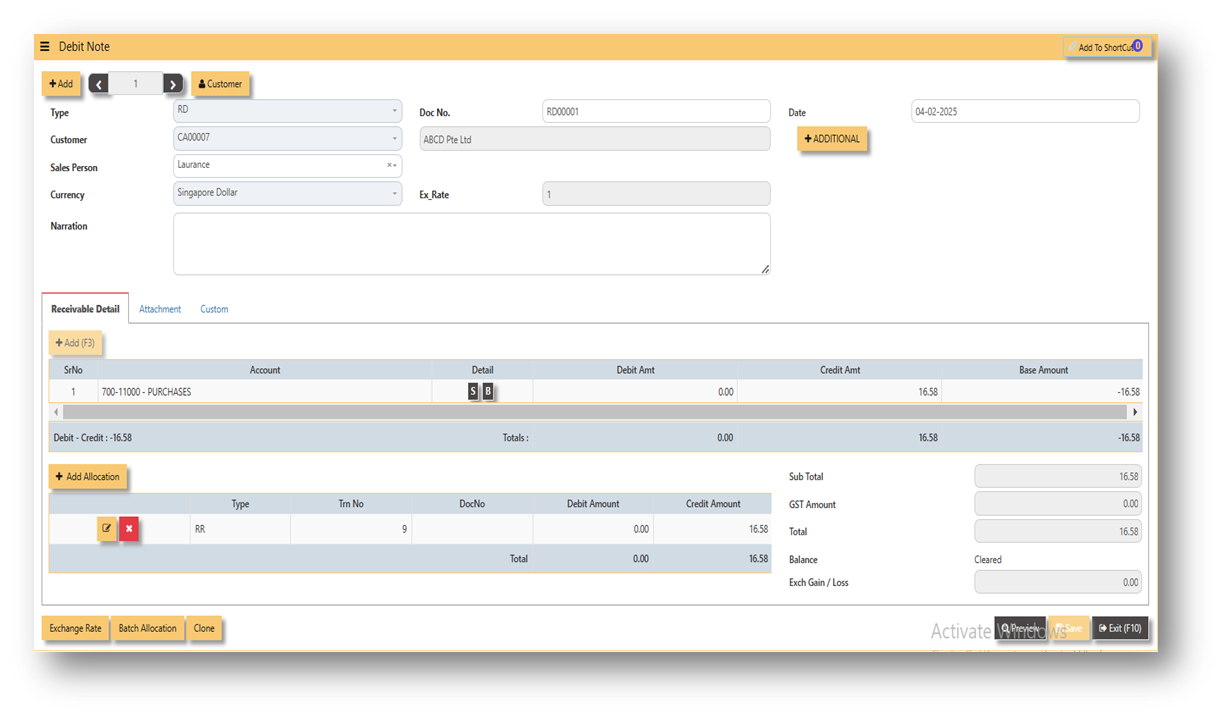
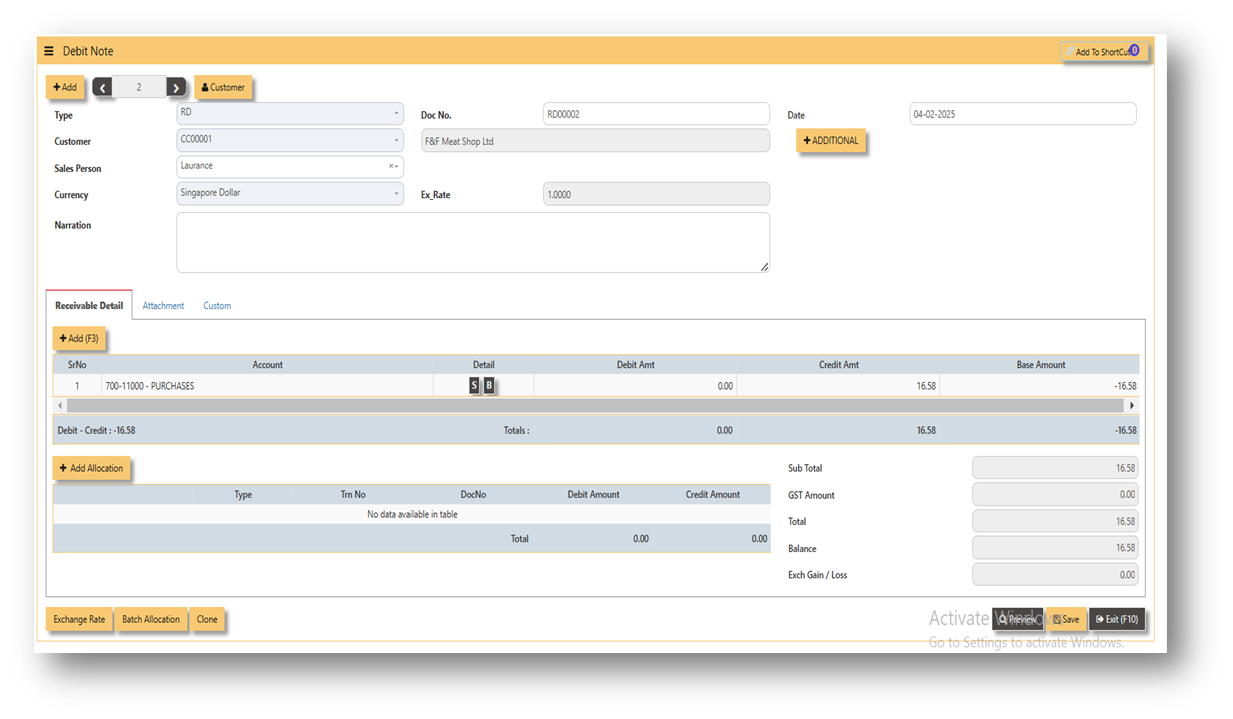
3. Attached photo is a sample transaction of Debit Note (RD).
______________________________________________________________________________________________________________________________________
ADDITIONAL INFORMATION:
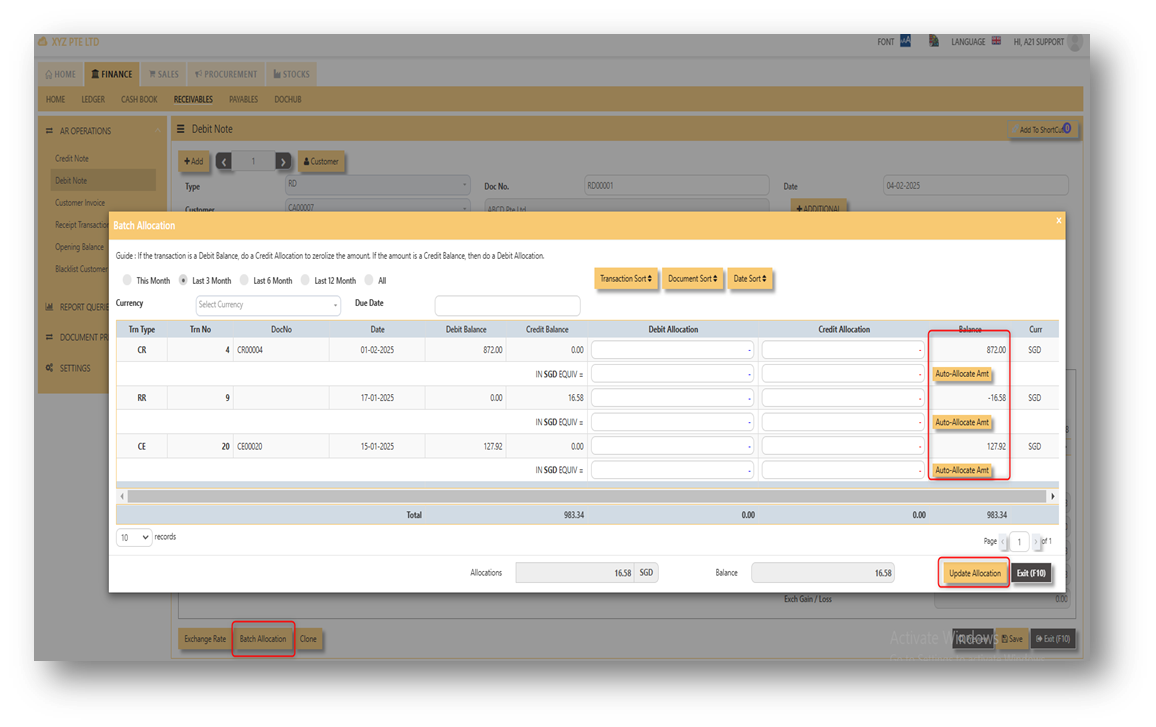
2.1 Batch Allocation
If user has a lot of transactions needed to allocate, they may use the batch allocation button to allocate more transactions in convenient way. Refer to attached photo on how batch allocation works.
2.2 Clone
If user wanted to create new RD transaction with same details from previous transaction, user can click the button of "clone" in order to create new RD transaction with same details from previous transaction. In this way, no need to key-in manually all the details, hence will just choose which customer should it be clone.
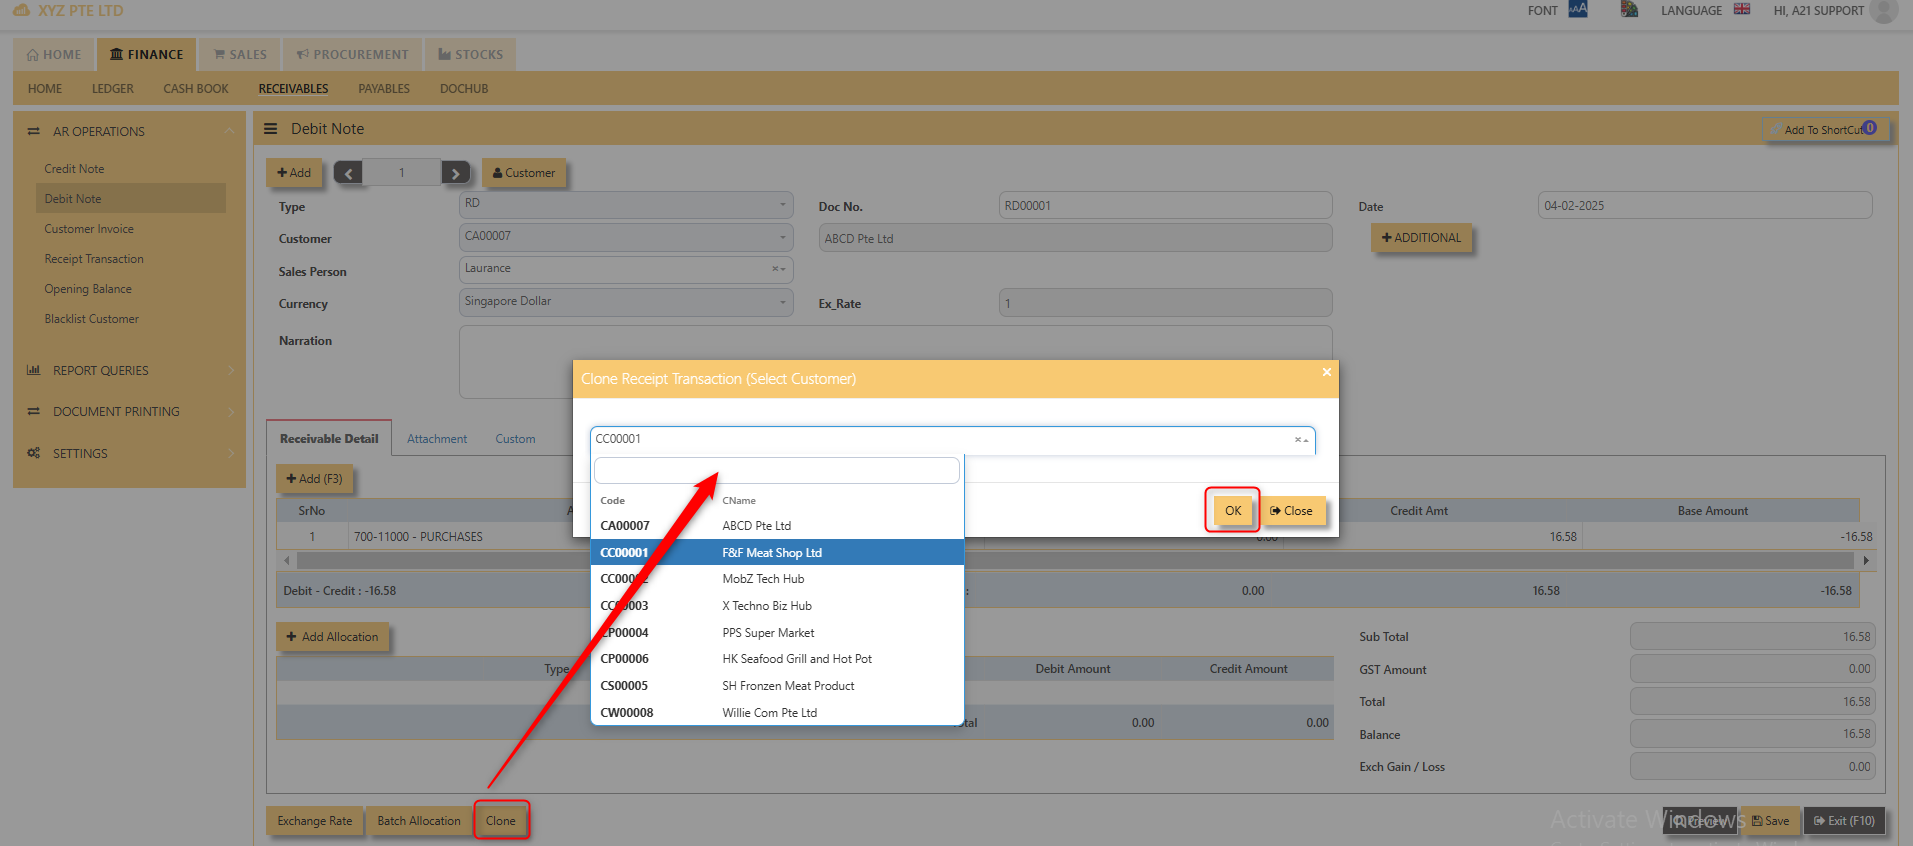
Attached photo is an example of transaction newly created from clone button.
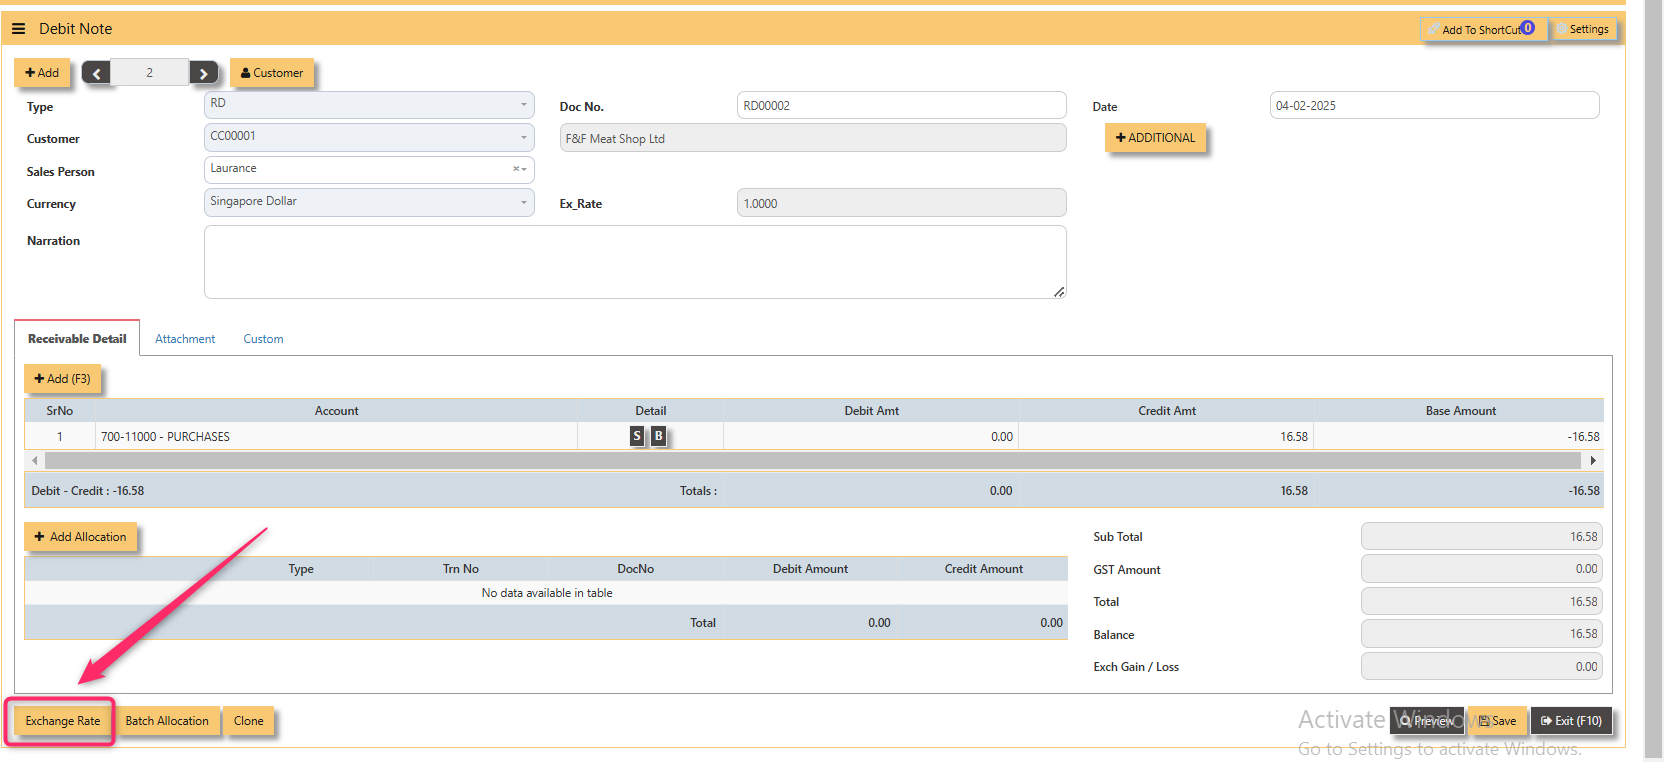
2.3 Exchange Rate
It will redirect you to Finance Tab. Attached link for further information. MASTERS GL | Support Doc
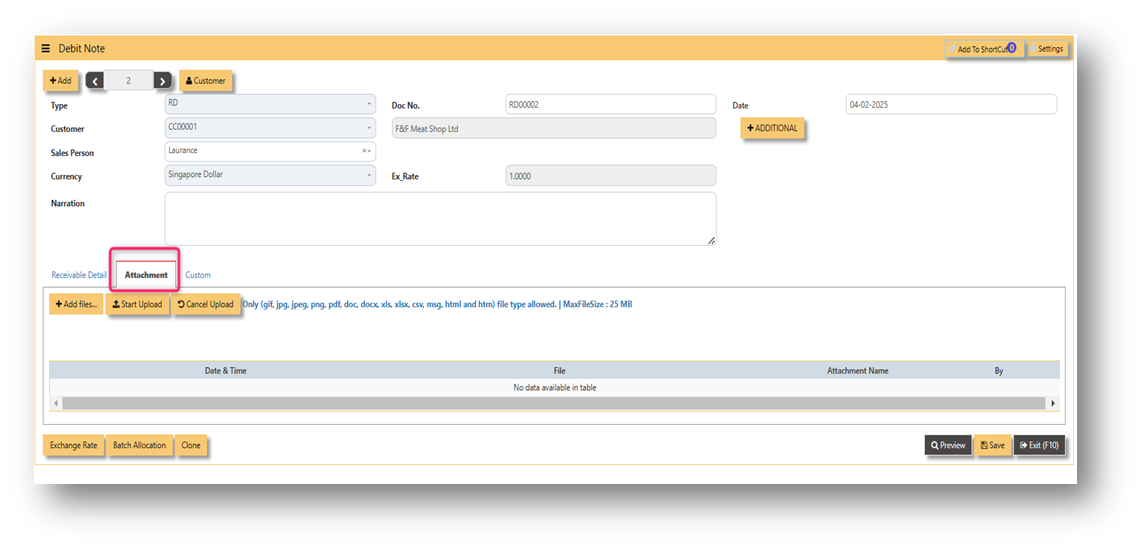
2.4 Attachment
This function use to upload supporting documents related to your transaction. Kindly also note that system only allow this format (gif, jpg, jpeg, png, pdf, doc, docx, xls, xlsx, csv, msg, html and htm) file type and with max file size 25 mb.
3. Report and Queries
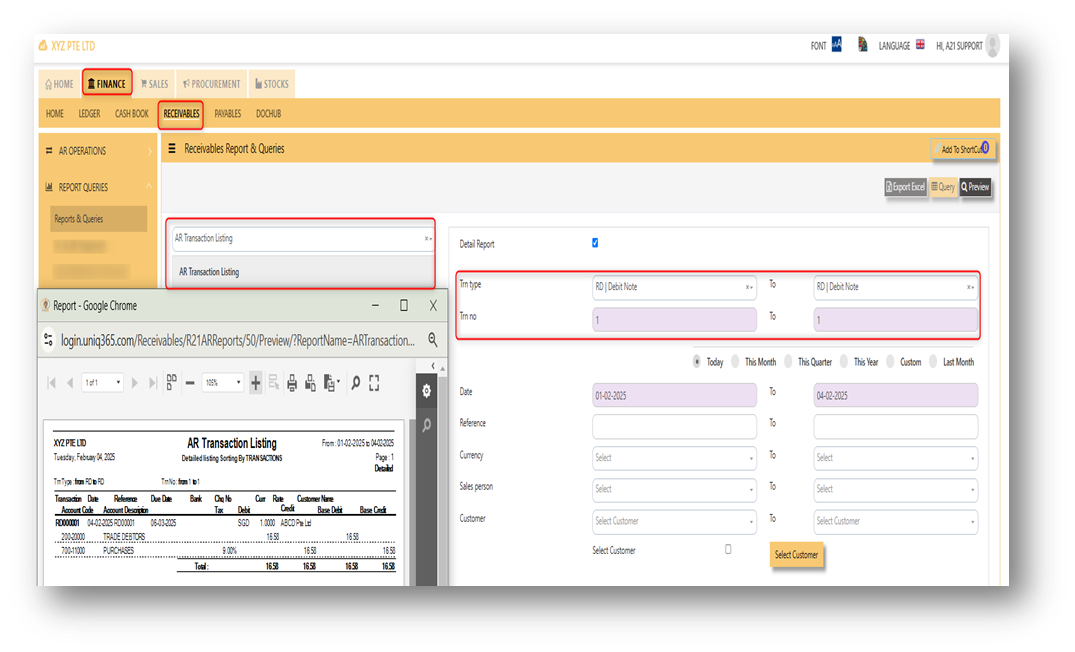
For the double entries of the said RD transaction above, it can verify to check under AR transaction listing.
CUSTOMER INVOICE
CUSTOMER INVOICE
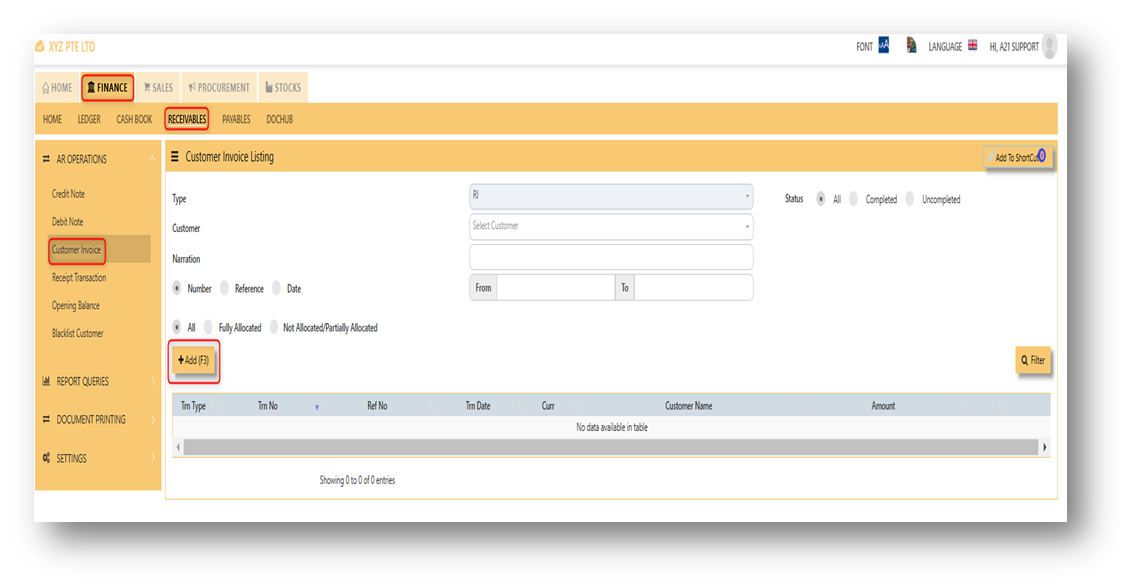
There may be times where there is a SALES of non-stock item. User may use Customer Invoice (RI) transaction to effect such a transaction. The customer invoice or RI can be found under receivable module. Please refer to attached photo where to find the customer invoice.
______________________________________________________________________________________________________________________________________
Steps on how to enter new transaction in Credit Note:
- Click on Receivables – AR Operations – Customer Invoice (RI) and the following screen will appear.

2. Click on Add button to create a new transaction.
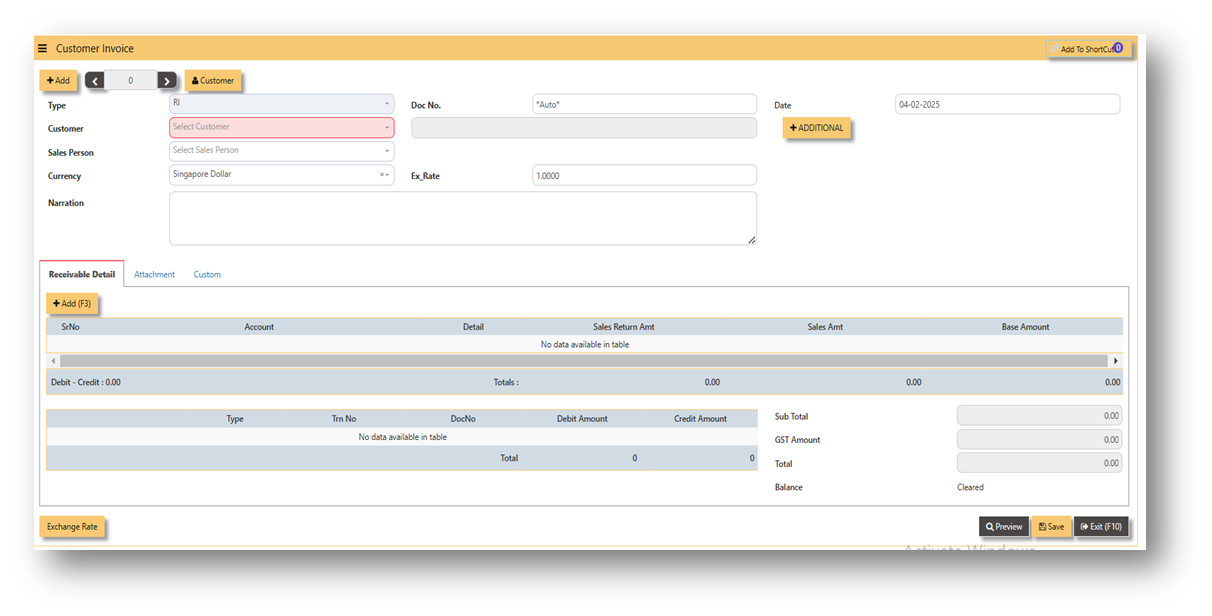
- Fill up the fields in the header section such as Ref No, Date, Supplier, Contact Person, Currency and Exchange Rate.
- Then select the account concerned at the detail section.
- Click on SAVE button to complete the entry.
3. Attached photo is a sample transaction of Customer Invoice (RI).

4. Report and Queries
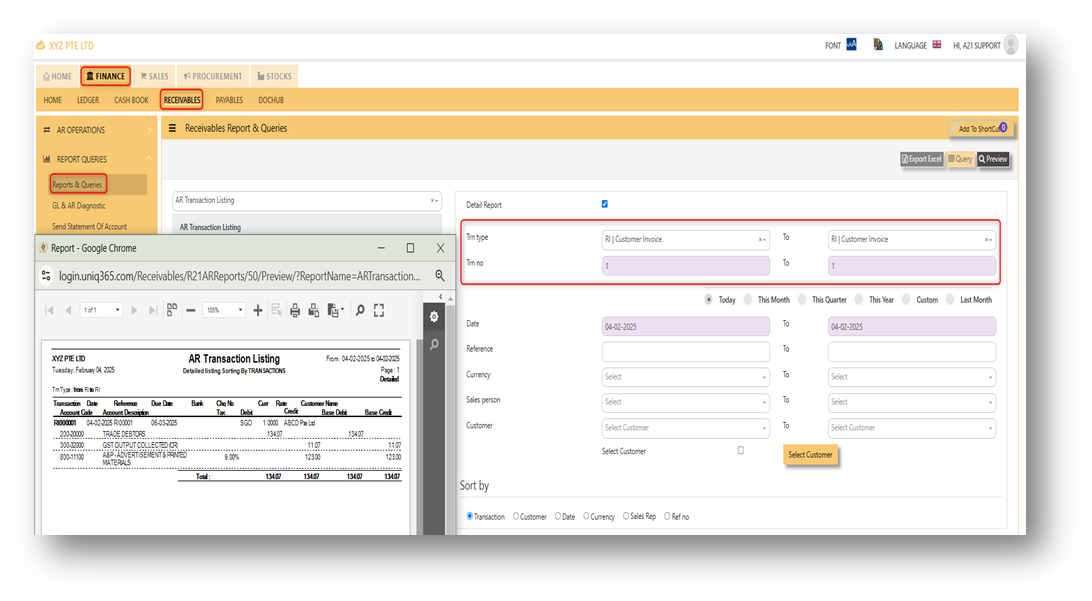
For the double entries of the said RI transaction above, it can verify to check under AR transaction listing.
RECEIPT TRANSACTION
Receipt Transaction
A receipt transaction menu is where you can record of a payment received from a customer. In UNIQ 365, the receipt transaction can be found in receivable module.
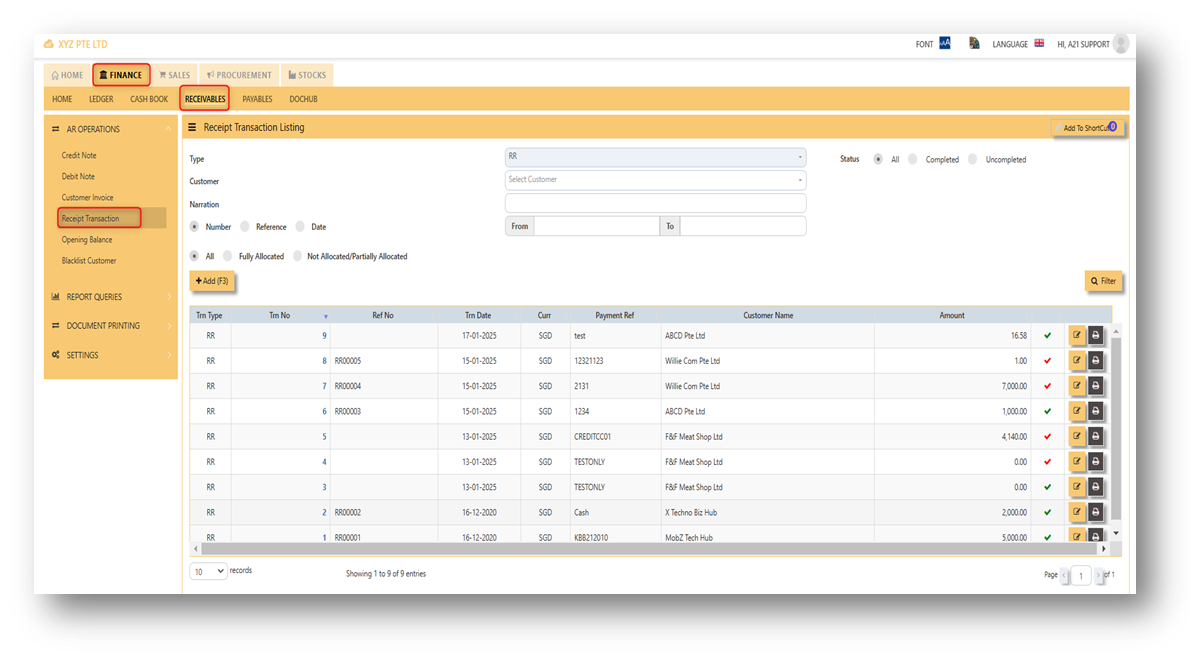
______________________________________________________________________________________________________________________________________
Steps on how to enter new transaction in Receipt Transaction:
- Click on Receivables – AR Operations – Receipt Transaction (RI) and the following screen will appear.
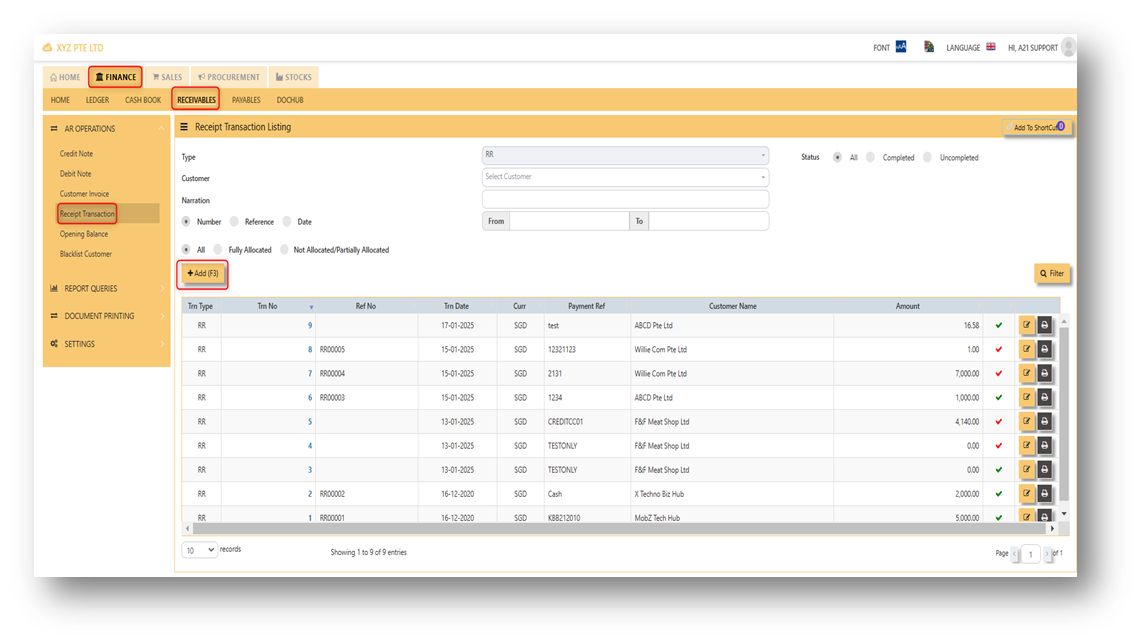
2. Click on Add button to create a new transaction.
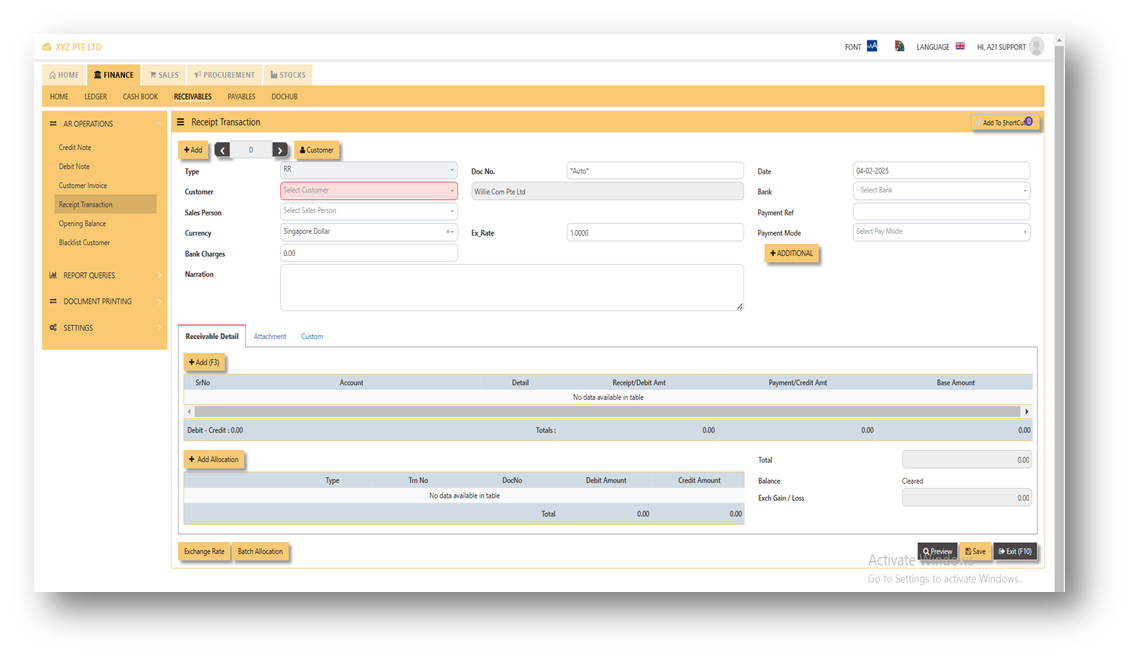
- Fill up the fields in the header section such as Ref No, Date, Supplier, Contact Person, Currency, Payment Ref, Payment mode and Exchange Rate.
- Fill up the Select a bank code and click on detail line, The system will automatically populate the detail line with account code that is being set to the cash bank.
- Then select the account concerned at the detail section.
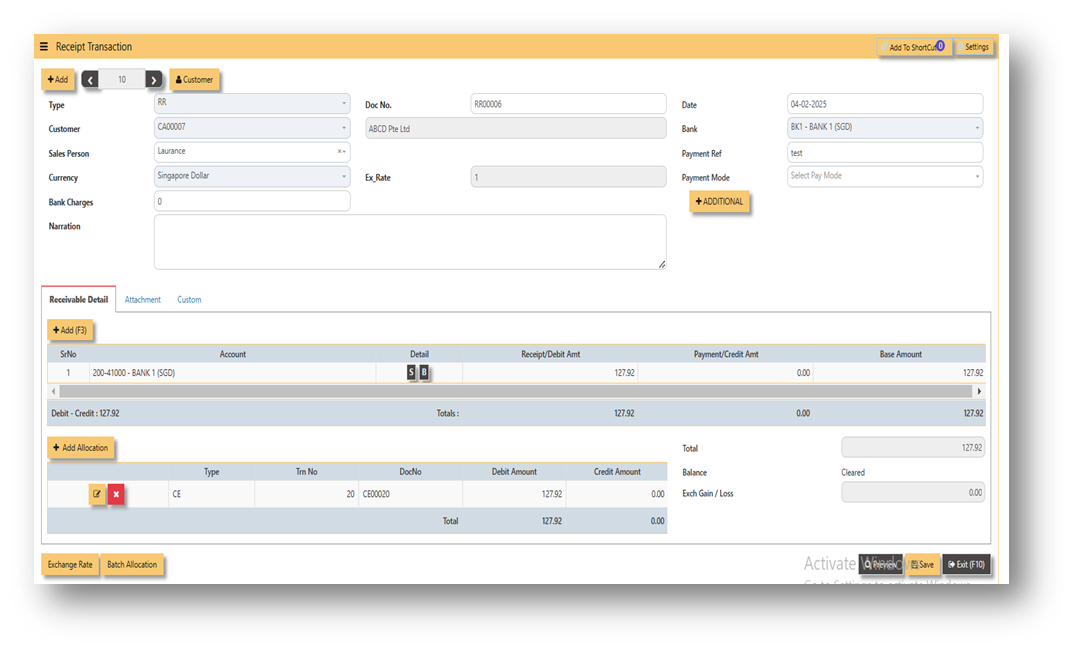
- Click on SAVE button to complete the entry.
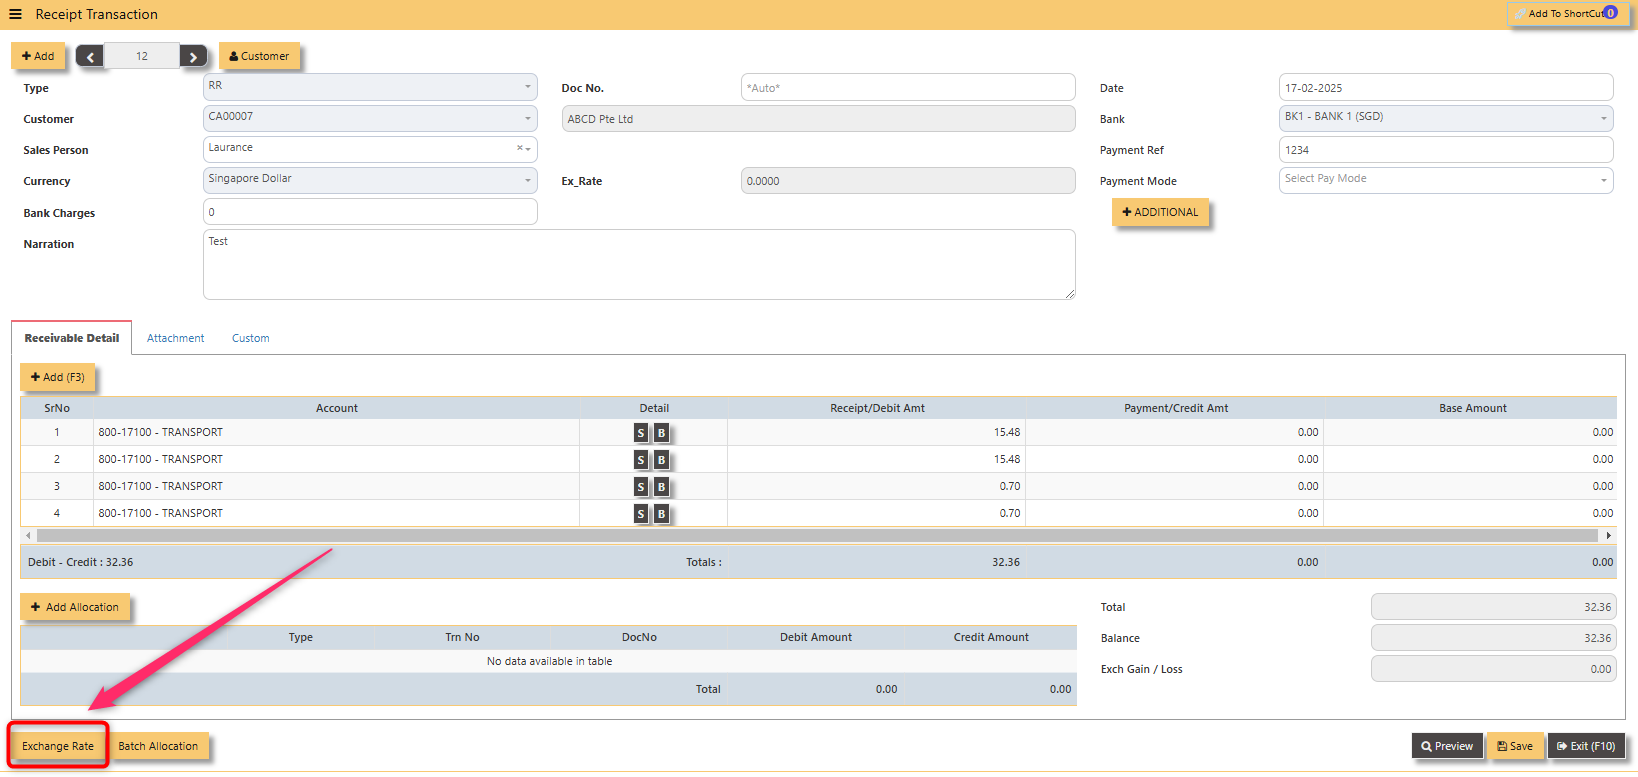
Attached is an example of new receipt transaction.
ADDITIONAL INFORMATION:
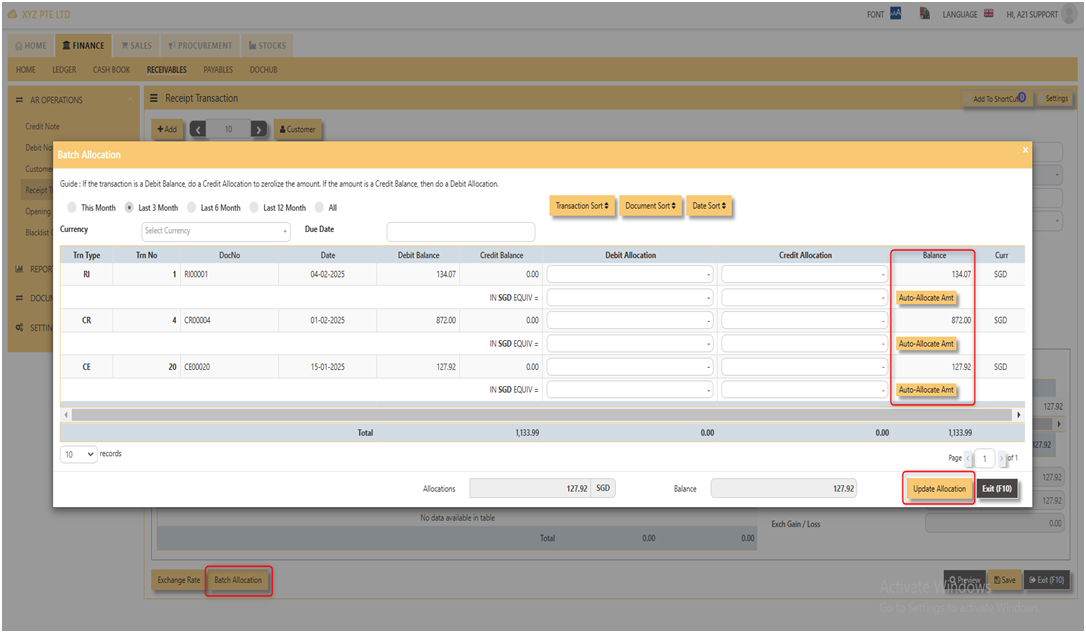
2.1 Batch Allocation
If user has a lot of transactions needed to allocate, they may use the batch allocation button to allocate more transactions in convenient way. Refer to attached photo on how batch allocation works.
2.3 Exchange Rate
It will redirect you to Finance Tab. Attached link for further information. MASTERS GL | Support Doc
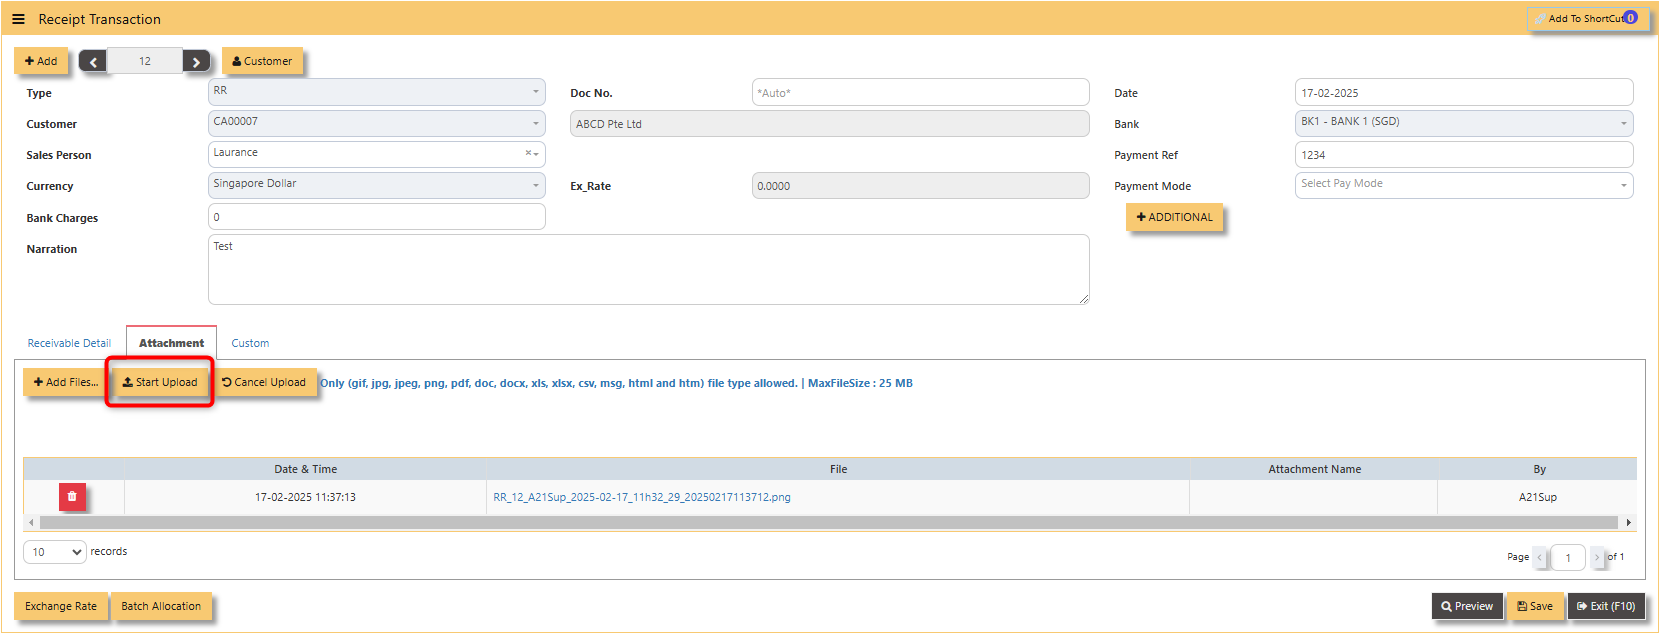
2.4 Attachment
This function use to upload supporting documents related to your transaction. Kindly also note that system only allow this format (gif, jpg, jpeg, png, pdf, doc, docx, xls, xlsx, csv, msg, html and htm) file type and with max file size 25 mb.
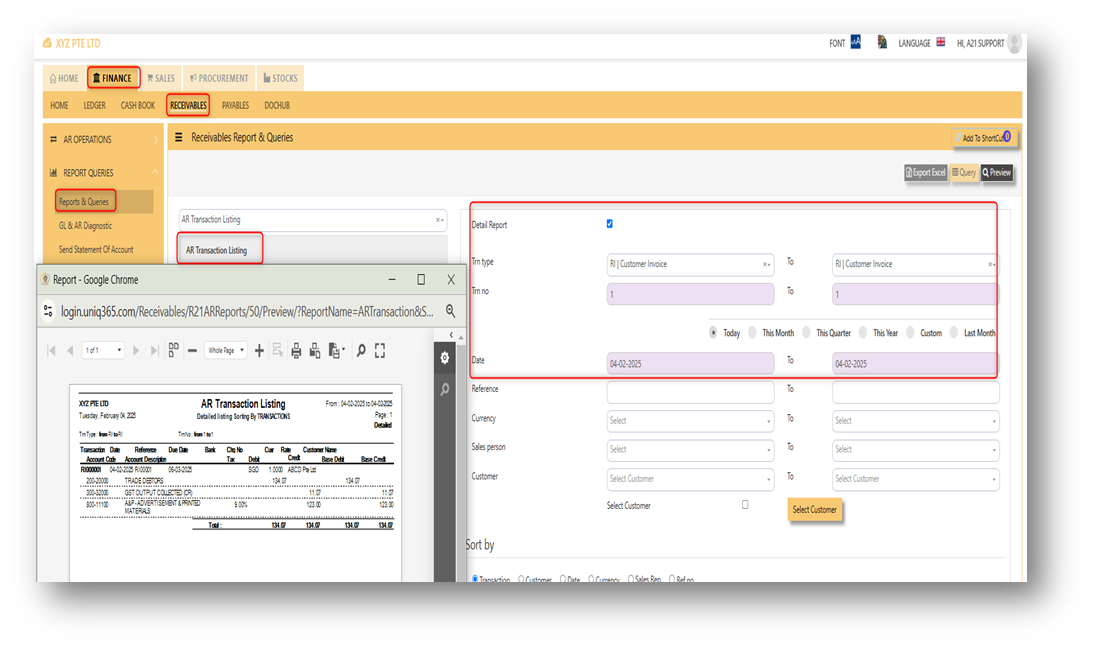
3. Report and Queries
For the double entries of the said RI transaction above, it can verify to check under AR transaction listing.
OPENING BALANCE
To start on a new database, AR Opening Balances must be updated in order for user to trace all the customer outstanding invoices at the start of the 1st financial year.
Important: The total amount entered under AR Open Item must tie with the opening amount in the General Ledger Opening for Trade Debtor Control Account/(s) if the Posting Type selected in Receivable Control Account is customer.
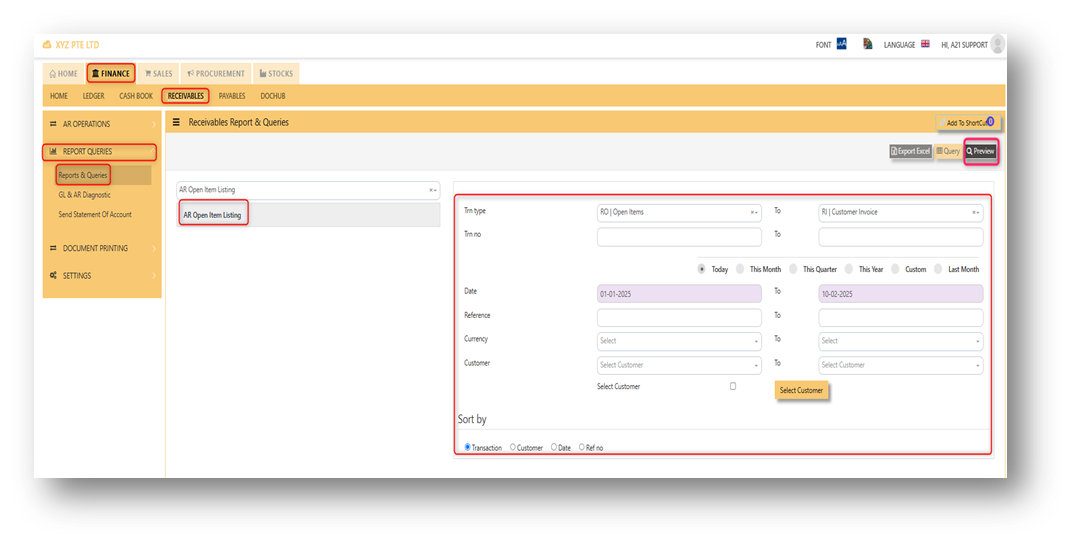
You may use the report under Receivables – Reports & Queries – AR Open Item Listings for reference to check your figures.
______________________________________________________________________________________________________________________________________
Below is the Account Receivable – Opening Items screen. There is NO double entry posting for this option. The records entered will be retained for current year usage like allocations, verification of outstanding invoices etc.
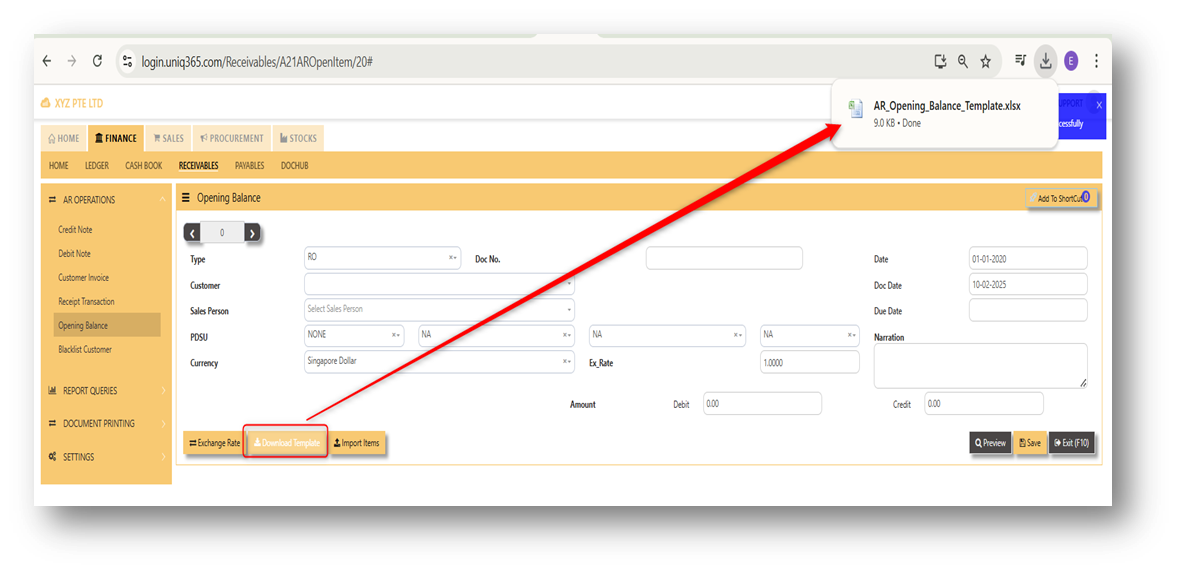
1. Click on Receivables – AR Operations – Opening Balance and the following screen will appear.
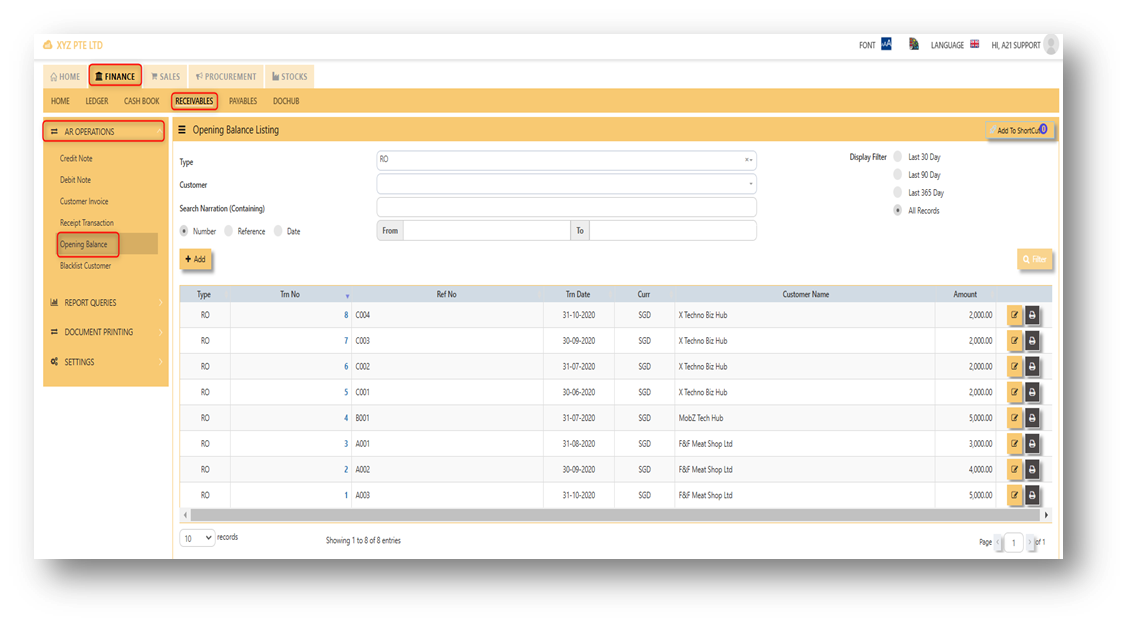
2. Click on Add button for new transaction
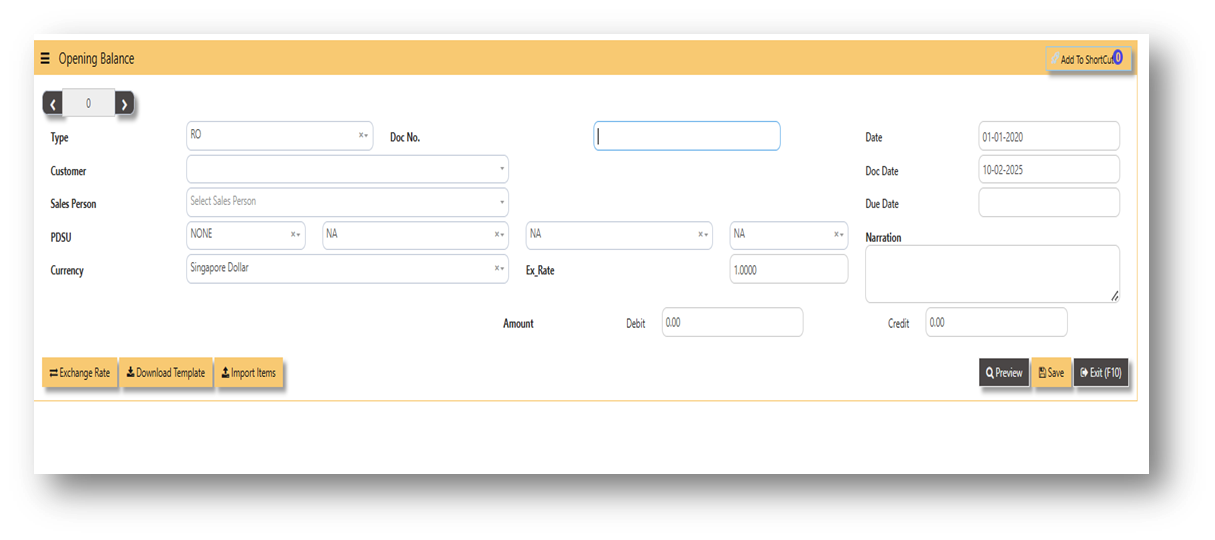
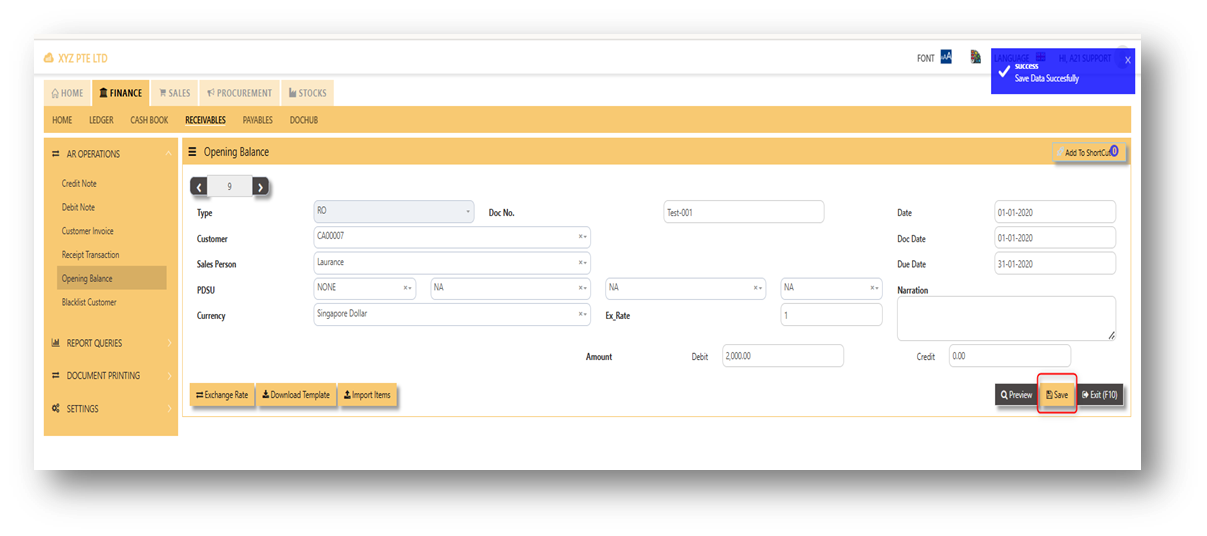
- Fill up the fields such as Ref No, Date, Dock Date, Due Date, Customer, Buyer, PDSU, Currency, Exchange Rate, Narration, and amount.
______________________________________________________________________________________________________________________________________
Additional Information:
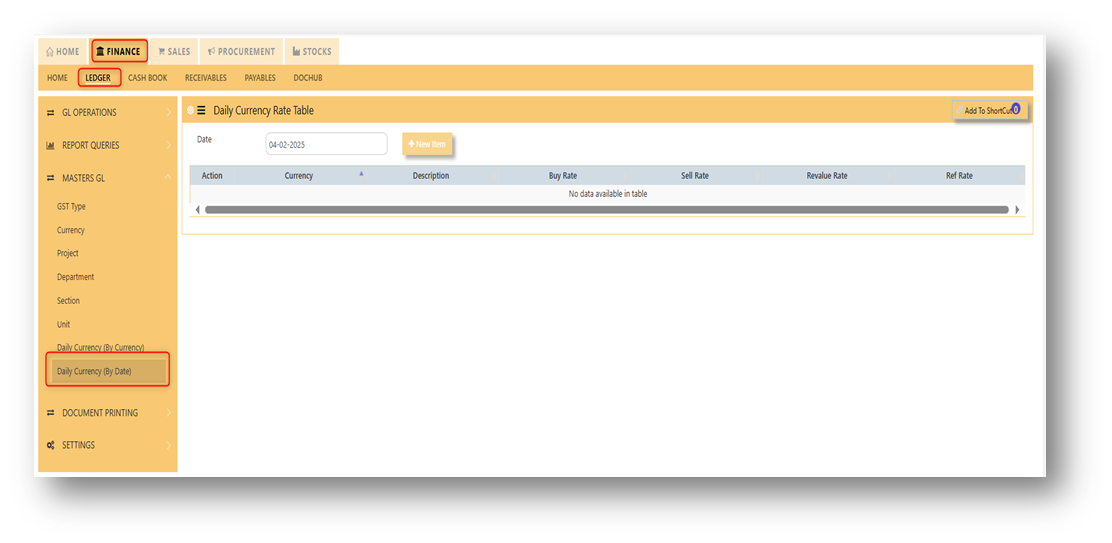
- Ex Rate It will redirect you to Finance Tab. Attached link for further information. MASTERS GL | Support Doc
- Download Template Once you click for the Download Template , it will auto download the Excel File.
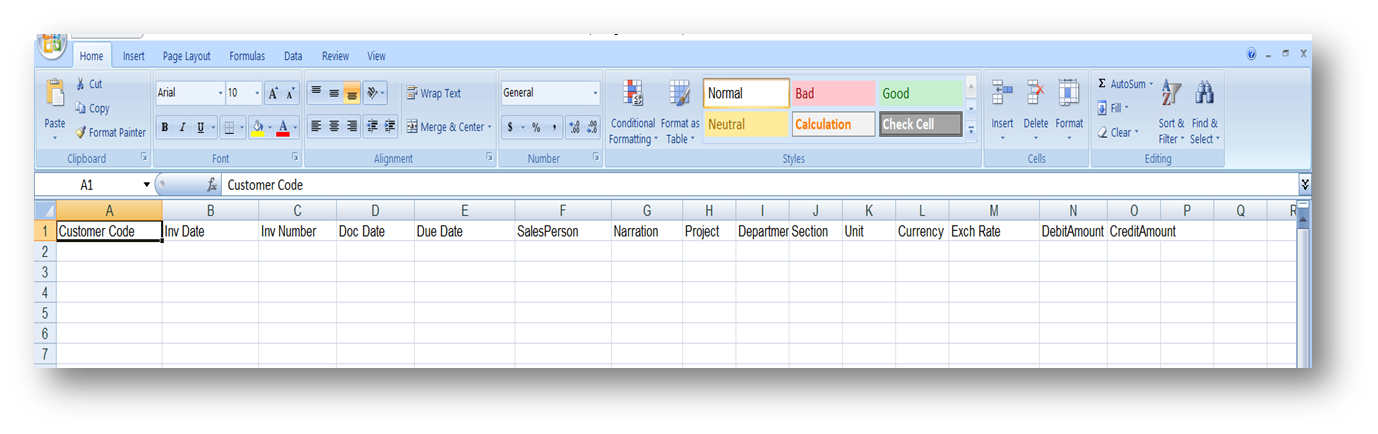
Ensure the Excel file you plan to upload is formatted correctly. It should contain all the necessary fields required such as:
- Customer Code
- Inv Date
- Inv Number
- Doc Date
- Due Date
- Sales Person
- Narration
- Project
- Department
- Section
- Unit
- Currency
- Exchange Rate
- Debit Amount
- Credit Amount
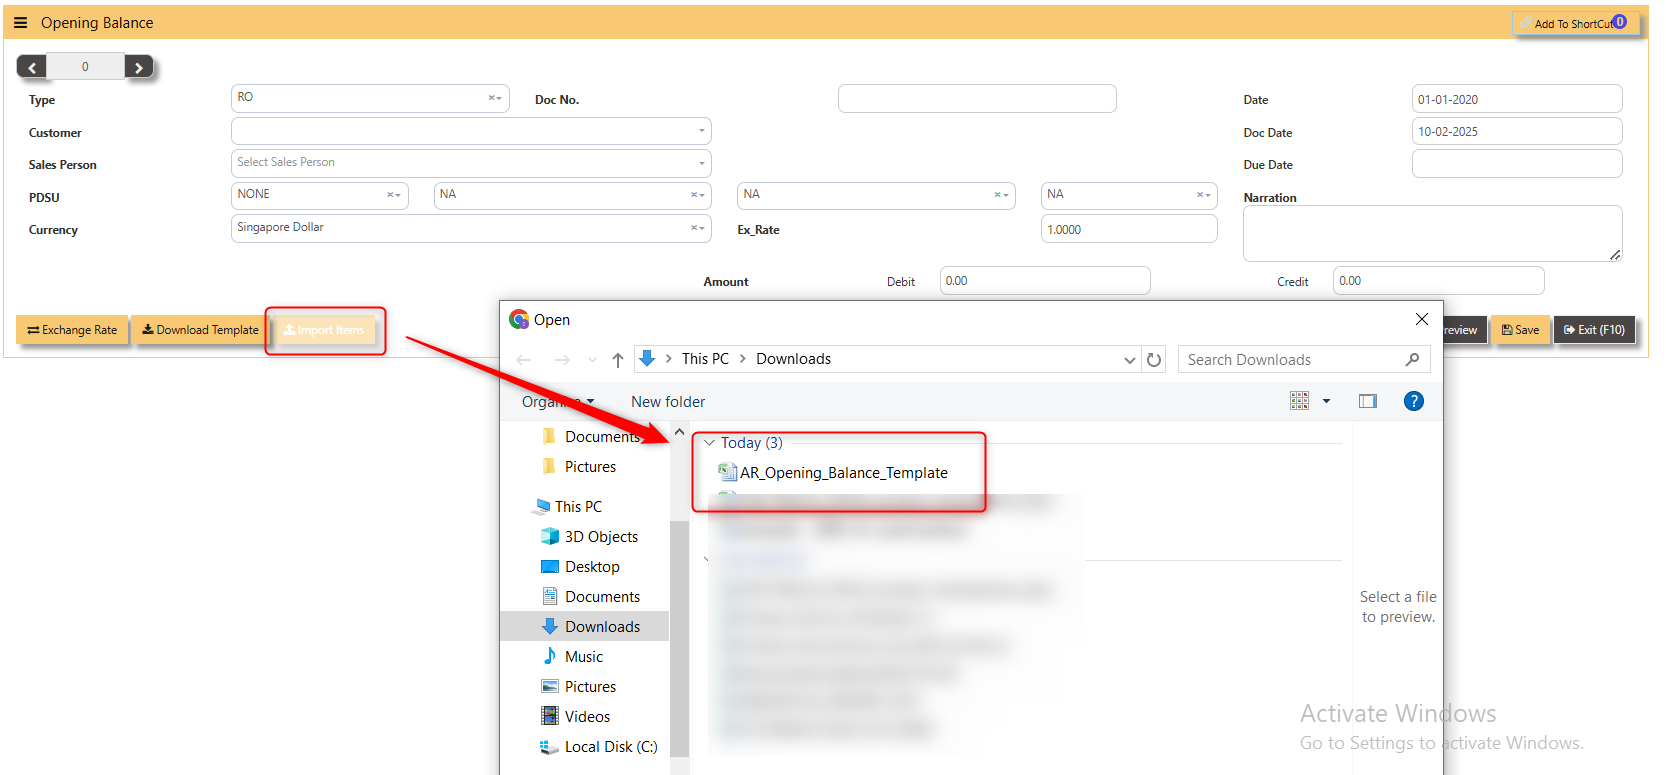
- Import Items This open a file browser or prompt you to select the Excel file you want to upload.
BLACKLIST CUSTOMER
This option enables user to blacklist customers and suppliers. Once a customer is black-listed, user will be blocked from entering any receivable transactions for the customer concerned.
______________________________________________________________________________________________________________________________________
How to enter Blacklist Customer?
Steps to enter Blacklist Customer are as follow:
1. Click on Receivables – AR Operations – Blacklist customer for the entry screen.
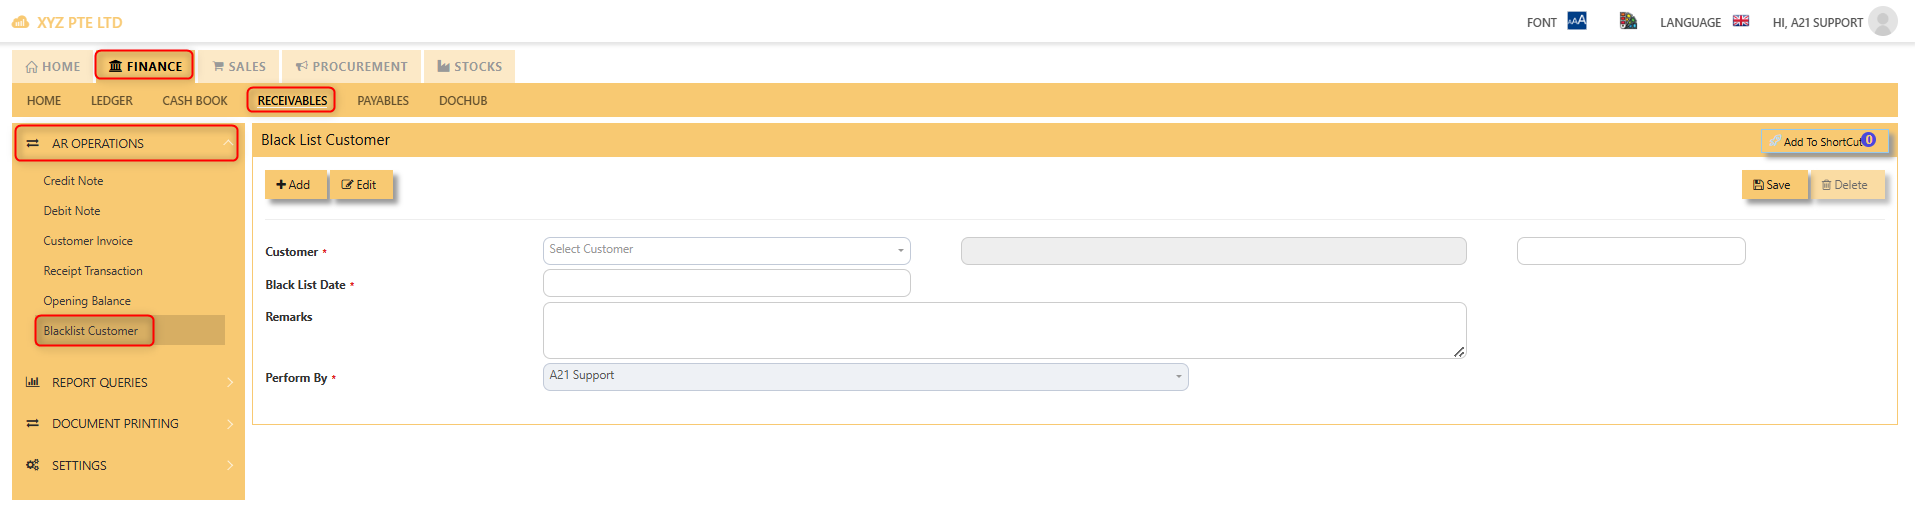
2. Click on Add button. Select the customer from the drop-down list, enter the Blacklist date, key in the Remarks.
Screen below is an example of the entry.
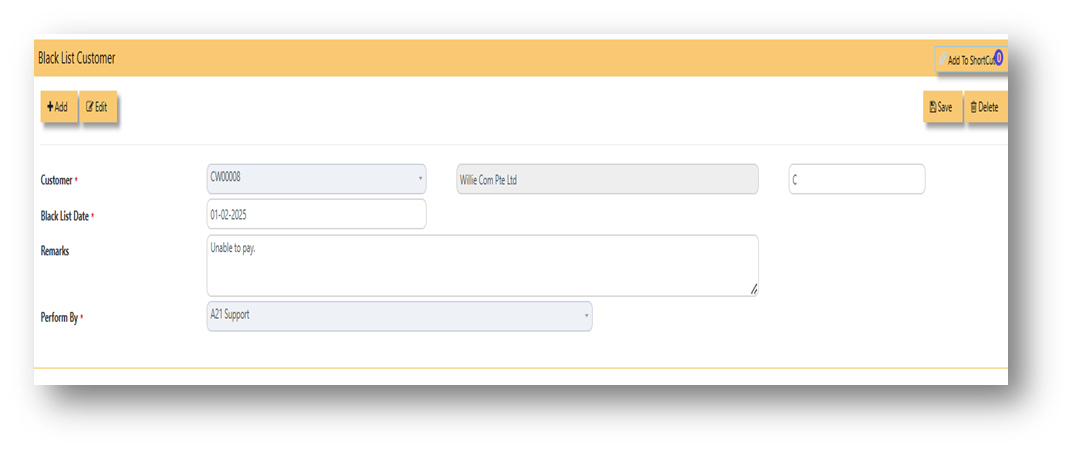
- To delete a customer from the blacklist record, user must click on edit button, select the customer concerned, and then click on delete button to clear the record.
- User may print the report of all the Blacklisted Customers for reference via Receivables – Reports & Queries – Blacklisted Customer Listing.
Reports & Queries
For report and queries under receivable module, there are three sub menus. First is the report and queries where you can find the reports related to receivables, second is the GL and AR diagnostics wherein if the general ledger and receivable report is not tie up, this report may help to identify which transaction causing of unbalance, and lastly, is the send statement of account wherein this can be used to send a statement of account in your specific customers.
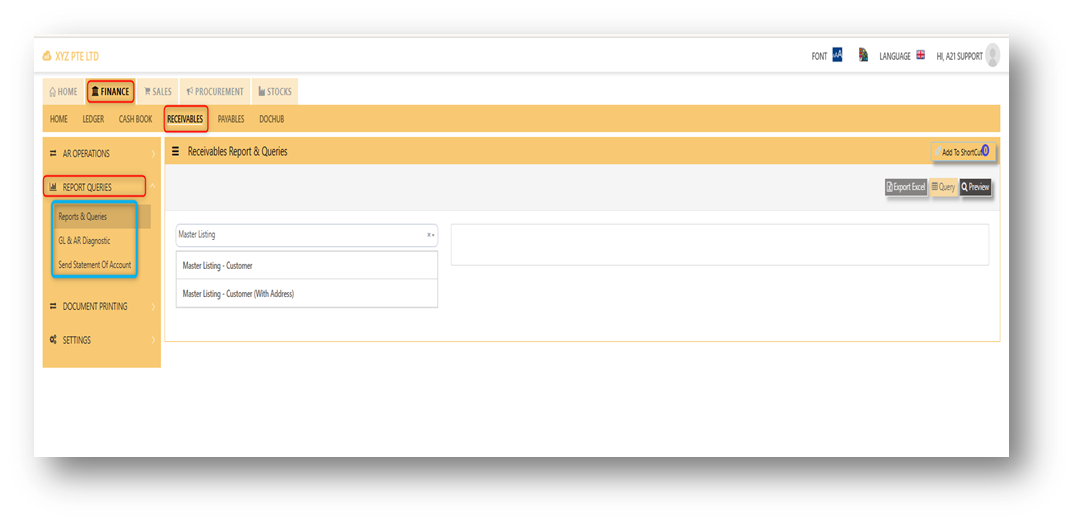
REPORT QUERIES
In report and queries menu you can generate a reports related to receivable transactions. Mainly use reports are AR transaction Listing, AR statement of account, AR aging analysis, customer ledger, AR outstanding and many more. The report and queries menu can be found in receivables > report and queries > report and queries.
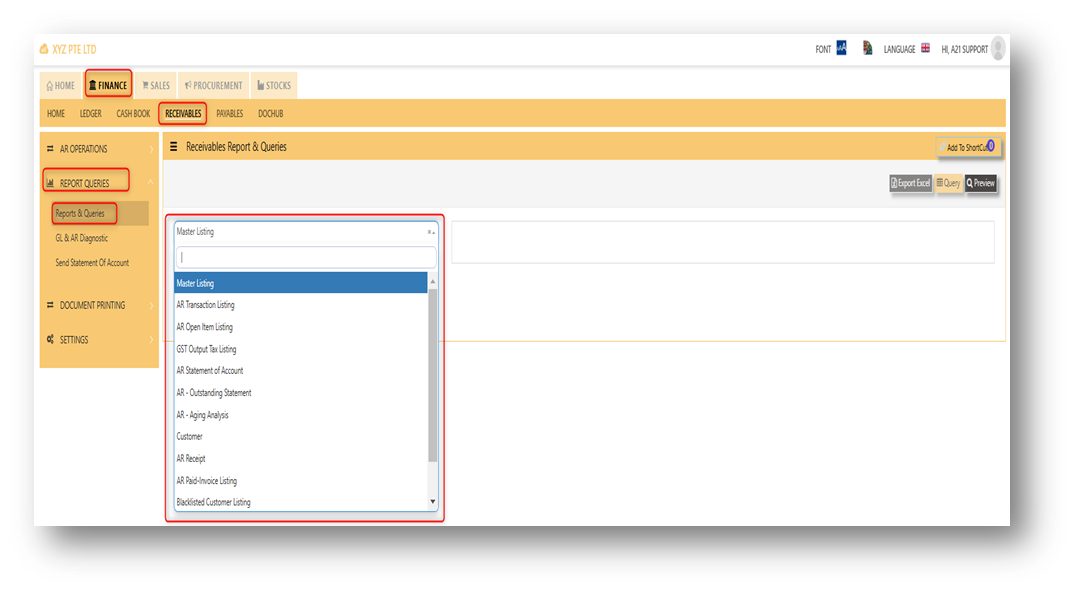
Example on how to generate a report.
1. Select a report you wanted to generate.
2. Fill up necessary field, in order to capture the filtering of report correctly.
3. Click ''preview'' button to generate the report.
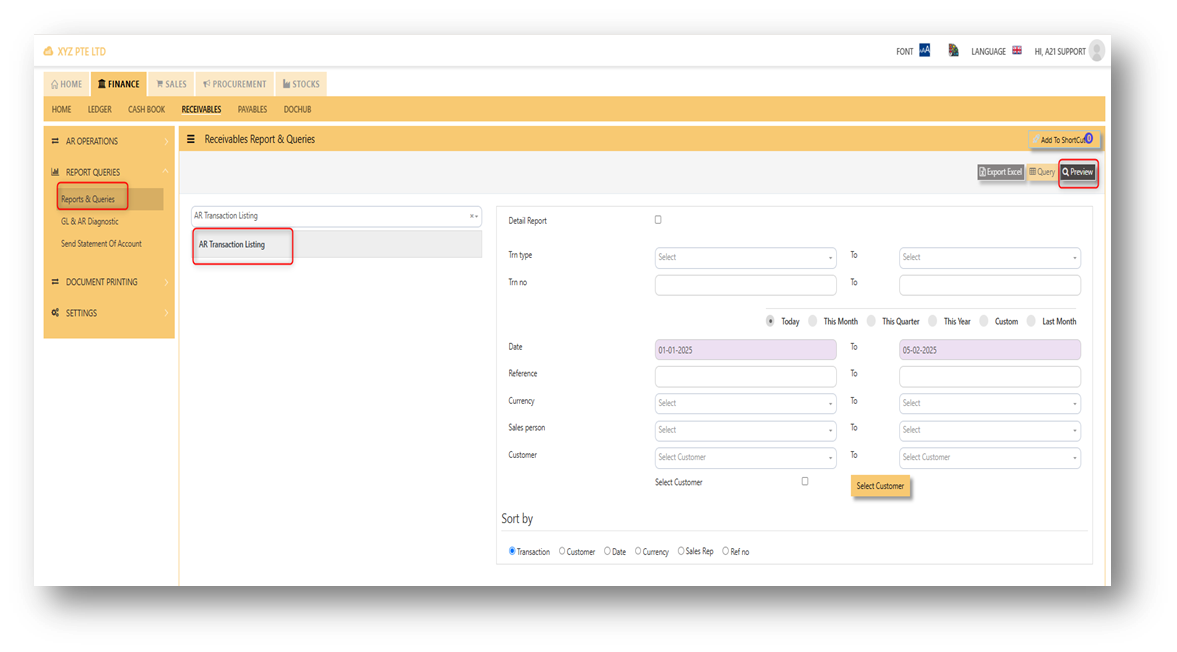
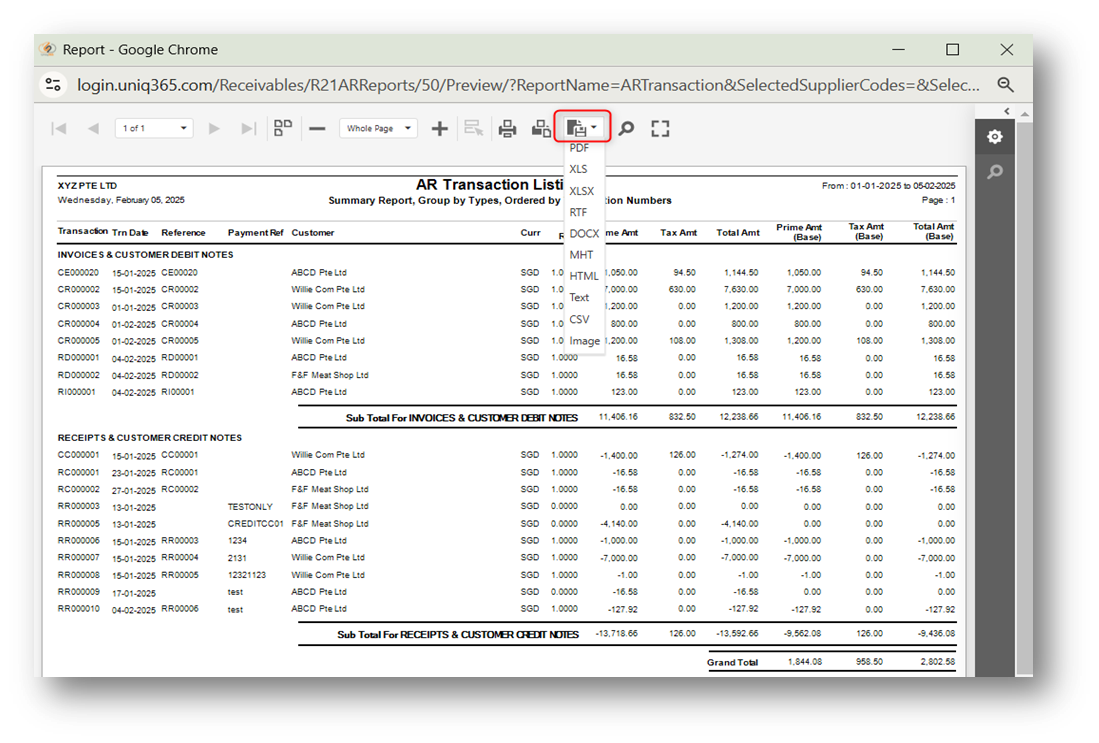
4. Also, there is an option to download the report in pdf, xlsx, csv, and etc. Please refer to attached photo on how to download on it.
GL AND AR DIAGNOSTICS
The GL and AR Diagnostic menu can be used to find transactions that are causing of unbalance from AR vs. GL. This menu can be found in receivables > report and queries > GL and AR diagnostics.
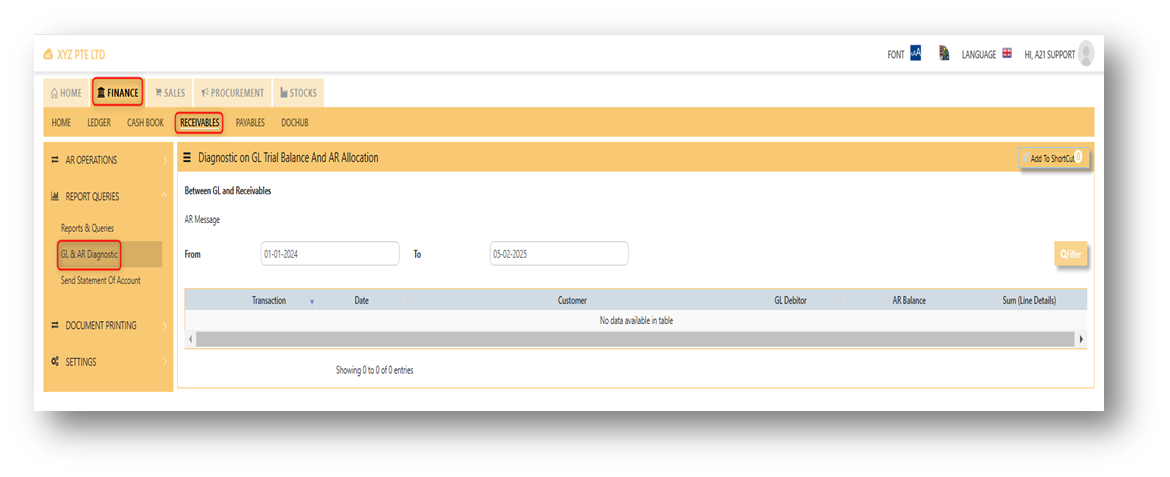
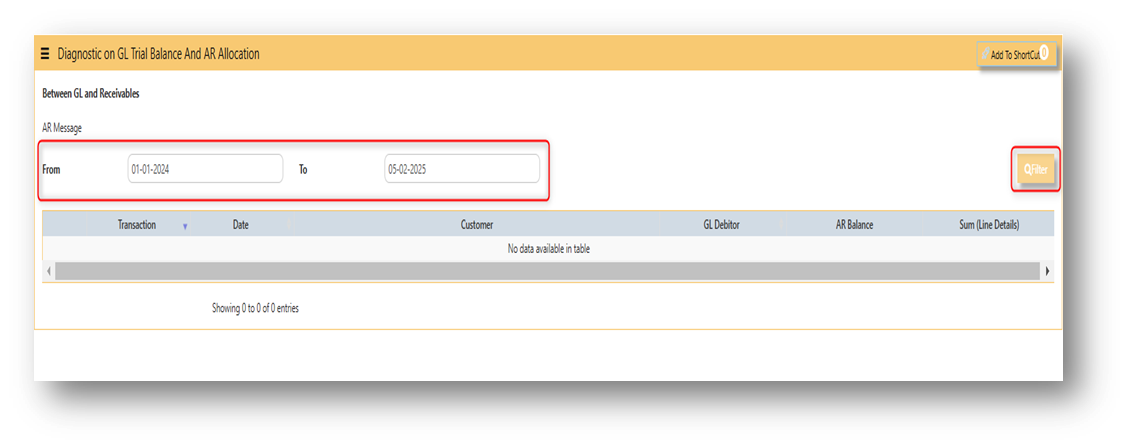
In order to generate if there is any transactions in the diagnostics, user must fill up the fields of from date and to date correctly, and after filling it up, need to click the filter button.
NOTE: If in case the transactions were not able to clear automatically, Please contact customer care support.
SEND STATEMENT OF ACCOUNT
In Uniq365, The ''send statement of account'' menu is used to send statement of account in your specific customers. This menu can be found in receivables > report and queries > send statement of account. 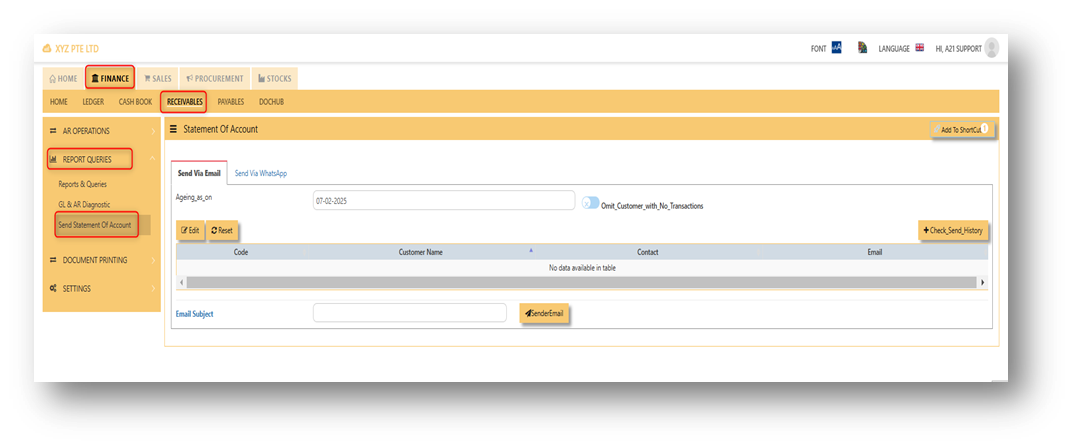
STEPS ON HOW TO SEND A STATEMENT OF ACCOUNT:
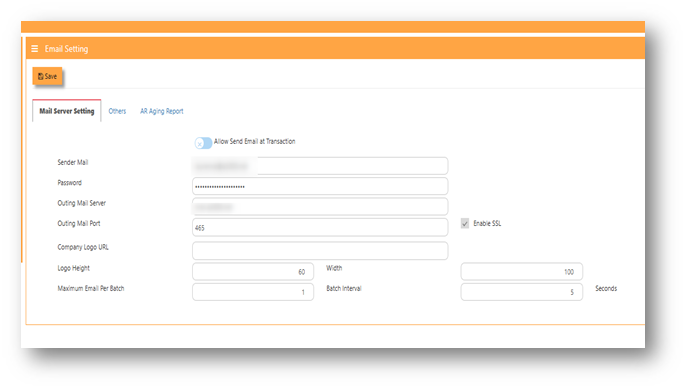
Note: Before you can able to send a SOA to a customer, the user must set up first email setting. Email setting can be found in system admin - company - email setting. The email set up usually done during implementation.
- Filter first the date you wanted to generate first.
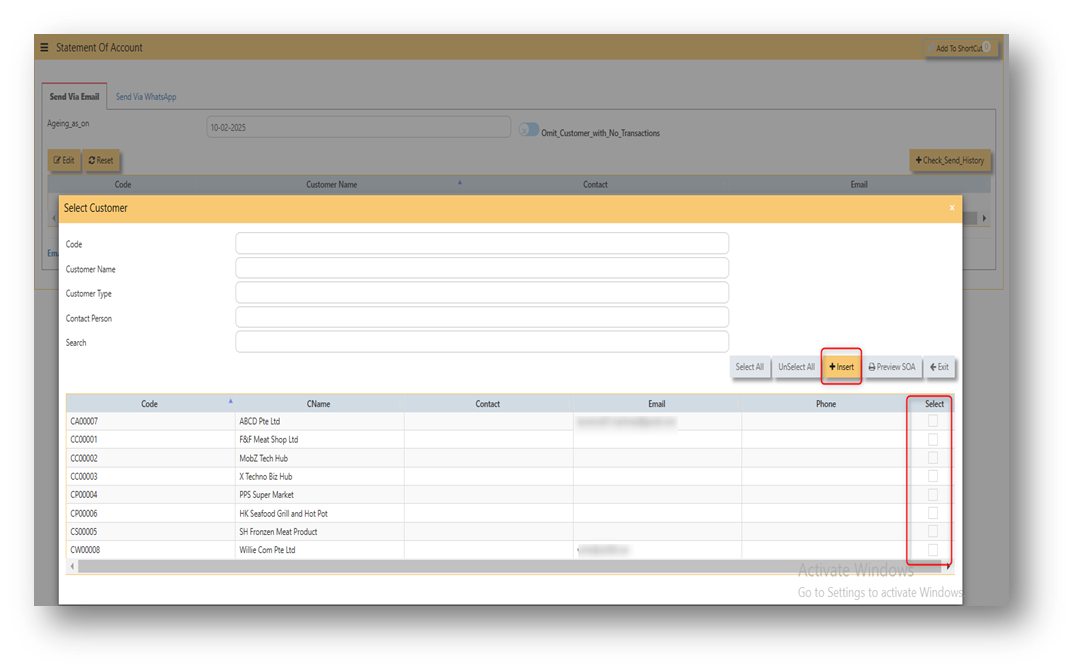
- Click ''edit'' to select customer, after that, tick which customer you will send the SOA and clicked for the ''insert button''

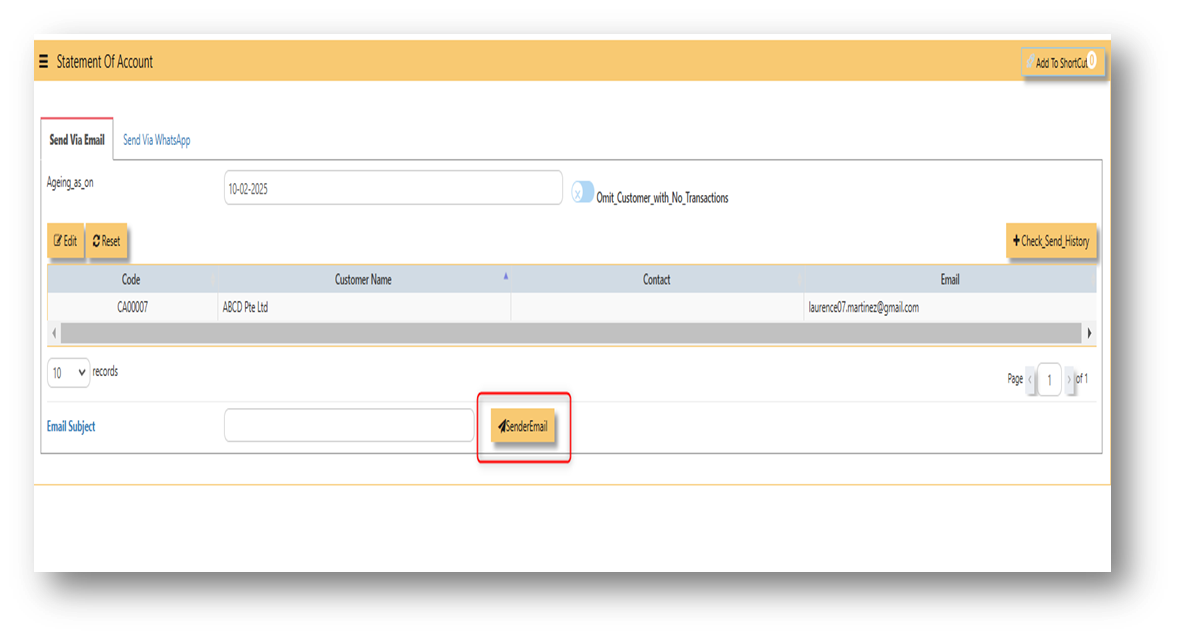
- After clicked ''insert'' button, all the customers you have ticked will show in the list, if already confirmed. User may clicked the ''sendemail'' to send the SOA into the following customers.

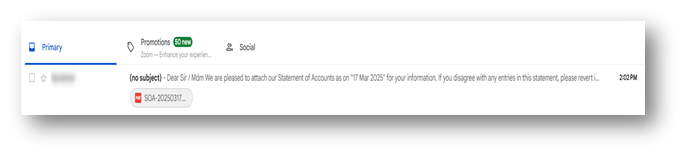
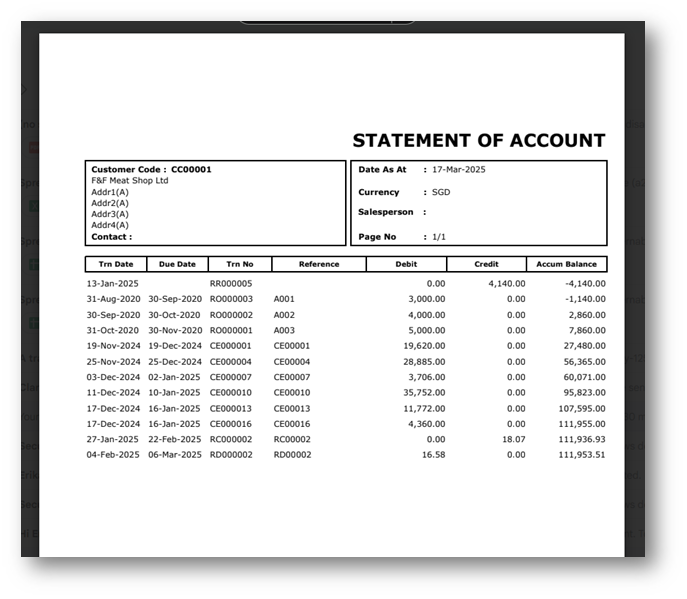
Attached photo is an example of E-SOA.

Document Printing
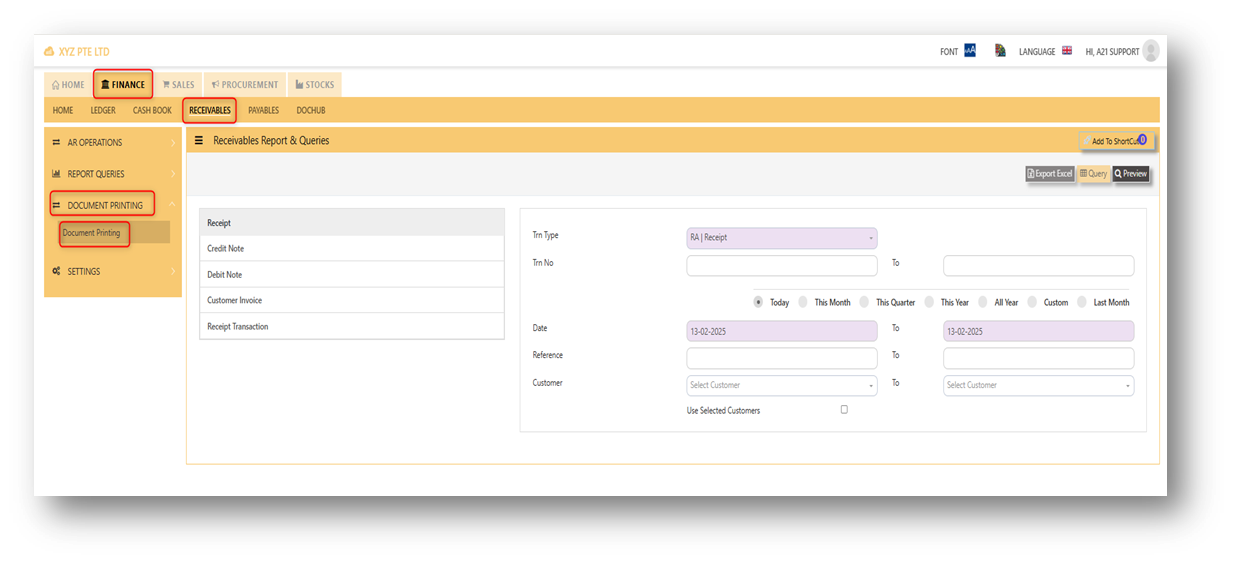
The Document Printing screen shown below enables user to preview and print a range of AR Transactions.
User must select the transaction type concerned as per example in screen below. If a specific range of transaction numbers needs to be printed, user must indicate the range in Trn No From and To fields.
Please note that the Trn No range selected must be within the date range.
Settings
Customer Maintenance
The Customer Maintenance is used to enter master records of customers. The information and properties of a customer such as customer code, customer name, billing address, credit limit, pricing information, shipping address, the account posting details etc are entered here.
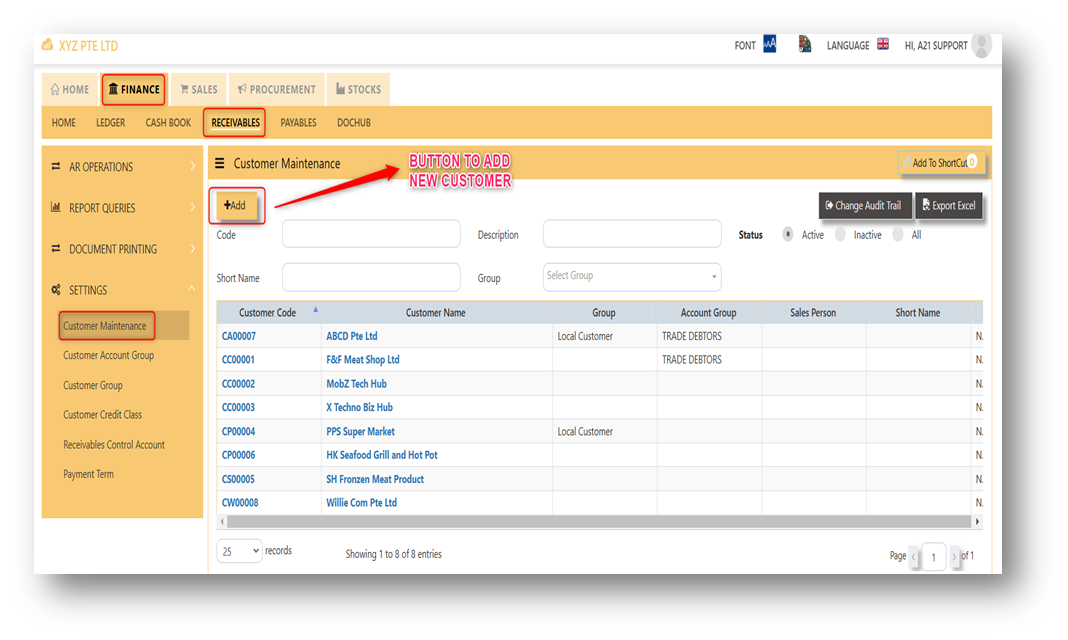
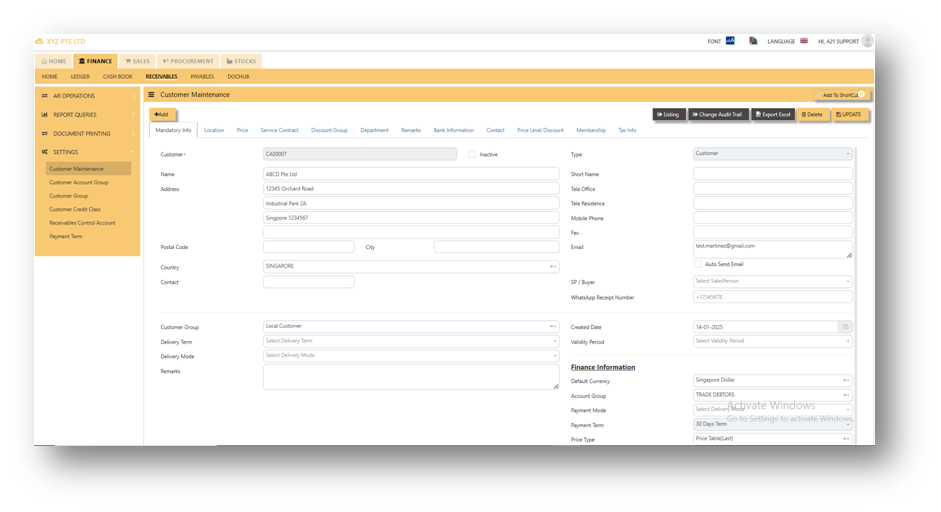
This is the place where you add new Customer or edit existing Customer. Some of the fields are mandatory, such
as the following :
- Customer - Enter the code for the new Customer. The maximum is 10 alphanumeric characters.
- Name - Enter the name of Customer. The maximum is 50 characters
- Key in the necessary Information, such as Address, Telephone, Fax, E-mail & etc.
- Type - Select C for Customer or B for both Customer & Supplier
- SP - Click to select the Salesperson defined under System Manager – System Utilities - Employee
- Credit Class - Click to select the credit class defined under Sales – Maintenance – Credit Class. This setting is for the reports under Receivable \ Aging Analysis by credit class (Transaction date / due Date)
- User - Click to select the user defined under System Manager – System Utilities - User Maintenance
This setting is to prevent a user from accessing customers and their information which belong to other users. - Territory - Click to select the credit class defined under Sales – Customer Management – Customer Territory
This setting is for the reports under Sales Module \ Sales Analysis Report \ Customer Territory Sales Analysis. - Price Type - You may decide on a pricing method for each and every Customer
A. Price Table (Sales/Last) - Every time a transaction is created for this Customer, the system will call out the selling price from the Customer Maintenance Price Table
B. Last Price - If Last Price is selected, the price billed for a particular product will be saved in the Last Price column of the Price table. The next time the same product is entered in an invoice for that customer, the Last Price will be automatically picked up.
C. Product Setting - Every time an invoice is created for this customer, the system will show the selling price from the Product & Service Maintenance (Depends on the Price Type selected)
D. Price Table (Sales) - Every time an invoice is created for this customer, the system will call out the selling price from the Customer Maintenance Price Table
E. Price Book - If the user select Price book as their price type, the configuration set-up can be found in Sales > Customer Management > Price Settings > Price Book. If price book is selected as price type, the price that will call out in transaction based from the price book that users been set up. - Deliver Term - Click to select the Delivery Term defined under Sales – Customer Management – Delivery Term
Example: FOB - Free On Board
CIF - Carriage, Insurance & Freight - Delivery Mode - Click to select the Delivery Mode defined under Sales – Customer Management – Delivery Mode
Example: Truck, Flight, Self Collection - Payment Term - Click to select the Payment Mode defined under Sales – Customer Management – Payment Terms
Example: 30 Days, 60Days, COD (Cash on delivery) - Group - Click to select the Group defined under Sales – Customer Management – Customer Type Group
The group here is for the reports under Sales\Sales Analysis Reports\Customer Group wise Sales Analysis - Account Group - If the auto account posting is by Customer, then click to select the relevant Account Group defined under Sales – Customer Management – Customer Account Group
- Default Currency - Select the currency that this Customer normally transacts in.
Location - Create different delivery locations for this Customer
Price - Records the history of selling prices for this Customer if the price type (price table) is selected
Important: Our system does not allow duplicate customer codes in Customer Maintenance, so before creating the coding for Customer Maintenance, please double check and make sure that there are no duplicates. As guidance for creating Customer codes, one example is “CA0001” for A2000 Pte Ltd.; “C” stands for Customer and “A” is the starting alphabet for the Customer name.
Customer Groups
This option lets you indicate the Customer Group if you intend to use reports that sort or filter by Customer Group (Optional).
How to Setup Customer Type Group?
- Click on Receivables – Settings – Customer Group icon for the following screen.
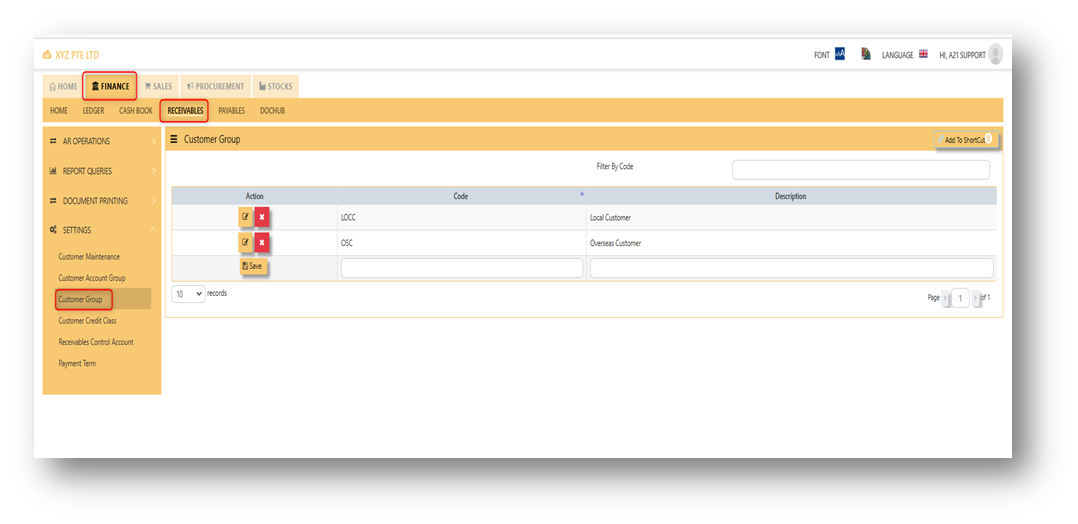
- Enter Customer Groups as shown in above example.
Note: If you did not use this grouping method for reporting, please ignore the options.
Customer Account Groups
The Customer Account Group is used for auto posting function when the user creates Sales Transaction. Unlike other systems that are hard-coded, A2000 WEB ERP allows the accounts posting to be organized according to the users’ requirements through their own Customer Account Groups.
You can create different groups and set the account posting to be by
“Customer Group” if you need:
Exp: Trade Debtor A/C by Customer
Sales A/C by Customer
Discount A/C by Customer
Cost of Sales A/C by Customer
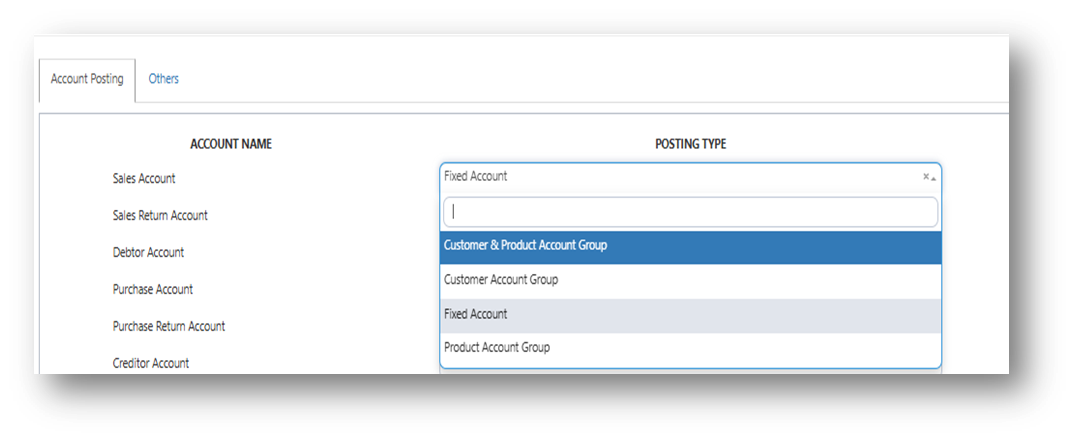
How to Setup Customer A/C Group?
- Click on Receivable – Settings – Customer Account Group icon for the following screen.
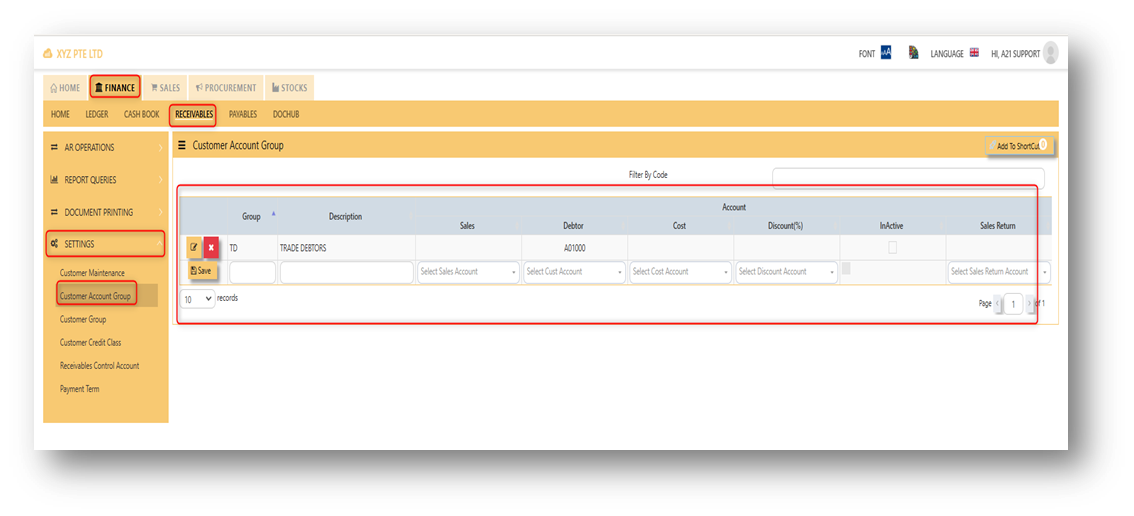
- Enter the Code & Description Name for Customer Account Group. After setting the codes and names, the user can map the GL Chart of Account code for “Trade Debtor A/C”, “Sales A/C”, “Discount A/C” & “Cost A/C”.
Note: If you did not use for this posting method, please ignore the options.
Payment Terms
This is where you indicate the Customer Payment Terms for Customers and Suppliers. The payment terms set for individual customers and suppliers are for the buckets in the Statement of Account & Aging reports.
How to add Payment Terms?
- Click on Receivables – Settings– Payment Terms icon for the following screen.
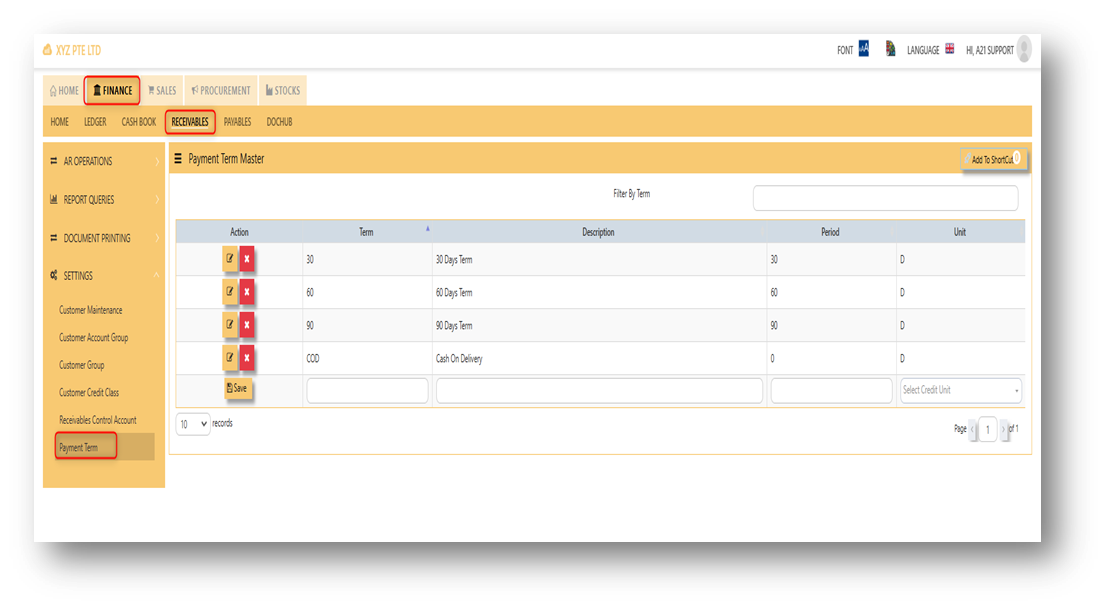
- Enter the above Terms of Payment as shown above. For more flexible settings, user can indicate the Payment Terms according to the report needed.
Exp: Add 7 Days, 45 days or 120 days…etc.
Note: If you did not set the payment terms, you can not select the terms for individual customers and the system
will be unable to generate accurate Statement of Account & Aging reports.