Finance (Payables)
Overview - Payables
PAYABLES MODULE
 This module contains the Accounts Payable (AP) entry options for the various payable transactions, payments and real-time GL posting. The flow chart of AP module is as follow:
___________________________________________________________________________________________________
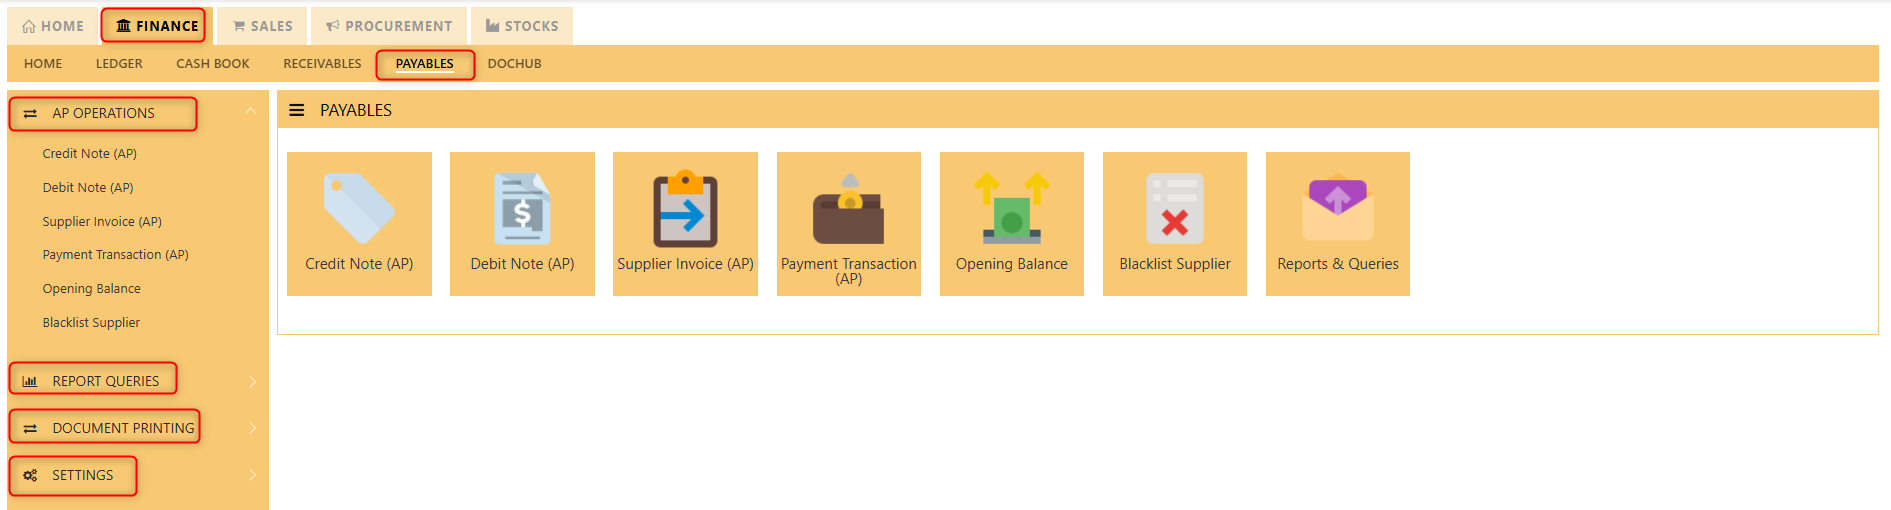
MENU NAVIGATION

The PAYABLES Module has 4 tabs, as shown above, which are Operations, Reports Queries and Maintenance, Document Printing and Settings.
- AP Operations is where transactions are entered, such as Payable Transactions and Opening Balances.
- Reports Queries contains all the Payable reports such as Supplier Ledger and others.
- Document Printing enables user to preview and print a range of AP Transactions.
- Settings is where master records are created.
AP- OPERATIONS
AP OPERATIONS
Payable Transaction
Transactions for Supplier Invoice (PI), Credit Note (PC), Debit Note (PD) and Payment transaction (PV) can be done at this option. Allocation of outstanding invoices can be made via PI, PC, PD and PV transactions.
This option posts on-line to Supplier/Creditors account and GST account if applicable. Upon allocation of foreign currency transactions, realized exchange gain/loss will be captured and its amount posted to the account concerned.
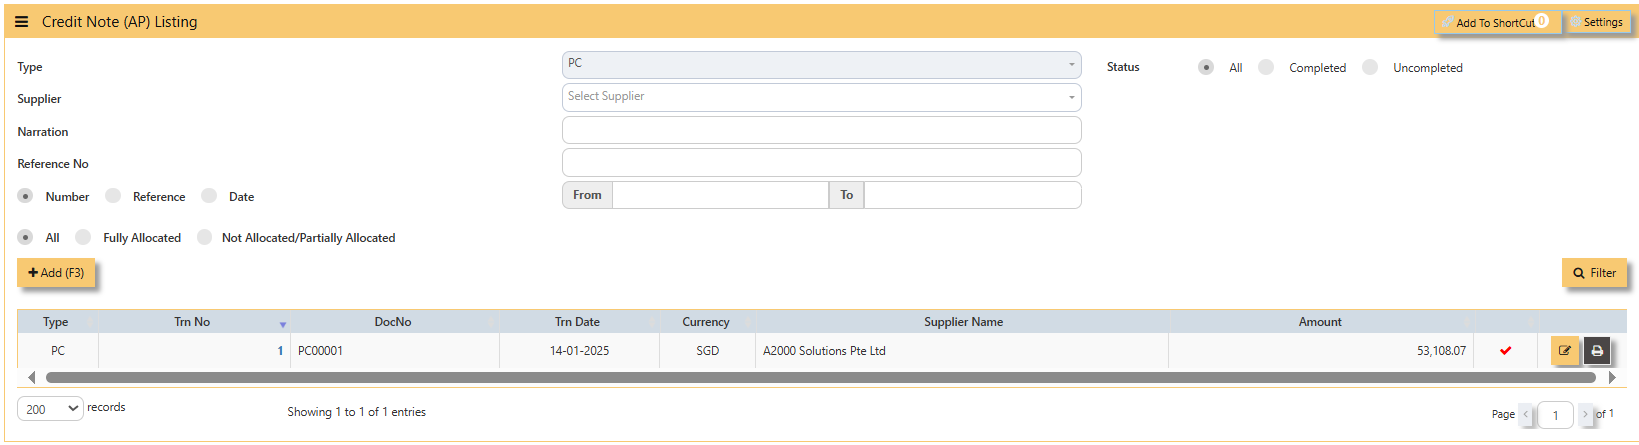
Credit Note (AP)
How to enter Credit Note (PC)?
A credit note is a document issued by a seller to a buyer, acknowledging that a certain amount of money is being credited to the buyer's account. It typically occurs when there has been a return of goods, overpayment, or an error in the original invoice. The credit note can be used by the buyer as a credit for future purchases or to request a refund.
___________________________________________________________________________________________________
Steps to enter PC are as follow:
1. Click on Payables – AP Operations – Credit Note (AP) and the following screen will appear.
2. Click on Add button to create a new transaction.
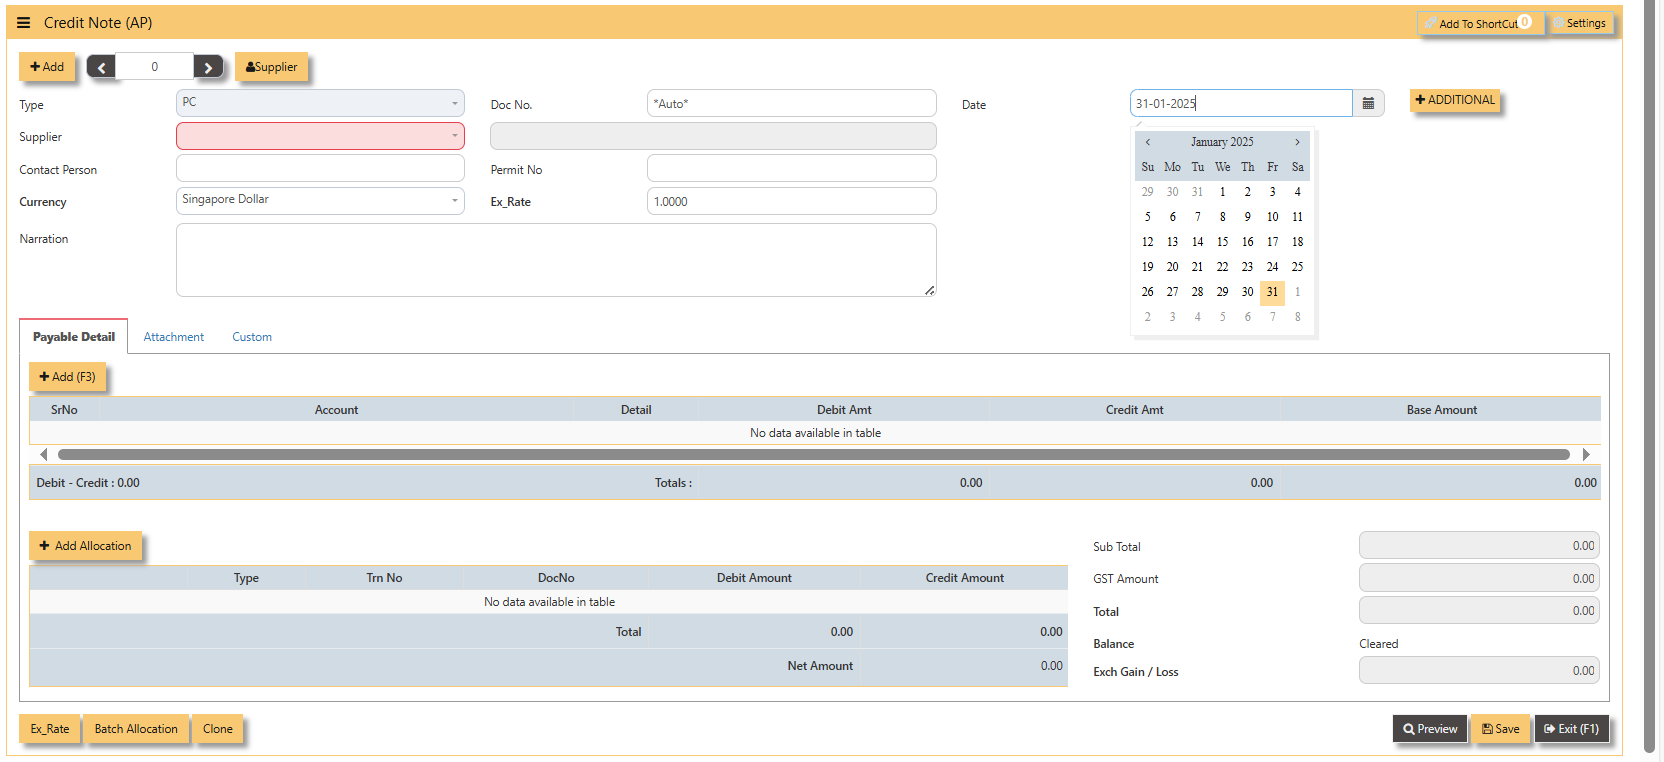
- Fill up the fields in the header section such as Date, Supplier, Contact Person, Currency and Exchange Rate.
- Then select the account concerned at the detail section.
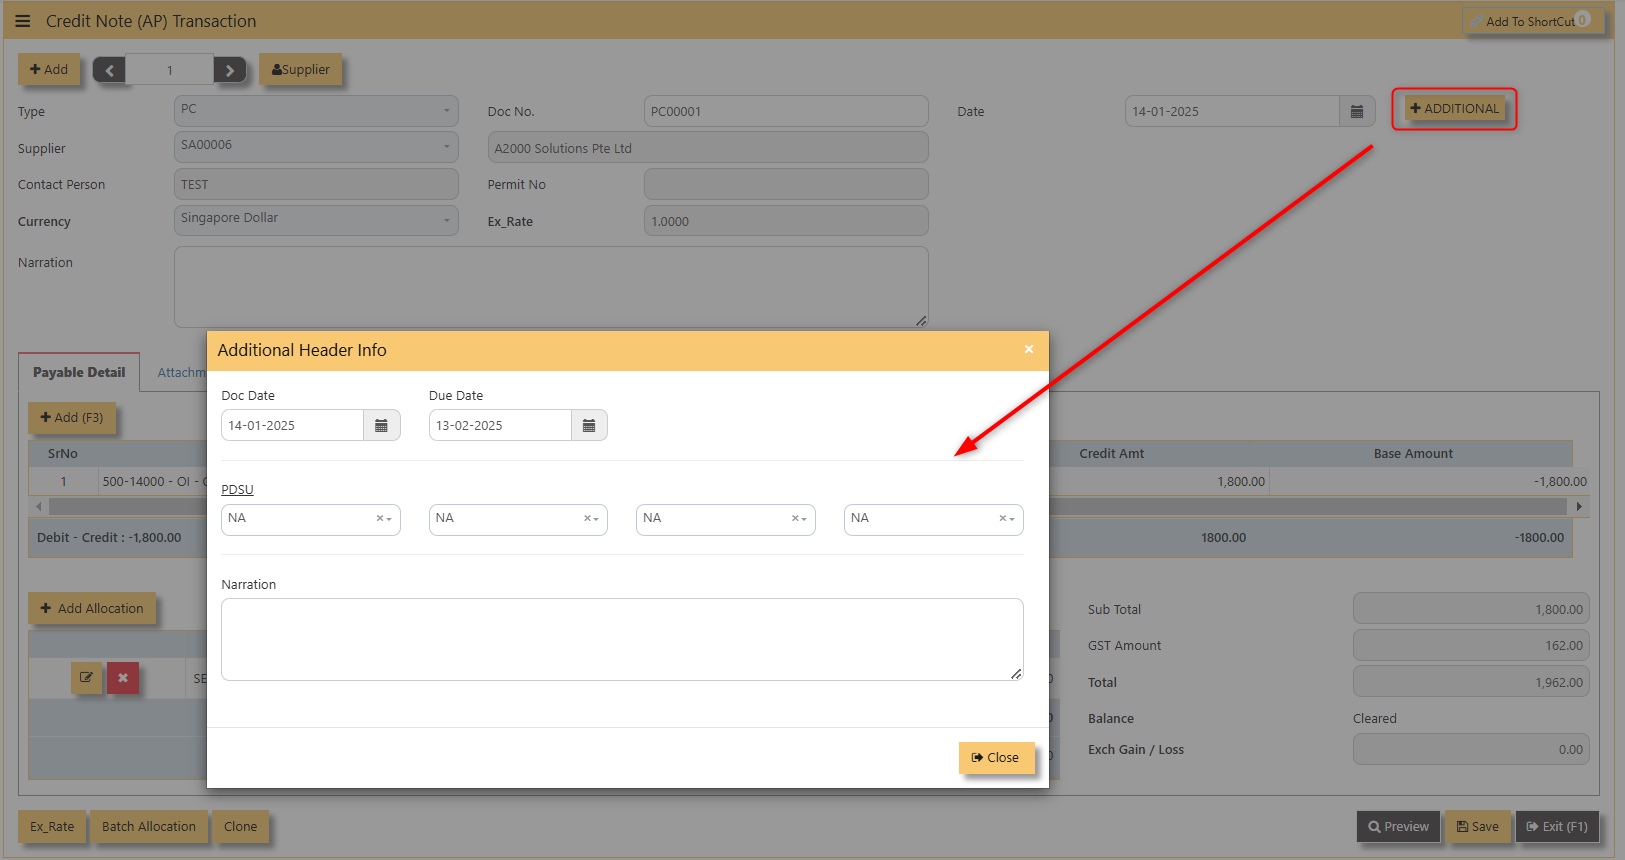
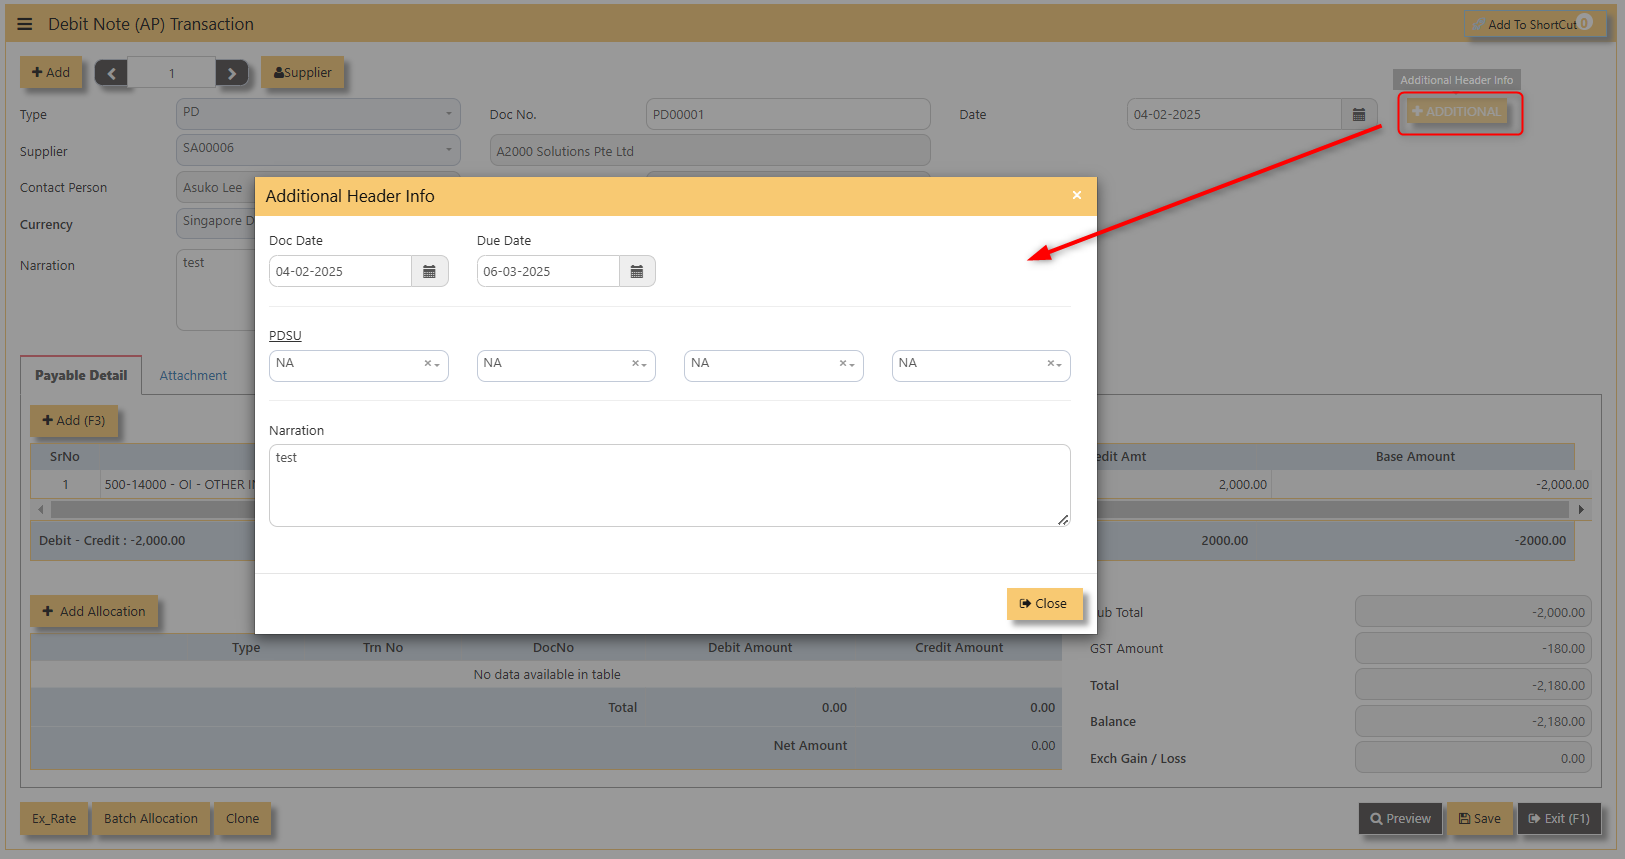
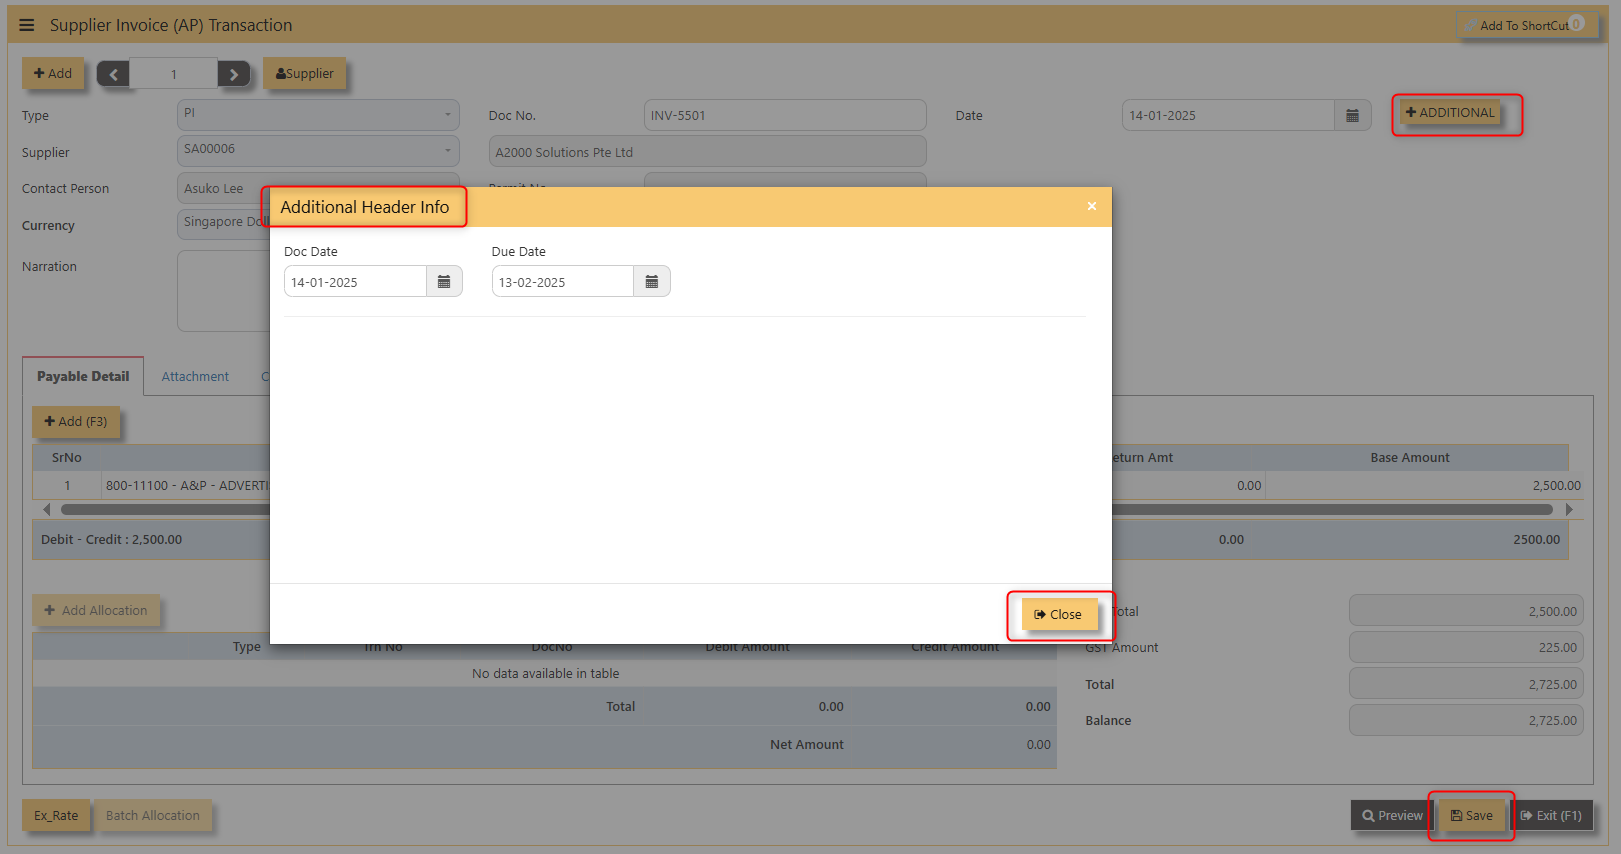
- Click for Additional Info for necessary details to add
- Click on save button to complete the entry.
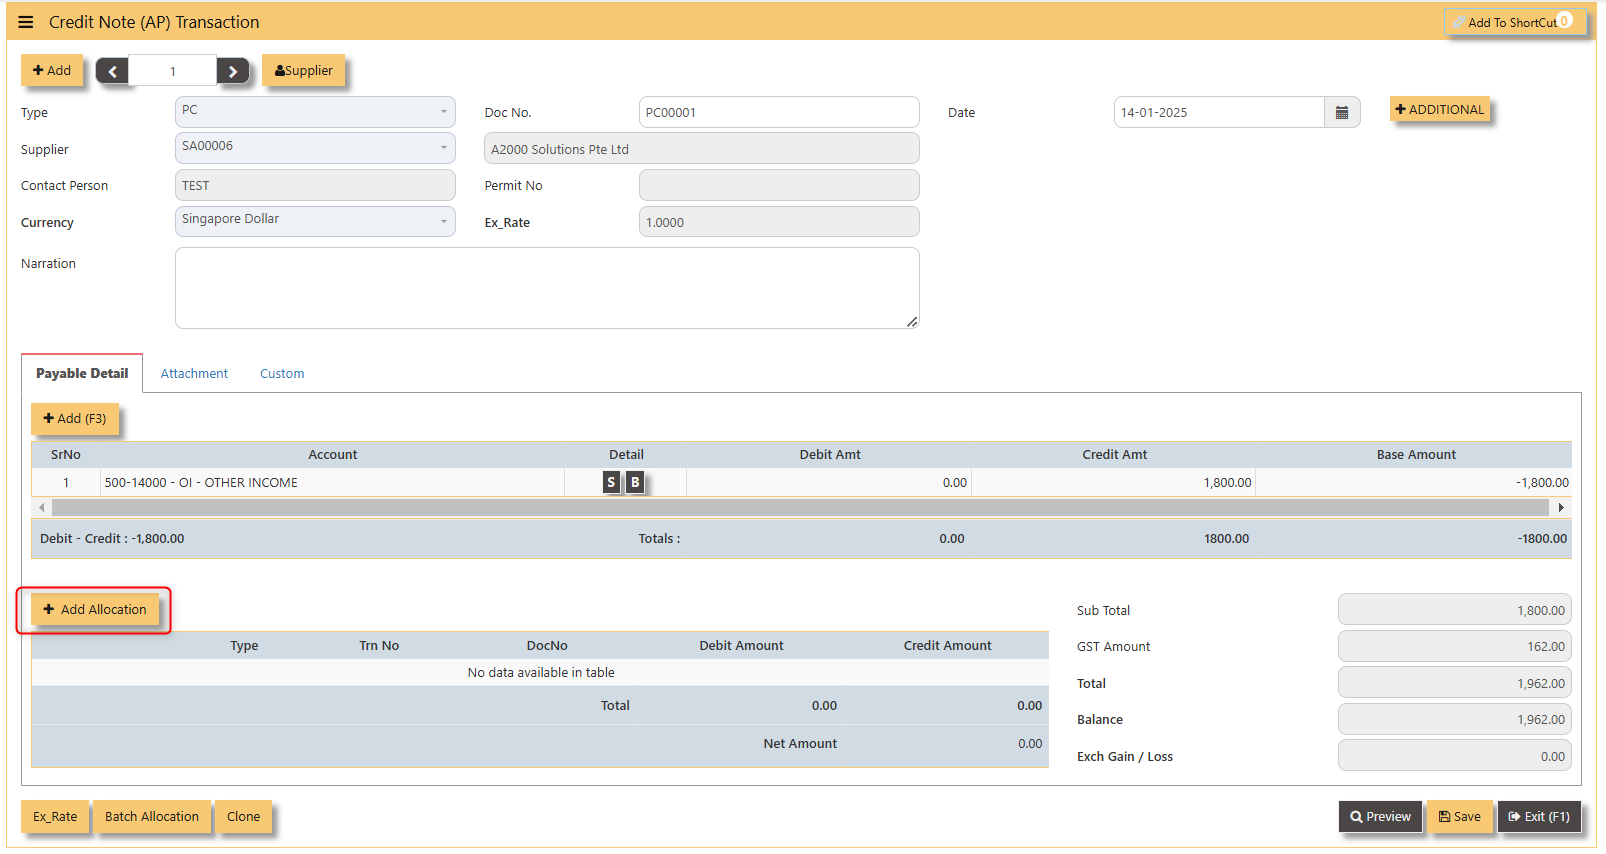
3. Below is a sample PC transaction screen.
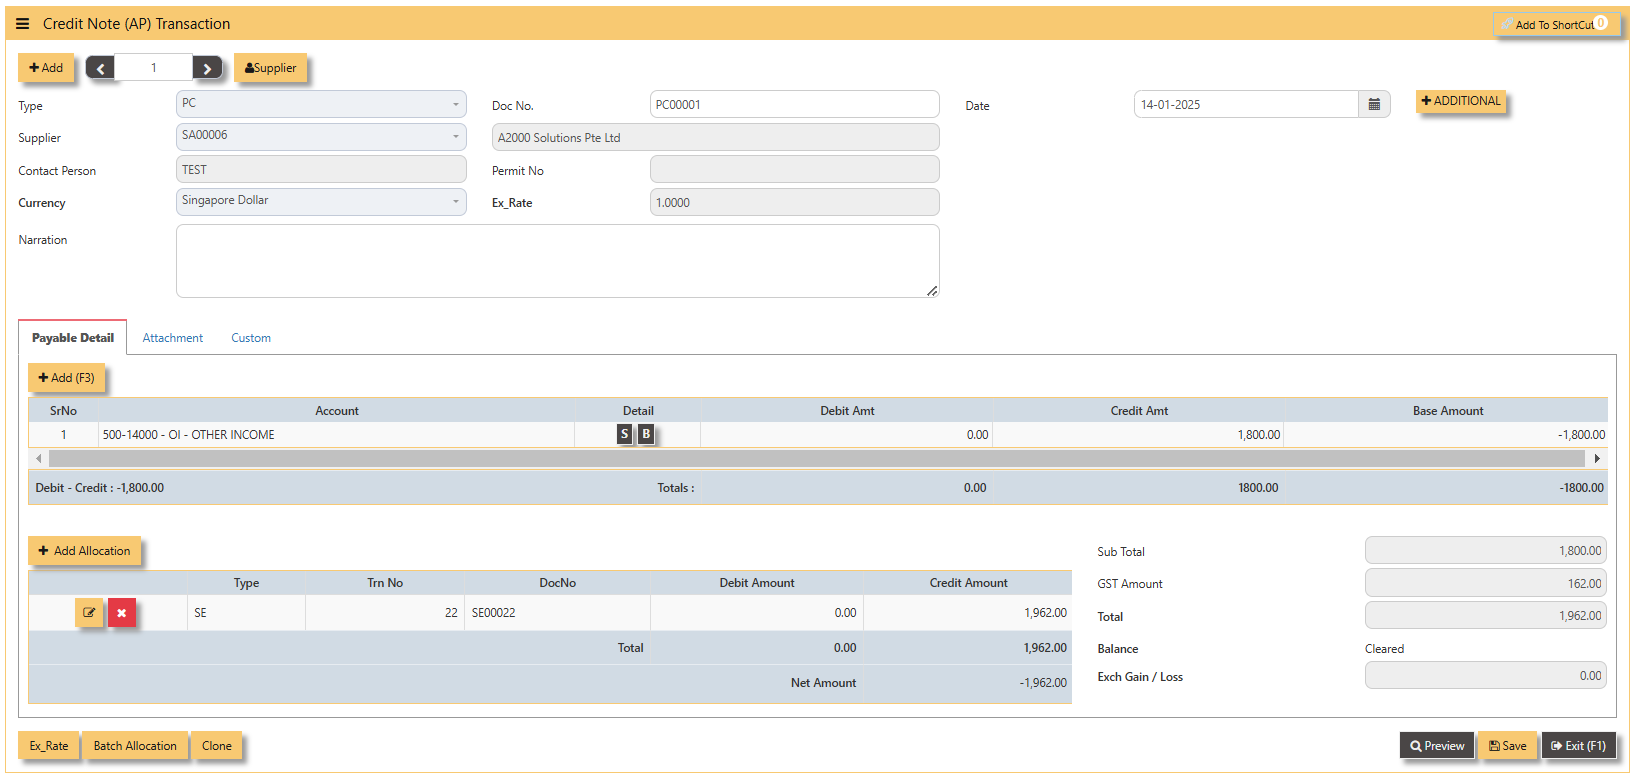
Additional Information:
- Add Allocation This is where you can manually add allocation.
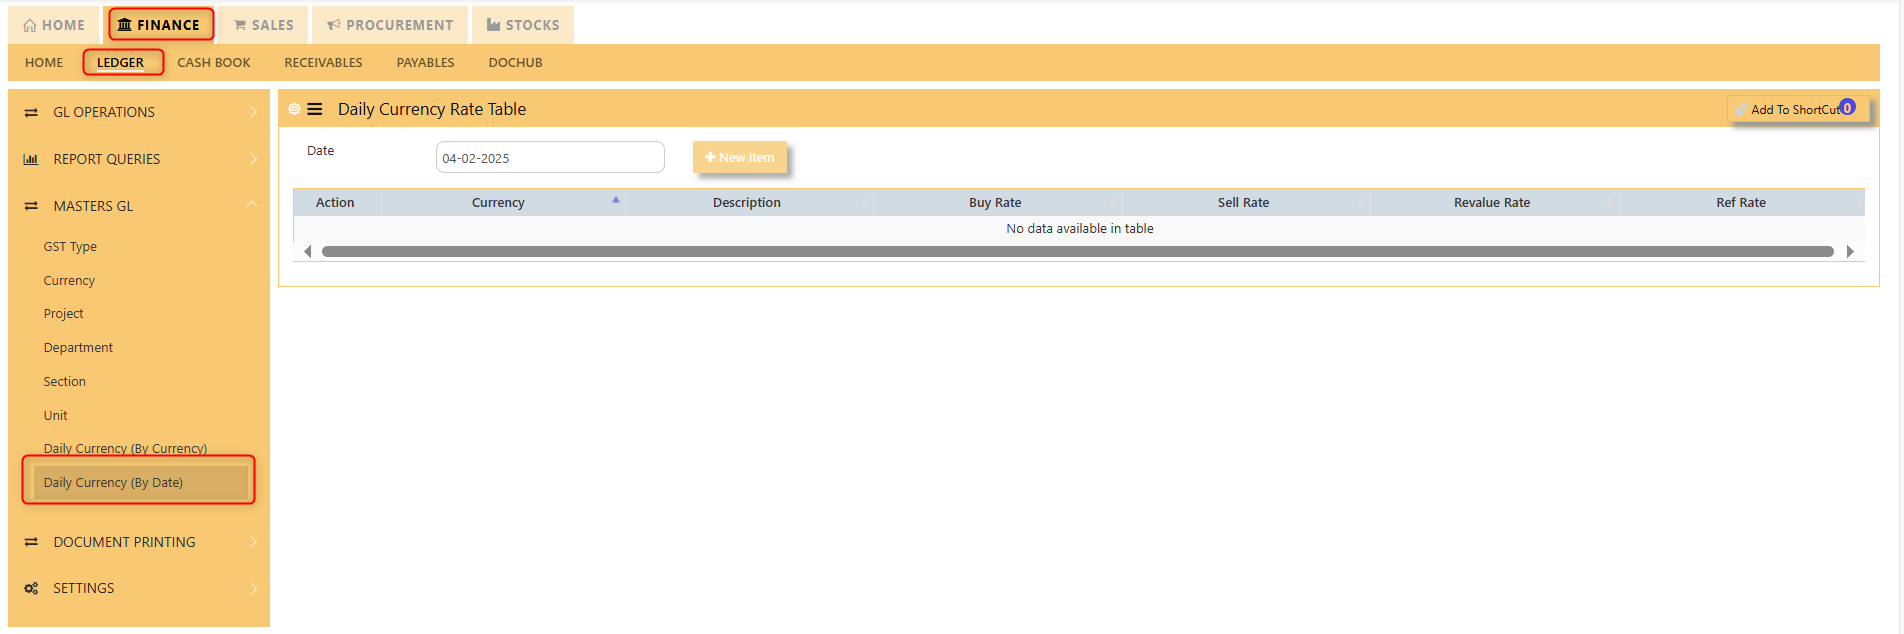
- Ex Rate It will redirect you to Finance Tab. Attached link for further information. MASTERS GL | Support Doc
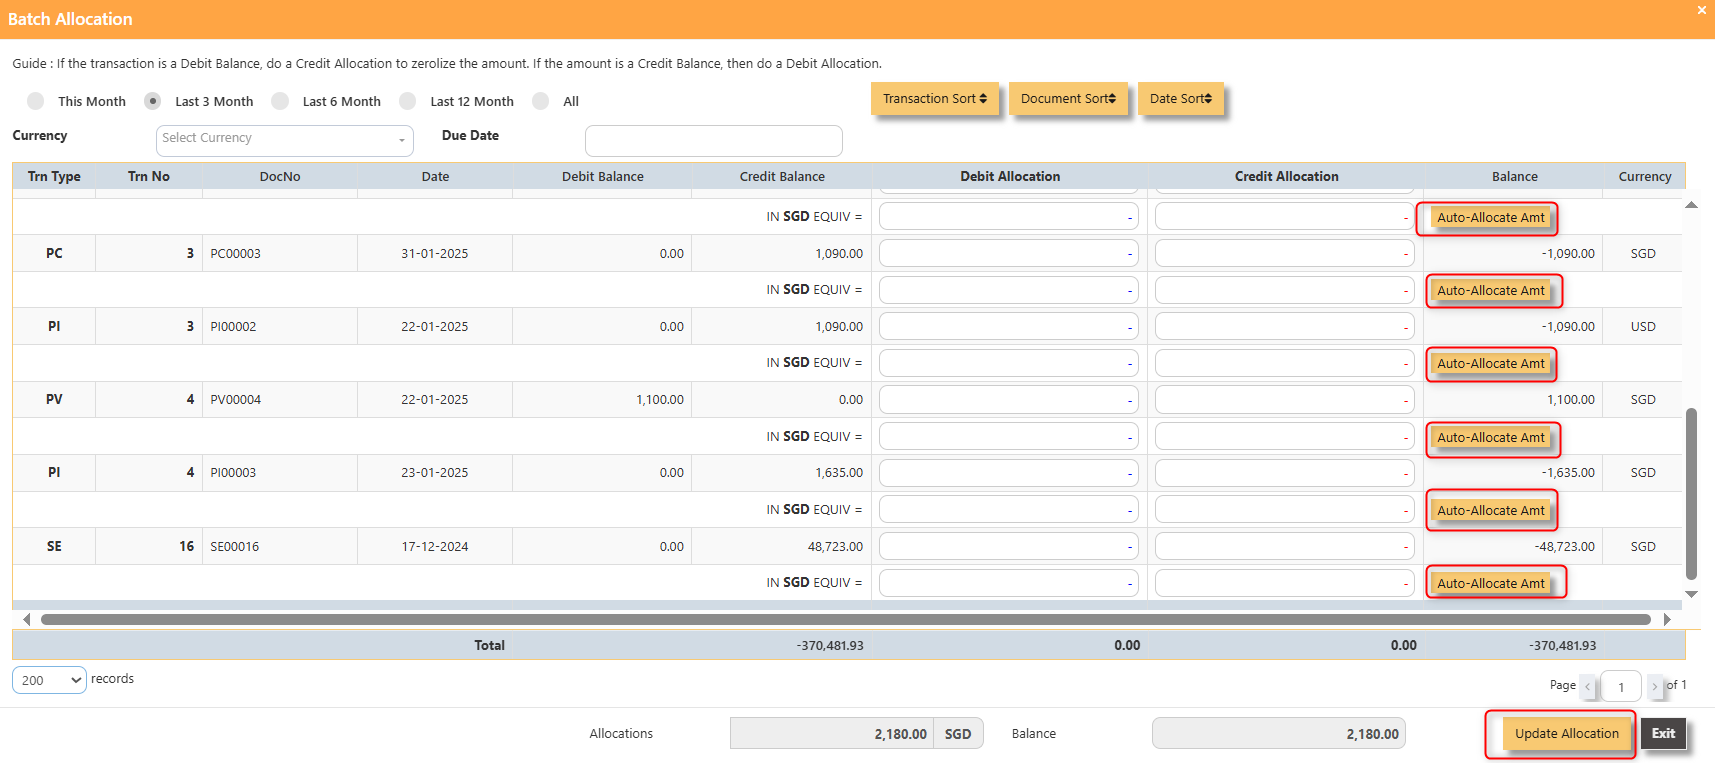
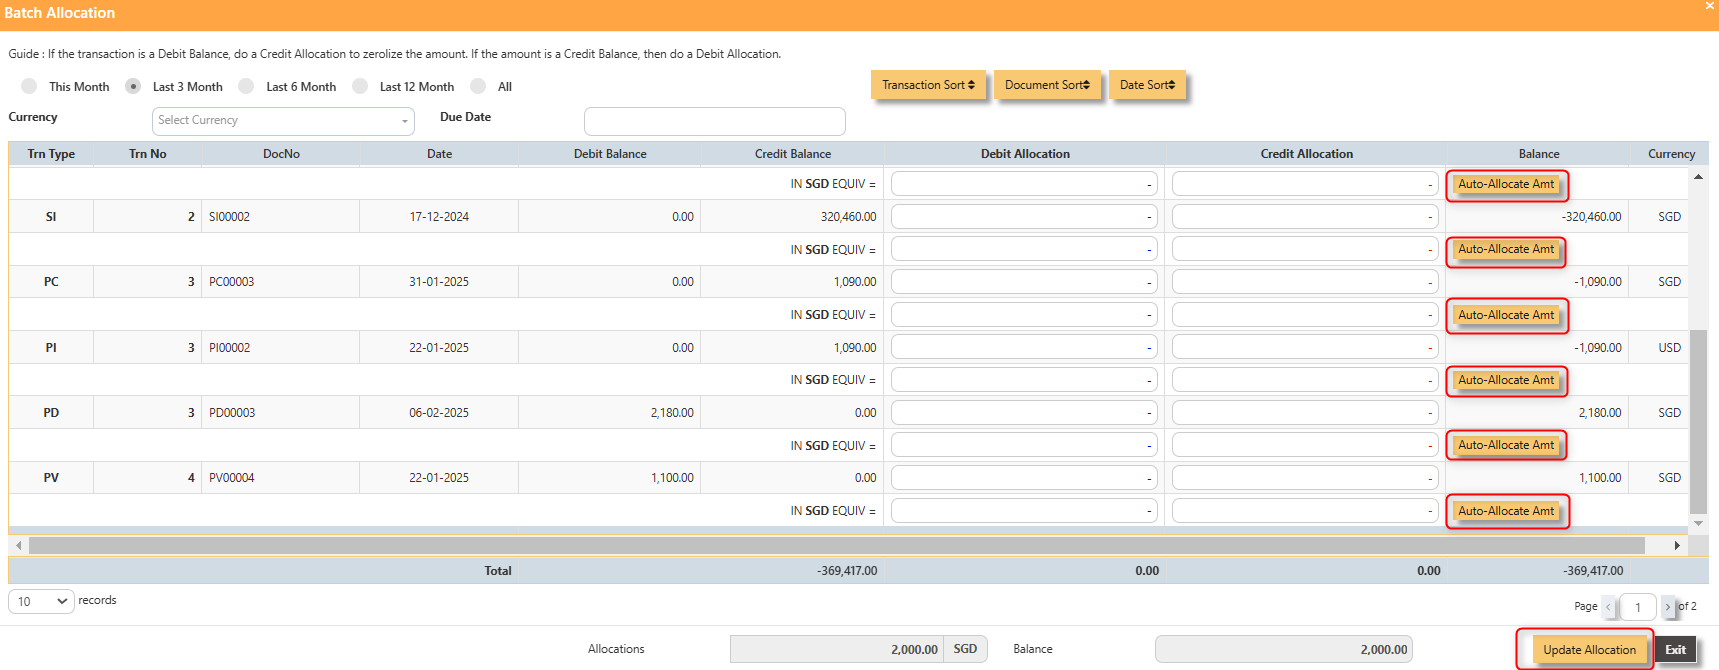
- Batch Allocation If you have a lot of transactions needed to allocate, you may use the batch allocation button to allocate transactions in a convenient way. Sample below.

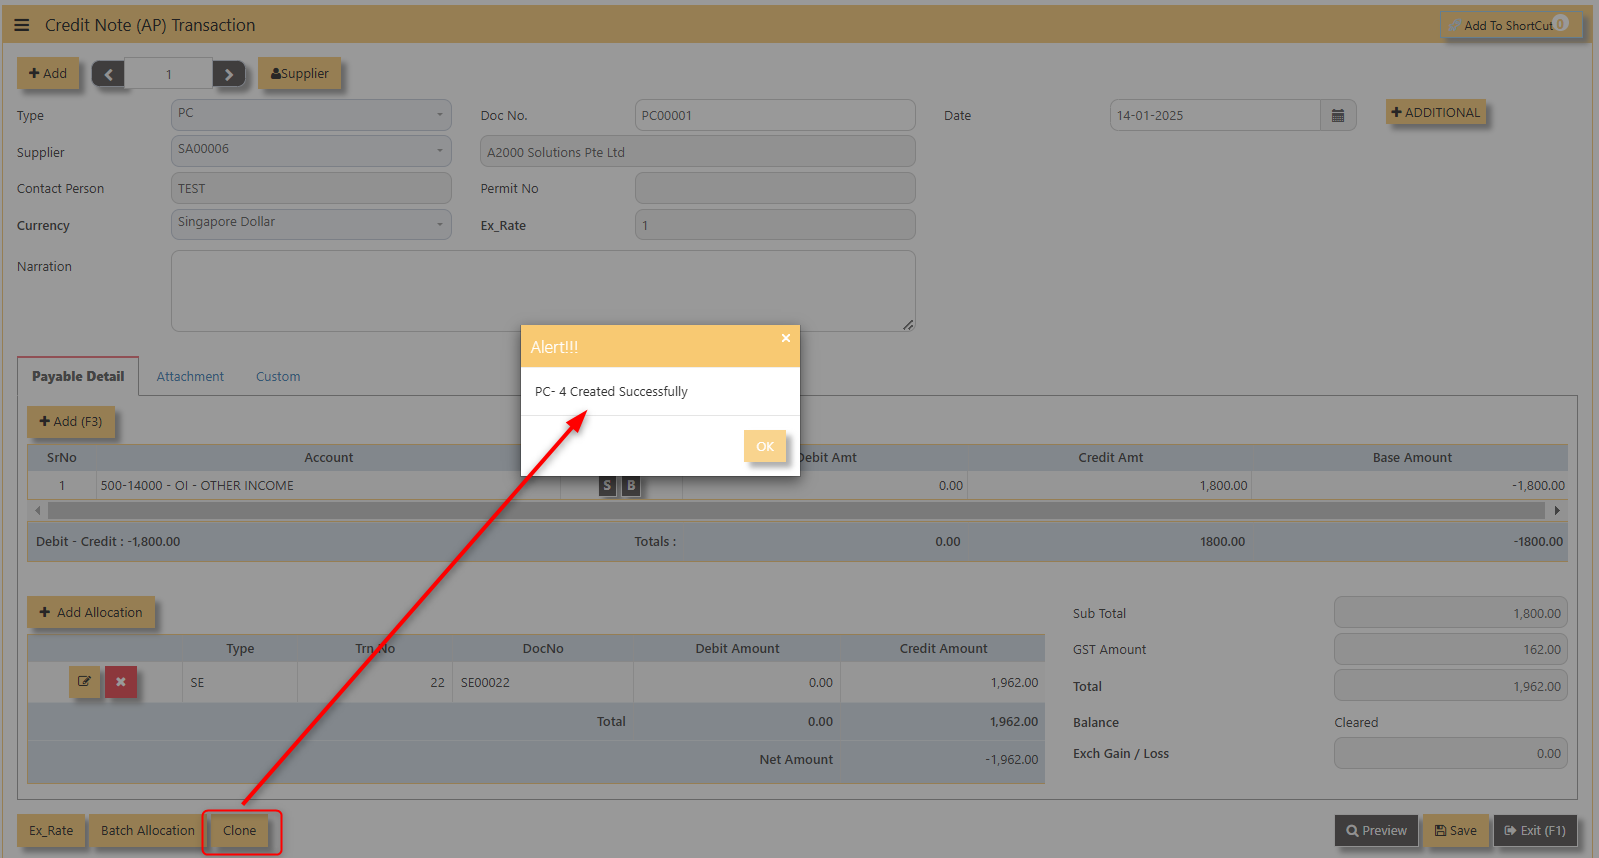
- CLONE It will allow you to copy the exact transaction created; where it will be creating another transaction copying the transaction you have clone.
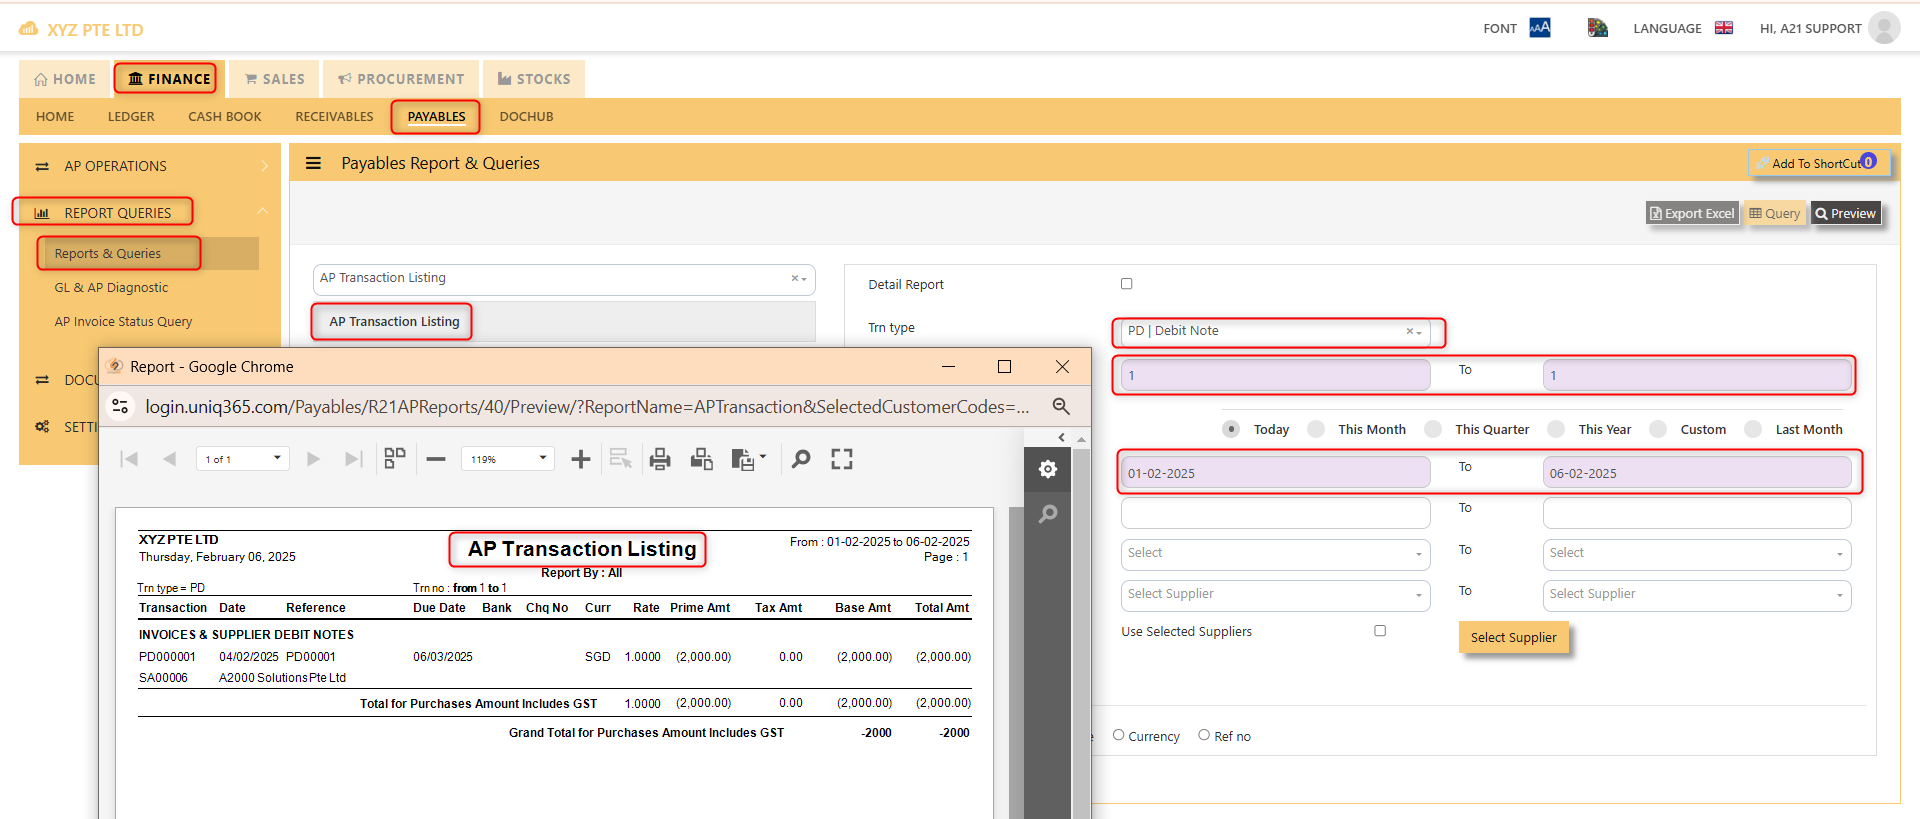
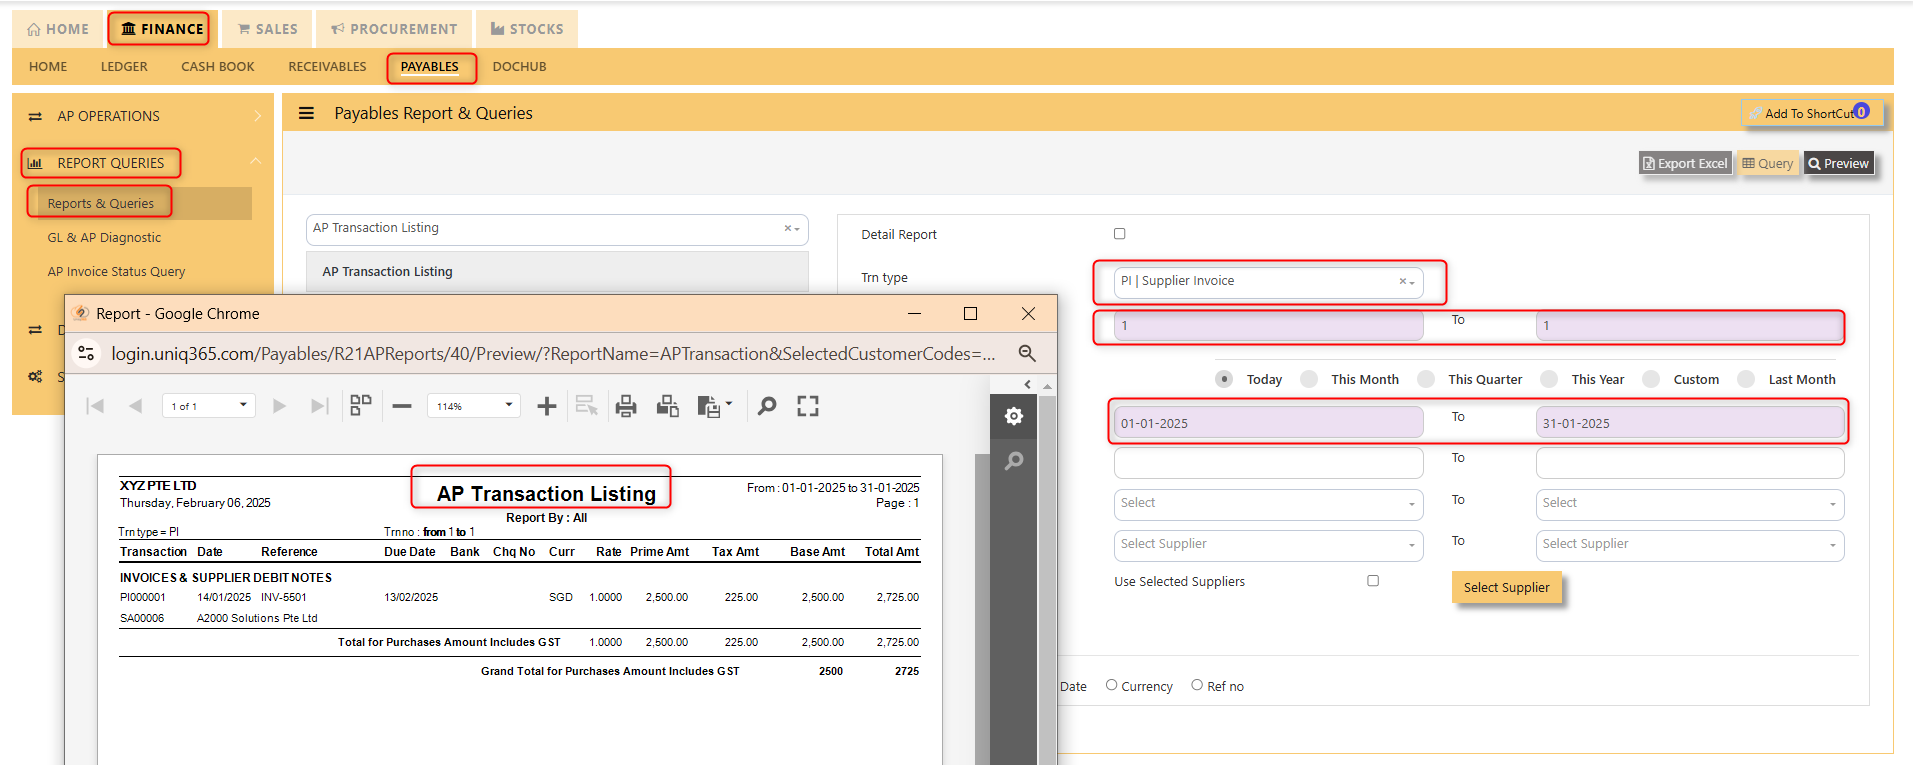
4. For the double entries of the PC transaction created, it can be verify under AP Transaction Listing.

Note: The steps to enter Credit Note (PC) & Debit Note (PD) are identical to PI. User will need to select transaction type PC or PD respectively to enter the record.
Debit Note (AP)
How to enter Debit Note (PD)?
A debit note is a document issued by a buyer to a seller, indicating that the seller owes a credit for goods or services that were returned, damaged, or invoiced incorrectly. It serves as a formal request for an adjustment in the payment, reducing the amount owed to the seller. Debit notes are commonly used in transactions to correct billing errors or return goods after delivery.
___________________________________________________________________________________________________
Steps to enter PD are as follow:
1. Click on Payables – AP Operations – Debit Note (AP) and the following screen will appear.
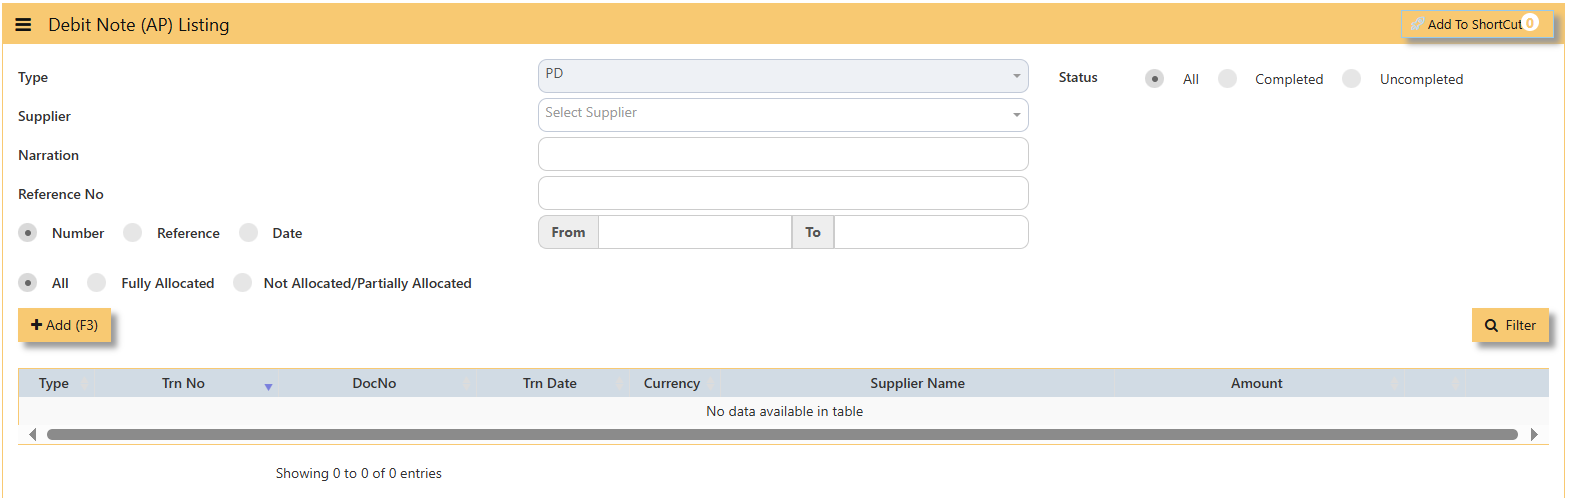
2. Click on Add button to create a new transaction.
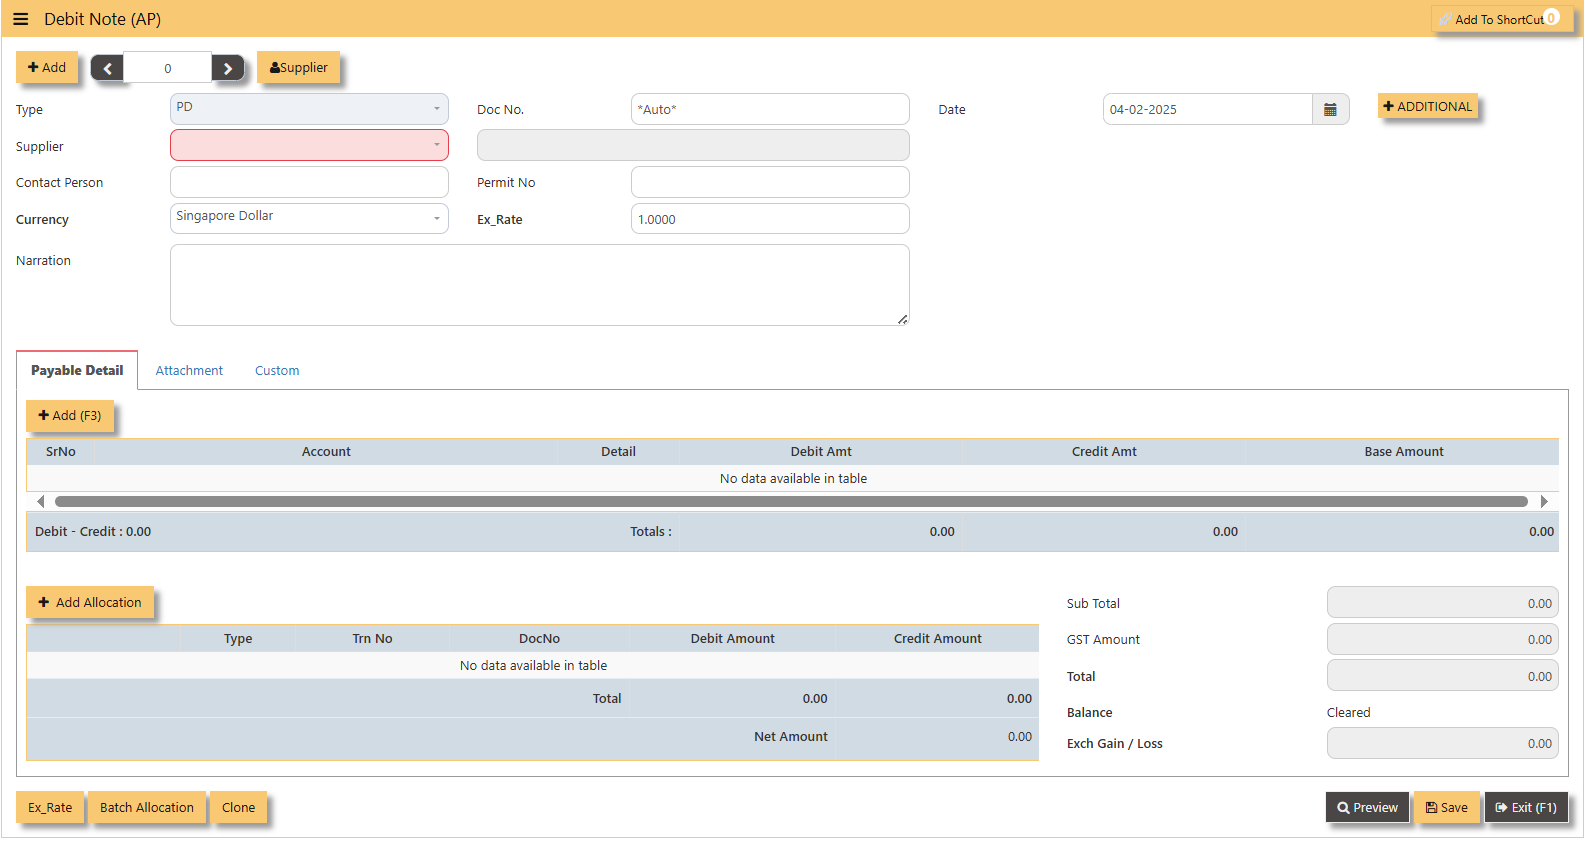
- Fill up the fields in the header section such as Date, Supplier, Contact Person, Currency and Exchange Rate.
- Then select the account concerned at the detail section.
- Click for Additional Info for necessary details to add.
- Click on save button to complete the entry.
3. Below is a sample PD transaction screen.

Additional Information:
- Add Allocation This is where you can manually add the transaction.

- Ex Rate It will redirect you to Finance Tab. Attached link for further information. MASTERS GL | Support Doc
- Batch Allocation If you have a lot of transactions needed to allocate, you may use the batch allocation button to allocate transactions in a convenient way. Sample below.
- Clone It will allow you to copy the exact transaction created; where it will be creating another transaction copying the transaction you have clone.
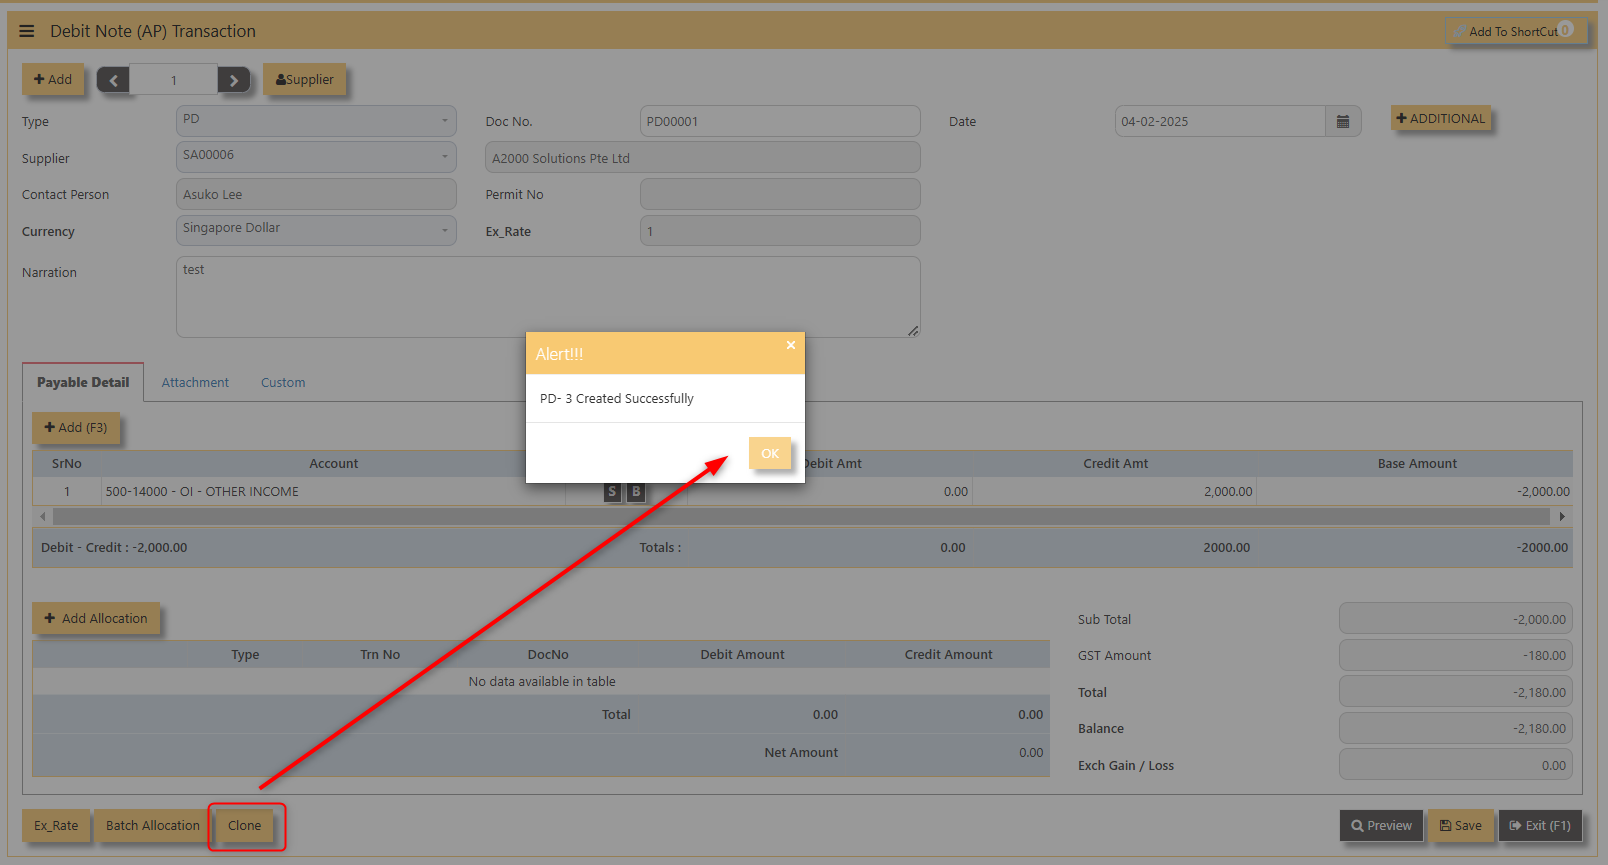
4. For the double entries of the PD transaction created, it can be verified under AP Transaction Listing.
Note: The steps to enter Credit Note (PC) & Debit Note (PD) are identical to PI. User will need to select transaction type PC or PD respectively to enter the record.
Supplier Invoice (AP)
How to enter Supplier Invoice (PI)?
A supplier invoice is a document issued by a supplier to a buyer requesting payment for goods or services provided. It typically includes details such as the quantity, price, and description of the items, along with payment terms and due dates. The invoice serves as a formal record of the transaction and is used for accounting and financial purposes.
There may be times where there is a purchase of non-stock item. User may use PI transaction to affect such transaction.
___________________________________________________________________________________________________
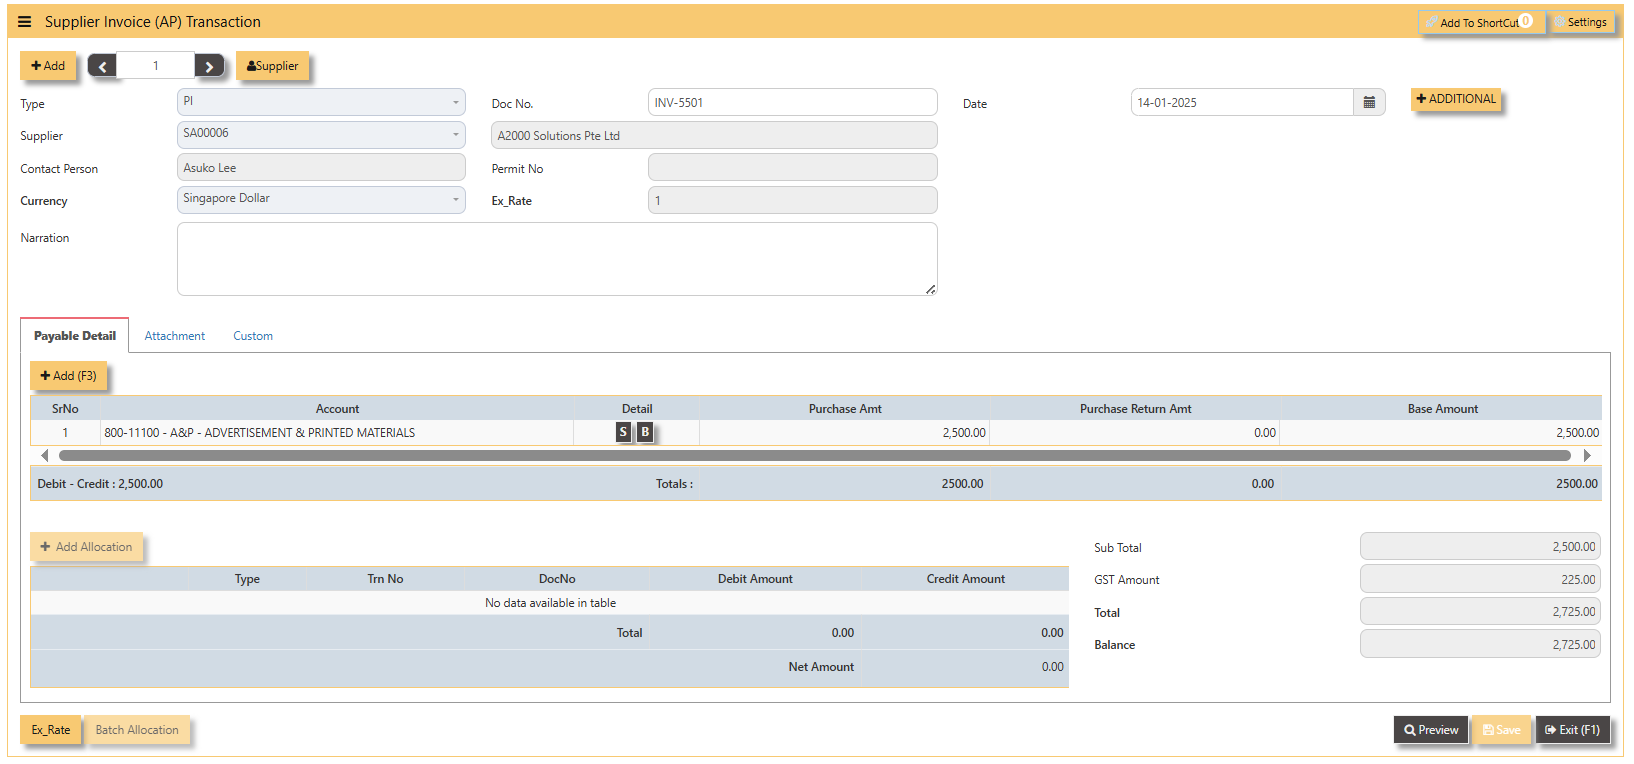
Steps to enter PI are as follow:
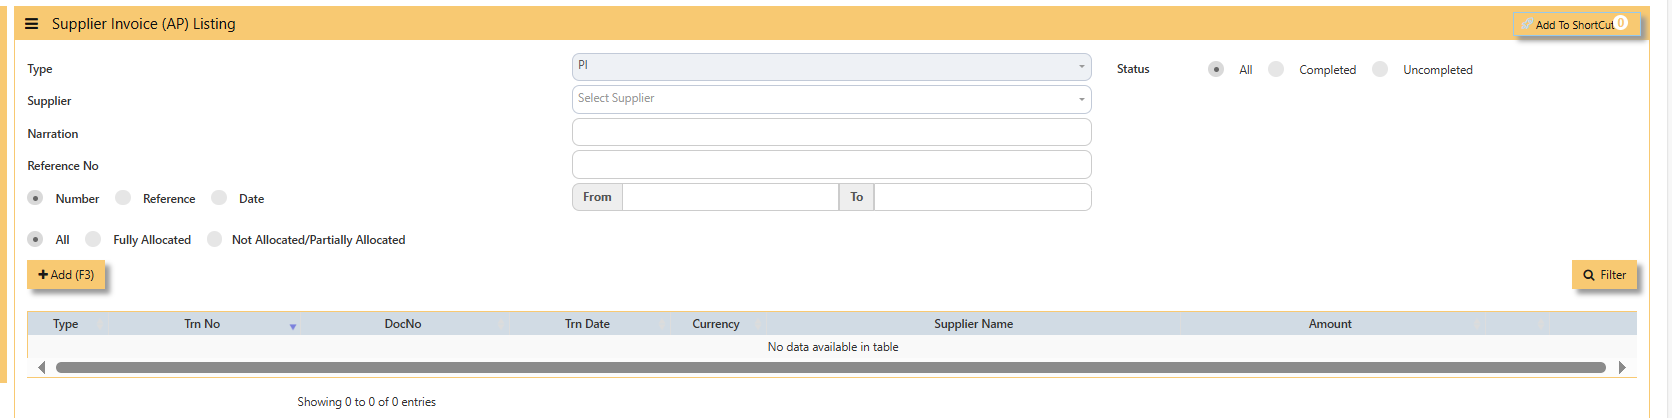
- Click on Payables – AP Operations – Supplier Invoice (AP) and the following screen will appear.

- Click on Add button to create a new transaction

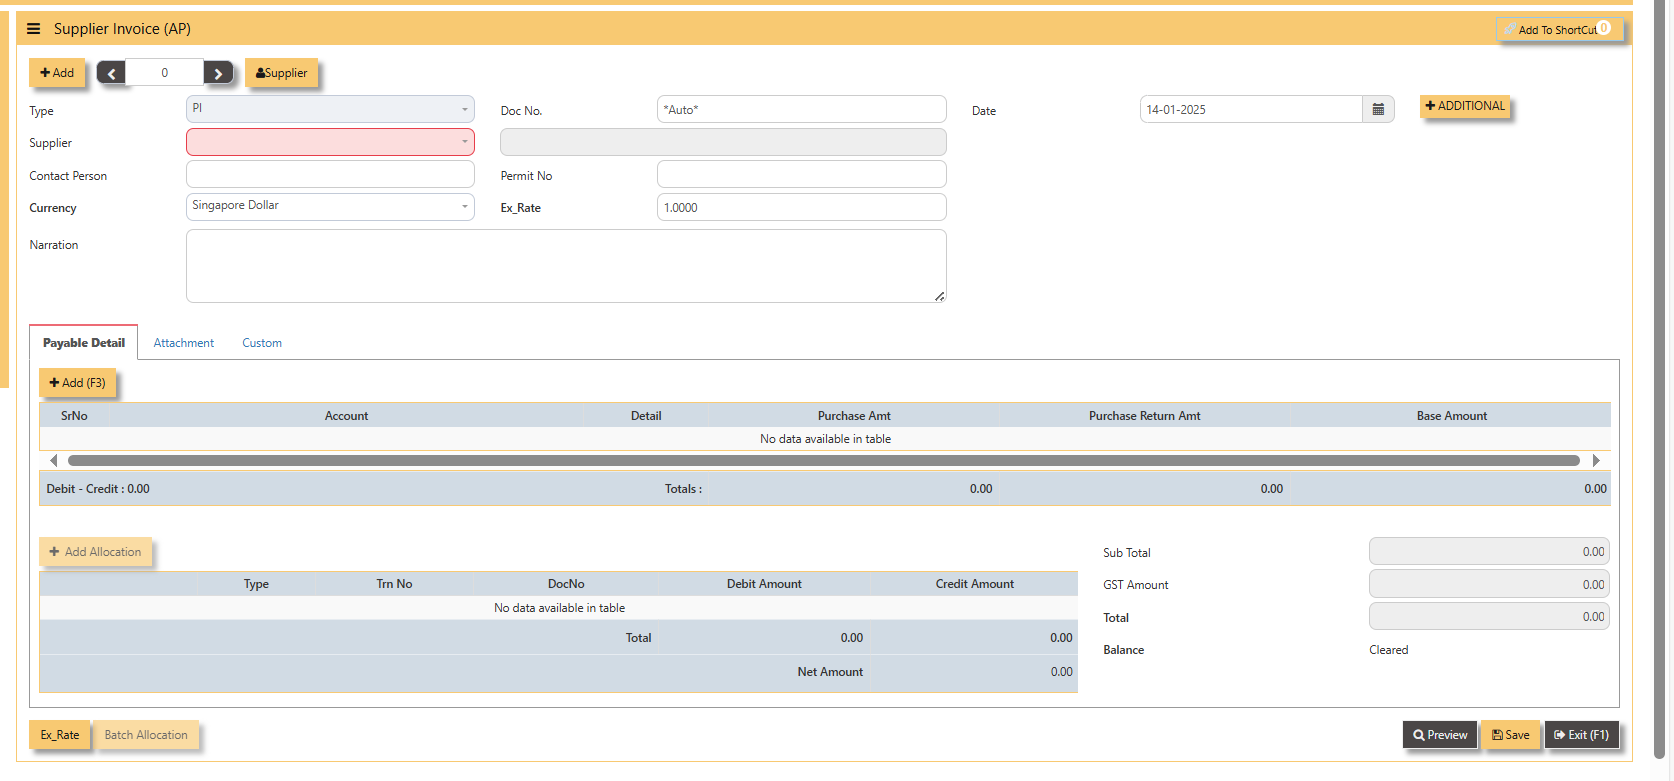
- Fill up the fields in the header section such as Ref No, Date, Supplier, Contact Person, Currency and Exchange Rate.
- Then select the account concerned at the detail section.
- Click for Additional Info for necessary details to add.
- Click on save button to complete the entry.
3. Below is a sample PI transaction screen.
Additional Information:
- Ex Rate It will redirect you to Finance Tab. Attached link for further information. MASTERS GL | Support Doc
3. For the entries of the PI transaction created, it can be verify under AP Transaction Listing.
Note: The steps to enter Credit Note (PC) & Debit Note (PD) are identical to PI. User will need to select transaction type PC or PD respectively to enter the record.
___________________________________________________________________________________________________
How to allocate Foreign Currency Invoice with Base Currency Payment?
Let's use the following example to do this type of allocation:
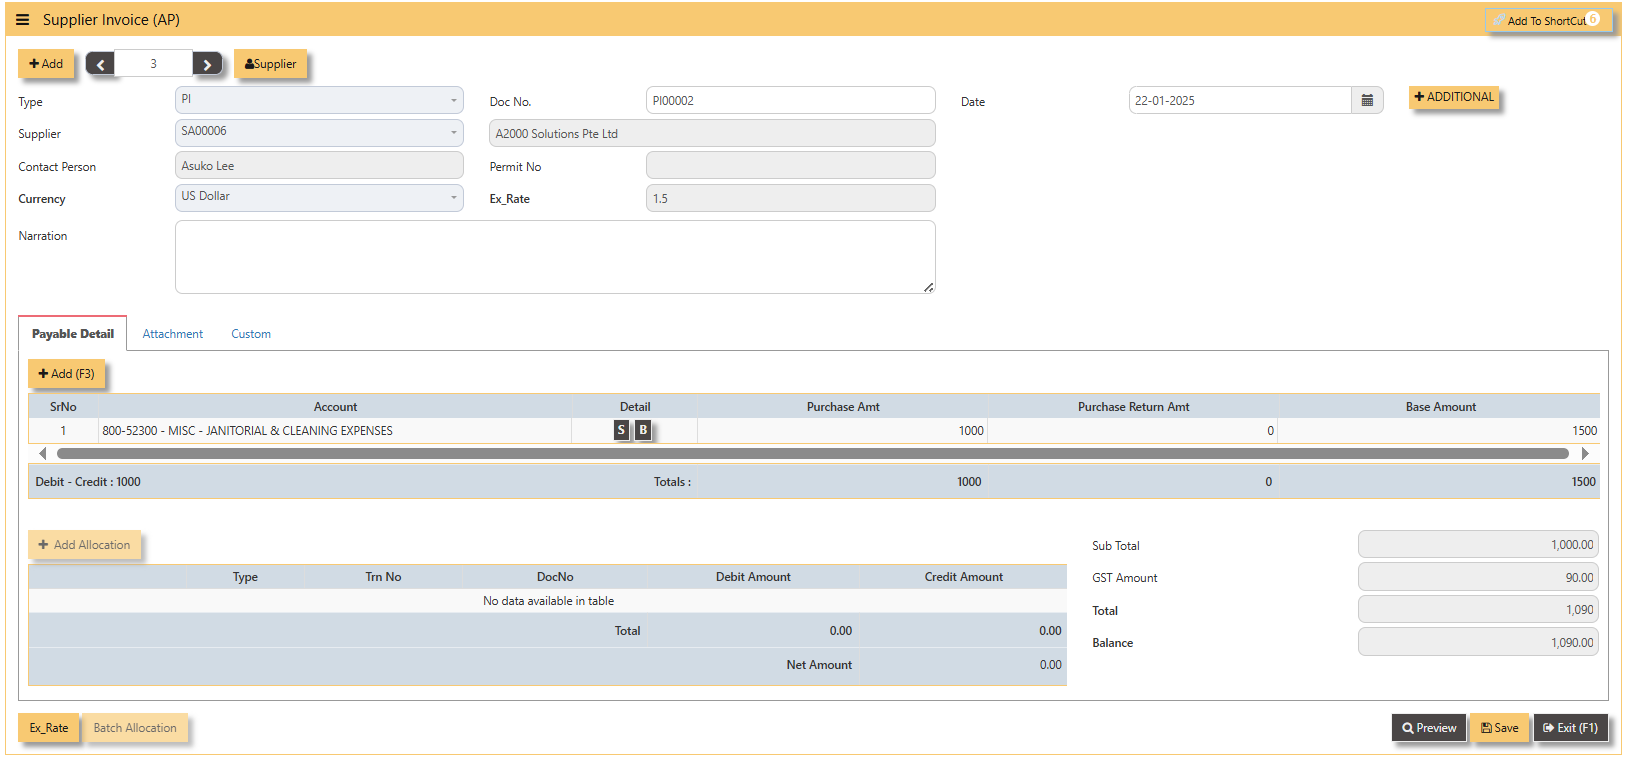
1. Create a foreign currency invoice as follow:
2. Payment is made in base currency and in this example, it is SGD. The payment voucher should be entered as follow:
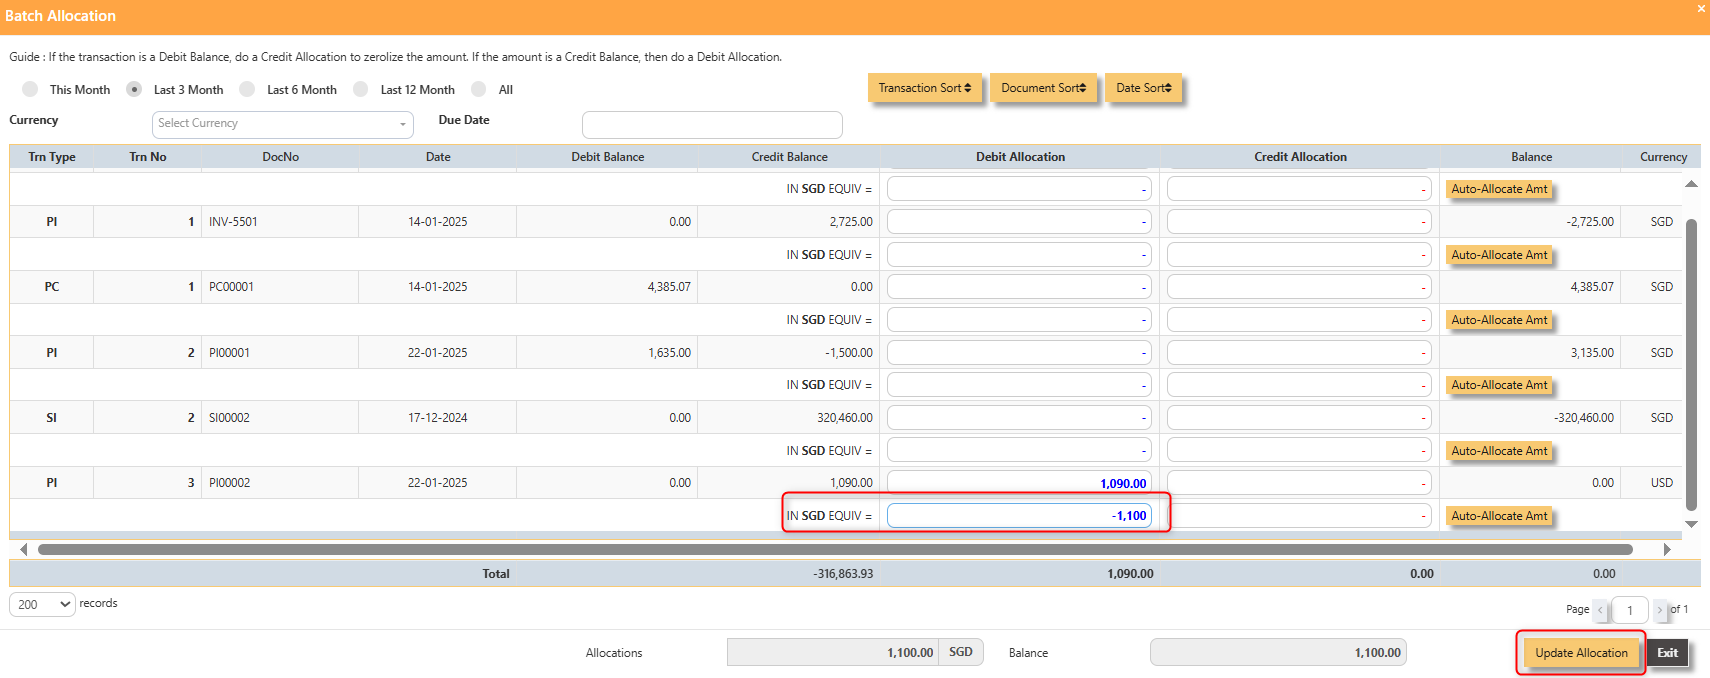
- Click on Batch Allocation button for the screen below:
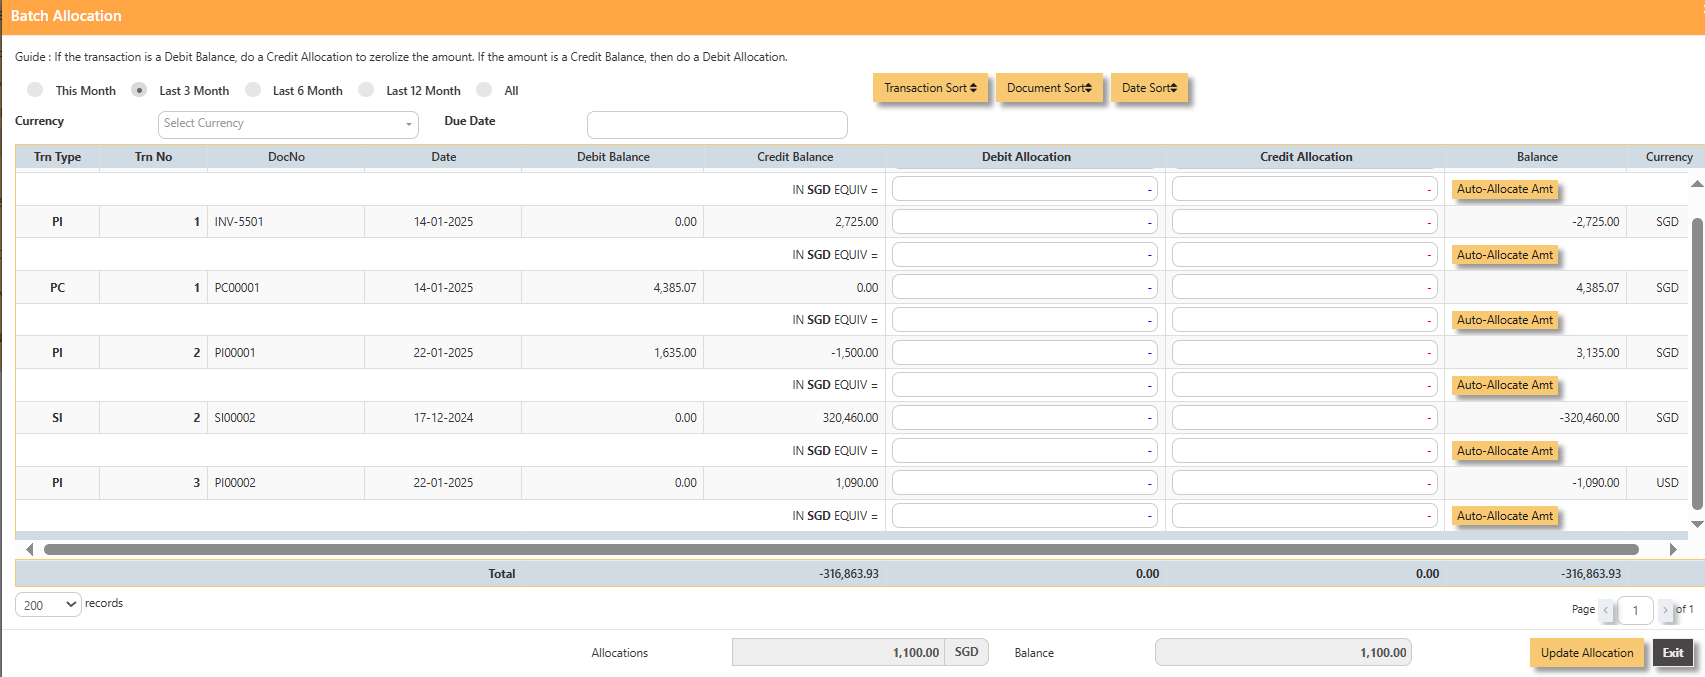
- For PI00002, click on Auto-Allocate Amt button, you will notice that the full amount of the invoice will be populated at
the 1st line.
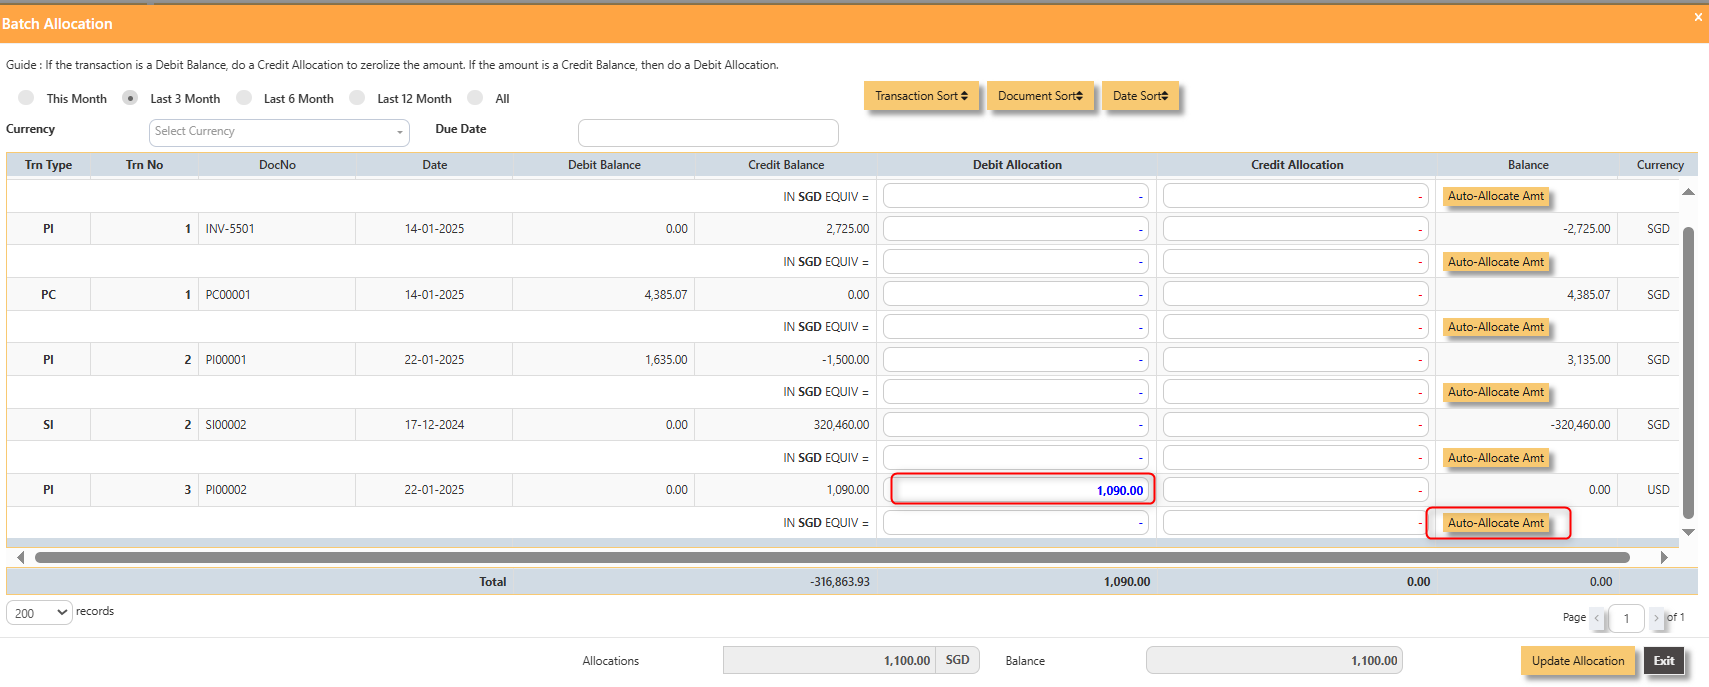
- You should manually type in the base currency amount in SGD field as shown below. Click on Update Allocation to complete the allocation and save the PV transaction.
3. The completed payment transaction is as follow:
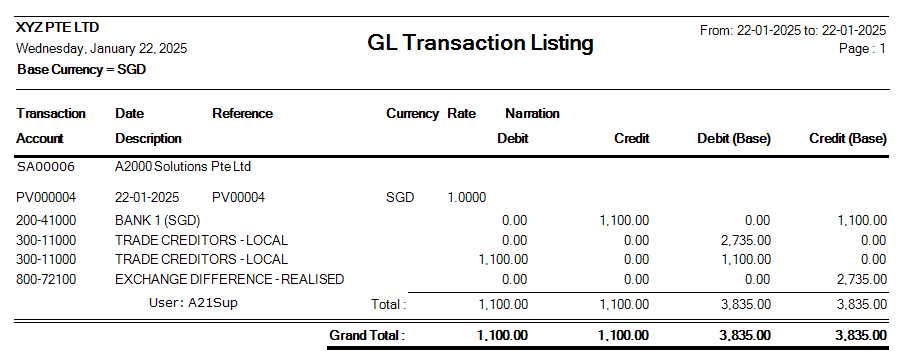
4. UNIQ365 will capture the Realized Exchange Gain/Loss automatically upon allocation. The double entry of the above
transaction is shown below:
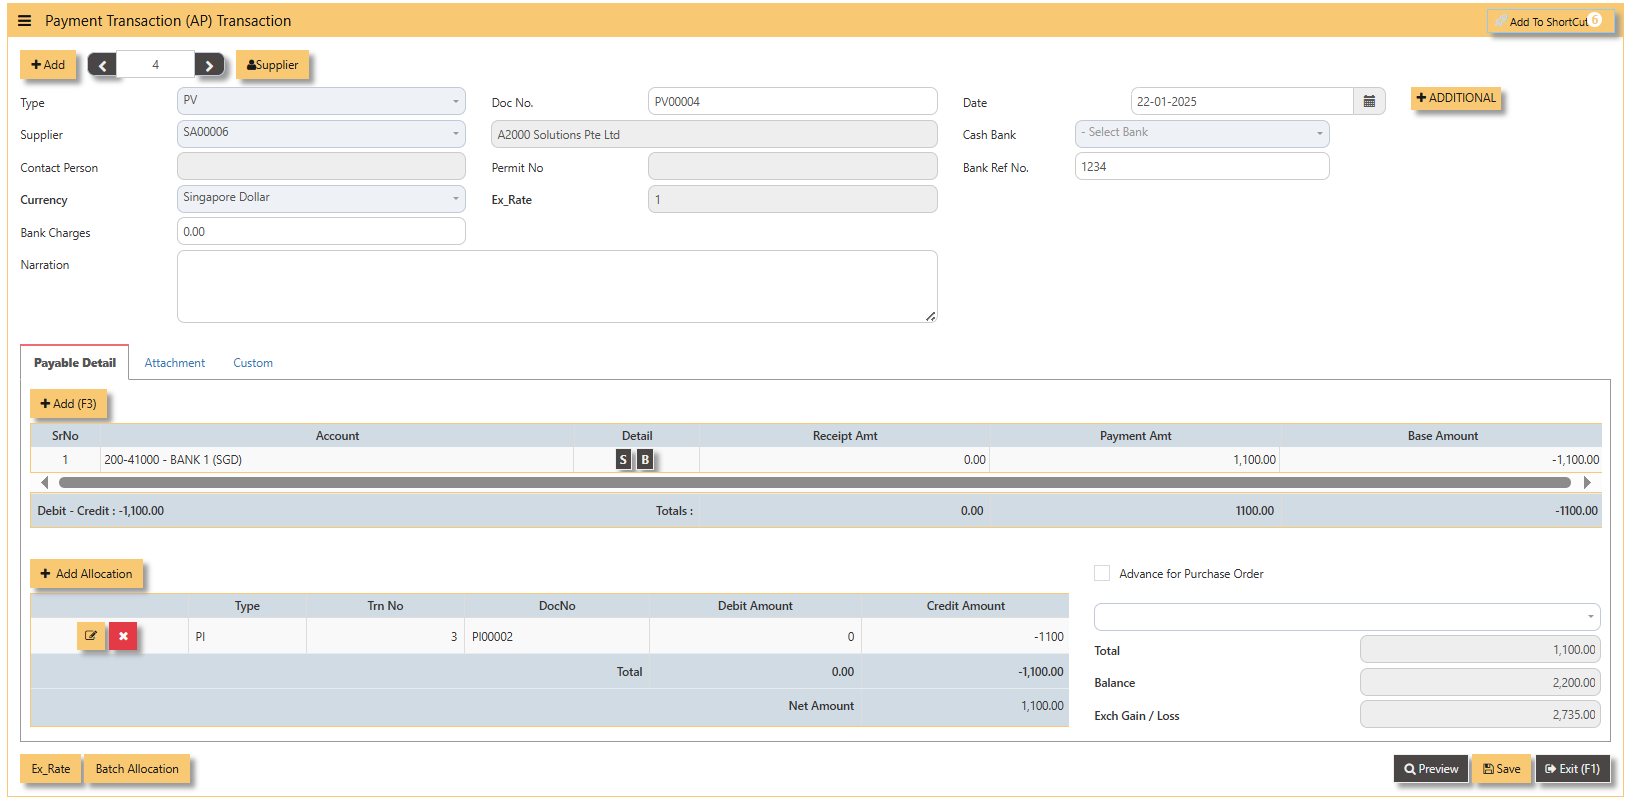
Payment Transaction (AP)
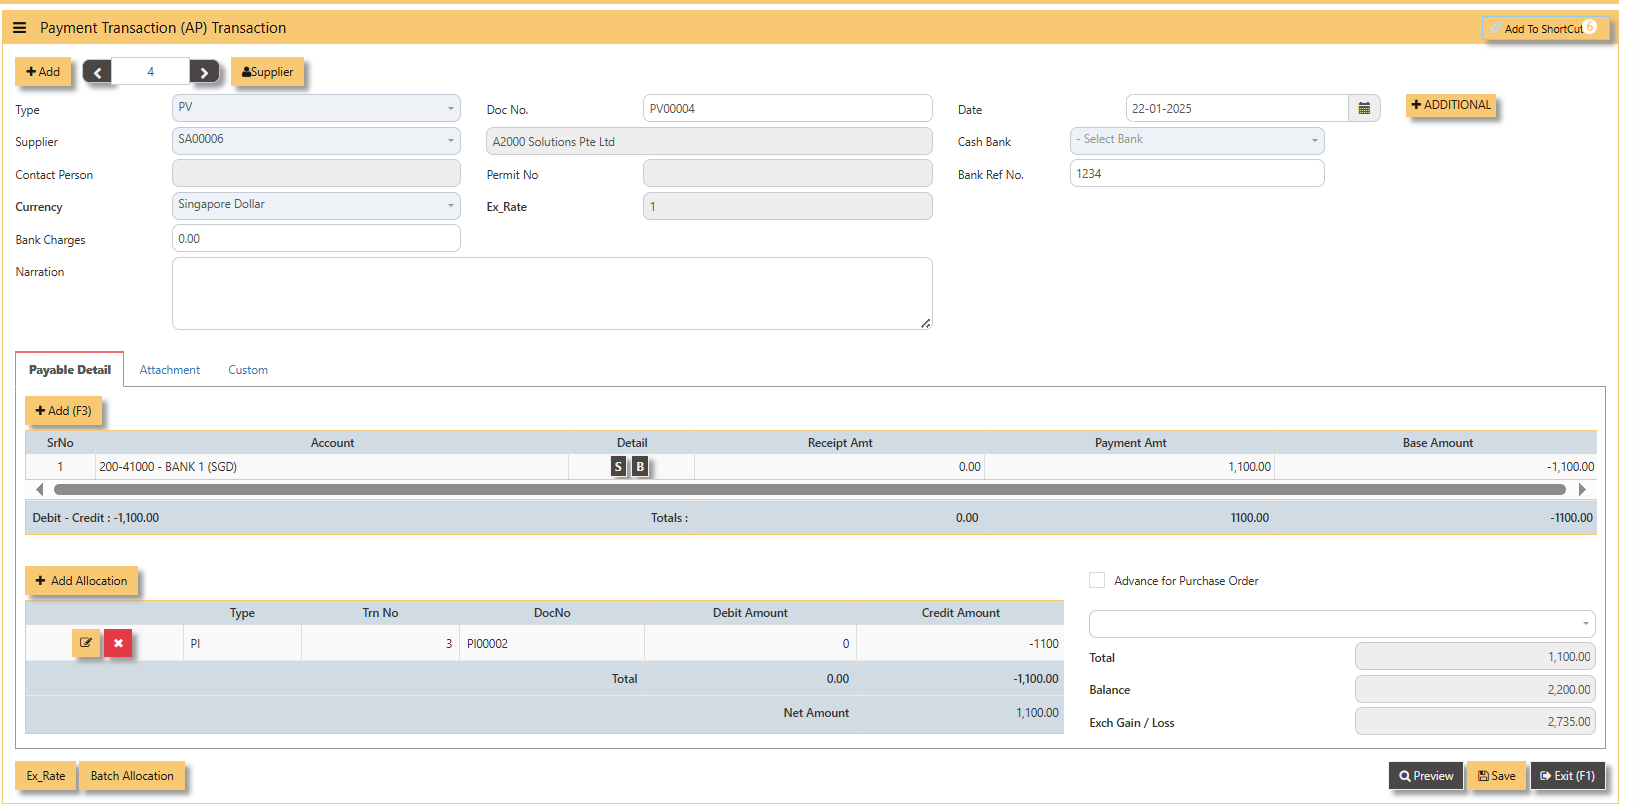
How to enter Payment Transaction (PV)?
A payment transaction is the process where funds are transferred from one party to another in exchange for goods, services, or obligations. It typically involves the payer providing payment information, which is then processed by a payment system or intermediary. Once the transaction is authorized, the funds are transferred to the payee, completing the exchange.
___________________________________________________________________________________________________
Steps to enter PV are as follow:
- Click on Payables – AP Operations – Payment Transaction (AP) and the following screen will appear.
2. Click on Add button to create a new transaction.
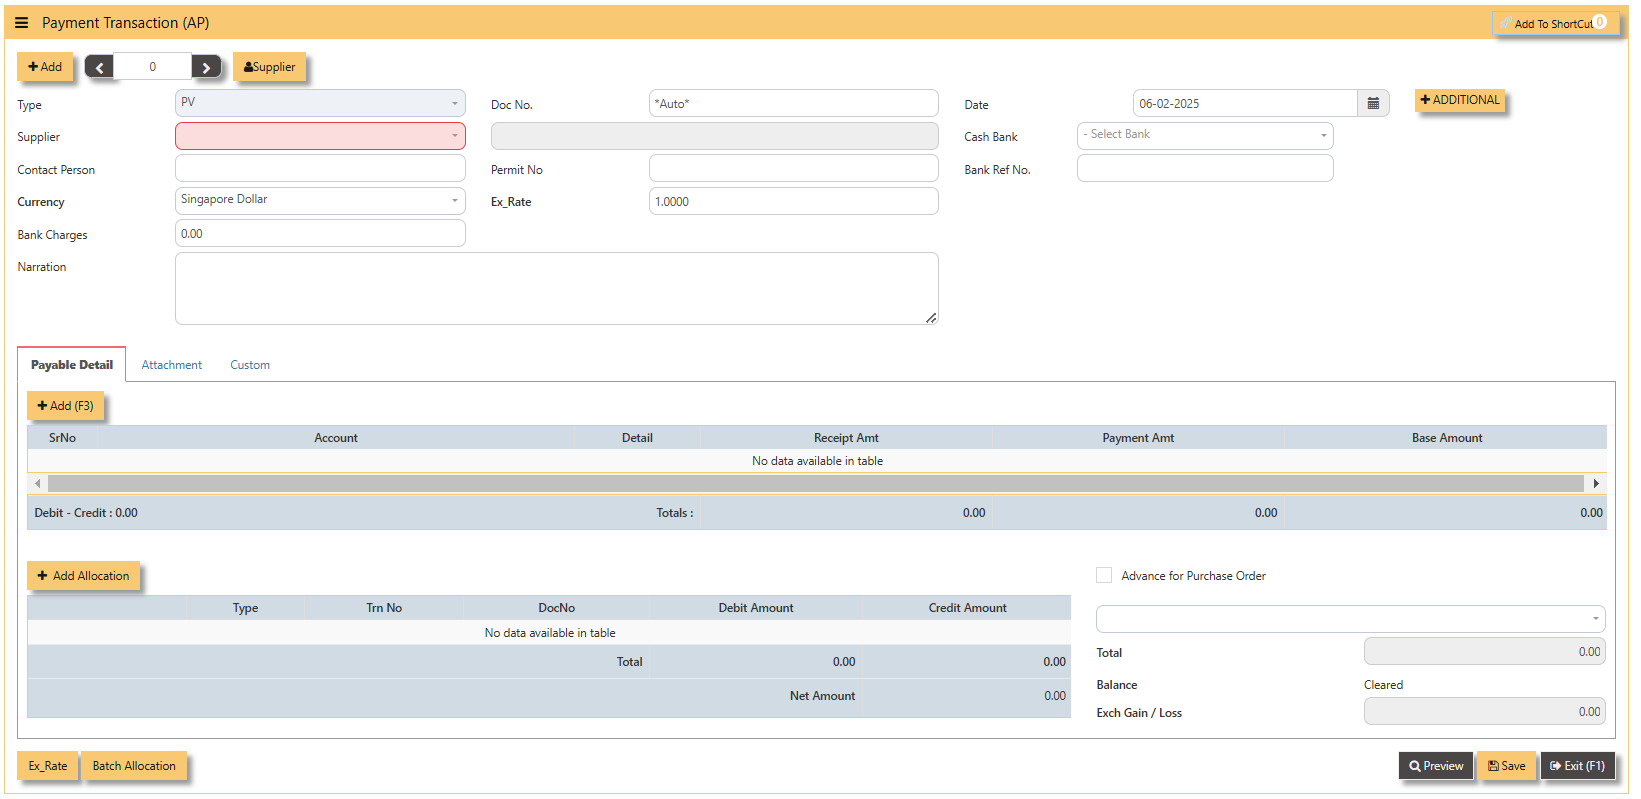
- Fill up the fields in the header section such as Date, Supplier, Contact Person, Currency, Exchange Rate, Cash Bank and Bank Ref No.
- Then select the account concerned at the detail section.
- Click for Additional Info for necessary details to add.
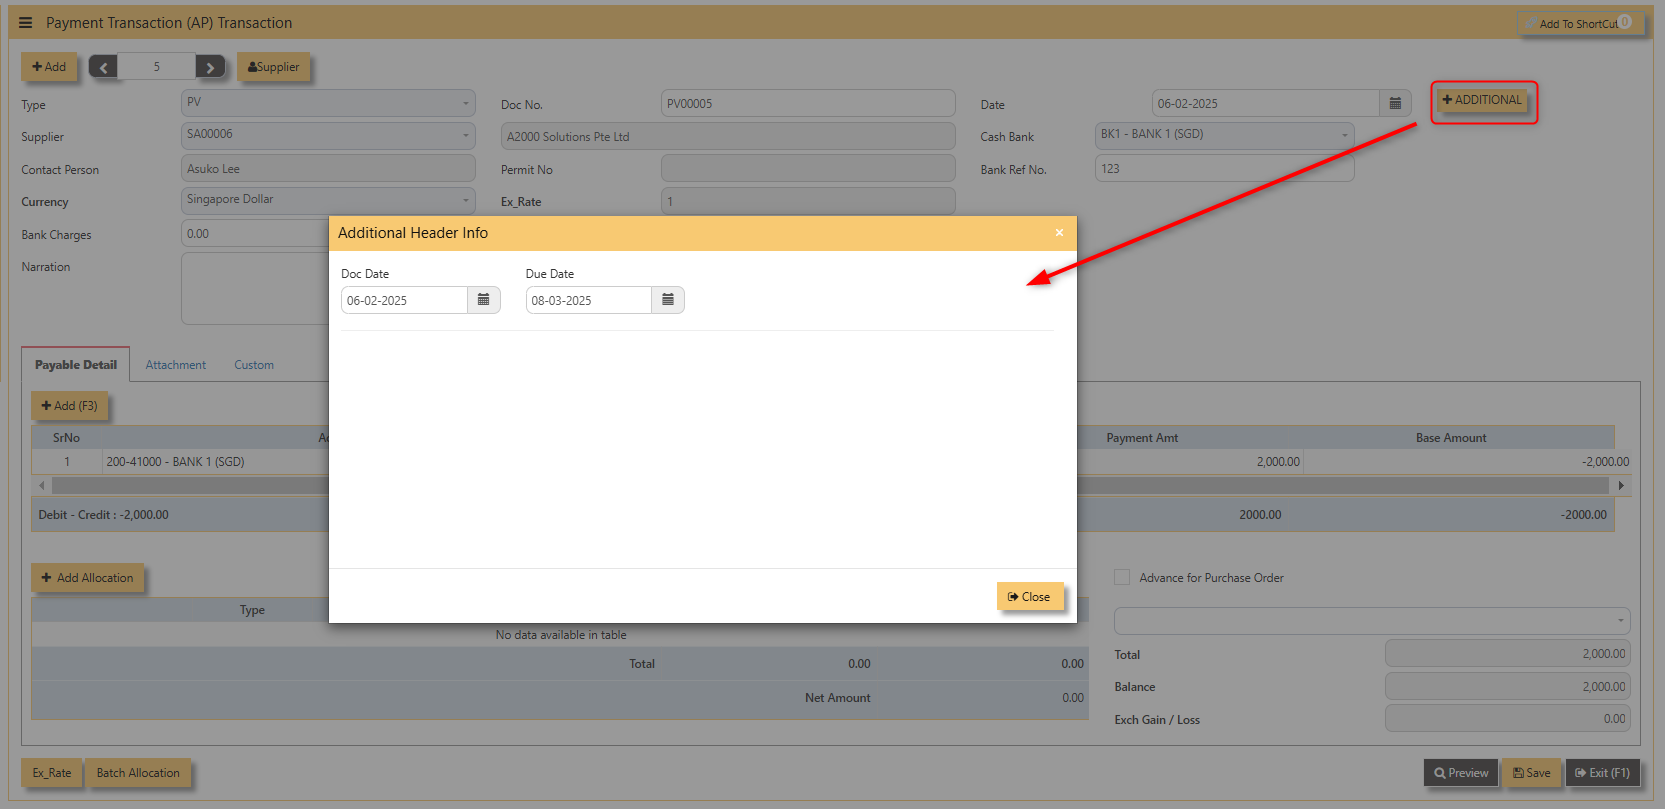
- Click on save button to complete the entry.
3. Below is a sample PV transaction screen.
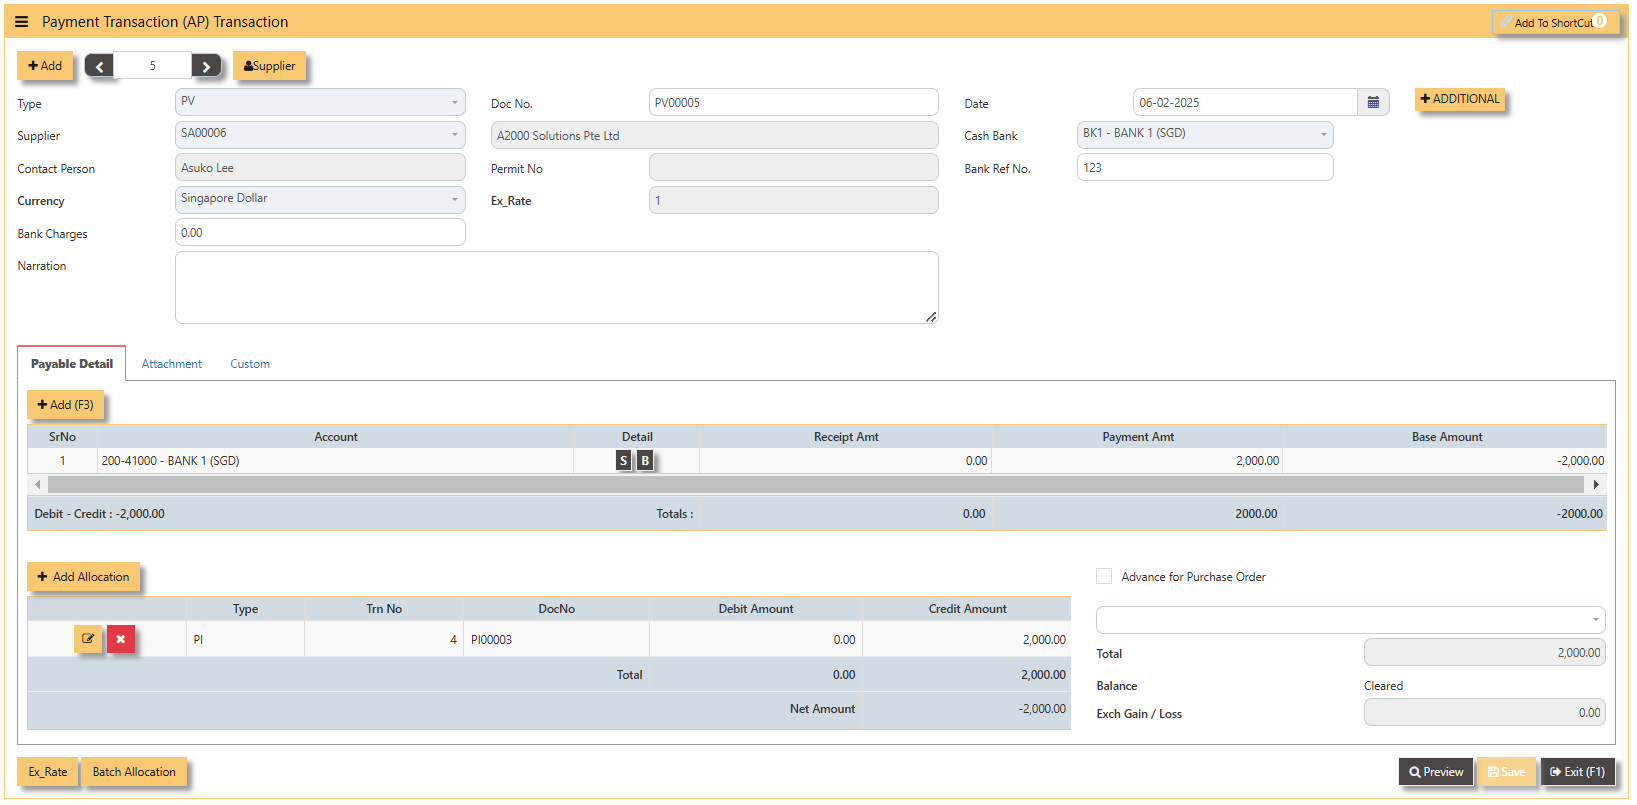
Additional Information:
- Ex Rate It will redirect you to Finance Tab. Attached link for further information. MASTERS GL | Support Doc
- Batch Allocation If you have a lot of transactions needed to allocate, you may use the batch allocation button to allocate transactions in a convenient way. Sample below.
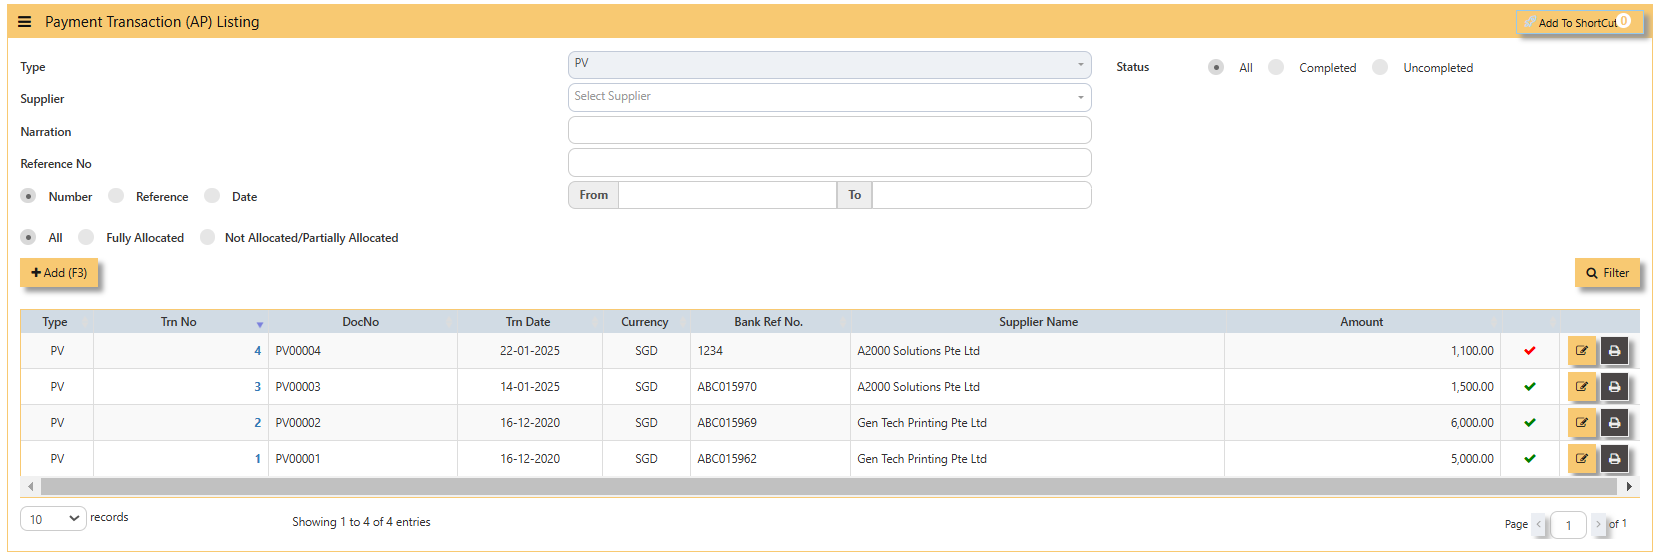
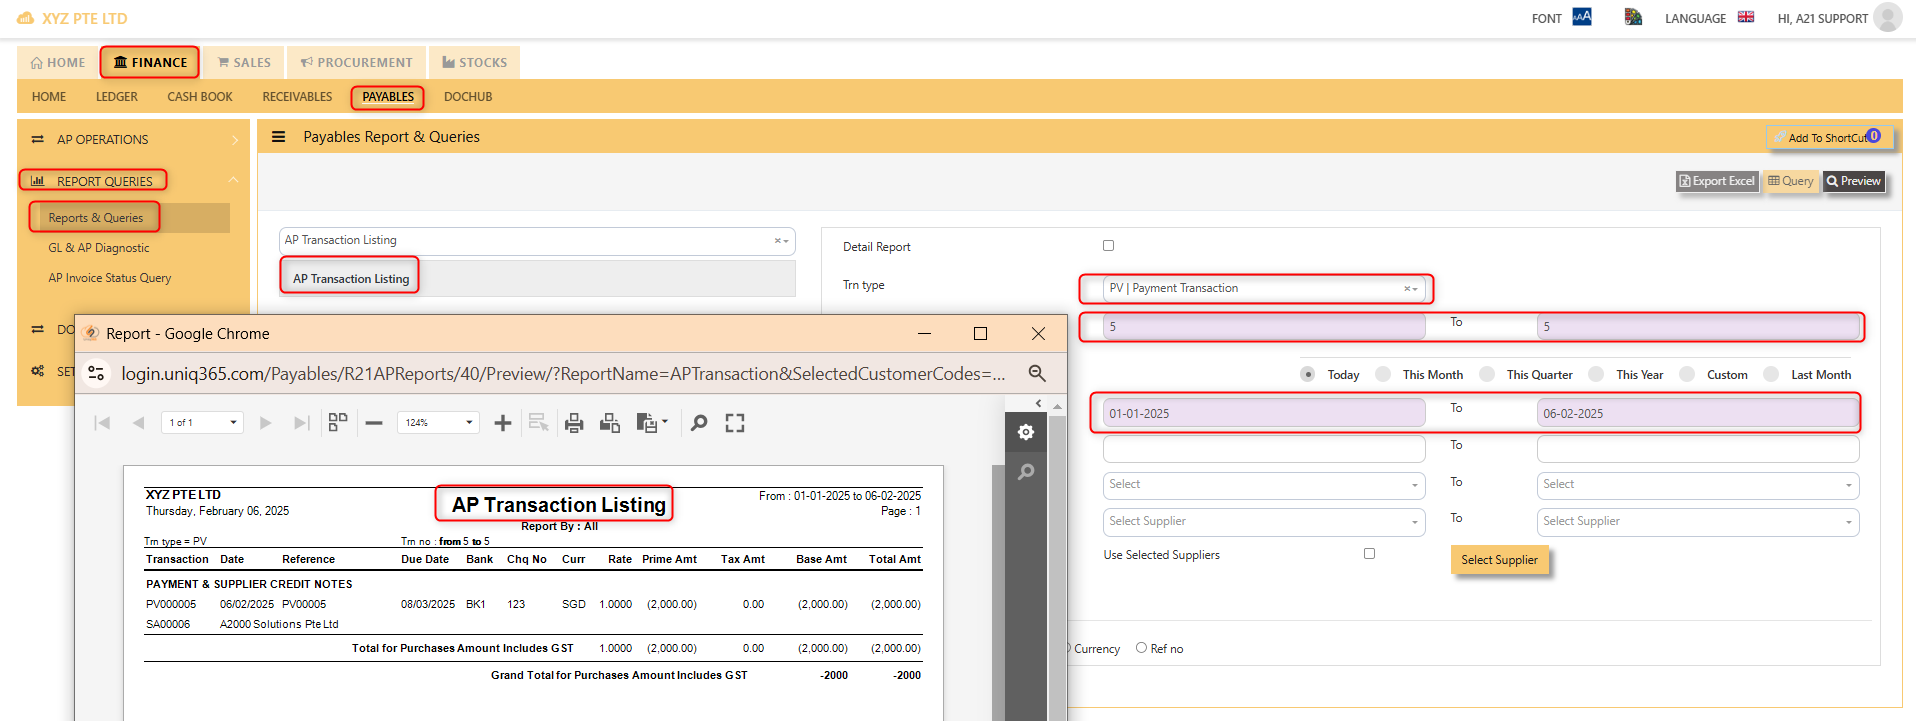
4. For the double entries of the PV transaction created, it can be verify under AP Transaction Listing.
Opening Balance
To start on a new database, AP Opening Balances must be updated in order for user to trace all the outstanding supplier invoices at the start of the 1st financial year.
Important: The total amount entered under AP Open Item must tie with the opening amount in the General Ledger Opening for Trade Creditor Control Account/(s) if the Posting Type selected in Payable Control Account is Supplier.
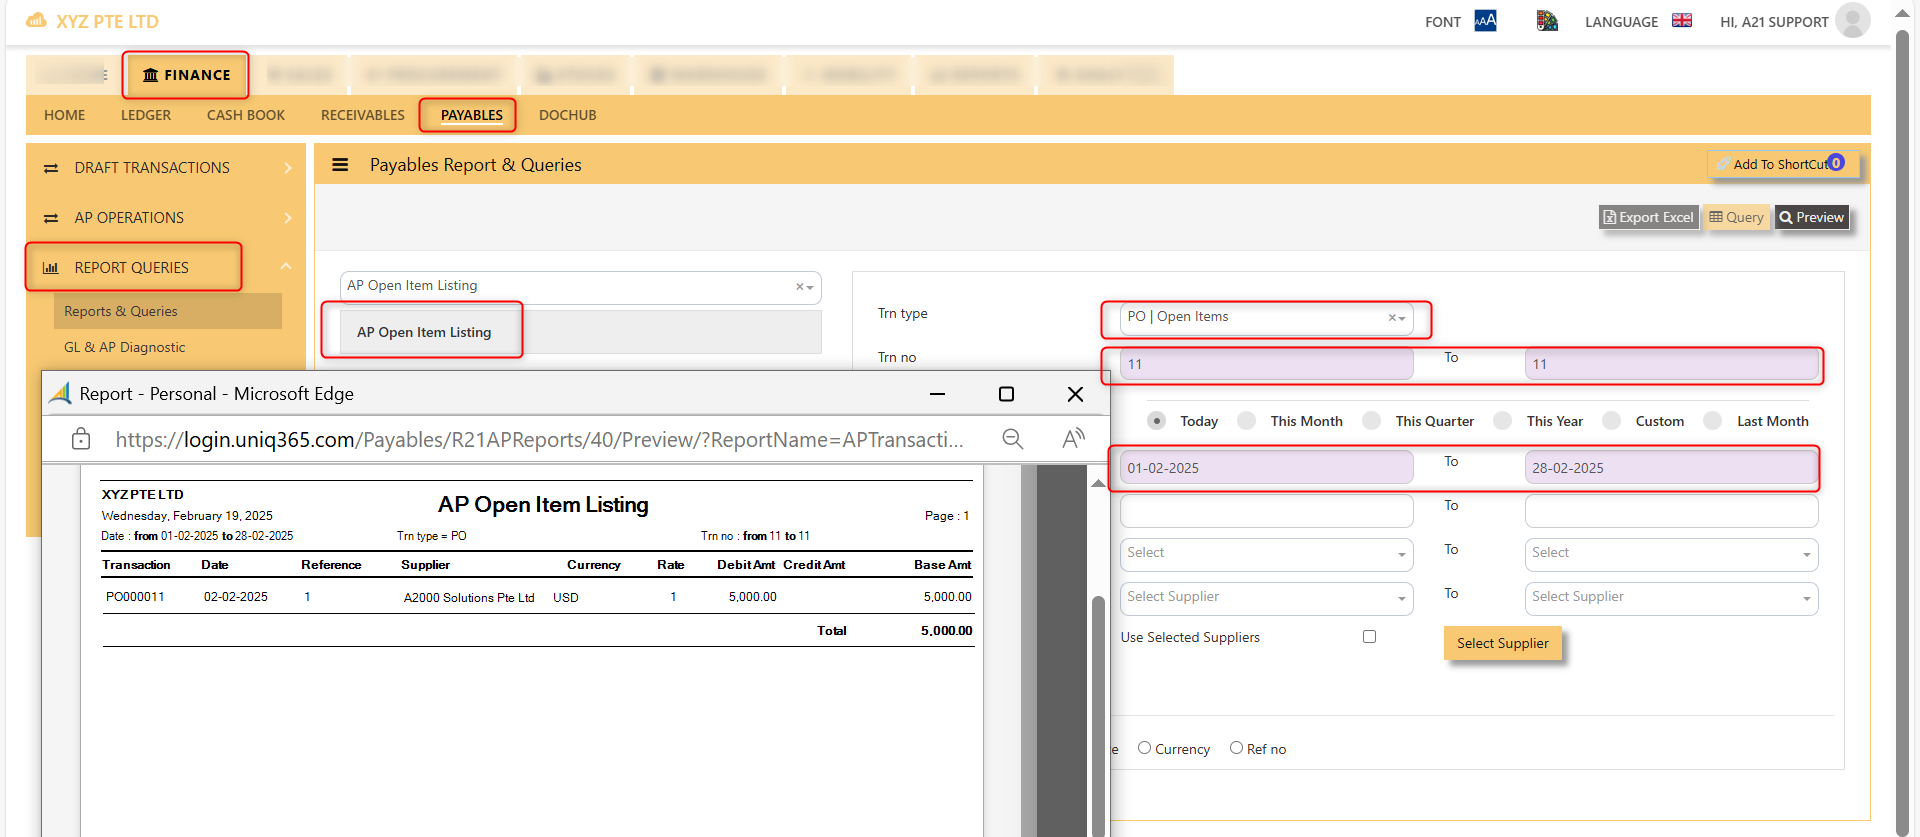
You may use the report under Payables – Reports & Queries – AP Open Item Listings to tie the figures.
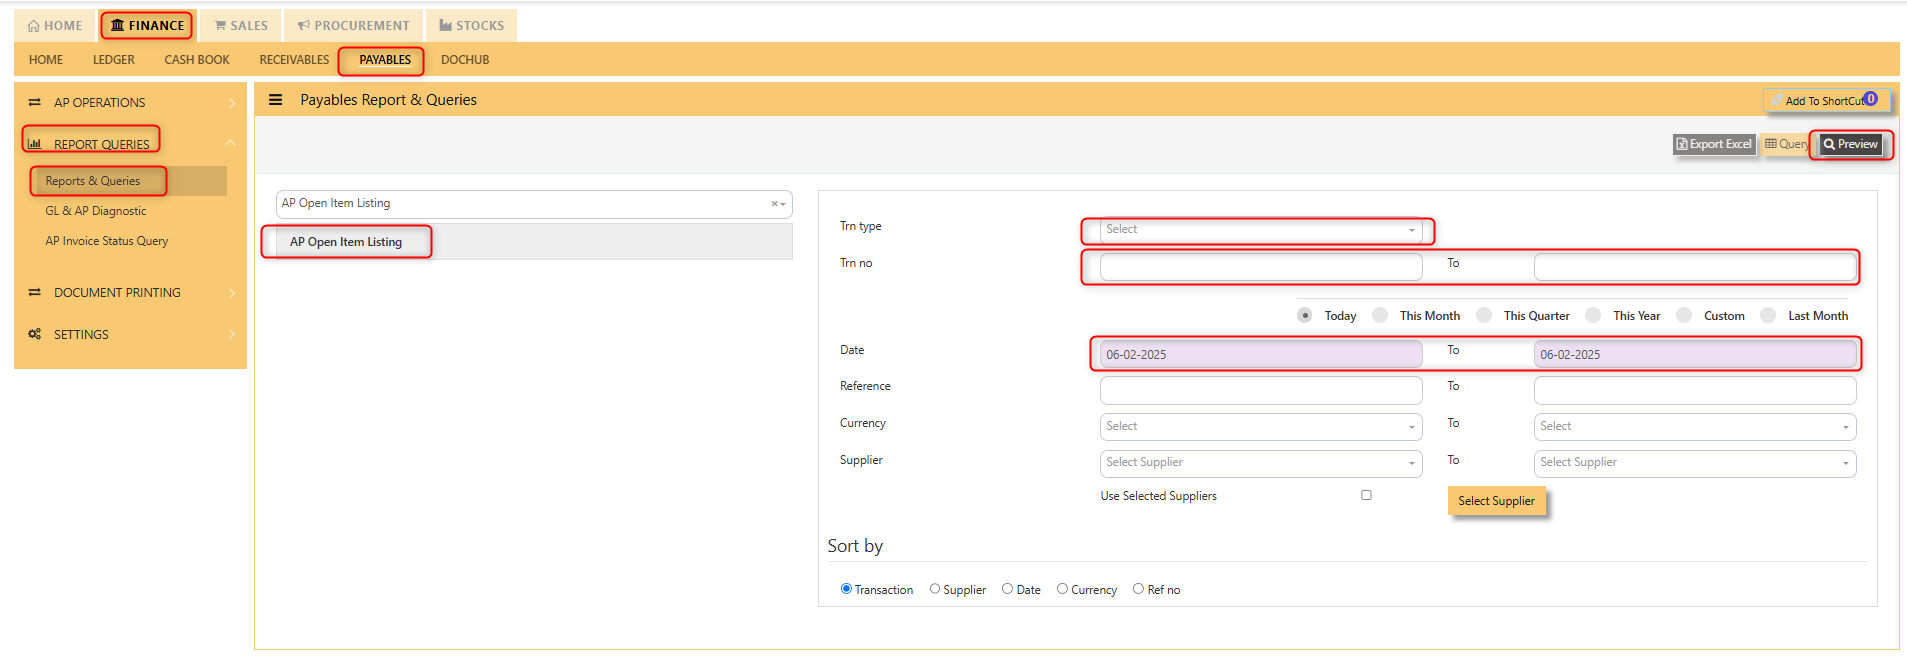
Below is the Account Payable – Opening Items screen. There is NO double entry posting for this option. The records entered will be retained for current year usage like allocations, verification of outstanding invoices etc.
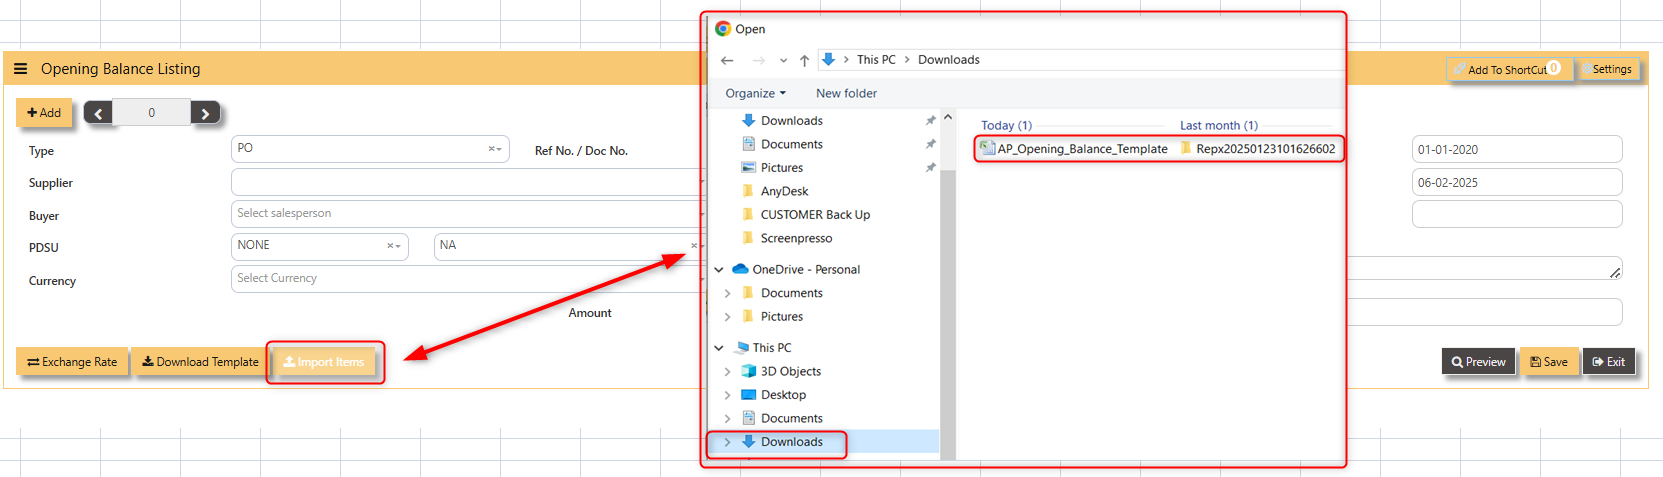
1. Click on Payables – AP Operations – Opening Balance and the following screen will appear.

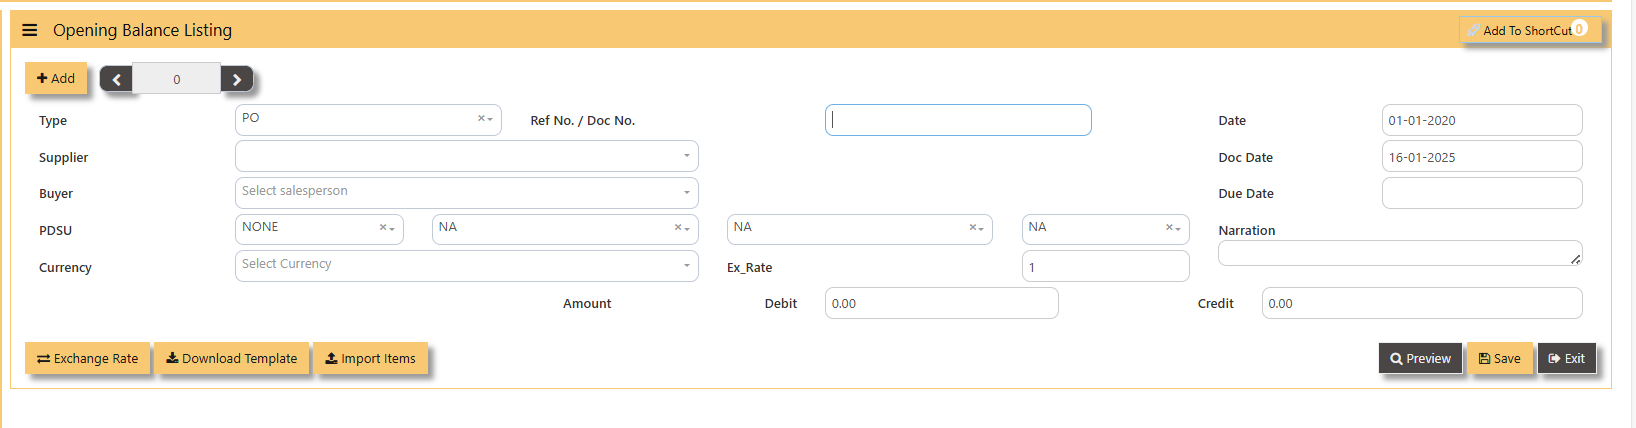
- Fill up the fields such as Ref No, Date, Dock Date, Due Date, Supplier, Buyer, PDSU, Currency, Exchange Rate, Narration, and amount.
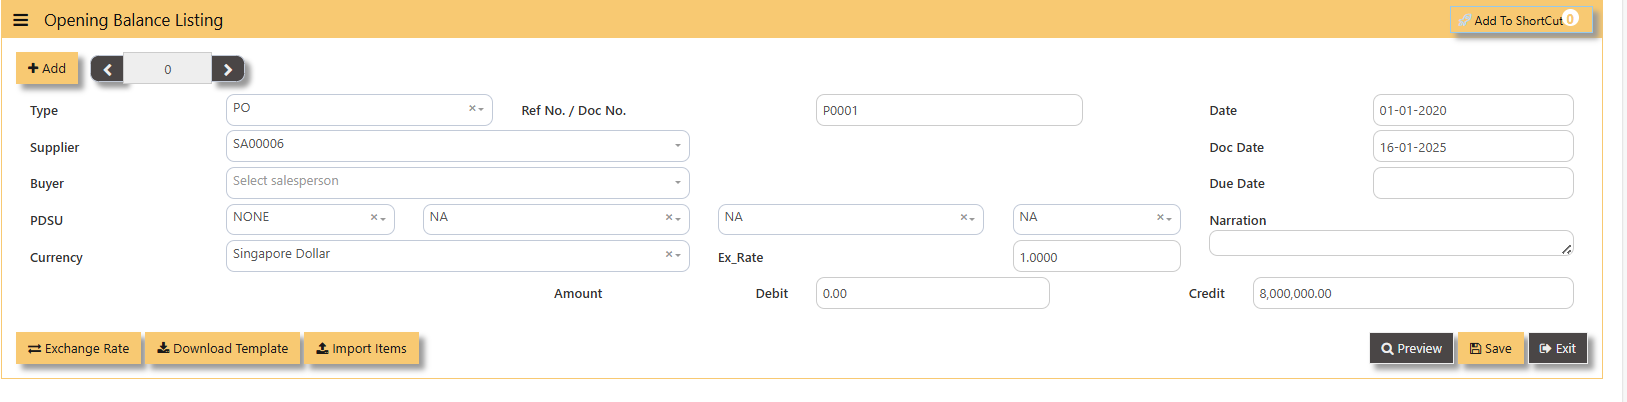
Note: The date must be the actual date of invoices concerned in order for the system to capture the correct supplier aging. If supplier invoice the amount is credit side and if is a supplier credit note is a debit side.
Additional Information:
- Ex Rate It will redirect you to Finance Tab. Attached link for further information. MASTERS GL | Support Doc
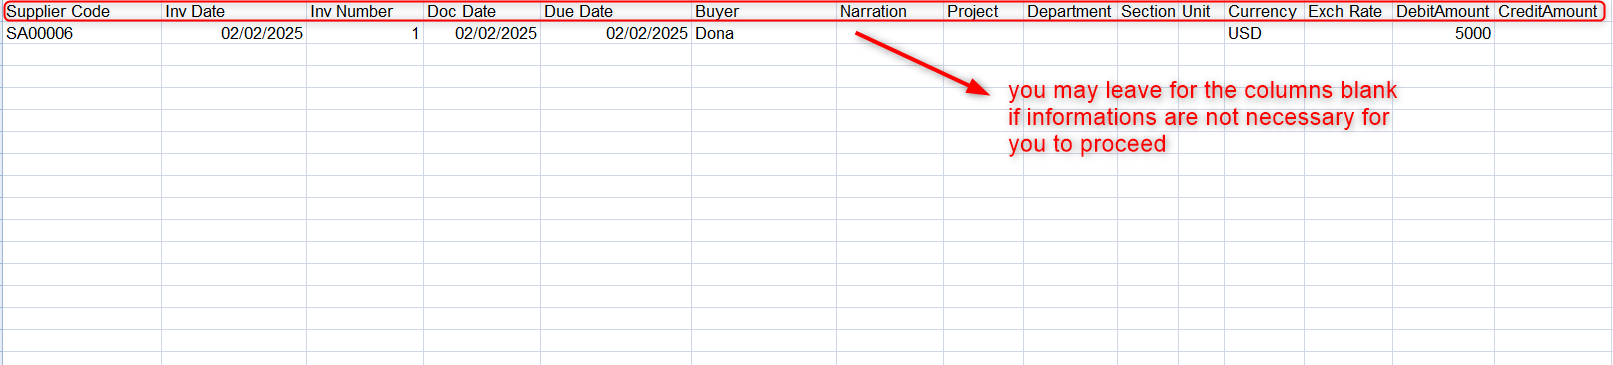
- Download Template Once you click for the Download Template, it will auto download the Excel File.
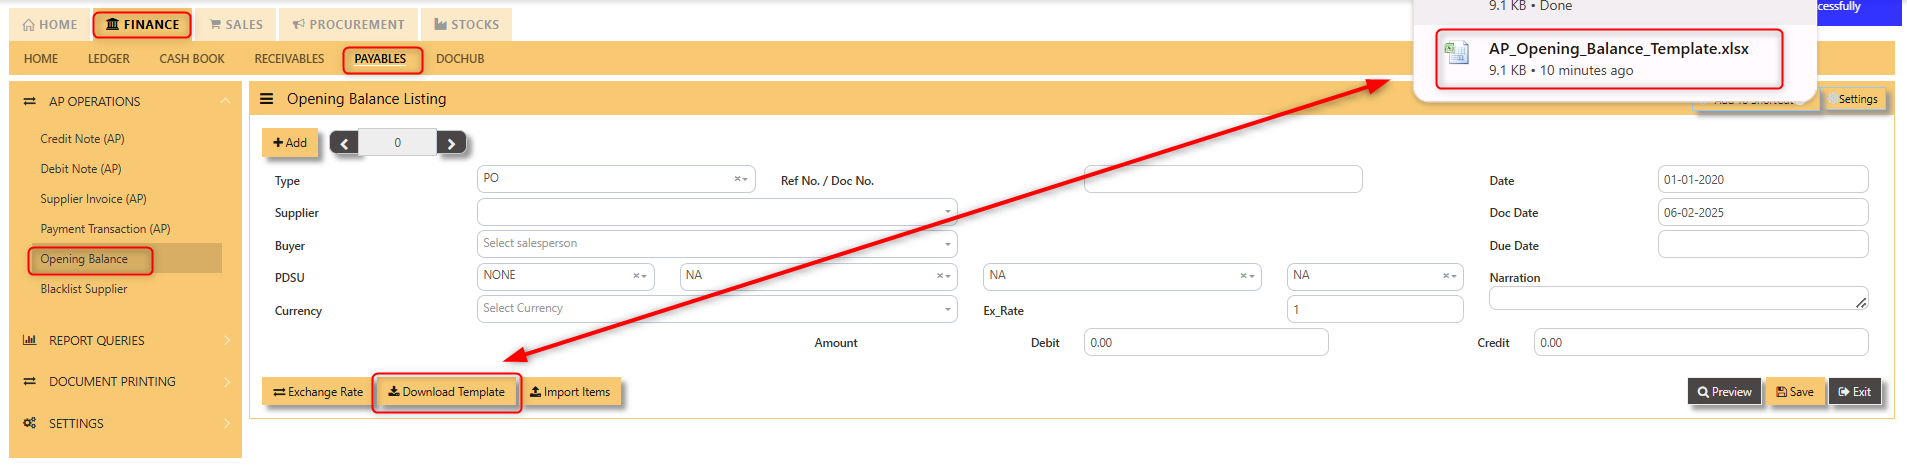
Ensure the Excel file you plan to upload is formatted correctly. It should contain all these fields:
- Supplier Code
- Inv Date
- Inv Number
- Doc Date
- Due Date
- Buyer
- Narration
- Project
- Department
- Section
- Unit
- Currency
- Exchange Rate
- Debit Amount
- Credit Amount

___________________________________________________________________________________________________
How to Import Items?
1. Click Import Items, this opens a file browser or prompt you to select the Excel file you want to upload.
- Sample excel file below generated from the system,
2. After successfully import of the excel file above, you may verify the entry in AP Open Item Listing,
Blacklist Supplier
This option enables user to blacklist customers and suppliers. Once a supplier is black-listed, user will be blocked from entering any purchase transactions for the supplier concerned.
___________________________________________________________________________________________________
How to enter Blacklist Supplier?
Steps to enter Blacklist Supplier are as follow:
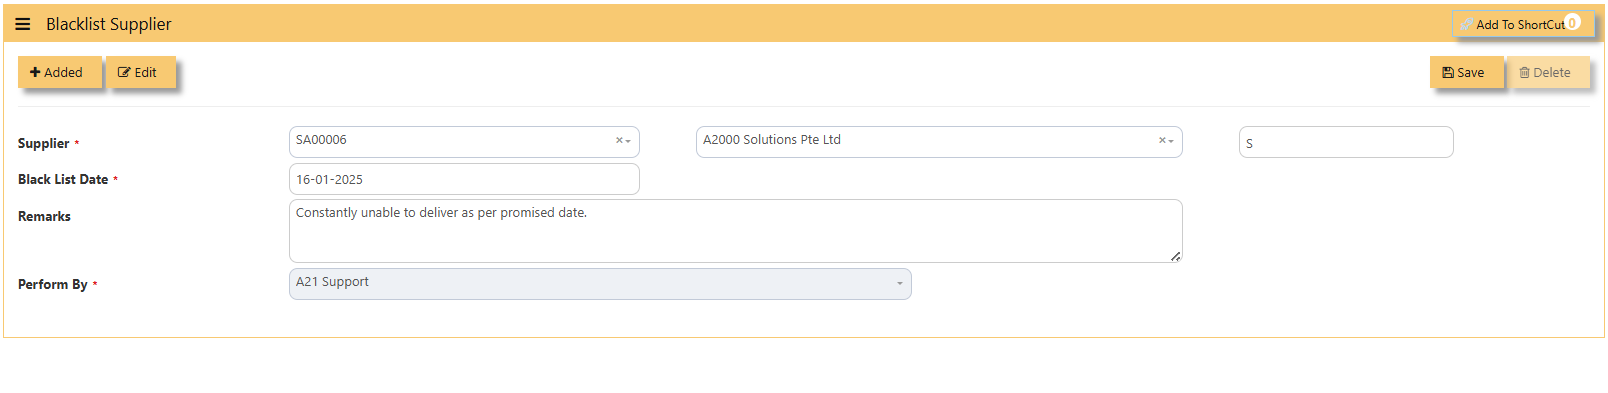
1. Click on Payables – AP Operations – Blacklist Supplier for the entry screen.
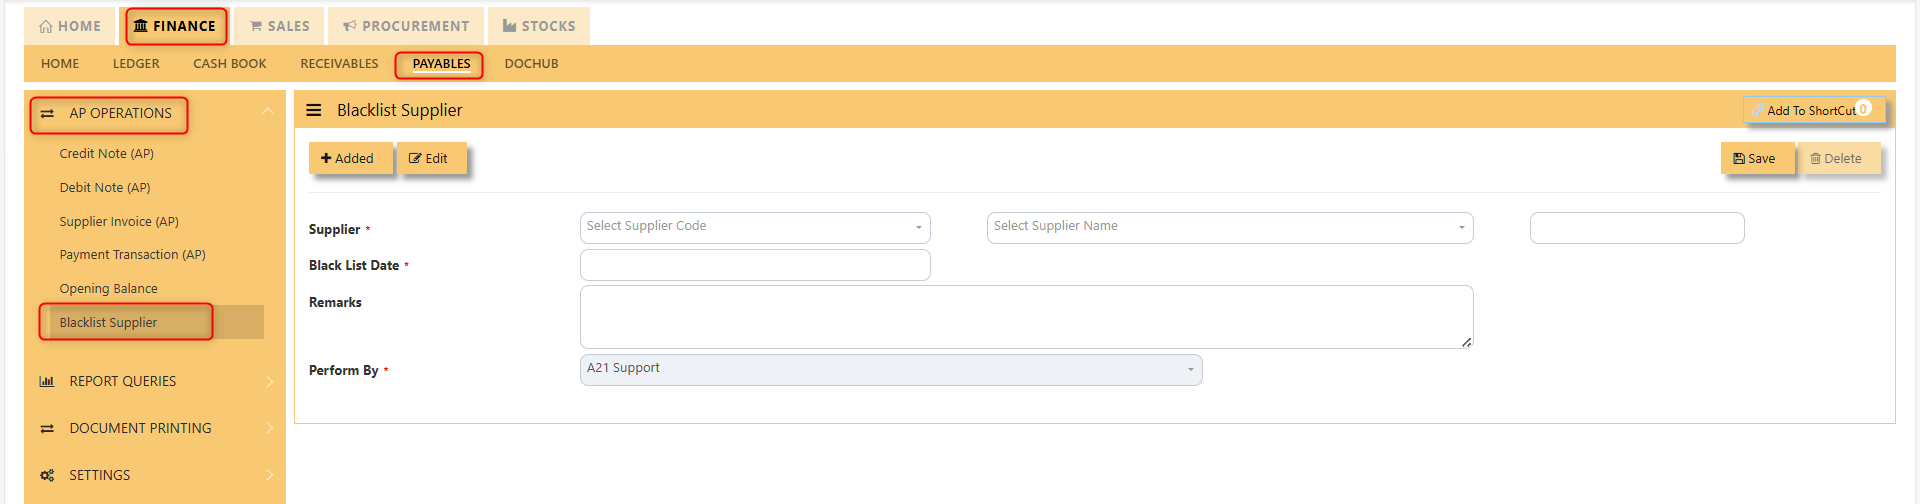
2. Click on Add button. Select the supplier from the drop-down list, enter the Blacklist date, key in the Remarks and select the A2000ERP user who performed the entry.
Screen below is an example of the entry,
- To delete a supplier from the blacklist record, user must click on Edit button, select the supplier concerned, and then click on Delete button to clear the record.
Report Queries
Report Queries
The reports & query screen shown here opens the options for the users to print important reports related to the payables/purchase modules.
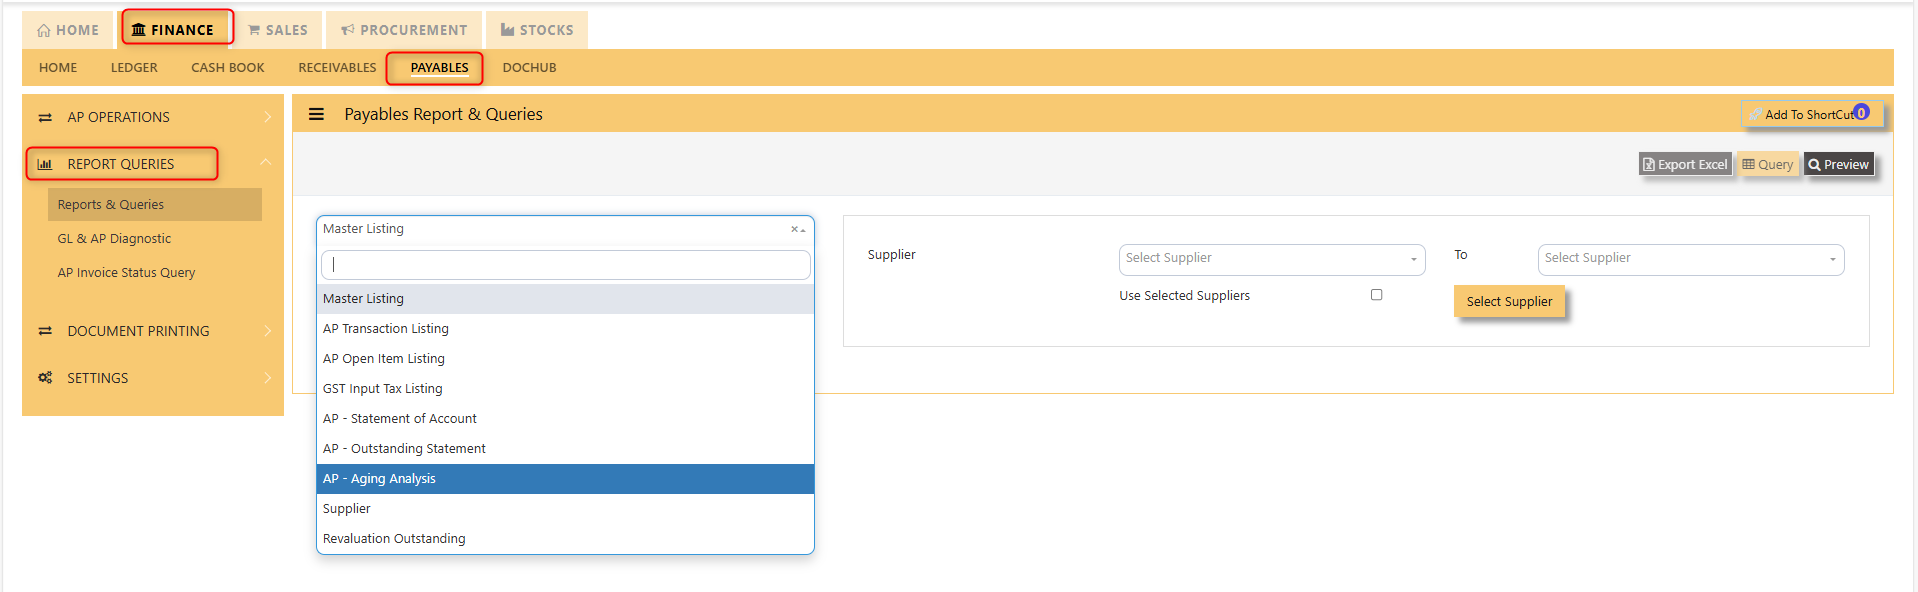
The main documents are the Statement of Account, Outstanding Statement and the Aging Analysis. These reports will enable the users to see the outstanding amount due to the suppliers, the transactions made as well as the aging report of outstanding transactions.
GL & AP Diagnostic
This screen will help you identify transactions that causes unbalanced of your GL Code and AP Accounts.
- Click on Payables – AP Operations – Report Queries - GL & AP Diagnostic and the following screen will appear.
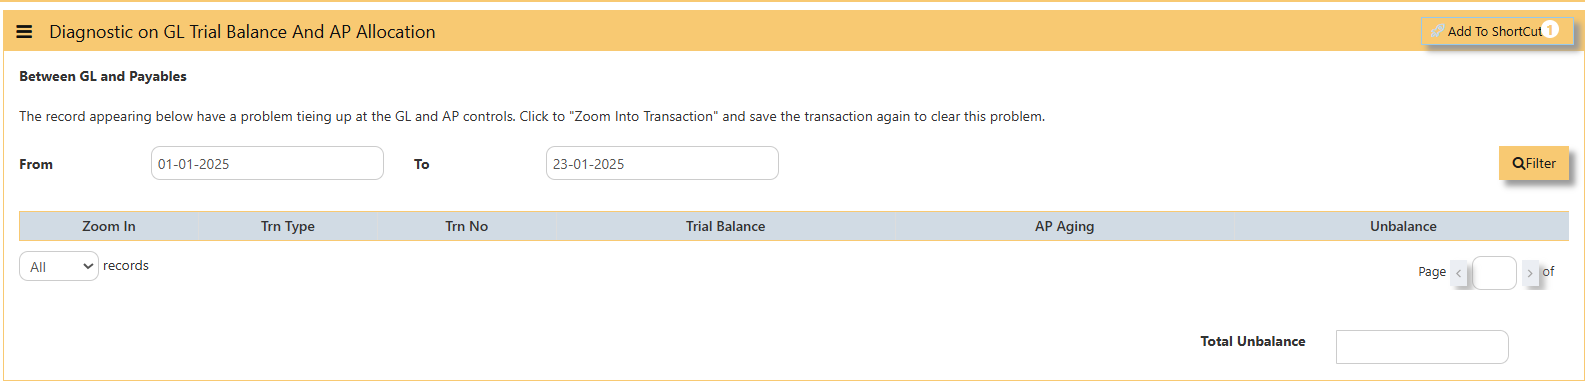
- Must filter the From To Date accordingly when was the unbalanced started and click filter so system will show you transactions that causes your unbalance if any.
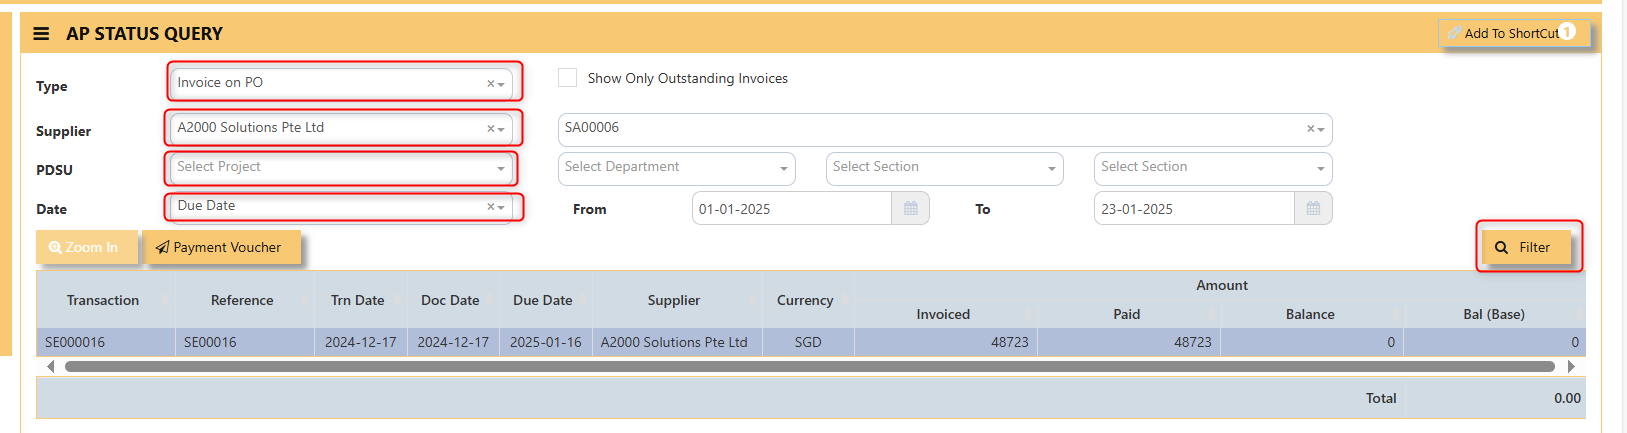
AP Invoice Status Query
This screen will show AP Invoices such as how many were invoiced, paid and its remaining balance.
- Click on Payables – AP Operations – Report Queries - AP Invoice Status Query and the following screen will appear.
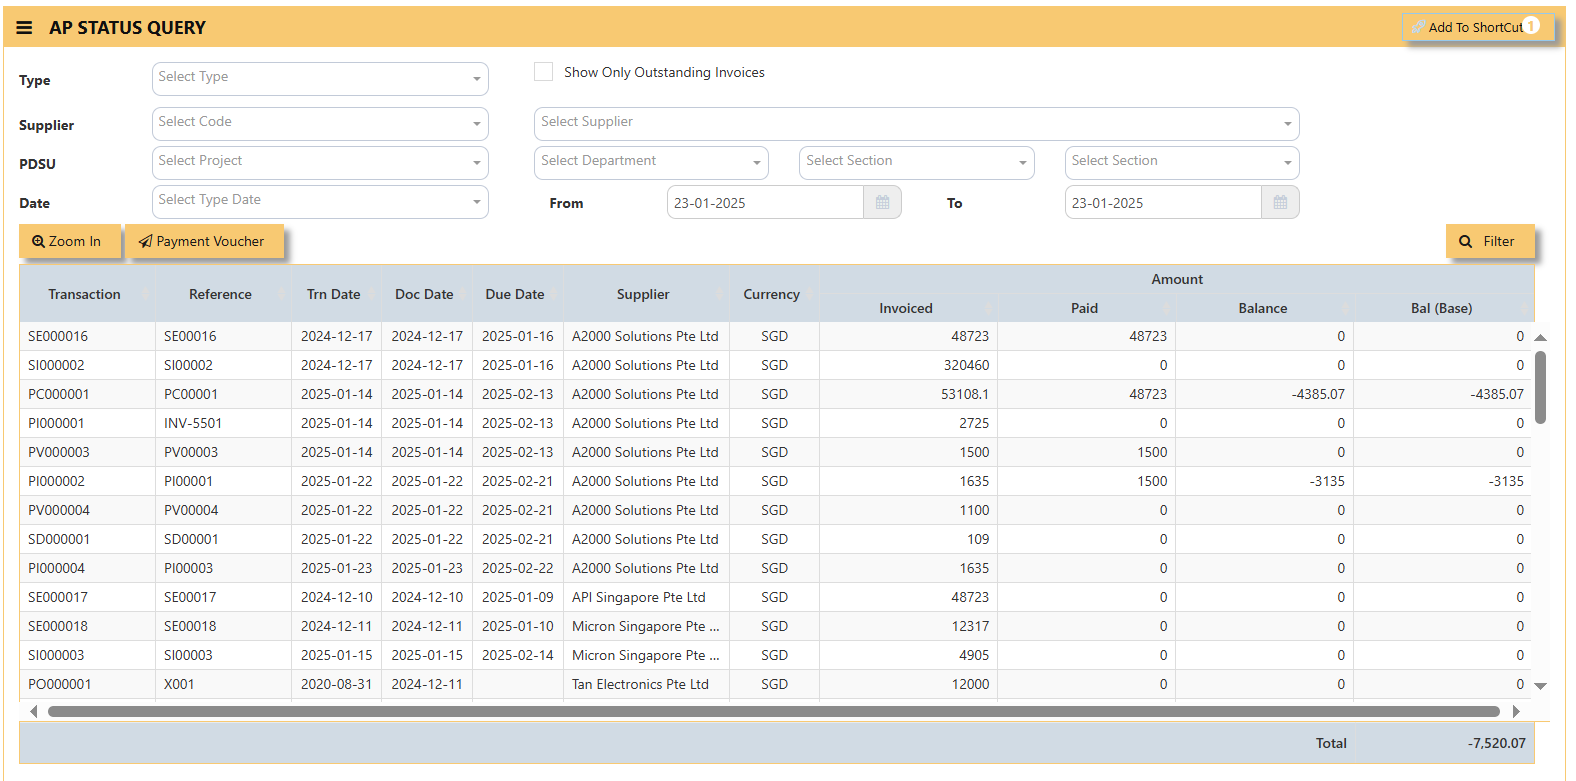
- Filter accordingly the necessaries such as Type of transaction, tick show only outstanding invoices if you want to, Supplier, PDSU if any, Type Date and Filter.
Below photo as a sample,
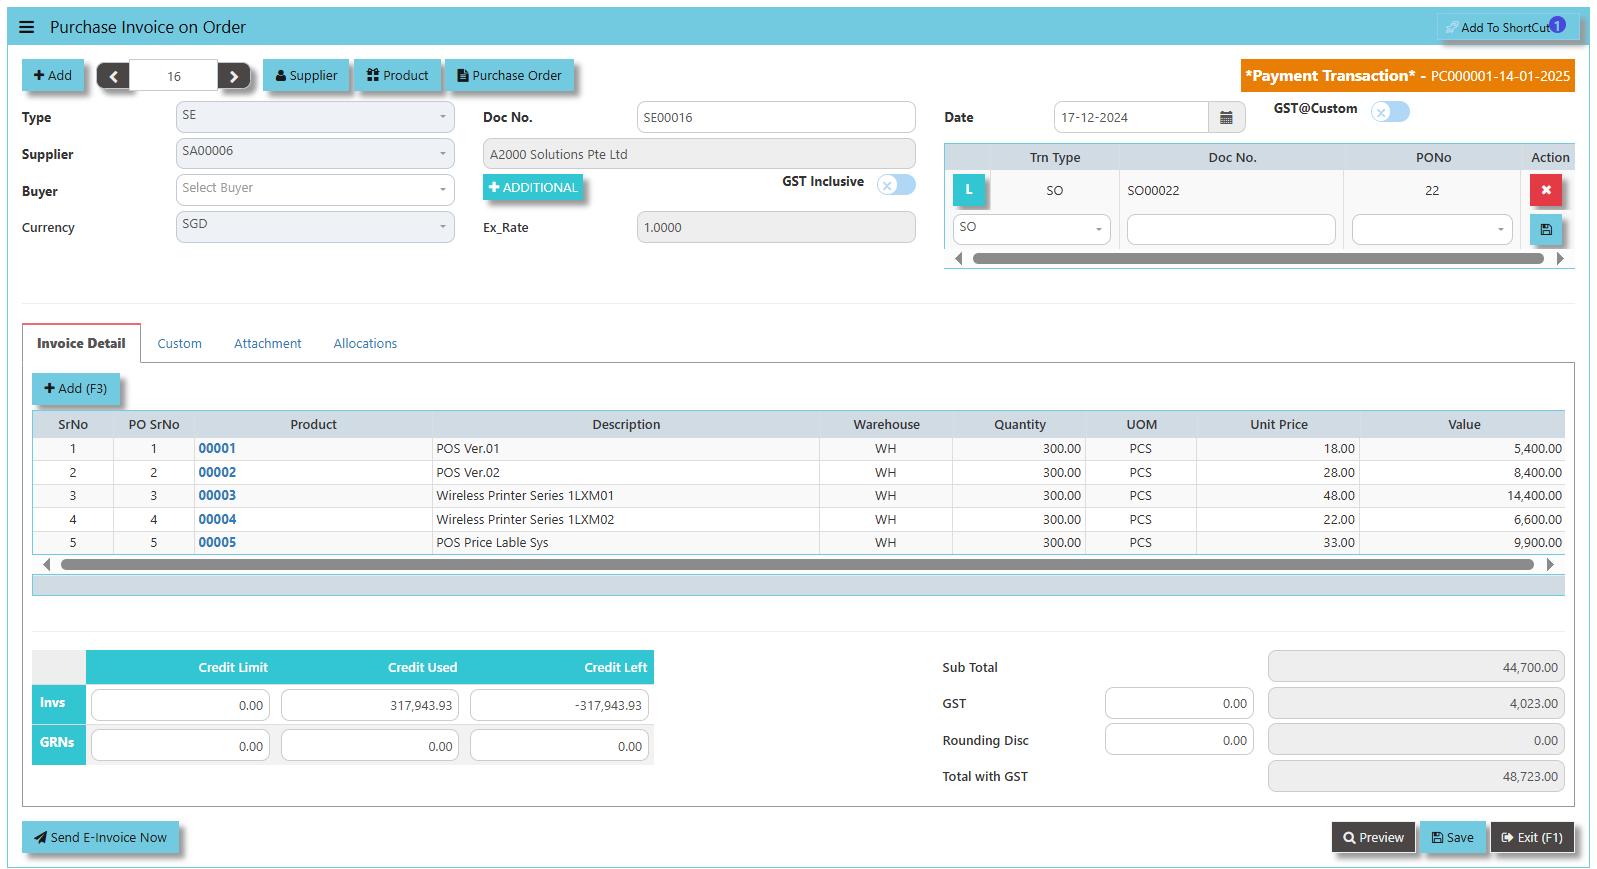
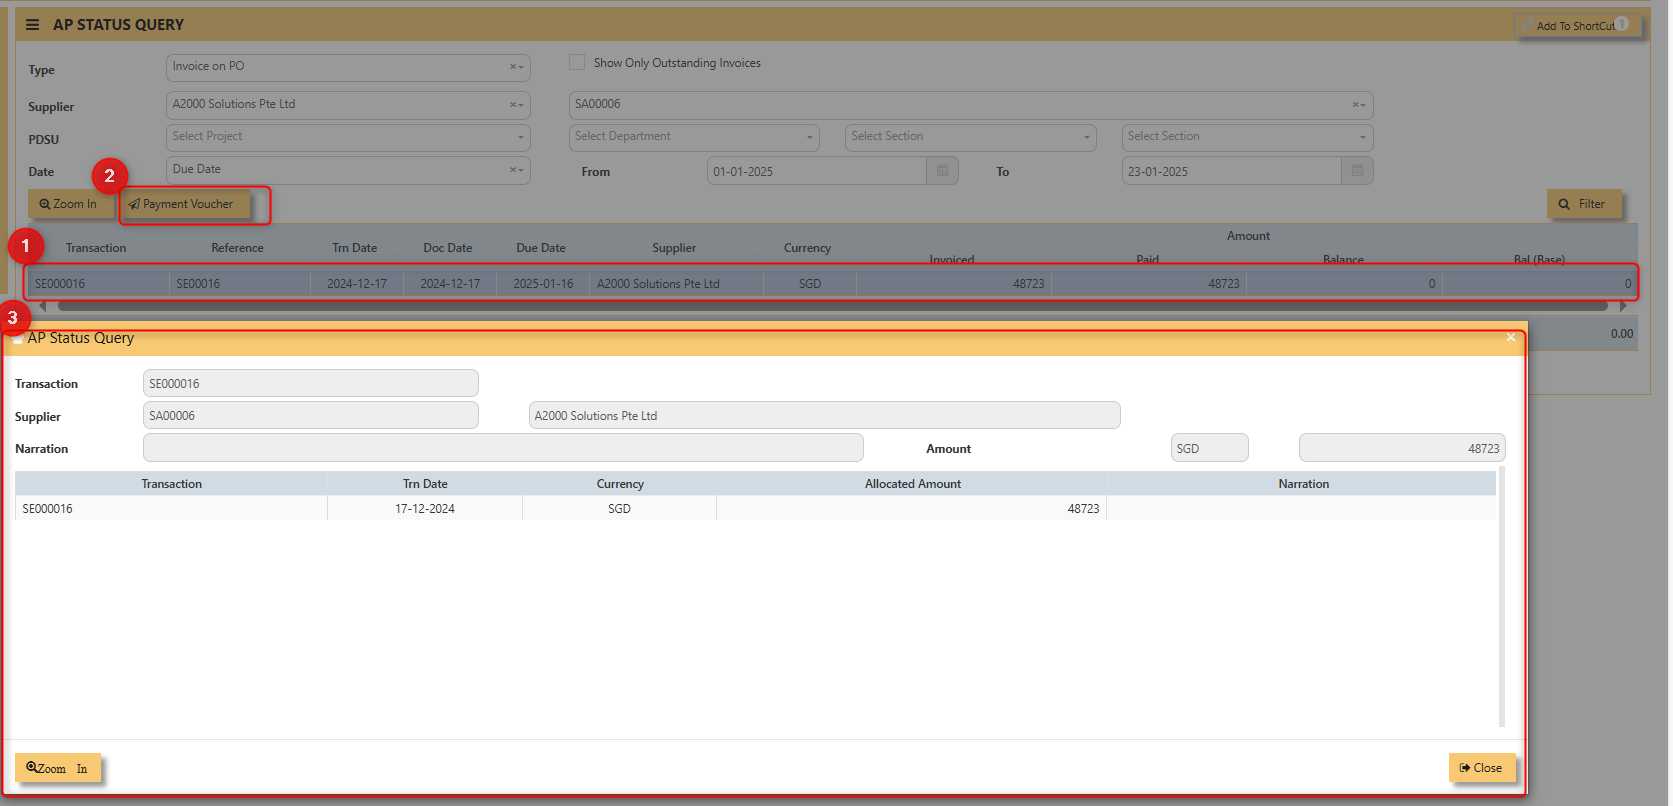
- You may click ZOOM IN and it will redirect you to the transaction itself.
- Meanwhile, when Payment Voucher is click, following screen will appear.
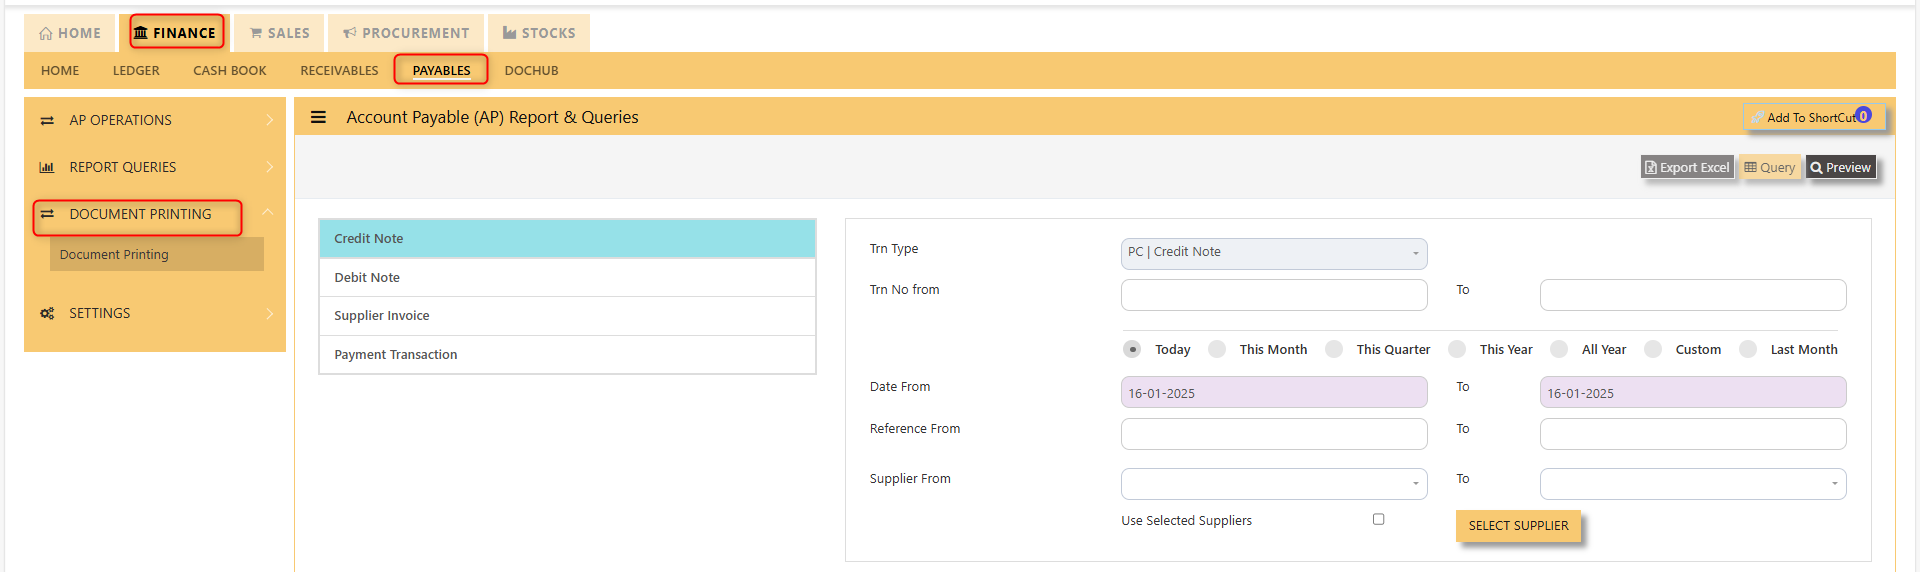
Document Printing
The Document Printing screen shown below enables user to preview and print a range of AP Transactions.
User must select the transaction type concerned as per example in screen below. If a specific range of transaction numbers needs to be printed, user must indicate the range in Trn No From and To fields.
Please note that the Trn No range selected must be within the date range.
Settings
Supplier Maintenance
The Supplier Maintenance is used to enter master records of suppliers. The information regarding a supplier such as Supplier Code, Name, billing address, credit limit, pricing information, shipping addresses and the account posting details are entered here.
___________________________________________________________________________________________________
How to create Supplier records?
Details:
Click on Finance - Payables – Settings – Supplier Maintenance for the following screen.
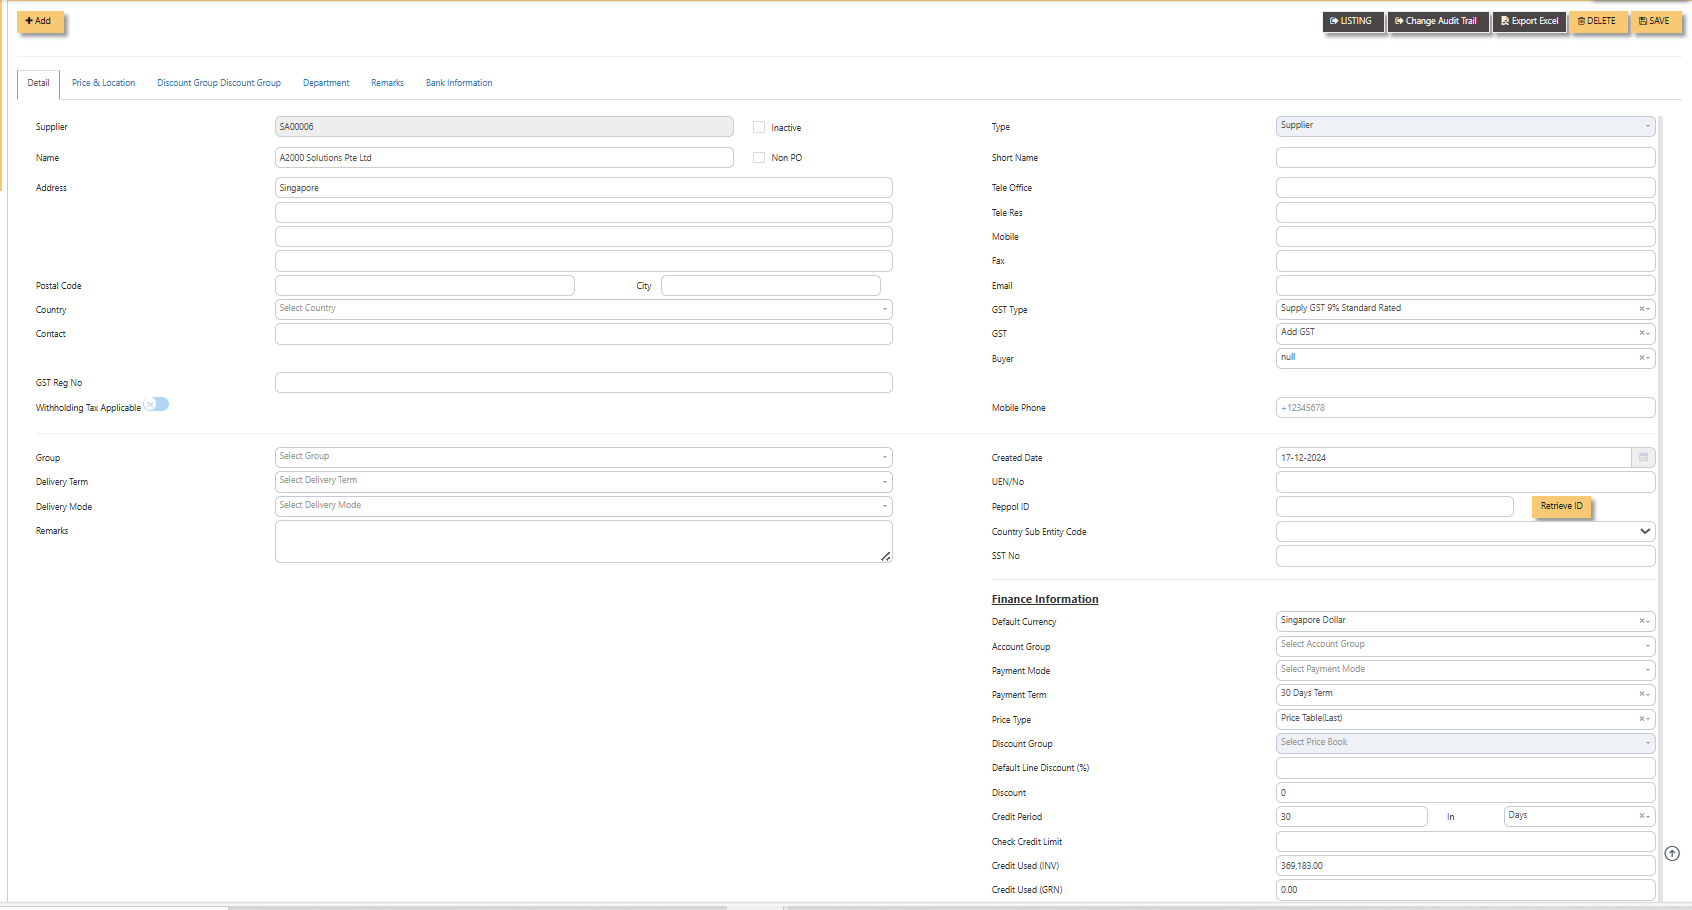
- Supplier (mandatory) Enter the code for new supplier. This is a 10-character alphanumeric field.
- Type Select S for Supplier or B for Both Customer & Supplier.
- Name (mandatory) Enter the name of the supplier.
- Address (mandatory) Enter the billing address of this supplier.
- Postal Code Enter the postal code of the supplier's address.
- Contact Enter the contact person's name.
- Account Group (mandatory) If the Account Posting Setting is set based on Supplier‟ Posting Type, then click to select the relevant Account Group that is defined under Payables - Maintenance.
- Group Click to select the reporting group.
- Delivery Term Click to select the Delivery Term.
- Delivery Mode Click to select the Delivery Mode.
- Payment Term Click to select the Payment Term.
- Payment Mode Click to select the Payment Mode.
- Sales Tax Type Select the Sales Tax type that will apply for this supplier. For example, if this is an Export supplier in USA, then the GST for this purchase will normally be zero-rated. Once Zero-GST is selected here, the next time this supplier's invoice is entered, the GST type will be captured automatically.
- Default Currency Select the currency that this supplier normally transacts in. For a USA based supplier, the default currency is in US Dollars. In the case of Japanese suppliers, it will be Yen.
- Price Type Please refer to procurement module for further information with Price Type
- Discount Enter the discount in percentage given by this supplier. For example, a particular supplier normally gives 10% off List Price for all the items supplied. User could then enter 10% in this field. The system will capture the discount
every time an invoice is raised for this supplier. Hence, you need not remember each and every of your supplier's discount rate. - Credit Period Enter the number of days, weeks or months that this supplier gives as credit period.
- Credit Limit Enter the Credit Limit of supplier. This is a numerical field that will enable the system to check and block
payable/purchase entries once the figure reaches the limit, provided the required setting is done in System Manager – System Utilities – System Settings. - Credit Used This is a non-editable field. It is updated automatically by the system every time the credit is used up.
- SP/Buyer Click to select the Buyer assigned to this supplier.
Note: Tab sheets for Prices & Location, Discount Group and Supplier Product Code are applicable for Purchase Module only
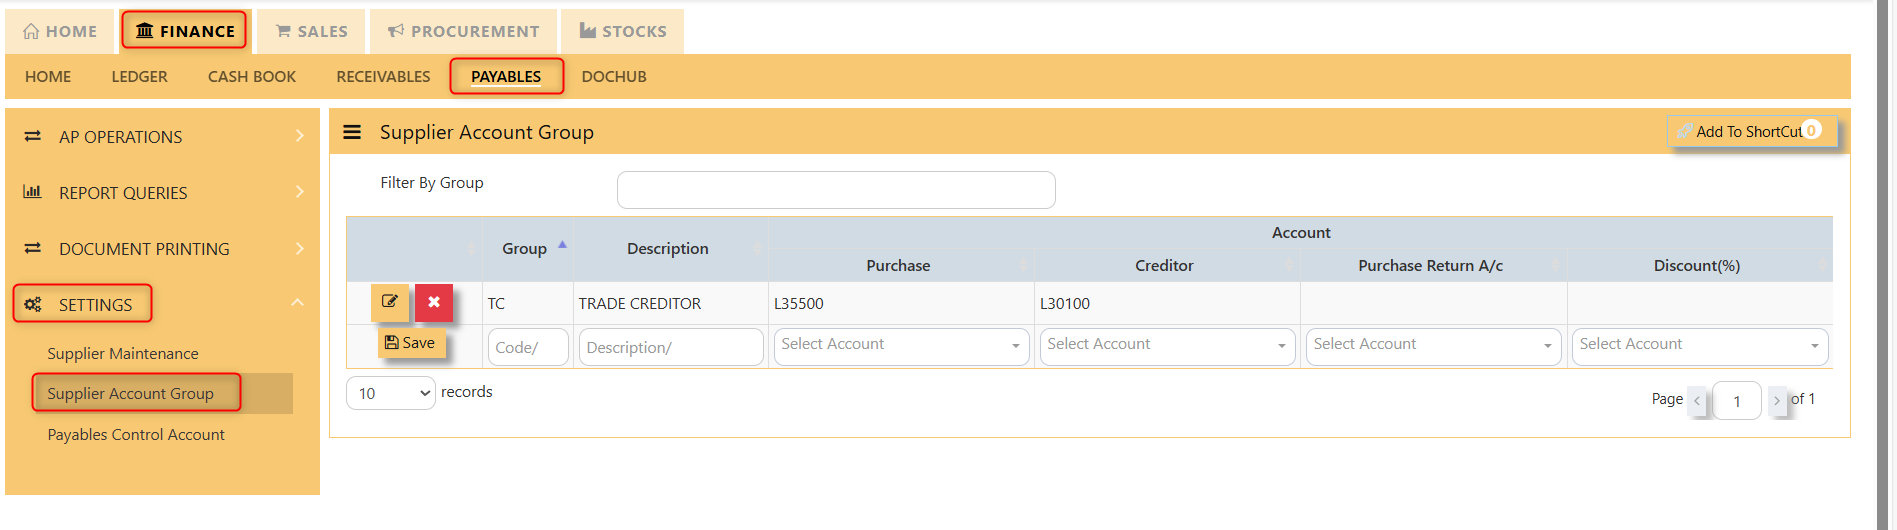
Supplier Account Group
If the Posting Type for Creditor Account is set to Supplier in Payable Control Accounts, the system will locate the creditor account code from Supplier Account Group maintenance screen as shown below:
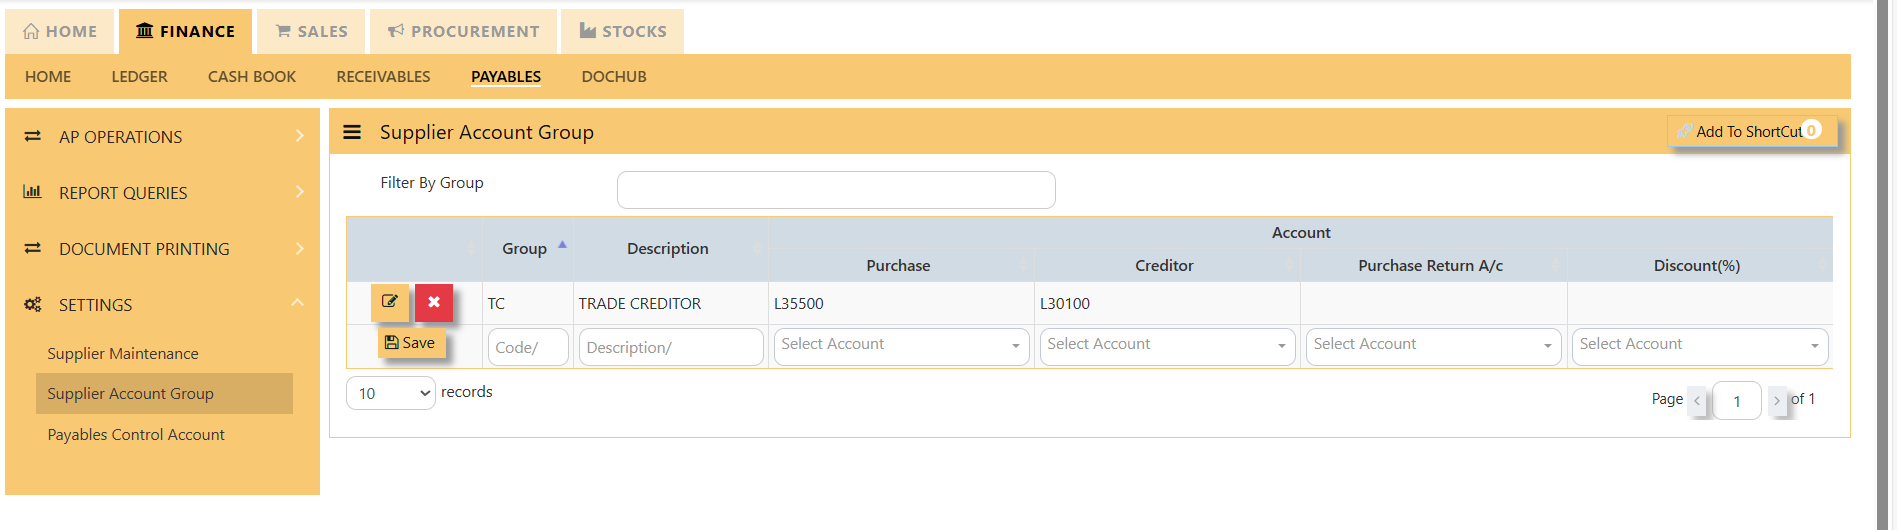 With reference to setting done as per screen above, if supplier TC is being mapped to TC Account Group in Supplier Maintenance, and user enter a Supplier Invoice (PI) transaction in AP module, the system will automatically credit the amount of transaction concerned to account name Other Creditors & Accrual.
Likewise, these creditor accounts will be automatically posted during creation of Invoices, Credit Notes and Debit Notes in Purchase Module and any AP Transaction in AP Module.
___________________________________________________________________________________________________
How to create Supplier Account Group?
- Click on Finance - Payables – Setting – Supplier Account icon for following screen.

- At the new line, enter the Supplier Account Group code under the Group column. This field can cater up to 4 alpha-numeric characters.
- Key in the account code description at the Description field. This field can cater up to 50 alpha-numeric characters.
- Select the Creditor A/c via the drop-down list.
Payable Control Account
UNIQ365 will automatically post Invoices, Credit Notes and Debit Notes in Purchase Module and AP Transactions in AP Module according to the setting done at Payable Control Accounts option.
Click on Payables – Settings – Payable Control Accounts icon for following screen.
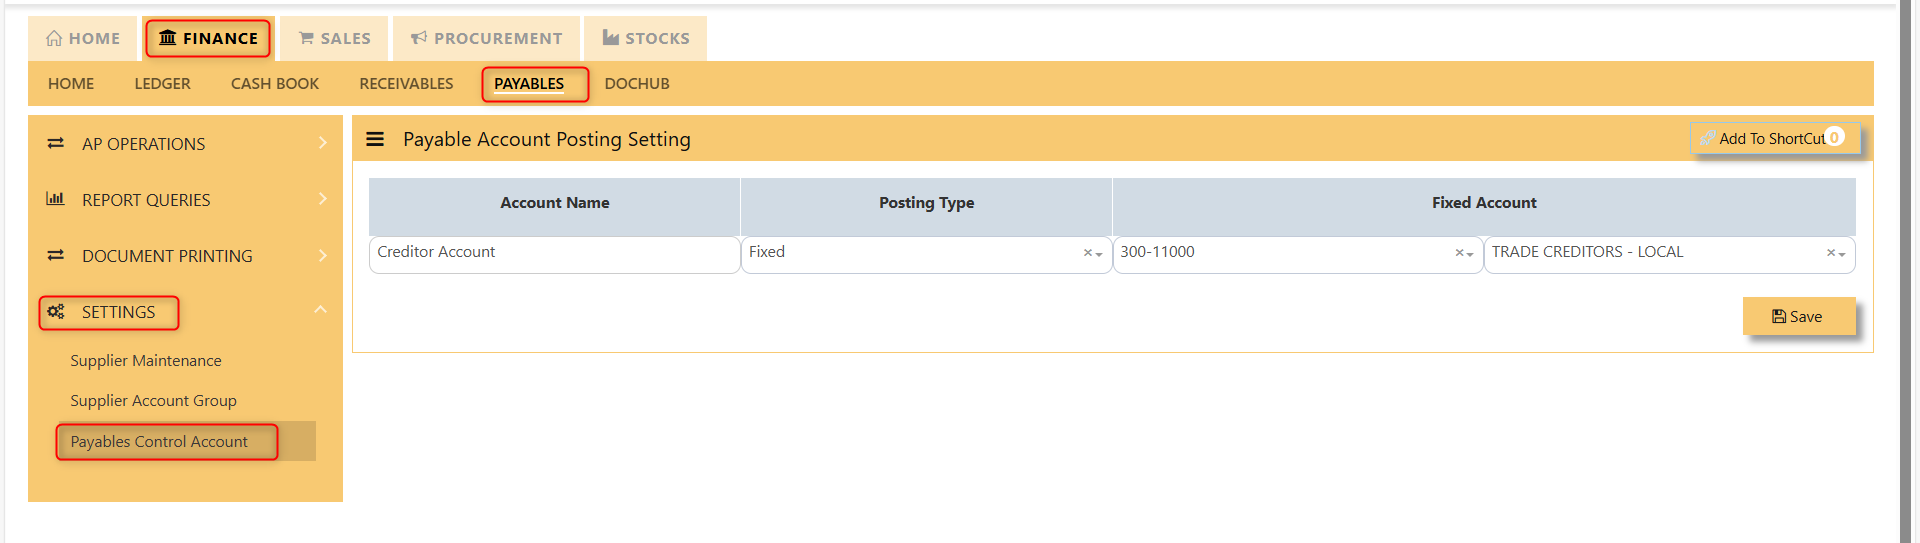
The Posting Types available are:
Fixed
If this option is selected, user must select the Creditor control account from the account code drop-down list at Fixed Account section.
For example, when a payment transaction is done at Payable module, assuming DBS Bank Account is used to make payment, the double entry under this setting will be as follow:
Dr Cr
Trade Creditor A/C XXX
DBS Bank A/C XXX
Supplier
User must ensure that the setting for Supplier Account Group is done. UNIQ365 will post to the Creditor Control Accounts accordingly for transactions done in Purchase and Payables modules.