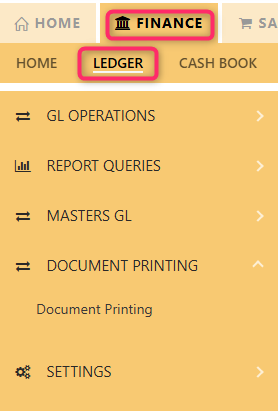
FINANCE (Ledger)
- Overview - Ledger
- GL Operations
- Reports Queries
- Masters GL
- Document Printing
- Settings
- Budgeting in Accounting
Overview - Ledger
The LEDGER UNDER FINANCE MODULE is the heart of Uniq365. It ties the different modules and allows for :
-
Entry of GL Transactions (Journal vouchers entry)
-
Auto-posting from Receivables, Payables, Sales, Procurement, Inventory & Fixed Assets modules
____________________________________________________________________________________________________________________________________________
MENU NAVIGATION

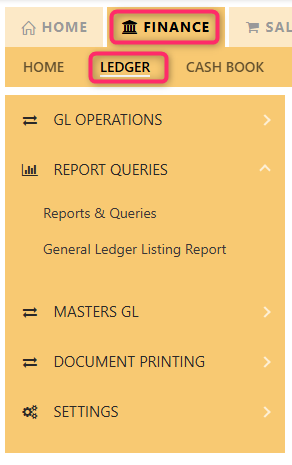
The LEDGER UNDER FINANCE MODULE , otherwise known as GENERAL LEDGER or GL, has 6 tabs, as shown above, which are GL Operations, Reports Queries, Master GL, Document printing and Settings:
-
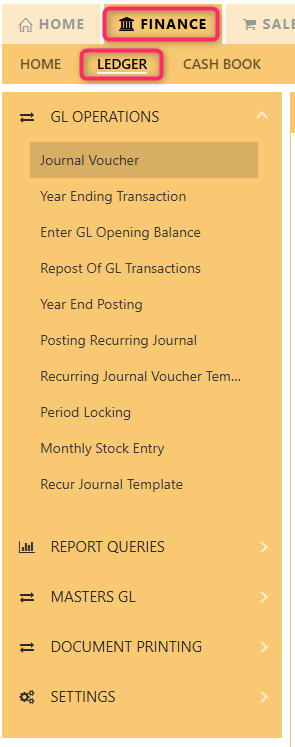
GL OPERATIONS is where transactions such as Journal Vouchers, Year Ending, Enter GL Opening Balance, Repost of GL transactions, A2000ERP year end, Posting recurring journal, Recurring Journal Voucher, Period Locking and Monthly Stock Entry.
-
REPORT QUERIES lists all the available reports in the GL Module.
-
MASTERS GL contains all the masters which are related to GL such as GST type tables, Currency, Project, Department, Section, Unit [simplified as PDSU] and Exchange Rates [Daily Currency -by currency and Daily Currency -by date.
-
DOCUMENT PRINTING - where you can print transaction by batch.
-
SETTINGS is where Chart of Accounts [COA], Final Accounts Layout [FAL], Control Account GL [CAG], Chart of Accounts Data Import [CADI].
____________________________________________________________________________________________________________________________________________
FINANCE DASHBOARD NAVIGATION
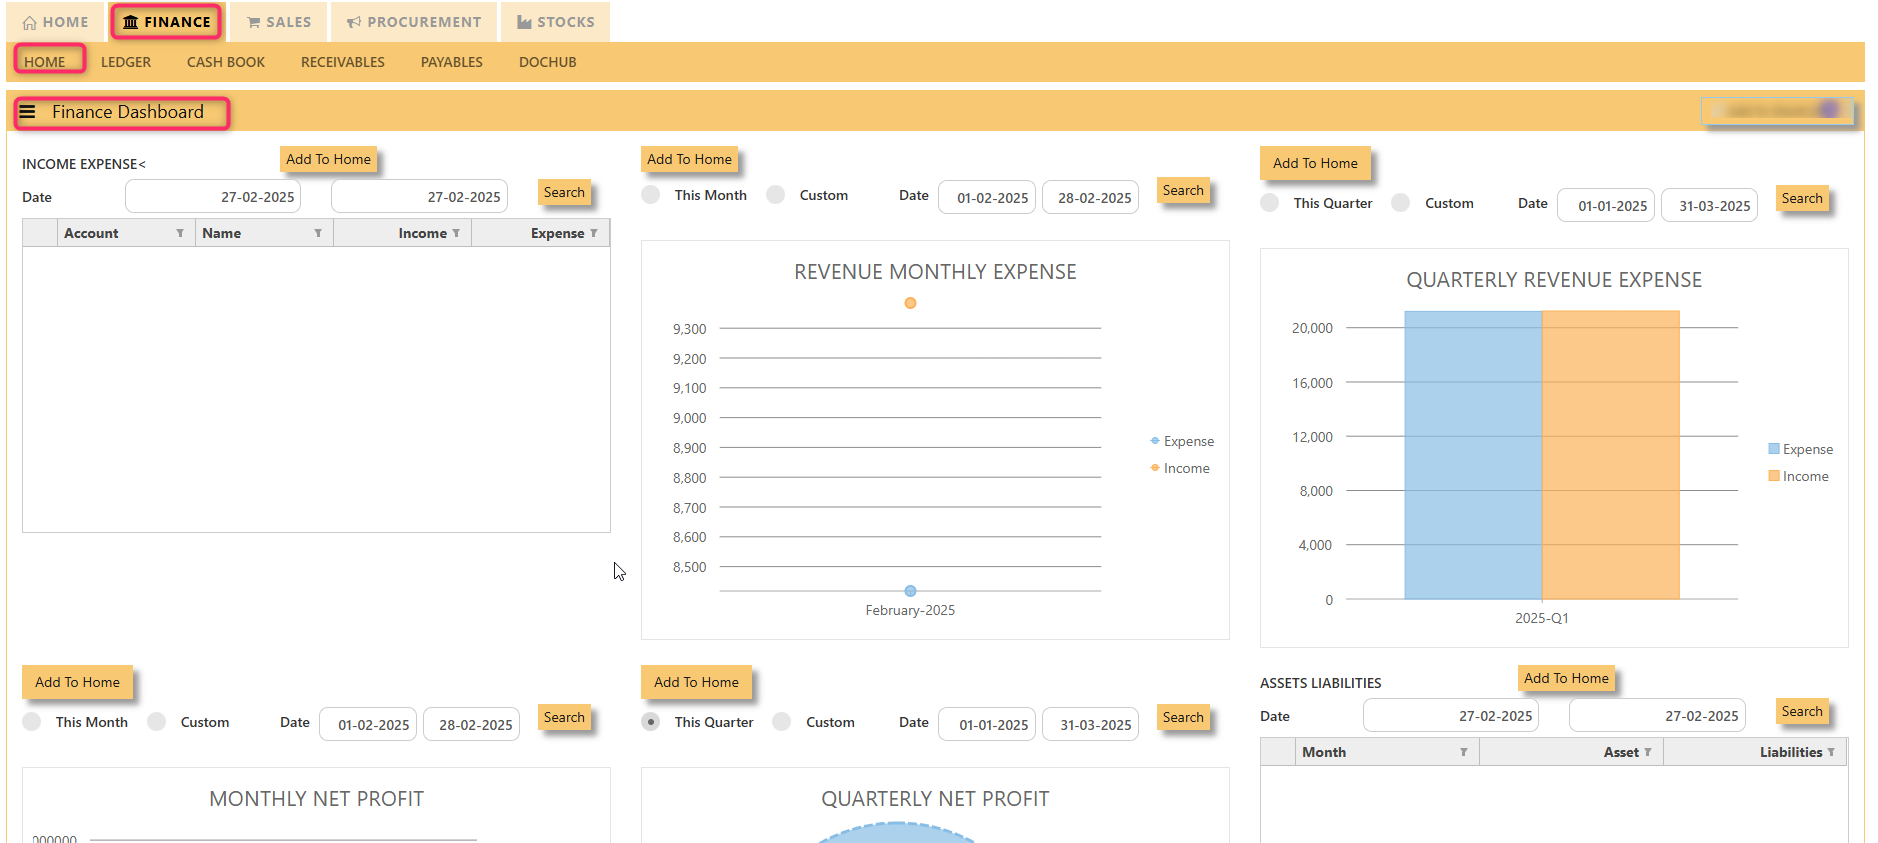
-
FINANCE DASHBOARD - showing the company performance thru graphical presentations.
-
ADD TO HOME - select the graph or dashboard to home
-
SEARCH - select date range
_______________________________________________________________________________________________________________________________________________
FLOW OF GENERAL LEDGER OR GL MANUAL
The flow of this manual is not designed to address every single feature in Uniq365. However, it will enable the user to :
-
Be competent to handle the main functions and workflow of the module,
-
Be confident enough to create new codes and transactions in this module,
-
Know how to troubleshoot data entry errors and set up the system properly.
Users are advised to refer to the supplementary training section or the user guide for other features not mentioned in this manual.
GL Operations
In Uniq365, General Ledger or GL OPERATIONS will help you to do the following:
-
Journal Voucher
-
Year Ending transaction
-
Enter GL opening balance
-
Repost of GL transactions
-
Year-End posting
-
Posting Recurring Journal
-
View Recurring Journal Voucher template listing
-
Period Locking
-
Monthly Stock Entry
-
Recur Journal Template
_______________________________________________________________________________________________________________________________________________
LEDGER GL OPERATIONS NAVIGATION
JOURNAL VOUCHER
Also known as JOURNAL VOUCHER, GL Transaction entry post all transactions directly to General Ledger. No other online posting to other modules are performed. In Uniq365, transaction type is GJ.
General Ledger Journal Voucher:
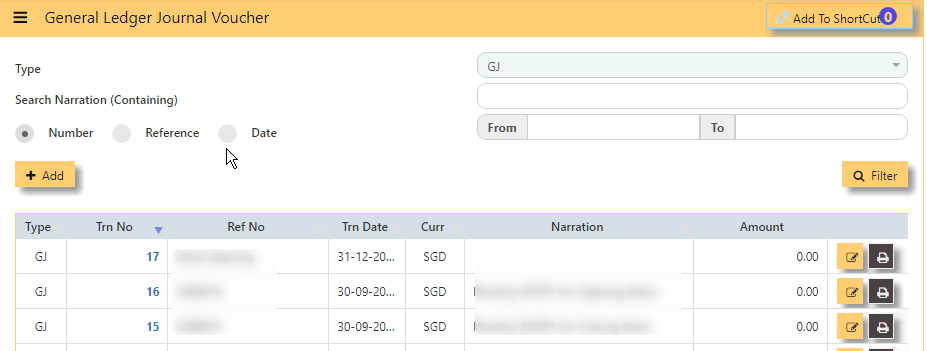
Upon click of the Journal Voucher, the General ledger Journal Voucher listing will show from latest entry with the following fields:
-
TYPE - Transaction Type is GJ
-
SEARCH NARRATION [containing] - Key in searchable text or description
-
FROM - Search FROM for any 'Number, Reference or Date'
-
TO - Search TO for any ''Number, Reference or Date'
-
FILTER - To enable the Search
-
ADD - Upon click, you can KEY IN new GJ transaction
-
EDIT - Upon click, you can EDIT the transaction
-
PRINT - Upon click, you may PREVIEW and PRINT
THE COLUMN SHOW:
-
TYPE - Transaction Type GJ
-
TRN NO -Transaction number which upon tick arrow, can be re-arranged by ascending or descending order
-
REF NO- Reference number
-
TRN DATE- Transaction Date (in this format DD-MM-YYYY)
-
CURRENCY- Header currency
-
NARRATION- Description
-
AMOUNT-Zero meaning the debit vs credit is equal
_______________________________________________________________________________________________________________________________
HOW TO ADD GJ?
-
Upon click ADD from the Journal Voucher listing, the form will show as below
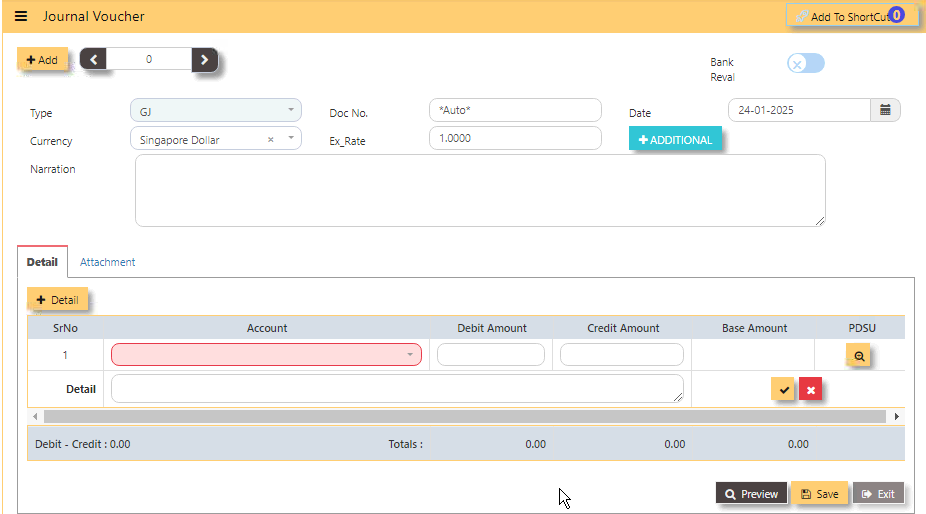
-
Select the transaction TYPE as GJ (Journal Voucher)
-
TRANSACTION NUMBER - Beside the add button, the transaction number is auto-numbering and not editable
-
DOC NO - Can be manually keyed in or 'auto-numbering' base on system setting opted (refer to system setting).
-
Enter the DATE, CURRENCY and EXCHANGE RATE
-
NARRATION Field is optional, key in any description
-
BANK REVAL - Switch on or off
-
+ADDITIONAL - Header info, to select for Project, Department, Section, Unit and Narration
-
+DETAIL - For the item details in the lower part of the screen, the first column is for the selection of the Account code, followed by the description, debit amount or credit amount, base amount and PDSU. Upon click +DETAIL, select chart of account code, key in either in debit or credit, then click check will save the first row.
-
PREVIEW - To preview and print the transaction
-
SAVE - Calibrate Saving for the Transaction.
-
EXIT-To go back in listing or menu navigation.
-
CREATE AUTO REVERSE JOURNAL - if tick, will allow to reverse the Journal entry.

Note: Please note that the GST or tax is not enable to GJ or GY. If any adjustment is needed for short or over billings, it has to be done in Receivables or Payables Modules.
Pre-requirements:
- Have a complete list of your chart of account before adding Journal Entry.
_____________________________________________________________________________________________________________________________
RELATED REPORTS:
WHERE CAN I GET THE SUMMARY OF GJ REPORT?
You may find summary of GJ report in the transaction listing report:
GENERAL LEDGER - REPOTS QUERIES - TRANSACTION LISTING
Select the Type 'GJ' and select the date range
Below is a sample screen:
-
QUERY - Tick if you opt to export in excel format, with filter capability,
-
EXPORT EXCEL - To export the report in excel format.
___________________________________________________________________________________________________________________________________
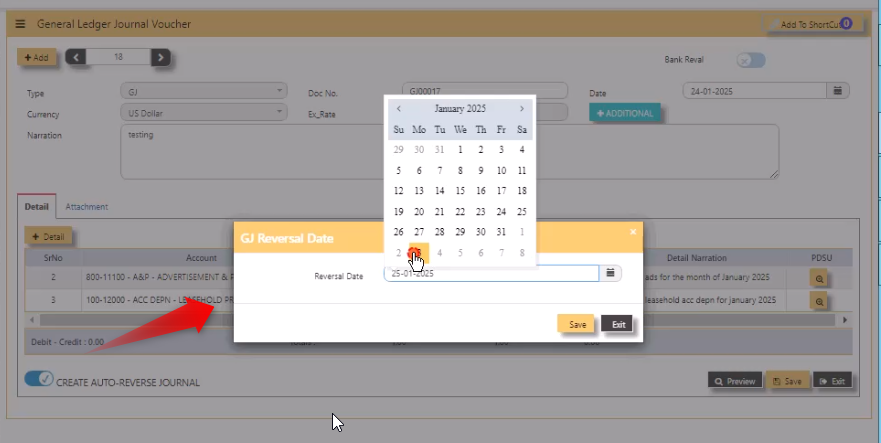
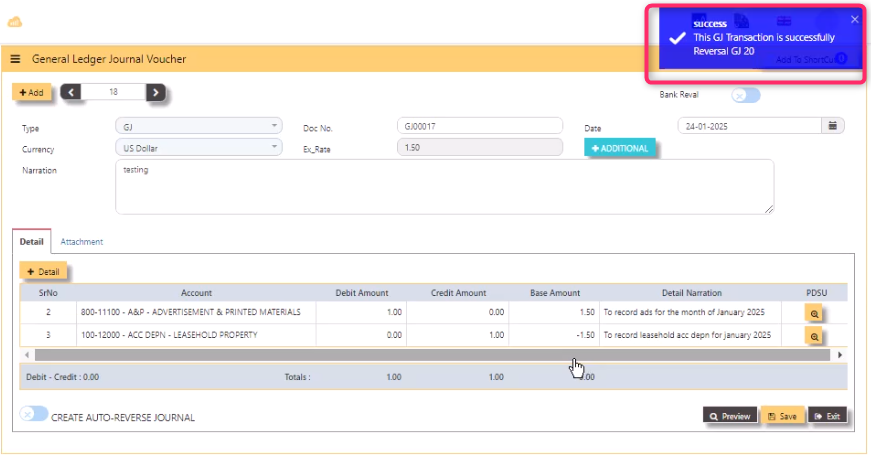
HOW TO CREATE AUTO-REVERSE JOURNAL?
-
In the below example, upon tick create auto-reverse journal, system will prompt and let user select the date to reverse.

-
After selected date, system will auto-post a new GY - GJ20 as prompted.

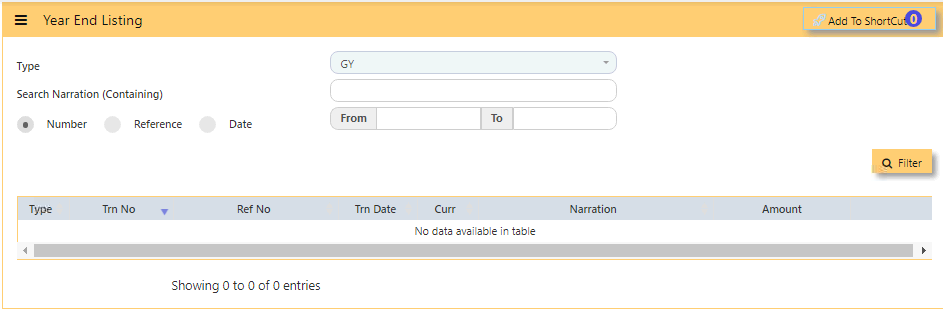
YEAR ENDING TRANSACTION
In YEAR END LISTING,
-
click open, you will find the list of year ending transaction listing with the transaction type GY.
-
TYPE - Transaction type as GY
-
SEARCH NARRATION (CONTAINING) - Search function
-
FROM - Use to Search FROM for any 'Number, Reference or Date'
-
TO - Search TO for any 'Number, Reference or Date'
-
FILTER - To calibrate the searching mechanism based from the given criteria
_______________________________________________________________________________________________________________________________
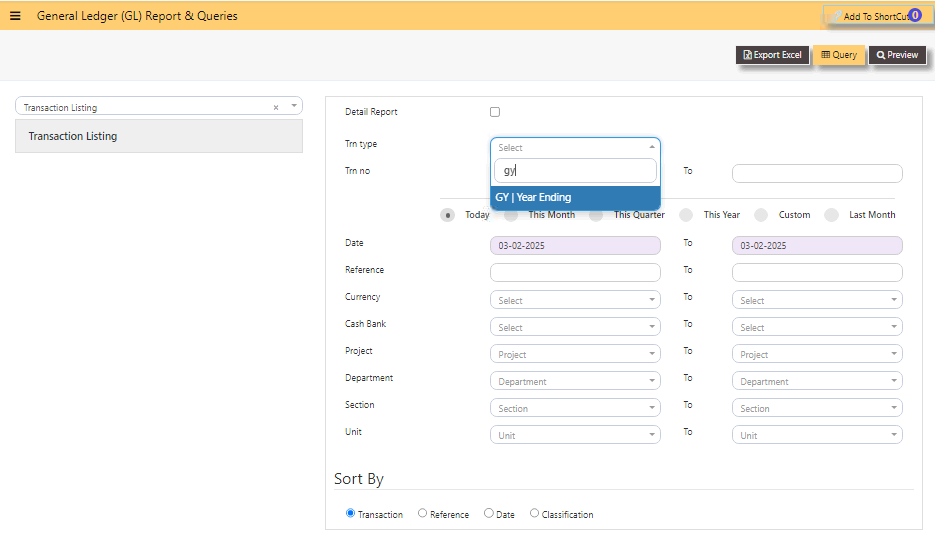
WHERE CAN I GET THE SUMMARY OF GY REPORT?
You may find summary of GY report in the transaction listing report:
1. GENERAL LEDGER - REPORTS QUERIES - TRANSACTION LISTING
2. Select the Type as 'GY'
3. Specify the Date Range
4. Click Preview
-
QUERY - Tick if you want to export in excel format, with filter capability
-
EXPORT EXCEL - To export the report in excel format
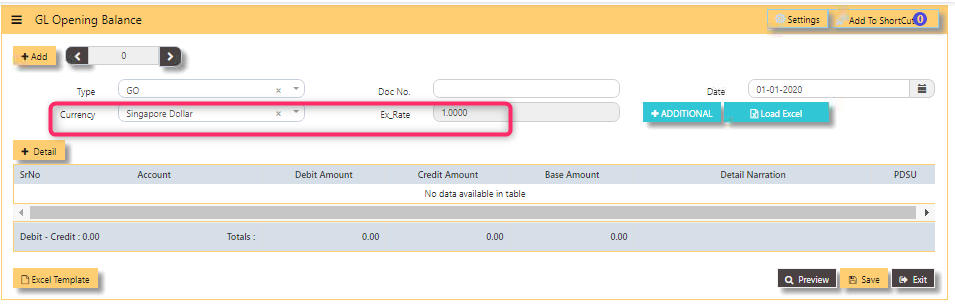
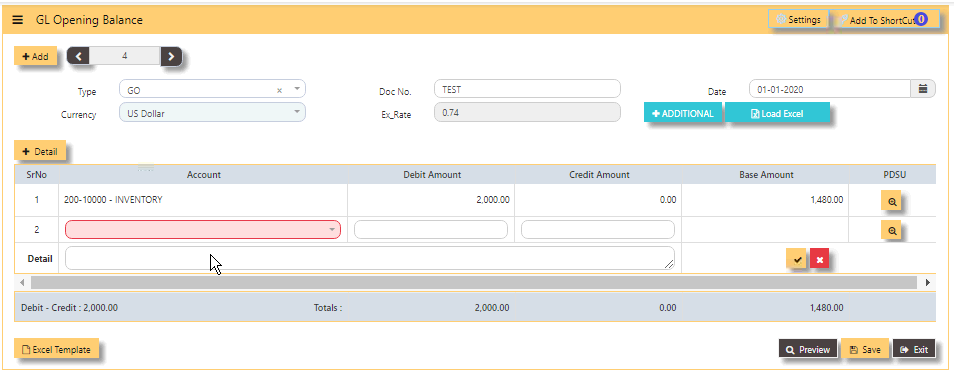
ENTER GL OPENING BALANCE
To start the accounting, the GL OPENING BALANCE needs to capture all balance sheet items (Assets and Liabilities) balances from the last closing balance. If this is a new company, then this entry is not necessary.
THE GL OPENING BALANCE LISTING:

________________________________________________________________________________
HOW TO ENTER GL OPENING BALANCE [PER BASE CURRENCY]?
In this sample, the base currency is in SGD Exchange Rate to 1.000
-
Click ADD
-
TRANSACTION NUMBER - Beside 'ADD' is auto-numbering and not editable,
-
select TYPE as GO
-
DOC NO - Key in the Reference Number,
Transaction Date (at least 1 day before the start date of the
accounting period – it must not be in the current accounting
period),
-
DATE - Default to 'today date' but can be interchangeable (in this format DD-MM-YYYY)
-
CURRENCY - Select from dropdown
-
EX RATE - Auto fill or can manually key in values
-
ADDITIONAL - Is for selecting the PROJECT-DEPARTMENT-SECTION-UNIT or PDSU and
-
NARRATION - Key in your narration.
-
+DETAIL - When tick, will open a line detail,
-
ACCOUNT - Select the chart of account and enter the amount in the debit or credit side. Save
the transaction.
-
We highly recommend to enter GL OPENING BALANCE [of foreign currency] in a separate GO.
________________________________________________________________________________________________________________________________
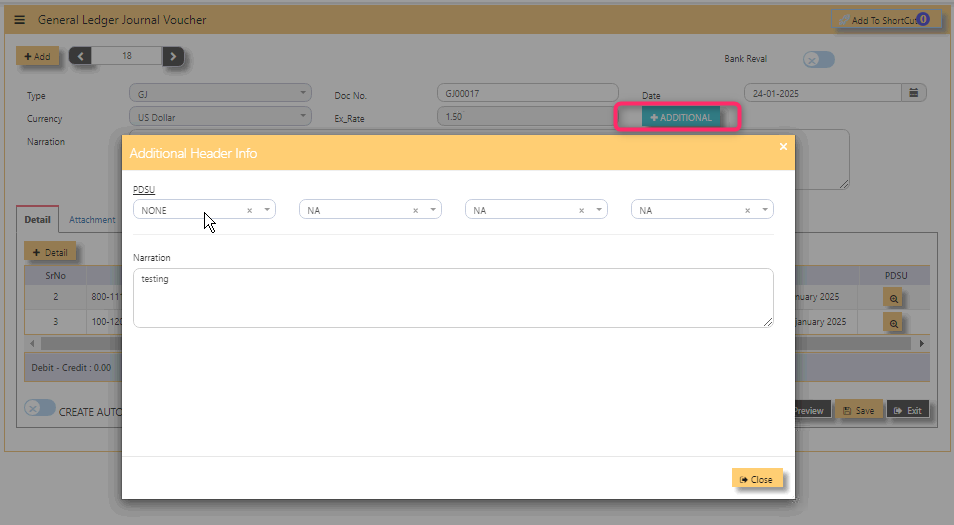
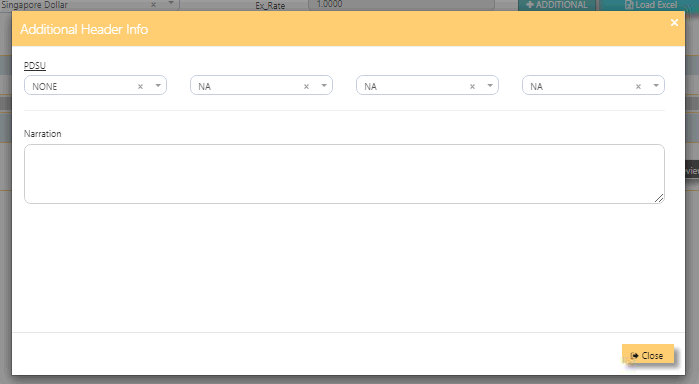
ADDITIONAL HEADER INFO
- PDSU
- Narration
-

_______________________________________________________________________________________________________________________________
HOW TO ENTER GL OPENING BALANCE (PER FOREIGN CURRENCY)?
In this sample, foreign currency is in USD ex rate .74-
-
Same steps as GO above but will vary on 'CURRENCY' selected. Here a foreign currency is USD.
_________________________________________________________________________________________________________________________________________
REPORTS:
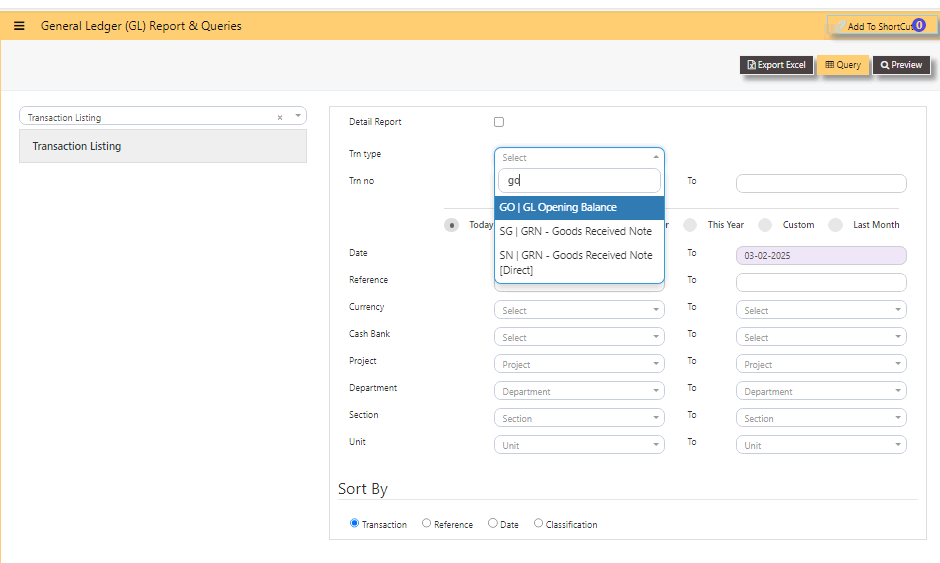
WHERE CAN I GET THE SUMMARY OF GO REPORT?
You may find summary of GO report in the transaction listing report:
-
In GENERAL LEDGER - REPORTS & QUERIES - TRANSACTION LISTING
-
Select type as ‘GO’ and date range
-
Then preview, as on the sample screen:
-
QUERY - tick if you opt to export in excel format, with filter capability,
-
EXPORT EXCEL - to export the report in excel format.
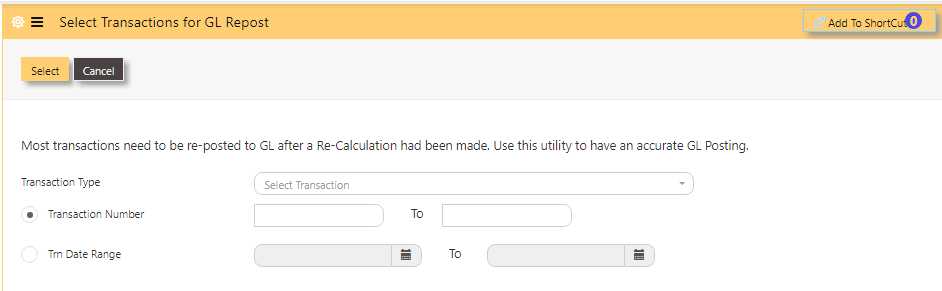
REPOST OF GL TRANSACTION
In a perfect situation, all transactions should post properly. However, the office network we operate is imperfect; virus & worms, power outage, network cabling issues, machine hangs, user negligence etc.
Any combination(s) of above can affect transaction. When problem happens, there is a feature for the GL transactions that
are affected to be re-posted. In cases where certain charts of accounts are re-mapped, you may need to re-post the transactions to
GL in a quickly manner.
HOW TO REPOST GL TRANSACTIONS?
-
Click on FINANCE, GENERAL LEDGER, REPOST OF GL TRANSACTIONS.
-
Select TRANSACTION TYPE,
-
Select either in TRANSACTION NUMBER, key in the number FROM and TO
-
or TRN DATE RANGE, select date FROM and TO (in this format DD-MM-YYYY)
-
then click SELECT.
YEAR END POSTING
Uniq365 is a real time accounting system that will have transactions that closed every time it is saved. No year end
procedures are needed at transaction level. However a Year-End Option is required.
The YEAR ENDING POSTING serves the purpose of transferring the present year P&L amount into a Retained Earning figure.
_____________________________________________________________________________________________________________________________________
HOW TO DO A YEAR-END POSTING?
-
In General ledger, Operations, year ending option,
-
Enter year to be closed - key in,
-
You may opt to leave blank these fields- 1.A, 1.B., 2.A., 2.B., 3.A., 3.B.,
-
mandatory tick - confirmation boxes,
-
lastly, tick 'PROCEED YEAR-END'.
-
CANCEL - tick if you do not want to proceed.
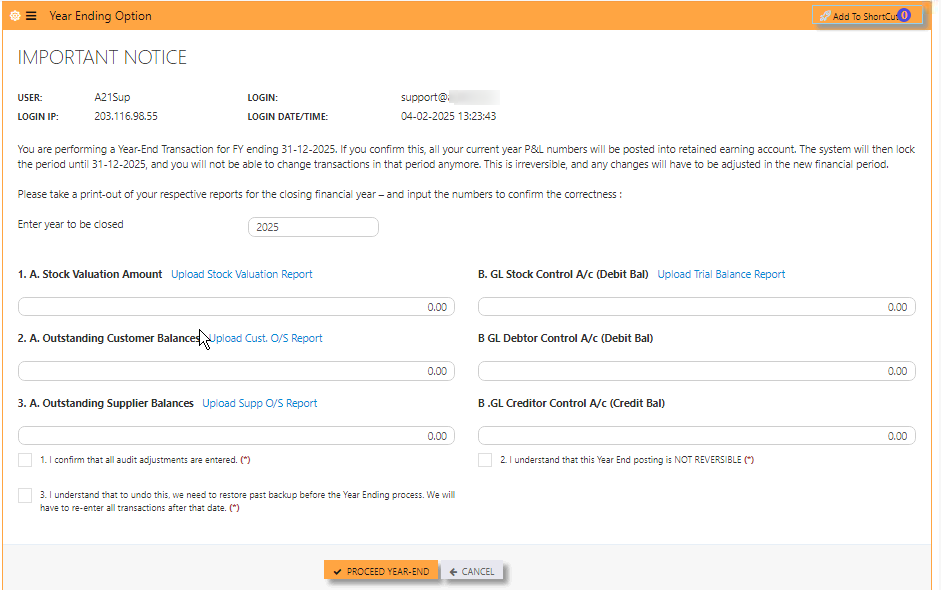
Pre-requirements:
-
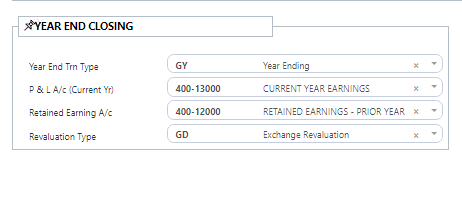
Before carrying out the Year Ending process, check if mappings are correctly done, go to SYSTEM ADMIN – ACCOUNT POSTING SETTING and check that the following accounts are setup.
A. Year End Trn Type – select GY, the pre-set transaction type for Year-End posting operation.
B. P & L Account – enter the code for Current Year P & L Account.
C. Balance Sheet A/c – select the Retained Earning Account, as below.

-
Have a saved file in pdf or excel of 4reports- Stock valuation report, Trial balance Report, Customer outstanding report and Supplier outstanding report as mandatory attachments in 1.A., 1.B., 2.A. and 3.A.
-
Year ending checklist to be done annually:
It is best recommended to do the checklist before the year ending:
- Stock ledger is tie to your General ledger stock balance,
- Diagnostics are cleared away,
- Customer ledgers are correct,
- Supplier ledgers are correct,
- and lastly, GST reports are correct.
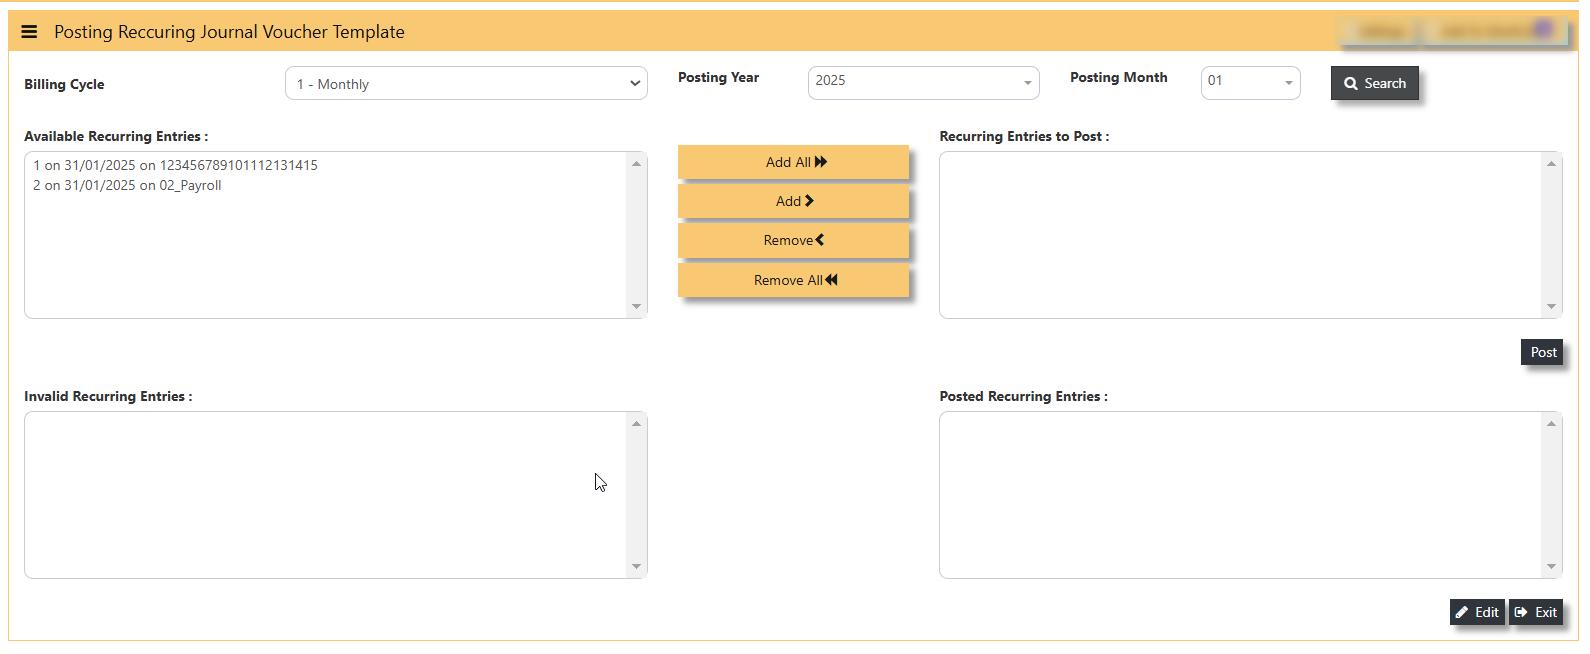
POSTING RECURRING JOURNAL
HOW TO DO POSTING RECURRING JOURNAL?
PRE-REQUISITE:
-
You must have an existing recurring journal first before do the posting recurring journal.
POSTING RECURRING JOURNAL:
-
BILLING CYCLE - select from the dropdown, 1-Monthly, 2-Bi monthly, 3- Quarterly, 6 - Semi-Annually 12 - Annually
-
POSTING YEAR - select the year to post
-
POSTING MONTH - select the month to post
-
SEARCH - tick, will show the available recurring entries
-
AVAILABLE RECURRING ENTRIES - show listings of available recurring journal entries
-
ADD ALL - tick, will transfer all 'AVAILABLE RECURRING ENTRIES' to the right 'RECURRING ENTRIES TO POST'
-
ADD - select one or selected entries to transfer to right
-
REMOVE - transfer back one or selected entries from 'RECURRING ENTRIES TO POST' back to 'AVAILABLE RECURRING ENTRIES'
-
REMOVE ALL - transfer all back from 'RECURRING ENTRIES TO POST' to 'AVAILABLE RECURRING ENTRIES'
-
RECURRING ENTRIES TO POST - are selected entries to post
-
POST - tick, will post the entries and will transfer the journal to 'POSTED RECURRING ENTRIES'
-
INVALID RECURRING ENTRIES - are invalid entries. You must review your template and correct them.
-
POSTED RECURRING ENTRIES - list of successfully posted entries
-
EDIT - select from 'POSTED RECURRING ENTRIES', upon tick EDIT, will zoom in recurring journal for edit
-
EXIT - tick to close the posting.
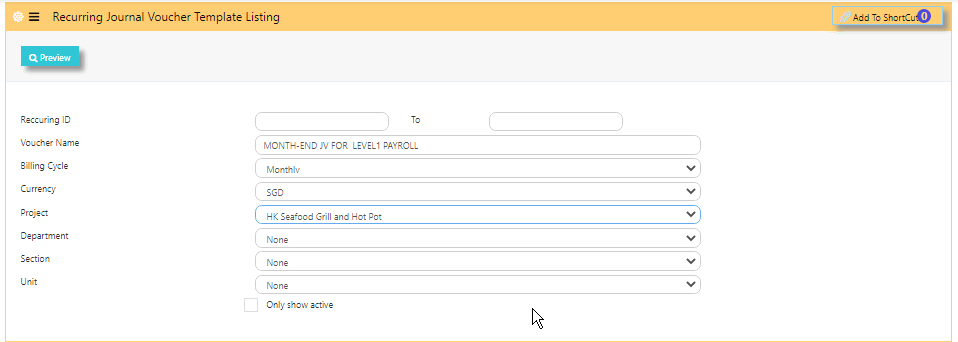
RECURRING JOURNAL VOUCHER TEMPLATE LISTING
PREVIEW THE RECURRING JOURNAL VOUCHER TEMPLATE LISTING
-
RECURRING ID - Key in from and to id
-
VOUCHER NAME - Key in the voucher name
-
BILLING CYCLE - Select if you opt to preview base on billing cycle
-
CURRENCY - Select if you opt to preview base on currency
-
PROJECT - Select if you opt to preview base on project
-
DEPARTMENT- Select if you opt to preview base on department
-
SECTION - Select if you opt to preview base on section
-
UNIT - Select if you opt to preview base on unit
-
ONLY SHOW ACTIVE - To show active.
PERIOD LOCKING
PERIOD LOCKING
Availability of this access - 'PERIOD LOCKING', vary base on user group. The locking is commonly given to 'ADMINISTRATOR GROUP' who have the highest authority to control the locking.
HOW TO SET PERIOD LOCKING?
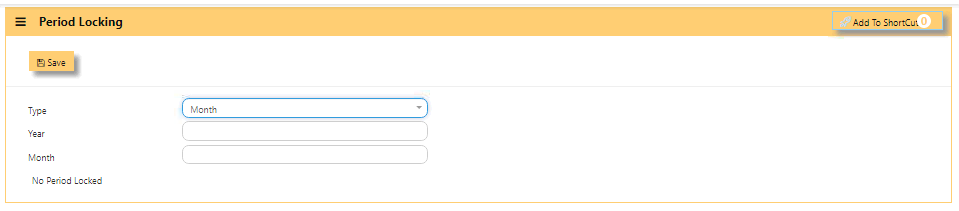
-
Select TYPE as month, year or no locking,
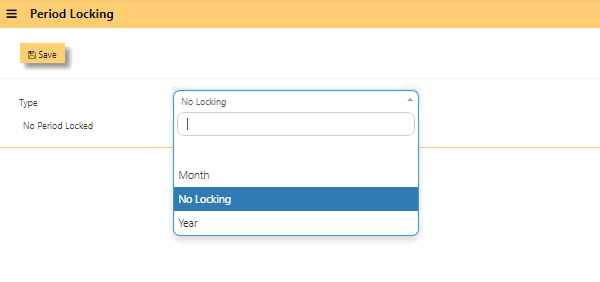
-
If selected type is other than 'No Locking', select either in YEAR - key in the year (this field is editable),
-
MONTH - key in the month (this field is editable),
-
SAVE.
-
NOTE - the year or month is editable depending on the last GY date entered.
-
This is the same 'LOCKING' you can find in SYSTEM ADMIN - SYSTEM SETTINGS.
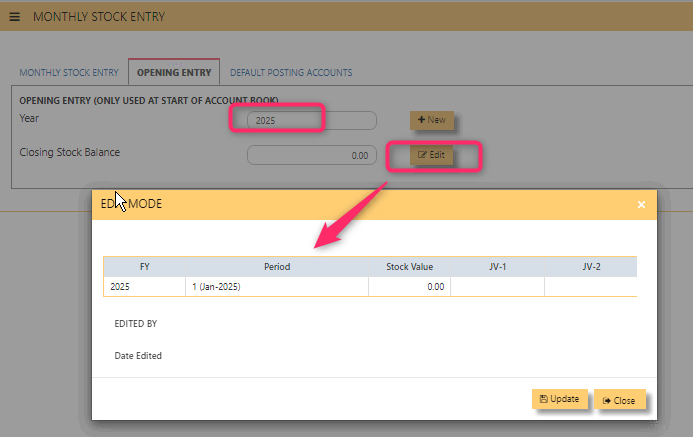
MONTHLY STOCK ENTRY
The MONTHLY STOCK ENTRY is used for NO STOCK POSTING [METHOD] ONLY:
HOW TO ADD IN OPENING ENTRY TAB?
-
YEAR - show year of opening entry
-
CLOSING STOCK BALANCE - show the value of the opening entry
-
NEW - tick to add the opening value and this is done once as opening entry
-
EDIT - upon select, will show edit window, value is editable
-
UPDATE - tick
-
CLOSE - to go back to previous window
MONTHLY STOCK ENTRY TAB
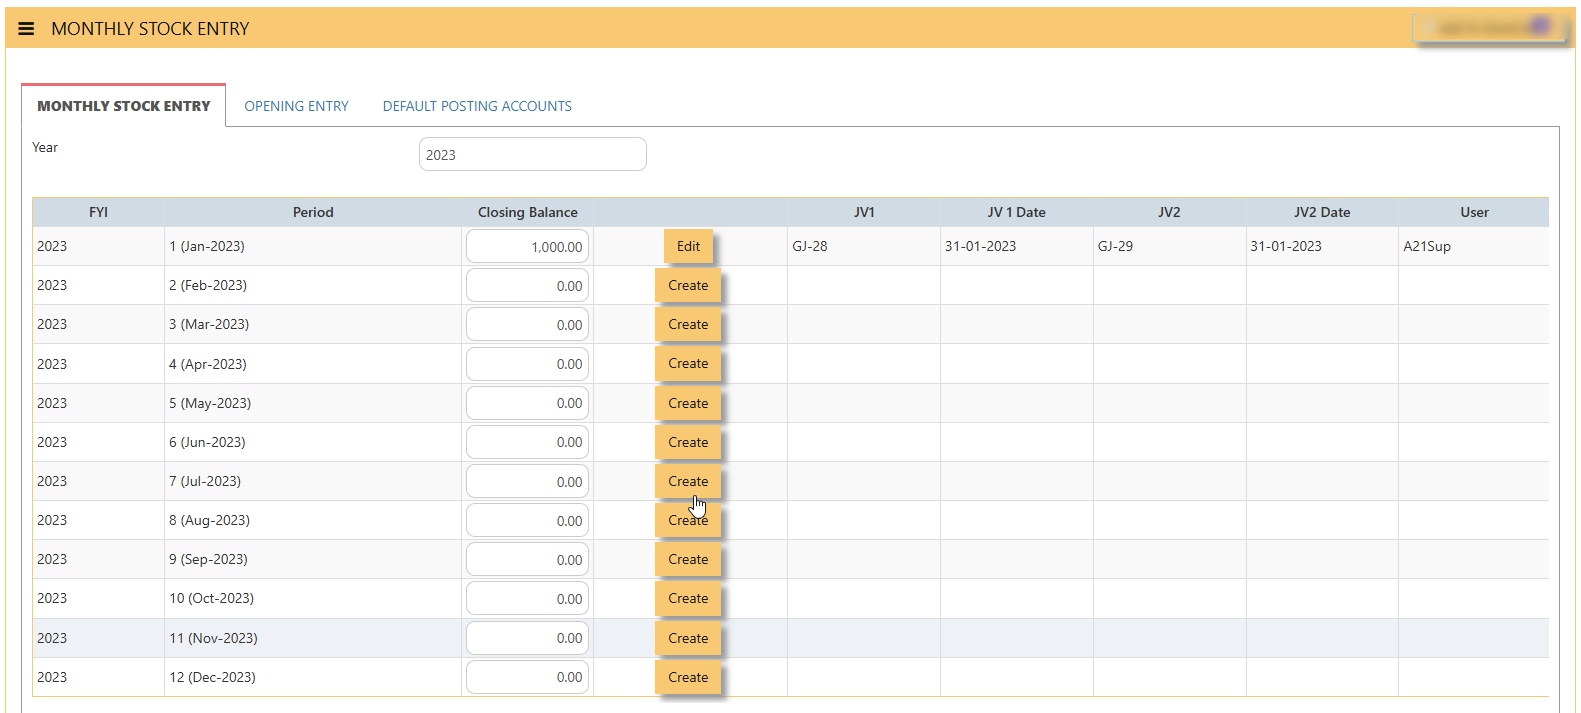
-
YEAR - key in year to search, in this sample, is YEAR 2024
-
FYI- financial year
-
PERIOD - month and year of the financial
-
CLOSING BALANCE - key in closing value
-
CREATE - tick after key in value of closing balance for the given month
-
EDIT - tick after edit value of closing balance for the given month
-
JV1 - this reference will auto-generate as CLOSING BALANCE of the month
-
JV1 DATE - date of JV1
-
JV2 - this reference will auto-generate as OPENING BALANCE of the month
-
JV2 DATE - date of JV2
-
USER - refers to user who added the entry
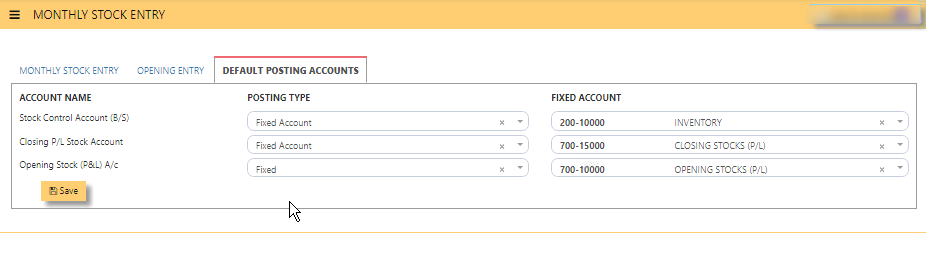
DEFAULT POSTING ACCOUNTS TAB
DEFAULT POSTING ACCOUNTS TAB is the mapping of STOCK CONTROL BS, CLOSING STOCK PNL and OPENING STOCK PNL account that will be necessary in monthly stock entry.
-
ACCOUNT NAME - mandatory to select stock control account BS, closing stock P&L and opening stock P&L.
-
POSTING TYPE - mandatory to select posting type 'fixed account', 'product group', etc.
-
FIXED ACCOUNT - mandatory to select GL account code
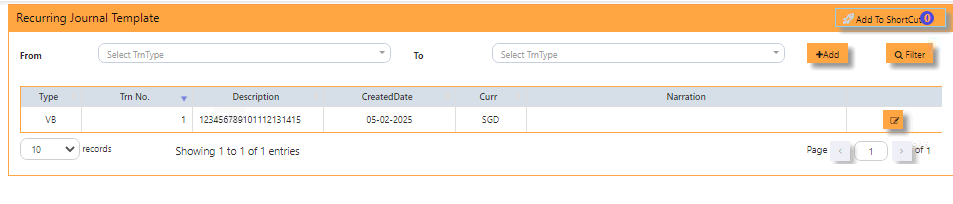
RECUR JOURNAL TEMPLATE
HOW TO SEARCH RECURRING JOURNAL TEMPLATE?
-
FROM - Select from dropdown Transaction Type and voucher name
-
TO - Select Transaction Type and voucher name
-
FILTER - Tick to proceed SEARCHING.
-
TYPE - Transaction type is VB
-
TRN NO - Show number descending order
-
DESCRIPTION - As name of recurring journal template
-
CREATED DATE - Display the Date (in this format DD-MM-YYYY)
-
CURR - Shows the Currency
-
NARRATION - Shows Transaction Description
-

- Tick if opt to edit the recurring journal template.

NOTE - If you wish to edit existing recurring journal with historical transactions, it can be edited only in validity date 'TO' only.
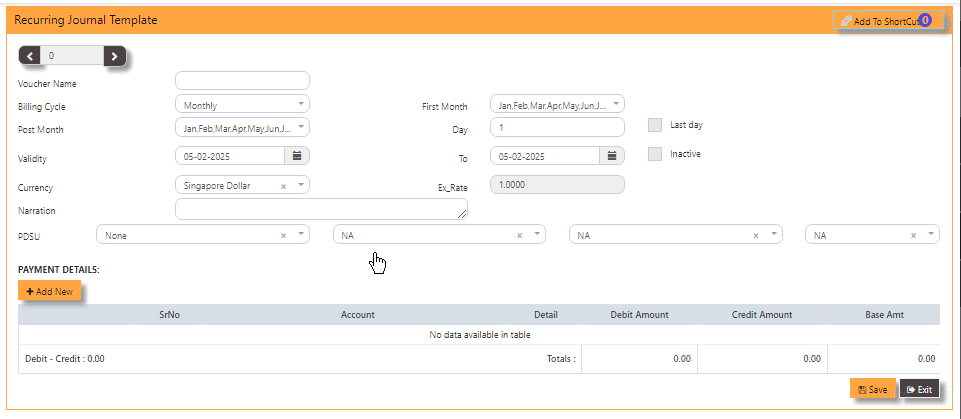
HOW TO ADD NEW RECURRING JOURNAL TEMPLATE?
-
+ADD - Tick to open the recurring journal form
-
VOUCHER NAME - Key in desired name, can be alphanumeric not more than 20characters.
-
BILLING CYCLE - Select from dropdown if monthly, quarterly, yearly, etc.
-
FIRST MONTH - Select month among January to December
-
DAY - Key in 1 or until 31, or tick 'LAST DAY'
-
POST MONTH - Select the months to post the recurring journal
-
VALIDITY FROM and TO - Select from and to date for the effectivity of the recurring journal (date in this format DD-MM-YYYY)
-
CURRENCY - Select currency from the dropdown
-
EX RATE - Defaulted to latest rate or key in new rate
-
NARRATION - Key in description of narration
-
PDSU - Select from dropdown the project-department-section-unit, skip if not enabled for your book.
-
PAYMENT DETAILS +ADD NEW - Tick to add the chart of account.
-
SAVE - Tick to save template
-
EXIT - To go back to sub menu.
-
INACTIVE - To hide or remove the template from active listings.
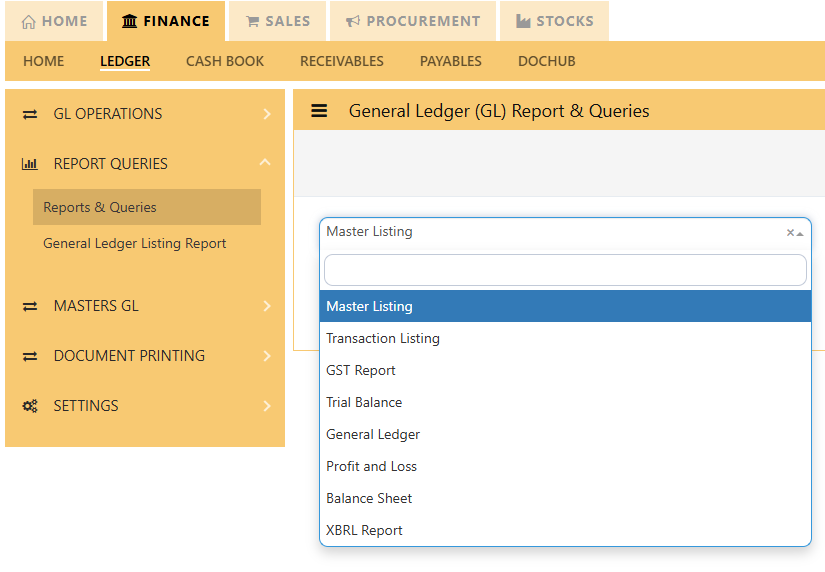
Reports Queries
REPORT QUERIES NAVIGATION in Uniq365 lists all the available reports in the Ledger
____________________________________________________________________________________________________________________________________________
CLICK REPORT QUERIES will show list of reports to select:
-
MASTER LISTING
-
TRANSACTION LISTING
-
GST REPORT
-
TRIAL BALANCE
-
GENERAL LEDGER
-
PROFIT AND LOSS
-
BALANCE SHEET
- CASH FLOW STATEMENT
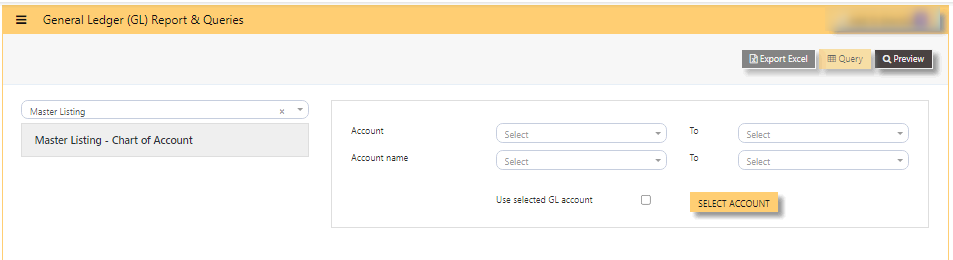
MASTER LISTING
HOW TO GENERATE MASTER LISTING - CHART OF ACCOUNT?
-
ACCOUNT - to view specific account or when left blank, will show full list of chart of account or
-
ACCOUNT NAME - to view specific name
-
USE SELECTED GL ACCOUNT button - tick, this selection is use when user want to select 2 or more chart of account
-
then SELECT ACCOUNT - tick 2 or more chart of account
-
PREVIEW - click will show list of chart of account in either select by 'ACCOUNT' or by 'USE SELECTED GL ACCOUNT
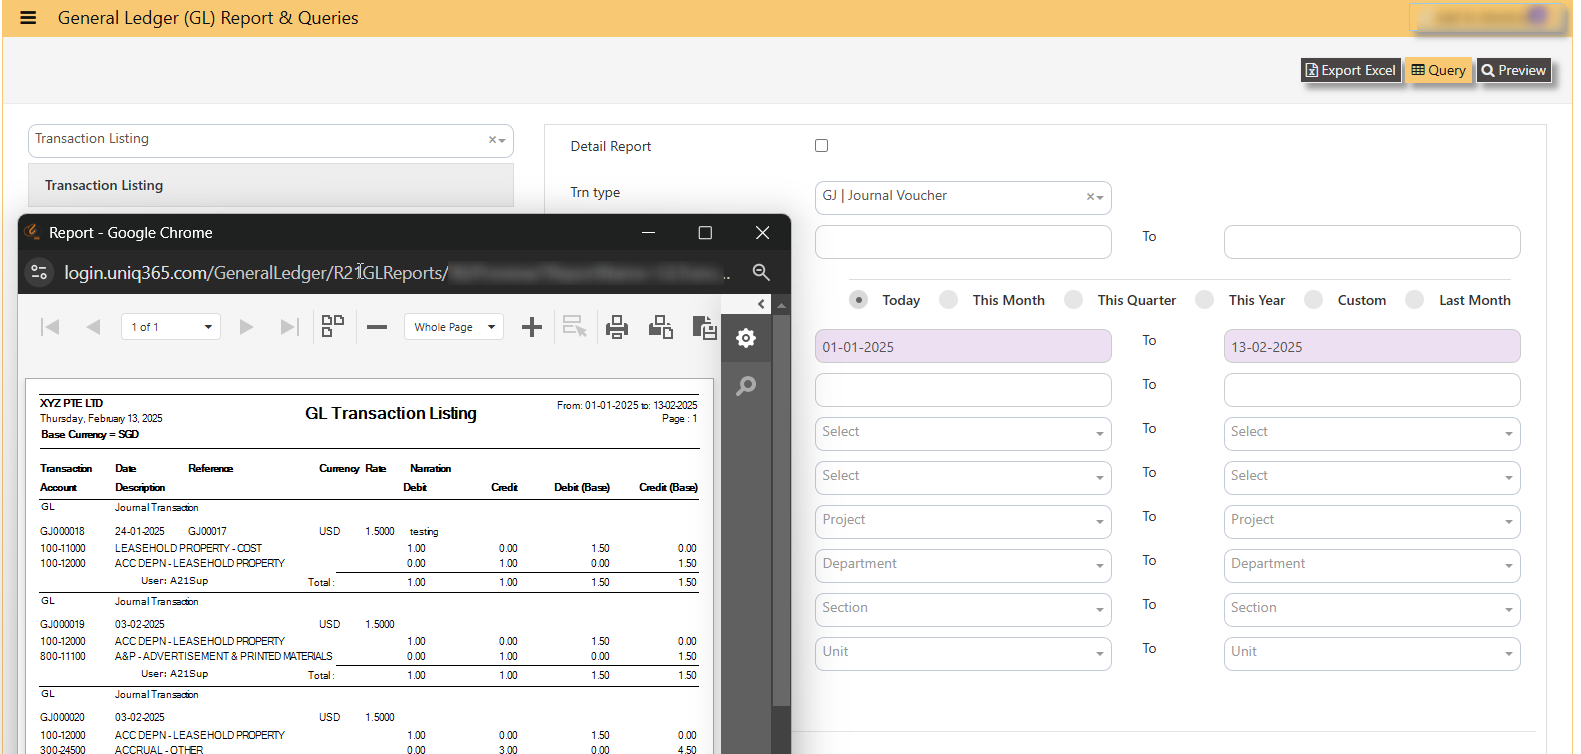
TRANSACTION LISTING
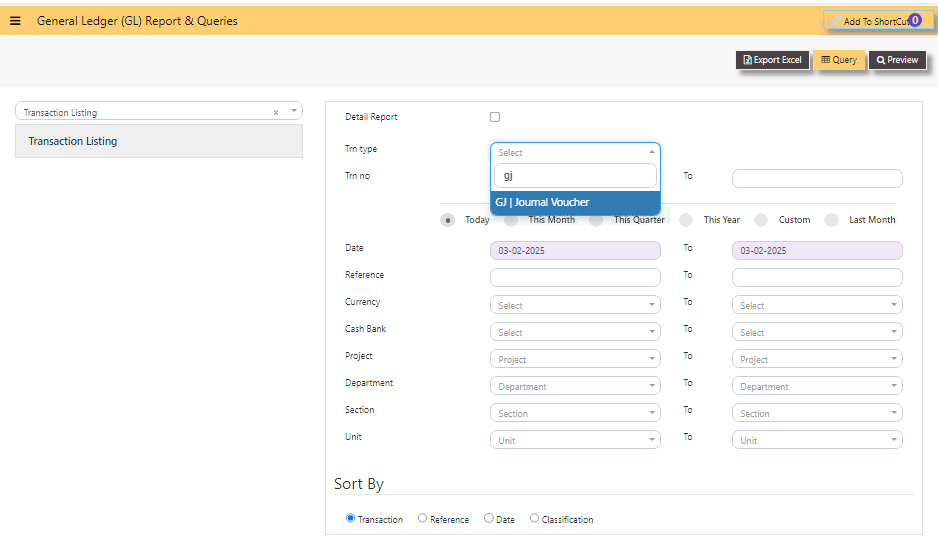
TRANSACTION LISTING REPORT or otherwise know GL transaction listing, can be previewed here.
HOW TO PREVIEW TRANSACTION LISTING?
Fill up the following filter parameters:
-
DETAIL REPORT
-
TRN TYPE
-
TRN NO
-
DATE
-
REFERENCE
-
CURRENCY
-
CASH BANK
-
PROJECT
-
DEPARTMENT
-
SECTION
-
UNIT
-
SORT BY - select TRANSACTION, REFERENCE, DATE or CLASSIFICATION
-
PREVIEW
-
QUERY
-
EXPORT EXCEL
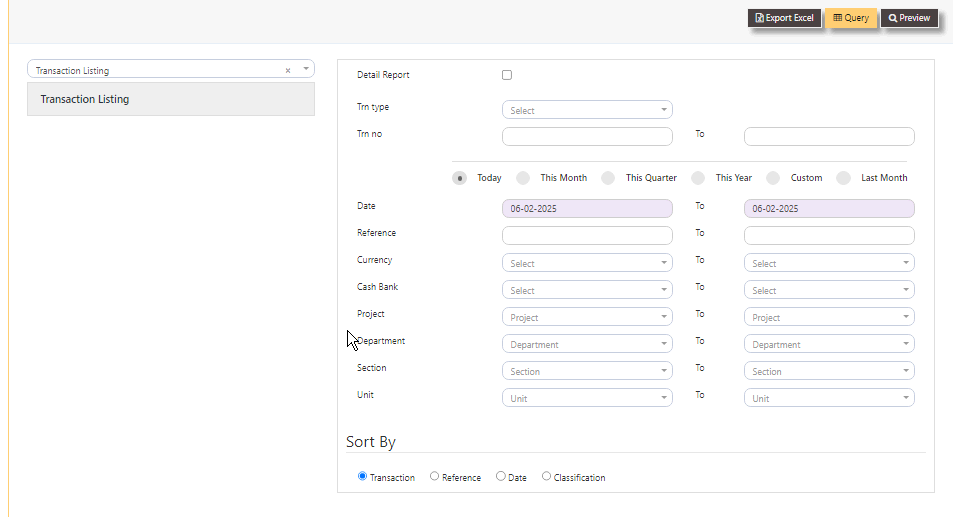
Sample transaction listing if selected a specific TRN TYPE GJ with selected date range 01 January 2025 to 13 February 2025, will show as below:
GST REPORT
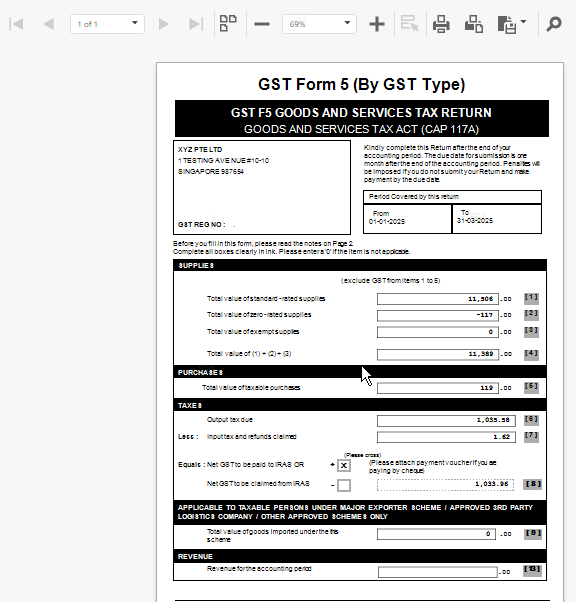
HOW TO GENERATE GST F5?
This report is generated for submission to IRAS.
-
GST Form 5 Statement (By GST TYPE) - is the most commonly used Form5
-
Date - select date range
-
PREVIEW - click to view
-
QUERY - to export excel with filter capability
-
EXPORT EXCEL - to export to excel

SAMPLE PREVIEW OF GST FORM5 (BY GST TYPE):
-
ARROW LEFT OR RIGHT- select pages [in sample will show pages 1 of total 1 page]
-
- or + - zoom from 1% to 100%
-
PRINT - select to print
-
DOWNLOAD - to pdf or excel.
__________________________________________________________________________________________________________________________
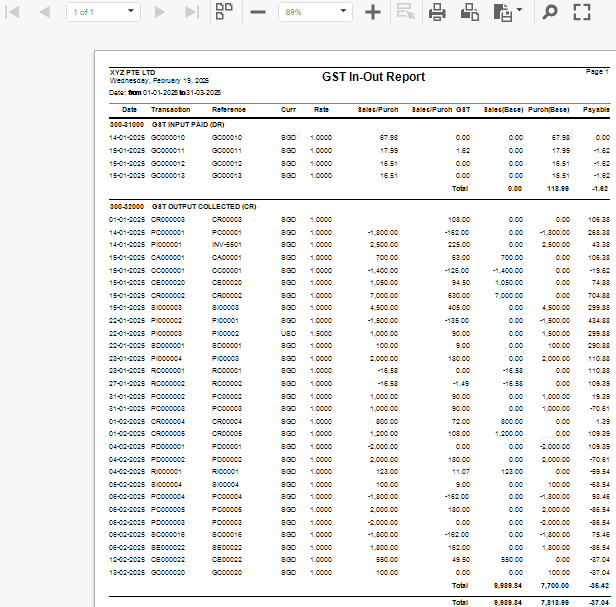
HOW TO GENERATE GST IN OUT LISTING?
This report reflects all posted transactions with GST (sorted from payable to receivable).
-
GST IN OUT LISTING
-
DATE
-
PROJECT
-
DEPARTMENT
-
SECTION
-
UNIT
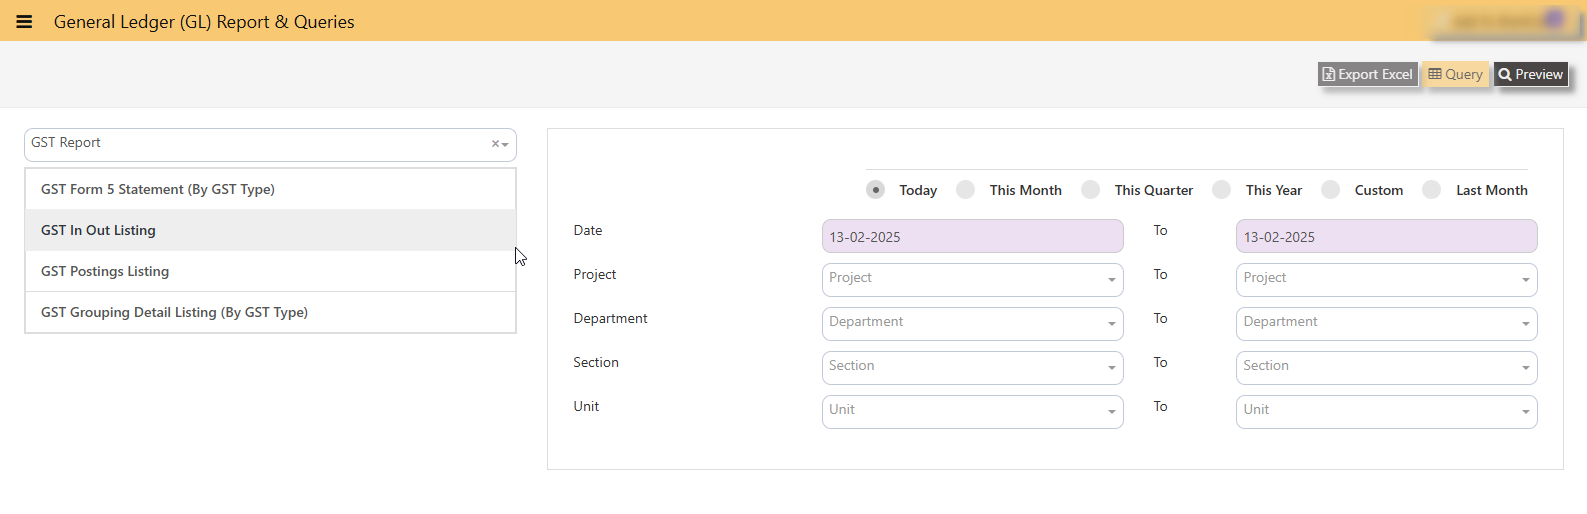
SAMPLE PREVIEW OF GST IN OUT LISTING:
_____________________________________________________________________________________________________________________________
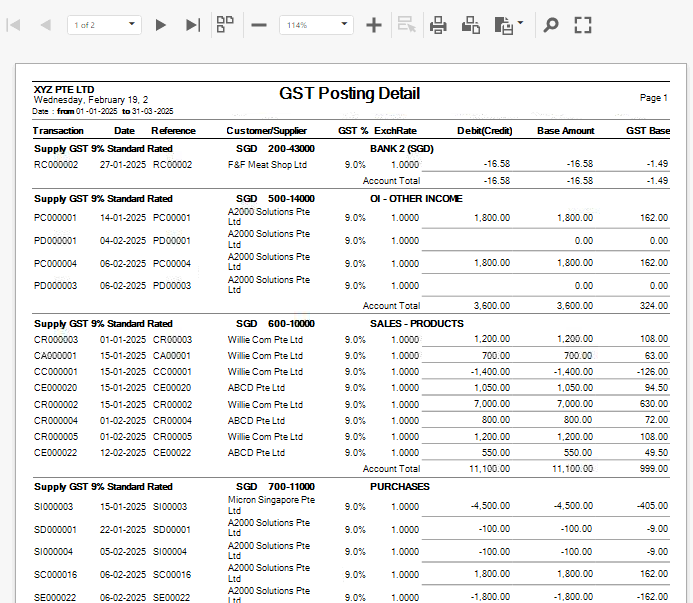
HOW TO GENERATE GST POSTING LISTING?
This report reflects transactions sorted by GST CODE, grouped by GL ACCOUNT CODE.
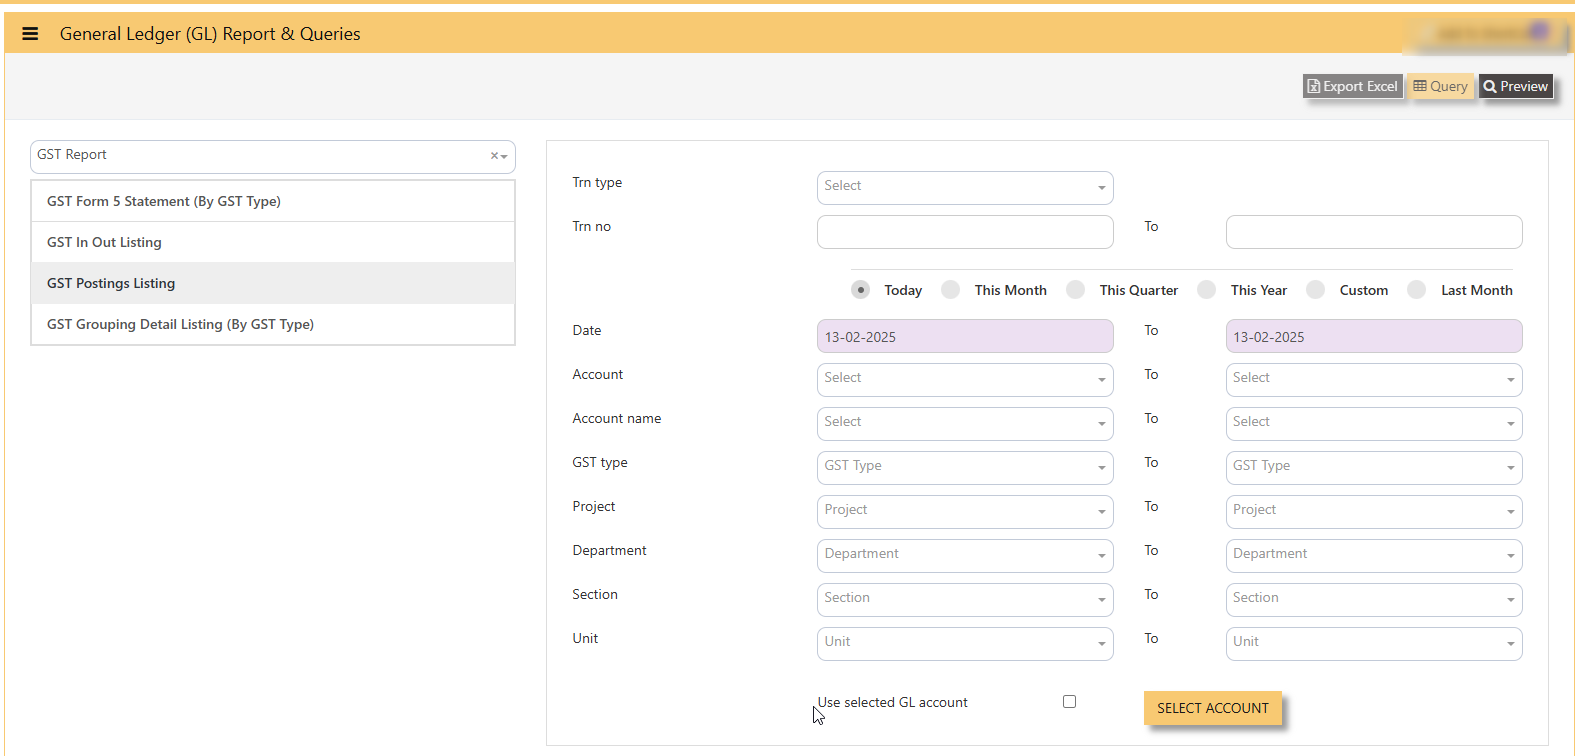
SAMPLE PREVIEW OF GST POSTING LISTING:
_____________________________________________________________________________________________________________________________
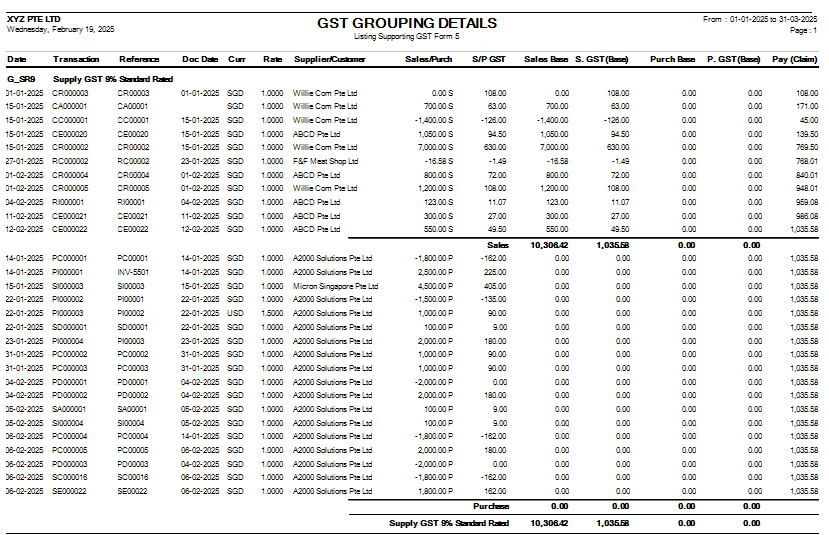
HOW TO GENERATE GST GROUPING DETAIL LISTING BY GST TYPE?
This report report reflect summary of transaction posted with GST involved, grouped by GST TYPE.
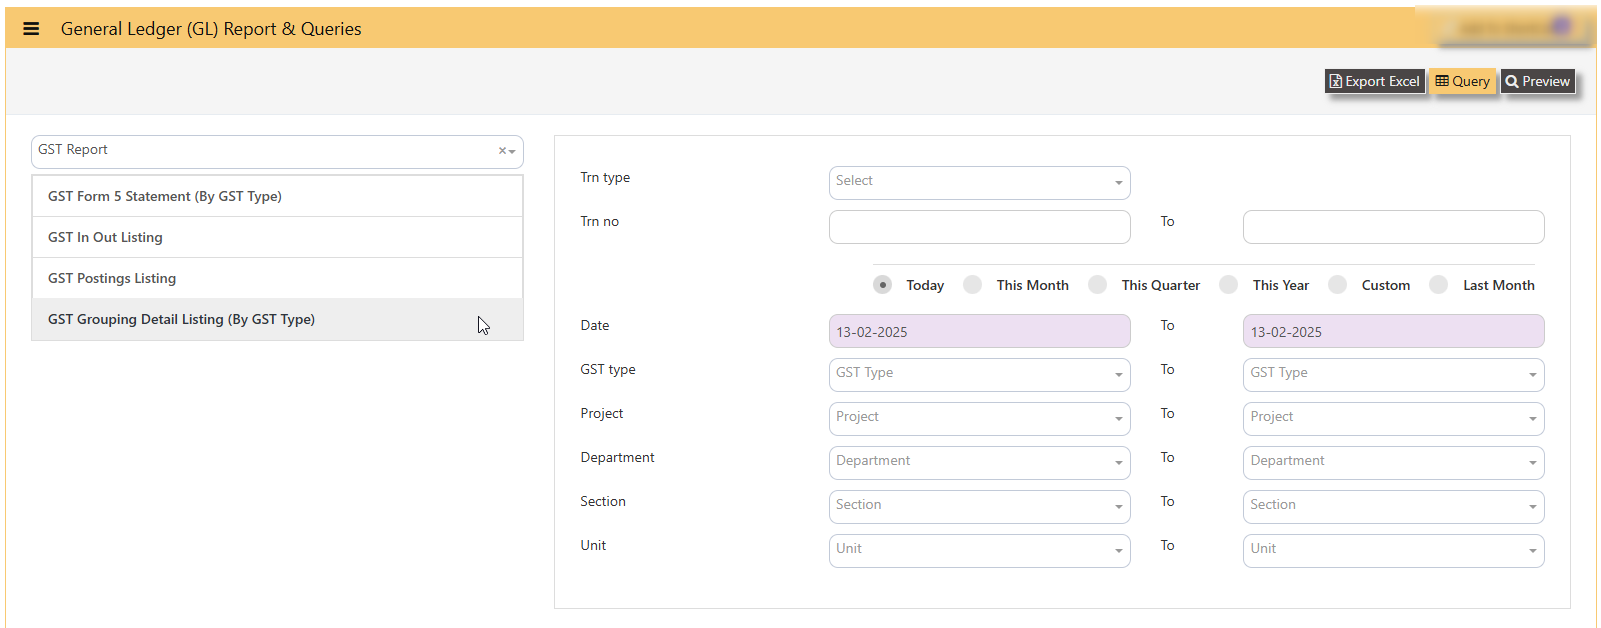
SAMPLE PREVIEW OF GST GROUPING DETAIL LISTING BY GST TYPE?
TRIAL BALANCE
TRIAL BALANCE in Uniq365 can be previewed in 2 ways-
-
Trial balance By Date
-
Trial balance By Year / Period
HOW TO GENERATE TRIAL BALANCE BY DATE?
-
select TRIAL BALANCE BY DATE
-
YEAR - key in
-
TODAY - defaulted but you may select 'THIS MONTH', 'THIS QUARTER', 'THIS YEAR', 'CUSTOM' or 'LAST MONTH'
-
DATE - select from and to (in this format DD-MM-YYYY)
-
PROJECT - filter by project
-
DEPARTMENT - filter by department
-
SECTION - filter by section or
-
UNIT - filter by unit
-
PREVIEW - tick to preview
-
QUERY - to export in excel with filter capability
-
EXPORT EXCEL - to export in excel
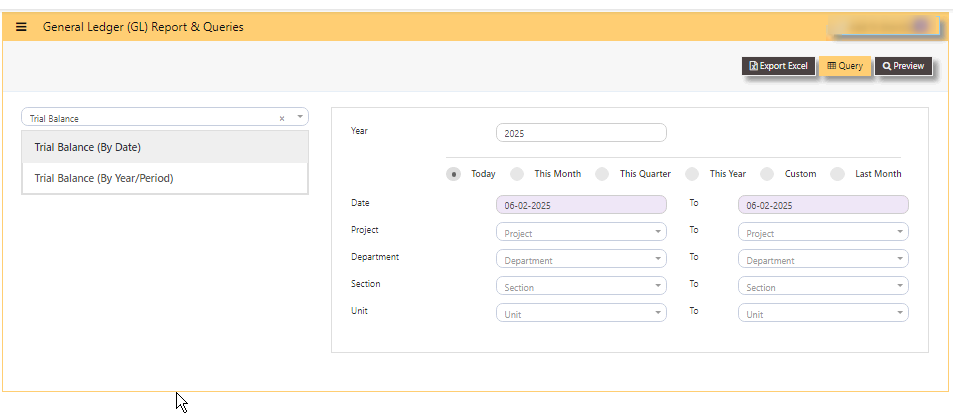
SAMPLE FORMAT OF TRIAL BALANCE BY DATE:
________________________________________________________________________________________________________________________
HOW TO GENERATE TRIAL BALANCE BY YEAR PERIOD?
-
select TRIAL BALANCE BY YEAR PERIOD
-
YEAR - key in
-
PERIOD - key in from 1 to 12 [end of month basis]. Example, if you key period 12, system will take the sum from month 1 to 12. If the start period is January, system will sum up from January 1 to December 31 of the selected year.
-
PROJECT - filter by project
-
DEPARTMENT - filter by department
-
SECTION - filter by section or
-
UNIT - filter by unit
-
PREVIEW - tick to preview
-
QUERY - to export in excel with filter capability
-
EXPORT EXCEL - to export in excel
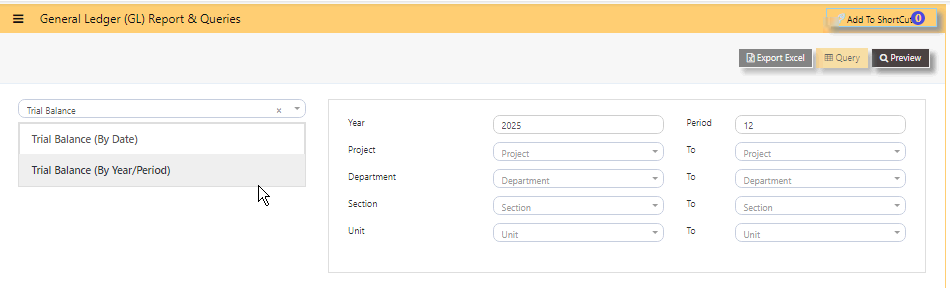
SAMPLE FORMAT OF TRIAL BALANCE BY YEAR PERIOD:
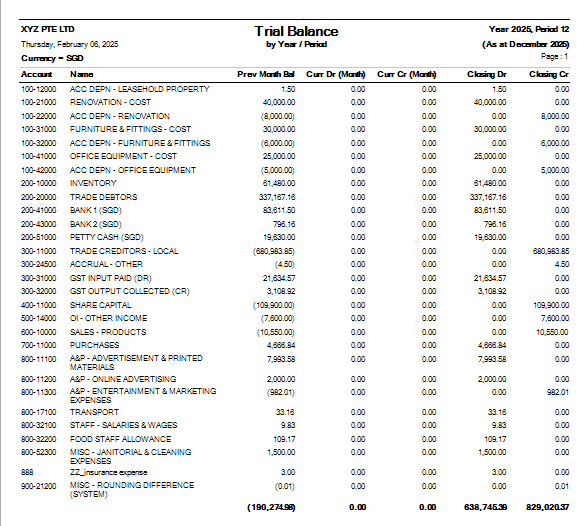
In this sample, year is 2025, the start month is January as period 1, so key in period 12 [system will sum up from period 1 to 12], trial balance will show as of [last day] DECEMBER 2025.
HOW TO READ THE COLUMNS OF TRIAL BALANCE?
-
YEAR - as keyed in
-
PERIOD - 12 as DECEMBER
-
ACCOUNT - chart of account code
-
NAME - description of chart of account
-
PREV MONTH BALANCE - in this sample, balance is from November 30 2025
-
CURR DR MONTH - sum of transactions from DECEMBER 1 to 31 2025
-
CURR CR MONTH - sum of transactions from DECEMBER 1 to 31 2025
-
CLOSING DR-sum of columns previous month bal, Curr Dr and Curr Cr
-
CLOSING CR-sum of columns previous month bal, Curr Dr and Curr Cr.

GENERAL LEDGER
GENERAL LEDGER LISTING can be previewed in many ways
-
GENERAL LEDGER LISTING
-
GENERAL LEDGER LISTING NO NARRATION
-
GENERAL LEDGER LISTING SUB LEDGER
-
GENERAL LEDGER LISTING BASE CURRENCY ONLY
-
GENERAL LEDGER LISTING DETAILS IN XLS
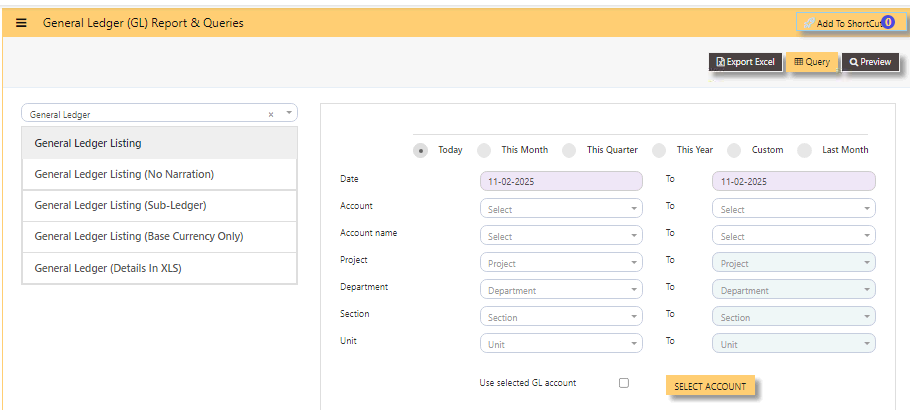
-
tick TODAY, THIS MONTH, THIS QUARTER, THIS YEAR, CUSTOM or LAST MONTH
-
DATE - select from and to (in this format DD-MM-YYYY)
-
ACCOUNT - select either from dropdown chart-of-account code or
-
ACCOUNT NAME - select from and to
-
PROJECT - you may leave blank if no project-department-section-unit use or select from and to
-
DEPARTMENT - you may leave blank if no department-section-unit use
-
SECTION - you may leave blank if no section-unit use
-
UNIT - you may leave blank if no unit use.
-
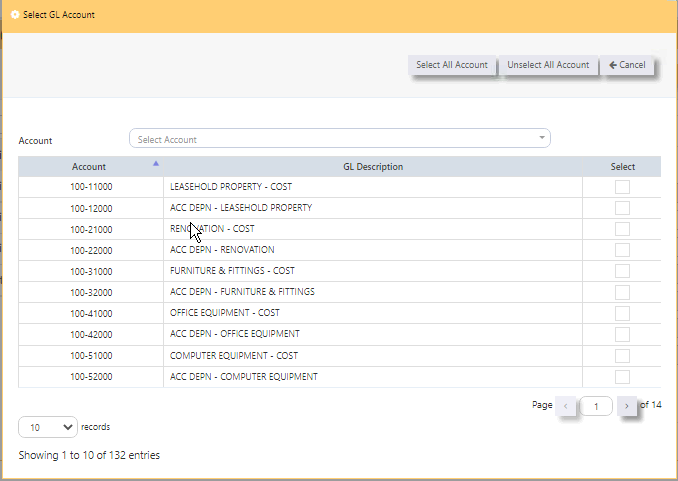
USE SELECTED GL ACCOUNT - you may use this if you wish to view selected chart of account.
-
SELECT ACCOUNT BUTTON - upon tick, another page will show, select the chart of account you wish to include in the preview by checking the box.
-
SELECT ALL ACCOUNT - will help tick all chart of accounts
-
UNSELECT ALL ACCOUNT - will untick all chart of accounts
-
CANCEL - will let you return to the previous page
-
ARROW LEFT and RIGHT on PAGES 1 to last - will let you select and tick chart of account.
-
RECORDS - 10, 25, 50 100 and 200 lines to show on each page.
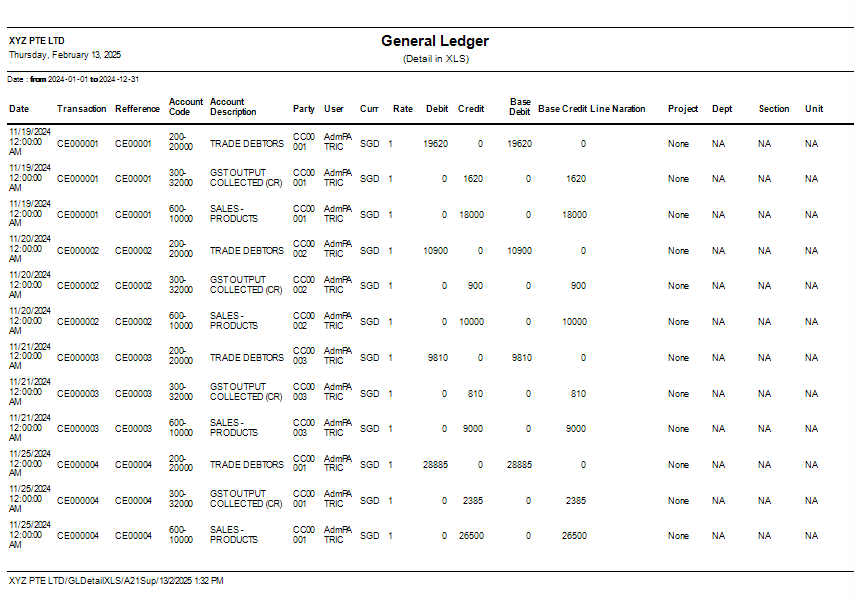
GENERAL LEDGER LISTING SAMPLE PREVIEW
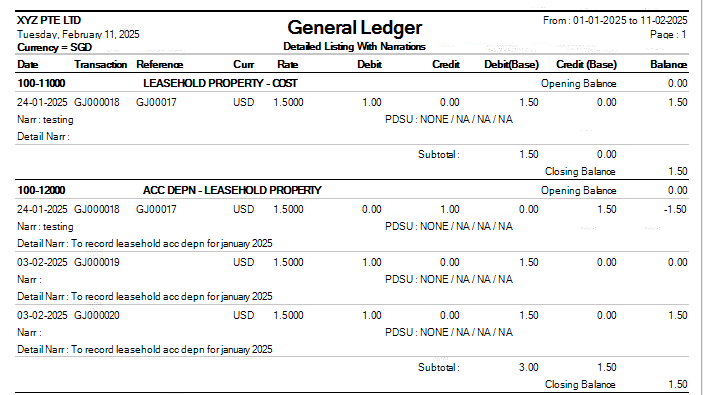
GENERAL LEDGER LISTING NO NARRATION SAMPLE PREVIEW
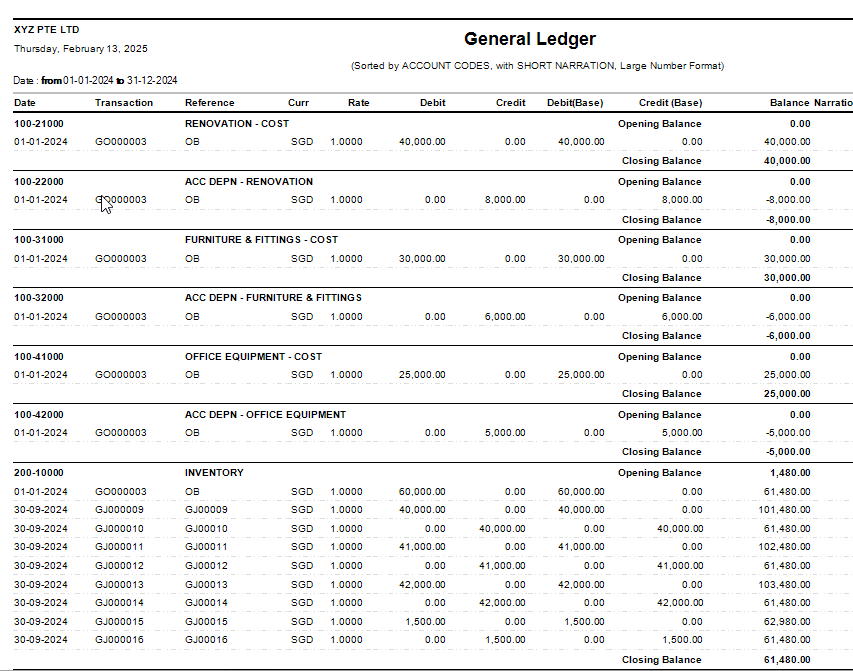
GENERAL LEDGER LISTING SUBLEDGER SAMPLE PREVIEW
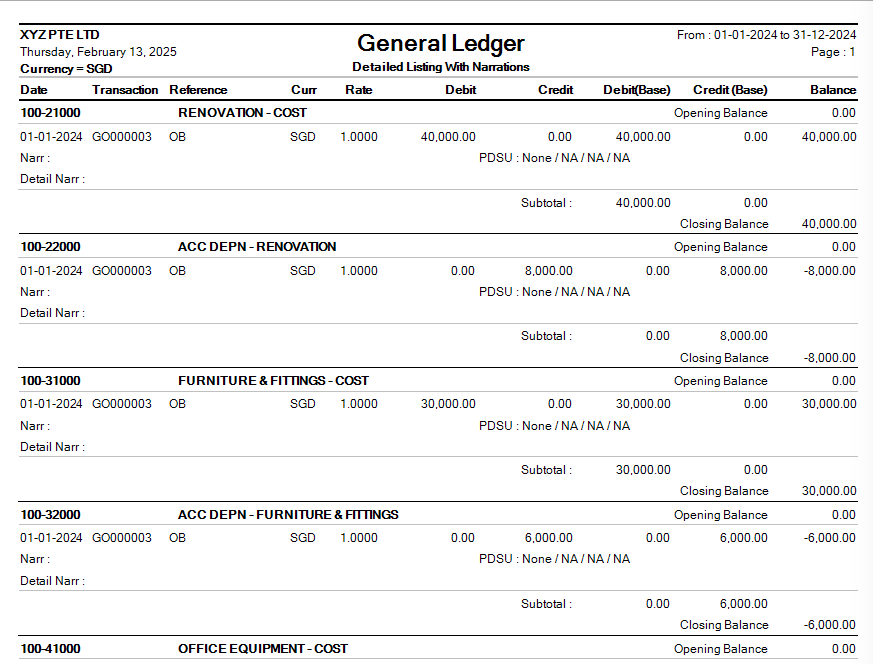
GENERAL LEDGER LISTING BASE CURRENCY ONLY SAMPLE PREVIEW
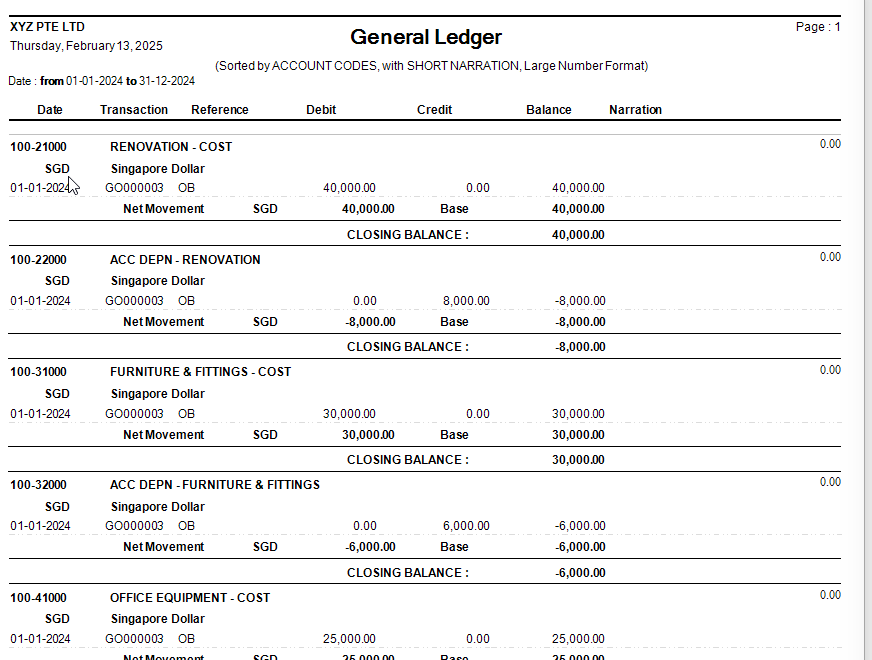
GENERAL LEDGER LISTING XLS SAMPLE PREVIEW
PROFIT AND LOSS
PROFIT AND LOSS can be previewed in many ways
-
PROFIT AND LOSS
-
PROFIT AND LOSS CLASSIFICATION IN MONTH
-
PROFIT AND LOSS CLASSIFICATION
-
PROFIT AND LOSS SUBACCOUNT TYPE GROUP
-
PROFIT AND LOSS SUBACCOUNT TYPE
_________________________________________________________________________________________________________________________
HOW TO PREVIEW PROFIT AND LOSS?
-
select the report - PROFIT AND LOSS, PROFIT AND LOSS CLASSIFICATION IN MONTH, PROFIT AND LOSS CLASSIFICATION, PROFIT AND LOSS SUBACCOUNT TYPE GROUP AND PROFIT AND LOSS SUBACCOUNT TYPE
-
DATE - from and to
-
TODAY - will auto select date range from 'today' to 'today', this month, this quarter, custom or last month.
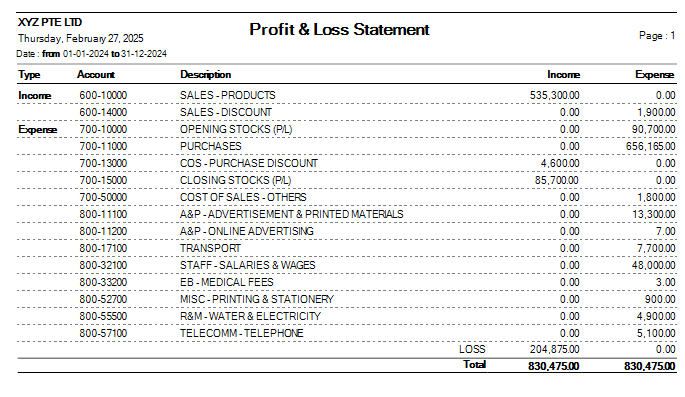
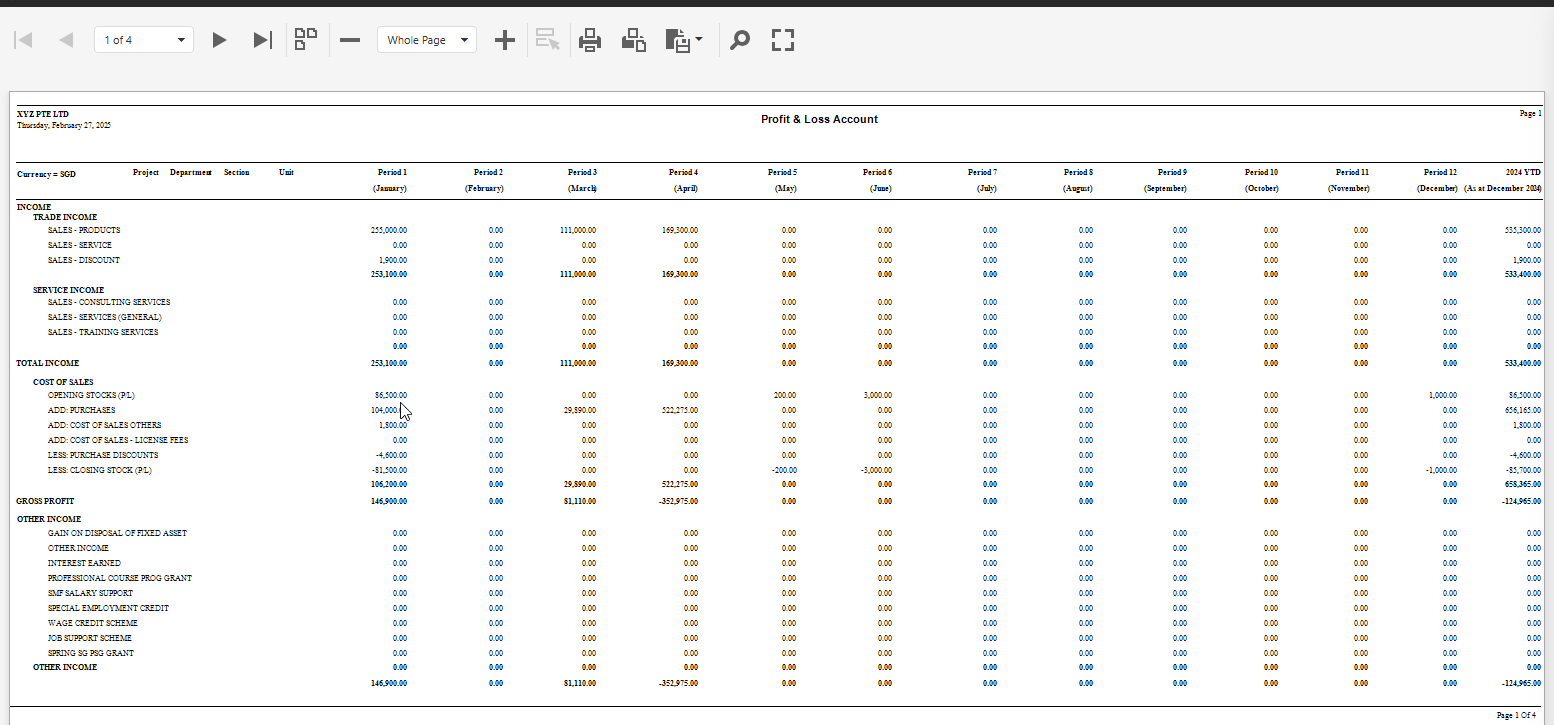
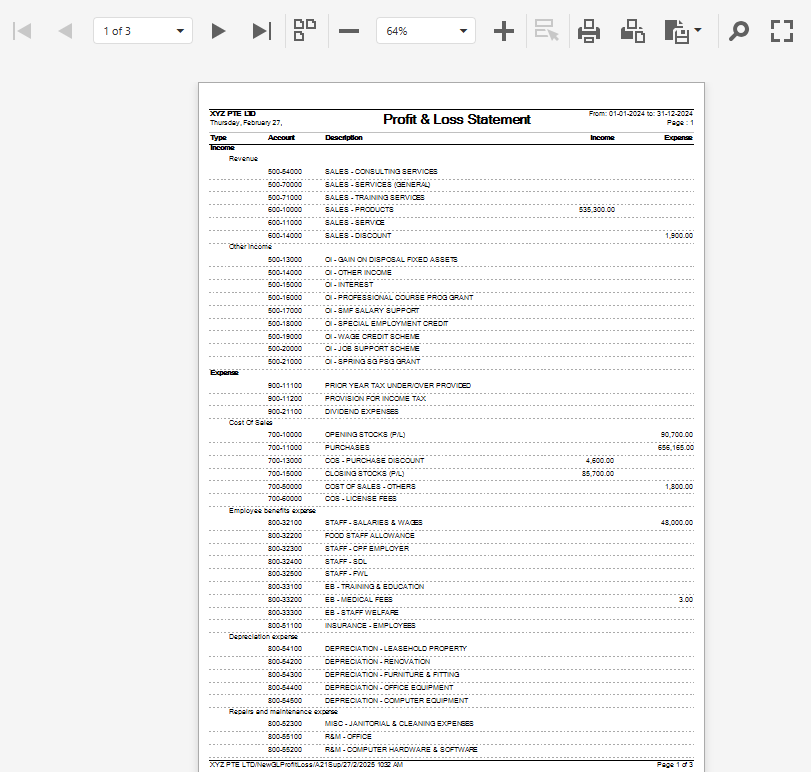
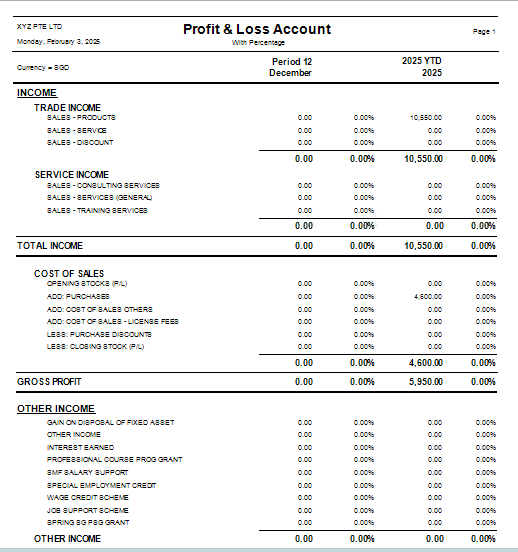
SAMPLE PREVIEW PROFIT AND LOSS
-
HEADER - company, date generated, date of profit and loss statement
-
PAGE - number of page
-
TYPE - income or expense
-
ACCOUNT - chart of account code
-
DESCRIPTION - description
-
INCOME - column of all debit balance
-
EXPENSE - column of all credit balance
-
PROFIT/LOSS - auto-indicate loss if 'debit balance' [this sample is loss] or profit if 'credit balance'
-
TOTAL - total debit or income and total credit or expense
_______________________________________________________________________________________________________________________________
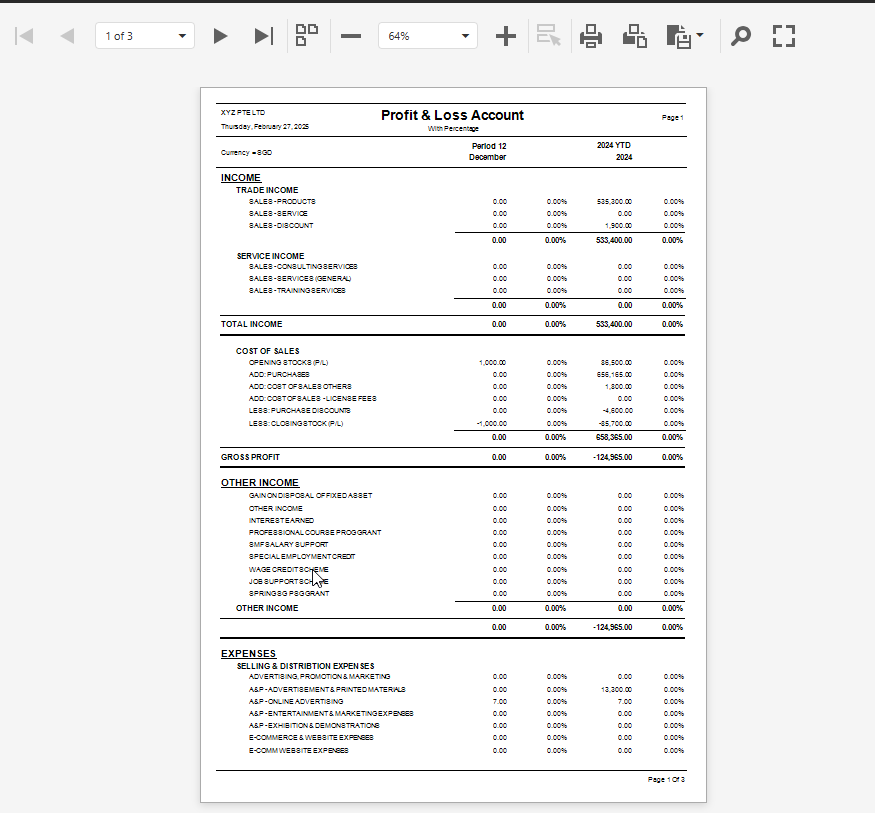
HOW TO PREVIEW PROFIT AND LOSS CLASSIFICATION IN MONTH?
-
select the report - PROFIT AND LOSS CLASSIFICATION IN MONTH
-
YEAR AND PERIOD - key in
-
PROJECT - select from and to
-
DEPARTMENT - select from and to
-
SECTION - select from and to
-
UNIT - select from and to
-
SHOW PERCENTAGE - tick to show percentage per row

-
PREVIEW - click
-
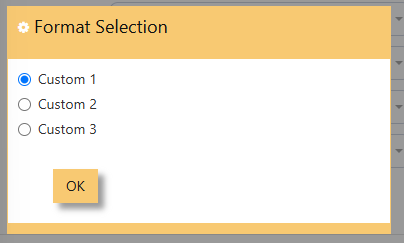
FORMAT SELECTION - select custom 1, 2 or 3
SAMPLE PREVIEW PROFIT AND LOSS CLASSIFICATION IN MONTH
-
report will show the monthly values in 12 months
-
arrows left or right - show page 1 to 4
-
- or + - zoom in report
-
printer icon - click to print
-
export - click to pdf or excel
SAMPLE PREVIEW PROFIT AND LOSS CLASSIFICATION
________________________________________________________________________________________________________________________
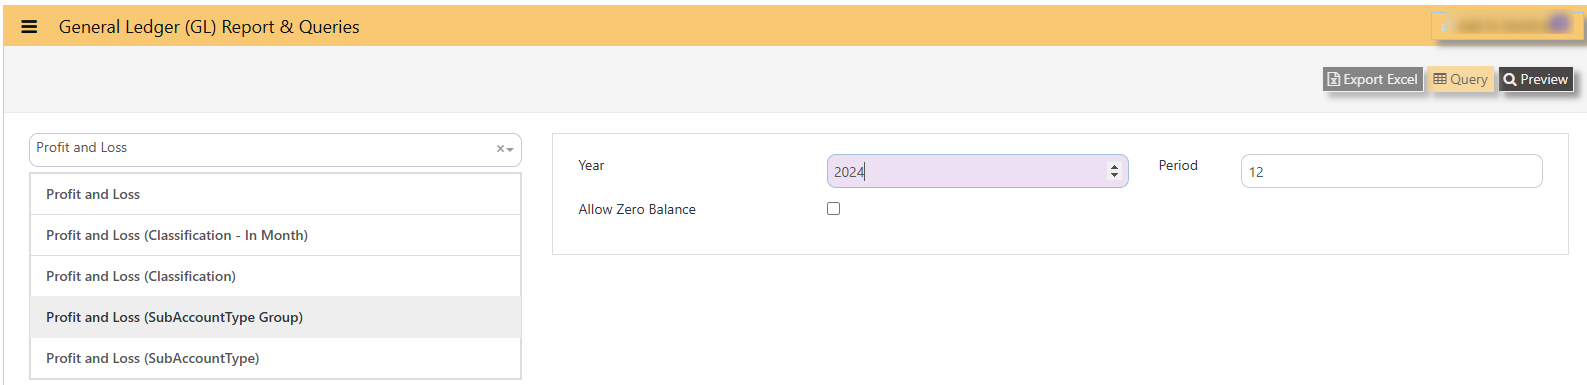
SAMPLE PREVIEW PROFIT AND LOSS SUBACCOUNT TYPE GROUP
-
YEAR and PERIOD - select from dropdown and key in period from 1 until 12
-
PREVIEW - click to preview
-
EXPORT EXCEL - to export to excel
-
ALLOW ZERO BALANCE - tick to allow accounts with zero balances

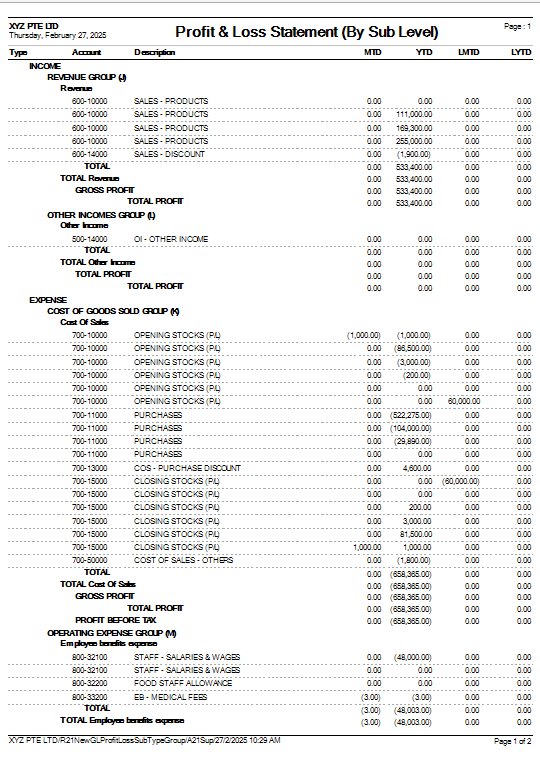
PROFIT AND LOSS STATEMENT BY SUB ACCOUNT or BY SUB LEVEL
-
TYPE - income or expense
-
ACCOUNT - chart of account code
-
DESCRIPTION - chart of account
-
MTD - month to date
-
YTD - year to date
-
LMTD
-
LYTD
_____________________________________________________________________________________________________________
SAMPLE PREVIEW PROFIT AND LOSS SUBACCOUNT TYPE
-
TYPE - income or expense
-
ACCOUNT - chart of account code
-
DESCRIPTION - chart of account
-
INCOME - debit balance
-
EXPENSE - credit balance
-
PAGE - number of pages
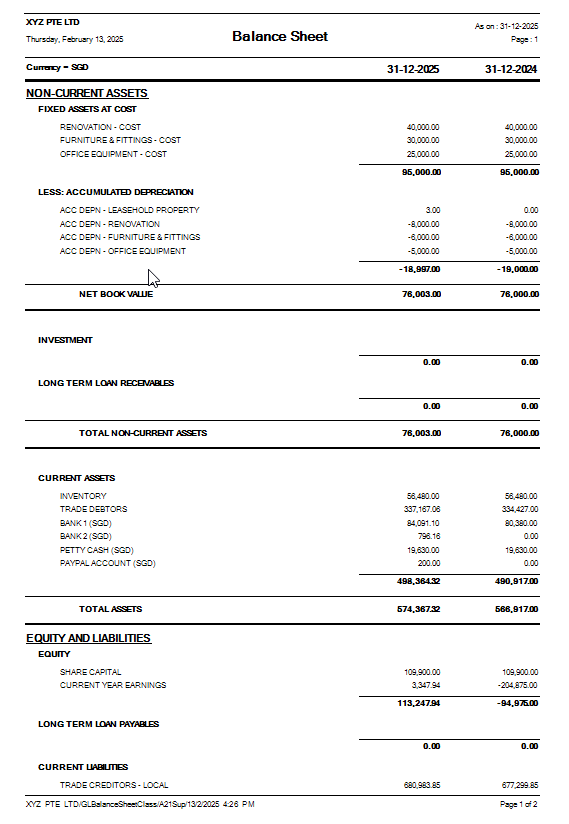
BALANCE SHEET
BALANCE SHEET can be previewed in many ways
-
BALANCE SHEET
-
BALANCE SHEET SUBACCOUNT TYPE
-
BALANCE SHEET WITH CLASSIFICATION
_________________________________________________________________________________________________________________________________
HOW TO PREVIEW BALANCE SHEET?
-
YEAR - select
-
DATE - select date (date is in this format DD-MM-YYYY)
-
PREVIEW - tick
-
QUERY - export to excel with filter capability
-
EXPORT EXCEL - export
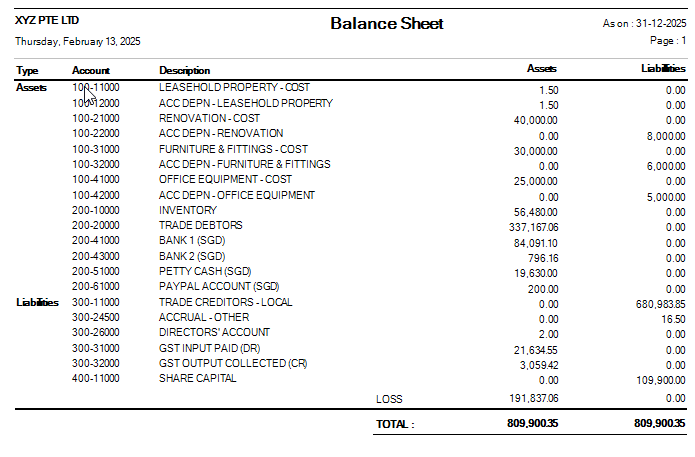
BALANCE SHEET SAMPLE PREVIEW
-
Type - Assets or Liabilities [wherein, in system, Equity is under Liabilities type]
-
Account - chart of account code
-
Description - chart of account description
-
Assets - column of account with debit closing values
-
Liabilities - column of account with credit closing values
BALANCE SHEET SUBACCOUNT TYPE SAMPLE PREVIEW
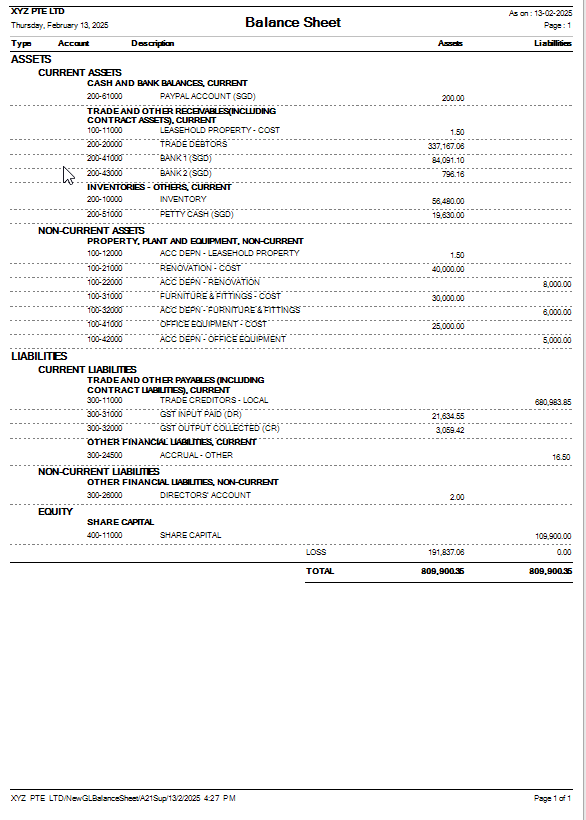
BALANCE SHEET CLASSIFICATION SAMPLE PREVIEW
CASH FLOW STATEMENT
Question : How to set and generate Cash Flow Statement?
Answer:
The cash flow statement format indirect method typically consists of three main cashflows from Operating activities, Investing activities and Financing activities, in sample below:
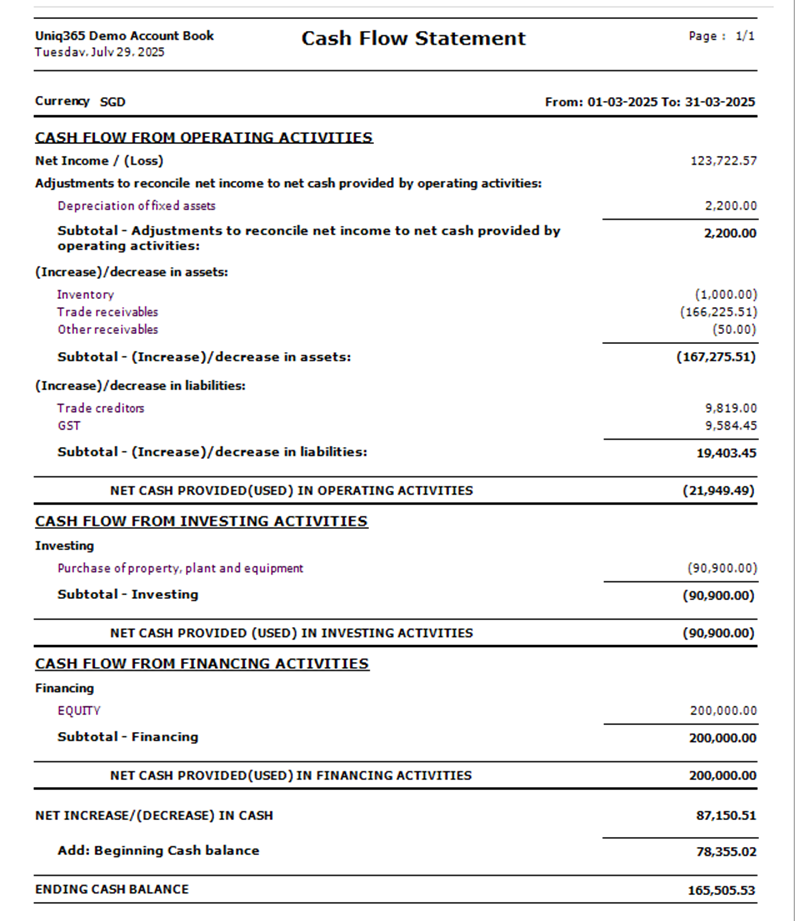
SETTING:
In UNIQ365, To generate the CASH FLOW STATEMENT, setting must be done properly.
STEP 1 – CREATE SUB-TITLES, in the CASH FLOW ACTIVITIES, fill the details of SECTION, ORDER and CASH FLOW ACTIVITES.
Note that the CASH FLOW ACTIVITIES and CASH FLOW DESCRIPTION may vary ‘name’ base on your creation and for purpose of this guide, we name cash flow activities as follows:
· SECTION – Operating, Investing and Financing as standard ‘terms’, nothing else.
· ORDER- Note that the report will be presented base on ORDER you set, in ascending from 10 to 50.
· CASH FLOW ACTIVITIES – in order ‘10’, it is advisable to assign the first SUB-TITLE name as ‘Adjustment to reconcile net income to net cash provided by operating activities’.
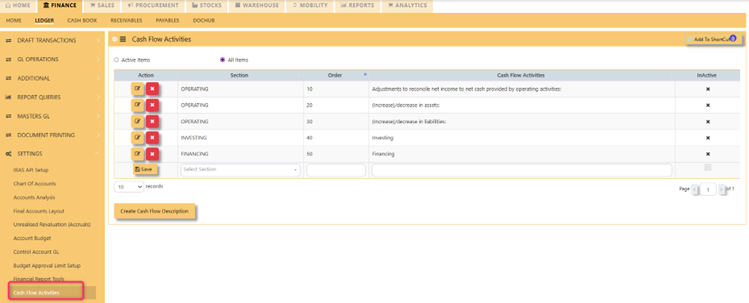
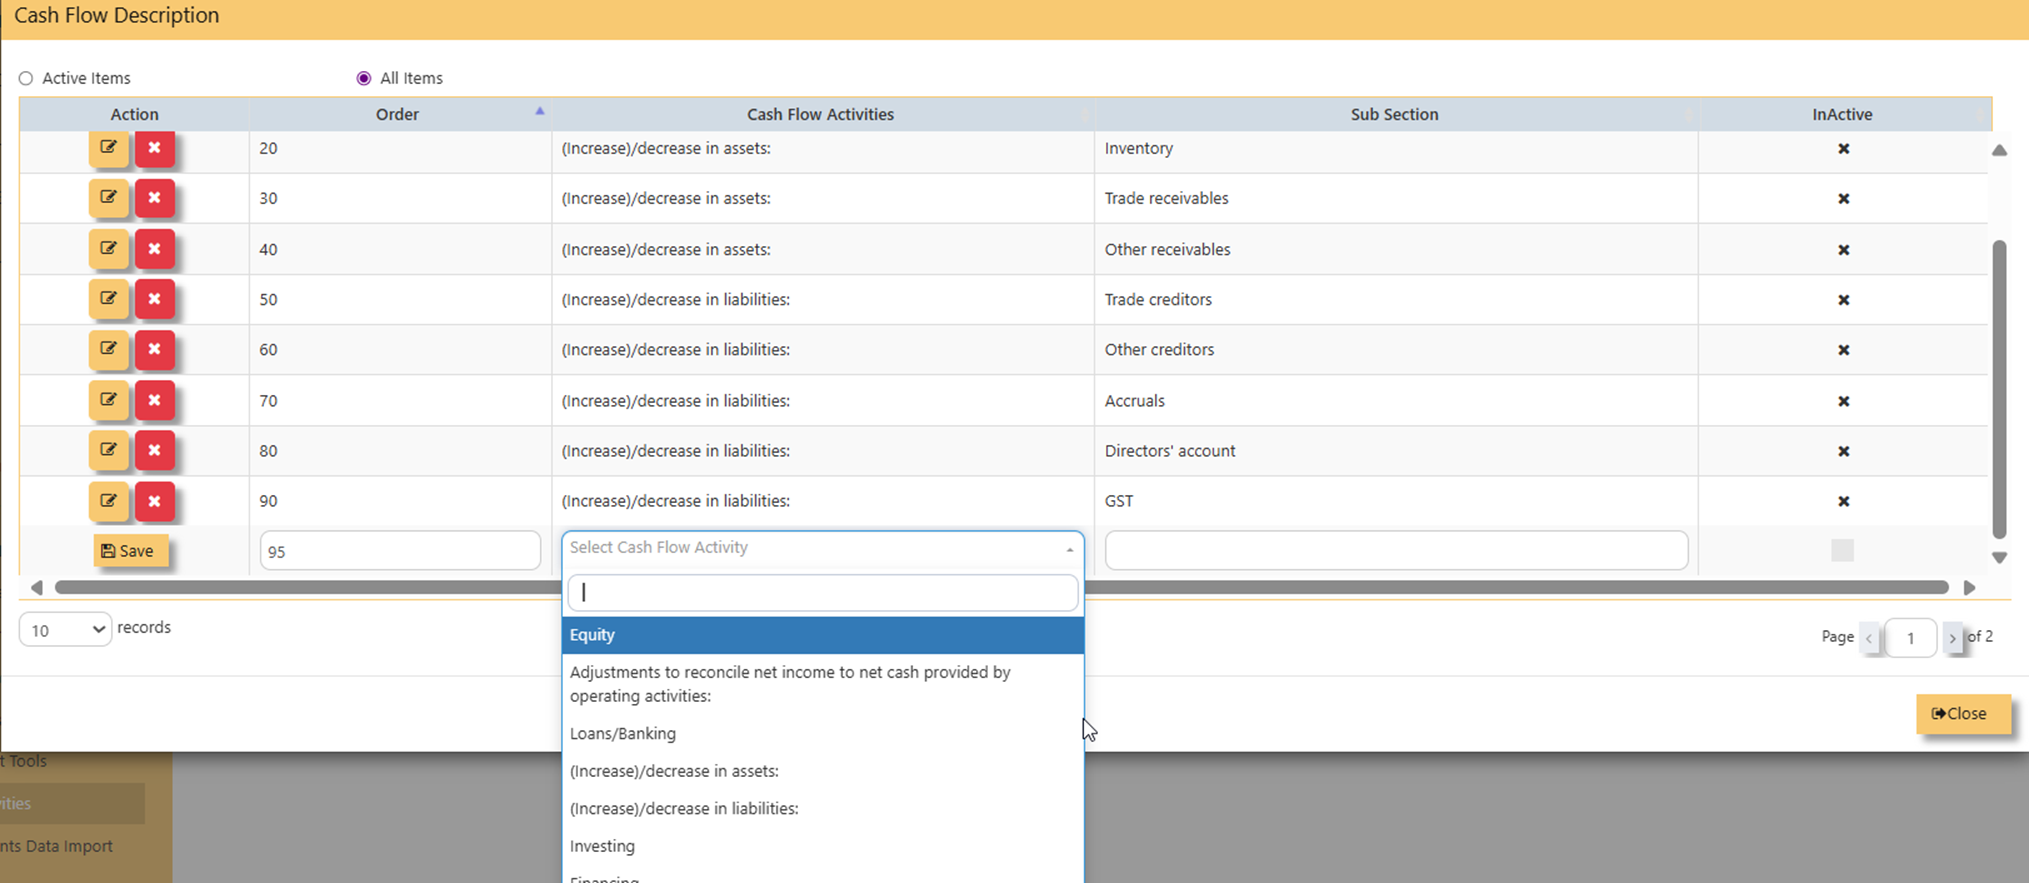
STEP 2 – CREATE CASH FLOW DESCRIPTION, list CASH FLOW DESCRIPTION by add ORDER, CASH FLOW ACTIVITIES dropdown and SUB-SECTION.
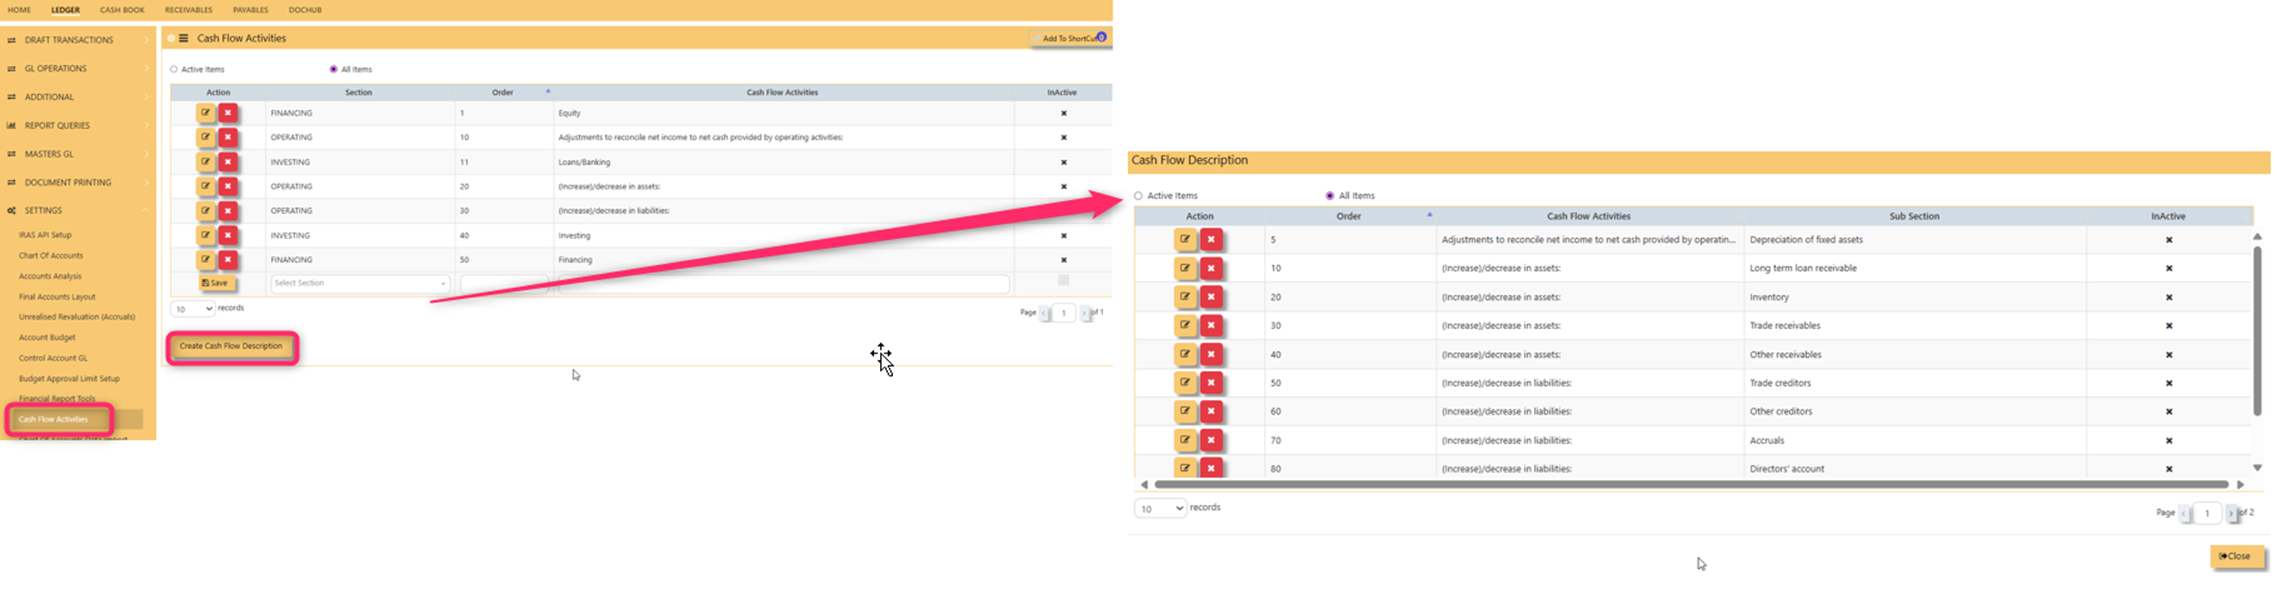
In CASH FLOW ACTIVITIES select from dropdown list, fill sub-section then save.
STEP 3 – OPERATING, INVESTING AND FINANCING, Identify the CHART OF ACCOUNT that belongs to OPERATING, INVESTING and FINANCING
3.1 OPERATING AND ACCUMULATED DEPRECIATION – To list ‘accumulated depreciation’ under subtitle ‘operating activities’, select accumulated depreciation in CHART OF ACCOUNT>FINANCE GROUP>select 2 LEVELS:
· SUBTITLE as ‘Adjustment to reconcile net income..’
· CASH FLOW DESCRIPTION as ‘Depreciation of fixed assets’
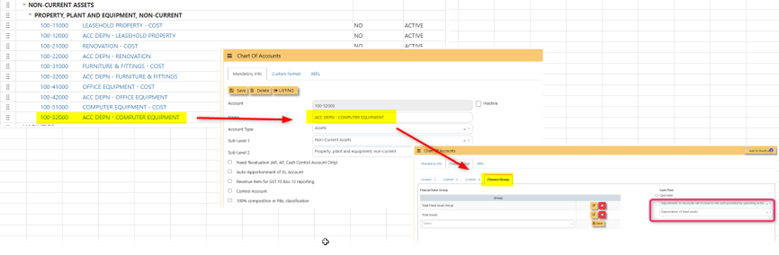
3.2 Trade receivables, inventory, other current assets, trade payables and othercurrent liabilities, same step on 3.1.
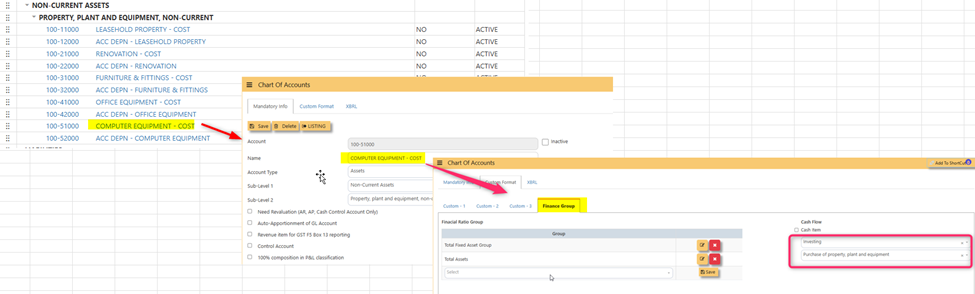
3.3 INVESTING To list ‘computer’ under subtitle ‘investing activities’, select ‘computer’ in CHART OF ACCOUNT>FINANCE GROUP>select 2 LEVELS:
- SUBTITLE as ‘Investing’
- CASH FLOW DESCRIPTION as ‘Purchase of property plant and equipment’
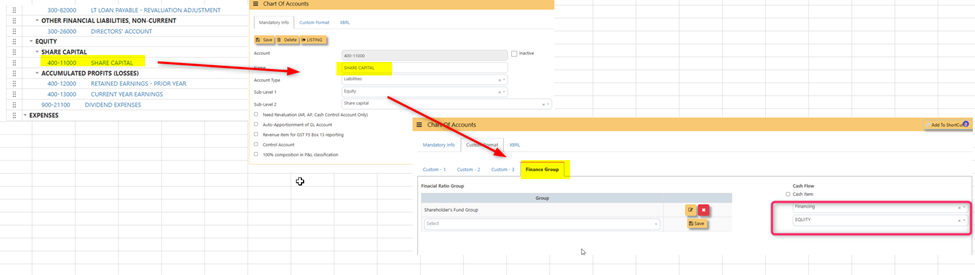
 3.4 FINANCING To list ‘share capital’ under subtitle ‘financing activities’, select ‘share capital’ in CHART OF ACCOUNT>FINANCE GROUP>select 2 LEVELS:
- SUBTITLE as ‘Investing'
- CASH FLOW DESCRIPTION as ‘Equity’
STEP 4 – BEGINNING CASH BALANCE, Identify the CASH AND CASH EQUIVALENT beginning cash balance by going to chart of account – in this example, in CHART OF ACCOUNT, select DBS BANK, in FINANCE GROUP, tick ‘CASH ITEM’ then SAVE.
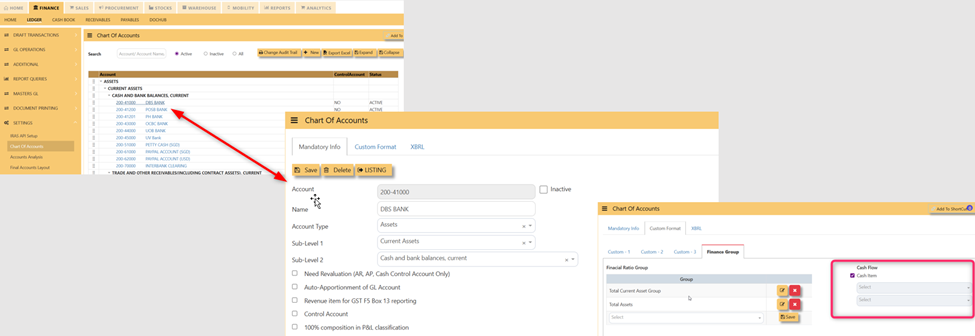
In this preview:

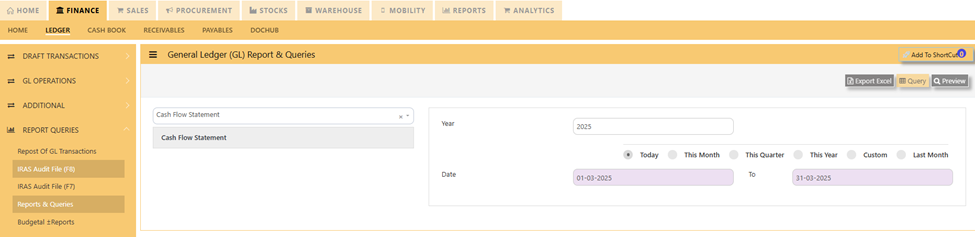
STEP 5 – GENERATE THE REPORT, in ledger, reports queries, generate the report by selecting
- CASH FLOW STATEMENT
- date range
- Preview
-

OTHER RELATED REPORTS OF CASH FLOW:
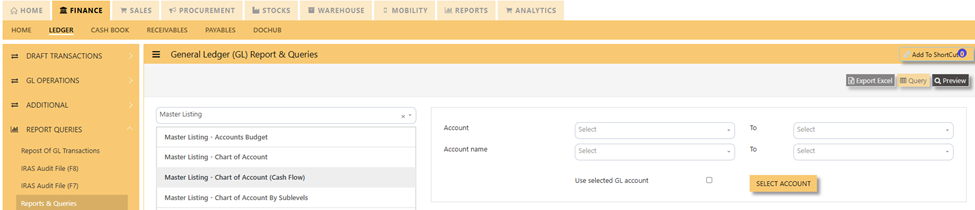
· CHART OF ACCOUNT MASTERLISTING CASH FLOW- in LEDGER> REPORTS QUERIES>MASTER LISTING CHART OF ACCOUNT CASH FLOW>PREVIEW.
Masters GL
MASTERS GL in Uniq365 is where main tables are stored and updated such as
-
GST TYPE
-
PROJECT
-
DEPARTMENT
-
SECTION
-
UNIT
-
CURRENCY
-
DAILY CURRENCY (BY CURRENCY)
-
DAILY CURRENCY (BY DATE)
________________________________________________________________________________________________________________________________________________
MASTERS GL NAVIGATION
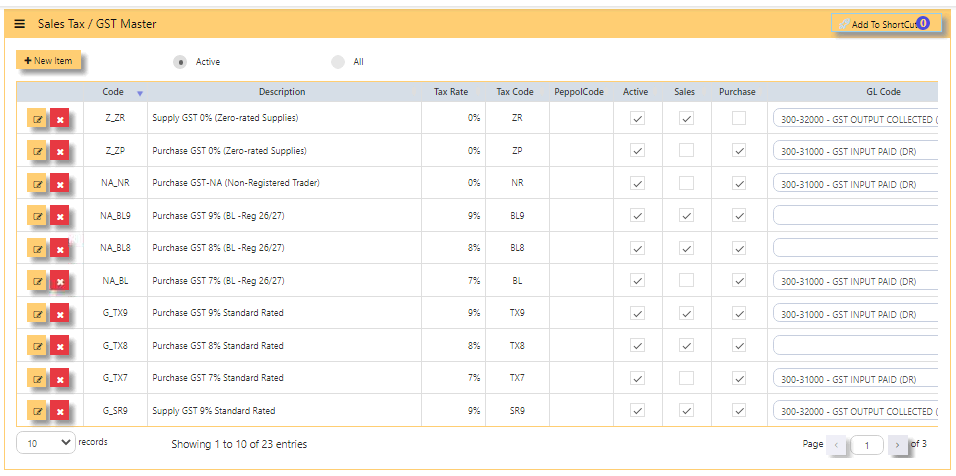
GST TYPE
GST TYPE or SALES TAX / GST MASTER in Uniq365 are pre-set codes and not interchangeable.
-
Note that the pre-set codes are based on the prevailing IRAS codes.
-
If there is any new rates advised by IRAS, it will be added accordingly and you should not manually add it.
-
What to do when GST Rates Change? The Uniq365 is able to cope with the changes of rate and is readily available. If you are not able to find the GST code, contact Uniq365 support team.
-
CODE is pre-set code and cannot be interchangeable
-
DESCRIPTION is also pre-set code but can be changed
-
TAX RATE is pre-set rate
-
TAX CODE is pre-set code base on prevailing IRAS codes
-
PEPPOL CODE is for peppol use
-
ACTIVE is ticked if actively use
-
SALES is ticked if the code is used for sales only
-
PURCHASE is ticked if the code is used for purchases only
-
GL CODE is chart of account mapped for the specific GST code
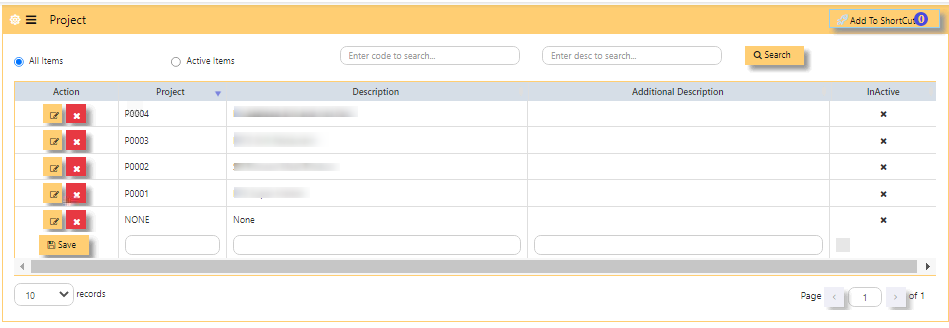
PROJECT
(*) - This is an optional module. If you have not sign up for it, you will not see this on your menu.
Project Accounting in Uniq365 is achieved by the use of PDSU Codes, available throughout the entire package. Understanding what the PDSU codes will enable you to set it up most appropriately.
Project Code
“P” refers to Project Code; an 8-character field, that can be used to signify different projects, different offices or even different business units.HOW TO ADD PROJECT?
key in DESCRIPTION - This field is interchangeable
optional ADDITIONAL DESCRIPTION [also interchangeable]
column 'INACTIVE' COLUMN Shows inactivated projects
after filling, tick SAVE.
NOTE - It is advisable to always keep 'NONE' department.
DEPARTMENT
Department Code
“D” refers to Department Code; an 8-character field, that can be used to signify sub-group under defined 'P' such as branches or the like.
HOW TO ADD DEPARTMENT?
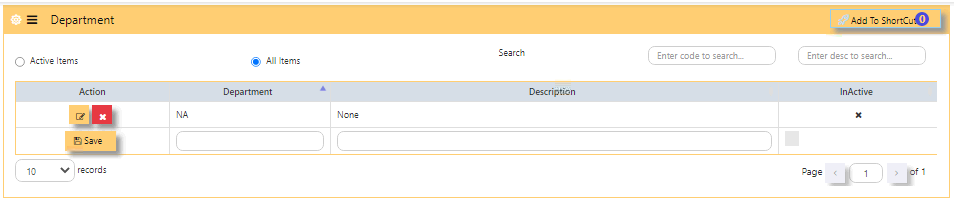
-
key in DESCRIPTION - This field is interchangeable
-
column 'INACTIVE' COLUMN Shows inactivated DEPARTMENT
-
after filling, tick SAVE
-
ACTIVE ITEMS - When ticked, will show active
-
ALL ITEMS - When ticked, will show both active and inactive
-
SEARCH - You may use this to search a specific DEPARTMENT
-
NOTE - It is advisable to always keep 'NONE' DEPARTMENT
SECTION
Section Code
“S” refers to Section Code; an 8-character field, that can be used
to signify sub-group under 'D'.
HOW TO ADD SECTION?

-
key in DESCRIPTION - This field is interchangeable
-
column 'INACTIVE' COLUMN Shows inactivated SECTION
-
after filling, tick SAVE
-
ACTIVE ITEMS - When ticked, will show active
-
ALL ITEMS - When ticked, will show both active and inactive
-
SEARCH - You may use this to search a specific SECTION
-
NOTE - It is advisable to always keep 'NONE' SECTION.
UNIT
Unit Code
“U” refers to Section Code; an 8-character field, that can be used
to signify sub-group under 'S'.
HOW TO ADD UNIT?
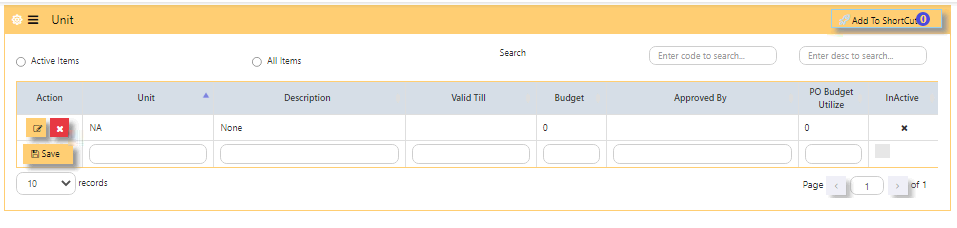
-
key in DESCRIPTION - This field is interchangeable
-
column 'INACTIVE' COLUMN shows inactivated UNIT
-
after filling, tick SAVE.
-
ACTIVE ITEMS - when ticked, will show active
-
ALL ITEMS-when ticked, will show both active and inactive
-
SEARCH - you may use this to search a specific UNIT
-
NOTE - it is advisable to always keep 'NONE' UNIT.
_________________________________________________________________________________________________________________________________
How does PDSU Works?
Every transaction can carry the PDSU at entry. The reports in General Ledger – Reports & Queries allow you to filter by PDSU
It also allows a combination of PDSU codes to work, thus narrowing the reporting band.
_________________________________________________________________________________________________________________________________
How to Use PDSU for Budgeting?
Accounts budgeting in Uniq365 requires the use of PDSU. To set budgets, go to Maintenance – Account Budget to start
entering the budgets.
-
Select the GL Account to set budget.
-
Enter the Year. If the financial year is from 1st Jan 2027 -
31st Dec 2027, enter the year as 2027 and January will be
Month 1, February is Month 2 and so on
-
At the first line (Month 1), click on “Details” to get into
entry mode as follow.
-
Select an appropriate Project, Department, Section and Unit Code to
start the budgeting process.
-
When this budget detail box is closed, the totals of all the
individual budgets auto-updates into the Month 1 balance.
Move on into Month 2 and so on until all the 12 months’
budgets are set. Move on to the next GL code.
CURRENCY
Currencies needed for transactions are created in this table.
Note: If you did not buy the multi-currency option in Uniq365, you can only create a single currency.
HOW TO ADD NEW CURRENCY?
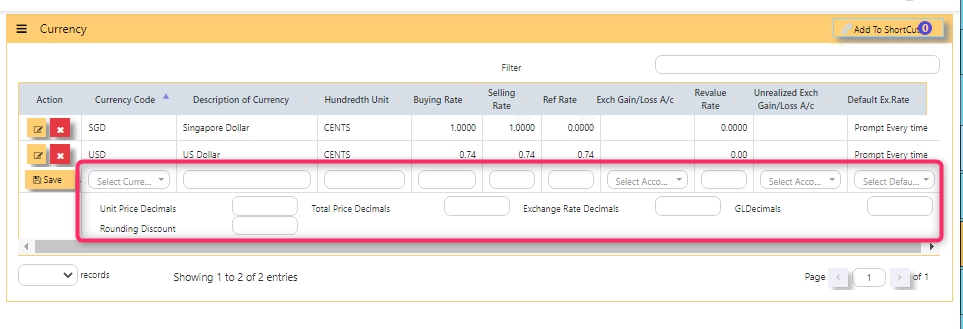
-
In the open field, SELECT CURRENCY, you can only pick up the CURRENCY CODE and you are not
allowed to create new ones. Any currency selected here is used for all transactions in Uniq365.
-
As you select the 'CURRENCY', DESCRIPTION OF CURRENCY will auto-fill,
-
Same on HUNDREDTH UNIT, will auto-fill. The hundredth-unit description is for Uniq365 to print amount in words. For example, it is “Cents” for Singapore Dollars, “Sen” for Malaysian Ringgit, “Satang” and “Centavos” for Thai and Filipino currencies respectively.
-
Manually key in BUYING RATE
-
Manually key in SELLING RATE
-
Manually key in REF RATE
-
The EXCHANGE GAIN/LOSS, REVALUE RATE and UNREALIZED EXCH GAIN/LOSS AC, will be skipped for now as it will be covered under Multi-Currency Handling
-
Fill UNIT PRICE DECIMALS as 2 depending on your preference, maximum 9 decimals.
-
Fill TOTAL PRICE DECIMALS as 2 depending on your preference, maximum 2 decimals
-
Fill EXCH RATE DECIMALS as 2 depending on your preference, maximum 8 decimals
-
Fill GL DECIMALS as 2 depending on your preference, maximum 2 decimals
-
Fill ROUNDING DISCOUNT as 2 depending on your preference, maximum 2 decimals.
___________________________________________________________________________________________________________________________________
HOW TO EDIT THE RATE [SIMPLE TABLE]?
Once added, you can only edit for the exchange rates and decimals. Changes can be set at first day of accounting year.
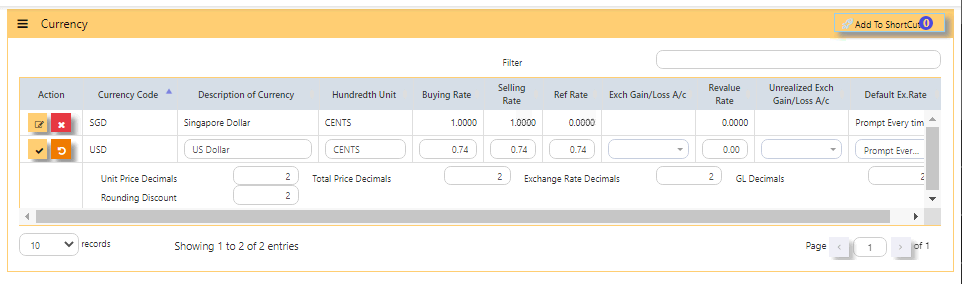 .
.
-
Note: If you did not buy the Foreign Currency option, ignore the Exchange Gain/Loss options.
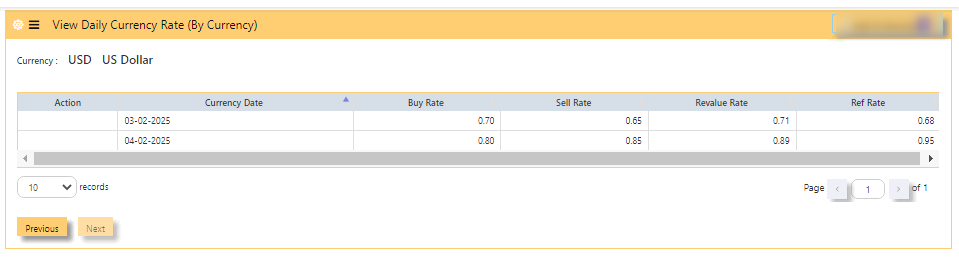
VIEW DAILY CURRENCY (BY CURRENCY)
IN DAILY CURRENCY BY CURRENCY TABLE, you will be able to view the daily rates by currency.
HOW TO VIEW THE DAILY CURRENCY RATE?
-
In DAILY CURRENCY BY CURRENCY - View by currency, each table is presented by currency, rows by date
-
PREVIOUS - Scroll left to show previous currency
-
NEXT - Scroll right to show the next currency
-
RECORDS - Select base on 10s, 25s, 50s, 100s and 200s per page
-
PAGE - 1 of total pages, click arrow right to reach last page
SAMPLE BELOW:
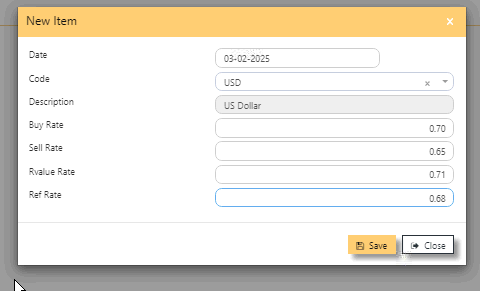
ADD DAILY CURRENCY (BY DATE)
DAILY CURRENCY BY DATE table, in this table, KEY IN the daily rates by currency.
HOW TO ADD DAILY CURRENCY RATE?
-
In GL operations, click open DAILY CURRENCY BY DATE
-
DATE -is defaulted today
-
+NEW ITEM - click to add daily rate

-
in new item, select the DATE of rate
-
select CODE of currency - select from dropdown list the currency
-
DESCRIPTION - auto fill after selected CODE of currency
-
BUY RATE - key in buying rate of foreign currency
-
SELL RATE - key in selling rate of foreign currency
-
REVALUE RATE - key in revalue rate of foreign currency
-
REF RATE - key in , optional, fill this if the base is other than SGD currency (Singapore dollar currency). This rate relates to GST reporting
-
SAVE-click to save the filled details then
-
CLOSE.


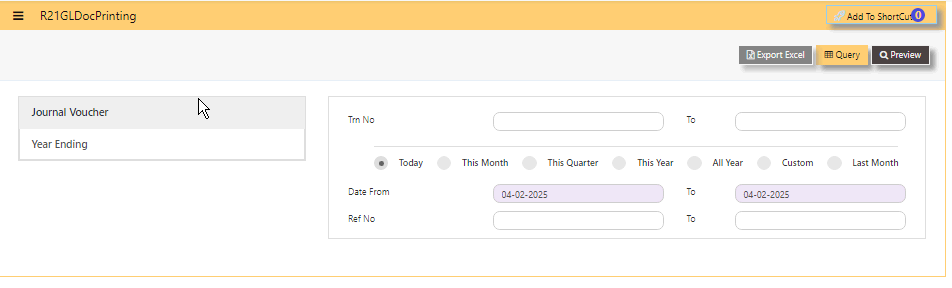
Document Printing
DOCUMENT PRINTING in Uniq365 will help you to print the GL transactions in batch.
DOCUMENT PRINTING NAVIGATION
___________________________________________________________________________________________________________________________________________
HOW TO PRINT DOCUMENT IN BATCH?
-
JOURNAL VOUCHER - select the GJ or,
-
YEAR ENDING - select the GY,
-
TRN NO from and to - key in the number,
-
DATE from and to - select date range or,
-
REF NO from and to - key in the number,
-
PREVIEW - click then show preview,
-
QUERY - export to excel with filter capability,
-
EXPORT EXCEL - export in excel format.
Settings
SETTINGS MENU in Uniq365 consists of the following:
-
CHART OF ACCOUNT - Consist of the COA for all GL account Codes
-
FINAL ACCOUNTS LAYOUT - Where layout and Design of Classification reports are configured
-
CONTROL ACCOUNT GL - where auto posting codes are maintained
-
CHART OF ACCOUNTS DATA IMPORT - where the COA mass upload is configured
________________________________________________________________________________________________________________________________________________
SETTINGS NAVIGATION
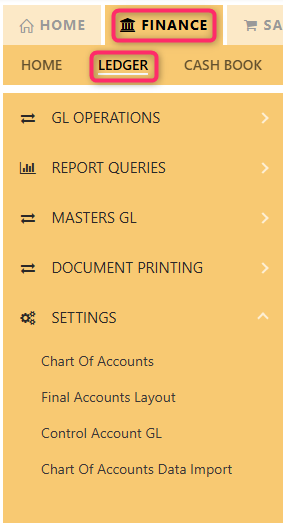
CHART OF ACCOUNTS
The Chart of Account is where the user can create account codes to be used in the system. The account codes can be classified into Assets, Liabilities, Income or Expense, as well as be grouped into various levels when designing layout of financial reports such as Balance Sheet.
In order to start using Uniq365, some basic Chart of Accounts such as the GST and Currency Codes must be created.

-
SEARCH - to search code by keying in 'description' for purpose of edit
-
ACTIVE - click to show only active codes, 'INACTIVE' to show all inactive codes or 'ALL' to show both active and inactive
-
CHANGE AUDIT TRAIL - to generate report of changes done in chart of account
-
NEW - click to add new code,
-
EXPORT EXCEL - to generate the listing in excel format
-
EXPAND - to expand
-
COLLAPSE - to collapse
_________________________________________________________________________________________________________________________________
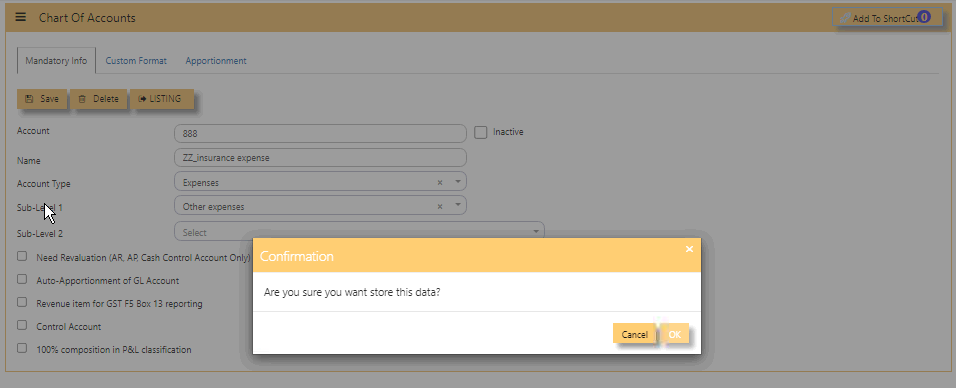
HOW TO ADD NEW CHART OF ACCOUNT CODE?
-
ACCOUNT - Enter a code for this Chart of Account. The maximum is 12 alpha-numeric characters.
-
NAME - Enter the description for this Chart of Account e.g. Sales Revenue Account. The maximum length allowed is 40 characters.
-
ACCOUNT TYPE - Click to select account type. The 4 choices are Income, Expense, Asset and Liability
-
SUB-LEVEL 1 - used in P&L presentation
-
SUB-LEVEL 2 - used in P&L presentation
-
NEED REVALUATION [AR, AP, CASH CONTROL ACCOUNT ONLY - when ticked, the specific coa will be included in the revaluation of AR or AP.
-
AUTO-APPORTIONMENT OF GL ACCOUNT -
-
REVENUE ITEM FOR GST F5 BOX13 REPORTING - when ticked, will include in BOX 13, applied to income Chart Of Account or COA,
-
CONTROL ACCOUNT-applies to AR and AP main chart of account,
-
100% COMPOSITION IN P&L CLASSIFICATION- applied to main income chart of account.
-
SAVE - click save and confirmation 'to store the data entered', select either 'cancel' or 'ok'.

- DELETE - to delete a specific chart-of-account code
- LISTING - click to go back to the listing with 'search'
- CUSTOM FORMAT - relates to the final accounts layout, to select the related level 1, level 2 and level 3


_____________________________________________________________________________________________________________________________________
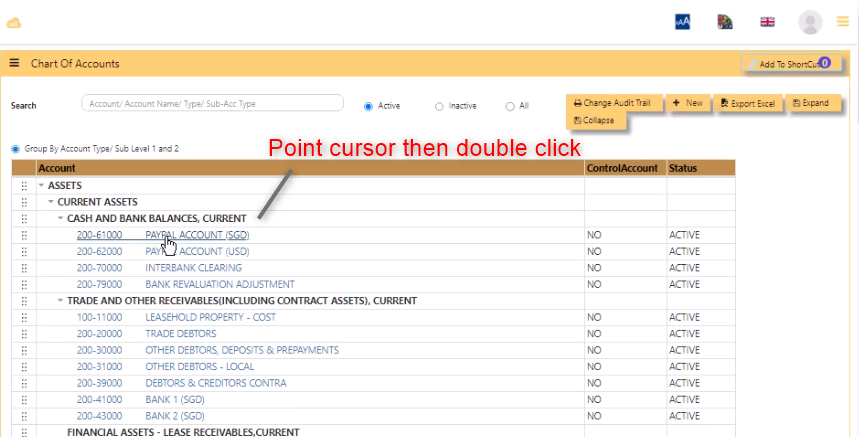
HOW TO EDIT CHART OF ACCOUNT CODE?
-
Note that existing CHART OF ACCOUNT CODE after having historical transaction cannot be deleted but can be edited in limited fields such as on name, account type, custom format.
-
In chart of account listing, search 'code' to edit or,
-
Point cursor then double click from the existing list then you can edit,
.

FINAL ACCOUNTS LAYOUT
Uniq365 allows almost unlimited ways to display your Profit & Loss Statement and Balance Sheet layout through FINAL ACCOUNTS LAYOUT. This module will help to manage the Profit and Loss classification and Balance sheet classification.
-
There are 3 custom format available for user to customize reports - custom 1, 2 and 3.
-
LEVEL 1- as main level, LEVEL 2 - are branches of Level 1 account, while LEVEL 3 - are branches of Level 2 account, key in your preferred description,
-
SHOW LINE - will provide underline, can be none, single line or double lines.
-
PROFIT - to show if the account is in normal credit balance or debit balance.
-
RUNNING TOTAL under LEVEL 1 - sums up the total of Level 1, key in the description 'TOTAL'.
-
+ADD - to add each account code corresponding chart of account.
-
LEVEL 3_ SORT 3 - key in description, select print, select profit, select non stock and category trading.
-
SAVE - tick will save any new addition or changes.
-
DOWNLOAD TEMPLATE - to get template in excel format for filling up,
-
IMPORT TEMPLATE - to forward to system the prepared template,
-
EXPORT - to export in excel format.
-
CHANGE AUDIT TRAIL-provide report of latest change done by user.
________________________________________________________________________________________________________________________________________
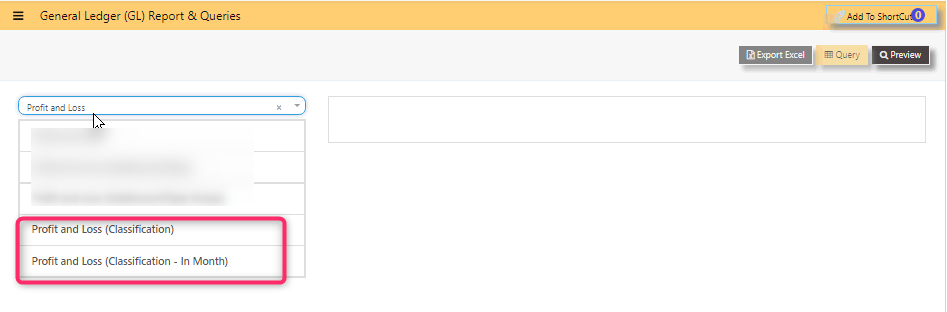
HOW TO GET PROFIT AND LOSS CLASSIFICATION REPORT?
-
In General ledger -> Reports Queries -> Profit and Loss (Classification)
-
In General ledger -> Reports Queries -> Balance Sheet (Classification)
CONTROL ACCOUNT GL
In Uniq365, this option determines how the GL is updated when posting transactions, in GL ACCOUNT POSTING SETTING.
User is reminded that SETTINGS should be set permanently at the start of use of new account book and not to be accessed other than by the ADMIN user.
-
ACCOUNT NAME -control accounts of exchange gain or loss realized and unrealized
-
POSTING TYPE - select from dropdown 'FIXED' or 'CURRENCY'
-
FIXED ACCOUNT - if posting type selected is FIXED, select the chart of account that corresponds to the exchange gain/loss account code
-
YEAR ENDING CLOSING - settings for the year ending
-
OTHER CONTROL ACCOUNTS - setting for the GST SALES, GST PURCHASES, GST FIXED ASSETS, GST CLEARING and ROUNDING DIFFERENCE ACCOUNT.
For example, the Chart of Account to be posted for Exchange Gain/Loss or GST tax depends on what has been selected for the respective account as shown below example.
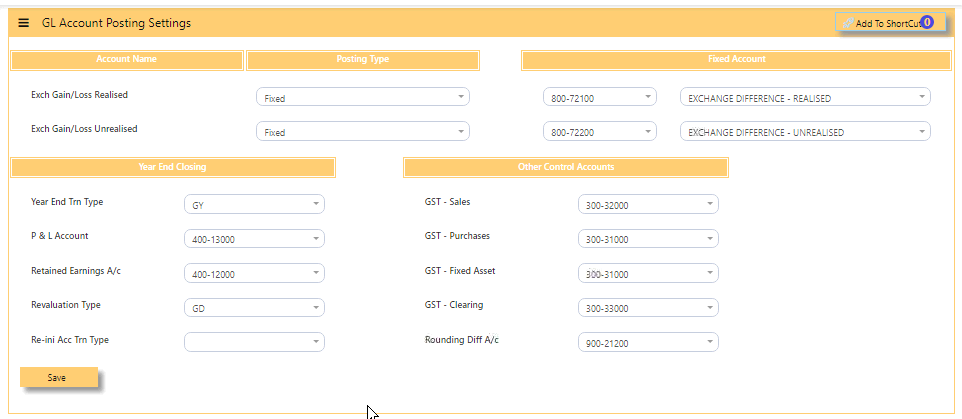
CONTROL ACCOUNT such as TRADE DEBTORS AND TRADE CREDITORS are also ticked in CHART OF ACCOUNT, as in below sample.
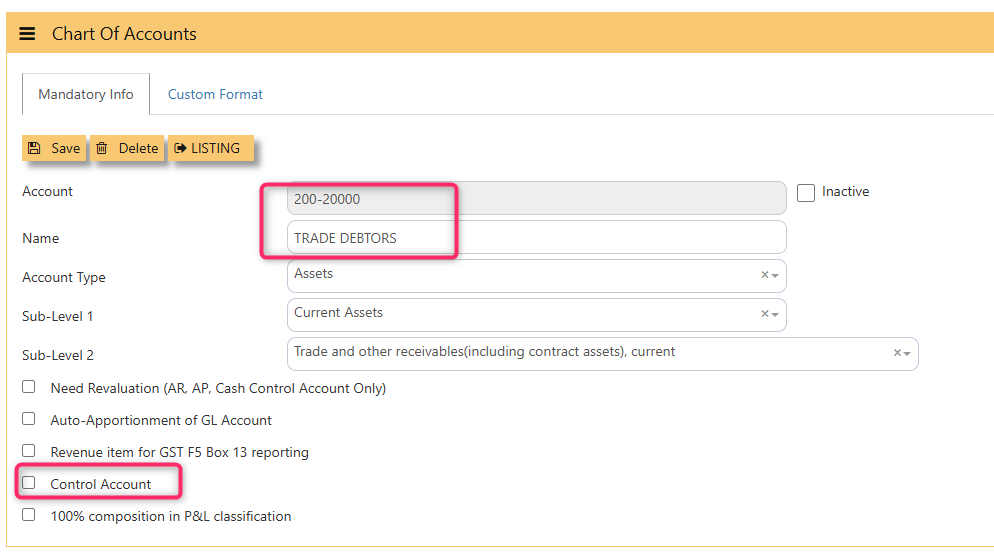
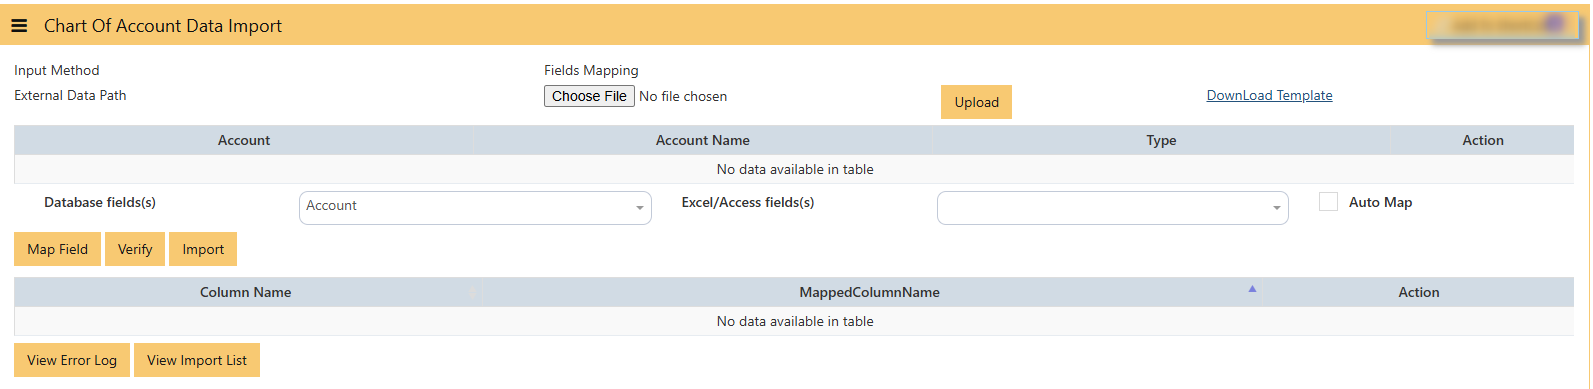
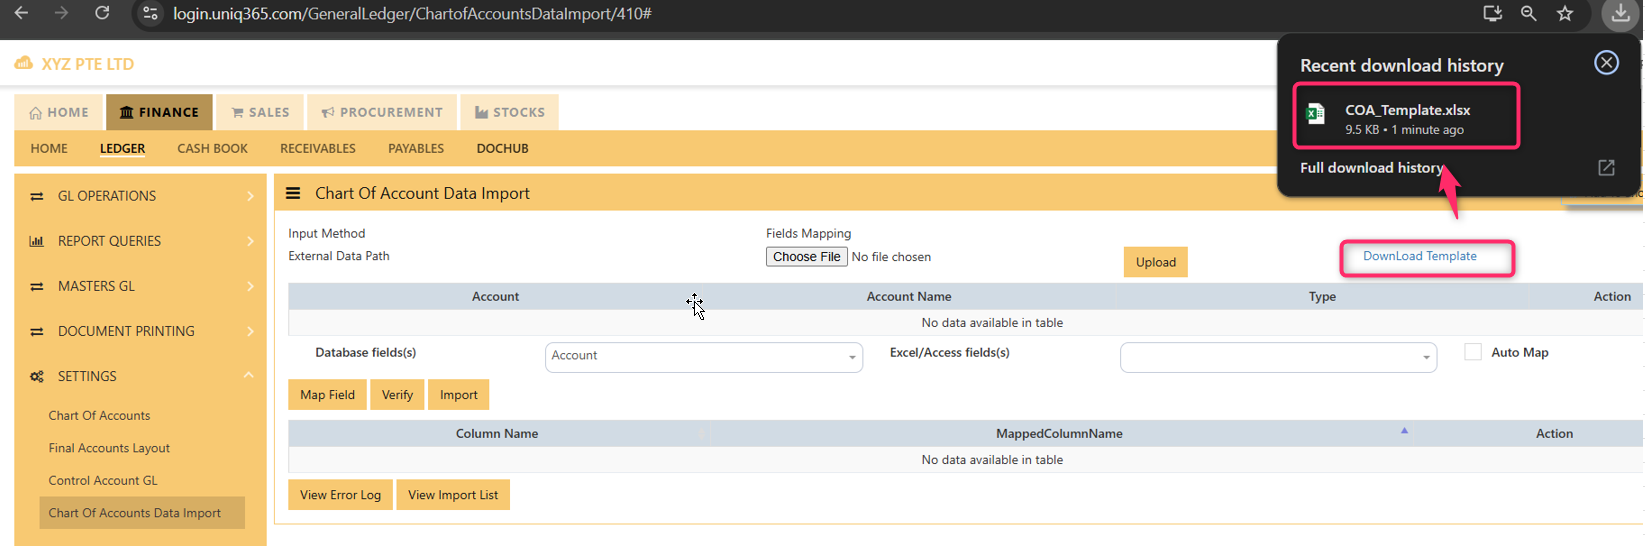
CHART OF ACCOUNTS DATA IMPORT
In Uniq365, CHART OF ACCOUNTS DATA IMPORT will help first-time user to import new CHART OF ACCOUNTS list.
__________________________________________________________________________________________________________________________________________
HOW TO IMPORT CHART OF ACCOUNTS?
-
DOWNLOAD TEMPLATE - before import, download template for filling up of CHART OF ACCOUNTS
-
FIELDS MAPPING - choose file should be in excel format
-
DATABASE FIELDS - select 'account' should match 'excel/access fields' or
-
AUTO MAP - tick to auto map
-
VERIFY - tick then system will verify if fields are correctly mapped
-
IMPORT - import every field accordingly
-
VIEW ERROR LOG - will list the error log, pay attention to the mentioned fields and try to correct them. If anything else, contact UNIQ365 support for assistance
-
VIEW IMPORT LIST - will list imported fields
______________________________________________________________________________________________________________________________________
DOWNLOAD TEMPLATE SAMPLE
-
check download folder - open COA_template and fill
Budgeting in Accounting
In Uniq365, Budgeting or the process of preparing detailed projections of future amounts such as Operational budgeting and
Capital budgeting are available.